


TC-39AS530U
Table of contents
 Loading...
TC-60AS530U
TC-55AS530U
TC-50AS530U
TC-39AS530U
e
HELP
English

- 2 -
Using my Home Screen
my Home Screen
•Features 8
•How to use 9
•Settings 10
Using Apps list
•Features 12
•How to use 13
•Settings 14
Network services
Connect to network
•Network connections 15
•Network connection types 16
Network settings
•Setting the menu 18
•Network connection/Network status 19
•My Home Cloud settings 20
•VIERA network name 21
•TV remote App settings 22
•Network link 23
•File sharing settings 24
•Software update 25
•New software notice 26
How to use
•Operate 27
Watching TV
Cable / Satellite / Fiber Optic box
•Initial setting 28
Antenna / Cable service without a box
•Initial setting 29
•Select channels 30
•Favorite channels 31
•Closed Caption 32

- 3 -
•SAP 33
•Other 34
Blu-ray, DVD, Game Console, etc.
•Connecting and viewing 35
•Example of AV connections 36
•HDMI connection notice 38
•HDMI connection caution 39
•Input signal 40
For best picture
•Picture mode 41
•Auto brightness (ECO) 42
•Aspect setting 43
•Screen mode 44
•Zoom adjustments 46
•Copy adjustments 47
For best audio
•Sound mode 48
•DIGITAL AUDIO OUT terminal 49
Home network “DLNA”
Get started
•Information 50
Photos
•Viewing Photos 51
•Photo view 52
•Options menu 53
•Using slideshow 54
•Slideshow settings 55
Videos
•Viewing Videos 56
•Video view 57
•Options menu 58
Music
•Playing Music 59
•Music view 60

- 4 -
•Options menu 61
Media player
Get started
•Information 62
•Media warning messages 63
•File sharing 64
•Notice 65
Photos
•Viewing Photos 66
•Photo View 67
•Sort the photos 68
•Options menu 69
•Thumbnails size 70
•Using slideshow 71
•Slideshow settings 72
•Soundtrack settings 74
Videos
•Viewing Videos 75
•Video view 76
•Options menu 77
Music
•Playing Music 78
•Music view 79
•Options menu 80
Convenience features
Eco navigation
•Eco navigation 81
Timer
•Setting the menu 82
Parental control
•Setting the menu 83
•Password setting 84
•Parental control ratings 85

- 5 -
Closed Caption
•Setting the menu 87
•Closed Caption notice 88
VIERA Link ™ “HDAVI Control ™”
•Basic feature 89
•Connecting note 90
•VIERA Link connections 92
•VIERA Link settings 94
•VIERA Link settings feature 95
•VIERA Link 97
•VIERA Link menu 98
Using Voice guidance
•Voice guidance 100
Control by Smartphone, etc.
•Smartphone remote 101
Using USB Keyboard
•Keyboard 102
All settings
How to use
•Setting the menu 103
Picture
•Basic settings 104
•Pro settings 106
•Advanced picture 108
•Screen settings 110
•Other settings 112
Sound
•Basic settings 113
•Advanced settings 115
•Voice guidance settings 117
Network
•Network settings 118
Timer
•Sleep (Off timer) 121

- 6 -
•Timer (On/Off timer) 122
•Clock settings 123
•Auto turn off settings 124
Setup
•Eco navigation 125
•USB device setup 126
•Parental control 127
•ANTENNA/Cable setup 129
•Language settings 131
•Display customization 132
•Closed Caption 133
•VIERA Link settings 135
•System settings 136
•Other settings 137
Support / FAQ
Help menu
•Using Help menu 138
FAQ
•Picture - Viewing 139
•Picture - Snowy / none 140
•Picture - Distortion 141
•Picture - Continue 142
•Sound - None 143
•Sound - Unusual 144
•Networking 145
•Software update 146
•Voice guidance 147
•Eco navigation (Eco-Navi) 148
•Other 149
•Menu - Gray-out or missing items 150
•Reset to factory default 151
Information
•Data information 152

- 7 -
Care and Cleaning
•Display panel 154
•Cabinet 155
•Pedestal / Power cord 156
Press the Remote control button
INFO Letters in box : Remote control button
Menu Letters in Cyan : Menus on screen display
References in this eHELP
- 8 -
Using my Home Screen
my Home Screen
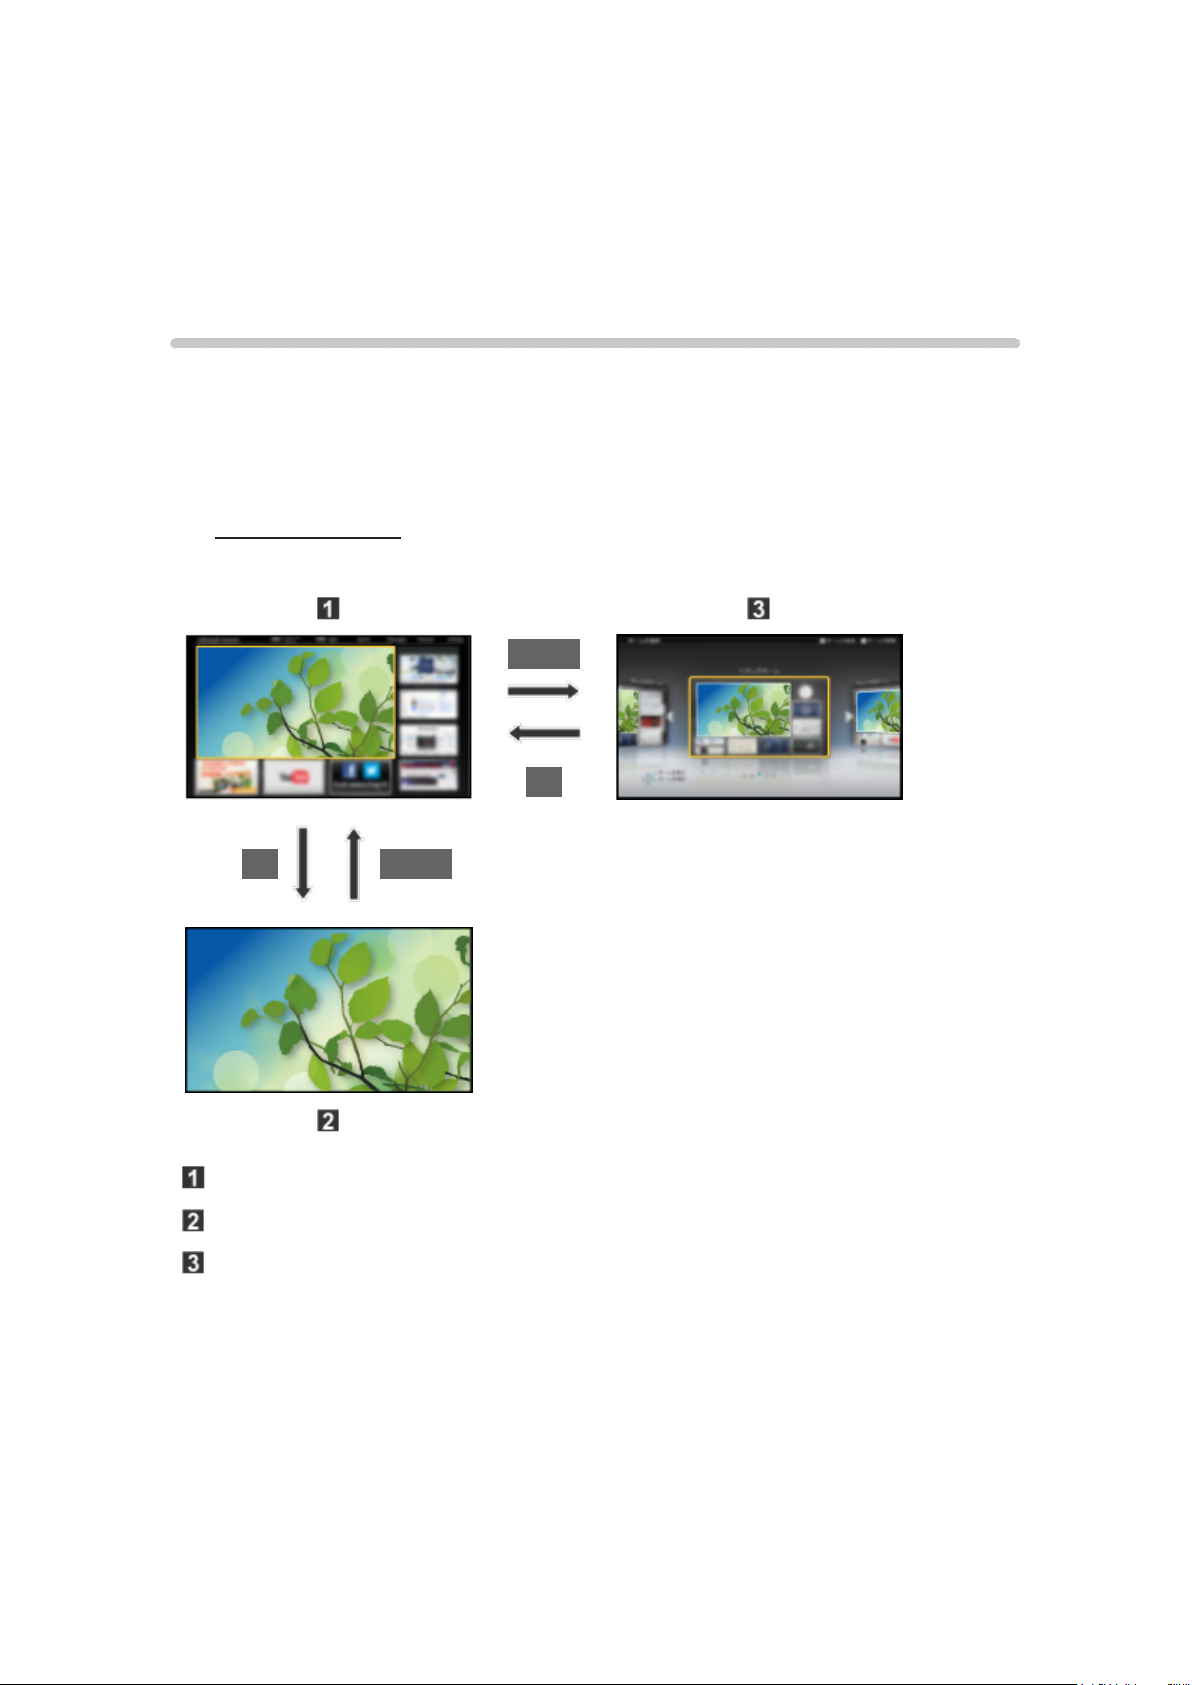
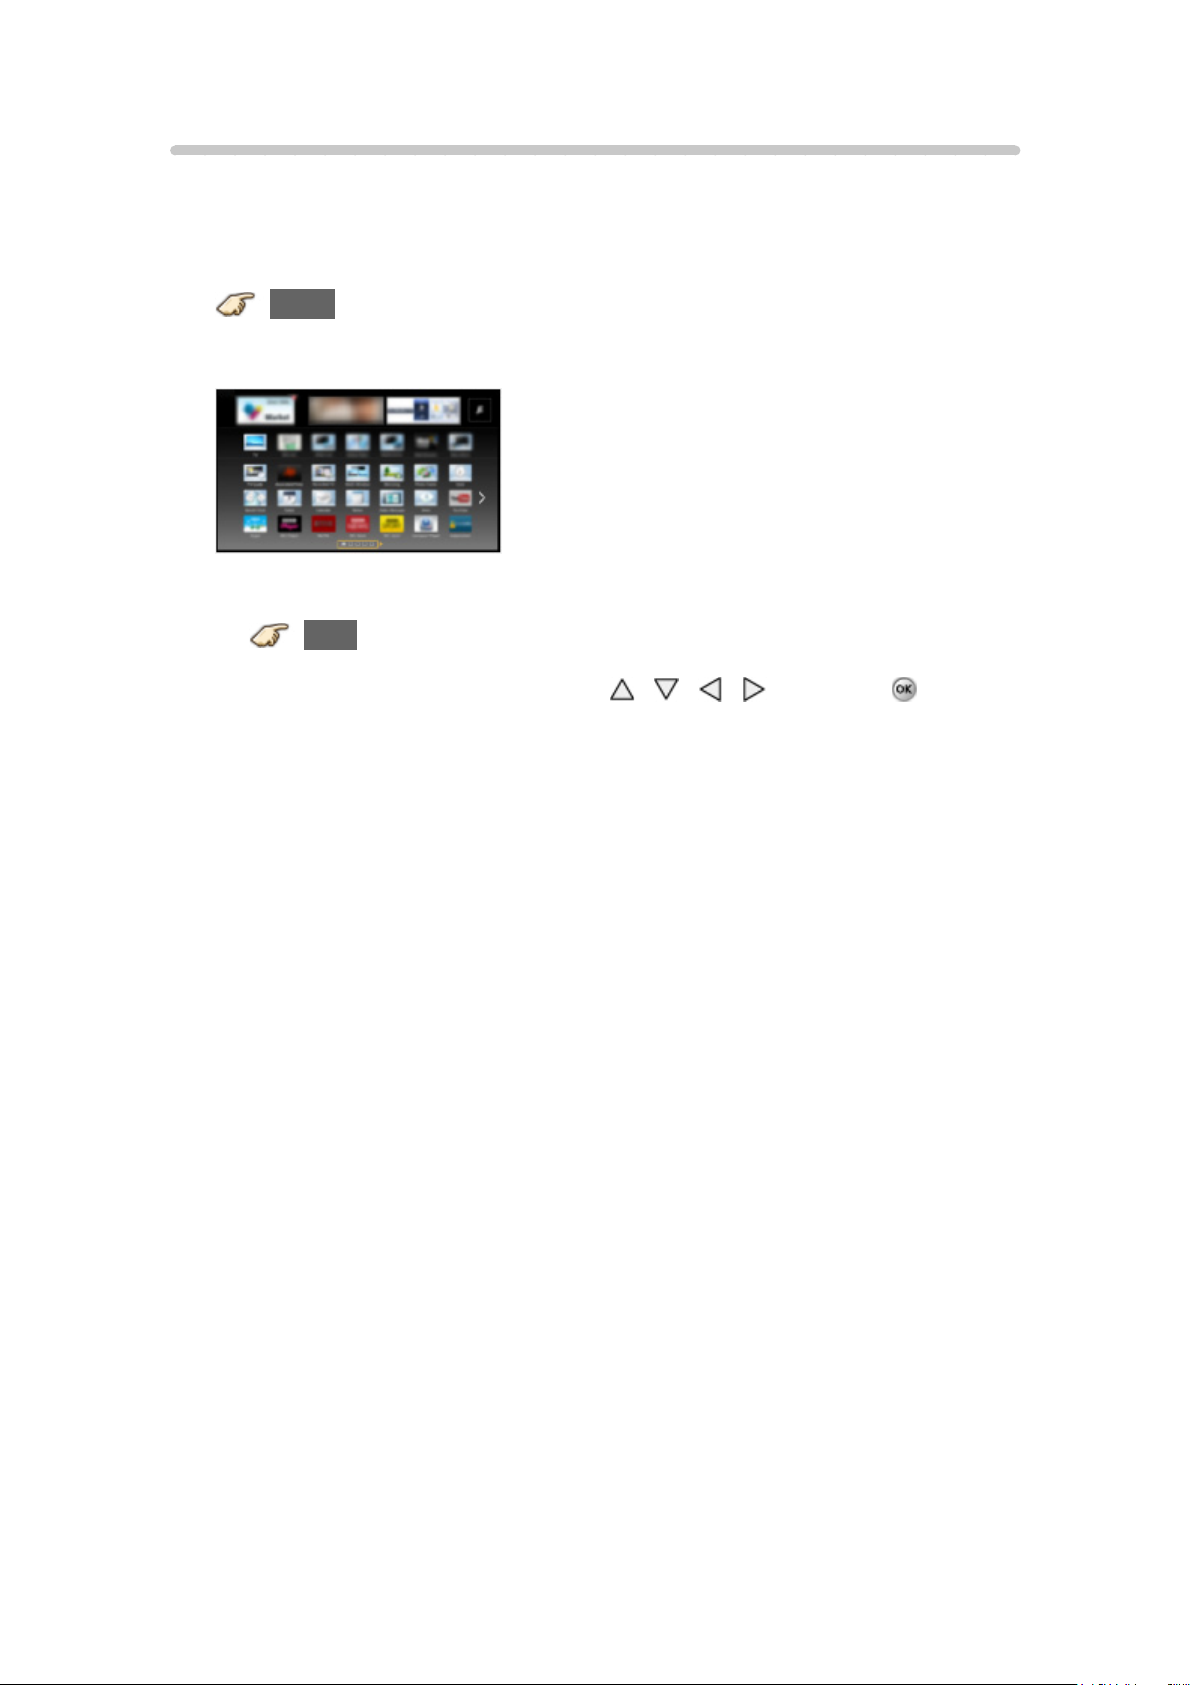
Features
my Home Screen is a gateway to the TV, applications, and more. It provides
easy access to special features such as the Media Player, videos, games,
communication tools, etc.
■ Home Screen
(Example)
HOME
OK
OK HOME
Home Screen (Full Screen TV, Various Home Screen, etc.)
Selected content screen (TV, application, etc.)
Home Screen Selection
– Choose your preferred Home Screen layout.
- 9 -
How to use
The Home Screen provides access to special features such as the Media
Player, TV, Internet content, data services, communication tools, etc.
1. Display Home Screen
HOME
●
The last viewed Home Screen is displayed each time the TV is turned
on.
●
Press HOME again to return to Home Screen Selection.
●
You can change the default Home Screen when the TV is turned on.
Using my Home Screen > my Home Screen > Settings
2. Select a Home Screen icon using
/ / / and press to
access the feature.
●
To watch full-screen TV
1) Select the TV window with
/ / /
2) Press
to watch
●
Also refer to Tutorial from the tool guide.
- 10 -
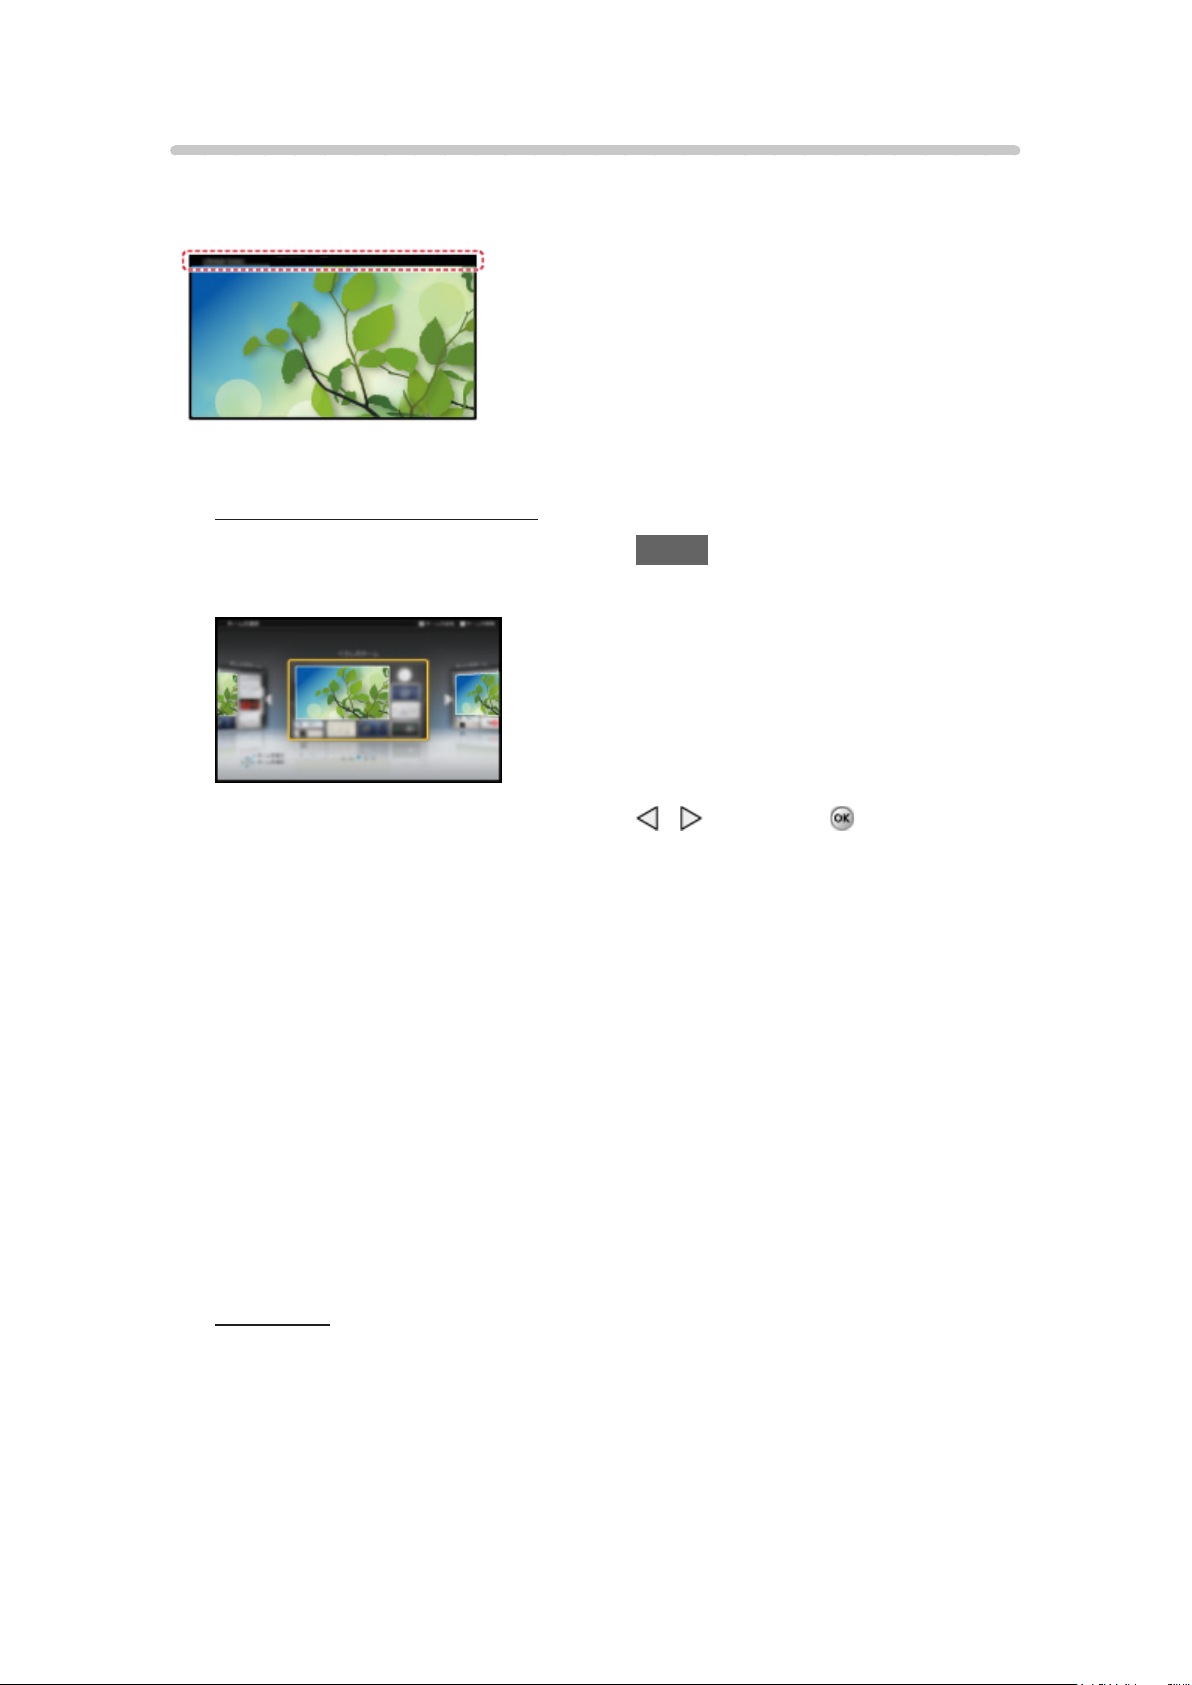
Settings
Select the setup menu from the tool guide on the top of the screen.
(Example)
■ Home Screen Selection
1. Display Home Screen Selection with HOME
(Example)
2. Select the type of Home Screen with / and press to set.
●
Full Screen TV
Exits the Home Screen and displays the TV picture in full-screen.
– To Keep Full Screen TV
During watching the TV on this full-screen, select Settings from tool
guide. Then, set the Power ON Option.
●
Various Home Screens
You can change the layout of the Home Screen according to your
lifestyle and personal preferences.
●
Add New Screen
You can add a new screen to personalize.
■ Settings
You can customize Home Screen. For example, you can change the
wallpaper, rename the screen, add / delete or set your preferred Home
screen, edit applications, etc.
1. Select Settings from the tool guide
2. Follow the on-screen instructions

- 11 -
■ Search function
You can search the content of various Home screen features.
1. Select Search from the tool guide
2. Follow the on-screen instructions
●
To use this function fully, you need a broadband network environment.
Ensure the network connections and network settings are completed.
●
Be sure to update the software when a software update notice is
displayed on the TV screen. If the software is not updated, you will not
be able to use my Home Screen. You can update the software later
manually.
●
To change the color type of on-screen displays.
All settings > Setup > Display customization
- 12 -
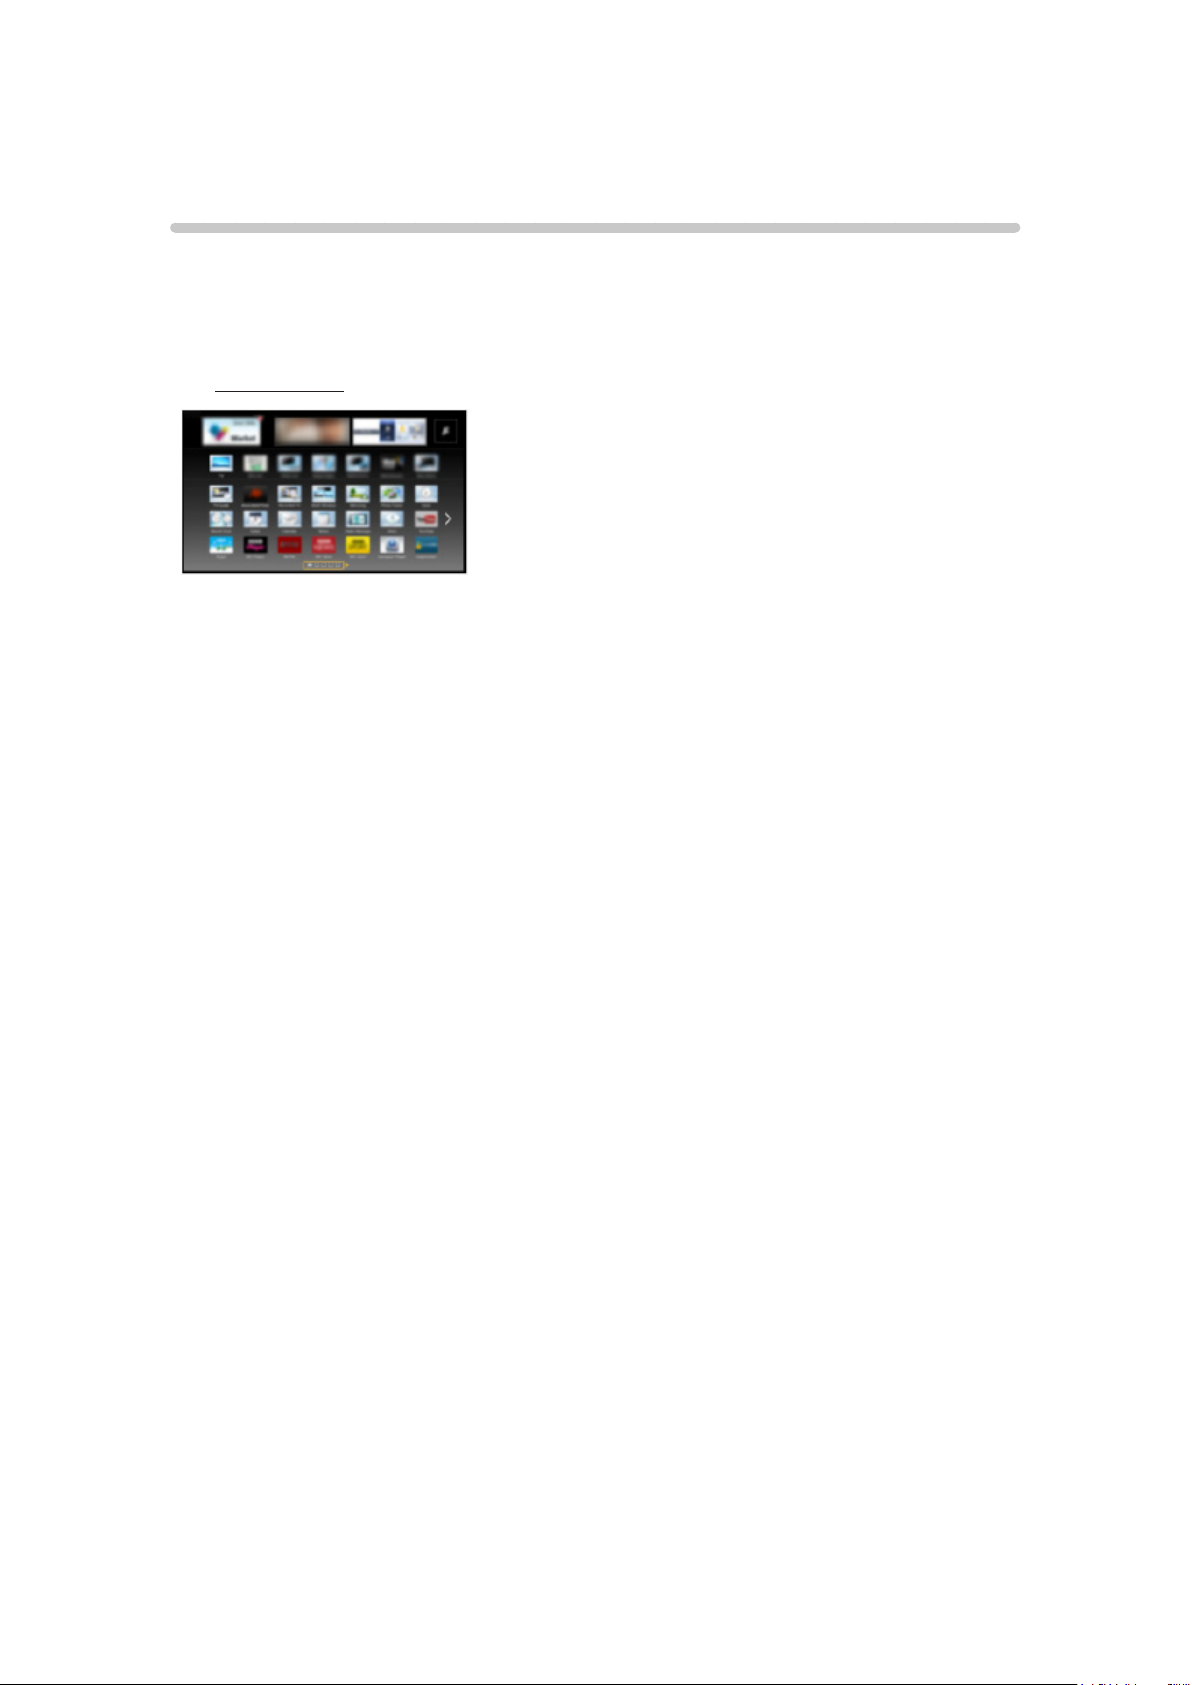
Using Apps list
Features
Special features (Internet contents, network contents, Media Player, etc.) can
be accessed easily from Apps (applications) list.
■ APPS list
●
Apps list is subject to change without notice.
- 13 -
How to use
You can access special features such as Internet contents, network contents,
Media Player, etc. from Apps list (applications list).
1. Display Apps list
APPS
(Example)
●
To exit Apps list
EXIT
2. Select an icon of the features with
/ / / and press to
access

- 14 -
Settings
You can set up Apps list manually. (For example, Screen Settings, Account
Information, restriction, etc.)
1. Display Apps list
APPS
2. Select the setup menu on Apps list with
/ / / and press
to access
3. Follow the on-screen instructions
●
Setup items may be change without notice

- 15 -
Watching TV
Cable / Satellite / Fiber Optic box
Initial setting
1. Connecting
Select the wiring method connecting your box to the TV, AV IN or
Antenna/Cable in.
Note:
●
HDMI will provide the best HD picture
2. Change INPUT
INPUT
Press the INPUT button to select the proper connection. Wait 2 seconds.
3. Power on your Cable, Satellite or Fiber Optic box
Use the box’s remote control to change channels.
●
If the box is connected to the TV using a COAX cable (Antenna/Cable
in), then set the TV channel to CH3 or CH4. Note that the picture will
not be in HD.
●
CC/SAP is not available when watching TV with a Cable or Satellite
box connected via HDMI.
●
If you have a High Definition box, ensure that it is outputting 720p or
1080i signal.
Tip: press the TV’s INFO button to verify.
●
Check your box’s “aspect” or “format” settings. It should be set to 16:9,
Widescreen or Full.
●
If the audio volume is too low, check the box’s audio settings.
●
Contact your Cable or Satellite provider for instructions on any box
settings.
- 16 -
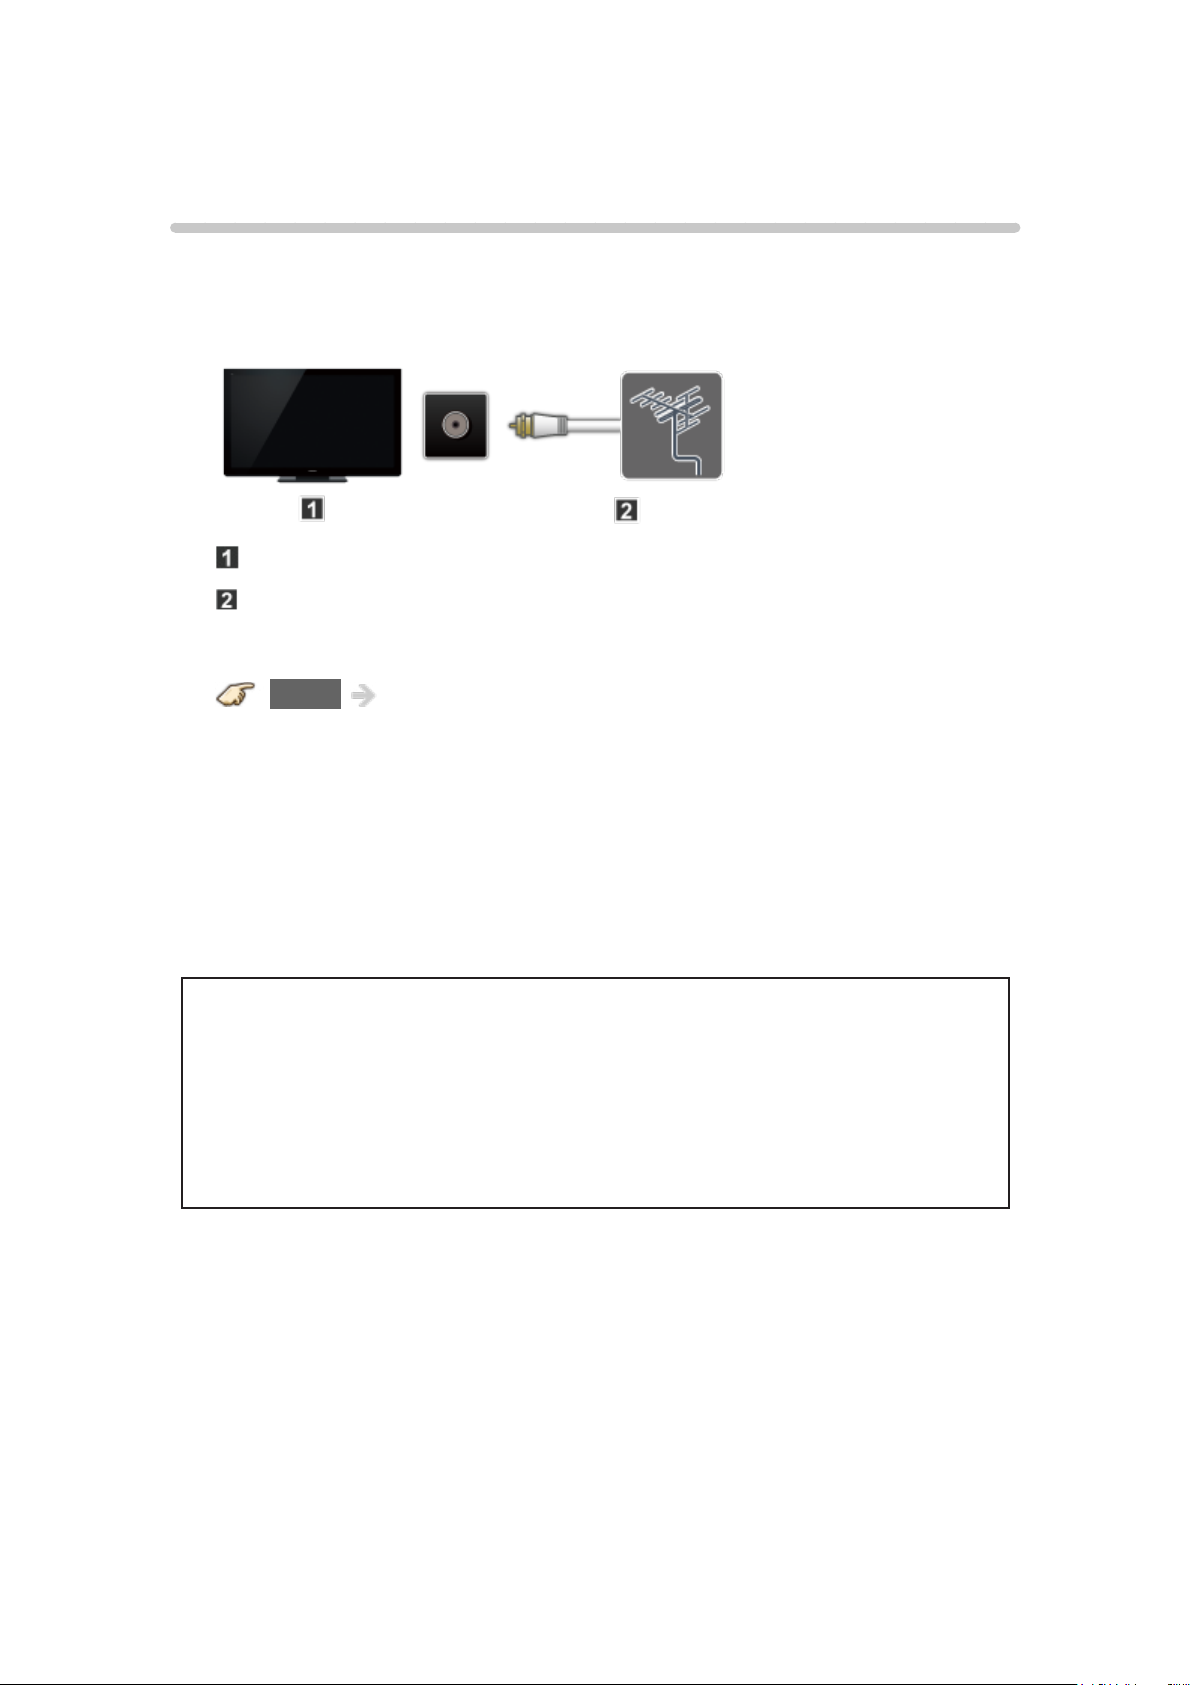
Antenna / Cable service without a box
Initial setting
1. Connect coax
Connect a COAX wire from either an antenna or Basic Cable service to
the TV’s “ANTENNA/CABLE IN” screw terminal.
TV (ANTENNA/CABLE IN)
Antenna
2. Scan the channel
MENU Menu > Setup > ANTENNA/Cable setup > ANTENNA/
Cable signal, Auto program
1) Select either Cable or Antenna programming source in ANTENNA/
Cable signal.
2) Select Auto program and then the appropriate scan mode:
(All channels / Analog only / Digital only)
3) Start scanning.
●
If no channels are found by the end of the scan, then check the
following:
– Antenna’s position - or availability of Cable service.
– Cable, Satellite or Fiber Optic services with a box are typically
connected to the TV’s A/V inputs, preferably HDMI, for best HD
picture. In such a case, the channel scanning is not needed.
- 17 -
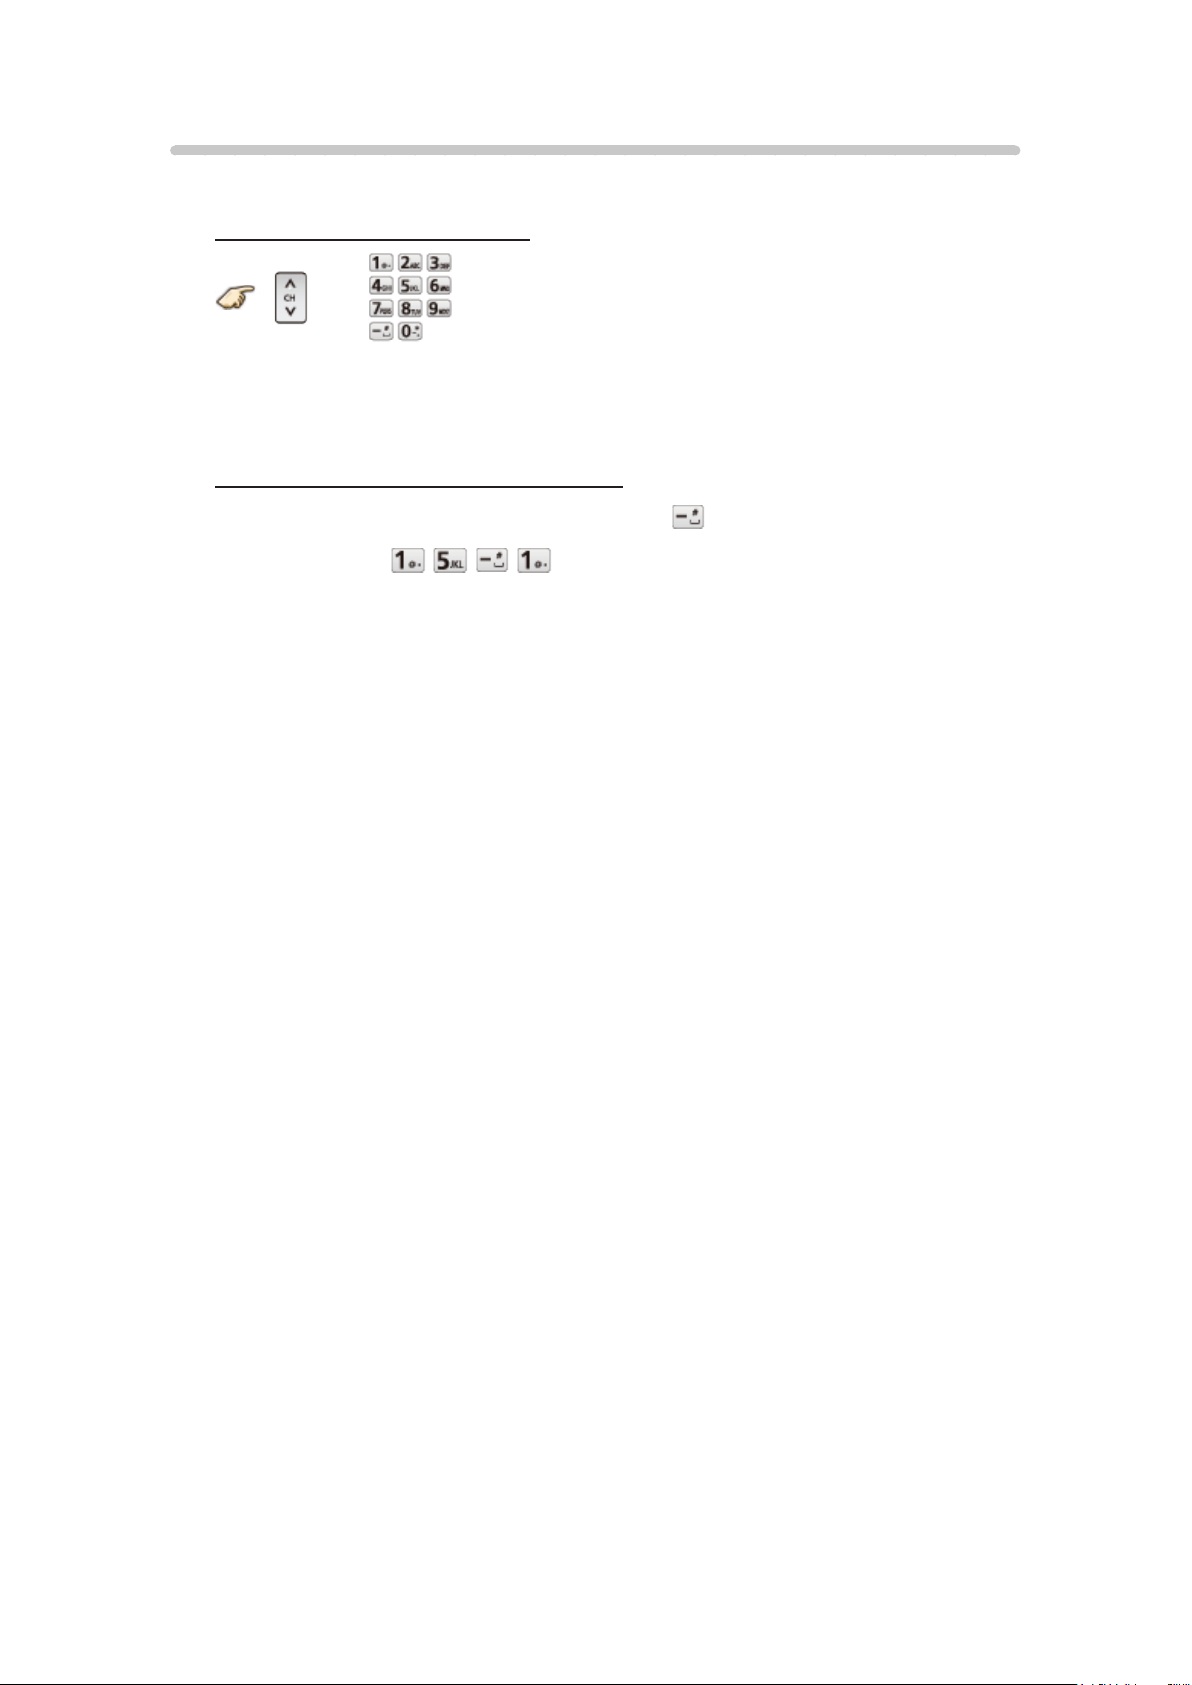
Select channels
■ Select desired channel
or
●
CH buttons are also available on the TV.
■ Select desired digital channel
To directly enter a digital channel number use button to enter the dash.
(e.g.CH15-1→
)
- 18 -
Favorite channels
Channel numbers registered in Favorite are displayed on the favorite tune
screen. Select the desired broadcast station with the cursor or use the
number buttons.
●
Favorite channels cannot be set when using Cable or Satellite box
■ Set the Favorite channel
OPTION Options menu > Set favorite
Select the list number using
/ and or - / directly to
save the displayed channel.
■ Delete a Favorite channel
OPTION Options menu > Set favorite
Select the list number using
/ and to delete.
●
To change the page in Set favorite
FAVORITE or / repeatedly
■ Display a Favorite channel
FAVORITE Favorite channels
Select the list number using
/ and or - / directly to
save the displayed channel.
●
To change the page in Favorite channels
FAVORITE or /
repeatedly

- 19 -
Closed Caption
■ Viewing with Closed Caption
CC
Switches the Closed Caption mode.
(Off / On / On mute)
●
CC is not available when watching TV with a Cable or Satellite box
connected via HDMI.
●
Contact your Cable or Satellite operator for instructions on enabling CC
with their box.
●
The TV’s CC button does not operate the Satellite or Cable box’s CC
function.
●
For viewing the CC of digital broadcasting, set the aspect to Full (If
viewing with H-FILL, JUST, ZOOM or 4:3; characters might be cut off).
●
If the CC is set to On on both the receiver and TV when the signal is
480i (except for the HDMI connection), the CC may overlap on the TV.
●
If a digital program is being output in analog format, the CC data will
also be output in analog format.
●
If the recorder or output monitor is connected to the TV, the CC needs
to be set up on the recorder or output monitor.
- 20 -
SAP
■ Listen with SAP (Secondary Audio Programming)
●
SAP is not available when watching TV with a Cable or Satellite box
connected via HDMI.
●
Contact your Cable or Satellite operator for instructions on enabling
SAP with their box.
●
The TV’s SAP button does not operate the Satellite or Cable box’s
SAP function.
Select the Audio mode for watching TV.
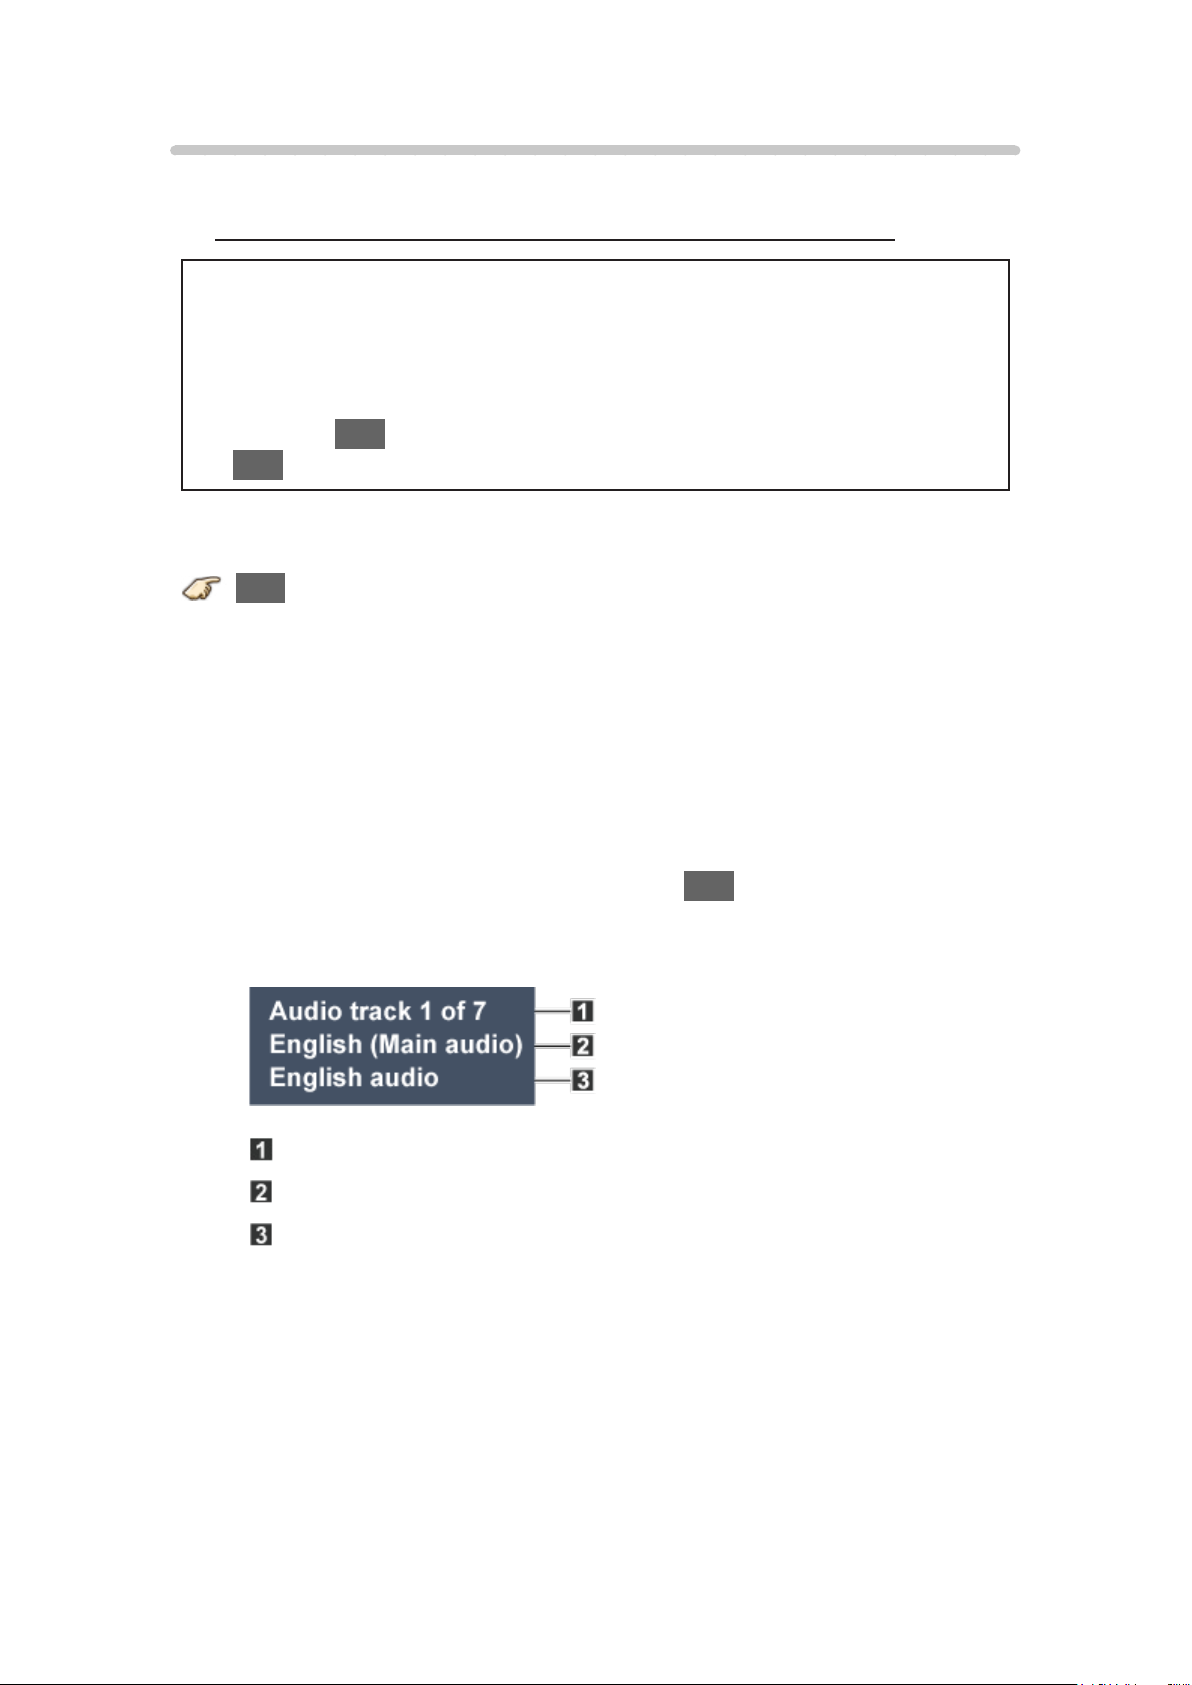
SAP
Digital mode:
Select available audio service when receiving a digital channel.
Audio track is automatically selected as Preferred audio type and
Preferred SAP language settings.
(Menu > Sound > Preferred audio type)
(Menu > Setup > Language > Preferred SAP language)
●
If you change the audio settings with the SAP button, Preferred SAP
language and Preferred audio type settings will not change.
(Example)
Track number / Number of tracks
Current audio track information
Audio service information
Analog mode:
Select the desired Audio mode.
(Stereo / SAP / Mono)
- 21 -
Other
1. Information banner
Displays TV status information. Also, when watching programs via the
Antenna/Cable input, INFO will include the channel banner.
INFO
Channel / Station identifier / Program title / Closed Caption / SAP /
Rating level / Signal resolution / Picture mode / Aspect ratio / Sleep
timer remaining time / Clock
2. Options menu
This menu consists of shortcuts to convenient functions.
(Options menu is also available in Menu.)
OPTION
Voice guidance settings:
Guidance settings for visually impaired users.
Channel surf mode:
Specify favorites or type of channels to view when pressing the
channel up/down button.
Set favorite:
Set favorite channel
Edit CH caption:
Edit the channel identifier
Signal meter:
Check the antenna’s signal strength
●
Options menu is only available when the TV is using the Antenna/Cable
input, not when using Cable or Satellite box.
- 22 -
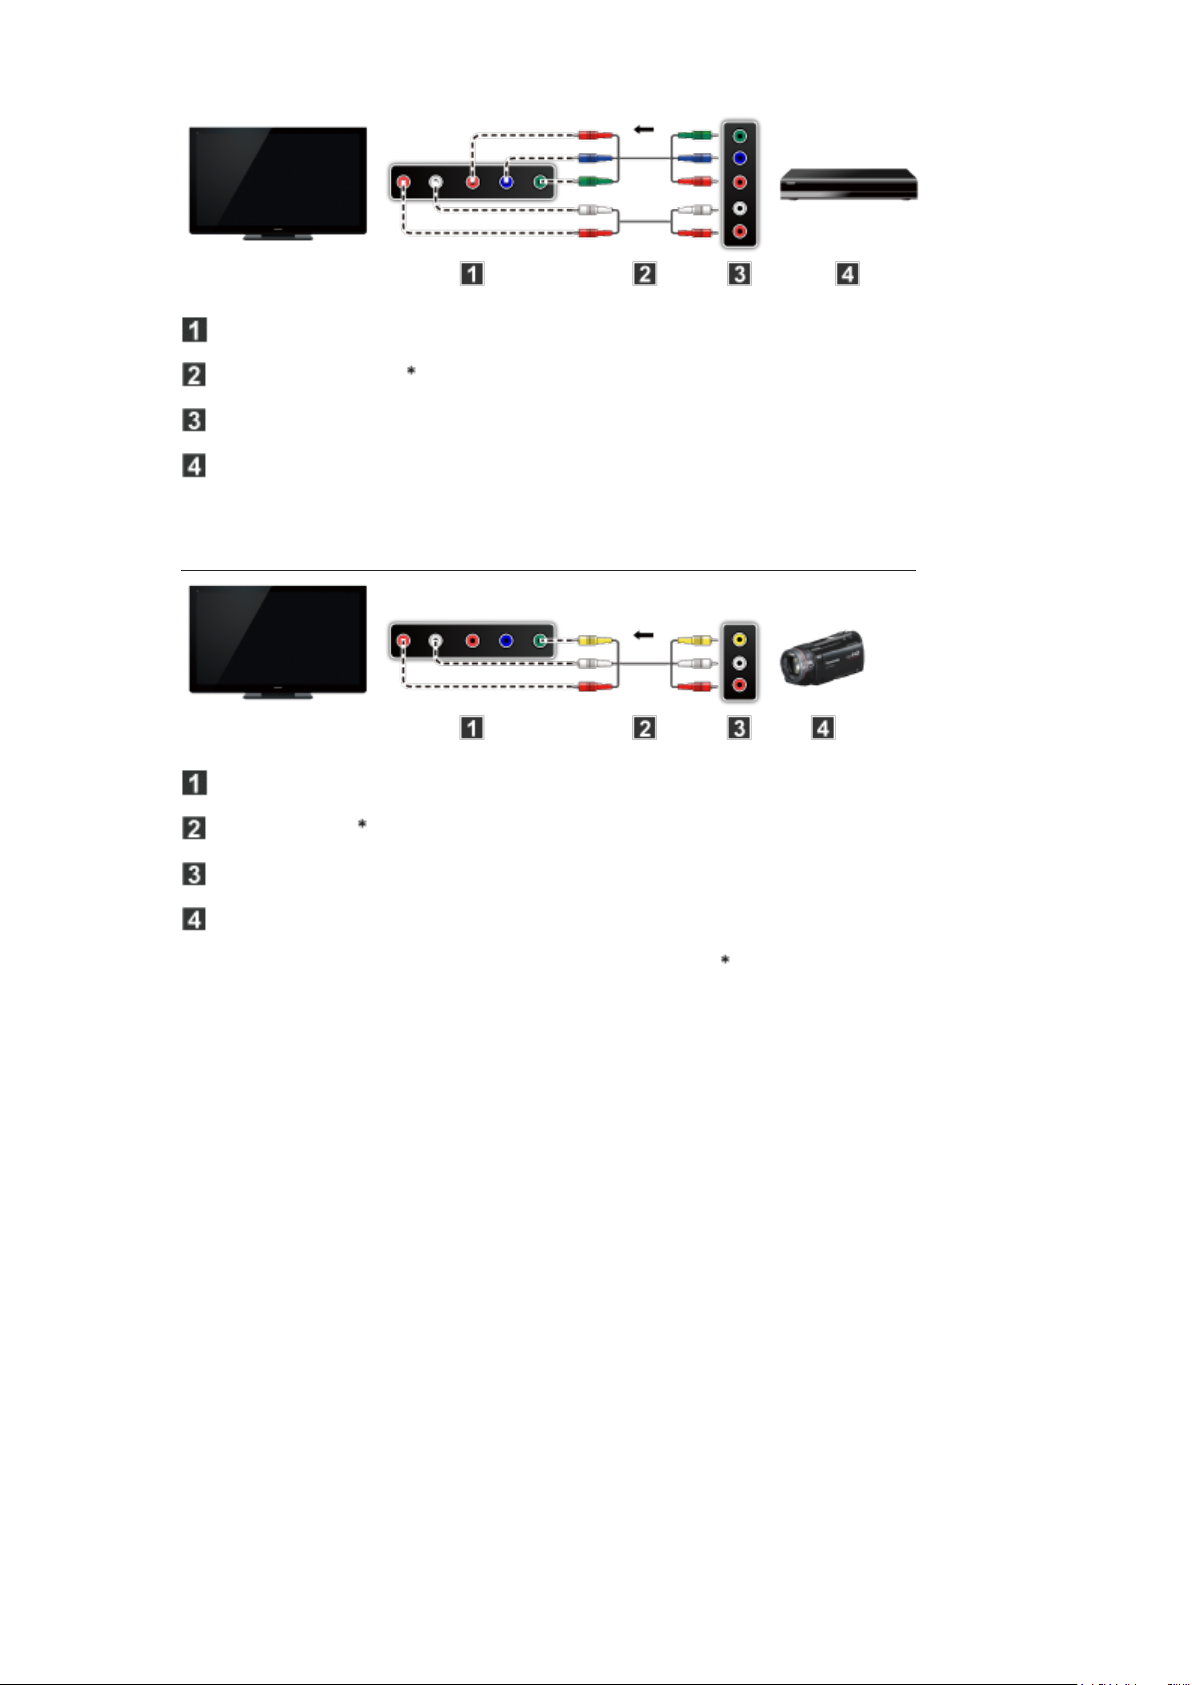
Blu-ray, DVD, Game Console, etc.
Connecting and viewing
1. Connect device
Verify that the device is connected to the TV properly and connect to
desired terminal. Note which terminal the device is connected to (HDMI 1,
HDMI 2,... Component or Video)
Component and Composite (Video) in terminals are shared.
Please be careful not to confuse the connection when you use Component
or Video.
●
For Example of AV connections
See next section, Example of AV connections.
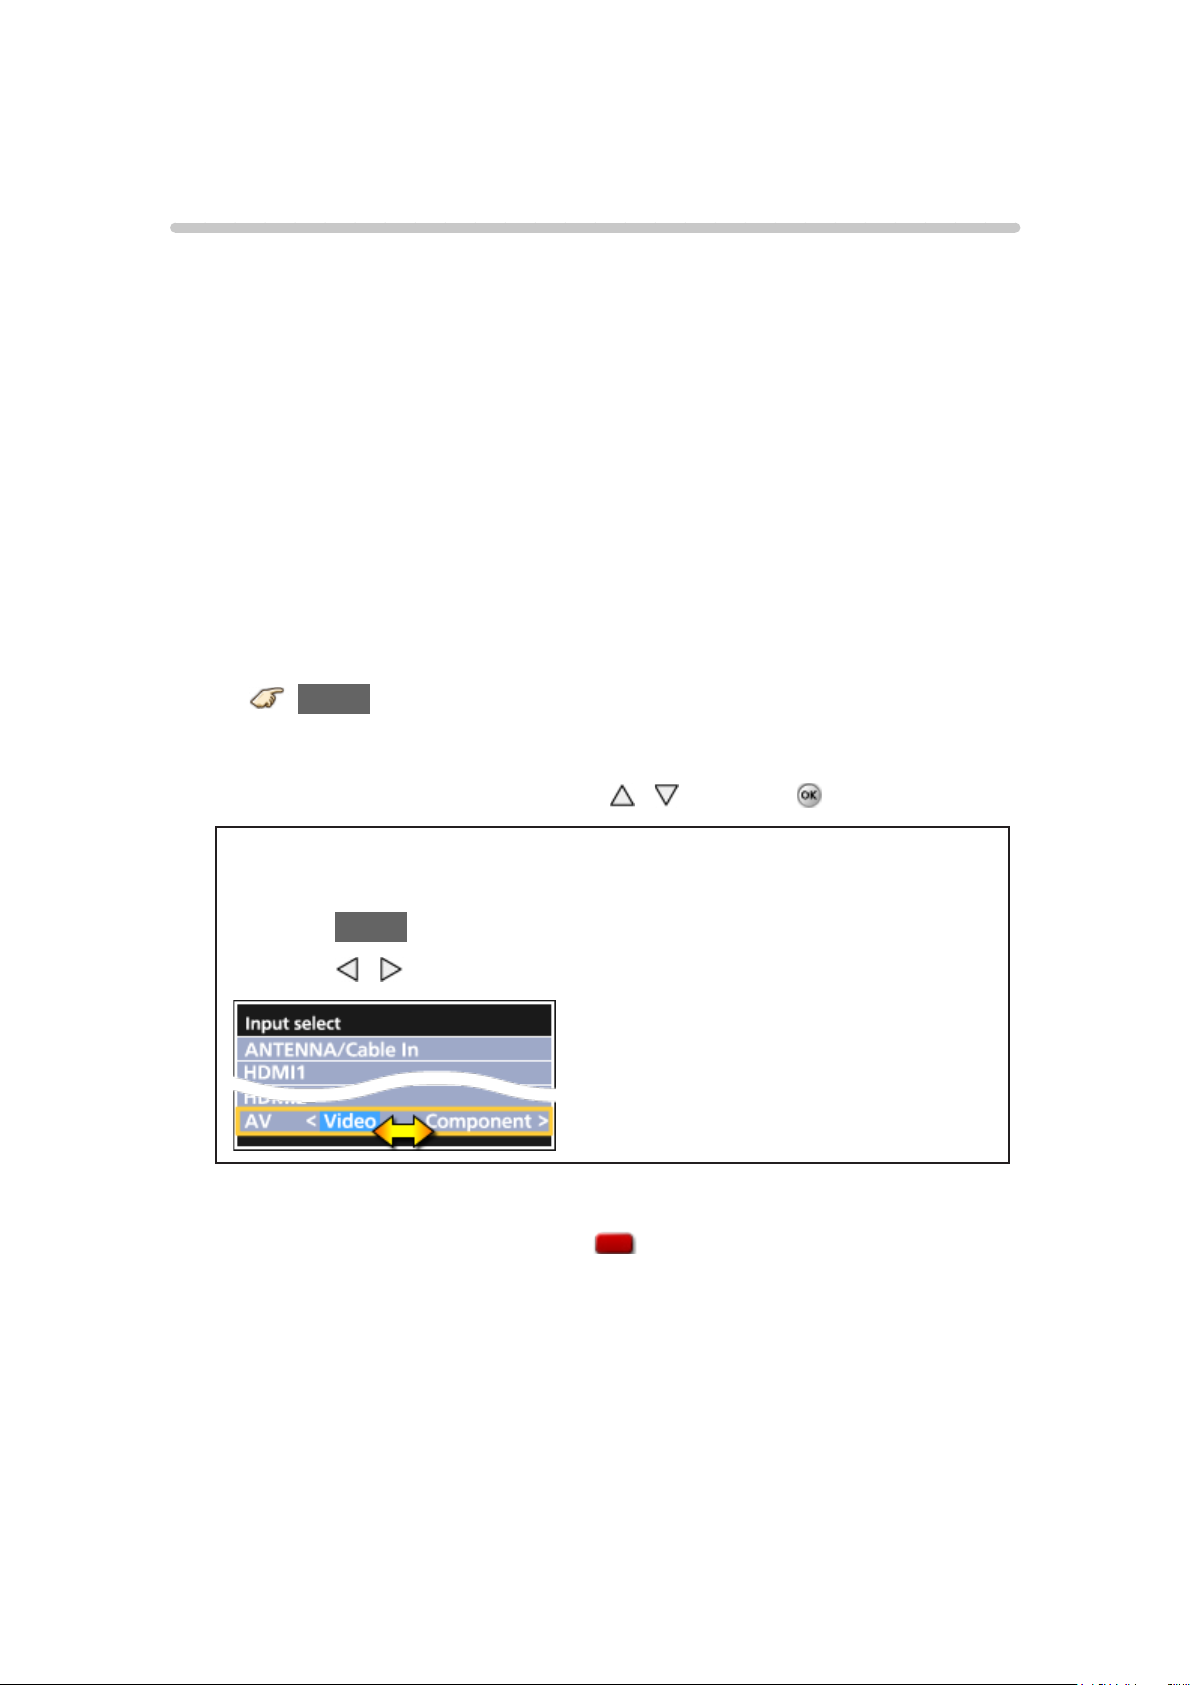
2. Select Input
1) Display Input select menu (With the connected equipment turned ON)
INPUT
2) Select the input used in step 1
Select correct input source, using
/ and press
When you connect to Component or Video input, you need to select
Video or Component.
●
Press INPUT and select AV: Video↔Component.
●
Press / to choose Video or Component.
●
You can edit and customize the TV’s Input label for easy
identification by pressing the (Red) button. If you label an input
as “Not used”, then it will not appear in the Input select menu.
3) Operate using your device’s remote control
- 23 -
Example of AV connections
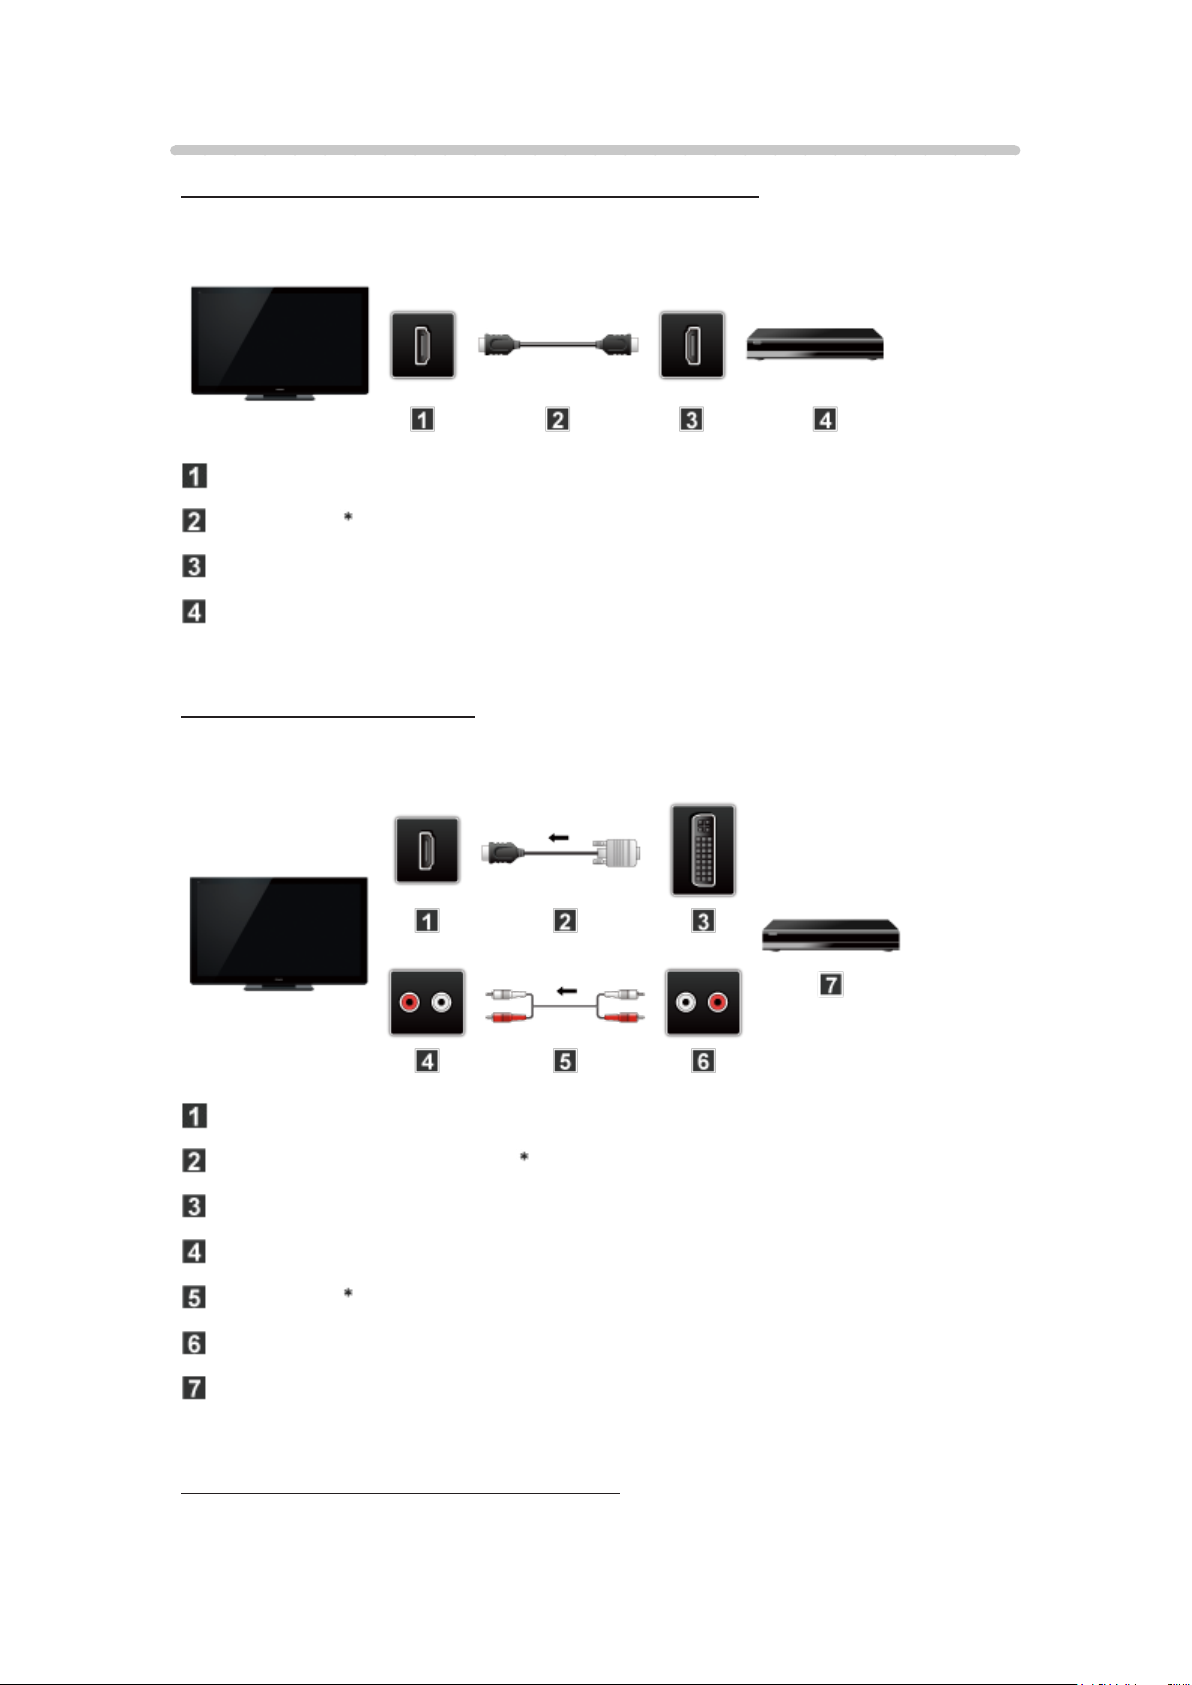
A. Connecting to the HDMI input (Best for HD viewing)
Recommended to use this connection, if the connected equipment has HDMI
terminal.
HDMI IN
HDMI cable
HDMI OUT
AV Equipment (e.g. Blu-ray Disc player)
For devices with DVI output
Recommended to use this connection, if the connected equipment has DVI
terminal only.
HDMI IN
HDMI-DVI Conversion cable
DVI OUT
AUDIO IN
Audio cable
AUDIO OUT
AV Equipment (e.g. Blu-ray Disc player)
B. Connecting to the COMPONENT input
Recommended to use this connection, if the connected equipment has
Component terminal only.
- 24 -
COMPONENT IN
Component cable
COMPONENT OUT
AV Equipment (e.g. Blu-ray Disc player)
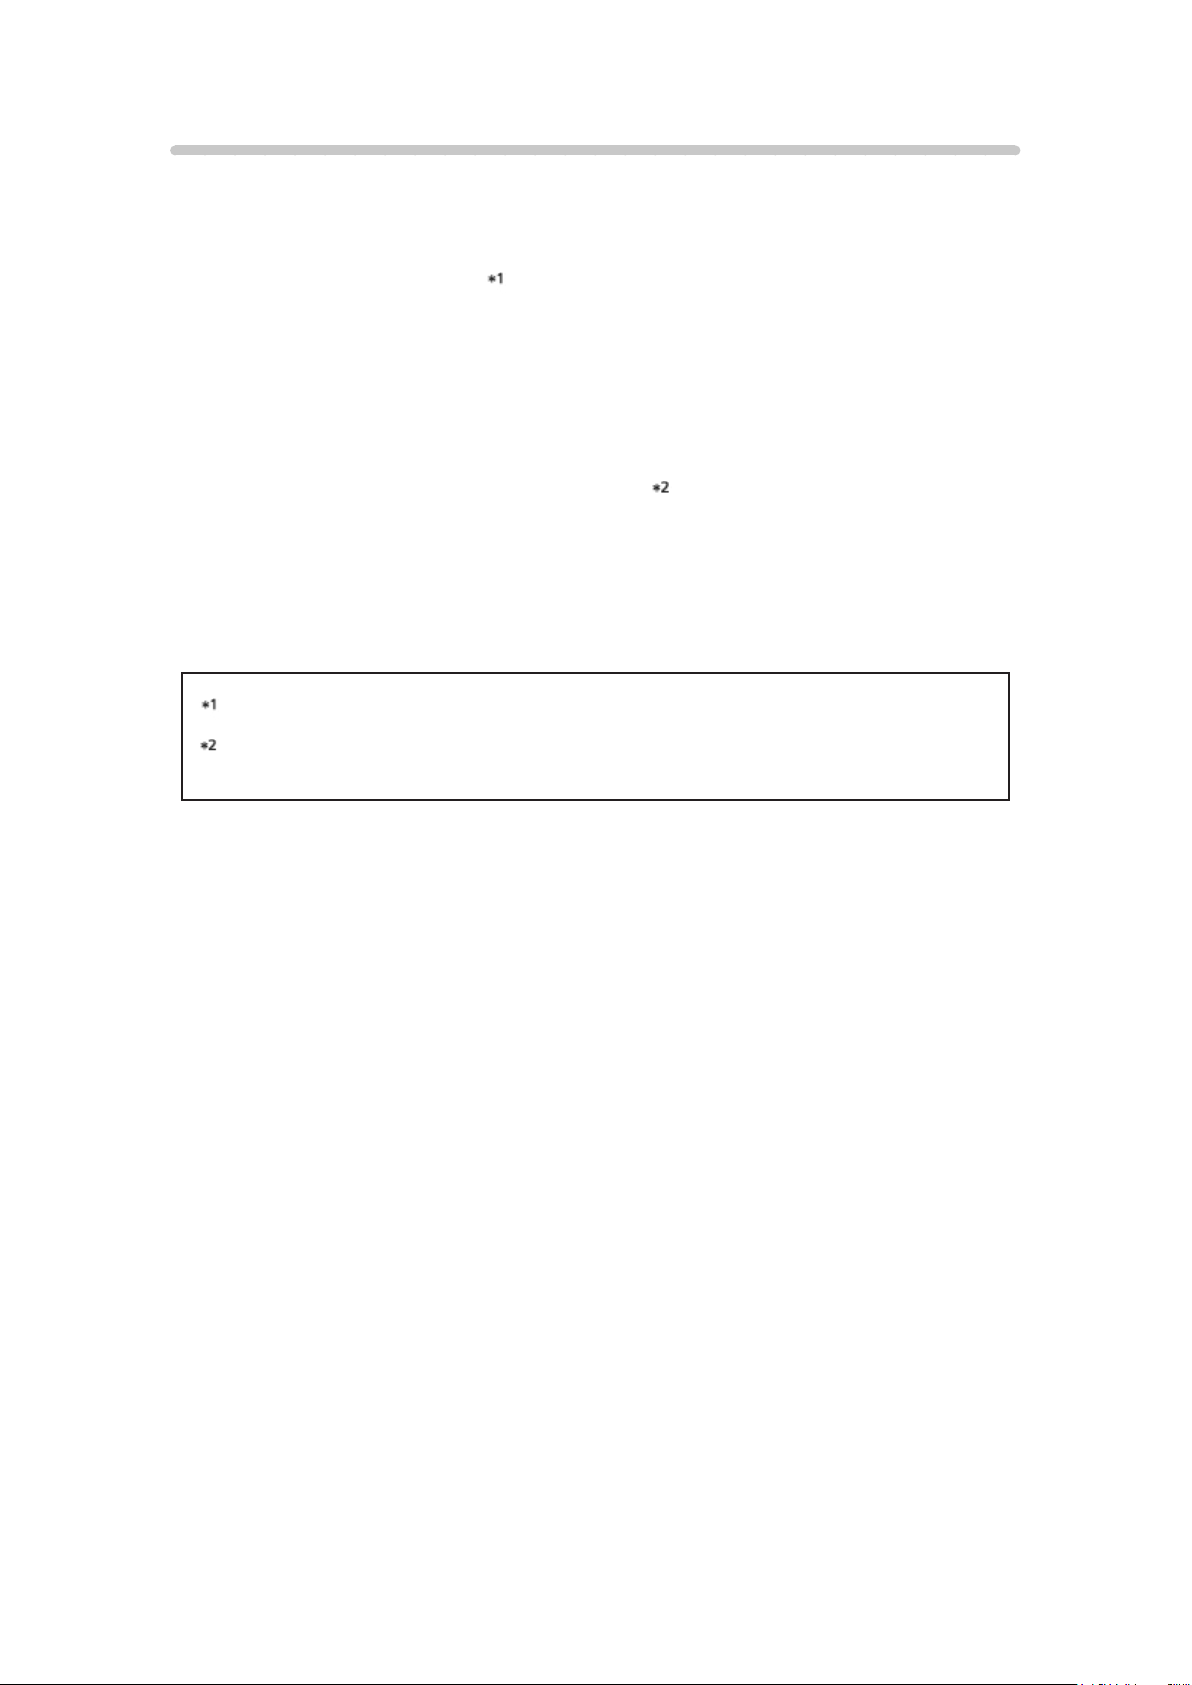
C. Connecting to the VIDEO input (For SD (Standard Definition) only)
COMPOSITE IN
VIDEO cable
COMPOSITE OUT
AV Equipment (e.g. Camcorder)
: Not supplied with this TV
- 25 -
HDMI connection notice
HDMI (high-definition multimedia interface) allows you to enjoy high-definition
digital images and high-quality sound by connecting the TV unit and HD
devices.
HDMI-compatible equipment
with an HDMI or DVI output terminal, such
as a Cable or Satellite box or a DVD player, can be connected to the HDMI
connector using an HDMI compliant (fully wired) cable.
●
HDMI is the world’s first complete digital consumer AV interface complying
with a non-compression standard.
●
If the external equipment has only a DVI output, connect to the HDMI
terminal via a DVI to HDMI adapter cable
.
●
When the DVI to HDMI adapter cable is used, connect the audio cable to
the audio input terminal.
●
Audio settings can be made on the HDMI in menu screen. Applicable
audio signal sampling frequencies (L.PCM): 48 kHz, 44.1 kHz, 32 kHz
: The HDMI logo is displayed on an HDMI-compliant device.
: Inquire at your local digital equipment retailer shop.

- 26 -
HDMI connection caution
Caution
●
If the connected device has an aspect adjustment function, set the aspect
ratio to “16:9”.
●
The HDMI connectors are “type A”.
●
The HDMI connectors are compatible with HDCP (High-Bandwidth Digital
Content Protection) copyright protection.
●
Devices with no digital output terminal may be connected to the input
terminal of either “COMPONENT IN”, or “VIDEO IN” to receive analog
signals.
●
The HDMI input terminal can be used only with the following video
signals: 480i, 480p, 720p, 1080i and 1080p. Ensure that the device being
connected to the TV can produce one of these video signals.
- 27 -
Input signal
●
Signals other than those listed below may not be displayed properly.
●
The signals are reformatted for optimal viewing on your display.
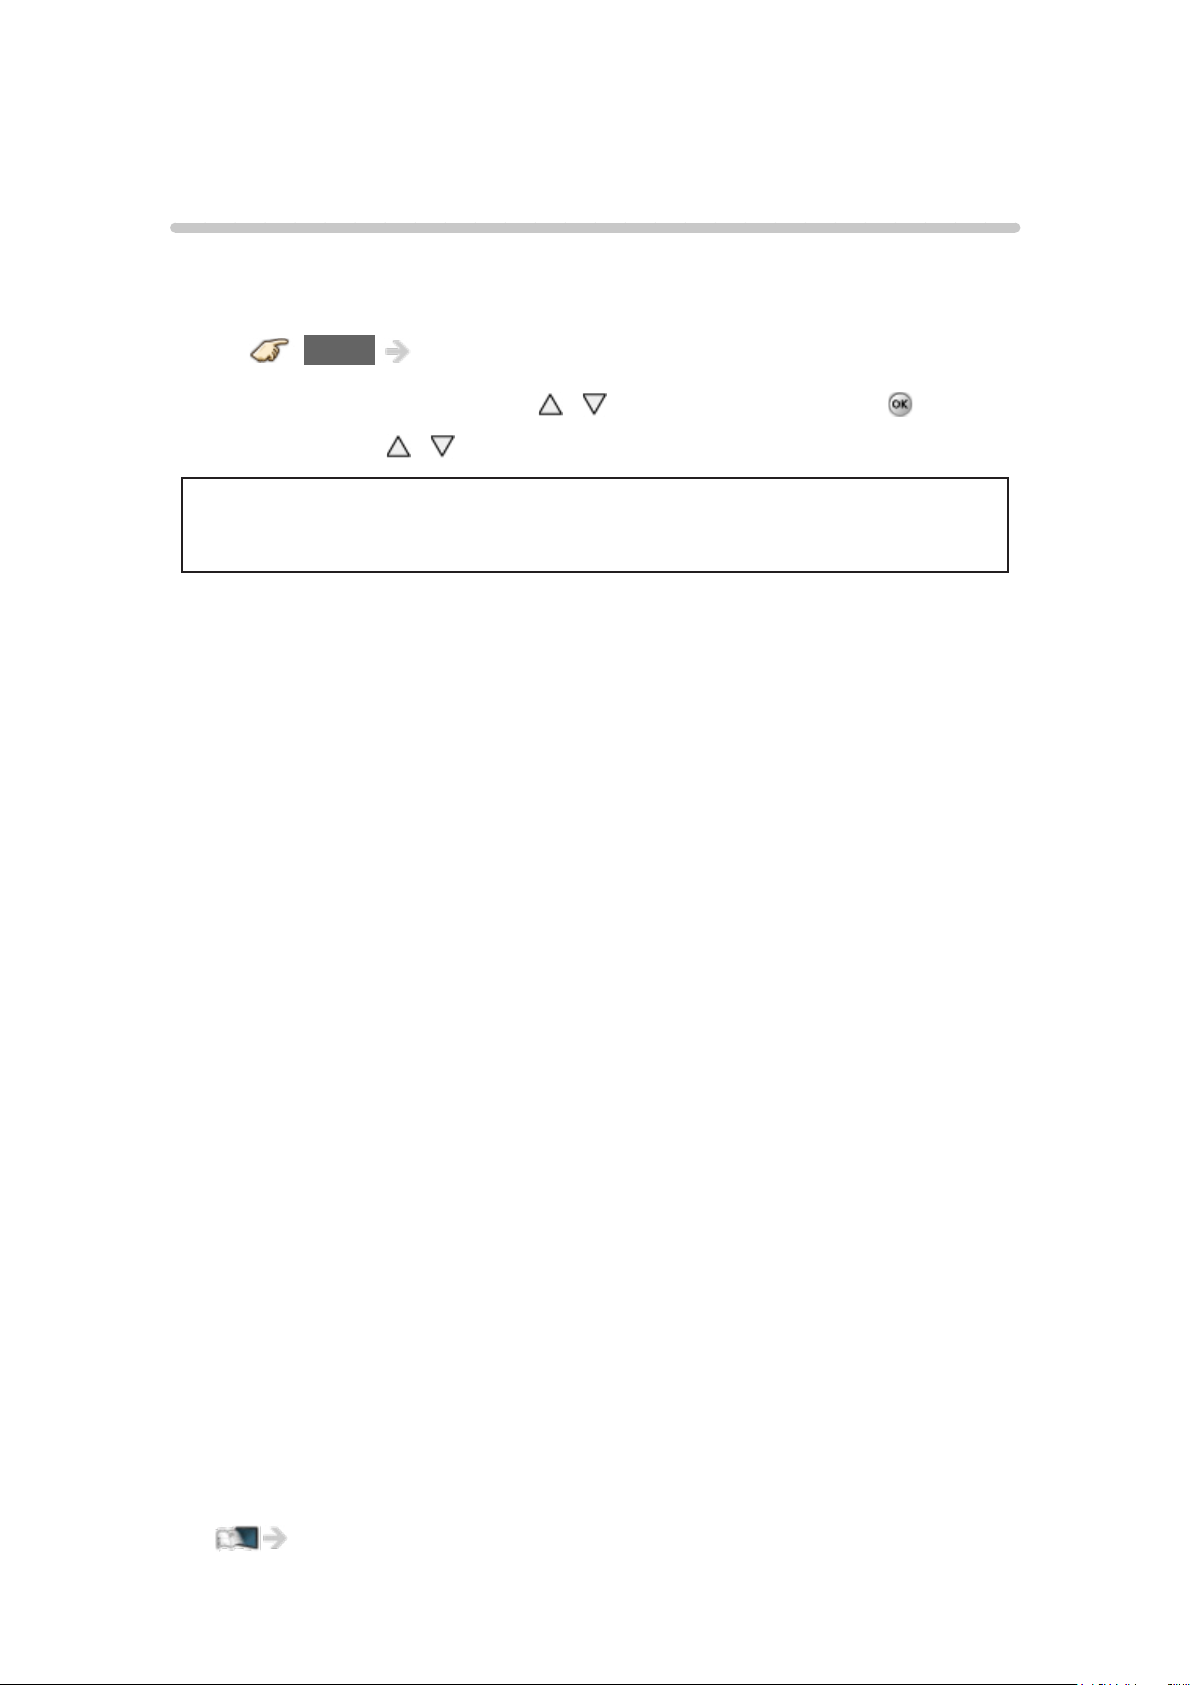
■ Component/HDMI
Input signal
Vertical
frequency (Hz)
Component HDMI
480/60i 59.94/60.00 ○ ○
480/60p 59.94/60.00 ○ ○
720/60p 59.94/60.00 ○ ○
1,080/60i 59.94/60.00 ○ ○
1,080/60p 59.94/60.00 ○ ○
1,080/24p 23.98/24.00 ○
○:Applicableinputsignal
- 28 -
For best picture
Picture mode
1. Change picture mode to suit your settings and taste
1) Select Picture mode
MENU Menu > Picture > Picture mode
Select desired menu using
/ from menu bar and press
2) Adjust using /
Note:
●
HDMI will provide the best HD picture
2. Picture mode type
Vivid
Provides enhanced picture contrast and sharpness for viewing in a well-lit
room.
Standard
Recommended for normal viewing conditions with subdued room lighting.
Home theater
For watching movies in a darkened room. It provides a soft, film-like picture.
Cinema
Reproduces the original image quality precisely without any revision.
Allows you to set the professional picture settings in Pro settings and Copy
adjustments.
●
Use the mode below to adjust the picture mode in more detail.
Custom
Customizes each item according to your taste.
Allows you to set the professional picture settings in Pro settings and Copy
adjustments.
●
Adjust the Picture mode in more detail.
All settings > Picture > Pro settings

- 29 -
Auto brightness (ECO)
Contrast Automatic Tracking System (C.A.T.S.) adjusts the screen brightness
and contrast according to the room’s ambient light conditions. This ECO
feature automatically dims the brightness of the screen when the room
lighting is lowered.
C.A.T.S. features a built-in delay when the lighting conditions change. The
adjustment happens gradually.
If you prefer a consistent brightness, disable C.A.T.S. by:
●
Menu > Picture > scroll down to C.A.T.S. and turn it off.
Or
●
Menu > Picture > Picture mode then select viewing mode such as
Custom.
- 30 -
Aspect setting
Use this function when the picture has black bars (sides or top/bottom) or to
zoom the picture.
Use FORMAT button to change the aspect ratio.
FORMAT (to cycle through the aspect modes)
480i, 480p: Full/JUST/4:3/ZOOM
1080p, 1080i, 720p: Full/JUST/4:3/ZOOM/H-FILL/SIDECUT JUST/
SIDECUT ZOOM
●
Use when the picture does not fill the whole screen or portions of the
picture are trimmed.
●
Some content, such as film-based movies, are available in extra-wide
format. Top and bottom bars are unavoidable.
●
Connected devices, such as Cable/Satellite box, DVD/Blu-ray players
and game consoles have their own aspect (format) settings. Adjust the
device’s aspect settings.
●
For screen format settings
All settings > Picture > Screen settings
Loading...