


Operating Instruction
Colour Television
TC-29P22R
Please read the operating instructions completely before operating this set.
TQB4G0628
1

Dear Panasonic customer
Welcome to the Panasonic family of customers. We hope that you will have many years of enjoyment from your new colour television.
Safety Instructions
The TV set can be operated on AC AUTO 110/240V, 50/60Hz
To prevent damage which may result in fire or electrical shock, do not expose the TV set to rain or excessive moisture.
Do not remove the rear cover, as live parts are accessible when it is removed.
Remove the plug from the wall outlet (Power point) when the TV set is not used for a prolonged period of time.
The cabinet and picture tube can be kept in good condition by simply wiping with a clean, soft cloth moistened with mild detergent and water. Do not use solutions containing benzol, petroleum or a chemical cloth. For safety, remove the plug from the wall outlet.
Adequate ventilation is essential to prevent failure of electrical components.
Avoid exposing the TV set to direct sunlight and other source of heat.
Do not use this set if abnormal operation occurs.
EX: smoke, odd sounds or smells, turn the power switch off and disconnect the AC power if you notice any unusual operation.
2

Before Operating This Set
Connect the Aerial Cable to the RF In Terminal
VHF Aerial
UHF Aerial
|
Mixer |
|
75Ω |
RF In Terminal |
|
Coaxial |
||
|
||
Cable |
|
Coaxial Aerial plug
To obtain the best quality picture and sound, an external antenna, the correct cables (75 Ohm coaxial) and the correct terminating plug will be required.
If a communal antenna system is used, you may require the correct connection cable and plugs between the wall antenna socket and your television receiver.
Your local Television Service Dealer may be able to assist you in obtaining the correct antenna system for your particular area and accessories required.
Any matters about antenna installation, upgrading of existing systems or accessories required, and the cost incurred, are the responsibility of the customer.
Note :
If your existing antenna system uses 300 Ohm to 75 Ohm Balun, see Below.
300 Ohm to 75 Ohm Balun
OR
75 Ohm
300 Ohm  Coaxial Cable
Ribbon
3

Before Operating This Set
Battery Installation
1 Open the cover.
Apply slight downward pressure while pulling towards the bottom.
2 Batteries: Use two “R6 (AA)” size batteries.
Two “R6 (AA)” size
Insert the batteries ensuring correct polarity.
This is identifiable by the “+” and “–” symbols on both the batteries and inside the battery compartment.
3 |
Replace the cover. |
Do not use rechargeable (Ni-Cd) batteries.
They are different in shape and performance and may fail to ensure correct operation.
! Battery cautions
The incorrect use of batteries can cause electrolyte leakage which will corrode the Remote Control or cause the batteries to burst.
Old Batteries |
New Batteries |
Replacement both batteries at the same time. |
Don’t mix battery types |
Don’t Recharge. |
|
(alkaline with carbon zinc. etc.) |
|
4

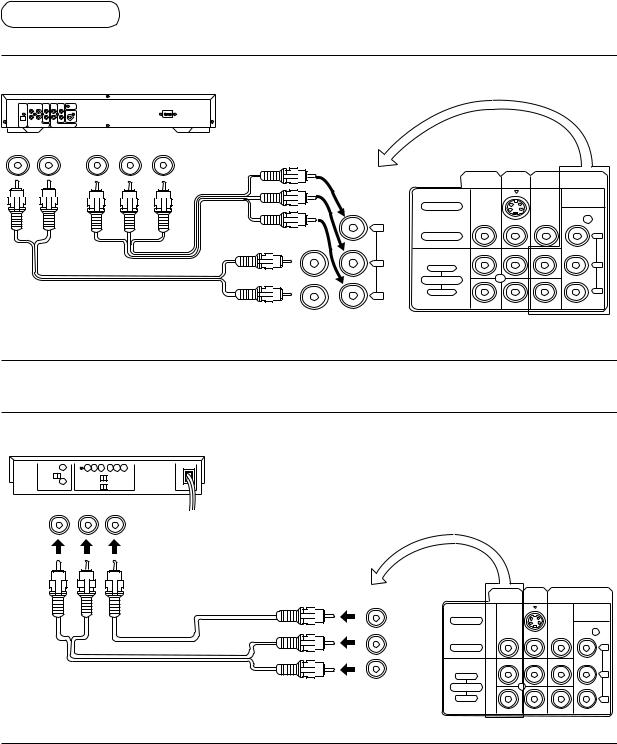
Connections
How to connect the "AV1, AV2 or AV3" Input Terminals
(Super - VHS VCR)
|
|
|
AV1 |
|
|
|
|
|
Audio |
Video |
S-Video |
IN |
|
|
|
|
|
|
|
|
|
|
|
|||
R OUT L |
OUT |
OUT |
|
S-Video |
MONITOR |
AV1 |
AV3 |
|
|
|
|
( |
input |
) |
|||
|
|
|
OUT |
IN |
IN |
|||
|
|
|
|
|
|
|
|
DVD(Y•PB•PR) |
|
|
|
|
|
|
S . VIDEO |
|
|
|
|
|
MONO |
|
|
|
|
|
|
|
|
|
|
|
VIDEO |
|
Y |
|
|
|
|
|
|
|
MONO |
MONO |
|
|
|
|
|
|
LEFT |
|
PB |
|
|
|
|
|
|
AUDIO |
|
|
|
|
|
|
|
|
RIGHT |
|
PR |
VIDEO
AUDIO
(VHS VCR)
Audio |
Video |
R OUT L |
OUT |
VIDEO
AUDIO
AV1
IN
MONITOR |
AV1 |
AV3 |
OUT |
IN |
IN |
|
|
DVD(Y•PB•PR) |
S . VIDEO |
|
|
MONO |
|
|
VIDEO |
|
Y |
|
MONO |
MONO |
LEFT |
|
PB |
AUDIO |
|
|
RIGHT |
|
PR |
Note:
(1)When AV1, AV2 or AV3 is selected, and that AV mode has no input picture signal, the background Colour of the TV screen will change (This only occur if the Blue-Back function is set to the ON condition).
(2)When an S-Video cable is connected to the S-Video terminal, the Video input will be automatically switched off for the AV mode.
(3)When a Monaural VCR is used, connect the Monaural Audio cable to the Audio “L” (Left) terminal.
(4)Similar connections are available at the AV1, AV2 and AV3 input terminals. Select the desired AV input position by pushing the “TV/AV” button.
(5)The AV3 audio input terminals serves as the audio input terminal for both the video input and for the DVD input.
5
Connections
How to connect the DVD Input Terminals
DVD Player
Audio |
|
DVD(Y•PB•PR)OUT |
|
R OUT L |
PR |
PB |
Y |
MONITOR |
AV1 |
AV3 |
OUT |
IN |
IN |
DVD(Y•PB•PR) |
|
|
|
|
DVD(Y•PB•PR) |
S . VIDEO |
|
|
Y |
|
|
VIDEO |
|
Y |
AUDIO |
|
|
|
MONO |
MONO |
PB |
|
PB |
LEFT |
|
|
AUDIO |
|
|
RIGHT |
|
PR |
PR
How to connect the AV Monitor Output Terminals to other Equipment
The “Monitor Out” terminal output the same signals as main picture on the TV screen and sound from the speaker at that time. e.g. TV programmes or signals from AV1, AV2 or AV3 input.
Recording Equipment
(VHS VCR)
|
Audio |
|
|
|
Video |
||||||
|
R IN |
L |
|
|
|
IN |
|||||
|
|
|
|
|
|
|
|
|
|
|
|
|
|
|
|
|
|
|
|
|
|
|
|
|
|
|
|
|
|
|
|
|
|
|
|
|
|
|
|
|
|
|
|
|
|
|
|
VIDEO
AUDIO
MONITOR |
MONITOR |
AV1 |
AV3 |
OUT |
OUT |
IN |
IN |
|
|
|
DVD(Y•PB•PR) |
|
S . VIDEO |
|
|
|
VIDEO |
|
Y |
|
|
MONO |
MONO |
|
LEFT |
|
PB |
|
AUDIO |
|
|
|
RIGHT |
|
PR |
|
|
|
Note:
(1)Never connect the same video recorder with both the VIDEO IN and MONITOR OUT terminals on this TV set, as this could cause incorrect operation.
(2)The monitor output emits the main picture normal video and audio signals.
(3)Teletext display on screen will not be output at the MONITOR OUT terminals.
(4)The DVD signal (Y, PB, PR) is not output at the MONITOR out terminals.
(5)The DVD signal input terminal takes priority over the AV3 Video input terminal.
6

Location of Control (TV)
|
PRE. TV/AV – + |
AV 2 IN |
|
|
|
|
|
S-VIDEO VIDEO L/MONO – R – AUDIO |
|
|
|
|
PRE. TV/AV – + |
|
AV 2 IN |
|
|
|
|
S-VIDEO VIDEO L/MONO – |
R – AUDIO |
||
Preset |
TV / AV |
|
AV2 IN |
Headphones |
|
button |
Channel Up and |
||||
button |
|
|
|||
|
Volume Up and |
Down Buttons |
|
|
|
|
Down Buttons |
|
|
||
|
|
|
|
||
MONITOR |
AV1 |
AV3 |
OUT |
IN |
IN |
|
|
DVD(Y•PB•PR) |
S . VIDEO |
|
|
VIDEO |
|
Y |
|
MONO |
MONO |
LEFT |
|
PB |
AUDIO |
|
|
RIGHT |
|
PR |
Model Name Plate
Connecting Headphones
When a headphones plug is inserted into the Headphones socket all speakers will be automatically disconnected; only the Headphones will function.
AV 2 IN
S-VIDEO |
VIDEO |
L/MONO – |
R – AUDIO |
|
|
|
|
(Optional) (not supplied)
7

Flow Chart of Main Menu
When the "MAIN MENU" button is pushed at the main menu screen, the screen display will return to the normal viewing condition. When the "MAIN MENU" button is pushed at each MENU screen (Picture, Sound, Features, Language, Preset), the screen display will return to the Main Menu screen.
MAIN MENU
Push
Select
Symbol
Mark
On-Screen |
|
|
|
|
|
|
|
|
|
|
|
|
|
|
|
|
|
|
|
|
PICTURE |
|
|
|
SOUND |
|
|
|
FEATURES |
|
|
|
LANGUAGE |
|
|
|
PRESET |
|
|
Indication |
|
|
|
|
|
|
|
|
|
|
|
|
|
|
|||||
|
|
|
|
|
|
|
|
|
|
|
|
|
|
|
|
|
|
|
|
|
|
|
|
|
|
|
|
|
|
|
|
|
|
|
|
|
|
|
|
Push |
|
|
|
|
|
|
|
|
DYNAMIC |
SPEECH |
|
|
88 PRESET |
|
|
On-Screen |
32 |
COLOUR |
28 BASS |
PICTURE AI |
ON |
AUTO TUNE |
|
MANUAL TUNE |
|
||||||
|
|
|
|
|
|
||
Indication |
32 |
NTSC–TINT |
45 TREBLE |
BLUE BACK |
ON |
SOUND SYS |
5.5MHz |
|
|
32 BALANCE |
|
|
COLOUR SYS |
AUTO |
|
32 BRIGHT |
CH COLOUR SET |
STD |
FINE TUNE |
|
|||
(example) |
63 CONTRAST |
OFF BASS BOOST |
CHILD LOCK |
OFF |
SKIP |
OFF |
|
OFF LOUDNESS |
POS. CHANGE |
88 |
|||||
|
32 |
SHARPNESS |
VCR/GAME |
OFF |
GEOMAGNETIC |
8 |
|
|
OFF AVL |
|
|
||||
|
|
|
|
|
|
|
|
|
STD |
COLOUR TEMP |
|
|
|
|
|
|
|
|
|
|
|
88 PRESET |
|
|
|
|
|
|
|
AUTO TUNE |
|
|
|
|
SPEECH |
|
|
MANUAL TUNE |
|
|
|
|
|
|
SOUND SYS |
5.5MHz |
|
|
DYNAMIC |
28 BASS |
|
|
COLOUR SYS |
AUTO |
|
|
|
|
FINE TUNE |
|
|||
|
32 |
COLOUR |
45 TREBLE |
PICTURE AI |
ON |
SKIP |
OFF |
|
32 BALANCE |
POS. CHANGE |
88 |
||||
|
32 |
NTSC–TINT |
BLUE BACK |
ON |
GEOMAGNETIC |
8 |
|
|
OFF BASS BOOST |
||||||
|
|
|
|||||
|
32 |
BRIGHT |
CH COLOUR SET |
STD |
|
|
|
|
OFF LOUDNESS |
|
|
||||
|
|
|
CHILD LOCK |
OFF |
|
|
|
|
63 |
CONTRAST |
OFF AVL |
88 PRESET |
|
||
|
|
|
|
VCR/GAME |
OFF |
|
|
|
32 |
SHARPNESS |
|
AUTO TUNE |
|
||
|
STD |
COLOUR TEMP |
|
|
|
MANUAL TUNE |
|
|
|
|
|
SOUND SYS |
5.5MHz |
||
|
|
|
SPEECH |
|
|
COLOUR SYS |
AUTO |
|
|
|
|
|
FINE TUNE |
|
|
|
|
|
28 BASS |
|
|
SKIP |
OFF |
|
|
|
|
|
POS. CHANGE |
88 |
|
|
|
|
45 TREBLE |
|
|
||
|
DYNAMIC |
|
|
GEOMAGNETIC |
8 |
||
|
32 BALANCE |
|
|
|
|
||
|
32 |
COLOUR |
PICTURE AI |
ON |
|
|
|
|
OFF BASS BOOST |
|
|
||||
|
|
|
|
|
|
|
|
|
32 |
NTSC–TINT |
OFF LOUDNESS |
BLUE BACK |
ON |
88 PRESET |
|
|
|
|
OFF AVL |
CH COLOUR SET |
STD |
|
|
|
32 |
BRIGHT |
AUTO TUNE |
|
|||
|
|
|
|
CHILD LOCK |
OFF |
MANUAL TUNE |
|
|
63 |
CONTRAST |
|
SOUND SYS |
5.5MHz |
||
|
32 |
SHARPNESS |
|
VCR/GAME |
OFF |
COLOUR SYS |
AUTO |
|
|
FINE TUNE |
|
||||
|
STD |
COLOUR TEMP |
|
|
|
SKIP |
OFF |
|
SPEECH |
|
|
POS. CHANGE |
88 |
||
|
|
|
|
|
GEOMAGNETIC |
8 |
|
|
|
|
28 BASS |
|
|
||
|
|
|
|
|
|
|
|
|
|
|
45 TREBLE |
|
|
|
|
|
DYNAMIC |
32 BALANCE |
|
|
88 PRESET |
|
|
|
OFF BASS BOOST |
|
|
|
|||
|
|
|
|
|
AUTO TUNE |
|
|
|
32 |
COLOUR |
|
PICTURE AI |
ON |
|
|
|
OFF LOUDNESS |
MANUAL TUNE |
5.5MHz |
||||
|
32 |
NTSC–TINT |
OFF AVL |
BLUE BACK |
ON |
SOUND SYS |
|
|
COLOUR SYS |
AUTO |
|||||
|
32 |
BRIGHT |
|
CH COLOUR SET |
STD |
FINE TUNE |
|
|
|
SKIP |
OFF |
||||
|
|
|
|
|
|
||
|
63 |
CONTRAST |
|
CHILD LOCK |
OFF |
POS. CHANGE |
88 |
|
|
|
|
VCR/GAME |
OFF |
GEOMAGNETIC |
8 |
|
32 |
SHARPNESS |
SPEECH |
|
|
||
|
|
|
|
|
|||
|
STD |
COLOUR TEMP |
28 BASS |
|
|
|
|
|
|
|
45 TREBLE |
|
|
88 PRESET |
|
|
|
|
32 BALANCE |
|
|
|
|
|
|
|
|
|
AUTO TUNE |
|
|
|
|
|
OFF BASS BOOST |
|
|
MANUAL TUNE |
|
|
|
|
|
|
SOUND SYS |
5.5MHz |
|
|
DYNAMIC |
OFF LOUDNESS |
|
|
COLOUR SYS |
AUTO |
|
|
OFF AVL |
|
|
FINE TUNE |
OFF |
||
|
32 |
COLOUR |
|
|
SKIP |
||
|
|
PICTURE AI |
ON |
POS. CHANGE |
88 |
||
|
|
|
|
GEOMAGNETIC |
8 |
||
|
32 |
NTSC–TINT |
|
BLUE BACK |
ON |
||
|
|
|
|
||||
|
32 |
BRIGHT |
SPEECH |
CH COLOUR SET |
STD |
|
|
|
63 |
CONTRAST |
CHILD LOCK |
OFF |
|
|
|
|
28 BASS |
88 PRESET |
|
||||
|
32 |
SHARPNESS |
VCR/GAME |
OFF |
|
||
|
45 TREBLE |
AUTO TUNE |
|
||||
|
STD |
COLOUR TEMP |
|
|
MANUAL TUNE |
|
|
|
|
|
|
|
|||
|
32 BALANCE |
|
|
SOUND SYS |
5.5MHz |
||
|
|
|
OFF BASS BOOST |
|
|
COLOUR SYS |
AUTO |
|
|
|
|
|
FINE TUNE |
|
|
|
|
|
OFF LOUDNESS |
|
|
SKIP |
OFF |
|
|
|
OFF AVL |
|
|
POS. CHANGE |
88 |
|
DYNAMIC |
|
|
GEOMAGNETIC |
8 |
||
|
|
|
|
|
|
||
|
32 |
COLOUR |
|
|
|
|
|
|
32 |
NTSC–TINT |
|
|
|
88 PRESET |
|
|
32 |
BRIGHT |
|
|
|
AUTO TUNE |
|
|
|
|
|
MANUAL TUNE |
|
||
|
63 |
CONTRAST |
|
|
|
SOUND SYS |
5.5MHz |
|
|
|
|
COLOUR SYS |
AUTO |
||
|
|
|
|
|
|
||
|
32 |
SHARPNESS |
|
|
|
FINE TUNE |
OFF |
|
STD |
COLOUR TEMP |
|
|
|
SKIP |
|
|
|
|
|
POS. CHANGE |
88 |
||
|
|
|
|
|
|
GEOMAGNETIC |
8 |
8

General Operation
Panasonic
14
1
7
R-TUNE |
TV/AV |
6
|
1 |
2 |
3 |
2 |
|
3 |
4 |
5 |
6 |
||
|
|||||
|
|
||||
|
7 |
8 |
9 |
+ |
|
8 |
|
0 |
|
5 |
|
|
|
|
|||
|
|
|
|
4 |
|
|
|
VCR ⁄ LD ⁄ DVD |
|
||
11
10
16
VCR |
LD ⁄ DVD |
DISC SIDE |
|
|
A |
B |
|
||
MAIN MENU |
|
|
|
|
|
|
|
SKIP |
|
|
N |
|
|
12 |
PICTURE MENU |
|
SOUND MENU |
SKIP |
|
P. A |
|
SURROUND |
WAKE UP |
13 |
|
|
|
|
|
|
|
|
|
15 |
|
|
|
|
9 |
1. |
To Switch Power on/off |
The TV set must be switched on at the wall outlet and at the Main power switch.
Press this button to turn the TV set ON, from stand-by mode. Press it again to turn off.
Note:
When in the stand – by condition, it is possible to turn the TV set on by pushing the
Direct Programme Number Selection button (0-9) or the Programme Number up and
Down button.
2. |
Programme Number Selection |
3 |
|
Press the programme number Up |
2 |
|
1 |
|
|
" v" or down " v " Button to select |
|
|
|
|
|
the next higher or lower |
|
|
programme number. |
|
3. |
Direct Programme Number Selection |
1 |
|
|
|
|
(0 - 9) |
|
|
e. g. To select programme |
|
|
number "1", press the "1" |
|
|
button. |
|
4. |
Two Digit Programme Number Selection |
|
|
e.g. To select Programme Number "24". |
|
|
Push the |
button. |
|
Push the |
button. |
|
Push the |
button. |
– –
2 –
Setting range |
0 ~ 99 |
24 |
|
9

General Operation
5. |
|
|
|
|
|
Volume Adjustment |
|
|
|
|
|||
|
|
|
|
Push the Volume Up or Down button to increase or decrease the sound volume level.
+
–
 5
5


 – – – – – – – – – – –
Note :
The on screen display will indicate both numerically and graphically the volume level. Numeric levels start at " 0 " for zero or no sound, and will increase up to 63 which is the maximum sound level.
|
TV / AV Selection |
6. |
Push the " TV/AV " button to select TV, AV1, AV2 and AV3 input |
signal modes sequentially. |
TV/AV Note:
If a clear picture cannot be obtained or even when a AV signal is received, refer to the “Colour System Selection” operation on page 19.
AV 3
AV 2 |
AV 1 |
7 |
7. Sound Mute Button
Push this button to mute the Sound completely.
Push the button once again to restore the previous sound level, and cancel the mute.
The " Mute " symbol will appear.
o( Colour changes to Red )
 5
5


 – – – – – – – – – – –
8. Recall Button
Push the RECALL button to display the current system status.
Press this button until display is cancelled.
9. |
Off Timer Button |
The TV set may be preset to switch to stand-by after a fixed period.
By pressing "Off-Timer" button,
you can select the preset time either 30, 60, or 90 minutes.
30 |
60 |
90 |
0 AUTO
AUTO

1
 30
30
1
3
When the off-timer reaches its last 3 minutes, it starts blinking before going to stand-by condition.
Note :
Setting Off-timer to AUTO mode.If the set is not switched off, when the TV station ends broadcasting, it will automatically go to the stand-by condition after 5 minutes. This AUTO mode will not operate when the TV receiver is in AV mode.
How to cancel the OFF-timer setting:
1.Set the preset time condition to "0" mode by pressing the Off -timer button.
2.Turning the TV set off.
10
 Loading...