

Operating Instructions
Digital Audio Player
Model No.
SV-MP100V
SV-MP110V
•
Windows Media Player (Version 9.0) Free download from
http://www.microsoft.com/downloads/
• Supports playback of MP3 and WMA (DRM) music files
• Built-in microphone for voice recording
Built-in FM tuner with recording function
•
• Portable data storage device (Plugs in directly to your PC)
• Language learning with repetition and comparison.
• Total play list (MUSIC, FM RADIO, IC RECORDER) can contain
up to 383 tracks.
These tables show the mode menu items available in the MUSIC,
LEARN, FM RADIO, IC RECORDER and SYSTEM modes.
SV-MP120V
Dear Customer
Thank you for purchasing this product.
Before connecting, operating or adjusting this product, please read the instructions
completely. Please keep this manual for future reference.
Caution
This unit is not waterproof and should not be exposed to excessive moisture
GC GK
Matsushita Electric Industrial Co., Ltd.
Web site: http://www.panasonic.co.jp/global
En
RQTT0665-G
.
M0105SF0
MUSIC
Mode Options
SOUND
NORMAL/ ROCK/
JAZZ/ POP/ CLASSIC/
USER DEFINE
NORMAL/ ALL-REP/
PLAY
ONE-REP/ RANDOM
Information (Artist/
INFO.
File format/ Bit Rate)
SINGLE TRACK/
ERASE
PLAYLIST/ ALL ERASE
IC RECORDER
Mode Options
RECORD
SPEED
ERASE
HQ/ SP/ LP
LOW-NOR
SINGLE TRACK/
ALL VOICE
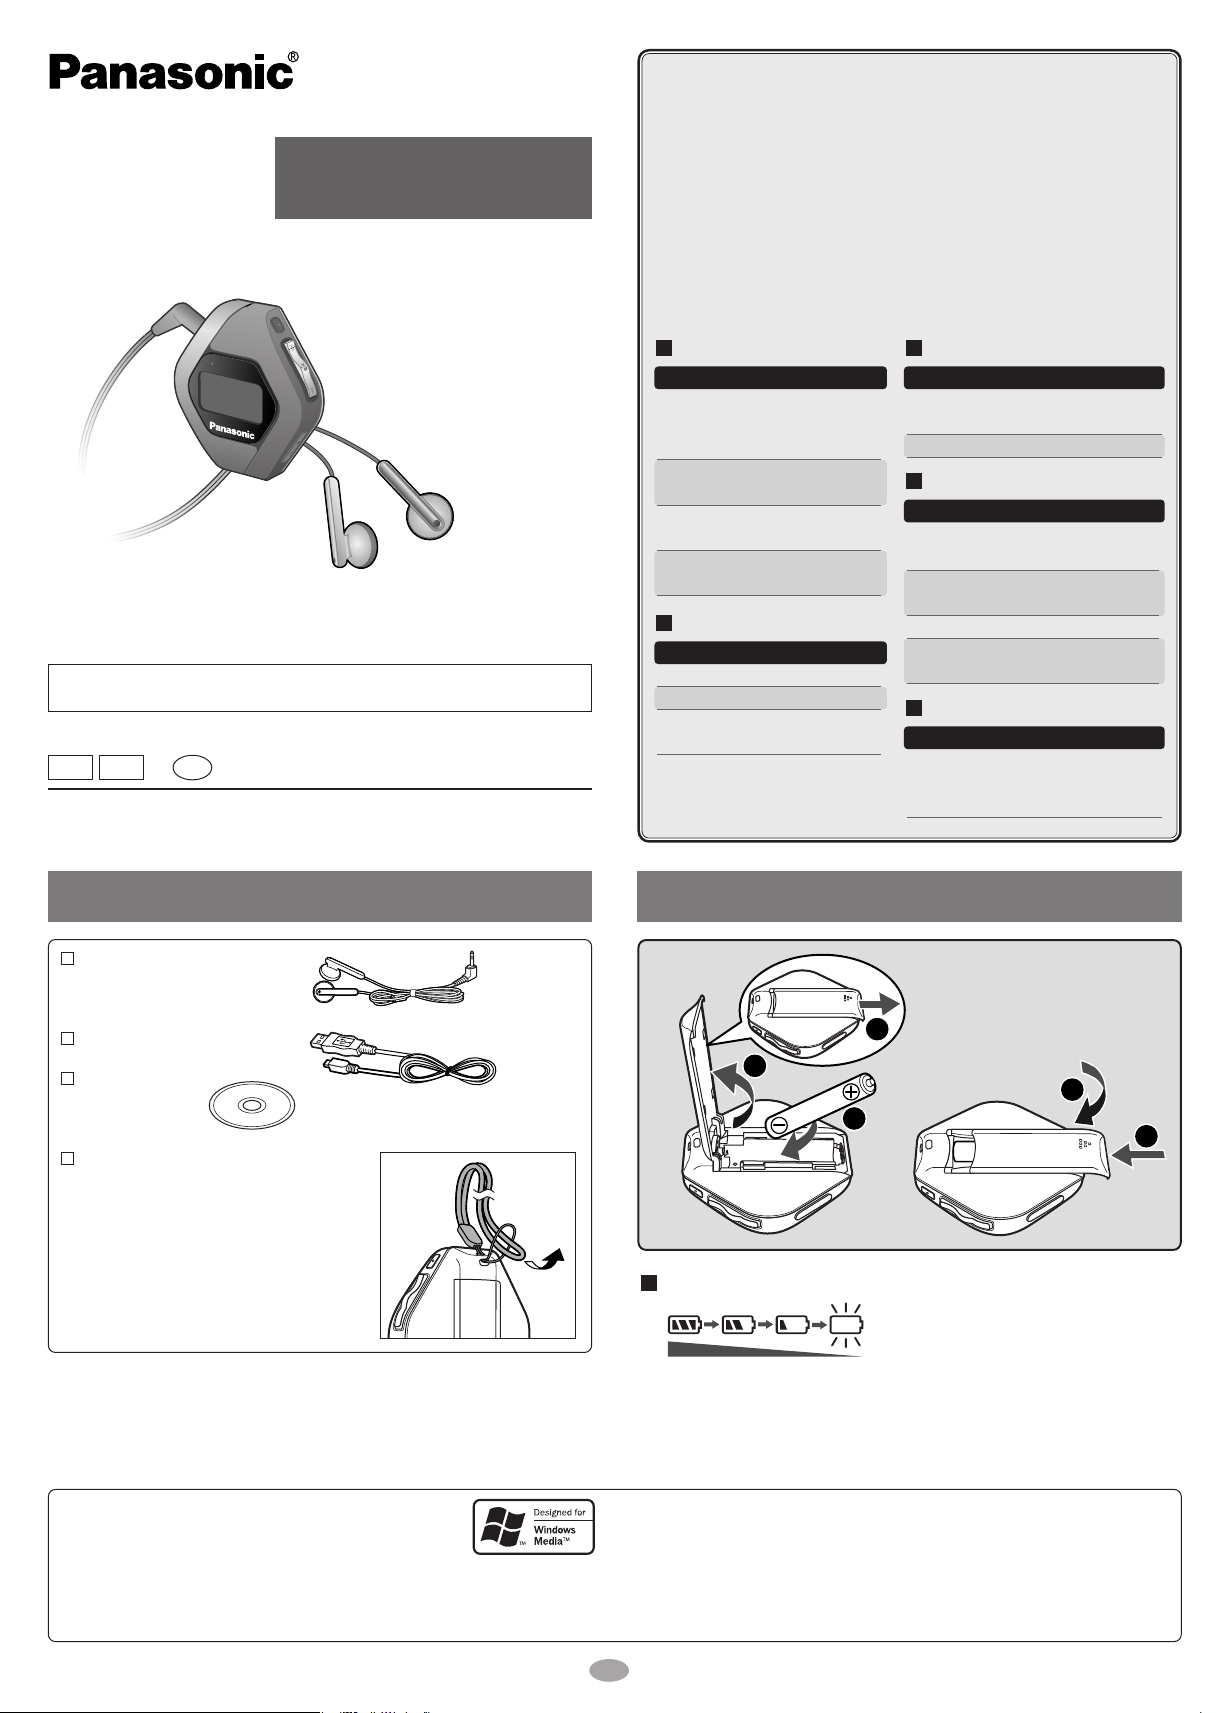
Supplied accessories Battery (not included)
FM RADIO
Mode Options
AUTO
PRESET
BAND STEP
Freq. set/ Channel set
50 kHz/ 100 kHz/ 200 kHz
LEARN
Mode Options
NORMAL/ ALL-REP/
PLAY
ONE-REP
REPEAT
SPEED
ERASE
TIME/ TRACE/ T.TIME
SET
LOW-NOR
SINGLE TRACK/
PLAYLIST/ ALL ERASE
SYSTEM
Mode
LANGUAGE/ AUTO OFF/
BACKLIGHT/ CONTRAST/
SOUND GRAPHIC/ SLEEP TIME
Pair of stereo earphones
—1pc
USB Cable —1pc
CD-ROM —1pc
Neck lanyard —1pc
Caution: Take care when using the neck
lanyard. If used improperly, it
can be a choking hazard.
• Microsoft, the Microsoft logo, the Windows, Windows
logo, Windows NT and Windows Media are either
trademarks or registered trademarks of Microsoft
Corporation in the United States and other countries.
• WMA is a compression format developed by Microsoft Corporation. It achieves the
same sound quality as MP3 with a file size that is smaller than that of MP3.
1
2
1 alkaline battery
(LR03, AAA)
4
3
5
Battery indicator
If rechargeable batteries are to be used,
rechargeable batteries manufactured by
Full Empty
Replace with
a fresh battery
• MPEG Layer-3 audio decoding technology licensed from Fraunhofer IIS and
Thomson multimedia.
• Other names of systems and products mentioned in these instructions are usually
the registered trademarks or trademarks of the manufacturers who developed the
system or product concerned.
The ™ and ® marks are not used to identify registered trademarks and trademarks
in these instructions.
Panasonic are recommended.
1
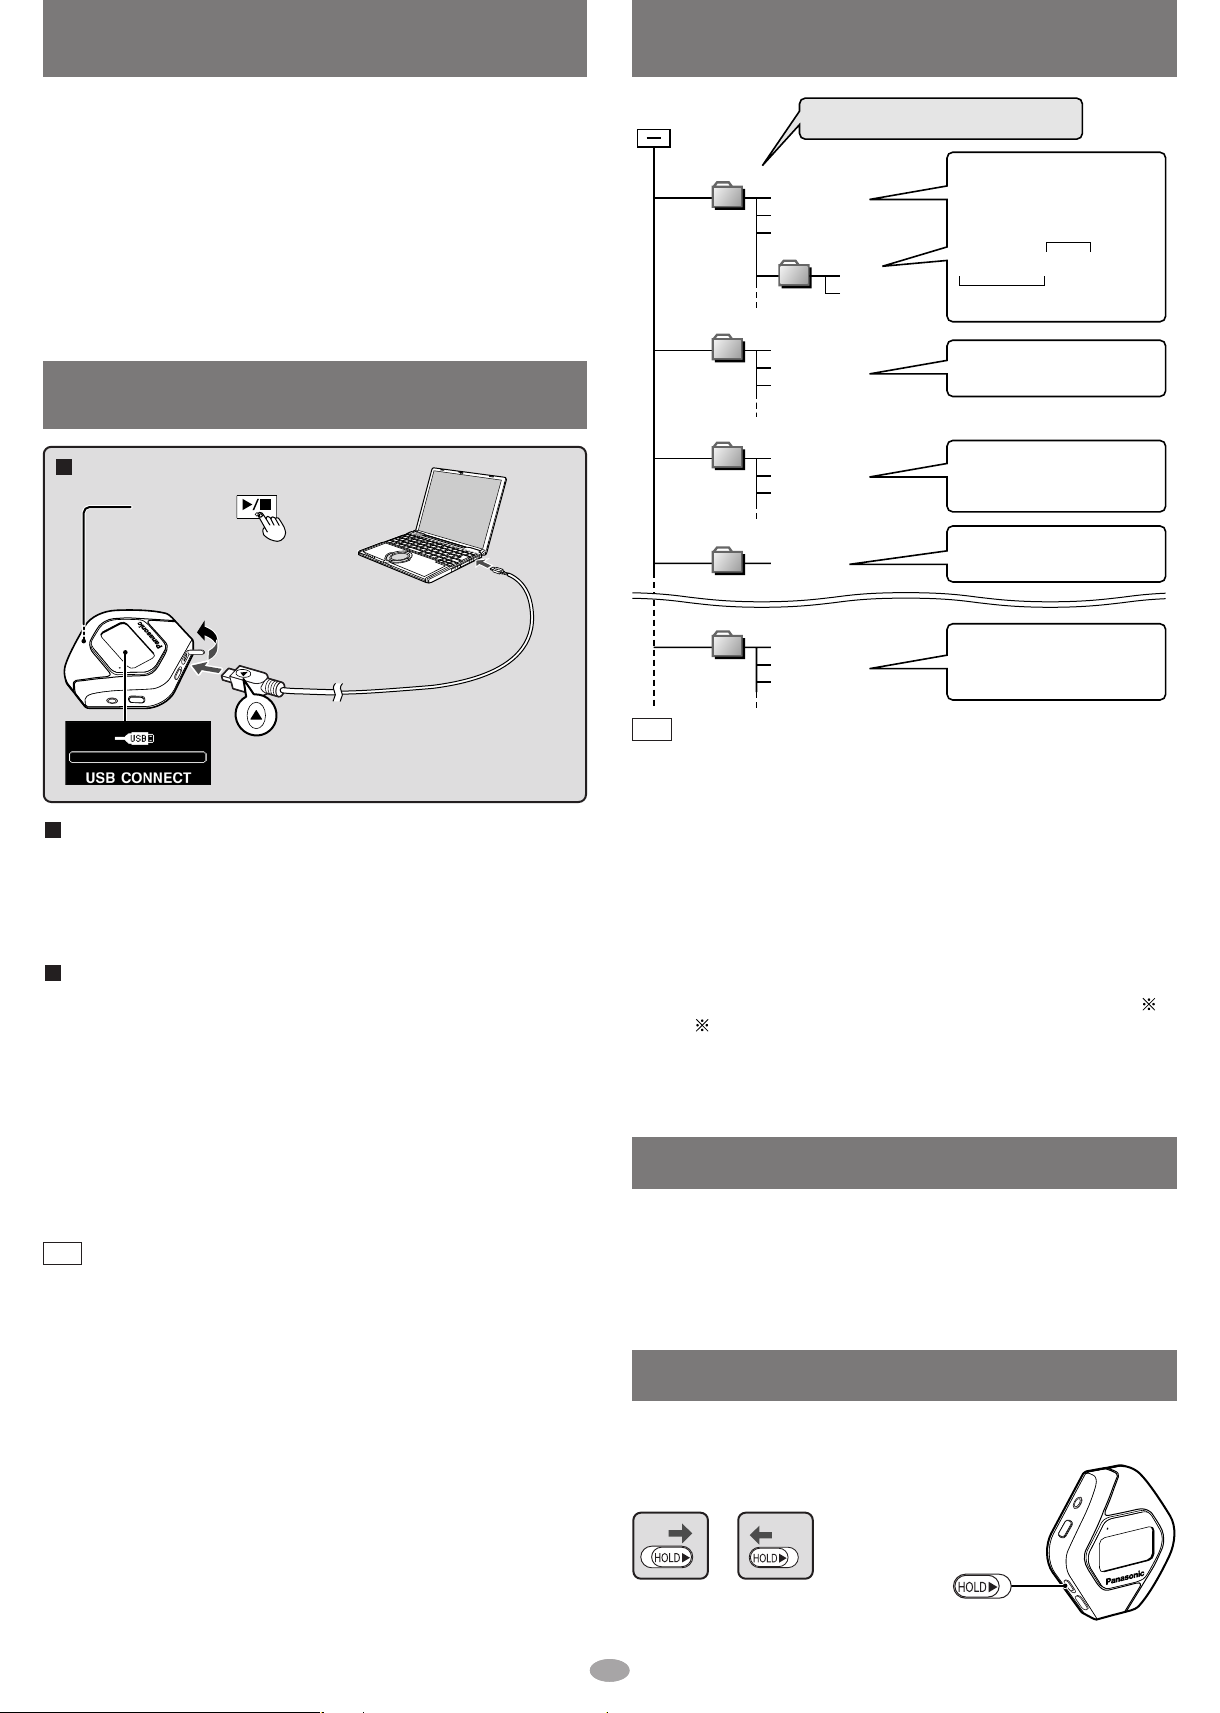
Removable disk or
device (this unit)
• Naming files and folders
PLAYER
001track.mp3
002track.mp3
005track.wma
004track.mp3
003track.wma
album
FM RADIO
Tuner001.wav
Tuner002.wav
Tuner003.wav
Folder and files will play in the
order in which they are
downloaded.
Make folders like this when
saving files other than MP3,
WMA, and WAV.
aaatrack.mp3 (or .MP3)
bbbtrack.wma (
or .WMA
)
Extension
alphanumeric
character
• Data storage
Files are created and saved
automatically when you
record FM RADIO.
TEMP
Temp.wav
Temporary file for LEARN.
Do not put any files in this
folder.
Copy and paste or drag and drop
MP3/WMA files into the PLAYER folder.
IC RECORDER
Voice001.wav
Voice002.wav
Voice003.wav
Files are created and saved
automatically when you
record using the
IC RECORDER.
××××
×××
001.xxx
×××002.xxx
×××003.xxx
System Requirements
Files and Folders Structure display on your computer
OS: Microsoft®Windows®98SE, Windows®Me,
Windows
Drive: CD-ROM Drive
• The player and USB Driver cannot be used on Microsoft
Windows
USB Driver:
• Operation on an upgraded OS is not guaranteed.
• Operation on an OS other than the one pre-installed is not guaranteed.
• Multi-CPU or Multi-boot environments are not supported.
• Only users having system administrator (Administrator) authority can use
this software.
®
2000 Professional, Windows®XP Home Edition/Professional
®
®
95, Windows® 98, Windows NT®and Macintosh®.
Windows®3.1,
Connecting to a computer and
downloading files
Connection
Press
1
and hold
Turn the unit on.
(Wait until MODE
select display appears.)
2
Small end to
player, large
end to PC
4
To USB
port
Insert so the arrow is
3
facing upwards.
After connection
• Windows®ME, 2000, or XP: The computer automatically finds and installs
®
• Windows
The player appears in My Computer or Explorer as a removable disk or device.
98SE: Put the included CD-ROM in your disk drive, then follow the
instructions on the computer screen to install the driver.
the driver for the player.
Downloading MP3 and WMA
1. In My Computer or Explorer, open the player’s folder (removable disk
or device).
2. Open the PLAYER folder.
3. Copy and paste or drag and drop the MP3/WMA files from your
computer’s folder into the PLAYER folder.
• “DOWNLOAD” appears on the player’s display. When downloading is
completed, “USB CONNECT” re-appears.
4. Disconnect the USB cable if instructed to do so in the PC’s operating
instructions.
• You can first put files into a new folder and then put that folder into the
PLAYER folder. The folders are treated as sublists by the player and the
names appear when you select play lists.
Note
• The first 20 characters of a file name you create on a computer are
displayed on this unit.
• There are some characters which cannot be displayed due to an
embedded font data limitation.
• Supports MP3 ID3 V1 tags, ID3 V2 tags and WMA tags.
• If there are no ID3 tags, the display shows the “filename.mp3”.
• You cannot play MP3/WMA files that are in the player through the
computer.
• Ensure the USB cable is kept as straight as possible. Bending it too
much may cause an accident.
Operation cannot be guaranteed if you use a USB hub or extension cable.
•
• ID3 tags will not be displayed correctly if the language of the ID3
tag recorded for the MP3 is different from the language setting for
this unit.
• Compatible with WMA (DRM).
• The player will turn off when downloading is completed.
Note
• Total maximum 383 tracks. Total maximum 20 folders.
• MP3 / WMA Files put into folders other than the PLAYER folder are
erased when you disconnect the USB cable.
• You cannot upload MP3/WMA files from this unit's PLAYER folder
to a computer, but you can erase them.
• Do not remove the battery while recording with the IC RECORDER or
FM RADIO as all the data you were recording at the time will be lost.
• Using the IC RECORDER as an example, assume the number of
recordings has been made up to Voice100. If you delete Voice005
and Voice016, both of these become blank numbers. If you then
add a recording it will become Voice005 and the next recording will
become Voice016.
• This unit is compatible with Windows Media Audio 9 (WMA9),
however not with WMA9 Professional/Lossless/Voice and MBR
Multiple Bit Rate: A file that contains the same content encoded at
several different bit rates.
• If you use VBR format MP3 files, some of the unit’s functions can
not be operated normally.
.
Saving Data
• The data recorded using this unit’s IC RECORDER or FM RADIO can be
uploaded to a PC.
• MP3 and WMA files in this unit can’t be uploaded to a PC.
• You can use this unit as a removable disk for saving PC data by
connecting the USB cable to a PC. (→ left)
HOLD switch
Button operations are ignored. It prevents:
• The unit turning on unexpectedly causing the
battery to run down.
• Interruptions to play or recording.
HOLD ON
22
Release
(before operation)

Location of Controls Displays
Microphone
Earphones jack
(3.5 mm stereo)
–MODE
Operation
lamp
HOLD switch
USB port
Display
(→below)
The operation lamp
lights when using a
low-power consumption
display (→below).
REC/STOP
Skip/Search
Turn on, off
(Press and hold)/
Play/Stop
Battery lid
Volume
(back)
Display Example: MUSIC
MUSIC mode
(→page 4)
IC RECORDER
mode
(→page 5)
SYSTEM mode (→page 6)
LEARN mode (→page 4)
FM RADIO mode
(→page 5)
Low-power consumption display
• Power consumption is reduced by dimming the brightness of the display's back
light. You can set the time until the display changes to a low-power consumption
one. (→page 6 “SYSTEM, BACKLIGHT”)
• Press any key on the unit to cancel the low-power consumption display. When the
back light lights, perform the next operation.
Specifications
Memory size:
Supported sampling frequency:
Supported bit-rates:
No. of channels:
Frequency response:
Mic S/N:
Radio Frequency range (FM):
Output:
Power supply:
Approximate play times:
Approximate recording times:
Cabinet dimensions (W××H××D):
Mass:
• Specifications are subject to change without notice.
• The play time shown depends on operating conditions.
• Mass and dimensions are approximate.
• MB means one million bytes. Useable capacity will be less.
• This product is compatible with the following character code. The display may not
appear correctly with other character codes.
Language
ENGLISH
SV-MP100V: 128 MB
SV-MP110V: 256 MB
SV-MP120V: 512 MB
MP3 32 kHz, 44.1 kHz, and 48 kHz
WMA 8 kHz to 44.1 kHz
MP3 8 kbps to 320 kbps (128 kbps is recommend)
WMA 32 kbps to 192 kbps (96 kbps is recommend)
Stereo, 2 channels (MUSIC, FM RADIO)
Mono, 1 channel (IC RECORDER)
20 Hz to 20,000 Hz (+0 dB, -6 dB) (MUSIC)
300 Hz to 4,300 Hz (
30 dB (IC RECORDER, HQ mode)
87.90 MHz to 107.90 MHz (200 kHz steps)
87.50 MHz to 108.00 MHz (50/100 kHz steps)
4.5 mW + 4.5 mW (16 Ω, M3 jack)
DC 1.5 V (one alkaline battery)
13 hours (MUSIC)
7 hours (FM RADIO)
13 hours (IC RECORDER, HQ mode)
7 hours (FM RADIO)
53.2 ×61.1 ×17.5 mm
41.7 with battery
30.4 without battery
Display
ENGLISH
TRADITION
SIMPLE
JAPANESE
KOREAN
RUSSIAN
IC RECORDER, HQ mode
Character code
Unicode
Unicode Big5
Unicode GB2312
Unicode JIS X0208
Unicode CP949
Unicode Windows 1251
)
NO TRACK PLAY
LOW BATTERY
HOLD
FULL MEMORY
TRACK OVER
• There is no audio data in the player.
• The battery is dead. Change the battery.
• The HOLD switch is on.
• Memory is full.
• You have tried to record more than 383 tracks into
a play list.
Troubleshooting guide
Before requesting service, make the following checks. If you are in doubt
about any of the check points, or if the solutions indicated in the chart do
not solve the problem, consult your dealer.
No operation
• The HOLD function is on.
• Replace the battery if it is dead.
• Ensure the earphone plug is inserted firmly.
No sound or there is a
lot of noise
Play doesn’t resume
from the track where I
stopped play
• Wipe the plug clean with a clean cloth.
• Turn up the volume.
• Keep this unit away from mobile telephones.
• This doesn’t work if:
You download, record, delete files, or change
the battery.
The random play mode is on.
• The random play mode may be on.
Play doesn’t start
from the first track
• Play usually resumes from the track where you
last stopped play. Use skip to return to the first
track.
• Take the battery out for about 5 seconds, then
reinsert it.
• RESET procedure
1. Slide the HOLD switch to ON.
The unit stops working
2. Turn the unit on.
3. Press 3 times.
4. Press .
All the memories in the unit are deleted.
The display is too dark
or too light
Play doesn't start
immediately
• Adjust the contrast. (→page 6)
• Depending on the amount of data in the unit, it
may take some time for play to start after
downloading / recording or changing the battery.
Care and use
• Leave some slack in the cord of the earphones and the neck lanyard if you wind
them around the unit.
Do not;
• disassemble, remodel, drop, or allow the unit to get wet.
• use or store in locations directly exposed to sunlight, corrosive gases, a heat vent, or
a heating appliance.
• use or store in humid or dusty locations.
• use force to open the battery lid.
• play your headphones or earphones at a high volume.
Batteries
•
Do not peel off the covering on batteries and do not use if the covering has been peeled off.
• Align the poles + and - correctly when inserting batteries.
• Remove batteries if you do not intend to use the unit for a long time.
• Do not throw into fire, short-circuit, disassemble, or subject to excessive heat.
• Keep out of the reach of small children.
Accidental swallowing of batteries can result in stomach and intestinal damage.
Allergies
Discontinue use if you experience discomfort with the earphones or any other parts that
directly contact your skin. Continued use may cause rashes or other allergic reactions.
This product may receive radio interference caused by mobile telephones during
use. If such interference is apparent, please increase separation between the
product and the mobile telephone.
Maintenance
Clean with a soft, dry cloth.
Do not use any type of abrasive pad, scouring powder or solvent such as alcohol or benzine.
Caution:
• Use only the provided shielded interface cables when connecting to computer.
• To reduce risk of radio interference caused by headphone, earphone or
microphone cable, only purchase accessories with cable length less than 3 m.
3
Playing tracks (MUSIC mode)
model
recording
Repetition
(6 seconds × 3 times)
Do each step within 10 seconds
Preparation: Download (→page 2) or record tracks (→page 5)
LR
Release
(before
operation)
Turn the unit on.
1
Press
and hold
The unit will highlight the mode last used.
Select MUSIC.
2
Skip this step if MUSIC is already selected.
Press
or
Adjust the volume
Setting mode
Other modes
3
Press or
(0-25)
Press and hold
VOL
Skip
1 to 4
Press
Select the play list.
3
• To play recordings, select an FM RADIO play list.
Press Press
Press Press Press
or or
Start play.
4
Press
Play stops at the end of the list.
forwardbackward forwardbackward
Search
During play,
press and hold
Track number
Off
Playlist title
Track title
Play time
Press and hold
A-B repeat
Play repeats
between the two
points.
Press at the start point
(A) and once more at the end
point (B)
Press to cancel.
Stop
Using the language learner (LEARN mode)
Preparation: Download the language learning model recording.
Select LEARN and use Play, Skip, Search, Stop, Resume, Off and change modes as you would in the MUSIC mode. (→ above)
Repeating and listening to model recordings (TRACE BACK)
Repeat and listen to the specified trace back segment.
Turn on the TRACE BACK function. (→ page 6, “LEARN, REPEAT SET”).
1
During play,
2
Listen to the model recording.
3
Play goes back 6 seconds and repeats 3 times.
The number of times to repeat and the trace back time can be changed.
(→ page 6, “LEARN, REPEAT SET”)
press .
Press
Press
Resume When you next press ,
play resumes from where you
stopped it.
Comparing model recordings and your voice (COMPARE)
You can continuously play and compare pronunciation of the model
recording with your recorded voice.
Start play.
1
Press .
2
When "RECORDING" appears,
3
speak into the microphone.
POWER
SAVE
The power automatically turns off
after about 15 seconds of inactivity.
• This time period can be adjusted.
(→page 6, “SYSTEM, AUTO OFF”)
Do each step within 10 seconds
xxxx
Microphone
REC/STOP
Press .
4
When "PLAYING" appears, listen to the model recording and your
5
recorded voice.
Both play continuously
3 times. The number of
times it is repeated can
be changed. (→ page 6
“LEARN, REPEAT
SET”)
Note
• During TRACE BACK and A-B repeat function, if you press , the
COMPARE function will not work.
4
model recording
AB
Repetition (3 times)
your voice
or or
LR
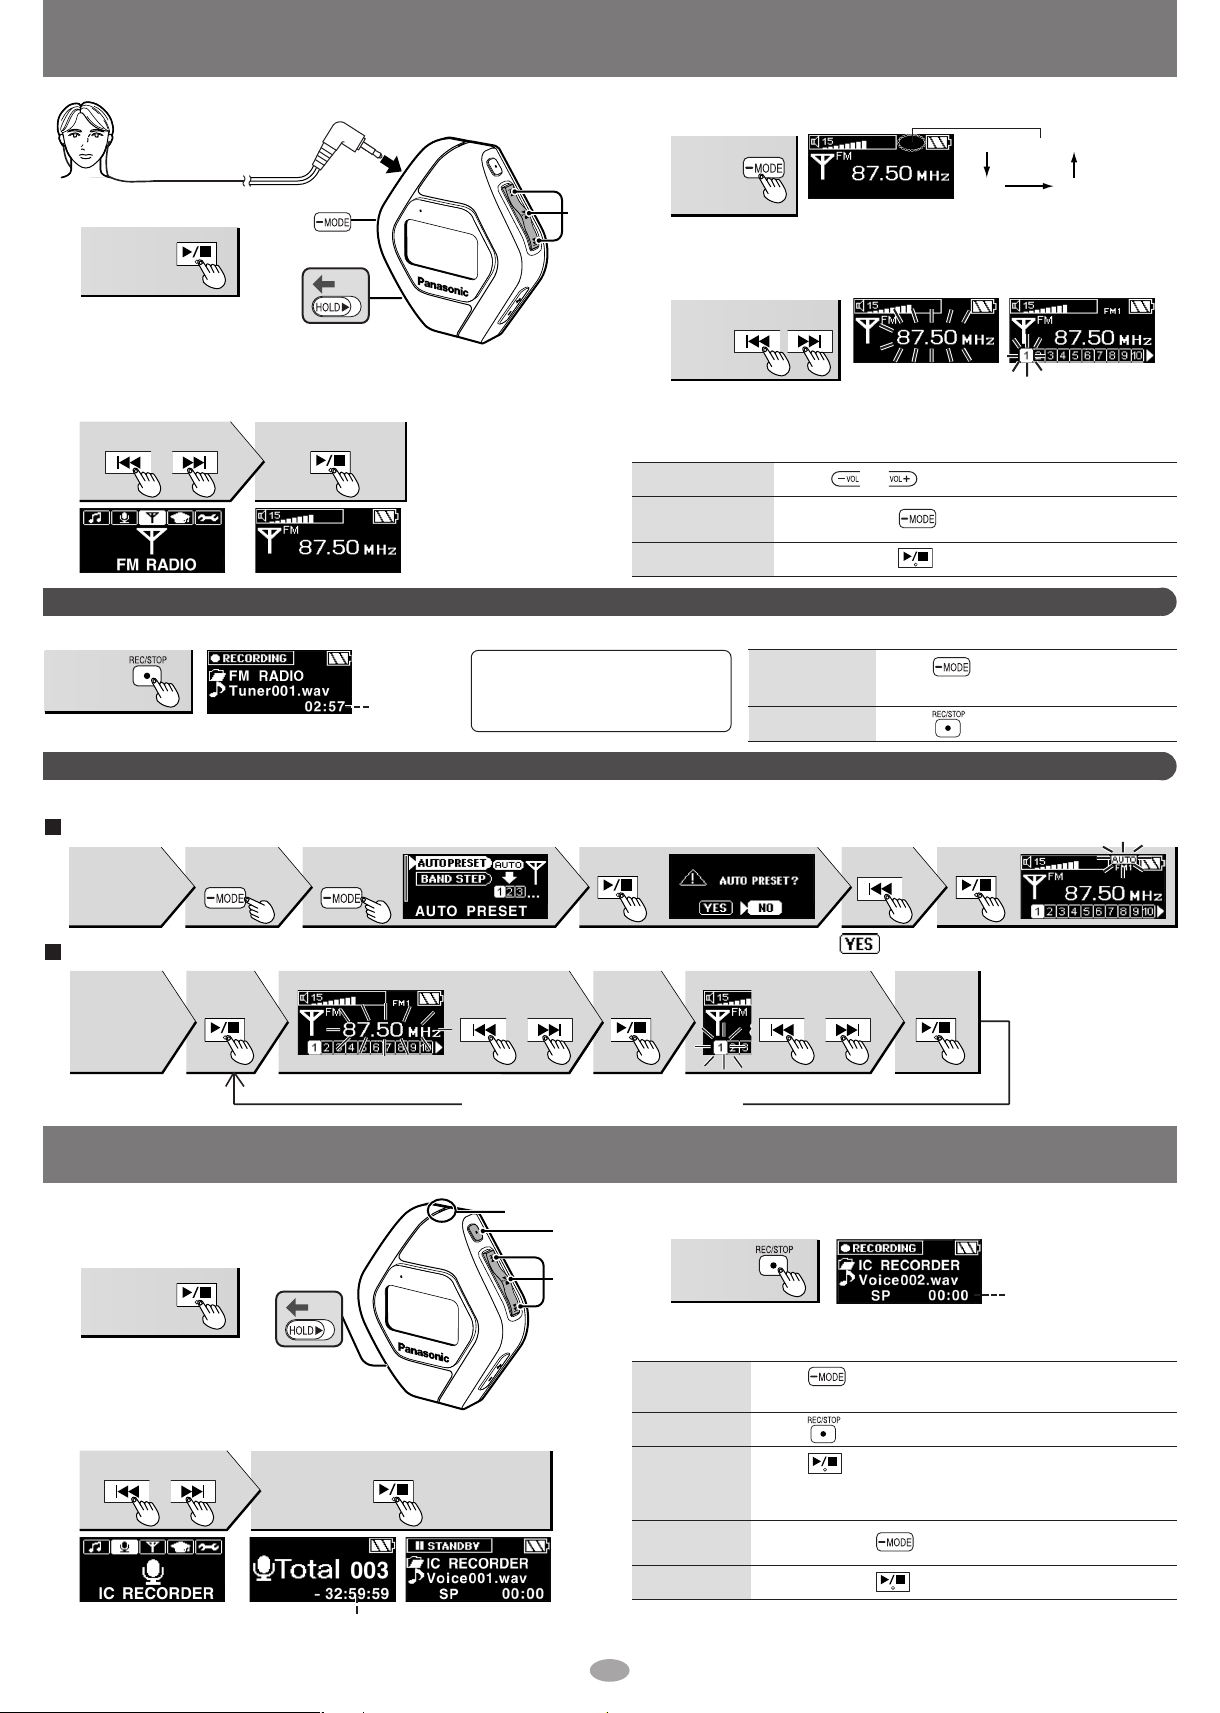
Using the FM radio (FM RADIO mode)
UPDOWN
FM1 FM2
Manual (No display)
or
or
Do each step within 10 seconds
As the cord of the earphones
acts the FM antenna, extend
it as far as possible rather
than leaving it coiled.
Turn the unit on.
1
Press
and hold
The unit will highlight
the mode last used.
Select FM RADIO.
2
Skip this step if FM RADIO is already selected.
Press Press
Release
(before operation)
Recording the radio
While listening to the station.
Press
3
Recording time
(Available time
→ Right)
Select manual or preset mode.
3
Press
1,2,
4
Select the station.
4
Press
•
In the manual mode, press and hold until the frequency starts scrolling
to start automatic tuning. Tuning stops when a station is found.
• The tuning band steps can be changed (BAND STEP →page 6)
Adjust the volume
Setting mode
Other modes
Off
To play the recording
Select MUSIC mode, then select
the FM RADIO play list. (→page 4)
Press or (0-25)
Press and hold
Press and hold
Show available
time
Stop
Press .
Press again to show the recording time.
Press .
Each time you press
• FM1, FM2 : This needs to be
preset beforehand.
→
(
below “Presetting stations”
manual FM1 or FM2
)
Presetting stations (FM1, FM2)
FM1: 20 stations can be stored. FM2: 10 stations can be stored.
AUTO
Select FM1
or FM2 by
step3.
Press and
hold
MANUAL
Select FM1
or FM2 by
step3.
Press Press
Voice recording (IC RECORDER mode)
Turn the unit on.
1
Press
and hold
The unit will highlight
the mode last used.
Select IC RECORDER.
2
Skip this step if IC RECORDER is already selected.
Press Press
Release
(before
operation)
Available time
•
“NO TRACK PLAY”
appears on the display
if there is no wave file.
PressPress Press Press
Select the
frequency.
Repeat as many times as is required.
Microphone
3
1,2
Start recording.
3
Press
Speak into the microphone.
4
Show
available time
Stop recording
To play
recorded
tracks
Setting mode
Other modes
Off
• Skip and Search method is the same as MUSIC mode.
• The unit will turn off if left in standby mode for more than 5 minutes.
5
Select .
Select the
channel.
Press .
Press again to show the recording time.
Press .
Press
After all recorded tracks are played the unit returns to standby
During play, press again to stop and return to standby.
Press and hold
Press and hold
Press
Exit the mode menu.
Do each step within 10 seconds
AUTO PRESET will
start. The radio
screen automatically
returns when AUTO
PRESET is finished.
Recording time
(Available time → below)
.

Setting mode
You can set various items in each mode.
1. Select MODE 3. Select the desired item 4. Set 5. Confirm2. Settings for selected
mode displayed.
Press and
hold
Press Press Press Press PressPress Press
Press and
hold
Do each step within 10 seconds
or oror
Example
: PLAY MODE
(MUSIC)
MUSIC LEARN
(→page 4, MUSIC mode, step 3
1
2
3
PLAYLIST
5
4
•
This step is not
necessary with SYSTEM.
41
PLAY MODE
)
SOUND MODE PLAY MODE
NORMAL: Normal play
All tracks repeat in a list
repeat in a list.
INFO. MODE
ERASE MODE
5
(YES) and press .
SPEED MODE
ERASE MODE
NORMAL: No change in sound
Switching
:
REMASTER on/off
is possible
ROCK: Adds impact
JAZZ: Adds club-like
atmosphere
POP: Clarifies the treble
range
:
CLASSIC
USER DEFINE:
2
IC RECORDER
Adds concert hall-like
atmosphere
Adjust BASS and
TREBLE between
-12dB and +12dB
REMASTER (Digital Re-master)
:
You can regenerate signal
frequency lost during
compression, restoring the sound
to near pre-compression form.
Press and then press
, to set on/off.
ON: Sound enhanced
OFF: Conserves battery life
→
RECORD MODE
The record
mode
[
Recording time guide (in hours)
(Maximum hours available
when player is empty of files.)
Mode
HQ
SP
LP
SV-MP
100V
3
6
9
SV-MP
110V
6
12
18
SV-MP
120V
ALL-REP:
ONE-REP: 1 track repeat
RANDOM: All tracks random
below
Show artist and data information
Erasing
• When selecting ALL, press
The play speed (Low-Normal)
]
(Same method as MUSIC)
• There is no PLAYLIST.
12
24
36
PLAYLIST
(→page 4, MUSIC mode, step 3)
(Same method as MUSIC)
However no RANDOM setting.
REPEAT SET
TIME:
Number of times to repeat
TRACE :
T.TIME:
Repeat and listen to the
specified trace back segment.
Play repeats between the two points.
TRACE / A-B repeat
Number of seconds to trace
TRACE
A-B repeat
SYSTEM
LANGUAGE
Changing the language in
which track and play list titles
are displayed
English, Chinese Tradition,
Chinese Simple, Japanese,
Korean, Russian
AUTO OFF
Setting the elapsed time before
the power automatically turns
off due to inactivity
BACKLIGHT
Setting the duration the display
will light when a button is pressed
• Press and hold
to cancel the
setting.
SPEED MODE
(Same method as IC
RECORDER)
ERASE MODE
(Same method as MUSIC)
CONTRAST
Adjusting the screen contrast
SOUND GRAPHIC
Selecting the display graphic
mode
SLEEP TIME
Setting the time the unit will
automatically turn off
• The display will show “.zZ”
when SLEEP is selected.
3
FM RADIO
AUTO PRESET
(→page 5, FM RADIO mode,
Presetting stations)
BAND STEP
The tuning band step
Converting the steps erases all
preset stations.
RQTT0665RQTT0665
6
 Loading...