

SD Media Storage
Operating Instructions
Model No. SV-PT1EB
Before attempting to connect, operate or adjust this product, please read
these instructions thoroughly.
Eng.p1-5.p65 2003/02/13, 16:471
LSQT0623A

Information For Your Safety
Dear Customer,
We would like to take this opportunity to
thank you for purchasing this Panasonic
SD Media Storage. Please read these
Operating Instructions carefully and keep
them handy for future reference.
Information for
Your Safety
WARNING
TO REDUCE THE RISK OF FIRE OR
SHOCK HAZARD AND ANNOYING
INTERFERENCE, USE ONLY THE
RECOMMENDED ACCESSORIES
AND DO NOT EXPOSE THIS
EQUIPMENT TO RAIN OR MOISTURE.
DO NOT REMOVE THE COVER (OR
BACK); THERE ARE NO USER
SERVICEABLE PARTS INSIDE.
REFER SERVICING TO QUALIFIED
SERVICE PERSONNEL.
Carefully observe copyright laws.
Recording of pre-recorded tapes or
discs or other published or broadcast
material for purposes other than your
own private use may infringe
copyright laws. Even for the purpose
of private use, recording of certain
material may be restricted.
CAUTION
Danger of explosion if battery is
incorrectly replaced.
Replace only with the same or
equivalent type recommended by the
manufacturer.
Dispose of used batteries according to
the manufacturer’s instructions.
THE SOCKET OUTLET SHOULD BE
INSTALLED NEAR THE EQUIPMENT
AND SHOULD BE EASILY
ACCESSIBLE.
• Only use the supplied USB
cable and Video cable.
• Do not open and close the
HDD door or remove the
card while HDD or SD is
operating.
• Do not turn this unit upside
down when in operation.
• Please note that the actual controls and
components, menu items, etc. of your
SD Media Storage may look somewhat
different from those shown in the
illustrations in these Operating
Instructions.
• Other names, company names, and
product names printed in these
instructions are trademarks or
registered trademarks of the companies
concerned.
2
Eng.p1-5.p65 2003/02/13, 16:472
Information For Your Safety
As this equipment gets hot during use,
operate it in well ventilated place; do not
install this equipment in a confined space
such as a bookcase or similar unit.
To reduce the risk of fire, electric shock
or product damage, do not expose this
equipment to rain, moisture, dripping or
splashing and ensure that no objects
filled with liquids, such as vases, shall be
placed on the equipment.
SD Media Storage
• The rating plate is on the underside
of the SD Media Storage.
AC Adaptor
• The rating plate is on the underside
of the AC Adaptor.
Caution for AC mains lead
For your safety, please read the
following text carefully.
This appliance is supplied with a
moulded three-pin mains plug for your
safety and convenience. A 5-ampere
fuse is fitted in this plug.
Should the fuse need to be replaced
please ensure that the replacement
fuse has a rating of 5-amperes and it is
approved by ASTA or BSI to BS1362.
Check for the ASTA mark or the
BSI mark on the body of the fuse.
If the plug contains a removable fuse
cover you must ensure that it is refitted
when the fuse is replaced. If you lose
the fuse cover, the plug must not be
used until a replacement cover is
obtained. A replacement fuse cover
can be purchased from your local
Panasonic Dealer.
IF THE FITTED MOULDED PLUG IS
UNSUITABLE FOR THE SOCKET
OUTLET IN YOUR HOME THEN THE
FUSE SHOULD BE REMOVED AND
THE PLUG CUT OFF AND DISPOSED
OF SAFELY.
THERE IS A DANGER OF SEVERE
ELECTRICAL SHOCK IF THE CUT
OFF PLUG IS INSERTED INTO ANY
13-AMPERE SOCKET.
If a new plug is to be fitted please
observe the wiring code as shown
below.
If in any doubt, please consult a
qualified electrician.
■■
■ IMPORTANT
■■
The wires in this mains lead are
coloured in accordance with the
following code:
Blue: Neutral
Brown: Live
As the colours of the wires in the
mains lead of this appliance may not
correspond with the coloured markings
identifying the terminals in your plug,
proceed as follows:
The wire which is coloured BLUE must
be connected to the terminal in the
plug which is marked with the letter N
or coloured BLACK.
The wire which is coloured BROWN
must be connected to the terminal in
the plug which is marked with the letter
L or coloured RED.
Under no circumstances should either
of these wires be connected to the
earth terminal of the three-pin plug,
marked with the letter E or the Earth
symbol .
■ ■
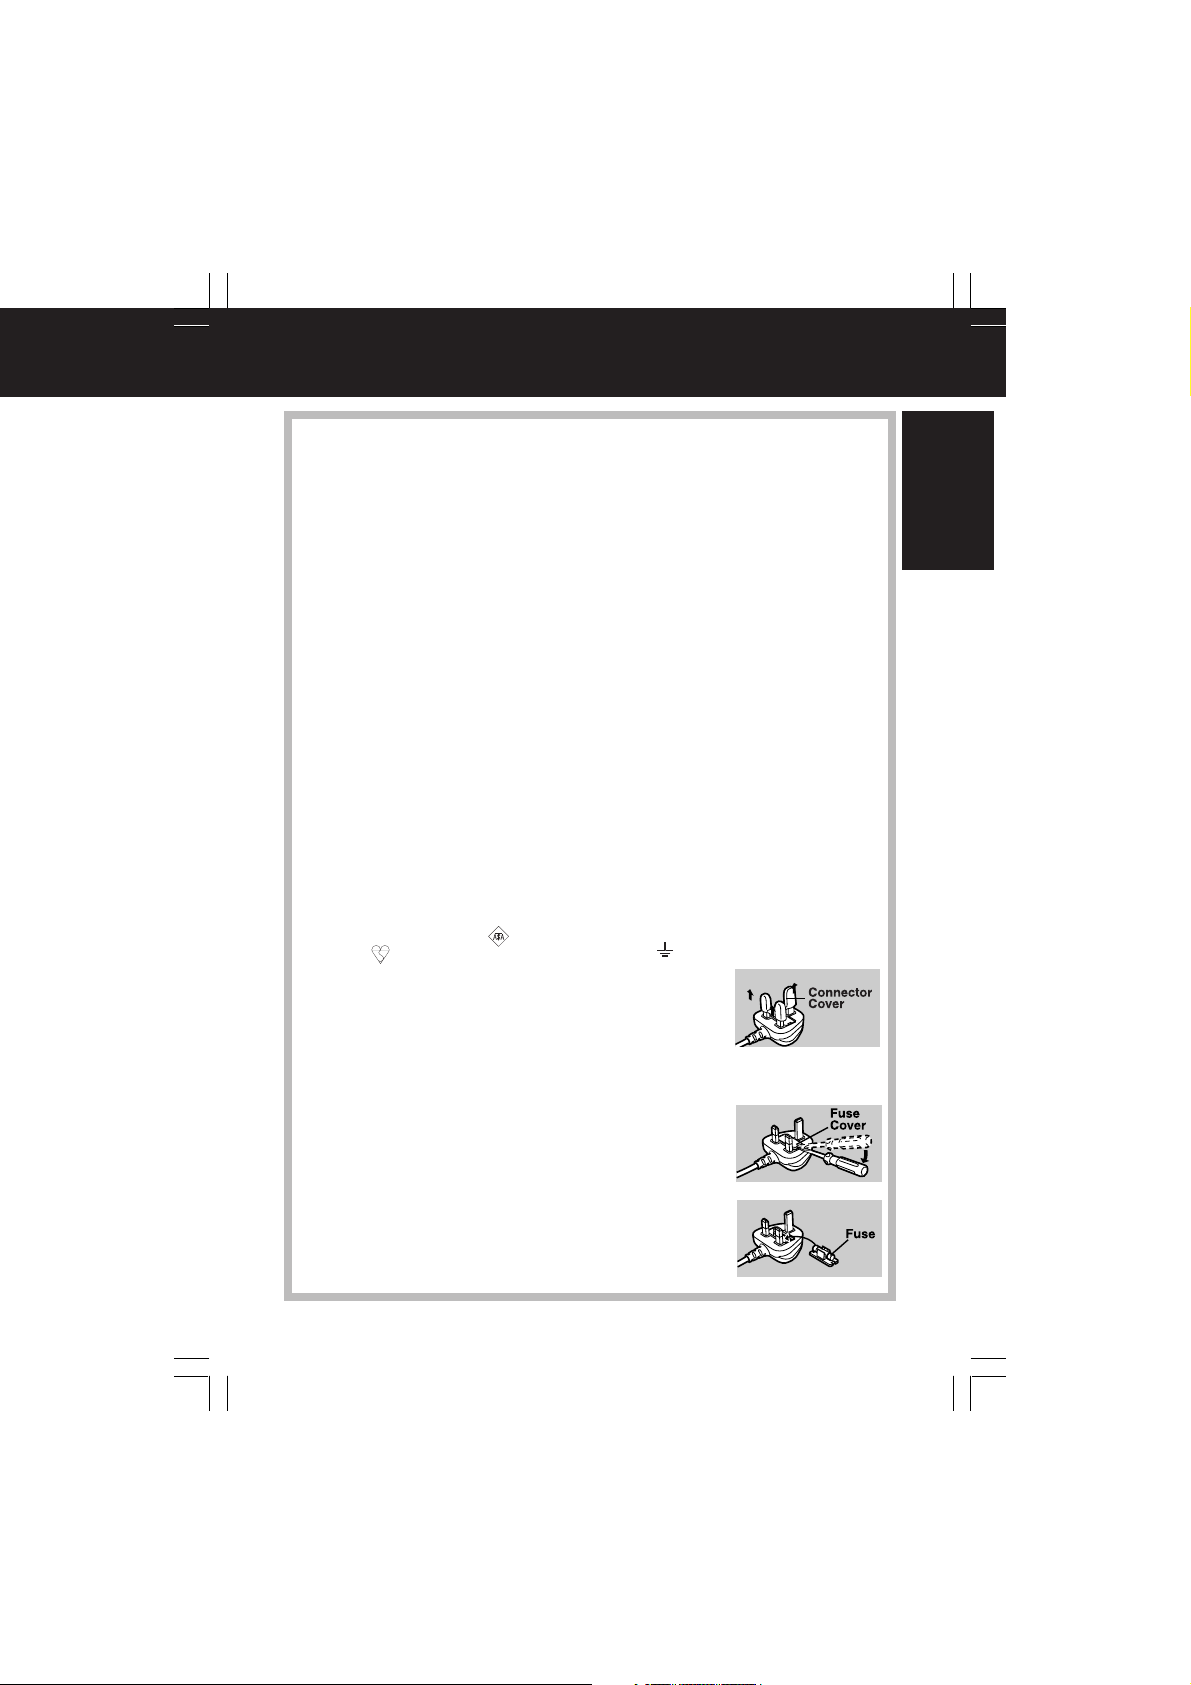
■ Before use
■ ■
Remove the
Connector Cover
as follows.
■ ■
■ How to replace the Fuse
■ ■
1) Remove the
Fuse Cover
with a
screwdriver.
2) Replace the
fuse and attach
the Fuse Cover.
Before Use
3
Eng.p1-5.p65 2003/02/13, 16:473

Table of Contents
Before Use
Information For Your Safety .................................................................... 2
Things You Should Know ........................................................................ 6
Operating Precautions ............................................................................ 7
• Main Unit ............................................................................................... 7
• Battery and Data Protection .................................................................. 8
• PC Card Hdd ......................................................................................... 9
• ScanDisk/CheckDisk ............................................................................. 9
Before Using
• Compatible Card ................................................................................. 10
• Folder Structure ................................................................................... 10
• Copying and Backup ........................................................................... 11
Selecting Modes [Copy/TV/PC] .............................................................. 13
Index Of Controls ................................................................................... 14
Carrying the Unit
• Attaching the Hand Strap .................................................................... 16
• Using the Carrying Case ..................................................................... 16
Recharging the Battery Pack ................................................................ 17
Inserting the Card .................................................................................. 18
Turning the Power On ............................................................................ 19
• HDD SAFETY Switch .......................................................................... 20
• Remaining Battery Life Display ........................................................... 20
Copy Mode
Display Indicator .................................................................................... 21
Menus ...................................................................................................... 22
Copying ................................................................................................... 23
Formatting Cards
• Format the SD Memory Card .............................................................. 24
• Format the PC Card HDD ................................................................... 25
TV Mode
TV Mode Setup
• Setup (Connections)............................................................................ 26
TV Mode Functions (Initial Screen) ...................................................... 27
Display Information
• Displayable Image Formats ................................................................. 28
• Folders and Files ................................................................................. 28
Image Display
• Viewing Images in the Index ............................................................... 29
• Using the Sub Menu ............................................................................ 29
Album ...................................................................................................... 30
Slide Show
• Performing Slide Show ........................................................................ 31
4
Eng.p1-5.p65 2003/02/13, 16:474

Table of Contents
Slide Show Settings
• Selecting Images ................................................................................. 32
• Setting Screen Transition Effects/Speed ............................................. 33
Presentation
• Performing Presentation ...................................................................... 34
• Selecting Presentation Content........................................................... 35
Editing
• Deleting Images (DELETE) ................................................................. 36
• Copying Images (COPY) ..................................................................... 37
• Protecting Images (PROTECT) ........................................................... 38
• How to Select Images ......................................................................... 39
Full Screen Playback
• Selecting Images ................................................................................. 40
• Displaying the Sub Menu .................................................................... 41
• Enlarging an Image (ZOOM) ............................................................... 41
• Rotating an Image (ROTATE) .............................................................. 42
• Processing Image Colour (COLOR EFFECT) ..................................... 43
• Displaying Image Information (PROPERTIES) ................................... 43
PC Mode
PC Mode Setup
• System Requirements ......................................................................... 44
• Setup (Connections)............................................................................ 44
• Installing the USB Driver ..................................................................... 45
Operation with the PC
• File Operations .................................................................................... 46
• Disconnecting Unit from PC ................................................................ 47
Using the Applications
• Installation ........................................................................................... 48
• Presentation File Creation ................................................................... 49
Other
• Uninstalling JPEG Addin Software ...................................................... 50
• Reinstalling the Device Driver ............................................................. 50
• HDD SAFETY Switch Operation ......................................................... 51
For Your Information
Warning and Instruction Displays ........................................................ 52
Reset Function ....................................................................................... 54
Before Requesting Service ................................................................... 55
Specifications ......................................................................................... 57
Before UseBefore Use Copy Mode For Your InformationTV Mode PC Mode
Eng.p1-5.p65 2003/02/13, 16:475
5
Things You Should Know
Main Features
●●
● This unit is a compact, lightweight portable media storage unit.
●●
●●
● The generous 5 GB HDD allows ample storage for your still images.
●●
●●
● Stored images can be viewed and edited (delete, copy, etc.) on a TV at
●●
home or elsewhere.
●●
● This unit can serve as an external drive by connecting the USB port to
●●
your PC.
●●
● Still images can be played back from a variety of cards *1 and copied to an
●●
SD Memory Card.
*1
Each type of card requires a compatible adaptor.
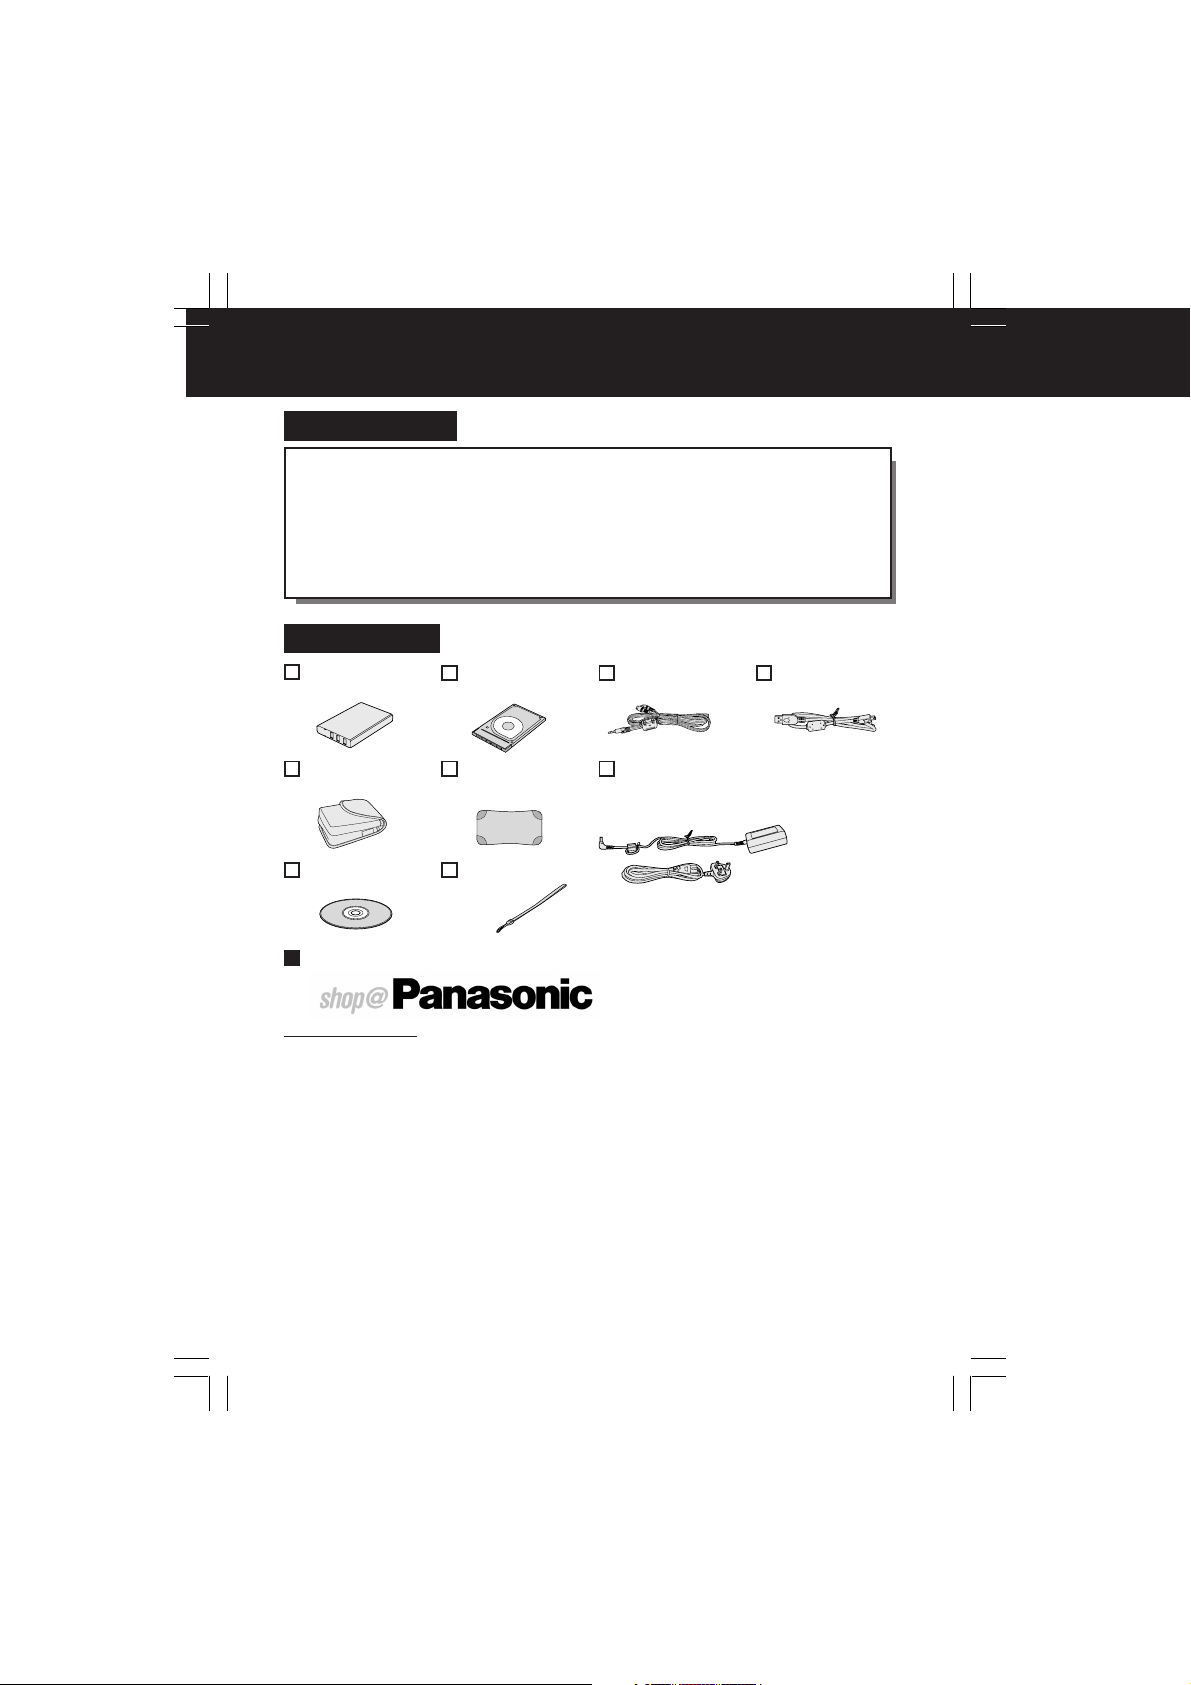
Accessories
Battery Pack
(CGA-S301E1)
PC Card HDD
(RP-PH005A)
Video Cable
(LSEC0003)
USB Cable
(LSEC0004)
Carrying Case
(LSFC0019)
CD-ROM
(VFF0181)
PC Card HDD
Case
(LSFC0020)
Hand Strap
(VFC3803)
AC Adaptor
(LSSQ0393)
with AC Cable
(VJA0940)
For UK and Republic of Ireland customers only
www.panasonic.co.uk
●●
● Order accessory and consumable items for your product with ease and confidence by
●●
telephoning our Customer Care Centre Mon-Friday 9:00am-5:30pm. (Excluding public holidays.)
●●
● Or go on line through our Internet Accessory ordering application.
●●
●●
● Most major credit and debit cards accepted.
●●
●●
● All enquiries transactions and distribution facilities are provided directly by Panasonic UK Ltd.
●●
●●
● It couldn’t be simpler!
●●
Customer Care Centre
For UK customers: 08705 357357
For Republic of Ireland customers: 01 289 8333
Technical Support
For UK customers: 0870 1 505610
This Technical Support Hot Line number is for Panasonic PC software related products only.
For Republic of Ireland, please use the Customer Care Centre number listed above for all
enquiries.
For all other product related enquiries, please use the Customer Care Centre numbers listed
above.
6
Eng.p6-9.p65 2003/02/13, 16:476

Operating Precautions
Carefully read these precautions prior to use and strictly observe them during
unit operation. Failure to do so may result in product malfunction or damage.
Also, disregarding these precautions could cause damage to, or loss of, data
stored within the media.
• Do not leave this unit in direct sunlight, inside tightly closed vehicles, in extremely
hot or cold places, or near heaters or air conditioners. Avoid rapid temperature
changes.
• Operate unit well away from magnetic or electromagnetic wave sources (e.g.
microwave ovens, TVs, game devices, portable telephones, etc.) as stored data may
be lost or distorted.
• Do not let volatile substances, such as insecticides, come in contact with this unit
as it could seriously damage the unit’s exterior finish.
• Do not allow this unit to remain in dusty locations. If dust enters this unit, request an
inspection from the retail store where this unit was purchased.
• Ensure that this unit is protected from vibration and impact. Do not swing or drop
this unit.
• Do not place objects on top of this unit and do not drop objects onto this unit.
• Do not attempt to twist or apply excess pressure to this unit.
• Do not use this unit’s jacks for purposes other than those specifically designated for
each jack. Always ensure that the cables are properly connected.
• Do not insert foreign objects into this unit. The battery and the storage media are
the only objects that may be inserted into this unit.
• This unit should be powered-up and operated at least once every 6 months.
• After each use, turn off the power and unplug the electrical cord from the outlet.
• Prior to performing maintenance, always unplug the electrical cord from the outlet
and remove the battery from this unit. Do not use benzene, thinners or alcohol to
clean this unit. These chemicals may cause deterioration, distortion and
discolouration of the case. To clean this unit, first use a soft, dry cloth to wipe off any
dust. If this unit is extremely dirty, dilute a neutral dishwashing detergent with water,
moisten a clean cloth with this detergent mixture, remove any excess liquid from the
cloth, then wipe this unit clean. Finally, dry this unit with a soft, dry cloth.
Before Use
Eng.p6-9.p65 2003/02/13, 16:477
7

Operating Precautions
Precautions Pertaining to the Battery
Caution:
• Charge only with specified charger.
• Charge the Battery within an ambient temperature range of 50 F (10 °C) and 86 F
(30 °C).
• The Battery may be warm after charging or just after use. This is normal.
• Do not use an insufficiently charged or worn out Battery.
• If charging is done in extreme low or high temperatures, Battery charge time increases.
Safety precautions:
• Do not place the Battery near, or dispose of in fire.
• Do not directly connect (short circuit) the positive (+) and negative (–) terminals.
• Never attempt to disassemble or reassemble the Battery.
To avoid damage to the Battery:
• Do not drop or jar the Battery.
• Use the Battery with specified models only.
• If the Battery is used in extremely high temperatures, a safety device will automatically
prevent operation.
To ensure longer battery life:
• While not in use, remove Battery from the unit and AC Adaptor and store in a cool,
dark, dry place. If you leave the Battery in the unit or on the AC Adaptor, the Battery
will no longer be rechargeable.
• Keep the Battery terminals clean.
Card Data Protection
(Refer to page 10 for details on compatible cards.)
• Do not unplug the AC adaptor or disconnect the USB cable connecting a PC while
this unit is in operation.
• Do not remove the card while it is being accessed.
• Be sure the card does not contain important data before formatting it. Formatting
irreversibly deletes all data stored on the card.
• Do not touch the terminals on the back of the Memory Card.
• Electrical interference, electrostatic discharges and malfunctions of the unit or card
may all result in damage to the card or data loss. It is recommended that any
important data also be backed up on a PC.
• Stored data should be periodically backed up as a protection against data
corruption, data loss or device malfunction. Please note that our company shall not
accept any liability for damage or loss of stored data.
• SD Memory Cards, Memory Sticks, Smart Media Cards and some CF Cards (when
a PC Card Slot is used) include a write-protect switch. When this switch is set to the
“LOCK” position, it will not be possible to write data to or delete data from the
Memory Card or format Memory Card.
8
Eng.p6-9.p65 2003/02/13, 16:478

Operating Precautions
Handling the PC Card HDD
The PC Card HDD is a very small, high-precision hard disk drive. Be particularly
careful when handling this drive. Strictly observe the following to avoid HDD
malfunction, damage, or data loss.
• Do not subject the PC Card HDD to excessive vibration and strong impacts.
• Do not use the unit in areas of extreme temperature differences (where temperature
changes more than 15 °C in one hour). If the unit is suddenly moved from a cold
place to a warm place or vice versa, or if a room is quickly heated in wintertime or
quickly cooled in summertime, or if a cooler blows directly on the unit, etc.,
condensation (dew) may form. Using the unit in this condition may cause serious
damage to the HDD. If condensation occurs, turn the unit power off and remove the
PC Card HDD. Then leave this way for about 4 hours until the ambient temperature
equalises. After confirming condensation is no longer present, you may use the unit.
• Do not twist the PC Card HDD or press down on the label surface, and do not write
on the PC Card HDD using a pen with a hard tip, as these actions may damage the
PC Card HDD. When holding the PC Card HDD, always hold it by the outside edges.
• Do not remove the label that is attached to the PC Card HDD. If this label is
removed, you may not be eligible for warranty service or other services.
• Before removing the PC Card HDD from its special carrying case, make sure that
the side of the case labeled “PC Card HDD” is facing upwards. If the case cover is
opened and the labeled side is not facing upwards, the PC Card HDD may fall out
and be damaged.
• Always use the special carrying case to carry the PC Card HDD.
• Please note that our company shall not accept any liability for damage or loss of
data stored within the PC Card HDD due to inappropriate handling.
ScanDisk
(“CheckDisk” for Windows 2000/XP users)
• Do not subject the PC Card HDD to excessive vibration or strong impacts. Also, do
not turn off the power supply or remove the card from the unit while it is in operation,
otherwise data may be corrupted. If a problem occurs, immediately use the
computer’s ScanDisk/CheckDisk function to check the media contents. (It takes
several hours for ScanDisk/CheckDisk to finish checking the PC Card HDD.) It is
recommended that you then make a backup of the data on the media. See page 44
on how to connect the unit to a computer. Refer to your computer manual regarding
ScanDisk/CheckDisk function.
Before Use
Eng.p6-9.p65 2003/02/13, 16:479
9
Before Using
• Photographs and printed materials may not be used except for personal and private
applications without authorisation from the copyright owner.
: SD logo is a trademark.
•
• Microsoft
• Other product names, trade names and company used in this manual are trademarks or
• Any unauthorised copying or reproduction of the software from this product or distribution of the
• In this manual, “Memory Card” is used to refer to SD Memory Card and MultiMediaCard. In
• In this manual, the name “Windows 98SE” shall refer to “Microsoft
• In this manual, the name “Windows 2000” shall refer to “Microsoft® Windows® 2000 Professional”.
• In this manual, the name “Windows Me” shall refer to “Microsoft
• In this manual, the name “Windows XP” shall refer to “Microsoft
The following types of card can be used in this unit :
PC Card Slot
SD Memory Card Slot
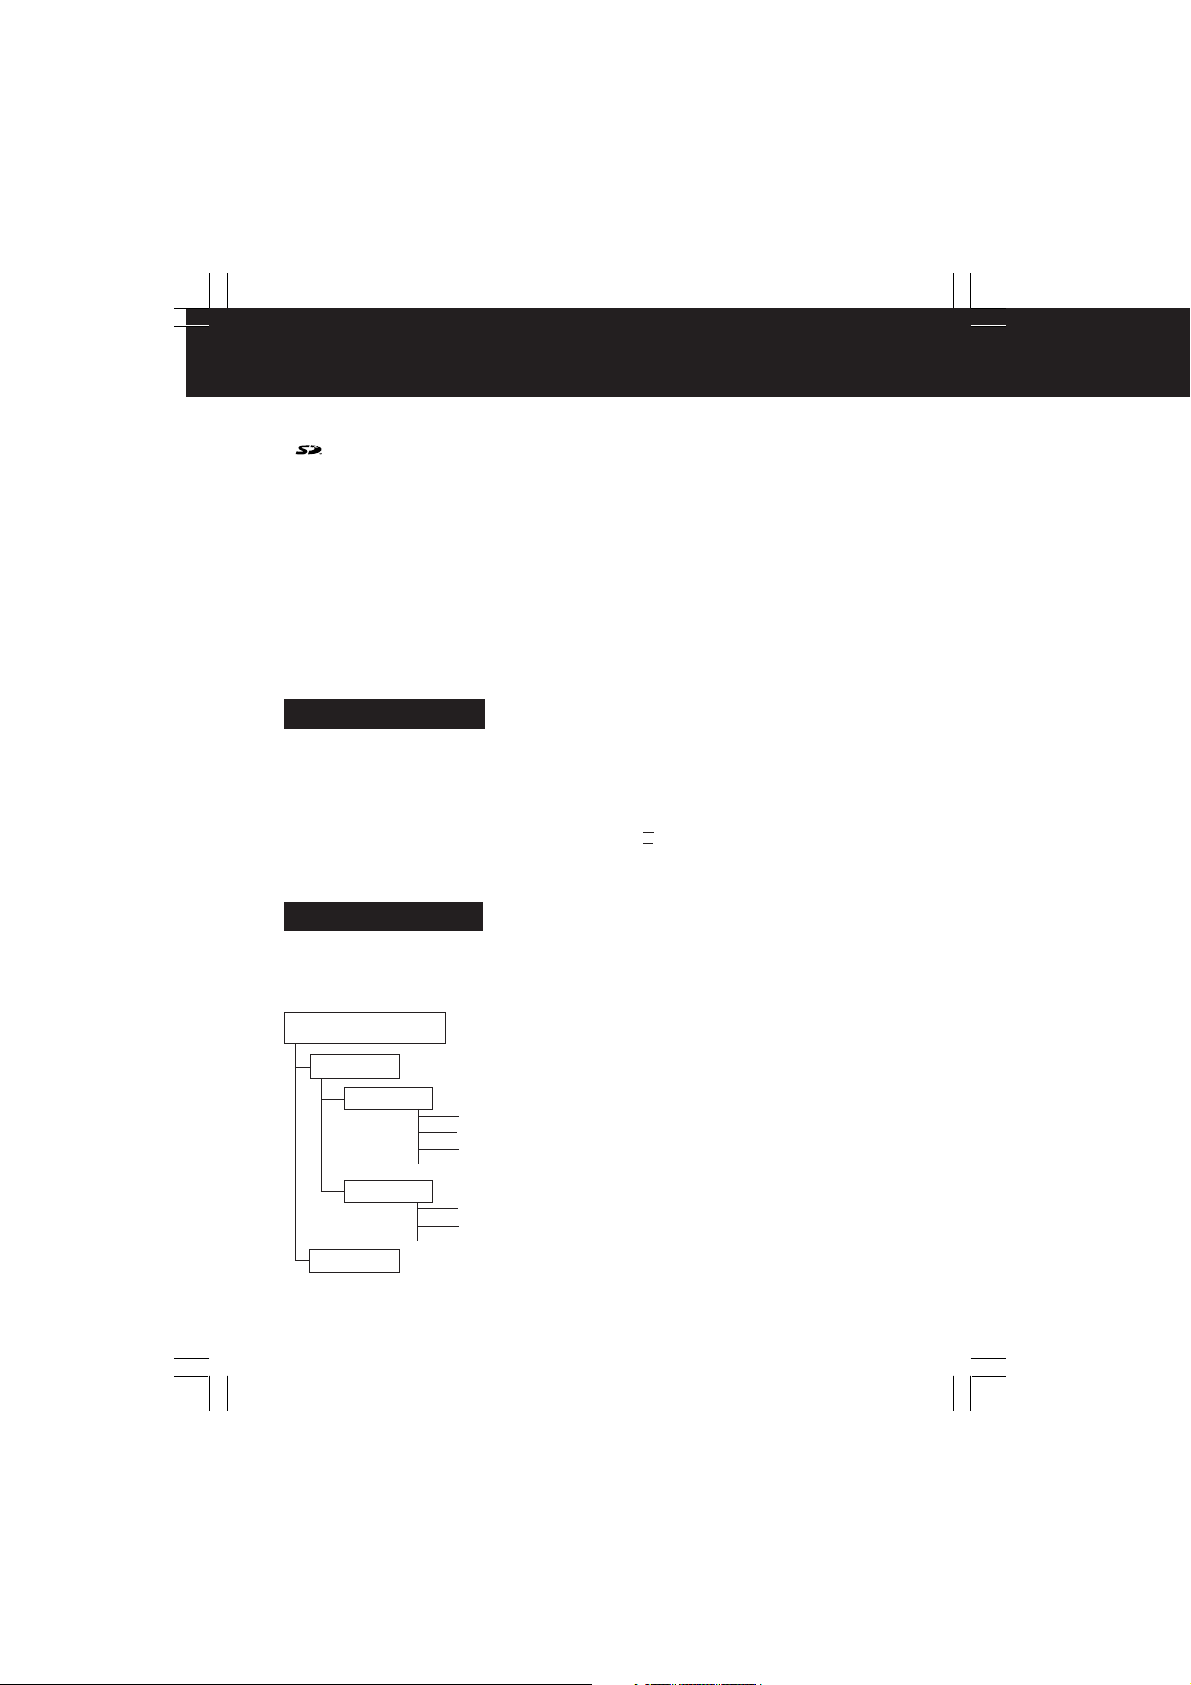
Digital cameras that are compliant with DCF specifications use folders with a specific
structure. The following diagram shows an example of the folder structure. If these
folders are deleted, or if a folder name or file name is changed, the data may no
longer be readable by a digital camera.
®
States and other countries.
registered trademarks of their respective owners.
software over a network is strictly prohibited.
addition, “Card” is also used to refer to Memory Cards, the PC Card HDD and other types of
PC Cards.
EDITION”.
or “Microsoft
, Windows® and PowerPoint® are registered trademarks of Microsoft in the United
®
Windows® 98 SECOND
®
Windows® Millennium Edition”.
®
®
Windows® XP Professional”.
Windows® XP Home Edition”
Compatible Card
• PC Card HDD (2 GB, 5 GB) • Microdrive* • CF Card*
• SD Memory Card* • Memory Stick*
• MultiMediaCard* • Smart Media*
*Requires an ATA-compatible PCMCIA TYPE II adaptor for use, sold separately.
• SD Memory Card • MultiMediaCard
Folder Structure
DCIM Folder
SD Memory Card
DCIM
100_PANA
P1000001. JPG
P1000002. JPG
P1000003. JPG
101_PANA
P1010001. JPG
P1010002. JPG
MISC
The digital camera creates this folder
automatically.
100_PANA Folder
Folder names consist of a 3-digit folder number
which is followed by five arbitrary characters.
Digital camera images are stored within these
folders.
P1000001.JPG: DCF File
File names consist of four arbitrary characters
followed by a 4-digit file number. DCF files are
image files (normally JPEG files) that have been
taken by a digital camera. (Other file extensions
such as TIF or THM may also be used.)
MISC Folder
The MISC folder contains the DPOF
configuration files that add print/slide information
to the images.
10
Eng.p10-13.p65 2003/02/13, 16:4710
Before Using
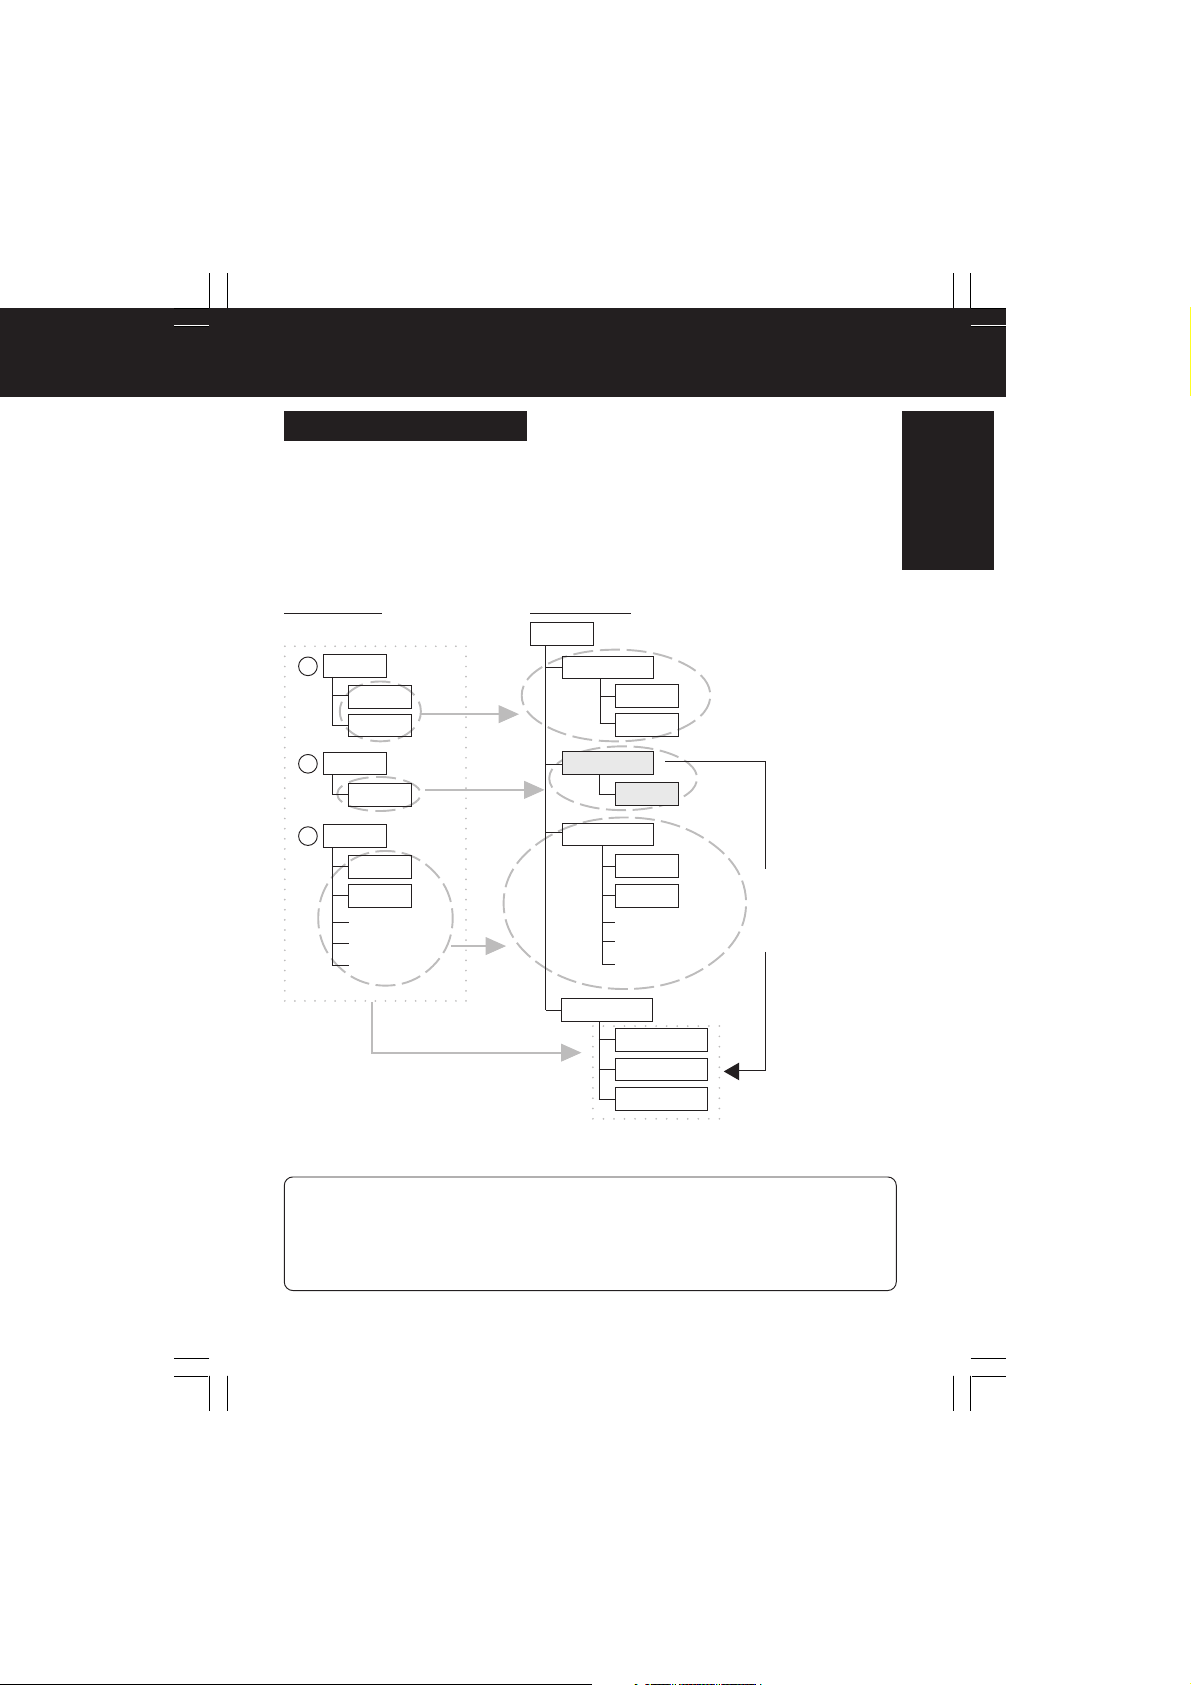
Copying and Backup
Copying: Memory Card -> PC Card HDD
When copying from a Memory Card to the PC Card HDD, create a folder entitled
“CARD****” for each copy and save Memory Card data into this folder. When BACKUP
is ON, the “CARD****” folder mentioned above is created in the “BACKUP” folder of
the PC Card HDD, and Memory Card data is copied into this folder. Thus, normal PC
Card HDD available space is reduced by half. See page 22 on how to turn the
BACKUP function ON and OFF.
Memory Card PC Card HDD
ROOT
ROOT
1
2
3
MISC
DCIM
ROOT
PHOTO
ROOT
MISC
DCIM
AAA. JPG
BBB. TXT
CCC. EXE
CARDA001
MISC
DCIM
CARDA002
PHOTO
CARDA003
MISC
DCIM
AAA. JPG
BBB. TXT
CCC. EXE
Delete
* Even after deletion,
the data will be
retained in the
[BACKUP] folder.
Before Use
BACKUP
CARDA001
CARDA002
CARDA003
See next page on how to copy from PC Card HDD to a Memory Card.
– Note –
• The contents of the BACKUP folder cannot be checked during TV mode. Use the computer to
check the contents at this time.
• Secure data files (audio files that include copyright restrictions) will not be copied.
• The **** por tion of the “CARD****” folder name is assigned automatically in numerical order
within the range of “A001~A999, B001~Z999”. Because of this, please do not change the
file names yourself.
Eng.p10-13.p65 2003/02/13, 16:4711
11
Before Using
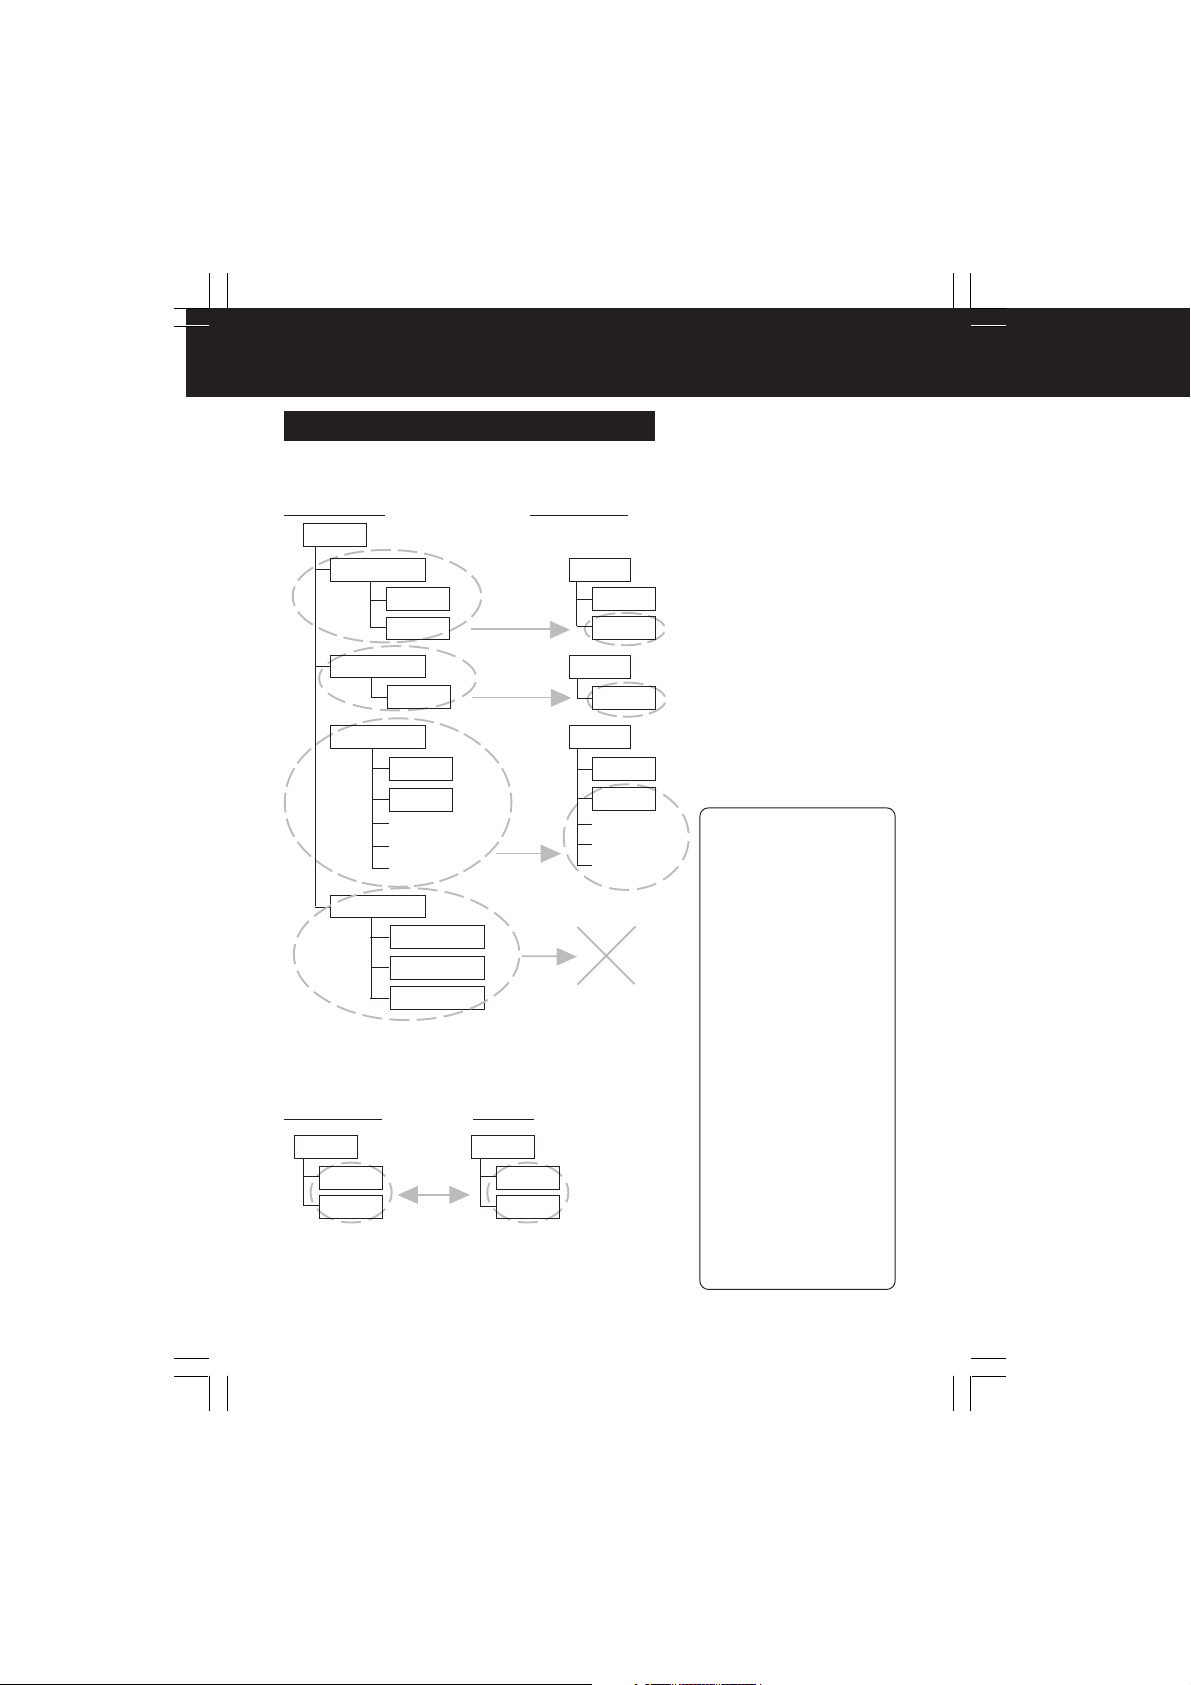
Copying and Backup (Continued)
Copying: PC Card HDD -> Memory Card
The folder entitled “CARD****” will disappear and data will be copied according to the file
structure rules.
PC Card HDD
ROOT
CARDA001
MISC
DCIM
Memory Card
ROOT
MISC
DCIM
CARDA002
PHOTO
CARDA003
MISC
DCIM
AAA. JPG
BBB. TXT
CCC. EXE
ROOT
PHOTO
ROOT
MISC
DCIM
AAA. JPG
BBB. TXT
CCC. EXE
BACKUP
CARDA001
CARDA002
CARDA003
Data files will not
be copied.
Copying: Memory Card <-> PC Card
When copying from a PC Card to a Memory Card or vice
versa, the data can be copied directly.
Memory Card
ROOT
MISC
DCIM
• This operation is possible for all types of cards
except the PC Card HDD.
PC Card
ROOT
MISC
DCIM
– Note –
• BACKUP folder contents,
not displayable in TV mode,
can be copied/edited/
deleted on a computer.
• Secure data files (including
copyrighted audio files) will
not be copied.
• When copying data to a
Memory Card, reset the
DPOF settings on devices,
such as digital cameras,
digital video cameras, etc.
that allow you to do so. See
the device manual.
• If no MISC folder has been
created on the card to
which the data will be
copied, the MISC folder will
also be copied.
• When copying a DCIM
folder name, e.g.
“100_PANA”, and that
name already exists on the
card, change the name to
“101_PANA” before
copying.
• If an overwrite operation is
about to occur in a folder
other than the DCIM folder,
a message asking the user
to confirm the overwrite
operation will be displayed.
12
Eng.p10-13.p65 2003/02/13, 16:4712
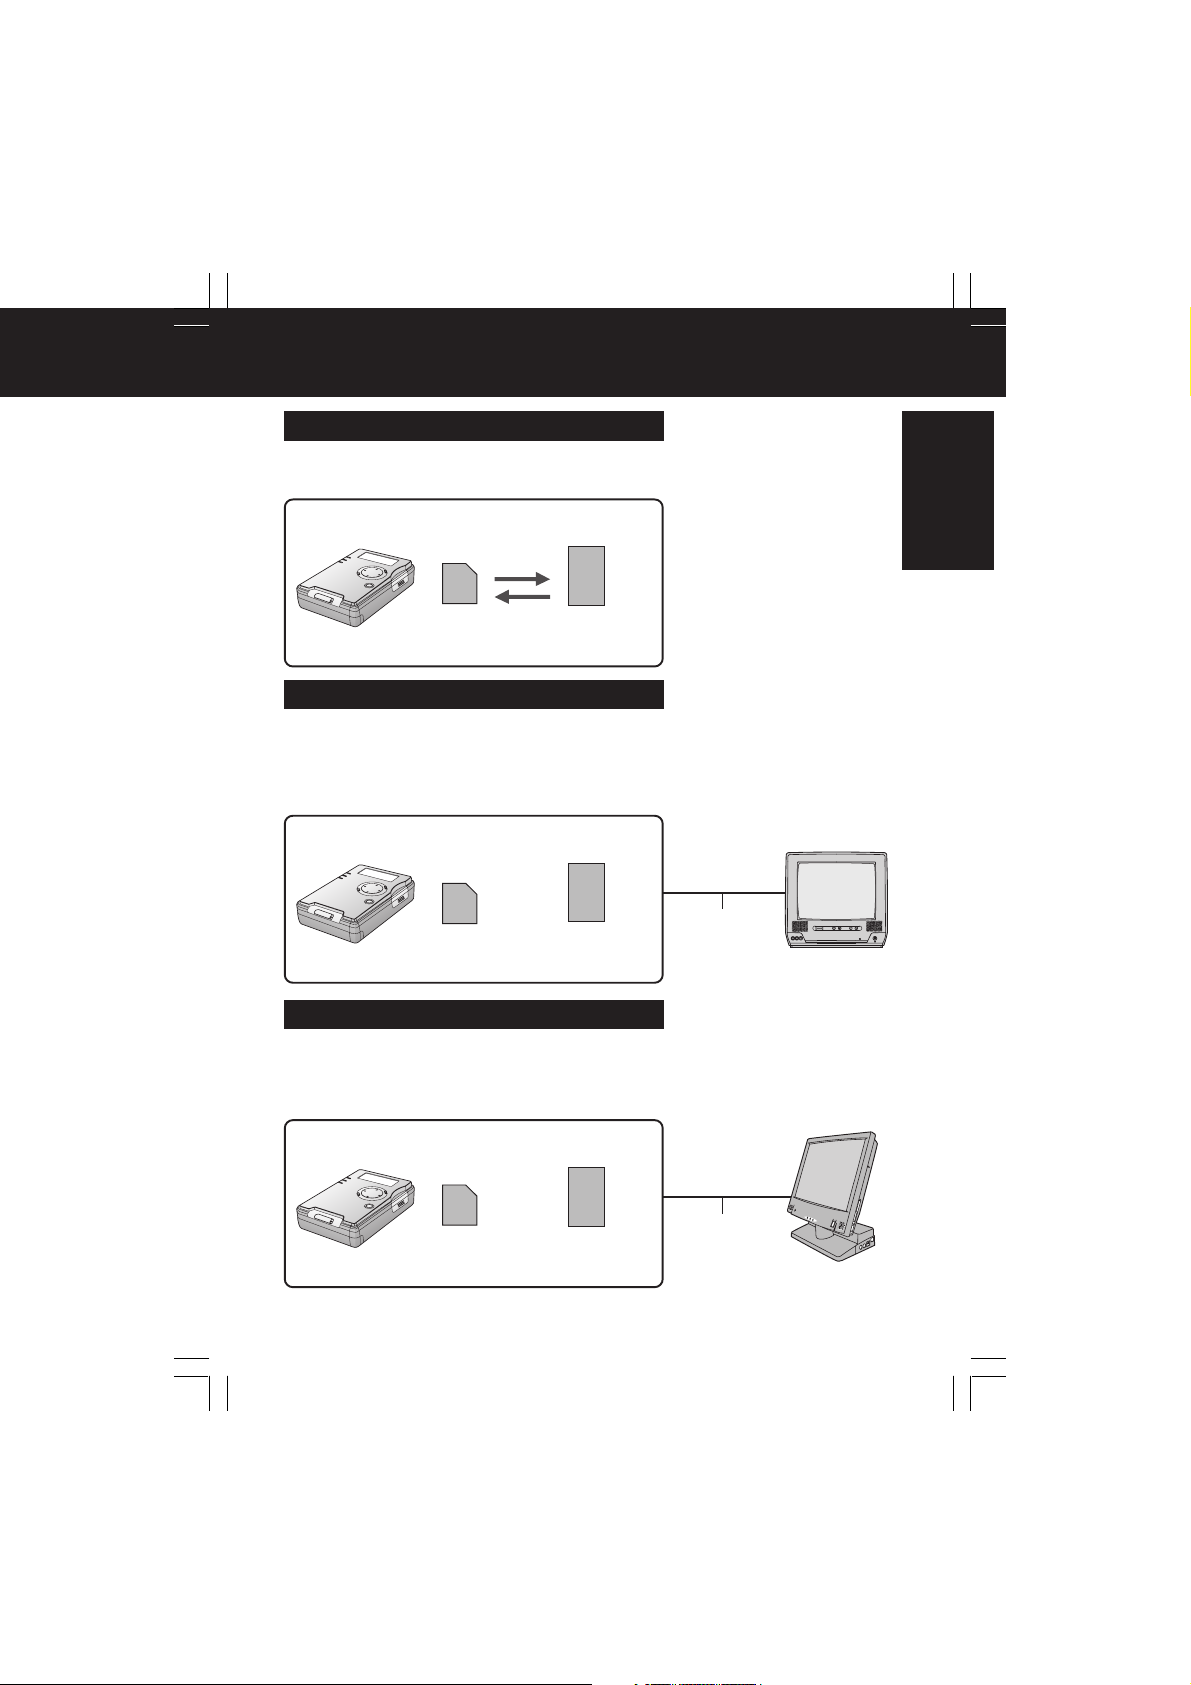
Selecting Modes
Copy Mode (pp. 21~25)
Copy mode is used to copy data from the inserted card to another card. In addition,
you can press MENU to carry out operations such as checking the card storage
capacity, making backup and TV format settings and formatting cards.
Memory Card PC Card HDD
(Or other card)
TV Mode (pp. 26~43)
In TV mode, you can connect the unit to a TV and then carry out playback and edit
operations (such as copying, deleting, protecting, zooming, rotating and enhancing
colours) for the data stored on a card while viewing the data on a TV screen.
* Only JPG, TIF, and MOV type files can be displayed. Other files require the unit to
be in PC Mode.
or
Memory Card PC Card HDD
(Or other card)
Video Cable
TV
Before Use
PC Mode (pp. 44~51)
In PC mode, the unit is connected to a computer using a supplied USB cable,
allowing the unit to function as an external disk drive. The data on the card inside the
unit can then be edited (copied and deleted, etc.), and the accessory software
application can be used to create files for presentations.
or
Memory Card PC Card HDD
Eng.p10-13.p65 2003/02/13, 16:4713
(Or other card)
USB Cable
PC
13
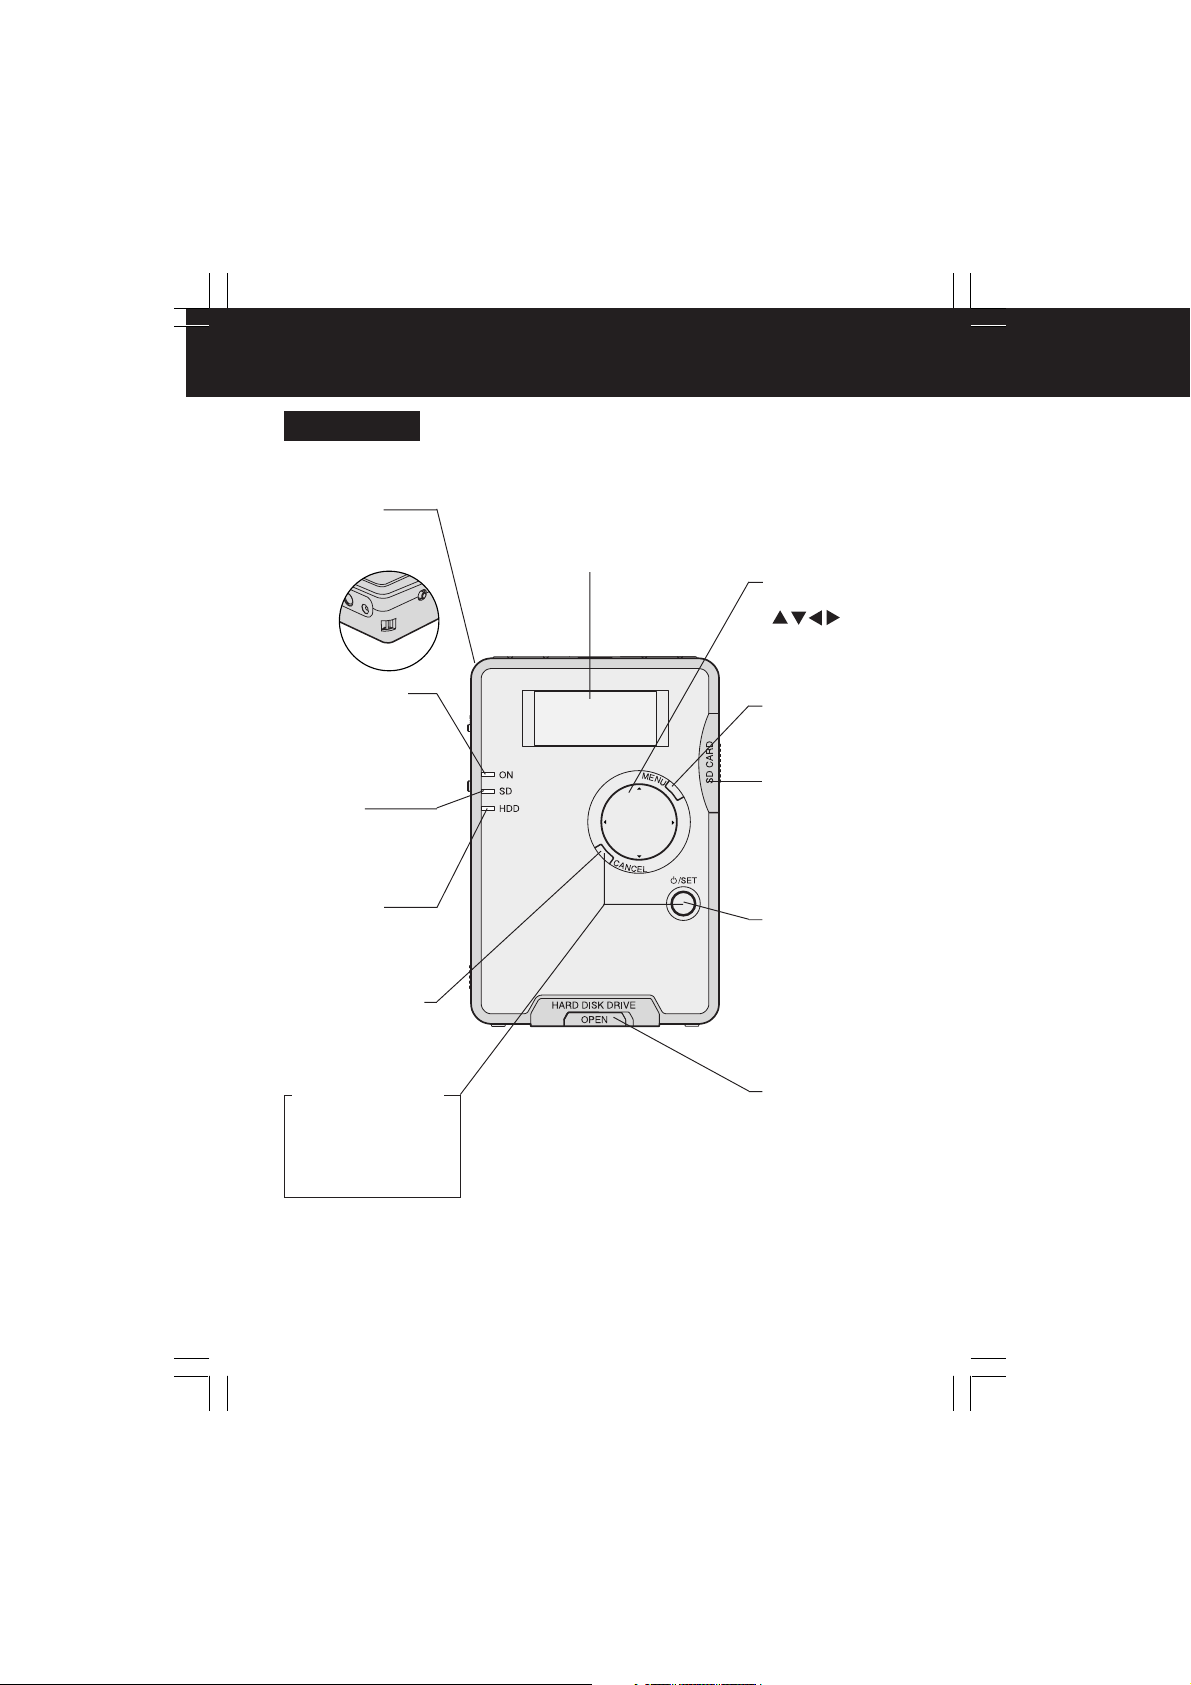
Index Of Controls
Front View
Liquid Crystal Display
Hand Strap
Attachment Pin
Attach hand strap
here. (p. 16)
POWER Lamp
Lights when power is
ON. Flashes during
battery recharge.
The LCD indicates the current operating (TV, Copy) mode.
• In Copy mode, displays battery level, data transfer
progress, and various menus. (pp. 20~25)
• With USB cable connection, displays card selection
options. (p. 46)
Cursor
Buttons
( )
Moves the cursor
up, down, left and
right.
MENU Button
Displays/Clears
menu.
SD Lamp
Lights when SD
Memory Card or
MultiMediaCard is
accessed.
HDD Lamp
Lights when PC Card
HDD or PC Card is
accessed.
CANCEL Button
Cancels Slide Show
and presentations.
RESET Function
Press CANCEL and
STANDBY
simultaneously for
5 seconds to reset unit.
(p. 54)
14
SD
HDD
SD Memory
Card Slot
Open to insert/
remove SD
Memory Card or
MultiMediaCard.
(p. 18)
STANDBY
Button
Press this button
for approx.
2 seconds to turn
power ON/OFF.
SET Button
Executes selected
operation.
PC Card HDD
(PC Card) Slot
Slide lever and
open cover to
insert/remove PC
Card HDD or PC
Card. (p. 18)
Eng.p14-17.p65 2003/02/13, 16:4714
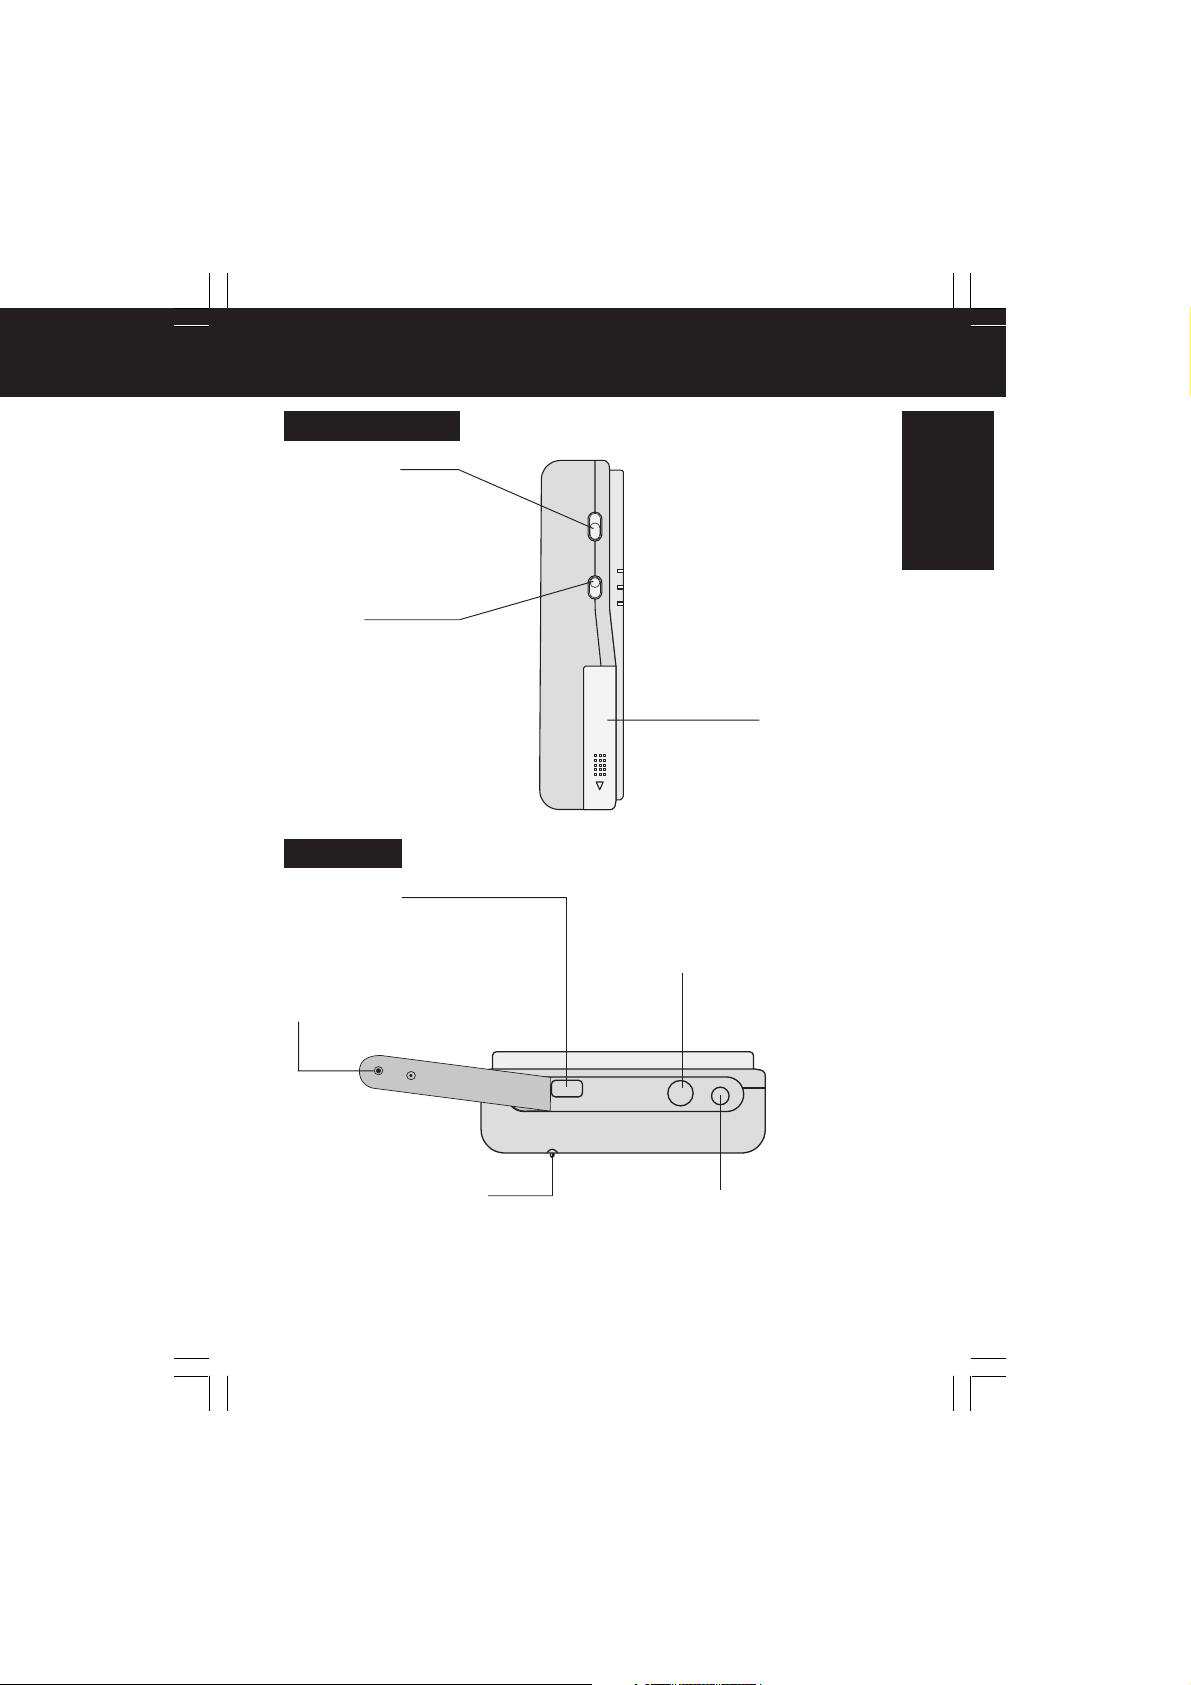
Index Of Controls
Left Side View
HDD SAFETY
(ON/OFF) Switch
Turns HDD SAFETY
function ON/OFF. (p. 20)
COPY/TV
MODE Switch
Switches between
Copy and TV
operating mode.
(pp. 21, 26)
End View
USB Terminal
By connecting this unit to a PC with
the supplied USB cable, it can
function as an external drive.
(pp. 44~51)
Connector Cover
Protects the connectors.
HDD SAFETY
OFF ON
COPY TV
MODE
BATTERY OPEN
Battery
Compartment
Holds the battery.
S/V Output Connector
You can use the supplied video cable
to connect this unit to the S-Video or
Video terminals of a TV to view
images. (p. 26)
Before Use
HDD SAFETY Detection
Switch
This switch pops out if the unit is
lifted up. In this case, the HDD and
all operations stop.
(p. 20)
Eng.p14-17.p65 2003/02/13, 16:4815
USB
S/V OUT DC IN
DC Input Connector
(Power Supply)
This unit can be supplied with external
power by connecting the AC adaptor
(supplied) to this connector.
(pp. 17, 26, 44)
15
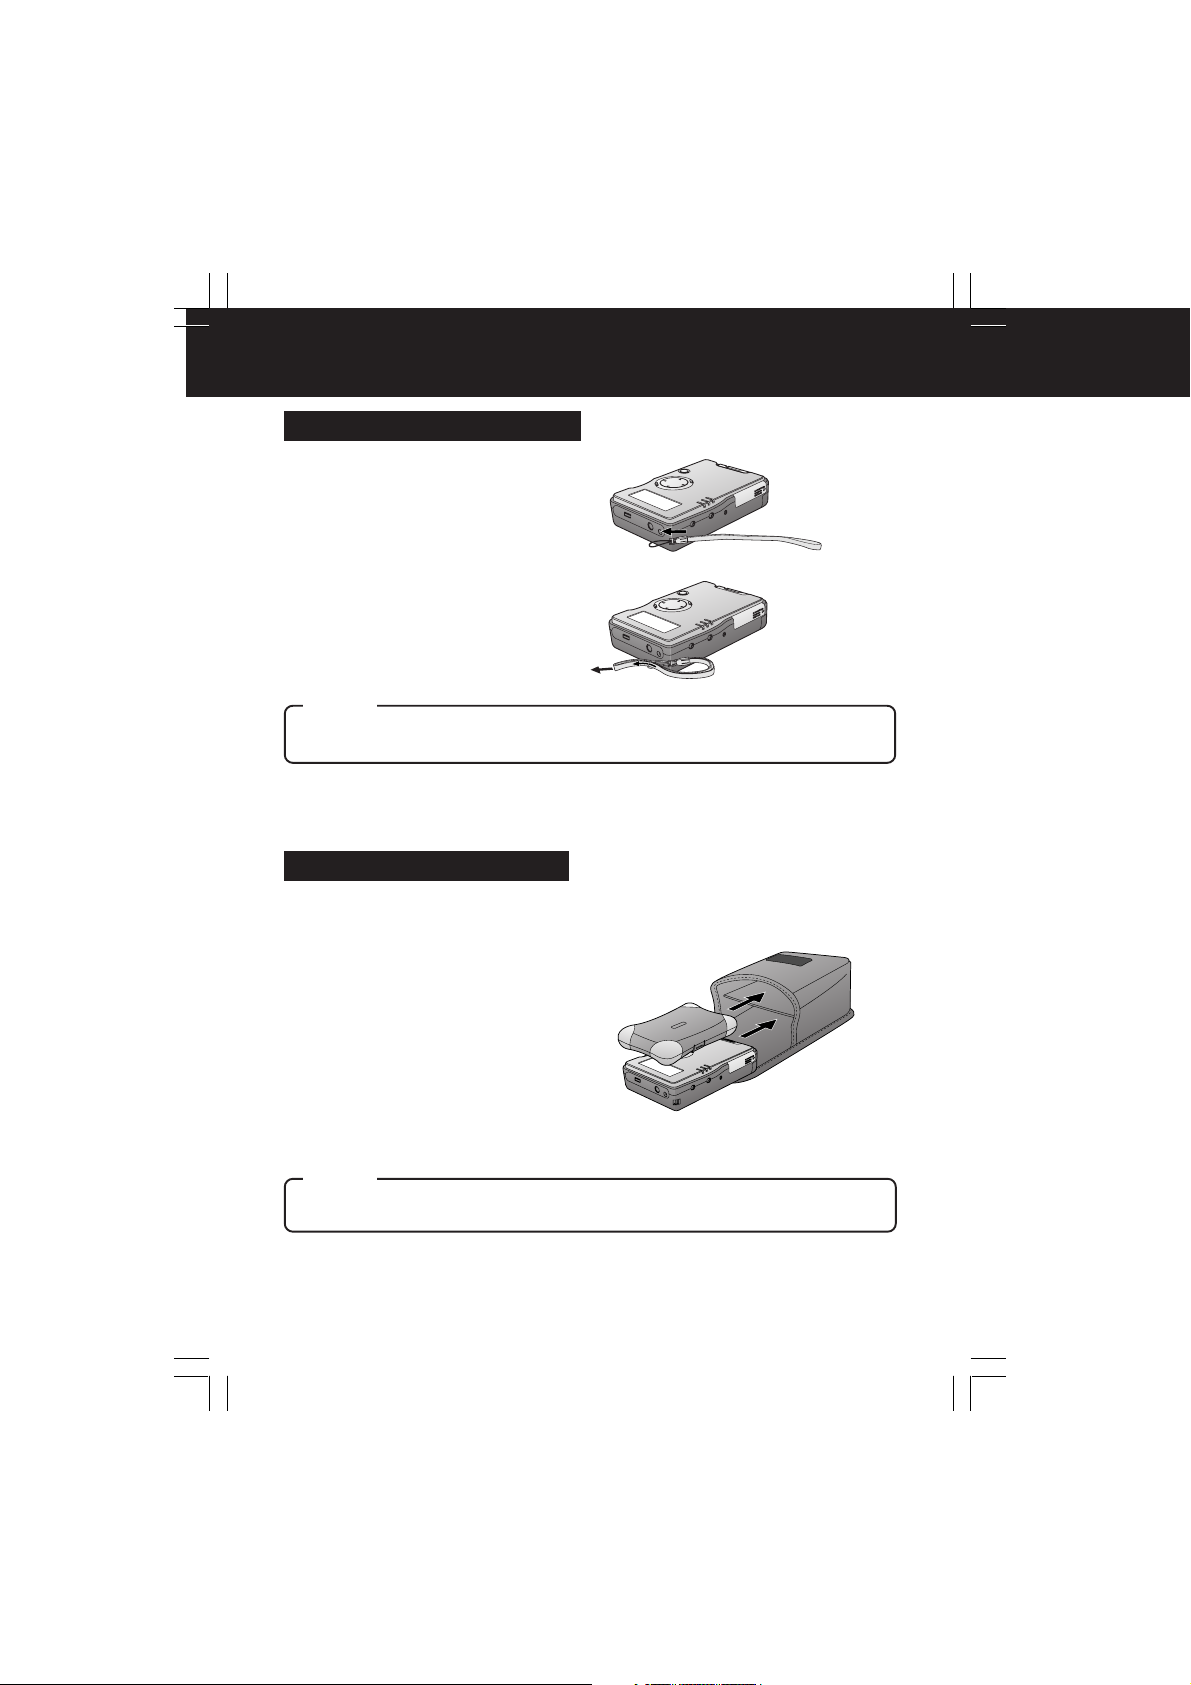
Carrying the Unit
Attaching the Hand Strap
1 Insert strap end loop into gap of
Attachment Pin.
2 Thread opposite end through the
end loop and pull strap tight in
the direction of arrow.
Caution
• This unit is a precision device . When carrying this unit, ensure that it does not swing
excessively. Do not drop this unit or subject it to strong impacts.
Using the Carrying Case
1 Open the carrying case.
2 Insert this unit into the lower
compartment.
3 Insert the PC Card HDD case into
the upper compartment with the
“PC Card HDD” mark facing
upwards.
4 Close the carrying case.
Caution
• When transporting the unit, always turn off the power and insert the PC Card HDD into its
case and then place the case inside the carrying case.
16
Eng.p14-17.p65 2003/02/13, 16:4816
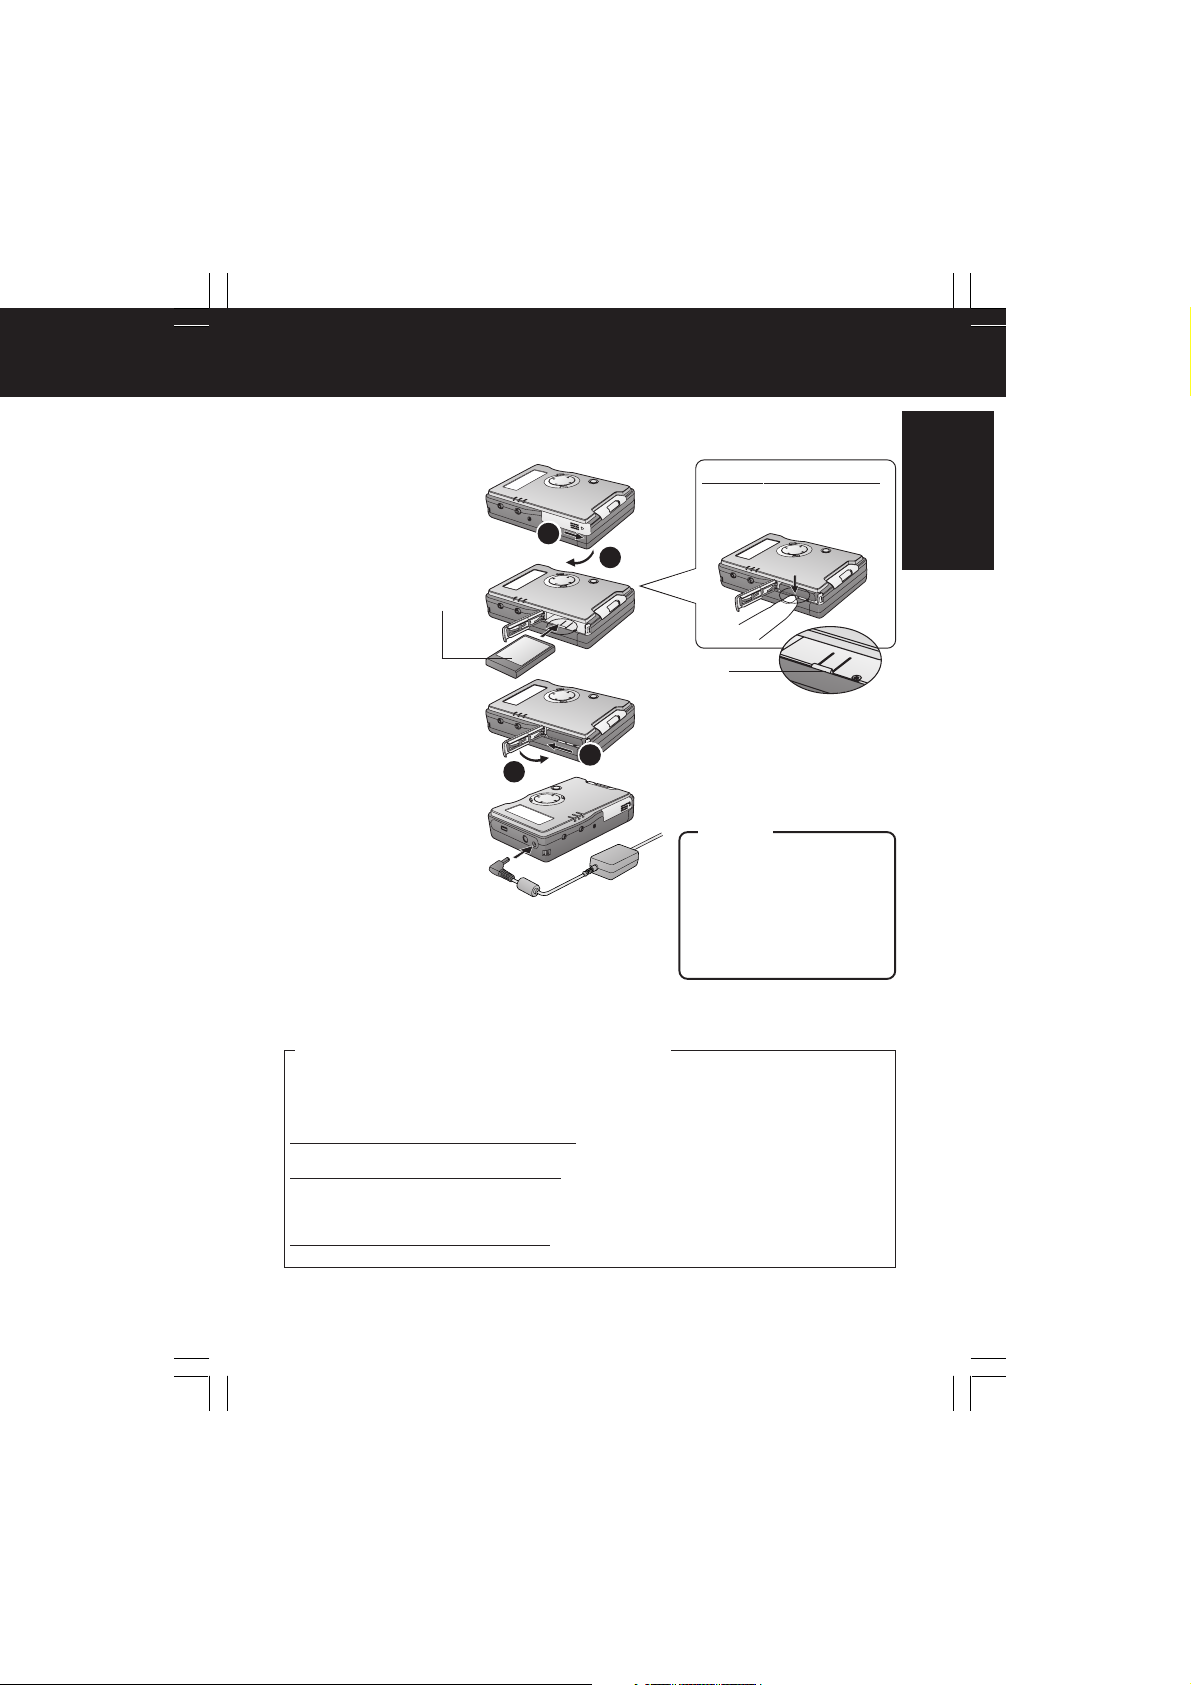
Recharging the Battery Pack
The battery pack can be recharged right inside this unit using the supplied AC
adaptor. Unit power must be turned OFF before recharging. Charging will stop if
unit power is turned on.
1 Slide the battery
cover slightly to the
right and swing open.
2 Insert the battery
(labeled side up) all the
way into the battery
compartment.
1
2
To remove the Battery :
Use your fingertip to push
down on the catch.
Catch
3 Close the cover.
4 Connect the DC plug
of the AC adaptor to
unit’s DC IN terminal,
then the AC adaptor
into a wall outlet.
• The POWER Lamp
flashes during
recharging.
1
5 Recharge is complete when POWER Lamp
goes out.
• A fully charged battery, given a temperature of 20 °C with
60 % humidity, will give about 80 minutes of operating time.
(Operating time may depend on the conditions of usage.)
2
Caution
• Remove battery if unit will not
be used for a long period.
• Do not install/remove batter y
or plug in or unplug the AC
adaptor with unit power ON.
This may cause unit damage
or loss of data.
• Do not unplug AC adaptor
while recharging.
Before Use
POWER Lamp Indications During Charging
During normal charging, the POWER Lamp flashes in approx. 1-second intervals. Charging usually
finishes in about 90 minutes. However, if the lamp flashes faster or slower than this (or if POWER
Lamp goes out before charging is finished), it means a problem has occurred. The flashing speed
can tell you what the problem may be. See below.
Flashing rapidly (approx. 0.5-second intervals):
• Possible problem with the unit or battery or the AC adaptor.
Flashing slowly (approx. 6 second intervals):
• Temperature of the battery or its surroundings is too high or low, or the battery is overdischarging. Charging can still continue under these conditions, but will take longer than
normal.
Lamp is OFF (charging is not yet finished):
• There may be a problem with the AC adaptor.
Eng.p14-17.p65 2003/02/13, 16:4817
17
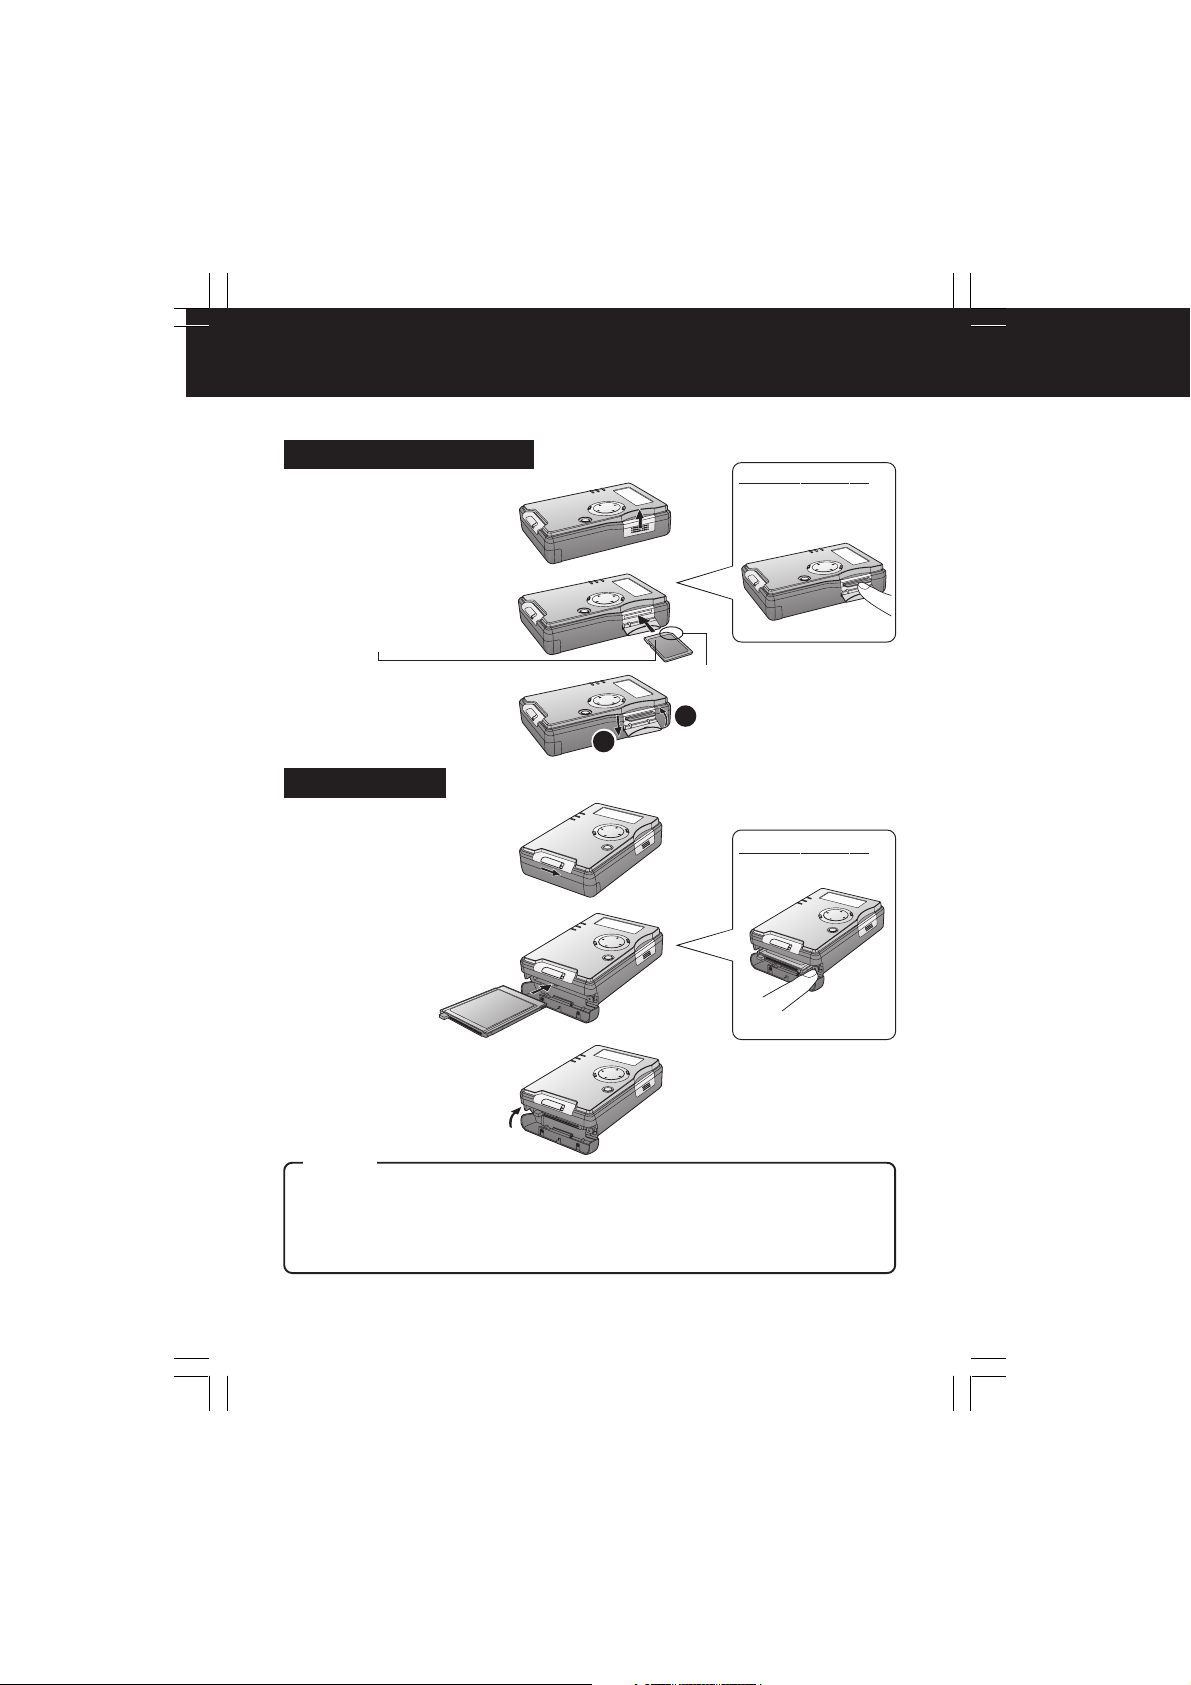
Inserting the Card
Set STANDBY to OFF when inserting or removing a Card.
SD Memory Card Slot
1 Push up slightly on card
door to swing open.
2 Insert the Memory Card
(labeled side up, cropped
corner right) and hold in
place until you hear a click.
cropped corner
3 Close the lid.
2
PC Card Slot
1
To remove Card :
Open card door.
Press in lightly on
card then release.
1 Slide the lever to open the
cover.
To remove Card :
Press EJECT TAB
twice.
2 Insert the PC Card HDD or
PC Card all the way into
the slot.
3 Close the cover.
Caution
• Always insert card in the correct direction. Failure to do so may result in damage to the card
and this unit.
• The PC Card HDD and Memor y Card are precision devices. Do not subject them to excessive
pressure or strong impacts.
• If the card door does not close completely, remove the card, check insertion orientation, and
reinsert. Also, confirm that EJECT TAB was firmly pressed.
18
Eng.p18-20.p65 2003/02/13, 16:4818

Turning the Power On
In case of a power outage, the unit utilises the supplied battery as a backup
in order to protect the unit and the card data. If you are using the AC adaptor,
insert a sufficiently charged battery before turning on the power. The unit
cannot be used if only the AC adaptor is used.
1 Insert the battery and connect the AC adaptor. (p. 17)
• The unit can be operated using only the battery, but when using PC mode, the AC
adaptor must be connected, otherwise the unit will not turn on.
2 Place unit on a flat, level surface.
• If this is not done, the HDD SAFETY Switch may prevent the unit from operating.
(p. 20)
3 Press STANDBY for approx. 2 seconds.
• The power comes on (POWER Lamp lights) and the
unit cycles through each operating mode in sequence.
(p. 13)
– Note –
• If using the unit on batter y power only, the power will turn off automatically if no unit operations
are carried out for 5 minutes, in order to conserve battery power.
• The power cannot be turned off while the HDD SAFETY Detection Switch has been activated.
(p. 20)
To turn this unit off :
Press STANDBY for approx.
2 seconds.
Before Use
Eng.p18-20.p65 2003/02/13, 16:4819
19

U
S
B
S
/V
O
U
T
DC
IN
Turning the Power On
HDD SAFETY Switch
Important: Keep unit on flat, level surface while in
use. If the unit is lifted up or placed on a surface that is
not flat and level, the PC card HDD operation will be
stopped by the HDD SAFETY Switch to protect it from
damage.
• If the unit receives a strong impact, the PC Card HDD
data may be corrupted. It is advisable to keep this
switch ON. (ON is the default setting.)
• If the HDD SAFETY Detection Switch, located under
the unit, is activated, unit operation will be stopped
and a warning message will appear on the TV screen
and unit LCD. In this case, place unit on a flat, level
surface. Normal operation will resume. Any copy
operations resume from precise point where copying
was interrupted.
• If the HDD SAFETY Detection Switch is activated
while the unit is connected to a PC, “SAFETY MODE
PUT IT DOWN” will appear on the unit LCD. Copy
operation in progress at this time will be suspended,
and computer errors may also occur.
Remaining Battery Life Display
HDD SAFETY
OFF ON
HDD SAFETY
(ON/OFF)
COPY TV
MODE
HDD
SAFETY
Detection
HDD stops and all
operations are interrupted.
COPY MODE
COPY MODE
BATT.BATT.
COPY MODE
BATT.
COPY MODE
BATT.
When the BATT. and the battery icon start flashing, all buttons, except
power off, are inoperable. Connect the AC adaptor or recharge the battery. If the
battery completely runs down during copying, the copying is stopped and power is
shut off. It may not be possible to play back the data that was being copied at this
time.
It is advisable to fully charge the battery before using the unit. (p. 17)
20
Eng.p18-20.p65 2003/02/13, 16:4820
BATTERY
LOW

V
POWER Lamp
COPY/TV
MODE
Copy Mode (Display Indicator)
In Copy mode, data can be copied from one
card to another. You can also check card
storage capacity, make backups, set TV
Liquid Crystal
Display
formats, and format cards.
If unit is on battery power only, power shuts off
automatically if you perform no operation for
5 minutes to conserve battery.
MODE
COPY T
M
E
N
U
C
A
N
C
E
L
/SET
Displaying Menu (Indicator Flowchart)
Follow these steps to display menus in COPY mode.
1 Set COPY/TV MODE to “COPY”.
2 Insert a Card. (p. 18)
3 Turn on this unit. (p. 19)
When using battery When using AC adaptor
Press SET
If a button is not pressed
within 10 seconds.
* When HDD SAFETY is
ON and is activated
(p. 20), the PC Card HDD
cannot be verified, so
always place unit on flat,
level surface.
Press MENU
*
(When a PC Card
HDD is inserted)
(When an SD Memory
Card is inserted)
*
(When a PC Card and SD Memory
Card are inserted)
MENU
STANDBY/SET
“Copying” (p. 23)
“Menus” (p. 22)
(When a PC
Card is
inserted)
Copy Mode
– Note –
• Any cards that utilise adaptors other than the accessory PC Card HDD adaptor are displayed
as “PC CARD”.
21
Eng.p21-25.p65 2003/02/13, 16:4821

Copy Mode (Menus)
M
C
A
N
C
E
L
E
N
U
/SET
V
COPY/TV MODE
Liquid Crystal
Display
COPY T
MODE
MENU
CANCEL
STANDBY/
PC Card HDD
(PC Card) Slot
SET
Memory Card Slot
• Card Storage Capacity Check (MEDIA CAPACITY)
This lets you confirm card storage capacity.
• PC Card HDD available space is approx. 4.6 GB.
(Example)
• BACKUP (BACKUP ON/OFF)
Set to ON, a backup folder containing your data is automatically created when copying. Useful
where data may become accidentally deleted or corrupt. Backup folder contents are not displayed
in TV mode. A computer can be used to copy, edit, and delete files. (This unit is
factory shipped set to “OFF”.)
• TV Format Selection (NTSC/PAL)
This unit can be set to the TV format used in your country (NTSC or PAL). NTSC is the TV format
used in countries, such as the United States, Canada and Japan, and PAL is used in some
European countries and Oceania.
• Formatting Cards (SD-FORMAT) (HDD-FORMAT)
Formatting a card irreversibly erases all contained data.
1 Display the menu as described on
page 21.
• Press MENU again to exit.
2 Press to select a menu item, then
press SET.
• Refer to above for details on menus.
• Refer to pages 24 and 25 for details on formatting.
3 Press to select a function, then
press SET.
• Selection flashes until SET is pressed.
To make other settings:
Press MENU to return to Step 2.
22
Eng.p21-25.p65 2003/02/13, 16:4822
(To check storage capacity)
(To perform BACKUP)
(To select TV format)

Copy Mode (Copying)
All the data can be copied from a Memory Card to the PC Card HDD (PC Card) in a
single operation. Also, data within specific folders can be copied from the PC Card
HDD (PC Card) to a Memory Card by selecting the desired folders to be copied.
Be sure both a PC Card HDD (PC Card) and a Memory Card are inserted.
1 Display the Copy menu. (p. 21)
• Press MENU to display the menu. (p. 22)
2 Press to select the desired
menu item, then press SET.
If “HDD -> SD”, press ,
then SET to select a folder.
(When a PC Card HDD and SD
Memory Card are inserted)
Copy Mode
3 Press to select “YES”, then
press SET.
• After menu selection is made, card
capacity is checked. If “NO
CAPACITY” is displayed, Copy menu
will reappear. Replace card with one
containing sufficient space, then
repeat these steps from the
beginning.
Copying will be performed.
• Refer to “Copying and Backup”
(pp. 11, 12) for data copy details.
• If existing data is to be
overwritten, the message at right
appears. To overwrite, press SET.
To cancel, press CANCEL.
Copy completed!
• Press any button redisplays Copy
menu in Step 1.
To cancel copy in progress:
1. Press CANCEL.
2. Press
press SET to execute.
to select “YES” then
Example: SD -> HDD
Caution
• Never remove a card from
the unit while copying is in
progress.
– Note –
• If “SD -> HDD” has been
selected, a “CARD****”
folder will be created on the
HDD, and the data will be
copied into that folder. If a
card other than a PC Card
HDD is inserted, copy will be
done in the folder structure
of the Memory Card used.
• When copying from HDD ->
SD, only the “CARD****”
folder on the HDD can be
copied.
• When unit is on battery
power only, not pressing a
button for 10 seconds
changes display to show
battery life remaining. Press
SET to resume previous
operation.
• Copying cannot be done if
Memory card is writeprotected.
• Secure data (including files
with WMA, SA1 and MP3
extensions) will not be
copied.
• If copy is canceled in
progress, data copied to
that point will remain on the
destination card. If this data
is unwanted, select TV or
PC mode and delete it.
Eng.p21-25.p65 2003/02/13, 16:4823
23

M
C
A
N
C
E
L
E
N
U
/SET
Formatting Cards
Normally you need not format (initialize) the SD Memory Card and PC Card HDD. An
SD Memory Card that has been formatted to FAT32* specifications cannot be used,
so transfer any important data to a PC, then format the card on this unit.
Format the SD Memory Card
1 Display the menu. (p. 21)
• See page 22 for menu details.
2 Press to select “SD-
FORMAT”, then press SET.
3 Press to select “YES”, then
press SET.
• Selected item flashes until SET is
pressed.
• Press MENU to redisplay menu.
YES
NO
4 Press to select “YES”, then
press SET.
• To cancel format, select “NO”.
* If an SD Memory Card formatted to FAT 32 specifications is
inserted, “CAN’T USE FAT32 SDCARD” will be displayed
followed by a format confirmation message.
FORMAT?
YES
NO
MENU
– Note –
• If “FORMAT ERROR” is displayed, remove the SD Memory Card and reinsert it. Then, repeat
formatting procedure. If error reoccurs, the SD Memory Card may be damaged.
• SD Memory Card can also be formatted on some digital cameras. Refer to digital camera
manual.
Caution regarding SD Memory Card Formatting
* SD Memory Cards formatted under Windows XP may be FAT 32 format because FAT 32 is the
default format selected for this OS. This unit and many digital camera types do not support
FAT 32. A FAT 32 formatted SD Memory Card should be reformatted on this unit or a digital
camera.
24
Eng.p21-25.p65 2003/02/13, 16:4824

Formatting Cards
YES
NO
Format the PC Card HDD
The product numbers for cards that can be formatted using the unit are given below.
Card product numbers not listed cannot be formatted (as of Oct. 1, 2002).
Matsushita
•RP-PH005A
1 Display the menu. (p. 21)
• See page 22 for menu details.
Toshiba
•PAMHD002
•PAMHD005
Melco
•RHDC-2G
•RHDC-5G
Io Data
Devices
•PCHDT-2Gt
•PCHDT-5Gt
Logitech
•LPM-HD2G
•LPM-HD5G
Kingston
•DP-PCM2/
2GB
•DP-PCM2/
5GB
Copy Mode
2 Press to select “HDD-FORMAT”,
then press SET.
SD-FORMAT
HDD-FORMAT
3 Press to select “YES”, then
press SET.
• Selected item flashes until SET is pressed.
• Press MENU to redisplay menu.
4 Press to select “YES”, then
press SET.
• To cancel format, select “NO”.
FORMAT?
Caution regarding PC Card HDD Formats
• Formatting a PC Card HDD with this unit must be done in Copy mode, not PC mode (USB
connection). However, if the disk has multiple partitions created on a device, such as a
notebook PC, formatting on this unit will restore the disk to a single partition (factory default).
To avoid this, use the same device used previously to format the card.
• Windows 95/98 has a FDISK.EXE utility for managing disk partitions, but it must never be
used to partition a PC Card HDD. Otherwise, the storage capacity of the PC Card HDD will be
reported incorrectly, and it will no longer work properly. Also, do not use Windows 95/98 to
format a PC Card HDD that contains multiple partitions or data in other partitions of the disk
may become corrupted, and any saved data may become unusable.
• Only the first par tition of a multi partition disk created on a separate device, such as a
notebook PC will be recognised.
• Also avoid formatting other types of PC Cards using PC mode (USB connection), otherwise
the format may not be mutually recognizable by the computer and the unit, or data corruption
may occur. Always use the unit to format PC Cards.
Caution regarding Formatting
• When a card is formatted, all data saved on the card is irreversibly deleted.
Check the card storage capacity and any data stored on the card, then copy important data
to another drive or card before formatting. Also, since some files types can only be displayed
on a PC, use a PC to check card contents.
• When using this unit to for mat cards, use only the correct type of card. Always check card
storage capacity and any stored data before formatting.
YES
NO
25
Eng.p21-25.p65 2003/02/13, 16:4825

TV Mode (Setup)
You can view DSC photos and PC presentation files on a TV when it is connected to
this unit. Refer to next page for available functions in TV Mode.
Setup (Connections)
1 Connect the Video Cable.
• Connect this unit to either the S-Video or the video input
terminal of your TV.
2 Turn on the TV and set it to VIDEO mode.
• See your TV manual.
3 Insert the Card into the unit. (p. 18)
4 Set COPY/TV MODE to “TV”.
COPY TV
MODE
5 Insert the battery and connect the AC adaptor.
(p. 17)
6 Turn on this unit. (p. 19)
• If unit is on batter y power only,
power shuts off automatically if
no operation is done for
5 minutes to conserve battery.
VIDEO IN
1
S/V OUT
Video Cable
(supplied)
Caution
• The USB cable must be disconnected from the unit to use TV Mode. Otherwise the unit
switches to PC Mode automatically.
• Always power down this unit before inserting/removing the card.
S-VIDEO IN
DC IN
2
Example showing
TV input terminals
4
5
AC Adaptor
5
26
Eng.p26-30.p65 2003/02/13, 16:4826

TV Mode (TV Mode Functions)
Initial Screen
The screen below is displayed when a card is inserted. If “NO CARD” appears,
confirm that a card is correctly inserted.
Folder Hierarchy Indicator
Menu Area
Card Selection
Choose card type, HDD/PC Card • SD
Memory Card. Press
card for display, then press SET.
to select
• When folders are opened within the
index, the number of these icons will
increase to indicate the level within the
hierarchy.
IMAGE DISPLAY
Image files stored on the card are displayed
in the Index Area. They can be searched by
image date. (p. 29) Images can be shown
full screen, and you can use the zoom,
rotate, add colour effects, image
information, and delete functions.
(pp. 40~43)
ALBUM
Index area images can be displayed in
a 6 or 9-image album screen. (p. 30)
Also, when a single image is selected,
you can use the functions as described
in IMAGE DISPLAY, above.
SLIDE SHOW
You can set screen transition effects
and speeds for a Slide Show. (pp. 31~33)
PRESENTATION
This function allows presentations to be
performed. (pp. 34, 35)
Using the included JPEG Addin Software,
PowerPoint data created on a PC can be
converted into JPEG files and used for
presentations. (pp. 48, 49)
EDIT
You can delete, copy, and protect image
files. (pp. 36~39)
Folder/File Name
Area
• Names of selected
files and folders are
displayed here.
Message Area
• Operation prompts
are displayed here.
– Note –
• See page 28 regarding displayable
images, folders, and files.
Page Number
Index Area
• Folders and files
are displayed
here.
TV Mode
Eng.p26-30.p65 2003/02/13, 16:4827
27

TV Mode (Display Information)
Displayable Image Formats
Formats Images of the following formats can be
displayed.
• DCF format 1.1 compliant
• Baseline JPEG format Y Cb Cr (compressed
format)
(Sampling ratios 4:4:4, 4:2:0, 4:2:2, 4:1:1)
(80 x 60 ~ 5120 x 3840 pixels)
• TIFF format RGB (RGB 8 bit non-compressed)
(This image format takes longer to be displayed.)
• The first image from Motion JPEG (QuickTime
format) files with a mov extension
– Note –
• JPEG files altered and saved on a PC as “greyscale”
format cannot be displayed.
• Some parts of an image may not be displayed or the
image may be displayed on a smaller scale depending
on the size of the image.
Folders and Files
Folders and files that are displayed in the Index Area (p. 27) are described in the table
below. Refer to page 10 for details on the folder structure.
Blue
Folder contains displayable images.
Folder
Pink
Folder contains presentation files (“PRES_***”).
Grey
Folder contains no displayable images.
M
E
N
U
MENU
C
A
N
C
E
L
/SET
SET
TIFF files take longer to be displayed in full screen and
Slide Show. In some cases, only TIFF icons appear in index
or album displays. Some files may not be displayed, or may
be displayed on a smaller scale.
TIFF
JPEG File
TIFF File
These are files with moving images or still images with
MOV File
Protect
audio content. Only the first frame of a moving image is
displayed. Rotated images cannot be saved.
Protected folders and files (p. 38) cannot be deleted.
– Note –
File and folder names will not be displayed correctly if...
• more than 8 characters are used.
• spaces and special symbols are used. Use care when changing file and/or folder names.
28
Eng.p26-30.p65 2003/02/13, 16:4828

TV Mode (Image Display)
Viewing Images in the Index
1 Press to select the card
used, then press SET.
2 Select “IMAGE DISPLAY”, then
press SET.
• Index Area is displayed with cursor at first
position.
3 Press to scroll to other index
pages if necessary.
To view folder contents:
Press to move cursor to a folder,
then press SET.
Using the Sub Menu
1 Move cursor over the Index Area
and press MENU.
2 Press to select the item (refer
to the section below), then press
SET.
SEARCH (DATE)
This searches through the folders and files in
the Index Area by date. To search for files
within folders, display the images within the
folder and then start the search.
SEARCH (DATE)
START DATE JAN / 01 / 2002
: SELECT
[SET] : GO
a Press to select the year, then
press to move the cursor to the
next item. Now repeat to select
month and day.
b Press SET.
• A search begins for files created on or
after the specified date. Results are
displayed in the index in order beginning
with the oldest dated file.
• To clear search results, select “RETURN
TO MENU”.
– Note –
• To display images in full screen, move
cursor over a file and press SET. (p. 40)
EXIT
Returns the index display to the first level of the
hierarchy and moves the cursor to the Main
Menu.
RETURN
Returns the display back one step in the
hierarchy.
RETURN TO MENU
Returns the cursor to the Main Menu.
– Note –
• Pressing MENU with Sub Menu displayed
removes the Sub Menu.
• Normally, files and folders are displayed in
the Index Area in order beginning with
the most recent date.
TV Mode
Eng.p26-30.p65 2003/02/13, 16:4829
29

TV Mode (Album)
Images in the index can be displayed on a TV screen in groups of 6 or 9 at a time,
like a photo album.
1 Press to select “ALBUM”, then
press SET.
• Only images in the Index Area can be
displayed as an album. Images in a folder
must first be displayed in the index. (p. 29)
2 Press MENU.
• The menu screen will be displayed.
3 Press to select “6 IMAGES” or
“9 IMAGES”, then press SET.
To go to next or previous pages:
Press for next page.
Press for previous page.
To return to Index Area:
a Press MENU.
b Press and select “RETURN”, then
press SET.
• To display an image in full screen,
select “FILE SELECT,” then move cursor
over the image and press SET. (p. 40)
(When “6 IMAGES” is selected.)
Selecting the Background Brightness
When viewing images in Album, Full Screen (p. 40) or Slide Show (p. 31) mode on an
HDTV monitor, the monitors “Fill-Mode” may affect the image. If brightness is
compromised, follow the steps below.
1 Select Album display, then press
MENU.
2 Press to select “WALL
BRIGHTNESS”, then press .
3 Press to select “GRAY 1”,
“GRAY 2” or “GRAY 3”, and then
press SET.
• If using a nor mal TV, use the “BLACK”
setting.
30
Eng.p26-30.p65 2003/02/13, 16:4830

TV Mode (Slide Show)
You can display selected images as a Slide Show in a variety of transition effects and
speeds.
M
E
N
U
MENU
C
Performing Slide Show
1 Press to select “SLIDE SHOW”,
then press SET.
• Only images in the Index Area are
displayed as a Slide Show. Images in a
folder must first be displayed in the index.
(p. 29)
2 Press MENU.
3 Press to select “SLIDE SETUP”.
“SELECT” (p. 32)
“EFFECT” (p. 33)
“SPEED” (p. 33)
4 Press to select “START”, then
press SET.
• Slide Show begins. It ends after the last
image.
A
N
C
E
CANCEL
L
/SET
SET
TV Mode
To pause the Slide Show:
Press SET.
• ( ) is displayed in top, left corner of screen.
• Press SET again to resume Slide Show.
• When the number of saved files is great, it
may take time to go into Pause/Stop mode.
To stop the Slide Show:
Press CANCEL.
– Note –
• The Sub Menu will disappear if MENU is pressed while the Sub Menu is displayed.
• Selecting “RETURN TO MENU” will redisplay the Main Menu.
Selecting “RETURN” changes the display back one level.
Selecting “EXIT” returns display to first level of hierarchy (p. 29).
• It may not be possible to display some types of TIFF files during album display.
• It will take a longer time to display TIFF files during Slide Show.
Eng.p31-35.p65 2003/02/13, 16:4831
31

TV Mode (Slide Show Settings)
The SLIDE SETUP setting allows you to specify which images to display in a Slide
Show. (p. 31)
M
E
N
U
MENU
C
A
N
C
E
L
/SET
SET
Selecting Images
Specify the images in the index to be included in the Slide Show. If you wish to
include all images in the index, this procedure is not necessary.
1 Do Steps 1~3 on page 31. In Step 3,
press to select “SELECT”.
2 Press SET.
• The cursor will move to the beginning of
the index.
3 Press to select an image,
then press SET.
• Pressing SET again to cancel selection.
•“
” appears at the bottom, right corner of a
selected image.
• Repeat Step 3 until all images for the
Slide Show are selected. Images will be
displayed in the order selected.
• Images in a folder must first be displayed
in the index for selection. (p. 29)
4 Press MENU when selection is
complete.
5 Press to select “YES”,
“CONTINUE” or “CANCEL”, then
press SET.
YES : To exit setup.
CONTINUE : To continue selection.
CANCEL : To cancel image selection.
6 Press to return to “SLIDE SETUP”.
32
Eng.p31-35.p65 2003/02/13, 16:4832

TV Mode (Slide Show Settings)
Setting Screen Transition Effects
1 Do Steps 1~3 on page 31. In Step 3,
press to select “SELECT”.
2 Press to select “EFFECT”, then
press SET.
3 Press for desired transition
effect, then press SET.
• NORMAL: images change one by one.
• WIPE : images change from top to
• SPLIT : images change from middle to
• BLIND : images change in a window
bottom.
each side.
blind fashion.
4 Press to return to “SLIDE SETUP”.
Setting Screen Transition Speed
1 Do Steps 1~3 on page 31. In Step 3,
press to select “SELECT”.
2 Press to select “SPEED”, then
press SET.
3 Press for desired transition
speed, then press SET.
• FAST : images change every
• NORMAL: images change every
• SLOW : images change every
* If larger file size images are included,
display takes longer and transition time
may exceed the selected setting.
2 seconds.
5 seconds.
10 seconds.
4 Press to return to “SLIDE SETUP”.
– Note –
• The Sub Menu will disappear if MENU is pressed while the Sub Menu is displayed.
• Selecting “RETURN TO MENU” will redisplay the Main Menu.
Selecting “RETURN” changes the display back one level.
Selecting “EXIT” returns display to first level of hierarchy (p. 29).
• If “RETURN” is selected or MENU is pressed from the “EFFECT” or “SPEED” menu, the
display returns to the previous sub menu.
TV Mode
Eng.p31-35.p65 2003/02/13, 16:4833
33

TV Mode (Presentation)
Microsoft PowerPoint data created on a PC can be converted into JPEG files using
the supplied JPEG Addin Software and then presented on the TV.
See pages 48 and 49 on how to create presentation files.
M
E
N
U
MENU
Performing Presentation
1 Press to select “PRESENTATION”,
then press SET.
• Make sure a folder (pink) containing
presentation files exists in the index.
2 Press MENU.
3 Press to select “START”, then
press SET.
• Only folders containing presentation files
will be displayed in the Index Area.
• To customise presentation data, press
MENU again, then select “SET
CONTENTS”. (p. 35)
4 Press to select a folder, then
press SET.
• The first slide is displayed.
To display the next slide:
Press .
• Pressing displays previous slide.
To exit presentation:
Press CANCEL.
C
A
N
C
E
CANCEL
L
/SET
SET
– Note –
• Selecting “RETURN TO MENU” will redisplay the Main Menu.
Selecting “RETURN” changes the display back one level.
Selecting “EXIT” returns display to first level of hierarchy (p. 29).
• Slides will be presented in the order they were selected. You can confirm presentation files
and the order in the index. This data is stored on the unit until selections are deleted. (p. 35)
• Only folders entitled “PRES_***” (last 3 digits “***” are variable) are recognised as
presentation folders. If you change the folder name on a PC, only change the last 3 digits,
otherwise, it will not be recognised.
34
Eng.p31-35.p65 2003/02/13, 16:4834

TV Mode (Presentation)
Selecting Presentation Content
You can select specific slides from the index to be displayed. If you wish to include all
images in the index, this procedure is not necessary.
1 Do Steps 1~3 on page 34. In Step 3,
select “SET CONTENTS”, then press
SET.
2 Press to select a folder, then
press SET.
• Folder contents will be displayed.
3 Press to select “SLIDE SELECT”,
then press SET.
• Selecting “RETURN” displays previous slide.
4 Press to select a slide, then
press SET.
• Pressing SET again cancels selection.
” appears at bottom, right corner of a
•“
selected slide.
• Repeat Step 4 until all slides to be displayed
are selected. Presentation will be in the order
slides were selected.
5 Press MENU when selection is
complete.
6 Press to select “YES”, “CONTINUE”
or “CANCEL”, then press SET.
• YES : To finish selection.
• CONTINUE : To continue selection.
• CANCEL : To cancel selection and return
To unselect images:
Press to select “RELEASE”, then press
SET.
• The selected images are returned to the their
original state.
To preview the presentation contents
(REHEARSAL):
Press to select “REHEARSAL”, then
press SET.
• Each slide will appear approx. 2 seconds.
• Pressing CANCEL will cancel this operation.
• Pressing SET will pause this operation.
• When the number of saved files is great, it may
take time to go into Pause/Stop mode.
7 Press to select “RETURN”, then
press SET.
• To proceed with presentation, return to
Step 3 on page 34.
to menu.
TV Mode
Eng.p31-35.p65 2003/02/13, 16:4835
35

TV Mode (Editing)
You can delete images from a card, copy data from one card to another, and protect
data from being deleted accidentally.
M
E
N
U
MENU
C
A
N
C
E
L
/SET
SET
Deleting Images (DELETE)
1 Press to select “EDIT”, then
press SET.
2 Press MENU.
• The Menu screen will be displayed.
3 Press to move the cursor to the right.
Press to select “SELECT” or “ALL”,
then press SET.
• SELECT : To select specific images
• ALL : To delete all images/folders
• Protected images cannot be deleted
unless protection is cancelled. (p. 38)
• To select a file within a folder, it must
first be displayed in the index. (p. 29)
and folders to be deleted.
displayed in the index.
Those not displayed are not
deleted.
For “select delete”, follow “How to Select
Images” instructions on page 39.
4 Press to select “YES”, then
press SET.
• The selected images will be deleted.
• To cancel the operation, select “NO”.
36
Eng.p36-39.p65 2003/02/13, 16:4836
(Example: when selecting “SELECT”)

TV Mode (Editing)
Copying Images (COPY)
Copy data from one card to another. A card to receive copied data must be inserted.
1 Press to select “EDIT”, then
press SET.
2 Press MENU.
• The Menu screen will be displayed.
3 Press to select “COPY”, then
press to move the cursor to the
right.
4 Press to select “SELECT” or “ALL”,
then press SET.
• SELECT : To select specific images
• ALL : To copy* all images/folders
* When a folder is copied, all contents
including non-image files are copied.
• To select a file within a folder, it must
first be displayed in the index. (p. 29)
For “select copy”, follow “How to Select
Images” instructions on page 39.
5 Press to select “YES”, then
press SET.
• Images are copied to the other card.
• To cancel the operation, select “NO”.
and folders to be copied*.
displayed in the index.
TV Mode
(Example: when selecting “SELECT”)
– Note –
• The Sub Menu will disappear if MENU is pressed while the Sub Menu is displayed.
• Selecting “RETURN TO MENU” will redisplay the Main Menu.
Selecting “RETURN” changes display back one level.
Selecting “EXIT” returns display to first level of hierarchy (p. 29).
•“ALL” selection deletes all files within a folder, so check folder contents before proceeding.
Files/folders not displayed are not deleted.
• Grey folders contain no displayable files and cannot be deleted.
• Any files with the same first eight characters in their file names as those selected will be
copied or deleted as well.
Eng.p36-39.p65 2003/02/13, 16:4837
37

TV Mode (Editing)
Protecting Images (PROTECT)
Important file data can be protected from accidental deletion.
1 Press to select “EDIT”, then
press SET.
2 Press MENU.
• The Menu screen will be displayed.
3 Press to select “PROTECT”,
then press to move the cursor to
the right.
4 Press to select “SELECT” or
“ALL”, then press SET.
• SELECT : To select specific images
• ALL : To protect* all images/folders
* When a folder is protected, all contents,
including non-image files, are protected.
For “select protect”, follow “How to
Select Images” instructions on page 39.
5 Press to select “SET”, then
press SET.
• The image or folder will be protected.
• A “key” icon appears in the upper, left
corner of the image.
• To cancel protection of an image, select
“RELEASE”.
and folders to protect*.
displayed in the index.
– Note –
• The Sub Menu will disappear if MENU is pressed while the Sub Menu is displayed.
• Selecting “RETURN TO MENU” will redisplay the Main Menu.
Selecting “RETURN” changes display back one level.
Selecting “EXIT” returns display to first level of hierarchy (p. 29).
• Any files with the same first eight characters in their file names as those selected will be
protected as well.
38
Eng.p36-39.p65 2003/02/13, 16:4838

TV Mode (Editing)
M
E
N
U
MENU
C
A
N
C
E
L
/SET
SET
How to Select Images
Select image files for the DELETE, COPY, and PROTECT functions.
The example screens below depict deleting an image.
1 Press to select an image,
then press SET.
• Pressing SET again cancels selection.
•“
” appears in the bottom, right corner of
the selected image.
• Repeat Step 1 until all desired images are
selected.
2 Press MENU when image selection is
finished.
• Pressing MENU again resumes selecting
operation.
TV Mode
3 Press to select “YES”,
“CONTINUE” or “CANCEL”, then
press SET.
• YES : To finish selection.
• CONTINUE : To continue selection.
• CANCEL : To cancel selection and
Eng.p36-39.p65 2003/02/13, 16:4839
return to menu.
39

TV Mode (Full Screen Playback)
When in image display or album mode, you can view an image full screen. Also, you
can use zoom, rotate, add colour effects, display image information, and delete the
image.
M
E
N
U
MENU
C
A
N
C
E
L
/SET
SET
Selecting Images
Display an Image (from the index)
1 Display the index. (p. 29)
2 Press to select a file, then
press SET.
• Image is displayed in full screen.
To display the next image:
Press to display next image in the
current index.
• Press for previous image.
Display an Image (from an album)
1 Display an album. (p. 30)
2 Press MENU.
3 Press to select “FILE SELECT”
then press SET.
To display the next image:
Press to display next image in the
current album.
• Press for previous image.
40
Eng.p40-43.p65 2003/02/13, 16:4840

TV Mode (Full Screen Playback)
With a full screen index or album image
displayed, you can zoom, rotate, add colour
effects, and display image information.
Press MENU to display the sub menu for
function selection.
• Selecting “RETURN”, then pressing SET
redisplays the index or album.
• Sub menu functions are described on pages
41~43.
Before operating any function, press MENU for Sub Menu.
Enlarging an Image (ZOOM)
Displaying the Sub Menu
Images can be displayed 2 or 4 times their normal size.
1 Press to select “ZOOM” from the
sub menu, then press SET. (Refer to
the above section.)
2 Press to select “X 2” or “X 4”,
then press SET.
3 Press to select an area for
zooming, then press SET.
• To enlarge a X2 image to X4, press MENU
and select “X4”, then press SET. Now,
repeat Step 3.
• You can change the viewing area in a
zoomed image with
To return image to normal size:
Select “RETURN” from the zoom
menu, then press SET.
• Repeat above if image is X4.
To delete the image:
a Select “DELETE” from the zoom
menu, then press SET.
b Press to select “YES”, then
press SET.
.
TV Mode
– Note –
• Selecting “RETURN” redisplays previous menus, one by one.
• To temporarily exit the sub menu, press MENU. Pressing MENU again displays the menu
previous to the one just exited.
• Some images appear grainy when enlarged.
Eng.p40-43.p65 2003/02/13, 16:4841
41

TV Mode (Full Screen Playback)
M
E
N
U
MENU
C
A
N
C
E
L
/SET
SET
Rotating an Image (ROTATE)
1 Press to select “ROTATE” from
the sub menu, then press SET.
(p. 41)
2 Press to select “LEFT” or
“RIGHT”, then press SET.
• LEFT : image is rotated 90°
• RIGHT : image is rotated 90° clockwise.
To save rotated images:
Select “SAVE” from the rotate menu,
then press SET.
• Image will hereafter be displayed in the
saved form.
counterclockwise.
(When “LEFT” is selected)
– Note –
• Selecting “RETURN” redisplays previous menus, one by one.
• To temporarily exit the sub menu, press MENU. Pressing MENU again displays the menu
previous to the one just exited.
• MOV files and some other types of rotated image files cannot be saved.
42
Eng.p40-43.p65 2003/02/13, 16:4842

TV Mode (Full Screen Playback)
Processing Image Colour (COLOR EFFECT)
You can change the image colour.
1 Press to select “COLOR
EFFECT” from the sub menu, then
press SET. (p. 41)
2 Press to select “B/W” or
“SEPIA”, then press SET.
• The image colour will change.
• Selecting “RETURN”, then pressing SET
restores image’s original colouration.
Displaying Image Information (PROPERTIES)
File name, date, and size are always displayed on all full screen images.
1 Press to select “PROPERTIES”
from the sub menu then press SET.
(p. 41)
• When a single image is displayed in a full
screen, the image information will remain
constantly displayed.
• Once this setting is made, information will
appear on any image displayed in full
screen while the unit is on. Properties is
cancelled when unit is turned off.
To cancel properties display:
Repeat the above procedure.
TV Mode
43
Eng.p40-43.p65 2003/02/13, 16:4843

PC Mode (Setup)
By connecting this unit to a PC via the supplied USB cable, it can be utilised as an
external drive.
System Requirements
System requirements are shown below.
Compatible PC Models
OS Compatibility
PC must come factory equipped with a USB port and preinstalled with one of the OS
listed above .
• For Windows 98SE, a CD-ROM drive is required to install the driver.
• If more than one USB device is connected to a PC, or if a USB hub or USB extension cable is
used, correct operation is not guaranteed.
• PC / AT compatible (PCs with USB port)
• Windows
®
98SE • Windows® 2000 • Windows® Me • Windows® XP
Setup (Connections)
1 Turn on the PC and start
Windows.
2 Install a fully charged
battery, then connect AC
adaptor, then turn this unit
on. (p. 19)
3 Connect unit to PC with
supplied USB cable.
• PC begins automatic hardware
detection. Messages displayed
depend on OS used.
• Windows 98SE requires a
dedicated driver. See next page
for the driver install procedure.
USB
Terminal
3
Caution
• Connect USB cable correctly, referring to the
symbol on the PC USB port. For more on USB
connection, see your PC manual.
• For PC connection, a fully charged battery must be
installed, followed by the AC adaptor. Without a
battery installed, power will not be supplied. It is
recommended that you charge the battery fully before
use.
• Never disconnect USB cable or AC adaptor during
communication between the unit and PC. Otherwise,
operation will terminate abnormally. If this happens,
restart the PC, immediately run ScanDisk/CheckDisk,
and make a backup of data. (p. 9) Data integrity
cannot be guaranteed, even if this procedure is
followed, so always place the unit on a stable, level
surface, and never disconnect USB cable or AC
adaptor during use. Refer to page 51 for what to do if
the HDD SAFETY is activated.
• Always start up the computer before connecting
the USB cable.
– Note –
• With USB cable connection, PC may take longer to detect this
unit. During this period, no operations can be performed from the
PC.
USB
Terminal
2
USB Cable (supplied)
44
Eng.p44-47.p65 2003/02/13, 16:4844
DC IN
AC Adaptor
2

PC Mode (USB Driver)
Installing the USB Driver
1 Make connections following “Setup
(Connections)” steps on page 44.
• The “Add New Hardware Wizard” screen is
displayed.
2 Insert the supplied CD-ROM into the
PC’s CD-ROM drive.
3 In the “This wizard searches for new
drivers for:” dialog box, click on
[Next].
1
4 With “Search for the best drive for your
device. [Recommended]” checked, click
2
on [Next].
5 With “CD-ROM drive” checked, click on
[Next].
3
• Uncheck the [Floppy disk drives] box.
6 In the “Windows driver file search for the
device:” dialog box, click on [Next].
• A file copy / driver information database will be
created.
4
7 With “Windows has finished installing the
software that your new hardware device
requires” displayed, click on [Finish].
If using Windows Me:
Depending on the PC, a message
window, such as the one on the right,
may appear during automatic recognition.
If so, click [Browse], select the
c:\windows\options\install folder from the
drop down list, then click [OK].
Afterwards, confirm that path
“c:\windows\options\install” appears in
the “Copy to (C)” box in the top window,
then click [OK].
5
(Only for Windows 98SE)
1
2
3
4
PC Mode
5
– Note –
• Selecting [Retur n] redisplays previous menus, one by one.
• Once the USB dr iver is installed successfully, it need not be installed again for USB
connection.
• After installation, double-click the “ My Computer” icon and confirm that a “Removable Disk”
icon was added to the drive icon list.
Eng.p44-47.p65 2003/02/13, 16:4845
45

PC Mode (Operation with the PC)
When this unit is connected to a PC using the USB Cable provided (p. 44), it will be
recognised as a Removable Disk. You can then copy, move, delete, and display files
on this unit the same as with a normal disk drive.
SD Lamp
HDD Lamp
Liquid Crystal
Display
M
E
N
U
C
A
N
C
E
L
/SET
SET
File Operations
1 Make connections following “Setup (Connections)” steps on page 44.
2 Select and change to another card.
• With a USB cable connected, selecting another card will terminate
communication with the PC. Do Steps 1~4 of “Disconnecting Unit from PC” on
page 47, then proceed with the following operation.
Press to select “SD” or “HDD (PC Card)”,
then press SET.
• While the SD or HDD lamp is flashing, “CANNOT
CHANGE SLOT” is displayed and operation is not
possible. After the lamp goes out, press SET again.
(Liquid Crystal Display)
3 Double-click [My Computer], then
double-click [Removable Disk].
• Files contained on the card will be
displayed and normal PC operations can
be done.
• If no removable disk is found, refer to
“Reinstalling the Device Driver” on page 50.
– Note –
• Drive letters (e.g. “H:”) and method of opening My Computer may vary depending on the PC.
• With USB cable connected, the “Removable Disk” icon will not appear while the SD or HDD
Lamp flashes as the PC checks the connection. Check for the icon once the indicator goes
out. It may take several minutes for the PC to recognise the PC Card HDD device.
46
Eng.p44-47.p65 2003/02/13, 16:4846

PC Mode (Operation with the PC)
Disconnecting Unit from PC
1 Confirm SD and HDD Lamps are out and card is not being accessed.
2 Click on [Safety Remove Hardware] icon in the desktop task tray.
3 Select [USB Mass Storage Device] and click [Stop].
• For Windows Me, “Unplug or eject hardware” will be displayed.
• The message “Stop a Hardware device” will be displayed.
• If this unit is disconnected from the PC while an application is running, an error message
may appear. In this case, close the application, then disconnect the unit.
4 Click on [OK].
• The USB cable can now be safely disconnected and the unit removed.
5 Disconnect the USB Cable from the PC.
Caution
• Never unplug USB cable while the card in this unit is being accessed. This may damage the
unit and the data. Always follow above procedure when removing USB cable.
• With Windows 98SE, there is no special “Safety Remove Hardware” operation. If using
Windows 98SE, do not repeatedly remove and connect the unit or repeatedly switch the
computer to standby or off while the unit is connected.
• PC Card HDD can be directly inser ted into Card Slot of a PC and used as a disk drive.
However, always click on the PC card icon (Step 2 above) when removing the PC Card HDD.
PC Mode
– Note –
• Messages displayed by your PC may vary.
To change the Card:
Do Steps 1~4 of “Disconnecting Unit from PC” above, then change the card following step 2 on
page 46.
To replace the Card:
Do Steps 1~5 of “Disconnecting Unit from PC” above. Then, after first turning unit power off, replace
the card following the procedure on page 18.
To turn unit power off while PC is connected:
Do Steps 1~5 of “Disconnecting Unit from PC” above, then turn unit power off.
Eng.p44-47.p65 2003/02/13, 16:4847
47

PC Mode (Using the Applications)
The included CD-ROM contains a “JPEG Addin Software” application which converts
Microsoft PowerPoint data created on a PC into JPEG files and creates a
presentation folder (p. 49) for TV screen presentation (pp. 34, 35).
• Recommended for use with a 300 MHz or higher CPU (or equivalent CPU) and at least 128 MB of
memory. Also, Microsoft
Installation
1 Turn on the PC and start Windows.
2 Load included CD-ROM into PC CD-ROM
drive.
• CD-ROM folder opens automatically. If not, open
from [My Computer].
3 In the [Setup] folder, double-click on
[Setup.exe] .
• The setup program will be executed.
• If PowerPoint has not been installed, a warning is
displayed. Click [OK], then install PowerPoint.
4 Click on [Next].
5 Confirm installation destination, then
click on [Next].
• To install into another folder, click on [Browse] and
select a folder.
®
PowerPoint® 97/2000/2002 must be installed prior to use.
6 Click on [Finish].
• If you do not want to restart the computer right
away, select “No, I will restart my computer later.”
7 Be sure CD-ROM access light is out
before removing the CD-ROM.
• This completes installation.
8 Start PowerPoint confirming that the
icon, right, is added.
• When PC restar ts, if a message, such as “Please install a JPEG filter” appears,
install “JPEG File Interchange Format Import” provided with PowerPoint.
– Note –
• The way to open folders, shape of “Setup.exe” icon, double or single clicking, and PC messages
vary according to the PC and OS used.
48
Eng.p48-51.p65 2003/02/13, 16:4848

PC Mode (Using the Applications)
Presentation File Creation
1 Install JPEG Addin Software (p. 48), then start PowerPoint on the PC.
2 Select [Open] from [File] menu to open a PowerPoint file for JPEG
conversion.
3 Connect PC using supplied USB cable. (p. 44)
4 Click in the upper, left corner. (p. 48)
• If “Drive not found.” appears, click [OK].
5 Select “Removable Disk” as the save
destination.
• Select “SD” or “HDD (PC Card)” as the save
destination, then specify the drive to be recognised
as the removable disk drive corresponding to the
connected unit. (p. 46)
To change an image name:
• Type in a five-character alphanumeric name. Do not
use spaces or special symbols.
• Default name is “sheet”.
To change the image size:
• Certain TV types may cut off image edges when
displayed on the screen. Thus, the default image
size value is set at 90 %. To enlarge, select 100 %.
About flicker reduction processing:
• Images are processed to reduce TV screen flicker.
It is advisable to leave this option checked.
6 Click on [Create].
• Conversion of PowerPoint files to JPEG files is
started. Afterward, “It was created.” is displayed.
7 Click on [OK].
PC Mode
8 Check the created folder.
a Confirm that a save destination folder was created on the PC.
b Disconnect the USB cable correctly. (p. 47)
c Switch to TV mode and confirm the folder color is pink. (pp. 26~28)
Caution
• Only folders entitled “PRES_***” (last 3 digits “*” are variable) are recognised as presentation
folders. If you change the folder name on a PC, only change the last 3 digits. Otherwise it will
not be recognised.
• For Windows 98SE/Me, a limited number of JPEG files can be created. If an error occurs
during conversion, restart the PC, then repeat this operation. The number of files that can be
converted will vary depending on PC environment, such as the number of open applications
and the number of resident programs.
Eng.p48-51.p65 2003/02/13, 16:4849
49

PC Mode (Other)
Uninstalling JPEG Addin Software
For Windows XP, log in with the same username used when software was installed.
1 Click “Start”, “Settings”, and “Control Panel”.
• For Windows XP, Click “Start” and “Control Panel”.
2 Double-click “Add/Remove Programs”.
• For Windows XP, click “Add or Remove Programs”.
• A list of the programs that are currently installed will be displayed.
3 Select “JPEG Addin Software”, then click [Add/Remove].
• For Windows Me/XP, click [Change/Remove].
4 Click on [OK].
• The JPEG Addin Software will then be uninstalled.
• To cancel, click [Cancel].
Reinstalling the Device Driver (Windows 98SE/Me)
If the unit device cannot be found on the PC, it may be due to incorrect device driver
installation. Reinstall the driver as follows.
1 Right-click the My Computer icon,
and then select “Properties”.
• The “System Properties” screen will be
displayed.
2 Click the “Device Manager” tab.
3 Select “Panasonic SD Media
Storage USB”, then click
[Remove].
4 Click on [OK].
5 Click on [Refresh].
• The Add New Hardware Wizard will start.
Refer to page 45 for details on installing
the driver.
50
Eng.p48-51.p65 2003/02/13, 16:4850

PC Mode (Other)
HDD SAFETY Switch Operation
When using a USB connection, place the unit device on a flat, level surface. If the
HDD SAFETY switch is activated, carry out the following remedies.
●●
● For Windows 98SE/Me
●●
If the HDD SAFETY Detection Switch is activated while a PC Card HDD is being
accessed, the PC screen goes blue and the following message appears.
Error Reading Disk in Drive**:
Please Insert Disk ***
With Serial Number *** in Drive *:
Press ENTER for OK or ESC to Cancel : OK
a “SAFETY MODE PUT IT DOWN” appears on the unit LCD. Make sure that the
unit is always placed on a flat, level surface.
b When the unit LCD changes to “SD” or “HDD” selection screen, and the HDD Lamp
starts flashing, press [Enter].
• The PC screen will turn black momentarily and the unit will then continue the
operation that was in progress before the switch was activated. Wait for a short
period while the HDD Lamp flashes. If the HDD Lamp stays off and the PC
screen does not return to its previous state, press [Enter] once more. If this has
no effect, disconnect the USB cable and restart the computer.
• After processing is complete, check that the required operation has completed
normally. Repeat the operation if necessary.
●●
● For Windows 2000/XP
●●
If the HDD SAFETY Detection Switch is activated while the PC Card HDD is being
accessed in PC mode, the following message may appear.
[ For Windows 2000 ] [ For Windows XP ]
PC Mode
Place the unit on a flat, level surface, and then click [OK], [Cancel], [Try Again]
or [Continue].
• Processing will be interrupted, so repeat the operation.
– Note –
• If the HDD SAFETY switch was activated while the PC Card HDD was being accessed, it is
advisable to run ScanDisk/CheckDisk on the computer. (p. 9)
Eng.p48-51.p65 2003/02/13, 16:4851
51

Warning and Instruction Displays
Copy Mode (Liquid Crystal Display)
Indications Condition
PLEASE
INSERT BATT.
NO CARD
NO DATA
INIT ERROR
FORMAT ERROR
NO CAPACITY
CARD PROTECT
COPY ERROR
HIT ANY KEY
SAFETY MODE
PUT IT DOWN
CAN’T USE
FAT32 SDCARD
CAN’T COPY
SECURE FILES
BATTERY LOW
COPY CANCEL
BATTERY LOW
PC CARD
CAN’T FORMAT
Insert battery. Power will not turn on without battery
inserted.
Insert the card.
No data is stored on the card.
An error has occurred during initialisation of the
HDD/PC Card. Turn off the power, then reinsert the
card. If error occurs again, format the card (p. 25),
then reinsert it. If error still occurs, card may be
damaged.
An error occurred during card formatting.
Re-insert card and format again. (pp. 24, 25)
Insufficient free space on the copy destination disk.
Delete unnecessary files, or insert a card with
sufficient free space.
The card is protected. Cancel the protection to
resume operation. Refer to documentation provided
with the card.
An error occurred during copying. Press any key,
then reset the unit (p. 54), or turn the power off,
then back on again and repeat copying operation.
The HDD SAFETY Detection Switch has activated
and the HDD has stopped for protection. Place the
unit on a flat, level surface.
SD Memory Cards formatted to FAT32 specifications
cannot be used. “Format?” will be displayed. Transfer
desired files to PC, then format the card. (pp. 24, 25)
Secure data files (audio files that include copyright
restrictions) cannot be copied.
The battery is spent. Copy operation will stop and
power will turn off. Recharge the battery.
The battery is spent. The copy operation will be
cancelled and the power will turn off. Then recharge
the battery.
The PC Card cannot be formatted.
52
Eng.p52-56.p65 2003/02/13, 16:4852

Warning and Instruction Displays
PC Mode (Liquid Crystal Display)
Indications Condition
CONNECT AC
CANNOT
CHANGE SLOT
INSERT BATT.
Connect the AC adaptor.
Selection cannot be changed between a PC Card
HDD/PC Card and an SD Memory Card during
data transfer between the unit and a PC. Wait for
transfer to finish, then make your selection.
Insert the battery.
DISCONNECT USB
PULL OUT USB CABLE
MODE CHANGE
PLEASE WAIT
POWER OFF
PLEASE WAIT
SAFETY MODE
PUT IT DOWN
Data transmission was interrupted. Disconnect the
USB cable. Check that the battery and AC adaptor
are connected correctly, then reconnect the USB
cable.
The mode is being changed. Please wait a moment.
After processing is finished, the power will turn off.
The HDD SAFETY Detection Switch has activated
and the HDD has stopped for protection. Place the
unit on a flat, level surface.
TV Mode (TV Screen Display)
Indications Condition
NO CARD
NO DATA
INITIALIZE ERROR
FORMAT ERROR
NO IMAGE FILE
NO CAPACITY
COPIED EXCEPT
SECURE FILES
Insert a card.
There is no data on the card or in the folder.
An error has occurred during HDD/PC Card
initialisation. Turn power off, then reinsert the
card. If error is repeated, format the card (p. 25)
and reinsert it. If error persists, card may be
damaged.
An error occurred during formatting of the card. Reinsert the card and then reformat it. (pp. 24, 25)
There are no JPEG or TIFF files in the folder that
can be displayed.
Insufficient free space on the copy destination disk.
Delete unnecessary files, or insert a card with
sufficient free space.
Secure data files (audio files that include copyright
restrictions) cannot be copied.
For Your Information
(Continued on next page.)
Eng.p52-56.p65 2003/02/13, 16:4853
53

Warning and Instruction Displays
TV Mode (TV Screen Display)
Indications Condition
COPY ERROR
DELETE ERROR
PROTECT ERROR
CAN’T READ
SETTING FILE
CAN’T DISPLAY
FOR HDD SAFETY
PUT UNIT DOWN
THIS FILE ISN’T EXIF
CAN’T SAVE THIS FILE
NO SUPPORT
FAT32 SD CARD
CANNOT SELECT
BATTERY LOW
COPY CANCEL
BATTERY LOW
NOT SELECTED
BATTERY LOW
PLEASE POWER OFF
DELETE EXCEPT
PROTECT AND CAN’T
VIEW FILE
CARD IS WRITE
PROTECTED
The specified operation did not execute correctly.
Reset the unit (see below), or turn power off, then
back on and repeat the operation.
An image file could not be displayed. The file is
corrupt or the format is incompatible.
The HDD SAFETY Detection Switch has activated
and the HDD has stopped for protection. Place the
unit on a flat, level surface.
Rotated images cannot be saved.
SD Memory Cards that have been formatted to
FAT32 specifications cannot be used.
Folders cannot be selected for Slide Show. Open a
folder, then select files.
The battery is spent. Operation will be cancelled and
power will turn off. Recharge the battery.
The battery is spent. Copy operation will stop and
power will turn off. Recharge the battery.
The operation timed out due to no selection during a
Slide Show, presentation, copying, deleting or file
protecting operation. Repeat the selection.
Battery level is getting low. Turn off the power and
recharge the battery.
Protected files and files that cannot be displayed
cannot be deleted.
Card or file is protected. To continue the operation,
remove the protection.
Reset Function
If an error occurs during an operation and
the unit no longer works, reset the unit as
follows.
Press CANCEL and STANDBY
simultaneously for 5 seconds.
• Unit is reset. Try operation again.
54
Eng.p52-56.p65 2003/02/13, 16:4854
CANCEL
STANDBY

Before Requesting Service
If a problem should arise, you may be able to correct it yourself using the corrections
listed below.
Symptom Correction
Unit does not power up...
Power is on, but unit turns off
after a short period...
Power turns off automatically...
Unit will not turn off...
Copying cannot be performed...
Files and folders cannot be
located...
• Be sure the battery and AC adaptor are
connected properly.
• Use a fully recharged battery.
• Press STANDBY for at least 2 seconds.
• Use a fully recharged battery.
• Always recharge battery within specified
temperature range. Battery will not recharge
at low temperatures under 23 F (-5 °C).
• If powering unit with battery only, power will shut
off if no operation is performed for 5 minutes.
Turn unit back on.
• Power will not turn off while files are being read
or copied. Turn unit off after SD/HDD access
Lamp goes out.
• Power will not turn off when HDD SAFETY
Detection Switch is activated. Place unit on flat,
level surface, then turn off the power.
• Insert card correctly.
• Be sure copy destination has sufficient free
space. Delete unnecessary data to free up
space.
• If HDD SAFETY Detection Switch was
activated, place unit on flat, level surface.
• Secure data files (audio files that include
copyright restrictions) cannot be copied.
• If the SD Memory Card write-protect switch is
set to “LOCK”, data cannot be overwritten.
• In Copy or TV mode, when an SD Memory Card
is copied to a PC Card HDD, copied data will be
placed in a folder entitled, “CARD****”. Open this
folder and confirm data was copied.
• If all or selected data in a “CARD****” folder is
copied to an SD Memory Card, the “CARD****”
folder disappears and data is copied according
to file structure rules. See “Copying and
Backup” section on page 12.
(Continued on next page.)
For Your Information
Eng.p52-56.p65 2003/02/13, 16:4855
55

Before Requesting Service
Symptom Correction
No images are displayed, even
though this unit is connected to
a TV...
Images cannot be displayed...
Video images cannot be played
back...
Data cannot be read or written
using USB connection...
PC Card HDD data cannot be
read or written...
Insufficient free space on card...
No presentation folders can be
found...
Computer does not start up...
• Set COPY/TV MODE to “TV.”
• Connect video cable properly.
• Set TV input to Video. See TV manual.
• The USB cable must be disconnected to view
images on a TV.
• Confirm that TV format is NTSC from Copy
mode.
• Insert card correctly.
• Files with extensions other than .JPG, .TIF and
.MOV, and files that contain corrupt data, cannot
be displayed.
• To view images within folders, open a folder,
then select .JPG, .TIF, and .MOV files.
• Some files take longer to display.
• Only the first frame of QuickTime format data
can be displayed.
• When the USB cable is connected, ensure that
the battery has been installed then connect the
AC adapter.
• Connect USB cable properly.
• Select a read or write destination card.
• Correctly install PC Card HDD in this unit.
• If HDD SAFETY Detection Switch was
activated, place unit on flat, level surface.
• The PC Card HDD is a precision hard disk
drive. If it is dropped or receives a strong
impact, malfunction, damage, and loss of stored
data could occur. If read/write errors occur or
operation is abnormal, a backup should be
performed immediately, using the ScanDisk/
CheckDisk function.
• Confirm card capacity on a PC as some data on
the card cannot be displayed using this unit.
• If Backup is set to on, available space is
reduced by half.
• For a PC Card HDD, be sure specified saving
destination name is in the form of “CARD****”.
• Do not change folders to unrecognisable
names.
• Be sure USB cable is not connected to the unit.
56
Eng.p52-56.p65 2003/02/13, 16:4856

Specifications
Power Supply: DC 4.8 V (AC Adaptor) / DC 3.7 V (Battery)
Power Consumption: 2.2 W (AC Adaptor) (peak 3.4 W)
2.2 W (Battery) (peak 2.9 W)
Compatible Memory
Cards
SD Card Slot: SD Memory Card, MultiMediaCard
PC Card Slot: PC Card HDD (2 GB, 5 GB)
SD Memory Card *
MultiMediaCard *
CF Card*
Smart Media*
Memory Stick*
Microdrive (340 MB, 1 GB)*
* Each type of Memory Card requires a compatible adaptor.
Copyable Data: All files and folders except secure files (audio files that
include copyright restrictions)
Image Playback Baseline JPEG, TIFF (RGB 8 bit non-compressed) and the
Formats: first screen of Motion JPEG files (QuickTime)
Image Sizes: 80 x 60 ~ 5120 x 3840 pixels
Copy Functions
Copy Mode: Copying of all data from SD Memory Card (MultiMediaCard)
-> PC Card HDD (PC Card)
Copying of selected folders from PC Card HDD (PC Card)
-> SD Memory Card (MultiMediaCard)
TV Mode: Copying of all data and selected files and folders from SD
Memory Card (MultiMediaCard) -> PC Card HDD (PC Card)
Copying of all data and selected folders from PC Card HDD
(PC Card) -> SD Memory Card (MultiMediaCard)
Playback Functions: Image Playback
Thumbnail display (4 x 6 display)
Album display (6 images or 9 images display)
Slide Show (automatic display)
Rotation, enlargement (x2, x4)
Presentation
Delete Functions: Selective deletion of files or folders, and deletion of all files
and folders
Protection Functions: PC card HDD protection using HDD SAFETY Detection
Switch
File backup protection
File protection against accidental deletion
For Your Information
Eng.p57-60.p65 2003/02/13, 16:4857
57

Specifications
Video Output: Composite Output : NTSC format / PAL format, 1 V p-p,
Dimensions: 73 (W) x 25.8 (H) x 107.5 (D) mm
Weight: 5.63 oz / 160 g (Not including PC Card HDD and battery
Operating Weight: 8.8 oz / 250 g
Operating Temperature: 32 F ~ 95 F (0 °C ~ 35 °C)
Operating Humidity: 10 % ~ 80 %
Battery Life: Continuous use
PC Interface: USB1.1
OS Compatibility: Windows 98SE, Windows 2000, Windows Me, Windows XP
Compatible PC Models: IBM PC / AT compatible models
AC Adaptor (LSSQ0393)
Power Supply: 110 - 240 V AC 50 / 60 Hz
Input Capacity: 0.12 A
Output: 4.8 V DC
Weight: 2.63 oz / 75 g
Dimensions: 40 (W) x 26 (H) x 75 (D) mm
Battery Pack (CGA-S301E1)
Maximum Voltage: 4.2 V
Nominal Voltage: 3.7 V
Rated Capacity: 1000 mAh
Weight: 0.98 oz / 28 g
Dimensions: 35 (W) x 7 (H) x 53 (D) mm
PC Card HDD (RP-PH005A)
Capacity: 5 GB
Input Voltage: 3.3 V / 5V
Interface: PCMCIA Type ll
Weight: 1.93 oz / 55 g
Dimensions: 54 (W) x 5 (H) x 86 (D) mm
75 ohm
S-Output : Y and C signals, NTSC format / PAL format,
1 V p-p, 75 ohm
2-14/16 (W) x 1 (H) x 4-4/16 (D) inch
pack)
Approx. 80 minutes in Copy mode
Approx. 80 minutes in TV mode
1-9/16 (W) x 1 (H) x 2-15/16 (D) inch
1-6/16 (W) x 2-12/16 (H) x 2-1/16 (D) inch
2-2/16 (W) x 1-15/16 (H) x 3-6/16 (D) inch
58
Eng.p57-60.p65 2003/02/13, 16:4858

Memo
Eng.p57-60.p65 2003/02/13, 16:4859
For Your Information
59

B
Printed in Japan
LSQT0623A
S0203A0
Eng.p57-60.p65 2003/02/13, 16:4860
Matsushita Electric Industrial Co., Ltd.
Web Site: http://www.panasonic.co.jp/global/
 Loading...