

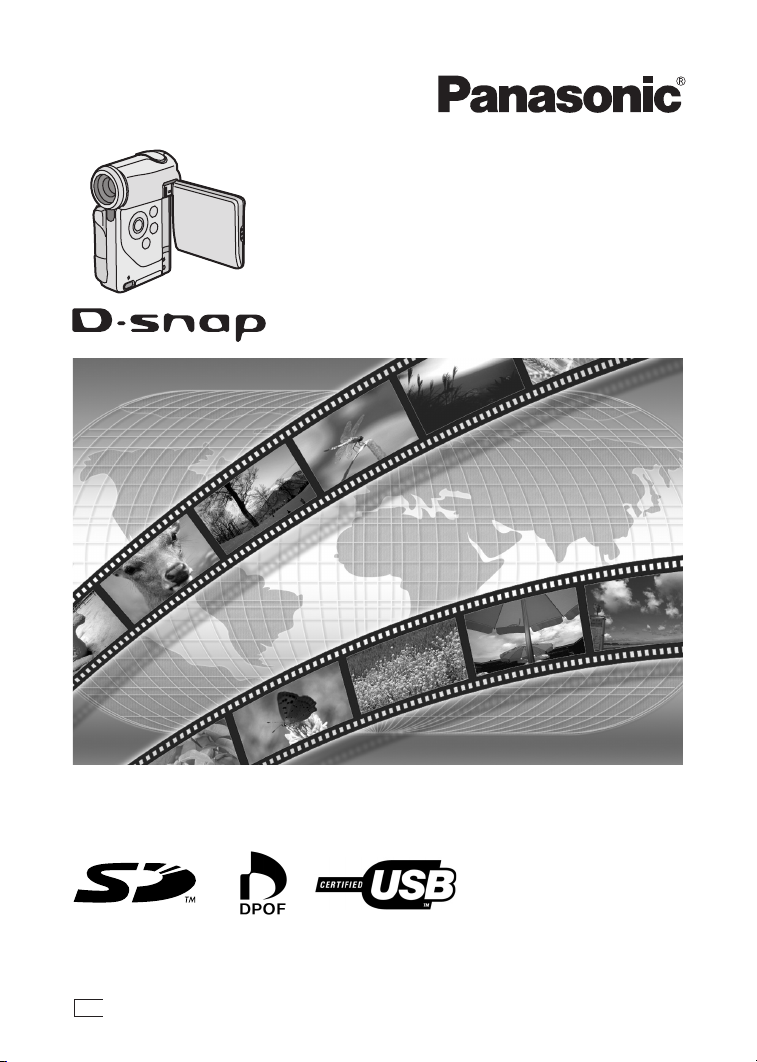
SD Video Camera
Operating Instructions
Model No. SV-AV100
Before use, please read these instructions completely.
B
VQT0F69

Before opening the CD-ROM package, please read the following.
bеЗ=rлЙк=iбЕЙелЙ=^ЦкЙЙгЙен
You (“Licensee”) are granted a license for the Software defined in this End User License Agreement
(“Agreement”) on condition that you agree to the terms and conditions of this Agreement. If Licensee does
not agree to the terms and conditions of this Agreement, promptly return the Software to Matsushita
Electric Industrial Co., Ltd. (“Matsushita”), its distributors or dealers from which you made the purchase.
Article 1 License
Licensee is granted the right to use the Software, including the information recorded or described on the
CD-ROM, instruction manuals, and any other media provided to Licensee (collectively “Software”), but all
applicable rights to patents, copyrights, trademarks and trade secrets in the Software are not transferred
to Licensee.
Article 2 Use by a Third Party
Licensee may not use, copy, modify, transfer or allow any third party, whether free of charge or not, to use,
copy or modify the Software, except as expressly provided for in this Agreement.
Article 3 Restrictions on Copying the Software
Licensee may make a single copy of the Software in whole or in part solely for back-up purpose.
Article 4 Computer
Licensee may use the Software only on one computer, and may not use it on more than one computer.
Article 5 Reverse Engineering, Decompiling or Disassembly
Licensee may not reverse engineer, decompile, or disassemble the Software, except to the extent either
of them is permitted under law or regulation of the country where Licensee resides. Matsushita, or its
distributors will not be responsible for any defects in the Software or damage to Licensee caused by
Licensee’s reverse engineering, decompiling, or disassembly of the Software.
Article 6 Indemnification
The Software is provided “AS-IS” without warranty of any kind, either expressed or implied, including, but
not limited to, warranties of non-infringement, merchantability and/or fitness for a particular purpose.
Further, Matsushita does not warrant that the operation of the Software will be uninterrupted or error free.
Matsushita or any of its distributors will not be liable for any damage suffered by Licensee arising from or
in connection with Licensee’s use of the Software.
Article 7 Export Control
Licensee agrees not to export or re-export to any country the Software in any form without the appropriate
export licenses under regulations of the country where Licensee resides, if necessary.
Article 8 Termination of License
The right granted to Licensee hereunder will be automatically terminated if Licensee contravenes any of
the terms and conditions of this Agreement. Upon termination hereof, Licensee must destroy the Software
and related documentation together with all the copies thereof at Licensee’s own expense.
O

`зенЙенл
End User License Agreement ...................2
Information for Your Safety........................4
Caution for AC mains lead ........................5
Introduction ...............................................6
mêÉé~ê~íáçå
Standard Accessories ...............................7
Optional Accessory ...................................7
Controls and Components ........................8
Power Supply ..........................................10
Fitting the Camera on the AV Cradle ......11
Inserting a Memory Card ........................12
Using the LCD Monitor............................13
Turn the Power On/Selecting Operation
Modes ....................................................15
Using the Menu Screen...........................16
List of Menus...........................................17
Setting Date and Time ............................20
Adjusting Brightness and
Colour Level on the LCD Monitor ...........22
_~лбЕ=cмеЕнбзел
Before Recording operation ....................23
Clean Up Function ..................................24
Recording Moving Pictures
(MPEG2)................................................25
Recording Moving Pictures
(MPEG4)................................................26
Playing Back Moving Pictures
(MPEG2)................................................27
Playing Back Moving Pictures
(MPEG4)................................................28
Adjusting the Volume ..............................29
Recording Still Pictures...........................30
Playing back Still Pictures.......................31
Play Back All of the Still Pictures
One by One (Slide Show) ......................32
Manual Exposure Adjustment .................35
Manual Focus Adjustment.......................35
Recording in Special Situations
(Program AE).........................................36
Image Stabilizer Function........................37
Wind Noise Reduction Function..............37
Using the Play Menu Functions...............38
Playing Back on an external device.........52
Storing on the PC....................................53
Using the DVD Video Recorder
with a Hard Disk.....................................54
lе=~=mЙклзе~д=`згймнЙк
About the supplied software....................55
USB Driver ..............................................56
MediaStage for AV100 ............................57
Installing MediaStage & USB Driver .......58
Installing USB Driver...............................59
Connecting with the PC...........................60
Starting the Software...............................61
Disconnecting the USB Cable safely.......61
If you no longer need software
(Uninstall)...............................................61
Constructing a Folder when
the Memory Card is used with a PC ......62
lнЬЙкл
Charge the built-in battery for
maintaining the date information............63
Using the Optional Earphones ................63
Using Accessories...................................64
After Use .................................................66
Indications (Recording Mode) .................67
Indications (Playback Mode) ...................69
Notes & Precautions ...............................72
Notes and Hints.......................................75
Before Requesting Service .....................83
Specifications..........................................86
Index........................................................88
^Зо~еЕЙЗ=cмеЕнбзел
Zoom In/Out Functions............................33
Backlight Compensation Function...........33
Adjusting White Balance.........................34
P

Dear Customer,
We would like to take this opportunity to
thank you for purchasing this Panasonic SD
Video Camera. Please read these
Operating Instructions carefully and keep
them handy for future reference.
fеСзкг~нбзе=Сзк=vзмк=
p~СЙну
WARNING
TO REDUCE THE RISK OF FIRE OR
SHOCK HAZARD AND ANNOYING
INTERFERENCE, USE ONLY THE
RECOMMENDED ACCESSORIES AND
DO NOT EXPOSE THIS EQUIPMENT TO
RAIN OR MOISTURE. DO NOT REMOVE
THE COVER (OR BACK); THERE ARE
NOT USER SERVICEABLE PARTS
INSIDE. REFER SERVICING TO
QUALIFIED SERVICE PERSONNEL.
IMPORTANT
Please respect all copyrights.
Whatever you have recorded and created
can be used for your personal
entertainment only. Under copyright
laws, other materials cannot be used
without obtaining permission from the
holders of the copyrights.
≥Injury or material damage resulting
from any kind of use that is not in
accordance with the operating
Instructions are the sole responsibility
of the user.
≥After long operation, this device can get
warm. This is not a malfunction. The
cautions label is stuck on the surface of
the SD Video Camera.
≥The manufacturer shall in no event be
liable for the loss of recordings due to
malfunction or defect of this SD Video
Camera, its accessories or Memory Card.
≥Please note that the actual controls and
components, menu items, etc. of your SD
Video Camera may look somewhat
different from those shown in the
illustrations in these Operating
Instructions.
≥ : SD logo is a trademark.
≥The SD Video Camera uses copyright-
protected technologies and is protected by
the patented technologies and intellectual
properties of Japan and the U.S. To use
these copyright-protected technologies,
authorization of the Macrovision Company
is required. It is prohibited to disassemble
or modify the SD Video Camera.
≥(l 00) indicates the page to be referred
to.
≥Note that the SD Video Camera may not
play back data recorded or created on
another product and another product may
not play back data recorded on the SD
Video Camera.
≥The nameplate of the SD Video Camera is
fixed on the bottom of the battery
compartment.
The SOCKET OUTLET SHALL BE
INSTALLED NEAR THE EQUIPMENT
AND SHALL BE EASILY ACCESSIBLE.
CAUTION
Danger of explosion if battery is
incorrectly replaced.
Replace only with the same or
equivalent type recommended by the
manufacturer.
Dispose of used batteries according to
the manufacturer’s instructions.
Q
Caution for AC mains lead
Message to User who has Power Cable as an accessory. (l 7)
For your safety, please read the following text carefully.
This appliance is supplied with a
moulded three-pin mains plug for your
safety and convenience. A 5-ampere
fuse is fitted in this plug.
Should the fuse need to be replaced,
please ensure that the replacement fuse
has a rating of 5-amperes and it is
approved by ASTA or BSI to BS1362.
Check for the ASTA mark Ï or the BSI
mark Ì on the body of the fuse.
If the plug contains a removable fuse
cover you must ensure that it is refitted
when the fuse is replaced. If you lose the
fuse cover, the plug must not be used
until a replacement cover is obtained. A
replacement fuse cover can be
purchased from your local Panasonic
Dealer.
IF THE FITTED MOULDED PLUG IS
UNSUITABLE FOR THE SOCKET
OUTLET IN YOUR HOME THEN THE
FUSE SHOULD BE REMOVED AND
THE PLUG CUT OFF AND DISPOSED
OF SAFELY.
THERE IS A DANGER OF SEVERE
ELECTRICAL SHOCK IF THE CUT OFF
PLUG IS INSERTED INTO ANY 13AMPERE SOCKET.
If a new plug is to be fitted, please
observe the wiring code as shown below.
If in any doubt, please consult a qualified
electrician.
As the colours of the wires in the mains
lead of this appliance may not
correspond with the coloured markings
identifying the terminals in your plug,
proceed as follows:
The wire which is coloured BLUE must
be connected to the terminal in the plug
which is marked with the letter N or
coloured BLACK.
The wire which is coloured BROWN
must be connected to the terminal in the
plug which is marked with the letter L or
coloured RED.
Under no circumstances should either of
these wires be connected to the earth
terminal of the three-pin plug, marked
with the letter E or the Earth Symbol Ó.
ª Before Use
Remove the Connector Cover as follows.
Connector
Cover
ª How to replace the Fuse
1 Remove the Fuse Cover with a
screwdriver.
Fuse
Cover
ª IMPORTANT
The wires in this mains lead are coloured
in accordance with the following code:
Blue: Neutral
Brown: Live
2 Replace the fuse and attach the
Fuse Cover.
Fuse
R

fенкзЗмЕнбзе
This SD Video Camera can record MPEG2/
MPEG4 moving pictures and still pictures.
Additionally, using the viewer software,
MediaStage for AV100 (supplied
accessory), the MPEG2/MPEG4 moving
pictures data can be edited on the personal
computer.
ª Charging the Battery
Be sure to charge the supplied battery
before use.
≥Refer to Page 10 for the procedures to
attach and charge the battery.
ª Clock setting
When you purchase the SD Video
Camera, the clock setting has not been
performed. To start, please set the year,
month, date and time. (l 20)
mêÉé~ê~íáçå
ª Sales and Support
Information
Customer Care Centre
≥For UK customers: 08705 357357
≥For Republic of Ireland customers: 01 289
8333
≥Visit our website for product information
≥E-mail: customer.care@panasonic.co.uk
Technical Support for AV Software
≥For callers in UK: 08701 505610
≥For callers in ROI: 0044 8701 505610
Direct Sales at Panasonic UK
≥Order accessory and consumable items
for your product with ease and confidence
by phoning our Customer Care Centre
Monday - Friday 9:00am – 5:30pm.
(Excluding public holidays).
≥Or go on line through our Internet
Accessory ordering application at
www.panasonic.co.uk
≥Most major credit and debit cards
accepted.
≥All enquiries transactions and distribution
facilities are provided directly by
Panasonic UK Ltd.
≥It couldn’t be simpler!
≥Also available through our Internet is
direct shopping for a wide range of
finished products, take a browse on our
website for further details.
.
S
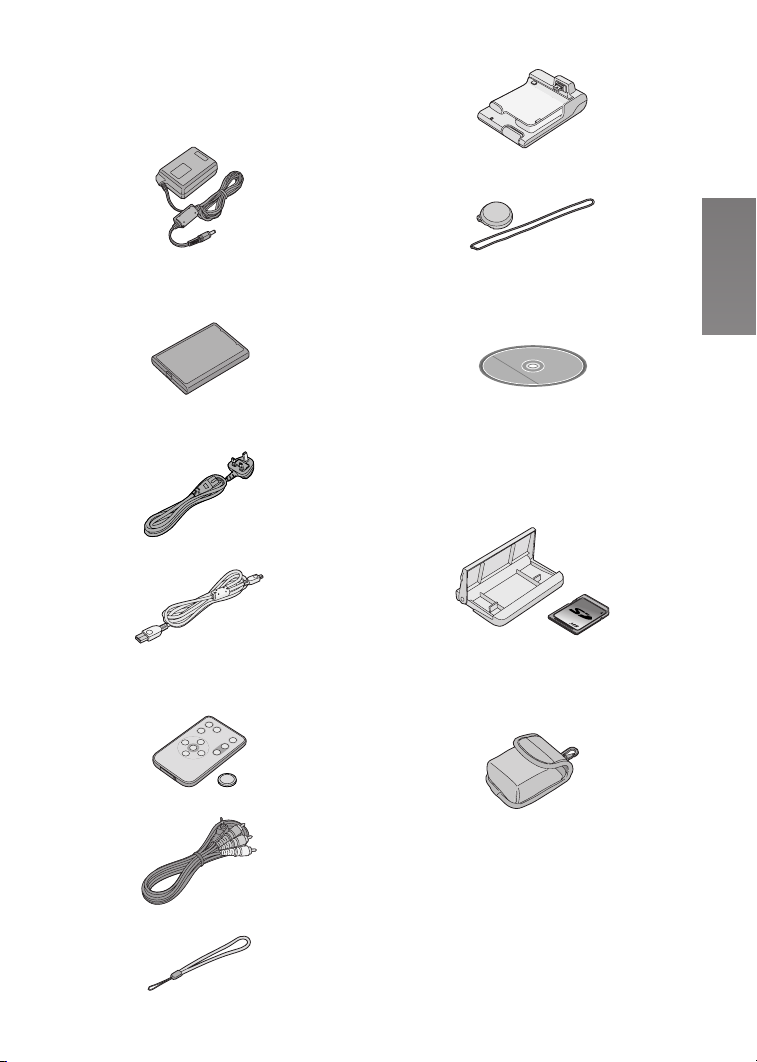
pн~еЗ~кЗ=^ЕЕЙллзкбЙл
1 AC Adaptor (VSK0617) (l 11)
≥Supplies power to the SD Video
Camera.
8 AV Cradle (VSK0654) (l 11)
9 Lens Cap (VGQ7448) and
Lens Cap Cord (VFC4035) (l 65)
2 Battery Pack (CGA-S302E) (l 10)
≥Supplies power to the SD Video
Camera.
3 AC Mains Lead (K2CT3DA00003)
(l 11)
4 USB Cable (K2KZ4CB00002) (l 60)
5 Remote Controller (N2QACC000005)
and Button-Type-Battery (CR2025)
(l 65)
6 AV Cable (K2KC4CB00009) (l 52)
10 CD-ROM (l 55)
MediaStage for AV100,
USB Driver, DirectX,
Adobe A crobat Reader
≥For using the MediaStage, refer to the
PDF manual. This manual describes
installation only.
11 Card Case/Movie Stand (VFC4032)
(l 66) and SD Memory Card
(512 MB) (RP-SDH512VE0) (l 12)
512
12 Wearable Carry Case (VFC4020)
≥Put the SD Video Camera in the
Wearable Carry Case supplied after
use or when carrying it.
7 Hand Strap (VFC4012) (l 65)
lйнбзе~д=^ЕЕЙллзку
1 Battery Pack (CGA-S302E/1B) (l 10)
≥Supplies power to the SD Video
Camera.
T

`зенкздл=~еЗ=`згйзеЙенл
1 Lens (l 73)
2 Recording Lamp (l 17)
3 Remote Control Sensor (l 65)
4 AV Output Socket [A/V OUT] (l 52)
Earphone Socket [ ] (l 63)
5 USB Port (l 60)
6 DC Input Socket [DC IN 4.9V] (l 10)
7 LCD Monitor (l 13)
Due to limitations in LCD production technology,
there may be some tiny bright or dark spots on
the LCD Monitor screen. However, this is not a
malfunction and does not affect the recorded
picture.
8 Memory Card Slot (l 12)
9 Card Slot Cover Open Lever (l 12)
10 Card Access Lamp [ACCESS] (l 76)
11 Multi-function Button
Operating/Select Function
[6/;/5/∫/1 SET] (l 16, 27, 31, 32)
Backlight Compensation [
12 Menu Button [MENU] (l 16)
13 Recording/Playback Mode Selector Button
[REC/PLAY] (l 15)
14 Mode Selector Button [MODE] (l 15)
15 Microphone (built-in, stereo)
16 Reset Button [RESET] (l21, 84)
17 Speaker
18 Zoom Lever [T/W] (l 33)
Volume Adjustment Lever [rVOLs] (l 29)
19 Recording Start/Stop Button (l 25, 26, 30)
20 AV Cradle Connector [MULTI] (l 11)
21 Strap Holder (l 65)
22 Power Lamp (l 10)
23 Power Switch [ON/OFF] (l 15)
24 Auto/Manual Selector Switch [AUTO/MANUAL/
SELECT] (l 34, 35)
ª] (l 33)
4
1
5
2
3
6
7
8
9
10
12
13
11
14
15
16
17
18
19
20
22
23
24
Í
21
U
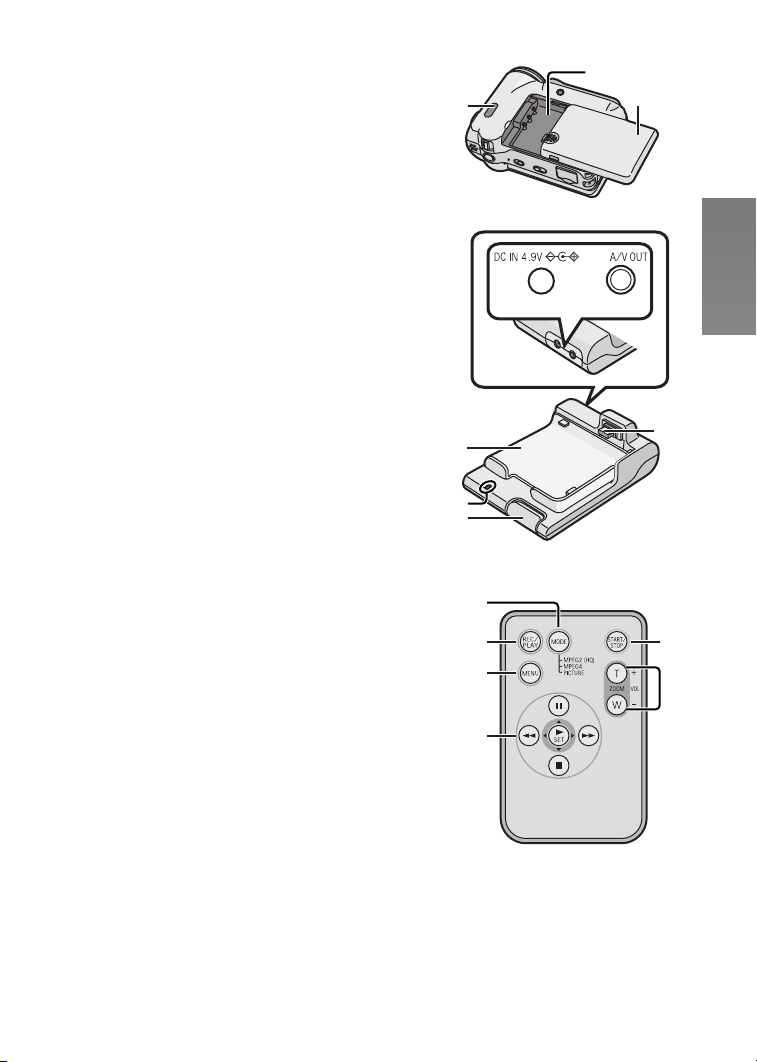
25 White Balance Sensor (l 34)
26 Battery Compartment (l 10)
27 Battery Compartment Cover (l 10)
28 DC Input Socket [DC IN 4.9V] (l 11)
29 AV Output Socket [A/V OUT] (l 52)
30 Tray
31 Power Lamp [Í] (l 10)
32 Release Button (l 11)
33 Device Connector (l 11)
34 Mode Selector Button [MODE] (l 15)
35 Recording/Playback Mode Selector Button
[REC/PLAY] (l 15)
36 Menu Button [MENU] (l 16)
37 Multi-function Button
Operating/Select Function
[6/;/5/∫/1 SET] (l 16, 27, 31, 32)
38 Recording Start/Stop Button (l 25, 26, 30)
39 Zoom Button [T/W] (l 33)
Volume Adjustment Button [rVOLs] (l 29)
25
30
31
32
26
27
28 29
33
34
35
36
37
38
39
V

mзпЙк=pмййду
ª Using AC Adaptor
N Open the DC Input Socket Cover and
connect the DC Input Lead to the [DC IN
4.9V] socket on the SD Video Camera.
O Connect the AC Mains Lead to the AC
Adaptor and the AC mains socket.
ª Charging the Battery
Be sure to charge the supplied battery before use.
1 While pressing the A part, slide it to
remove the Battery Compartment Cover.
2 Press the terminals of the battery onto
the terminals of the Battery Compartment
and set the battery.
≥Fit the battery with its label facing upward.
≥After the battery is set, close the cover.
3 Connect the DC Input Lead to the [DC IN
4.9V] socket on the SD Video Camera.
4 Connect the AC Mains Lead to the AC
Adaptor and the AC mains socket.
≥Power Lamp 1 flashes, and Charging starts.
≥When recharging, turn the power of the SD Video
Camera off.
5 Wait until Power Lamp 1 goes off.
≥When recharging is completed, Power Lamp 1
goes off.
N
O
1
2
≥If the Power Lamp flashes quickly (or slowly) when
recharging, recharging is not normal. (l 75)
≥For other notes, see pages 73, 75.
NM
1
3
4
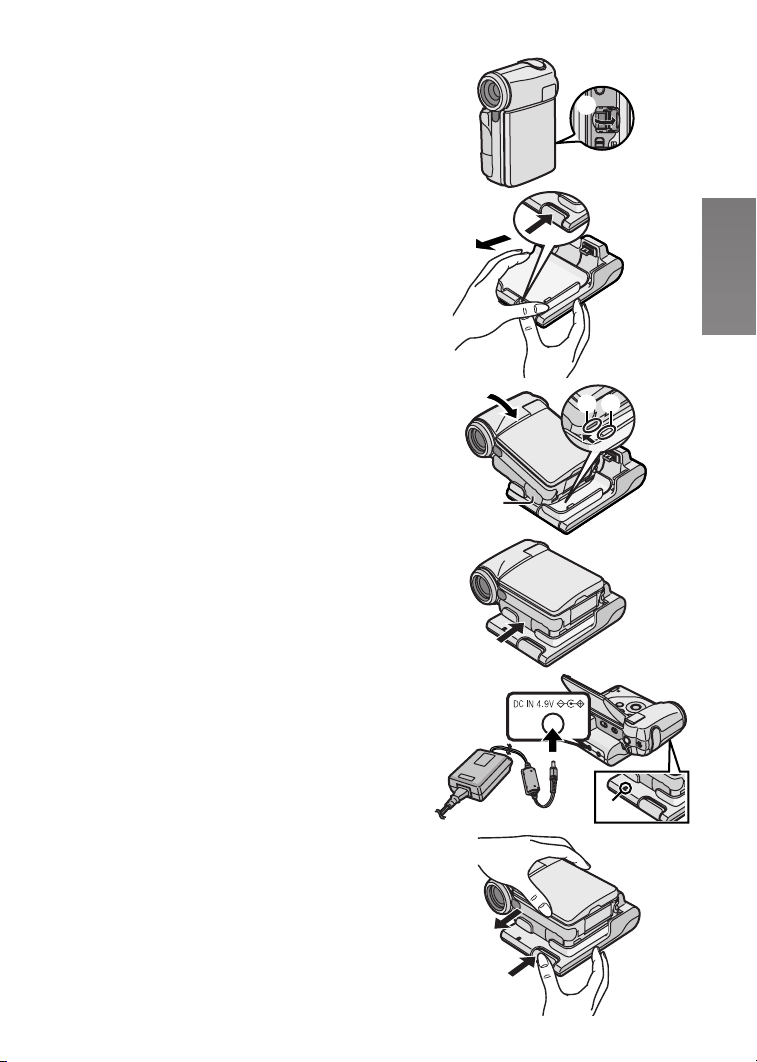
cбннбеЦ=нЬЙ=`~гЙк~=зе=нЬЙ=^s=
`к~ЗдЙ
Fitting the Camera on the AV Cradle eases charging.
The AV Cradle allows the Camera to be connected to
the external device, such as a TV in order for the
pictures on this Device to be viewed on the TV.
N
A
≥The charging configuration is the same as the one for
connecting the DC Input Lead to the SD Video
Camera. (l 10)
N Open the [MULTI] Cover. A
O While pressing the Release Button, pull
out the tray.
P Place the SD Video Camera on the AV
Cradle.
≥If the DC Input Socket cover B is open, it is not
possible to fit the SD Video Camera on the AV
Cradle.
≥The grooves 1 of the SD Video Camera fit in the
leading protrusions 2.
Q Push the tray until you hear it click.
R Connect the DC Input Lead to the
[DC IN 4.9V] socket on the AV Cradle.
S Connect the AC Mains Lead to the AC
Adaptor and the AC mains socket.
≥Power Lamp C flashes, and Charging starts.
≥When recharging, turn the power of the SD Video
Camera off.
≥When recharging is completed, Power Lamp
goes off.
≥Be sure to turn the SD Video Camera off before
fitting it on the AV Cradle.
≥If the AV Cable or AC Adaptor is connected to the SD
Video Camera, it is not possible to fit the SD Video
Camera on the AV Cradle.
C
O
P
Q
RIS
12
B
C
Remove the SD Video Camera from the AV Cradle
While pressing the Release Button 1, pull out the tray
and remove the SD Video Camera 2.
≥For other notes, see page 76.
2
1
NN
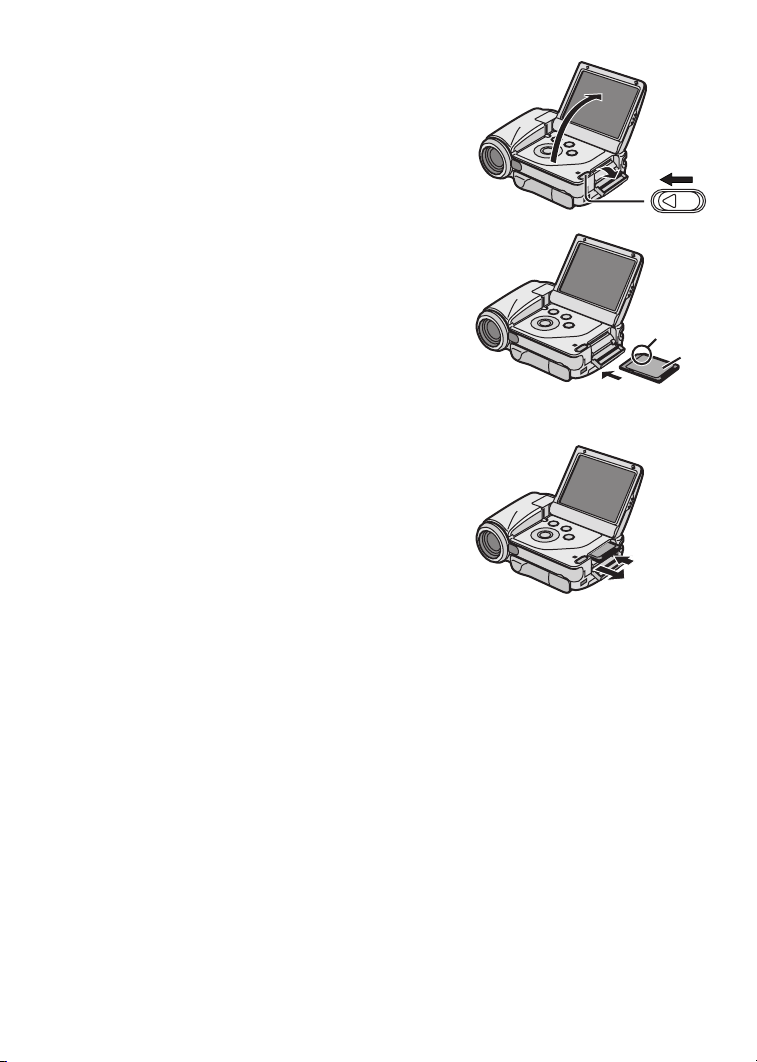
fелЙкнбеЦ=~=jЙгзку=`~кЗ
An SD Memory Card can be used for this SD Video
Camera.
N Open the LCD Monitor and slide the Card
Slot Cover Open Lever to open the Card
Slot Cover.
O Hold the Memory Card placing the cut off
corner
facing up, and then insert it fully into the
Memory Card Slot horizontally.
≥Turn off the SD Video Camera before inserting/
1 at the front with the label 2
removing a Card.
P Close the Card Slot Cover securely.
ª Removing the Memory Card
Open the Card Slot Cover and press the centre of
the Card
A and then pull it straight out B.
≥After removing the Card, close the Card Slot
Cover.
≥The SD Video Camera may be damaged if the
Card is forced out when the Card is fully inserted.
N
O
1
2
≥Keep the SD Memory Card out of the reach of
children to prevent swallowing.
≥For other notes, see page 76.
NO
A
B
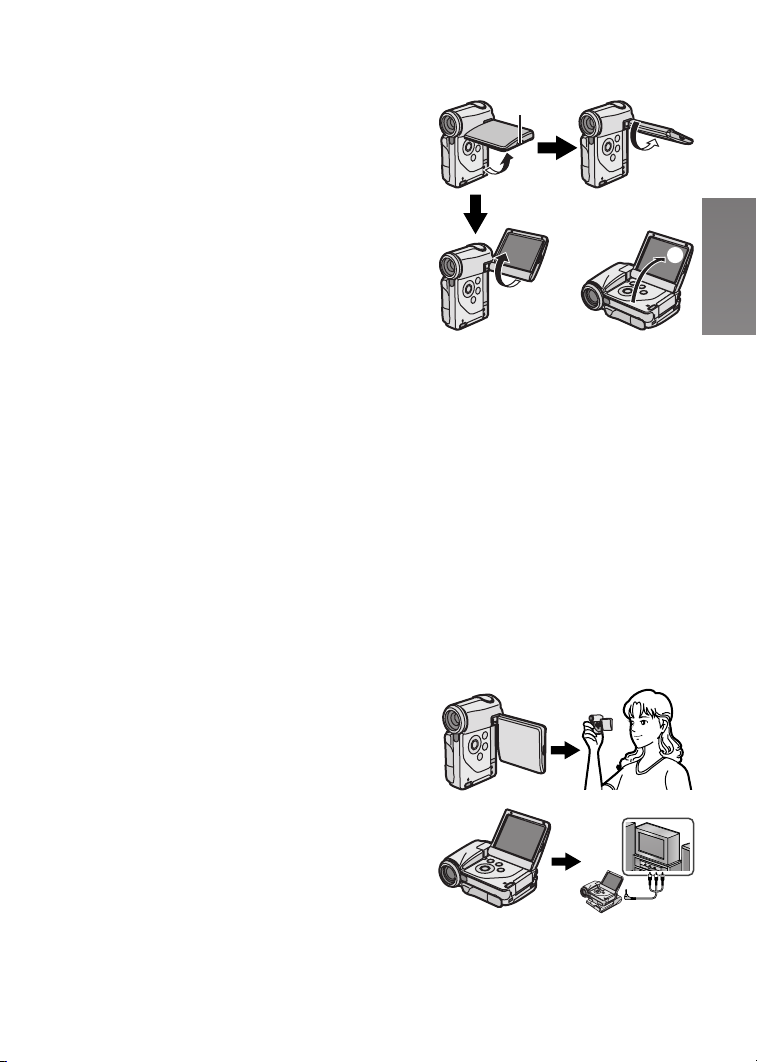
rлбеЦ=нЬЙ=i`a=jзебнзк
Record and play the video image while viewing the
LCD Monitor.
NIO
1
N Put your finger on the groove 1 to open
the LCD Monitor.
O Adjust the LCD Monitor angle according
to the desired recording/playing angle.
≥The LCD Monitor can rotate up to the angles
illustrated.
1: Up to 90
2: Up to 130
3: Up to 140
4: Up to 130
≥Forcefully rotating the LCD Monitor beyond these
ranges will damage the SD Video Camera.
≥If the position of the LCD Monitor is set to 2 or 4,
when you select the Recording Mode only the
indication which is limited (REC pause [¥;], REC
[¥] or Warning [°]) appears on screen display.
If you desired the indication returned to normal, set
position of the LCD Monitor to 1 or 3.
≥The LCD image may appear slightly brighter than the
actual recorded image. This is done intentionally to
provide better visibility when the camera is used
outdoors in bright sunlight.
≥For other notes, see page 76.
ª Vertical Style and Horizontal Style
This SD Video Camera can be used in 2 way styles.
1 Vertical Style: Use mainly when recording.
2 Horizontal Style: Use mainly when playing back.
° maximum
° maximum
° maximum
° maximum
3
1
4
2
1
2
NP

ª Portrait Picture Recording
By opening the LCD Monitor and turning it so that it
faces forward (to the lens side), you can let the subject
in front of the SD Video Camera monitor the shot while
shooting is in progress.
≥If you set the LCD Monitor to this position, an image
on the LCD Monitor will be reversed when displayed.
However, recording images are recorded normally.
≥If a general Warning indication [°] appears, return
the LCD Monitor to the Vertical style in order to verify
contents. (l 68)
ª Using the Multi-function Button
In this SD Video Camera, the Multi-function Button is
tilted to the right to 45 degrees in order to make it easy
to do operation in both the Vertical and Horizontal
Style.
Move the cursor and selection of the item on the
display by the Multi-function Button of main unit:
A: 6 (LEFT)
B: ∫ (DOWN)
C: ; (UP)
D: 5 (RIGHT)
CA
NQ
B
D
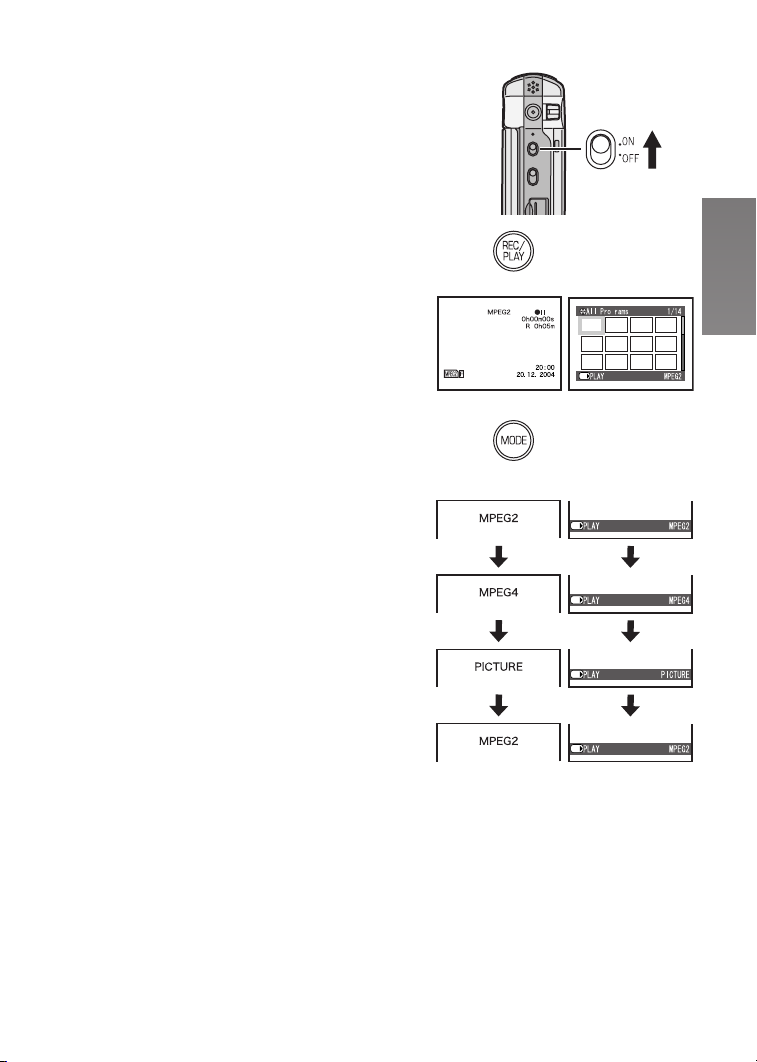
qмке=нЬЙ=mзпЙк=lеLpЙдЙЕнбеЦ=
lйЙк~нбзе=jзЗЙл
Select a desired mode on the mode selection screen.
N Set the Power Switch to [ON].
≥The SD Video Camera is turned on.
O Press the [REC/PLAY] Button to select
Recording Mode or Playback Mode.
1: Recording Mode
2: Playback Mode
P Press the [MODE] Button to select a
Operation Mode.
≥Every time the [MODE] Button is pressed, the
Operation Mode changes as followed.
1: Recording Mode
2: Playback Mode
≥For other notes, see page 76.
N
Í
O
12
g
SET/
P
ª About the Operation Modes
Six operation modes are provided as follows.
Moving picture [MPEG2]:
Moving picture (MPEG2 format) recording mode
(l 25)
Moving picture (MPEG2 format) playback mode
(l 27)
Moving picture [MPEG4]:
Moving picture (MPEG4 format) recording mode
(l 26)
Moving picture (MPEG4 format) playback mode
(l 27)
Still picture [PICTURE]:
Still picture (JPEG format still picture) recording
mode (l 30)
Still picture (JPEG format still picture) playback mode
(l 31)
≥When you use the battery to supply the power with
the SD Video Camera, it is automatically turned off if
you leave it for more than approx. 5 minutes without
any operation.
12
SET/
SET/
SET/
SET/
NR
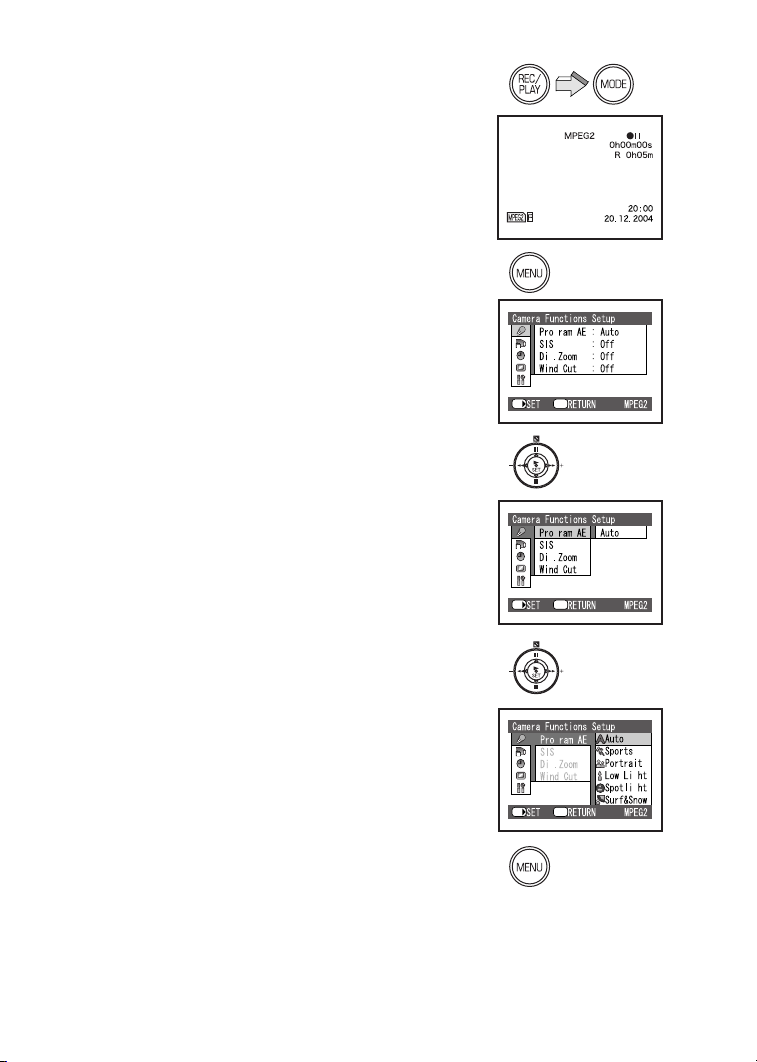
rлбеЦ=нЬЙ=jЙем=pЕкЙЙе
Allows the functions usable in the selected mode to be
set from the menu.
N Select a desired mode. (l 15)
O Press the [MENU] Button.
≥The Main Menu in the selected mode is
displayed.
P Press the ;/∫ side of the Multi-function
Button to select a desired Main Menu and
press the [1 SET] Button.
≥The Sub-Menu in the selected mode is
displayed.
Q Press the ;/∫ side of the Multi-function
Button to select a desired Sub-Menu and
then press the [1 SET] Button.
R Press the ;/∫ side of the Multi-function
Button to select a desired item and then
press the [1 SET] Button.
S Press the [MENU] Button.
≥Menu screen disappears, and the selected item
is now being set.
Return to the menu one before
Press the 6 side of the Multi-function Button.
N
O
P
SET/
SET/
g
g
Menu
g
g
Menu
≥Press the [MENU] Button when playing back the
moving picture or still picture to edit the file being
played back.
≥When you do not perform operation the menu screen
is automatically disappeared if you leave it for more
than approx. 1 minute.
≥For other notes, see page 76.
NS
QIR
S
SET/
g
g
Menu
g
g
iáëí=çÑ=jÉåìë
The menu images used differ slightly from the actual
menus. These are offered for simplified illustration
purposes.
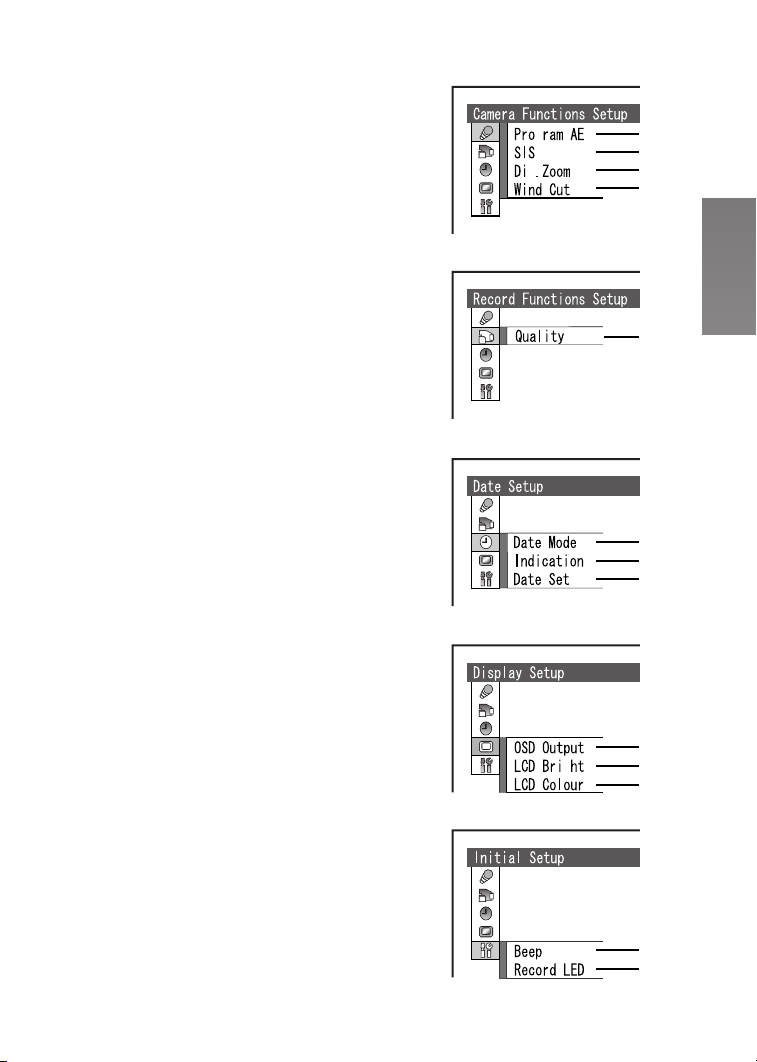
ª Recording Mode
Camera Functions Setup
1 Auto Exposure Mode [Program AE] (l 36)
2 Image Stabilizer [SIS] (l 37)
3 Digital Zoom [Dig. Zoom] (l 33)
4 Wind Noise Reduction [Wind Cut] (l 37)
≥This function appears [MPEG2] mode and
[MPEG4] mode.
Record Functions Setup
5 Picture Quality [Quality] (l 25, 26, 30)
Date Setup
6 Date and Time Indication Mode [Date Mode]
(l 21)
7 Date and Time Indication [Indication] (l 21)
8 Date and Time Setting [Date Set] (l 20)
Display Setup
9 OSD Indication [OSD Output] (l 23)
10 LCD Brightness Adjustment [LCD Bright]
(l 22)
11 LCD Colour Adjustment [LCD Colour] (l 22)
Initial Setup
12 Beep Sound [Beep]
≥This SD Video Camera will emit sound when the
power switch is changed over, the REC Button is
pressed, or other operations are engaged. If you
do not need operating sound, you can switch it
off.
13 Recording LED [Record LED]
≥The Recording Lamp which is on the front of the
SD Video Camera lights while recording, in
addition flashes during remote control receiving.
When [Record LED] set to [Off], the Recording
Lamp will not light.
g
g
g
1
2
3
4
5
6
7
8
9
10
11
12
13
NT
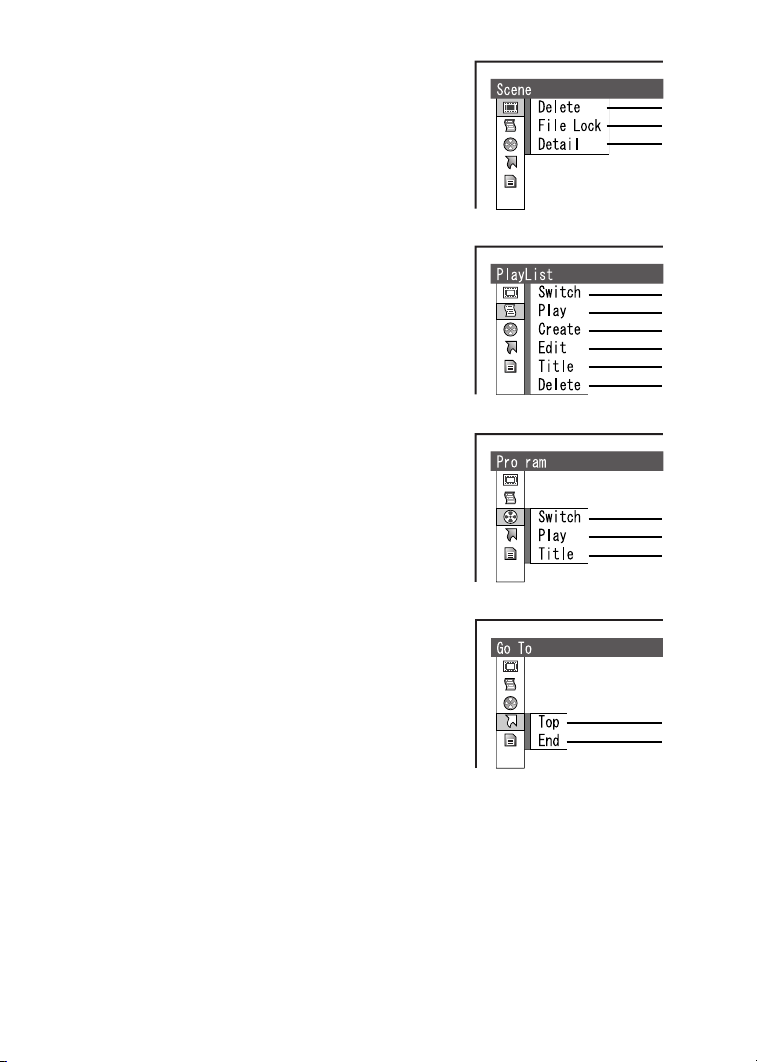
ª Playback Mode
[MPEG2/MPEG4] mode
Scene
1 Deleting a Scene [Delete] (l 38)
2 Setting the Lock [File Lock] (l 39)
3 Scene Detail [Detail] (l 39)
PlayList*
4 Selecting and switching a Play List [Switch]
(l 41)
5 Playing back the Play List [Play] (l 42)
6 Creating the Play List [Create] (l 41)
7 Editing the Play List [Edit] (l 42)
8 Edit a title of the Play List [Title] (l 44)
9 Deleting a Play List [Delete] (l 45)
Program*
10 Switching a Programme [Switch] (l 46)
11 Playing back the Programme [Play] (l 46)
12 Edit a title of the Programme [Title] (l 47)
Go To
13 Go to Top of List [Top] (l 48)
14 Go to End of List [End] (l 48)
1
2
3
ETC.
4
5
6
7
8
ETC.
9
g
*[MPEG2] mode only.
NU
10
11
ETC.
12
13
ETC.
14
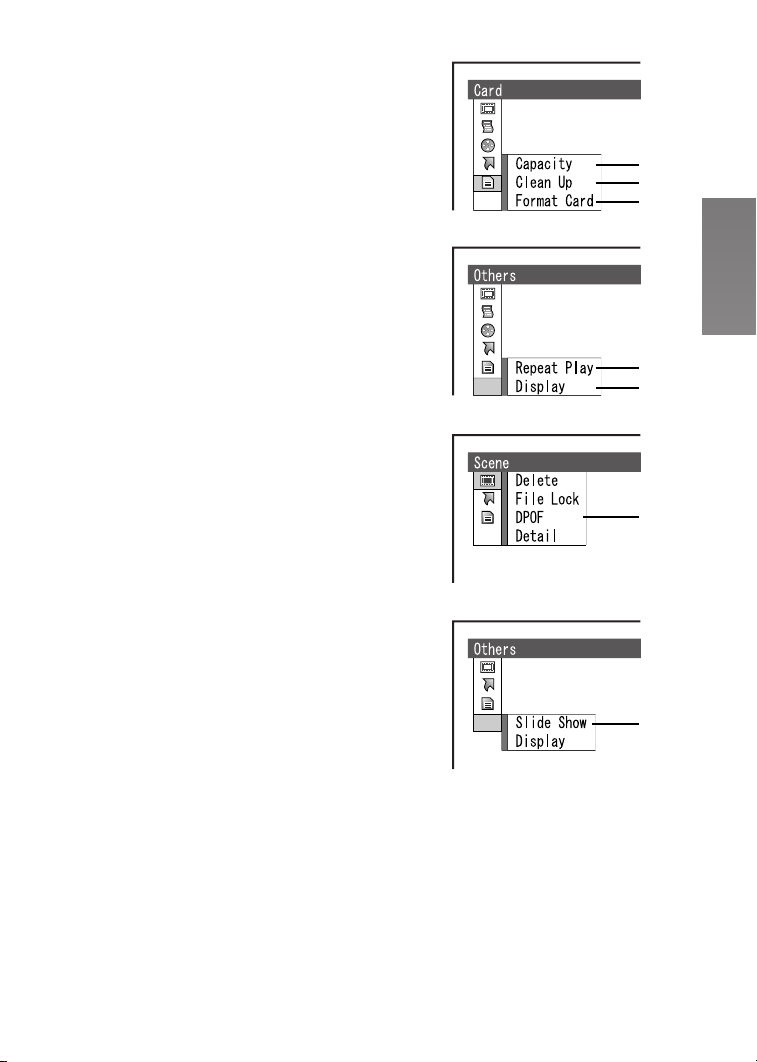
Card
15 Capacity of a Card [Capacity] (l 49)
16 Recover writing speed of the data to a Card
[Clean Up] (l 24)
17 Formatting a Card [Format Card] (l 49)
Others
18 Setting a Repeat Playback [Repeat Play] (l 50)
19 Display Mode [Display] (l 51)
[PICTURE] mode
Scene
20 Setting DPOF [DPOF] (l 40)
Others
21 Setting a Slide Show [Slide Show] (l 51)
15
16
ETC.
17
≥The other functions of [PICTURE] mode are the
same as those of [MPEG4] mode.
ETC.
ETC.
ETC.
19
20
21
18
NV

pЙннбеЦ=a~нЙ=~еЗ=qбгЙ
At the time of purchase of the SD Video Camera,
the date and time are not set. First, set the date
and time, then use the SD Video Camera.
N Press the [REC/PLAY] Button to select
Recording Mode.
O Press the [MENU] Button and select [Date
Setup] and then press the [1 SET]
Button.
P Select [Date Set] and press the [1 SET]
Button.
Q Press the ;/∫/6/5 side of the
Multi-function Button to set the desired
Date and Time.
≥6/5: Select the item
≥;/∫: Change the value
≥Year will cycle in the order shown below.
2003, 2004, ..., 2079, 2003, ...
R Press the [1 SET] Button.
≥A verification message appears.
S Select [YES] and press the [1 SET]
Button.
≥If [NO] is selected, returns to step 4.
≥For other notes, see page 76.
N
O
PIQ
SET/
SET/
Menu
Menu
OM
RIS
SET/
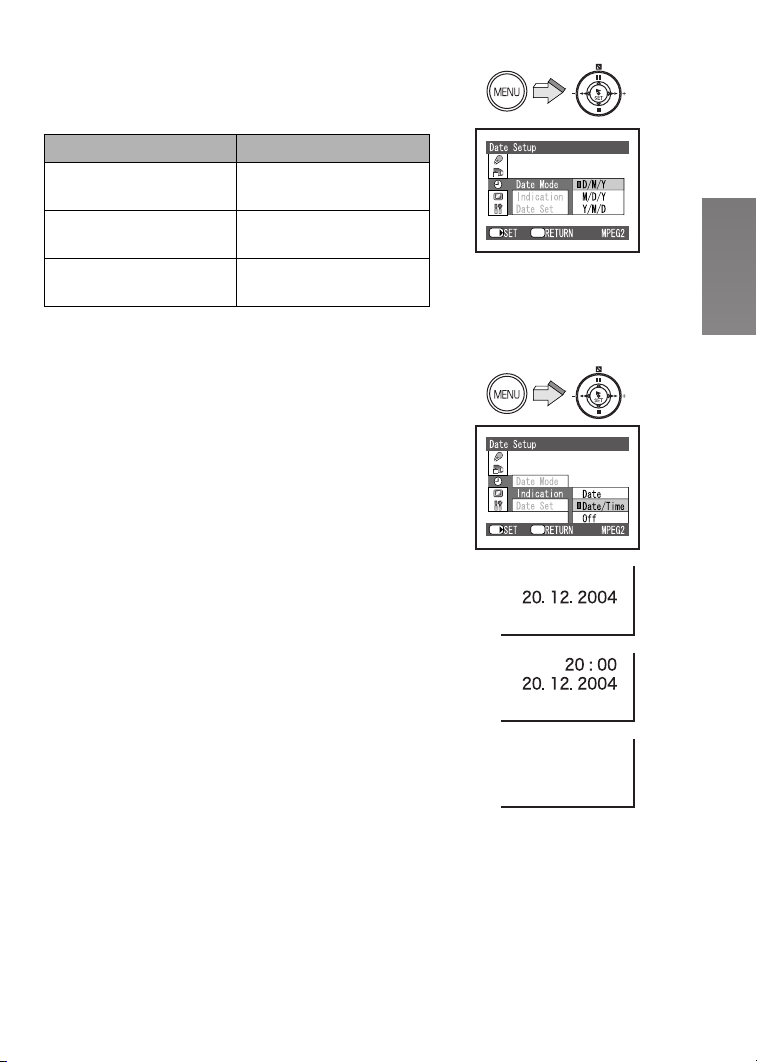
ª Change of the Date Display Mode
Select a desired mode on [Date Mode] in
[Date Setup].
Date Mode Display
D/M/Y
M/D/Y
Y/M/D
20:00
20. 12. 2004
8:00PM
DEC 20 2004
20:00
2004. 12. 20
ª Change of the Date/Time Indication
Mode
Select a desired mode on [Indication] in
[Date Setup].
1: [Date]
2: [Date/Time]
3: [Off]
≥Where battery and AC adaptor are not attached and
the [RESET] Button is pressed, the date and time will
be set to [1. 1. 2003 0:00].
≥When the built-in battery has been exhausted, set
the date and time after the battery has charged.
(l 63)
Menu
SET/
Menu
SET/
1
2
3
ON
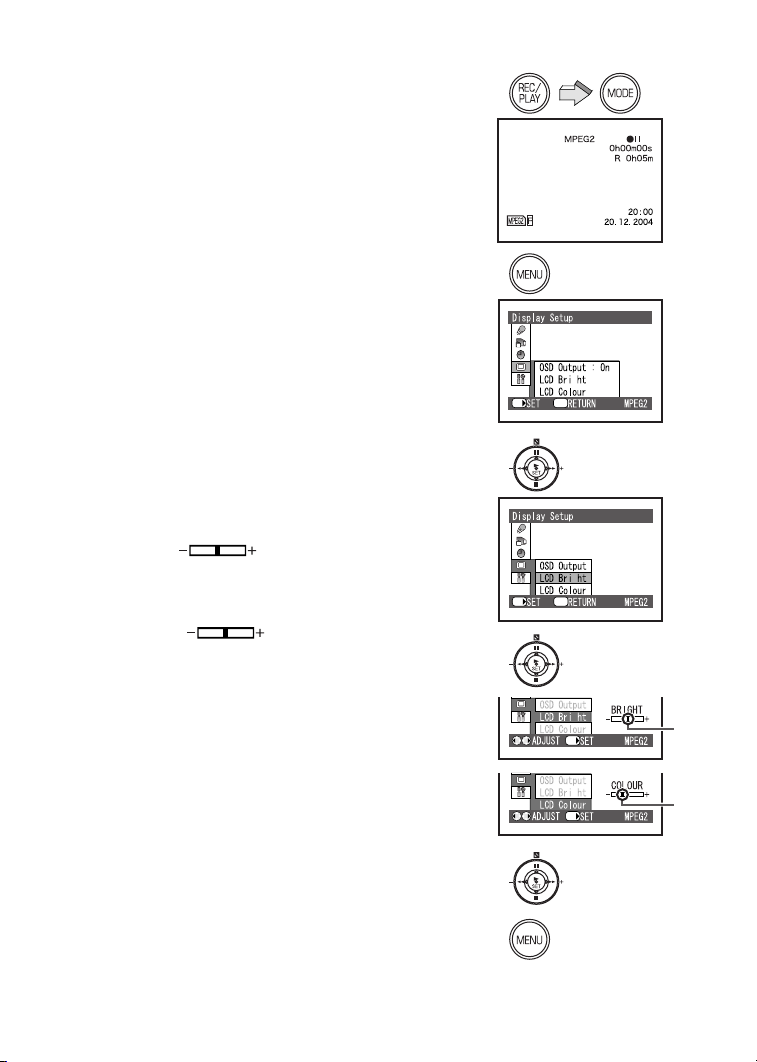
^ЗамлнбеЦ=_кбЦЬнеЙлл=~еЗ=
`здзмк=iЙоЙд=зе=нЬЙ=i`a=
jзебнзк
LCD Brightness [LCD Bright]
It adjusts the brightness of the image on the LCD
screen.
LCD Colour Level [LCD Colour]
It adjusts the colour saturation of the image on the
LCD screen.
N Press the [REC/PLAY] Button to select
Recording Mode.
O Press the [MENU] Button.
P Select [Display Setup] and press the
[1 SET] Button.
Q Select [LCD Bright] or [LCD Colour] and
press the [1 SET] Button.
R Press the 6/5 side of the
Multi-function Button for adjustment.
≥If [LCD Bright] 1 is selected.
[BRIGHT ] indication appears, the
brightness can be increased by moving the [?]
to the right.
≥If [LCD Colour] 2 is selected.
[COLOUR ] indication appears, the
colour can become darker by moving the [?]
the right.
B to
S Press the [1 SET] Button.
T Press the [MENU] Button.
≥These adjustments do not affect the recorded
images.
A
N
O
PIQ
R
1
2
SET/
SET/
Menu
Menu
SET/
SET/
g
g
g
g
A
B
OO
S
T

_~лбЕ=cмеЕнбзел
_ЙСзкЙ=oЙЕзкЗбеЦ=зйЙк~нбзе
Do not cover the sensor with your hand when using the
Remote Control and recording pictures.
1Remote Control Sensor
2White Balance Sensor
ª MPEG2/MPEG4 Moving Picture
MPEG stands for Moving Picture Experts Group. It is
the name of the standard for the compression and
extension of a digital moving picture and sound
enacted by ITU-TS (International Telecommunications
Union-Telecommunication Standardization Sector) and
ISO (International Standardization Organization).
The picture data is transferred at a rate of about
25 frames per 1 second under MPEG2 format.
Therefore, you can enjoy beautiful and smooth moving
picture.
The picture data of MPEG4 is inferior to those of
MPEG 2 in smoothness because the number of the
frames transferred in MPEG4 is less than that in
MPEG2. However, it is suitable for use in PC because
the transfer rate is higher.
ª OSD Indication on LCD Monitor
This SD Video Camera can appear or disappear
indications on the LCD Monitor. (l 67)
N Press the [REC/PLAY] Button to select
Recording Mode and set the operation
mode.
O Press the [MENU] Button and select [OSD
Output] on [Display Setup] to [On] and
press the [1 SET] Button.
≥OSD Indications appears on LCD Monitor.
N
O
1
2
g
Menu
SET/
≥If you select [Off] the OSD Indication which is limited
appears on LCD Monitor.
OP
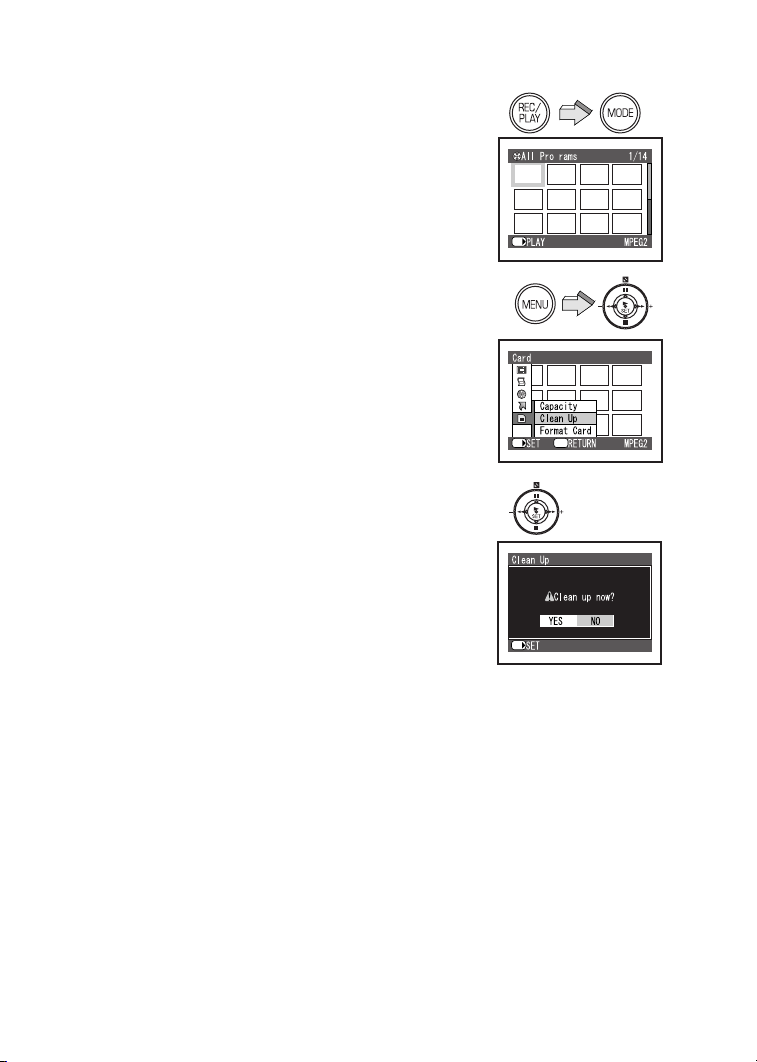
`дЙ~е=rй=cмеЕнбзе
Generally, if you repeatedly write data on a Memory
Card, the data writing speed is decreased by the
characteristic of the Memory Card.
To recover the data writing speed on Panasonic SD
Memory Card, [Clean Up] function is installed in this
unit.
When repeating write of data or files on SD Memory
Card, it may be suddenly stopped while recording
MPEG2 motion images. In this case, an error message
[Record Stopped. Clean up in no data area?] appears.
Be sure to use the function. (l 70)
[Clean Up] is a function to recover the writing speed on
the free space of the SD Memory Card. It may take
time to finish its process.
≥Be sure to clean up the SD Memory Card before
use.
N Press the [REC/PLAY] Button to select
Playback Mode and set the operation
mode.
O Press the [MENU] Button and select
[Clean Up] on [Card] and press the
[1 SET] Button.
P The confirmation screen appears and
then select [YES] and press the [1 SET]
Button.
≥Clean up is carried out.
≥Even if the [Clean Up] function is performed,
existing data on the card is not erased.
N
O
P
SET/
SET/
SET/
g
ETC.
Menu
≥While card is being cleaned, you should not remove
the Memory Card or turn off the power.
≥Except for Panasonic SD Memory Cards, other
memory cards cannot activate [Clean Up] function.
OQ
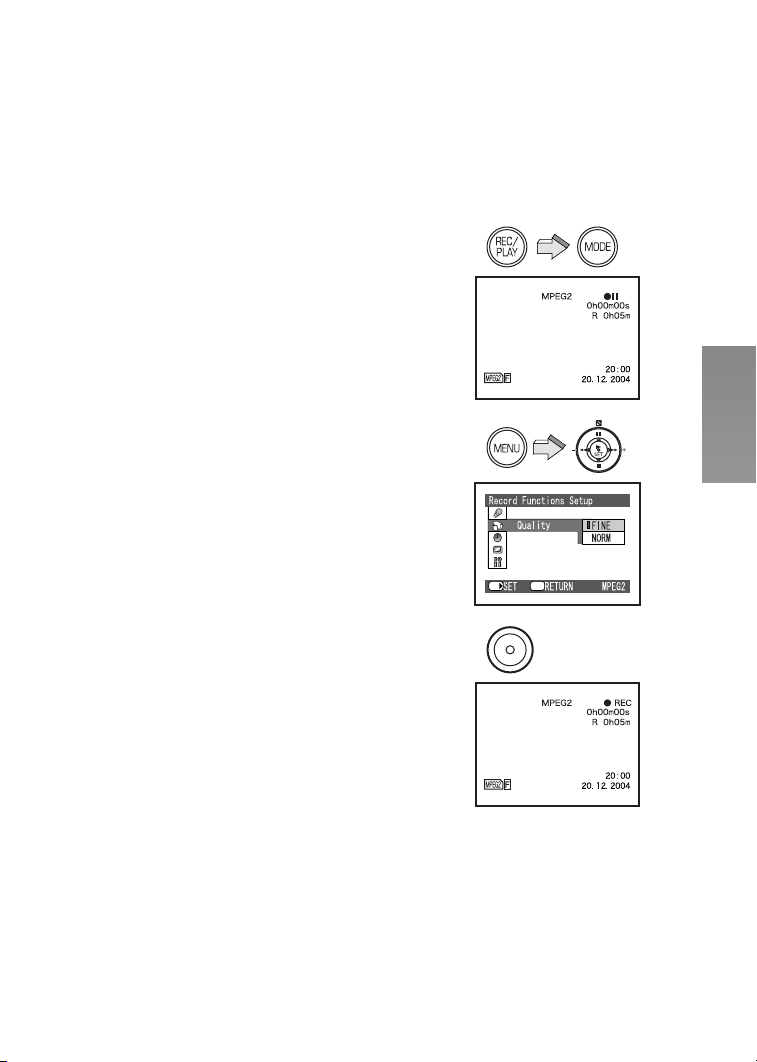
oЙЕзкЗбеЦ=jзобеЦ=mбЕнмкЙл=
EjmbdOF
You can record moving pictures in high quality on the
Memory Card. Therefore, it is suitable for recording
important pictures.
In MPEG2 moving picture recording, the
transmission rate in [FINE] mode is 6 Mbps on this
SD Video Camera. Be sure to use a Panasonic SD
Memory Card since it is compatible with the above
transmission rate.
[FINE]: 256 MB or more
[NORM]: 32 MB or more
≥You cannot record MPEG2 moving pictures on a card
other than the above.
N Press the [REC/PLAY] Button to select
Recording Mode and set the operation
mode to [MPEG2].
O Press the [MENU] Button and set [Quality]
on [Record Functions Setup] to desired
picture quality and then press the
[1 SET] Button.
≥Select one of [FINE] or [NORM].
[FINE]: High image quality 704 k 576 pixels
[NORM]: Nomal image quality 352 k 576 pixels
≥Press the [MENU] Button after completing the
setting.
P Press the Recording Start/Stop Button.
≥Recording starts.
≥While recording the moving picture, press the
Recording Start/Stop Button to stop recording.
≥Be sure to clean up the SD Memory Card before
use. (l 24)
≥If you use a 32-128 MB Panasonic SD Memory Card,
when you select [Quality] on [Record Functions
Setup] to [FINE] of the MPEG2 moving picture
recording mode, an error message [This card cannot
record in MPEG2 FINE mode.] appears on the LCD
Monitor. If you use a MultiMediaCard, an SD Memory
Card from another company, or an 8 MB and 16 MB
(Panasonic) SD Memory Card, when you select the
MPEG2 moving picture recording mode, an error
message [This card cannot record in MPEG2 mode.]
appears on the LCD Monitor.
≥For other notes, see page 77.
N
O
P
SET/
Menu
OR
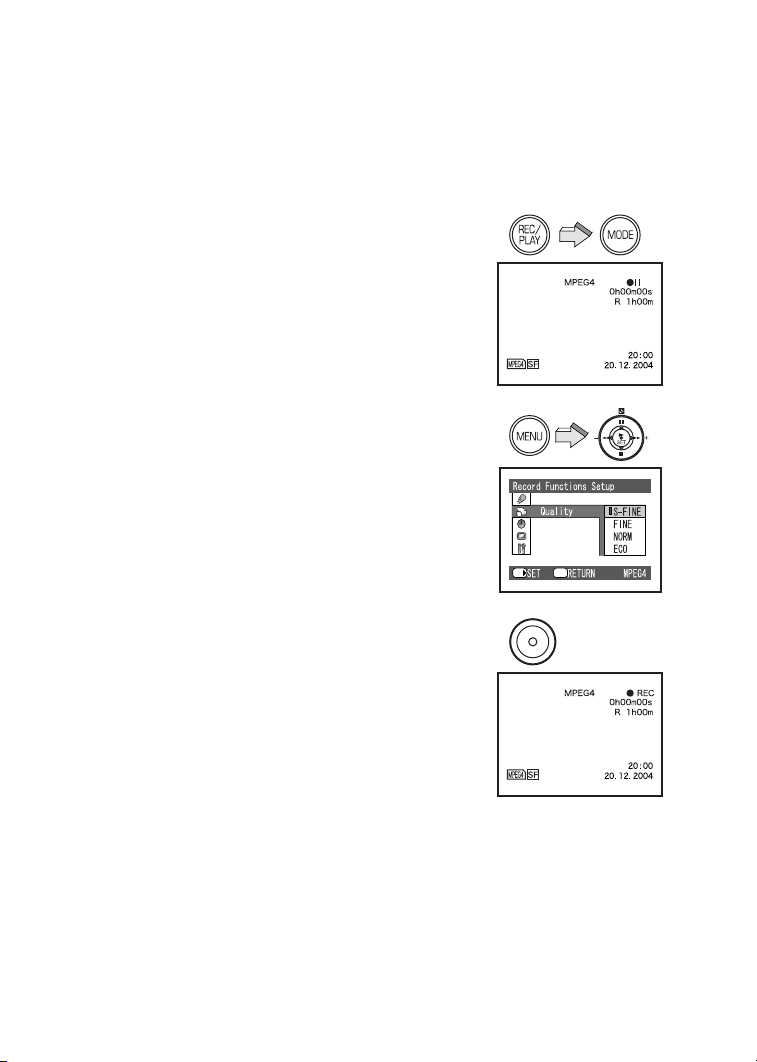
oЙЕзкЗбеЦ=jзобеЦ=mбЕнмкЙл=
EjmbdQF
MPEG4 recording provides less visual quality than
MPEG2 recording. It is recommended when long
recording durations are needed. Since the file size is
much smaller than MPEG2, it’s ideal if the recording
needs to be sent as an E-mail attachment.
N Press the [REC/PLAY] Button to select
Recording Mode and set the operation
mode to [MPEG4].
O Press the [MENU] Button and set [Quality]
on [Record Functions Setup] to desired
picture quality and then press the
[1 SET] Button.
≥Select one of [S-FINE], [FINE], [NORM], or
[ECO].
[S-FINE]: Super high image quality 320 k 240
pixels (1 Mbps, 12fps)
[FINE]: High image quality 320 k 240 pixels
(420 kbps, 12fps)
[NORM]: Normal image quality 176 k 144 pixels
(300 kbps, 12fps)
[ECO]: Low image quality 176 k 144 pixels
(100 kbps, 6fps)
≥Press the [MENU] Button after completing the
setting.
P Press the Recording Start/Stop Button.
≥Recording starts and Recording Lamp lights up.
≥While recording the moving picture, press the
Recording Start/Stop Button to stop recording.
≥The sounds recorded will be in monaural.
≥For other notes, see page 77.
N
O
P
SET/
Menu
OS
mд~убеЦ=_~Ев=jзобеЦ=
mбЕнмкЙл=EjmbdOF
Plays back moving pictures recorded on the Memory
Card.
N Press the [REC/PLAY] Button to select
Playback Mode and set the operation
mode to [MPEG2].
≥Moving picture files recorded on the Memory
Card are displayed in the index picture screen.
O Press the ;/∫/6/5 side of the
Multi-function Button to select a desired
file.
P Press the [1 SET] Button.
≥A moving picture file is played back.
≥After playing back continuously from the selected
file to the last file, the display will pause at the
last scene of the last file.
ª Operation during Playback
[∫]: Stop (Reverts to the index picture
screen.)
[;]: Pause (Press during playing.)
[6], [5]: Finding the beginning of a file (Tap this
button.)
[6], [5]: Rewinding/fast forwarding (Press and
hold this button for more than approx.
1 second.)
During pause
[6], [5]: Go back/advance one frame (Tap this
button.)
Go back: Playback at intervals of
0.5 seconds.
Advance: Playback at intervals of
0.03 seconds.
[6], [5]: Backward/forward Slow playback
(Press and hold this button for more
than approx. 1 second.)
Backward: Playback at intervals of
0.5 seconds.
Forward: Playback at intervals of
0.03 seconds.
≥You cannot hear sounds other than normal playback.
≥For other notes, see page 77.
N
g
SET/
OIP
g
SET/
OT
mд~убеЦ=_~Ев=jзобеЦ=
mбЕнмкЙл=EjmbdQF
Plays back moving pictures recorded on the Memory
Card.
N Press the [REC/PLAY] Button to select
Playback Mode and set the operation
mode to [MPEG4].
≥Moving picture files recorded on the Memory
Card are displayed in the index picture screen.
O Press the ;/∫/6/5 side of the
Multi-function Button to select a desired
file.
P Press the [1 SET] Button.
≥A moving picture file is played back.
≥After playing back continuously from the selected
file to the last file, the display will pause at the
last scene of the last file.
≥The size of a playback screen changes with recorded
quality of image.
ª Operation during Playback
[∫]: Stop (Reverts to the index picture
screen.)
[;]: Pause (Press during playing.)
[6], [5]: Finding the beginning of a file (Tap this
button.)
[6], [5]: Rewinding/fast forwarding (Press and
hold this button for more than approx.
1 second.)
≥When you keep rewinding/fast forwarding, it
becomes the beginning of a file/next file and returns
to normal playback. If you continue rewinding/fast
forwarding again, press the [6]/[5] Button.
≥For other notes, see page 78.
N
SET/
OIP
SET/
OU

ª For Repeat Playback (l 50)
Set [Repeat Play] on [Others] to [On].
≥Select [Off] to cancel Repeat Play setting.
≥To cancel Repeat Playback midway, press the [∫]
Button. However, the Repeat Play setting will not be
cancelled.
SET/
ETC.
Menu
^ЗамлнбеЦ=нЬЙ=sздмгЙ
During playback, the zoom control is used to adjust the
volume.
N Press [r (T)] or [s (W)] of the [VOL] Lever.
≥The [VOLUME] indication 1 appears.
≥Push the [VOL] Lever towards [r (T)] to increase
the volume.
≥Push the [VOL] Lever towards [s (W)] to
decrease the volume.
≥If the volume buttons are left unoperated for
1 second, the [VOLUME] indication will
automatically disappear.
N
+
VOL
j
1
OV

oЙЕзкЗбеЦ=pнбдд=mбЕнмкЙл
Records still pictures.
N Press the [REC/PLAY] Button to select
Recording Mode and set the operation
mode to [PICTURE].
O Press the [MENU] Button and set [Quality]
on [Record Functions Setup] to desired
picture quality and then press the
[1 SET] Button.
≥Select one of [FINE] or [NORM].
≥Press the [MENU] Button after completing the
setting.
P Press the Recording Start/Stop Button.
≥The still image is recorded on the Memory Card.
≥The sound cannot be recorded.
≥For other notes, see page 78.
N
O
P
SET/
Menu
PM

mд~убеЦ=Д~Ев=pнбдд=mбЕнмкЙл
Plays back still pictures recorded on the Memory Card.
N Press the [REC/PLAY] Button to select
Playback Mode and set the operation
mode to [PICTURE].
≥Still picture files recorded on the Memory Card
are displayed in the index picture screen.
O Press the ;/∫/6/5 side of the
Multi-function Button to select a desired
file.
P Press the [1 SET] Button.
≥A still picture file is played back.
ª Operation during Playback
[∫]: Stop (Reverts to the index picture
screen.)
[6]: Displays the previous screen.
[5]/[1 SET]: Displays the next screen.
≥Only JPEG images that were created by this product
will be displayed correctly. Files that are copied to the
SD card may not be displayed properly, or not at all.
≥For other notes, see page 78.
N
SET/
OIP
SET/
PN
mд~у=_~Ев=^дд=зС=нЬЙ=pнбдд=
mбЕнмкЙл=lеЙ=Ду=lеЙ=
EpдбЗЙ pЬзпF
Plays back all of still pictures one by one recorded on
the Memory Card.
N Press the [REC/PLAY] Button to select
Playback Mode and set the operation
mode to [PICTURE].
O Press the [MENU] Button and set [Slide
Show] on [Others] to desired mode.
≥Select [All] or [DPOF].
≥[All]: Playing back all still pictures
≥[DPOF]: Playing back all the DPOF set pictures
(l 40)
P Press the [1 SET] Button.
≥The [ ] indication 1 appears.
≥Images are displayed one by one for approx.
5 seconds each.
≥Press [∫] to stop.
≥Press [;] to pause.
≥Only JPEG images that were created by this product
will be displayed correctly. Files that are copied to the
SD card may not be displayed properly, or not at all.
≥For other notes, see page 79.
N
O
P
SET/
SET/
ETC.
Menu
1
PO
^Зо~еЕЙЗ=cмеЕнбзел
wззг=fеLlмн=cмеЕнбзел
Allows the user to vary the field of view that will be
photographed.
Set the Recording Mode
N For close-ups (zoom in):
Push the [T/W] Lever towards [T]
For wide-angle shots (zoom out):
Push the [T/W] Lever towards [W].
≥Zoom indication 1 is displayed for a few
seconds.
≥For other notes, see page 79.
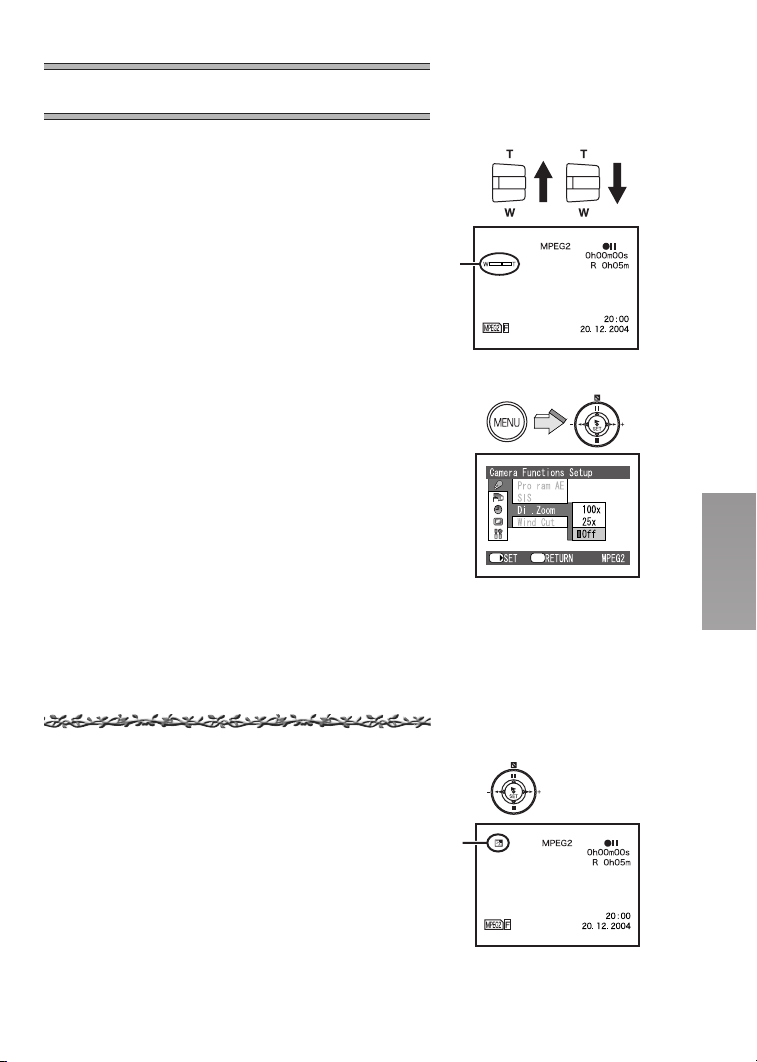
ª Digital Zoom Function
This function is useful when you want to record
close-up shots of subjects located beyond a normal
zoom range of 1 time to 10 times magnification.
With the Digital Zoom Function, you can select a
magnification of 25a or even to 100a.
Set [Dig. Zoom] on [Camera Functions Setup] to
desired mode.
≥25a: Digital Zoom Functions to 25 times
≥100a: Digital Zoom Functions to 100 times
≥When magnification ratio exceeds 10 times, it
changes to digital zoom.
≥As the magnification of Digital Zoom increases, the
quality of image may deteriorate.
N
1
SET/
g
g
Menu
_~ЕвдбЦЬн=`згйЙел~нбзе=
cмеЕнбзе
This prevents a recording subject from being recorded
too dark in backlight. (Backlight is the light that shines
from behind a recording subject.)
Set the Recording Mode
1 Press the [ª] Button.
≥The [ª] Indication A is displayed.
≥Press the [ª] Button again to resume Normal
Recording mode.
≥For other notes, see page 79.
1
A
PP
^ЗамлнбеЦ=tЬбнЙ=_~д~еЕЙ
The SD Video Camera adjusts White Balance
automatically. However, depending on the scene or
light condition, the Automatic White Balance may not
be able to bring out natural colours. In such cases, the
white balance can be adjusted manually.
Set the Recording Mode
≥Do not cover the White Balance sensor with your
hand when recording pictures. (l 23)
N Set the Auto/Manual Selector Switch to
[MANUAL].
≥The [AWB], [ ] and [AF] Indications
are displayed.
O Slide the Auto/Manual Selector Switch to
[SELECT] and select [AWB].
P Press the [1 SET] Button and set a
desired White Balance Mode.
≥Automatic White Balance Adjustment [AWB]
≥Indoor Mode (recording under incandescent
lamp) [{]
≥Outdoor Mode [z]
≥The white balance setting that was previously set
manually [1]
To Resume Automatic Adjustment
≥ Press the [1 SET] Button and set [AWB]. Or, set the
Auto/Manual Selector Switch to [AUTO].
≥For other notes, see page 79.
ª White Balance Sensor
The White Balance Sensor 1 determines the nature of
the light source during recording.
≥Do not cover the White Balance Sensor with your
hand during recording, otherwise, White Balance will
not function normally.
ª Adjusting White Balance Manually
Point the SD Video Camera at a full screen white
object. The actual lighting you will be
photographing in should illuminate the white
object. Press the [1 SET] Button until the [1]
Indication stops flashing.
≥You may not be able to achieve correct White
Balance adjustment manually under weak
illumination. (In this case, the [1] Indication
flashes.)
N
O
P
1
PQ
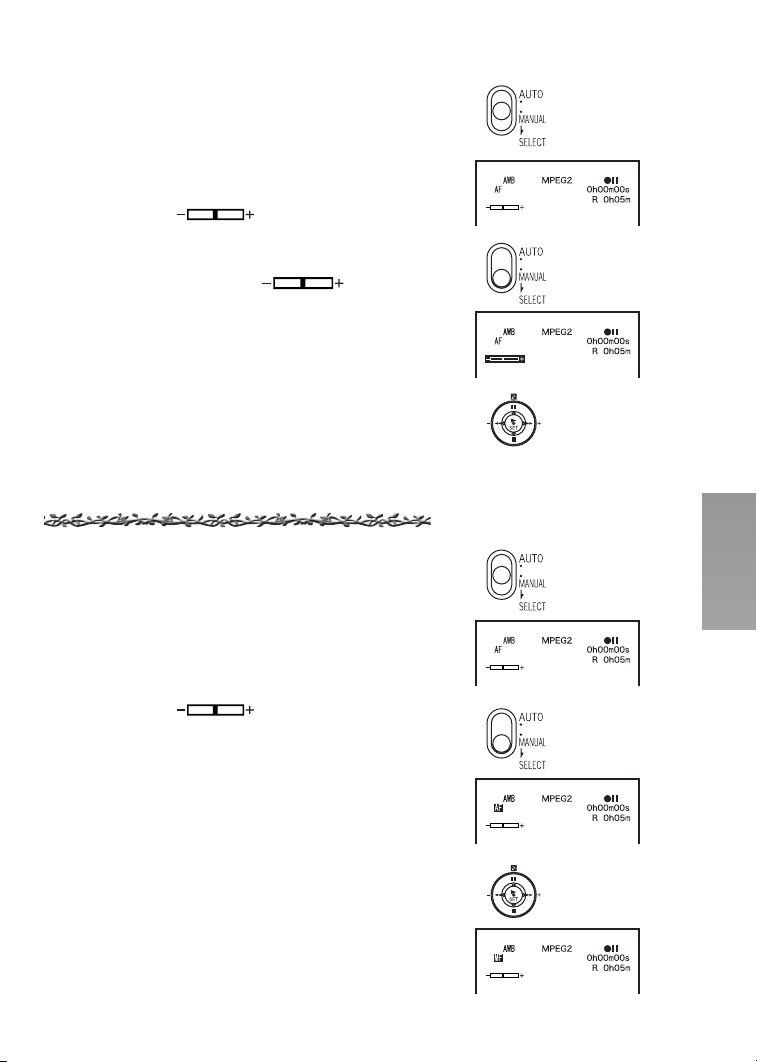
j~ем~д=bсйзлмкЙ=^ЗамлнгЙен
Exposure can be adjusted manually for recording in a
situation where auto exposure may not function well.
Set the Recording Mode
N Set the Auto/Manual Selector Switch to
[MANUAL].
≥The [AWB], [ ] and [AF] Indications
are displayed.
O Slide the Auto/Manual Selector Switch to
[SELECT] and select [ ].
P Press the 6/5 side of the
Multi-function Button to adjust the
exposure level.
N
O
To Resume Automatic Adjustment
≥Set the Auto/Manual Selector Switch to [AUTO].
≥For other notes, see page 79.
j~ем~д=cзЕмл=^ЗамлнгЙен
Focus can be adjusted manually for recording in a
situation where auto focus may not function well.
Set the Recording Mode
1 Set the Auto/Manual Selector Switch to
[MANUAL].
≥The [AWB], [ ] and [AF] Indications
are displayed.
2 Slide the Auto/Manual Selector Switch to
[SELECT] and select [AF].
3 Press the [1 SET] Button to set [MF] and
press the 6/5 side of the
Multi-function Button to adjust the focus.
To Resume Automatic Adjustment
≥ Press the [1 SET] Button and set [AF]. Or, set the
Auto/Manual Selector Switch to [AUTO].
≥For other notes, see page 79.
P
1
2
3
PR
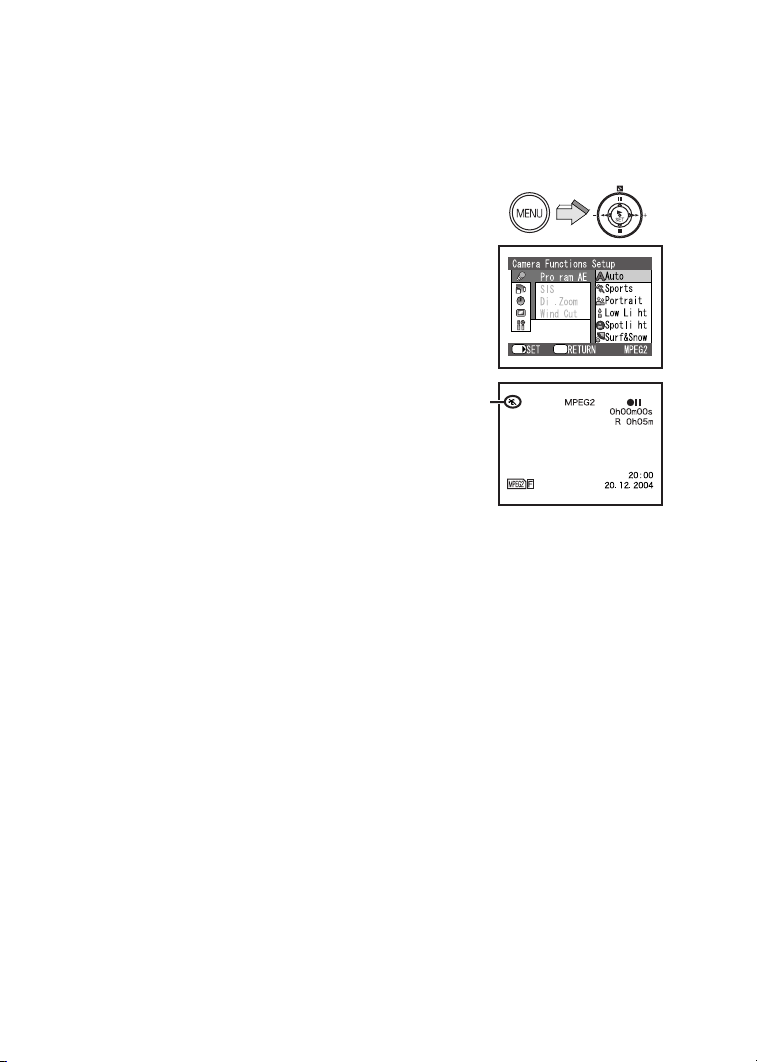
oЙЕзкЗбеЦ=бе=pйЙЕб~д=
pбнм~нбзел=EmкзЦк~г=^bF
Select optimal automatic exposures under specific
recording situations.
Set the Recording Mode
N Press the [MENU] Button and select
[Program AE] on [Camera Functions
Setup] to set a desired mode.
≥The indication 1 of the selected mode is
displayed.
[5] Sports Mode
For recording scenes involving quick movements,
such as sports scenes.
[7] Portrait Mode
Focuses on the main subject of the image and
leaves the background slightly out of focus.
[4] Low Light Mode
Preserves the mood of dim light settings without
altering picture brightness.
[Ω] Spotlight Mode
Neutralizes the additional brightness created by
a spotlight.
[º] Surf & Snow Mode
Compensates for excessive illumination from sun
glare to produce a clear picture.
Cancelling the Program AE Function
≥ Set [Program AE] on [Camera Functions Setup] to
[Auto].
≥For other notes, see page 79.
N
1
SET/
g
g
Menu
g
g
PS
fг~ЦЙ=pн~ДбдбтЙк=cмеЕнбзе
If the SD Video Camera might be shaken while
recording (with a Zoom In, with a walk etc.), the
camera shake in the image can be corrected.
≥If the SD Video Camera shakes too much, this
function may not be able to stabilizer images.
Set the Recording Mode
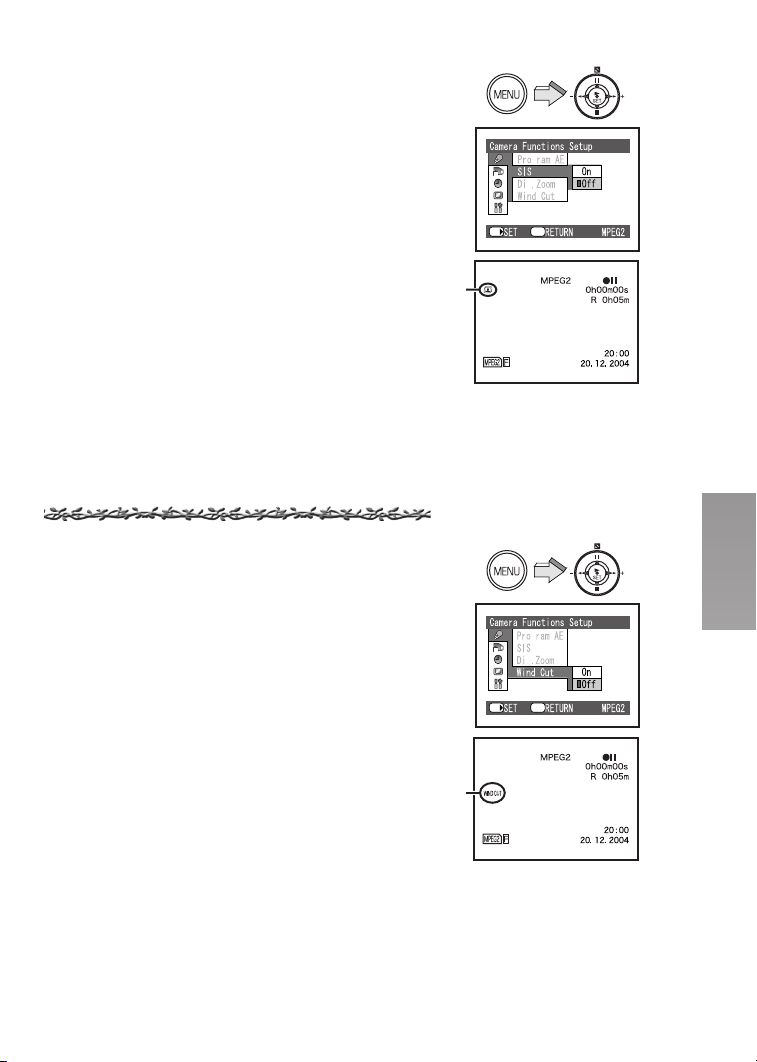
N Press the [MENU] Button and select [SIS]
on [Camera Functions Setup] to set [On].
≥The [[] indication 1 is displayed.
To Cancel the Image Stabilizer
≥ Set [SIS] on [Camera Functions Setup] to [Off].
≥This function is memorized even if the SD Video
Camera is turned off.
≥Under fluorescent lighting, image brightness may
change.
N
1
SET/
g
g
Menu
tбеЗ=kзблЙ=oЙЗмЕнбзе=
cмеЕнбзе
This function reduces the noise that the wind makes as
it hits the microphone during recording.
MPEG2/MPEG4 Mode only
Set the Recording Mode
1 Press the [MENU] Button and select
[Wind Cut] on [Camera Functions Setup]
to set [On].
≥The [WIND CUT] indication A is displayed.
Canceling the Wind Noise Reduction Function
≥ Set [Wind Cut] on [Camera Functions Setup] to [Off].
≥This function is memorized even if the SD Video
Camera is turned off.
1
g
g
Menu
SET/
A
PT
rлбеЦ=нЬЙ=mд~у=jЙем=
cмеЕнбзел
Allows the functions usable in the selected mode to be
set from the menu.
≥List of Menus to “Playback Mode”. (l 18)
N
g
N Press the [REC/PLAY] Button to select
Playback Mode and set the operation
mode.
O Press the [MENU] Button.
≥Using the Menu Screen (l 16)
Scene
Moving Picture:
One scene means images recorded from one press of
the Recording Start/Stop Button until recording is
temporarily stopped by pressing the Recording Start/
Stop Button again.
Still Picture:
One scene means a still picture recorded by pressing
the Recording Start/Stop Button.
ª Deleting Scenes (Delete)
You can delete unnecessary scenes.
1 Press the [MENU] Button and select
[Delete] on [Scene] and press the
[1 SET].
2 Select the scene to delete and then press
the [1 SET] Button.
3 The confirmation screen appears and
then select [YES] and press the [1 SET]
Button.
≥Select [NO] to cancel deletion.
O
1
2
3
SET/
SET/
SET/
SET/
ETC.
Menu
ETC.
Menu
Menu
≥Do not delete a file by using a personal computer.
≥After the scene is deleted, it cannot be restored.
≥The Play List may not be able to be created if the
memory card is nearly full.
≥For other notes, see page 80.
PU
SET/
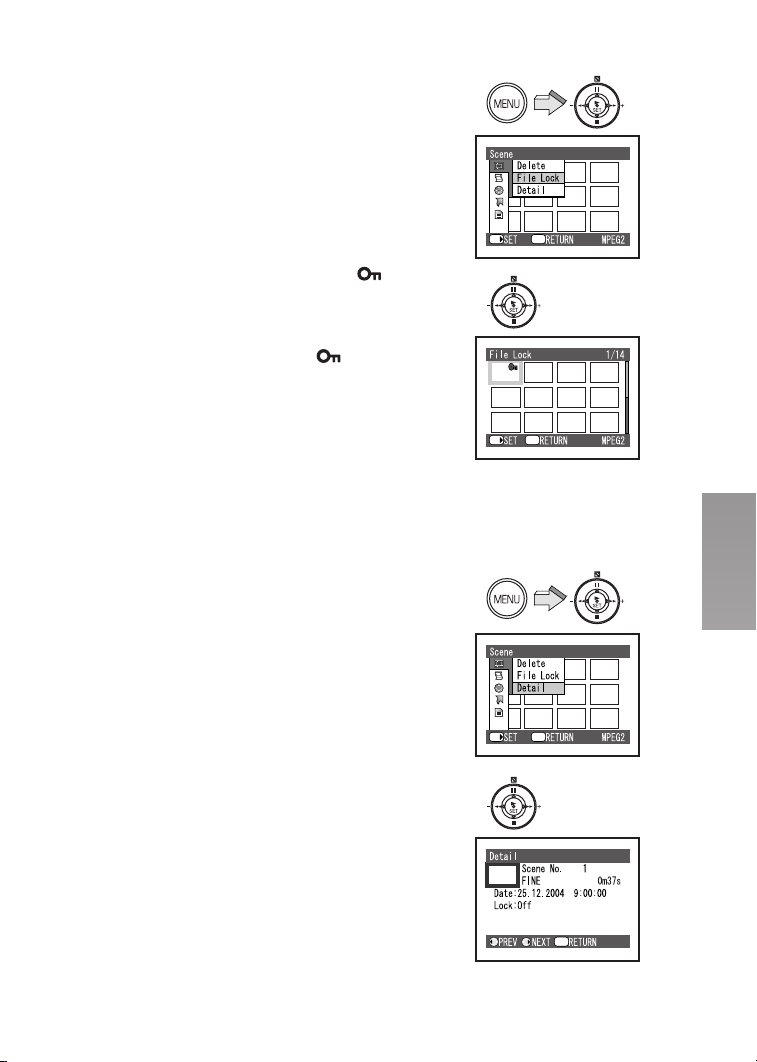
ª Locking Scenes (File Lock)
Precious scene recorded on the Memory Card can be
locked to prevent accidental erasure.
N Press the [MENU] Button and select [File
Lock] on [Scene] and press the [1 SET]
Button.
O Select the scene to lock set and then
press the [1 SET] Button.
≥The selected scene is locked and the [ ]
Indication is attached to the selected scene.
Unlock the scene
≥Select the locked scene and then use the foresaid
procedure to unlock the scene. The [ ] indication
will disappear and locking will be released.
≥For other notes, see page 80.
ª Displaying Information Using Menu
Screen (Detail)
You can display various information for a scene
number, picture quality, recording date/time and length
and File Lock/DPOF settings.
N
O
1
SET/
SET/
ETC.
Menu
Menu
1 Press the [MENU] Button and select
[Detail] in [Scene] and press the [1 SET].
2 Select the scene you would like more
information.
≥The scene detail information will be displayed.
ETC.
Menu
SET/
2
Menu
PV
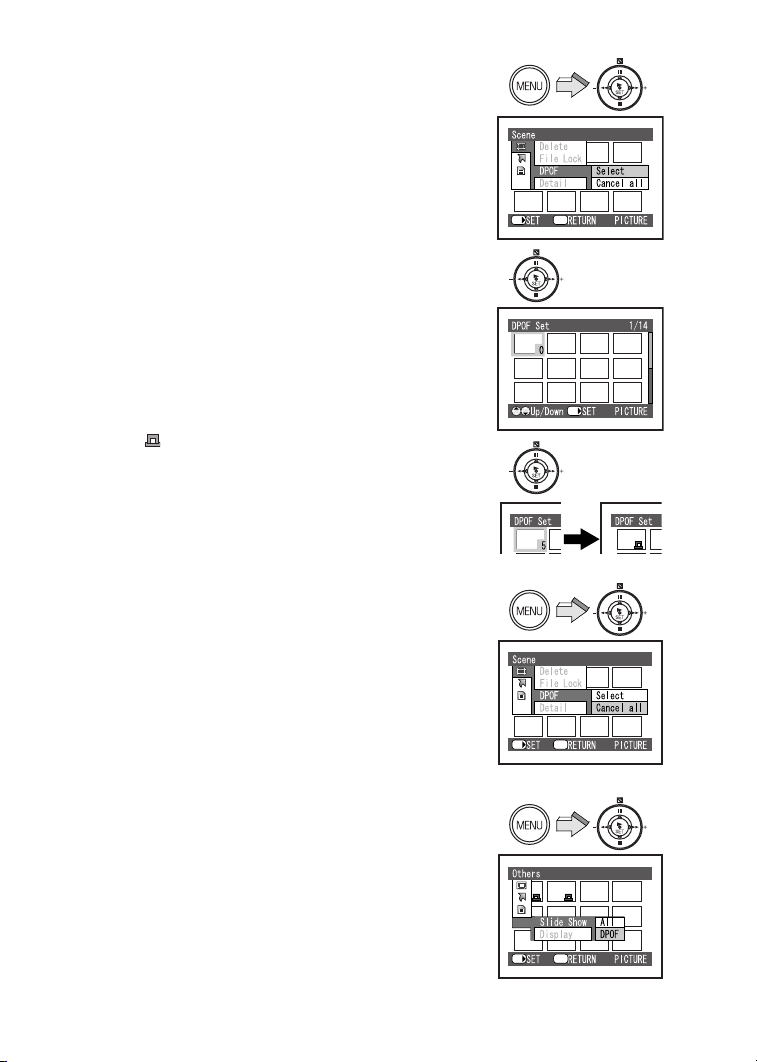
ª Designating Scenes to be Printed
(DPOF)
PICTURE Mode only
DPOF Setting Printing data (DPOF Setting), such as
the number of images to be printed, can be written to
the Memory Card.
“DPOF” means Digital Print Order Format.
N Press the [MENU] Button and select
[DPOF] on [Scene] to [Select] and then
press the [1 SET] Button.
O Select the scene for DPOF setting and
then press the [1 SET] Button.
≥The present setting quantity is displayed under
the right of the picture which selected.
P Press the ;/∫ side of the Multi-function
Button to select the desired number of
prints and then press the [1 SET] Button.
≥The [ ] Indication is displayed and attached to
the selected scene.
≥Up to 99 prints can be set for one scene.
To Release All the DPOF Settings
1 Press the [MENU] Button and select
[DPOF] on [Scene] to [Cancel all] and
then press the [1 SET] Button.
2 The confirmation screen appears and
then select [YES] and press the [1 SET]
Button.
N
O
P
1
SET/
ETC.
Menu
SET/
To Check the DPOF Settings in Slide Show
Press the [MENU] Button and select
[Slide Show] on [Others] to set [DPOF]
and then press the [1 SET] Button.
≥DPOF set images are displayed one by one for
approx. 5 seconds each.
≥Press [∫] to stop.
≥Press [;] to pause.
≥For other notes, see page 80.
QM
SET/
SET/
ETC.
Menu
ETC.
Menu
PlayList (MPEG2 Mode only)
You can create a play list on this SD Video Camera by
gathering your favourites from the recorded scenes.
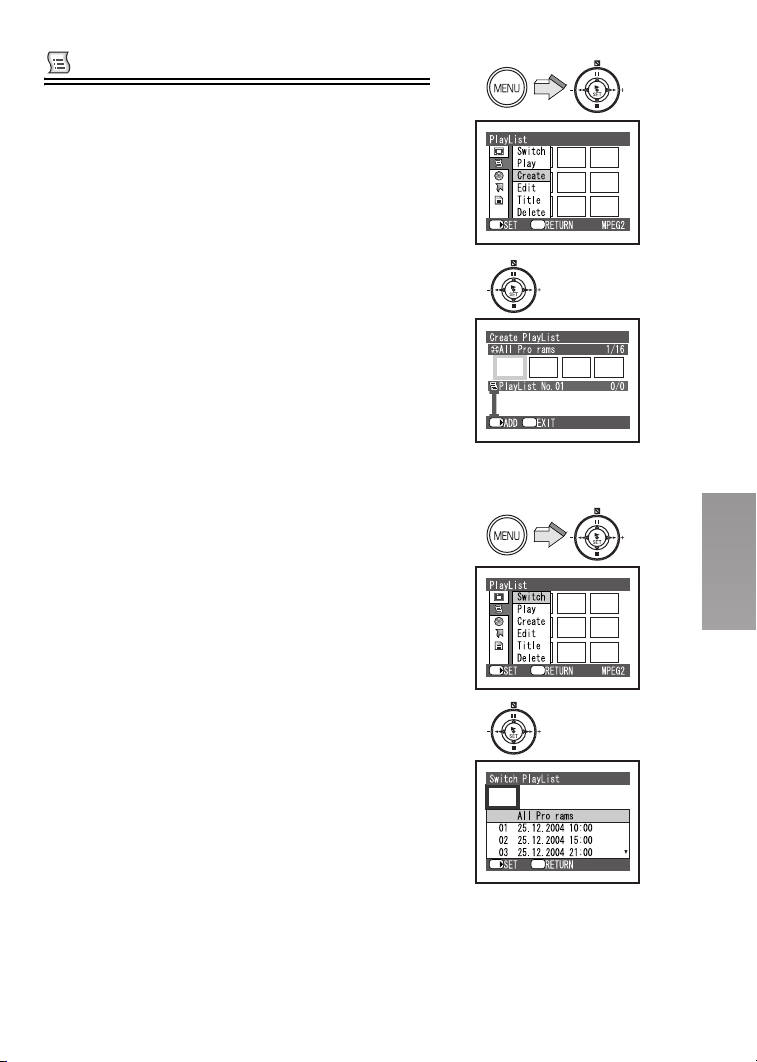
ª Creating New Play List (Create)
You can create a play list on this SD Video Camera by
gathering your favourite MPEG2 moving pictures from
the recorded scenes.
N
SET/
ETC.
Menu
N Press the [MENU] Button and select
[Create] on [PlayList] and press the
[1 SET] Button.
O Select the scenes to add to a play list and
then press the [1 SET] Button.
≥The added scene is displayed on the play list of
the screen lower row.
P Repeat step 2 in order to add the desired
scene and then press the [MENU] Button.
Q The confirmation screen appears and
then select [YES] and press the [1 SET]
Button.
≥More than 99 scenes cannot be recorded on a play
list.
≥The Play List may not be able to be created if the
memory card is nearly full.
≥Even if you delete a scene from the play list, the
original scene will not be deleted.
≥If you delete a original scene, the scene in the play
list will be deleted.
ª Switching to Thumbnail Display of
Each Created Play List (Switch)
You can select the desired play list from multiple play
lists.
O
1
2
SET/
SET/
g
Menu
ETC.
Menu
g
1 Press the [MENU] Button and select
[Switch] on [PlayList] and press the
[1 SET] Button.
2 Select the play list to display and then
press the [1 SET] Button.
≥To display scene of all programmes (all recorded
scenes), select [All programs].
SET/
Menu
QN

ª Playing back a Play List (Play)
N Press the [MENU] Button and select
[Play] on [PlayList] and press the [1 SET]
Button.
O Select the play list to play back and then
press the [1 SET] Button.
≥The selected play list will be played back from the
first scene. To cancel playback midway, press the
[∫] Button.
ª Adding/Deleting Scenes from Play
List (Edit)
You can later add/delete scenes to the play list.
1 Press the [MENU] Button and select [Edit]
on [PlayList] and press the [1 SET]
Button.
2 Select the play list to edit and then press
the [1 SET] Button.
≥The scenes of the programme will appear in the
upper row, and the scenes of selected play list
will appear in the lower row.
N
O
1
SET/
SET/
SET/
ETC.
Menu
Menu
ETC.
Menu
QO
2
Menu
SET/

Adding scenes
Follow the steps 1–2 of “Adding/Deleting Scenes from
Play List (Edit)”.
P Press the ∫ side of the Multi-function
Button down to move the cursor to the
lower row, and press the 6/5 side of
the Multi-function Button to select the
point where the scene is to be inserted.
≥1: Insertion position
Q Press the ; side of the Multi-function
Button up to move the cursor to the upper
row, and press the 6/5 side of the
Multi-function Button to point the cursor
to the scene to be added, and press the
[1 SET] Button.
≥2: Scene to be added
R Repeat step 4 in order to add the desired
scene and then press the [MENU] Button.
S The confirmation screen appears and
then select [YES] and press the [1 SET]
Button.
Deleting scenes
Follow the steps 1–2 of “Adding/Deleting Scenes from
Play List (Edit)”.
3 Press the ∫ side of the Multi-function
Button down to move the cursor to the
lower row, and press the 6/5 side of
the Multi-function Button to select the
place the cursor on the scene to be
deleted, and press the [1 SET] Button.
≥A: Scene to be deleted
4 Repeat step 3 in order to delete the
desired scene and then press the [MENU]
Button.
5 The confirmation screen appears and
then select [YES] and press the [1 SET]
Button.
PIQ
2
1
R
S
3
A
4
5
SET/
SET/
SET/
g
Menu
g
Menu
SET/
QP

ª Changing Title of Play List (Title)
Selections in the play list will be numbered in the order
you select them. The title of play list can be changed at
any time.
You can change the recording date/time to desired
title.
N
N Press the [MENU] Button and select
[Title] on [PlayList] and press the [1 SET]
Button.
O Select the play list of which title to be
changed and then press the [1 SET]
Button.
≥The screen for setting a title will appear.
P Select a character and then press the
[1 SET] Button.
≥Select [Delete] to erase a character.
≥When you put in a space, move cursor to desired
position of title input frame
[1 SET] Button.
≥You can give titles of up to 20 characters.
A , and press the
Q Repeat step 3 in order to enter the desired
character and after entering the title,
select [Enter] and then press the [1 SET]
Button.
≥If you cancel the setting of [Title], select [Cancel]
and the confirmation screen appears and then
select [YES].
R The confirmation screen appears and
then select [YES] and press the [1 SET]
Button.
≥The title inputted with this SD Video Camera may not
be displayed by other devices.
≥Do not change the title inputted by other devices with
this SD Video Camera.
ETC.
SET/
O
SET/
PIQ
TITLE
1 234567890
ABCDEFGHI JKLM
NOPQRSTUVWXY Z
АИ М ТЩБЙ Н УЪГСХ
ВК О ФЫДЛ П ЦЬЗ
1 Enter Cancel
SET/
R
SET/
Menu
Menu
Delete
g
A
QQ

Characters available for entering title
You can use the ;/∫/6/5 side of the Multi-function Button to select characters from
the “1 (capital letter)”, “2 (small letter)” and “3 (symbol)” input modes.
With the step 3, select the input mode and then press the [1 SET] Button.
TITLE
1234567890
ABCDEFGHI JKLM
NOPQRSTUVWXY Z
АИ М ТЩБЙ Н УЪГСХ
ВК О ФЫДЛ П ЦЬЗ
1 Enter Cancel
SET/
Delete
TITLE
1234567890
abcdefgh i j k lm
nopqrstuvwxyz
аи м тщб й н уъгсх
вк о фыдл п цьзЯ
Enter Cancel
2
SET/
ª Deleting Play List (Delete)
You can delete unnecessary play lists.
N Press the [MENU] Button and select
[Delete] on [PlayList] and press the
[1 SET] Button.
O Select the play list to delete and then
press the [1 SET] Button.
P The confirmation screen appears and
then select [YES] and press the [1 SET]
Button.
≥Select [NO] to cancel deletion.
≥Even if you delete a scene from the play list, the
original scene will not be deleted.
Delete
TITLE
1234567890
3
SET/
N
ETC.
SET/
O
SET/
P
Delete
Enter Cancel
Menu
Menu
SET/
QR

Program (MPEG2 Mode only)
Programme refers to an assembly of scenes recorded
on the same date.
ª Switching to Thumbnail Display of
Specific Date (Switch)
Since the scenes recorded on this SD Video Camera
are collected as “programs” for each recording date,
selecting a programme will allow you to display only
scenes from a specific date.
≥You cannot record more than 99 programs on a card.
N
O
SET/
g
ETC.
Menu
N Press the [MENU] Button and select
[Switch] on [Program] and press the
[1 SET] Button.
O Select the programme to display and then
press the [1 SET] Button.
≥To display scenes of all programmes (all
recorded scenes), select [All programs].
ª Playing Back Programme (Play)
You can play back only the selected programme.
1 Press the [MENU] Button and select
[Play] on [Program] and press the
[1 SET] Button.
2 Select the programme to play back and
then press the [1 SET] Button.
≥The selected programme will be played back
from the first scene. To cancel playback midway,
press the [∫] Button.
g
g
Menu
SET/
1
g
ETC.
Menu
SET/
2
g
g
Menu
SET/
QS

ª Changing Title of Programme (Title)
The recording date has initially been titled to any
progaramme.
You can change the recording date to desired title.
N Press the [MENU] Button and select
[Title] on [Program] and press the
[1 SET] Button.
O Select the program of which title to be
changed and then press the [1 SET]
Button.
≥The screen for setting a title will appear.
≥See “Changing Title of Play List (Title)” for how to
enter a title (l44).
P After entering the title, select [Enter] and
then press the [1 SET] Button.
≥If you cancel the setting of [Title], select [Cancel]
and the confirmation screen appears and then
select [YES].
Q The confirmation screen appears and
then select [YES] and press the [1 SET]
Button.
N
g
ETC.
SET/
O
g
SET/
P
TITLE
1 234567890
ABCDEFGHI JKLM
NOPQRSTUVWXY Z
АИ М ТЩБЙ Н УЪГСХ
ВК О ФЫДЛ П ЦЬЗ
1 Enter Cancel
SET/
Menu
Menu
Delete
Q
g
SET/
QT
Go To
ª Jump to the first or last scene (Top/
End)
From the Playback Mode screen, you can jump to the
first scene or last scene.
N Press the [MENU] Button and select
desired item on [Go To] and then press
the [1 SET] Button.
≥[Top]: To go to first scene.
≥[End]: To go to last scene.
ª Jump to the first, end of last, or
specification scene (Top/End/Specify)
While playing back a scene, you can jump to the
specification scene.
Follow the step 1 of “Jump to the first or last scene
(Top/End)” while playing back scene.
≥[Top]: To go to the start.
≥[End]: To go to the end of last scene.
≥[Specify]: To go to a specified point.
Select [Specify]
O Press the ;/∫/6/5 side of the
Multi-function Button and select desired
point 2 and then press the [1 SET]
Button.
1: The present playback point
2: The select point
≥6/5 (Tap this button)
[MPEG2]: Move the point to every 10 seconds.
[MPEG4]/[PICTURE]: Move the point to every
scene.
≥6/5 (Press and hold this button)
[MPEG2]: Move the point to every 1 minute.
[MPEG4]/[PICTURE]: Move the point to every
10 scenes.
≥;: Move the point to start
≥∫: Move the point to end of last scene
≥Go to the specified point and enter the playback
pause status.
N
ETC.
Menu
SET/
O
Menu
SET/
12
Menu
SET/
QU
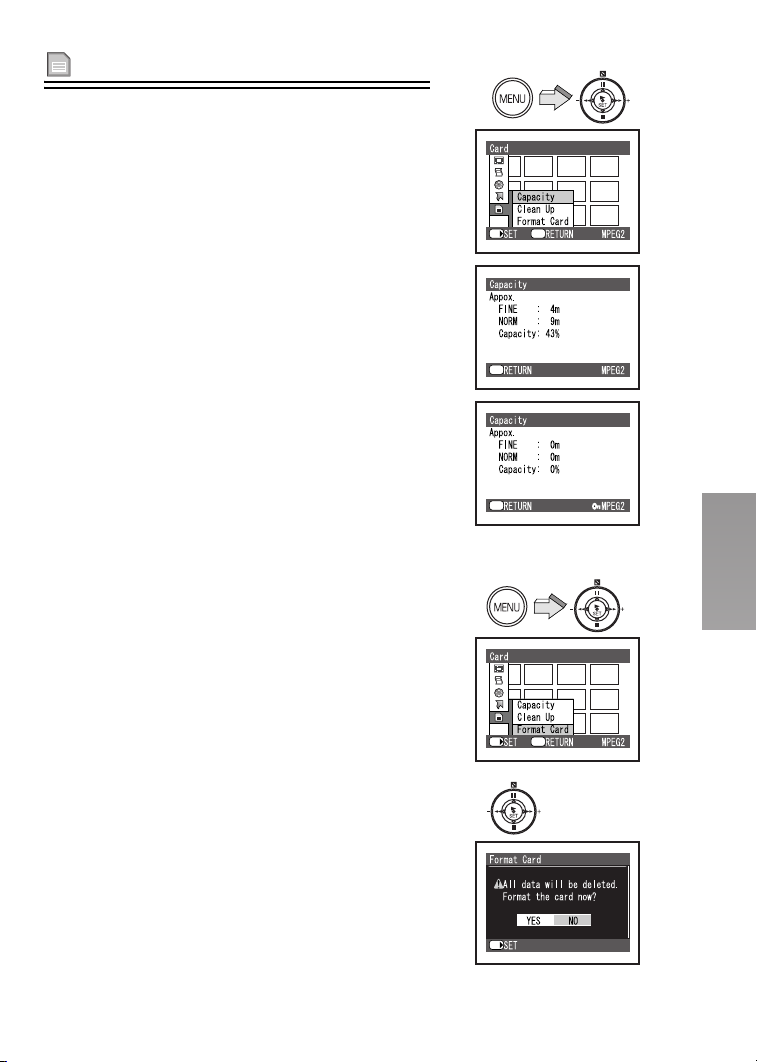
Card
ª Verifying Remaining Free Space on
Card (Capacity)
You can find out how long you will be able to record on
card.
N
N Press the [MENU] Button and select
[Capacity] on [Card] and press the
[1 SET] Button.
≥[Capacity] screen is displayed. 1
≥If write-protect switch is set to [LOCK] on SD
Memory Card, remaining capacity is displayed as
“0”. 2
ª Cleaning up the contents of Card
(Clean Up)
Recover writing speed of the data to a Card. (l 24)
≥Be sure to clean up the SD Memory Card before
use.
ª Formatting the Memory Card
(Format Card)
If a Memory Card becomes unreadable by the SD
Video Camera, formatting it may make it reusable.
Formatting erases all the data recorded on the
Memory Card.
1 Press the [MENU] Button and select
[Format Card] on [Card] and press the
[1 SET] Button.
2 The confirmation screen appears and
then select [YES] and press the [1 SET]
Button.
≥Formatting is carried out.
≥For other notes, see page 80.
ETC.
Menu
SET/
1
Menu
2
Menu
1
ETC.
Menu
SET/
2
SET/
QV
ETC
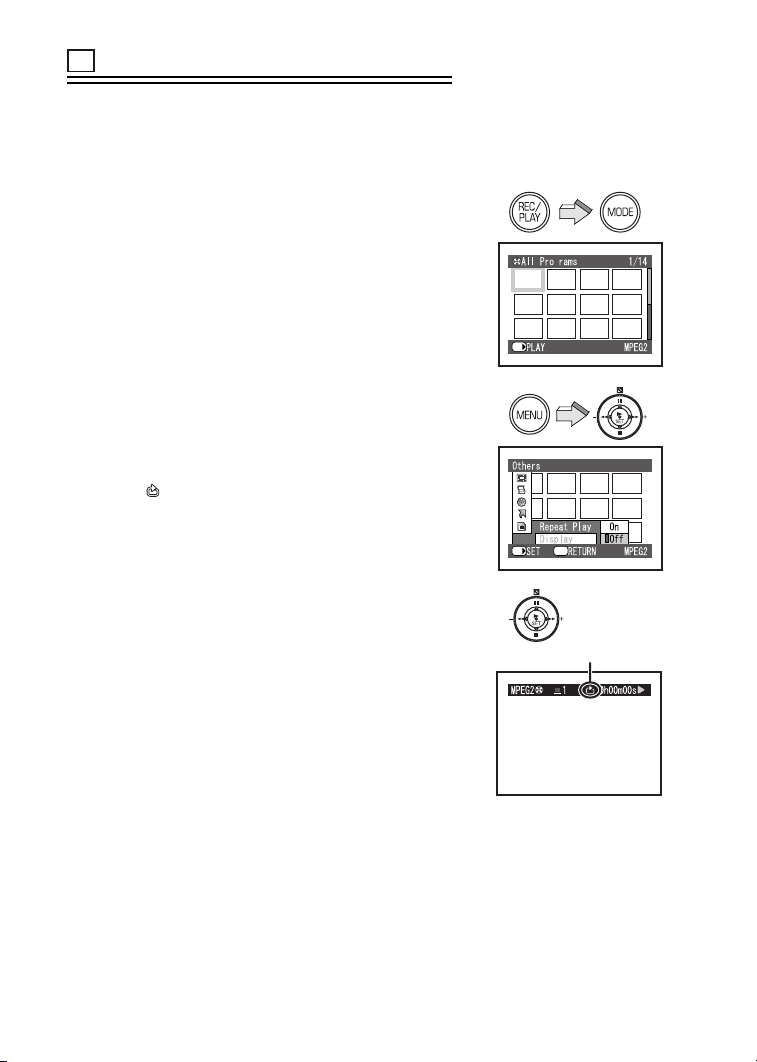
Others
ª Playing Back Scenes Repeatedly
(Repeat Play)
When playback of the last scene is finished, playback
of all scenes will repeat from the first scene.
≥Play List/Program:
Playback of the scenes in that range will be repeated.
MPEG2/MPEG4 Mode only
N Press the [REC/PLAY] Button to select
Playback Mode and set the operation
mode to [MPEG2] or [MPEG4].
O Press the [MENU] Button and set [Repeat
Play] on [Others] to [On] and then press
the [1 SET] Button.
≥Select [Off] to cancel Repeat Play setting.
P Press the [1 SET] Button.
≥Playback will start.
≥The [ ] indication 1 appears.
≥To cancel playback midway, press the [∫] Button.
However, the Repeat Play setting will not be
cancelled.
N
O
SET/
SET/
g
ETC.
Menu
To release Repeat Play
Use one of the following 2 methods to release
≥Set [Repeat Play] on [Others] to [Off].
≥Turn the SD Video Camera off once.
RM
P
1
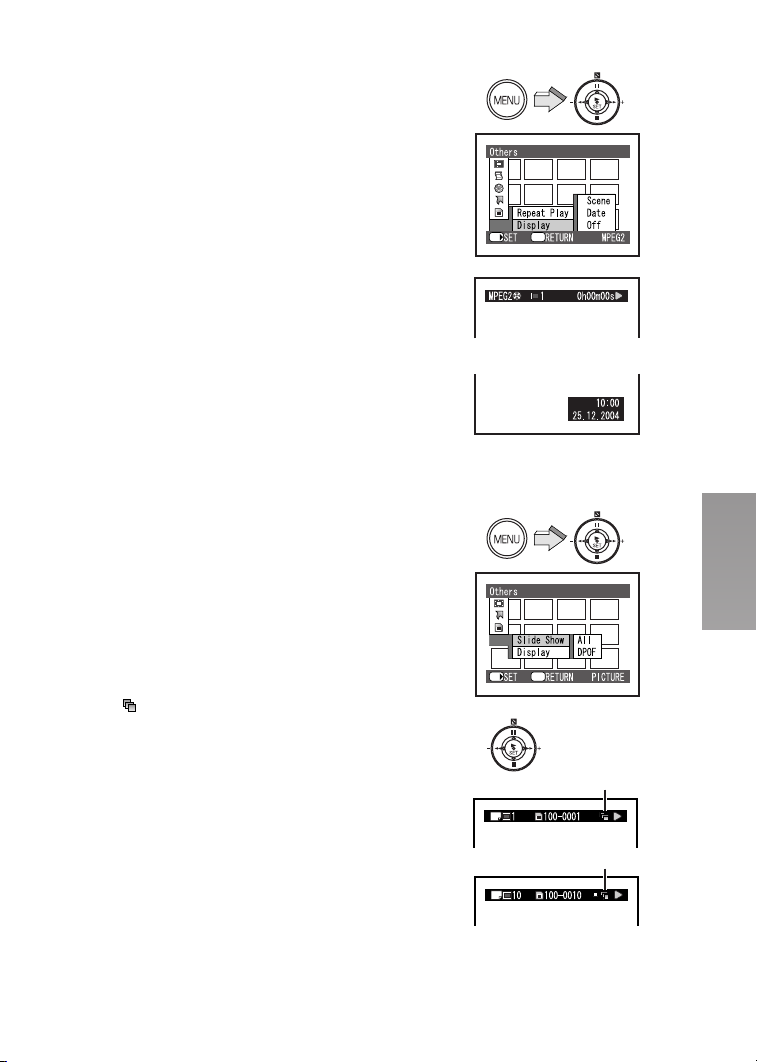
ª Information is displayed on a screen
(Display)
The programmes and scenes recorded by SD Video
Camera includes the information such as recording
date/time, scene number, etc.
You can select the information to be displayed during
playback.
N
N Press the [MENU] Button and set
[Display] on [Others] to desired mode.
≥[Scene] A: Displays the scene number, the
counter, the current status of the programmes or
the play list.
B:Displays the recording date/time of the
≥[Date]
scene.
≥[Off]: Does not display any information.
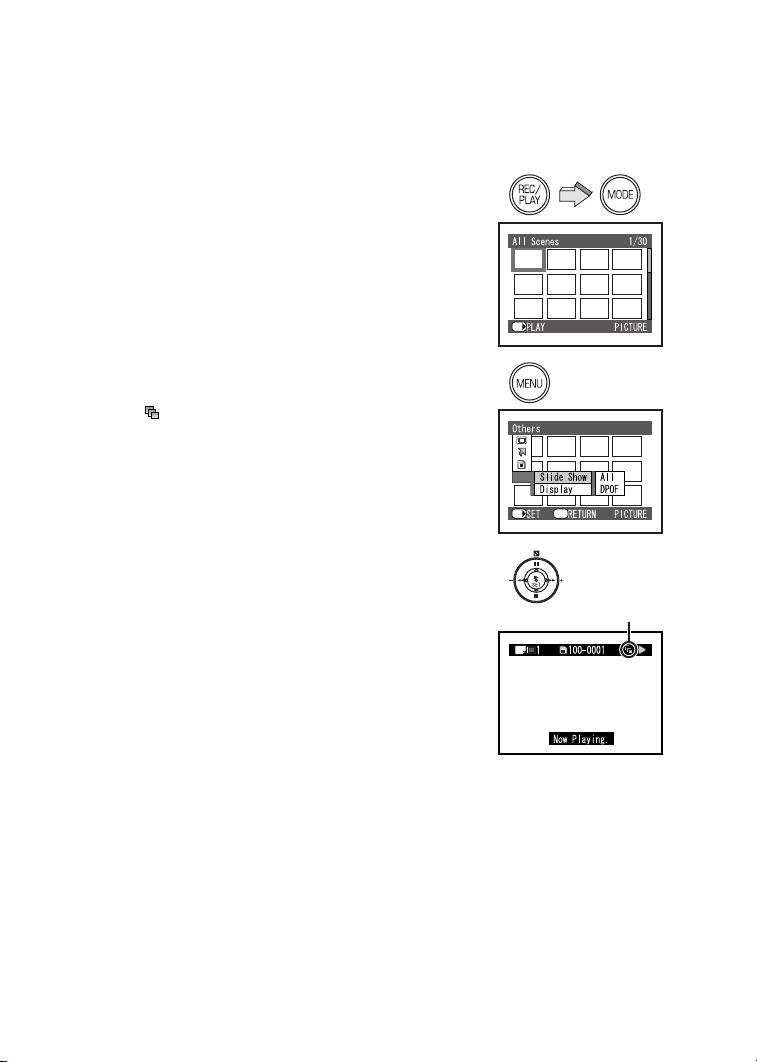
ª Slide Show
Plays back all of still pictures one by one recorded on
the Memory Card.
PICTURE Mode only
1 Press the [MENU] Button and set [Slide
Show] on [Others] to desired mode.
≥Select [All] or [DPOF].
≥[All]: Playing back all still pictures
≥[DPOF]: Playing back all the DPOF set pictures
2 Press the [1 SET] Button.
1: All
2: DPOF
≥The [ ] indication
≥Images are displayed one by one for approx.
5 seconds each.
≥Press [∫] to stop.
≥Press [;] to pause.
≥Only JPEG images that were created by this product
will be displayed correctly. Files that are copied to the
SD card may not be displayed properly, or not at all.
A appears.
ETC.
Menu
SET/
A
B
1
ETC.
Menu
SET/
2
A
1
A
2
RN
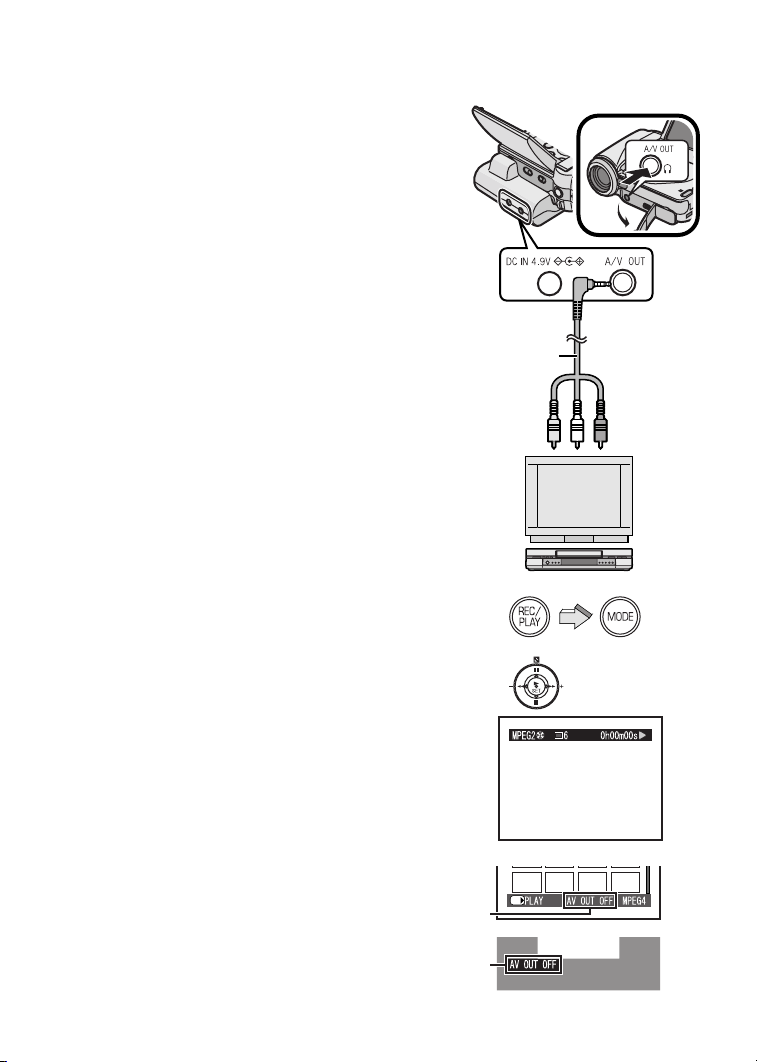
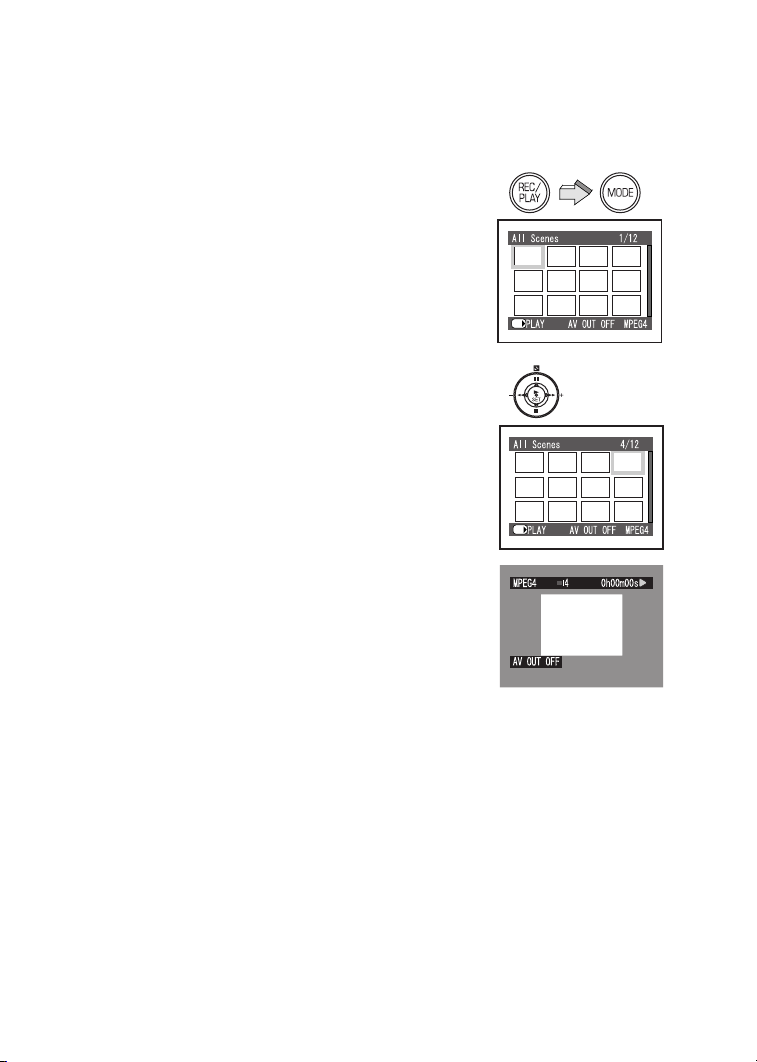
mд~убеЦ=_~Ев=зе=~е=ЙснЙке~д=
ЗЙобЕЙ=
By connecting the SD Video Camera in AV Cradle with
an external device, the recorded scenes can be played
back on an external device such as a TV or Audio
device.
MPEG2/PICTURE mode only
N Put the SD Video Camera in the AV
Cradle. (l 11)
O Connect the [A/V OUT] Socket of the AV
Cradle to the AV Input Sockets of the
external device
1.
Cable
≥A: When not using the AV cradle.
≥Turn off the SD Video Camera before connecting
the AV Cable.
2 using supplied AV
P Press the [REC/PLAY] Button to select
Playback Mode and set the operation
mode.
Q Press the ;/∫/6/5 side of the
Multi-function Button to select a desired
file and press the [1 SET] Button.
≥A file is played back.
N
A
O
1
2
≥MPEG4 mode cannot be displayed on external
device. When you select MPEG4 mode to Playback
mode, message of [AV OUT OFF] will be displayed
on the LCD Monitor. In this case, even if SD Video
Camera connected to an external device, scenes and
sounds are not output to it.
A: Index screen
B: Screen during playback (If you want to disappear
the message, set [Display] on [Others] to [Off].)
≥After saving at PC etc., MPEG4 moving pictures can
be played back on it. (l 53, 54)
≥Do not use any other AV cables except the supplied
one.
≥For other notes, see page 81.
RO
P
Q
A
B
SET/

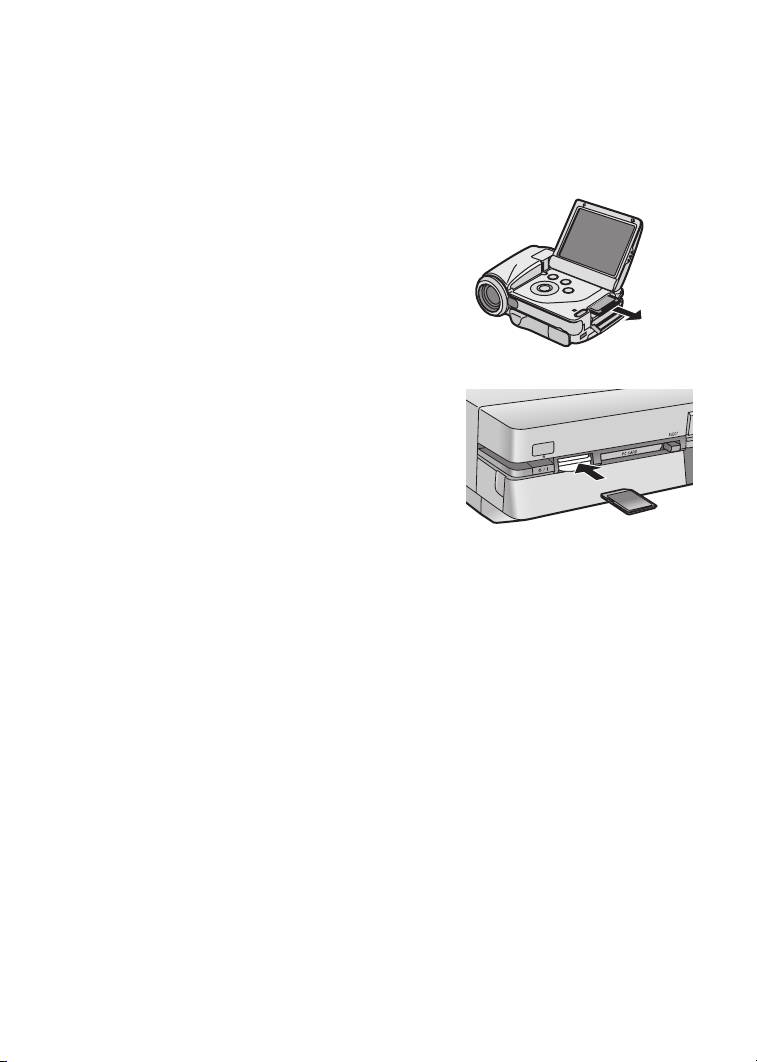
pнзкбеЦ=зе=нЬЙ=m`
If a card has reached its capacity limit because of
recorded pictures by SD Video Camera, or in order to
prevent accidental erasure of recorded pictures. You
can store the files inside the card in a PC.
≥Connect the USB cable after the USB driver is
installed. (l 58, 59)
≥Use both the AC adaptor and the battery. Either
one alone does not allow the SD Video Camera
to be used with a personal computer.
N
N Open the AV Output and USB Port Cover
and the DC Input Socket Cover.
≥When using AV Cradle, put the SD Video
Camera in the AV Cradle after opening AV
Output and USB Port Cover.
O Connect with the AC Adaptor 1. (l 10)
P Connect the [USB] Port 2 of the SD Video
Camera to the USB Port of the personal
computer 3 using supplied USB Cable
4.
≥While connecting the PC and SD Video Camera, do
not delete the data inside a card or format a card with
the PC.
≥Do not use any other USB Cables except the
supplied one.
OIP
2
4
1
3
RP
rлбеЦ=нЬЙ=asa=sбЗЙз=
oЙЕзкЗЙк=пбнЬ=~=e~кЗ aблв
ª Recording to a Hard Disk on DVD
Video Recorder
If you have a DVD Video Recorder with a Hard Disk
(DMR-E100H), you can save the pictures recorded by
the SD Video Camera on the hard disk or DVD-RAM of
the device.
When the capacity of the Memory Card becomes full,
save the files in the Memory Card to DMR-E100H.
N Remove the recorded Memory Card.
(l 12)
≥Turn off the SD Video Camera before removing a
Card.
O Insert the Memory Card into the card slot
of DMR-E100H and then save the files on
the hard disk or DVD-RAM.
≥For details, refer to the operating instructions of
DMR-E100H.
≥Play list cannot be saved.
Playing back moving pictures that were recorded
with the DVD Video Recorder.
When a programme recorded with MPEG4 format
using DMR-E100H is copied on an SD Memory Card,
it can be played back on this SD Video Camera.
≥For details, refer to the operating instructions of
DMR-E100H.
≥For other notes, see page 81.
N
O
RQ

lе=~=mЙклзе~д=`згймнЙк
^Дзмн=нЬЙ=лмййдбЙЗ=лзСнп~кЙ
ª About the supplied software
The SD Video Camera comes with MediaStage for AV100, DirectX 8.1 and a USB driver to
allow the SD Video Camera to be used on a personal computer. By using these software
packages, you can arrange the pictures on a Memory Card, and cut and edit moving
pictures (MediaStage for AV100). Please read the PDF-format instructions installed with the
software for how to use the software. These Operating Instructions describe only how to
install and start up the software and how to connect the SD Video Camera to a personal
computer. Install the USB driver before connecting the SD Video Camera to a personal
computer.
≥Even if the system requirements mentioned in these operating instructions are fulfilled,
some personal computers cannot be used.
≥USB Driver, MediaStage for AV100 and DirectX 8.1 cannot be used on Microsoft Windows
3.1, Windows 95, Windows 98, Windows NT and Macintosh.
≥Operation on an upgraded OS is not guaranteed.
≥Operation on an OS other than the one pre-installed is not guaranteed.
≥Dual CPUs or Multi-boot environments are not supported.
≥Only users having system administrator (Administrator) authority can use these software
applications.
≥The software is available in English, German and French.
≥The software and PDF manual in the selected language version are installed.
≥When you operate a personal computer in other than English, German and French, the
application and PDF manual installed is the English version. Please refer to the PDF
manual of your respective language version in the supplied CD-ROM. (Spanish, Italian,
and Simplified Chinese version are available.)
≥A USB hub or USB card used for connection does not guarantee a normal operation. Use
the attached USB cable for direct connection to the personal computer.
≥Before installing (or uninstalling), quit all other applications and installation of the
other applications. If the launcher for installation is not activated automatically
when the CD-ROM is inserted in the personal computer’s CD-ROM drive, doubleclick the CD-ROM icon in [My Computer].
≥For operating instructions, please read the PDF manual on the CD-ROM. To read the
PDF Manual, you must have Adobe Acrobat Reader 5.0 or higher. If Adobe Acrobat
Reader is not installed on the Personal Computer, please install it from the
launcher.
RR

≥Microsoft®, Windows®, Windows Media™, Windows NT ® and DirectX® are either
trademarks or registered trademarks of Microsoft Corporation in the United States and/or
other countries.
≥Intel®, Pentium® and Celeron® are trademarks or registered trademarks of Intel
Corporation in the United States and/or other countries.
≥Adobe®, the Adobe logos and Acrobat® are trademarks or registered trademarks of Adobe
Systems Incorporated in the United States and/or other countries.
≥CDDB is a registered trademark and Gracenote is a trademark of CDDB, Inc. (dba
Gracenote)
≥Other names of systems and products mentioned in these Operating Instructions are
usually the registered trademarks or trademarks of the manufacturers who developed the
systems or products concerned.
≥The contents or complete reproduction or copy of these Operating Instructions could be
changed without notice.
≥Although the screens in these Operating Instructions are shown in English (Windows XP
version) for the sake of example, other languages are supported as well.
≥When installing or using this software, specify the user name to [Administrator (computer
administrator)] or any other user name having the equivalent right. Then log on with that
user name to install this software. (For Windows XP/2000 Professional) (If you do not have
such a right, consult with your system administrator.)
rp_=aкбоЙк
ª System Requirements for USB Driver
OS:
Microsoft Windows 98SE, Windows Me, Windows 2000 Professional, Windows XP Home
Edition/Professional
Drive: CD-ROM Drive
RS

jÉÇá~pí~ÖÉ=Ñçê=^sNMM
ª Features of MediaStage for AV100
≥MPEG2 moving pictures, MPEG4 moving pictures (ASF-format files) and still pictures
(JPEG pictures) recorded on the SD Video Camera are displayed in thumbnail form and
can be easily played back on a personal computer.
≥MPEG2 moving pictures and MPEG4 moving pictures (ASF-format files) can be cut-
edited.
≥E-mails with moving pictures attached can be easily sent.
ª System Requirements for MediaStage for AV100
OS:
Microsoft Windows 98SE, Windows Me, Windows 2000 Professional, Windows XP Home
Edition/Professional
CPU:
Intel Celeron 800 MHz or higher
Intel Pentium III 600 MHz or higher
HDD:
400 MB or more
RAM:
256 MB or more
Display:
High Colour (16 bit) or more with a resolution of 800 k 600 pixels or more
Drive: CD-ROM Drive
I/F: USB port
Others:
Pointing device such as a mouse or equivalent to mouse. The following software except for
the above environment motions are installed;
Windows Media Player 6.4 or later, Internet Explorer 5.01 or later, DirectX 8.1 or later.
≥As an IEEE1394 port is not provided on the SD Video Camera, transfer or editing of
pictures using the IEEE1394 port is not supported.
RT

fелн~ддбеЦ=jЙЗб~pн~ЦЙ=C=rp_=
aкбоЙк
Do not connect the USB cable until the USB driver has
been installed.
N Insert the supplied CD-ROM into the
personal computer’s CD-ROM drive.
≥The launcher for the installation is activated
automatically.
O Click [MediaStage & USB Driver].
P Select the Language to be installed and
click the [OK] Button.
≥When [MediaStage & USB Driver] screen
appears, click [Next].
Q Read License Agreement carefully, and
click [Yes], if you accept the terms of the
agreement.
R Complete the installation according to the
message.
≥The USB Driver is installed automatically.
≥If you use other than Windows XP, when the
DirectX 8.1 setup screen appears, install it
according to the message. (Failure to install
DirectX 8.1 disables you from using MediaStage
for AV100.)
≥After rebooting the computer, the MediaStage for
AV100 is enabled.
O
P
Q
RU
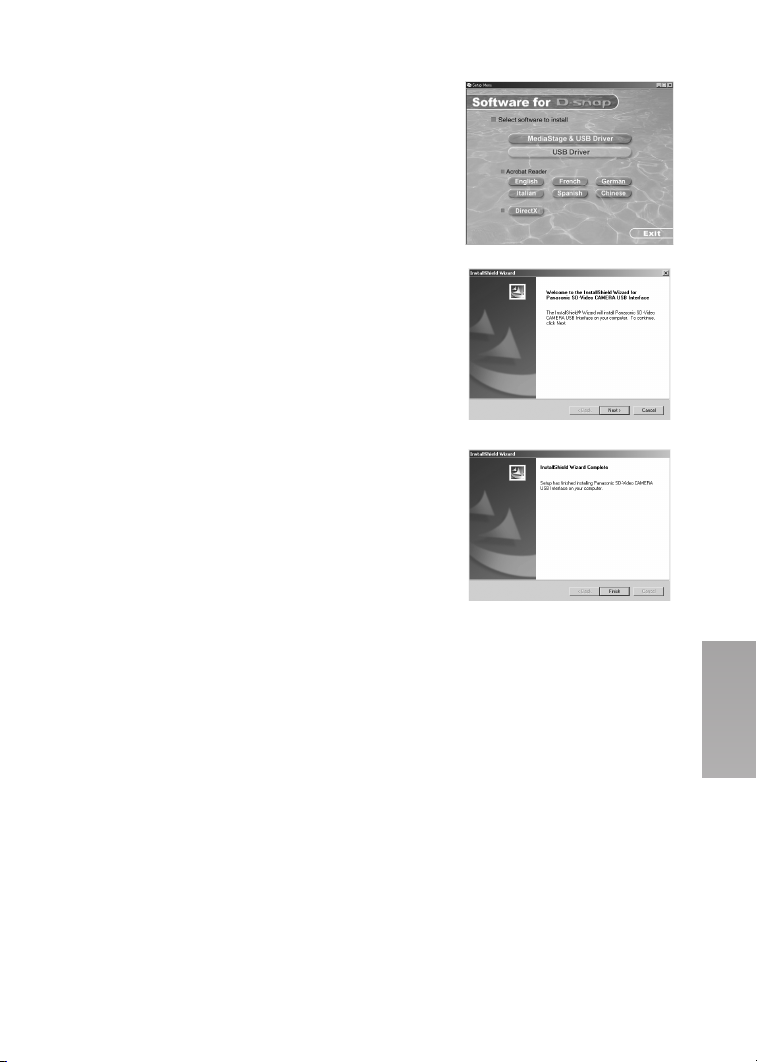
fелн~ддбеЦ=rp_=aкбоЙк
When the USB driver is installed, the SD Video
Camera will be recognized by the personal computer.
Do not connect the USB cable until the USB driver has
been installed.
≥When [MediaStage & USB Driver] is already
installed, you do not need to install [USB Driver].
N Insert the supplied CD-ROM into the
personal computer’s CD-ROM drive.
≥The launcher for installation is activated
automatically.
O Click [USB Driver].
P Click [Next].
Q Click [Finish].
O
P
Q
RV

`зееЙЕнбеЦ=пбнЬ=нЬЙ=m`
≥Connect the USB cable after the USB driver is
installed.
≥Use both the AC adaptor and the battery. Either
one alone does not allow the SD Video Camera
to be used with a personal computer.
N Open the AV Output and USB Port Cover
and DC Input Socket Cover.
≥When using AV Cradle, put the SD Video
Camera in the AV Cradle after opening AV
Output and USB Port Cover.
O Connect with AC Adaptor 1. (l 10)
P Connect the [USB] Port 2 of the SD Video
Camera to the USB Port of the personal
computer 3 using supplied USB Cable
4.
≥The SD Video Camera works as a personal
computer peripheral. (Operation of the SD Video
Camera is disabled.)
≥The [Removable disk] icon appears in
[My Computer].
≥Do not use any other USB Cables except the
supplied one.
≥For other notes, see page 81.
N
OIP
2
4
1
3
When the SD Video Camera is connected for the
first time.
≥[Found New Hardware Wizard] screen appears.
For Windows Me/98SE Users:
1Click [Next].
2Click [Finish].
For Windows XP Users:
1Click [Next].
≥When the supplied CD-ROM is inserted, click
[Next] again.
2Click [Continue Anyway].
3Click [Finish].
≥Since [Found New Hardware Wizard] screen
appears again after this, repeat steps.
For Windows 2000 Users:
1Click [Yes].
SM
Windows XP
Windows 2000

pн~кнбеЦ=нЬЙ=pзСнп~кЙ
ª Starting the MediaStage for AV100
1 Select [Start]>> [All programs
(programs)]>> [Panasonic]>>
[MediaStage]>> [MediaStage for AV100].
≥For other notes, see page 82.
aблЕзееЙЕнбеЦ=нЬЙ=rp_=`~ДдЙ=
л~СЙду
If you use Windows XP/2000, remove the USB Cable
using the following method.
If you use Windows Me/98SE, check that the Card
Access Lamp is out, then remove the USB Cable.
(Keep the SD Video Camera turned on.)
N Double click the in task tray.
≥Hardware disconnect dialogue box appears.
O Select [Panasonic SD-Video CAMERA
USB Interface] and click [Stop].
P Click [OK].
≥Click [OK], and you can safely disconnect the
cable.
1
N
O
fС=узм=ез=дзеЦЙк=еЙЙЗ=
лзСнп~кЙ=Erебелн~ддF
1 Select [Start] (>>[Settings]) >>[Control
Panel].
2 Double-click [Add/Remove Programs].
3 Select the software to be uninstalled and
click [Change/Remove].
≥Uninstalling steps may vary depending on the OS.
Please refer to the user manual of your OS.
P
SN

`зелнкмЕнбеЦ=~=cздЗЙк=пЬЙе=
нЬЙ=jЙгзку=`~кЗ=бл=млЙЗ=
пбнЬ=~=m`
≥When the Memory Card with data recorded by the
SD Video Camera is inserted into a personal
computer, folders will be displayed as in the figure.
≥Use the MediaStage for AV100 for operating files
in the Memory Card. (l 82)
[DCIM]: The images (IMGA0001.JPG etc.) in
[MISC]: Files in which DPOF Data has been
[SD_VIDEO]: MPEG2 moving pictures
≥For other notes, see page 83.
SO
this folder are recorded in the JPEG
format. ([100-0001] or similar
indication is displayed on the SD
Video Camera.)
set to the image are in this folder.
Slide show data created by
MediaStage for AV100 are in this
folder. (AUTPLAY0.MRK etc.)
(MOV001.MOD etc.) and MPEG4
moving picture is recorded in ASF
format (MOL001.ASF etc.).

lнЬЙкл
`Ь~кЦЙ=нЬЙ=ДмбднJбе=Д~ннЙку=
Сзк=г~бен~бебеЦ=нЬЙ=З~нЙ=
беСзкг~нбзе
This built-in battery is used for the memory of date and
time. If [0] indicator is displayed when the power is
on, the built-in battery may be exhausted. Charge
using the following procedure:
N Take the battery out and plug in the AC
adaptor. (
O Turn the power off and leave the SD Video
Camera as it is for approx. 12 hours.
≥The built-in battery can be used for about 6 months
by 1 charge. (It changes with operating.)
≥After recharging the built-in battery, adjust the date
and time. (l 20)
rлбеЦ=нЬЙ=lйнбзе~д=
b~кйЬзеЙл
While recording or playing back on an SD Video
Camera, the sound can be heard using optional
earphones.
l 10)
N
O
Í
1
1 Plug the Earphone terminal in to the [ ]
Socket.
≥If the volume while playing back is loud or soft, you
can adjust the volume by using the Volume
Adjustment Lever on the SD Video Camera, or the
Volume Adjustment Button on the Remote Controller.
are able to adjusting the volume. (Adjustment of
volume cannot be performed while recording.)
(l 29)
≥If you use earphones be sure to use a thing with
length of cord less than 3 metres.
SP
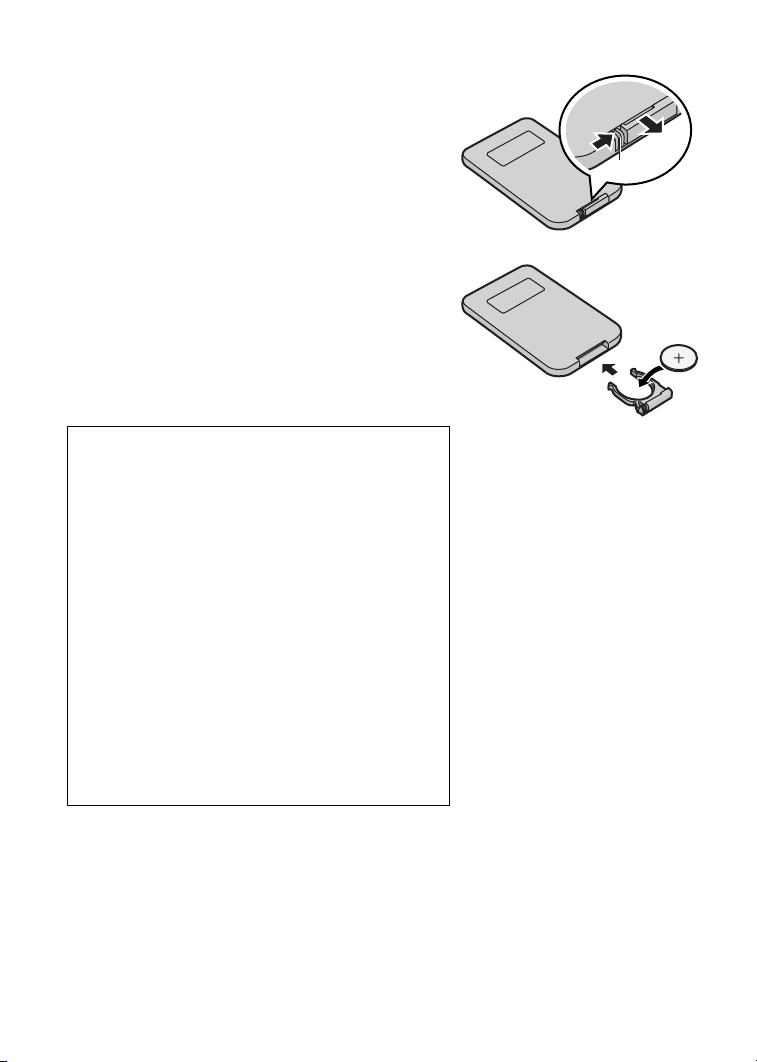
rлбеЦ=^ЕЕЙллзкбЙл
ª Inserting the Button-type Battery
Before using the Remote Controller, insert the
supplied button-type battery.
N While pressing the Stopper 1, pull out
the Battery Holder.
O Insert the button-type battery with the
imprint (r) facing upward.
P Insert the Battery Holder into the Remote
Controller.
≥When the button-type battery becomes weak,
replace it with a new CR2025 battery. (A battery
is normally expected to last about one year,
however, it depends on operation frequency.)
≥Be sure to match the poles properly when
inserting the battery.
Warning
“THE LITHIUM BATTERY IS A CRITICAL
COMPONENT (TYPE NUMBER CR2025
MANUFACTURED BY PANASONIC).
IT MUST NEVER BE SUBJECTED TO
EXCESSIVE HEAT OR DISCHARGE. IT MUST
THEREFORE ONLY BE FITTED IN EQUIPMENT
DESIGNED SPECIFICALLY FOR ITS USE.
REPLACEMENT BATTERIES MUST BE OF THE
SAME TYPE AND MANUFACTURER.
THEY MUST BE FITTED IN THE SAME MANNER
AND LOCATION AS THE ORIGINAL BATTERY,
WITH THE CORRECT POLARITY
CONNECTIONS OBSERVED.
DO NOT ATTEMPT TO RE-CHARGE THE OLD
BATTERY OR RE-USE IT FOR ANY OTHER
PURPOSE. IT SHOULD BE DISPOSED OF IN
WASTE PRODUCTS DESTINED FOR BURIAL
RATHER THAN INCINERATION.”
N
1
OIP
SQ
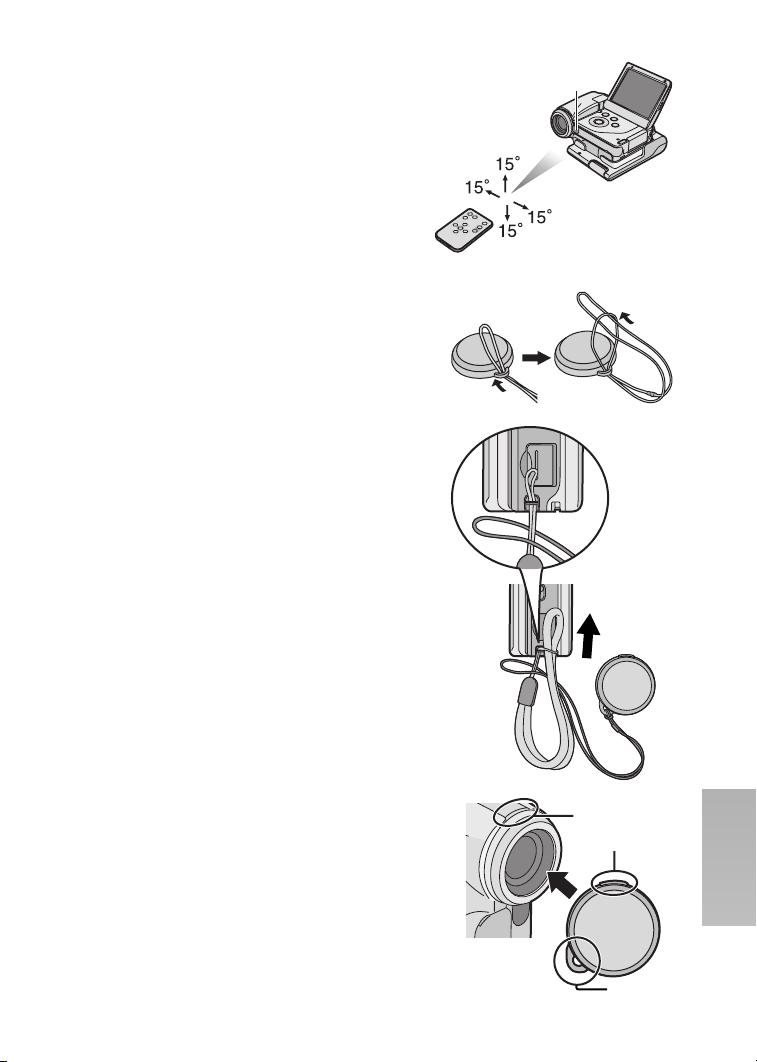
ª Using the Remote Controller
N Direct the Remote Controller at the
Remote Controller Sensor 1 on the SD
Video Camera and press the desired
button.
≥Distance from the SD Video Camera: Within
approx. 5 meters.
≥Angle: Within approx. 15 degrees in all directions
from the central axis.
N
1
≥The above operative ranges are for indoor use.
Outdoors or under strong light, the SD Video Camera
may not operate properly even within the above
ranges.
ª Attaching the Hand Strap/Lens Cap
To protect the Lens surface, attach the Lens Cap.
1 Pass the end of Lens Cap Cord through
the hold A in the Lens Cap.
2 Pass the Hand Strap through the Lens
Cap Cord.
3 Pass the shorter loop of the Hand Strap
through the Strap Holder.
4 Pass the longer loop of the Strap through
the shorter loop.
5 Attach the Lens Cap on the SD Video
Camera.
≥Fit the part 2 of the Lens Cap to the part 1 of
the SD Video Camera.
≥When you remove the Lens Cap, hook a finger
into 3 and remove it.
≥Keep the Lens Cap out of the reach of children to
prevent swallowing.
1
2,3
4
5
A
1
2
3
SR
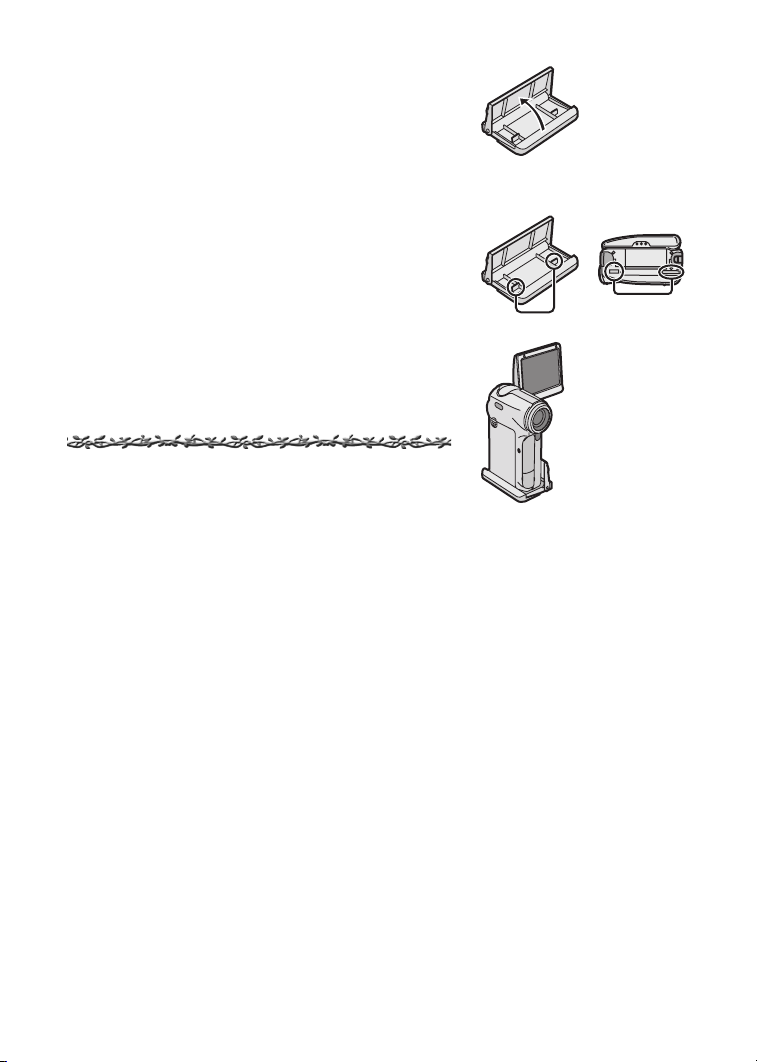
ª Using the Stand
The Card Case can be used as a Movie Stand. It can
be used for Portrait Picture Recording etc., or
whenever you do not want to record with the SD Video
Camera in your hand.
N Open the Card Case.
O Fit the leading protrusions 1 of the Stand
and the grooves 2 of the SD Video
Camera, and place the SD Video Camera
on the Stand.
N
O
^ÑíÉê=rëÉ
1 Turn off the SD Video Camera. (l 15)
2 Take out the Memory Card. (l 12)
3 Retract the LCD Monitor.
4 Attach the Lens Cap on the SD Video
Camera. (
If you do not use for a long time:
l 65)
N Remove the AC Adaptor and take the
battery out. (
l 10)
O Attach the Lens Cap on the SD Video
Camera. (
l 65)
P Put the SD Video Camera into the
Wearable Case.
1
2
SS
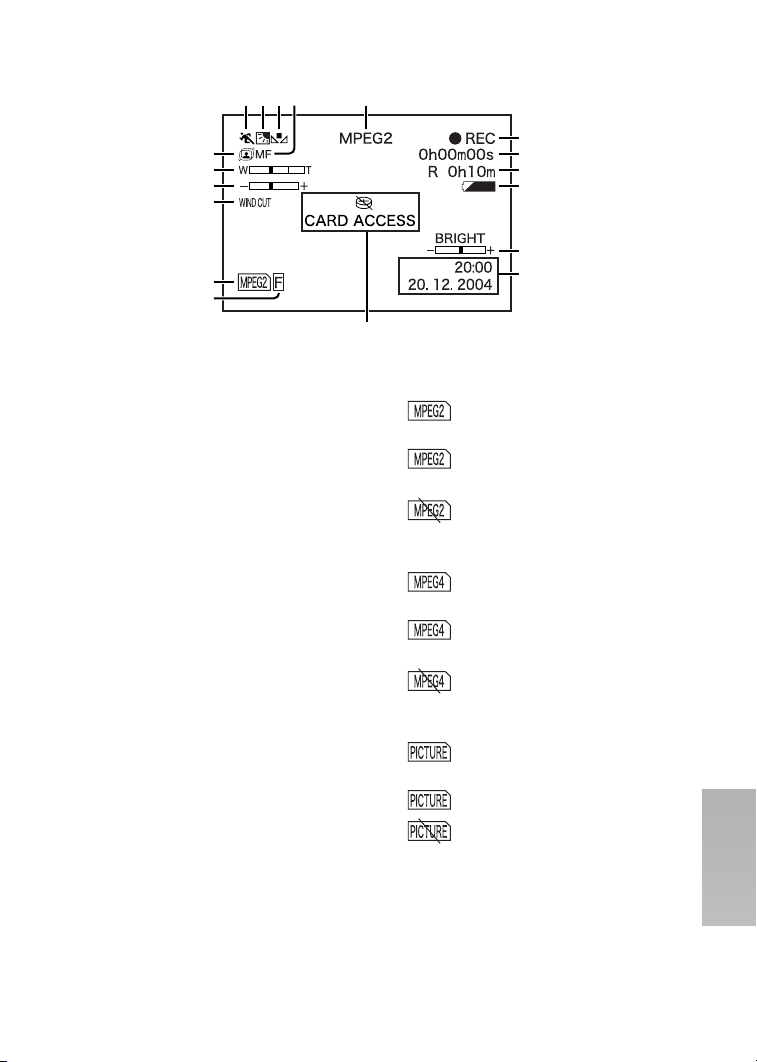
fеЗбЕ~нбзел=EoЙЕзкЗбеЦ=jзЗЙF
1
2 3 54
6
7
8
9
10
11
1 Program AE Mode (l 36)
5: Sports Mode
7
:
Portrait Mode
4
:
Ω
:
º: Surf & Snow Mode
2 Backlight Mode (l 33)
3 White Balance Mode (l 34)
AWB: Auto White Balance
{
:
z
:
1: The white balance setting
4 Focus Setting (l 35)
AF: Auto Focus
MF: Manual Focus
5 Operation Mode (l 25, 26, 30)
MPEG2: MPEG2 Moving Picture
MPEG4: MPEG4 Moving Picture
PICTURE: Still Picture Mode
6 Image Stabilizer (l 37)
7 Zoom/D.Zoom Magnification (l 33)
8 Manual Exposure Adjustment (l 35)
Low Light Mode
Spotlight Mode
Adjustment
Indoor Mode (recording
under incandescent lamp)
Outdoor Mode
that was previously set
manually
Mode
Mode
12
13
14
15
16
17
18
9 Wind Noise Reduction (l 37)
10 Card Mode
(Blue): MPEG2 Moving Picture is
ready to record
(Red): MPEG2 Moving Picture is
recording
(Red): SD Memory Card is not
inserted/SD Memory
Card is locked
(Blue): MPEG4 Moving Picture is
ready to record
(Red): MPEG4 Moving Picture is
recording
(Red): SD Memory Card is not
inserted/SD Memory
Card is locked
(Blue): Still Picture is ready to
record
(Red): Still Picture is recording
(Red): SD Memory Card is not
inserted/SD Memory
Card is locked
ST

11 Picture Quality (l 25, 26, 30)
MPEG2/PICTURE (l 25, 30)
:Fine
:Normal
MPEG4 (l 26)
: Super Fine
:Fine
:Normal
: Economy
12 Recording Mode
¥REC: Record
¥;: Recording pause
13 Elapsed time indication
14 Indication of recordable time and
recordable number of images
R 0h10m:
Remaining recordable time for moving
pictures (Lights up in red when it
reaches 0h00m.)
R 10:
Number of remaining recordable still
pictures (Lights in red when it reaches
zero.)
15 Remaining Battery Power [ ]
When the battery power becomes low,
the indication changes. When the
battery level indicator indicates
(Red) flashes
a few minutes. Recharge the battery.
(l 10)
16 Adjusting Brightness and Colour
Level on the LCD Monitor (l 22)
BRIGHT: LCD Brightness
COLOUR: LCD Colour Level
17 Date/Time Indication (l 21)
18 Warning
[0]:
The built-in battery may be exhausted.
Recharge the built-in battery.
[°]:
Warning has appeared in the portrait picture
recording. Return the LCD monitor and
verify contents. (l 14)
[CARD ACCESS]:
While checking a Card.
, the battery will run out in
[CARD ERROR]:
Error occurred when the recording starts, or
while recording. Turn on power again.
If a card is not corresponding, the SD Video
Camera cannot recognize the card. Perform
format with this SD Video Camera.
[CARD LOCKED]:
The write-protect switch of the SD Memory
Card is set to [LOCK]. (l 74)
[PROGRAM NO. FULL]:
The number of programs of an MPEG2
moving picture which can be recorded to
1 card has filled. Delete all files in the
unnecessary program, or insert the new
card.
[NO CARD]:
The Memory Card is not inserted, or the
Memory Card may not be inserted correctly.
[CARD FULL]:
The memory capacity is fully utilized. Erase
any unnecessary files or replace it with a
new Memory Card.
[COPY INHIBITED]:
The moving picture has the copy-protect
signal (copy guard), so cannot record this
data.
[LOW BATTERY]:
The battery may be exhausted. Replace it
with a fully charged battery or recharge the
supplied battery.
[UNFORMAT CARD]:
This card is not formatted, or formatted by
device other than this SD Video Camera.
Perform format with this SD Video Camera.
SU
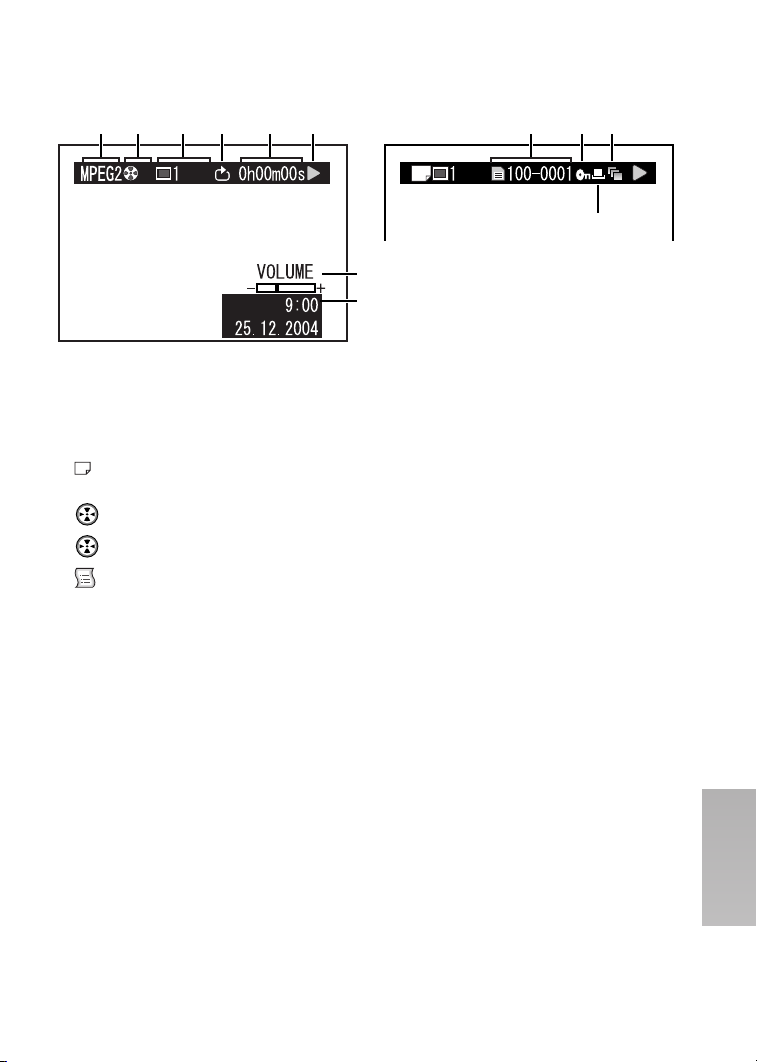
fеЗбЕ~нбзел=Emд~уД~Ев=jзЗЙF
MPEG2/MPEG4 PICTURE
1 2 3 5 6 101211
4 9
7
8
1 Operation Mode (l 27, 28, 31)
MPEG2: MPEG2 Moving Picture
Mode
MPEG4: MPEG4 Moving Picture
Mode
: Still Picture Mode
2 Program/Play List
: All programs
01: Program Playback
01: Play List Playback
3 Scene Number
4 Repeat play (l 50)
5 Elapsed time indication
6 Playback Mode (l 27, 28, 31)
1: Playback (l 27, 28, 31)
;: Pause (l 27, 28, 31)
6/5: Review Playback/Cue
Playback (l 27, 28, 31)
:/9: Backward/Forward finding
the beginning of a file.
2;/;1: Go back/Advance one
frame.
2?/?1: Backward/Forward Slow
Playback
8/7: Start/End of last scene
pause.
7 Volume indication
8 Date/Time indication
9 File Name
10 File Lock (l 39)
11 Slide Show (l 32, 40, 51)
12 DPOF setting (l 40)
SV

ª Displayed by the text
g
[No card.]
Card is not inserted.
[Card door opened.]
The Card Door is opened. Close it.
[Card locked. Check card.]
The write protect tab of SD Memory Card is
set to [LOCK].
[Card error.]
This card is incompatible with the SD Video
Camera. Format it.
[Card is not formatted. Format the card
now?]
This card is formatted by other equipment.
Format with the SD Video Camera.
[This card cannot record in MPEG2
mode.]
You cannot record MPEG2 moving pictures
on 8 and 16 MB Panasonic SD Memory
Cards, SD Memory Cards made by other
companies, or a MultiMediaCard.
[This card cannot record in MPEG2 FINE
mode.]
Use a Panasonic SD Memory Card with
capacity more than 256 MB.
[This card cannot record in MPEG4
S-FINE mode.]
When recording on a MultiMediaCard, you
cannot record MPEG4 moving pictures in
[S-FINE] mode.
[Record Stopped. Clean up in no data
area?]
The recording of MPEG2 moving picture is
aborted. Activate [Clean Up] function.
[Error has occurred. Please restart.]
To recover from the error, turn the unit off
and then turn it on again.
[No File.]
Moving pictures and still pictures are not
recorded on the card.
[Cannot delete scene.]
You tried to delete the locked files.
[DPOF is not set to a scene.]
You tried to select [DPOF] in SlideShow but
the card has no scenes with DPOF setting.
[Card has no PlayList.]
You cannot select [Switch] or [Play] on
[Playlist] because no play lists are created.
[Cannot lock scene in PlayList mode.]
When activating the playback screen for
each play list, you cannot lock scenes.
[Same scene on PlayList will be deleted.
Delete scene?]
If you delete a scene which is included in
play lists, the same scene in play lists is also
deleted.
[No more scenes. PlayList was deleted.]
If you delete all scenes in a play list, the play
list is deleted.
[Scenes over limit. Cannot add scenes.]
You cannot record more than 99 scenes on
a play list.
[PlayLists over limit.]
There are already 99 play lists on the card.
When you create a new play list, delete
unneeded play lists.
[Please connect both AC adapter and
battery.]
When connecting the SD Video Camera to
a PC, be sure to use both AC adaptor and
battery.
TM

ª About Recovery
When you access to a card in MPEG2 mode and faulty control information or play list
information is found, the following messages may appear. (When activating the recovery
function, it may take time depending on the error.)
Recovery of control information:
[Found error in control information.
Recommend to connect AC adapter.]
After the above message, the confirmation
screen [Repair data now?] appears.
[Yes]
When connecting to AC adaptor or the
remaining capacity of the battery is
enough:
#The management information is
recovered properly.
When the remaining capacity of the
battery is low:
#[Please connect AC adapter or change
battery.]
[No]
#[Control information error. Cannot use
this card in MPEG2 mode.]
≥When you recover files, you can record or play MPEG2 moving pictures again. Therefore,
be sure to follow the instruction. However, when the recording time is less than 1 second
in Fine or 1.5 second in Normal, the movie files cannot be recovered.
≥When you delete error play lists or all play lists, you can record or play MPEG 2 moving
pictures again. Be sure to delete them.
≥If you recover the data recorded by other equipment on the SD Video Camera, the data
may not be played on other equipment.
Deletion of PlayList:
[Found error in PlayList. Delete error
PlayList now?] or [Found error in
PlayList. Delete all PlayList now?]
[Yes]
When connecting to AC adaptor or the
remaining capacity of the battery is
enough:
#The play lists with errors or all play lists
are deleted.
When the remaining capacity of the
battery is low:
#[Please connect AC adapter or change
battery.]
[No]
#[PlayList error. Cannot use this card in
MPEG2 mode.]
TN

kзнЙл=C=mкЙЕ~мнбзел
ª Cautions for Use
When you use your SD Video Camera on
a rainy or snowy day or on a beach,
make sure that no water or moisture
enters the SD Video Camera.
≥Water may cause the SD Video Camera or
Memory Card to malfunction. (Irreparable
damage may occur.)
≥If sea water splashes onto the SD Video
Camera, wet a soft cloth with tap water,
wring it well, and use it to wipe the camera
body carefully. Then, wipe it again
thoroughly with a soft dry cloth.
Keep the SD Video Camera away from
magnetized equipment (such as a
microwave oven, TV, video game
equipment, etc.).
≥If you use the SD Video Camera on or
near a TV, images or sounds may be
disturbed due to electromagnetic wave
radiation.
≥Do not use near a cell phone because
doing so may cause noise to adversely
affect the picture and sound.
≥Recording on the Memory Card may be
damaged, or images may be distorted by
strong magnetic fields created by
speakers or large motors.
≥Electromagnetic wave radiation generated
by a microprocessor may adversely affect
the SD Video Camera, causing the
disturbance of images and sounds.
≥If the SD Video Camera is affected by
magnetically charged equipment and does
not function properly, turn off the SD Video
Camera and detach the Battery or AC
Adaptor and then connect the Battery or
AC Adaptor again. Thereafter, turn on the
SD Video Camera.
Do not use your SD Video Camera near
radio transmitters or high-voltage lines.
≥If you record pictures near radio
transmitters or high-voltage lines,
recorded images or sounds may be
adversely affected.
Do not use the SD Video Camera for
surveillance purposes or other business
use.
≥If you use the SD Video Camera for a long
period of time, the internal temperature
increases and, consequently, this may
cause malfunction.
≥The SD Video Camera is not intended for
business use.
When you use your SD Video Camera on
a beach or similar place, do not let sand
or fine dust get into the SD Video
Camera.
≥Sand or dust may damage the SD Video
Camera. (Extra care should be taken
when inserting and removing the Memory
Card.)
Do not spray insecticides or volatile
chemicals onto the SD Video Camera.
≥If the SD Video Camera is sprayed with
such chemicals, its body may be deformed
and the surface finish may peel off.
≥Do not keep rubber or plastic products in
contact with the SD Video Camera for a
long period of time.
Do not use benzine, thinner or alcohol
for cleaning the SD Video Camera.
≥The camera body may be deformed and
the surface finish may peel off.
≥Before cleaning, detach the Battery or pull
out the AC Mains Lead from the AC Mains
socket.
≥Wipe the SD Video Camera with a soft dry
cloth. To remove stubborn stains, wipe
with a cloth that is soaked in detergent
diluted with water, and afterward, finish
wiping with a dry cloth.
TO
After use, be sure to take the Memory
Card out and detach the Battery from the
SD Video Camera or pull out the AC
Mains Lead from AC Mains socket.
If the Battery is used in an extremely
cold environment, the Battery may only
operate for approx. 5 minutes. If the
Battery becomes extremely hot, a
protective function may operate, and the
Battery may become unusable for a
while.
ª About the Lens
≥Do not touch the lens. Wipe the SD Video
Camera with a soft dry cloth when the lens
becomes unclean.
≥When condensation has taken place, set
the power switch to [OFF] and leave the
SD Video Camera in this condition for
about 1 hour. When the camera becomes
close to ambient temperature, the fog
disappears naturally.
≥Be careful not to touch the lens when
picking up the SD Video Camera from the
supplied Wearable Carry Case.
ª About the AC Adaptor
≥If the Battery is warm, charging takes
longer than usual.
≥If you use the AC Adaptor near a radio,
radio reception may be disturbed. Keep
the AC Adaptor 1 metre or more away
from a radio.
≥After use, be sure to pull out the AC Mains
Lead from the AC Mains socket.
≥Keep the electrodes of the AC Adaptor
and Battery clean at all times.
≥Remove the battery if the device is left
unused for a long time.
≥The temperature of the SD Video Camera
and the battery may rise while charging
the battery. Such rise of temperature does
not indicate a fault.
≥Do not install, remove, plug or unplug the
battery or power cord while the power is
on.
ª About the LCD Monitor
≥In a place with drastic temperature
changes, condensation may form on the
LCD Monitor. Wipe it with a soft dry cloth.
≥If your SD Video Camera is extremely cold
when you turn its power on, the image on
the LCD Monitor will be slightly darker
than usual at first. However, as the internal
temperature increases, it goes back to the
normal brightness.
Extremely high precision technology is
employed to produce the LCD Monitor
screen featuring a total of approximately
123,000 pixels. The result is more than
99.99% effective pixels with a mere
0.01% of the pixels inactive or always lit.
However, this is not a malfunction and
does not affect the recorded picture.
ª Optimal Use of the Battery
Battery Characteristics
Lithium ion battery is small-sized battery
with large capacity. However, when it is
cooled down due to the low temperature
(10 oC or less), the operating time becomes
short by its characteristics and it may not
operate properly. In this case, warm the
battery moderately (e.g. in a pocket of your
clothes) and then insert it just before you
use the Camera. (When using a
handwarmer, be careful not to directly make
the battery touched to it.)
Battery may be warmed
The Battery may be warmed after charge or
use. This is not a malfunction.
TP

Be Sure to Detach the Battery after Use
Be sure to detach the Battery from the SD
Video Camera. (If it is left attached to the
SD Video Camera, a minute amount of
current is consumed even when the SD
Video Camera power is off.) If the Battery is
left attached to the SD Video Camera for a
long time, over discharge takes place. The
Battery may become unusable after it is
charged.
Have spare batteries on hand when you
use this unit outdoors.
In a cold place, the recordable time will be
shorter.
When you travel, be sure to bring the
supplied AC adaptor for charging in the
place you are visiting.
Self-discharge of the Battery
Leaving the Battery for a long time may
cause self-discharge of the Battery. Charge
it before use.
Store the Battery
Store the battery in a cool and dry place
with a relatively stable temperature.
If it is stored in a place with extremely high
or low temperature, the life of the battery
may be shorten.
Battery is not used for a long time
If the Battery is not used for a long time, it
may not be charged sufficiently. Or the
operating time may be shorten.
Disposing of an Unusable Battery
≥The Battery has a limited life.
If the operating time is drastically shorten
even after charging, the life is expired.
Replace it with a new battery.
≥Do not throw the Battery into fire because
it may cause an explosion.
Always Keep the Terminals of the Battery
Clean
≥Prevent the terminals from getting clogged
with dirt, dust, or other substances.
≥If you drop the Battery accidentally, check
to see if the Battery body and terminals
are damaged.
≥Attaching a deformed Battery to the SD
Video Camera may damage the SD Video
Camera.
ª Notes on the SD Memory Card
Write-Protect Switch
≥The SD Memory Card has
a write-protect switch.
Sliding the switch to
[LOCK] prevents the
contents in the Memory
Card from deleting
accidentally.
ª Cautions for Storage
Before storing the SD Video Camera,
take the Memory Card out and detach the
Battery.
Store all the components in a dry place with
a relatively stable temperature.
(Recommended Temperature:15 to 25oC,
Recommended Humidity:40 to 60%)
SD Video Camera
≥Do not leave the SD Video Camera in
places that expose it to high temperature.
Battery
≥Extremely high temperatures or low
temperatures will shorten the life of the
Battery.
≥If the Battery is kept in smoky or dusty
places, the terminals may rust and cause
malfunctions.
≥Do not allow the Battery terminals to
come in contact with metal objects
(such as necklaces, hairpins, etc.). This
can result in a short circuit or heat
generation and, if you touch the
Battery in this condition, you may be
badly burned.
≥Store the Battery in a completely
discharged state. To store the Battery for a
long period of time, we recommend you
charge it once every year and store it
again after you completely use up the
charged capacity.
TQ

Memory Card
≥When the Memory Card is being read, do
not remove the Memory Card, turn off the
power, or subject it to vibration or impact.
≥Do not leave the Memory Card in places
where there is high temperature or direct
sunlight, or where electromagnetic waves
or static electricity are easily generated.
≥Do not bend or drop the Memory Card.
The Memory Card or the recorded content
may be damaged.
≥After use, be sure to remove the Memory
Card from the SD Video Camera.
≥After use, store the supplied SD Memory
Card in the Card Case.
≥Do not touch the terminals on the back of
the Memory Card with your fingers. Do not
allow dirt, dust or water to enter it.
≥Keep the Memory Card out of reach of
children to prevent swallowing.
ª State of Power Lamp while
charging
The Power Lamp flashes while charging.
(Flashes approx. every 2 seconds when
charging is normal.)
When the Power Lamps flashes more
quickly or slowly (or turns off), some
abnormality may have occurred.
The flashing speed suggests the following
states.
Flashing approx. every 0.5 seconds:
≥The SD Video Camera, battery, AC
adaptor or the battery may be defective.
Contact your nearest Panasonic dealer.
Flashing approx. every 6 seconds:
≥The ambient temperature or that of the
battery itself is too high or too low.
Charging proceeds, but will take a longer
time.
Turning off:
Charging is completed.
≥If the Power Lamp turns off when charging
is not completed, the AC Adaptor is
probably defective. Contact your nearest
Panasonic dealer.
kçíÉë=~åÇ=eáåíë
ª Power Supply (l 10)
≥When the Battery Level Indicator
indicates [
battery will run out in a few minutes.
Recharge the battery.
≥It takes approx. 145 minutes, maximum for
full-charging. (The charging times are for
normal ambient temperature (20°C/60%).
If the Battery is charged at a higher or
lower temperature, the charging time may
be longer.)
≥The capacities of the recording time/
playback time/still picture storage with a
supplied, full-charged battery are as
follows (20°C/60%):
Maximum Continuous Recording Time
(MPEG2)
Maximum Continuous Recording Time
(MPEG4)
Number of Recordable Still Pictures
(PICTURE)
*In this case a record at intervals of
6 seconds.
The times/number of images listed in the
above table are approximate.
≥If you disconnect the DC Input Lead or the
AC Mains Lead while charging the Battery,
Power Lamp flashes several times and
goes off. For continuing Battery charge,
wait for approx. 1 minute, and then
connect the AC Mains Lead and the DC
Input Lead.
≥It is recommended to set the battery even
when using the AC adaptor.
≥The main unit becomes hot when it is
being charged or used. This is normal.
≥When removing the battery, take care not
to drop it.
≥When the SD Video Camera is turned on,
do not attach or remove the battery, or
plug the power cord in or out.
(Red)] flashes, the
60 min.
60 min.
600*
TR

ª Fitting the Camera on the AV
Cradle (l 11)
≥To fit the SD Video Camera on the AV
Cradle, turn the SD Video Camera [OFF].
≥When the SD Video Camera is connected
to the AV Cradle, the SD Video Camera
cannot record through-the-lens images.
≥When the AC adaptor is connected to this
SD Video Camera, the SD Video Camera
cannot be fitted on the AV Cradle.
ª Inserting a Memory Card (l 12)
≥An SD Memory Card can be used for this
SD Video Camera.
≥While the Card Access Lamp [ACCESS] is
on, the following operations should not
be attempted: (Such action will damage
the Memory Card, cause loss of recorded
data and cause the SD Video Camera to
malfunction.)
-Remove or insert the Memory Card.
-Remove the battery or unplug the power
cable.
-Apply vibration or shock.
≥Close a Card Slot Cover after checking
whether the Memory Card is inserted
correctly.
≥Do not touch the terminals on the back of
the Memory Card with your fingers.
≥Electrical noise, static electricity or failure
of the SD Video Camera or the Memory
Card may damage the Memory Card or
erase the data stored on the Memory
Card. It is recommended to save
important data onto a personal computer.
≥Some cards may pop out when they are
removed.
≥Cannot guarantee the contents of
recording when pictures are recorded on a
MultiMediaCard.
ª Using the LCD Monitor (l 13)
≥Forcefully rotating the LCD Monitor
beyond ranges described in these
operating instructions will damage the SD
Video Camera.
≥When the LCD Monitor is closed with its
display section facing outward, operation
with the Multi-function Button or [MENU]
Button is disabled. You can perform the
function such as playing back, recording
and adjusting the volume, etc. with the
remote controller.
ª Turn the Power On/Selecting
Operation Modes (l 15)
≥If the SD Video Camera is not used for
5 minutes or longer, the power is
automatically turned off. Set the Power/
Mode Switch to [OFF] and turn it back on.
ª Using the Menu Screen (l 16)
≥While a Menu is displayed, you cannot
record or play back.
≥The menu screen does not appear during
recording.
ª Setting Date and Time (l 20)
≥The built-in battery sustains the operation
of the clock.
≥The clock might cause a deviation from
the correct date and/or time, so be sure to
check the current date and/or time before
recording.
≥If the [0] indicator is displayed, set the
date and time after the battery has
charged. (l 63)
TS

ª Recording Moving Pictures
(MPEG2) (l 25)
≥If you disconnect the battery or the AC
adaptor while recording MPEG2 moving
pictures, or if you pull out a card while the
Card Access lamp [ACCESS] is lit, a
message for recovery appears when you
turn the unit on or insert a card again.
When you recover files, you can record or
play MPEG2 moving pictures again.
Therefore, be sure to follow the
instruction. However, when the recording
time is less than 1 second in Fine or
1.5 second in Normal, the movie files
cannot be recovered.
≥If the moving picture is recorded again
after stopping recording, it will be saved as
another file.
≥Be sure to use a Panasonic SD Memory
Card.
[FINE]: Use a Panasonic SD Memory
Card with capacity more than 256 MB.
[NORM]: Use a Panasonic SD Memory
Card with capacity more than 32 MB.
≥The sounds recorded will be in stereo.
≥The capacities of the recording time for
MPEG2 files are as follows:
FINE NORM
8MB — —
16 MB — —
32 MB — 1 min.
64 MB — 2 min.
128 MB — 5 min.
256 MB 5 min. 10 min.
512 MB 10 min. 20 min.
The times listed in the above table are
approximate.
ª Recording Moving Pictures
(MPEG4) (l 26)
≥If the moving picture is recorded again
after stopping recording, it will be saved as
another file.
≥The MPEG4 moving pictures can be
recorded in any mode, but moving pictures
recorded in the [S-FINE], [FINE] or
[NORM] mode may not be played on other
Panasonic digital video cameras. The
message [PLEASE RE-OPERATE AFTER
PUSHING RESET BUTTON] may be
displayed on some Panasonic digital video
cameras in such a case. This is not a fault
of the SD Video Camera.
≥The sounds recorded will be in monaural.
≥Playing back MPEG4 moving pictures
recorded in the [S-FINE] mode is not
guaranteed for digital devices other than
this SD Video Camera.
≥MPEG4 moving pictures of the [S-FINE]
mode cannot be recorded in the
MultiMediaCard.
≥The capacities of the recording time for
MPEG4 files are as follows:
S-FINE FINE NORM
8MB 40 sec.
16 MB
32 MB 3 min. 8 min. 10 min. 35 min.
64 MB 7 min. 17 min. 25 min. 1 h 10 min.
128 MB 15 min. 35 min. 50 min. 2 h 30 min.
256 MB 30 min.
512 MB
1 min
30 sec.
1 min
4 min. 5 min. 15 min.
30 sec.
1 h 10
min.
1 h 00
2 h 20
min.
min.
2 min. 7 min.
1 h 40
min.
3 h 30
min.
ECO
5 h 00 min.
10 h 10
min.
The times listed in the above table are
approximate.
ª Playing Back Moving Pictures
(MPEG2) (l 27)
≥If you select [NORM] on [Quality], the
quality of image will deteriorate.
≥Files are numbered hexadecimally.
≥When a moving picture is played back, a
mosaic may appear or some frames may
be missing; but this is normal.
TT

≥If there are 12 files or more on the index
picture screen, each press of the left (or
right) of the multi-function button makes
the previous (or next) page appear.
≥Fast forward or fast backward will be reset
to normal playback on the next file.
≥In the index picture screen, the first frame
for the pictures is displayed. (For example,
if the first frame is painted in black as a
whole, a black screen will be displayed.)
≥Files recorded by another device or
another application may not be played
back. Files recorded on the SD Video
Camera may not be played back on
another movie camera or the file size may
not be displayed correctly.
≥When playing back a picture recorded by
other equipment, picture size may differ.
ª Playing Back Moving Pictures
(MPEG4) (l 28)
≥If you select [NORM] or [ECO] on
[Quality], the quality of image will
deteriorate.
≥Files are numbered hexadecimally.
≥The file format supported by this SD Video
Camera is ASF. (Some ASF formatted
files may not be played back.)
≥When a moving picture is played back, a
mosaic may appear or some frames may
be missing; but this is normal.
≥If there are 12 files or more on the index
picture screen, each press of the left (or
right) of the multi-function button makes
the previous (or next) page appear.
≥Fast forward or fast backward will be reset
to normal playback on the next file.
≥In the index picture screen, the first frame
for the pictures is displayed. (For example,
if the first frame is painted in black as a
whole, a black screen will be displayed.)
≥Files recorded by another device or
another application may not be played
back. Files recorded on the SD Video
Camera may not be played back on
another movie camera or the file size may
not be displayed correctly.
≥When playing back a picture recorded by
other equipment, picture size may differ.
ª Recording Still Pictures (l 30)
≥The image size is 640 k 480 (VGA).
≥If [NORM] is selected for recording,
mosaic-pattern noise may appear on a
playback image depending on the image
content.
≥If there are 12 files or more to be
displayed in the index picture screen, each
press of the left (or right) multi-function
button makes the previous (or next) page
appear.
≥The following table shows still image
storage capacity for each image quality
settings:
FINE NORM
8MB 45 95
16 MB 100 200
32 MB 220 440
64 MB 440 880
128 MB 880 1760
256 MB 1760 3520
512 MB 3520 7040
The numbers shown in the above table are
approximate and may vary depending on
picture content.
ª Playing back Still Pictures (l 31)
≥The image data files recorded on the
Memory Card with the SD Video Camera
conform to the DCF (Design rule for
Camera File system) universal standard
stipulated by JEITA (Japan Electronics
and Information Technology industries
Association).
≥The file format supported by this SD Video
Camera is JPEG. (Some JPEG formatted
files may not be played back.)
TU

ª Play Back All of the Still Pictures
One by One (Slide Show) (l 32)
≥The playback time of the Slide Show may
become longer than usual depending on
the file, such as still pictures recorded by
other equipment.
ª Zoom In/Out Functions (l 33)
≥When recording pictures using the Zoom
In function, we recommend using the
Image Stabilizer (SIS) Function. (l 37)
≥During considerably fast zooming, the
image may become out of focus
temporarily.
≥When the zoom magnification is 1a, the
SD Video Camera can focus on a subject
that is as close as approximately 4 cm
from the Lens.
≥When pushing the Zoom Lever, the zoom
speed will be changed depending on the
power of pushing it.
≥When using the Remote Controller, zoom
speed is not changed.
ª Backlight Compensation
Function (l 33)
≥When the Backlight Compensation
Function is activated, the entire screen
becomes brighter.
≥Turning the power off will release this
function.
≥The backlight may not be sufficiently
compensated for in dark places.
ª Adjusting White Balance (l 34)
≥You may not be able to achieve correct
White Balance adjustment manually under
weak illumination. (In this case, the [1]
Indication flashes.)
≥This mode cannot be set or released while
recording.
≥The White Balance may not be adjusted in
dark places.
≥Adjustment of White Balance is effective
under the following conditions.
-When recording under reddish lighting
(halogen light bulb, incandescent light
bulb, etc.).
-When recording a picture of mono-tone
colour.
-When recording under multiple light
sources.
≥White Balance cannot be set in the digital
zoom range.
ª Manual Exposure Adjustment
(l 35)
≥The brightness of the LCD monitor may
differ from that of the actual recorded
pictures.
ª Manual Focus Adjustment (l 35)
≥If you focus on the subject by turning the
zoom lever to “W”, the focus may be faulty
when you turn the zoom lever to “T”. To
focus on the subject sharply, turn the
zoom lever to “T” first and then adjust the
focus.
≥Manually focus the following objects,
which may not be automatically focused.
-Objects that are far and near at the same
time.
-Glares objects.
-Objects behind glass with dirt on it.
-Objects moving rapidly.
-Objects with little variation in brightness,
such as white wall.
-Dark objects.
ª Recording in Special Situations
(Program AE) (l 36)
Sports Mode
≥During pause or slow playback, the image
movement may appear smooth.
≥During normal playback, the image
movement may not appear smooth.
≥Because the colour and brightness of the
playback image may change, avoid
recording under fluorescent light, mercury
light or sodium light.
≥If you record a subject illuminated with
strong light or a highly reflective subject,
vertical lines or light may appear.
≥If the light is insufficient, the [5]
indication flashes.
≥If these modes are used for indoor
recording, playback images may flicker.
TV

Portrait Mode
≥If these modes are used for indoor
recording, playback images may flicker.
Low Light Mode
≥Extremely dark scenes may not be able to
be made brighter to a satisfactory degree.
Spotlight Mode
≥With this Mode, recorded images may turn
out to be extremely dark.
≥If the recording subject is extremely bright,
its recorded image may turn out to be
washed out.
Surf & Snow Mode
≥If the recording subject is extremely bright,
its recorded image may turn out to be
washed out.
ª Deleting Scenes (Delete) (l 38)
≥Erased files cannot be restored.
≥A locked file cannot be erased. Release
the lock to erase them.
≥No files can be erased if the write protect
switch on the SD Memory Card is set to
[LOCK].
≥If a file is erased on the SD Video Camera,
the DPOF information set by another
camera may also be erased.
≥A still picture file (other than JPEG) that
cannot be played back on the SD Video
Camera may be erased.
≥Erasing many files may take a little time.
Wait until the Card Access Lamp goes out.
≥Do not turn the power off or remove the
Memory Card while a file is being deleted.
Otherwise, the Memory Card may be
damaged.
ª Locking Scenes (File Lock) (l 39)
≥Even if files are locked, the files will be
deleted when the Memory Card is
formatted.
≥The File Protection carried out by this SD
Video Camera is only effective for this SD
Video Camera.
≥The SD Memory Card has a write
protection switch on it. If the switch is
moved to the [LOCK] side, you cannot
write to or format the Memory Card. If it is
moved back, you can.
UM
≥Locking/Unlocking many files may take a
little time. Wait until the Card Access
Lamp goes out.
ª Designating Scenes to be Printed
(DPOF) (l 40)
≥DPOF is the abbreviation of Digital Print
Order Format. DPOF is used to select
images you want to print. DPOF can only
be used with products that support this
feature.
≥The number of prints can be set from 0 to
99.
≥This SD Video Camera may not recognize
the DPOF set by another type of device.
≥DPOF-setting many files may take a little
time. Wait until the Card Access Lamp
goes out.
ª Formatting the Memory Card
(Format Card) (l 49)
≥Normally, it is not necessary to format the
Memory Card.
≥If the Memory Card performance becomes
unstable (recording or playback fails, etc.),
try to format it.
≥If a message to prompt you to check the
Memory Card comes up, it will be
necessary to format it in order to use it on
the SD Video Camera.
≥By formatting, all data stored in the
Memory Card (e.g., MPEG2 moving
pictures, MPEG4 moving pictures, still
pictures) are erased.
≥Format the Memory Card on the SD Video
Camera. A Memory Card formatted on a
machine other than the SD Video Camera
may not be used. A Memory Card
formatted on the SD Video Camera may
not be used on other machines. Format a
Memory Card on the machine on which it
is used.
≥Do not use the personal computer
(Explorer) to format it. Otherwise, it may
not be recognized by the SD Video
Camera.
≥If the write protection switch of the SD
Memory Card is set to [LOCK], data
cannot be erased.

≥When the Memory Card is formatted, the
files will be deleted, even if files are
locked.
≥As formatting erases all the data, save the
necessary data on a personal computer,
etc. beforehand.
≥Format may take a little time. Wait until the
Card Access Lamp goes out.
ª Playing Back on an external
device (l 52)
≥Read the Operating instructions of an
external device before connecting SD
Video Camera.
≥When connecting, turn the power [OFF].
≥Part of the characters may be clipped on
the screen, depending on the type of TV.
ª Using the DVD Video Recorder
with a Hard Disk (l 54)
≥You can save files on the Hard Disk by
connecting to the DVD Video Recorder
with the supplied AV cable. However, the
picture quality is deteriorated.
ª Connecting with the PC (l 60)
≥To erase pictures that you recorded on the
Memory Card by using the SD Video
Camera, be sure to erase them on the SD
Video Camera or by the MediaStage for
AV100 (supplied), not on a personal
computer (the explorer, etc.).
≥You may not be able to properly play back
on the SD Video Camera after editing the
recorded data or changing the image data
on a personal computer.
≥Moving Picture format (MPEG4) that can
be played back on the SD Video Camera
is ASF. (Depending on the file, it may not
be able to be played back even if it is in
ASF format.)
≥When you operate the SD Video Camera
using its buttons, pull out the USB cable.
(The SD Video Camera cannot be
operated in the [PC ACCESSING] mode.)
≥Use only the supplied USB cable.
≥Do not remove the AC adaptor when the
SD Video Camera is connected to the
personal computer.
≥If the SD Video Camera’s personal
computer peripheral mode
([PC ACCESSING] is displayed) is not
cancelled when the personal computer is
turned OFF, remove the USB cable.
≥If the personal computer switches to the
suspend mode when the SD Video
Camera is connected to it, the personal
computer may not recognize the SD Video
Camera when it reverts to normal mode.
In this case, restart the personal
computer.
≥Display images on the software window
may be distorted depending on a
combination of the language in the
operating system and the installed
software language.
≥While MediaStage for AV100 (supplied) is
accessing a CD, the CD may not work
properly in other applications.
UN
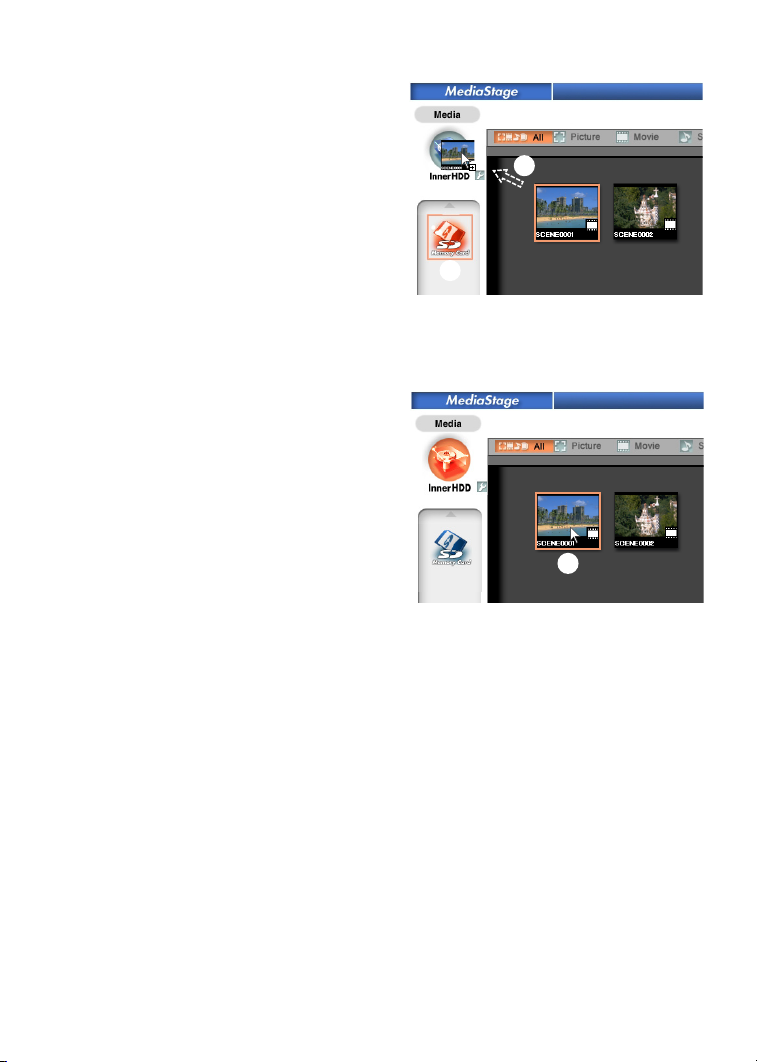
≥When an NTFS-formatted Memory Card is
inserted into the SD Video Camera and
the Device is connected to the personal
computer, the Memory Card Access lamp
[ACCESS] keeps lighting. In this case, log
on with [Administrator (computer
administrator)] (or any other user name
having equivalent rights), right-click the
Removable Disk icon in [My Computer],
and select [Remove]. Check that the Card
Access Lamp [ACCESS] goes off, then
remove the Memory Card.
≥When the USB Driver is installed and the
SD Video Camera is connected to the
personal computer for the first time, the
[Found New Hardware Wizard] screen
may appear. Complete the operation in the
following procedure, and the personal
computer will recognize the SD Video
Camera.
1Click [Next].
2Confirm whether your device is
configured to the optimal driver
detection setting and click [Next].
3Insert the supplied CD-ROM into the
CD-ROM drive.
4Enter the path as “D:\USB
Driver\files”. (example of D drive
assigned as CD-ROM drive)
5Click [Next].
6Click [Next].
7Click [Finish].
≥When playing MPEG2 moton pictures
directly from the SD Memory Card with
MediaStage for AV100 (included in the
supplied CD-ROM), frame drop may occur
or the sound may be interrupted.
In this case, copy the data in the SD
Memory Card to the hard disk of the PC
with MediaStage for AV100 before playing.
You can reduce the frame drop or
interruption of the sound.
Copy to the InnerHDD
2
1
1: Select the SD Memory Card icon.
2: Drag and drop a file to the InnerHDD.
Playing back a file in the InnerHDD
3
4
3: Click the InnerHDD icon.
4: Double click the desired file.
UO

ª Constructing a Folder when the
Memory Card is used with a PC
(l 62)
≥[DCIM], [SD_VIDEO] etc. are necessary
items in the folder structure. They have
nothing to do with actual operations.
≥The memory capacity indicated on the SD
Memory Card label corresponds to the
total amount of the capacity to protect and
manage the copyright and of the capacity
available as a conventional memory for a
SD Video Camera, Personal Computer or
others.
≥Do not delete any folders located on the
Memory Card. If this is done, the Memory
Card may not be recognized on your SD
Video Camera.
≥The MPEG4 moving picture file (ASF
format) can be played on the Windows
Media Player 6.4 or later. If it cannot be
played back, download the appropriate
software (G.726). (G.726 is installed at the
same time as the supplied software,
MediaStage for AV100.)
≥When formatting a Memory Card, format it
on the SD Video Camera.
≥When a moving picture is played back on
a personal computer, a black belt may be
present along the top and bottom of the
picture.
≥If data not supported by the SD Video
Camera is recorded on a personal
computer, it cannot be recognized by the
SD Video Camera.
_ЙСзкЙ=oЙимЙлнбеЦ=
pЙкобЕЙ
Power
1: The SD Video Camera power cannot
be turned on.
1-1: Is the power source connected
correctly?
1-2: Is the Battery fully charged? Charge it
with the AC Adaptor.
2: The SD Video Camera power shuts
off automatically.
2: If you do not use the SD Video Camera
for more than 5 minutes, the power
shuts off automatically to save the
Battery power.
3: The SD Video Camera power does
not stay on long enough.
3: Is the Battery low? Charge the Battery
or attach a fully charged Battery.
Battery
1: Battery runs down quickly.
1-1: Is the Battery fully charged? Charge it
with the AC Adaptor.
1-2: Are you using the Battery in an
extremely cold place? In cold places,
the operating time of the Battery
becomes shorter.
1-3: Has the Battery worn out? If the
operating time is still short even after
the Battery is fully charged, the Battery
has worn out.
Recording
1: Recording does not start although
power is supplied to the SD Video
Camera and the Memory Card is
correctly inserted.
1-1: Is the SD Video Camera turned on?
1-2: Is the write-protect switch set to
[LOCK]? Being set to [LOCK], the
Memory Card cannot be recorded.
1-3: Does the Memory Card have enough
free space? Check the [Capacity] of a
card, and when there are few
capacities. Delete unnecessary data in
the Memory Card. (l 49)
UP

1-4: Please check the capacity of a card,
and when there are few capacities,
delete unnecessary data.
2: MPEG2 moving picture recording
does not start although power is
supplied to the SD Video Camera
and the Memory Card is correctly
inserted.
2: When you perform MPEG2 moving
picture recording, be sure to use a
Panasonic SD Memory Card.
[FINE]: Use a Panasonic SD Memory
Card with capacity more than 256 MB.
[NORM]: Use a Panasonic SD Memory
Card with capacity more than 32 MB.
Playback
1: Recorded MPEG4 moving pictures
are not clear.
1: Is [Quality] on the menu set to [NORM]
or [ECO]? If recording is done with it
set to [NORM] or [ECO], images with
fine details may include a mosaic-like
pattern. Set [Quality] to [FINE] or
[S-FINE].
2: Playback images do not look
normal.
2: The picture may be damaged. In order
to prevent the loss of image data,
backing up on a personal computer is
recommended.
3: Actual recording time/still image
storage capacity in the Memory
Card is different from those
described in these Operating
Instructions drastically.
3-1: Actual recording time/still image
storage capacity depends on the kind
of the image.
3-2: When moving picture data and still
picture data are recorded in the
Memory Card, less capacity in the
Memory Card can be used.
4: Even if a Memory Card is formatted,
it cannot be used.
4: Either the SD Video Camera or the
Memory Card may be damaged.
Please consult your Panasonic dealer.
5: Playing back or recording do not
function and the screen has frozen.
5: Set the Power Switch to [OFF]. If the
SD Video Camera is not turned off
after setting to [OFF], unplug the AC
Adaptor and remove the battery.
6: Sound is not heard while a still
picture is played back.
6: Sound is not presented in the Still
Picture mode (recording or playing
back of still pictures).
7: No images are displayed on TV,
although the SD Video Camera is
connected to a TV.
7-1: Connect the SD Video Camera to the
TV correctly.
7-2: Use the supplied AV cable.
7-3: When the SD Video Camera is set to
Recording mode.
7-4: MPEG4 mode cannot be displayed on
TV.
Others
1: Something is wrong with the SD
Video Camera’s operation. The SD
Video Camera is turned on but no
functions operate.
1: Press the [RESET] Button on the SD
Video Camera with a pointed object.
(It becomes factory-shipments state.
However, a date/time setup is
memorized.) If this does not solve the
problem, first disconnect the power
supply and wait for a minute or so, and
then reconnect the power supply to
turn the power back on. (If the above
operation is performed when the
Access Lamp of Memory Card Slot is
lit, the data on the Card may be
damaged.)
UQ

2: How do I send an MPEG4 moving
picture recorded as e-mail?
2: Capture the moving picture data
recorded on the SD Video Camera
onto a personal computer and attach it
to an e-mail to send it. In this case, it is
recommended to make a file size 1 MB
or less. The recording time of 1 MB
MPEG4 moving picture is approx.
8 seconds (S-FINE), 15 seconds
(FINE), 20 seconds (NORM) or
60 seconds (ECO). (The capacity limit
of the file which is attachable to an email differs depending on the
environment used.) If the file is played
back on the personal computer,
Windows Media Player 6.4 or later is
required. If the file is played back on
Macintosh, use the Windows Media
Player for Macintosh. (Mac OS
®
8.0 or
later) The Windows Media Player for
Macintosh can be downloaded from
Microsoft’s Web site.
3: Red, blue, green or white dots
appear on the screen.
3: 0.01% or less of the pixels of some
LCD Monitors may remain turned on or
off.
4: When the USB cable is connected, a
green [?] mark is indicated in [USB
Mass Storage Device] in [Device
Manager] of the Windows OS.
4: If the USB cable is connected without
installing the USB Driver (supplied), [?]
will be indicated on some OSs.
Remove the USB cable from the SD
Video Camera and install the USB
Driver according to the procedure
shown on page 59, and [?] will
disappear.
5: When the USB cable is removed
when Windows Me is used, Device
removal warning appears.
5: If the USB cable is connected without
installing the USB Driver (supplied)
when you use Windows Me, the
warning message will appear as soon
as the USB cable is pulled out. Install
the USB Driver, and the warning
message will not appear.
For how to disconnect the USB cable
on Windows XP or Windows 2000,
refer to page 61.
UR

pйЙЕбСбЕ~нбзел
SD Video Camera Information for your safety
Power Source: DC 4.9 V (AC Adaptor)
Power Consumption: Recording (When recording the MPEG2/MPEG4 moving
Image Sensor: 1/6-inch CCD Image Sensor
Lens: F1.8–2.3, Focal Length; 2.3–23.0 mm
Zoom: 10:1 Power Zoom
Monitor: 2.5-inch LCD
Microphone: Stereo
Standard Illumination: 1400 lx
Minimum Required Illumination: 10 lx
Recording Media: SD Memory Card
Video Compression: MPEG2
Image Compression: JPEG (Exif2.2/DCF)
Voice Compression: MPEG2: MPEG1-Layer2
Television System: CCIR: 625 lines, 50 Fields PAL colour signal
Video Output Level: 1.0 Vp-p, 75 ohm (AV mini jack)
Audio Input Level: Mic: Stereo Microphone
Audio Output Level: Line: 316 mV, 10 kohm or more (AV mini jack)
USB: Card reader/writer function, (No copyright protection
Dimensions: Approx. 33.2 (W)k 89.8 (H) k 64.9 (D) mm
Weight: Approx. 156 g (without Battery, Memory Card and Lens
Operating Temperature: 0 oCj40 oC
Operating Humidity: 10%j80%
DC 3.7 V (Battery)
picture with Camera Input)
3.7 W (When using the AC Adaptor)
3.5 W (When using the battery)
Shortest Image Distance; Approx. 35 mm from Lens
Fine: 704 k 576 pixels (6 Mbps, 25fps)
Normal: 352 k 576 pixels (3 Mbps, 25fps)
MPEG4
Super Fine: 320 k 240 pixels (QVGA) (1 Mbps, 12fps)
Fine: 320 k 240 pixels (QVGA) (420 kbps, 12fps)
Normal: 176 k 144 pixels (QCIF) (300 kbps, 12fps)
Economy: 176 k 144 pixels (QCIF) (100 kbps, 6fps)
MPEG4: G.726
support)
USB 2.0 compliant (max. 12 Mbps)
Cap)
Approx. 190 g (with Battery, Memory Card and Lens Cap)
US

AC Ada ptor Information for your safety
Input: AC 110–240 V, 50/60 Hz
0.2 A
Output: DC 4.9 V, 1.4 A
Dimensions: Approx. 59 (W)k 31 (H)k 96 (D) mm
Weight: Approx. 130 g
Battery Pack Information for your safety
Nominal Voltage: 3.7 V
Nominal Capacity: 1050 mAh
Dimensions: Approx. 36 (W) k 7(H)k 53 (D) mm
Weight: Approx. 28 g
UT

fåÇÉñ
ª A
AC Adaptor ........................10, 11, 53, 60
AC Mains Lead
AV Cable
AV Cradle
ª B
Backlight Compensation .........................33
Battery
Beep Sound
ª C
Capacity ..................................................49
Card Case/Movie Stand
Clean Up
ª D
Date Mode ..............................................21
Date/Time Indication
Date/Time Set
......................................................39
Detail
Digital Zoom
DPOF setting
ª F
File Lock .................................................39
Format
ª G
Go To ......................................................48
ª H
Hand Strap .............................................65
Horizontal Style
ª I
Image Stabilizer ......................................37
Information Display
ª L
LCD Monitor ....................................13, 22
Lens Cap
ª M
Manual Exposure Adjustmen ..................35
Manual Focus Adjustment
MediaStage for AV100
................................................16, 17
Menu
MPEG2 Moving Picture
MPEG4 Moving Picture
UU
................................10, 11
.................................................52
........................................11, 52
.............................................10, 73
............................................17
.........................66
..........................................24, 49
...............................21
.........................................20
...........................................33
..........................................40
....................................................49
......................................13
.................................51
................................................65
...................... 35
............................57
............23, 25, 27
............23, 26, 28
ª O
Operation Mode ......................................15
OSD Indication
ª P
Picture Quality ..........................25, 26, 30
PlayList
Portrait Picture
Program
Program AE
ª R
Recording LED .......................................17
Remote Controller
Repeat Play
RESET Button
ª S
Scene .....................................................38
SD Memory Card
Slide Show
System Requirements
ª T
Title ..................................................44, 47
ª U
USB Cable .......................................53, 60
USB Driver
ª V
Ver tical S t y le ...........................................13
Volume Adjustment
ª W
Warning display ...............................68, 70
Wearable Carry Case
White Balance Adjustment
Wind Noise Reduction
ª Z
Zoom In/Out ............................................33
.......................................23
...................................................41
........................................14
..................................................46
............................................36
..................................65
.....................................29, 50
.................................21, 84
......................12, 62, 75
.......................................32, 51
.....................56, 57
.........................56, 58, 59, 82
.................................29
...............................7
.....................34
............................37

UVVMVN


B
VQT0F69
F0903Ah0 ( 1300 A)
C
Matsushita Electric Industrial Co., Ltd.
Web site: http://www.panasonic.co.jp/global/
 Loading...