

Panasonic SC-DK20 User Manual
DVD Stereo System
Operating Instructions
The above illustration of the unit is an example and shows the model for the U.S.A.
Model No. SC-DK20
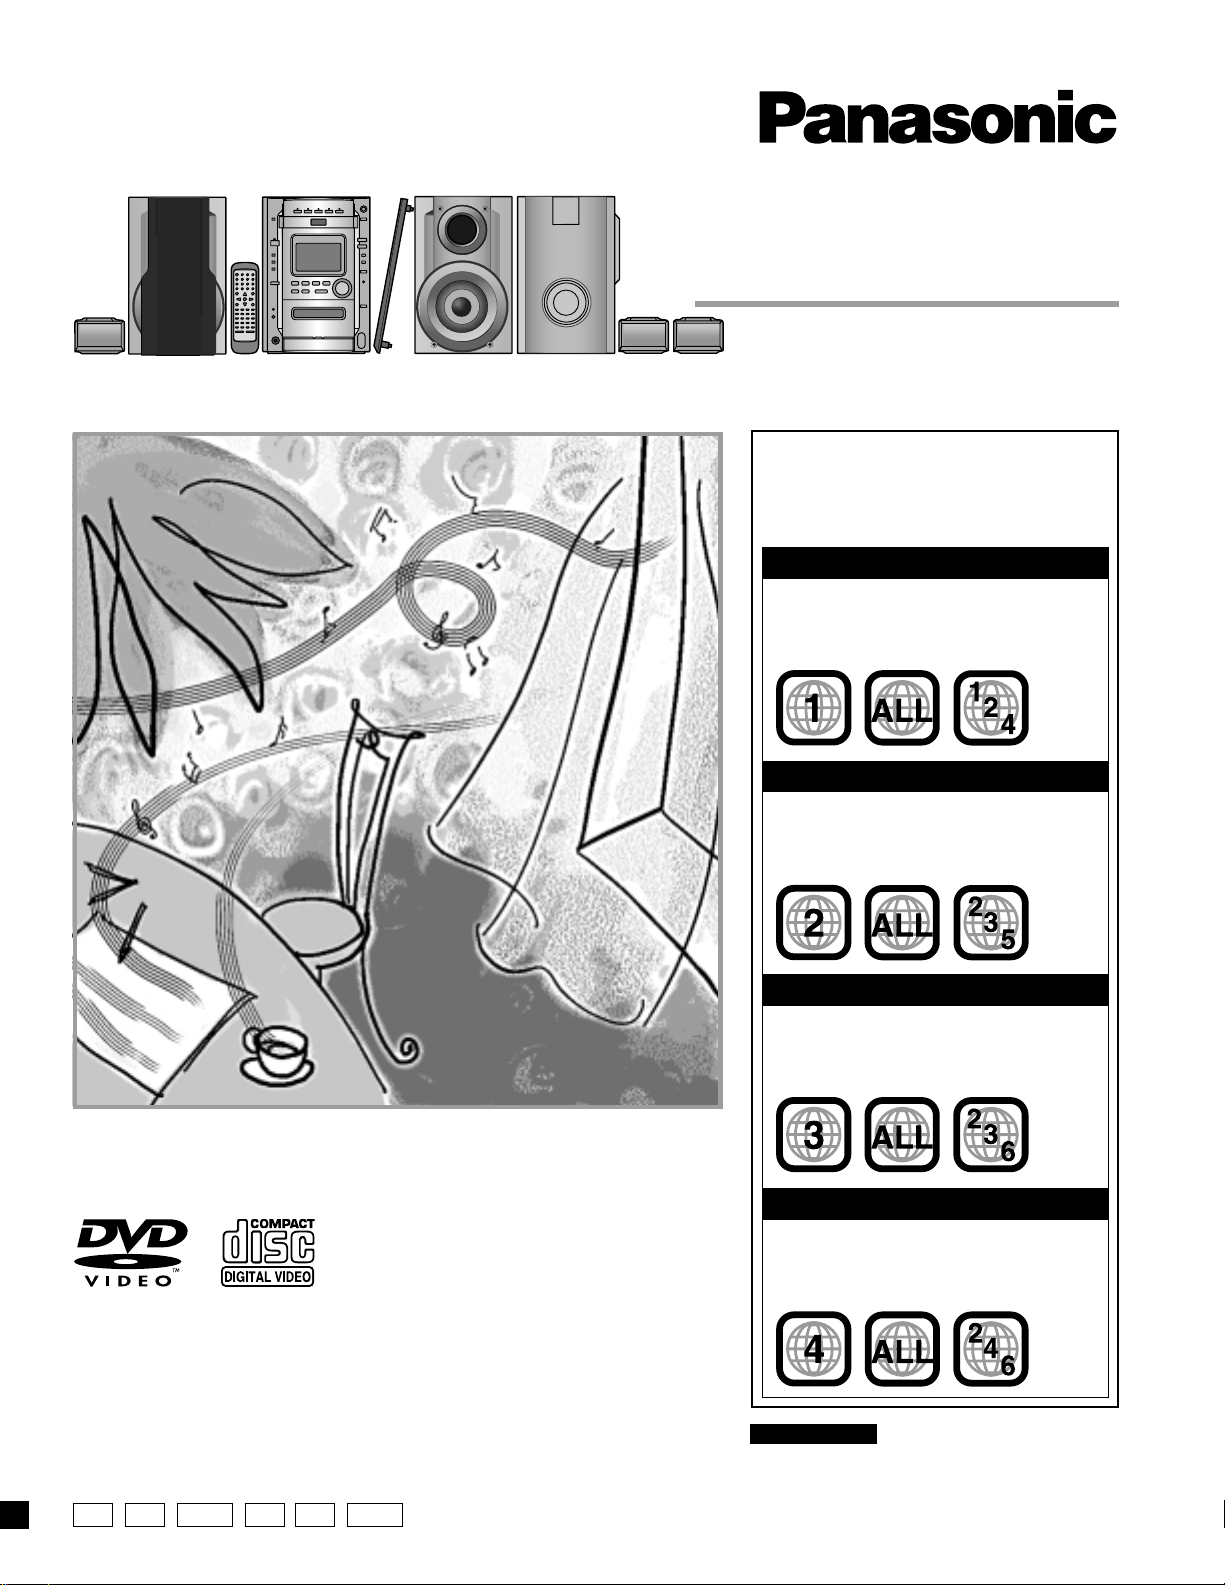
Region number supported by
this unit
Region numbers are allocated to DVD unit and
software according to where they are sold.
For U.S.A. and Canada
The region number of this unit is “1”.
•
The unit will play DVDs marked with labels
•
containing “1” or “ALL”.
Example:
For the Middle East and South Africa
The region number of this unit is “2”.
•
The unit will play DVDs marked with labels
•
containing “2” or “ALL”.
Example:
Before connecting, operating or adjusting this product, please read these instructions
completely.
Please keep this manual for future reference.
P PC GCP GCSGN GC
For Asia
The region number of this unit is “3”.
•
The unit will play DVDs marked with labels
•
containing “3” or “ALL”.
Example:
For Australia, N.Z. and Latin America
The region number of this unit is “4”.
•
The unit will play DVDs marked with labels
•
containing “4” or “ALL”.
Example:
For U.S.A. only
The servicenter list and warranty can be found
on pages 59 and 60.
RQT6345-3P
Dear customer
Thank you for purchasing this product.
For optimum performance and safety, please read these instructions carefully.
These operating instructions are applicable to the following system.
For the Middle East,
South Africa and Asia
System
Main unit
Front speakers
Center speaker
Surround speakers
Before use
Subwoofer
SC-DK20
SA-DK20
SB-DK20
SB-PC90
SB-PS90
SB-W20
For areas except U.S.A., Canada, Australia and N.Z.
CAUTION:
Change the voltage setting to suit the AC voltage in your
area. See page 9.
Note that the unit will be seriously damaged or fail to operate correctly if this setting is not made correctly.
CAUTION!
THIS PRODUCT UTILIZES A LASER.
USE OF CONTROLS OR ADJUSTMENTS OR PERFORMANCE OF PROCEDURES OTHER THAN THOSE SPECIFIED HEREIN MAY RESULT IN HAZARDOUS RADIATION
EXPOSURE.
DO NOT OPEN COVERS AND DO NOT REPAIR
YOURSELF. REFER SERVICING TO QUALIFIED
PERSONNEL.
WARNING:
TO REDUCE THE RISK OF FIRE, ELECTRIC
SHOCK OR PRODUCT DAMAGE, DO NOT
EXPOSE THIS APPARATUS TO RAIN,
MOISTURE, DRIPPING OR SPLASHING AND
THAT NO OBJECTS FILLED WITH LIQUIDS,
SUCH AS VASES, SHALL BE PLACED ON
THE APPARATUS.
-
VISIBLE AND INVISIBLE LASER RADIATION WHEN OPEN.
DANGER
AVOID DIRECT EXPOSURE TO BEAM.
-
VISIBLE AND INVISIBLE LASER RADIATION WHEN OPEN.
CAUTION
AVOID EXPOSURE TO BEAM.
-
RAY ONNEMENT LASER VISIBLE ET INVISIBLE EN CAS D’OUVERTURE.
ATTENTION
EXPOSITION DANGEREUSE AU F AISCEA U .
-
SYNLIG OG USYNLIG LASERSTRÅLING VED ÅBNING.
ADVARSEL
UNDGÅ UDSÆTTELSE FOR STRÅLING.
-
AVATTAESSA OLET ALTTIINA NÄKYVÄÄ JA NÄKYMÄTÖN
VARO !
LASERSÄTEILYLLE. ÄLÄ KATSO SÄTEESEEN.
-
SYNLIG OCH OSYNLIG LASERSTRÅLNING NÄR DENNA DEL
VARNING
ÄR ÖPPNAD. BETRAKTA EJ STRÅLEN.
-
SYNLIG OG USYNLIG LASERSTRÅLING NÅR DEKSEL ÅPNES.
ADVARSEL
UNNGÅ EKSPONERING FOR STRÅLEN.
-
SICHTBARE UND UNSICHTBARE LASERSTRAHLUNG, WENN ABDECKUNG
VORSICHT
GEÖFFNET. NICHT DEM STRAHL AUSSETZEN.
-
-
For areas except U.S.A. and Canada
(FDA 21 CFR)
(IEC60825-1)
RQLS0233
For U.S.A., Canada
and others
SC-DK20
SA-DK20
SB-DK20
SB-PC93
SB-PS90
SB-W20
(Inside of product)
Table of contents
Before use
Supplied accessories ................................................................... 2
IMPORTANT SAFETY INSTRUCTIONS ....................................... 4
The remote control ....................................................................... 5
Disc information............................................................................ 5
Simple set-up
STEP1 Locating ............................................................. 7
STEP2 Speakers and TV............................................... 8
STEP3 Antennas and AC power supply cord ................ 9
Control guide and preparatory steps
Front panel controls ................................................................... 10
Turning DEMO off ....................................................................... 12
Setting the time ........................................................................... 12
Auto power-off ............................................................................ 12
Quick Setup ................................................................................. 13
Disc operations
Discs ............................................................................................14
Normal play ............................................................................... 14
Using menus to play MP3 discs ................................................ 15
Resume function ....................................................................... 16
Skip ........................................................................................... 17
Search ....................................................................................... 17
Frame-by-frame viewing ...........................................................17
Slow-motion play ....................................................................... 17
Changing the picture quality for movie viewing ......................... 18
Switching angles ....................................................................... 18
Changing soundtrack and subtitle languages ........................... 19
Marking a position ..................................................................... 20
Other methods of disc play........................................................ 21
Repeat function ......................................................................... 21
Program play ............................................................................. 22
Random play ............................................................................. 23
Starting play from a specific track ............................................. 23
Using the CD MANAGER.......................................................... 24
Using On-Screen Menu Icons .................................................... 25
Common procedures.................................................................25
Disc information ........................................................................26
Progress indicator ..................................................................... 26
Unit information ......................................................................... 27
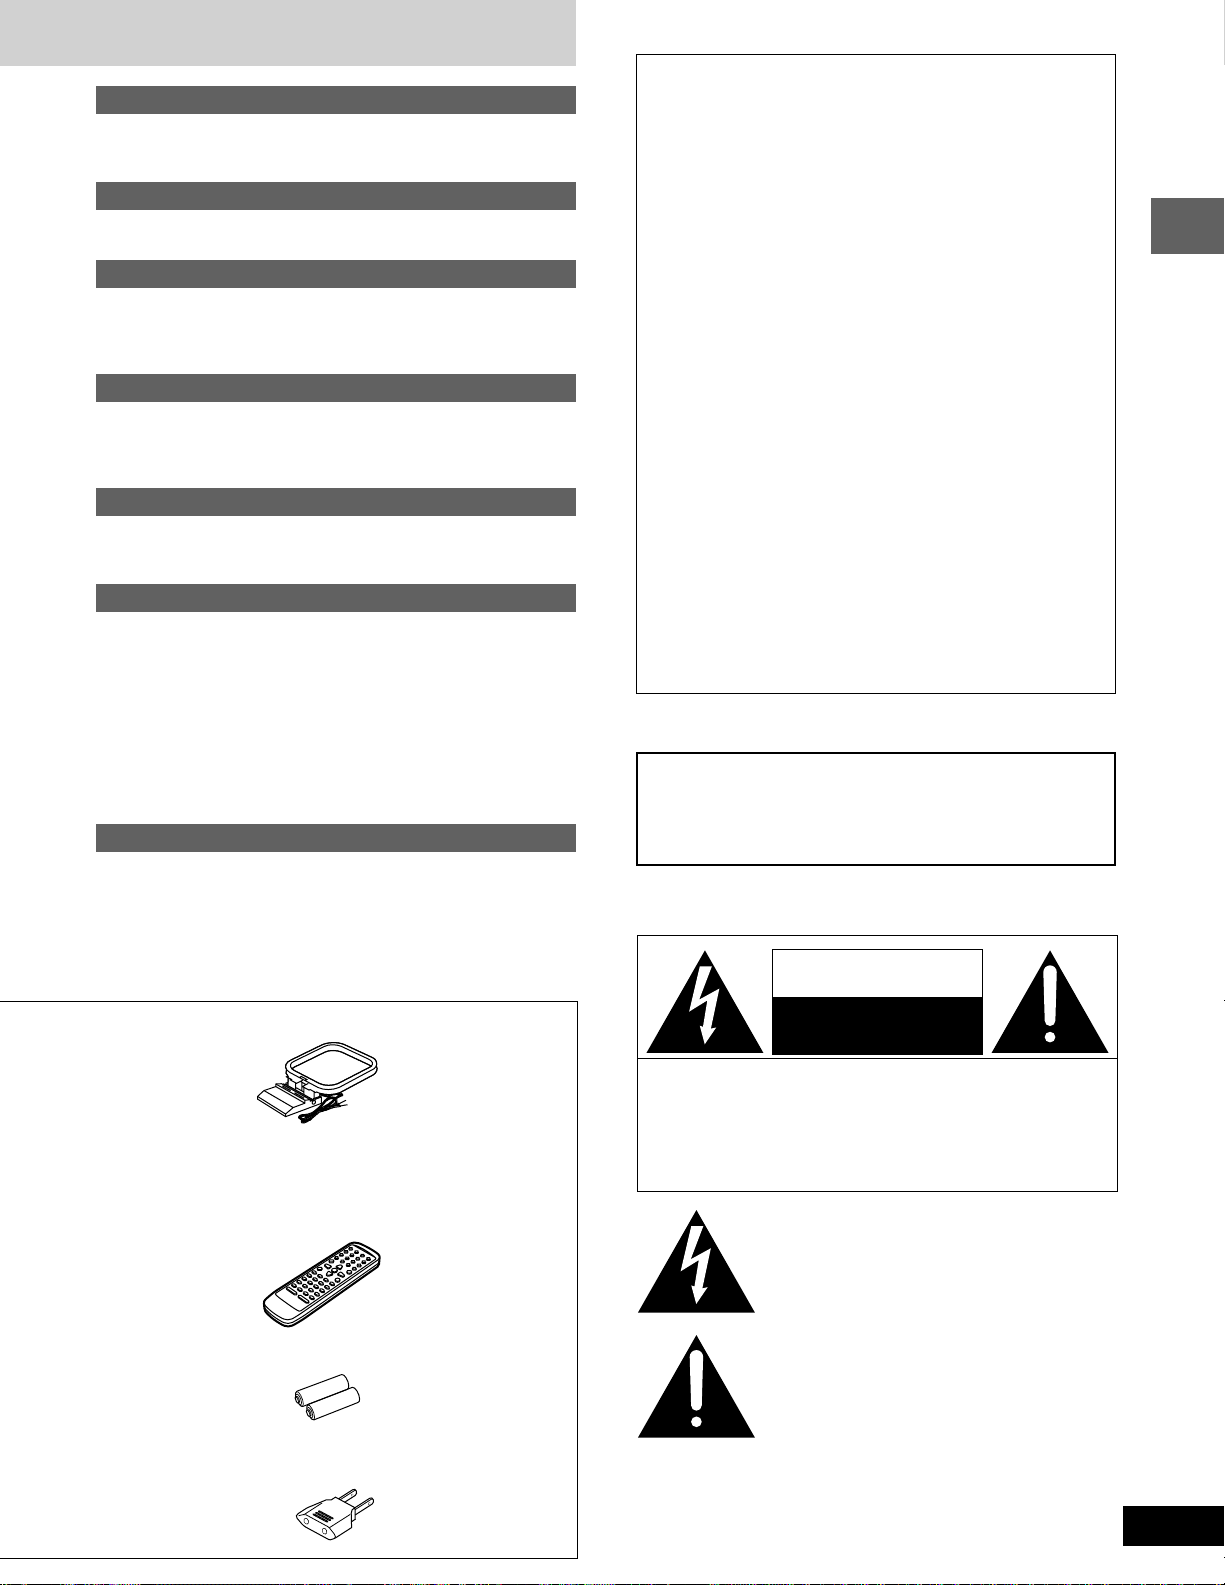
Supplied accessories
Please check and identify the supplied accessories.
Use numbers indicated in parentheses when asking
for replacement parts.
(Only for U.S.A.)
To order accessories contact 1-800-332-5368 or
web site (http://www.panasonic.com).
M AC power supply cord .............................................. 1 pc.
For U.S.A. and Canada For Australia and N.Z.
(RJA0065-1D) (RJA0035-X)
2
RQT6345
For others
(RJA0019-2X)
M FM indoor antenna .................................................... 1 pc.
(RSA0006-J)
M Video cable ................................................................ 1 pc.
(RJL1P016B15A)
Radio operations
The radio: manual tuning ........................................................... 28
The radio: preset tuning ............................................................. 29
Tape operations
Cassette tapes............................................................................. 30
Sound quality/sound field operations
Adjusting the bass ...................................................................... 31
Changing sound field and quality ............................................. 31
Enjoying surround sound .......................................................... 33
Recording operations
Before recording ......................................................................... 37
Recording discs .......................................................................... 38
Recording the radio .................................................................... 39
Karaoke operations
(For the Middle East, South Africa and Asia)
Enjoying karaoke ........................................................................ 39
THE FOLLOWING APPLIES ONLY IN THE U.S.A.:
CAUTION:
This equipment has been tested and found to comply with
the limits for a Class B digital device, pursuant to Part 15 of
the FCC Rules.
These limits are designed to provide reasonable protection
against harmful interference in a residential installation. This
equipment generates, uses and can radiate radio frequency
energy and, if not installed and used in accordance with the
instructions, may cause harmful interference to radio
communications. However, there is no guarantee that interference will not occur in a particular installation. If this equipment does cause harmful interference to radio or television
reception, which can be determined by turning the equipment off and on, the user is encouraged to try to correct the
interference by one or more of the following measures:
Reorient or relocate the receiving antenna.
•
Increase the separation between the equipment and re-
•
ceiver.
Connect the equipment into an outlet on a circuit different
•
from that to which the receiver is connected.
Consult the dealer or an experienced radio/TV technician
•
for help.
Any unauthorized changes or modifications to this equipment would void the user’s authority to operate this device.
Before use
Timer and others
Using the timers .......................................................................... 43
Convenient functions ................................................................. 46
Using headphones (not included) ............................................. 46
External unit connections .......................................................... 47
Using other equipment ............................................................... 48
Changing settings....................................................................... 49
Common procedures................................................................. 49
Summary of settings .................................................................50
Entering a password .................................................................54
Delay time ................................................................................. 55
References
Troubleshooting guide ............................................................... 56
Maintenance/Product Service .................................................... 57
Glossary....................................................................................... 58
Servicenter List (ONLY FOR U.S.A.) ......................................... 59
Warranty (ONLY FOR U.S.A.) ..................................................... 60
Specifications.............................................................................. 61
M AM loop antenna ....................................................... 1 pc.
(RSA0033-1)
M Remote control transmitter ...................................... 1 pc.
For Australia and N.Z. (N2QAJB000059)
For the Middle East, South Africa and Asia
(N2QAJB000054)
For U.S.A., Canada and Latin America (N2QAJB000053)
This device complies with Part 15 of the FCC Rules. Operation is subject to the following two conditions: (1) This device
may not cause harmful interference, and (2) this device must
accept any interference received, including interference that
may cause undesired operation.
THE FOLLOWING APPLIES ONLY IN THE U.S.A. AND CANADA:
CAUTION:
TO PREVENT ELECTRIC SHOCK MATCH
WIDE BLADE OF PLUG TO WIDE SLOT,
FULLY INSERT.
THE FOLLOWING APPLIES ONLY IN THE U.S.A. AND CANADA:
CAUTION
RISK OF ELECTRIC SHOCK
DO NOT OPEN
CAUTION: TO REDUCE THE RISK OF ELECTRIC
SHOCK, DO NOT REMOVE SCREWS.
NO USER-SERVICEABLE PARTS
INSIDE.
REFER SERVICING TO QUALIFIED
SERVICE PERSONNEL.
The lightning flash with arrowhead symbol, within
an equilateral triangle, is intended to alert the user
to the presence of uninsulated “dangerous voltage”
within the product’s enclosure that may be of sufficient magnitude to constitute a risk of electric shock
to persons.
M Remote control batteries ........................................ 2 pcs.
M Power plug adaptor................................................... 1 pc.
For areas except U.S.A., Canada, Australia, N.Z.
and Asia (SJP5213-2)
The exclamation point within an equilateral triangle
is intended to alert the user to the presence of
important operating and maintenance (servicing)
instructions in the literature accompanying the appliance.
3
RQT6345
IMPORTANT SAFETY INSTRUCTIONS
Read these operating instructions carefully before using the unit. Follow the safety instructions on the unit and the applicable safety instructions
listed below. Keep these operating instructions handy for future reference.
1) Read these instructions.
2) Keep these instructions.
3) Heed all warnings.
4) Follow all instructions.
5) Do not use this apparatus near water.
6) Clean only with dry cloth.
Before use
7) Do not block any ventilation openings. Install in accordance
with the manufacturer’s instructions.
8) Do not install near any heat sources such as radiators, heat
registers, stoves, or other apparatus (including amplifiers) that
produce heat.
9) Do not defeat the safety purpose of the polarized or
grounding-type plug. A polarized plug has two blades with one
wider than the other. A grounding-type plug has two blades
and a third grounding prong. The wide blade or the third prong
are provided for your safety. If the provided plug does not fit
into your outlet, consult an electrician for replacement of the
obsolete outlet.
10) Protect the power cord from being walked on or pinched
particularly at plugs, convenience receptacles, and the point
where they exit from the apparatus.
11) Only use attachments/accessories specified by the
manufacturer.
12) Use only with the cart, stand, tripod, bracket,
or table specified by the manufacturer, or sold
with the apparatus. When a cart is used, use
caution when moving the cart/apparatus
combination to avoid injury from tip-over.
13) Unplug this apparatus during lightning storms or when unused
for long periods of time.
14) Refer all servicing to qualified service personnel. Servicing is
required when the apparatus has been damaged in any way,
such as power-supply cord or plug is damaged, liquid has
been spilled or objects have fallen into the apparatus, the
apparatus has been exposed to rain or moisture, does not
operate normally, or has been dropped.
Item 9 applies only in the U.S.A. and Canada.
CAUTION!
DO NOT INSTALL, OR PLACE THIS UNIT, IN A
•
BOOKCASE, BUILT-IN CABINET OR IN ANOTHER
CONFINED SPACE. ENSURE THE UNIT IS WELL
VENTILATED. TO PREVENT RISK OF ELECTRIC SHOCK
OR FIRE HAZARD DUE TO OVERHEATING, ENSURE
THAT CURTAINS AND ANY OTHER MATERIALS DO NOT
OBSTRUCT THE VENTILATION VENTS.
DO NOT OBSTRUCT THE UNIT’S VENTILATION
•
OPENINGS WITH NEWSPAPERS, TABLECLOTHS,
CURTAINS, AND SIMILAR ITEMS.
DO NOT PLACE SOURCES OF NAKED FLAMES, SUCH
•
AS LIGHTED CANDLES, ON THE UNIT.
DISPOSE OF BATTERIES IN AN ENVIRONMENTALLY
•
FRIENDLY MANNER.
For the Middle East, South Africa, Asia and Latin America
THIS UNIT IS INTENDED FOR USE IN TROPICAL
CLIMATES.
For others
THIS UNIT IS INTENDED FOR USE IN MODERATE
CLIMATES.
This product may receive radio interference caused by mobile telephones during use. If such interference is apparent, please increase
separation between the product and the mobile telephone.
Listening caution
Selecting fine audio equipment such as the unit you’ve just purchased is only the start of your musical enjoyment. Now it’s time to
consider how you can maximize the fun and excitement your equipment offers. This manufacturer and the Electronic Industries
Association’s Consumer Electronics Group want you to get the
most out of your equipment by playing it at a safe level. One that
lets the sound come through loud and clear without annoying blaring or distortion—and, most importantly, without affecting your sensitive hearing.
We recommend you to avoid prolonged exposure to excessive
noise.
Sound can be deceiving. Over time your hearing “comfort level”
adapts to higher volumes of sound. So what sounds “normal” can
actually be loud and harmful to your hearing.
Guard against this by setting your equipment at a safe level
BEFORE your hearing adapts.
To establish a safe level:
Start your volume control at a low setting.
•
Slowly increase the sound until you can hear it comfortably and
•
clearly, and without distortion.
Once you have established a comfortable sound level:
Set the dial and leave it there.
•
4
RQT6345
Taking a minute to do this now will help to prevent hearing damage
or loss in the future. After all, we want you listening for a lifetime.
The remote control
Disc information
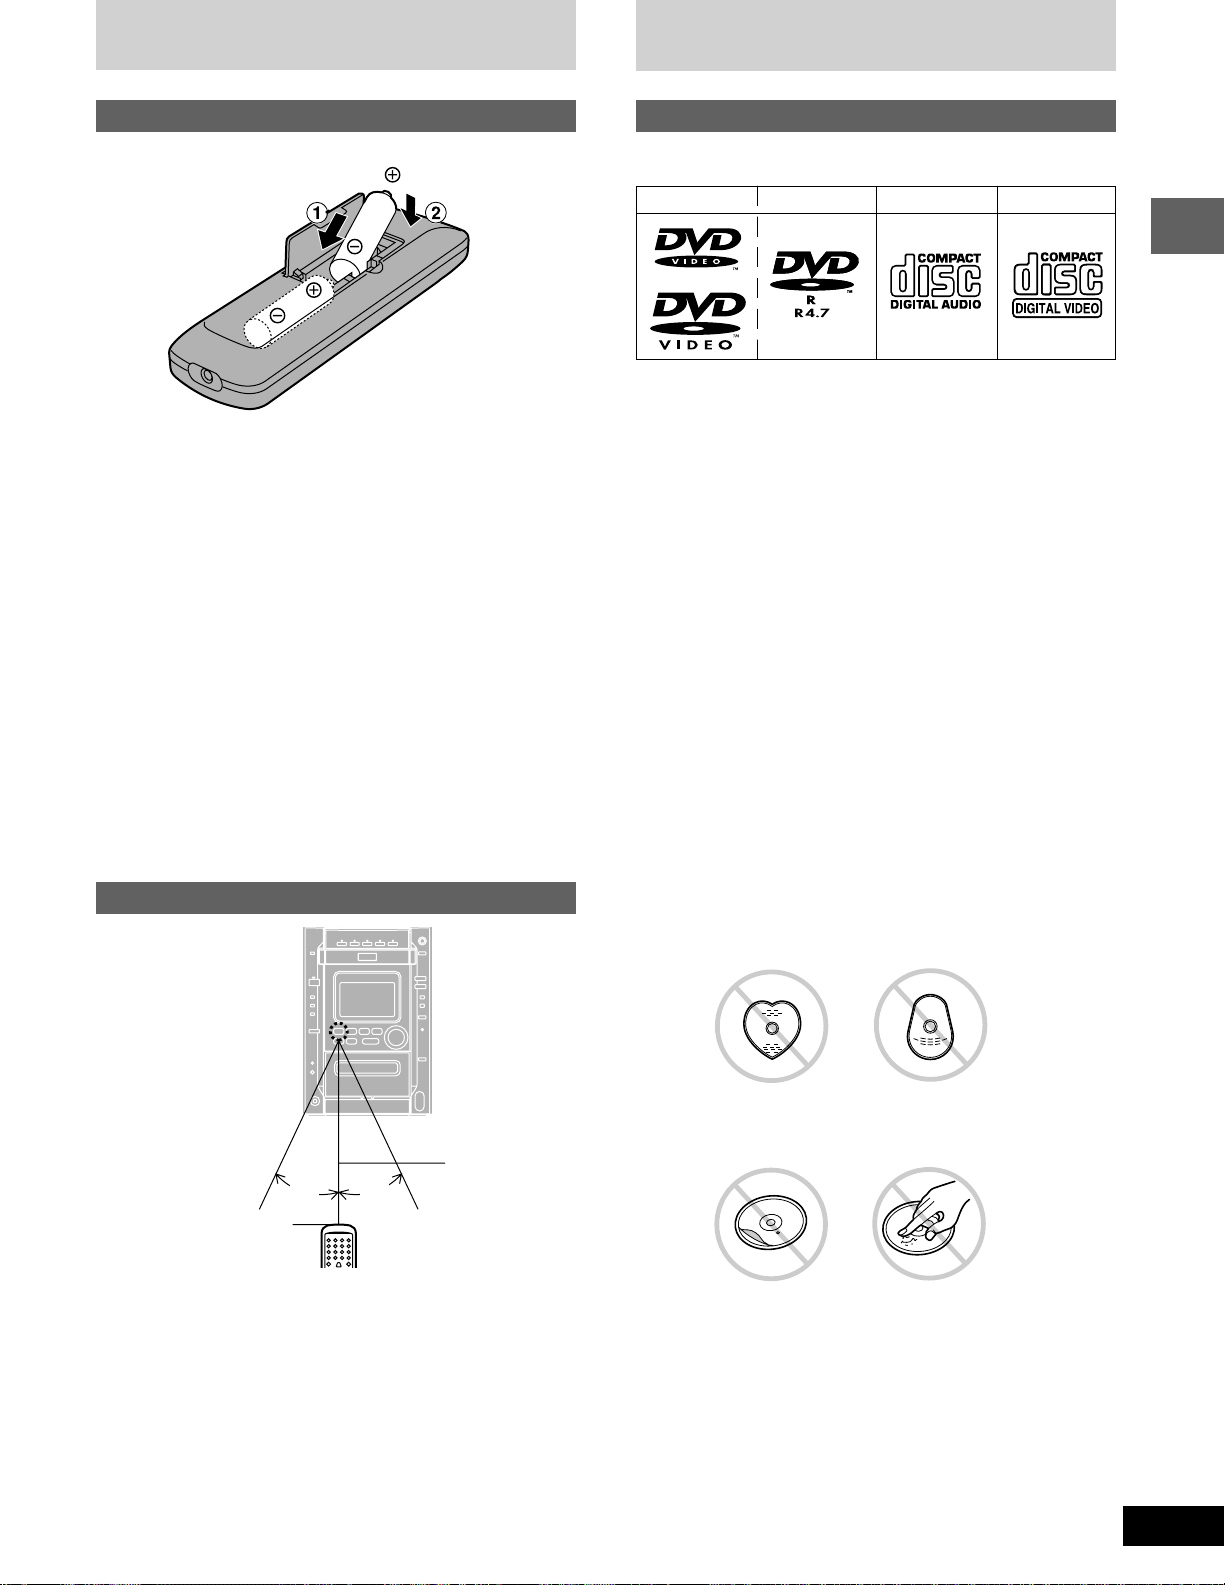
Batteries
R6/LR6, AA, UM-3
Insert so the poles (+ and –) match those in the remote control.
•
Do not use rechargeable type batteries.
•
Do not;
mix old and new batteries.
•
use different types at the same time.
•
heat or expose to flame.
•
take apart or short circuit.
•
attempt to recharge alkaline or manganese batteries.
•
use batteries if the covering has been peeled off.
•
keep together with metallic objects such as necklaces.
•
Mishandling of batteries can cause electrolyte leakage which can
damage items the fluid contacts and may cause a fire.
If electrolyte leaks from the batteries, consult your dealer.
Wash thoroughly with water if electrolyte comes in contact with any
part of your body.
Remove if the remote control is not going to be used for a long period
of time. Store in a cool, dark place.
Replace if the unit does not respond to the remote control even when
held close to the front panel.
Use
Types of discs
This unit can playback discs bearing any of the marks.
DVD-Video DVD-R Audio CD Video CD
L CD-R and CD-RW discs
This unit can play CD-DA (digital audio) and video CD format audio
CD-R and CD-RW that have been finalized ( a process that enables
CD-R/CD-RW players to play audio CD-R and CD-RW) upon completion of recording. It may not be able to play some CD-R or CD-RW
due to the condition of the recording.
L DVD-R discs
Panasonic DVD-R recorded and finalized on a Panasonic DVD video
recorder are played as DVD-Video on this unit.
It may not be possible to play these discs in all cases due to the type
of disc or condition of the recording.
This unit does not have a DTS decoder so it cannot play audio encoded with DTS.
This unit cannot play the following discs:
DVD with an unsuitable region
•
number (➡ front cover)
DVD-Audio
•
DVD-ROM
•
DVD-RAM
•
+
RW
•
DVD-RW
•
Divx Video Disc
•
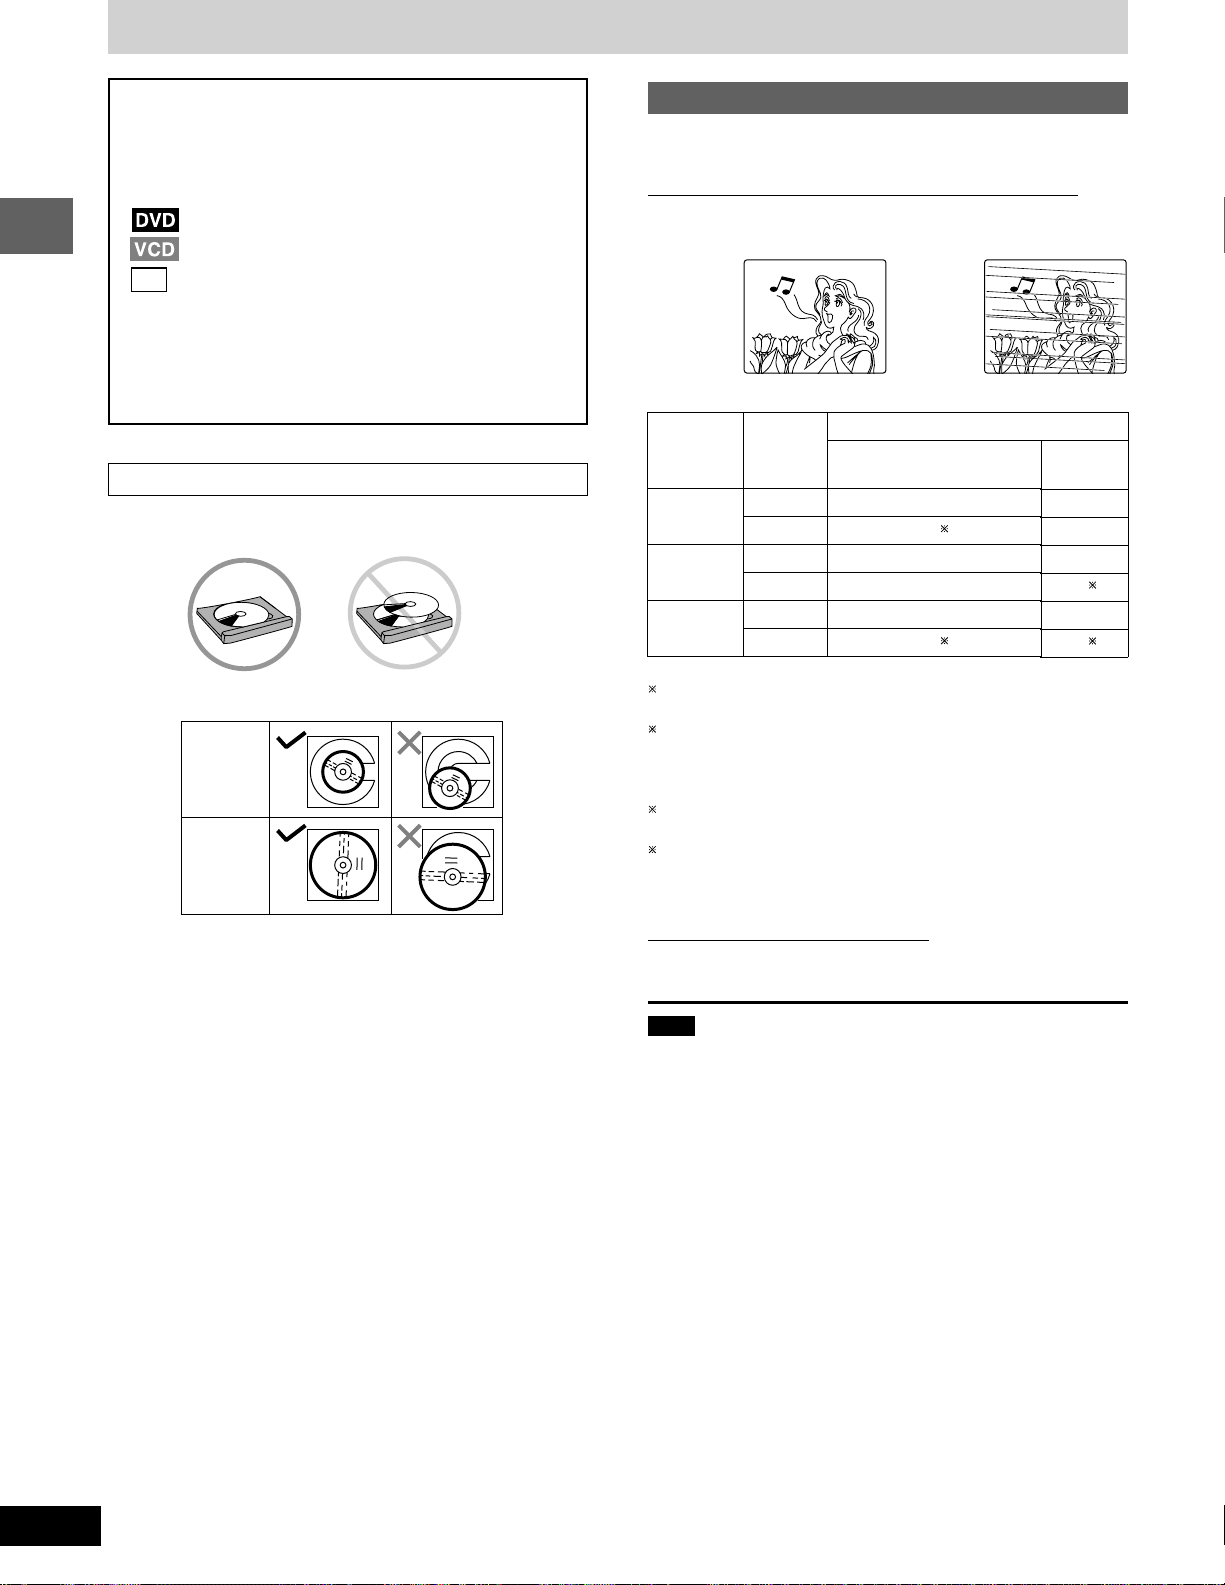
Do not;
use irregularly shaped discs.
•
CD-ROM
•
CDV
•
CVD
•
CD-G
•
SACD
•
SVCD
•
Photo CD
•
Before use
7 m
30° 30°
Transmission window
Aim at the sensor, avoiding obstacles, at a maximum range of
7 meters directly in front of the unit.
Keep the transmission window and the unit’s sensor free from
•
dust.
Operation can be affected by strong light sources, such as direct
•
sunlight, and the glass doors on cabinets.
Do not;
put heavy objects on the remote control.
•
take the remote control apart.
•
spill liquids onto the remote control.
•
attach extra labels and stickers.
•
use discs with labels and stickers that are coming off or with adhe-
•
sive exuding from under labels and stickers.
attach scratch-proof covers or any other kind of accessory.
•
write anything on the disc.
•
clean discs with liquids. (Wipe with a soft, dry cloth.)
•
use discs printed with label printers available on the market.
•
5
RQT6345
Disc information
Disc symbols used in these operating instructions
The functions you can use depend on the type of disc you
play. These marks are used to indicate which type of disc is
available for use.
: Feature can be used with DVD-Video
: Feature can be used with Video CD
: Feature can be used with Audio CD
CD
Playing DVDs and Video CDs
The producer of the material can control how these discs are
played. This means that you may not be able to control play of
Before use
a disc with some operations described in these operating instructions. Read the disc’s instructions carefully.
To prevent damage
Always observe the following points.
Load only 1 disc per tray.
•
Type of disc for the type of TV
DVDs and Video CDs are recorded using either PAL or NTSC.
For Australia, N.Z., the Middle East, South Africa and Asia
Refer to this table when selecting discs.
Example of how the picture appears on the screen
✔ . . . . . . . ✕ . . . . . . .
TV Monitor
TV type
Multi-
system TV
NTSC TV
PAL TV
Disc
PAL
NTSC
PAL
NTSC
PAL
NTSC
For the Middle East, South
Africa, Australia and N.Z.
✔
1
✔
✕
✕
✔
2
✔
For Asia
✔
✔
✕
3
✔
✔
4
✔
Load discs as shown in the figure.
•
8cm disc
12cm disc
An adaptor is not needed with 8 cm discs (singles).
Set the system on a flat, level surface.
•
Always unload all discs before moving the unit.
•
Do not;
set the unit on top of magazines, inclined surfaces, etc.
•
move the unit while a tray is opening/closing, or when loaded.
•
put anything except discs in trays.
•
use cleaning discs or discs which are badly warped or cracked.
•
1
If you select “NTSC” in “NTSC Disc Output” (➡ page 50), the picture may be clearer.
2
The factory preset for “NTSC Disc Output” is “PAL60”, so no
changes to the settings are necessary.
(If your television is not equipped to handle PAL 525/60 signals
the picture will not be shown correctly.)
3
The factory preset for “NTSC Disc Output” is “NTSC”, so no
changes to the settings are necessary.
4
Select “PAL60” in “NTSC Disc Output” (➡ page 50).
(If your television is not equipped to handle PAL 525/60 signals
the picture will not be shown correctly.)
For U.S.A., Canada and Latin America
The unit can playback only NTSC system discs.
Note
The bottom part of the picture may be cut off if the Video CD played
does not comply with standards.
6
RQT6345
Simple set-up
STEP
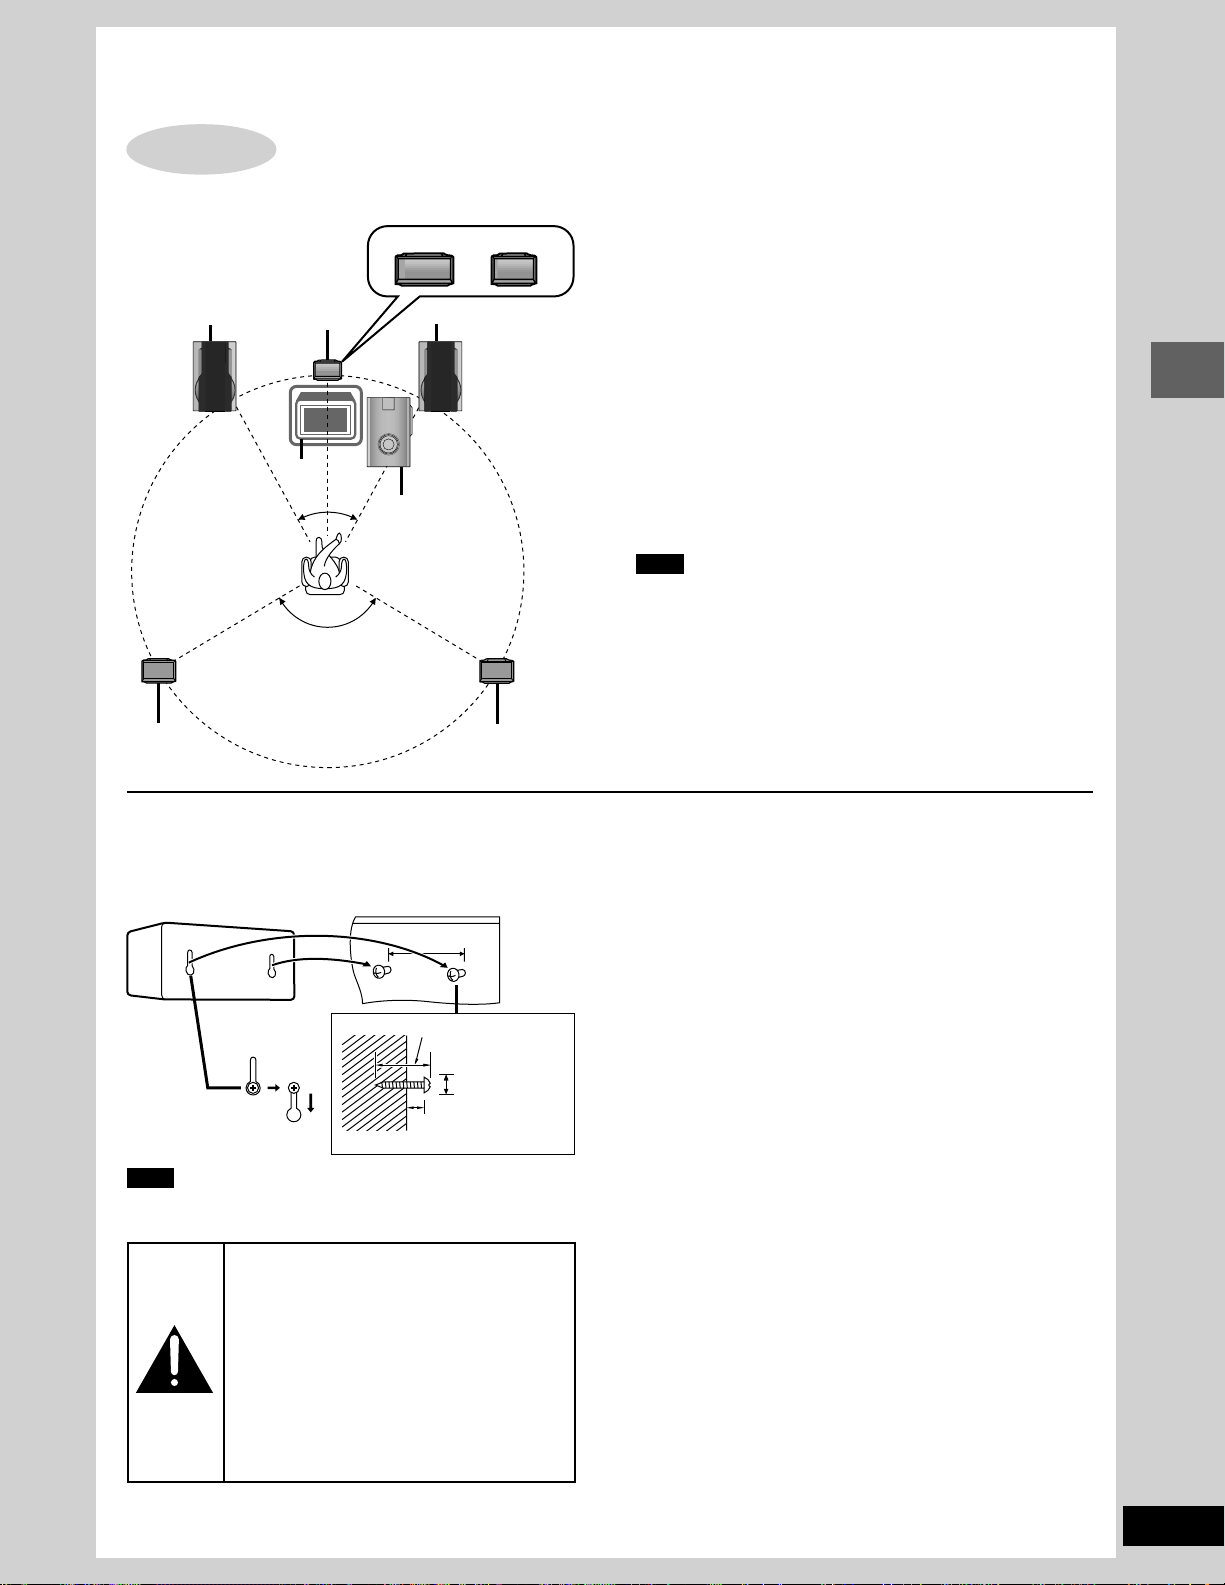
Optimum location
Distance: A=B=C=D=E
Front speaker
1
D
Locating
Center speaker
TV
B
A
30°
120°
30°
SB-PC90 SB-PC93
C
Subwoofer
Front speaker
E
Front speaker (SB-DK20)
Speakers are designed identically so that no left or right channel
orientation is necessary.
Center speaker
(For the Middle East, South Africa and Asia)
•
The medium-sized speaker is the center speaker (SB-PC90).
(For U.S.A., Canada and others)
•
The small speaker with the short cord is the center speaker
(SB-PC93).
The model numbers are printed on the back of the speakers.
Surround speakers (SB-PS90)
The small speakers with the long cords are surround speakers.
Place on either side of listening position, or slightly to the rear,
about 1 meter higher than ear level with the Panasonic logo facing towards the listening position.
The effect varies with the type of music and music source.
Subwoofer (SB-W20)
Place near the television, on the floor or a sturdy shelf so that it
won’t cause vibration.
Note
Keep your speakers at least 10mm (13/32") away from the sys-
•
tem for proper ventilation.
Do not place the center speaker on the main unit as sound qual-
•
ity will be affected.
Simple set-up
Surround
speaker (left)
Attaching to a wall
Surround speakers can be attached to a wall.
Set the speaker onto screws and slide through bracket to lock
into position.
Note
The wall or pillar on which the speakers are to be attached
should be capable of supporting 5 kg (11 Ib.) per screw.
Caution
Use the speakers only with the recom-
•
mended system. Failure to do so may
lead to damage to the amplifier and/or the
speakers, and may result in the risk of
fire. Consult a qualified service person if
damage has occurred or if you experience a sudden change in performance.
Do not attempt to attach these speakers
•
to walls using methods other than those
described in this manual.
Surround
speaker (right)
70 mm (23/4")
30–35 mm
3
/16"–13/8")
(1
Ø7.5~9.5 mm
(
7–9 mm
9
/32"–23/64")
(
19
/64"–3/8")
Use only supplied speakers
Using other speakers can damage the unit and sound quality will
be negatively affected.
Notes on speaker use
■ You can damage your speakers and shorten their useful life if
you play sound at high levels over extended periods.
■ Reduce the volume in the following cases to avoid damage.
When playing distorted sound.
•
When the speakers are receiving howling from a microphone
•
or record player, noise from FM broadcasts, or continuous
signals from an oscillator, test disc, or electronic instrument.
When adjusting the sound quality.
•
When turning the unit on or off.
•
Positioning for best effect
How you set up your speakers can affect the bass and the sound
field. Note the following points.
Place speakers on flat secure bases.
•
Placing speakers too close to floors, walls, and corners can re-
•
sult in excessive bass. Cover walls and windows with a thick
curtain.
If irregular coloring occurs on your television
These speakers are designed to be used close to a television,
but the picture may be affected with some televisions and set-up
combinations.
If this occurs, turn the television off for about 30 minutes.
The television’s demagnetizing function should correct the
problem. If it persists, move the speakers further away from the
television.
7
RQT6345
Simple set-up
STEP
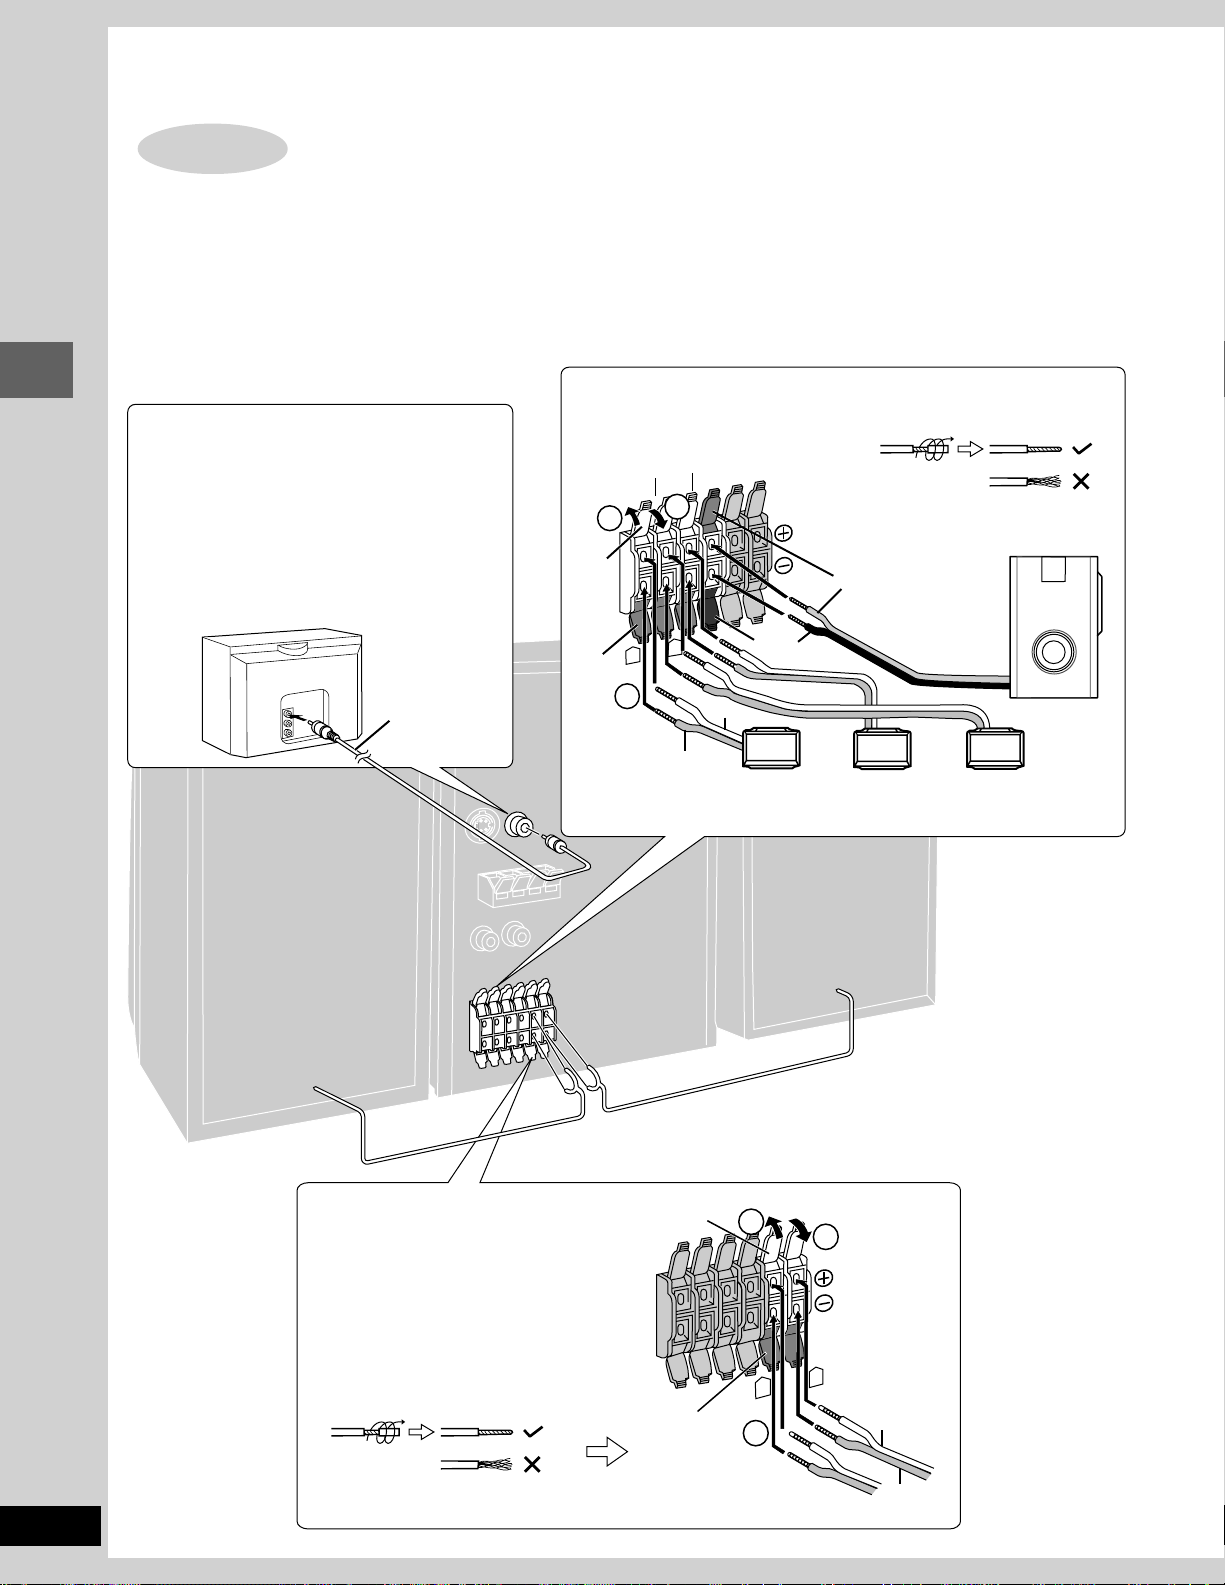
The illustrations show the model for U.S.A., Canada, Australia, and N.Z.
Connect the cords to the terminals of same color.
Never short-circuit positive (+) and negative (–) speaker wires.
•
Be sure to connect only positive (red or gray) wires to positive (+) terminals and negative (black, blue or gray with blue line) wires to negative
•
(–) terminals.
Incorrect connection can damage the speakers.
TV (not included)
You can connect through the S-VIDEO terminal
if your TV has an S-VIDEO terminal (➡ page 47).
Connect directly to your TV.
Simple set-up
Do not connect the unit through a video cassette
recorder, because the picture may not be played
correctly due to the copy guard.
TV
2
Speakers and TV
O
E
D
I
V
N
I
Video cable
(included)
Subwoofer, center, and surround speakers
Twist the vinyl tip and pull off.
–
B
U
S
R
E
F
O
O
W
R
E
T
N
E
C
D
N
U
O
R
R
U
S
1
Gray
Blue
Gray with
blue line
3
Red
L
R
2
Surround speaker
(right)
(SB-PS90)
Black
Gray
Center speaker
(SB-PC90/
SB-PC93)
Subwoofer
(SB-W20)
Surround speaker
(Left)
(SB-PS90)
(Right)
Front speakers
Twist the vinyl tip and pull off.
Gray
Blue
1
R
2
(Left)
FRONT
3
L
Gray
8
RQT6345
Blue
STEP
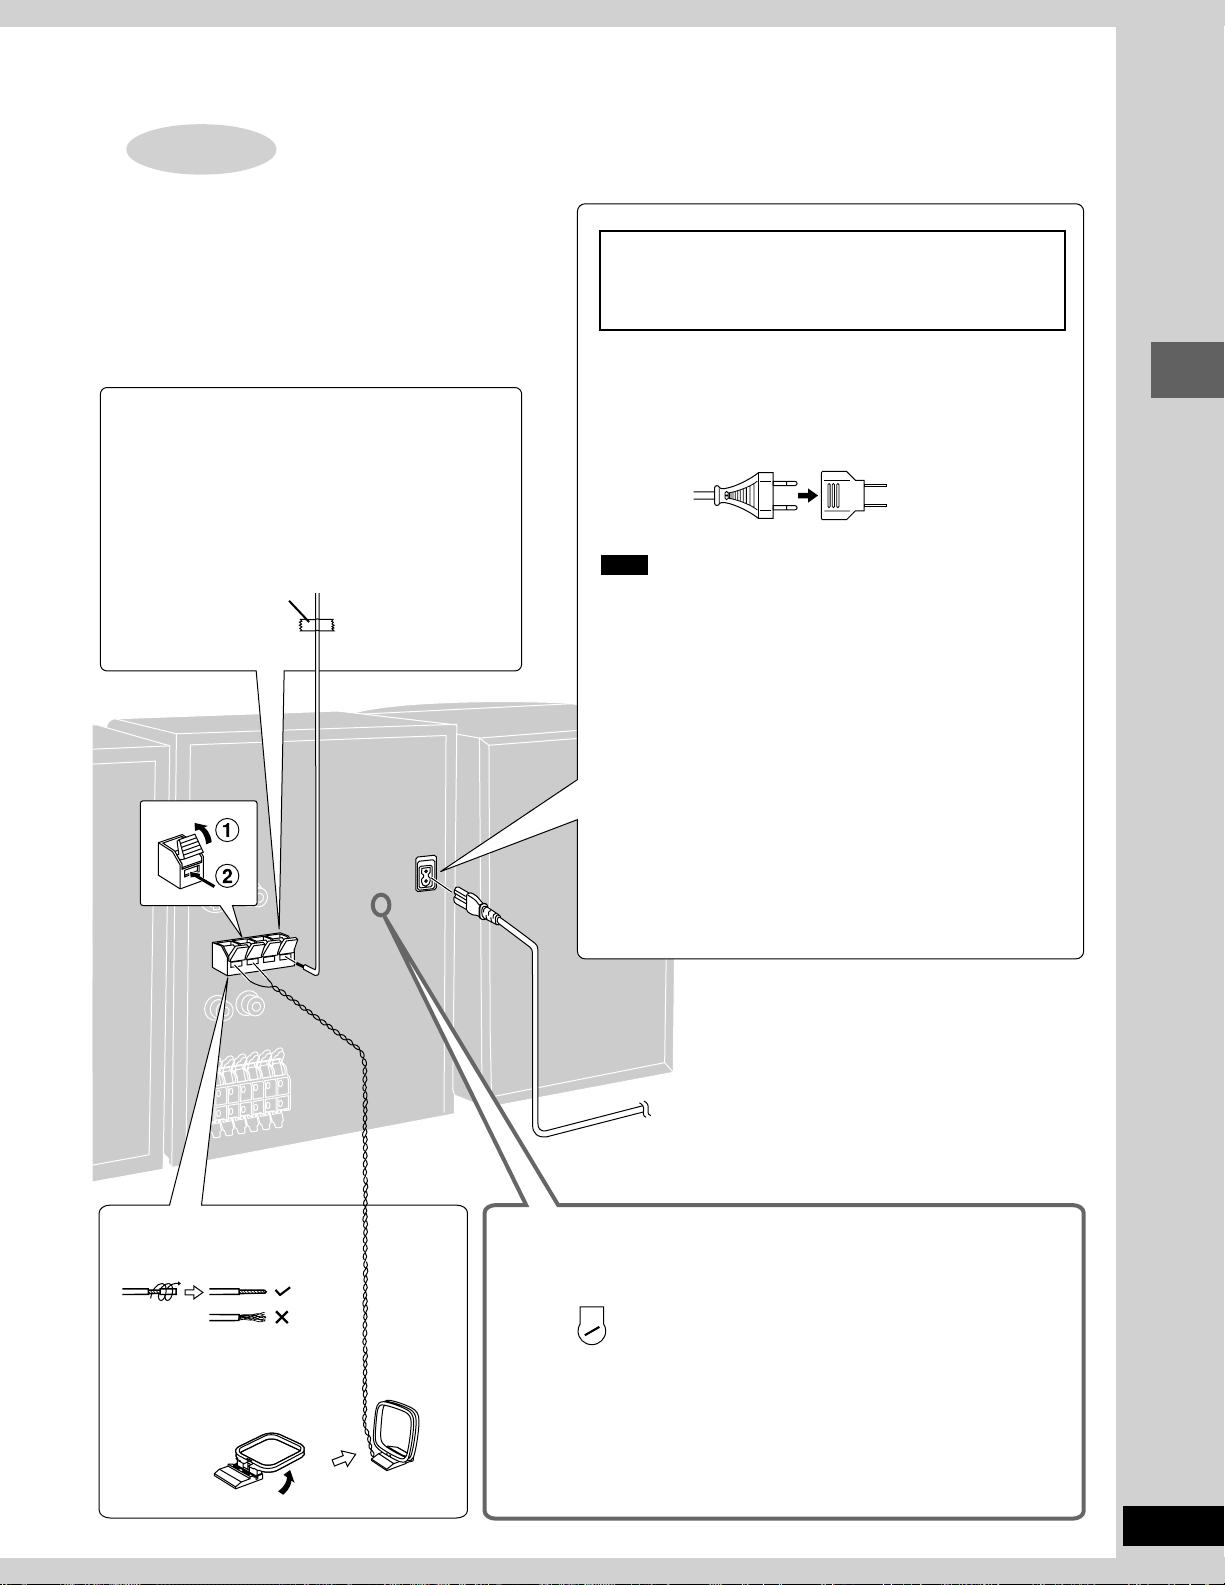
3
Antennas and AC power supply cord
FM indoor antenna
Twist the vinyl tip and pull off.
Fix the other end of the antenna where reception is
best.
Adhesive tape
For areas except U.S.A., Canada, Australia and N.Z.
Set the voltage before connection
(➡ below).
AC power supply cord
For areas except U.S.A., Canada, Australia, N.Z. and Asia
If the power plug will not fit your socket, use the power plug adaptor (included).
Simple set-up
Note
The included AC power supply cord is for use with this unit only.
Do not use it with other equipment.
Conserving power
The unit consumes power even when it is turned off with [POWER
f/I] ([f/I]). To save power when the unit is not to be used for a
long time, unplug it from the household AC outlet. Remember to
reset the radio stations and any other memory items before using
the unit again.
AM loop antenna
Twist the vinyl tip and pull off.
Stand the antenna up on its
base.
Keep loose antenna cord away
from other wires and cords.
U.S.A. and Canada: 0.25 W
Australia and N.Z.: 0.6 W
Others: 0.8 W
For your reference
Information you enter into the unit’s memory, except for time, remains intact for up to a week after the AC power supply cord is
disconnected.
To household
AC outlet
Voltage setting
For areas except U.S.A., Canada, Australia and N.Z.
Use a flat-head screwdriver to turn the voltage selector to the appropriate position for your area.
If the power supply in your area is 115 V or 120 V, please set the voltage selector as follows.
For 115 V: Set to 110 V.
For 120 V: Set to 127 V.
220
127 V↔110 V↔ 220 V-230 V↔240 V
I V
230
VOLT ADJ
Note that the unit will be seriously damaged or fail to operate correctly if this
setting is not made correctly.
9
RQT6345
The illustration is the model for the Middle East,
South Africa and Asia.
DISC 1DISC 2DISC 3DISC 4DISC 5
CD
MANAGER
AC IN
DISPLAY
DEMO
CLOCK
TIMER
PLAY
REC
SELECTOR
REV MODE
FM MODE BP
REC STOP
PHONES
TUNE MODE
TUNER TAPE
BAND
DVD/CD
MEMORY
DOWN
2
4
8
1
3
5
6
7
9
;
TUNE MODE
Control guide and preparatory steps
<
TUNER TAPE
BAND
MEMORY
=
VOL
UP
DVD/CD
CINEMA
OPEN CLOSE
S.SRND
SUPER
3D AI
SOUND
SUPER
SOUND EQ
SUBWOOFER
OPEN
MIC
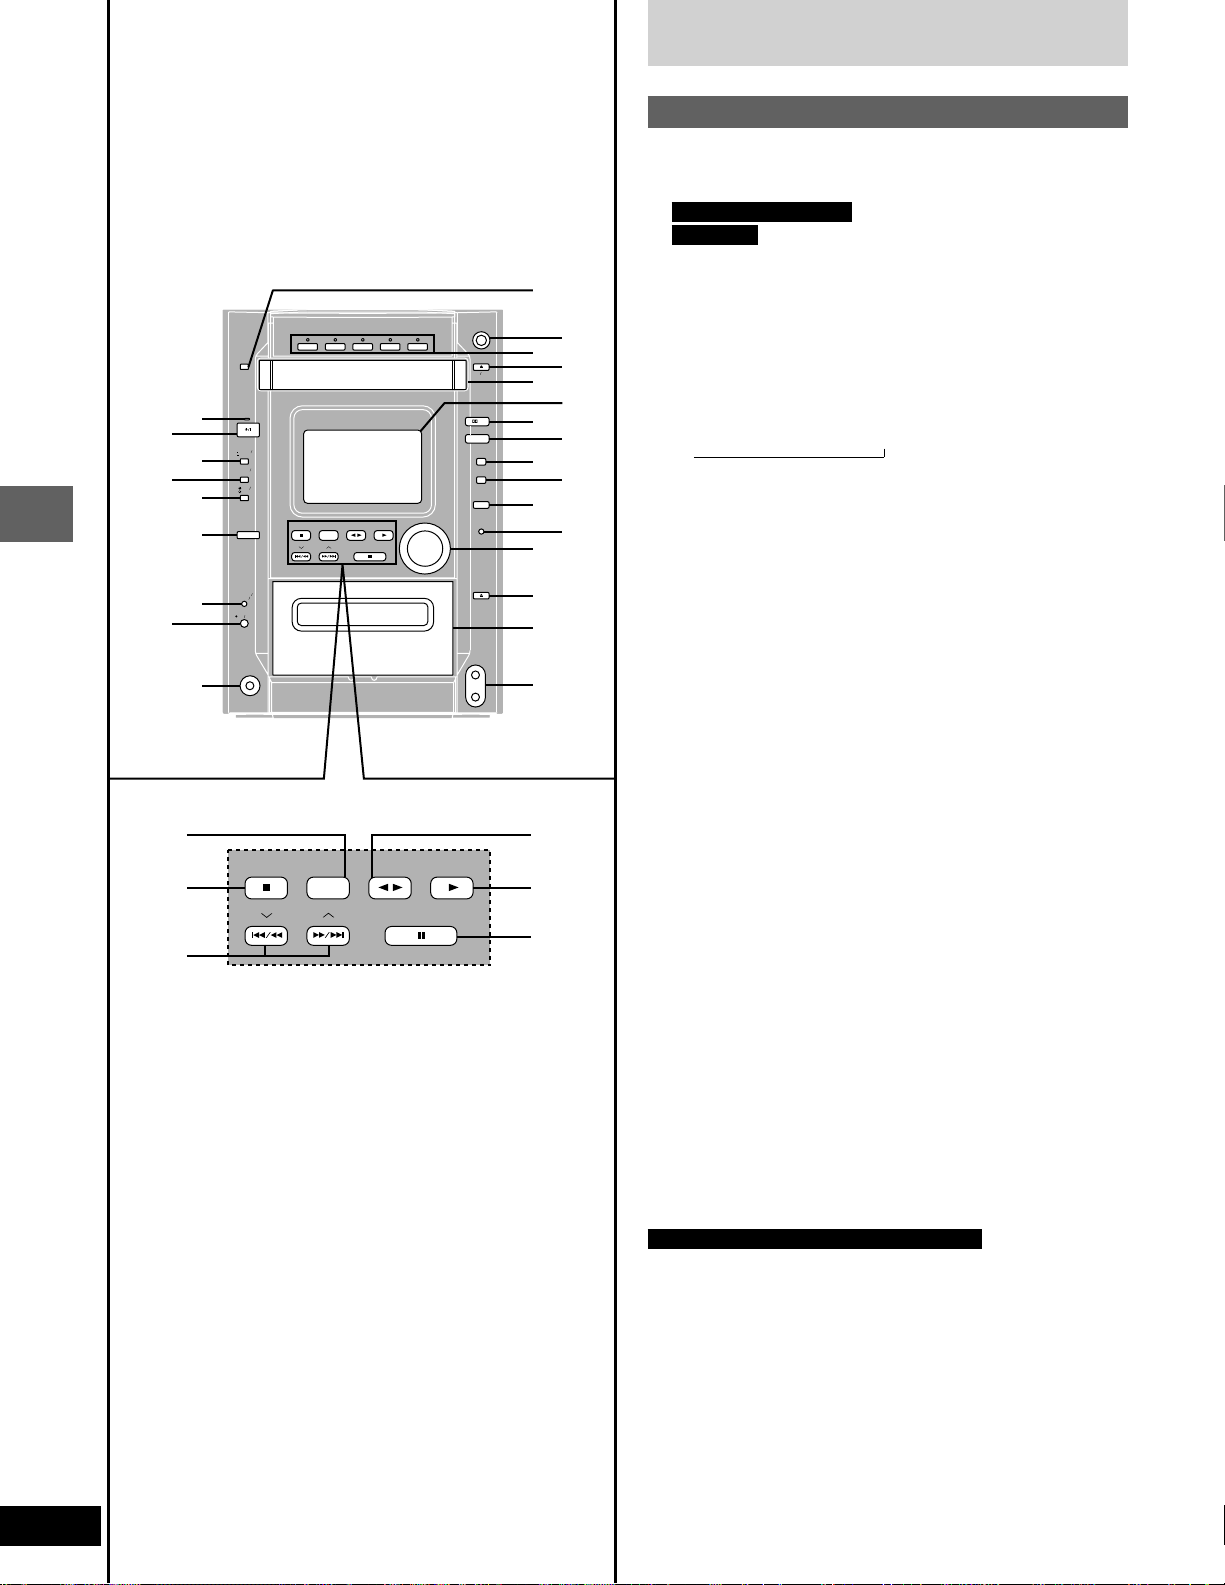
Front panel controls
Main unit
1 AC supply indicator (AC IN)
This indicator lights when the unit is connected to the AC mains
supply.
2 For U.S.A. and Canada : Standby/on switch (POWER f/I)
For others : Standby/on switch (f/I)
Press to switch the unit from on to standby mode or vice versa. In
!
"
#
$
%
PL
&
(
)
~
EQ
+
,
-
.
/
:
[
>
?
@
standby mode, the unit is still consuming a small amount of
power.
3 Display select/demonstration button
(-DISPLAY/–DEMO) . . . . . . . . . . . . . . . . . . . . . . . . . . . . 12, 46
4 Clock/timer button (CLOCK/TIMER) . . . . . . . . . . . 12, 43, 44
5 Timer button (rPLAY/rREC) . . . . . . . . . . . . . . . . . . . . 43, 44
6 Source select button (SELECTOR) . . . . . . . . . . . . . . . 12, 48
Each time you press the button:
TUNER→TAPE→DVD/CD→AUX
→
7 Tape reverse mode, FM mode, AM beat proof button
(REV MODE/FM MODE/BP) . . . . . . . . . . . . . . . . . . . 28, 30, 39
8 Recording start/stop button ([REC/STOP) . . . . . . . . . . . 38
9 Headphones jack (PHONES) . . . . . . . . . . . . . . . . . . . . . . . 46
! CD MANAGER button (CD MANAGER) . . . . . . . . . . . . . . . 24
" CINEMA mode button and indicator (CINEMA) . . . . . . . . 18
# Disc direct select buttons and disc indicators
(DISC 1 – DISC 5)
$ Disc tray open/close button (c OPEN/CLOSE) . . . . . . . . 14
% Disc tray
& Display
( DOLBY PRO LOGIC button and indicator (0 PL) . . . . . . 34
) Super surround button and indicator (S.SRND) . . . . . . . . 36
~ Super 3D AI EQ button (SUPER 3D AI) . . . . . . . . . . . . . . . 32
+ Sound EQ button (SOUND EQ) . . . . . . . . . . . . . . . . . . . . . 31
, Super sound EQ button and indicator
(SUPER SOUND EQ) . . . . . . . . . . . . . . . . . . . . . . . . . . . . . . 32
- Subwoofer button and indicator
(SUBWOOFER) . . . . . . . . . . . . . . . . . . . . . . . . . . . . . . . . . . 31
. Volume control (VOL) . . . . . . . . . . . . . . . . . . . . . . . 14, 28, 30
/ Cassette holder open button (c OPEN) . . . . . . . . . . . . . . 30
: Cassette holder
; Tuner, band select button (TUNER, BAND) . . . . . . . . . . . 28
Press to select TUNER as the source.
Lights when TUNER is selected as the source.
< Disc/tape stop, tuning mode select button
(L, TUNE MODE) . . . . . . . . . . . . . . . . . . . . . . . . . . . 14, 28, 30
= Disc skip/search, tape fast-forward/rewind/TPS,
tune/time adjust buttons
(g/(, 3, )/f, 4) . . . . . . . . . . . . . . . . 12, 17, 28, 30
> Tape play button (TAPE ; :) . . . . . . . . . . . . . . . . . . . . . . . 30
Press to select TAPE as the source.
Lights when TAPE is selected as the source.
? Disc play button (DVD/CD :) . . . . . . . . . . . . . . . . . . . . . . . 14
Press to select DVD/CD as the source.
Lights when DVD/CD is selected as the source.
@ Disc pause, memory button (J, MEMORY) . . . . . . . . . 16, 29
10
RQT6345
For the Middle East, South Africa and Asia
[ Microphone jacks (MIC) . . . . . . . . . . . . . . . . . . . . . . . . . . . 39
MIX
CH
EEP
CTIO
UT
DIMMER
ER
V
IDEO
ND
A-B REP
AR
3D AI
NGLE
MENU
OP MENU
SUB
TITLE
EST
GUI DISP
URN
ER
SHI
CH SE
ECT
V CH UP
V CH
WN
Y MODE
SELECTOROR
SOUND EQ
REP
SLO
W S
RCH
PL
SUBW
OFER
CD
PE
UNER
DISC
OLUME
POSITION
MEMOR
ENTNTER
MIX MIX 2CHCH
SLEEPEEP
AUTO O OFOFF
SET UPSET UP
MUTUTINGDIMMERDIMMER
TV V POWERER
TV V VIDEOIDEO
MENUMENU
TOP MENUOP MENU
TESTEST
CH SECH SELECTECT
TV CH UP
DISCDISC
MICMIC
ECHOECHO
Front panel controls
Remote control
\
]
^
_
{
|
}
V
0
1
2
3
4
-
5
6
TV V POWER
TV
TOP MENU
CH SE
GUI DISP
MARKER
SOUND EQ
SUBW
VIDEO
LECT
TEST
PL
S.S.SRND
3D AI
OOFER
SHI
FT
AUTO O OFOFF
SLEEP
TV CH UP
TV CH
SUB
TITLE
CLCLEAR
PLAY MODE
POSITION
MEMOR
SLO
W S
VOLUME
ENTNTER
DOWN
A-B REP
Y
EARCH
MIX
AUDUDIO
REP
2CH
EAT
EAT
ACTIO
INGDIMMER
MUT
DISC
MENU
RETURN
ANGLE
SELECT
DVD D CD
TAPE
TUNER
7
N
8
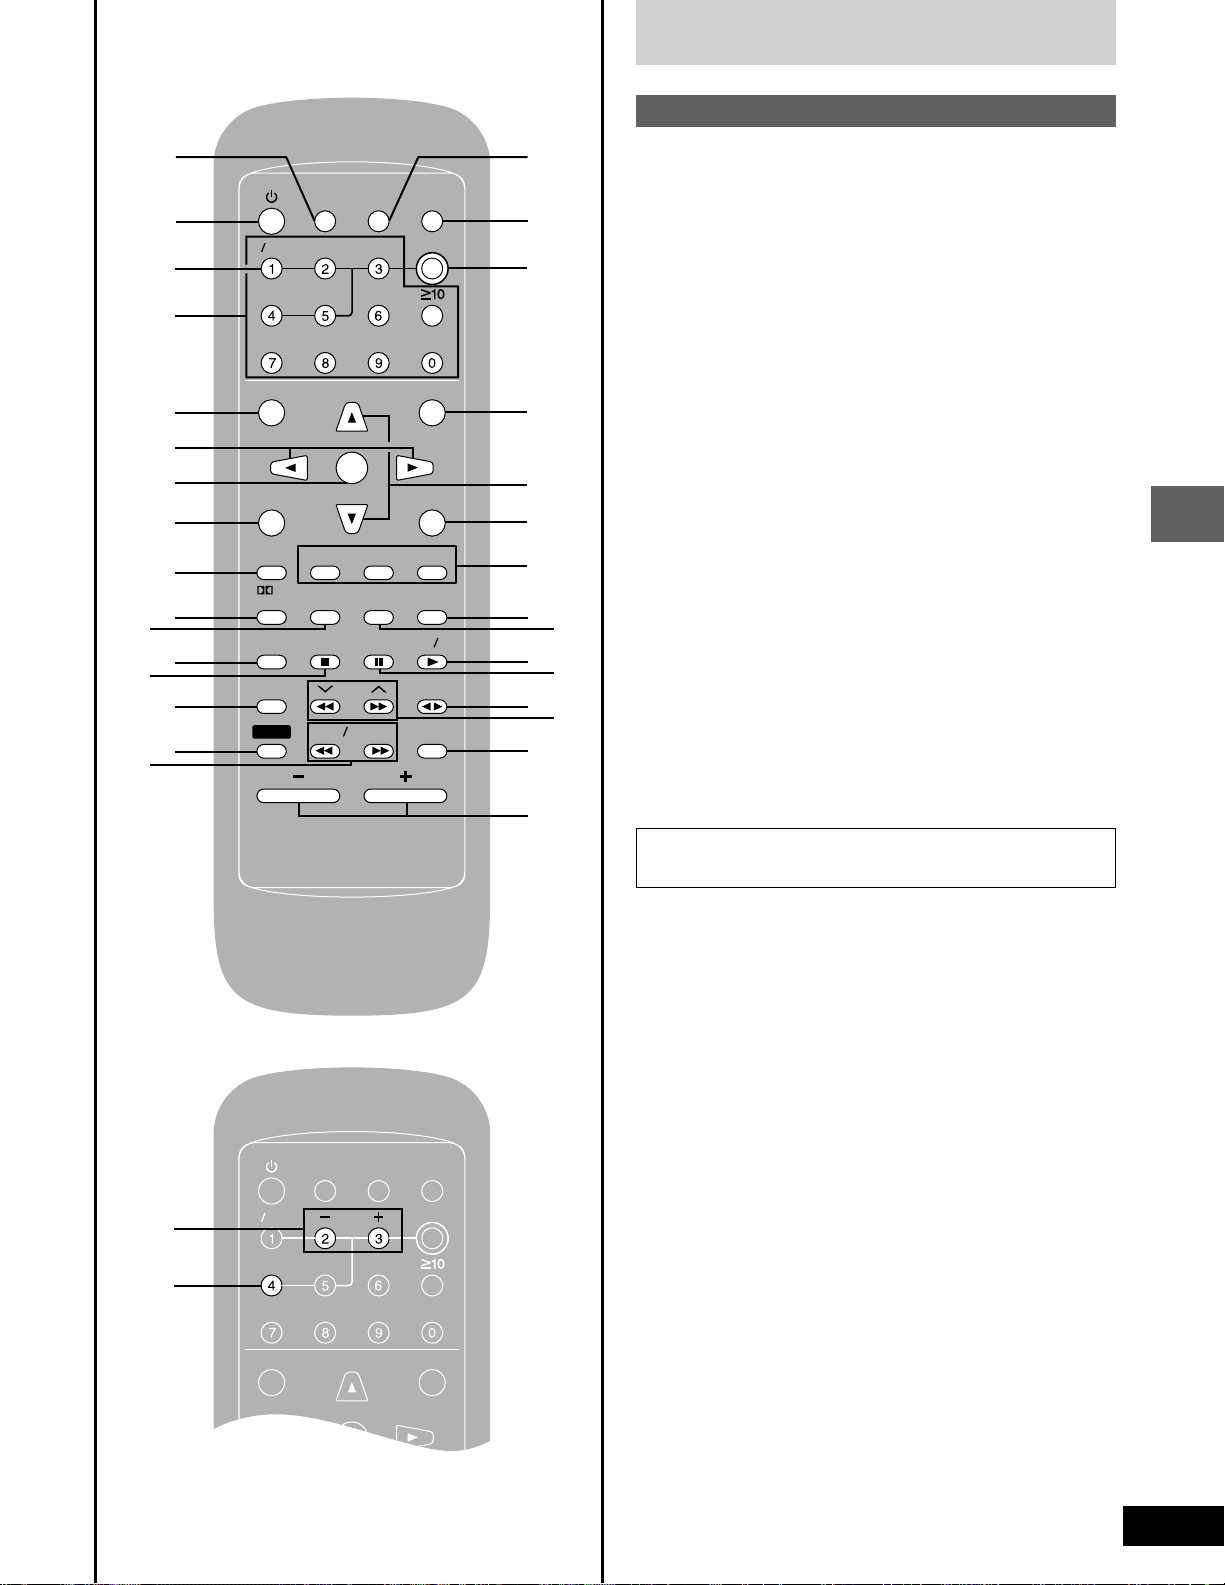
The illustration shows the remote control for areas except
Australia, N.Z., the Middle East, South Africa and Asia.
Buttons such as 6 function in the same way as the controls on
the main unit.
9
\ Sleep button (SLEEP) . . . . . . . . . . . . . . . . . . . . . . . . . . . . . 45
] Standby/on switch (f)
_ Numbered buttons (0–9, j) . . . . . . . . . . . . . . . . . . . . 22, 29
{ Top menu button (TOP MENU) . . . . . . . . . . . . . . . . . . . 14, 15
|∑ Cursor buttons (;, :, 8, 9) . . . . . . . . . . . . . 13, 15, 17, 31
} Enter button (ENTER) . . . . . . . . . . . . . . . . . . . . . . . 13, 15, 20
!
V GUI display button (GUI DISP) . . . . . . . . . . . . . . . . . . . . . . 25
0 Marker button (MARKER) . . . . . . . . . . . . . . . . . . . . . . . . . . 20
1 Super surround button (S.SRND) . . . . . . . . . . . . . . . . . . . 36
2 Play mode select button (PLAY MODE) . . . . . . . . . . . 22, 23
"
3 Sound EQ button (SOUND EQ) . . . . . . . . . . . . . . . . . . . . . 31
∞ Stop button (L) . . . . . . . . . . . . . . . . . . . . . . . . . . . . . . . 14, 30
#
5 Shift button (SHIFT)
See below.
$
6 Disc slow/search button
(SLOW/SEARCH (, )) . . . . . . . . . . . . . . . . . . . . . . . . 17
7 Display dimmer button (DIMMER) . . . . . . . . . . . . . . . . . . . 46
6
?
>
;
%
&
(
8 Muting button (MUTING) . . . . . . . . . . . . . . . . . . . . . . . . . . . 46
9 Disc button (DISC) . . . . . . . . . . . . . . . . . . . . . . . . . . . . . . . . 22
! Menu button (MENU) . . . . . . . . . . . . . . . . . . . . . . . . . . . 14, 15
# Return button (RETURN) . . . . . . . . . . . . . . . . . . . . 13, 14, 25
$ Subtitle/audio/angle buttons
(SUB TITLE) (AUDIO) (ANGLE) . . . . . . . . . . . . . . . . . . . 18, 19
% Repeat button (REPEAT) . . . . . . . . . . . . . . . . . . . . . . . . . . 21
& Pause button (J) . . . . . . . . . . . . . . . . . . . . . . . . . . . . . . . . . 16
( Disc skip, tape fast-forward/rewind/TPS, tuning button
.
(g,3, f,4) . . . . . . . . . . . . . . . . . . . . . . . . . . . 17, 28, 30
To operate functions labeled in orange, press [SHIFT]
(5) and the corresponding button at the same time.
\ Auto power-off button (AUTO OFF) . . . . . . . . . . . . . . . . . . 12
Control guide and preparatory steps
] TV power on/off button (TV POWER) . . . . . . . . . . . . . . . . . 48
^ TV/video input mode select button (TV/VIDEO) . . . . . . . . 48
{ Channel select button (CH SELECT) . . . . . . . . . . . . . . . . . 35
V Test signal button (TEST) . . . . . . . . . . . . . . . . . . . . . . . . . . 35
1 DOLBY PRO LOGIC button (0PL) . . . . . . . . . . . . . . . . . . 34
2 Clear button (CLEAR) . . . . . . . . . . . . . . . . . . . . . . . . . . 20, 22
3 Super 3D AI EQ button (3D AI) . . . . . . . . . . . . . . . . . . . . . . 32
4 Position memory button (POSITION MEMORY) . . . . . . . . 16
7 2 channel down-mixing button (MIX 2CH) . . . . . . . . . . . . . 34
8 Initial settings button (ACTION) . . . . . . . . . . . . . . . . . . . . . 13
This button is labeled “SET UP” on the remote control for
Australia, N.Z., the Middle East, South Africa and Asia.
∑ TV channel select buttons (TV CH UP, TV CH DOWN) . . . 48
% A-B repeat button (A-B REPEAT) . . . . . . . . . . . . . . . . . . . . 21
)
U
The numbered buttons are also used for karaoke functions on the
remote control for the Middle East, South Africa and Asia.
) Microphone volume buttons (– MIC +) . . . . . . . . . . . . . . . 39
U Echo button (ECHO) . . . . . . . . . . . . . . . . . . . . . . . . . . . . . . 42
11
RQT6345
A
MIX
CH
EEP
CTIO
UT
DIMMER
ER
V
IDEO
ND
A-B REP
AR
3D AI
NGLE
MENU
OP MENU
SUB
TITLE
EST
GUI DISP
URN
ER
SHI
CH SE
ECT
V CH UP
V CH
WN
Y MODE
SELECTOROR
SOUND EQ
REP
SLO
W S
RCH
PL
SUBW
OFER
CD
PE
UNER
DISC
OLUME
POSITION
MEMOR
SHI
EEP
•
2
DISPLAY
DEMO
1
4
3
-DISPLAY
–DEMO
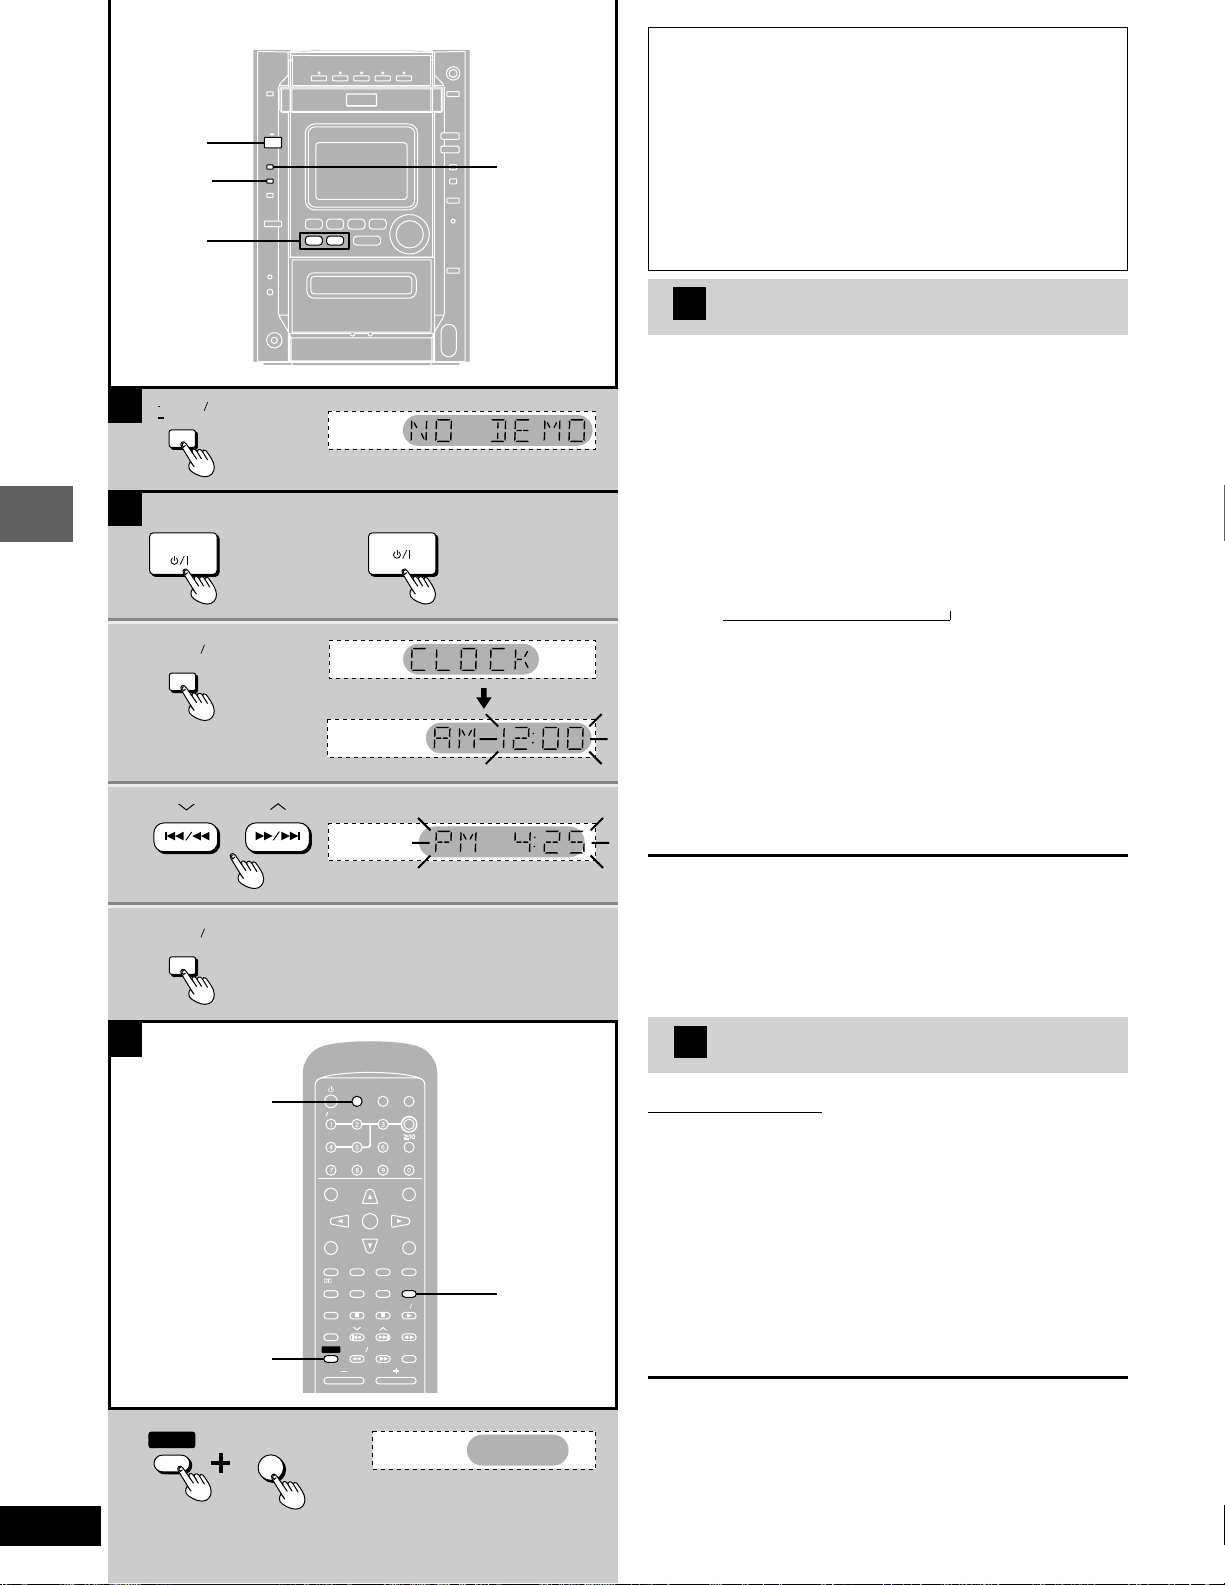
A Turning DEMO off
A demonstration of the display is shown if you have not set
the clock. You can reduce the power consumed in standby
mode by turning it off.
/
Press and hold [-DISPLAY/–DEMO]
until “NO DEMO” is displayed.
Each time you press and hold the button:
NO DEMO (off) ↔ DEMO (on)
B
Setting the time
For U.S.A. and Canada: 12-hour clock
For others: 24-hour clock
The example shows how to set the 12-hour clock for 4:25 p.m.
B
(For U.S.A. and Canada) (For others)
POWER
1
CLOCK
TIMER
2
3
Control guide and preparatory steps
CLOCK
TIMER
4
1 Press [POWER
ff
f/I] ([
ff
ff
f/I]) to turn the
ff
unit on.
2 Press [CLOCK/TIMER] to display
“CLOCK”.
Each time you press the button:
CLOCK→rPLAY→rREC→Original display
→
3 (Within 5 seconds or so)
Press [g/(, 3] or [)/f, 4]
to set the time.
The time display can be changed in one minute units by tapping the buttons, and quickly by holding down the buttons.
4 Press [CLOCK/TIMER].
The time is set and the original display is restored.
Displaying the clock
Press [CLOCK/TIMER] to display “CLOCK”.
The clock is shown for about 5 seconds then the previous display is
restored.
Reset the clock regularly to maintain accuracy.
12
RQT6345
C
AUTO OFF
SHI
FT
SHIFT
AUTO OFF
SLEEP
TV V POWER
TV
VIDEO
TOP MENU
CH SE
LECT
TEST
GUI DISP
MARK ER
PL
S.S.SRND
3D AI
SOUND EQ
SUBW
OOFER
SHI
FT
AUTO O OFOFF
SLEEP
TV CH
SUB
TITLE
CLCLEAR
PLAY MODE
POSITION
MEMOR
SLO
VOLUME
TV CH UP
ENTNTER
DOWN
A-B REP
Y
W S
EARCH
C
Auto power-off
MIX
2CH
ACTIO
N
INGDIMMER
MUT
DISC
Remote control only
When disc or tape is selected as the source
To save power, the unit turns off if it is left unused for 10 minutes.
MENU
This function does not work if the source is tuner or AUX or if a disc
menu is being displayed.
RETURN
ANGLE
AUDUDIO
EAT
SELECT
REP
EAT
DVD D CD
TAPE
TUNER
SELECTOR
1 Press [SELECTOR] to select “DVD/
CD” or “TAPE”.
2 Press [SHIFT]
“AUTO OFF” is displayed.
+
[AUTO OFF].
The setting is maintained even if the unit is turned off.
If you select tuner or AUX as the source, “AUTO OFF” goes out. It
AUTO OFF
comes on again when you select disc or tape.
To cancel
Press [SHIFT] + [AUTO OFF] again.
MIX
CH
EEP
CTIO
UT
DIMMER
ER
V
IDEO
ND
A-B REP
AR
3D AI
NGLE
MENU
OP MENU
SUB
TITLE
EST
GUI DISP
URN
ER
CH SE
ECT
V CH UP
V CH
WN
Y MODE
SELECTOROR
SOUND EQ
REP
SLO
W S
RCH
PL
SUBW
OFER
CD
PE
UNER
DISC
POSITION
MEMOR
CTIO
UT
SET UP
CTIO
UT
SET UP
Quick Setup
SHIFT
1•5
ACTIO
MUT
ING
SET UP
MUTUTING
TV V POWER
MIX
2CH
AUTO O OFOFF
ACTIO
SLEEP
TV
VIDEO
N
INGDIMMER
MUT
DISC
Remote control only
Preparation
Turn on the television and switch the video-input mode on the tele-
•
vision to suit the connection.
Press [SELECTOR] to select “DVD/CD”.
TV CH UP
TV CH
SUB
TITLE
CLCLEAR
PLAY MODE
POSITION
MEMOR
SLO
W S
VOLUME
MENU
ENTNTER
DOWN
RETURN
ANGLE
AUDUDIO
A-B REP
EAT
SELECT
REP
EAT
DVD D CD
Y
TAPE
TUNER
EARCH
2•3
RETURN
SELECTOR
TOP MENU
CH SE
LECT
TEST
GUI DISP
MARK ER
PL
S.S.SRND
3D AI
SOUND EQ
SUBW
OOFER
SHIFT
•
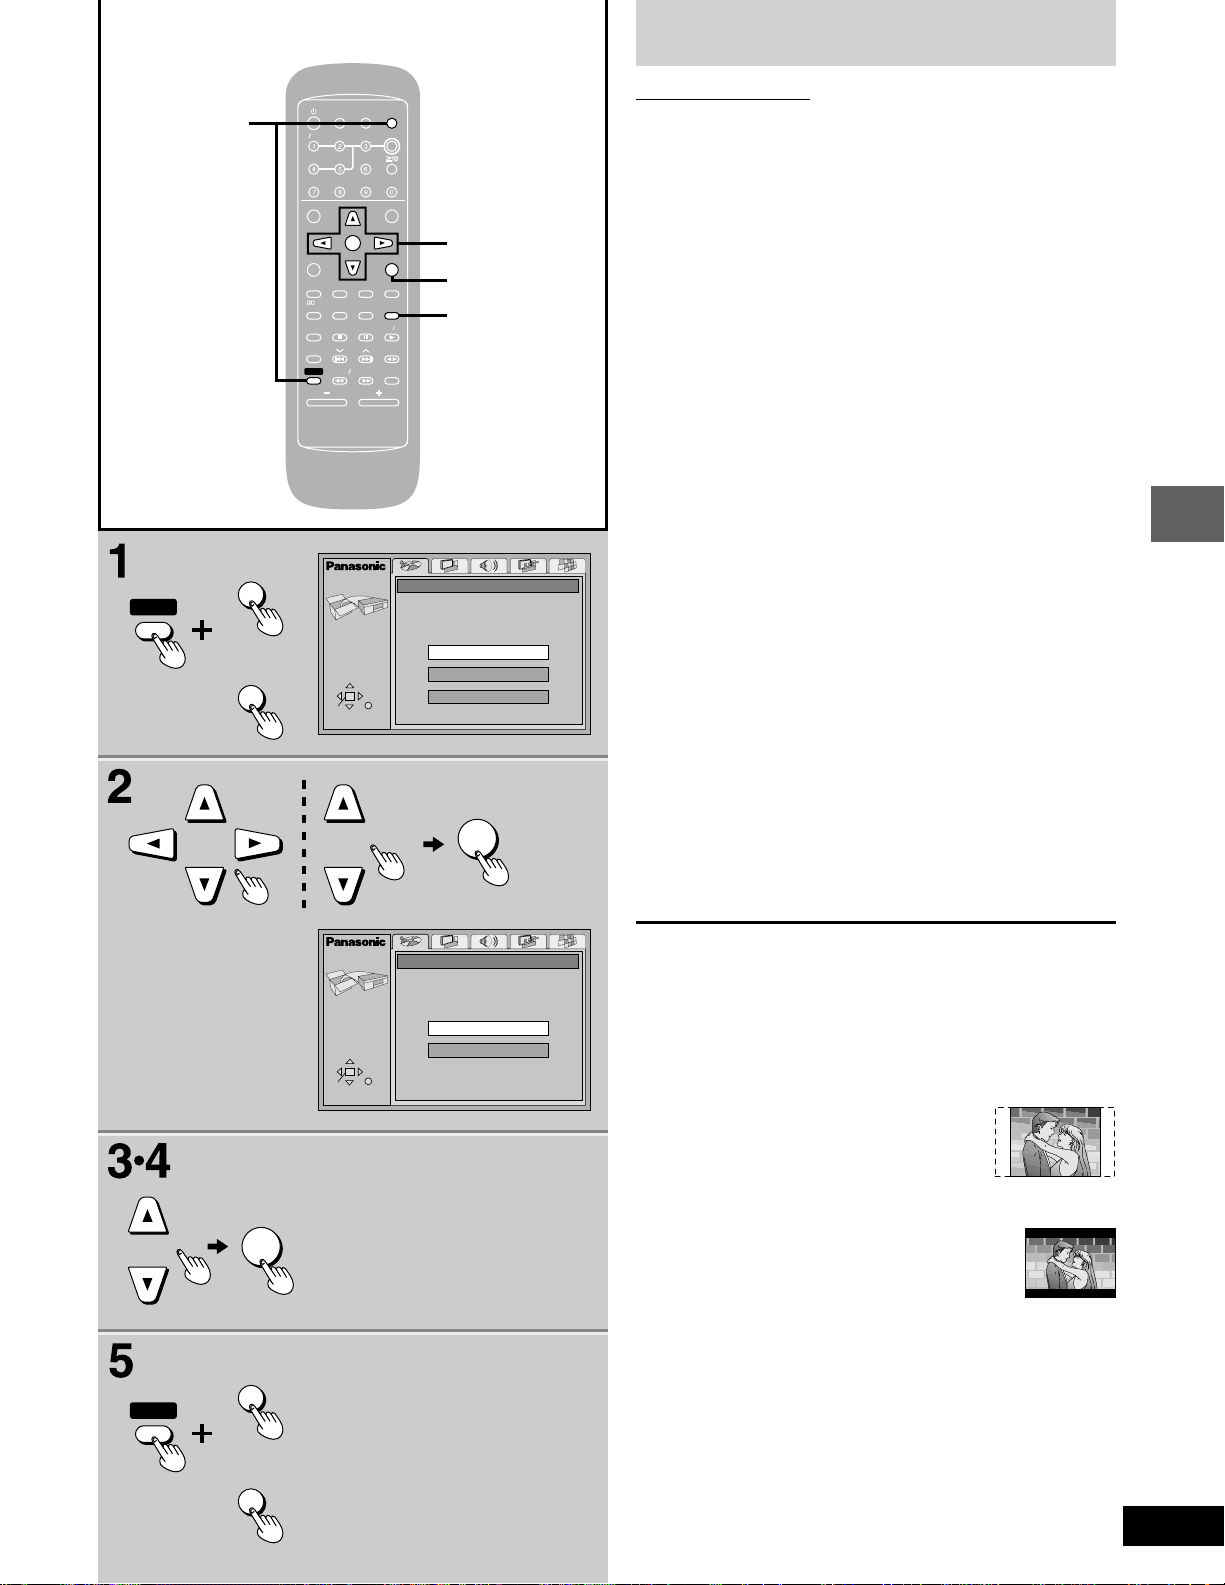
1 For Australia, N.Z., the Middle East, South Africa and Asia
Press [SHIFT]
QUICK SETUP screen.
For U.S.A., Canada and others
Press [SHIFT]
QUICK SETUP screen.
The QUICK SETUP screen appears when you press [SHIFT]
+
[SET UP] to show the
+
[ACTION] to show the
+ [ACTION] (or [SET UP]) the first time after purchase and
assists you to make necessary settings.
2 For Australia, N.Z., the Middle East and South Africa
Press [8], [9], [;], [:] to select the
menu language and press [ENTER].
N
SETUP
SELECT
ENTER RETURN
QUICK SETUP
Select the menu language.
English
Français
Español
For U.S.A., Canada and others
Press [8], [9] to select the menu language and press [ENTER].
3 Press [8], [9] to select “Yes” to con-
tinue and press [ENTER].
4 Follow the onscreen instructions.
Audio Language (For setting detail ➡ page 50-51)
•
Subtitle Language (For setting detail ➡ page 50-51)
•
TV aspect (For setting detail ➡ below)
•
ENTNTER
ACTIO
ING
MUT
ENTNTER
5 Press [ENTER] and then [SHIFT]
[ACTION] (or [SET UP]) to end the set-
+
tings.
Control guide and preparatory steps
SETUP
SELECT
ENTER RETURN
QUICK SETUP
Use QUICK SETUP to make basic settings.
Do you want to use QUICK SETUP?
Yes
No
N
To return to the previous screen
Press [RETURN].
L TV Aspect.
Select “4:3” (regular) or “16:9” (widescreen) to suit your television. If
you have a regular 4:3 television, you can also select how video on
some discs is shown (➡ page 50, Video–TV Aspect).
4:3 Pan&Scan (Factory preset)
•
The pan and scan (the original widescreen
images are converted for viewing on a
regular television) version of the video is
automatically selected if recorded on the
disc.
4:3 Letterbox
•
The letterbox (the original widescreen images
appear with black bands above and below)
version of the video is automatically selected if
recorded on the disc.
SHIFT
SET UP
MUTUTING
13
RQT6345
DISC 1–DISC 5
MIX
CH
EEP
CTIO
UT
DIMMER
ER
V
IDEO
ND
A-B REP
AR
3D AI
NGLE
MENU
OP MENU
SUB
TITLE
EST
GUI DISP
URN
ER
CH SE
ECT
V CH UP
V CH
WN
Y MODE
SELECTOROR
SOUND EQ
REP
SLO
W S
RCH
PL
SUBW
OFER
CD
PE
UNER
DISC
POSITION
MEMOR
Discs
1
Normal play
, TUNE MODE
1
OPEN CLOSE
TV V POWER
AUTO O OFOFF
SLEEP
TV
VIDEO
TOP MENU
TV CH UP
CH SE
LECT
TEST
TV CH
GUI DISP
SUB
TITLE
MARK ER
CLCLEAR
PL
S.S.SRND
PLAY MODE
3D AI
POSITION
SOUND EQ
MEMOR
SUBW
OOFER
Disc operations
SHIFT
SLO
VOLUME
2
3
Preparation: Turn on the television and switch the video-input
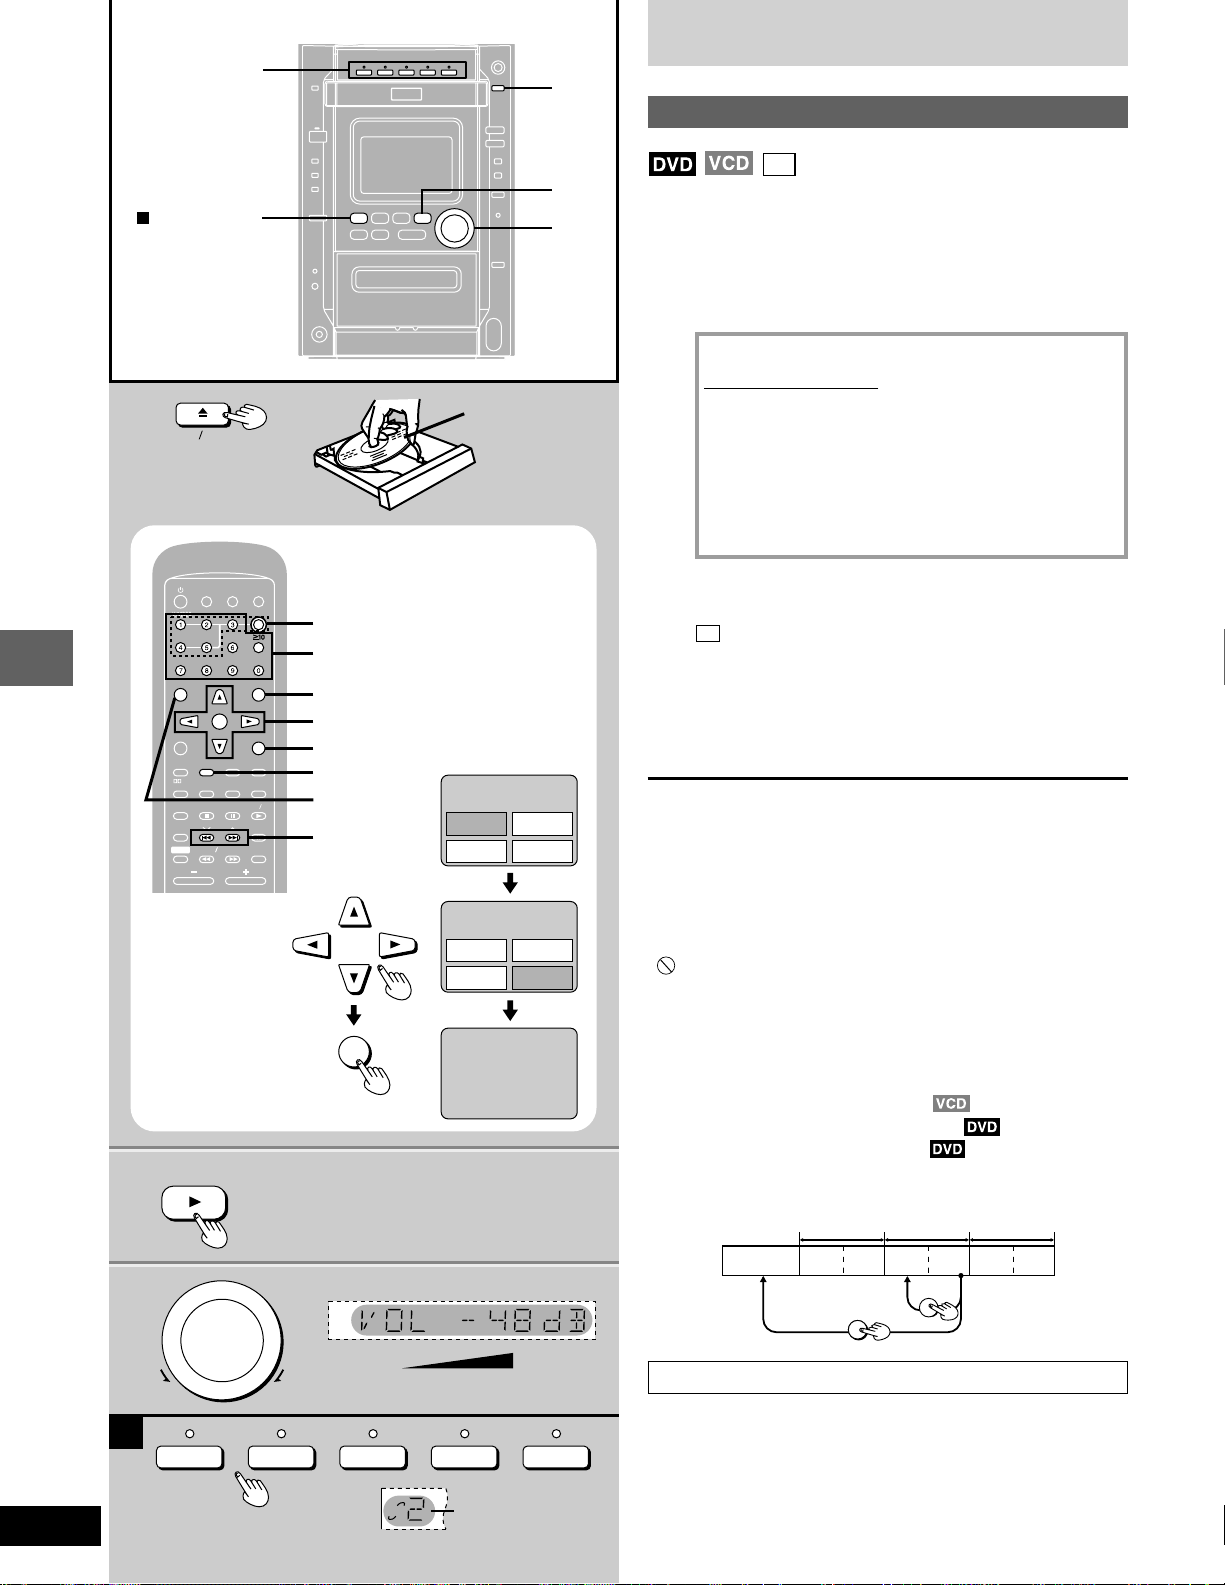
1 Press [c OPEN/CLOSE] to open the
CD
mode on the television to suit the connection.
tray.
The unit comes on automatically.
Insert a disc and press [c OPEN/CLOSE] to close the tray.
If a menu screen appears on the television
Remote control only
Label must
face upward
MIX
2CH
ACTIO
N
INGDIMMER
MUT
DISC
DISC, 1–5
Numbered buttons
MENU
ENTNTER
DOWN
RETURN
ANGLE
AUDUDIO
A-B REP
EAT
SELECT
REP
EAT
DVD D CD
Y
TAPE
TUNER
W S
EARCH
MENU
;, :, 8, 9, ENTER
RETURN
SUB TITLE
TOP MENU
g, f
Lovers
Lovers
Example
TITLE MENU
Dogs
Castles
Birds
TITLE MENU
Dogs
Castles
Birds
Use the cursor buttons (;, :, 8, 9) to highlight an item
and press [ENTER].
You can also select the desired item by pressing the numbered buttons with some discs.
To select title No.10 or over, press [j] then the two digits.
e.g. Title No. 12: [j] → [1] → [2]
Items can only be selected with the numbered buttons
when playing Video CDs.
See below for other menu operations.
2 If play does not start after step 1
Press [DVD/CD
CD
(MP3 discs)
Group and track names are displayed on the television.
Press [SUB TITLE] to change the display.
::
:].
::
3 Adjust the volume.
Use the CD MANAGER’s ALL-DISC mode to play CDs and Video
CDs in succession (➡ page 24).
To stop the disc
Press [L, TUNE MODE] (the resume function is activated, ➡ page
16).
The disc continues to rotate while the menu is displayed even after
•
a particular item has finished. When no more items are to be selected, be sure to press [L, TUNE MODE] to clear the menu display.
“ ” is displayed on the TV
When the operation is prohibited by the unit or the disc.
14
RQT6345
Other buttons used to operate menus
ENTNTER
Birds
DVD/CD
2
3
A
DOWN
DISC
VOL
-- dB
MIN
UP
1
DISC
2
DISC
3
DISC
DISC
4
Disc number
0 dB
MAX
DISC 5
Read the disc’s instructions for further details about operation.
[g]: Shows the previous menu.
ff
[
f]: Shows the next menu.
ff
[RETURN]: Shows the menu screen.
[TOP MENU]: Shows the first menu screen.
[MENU]: Shows the menu screen.
DVDs can have several menus. The menu displayed when you
press [TOP MENU] may be different from the menu displayed when
you press [MENU].
The disc’s top
menu
Title 1
Menu
TOP MENU
CH SELECT
Title 2 Title 3
Menu Menu
MENU
How the changer works
The tray closed when you press [c OPEN/CLOSE] is in the play
position.
The disc in the play position is ready to play immediately when you
press [DVD/CD :].
The indicator for the tray in the play position lights.
To listen to another disc or open another tray, press [DISC 1]–
[DISC 5] (remote control: [DISC] then [1]–[5]) to put the tray in the
play position.
AA
A
AA
MIX
CH
EEP
CTIO
UT
DIMMER
ER
V
IDEO
ND
A-B REP
AR
3D AI
NGLE
MENU
OP MENU
SUB
TITLE
EST
GUI DISP
URN
ER
CH SE
ECT
V CH UP
V CH
WN
Y MODE
SELECTOROR
SOUND EQ
REP
SLO
W S
RCH
PL
SUBW
OFER
CD
PE
UNER
DISC
POSITION
MEMOR
OP MENU
MENU
Discs
A
1
TOP MENU
MENU
;
G
T
Total
SELECT
ENTER RETURN
TV V POWER
MIX
2CH
AUTO O OFOFF
ACTIO
TV CH UP
ENTNTER
TV CH
DOWN
TITLE
A-B REP
Y
W S
EARCH
VOLUME
N
MUT
INGDIMMER
DISC
MENU
RETURN
ANGLE
AUDUDIO
EAT
SELECT
REP
EAT
DVD D CD
TAPE
TUNER
1
2
•
Information about discs that appears on the
unit display
“
”
When there are 16 or more tracks on the disc (CD and Video CD
without PBC).
“DVD”
When a DVD is in the play position tray.
“VCD”
When a Video CD is in the play position tray.
“NO DISC”
When there is no disc on the selected tray or the disc is set
incorrectly.
SLEEP
TV
VIDEO
TOP MENU
CH SE
LECT
TEST
GUI DISP
SUB
MARK ER
CLCLEAR
PL
S.S.SRND
PLAY MODE
3D AI
POSITION
SOUND EQ
MEMOR
SUBW
OOFER
SLO
SHIFT
“NO PLAY”
When the disc does not correspond to the unit and cannot be played.
“96kHz 24bit”
When the disc is one with high quality sound recorded with a sampling frequency of 96 kHz and 24 bits.
Group name
File list
No. Group: 001 My Favorite Tree
1
1
1
001 Both Ends Freezing
1
002 Lady Starfish
2
003 Life on Jupiter
3
004 Metal Glue
4
005 Paint It Yellow
5
006 Pyjamamama
6
007 Shrimps from Mars
7
008 Starperson
8
009 Velvet Cuppermine
9
010 Ziggy Starfish
10
NextPrev
A
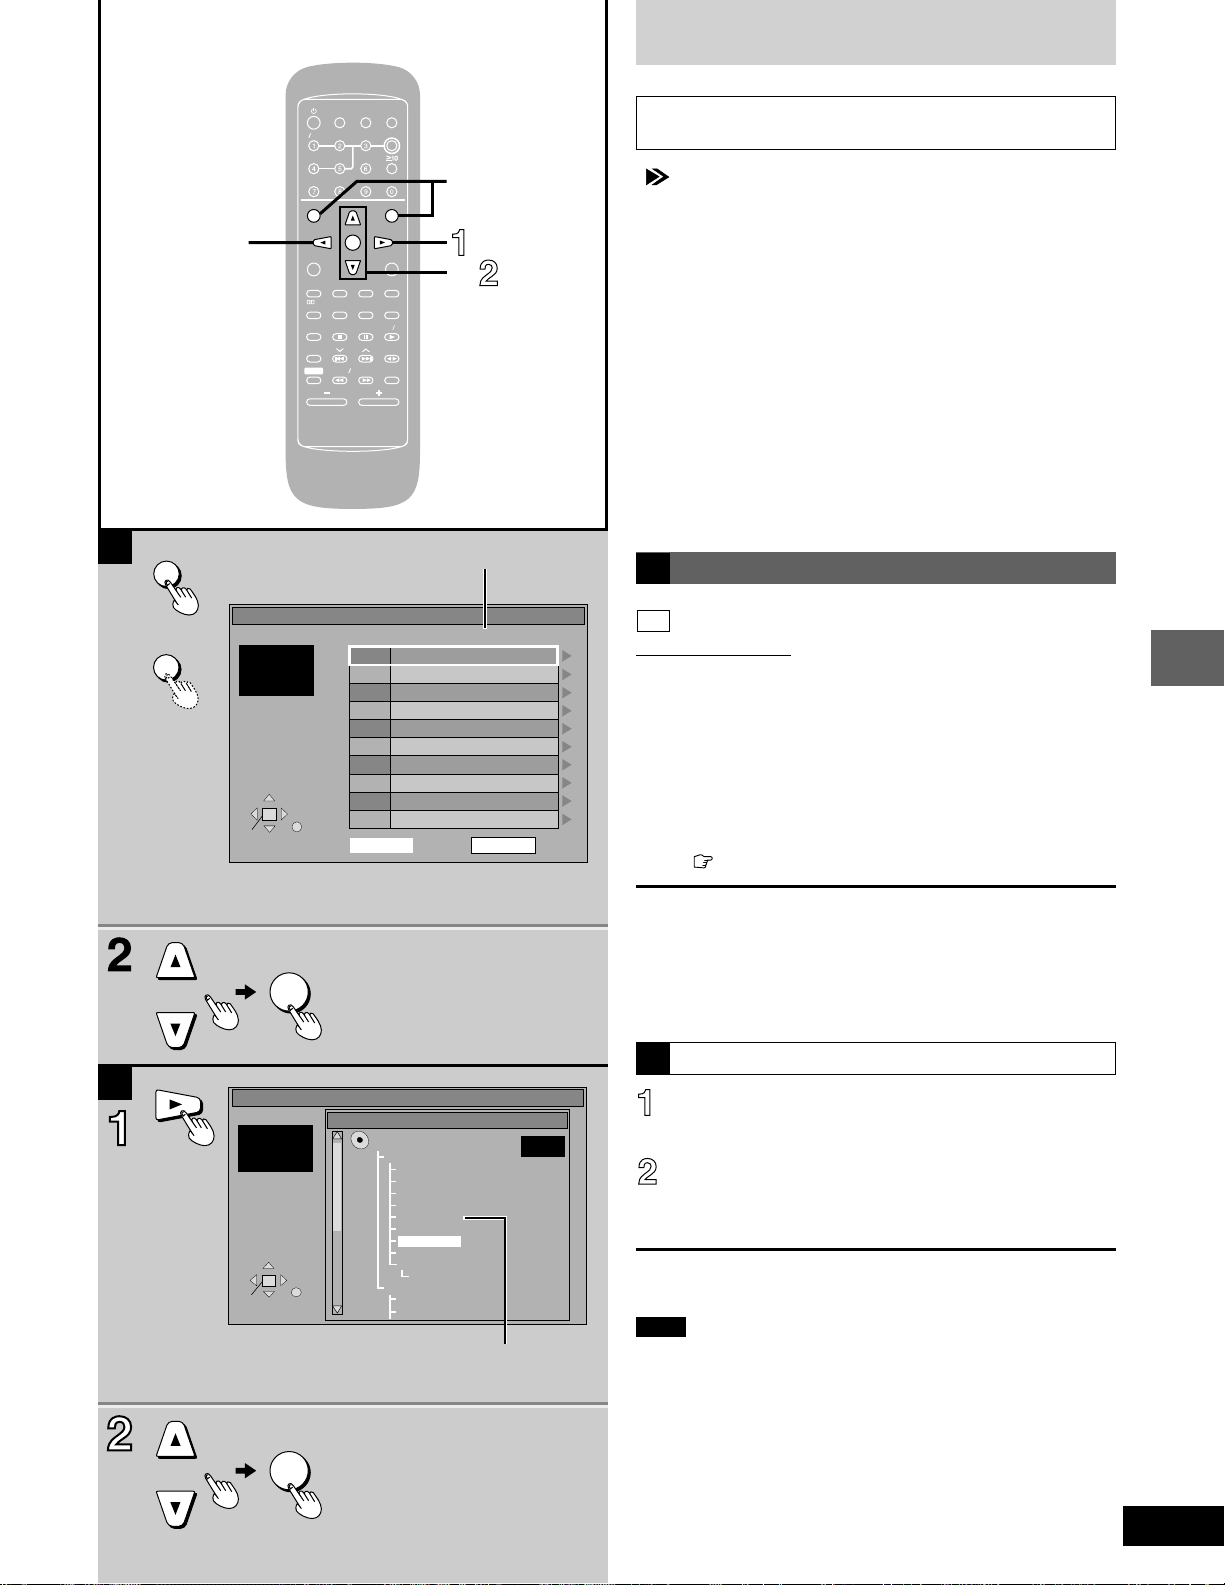
Using menus to play MP3 discs
(MP3 discs)
CD
Remote control only
This unit can play MP3 files recorded on CD-R/RW with a computer.
Files are treated as tracks and folders are treated as groups.
1 Press [TOP MENU] or [MENU].
A file list appears.
2 Press [8], [9] to select the track and
press [ENTER].
Play starts and continues to the last track in the last group.
“ ” indicates the track currently playing.
Disc operations
B
Indicates the track currently playing
ENTNTER
File list
G 8
T 14
Total 123
SELECT
ENTER RETURN
MP3 music
Pop music
Brazilian pops
Chinese pops
Czech pops
Hungarian pops
Liner notes
Mexican pops
My Favorite
Philippine pops
Swedish pops
Momoko
Standard number
Piano solo
Vocal
Tree
You cannot select groups that
contain no compatible files.
ENTNTER
G 8/16
L To show other pages
Press [8, 9, ;, :] to select “Prev” or “Next” and press [ENTER].
After listing all the tracks in one group, the list for the next group
appears.
L To close the file list screen
Press [TOP MENU] or [MENU].
Using the tree screen to find a group
B
Press [:] while a track is highlighted
to display the tree screen.
Press [8], [9] to select a group and
press [ENTER].
The file list for the group appears.
For your reference
Press [;], [:] to jump layers in the tree screen.
Note
You cannot use program play, random play and CD MANAGER.
•
This unit may not be able to play disc containing more than one data
•
format.
If you play an MP3 track that includes still picture data, it will take
•
some time before the music itself starts playing and the elapsed
time will not be displayed during this time.
Even after the track starts, the correct play time will not be display ed.
This unit is not compatible with ID3 tags.
•
Refer to the glossary on page 58 for more information about MP3.
15
RQT6345
MIX
CH
EEP
CTIO
UT
DIMMER
ER
V
IDEO
ND
A-B REP
AR
3D AI
NGLE
MENU
OP MENU
SUB
TITLE
EST
GUI DISP
URN
ER
CH SE
ECT
V CH UP
V CH
WN
Y MODE
SELECTOROR
SOUND EQ
REP
SLO
W S
RCH
PL
SUBW
OFER
CD
PE
UNER
DISC
POSITION
MEMOR
POSITION
MEMOR
Discs
POSITION MEMORY
L
,
TUNE MODE
Disc operations
A
SHIFT
J
L
TV V POWER
MIX
2CH
AUTO O OFOFF
ACTIO
SLEEP
TV
VIDEO
N
INGDIMMER
MUT
DISC
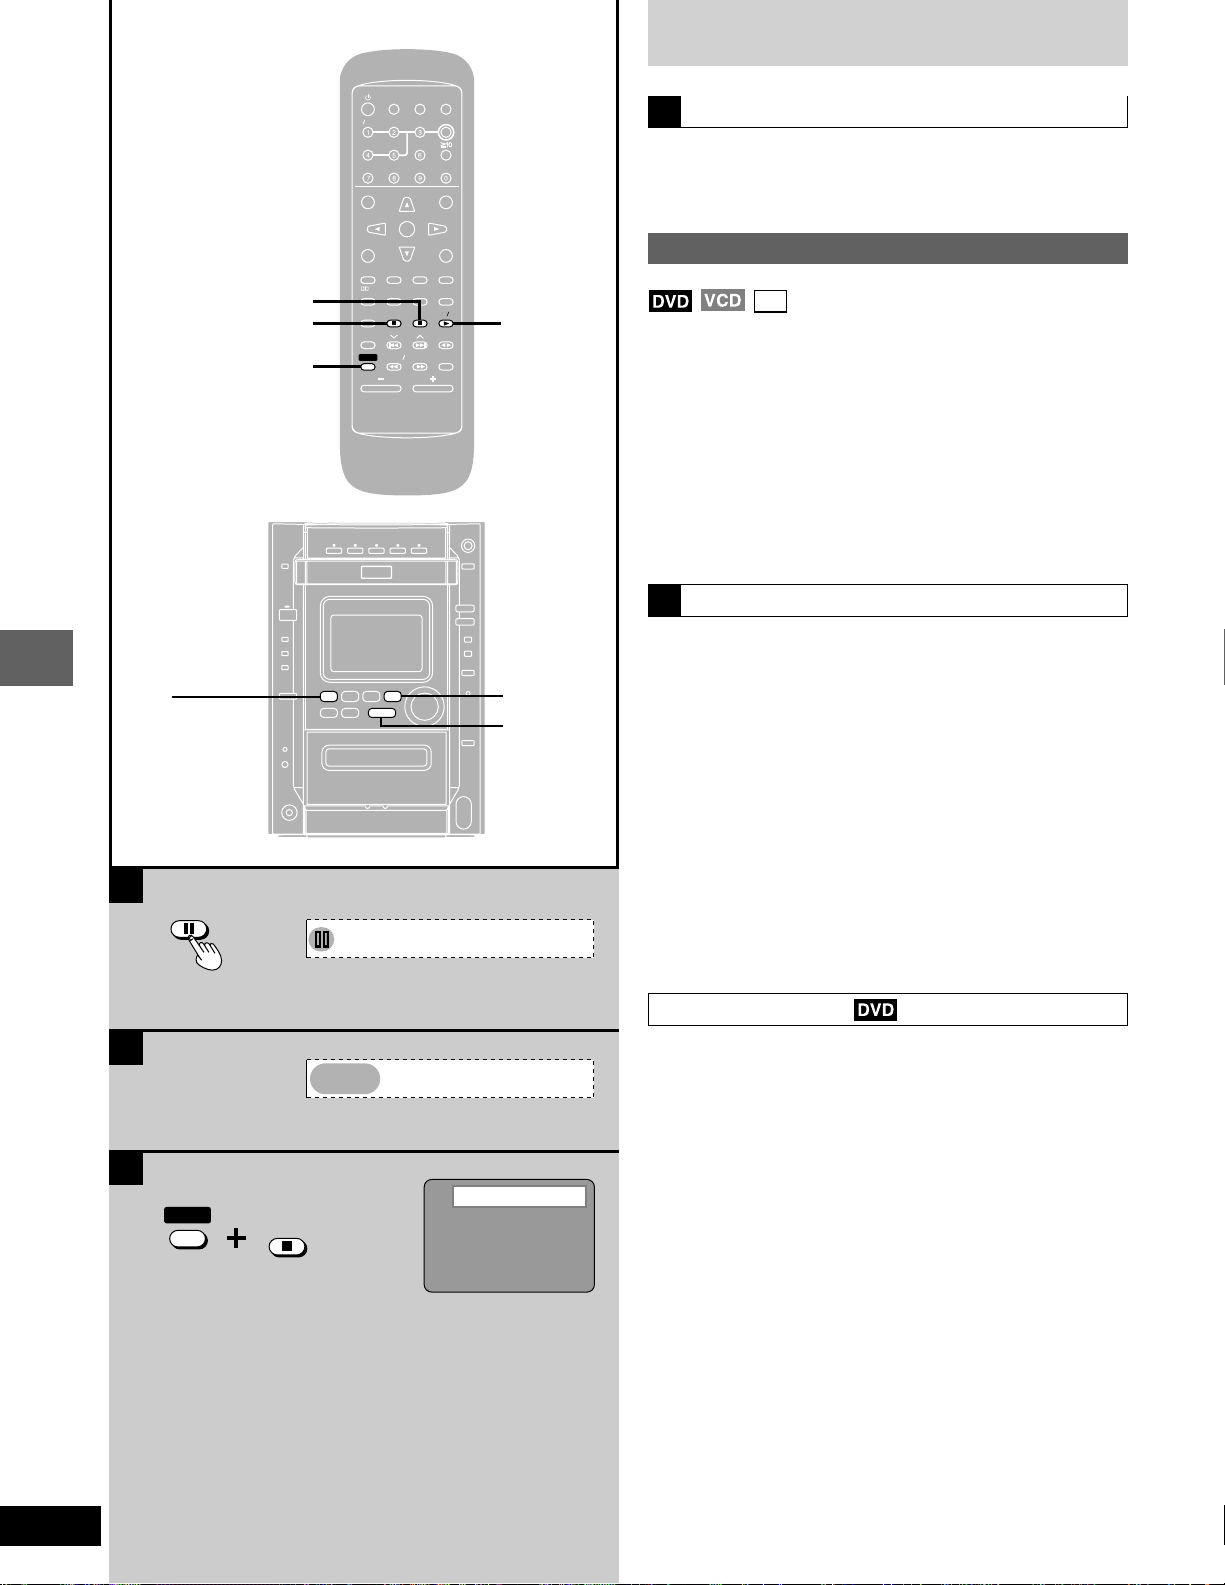
Pause (Still picture)
A
Press [J] (on the main unit: [J, MEMORY] during play.
TOP MENU
CH SE
LECT
TEST
GUI DISP
MARK ER
PL
S.S.SRND
3D AI
SOUND EQ
SUBW
OOFER
SHIFT
TV CH UP
TV CH
SUB
TITLE
CLCLEAR
PLAY MODE
POSITION
MEMOR
SLO
W S
VOLUME
ENTNTER
Y
DOWN
A-B REP
EARCH
MENU
RETURN
ANGLE
AUDUDIO
EAT
SELECT
REP
EAT
DVD D CD
TAPE
TUNER
DVD/CD
:
Press [DVD/CD :] to resume play.
Resume function
(When the elapsed play time is displayed)
B “RESUME” lights on the display when the unit has recorded the
position at which you stopped play.
Press [DVD/CD :] to start play from that position.
(When playing DVD ➡ Chapter Preview below)
The position is cleared when:
•
– The unit is turned off.
– The disc is changed or removed.
– A source other than DVD/CD is selected.
Press [L] to clear the position.
•
C
CD
Position Memory function
Press [SHIFT] + [POSITION MEMORY] to
DVD/CD
:
J, MEMORY
memorize a position during play.
This position is saved even if you change or remove the disc, change
the source, or turn the unit off.
When you reselect or reinsert the disc, reselect DVD/CD, or turn the
unit on, “RESUME” lights on the display.
Press [DVD/CD :] to start play from the memorized position.
The position is cleared.
(When playing DVD ➡ Chapter Preview below)
To clear the position before play
Press [L].
You can memorize positions on up to five different discs at a time.
•
When you memorize another position, the earliest position is replaced.
16
RQT6345
B
C
SHIFT
RESUME
POSITION
MEMOR
Y
Position memorized
Chapter preview
The message “Press PLAY to Preview Chapters” (or “Press PLAY to
Chapter Review”) appears on the TV immediately after you press
[DVD/CD :].
Press [DVD/CD :] while the message is displayed and the beginning portions of each chapter up to the current one are played.
Full play resumes from the point where you pressed [L] or [SHIFT] +
[POSITION MEMORY].
(This feature works only within a title.)
If you do not press [DVD/CD :], the message disappears and
play starts from where you pressed [L] or [SHIFT] + [POSITION
MEMORY].
Discs
MIX
CH
EEP
CTIO
UT
DIMMER
ER
V
IDEO
ND
A-B REP
AR
3D AI
NGLE
MENU
OP MENU
SUB
TITLE
EST
GUI DISP
URN
ER
CH SE
ECT
V CH UP
V CH
WN
Y MODE
SELECTOROR
SOUND EQ
REP
SLO
W S
RCH
PL
SUBW
OFER
CD
PE
UNER
DISC
POSITION
MEMOR
g, 3
f, 4
g/(, 3
)/f, 4
J
TV V POWER
TV
TOP MENU
CH SE
GUI DISP
MARK ER
S.S.SRND
SOUND EQ
SUBW
SHIFT
MIX
2CH
AUTO O OFOFF
ACTIO
N
MUT
SLEEP
VIDEO
LECT
TEST
SUB
CLCLEAR
PL
PLAY MODE
3D AI
POSITION
MEMOR
OOFER
SLO
TV CH UP
ENTNTER
TV CH
DOWN
TITLE
Y
W S
VOLUME
AUDUDIO
A-B REP
REP
EARCH
INGDIMMER
DISC
MENU
A
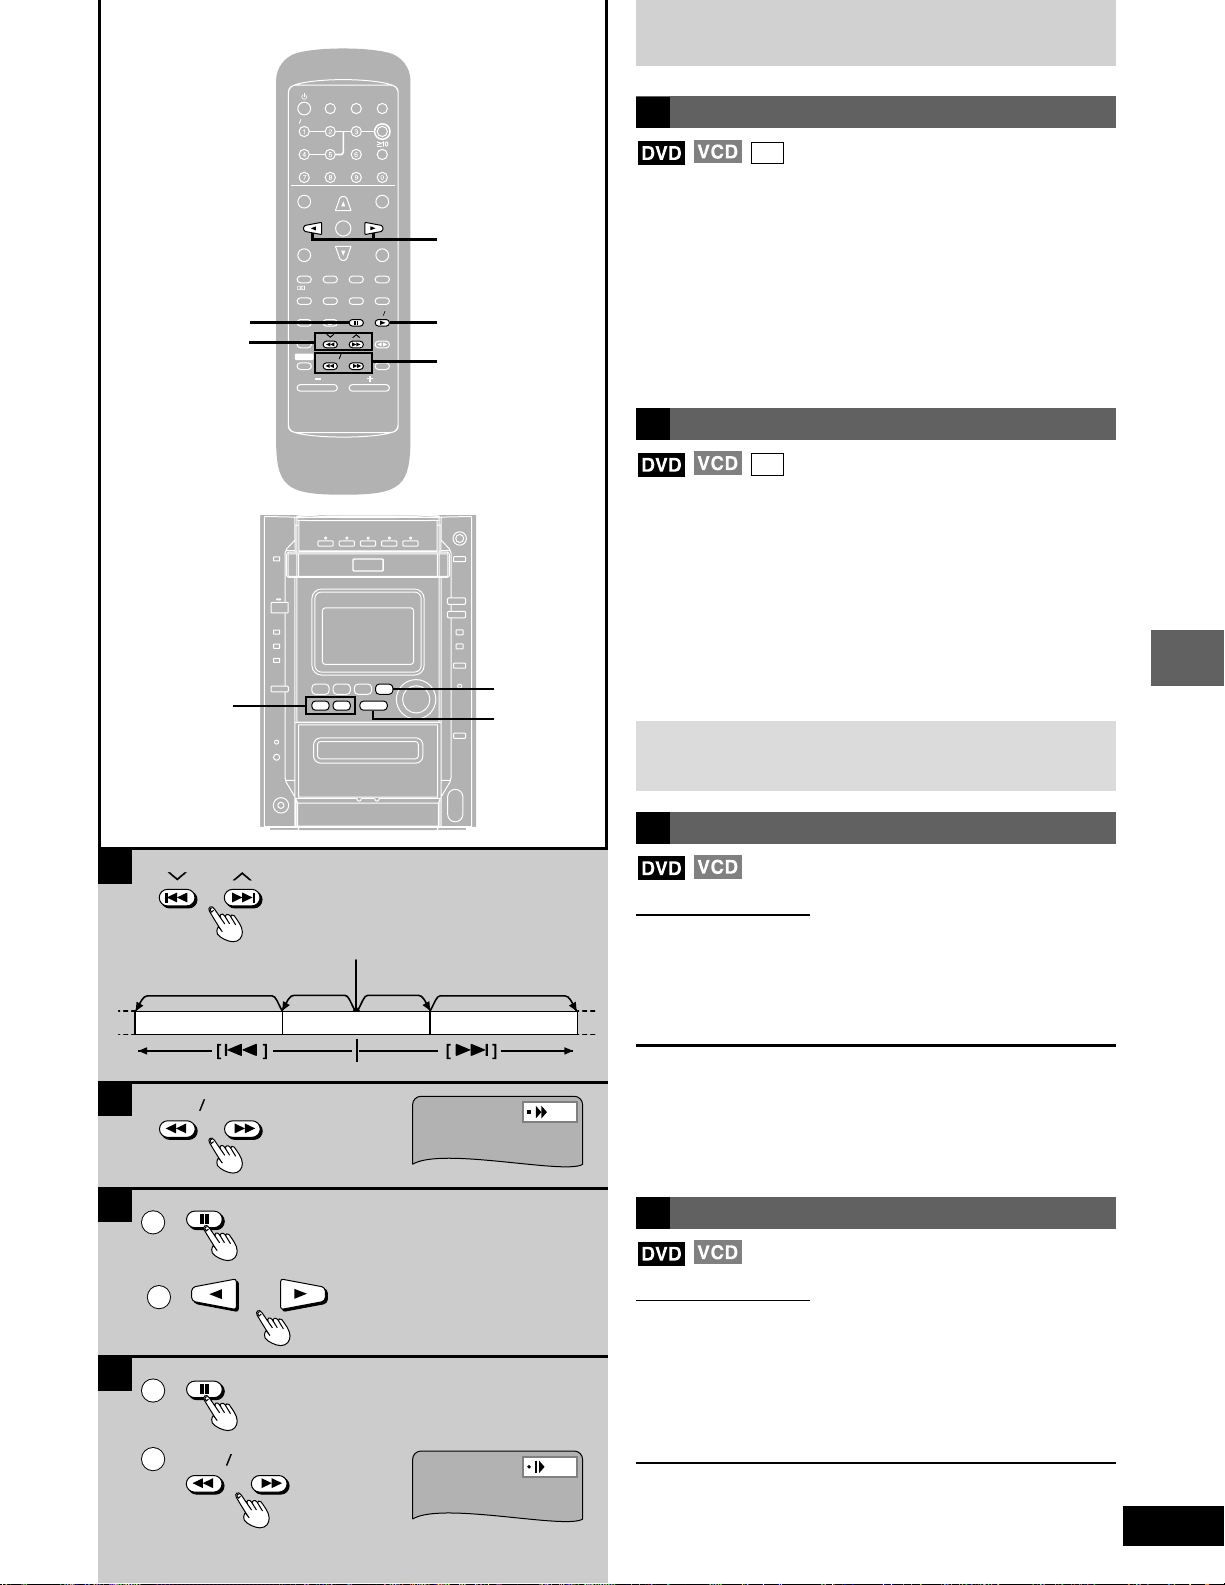
Skip
CD
Chapters/titles on DVD and tracks on Video CD and CD can be
skipped.
RETURN
ANGLE
EAT
SELECT
EAT
DVD D CD
TAPE
TUNER
;, :
DVD/CD
:
SLOW/SEARCH
(, )
Remote control:
Press [g, 1] or [
On the main unit: [g/(, 1] or [)/f, 2]
g, 1 (g/(, 1) : Backward
f, 2 ()/f, 2) : Forward
Each press increases the number of skips.
B
Search
ff
f, 2] during play.
ff
CD
Remote control:
Press [SLOW/SEARCH (( or ))] during play.
Each press increases the speed of the search up to 5 steps.
On the main unit:[g/(, 1] or [)/f, 2]
The speed increases if you press and hold the
button.
( (g/(, 1) : Backward
) ()/f, 2) : Forward
DVD/CD
:
Press [DVD/CD :] to resume play.
J, MEMORY
When playing Video CDs with playback control
Pressing buttons to perform skip or search may take you to a
menu screen.
A
Current position
Twice Once Once
Chapter/track Chapter/track
B
C
D
Chapter/track
SLOW SEARCH
1
2
1
SLOW SEARCH
2
Twice
C
Frame-by-frame viewing
Remote control only
1 Press [J] during play.
2 Press the cursor buttons [;] (backward) or
[:] (forward).
The frame changes each time you press a cursor button.
The frames change in succession if you press and hold a cursor
•
button.
The frame also advances each time you press [J].
•
You cannot move backwards with Video CD.
•
Press [DVD/CD :] to resume play.
D
Slow-motion play
Remote control only
1 Press [J] during play.
2 Press [SLOW/SEARCH (( or ))].
(: Backward
): Forward
Each press increases the speed of the slow motion. There are 5
speeds.
You cannot move backwards with Video CD.
•
To resume play
Press [DVD/CD :] to resume play.
Disc operations
17
RQT6345
CINEMA
MIX
CH
EEP
CTIO
UT
DIMMER
ER
V
IDEO
ND
A-B REP
AR
3D AI
NGLE
MENU
OP MENU
SUB
TITLE
EST
GUI DISP
URN
ER
CH SE
ECT
V CH UP
V CH
WN
Y MODE
SELECTOROR
SOUND EQ
REP
SLO
W S
RCH
PL
SUBW
OFER
CD
PE
UNER
DISC
OLUME
POSITION
MEMOR
NGLE
Discs
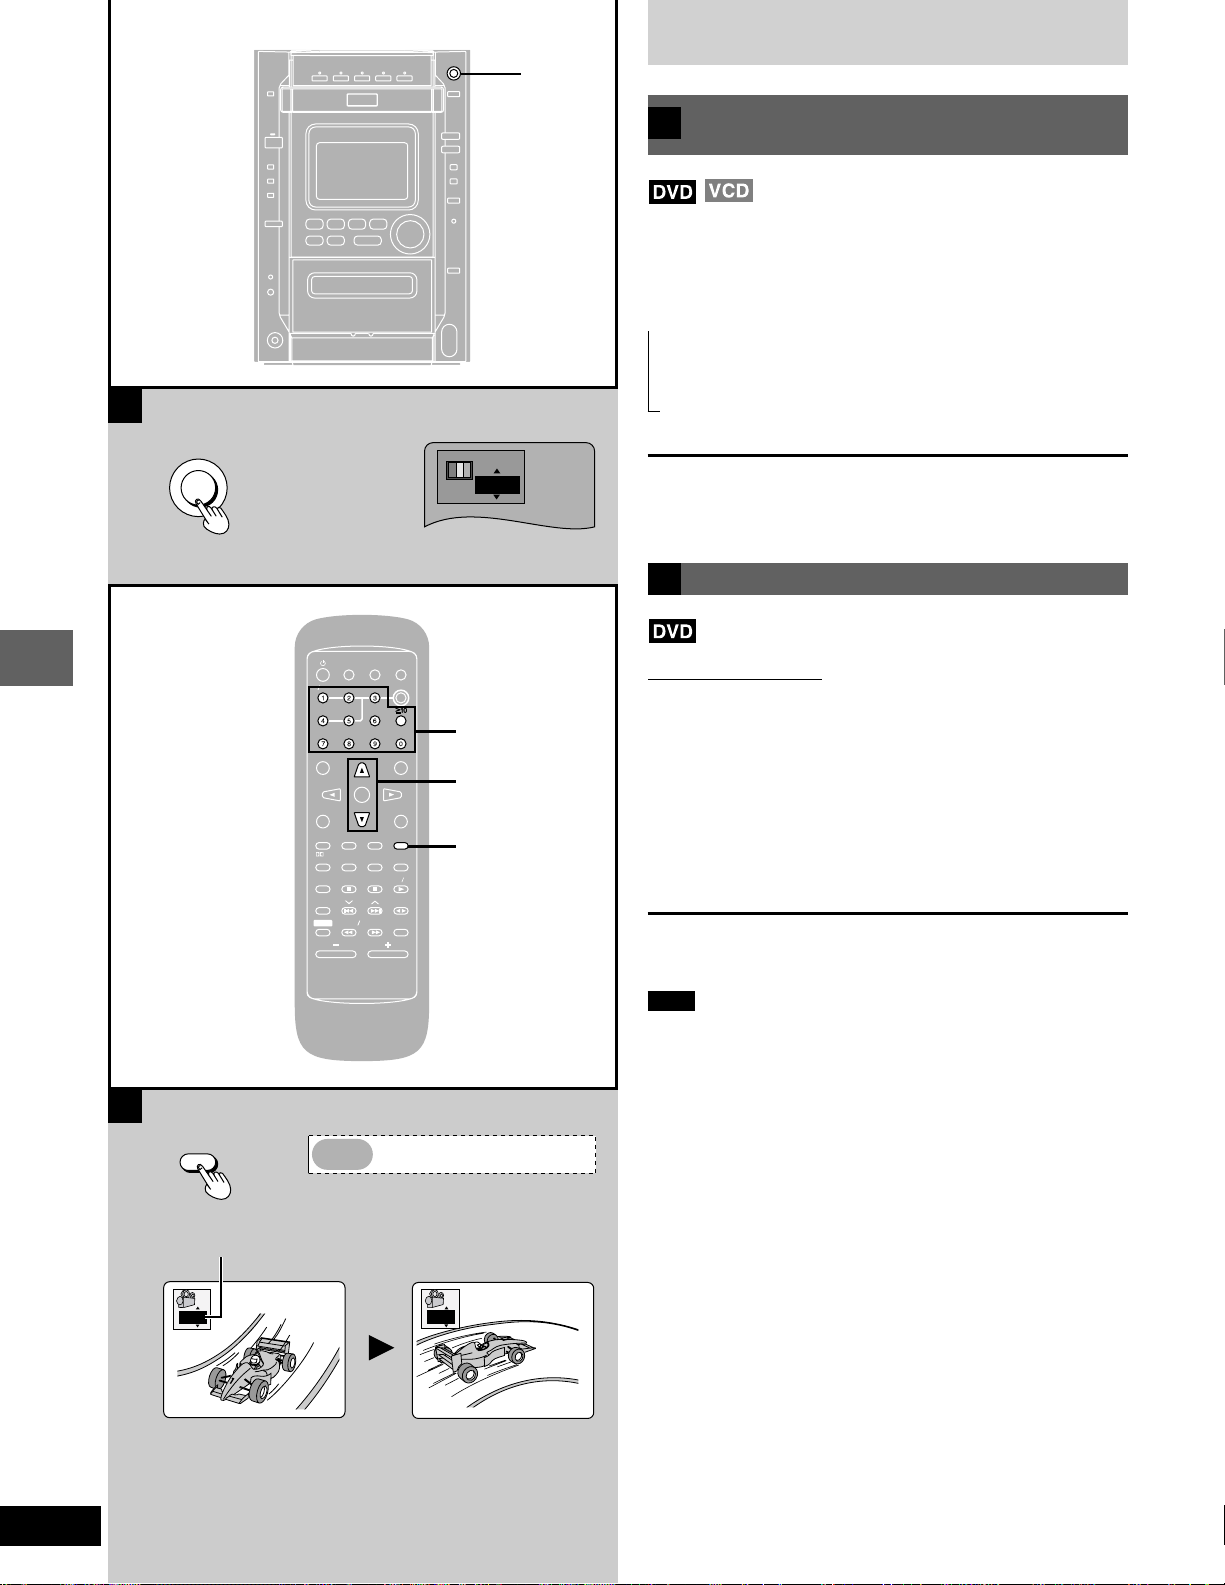
Changing the picture quality
A
for movie viewing
You can change the picture quality for movie viewing.
Press [CINEMA].
The button lights and the CINEMA display appears on the screen.
Each time you press the button:
Cin.1: Mellows images and enhances detail in dark scenes.
→
→→
Cin.2: Sharpens images and enhances detail in dark scenes.
A
CINEMA
Disc operations
Nor.: Normal mode (Factory preset).
Cin.1
For your reference
You can make finer adjustments to the picture if desired (➡ page 27,
Digital picture mode–User mode).
Switching angles
B
TV V POWER
MIX
2CH
AUTO O OFOFF
ACTIO
SLEEP
TV
VIDEO
N
MUT
INGDIMMER
DISC
Remote control only
Some DVDs allow you to view the same scene from different angles.
Numbered
TV CH UP
TV CH
SUB
TITLE
CLCLEAR
PLAY MODE
POSITION
MEMOR
SLO
VOLUME
MENU
ENTNTER
DOWN
RETURN
ANGLE
AUDUDIO
A-B REP
EAT
SELECT
REP
EAT
DVD D CD
Y
TAPE
TUNER
W S
EARCH
TOP MENU
CH SE
LECT
TEST
GUI DISP
MARK ER
PL
S.S.SRND
3D AI
SOUND EQ
SUBW
OOFER
SHIFT
buttons
8, 9
ANGLE
“ANGLE” lights up on the unit’s display during scenes recorded with
multiple angles to indicate that this feature is available.
Press [ANGLE] during play.
The angle display appears.
The angle number changes each time you press the button.
The number can also be changed with the cursor buttons (8 or 9) or
the numbered buttons.
Some discs allow you to set angles before multi-angle scenes are
played. Read the instructions that come with the disc.
18
RQT6345
B
ANGLE
Angle number
1
Note
Some discs allow changes to angles only by using the disc’s menus.
ANGLE
2
MIX
CH
EEP
CTIO
UT
DIMMER
ER
V
IDEO
ND
A-B REP
AR
3D AI
NGLE
MENU
OP MENU
SUB
TITLE
EST
GUI DISP
URN
ER
CH SE
ECT
V CH UP
V CH
WN
Y MODE
SELECTOROR
SOUND EQ
REP
SLO
W S
RCH
PL
SUBW
OFER
CD
PE
UNER
DISC
OLUME
POSITION
MEMOR
SUB
TITLE
Discs
To change the soundtrack
AUDUDIO
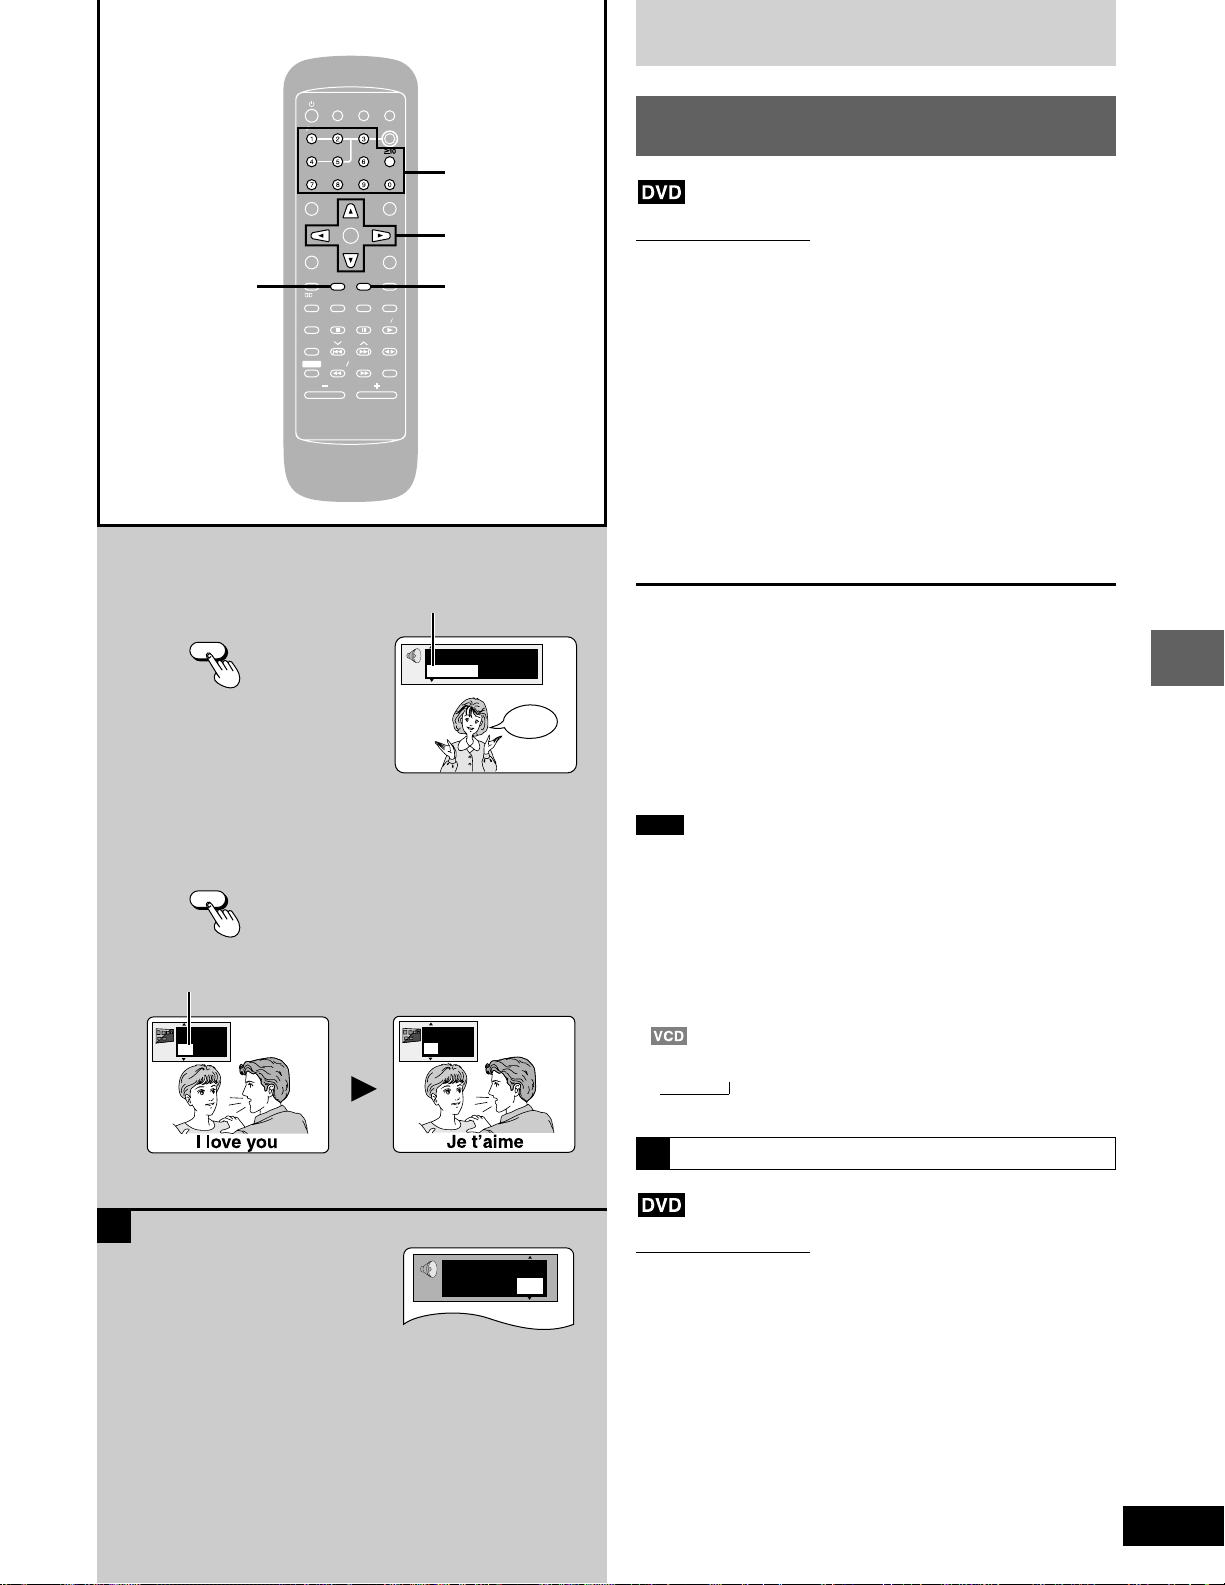
To change the subtitle language
SUB
TITLE
Subtitle number
ON
1
English
TV V POWER
TV
TOP MENU
CH SE
TEST
GUI DISP
MARK ER
S.S.SRND
SOUND EQ
SUBW
SHIFT
MIX
2CH
AUTO O OFOFF
ACTIO
SLEEP
VIDEO
N
INGDIMMER
MUT
DISC
Changing soundtrack and subtitle
languages
Numbered
MENU
TV CH UP
LECT
ENTNTER
TV CH
DOWN
RETURN
ANGLE
SUB
TITLE
AUDUDIO
A-B REP
EAT
CLCLEAR
PL
PLAY MODE
SELECT
REP
EAT
3D AI
POSITION
DVD D CD
MEMOR
Y
SLO
W S
VOLUME
EARCH
TAPE
TUNER
OOFER
buttons
;, :, 8, 9
AUDIOSUB TITLE
Remote control only
Some DVDs have multiple soundtracks and subtitle languages recorded on them. You can change these during play.
To change the soundtrack
Press [AUDIO] during play.
The soundtrack display appears.
The number changes each time you press the button.
To change the subtitle language
Press [SUB TITLE] during play.
The subtitle display appears.
The number changes each time you press the button.
The number can also be changed with the cursor buttons (8 or 9) or
the numbered buttons.
See page 26 for a key to language abbreviations.
Soundtrack number
Digital
p
1 English 3/2.1 ch
ON
2
French
Hello
To clear/display the subtitles
1 Press [SUB TITLE].
2 Press [:].
3 Press [8] or [9] to select “ON” or “OFF”.
For your reference
Soundtrack and subtitle languages can be set before play with the
unit’s menus (➡ pages 50–51).
(Some discs are designed to start in a certain language despite the
setting.)
You can only select the languages recorded on the disc.
Note
Some discs allow changes to soundtrack and subtitle languages
•
only by using the disc’s menus.
“–” or “– –” is displayed instead of the language number in circum-
•
stances such as when no language is recorded on the disc.
In some cases, the subtitle language is not changed to the select-
•
ed one immediately.
(For areas except Australia, N.Z., the Middle East, South Africa,
•
and Asia)
If the subtitles overlap closed captions recorded on discs, turn the
subtitles off.
•
Audio changes as follows each time you press [AUDIO]:
LR → L → R
→
This may not work with some discs.
Disc operations
A
Vocal
1 ¤ ON
Switching vocals on/off for karaoke discs
A
Remote control only
1 Press [AUDIO] during play.
2 Press the cursor buttons [;], [:] to highlight the illustrated
icon.
3 Press the cursor buttons [
Solo
•
OFF: No vocal OFF: No vocal
ON: Vocal V1+
Choose “OFF” for karaoke.
Choose “V1” or “V2” to duet with the player.
Actual operations depend on the disc. Read the disc’s instructions
for details.
88
99
8], [
9] to turn the vocals on or off.
88
99
Duet
•
V2: Vocal 1 and 2
V1: Vocal 1
V2: Vocal 2
19
RQT6345
MIX
CH
EEP
CTIO
UT
DIMMER
ER
V
IDEO
ND
A-B REP
AR
3D AI
NGLE
MENU
OP MENU
SUB
TITLE
EST
GUI DISP
URN
ER
CH SE
ECT
V CH UP
V CH
WN
Y MODE
SELECTOROR
SOUND EQ
REP
SLO
W S
RCH
PL
SUBW
OFER
CD
PE
UNER
DISC
POSITION
MEMOR
ER
ER
Discs
CLEAR
SHIFT
MARKER
TV V POWER
MIX
2CH
AUTO O OFOFF
ACTIO
TV CH UP
ENTNTER
DOWN
A-B REP
Y
W S
EARCH
VOLUME
N
MUT
INGDIMMER
DISC
MENU
RETURN
ANGLE
AUDUDIO
EAT
SELECT
REP
EAT
DVD D CD
TAPE
TUNER
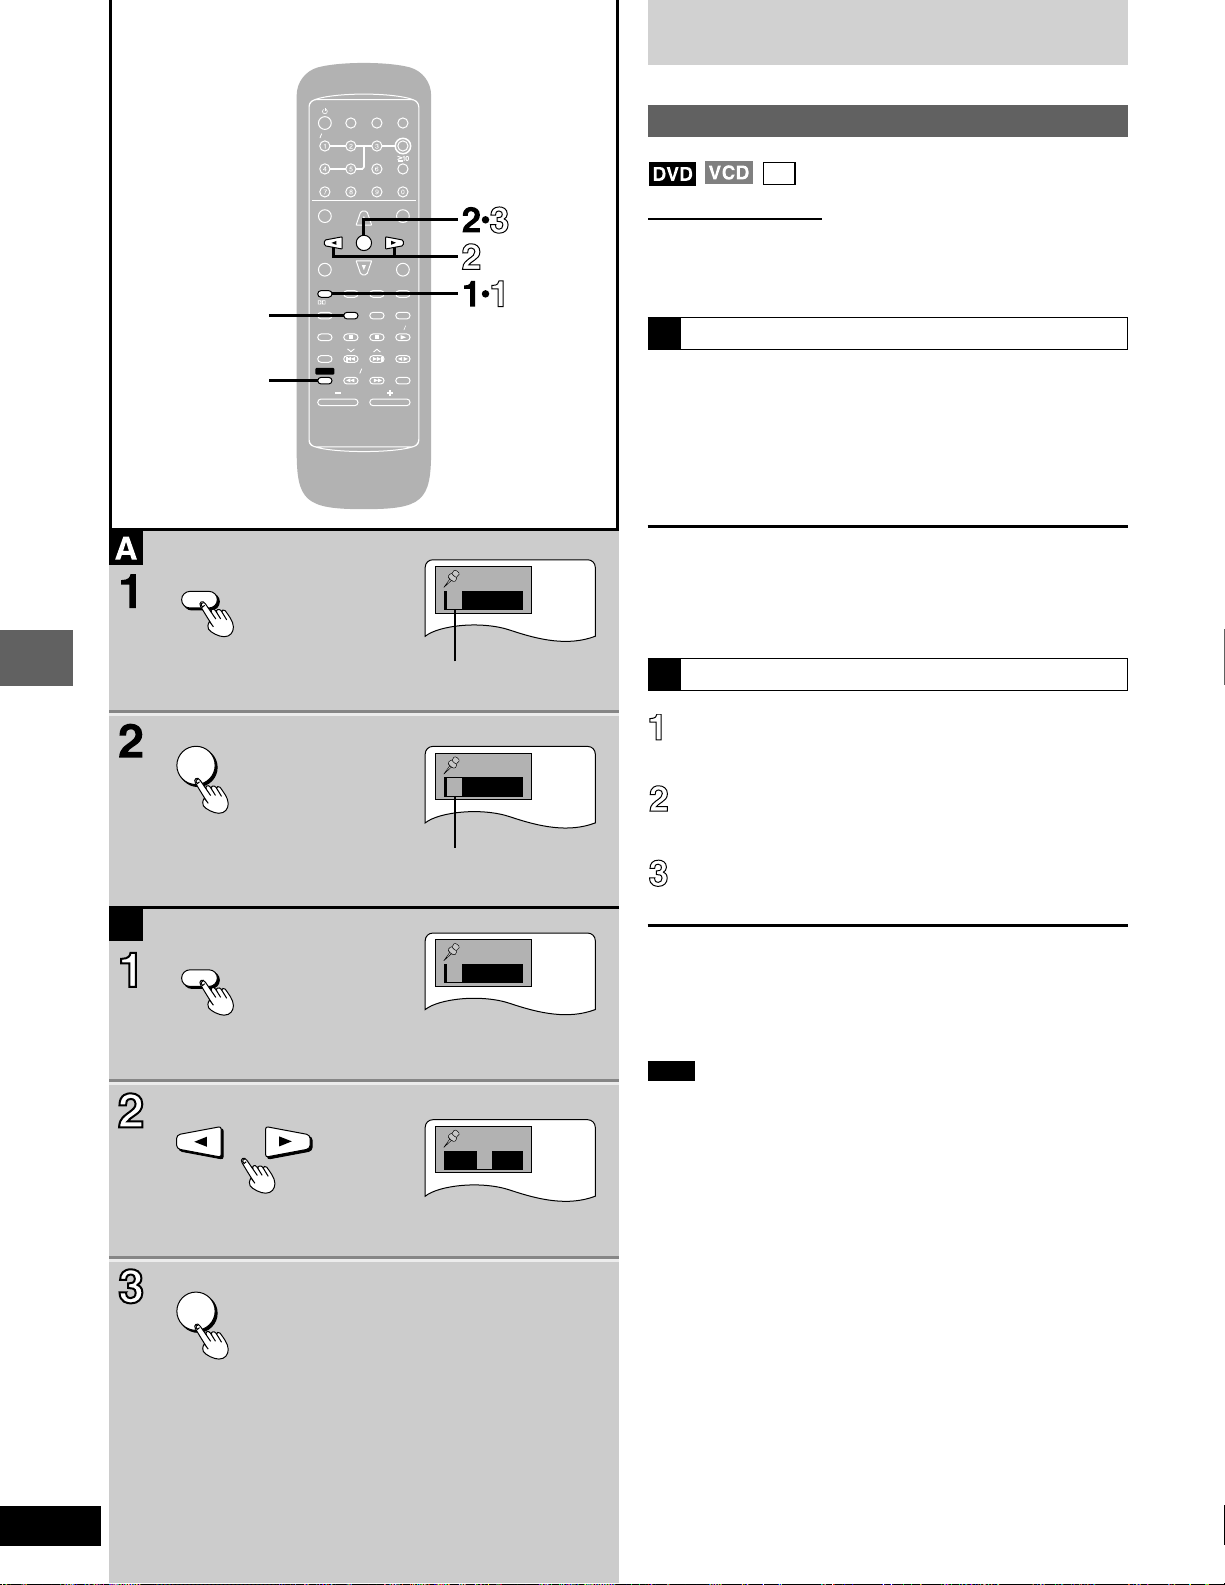
Marking a position
Remote control only
This feature allows you to mark up to 5 points on a disc so you can
return to them easily at a later time.
A
CD
To mark a position
1 Press [MARKER] during play.
The marker display appears.
SLEEP
TV
VIDEO
TOP MENU
CH SE
LECT
TEST
TV CH
GUI DISP
SUB
TITLE
MARK ER
CLCLEAR
PL
S.S.SRND
PLAY MODE
3D AI
POSITION
SOUND EQ
MEMOR
SUBW
OOFER
SLO
SHIFT
2 Press [ENTER] at the point you want
to mark.
To mark another position
1 Press [MARKER] to display the marker display.
¤¤¤¤¤
No marker
2 Press the cursor buttons [;] or [:] to select another marker.
3 Press [ENTER].
Recalling a marked position
B
ENTNTER
Disc operations
B
MARKER
ENTNTER
1 ¤¤¤¤
Marker 1
1 2 3 ¤¤
1 2 3 ¤¤
Press [MARKER].
The marker display appears.
Press the cursor buttons [;] or [:] to
highlight the required marker.
Press [ENTER] to recall the position.
To clear a marker
1 Press [MARKER] to display the marker display.
2 Press the cursor buttons [;] or [:] to highlight the marker you
want to clear.
3 Press [SHIFT] + [CLEAR].
Note
This feature cannot be used;
•
If the play time for the disc is not displayed.
•
During program (➡ page 22) and random play (➡ page 23).
•
While CD MANAGER (➡ page 24) is on.
•
Some subtitles may fail to appear around the marker (DVD).
•
Markers clear in the following situations:
•
The unit is turned off.
•
The disc is changed or removed.
•
A source other than DVD/CD is selected.
•
20
RQT6345
 Loading...