

Panasonic
Mini Changer System
Operating Instructions
B -m W 3' J iài-
SC-CH60
Before connecting, operating or adjusting this product, please read
these instructions completely.
COMMCT
RQT2599-L *

Thank you for purchasing this system.
For optimum performance and safety, please read these instructions carefuily.
Table of Contents
Before Use
Suggestions tor Safety............................................
Preparations........................................................... 4
stacking the components ................................................................... 4
Supplied accessories ......................................................................... 5
Connections ....................................................................................... 0
Front Panei Controis and Functions
Compact disc changer section ........................................................... 3
Tuner section .....................................................................................10
Amplifier section
Cassette deck section
................................................................................
........................................................................
..........................
Remote Control Unit Controls and
Functions
Common operation controls
Tuner controls...................................................................................14
Compact disc controls
Concerning the Remote Control
Battery installation............................................................................16
Use of batteries
Operation notes................................................................................16
.......................................................
............................................................
......................................................................
.............................
................................................................................
.14
Basic Operations
Basic Operating Procedure
How to mute the volume...................................................................17
How to use headphones...................................................................17
Setting the Time of Day
....................................
..........................................
3
$
16
17
18
14
15
16
Tape Deck Operations
Listening to Tapes
To play back prerecorded cassettes
To fast forward or rewind the tape
To cue or review the tape
Series playback ................................................................................ 35
............................................... 32
.................................................
...............................
................................................................
...................
34
34
32
Recording Operations
12
13
Making a Recording
To record from the desired source
Tape-to-tape recording from deck 2 to deck 1 .................................38
Edlt>Recordlng from Compact Discs
Sequential CD recording (ALBUM)
Fit editing (J.FIT) .............................................................................. 42
Program recording from two or three discs
.............................................
..................................................
.......................
..................................................
....................................
36
36
40
40
43
Tone Quality Operations
Changing the Tone Quality.......................................44
Using the graphic equalizer control ................................................ 44
To listen with augmented bass (super bass effect) ........................ 45
Timer Operations
Radio Operations
Listening to Radio Broadcasts................................ 19
Manual tuner operation.....................................................................19
Automatic tuner operation only for FM
Memory presetting ............................................................................21
Memory tuner operation
...................................................................
.............................................
Compact Disc Operations
Listening to Compact Discs.....................................24
Sequential play.................................................................................24
Direct access play
Program play
Random play.....................................................................................29
Special features
............................................................................
....................................................................................
...........................,..................................................
20
22
26
27
30
Using the Timer
Setting the timer play........................................................................46
Setting the timer recording
To use the sleep timer......................................................................50
....................................................
...............................................................
External Unit Operations
Using an External Unit
To enjoy an external source
Reference
Care & Use
Concerning Cassette Tapes.............................................................53
Concerning Compact Discs .............................................................54
Maintenance................................................................................... 55
Troubleshooting Guide
Technical Specifications
..........................................................
...........................................
......
................................
46
48
.52
52
53
56
58
Suggestions for Safety
■ Use a standard AC wall outlet
1. Use from an AC power source of high voltage, such as that
used for an air conditioner, Is very dangerous.
A fire might be caused by such a connection.
2. A DC power source cannot be used.
Be sure to check the power source carefully, especially on a ship
or other place where DC is used.
■ Grasp the plug when disconnecting the power supply cord
1. Wet hands are dangerous.
A dangerous electric shock may result if the plug is touched by
wet hands.
2. Never place heavy items on top of the power supply cord,
nor force it to bend sharply.
■ Place the unit where it will be well ventilated
Place this unit at least 10 cm (4") away from wall surfaces, etc.
Be careful that curtains and similar materials do not obstruct the
ventilation holes.
■ Avoid places such as the following:
In direct sunlight or in other places where the temperature is
high.
In places where there is excessive vibration or humidity.
Such conditions might damage the cabinet and/or other component
parts and thereby shorten the unit’s service life.
■ Be sure to place the unit on a flat, level surface
If the surface is inciined, a malfunction may result.
■ Never attempt to repair nor reconstruct this unit
A serious electric shock might occur if this unit is repaired, disassem
bled or reconstructed by unauthorized persons, or if the internal parts
are accidentally touched.
■ Take particular care if children are present
Never permit children to put anything, especially metal, inside this
unit. A serious electric shock or malfunction could occur if articles
such as coins, needles, screwdrivers, etc. are inserted through the
ventilation holes, etc. of this unit.
■ If water is spilled on the unit
Be extremely careful if water is spilled on the unit, because a fire or
serious electric shock might occur. Immediately disconnect the
power cord plug, and consult with your dealer.
■ Avoid spray-type insecticides
Insecticides might cause cracks or “cloudiness" in the cabinet and
plastic parts of this unit. The gas used in such sprays might, more
over, be ignited suddenly.
■ Never use alcohol or paint thinner
These and similar chemicals should never be used, because they
might cause flaking or cloudiness of the cabinet finish.
■ Disconnect the power supply cord if the unit will not be used for a long time
If the unit is left for a long time with the power ON, this not only will
shorten its useful operation life, but also may cause other trouble.
a If trouble occurs
If, during operation, the sound is interrupted or indicators no longer
illuminate, or if an abnormal odour or smoke is detected, immediately
disconnect the power cord plug, and contact with your dealer or an
Authorized Service Center.
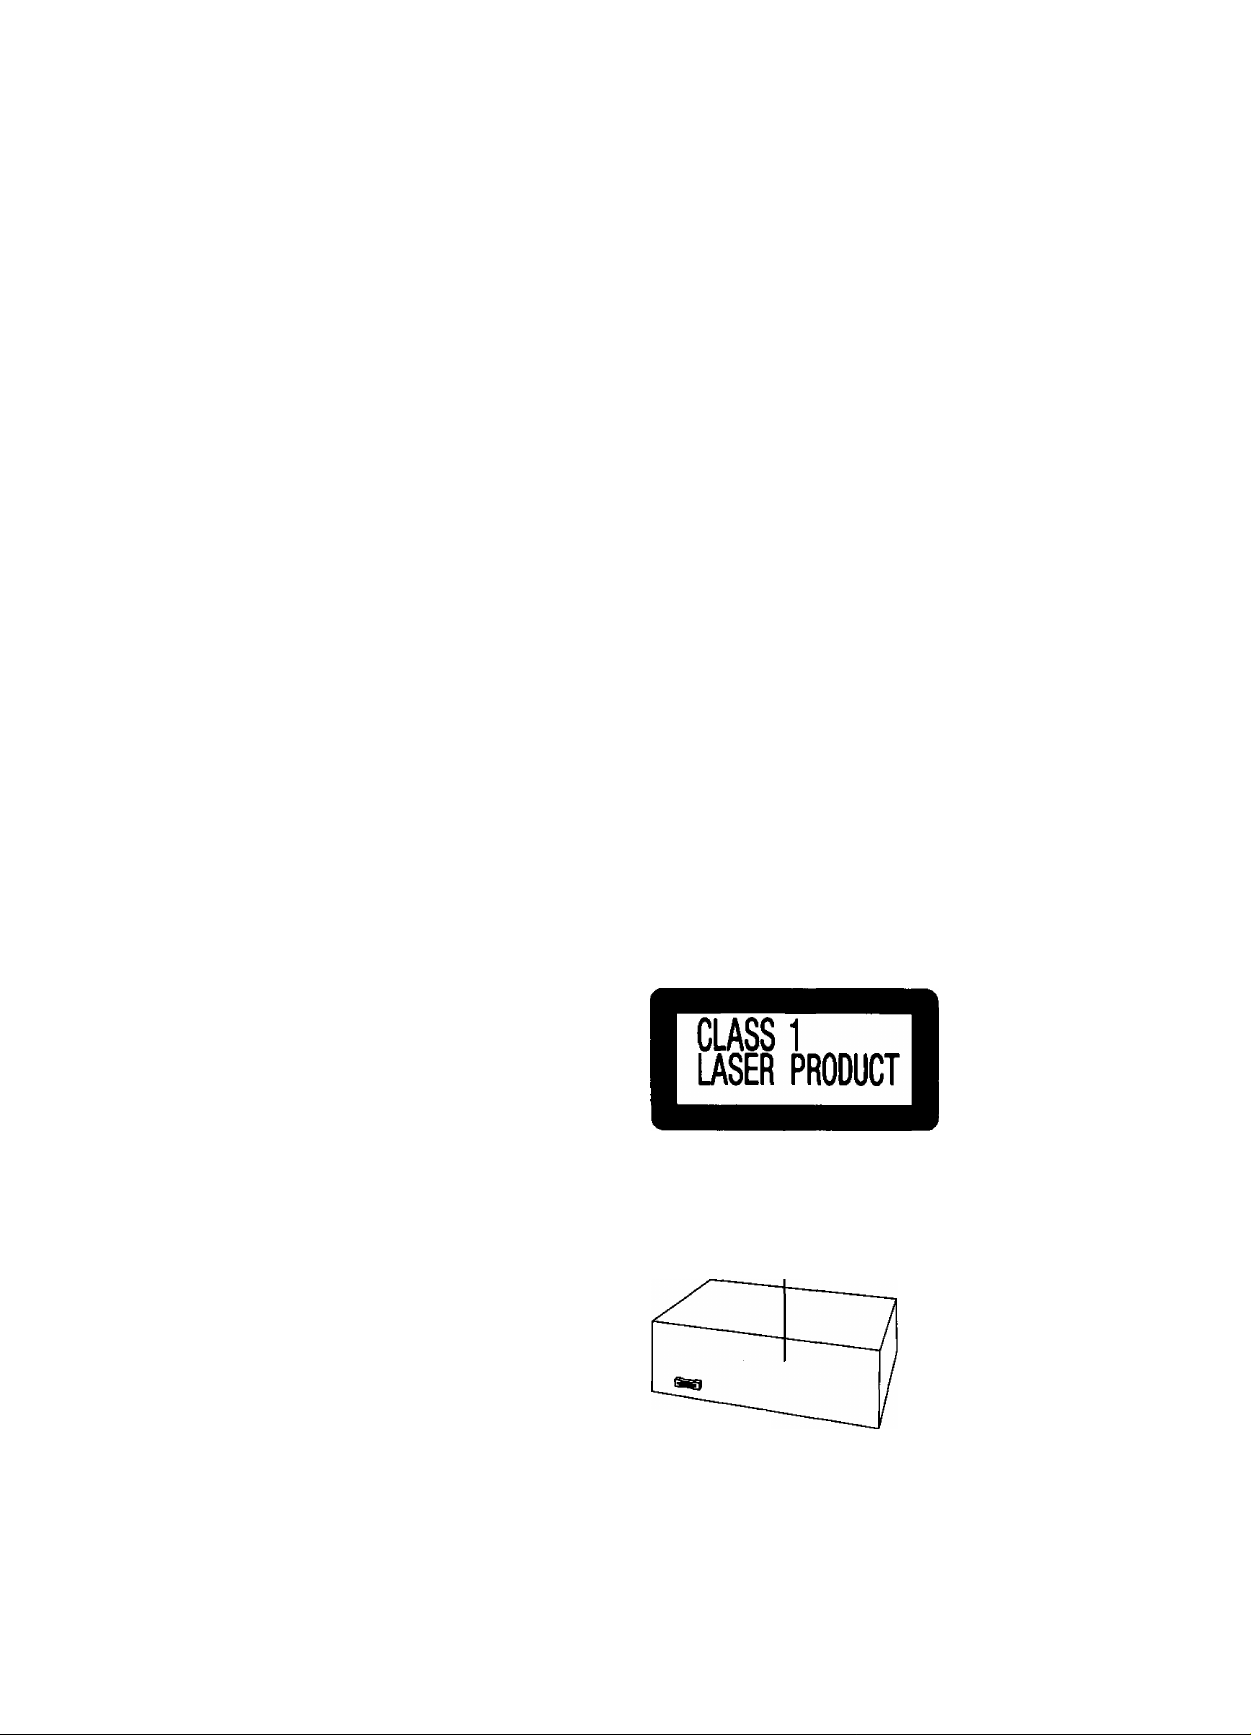
CAUTION!
THIS PRODUCT UTILIZES A LASER.
USE OF CONTROLS OR ADJUSTMENTS OR PERFORM
ANCE OF PROCEDURES OTHER THAN THOSE SPECI
FIED HEREIN MAY RESULT IN HAZARDOUS RADIATION
EXPOSURE.
DO NOT OPEN COVERS AND DO NOT REPAIR YOUR
SELF. REFER SERVICING TO QUALIFIED PERSONNEL
THIS MUSIC SYSTEM IS CAPABLE OF RECEIVING
THE NEW AM STEREO BROADCASTS FROM THE
AM BAND RADIO STATIONS. HOWEVER LIKE
MANY MUSIC SYSTEM CURRENTLY AVAILABLE
ON THE MARKET IT WILL REPRODUCE THIS AM
STEREO SIGNAL ONLY IN AM MONO, WHICH, IN
EFFECT, IS OF NO LESSER QUALITY THAN YOUR
EXISTING AM MONO MUSIC SYSTEM.
Comp«ict disc changer
(Back of product)
DAN6ER-lnvisWe
luerndiftiMwIwn
AVOio DIRECT EX
POSURE TO BEAM.
(Inskle of product)
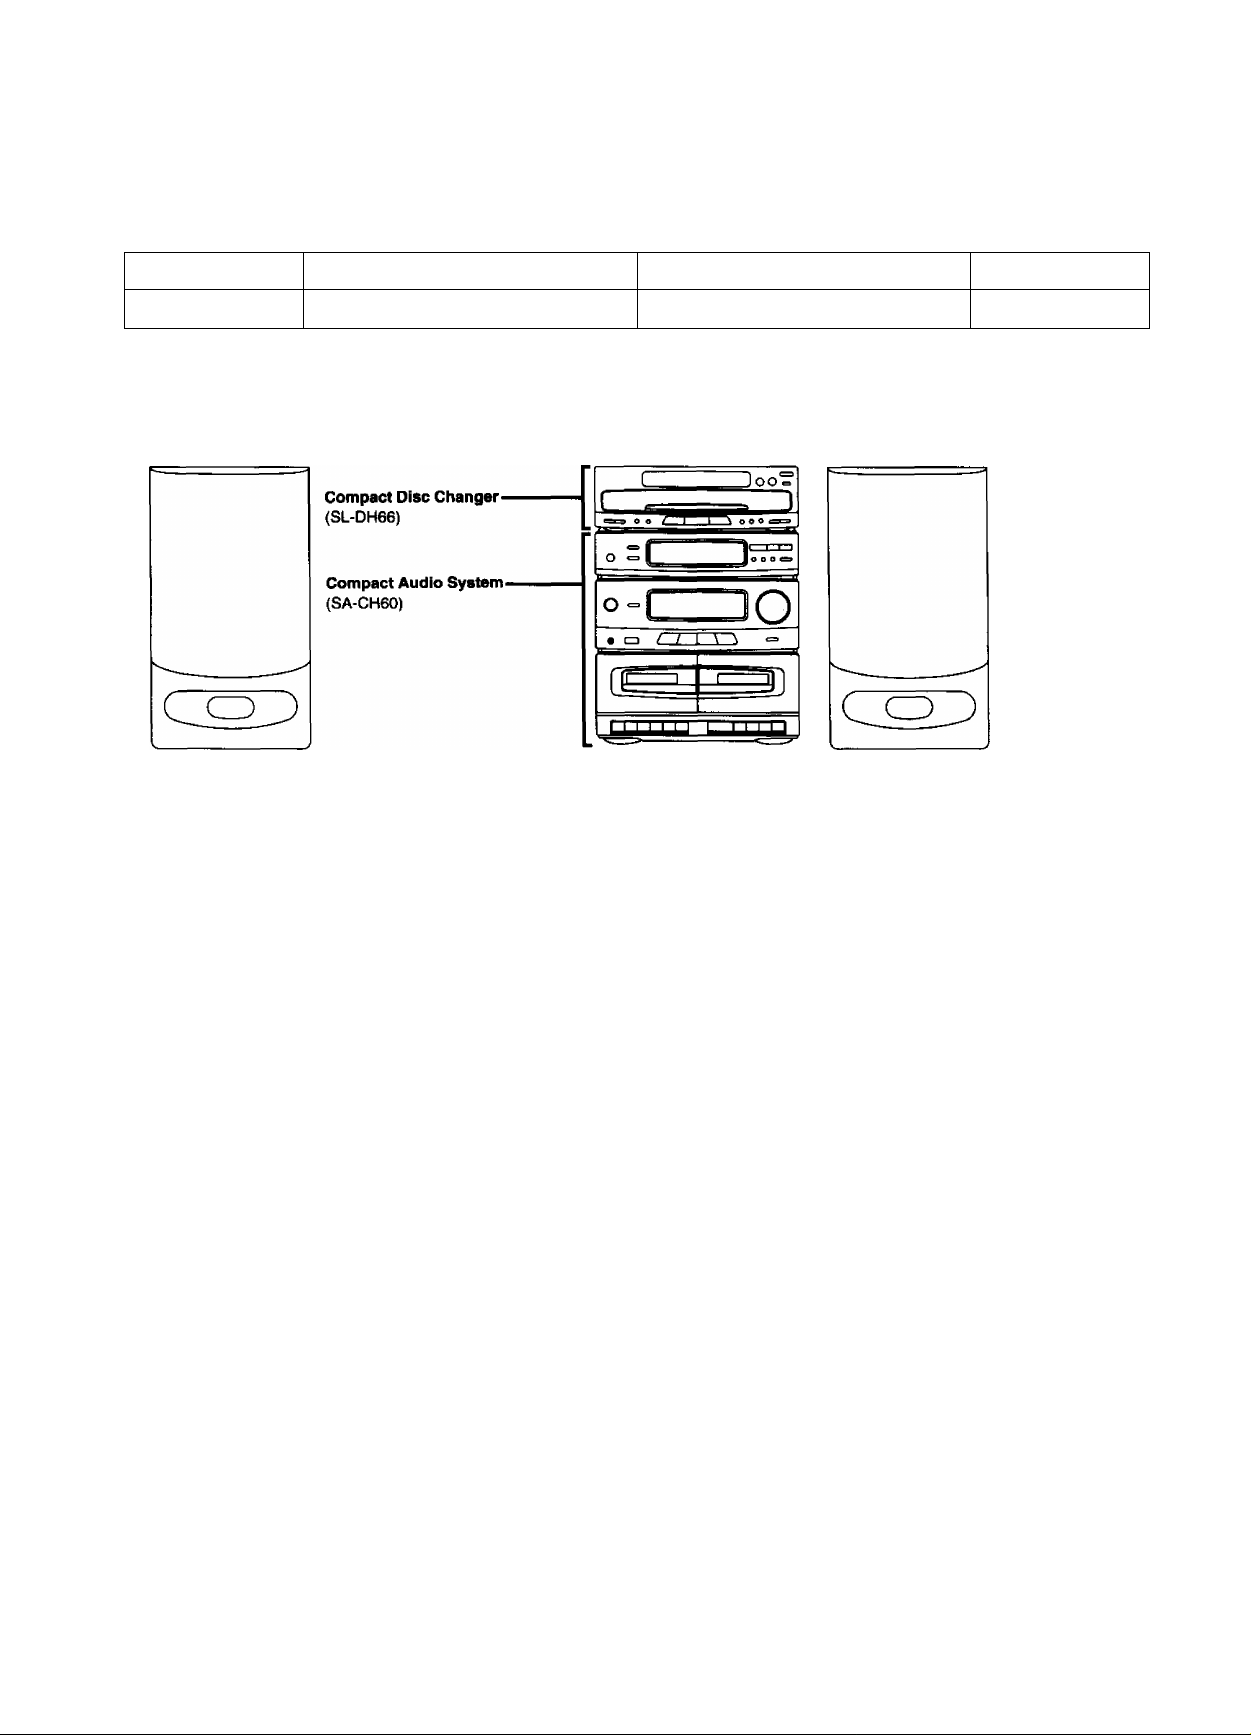
Preparations
These operating Instructions are appiicable to the foiiowing system.
System
SC-CH60 SA-CH60
Compact Audio System
Stacking the components
Install the components as shown below.
Left speaker
(SB-CH60)
Compact Disc Changer
SL-DH66
Right speaker
(SB-CH60)
Speakers
SB-CH60
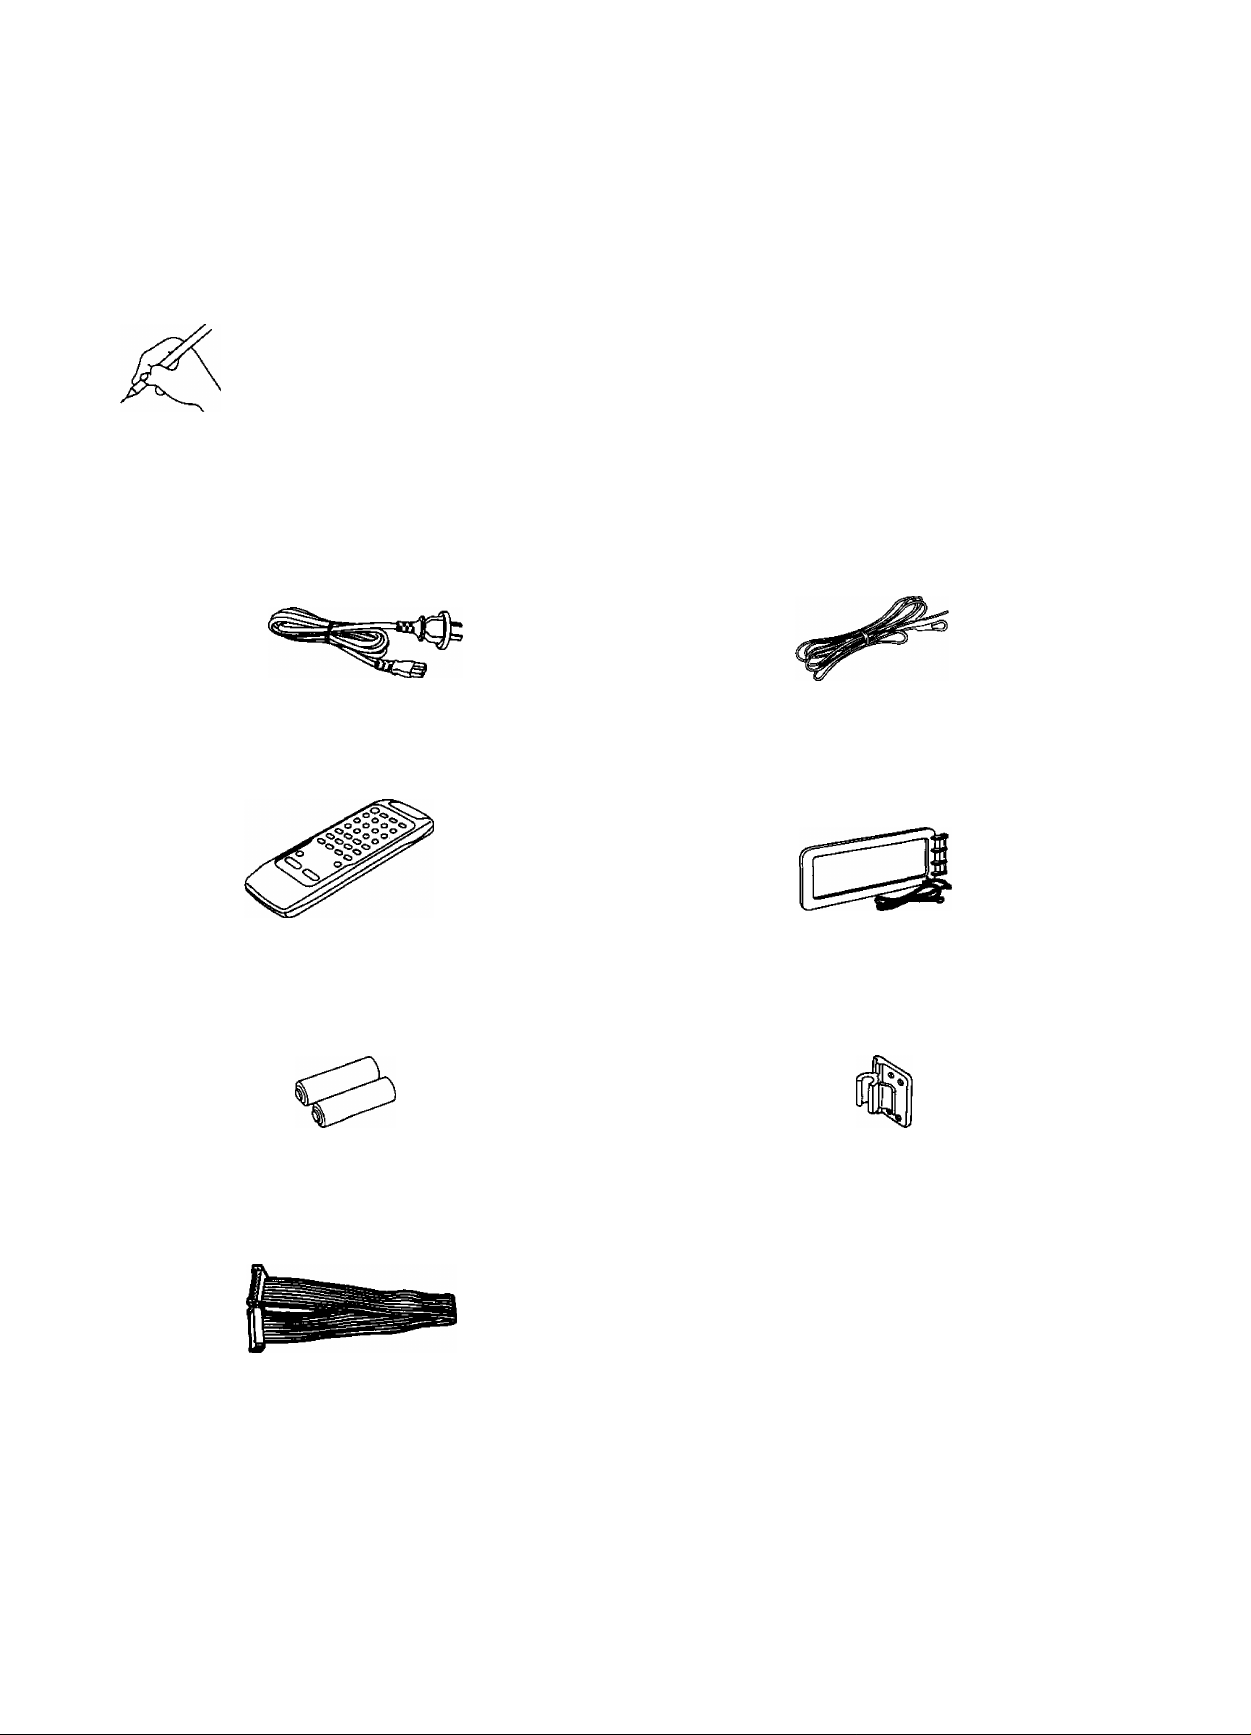
Supplied accessories
Check the packing carton for these accessories.
s
□ AC power supply cord
d! Remote control transmitter...........................................................1 pc. CH AM loop antenna......................................................................................1 pc.
Q Remote control batteries
UM-4, AAA, R03
............................................................... 1 pc. □ FM indoor antenna.........................................................................................1 pc.
□
..............
2 pcs.
Antenna holder .........................................................................i pc.
□
Flat cable
1 pc. □ Mounting screws .....................................................................................2 pcs.
Preparations
(continued)
Connections
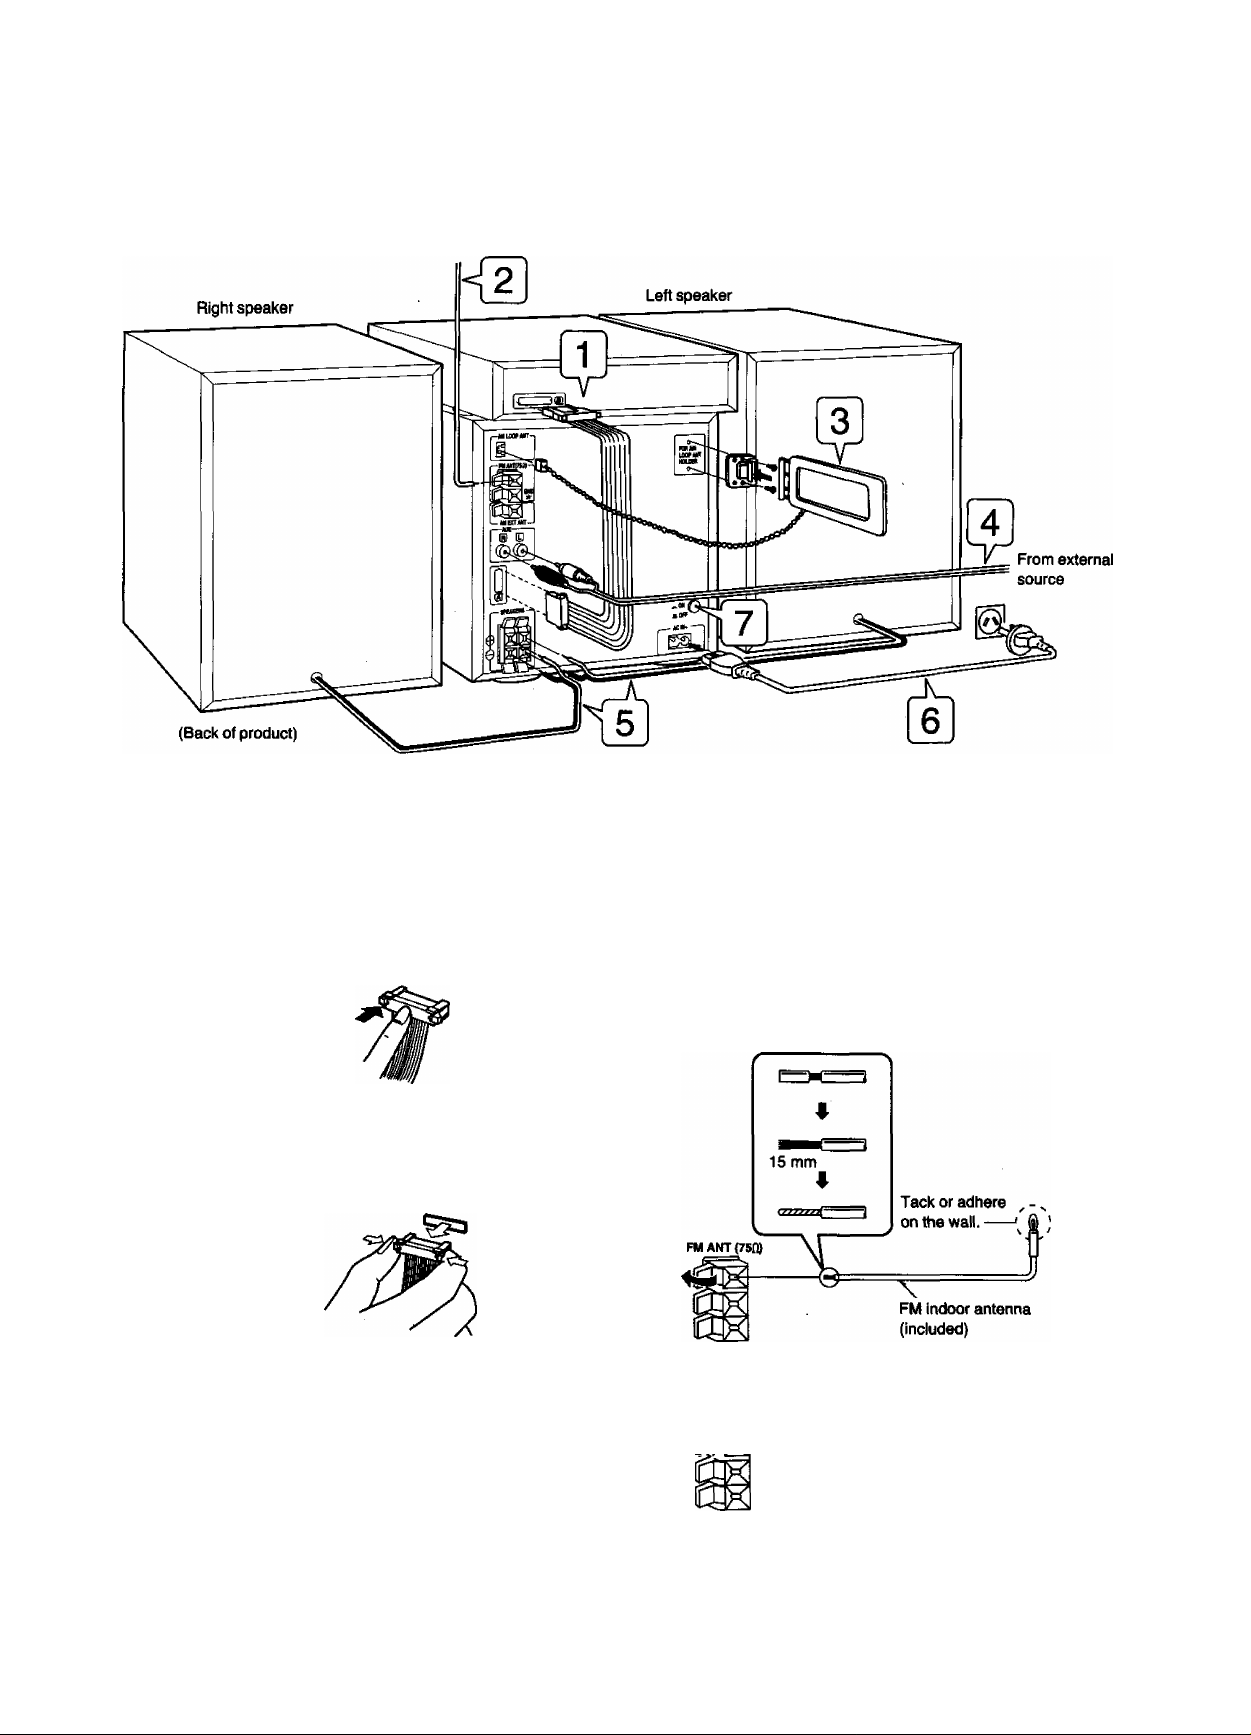
-------------
1 Connect the Included flat cable to connectors
A, B.
Connecting
Hold the connector with the recessed part up and press in at the
center until you hear a click.
Disconnecting
Do not try connecting or disconnecting the flat cable
while the power is switched to ON.
2 Connect the included FM Indoor antenna.
Tack or adhere the antenna on the wall at a height and in a
direction which result in the best reception. The tip of the internal
antenna wire should not come into contact with any metal object.
Connecting the FM Indoor antenna
4
FM ANT (75iH
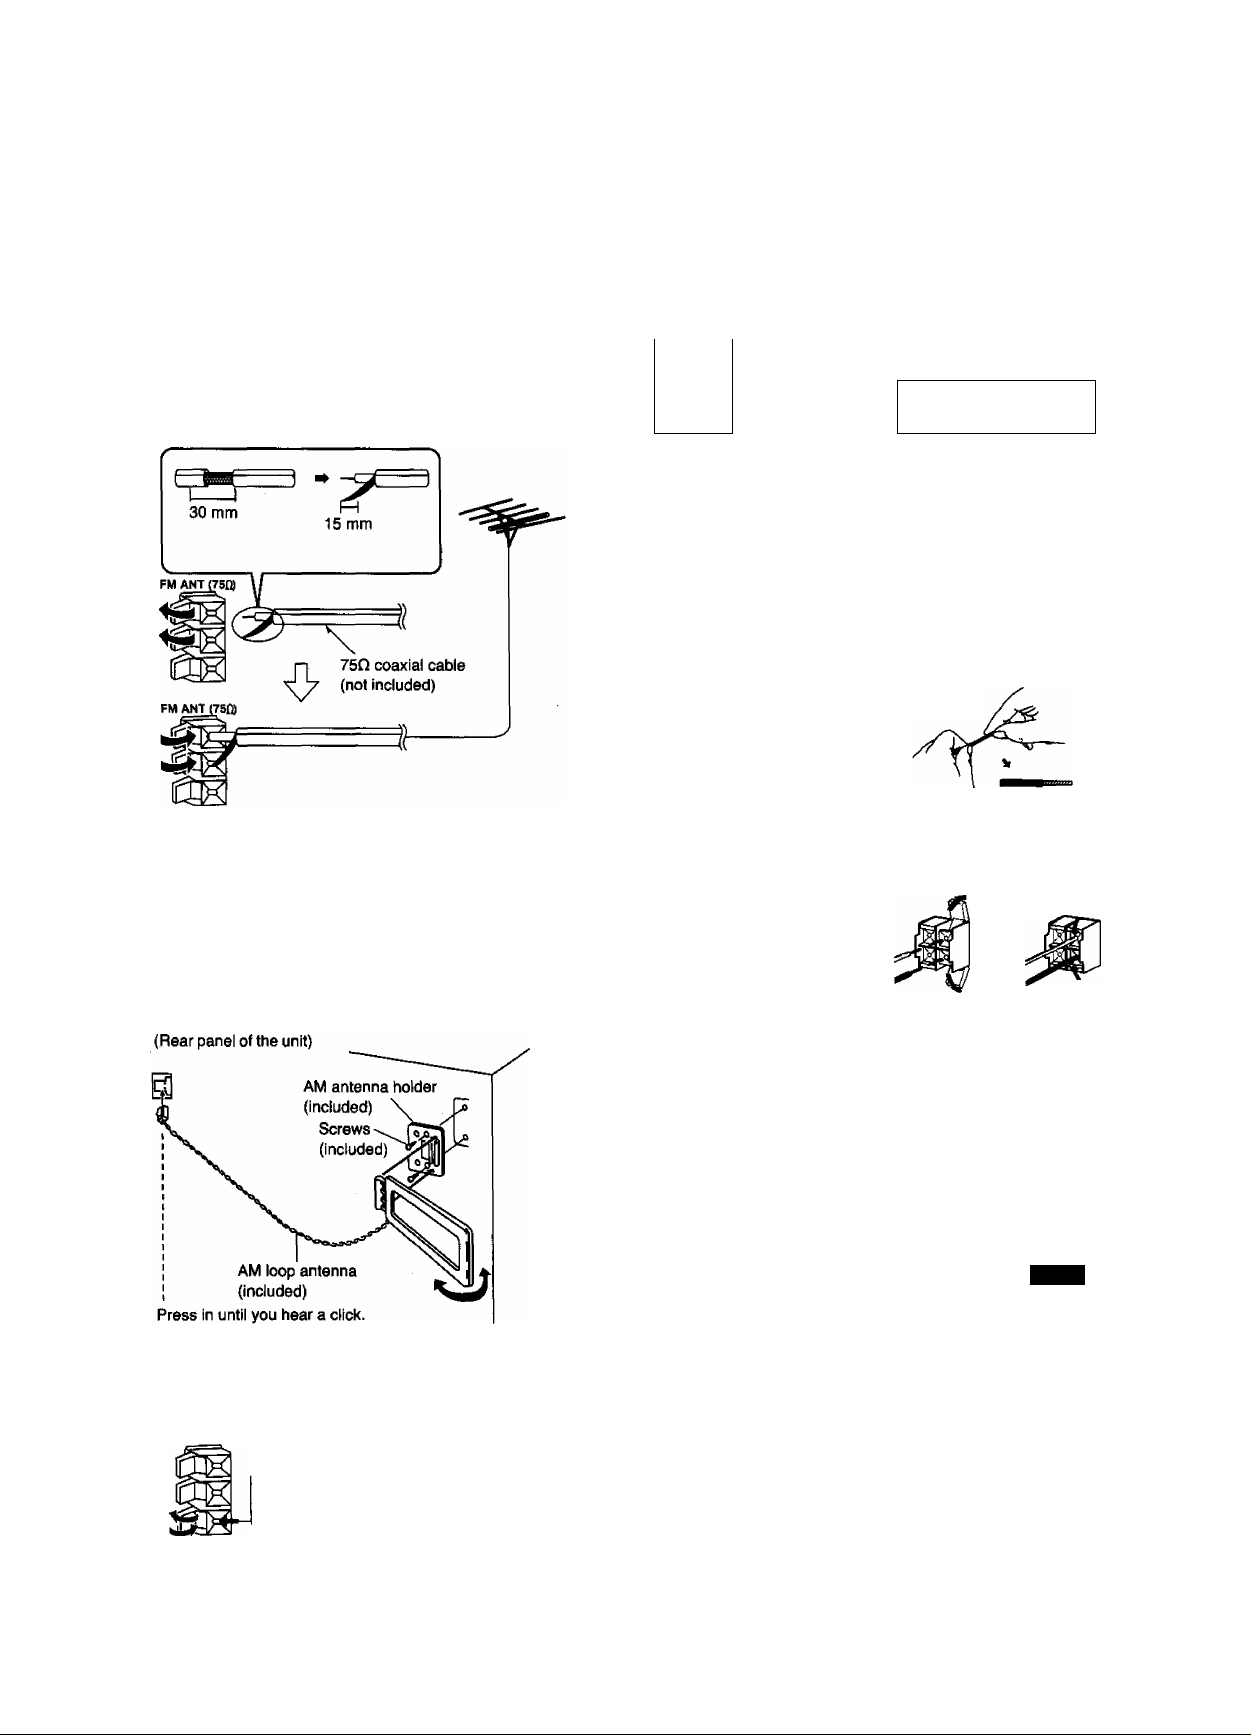
For best reception and sound quality, use an
FM outdoor antenna (not included).
If you use an FM outdoor antenna, disconnect the indoor an
tenna.
You may need an outdoor antenna if you use this system in a
mountainous region or inside a reinforced-concrete building, etc.
An outdoor antenna should be installed by a competent techni
cian only.
Connecting a 75-ohm coaxial cable
3 Connect the included AM loop antenna.
Connect an external unit, such as audio tape
deck (for playback only) or output terminals of
a VCR or TV (not included).
Connecting external unit
-------
AUX
---------
B 0
-------
0
=an[i./““7 Ninii>=(R)
Stereo connection cable
(not included)
0 L /AUDIOn
-------
O R ^OUT J
•-CZZl--------------------------------------
Video cassette recorder
(not included)
—
Connect the right (R) and left (L) speaker
cables.
Match the two wires from the left and right speaker cables with
the same colored levers of the speaker terminals, then insert the
wires into the respective terminals.
Connection of speaker cables
1. strip off the outer
covering, and twist the
center conductor.
Make sure the bare ends of the wires are not unraveled.
(If they are, twist them tight again.)
Connect the AM loop antenna to the AM antenna terminal.
You may attach the AM antenna holder to the rear panel of the
system or to a rack or other structure.
Clamp the antenna to the holder and position the loop for the
best reception.
To minimize noise pickup, keep the loop antenna away from the
speaker cable, power cord, flat cable, and metal surfaces.
Connecting an AM outdoor antenna (not included)
You may need an outdoor antenna if you use this system in a
mountainous region or inside a reinforced-concrete building, etc.
Run vinyl-covered wire of 5-12 m horizontally along the window
or some other convenient location.
5-12m
2. Insert the wire to the
rear panel of the main
unit, and then close
the lever.
Notes;
Connect speaker cables before connecting the AC power
supply.
Be sure to connect only positive (red) wires to positive (+)
terminals and negative (black) wires to negative (-) terminals'.
To prevent damage to circuitry, never short-circuit positive (-(-)
and negative (-) speaker wires.
Connect the AC power supply cord after you
have connected all other cables and cords.
Press the MAIN POWER switch to ON position.
The primary circuit is always “live" as long as this switch is set
to ON position.
AM EXT ANT
AM outdoor antenna (not included)
Note;
If you don’t plan to use the system for a long time, press the
MAIN POWER switch to OFF position or disconnect the AC
power supply cord.
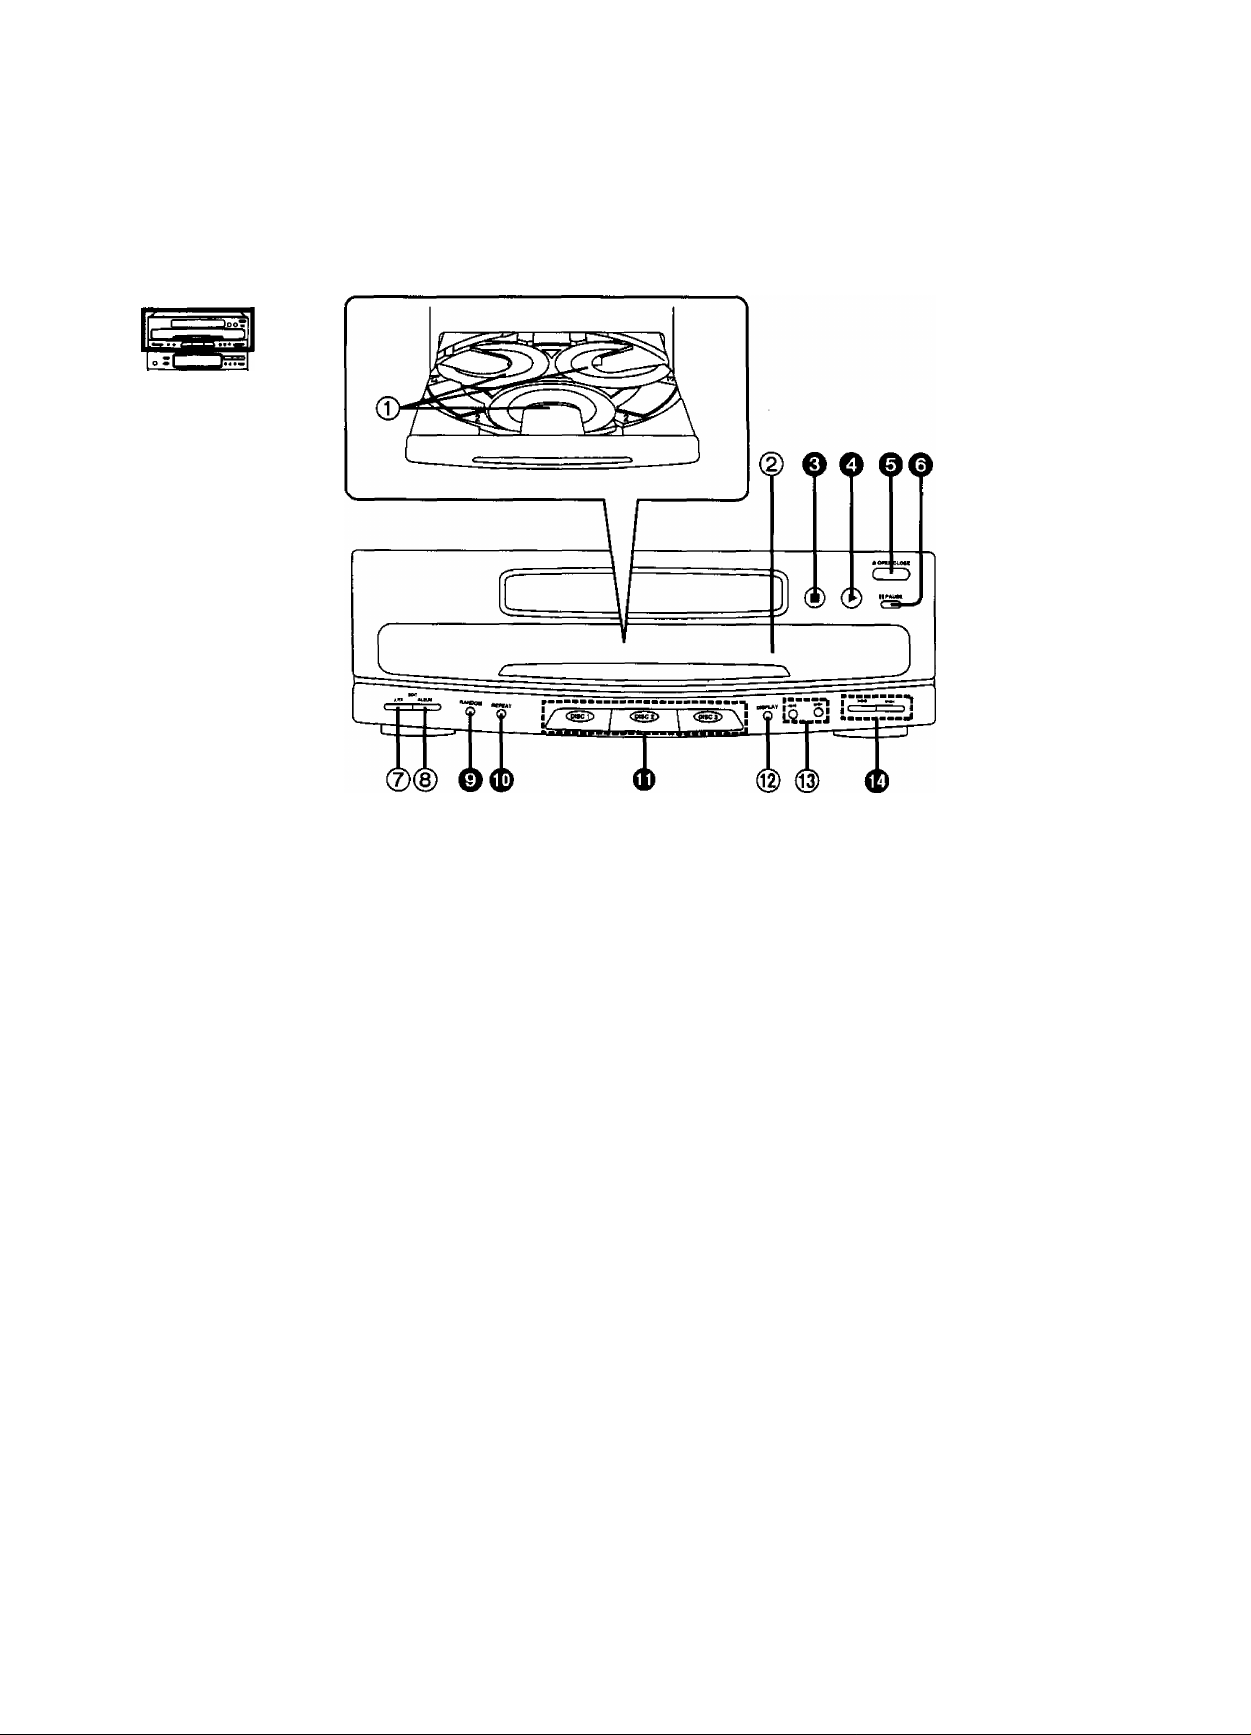
Front Panel Controls and Functions
The functions indicated by the numbers with black background (for
example O) can also be activated from the remote control transmit
ter. (See pages 14-15.)
Compact disc changer section
© Disc trays (1-3)
You can load up to three discs; one disc per one tray.
© Loading drawer
You can load and unload discs when this drawer is open,
0 Stop button (■)
Press to stop the disc play.
O Piay button (^)
Press to start disc play.
0 Loading drawer open/close button
{A OPEN/CLOSE)
Press to open or close the loading drawer.
If you press this button while the play indicator is lit, the drawer
will open to half position.
0 Pause button (I I PAUSE)
Press to stop the disc play temporarily.
® Fit edit button (J.FIT)
Press to activate the fit edit mode of the edit-recording.
© Album edit button (ALBUM)
Press to activate the album edit mode of the edit-recording.
0 Random piay button (RANDOM)
Press to play the disc’s ^acks in random order.
0 Repeat button (REPEAT)
Press to activate the repeat mode.
0 Disc buttons (Disc 1 -3)
Press to select the desired disc.
@ Display button (DISPLAY)
Press to change the display.
© Search buttons (^ )
Press to hear disc sound at high speed while searching in the
play mode.
<D Skip buttons (• ^>1)
Press to move forward or backward through the tracks on a disc.
°-CZ30
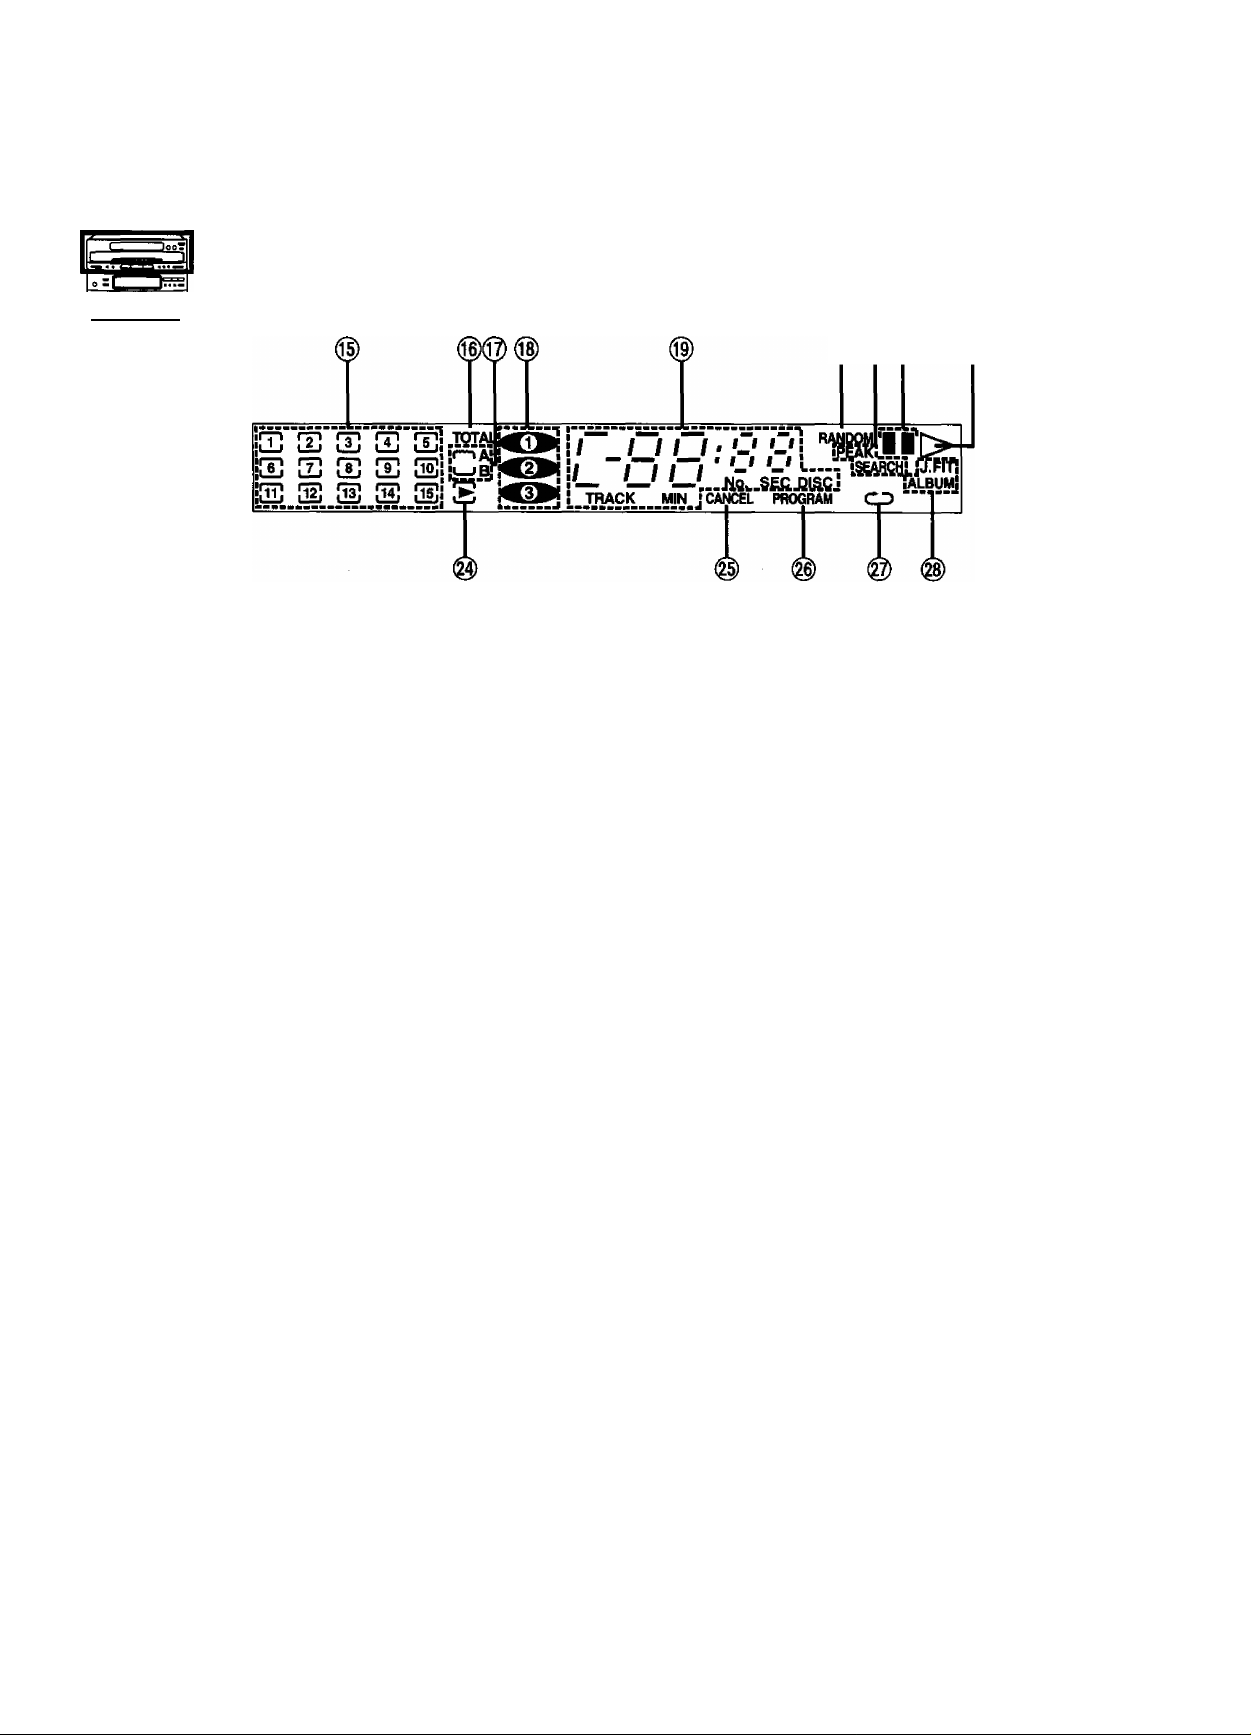
Display
® (l3)(Si @
@ Matrix display
Shows the total number of tracks on a disc, and the current
playing track to flash and the tracks edited on side A and B.
® Total track indicator (TOTAL)
Lights to show the total number of tracks edited on side A and B
when you use the edit-recording Kjnction of compact disc.
© Tape side indicator (A, B)
Shows which side of the cassette tape (A or B) wiii be recorded
on when you use the edit-recording function of compact disc.
® Disc indicators
Flashes to show which disc is in play.
@ Multi-dispiay
Shows the total playing time on the disc, elapsed play time of the
current track, the number of tracks, current playing or recording
track number, the number of programmed tracks and disc
number.
@ Random piay indicator (RANDOM)
Lights during the random play mode of the compact disc.
® Peak search indicator (PEAK SEARCH)
In the edit-recording mode, lights when the compact disc
changer is automatically scanning the peak level on a disc.
@ Pause indicator (II)
Lights when you press the pause button to stop the disc play
temporarily.
Play indicator (>)
Lights when compact disc is in play.
Over indicator (^)
Lights if there are 16 or more tracks on the disc.
® Program cancel indicator (CANCEL)
Lights when you cancel the programmed tracks.
@ Program indicator (PROGRAM)
Lights during the program play mode of compact disc.
@ Repeat play Indicator (CD)
Lights during the repeat play mode of the compact disc.
® Edit mode indicators (J.FIT, ALBUM)
J.FIT: Lights when you activate the fit edit mode.
ALBUM: Lights when you activate the sequential CD recording
edit mode.
Front Panel Controls and Functions
(continued)
Tuner section
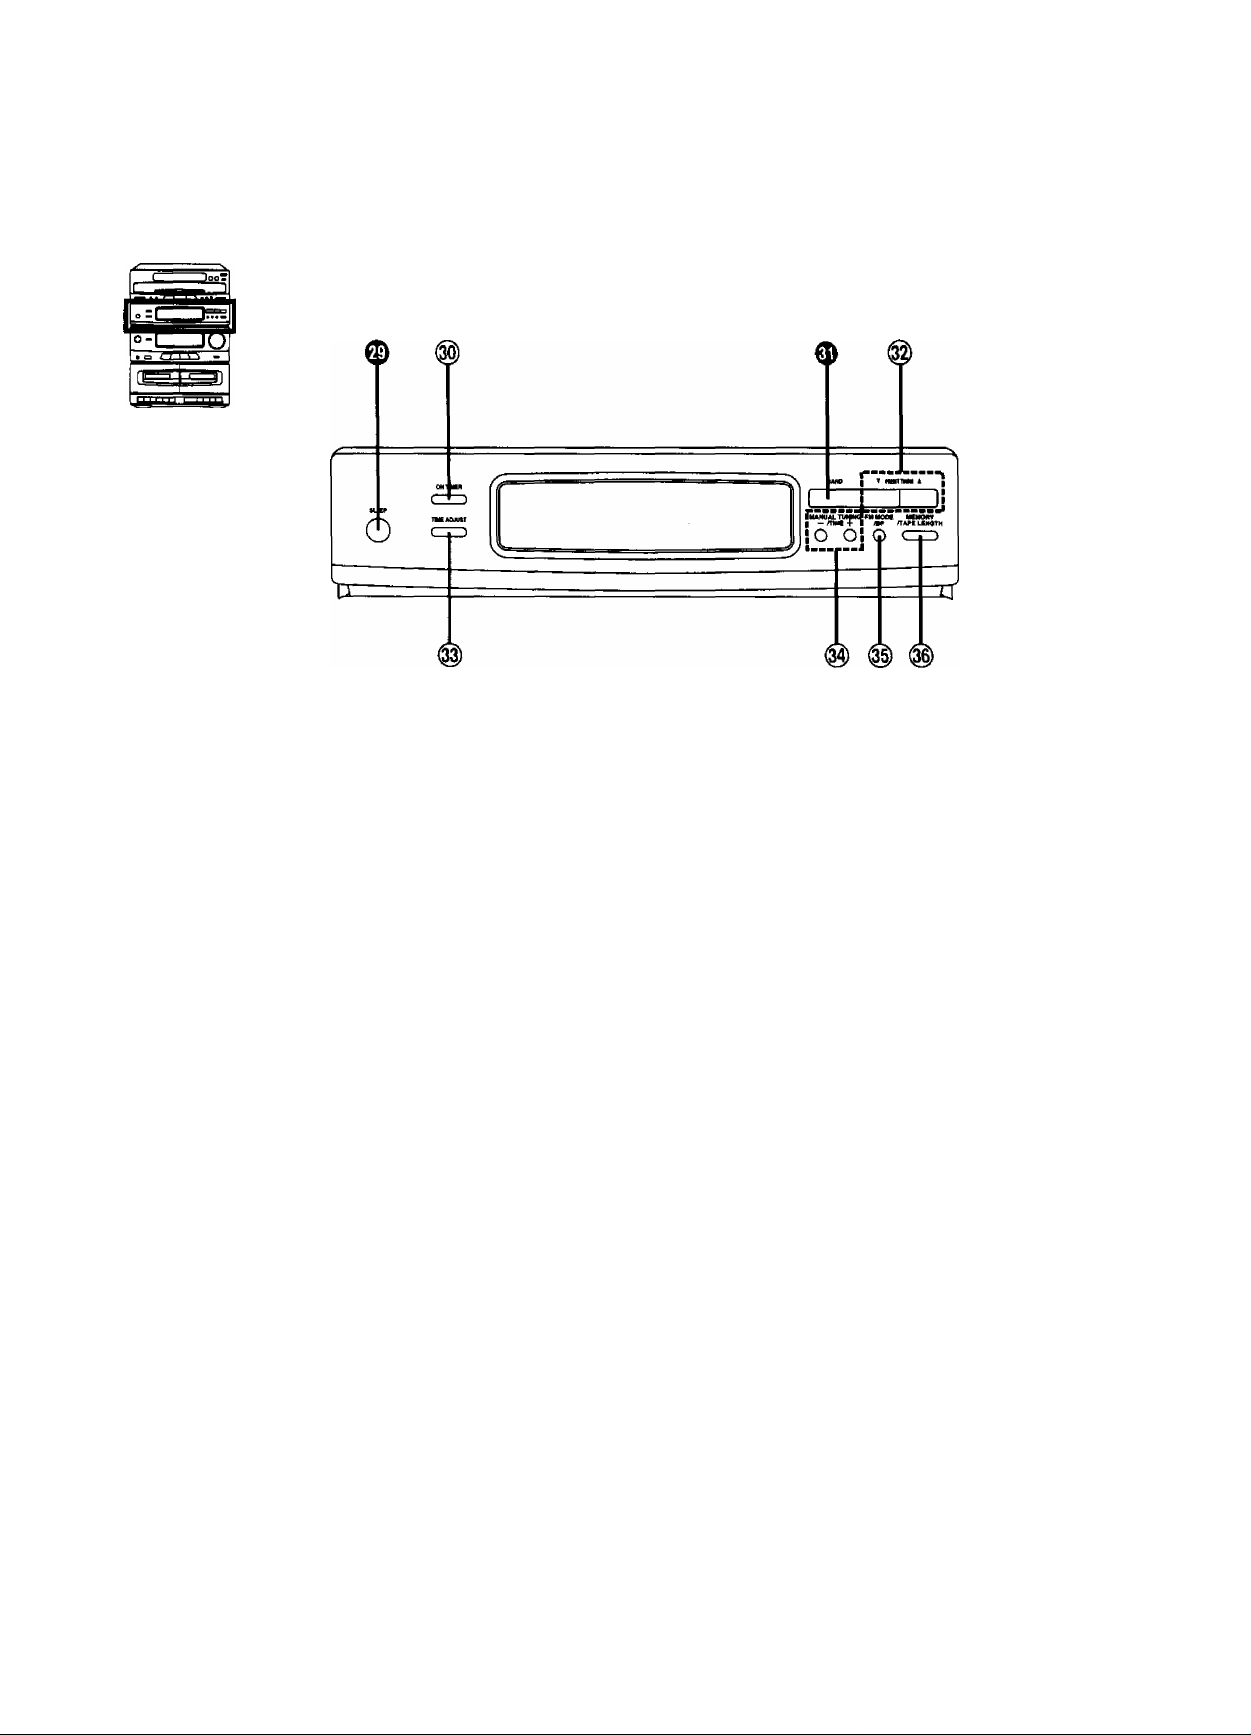
0 Sleep timer button (SLEEP)
Press when you want the system to turn itself oft.
® Timer on button (ON TIMER)
Use for timer play or recording (when you want to set the system
to operate automatically at a preset time).
0 Band select button (BAND)
Press to select the AM or FM radio band.
® Preset tuning buttons (▼ PRESET TUNING A)
Press to program broadcast frequencies into the unit’s memory,
and also to recall the programmed stations.
@ Time adjustment button (TIME ADJUST)
Use to adjust the clock.
Manual tuning/time set buttons
(MANUAL TUNING -/TIME+)
Press to tune to the desired station or set the time.
® FM mode/beat proof button (FM MODE/BP)
Press to select the FM listeni ng mode (stereo or monaural)
during FM broadcasts or to reduce the unwanted beat signals
(whistle) during recording of an AM broadcast.
@ Memory/tape length button
(MEMORY/TAPE LENGTH)
Press to program a broadcasting station or to set the tape length
when edit-recording.
T IW
3oQ?
I PECK 1 I
-QUARTZ LOCK rVrTT:"V=r?:"'V-^:"Vr^^
■JSIEB^O
IFMA№
Multi-digital display
® Quartz lock Indicator (QUARTZ LOCK)
Lights when a broadcast station is tuned in precisely.
® Deck indicators (DECK 1, DECK 2)
Light while the power is switched ON.
® Tape travel indicators (^)
Lights when the tape travels.
® High speed edit Indicator (EDIT Hi)
Lights when the high speed editing is selected.
® Recording indicator (REC)
Lights when the system is recording.
----------------------------
IWI /!///• IWI IM/I IWI
imi imi: imi, imi
I I /!
MU_TI_NG^
:=MIN
lVOLUM|i
DECK 2
S.BÄSS M.SCAN r=MAX
------
© Muting indicator (MUTING)
Lights when you activate the muting mode.
© FM stereo indicator (STEREO)
Lights when you receive an FM stereo broadcast. It will not light
if you are using the FM mode/beat proof button to select monau
ral mode.
© Band indicator (FM, AM)
Lights to show which band was selected.
© Alpha-numeric display
Shows the selected source, present time, received frequencies,
volume level, etc.
© Timer indicator (TIMER. TIMER ON)
"TIMER” lights during the timer setting.
“TIMER ON" lights when the timer play or timer recording is
activated.
© Sleep timer indicator (SLEEP)
Lights when you press the sleep timer button.
© Super bass indicator (S.BASS)
Lights when you activate the super bass mode.
® Memory scan indicator (M.SCAN)
Lights when the memory scanning function is used.
© Channel display
Lights to show the preset channel number selected after press
ing the preset tuning button.
@ Memory indicator (MEMORY)
Lights when the memory button is pressed.
© Volume level indicator (VOLUME)
Shows the volume level.
11
Front Panel Controls and Functions
(continued)
i
Amplifier section
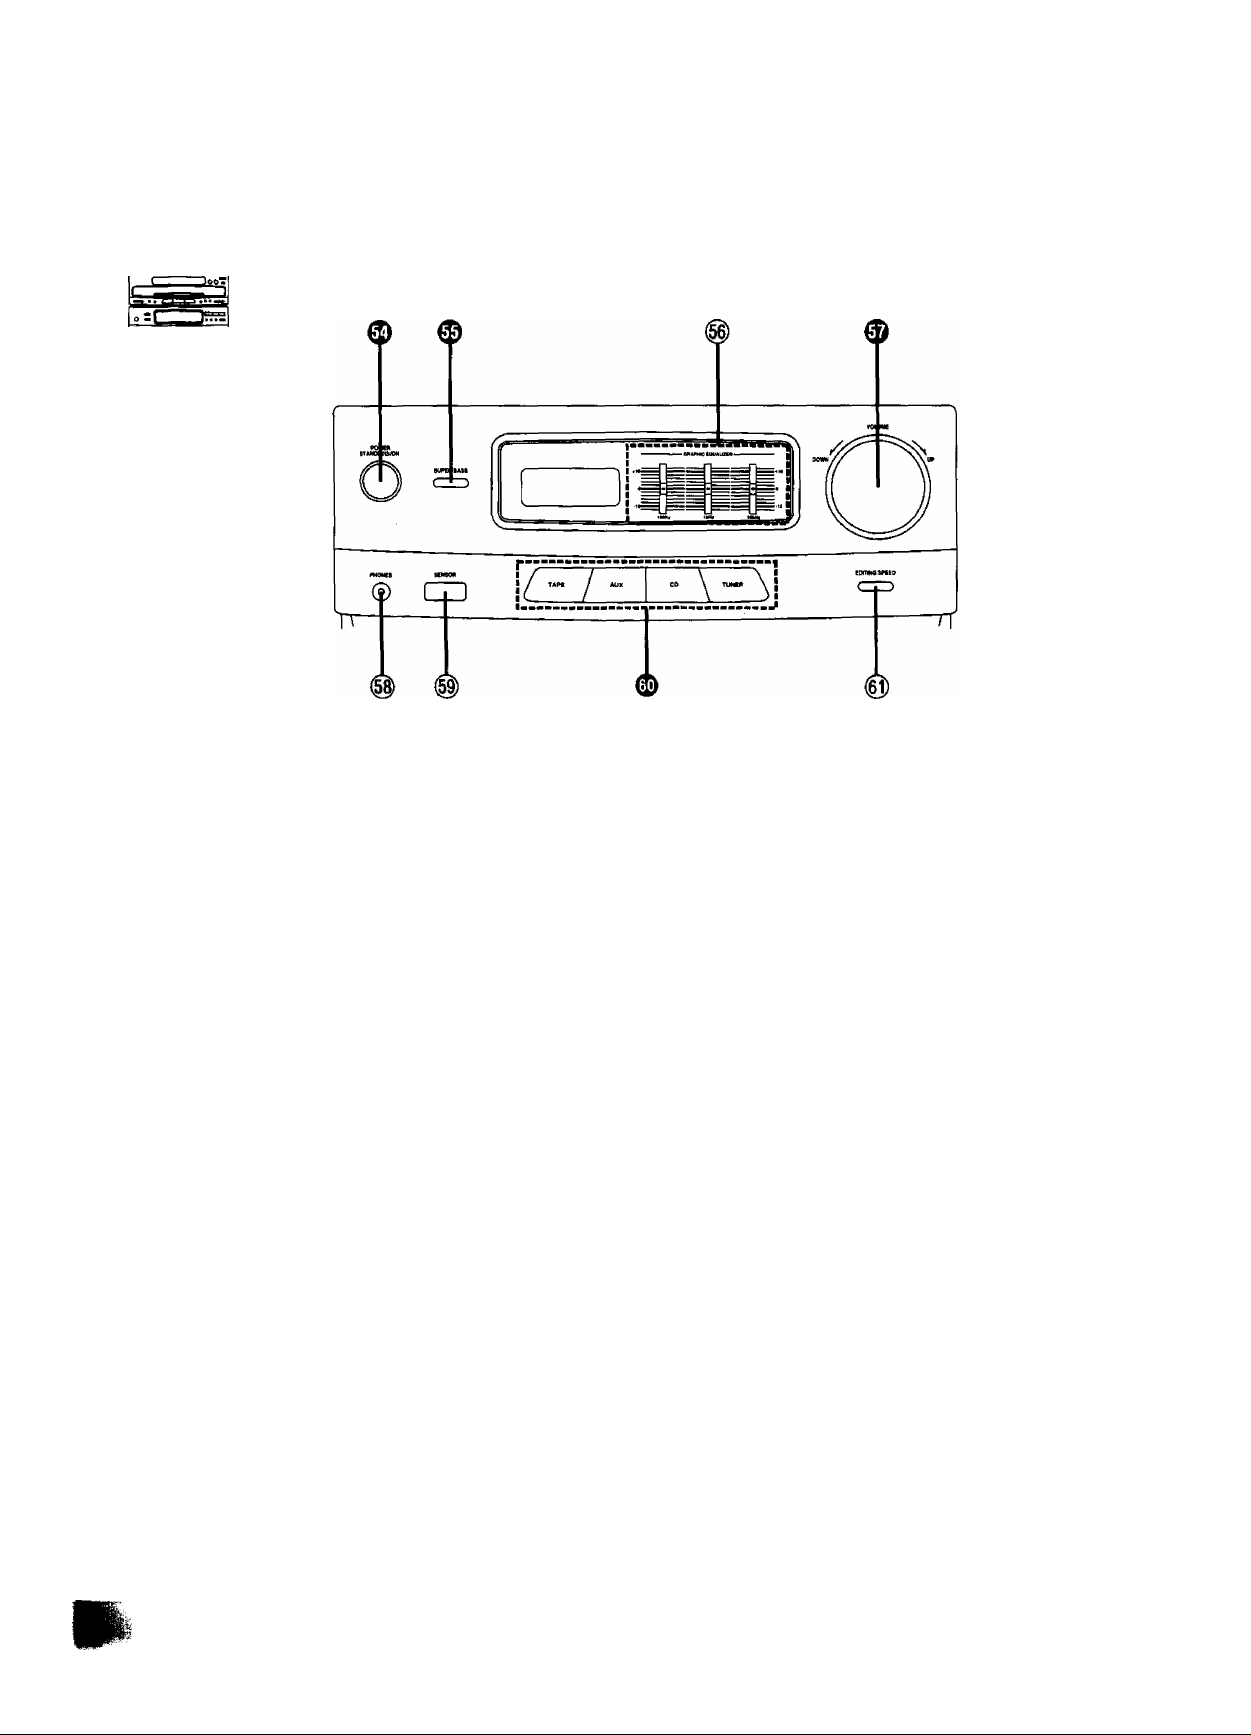
Power “STANDBY c!)/ON” switch (POWER, STANDBY c!)/ON)
Press to switch the unit from on to standby mode or vice versa.
In standby mode, the unit is still consuming a smalt amount of
power.
® Super bass button (SUPER BASS)
Press to boost the low-frequency ranges.
® Equaiizer controls
(GRAPHIC EQUALIZER)
Use to adjust the equalization level.
These controls are for compensation of tonal quality. By sliding
the controls at each of the indicated frequencies in the "+"
direction, the tonal quality is increased, and by sliding them in
the direction, the tonal quality is decreased.
® Volume level control (VOLUME)
Turn to adjust the volume level.
When turning the control, the alpha-numeric display shows the
volume level.
Note that — dB is the lowest volume setting and 0 dB is the
highest.
® Headphones Jack (PHONES)
Plug headphones cord into this jack.
(g) Remote control signal sensor (SENSOR)
Receives the signals from the remote control.
(^ Input select buttons (TAPE, AUX, CD, TUNER)
Press to select the sound source.
@) Tape-to-tape recording speed selector
(EDITING SPEED)
Press to select the recording speed when a tape-to-tape record
ing is made.
^
.........
Q
O ~r~
hr=-cn
Z30
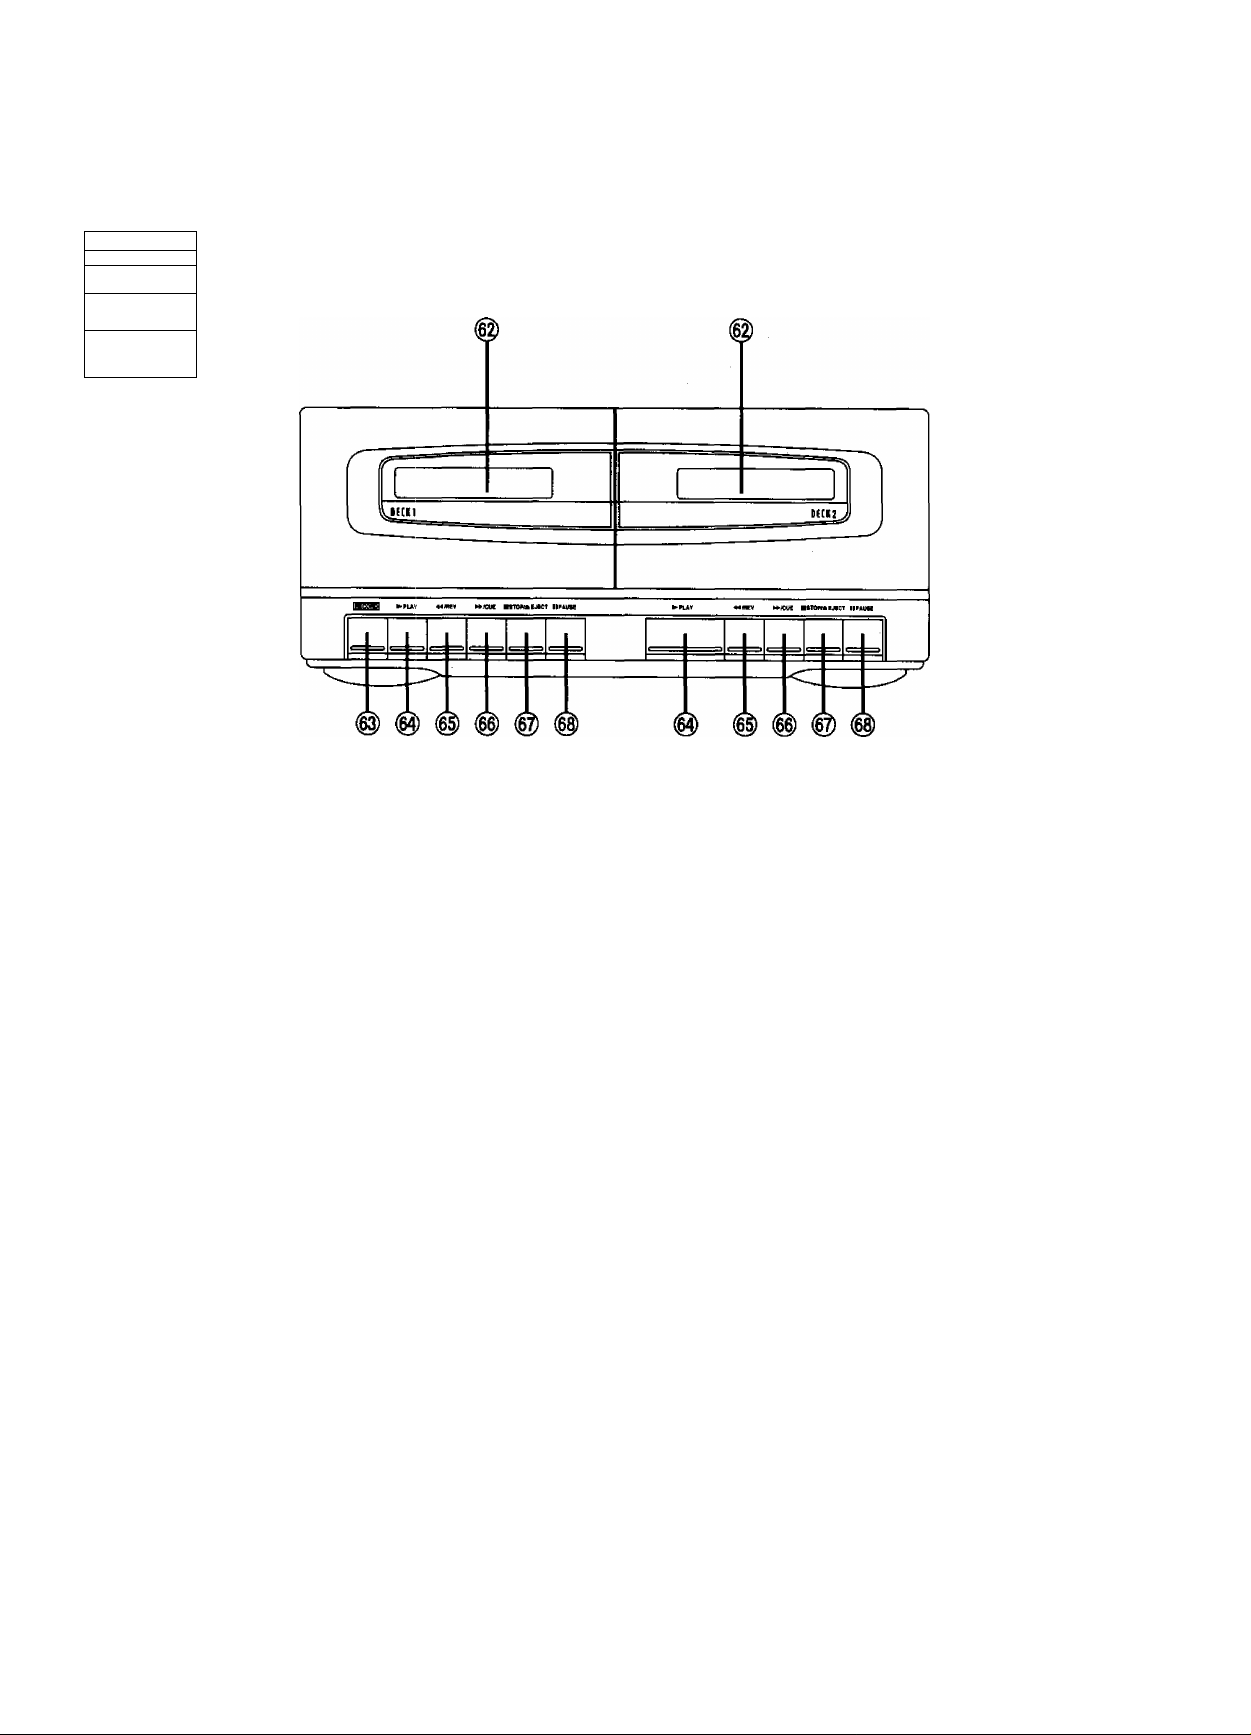
Cassette deck section
® Cassette holders @ Record button (RECORD)
Press to make a recording (tape deck 1 only).
@ Playback buttons (P> PLAY)
Press to play back a tape.
Rewind/review buttons (^^/REV)
Press to rewind the tape.
Press and hold during playback to review the contents at high
speed.
Fast forward/cue buttons (P^P'/CUE)
Press to advance the tape.
Press and hold during playback to cue the contents at high
@ Stop/eject buttons (■ STOP/a EJECT)
Press to open the cassette holder, or to stop the tape.
(|^ Pause buttons (II PAUSE)
Press to temporarily stop the tape playback or recording (deck 1
only).
1.“^
Remote Control Unit Controls and
Functions
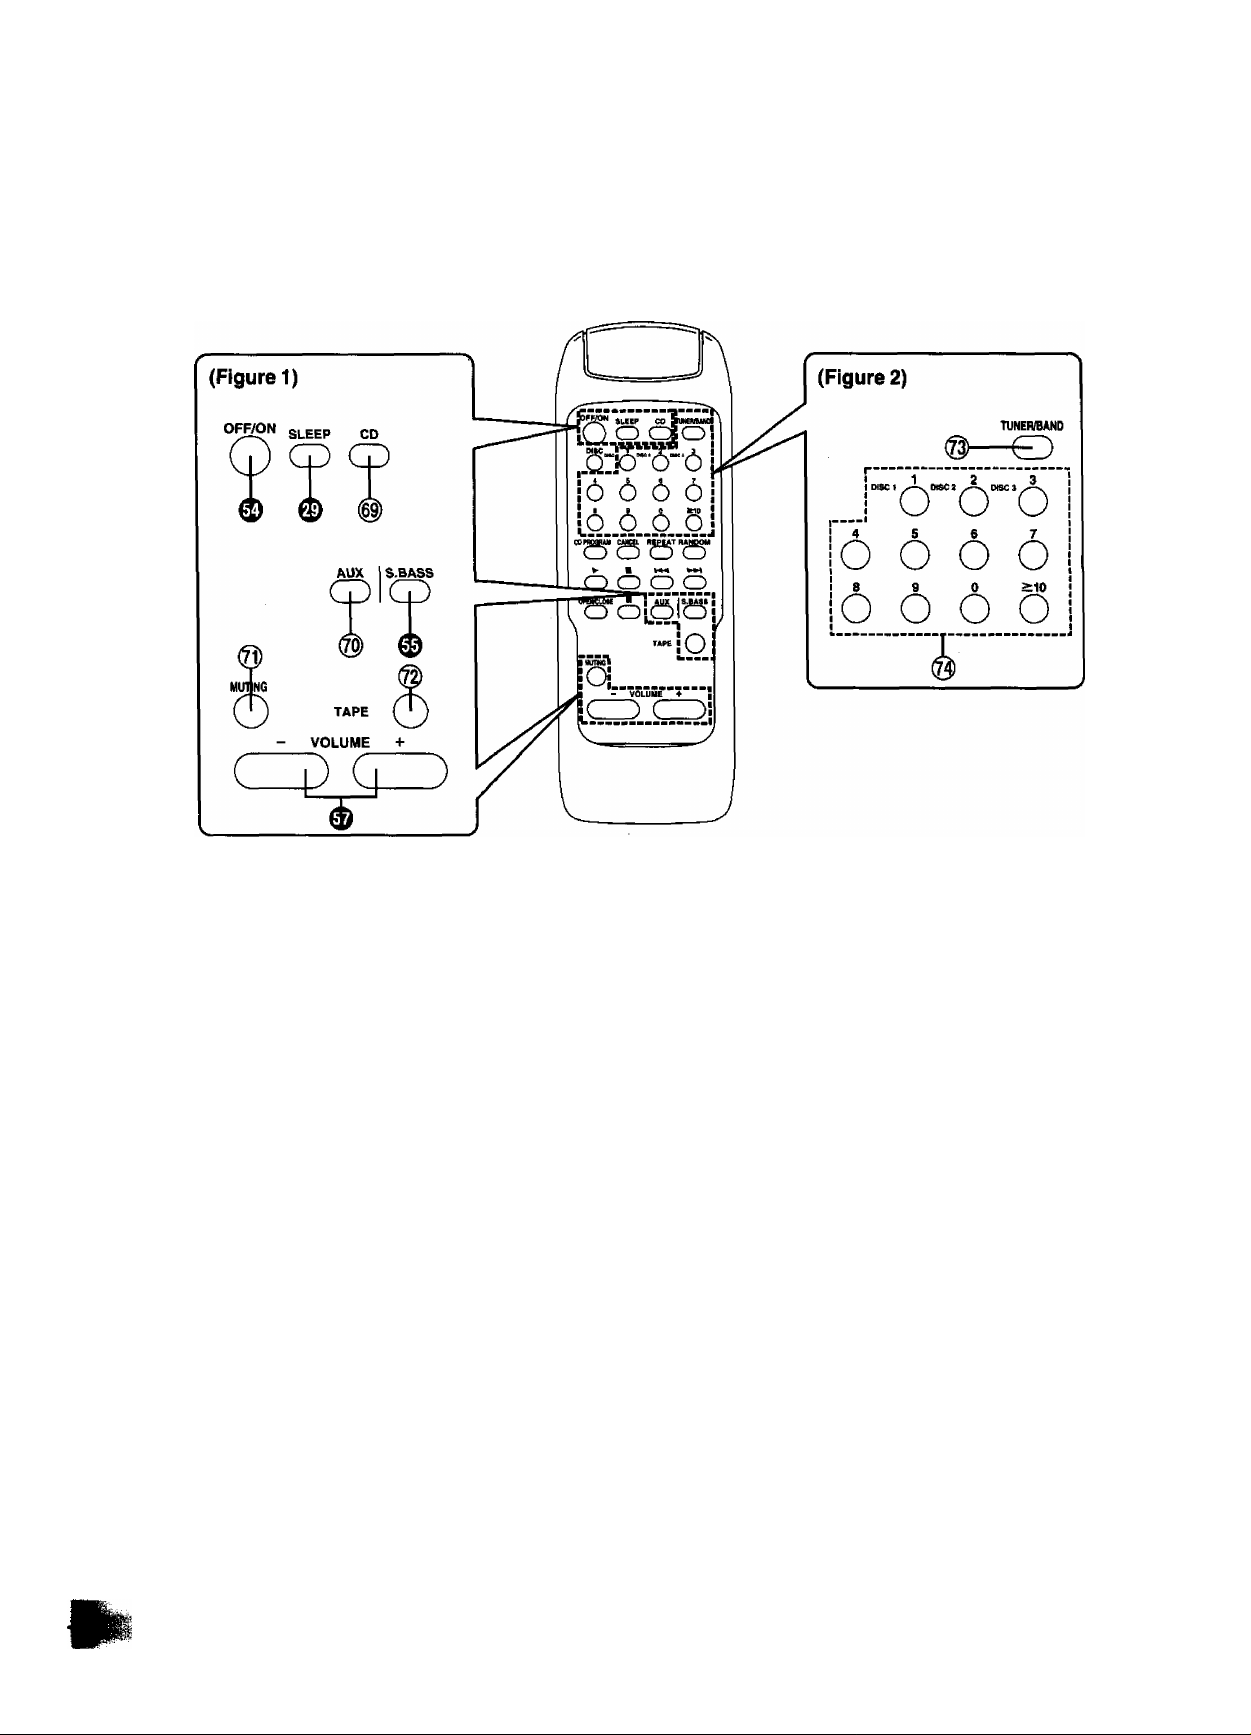
Common operation controls (Figure 1)
The functions of buttons ® and ® are identical to those
described under “Tuner section” on page 10 and “Amplifier section"
on page 12.
@ CD input select button (CD)
Press to select the CD source.
@ AUX Input select button (AUX)
@ Muting button (MUTING)
@ Tape input select button (TAPE)
Tuner controls (Figure 2) —
@ Tuner input /band select button (TUNER/BAND)
Use to select tuner source and desired band (FM or AM).
@ Preset-tuning buttons
Use to tune to broadcast stations which have been preset in the
unit’s memory.
Press to select the external source.
Press to temporarily mute the volume level.
Press to select the tape source.
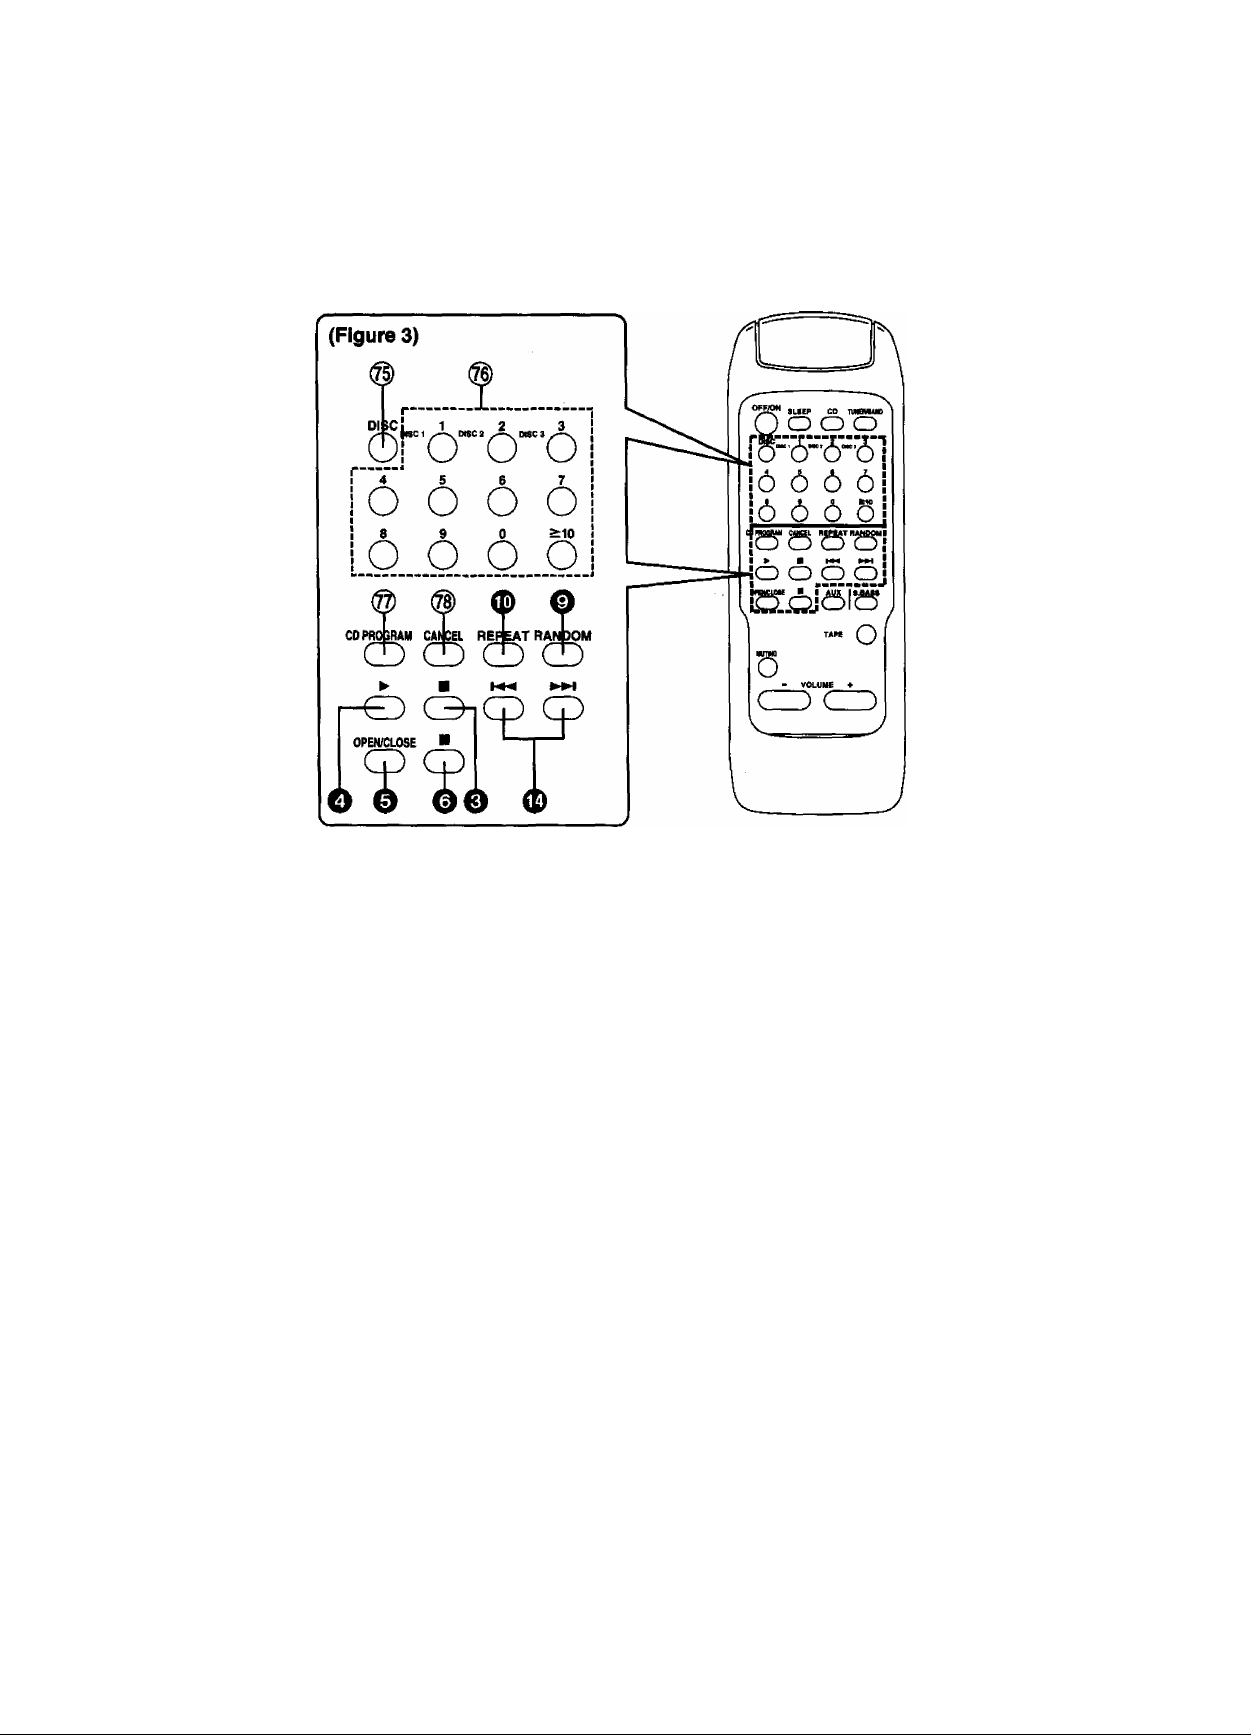
Compact disc controls (Figure 3)
The functions of buttons 0, O, 0, ©, 0,0 and 0 are identical to
those described under “Compact disc changer section" on page 8.
® Disc button (DISC)
Press this button before selecting the disc number
(DISC 1-DISC 3) on the numeric buttons.
@ Numeric buttons
Use to select one track on a compact disc or when selecting
which disc (1 -3) you want to play.
@ Program button (CD PROGRAM)
Press to activate the program play mode. You can then enter
specific tracks using the numeric buttons.
Cancel button (CANCEL)
Press to cancel the programmed track.
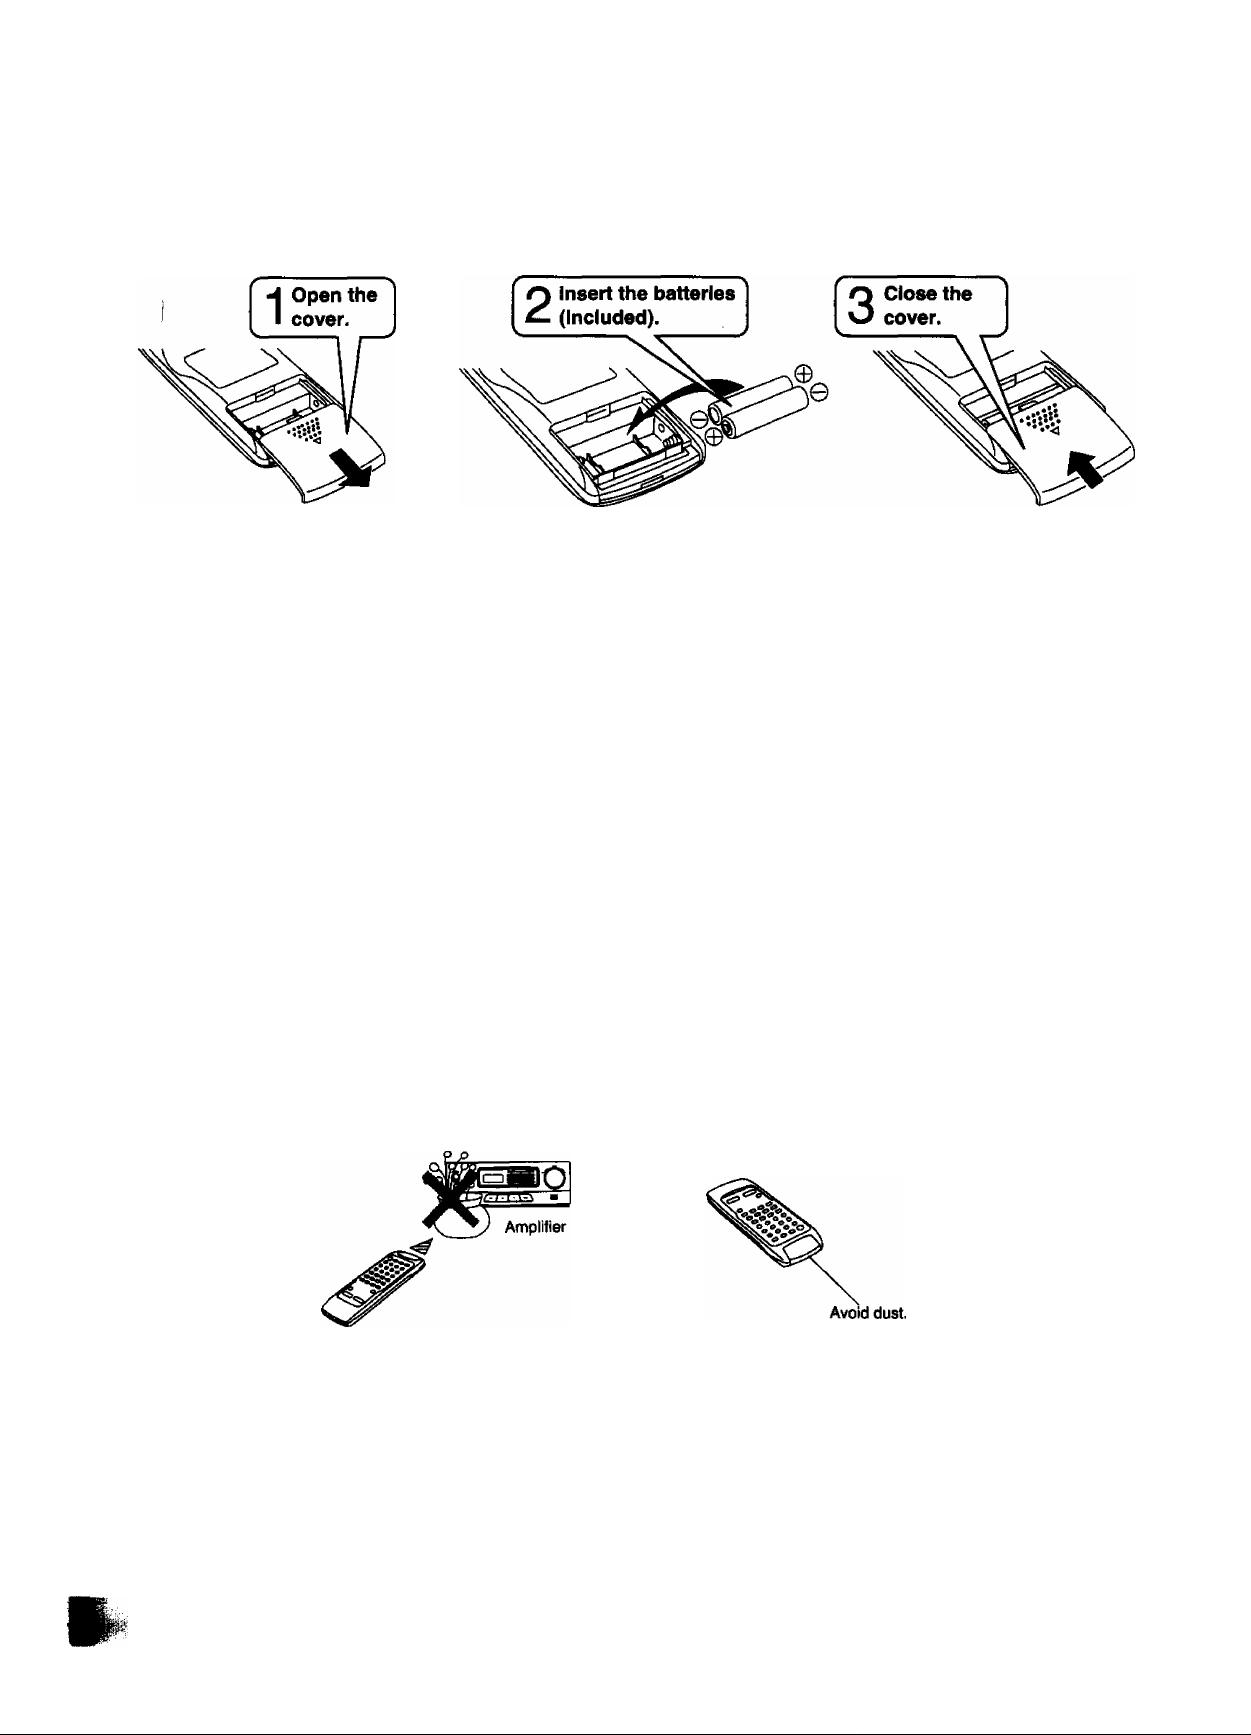
Concerning the Remote Control
Battery installation
-------------------------------------------------
1 Open the cover.
Press gently and slide the cover out,
2 Insert the batteries Included with this system.
When you need to replace these batteries, use two UM-4
‘'AAA", lEC R03 (1.5 V) or equivalent batteries.
Use of batteries
Do not mix old and new batteries or batteries of different types
(carbon and alkaline, etc,).
The average battery life is about one year. Although the battery life
varies depending on how often the device is used, you should gener
ally replace the batteries about once a year.
Replace the batteries if commands from the remote control transmit
ter do not operate the unit even when the transmitter is held close to
the front panel.
Never subject batteries to excessive heat or flame; do not attempt to
disassemble them; and be sure they are not short-circuited.
If you will not be using the remote control for a long period of time,
remove the batteries and store them in a cool, dark place.
Be sure that you insert the batteries so that their positive (+) and
negative (-) polarities match the polarities indicated in the
compartment. Batteries installed incorrectly may leak and cause
damage.
Refer to “Use of batteries" for additional information.
3 Close the cover.
If a battery leaks, remove all batteries and dispose of them properly.
Thoroughly clean the battery compartment before inserting new bat
teries.
If the leaking electrolyte comes into contact with skin or clothes, flush
with water immediately.
Keep batteries out of the reach of children.
Do not use rechargeable-type (nickel-cadmium) batteries.
Do not attempt to recharge alkaline or carbon batteries.
Always remove old, weak, or worn-out batteries promptly and dispose
of them properly.
Do not dispose of used batteries in household rubbish.
Operation notes
Aim the remote control transmission window toward the amplifier’s
sensor. Avoid any obstacles.
-i'='WiiO
* * g
Amplifier
30”
30'
/trJ\ 7 meters
(23 feet)
Use the remote control within a 60-degree angle of the amplifier.
The maximum distance is within 7 meters (23 feet) directly facing
toward the amplifier.
5 "OSO
Sì =
Amplifier
Avoid dust.
Be sure the transmission window and the amplifier's sensor are free
from dust. Excessive dust might prevent reception.
If direct sunlight or other strong light source strikes the remote control
signal sensor part of the amplifier, it may impair the remote control's
operation, if there is a problem, move the amplifier away from the
light source.
If this system is installed in a rack with glass doors, the glass doors'
thickness or color might make it necessary to use the remote-control
transmitter at a shorter distance from the system.
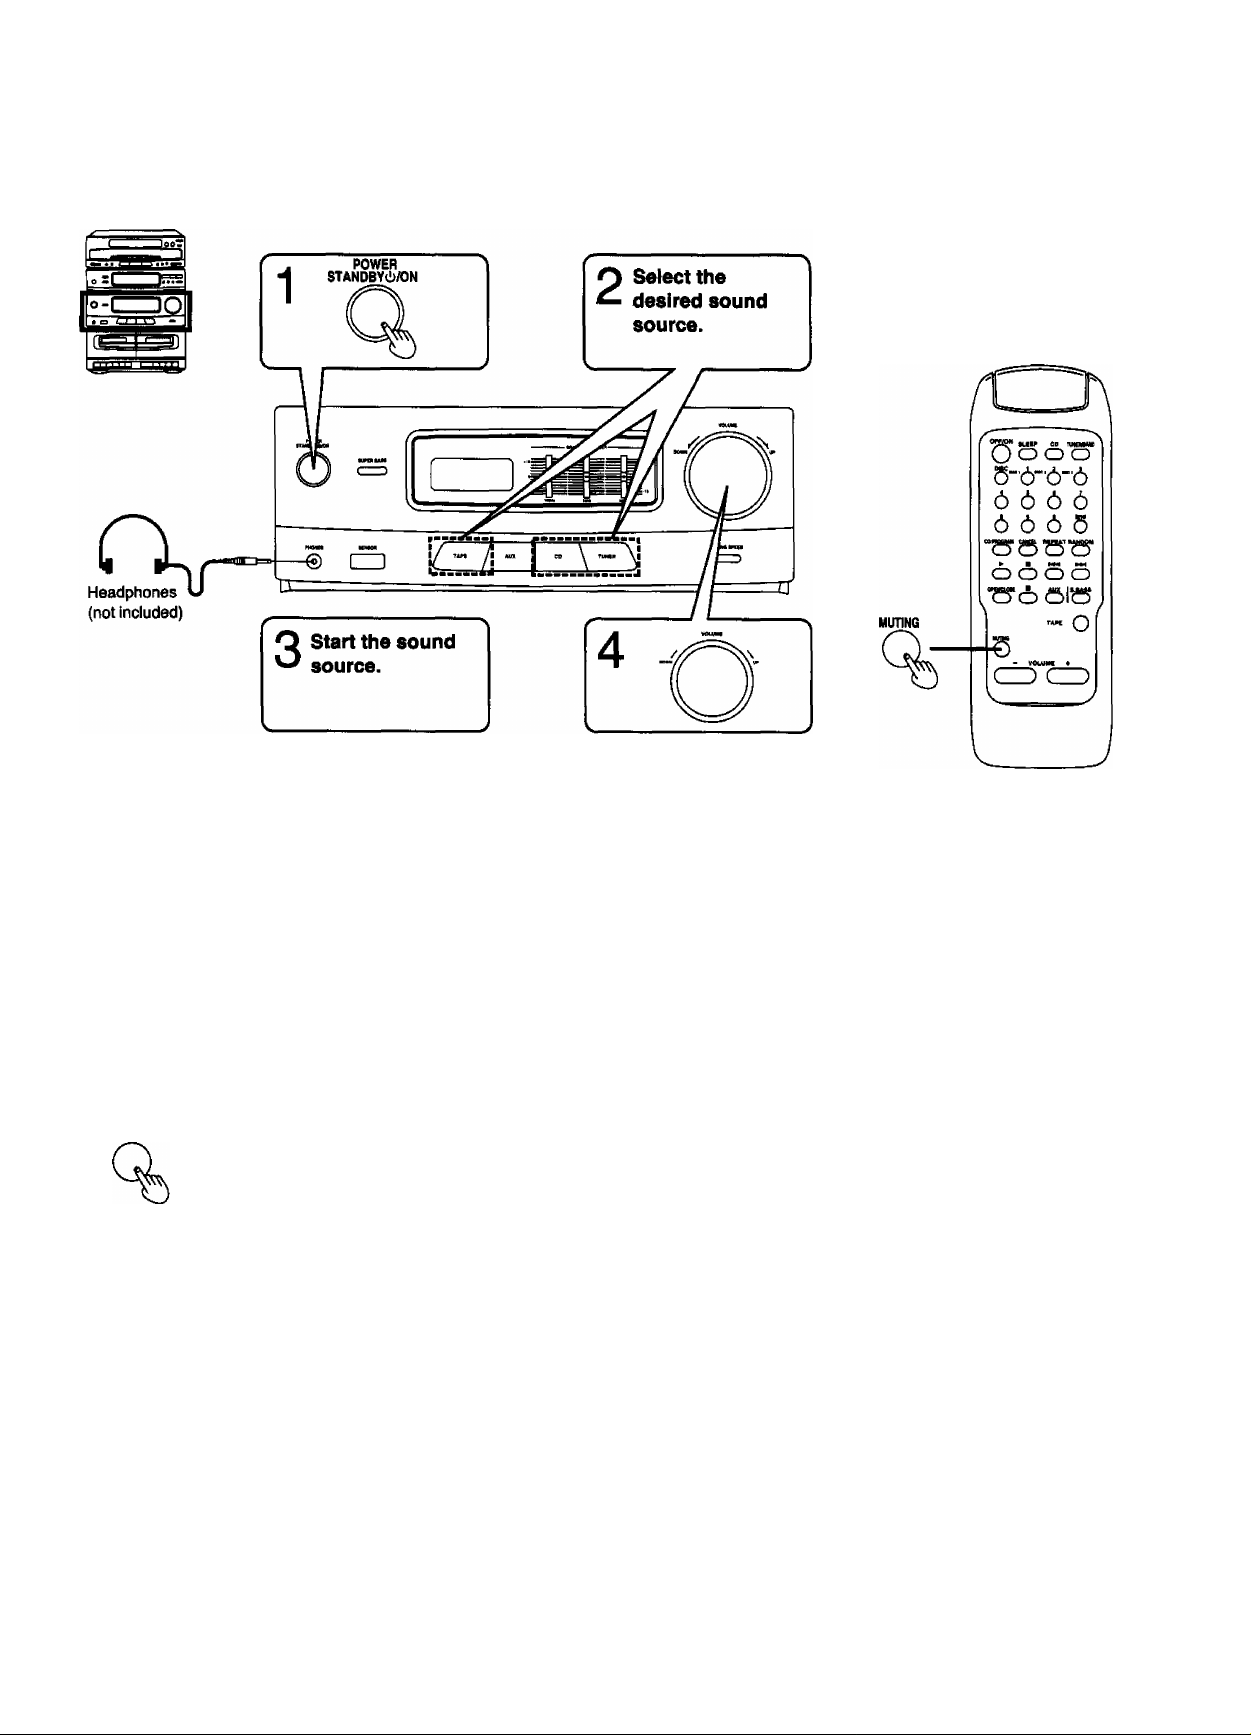
Basic Operating Procedure
1 Press POWER STANDBY
the power.
CD
/ON to switch on
2 Select the sound source by pressing TAPE, CD
or TUNER.
The display panel will show which source has been selected.
How to mute the volume
Press MUTING on the remote control.
MUTING
The muting indicator appears on the display.
This lowers the volume level by 20 dB (approximately Vio).
How to use headphones
Reduce the volume level.
Connect the headphones to the headphones Jack.
When you connect the headphones, the speakers will automatically
be cut off.
(not included) ‘
3 Start the sound source. 4 Adjust the volume level.
Note:
Before you set the system to the standby mode, be sure to reduce the
volume level to prevent the extremely high output from the amplifier
from damaging the speakers.
To cancel, press MUTING again or reduce the volume level to the
minimum position and then reset to the desired volume.
Avoid listening for prolonged periods of time to prevent hearing
damage.
Plug type: Stereo mini
17
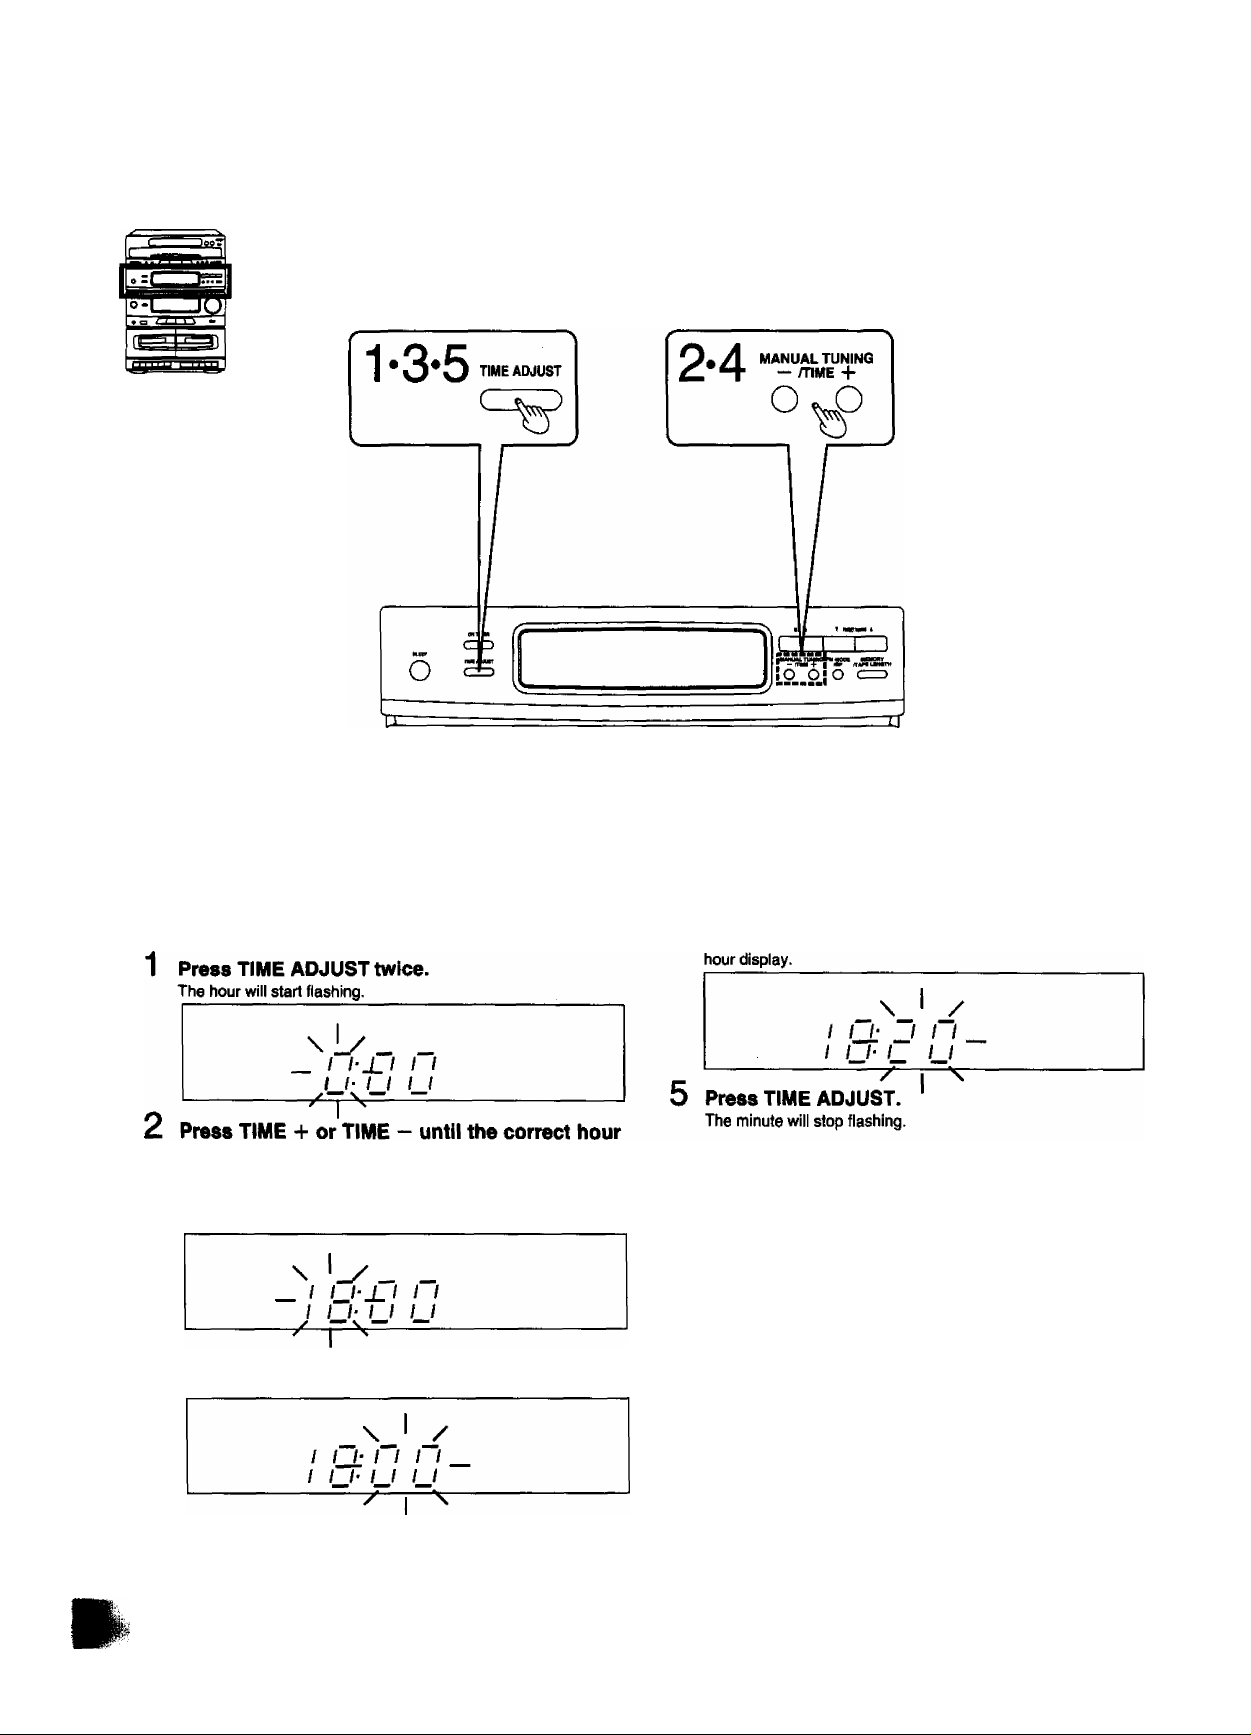
Setting the Time of Day
These instructions explain how to set the time for 18:20.
Switch on the power.
appears on the display.
TIME +; To advance the time
TIME —: To reverse the time
Press TIME ADJUST.
The hour will stop flashing and then minute will begin to Rash.
4 Press TIME + or TIME - until the correct min
ute appears on the display.
Going from 59 to 00 on the minute display will not change the
The clock will be reset to "0” seconds.

Listening to Radio Broadcasts
Manual tuner operation
---------------------------------------
1 Press the TUNER input select button.
2 Press BAND to select FM or AM.
The display will show which band you selected.
Band Frequencies
3 Press MANUAL TUNING + or MANUAL TUN
ING — to tune in the desired broadcast.
Press momentarily until the desired frequency appears in the
display.
If you have tuned in an FM stereo broadcast, the FM stereo
indicator will appear.
1Q

Listening to Radio Broadcasts
(continued)
Automatic tuner operation oniy for FM
For FM broadcasting stations (but not AM), you can automatically
tune in the station.
=-l
_ _
lUl
1
--------------------
1 Press the TUNER input select button.
2 Press BAND to select FM.
MAX
1 1
F*»
1 1 1
u
K MHz
=MIN
VOLUME
3 Press and hold MANUAL TUNING + or MAN
UAL TUNING then release when the dis
played frequency begins to change.
+ : For higher frequencies
-: For lower frequencies
Once a station is tuned in, the frequency will stop changing.
To cancel the automatic tuner operation:
Press either MANUAL TUNING + or MANUAL TUNING - again.
MANUAL TUNING
— /TIME +
Note;
Vl^en there is excessive interference, the automatic tuner function
may not function.

Memory presetting
If you want to preset broadcast frequencies, you can input them into
the unit's memory. You can easily recall any of those broadcast
frequencies by pressing one of the preset-tuning buttons on the
remote controi or by using the preset button (PRESET TUNING).
You can input up to 24 radio stations (12 FM and 12 AM) into the
tuner’s memory.
(When you input a new frequency on a preset channel, the previous
setting for that channel is automatically cancelled.)
1 Press the TUNER input select button.
2 Press BAND to select FM or AM.
3 Tune in your favorite station.
Press MANUAL TUNING until the correct frequency appear on
the display.
4 Press MEMORY to activate the memory indi
cator.
The memory indicator will flash.
Memory indicator
\ /
1 1 /
FM
П
и
1
Most-recent-memory
The most-recent-memory system remembers the broadcast station
last tuned to when you switched the power to standby mode or
selected another function. When you switch the tuner back on, the
last station you tuned to will automatically come on.
The programmed frequencies wilt remain In the unit’s memory for
approximately 2 weeks, even if there is an interruption.
— MEMORY —
MHz
MAX
^ 1 ^ =M«
VOLUME
5 Press ▼ PRESET TUNING or PRESET TUNING
A to select the desired preset channel while
the memory Indicator is flashing.
PRESET TUNING A: Press to increase (from 1 to 12).
▼ PRESET TUNING: Press to decrease (from 12 to 1).
MAX
\ 1 /
FM
6 Press MEMORY.
The memory indicator will go off.
П 1 /
и и.
1
I
— MEMORY —
^ 1.^ =MM
MHz VOLUME
Channel number
7 Repeat steps 3 through 6 to program station for
each of the remaining channels.
21

Listening to Radio Broadcasts
(continued)
Memory tuner operation
(To listen to broadcast stations which have been programmed into the unit’s memory)'
Switch on the power and be sure you’ve completed the steps for
“Memory presetting" on page 21.
1 Press BAND to select FM or AM.
AM and FM indicators will appear in turn.
/ /
FM
From the remote control
1 Press TUNER/BAND to select FM or AM.
2. Press the numeric button corresponding to the
preset channel you wish to tune in.
1 1 1
u
L MHz
---------------------
MAX
= IIN
VOLUME
2 Press ▼ PRESET TUNING or PRESET TUNING
A to select the desired preset channel.
The selected channel number will appear on the display.
MAX
___
/ / 1 t 1
u.
u
1
MHz
Channel number
FM
To select a preset channel between 1 and 9:
Press the appropriate preset-tuning button 1 -9 directly.
To select a two-digit preset channel:
First press^lO and №en a numeric button 1 to select the “tens" digit.
Then press one of the buttons from 0 to 2 to select the “unit” digit.
For example:
Preset channel 12:
=MM
VOLUME

^¡ssì
Memory scanning
This feature is convenient when trying to iocate a certain broadcast,
or to monitor each station briefly.
Each frequency can be heard (in sequence) for about 5 seconds.
Press T PRESET TUNING or PRESET TUNING ▲, then release when the frequency display begins to change.
The memory scan indicator will flash.
PRESET TUNING ▲: For higher channel
T PRESET TUNING; For lower channel
Memory scan indicator
\ 1 /
— HSCAN— ““
FM
/ / / / 1
/_/ /
^ 1 ^
MHz VOLUME
=MM
If noise is excessive in the FM mode
Press FM MODE/BP to monaural position.
FM MODE
/BP
When the broadcast you want to listen to Is found
Press ▼ PRESET TUNING or PRESET TUNING A.
The broadcast will continue even after 5 seconds.
The FM stereo indicator will go off, showing that the sound will then
be heard in monaural. If the broadcast signal is weak, or if there is a
targe amount of interference, you will get a clearer sound using the
FM MODE/BP button.
23

Listening to Compact Discs
Sequential play--------------------------------------------
Sequential play refers to play all tracks on the loaded discs in se
quence beginning with the first track on the disc in playing position.
(Also available from the remote control)
1 Press the CD Input select button. 2 Press OPEN/CLOSE to open the loading
drawer.
3 Load the dlsc(s) on the disc tray(s).
Do not load 8 cm and 12 cm discs on the same disc tray.
Be sure to load a 8 cm disc correctly at center position.
The number (1 -3) on the disc tray indicates the disc number.
Label must face up.
4 Press OPEN/CLOSE again to close the loading
drawer.
You can skip this step by pressing the CD play button.
The loading drawer will close automatically, and play will start.
Do not attempt to close the drawer by hand. Be sure to press
OPEN/CLOSE.
Press the CD play button.
Disc play begins from the first track on disc 1.
You can specify which disc you want to play first by pressing the
disc button (DISC 2 or DISC 3).
The disc indicator corresponding to the disc being played
flashes.
Flashing
Flashing
Elapsed time
• S-S S S s
'HTS ¡ESS
52
The frames above and below the track currently playing will
flash while the track is played and go out at the end of that track.
The changer will play all the tracks on all the discs in order and
stop automatically when the last №ack on the last disc finishes
playing.
When there are 16 or more tracks on the disc.^'will appear.
Note:
If you press OPEN/CLOSE while the play indicator is lit, the
drawer will open to half position.
To open fully, follow the procedure below.
® Press the stop button.
@ Press OPEN/CLOSE to close the drawer.
@ Press OPEN/CLOSE again to open the drawer.
SEC
^Play indicator
Note:
Do not touch the carrousel or the loading drawer while it
is moving.
Do not turn the carrousel forcibly by hand because it may
fail to operate normally.
CAUTION:
Do not move this changer with a compact disc inside the unit.
If a disc comes off the disc tray, it might be scratched or the
changer might become incapable of playing.

To temporarily stop the disc play
(Also available from the remote control)
Press the pause button.
II PAUSE
The pause indicator will appear.
Press the pause button again or the CO play button, to resume play.
±y~
"S-lS Œj s s
S S
To stop the disc play —
(Also available from the remote control)
Press the stop button.
The changer switches to the stop mode and the indication tor total
number of tracks and disc number will appear.
To confirm the total playing time of the disc currently
in playing position —
-----------------------------
------------------
mm
Total number of tracks
F=:n
/
11
I
I r
Pause indicator
SEC
Disc number
In Stop mode Press DISPLAY.
DISPLAY
To exchange discs during play
You can exchange the other discs while a disc is playing,
(T) Press OPEN/CLOSE during playing.
(Also avsilable from the remote control)
The loading drawer will open at half position.
@ Exchange the discs.
<g) Press OPEN/CLOSE again to close the loading drawer.
(Also avsilable from the remote control)
Note:
If you play a disc with the loading drawer open, the changer will
automatically stop when the last track on №e current disc finishes
playing.
Notes:
Do not cover the hole or silts indicated on the right.
Otherwise the Incorrect operation will take place.
Do not Insert another disc onto tray ®, although the tray is
partially showing, its disc is in the play position.
Total playing time
I — _ Ti-
/ /.'**-
SEC
èOPEWCLOSE
25

Listening to Compact Discs
Direct access play----------------------------------------
(Only from the remote control)
Direct access allows you to start sequential play from a specific track
on a specific disc and to play all discs loaded in sequence.
(continued)
If you want to start with the disc currently in playing position, proceed
to step 4.
1 Press the CD input select button.
2 Press DISC. Flashing
VV
/ /
11 12 13 14 IS
I I
Press one of the numeric buttons (1-3) to specify which disc contains the track you wish to play.
If you don’t proceed to step 4, play will begin with the first track
of the selected disc and continue to the end of the disc.
'l"
4 Press the numeric buttons to specify the de
sired track number.
To select a track between 1 and 9:
Press the appropriate numeric button 1-9 directly.
To select a two-digit track:
First press >10 and then a numeric button 1-9 to select the
"tens” digit. Then press one of the buttons from 0 to 9 to select
the "unit” digit.
For example:
Track no. 13; [5^iol-[T]-5l
Track no, 20; Eiol-Bl-lol
Track no, 35; Eia-lsl-BI
Play begins with the track selected and continues to the end of
the last disc.
The changer will stop automatically when the last track on the
last disc finishes playing.
____

Program play
(Only from the remote control)
This function ailows you to program up to 20 tracks from the loaded
discs in any order you choose.
1 2
3 4
6 T
11 12
Press DISC.
3
4
Press one of the numeric buttons (1-3) to
« 9
13 14
10
1B
^ TIUCK
t 1
/ f
$
t
DISC
Program indicator
specify which disc contains the track you wish
to play.
Press the numeric buttons to specify which
track you want to play.
Program track Program disc
"tens" digit. Then press one of the buttons from 0 to 9 to select
the "unit” digit.
For example:
Track no. 13; fel0l-fn*l3l
Track no. 20; Eiol-BI-151
Notes:
“F" will appear on the display if you try to program more than
20 tracks.
If you enter non-existing disc(s) or track(s) soon after the loading
drawer is closed or when H is open, the corresponding indicator
illuminates and the entry is included in the program count. In the
play mode, the changer will cancel the non-existing entry and
play the subsequent programmed disc or track.
Repeat steps 3, 4 and 5 until you have com
6
pleted the program.
7
Press the CD play button.
Play will begin from the first track you programmed.
97

Listening to Compact Discs
To clear a programmed track-------------------------------------------
1. Press CANCEL in the stop mode.
CANCEL indicator will light.
2. Specify which track is to be canceiled.
(i) Press DISC.
@ Press a numeric button (1 -3) to specify which disc contains
the track you want to cancel.
@ Press a numeric button corresponding to the track you want to
cancel.
3. Repeat step 2 If required.
4. Press CANCEL again.
CANCEL indicator will go out.
To add an entry
You can add an entry in the play or stop mode.
Press a numeric button to show which track is to be added.
® Press DISC.
d) Press a numeric button (1-3) to specify which disc contains the
track you want to add.
@ Press a numeric button corresponding to the track you want to
add.
(continued)
To cancel program play
Press CD PROGRAM to go off the program indi
cator.
When pressed in the play mode, sequential play will resume.
Note:
When you press OPEN/CLOSE to open the disc drawer or press the
stop button in the stop mode, all the program is cancelled.
Program memory function
The unit’s memory will retain the programmed sequence until you
cancel it by opening the compact disc drawer or by pressing the stop
button in the stop mode. The sequence will remain in the unit's
memory for approximately 2 weeks.

Random play
The microcomputer will automatically select a sequence of tracks to
be played from all of the loaded discs in an "exclusive random"
manner. (No tracks will be repeated.)
loo“
o —
o-(~~
=)0
1
^ <ss^ j ascb y o O O
(Also available from the remote control)
1 Press the CD input select button.
2 Press RANDOM.
The random indicator will appear on the display, and random
play will start.
Random indicator
S t UJ t f / <
s S'aTE [E
[ii? fiil liD 4 k iMu
To cancel random play
(Also available from the remote control)
Press RANDOM once again to end random play.
RANDOM
The random indicator on the display will go off.
The changer returns to sequential play mode from the current track
on the current disc which is playing.
The changer will stop automatically when alt the tracks on all the
loaded discs have been played.
The changer will randomly choose a track from a randomly selected
disc. Once the changer has played the selected track, it will make
another selections at random, excluding the tracks already played.
rJLm
9Q

Listening to Compact Discs
Special features-------------------------------------------
o-CZZDO
Search function
(continued)
You can search rapidly forward or backward on the disc for specific
sections.
While in the play mode, press and hold either « or (search button). Release the button when you have reached the desired point.
You can search forward.
You can search backward.
Skip function
(Also available from the remote control)
Press either or P>l (skip button) until you reach the desired track.
: You can skip forward.
Kd : You can skip backward.
In sequential play/program play mode:
^ ; You can skip as many tracks as the number of times you press
the button.
hdd : You can skip back to the beginning of the track being played.
If you press this button again quickly, you can skip to the
beginning of the previous track.
Note that in a backward skip, the current track is included in
the count.
At first, the search is at slow speed, and then becomes more rapid if
the button is held down.
The volume level will drop to about Va of normal.
In program and random play modes:
A search will take place only within the track being piayed.
In program play mode, you can skip only within the programmed
tracks.
In random play mode:
^ ; You can skip to the beginning of a next track on random
manner.
HH : You can skip back to the beginning of the current track.
oBF

Repeat function
This function repeats the play of tracks on the loaded discs.
(Also available from the remote control)
Press REPEAT before or during play.
Repeat indicator will appear on the display.
13j E E
ass
TRACK MM
I I
SEC
C3
Repeat indicator
Switching the dispiay
In the stop mode Press DISPLAY.
Total playing time
___
(e < MM
LU lil
The display will change to show the total pla^ng time of the disc in
playing position.
:■ . _T-
/ /•*'*-
-m. ’ SEC
In sequential play mode:
All tracks of all discs will be played repeatedly.
In program play mode:
The changer plays only the programmed tracks in the programmed
sequence repeatedly.
You can enjoy the same track over and over if you press REPEAT
when only one track is programmed.
In random play mode:
When the changer has played all the tracks on all the loaded discs, it
will select a new random sequence and play continuously. The se
quence differs each time.
To cancel repeat play:
Press REPEAT once again.
REPEAT
The repeat indicator on the display will go off.
In the play mode
Press DISPLAY.
Track number Disc number
■'¿AlJ ESS
iiTS E S SS «9 /
E E TRACK
The display will change to show which track and which disc are
currently playing.
DISC
>
31

Listening to Tapes
You can use either deck 1 or deck 2 for tape playback by following the
same steps. (This page shows an example using deckt.)
To play back prerecorded cassettes
1 Press the TAPE Input select button.
2 Press STOP/EJECT, and then load the cassette
you wish to play.
The normal grade of tape is recommended.
Insert the cassette with the exposed tape facing down.
3 Press PLAY to start playback.
Tape travel indicator
IDEdK 11 I bECK 21
/
/“ n r
III /_
/
MAX
=MW
VOLUME

To stop the tape
Pres* STOP/EJECT.
■STOP/± EJECT
The playback will stop.
To briefly Interrupt playback
Press PAUSE.
II PAUSE
To resume playback, press PAUSE again.
Full auto-stop
When the tape reaches the end, the tape transport will automatically
stop.
33

Listening to Tapes
>-rzjo
(continued)
To fast forward or rewind the tape
Press P^P^/CUE or ^^/REV whiie the tape is
stopped.
The tape will start moving at high speed.
To stop the fast forward or rewind operation -
Press STOP/EJECT.
■STOP/± EJECT
To cue or review the tape
During piayback, press and hoid P^P^/CUE or
REV.
The recorded sound on the tape can be monitored at high speed.
When the button is released, normal playback will resume.

Series playback
Series playback is the continuous playback o1 the side which faces
toward you in both tape decks, from tape deck 2 to tape deck1.
1 Press the TAPE input select button.
2 Press STOP/EJECT and load cassettes In
decks 1 and 2.
Load with the side that you wish to listen to first facing you in
deck 2.
3 Press PLAY on deck 2 to start deck 2 playback. 4 Press PAUSE on deck 1. 5 Press PLAY on deck 1.
The tape in deck 1 will begin playing after the tape in deck 2
finishes.
And tape deck 1 will stop at the end of the tape.
35

Making a Recording (Deck 1 only)
To record from the desired source---------------
To make a tape-to-tape recording, see “Tape-to-Tape Recording" on
Switch on the power.
1 Press STOP/EJECT on deck 1 to load a cas
sette.
The normal grade ot tape is recommended.
Check to see that the tape's erasure prevention tabs (see page
53) are intact, and then insert the cassette into deck 1.
You cannot record on the leader tape (the first few revolutions)
so take up the leader tape in advance (See page 37.)
2 Press the Input select button to select your
desired sound source.
To record from the radio:
Press TUNER.
Then tune in the desired station. (See pages 19-23.)
To record from compact discs:
Press CD.
To record from the external unit:
Press AUX.
Pross RECORD.
The recording will begin.
The unit has been set for the optimum recording level.
After pressing RECORD, the cassette deck will automatically
start the recording from the first track. (Synchro start funo
tion)
So you don't have to press the CD play button.
Note:
You can record programmed tracks from more than one disc (up
to 3). The cassette deck wilt create a non-reoorded passage of
about 4 seconds each time that the CD changer changes discs.
Notes:
The graphic equalizer effects will not be recorded.
Do not use the input selectors while a recording is in progress,
because the sound source will be changed.

To briefly interrupt recording
Press PAUSE on deck 1.
IIPAUSE
To stop recording
Press STOP/EJECT on deck 1.
■STOP/± EJECT
---------
The cassette deck will return to the recording standby mode.
To resume recording, press PAUSE again.
To use the beat proof function (AM broadcast only)
Press FM MODE/BP on the tuner.
FM MODE
/BP
When recording an AM broadcast, use the beat proof button to
reduce unwanted “beat" signals (whistle). Press the FM mode/beat
proof button to whichever position (BP 1, or BP 2) best reduces these
beat signals. The display will indicate which position is in effect.
reiCK 11 Ena
1 DECK 1 ]
To erase a recorded tape (Deck 1)
BHa
n
J1
r^k2l
Ti n 1
1oEdk 21
n ~l
1 /_
MAX
=MW
VOLUME
MAX
VOLUME
When you make a new recording on a previously recorded tape, the
new recording will automatically erase what was previously recorded.
To erase a tape without making a new recording, follow the steps on
the right.
Concerning the leader tape
1) Press the TAPE input select button on the amplifier.
2) Insert the recorded tape Into the cassette holder of deck 1.
3) Press RECORD.
The term “leader tape" refers to the first few revolutions on a cassette
tape. No recording can be made on this position of the tape. Before
recording, wind the tape to a point just beyond the leader tape.
37

Making a Recording
Tape-to-tape recording
(continued)
from deck 2 to deck 1
The recording level and the noise reduction effect of the original
(playback) tape will be recorded on the new tape just as they were in
the original recording.
-------------------
1 Press the TAPE input seiect button.
2 insert the piayback cassette into deck 2 and the
cassette you are recording on (the editing tape)
into deck 1.
The normal grade of tape is recommended.
Check to see that the tape’s erasure prevention tabs (see page
53) are intact, and then insert the cassette into deck 1.
Vou cannot record on the leader tape (the first few revolutions)
so take up the leader tape in advance. (See page 37.)
Press EDiTiNG SPEED to select editing speed.
Each time you press,“EDIT HI” is dispiayed on and off to show
the editing speed.
When you wish to record at high speed (about 1.7 times normai
speed), press to display “EDIT HI".
When you wish to monitor the sound at a normal speed while
recording, press to go off the "EDIT HI” indication.
Press PAUSE on deck 1, then press RECORD.
The recording indicator will start flashing.
I
I DECK 1 I —KHi —
^ITT>H
/
1
\hl6 K2)
n n r
III l_
MAX
VOLUME

5 Press PLAY on deck 2.
The synchro start function starts tape-to*tape recording.
ibEomi tm
ENT HI
I DECK 21 ^
MAX
7 n n r
fill L
Notes:
Whiie tape-to-tape recording is in progress, you cannot change the
editing speed.
Some TV sets generate noise that might be picked up during tape-to-
tape recording. To prevent the possibiiity of this, do not use this
system ciose to a TV set.
=lnH
VOLUME
To briefly interrupt tape-to-tape recording
Press PAUSE on deck 1.
(The tape in deck 2 continues playback.)
IIPAUSE
To resume recording, press PAUSE again.
To stop the tape-to-tape recording
Press STOP/EJECT on both decks.
■STOP/^ EJECT
Both decks will stop.

Edit-Recording from Compact Discs
Use the edit-recording safeguard to maintain continuity when chang
ing from one side of the tape to the other.
The number of tracks that can be recorded on sides A and B of the
tape is automatically calculated according to the set tape length.
Sequential CD recording (ALBUM)
The number of tracks can be selected sequentially to fit the length of
the tape used.
Q
-1
____
10
1
The edit-recording will start after the cassette deck makes a nonrecorded passage of about 10 seconds.
So you don't have to take up the leader tape (the first few revolution)
before recording.
1 Press the CD input select button.
2 Load a cassette in deck 1.
The normal grade of tape is recommended.
Check to see that the tape’s erasure prevention tabs (see page
53) are intact and the tape is fully rewound.
Use a tape of under 90 minutes.
3 Press OPEN/CLOSE on the CD changer to load
a disc you want to edit.
4 Press ALBUM.
ALBUM indicator will light.
The compact disc changer automatically scans for the peak
(highest) level of the entire disc. (ATLS; See page 41.)
The tuner display shows the tape length.

Specify the tape length by one minute.
0) Press T PRESET TUNING or PRESET TUNING
Specify the desired time.
You can specify up to 90 minutes.
(D Press MEMORY/TAPE LENGTH.
Press RECORD for recording side A.
1, After AILS is over, the cassette deck will automatically ad
vance the tape beyond the leader tape.
2. The CD changer will start a disc play and the edit-recording
will start.
The tracks assigned on tape side A
When the tracks specified on tape side A have been played
3.
through, the CD changer will be automatically set to the
pause mode.
4.
The tape will remain in the recording mode (although no
sound is being recorded) and advance to the end of №e tape.
To cancel sequential edit-recordlng
A to
After recording side A, the deck will stop auto
matically. Then press STOP/EJECT to turn over
the tape.
8
Press RECORD for recording side B.
A non-recorded passage of about 10 seconds will be automati
cally created, and then the tracks reserved on tape side B will
start playing to be recorded.
Notes:
You can edit-record up to 20 tracks.
You cannot edit-record the backs numbering higher than 20.
Press STOP/EJECT on the cassette deck and the stop button on the compact disc changer.
■ST0P/± EJECT
and
About Automatic Tape Level Setting (ATLS)
Since compact discs generally have a wide dynamic range, careful
setting of the recording level is required to achieve optimum recording
results.
This system automatically scans (fast search) for the peak (highest)
level of the entire disc, and the tape deck then sets the appropriate
recording level. During this period, the peak level sound will not be
heard.
It takes about 70 seconds to complete ATLS for a compact disc of
60 minutes.
Both deck and changer will stop.
im
■lb
41

Edit-Recx)rding from Compact Discs
(continued)
Fit editing (J.FiT)--------------------------------------------------------------
This function allows the system to select the track order that best fits
on tape side "A”.
If the amount of blank tape remaining is too great, the compact disc
changer will select a different track order which fits better on tape
side "A".
0-1
__
JO
T'^ 1
1
A tape such as follows will be made:
(Side A) I I l»t track I i 2nd I I 3rd i I 8th I I Sth I
(Side B) II 4th I I Slh I I 71h i
____________________________
I
■■k
1 Press the CD Input select button.
2 Load a cassette in deck 1.
The normal grade of tape is recommended.
Check to see that the tape’s erasure prevention tabs (see page
53) are intact and the tape is fully rewound.
Use a tape of under 90 minutes.
3 Press OPEN/CLOSE on the CD changer to load
a disc you want to edit.
4 Press J.FIT.
J.FIT Indicator will light.
The compact disc changer automatically scans for the pe^
(highest) level of the entire disc. (ATLS; See page 41.)
The tuner display shows the tape length.

specify the tape length by one minute.
CD Press ▼ PRESET TUNING or PRESET TUNING A to
specify the desired time.
You can specify up to 90 minutes.
(D Prese MEMORY/TAPE LENGTH.
Press RECORD for recording side A.
1. After ATLS is over, the cassette deck will automatically
advance the tape beyond the leader tape,
2. The CD changer will start the disc play and the edit-recording
will start.
The tracks assigned on tape side A
3. When the tracks specified on tape side A have been played
through, the CD changer will be automatically set to the
pause mode.
4. The tape will continue to advanoe (although no sound is
being recorded) to the end of the tape.
7 After recording side A, the deck will stop auto
matically. Then press STOP/EJECT to turn over
the tape.
8 Press RECORD for recording side B.
A non-recorded passage of about 10 seconds will be automati
cally created, and then the tracks reserved on tape side B will
start playing to be recorded.
Notes:
You can edit-record up to 20 tracks.
You cannot edit-record the tracks numbering higher than 20.
To cancel fit editing
Press STOP/EJECT on the cassette deck and the
stop button on the compact disc changer.
■STOP/A EJECT
and
Both deck and changer will stop.
Program recording from two or three discs
You can record your desired tracks in your desired sequence from
two or three discs.
Notes:
The continuity of sound will be interrupted when the tape reaches to
the end.
The display on this unit does not show the total time of the
programmed tracks.
We recommend that you calculate the required recording length and
use an adequate tape.
Steps 2 to 6 are available only from the remote control.
1 Prepare the deck for recording.
(Follow the procedures step 1 and 2 on page 36.)
5 Press the numeric button to specify the tracks
you want to record in the desired sequence.
6 Repeat steps 3 to 5 as required.
7 Press RECORD on the deck.
Recording will automatically start.
2 Press CD PROGRAM.
3 Press DISC.
4 Press one of the numeric buttons (1-3) to
specify which disc contains the track you want
to record.
43

Changing the Tone Quality
Using the graphic equaiizer controi
------------------
Adjust the graphic equaiizer controis as desired.
Examples
To reproduce disco music
more powerfully
Compensation for
frequency response
of the speaker system
For clearer vocals
--------------------------------------
The characteristics of each frequency band
(100 Hz): deep base range
When this level is increased, the bass guitar and drums will sound
louder.
When №e level is reduced, indistinct sounds will become more clear.
(1 kHz): mid range
When this level is increased, a greater tension is added to sounds,
and applause and cheers become even more lifelike, simulating a live
concert performance.
(10 kHz): treble range
When this level is increased, an extra glitter can be added to cymbals
and the triangle; when the level is reduced, tape "hissing" noise can
be reduced.
Note:
You cannot make a recording with the graphic equalizer effect.
To reproduce classical
music
-eww CQuMUtn-

To listen with augmented bass (super bass effect)
(Also available from the remote control)
---------------------
Super bass indicator
Press SUPER BASS.
The super bass indicator will appear.
Note:
You cannot make a recording with the super bass effect.
To cancel the super bass mode
(Aleo available from the remote control)
Press SUPER BASS again.
SUPER BASS
The super bass indicator will go off.
45

Using the Timer
Setting the timer piay —
You can use this timer function to program the system to play a
desired sound source at a desired time and switch to the standby
condition after 60 minutes.
[ looT
0
0-L-..JO
1 Г. / t -
III 1' ^
POWER
STANDBY6/0N
Have you read and compieted “Setting the Time of Day“ on page 18? If not, please complete these sections before continuing.
The following example shows how to set the timer play function for
listening from 7:15. (The system will automaticaily switch to the
standby condition at 8:15.)
Switch on the power.
1 Press one of the input select buttons to select
the desired sound source.
For timer play on the CD changer:
Press the CD input select button.
You can use timer play.
For timer play on the tuner:
Press the TUNER input select button, select the desired band,
and tune in a station.
For timer play on the tape:
Press the TAPE input select button.
After step 7, press PLAY on whichever deck you want to play.
Note:
You can activate the timer play on the external unit.
Press the AUX input select button and operate the external unit.
2 Set the volume level for timer play.
10ЁСК 11
1DECK 21
Г П 1 Ti
и и и ±1
3 Press ON TIMER. 4 Press TIME ADJUST.
The timer indicator will appear.
The 0 will start flashing.
Timer indicator
MAX
VOLUME

5 Select the hour you want the timer to go on.
0 Press TIME + or TIME - to set hour. In this case, set to
7.
~i Press POWER STANDBY /ON to switch to the
standby mode.
TIMEtl
--------------------------\-
(D Press TIME ADJUST.
The hour indicator will stop flashing and the minute indicator
wiil flash.
. I-J 1 1 1
--------------------
\l/_ -
h±l 1 1
---------------------------------------
6 Select the correct time you want the timer to go
on.
0 Press TIME + or TIME - to set minutes. In this case, set
to 15.
(D Press TIME ADJUST,
The minute indicator wili stop flashing.
To cancel the timer mode
Press ON TIMER.
ONTtU№
TIMER
/ /■ / / /
/ / • / / /
The timer play will start at the preset time with volume level increasing
gradually up to the volume level you preset.
Note:
It the power is on, №e timer will not function.
The system must be in the standby mode.
The timer on time indicator will go out.
The timer play will not occur, but the time ON setting for the timer play
will remain in the unit’s memory.
To resume regular play after the timer
setting has been completed-----------------
1. Press POWER STANDBY 0 /ON to switch on the power.
When tape timer play is set, first press STOP/EJECT to release
the pressed playback button (PLAY).
2. Select the desired listening source.
3. After you’ve finished listening, be sure to press POWER
STANDBY 0 /ON to switch the power to the standby mode.
If setting to the tape timer play, press PLAY in succession.
Even if you change the volume level or music source, the timer play
will start as previously set.
47

Using the Timer
Setting the timer recording
You can use this timer function when you want to record from the
radio at a desired time and switch to the standby condition after
60 minutes.
(continued)
Have you read and completed “Setting the Time of
Day” on page 18? If not, please complete these
sections before continuing.
The following example shows how to set the timer recording function
for recording a radio broadcast from the tuner.
Switch on the power.
1 Press the TUNER input select button and tune
in the station whose broadcast you want to
record. Then insert a cassette Into deck 1.
2
Follow steps 3 to 7 on pages 46-47 for setting
the timer.
Press RECORD on deck 1.
3
Timer recording will start at the preset time.
Note:
If the power is on, the timer will not function.
The system must be in the standby mode.

To cancel tinier recording mode
Press ON TIMER on the tuner.
ONTtMER
The timer on time indicator will go out.
To resume regular play after the timer
setting has been completed
1. Press STOP/EJECT to release the pressed record button
(RECORD).
2. Press POWER STANDBY O /ON to switch on the power.
3. Select the desired listening source.
When listening to a cassette tape, use deck 2.
4. After you’ve finished listening, be sure to press POWER
STANDBY O /ON to switch the power to the standby mode.
Make sure that RECORD on deck 1 is pressed.
Even if you change the music listening source, the timer recording will
start as previously set.
-----------------
4Q

Using the Timer (continued)
To use the sleep timer
You can use this timer function to switch the power to the standby
mode at a preset time, starting at 30 minutes from the present time
and extending (by 30-minutes intervals) up to 120 minutes.
-------------------
Use the sleep timer to switch the power to the standby mode auto
matically in case you fall asleep while listening.
(Also available from the remote control)
1 Press SLEEP.
The sleep timer indicator will appear,
------------------------
The display will return to the previous indication after 5 seconds.
Please complete the next procedure within 5 seconds.
Illuminate
^-----------------------------
SLEEP
1 “ /“/
1 f L U 1
Time for sleep timer
While the time for sleep timer appears, press SLEEP to set the length of time you would like the system to operate.
The display will show 120 (minutes), 90, 60, 30 and (OFF) in
turn.
SLEEP
D f ~
_l /_/
After about 5 seconds, the display will show the mode display.

To confirm the time remaining on the sleep timer
{Also available from the remote control)
After the display shows the mode display:
Press SLEEP.
SLEEP
To cancel the sleep timer mode-------------
(Also available from the remote control)
Press the power switch to put thp system in
standby mode or press SLEEP until ti^e sleep timer
indicator disappears.
POWER
STANDBYÓ/ON
SLEEP
or
To use the sleep timer in conjunction with the timer play or timer recording operation
For example, to go to steep listening to a radlrjt broadcast, and
wake up the next morning listening to a compajct disc.
The display will show the time remaining on the sleep timer for
approximately 5 seconds.
1) Set the timer for the timer play.
(See steps 1 to 6 on pages 46-47.)
2) Press POWER STANDBY (!) /ON. This will swjtch the system to
the standby mode.
3) Press SLEEP and set the desired time for the s eep timer.
This will switch the power on, and the sleep timer indicator will
light.
4) Tune in your desired band and station, and ^djust the volume
level. !
51

Using an External Unit
To enjoy an external source
You can connect an output terminal of a VCR or TV to this system.
(See pages 6-7.)
-----------------
1 Press the AUX input select button.
2 Operate the unit which is connected to the
system.
See the operating instructions of the unit concerned.

Care & Use
Concerning Cassette Tapes -
Selection of cassette tapes
Cassene tapes exceeding 90 minutes:
These tapes are handy for their long playback and recording time but
be careful about repeatedly stopping and starting, rewinding and fast
forwarding these tapes in short intervals as they are thin, tend to
stretch and may become entangled in the deck mechanism.
Do not use the following types of tapes In this unit:
Fe-Cr tapes (TYPE III)
This type emphasizes the high-frequency range, making it impossible
to obtain a flat frequency response.
Metal or chromium-type tape;
Sound will be badly distorted.
To prevent erasure of a recorded tape
Remove the erase-prevention tabs (thus preventing recording). To re-record on a protected cassette:
Cover the slot with adhesive tape.
Tape slack
Tape slack may cause the tape to break.
Improper tape storage
You can damage tape if you store it in the following ways:
In high temperature (35°C or higher) or high humidity (80% or higher)
areas.
In a strong magnetic field (near a speaker, on top of a TV, etc,). This
can erase a recording.
In direct sunlight.
53

Care & Use (continued)
Concerning Compact Discs
With this system, you can only use compact
discs having this mark:
Handling precautions
[alngfg
DIGITAL AUDIO
To open the compact disc case, gently press the sides of the top,
holding the top at both sides and pull up.
To remove the disc from the case, press the center holder and lift the
disc, holding it by the edges.
/
Center holder
To return the disc to the case, insert the disc with label facing up and
press downward at the center.
Hold compact discs by the edges so you will not soil the surface with
fingerprints. Fingerprints, dirt, and scratches can cause skipping and
distortion.
storage precautions
Be sure to store discs in their cases to protect them from dust,
scratches, and warping.
Do not use record cleaning sprays, benzine, thinner, static electricity
prevention liquids, or any other solvent.
If the surface is soiled, wipe gently with a soft, damp (water only)
cloth.
Always move the cloth directly outward from the center of the disc,
not in a circular motion as with standard phonograph records.
If you are taking the disc from a cold to a warm environment, moisture
may form on the disc. Wipe this off with a soft, dry, lint-free cloth
before using the disc.
Do not write on the labei side with a bail-point pen or other writing
instrument.
Do not place or store discs in the following places;
1) Locations exposed to direct sunlight.
2) Humid or dusty locations.
3) Locations directly exposed to a heat vent or heating appliance.
4) In the glove compartment or rear deck of an automobile.

Maintenance
Cassette deck head care
To ensure good sound quality for recording and playback, be sure to
clean the heads approximately after every 10 hours of use.
1) Turn off the povirer of the system.
2) Press the stop/eject button to open the cassette holder.
3) Clean the heads, pinch roller, and the capstan shaft with a cotton
swab (or with a soft, lint-free cloth) slightly moistened wrtti isopro
pyl alcohol. Do not use any solution other than alcohol for head
cleaning.
Cassette deck head demagnetization
In order to maintain good sound quality during recording and play
back, we recommend that you demagnetize the head assembly if
there is still distortion or poor sound quality after you have cleaned
the heads.
If the head assembly becomes magnetized, it could create noise in
your recordings, cause a loss of high-frequency response, or cause
the erasure of valuable recordings. There are several types of head
demagnetizers that you can purchase at local electronics supply
stores.
Follow the instructions that are supplied with the derhagnetizer.
Do not touch the head assembly with any type of metal object or tool
such as a magnetic screwdriver.
Maintenance of external surfaces
Use a soft, dry cloth to clean the cabinet and controls.
If the surfaces are extremely dirty, use a soft cloth, dipped in a
soap-and-water solution or a weak detergent solution. Wring the cioth
well before wiping the surfaces. Then wipe once again with a soft, dry
cloth.
Never use alcohol, paint thinner, benzine, or a chemically treated
cloth to clean the cabinet or controls. Such chemicals may damage
the finish of your system.
55

Troubleshooting Guide
Before requesting service for this unit, check the chart below for a
possible cause of the problem you are experiencing. Some simple
checks or a minor adjustment on your part may eliminate the problem
and restore proper operation.
Problem Probable cause(s)
Probiems common to ail systems
There is no sound when the
power Is ON and no bar
appears on the votunw
level display.
The location of the various
musical instruments Is not
well defined.
The left and right sounds
are reversed.
Only one speaker is
emitting sound.
There is no sound when a
source is being played.
There is a low-frequency
hum when a source is
being played.
Volume is set too low.
The (+) and (-) connections to one of the
speakers are reversed.
The left and right connections to the speaker are
reversed.
One of the wires of the speaker cords is
disconnected.
The (+) and (-) wires of the speaker cords are
shorted.
A power cord or a fluorescent light is located near
a connecting cord.
If you are in doubt about some of the check points, or if the remedies
indicated in the chart do not solve the problem, refer to the directory
of Authorized Service Centers (enclosed with this unit) to locate a
convenient service center, or consult your dealer for instructions.
Suggested remedy
Adjust the volume level with the volume control on
the amplifier.
Connect the speaker cords correctly.
Connect the speaker cords correctly.
Connect the speaker cords correctly.
Switch the system to the standby mode, and
reconnect the speaker cords so that they are not
shorted.
Then switch on the power.
Keep electrical appliances wett away from the
connecting cords.
While listening to FM broadcasts
There is a “rushing” noise
during a stereo broadcast
which Is not audible during
a monaural broadcast.
You hear excessive noise
during a stereo broadcast,
and occasionally the sound
disappears.
The stereo Indicator of the
tuner flickers and does not
light completely.
The sound of stereo
broadcast Is badly distorted.
Noise is more likely to appear on a stereo signal
than on a monaural signal.
•The installation location and orientation of the
antenna are unsuitable.
•The transmitting station is a long distance away.
There is a building or mountain nearby. [Distortion
is caused by interference between the signal from
the transmitting station (direct wave) and the
signal reflected from the building or mountain
(reflected wave).]
While listening to AM broadcasts
You hear an unusual beat
sound.
You hear a low-frequency
hum.
You are using the system with a television on
nearby.
The antenna wire is near the power cord.
•If you are using an indoor antenna, change to an
outdoor antenna.
• If you are using a special outdoor antenna, try
changing the installation location, height, and
orientation.
•Try switching off the television or VCR.
•Press the FM mode button to change the
reception from stereo to monaural mode.
Switch off the TV set, or move the system farther
away from it.
Separate the antenna wire from the power cord.

Problem Probable cause(s)
When there is a television set nearby
The picture on the TV
disappears or stripes
appear on the screen.
The location and orientation of the antenna are
incorrect.
The wiring at the back of the system is incorrect. Separate the antenna wire of the TV set from the
Suggested remedy
•if an indoor antenna is being used, change to an
outdoor antenna.
•Separate the TV set from the system.
system.
While listening to ta
Sound is low, Intermittent,
of poor quality, noisy,
scratchy, or unsteady.
The deck section does not
enter the recording mode.
pes
Heads are dirty. Ciean the heads.
The erase-prevention tabs are removed from the
cassette.
While listening to compact discs
The drawer does not close
when you load a disc and
press the OPEN/CLOSE
button.
The display will not show
the correct Indication.
Disc play does not start
when you press the play
button.
A certain part of the disc
does not play.
The disc is not positioned correctiy in the disc tray.
The disc is not positioned correctiy in the disc tray.
The disc is ioaded upside down.
The disc is dirty.
The disc is scratched.
The disc is badly warped.
The disc is a nonstandard one.
There is condensation inside the disc changer.
While using the remote control
The remote control will not
operate the system.
You have installed the batteries in the reverse
poiarity.
The batteries are worn out.
Attach tape to cover the space left by renrwval of
the erase-prevention tabs.
Reinsert the disc.
Reinsert the disc.
Reload the disc.
Wipe the disc with a soft doth.
Skip the scratched part of the disc (skip piay).
Replace the disc with a new one.
Replace the disc with a different one.
Switch the power ON, then wait for one hour
before using the disc changer.
Reinsert the batteries in the correct poiarity.
Repiace the batteries with new ones.
The servicer will require all components to service your system.
Therefore, should service ever be necessary, be sure to bring the entire system.
57

Technical Specifications
COMPACT AUDIO SYSTEM
COMPACT DISC CHANGER
AMPLIFIER SECTION AUDIO
100 Hz-20 kHz continuous power
output both channels driven
1 kHz continuous power output both
channels driven
Total harmonic distortion
half power at 1 kHz 0.1% (60)
Input sensitivity and impedance
AUX
Graphic equalizer ±10dB(100Hz, 1 kHz, 10 kHz)
Load impedance
2x20W(THD1%,6Q)
2x24W(THDl%,60)
250 mV/24 kO
FM TUNER SECTION
Frequency range
Sensitivity
Total harmonic distortion
MONO
STEREO
S/N
MONO
Frequency response
Image re|ection at 98 MHz
Stereo separation at 1 kHz
Antenna terminal(s)
23.3 dBf (4.0 pV, IHF'58) Dimensions (WxHxD)
50 Hz-15 kHz (+0.5, -2 dB)
87.5-108 MHz
750 (unbalanced)
AM TUNER SECTION
Frequency range
MW 522-1611 kHz
Sensitivity (for 500 mW)
MW (at 999 kHz)
250 pV/m
CASSETTE DECK SECTION
Track system
Heads
Playback
Record/Playback
Erasure
Motor
Recording system
Erase system
Tape speed
Frequency response
NORMAL
Wow and flutter
Fast forward and rewind time
Approx. 120 seconds with C-60 cassette tape
4 track, 2 channel
Solid permalloy head
Solid permalloy head
Double gap ferrite head
DC servo motor
AC bias, 101 kHz
AC erase, 101 kHz
4.8 cm/sec
50 Hz-14 kHz (±3dB)
0.15% (WRMS)
60
0.3%
0.5%
65 dB
35 dB
35 dB
No. of channels
Frequency response
Output voltage
Dynamic range
S/N
Total harmonic distortion
Wow and flutter
DA converter
Output impedance
Load impedance
PICKUP
Wavelength
GENERAL
Weight
SPEAKERS
Speaker(s)
Woofer
Tweeter
Impedance
Input power
Output sound pressure level
Cross over frequency
Frequency range
Dimensions (WxHxD)
Weight
Notes:
1. Specifications are subject to change without notice.
2. Total harmonic distortion is measured by the digital spectrum
analyzer.
MASH is a trademark of NTT.
2 (left and right, stereo)
2 Hz-20 kHz, ±1dB
1.2V(at0dB)
85 dB
95 dB
0.02% (1 kHz,0dB)
Below measurable limit
1 bit 2 DAC MASH
Ikfl
More than 10kO
780 nm
270x89.5x315 mm
2.9 kg
Type 2-way, 2-speaker, bass-ref
13 cm cone type
Piezo type
6Q
50 W (music)
25 W (DIN)
88dBW(1.0 m)
10 kHz
50 Hz-20 kHz{-16dB)
62 Hz-18 kHz (-10 dB)
200x367x204 mm
2.9 kg
Weight and dimensions are approximate.
GENERAL
Power consumption
Power supply
Dimensions (WxHxD)
Weight
AC 50 Hz, 230-240 V
96 W
270x279x356 mm
5.95 kg

Memo
59

Mat|ushita Electric Industrial Co., Ltd.
Central P.O. Box 288, Osaka 530-91, Japan
in Singapore
RQT2599-L
F0294U0
 Loading...