

Page 1
Operating Instructions
(For Scanner and Email)
Digital Color Imaging Systems
Model No.
DP-C262/C322
Before operating this machine, please read this manual completely
and keep this manual for future reference.
(Illustration shows optional accessories that may not be installed on your machine.)
English
Page 2
Operating Instructions
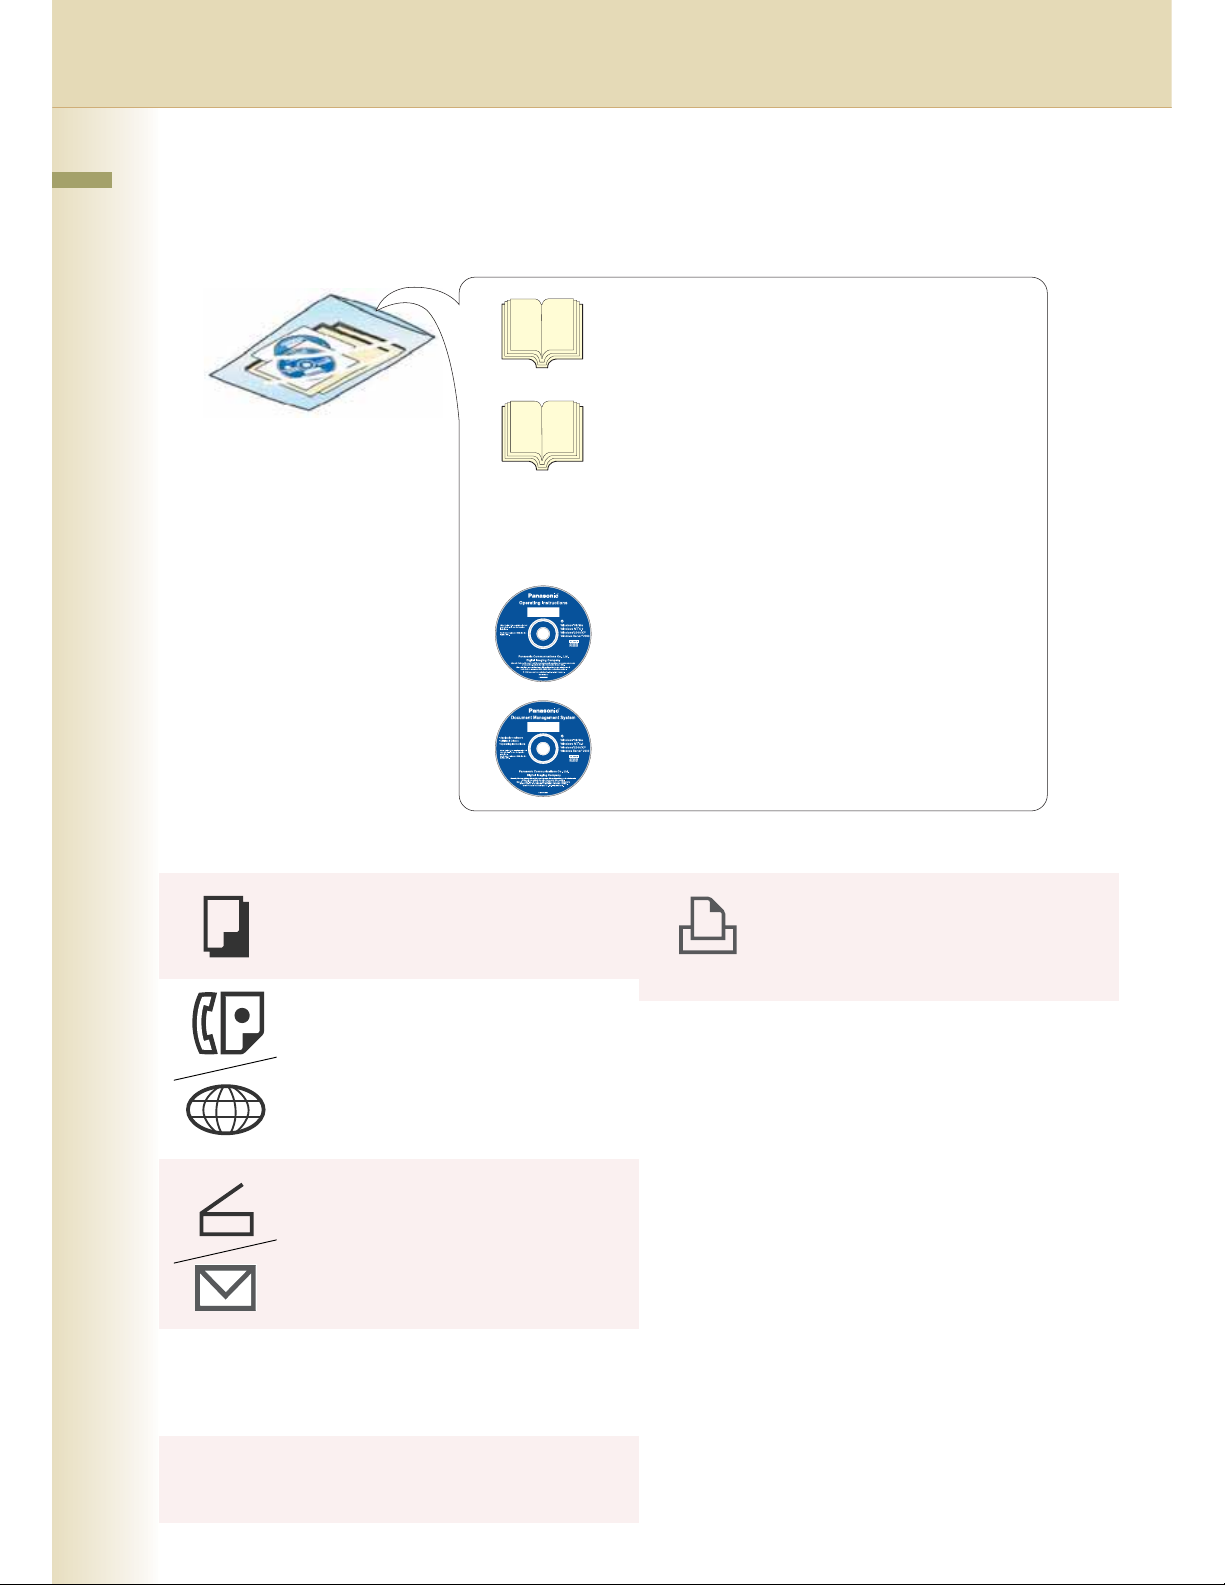
The following Operating Instruction manuals are included with this machine. Please refer to the appropriate manual
and keep all manuals for future reference. If you lose the manual, contact the authorized Panasonic dealer.
Operating Instructions (For Setting Up)
This manual contains essential information for setting
up the machine.
Accessories
This manual contains essential information for proper
operation of the machine.
It describes basic Copy, Print, Facsimile/Internet Fax,
Scan/Email, and other functions.
For a more detailed explanation of each function, please
refer to the Operating Instruction manuals included on
two CD-ROM as illustrated below.
Operating Instructions CD
Operating Instructions (For Basic Operations)
Contains manuals with detailed information for Copy,
Facsimile/Internet Fax, Scan/Email Functions, Function
Parameters and User Authentication.
Document Management System CD
Contains the PDMS Application Software, and manuals
with detailed information for the Print function, and
PDMS Application software.
Operating Instructions CD Document Management System CD
Copy Function
Describes how to make a Color Copy with
creative features.
Print Function
Describes how to print with color, change
default printer settings, or describes the
course of action to take when a problem
message appears, etc.
Facsimile and Internet Fax Function
(When the optional G3 Fax Board/ Internet
Fax Module is installed.)
Describes how to send/receive a Facsimile/
Internet Fax, or describes the course of
action to take when a trouble message
appears, etc.
Scan and Email Function
(When the optional Network Scanner/
Email Module, Hard Disk Drive, Main
Memory and Image Memory are installed.)
Describes how to scan, send an Email.
Application Software
Describes how to use the application
software.
Ex:Web Device Monitor, Panafax Desktop,
Document Manager/ Viewer, Client
Device Monitor, Network Config/Add
Editor, Network Setup Tool, Embedded
Web Launcher
2
Function Parameters
Describes how to change the default
settings of each function using the Control
Panel of the machine.
User Authentication
Describes how to enable and use the user
authentication function.
Page 3
Conventions
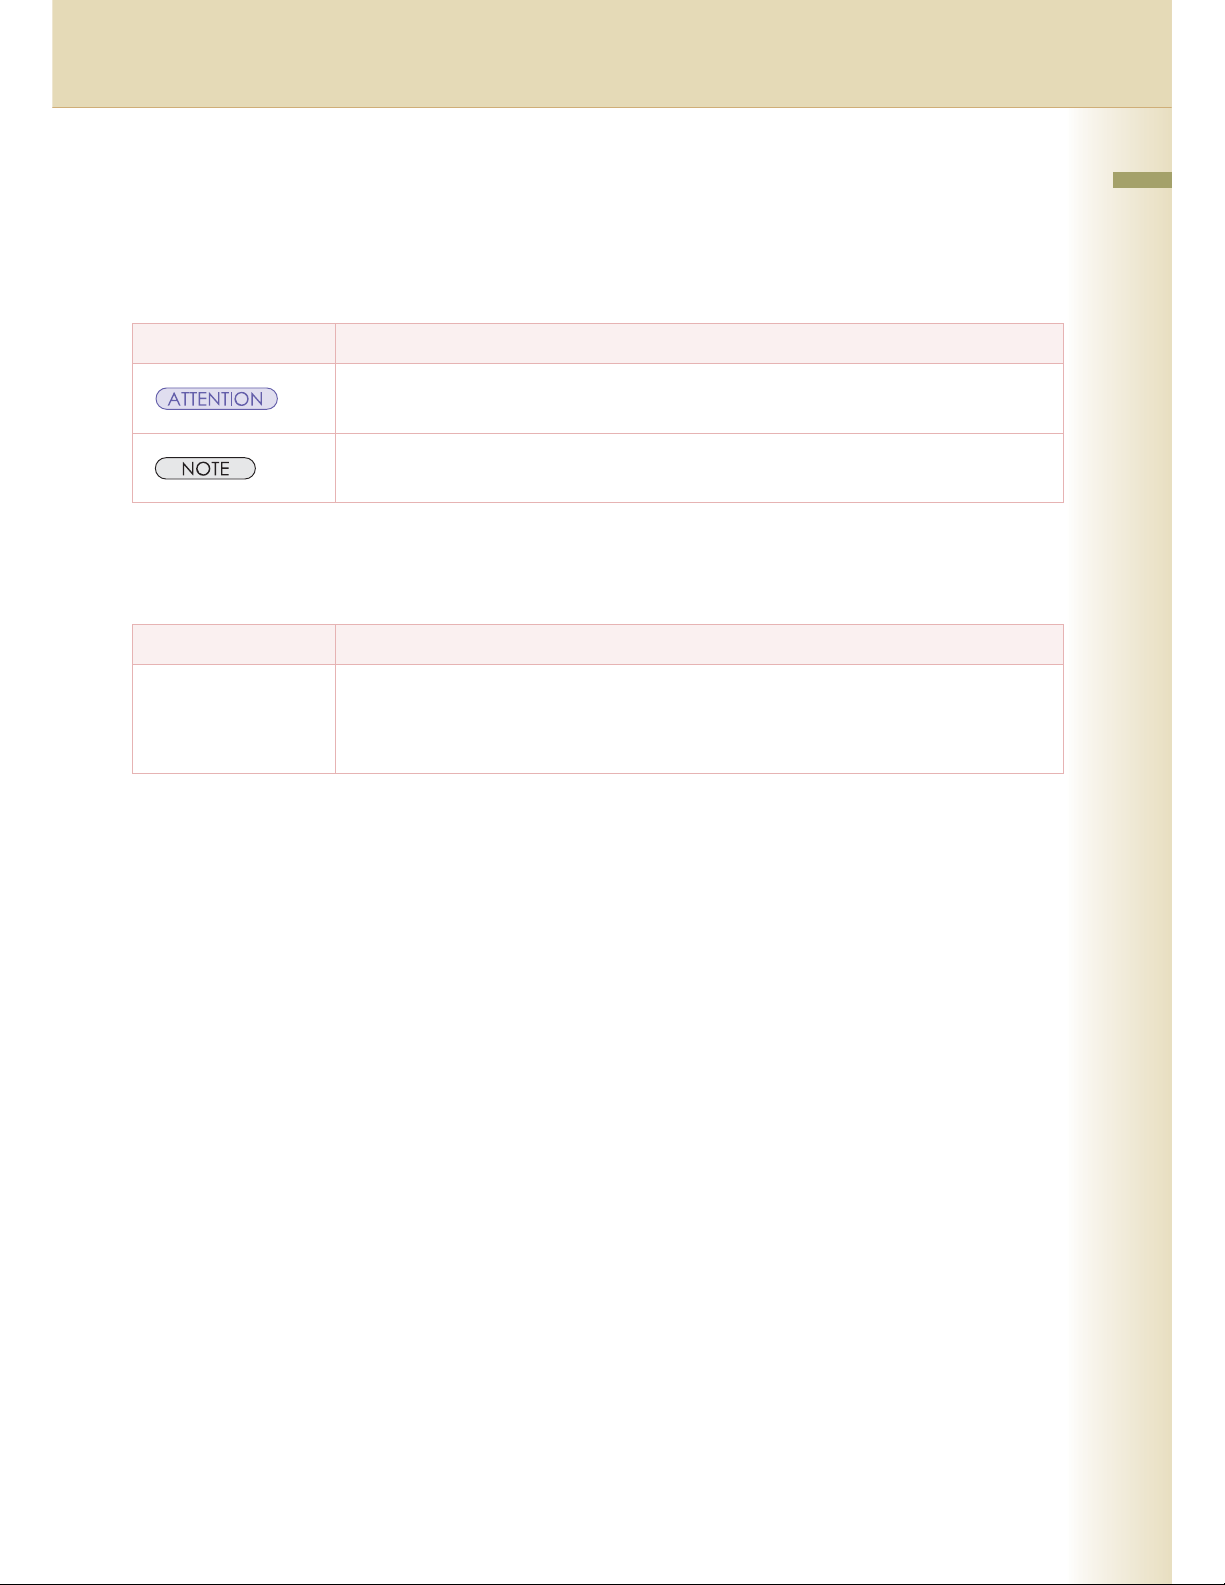
Icons
The following icons are used in this manual.
Icon Description
Indicated important information that must be read in detail.
Indicates reference Information.
Notation
The following notations are used in this manual.
Notation Description
For Keys and Buttons Hard buttons on the Control Panel are depicted as **** key, soft buttons on the Touch Panel are
depicted as "xxx".
Ex:
Press the Start key and select "More Menus".
3
Page 4

Table of Contents
Chapter 1 Getting To Know Your Machine
Basic Operation Procedure ..................................................................................................... 6
Sending an Email .................................................................................................................... 8
Chapter 2 Scan/Email Operations
Scan to the SD Memory Card................................................................................“SD Card” 10
Scan to the PCMCIA/PC Card...............................................................................“PC Card” 12
Scan to the Internal Hard Disk Drive ..................................................................................... 14
Retrieve Scanned Image from Hard Disk Drive ................................................................ 15
Scan to the Computer............................................................................................................ 16
Scan to Email ............................................................................................................ “Email” 18
Email Addressing from LDAP Server...................................................................“Global” 22
Add an Email Address to the Address Book ............................................. “Add to Local” 24
Receiving an Email................................................................................................................ 26
Configure to Receive Email............................................................................................... 26
Receiving Email Automatically .......................................................................................... 26
Receiving Email Manually ................................................................................................. 27
Chapter 3 Scanner Settings
Setting the Scanning Quality ...........................................................................“Basic Menu” 28
Quality Adjustment ............................................................................................................ 28
Setting Original Type and Scanning Density......................................................................... 29
Selecting Original Type ..................................................................................................... 29
Adjusting Scanning Density .............................................................................................. 29
Scanning Resolution.............................................................................................................. 30
Advanced Color Quality Settings..................................................................... “Adjustment” 32
Compression (Full Color) .....................................................“Compression (Full Color)” 32
Compression (Grayscale) ................................................... “Compression (Grayscale)” 34
Compression (Black)...................................................................“Compression (Black)” 34
Background Removal.................................................................“Background Removal” 35
Contrast............................................................................................................ “Contrast” 35
Setting the File Type and/or File Name............................................. “File Type and Name” 36
Scanning 2-Sided Originals..................................................................... “2-Sided Original” 38
When Scanning the Special Originals (Thin paper, etc.) from ADF ..................“
Job Build and SADF
” 39
4
Page 5

Chapter 4 Adding to the Address Book
Editing the Address Book ...................................................................................................... 40
Edit an Email Address ....................................................................................................... 40
Delete an Email Address................................................................................................... 42
Editing Image Box Name....................................................................................................... 44
Chapter 5 Appendix
Glossary................................................................................................................................. 46
5
Page 6
Chapter 1
Getting To Know Your Machine
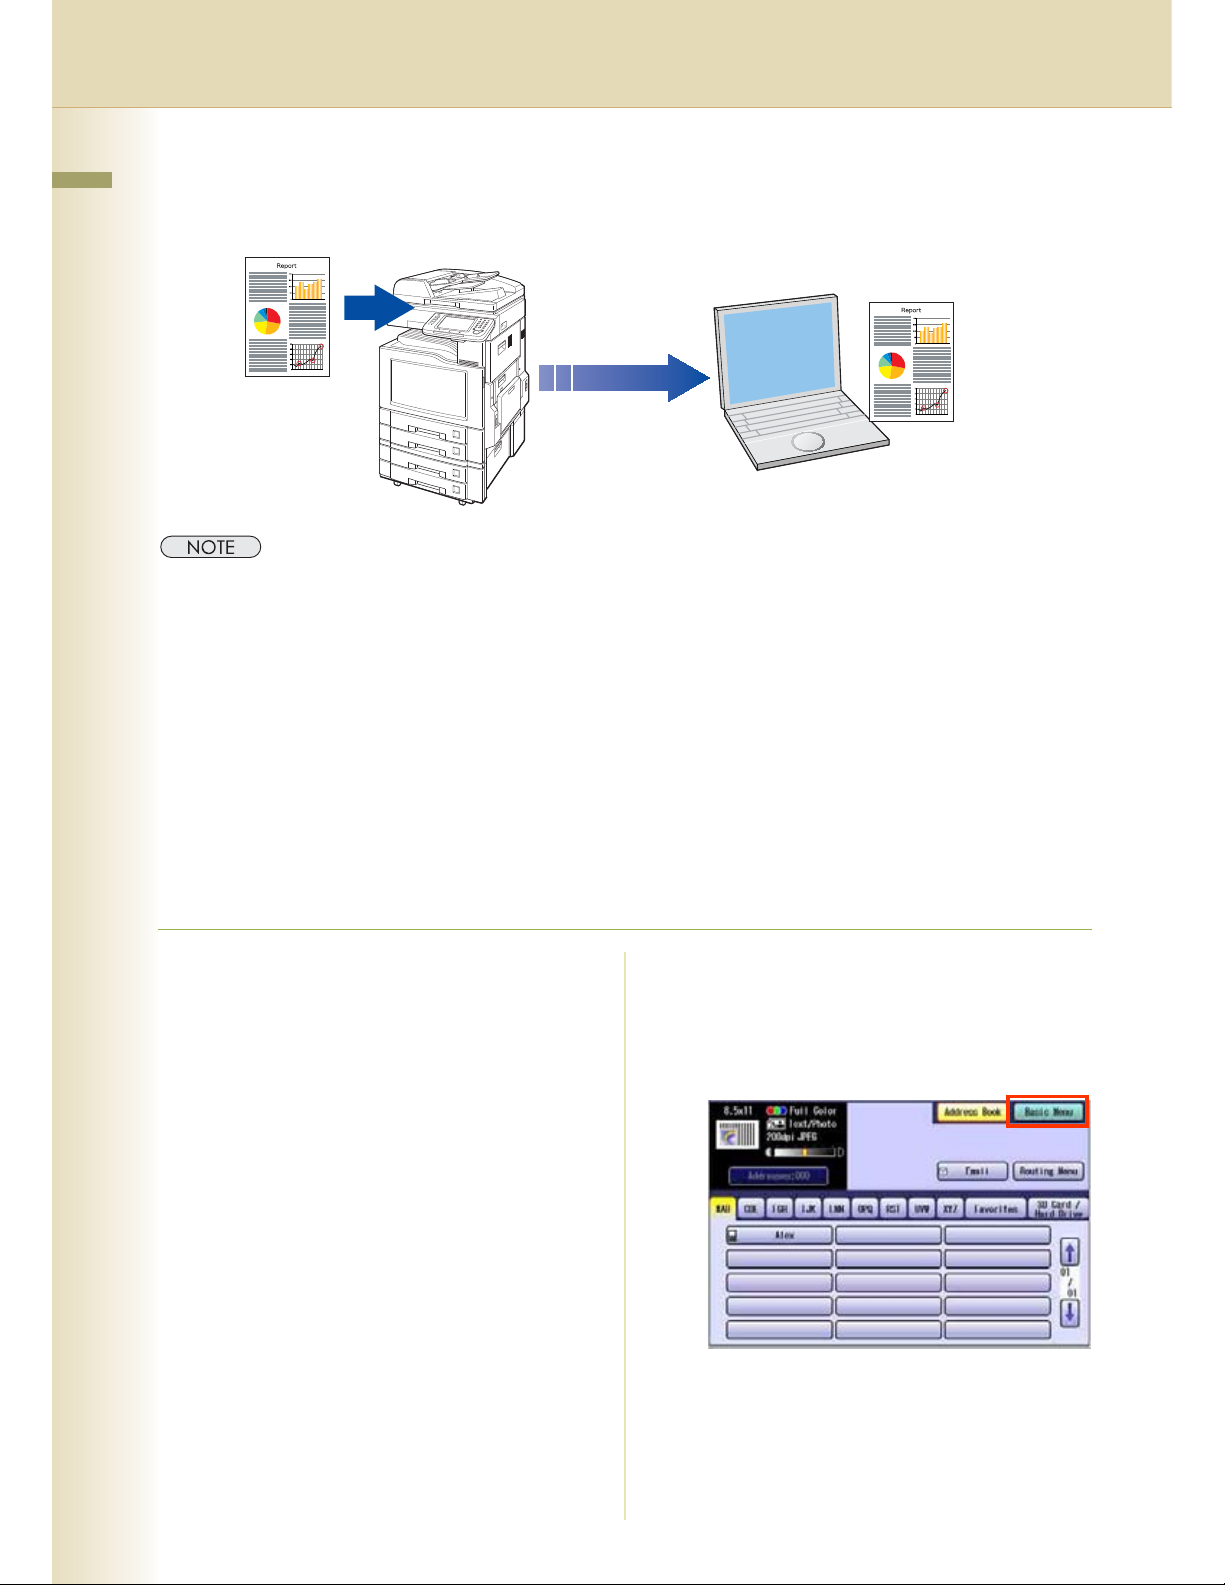
Basic Operation Procedure
Chapter 1 Getting To Know Your Machine
This section describes the workflow of Scan/Email operations. For a detailed description of each setup
item involved, refer to the relevant suggested section.
z Optional Hard Disk Drive, Main Memory and Image Memory are required in this Scanner Function.
1
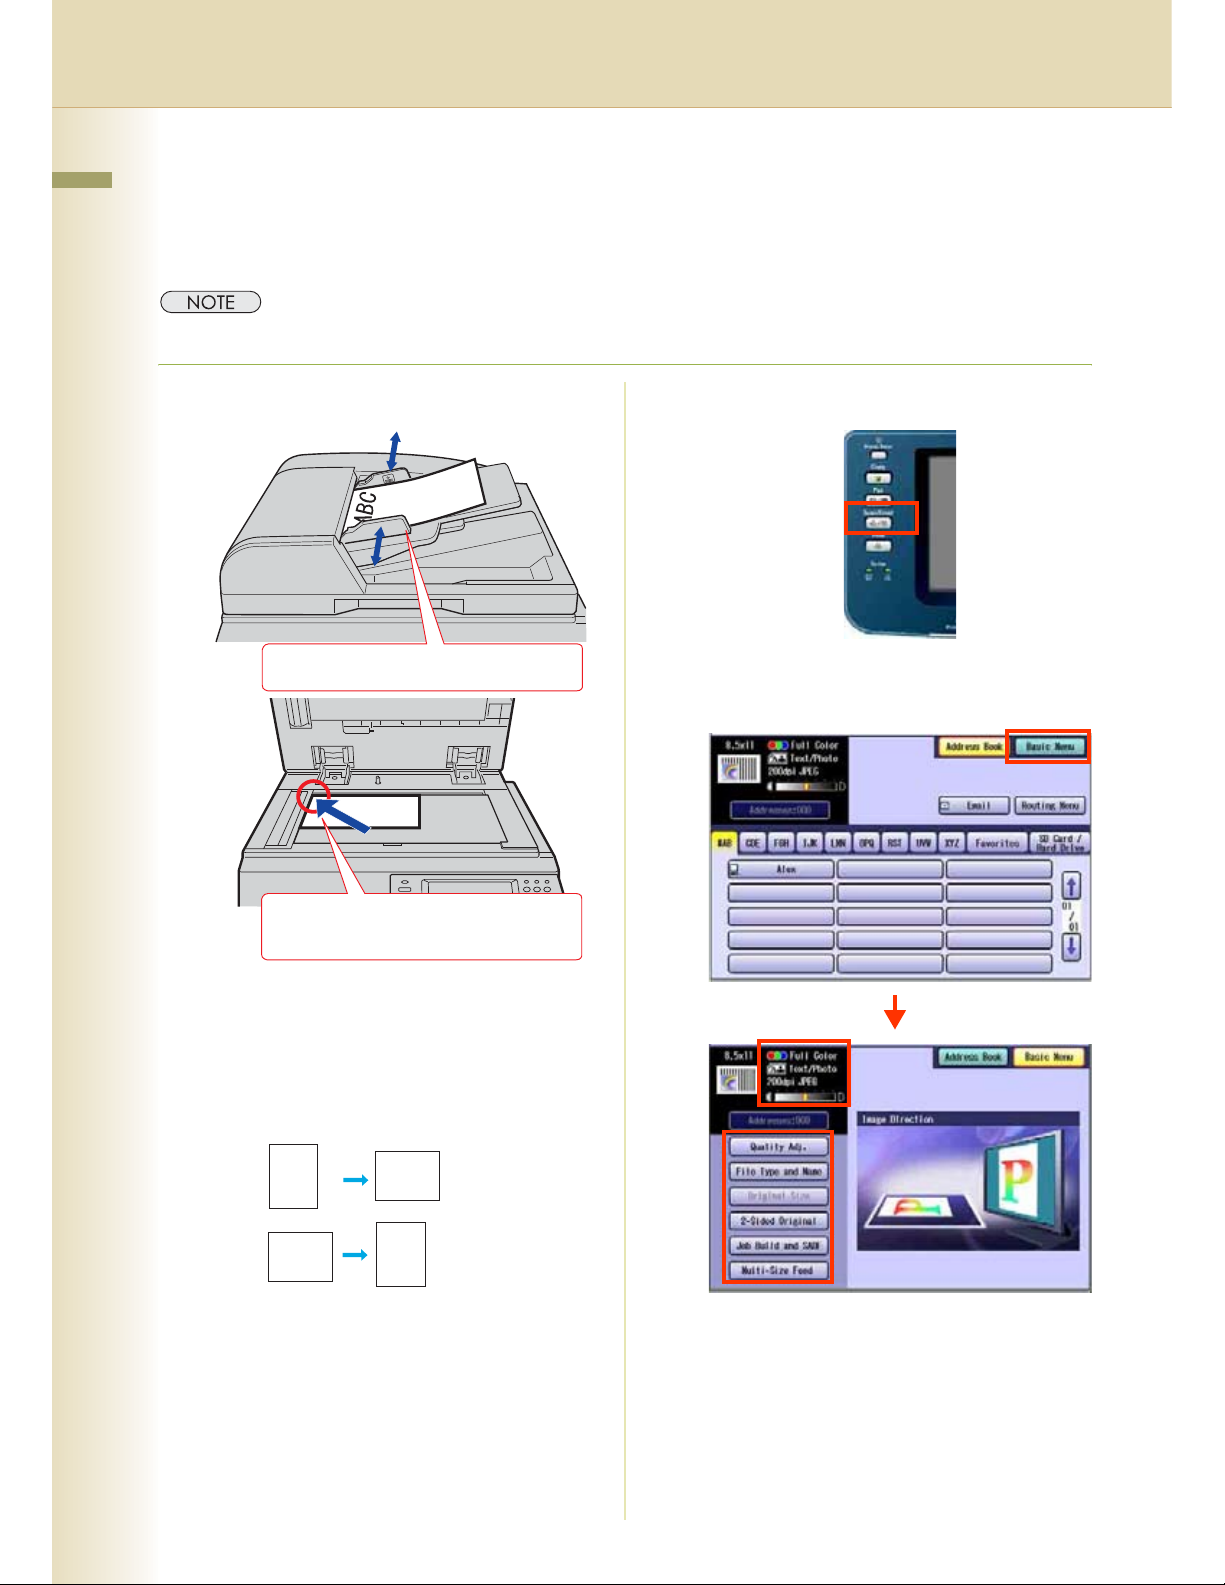
Place the original(s).
Face Up. Up to 70 sheets (20 lb).
2
Press the Scan/Email key.
3
Select "Basic Menu", and then set the
desired scanning mode if necessary.
Face Down Align with top left corner.
z When using the Scan/Email function, the
created images are rotated by 90 degrees.
Place the originals with their top edges
aligned with the left side of the scanner to
create upright scan data.
Original Scan Data
ABC
ABC
ABC
ABC
z Refer to Placing Originals (Copy) in the
Operating Instructions (For Basic
Operations) of provided booklet.
z For more detailed instructions, refer to the
Scanner Settings (see pages 28-39).
6
Page 7
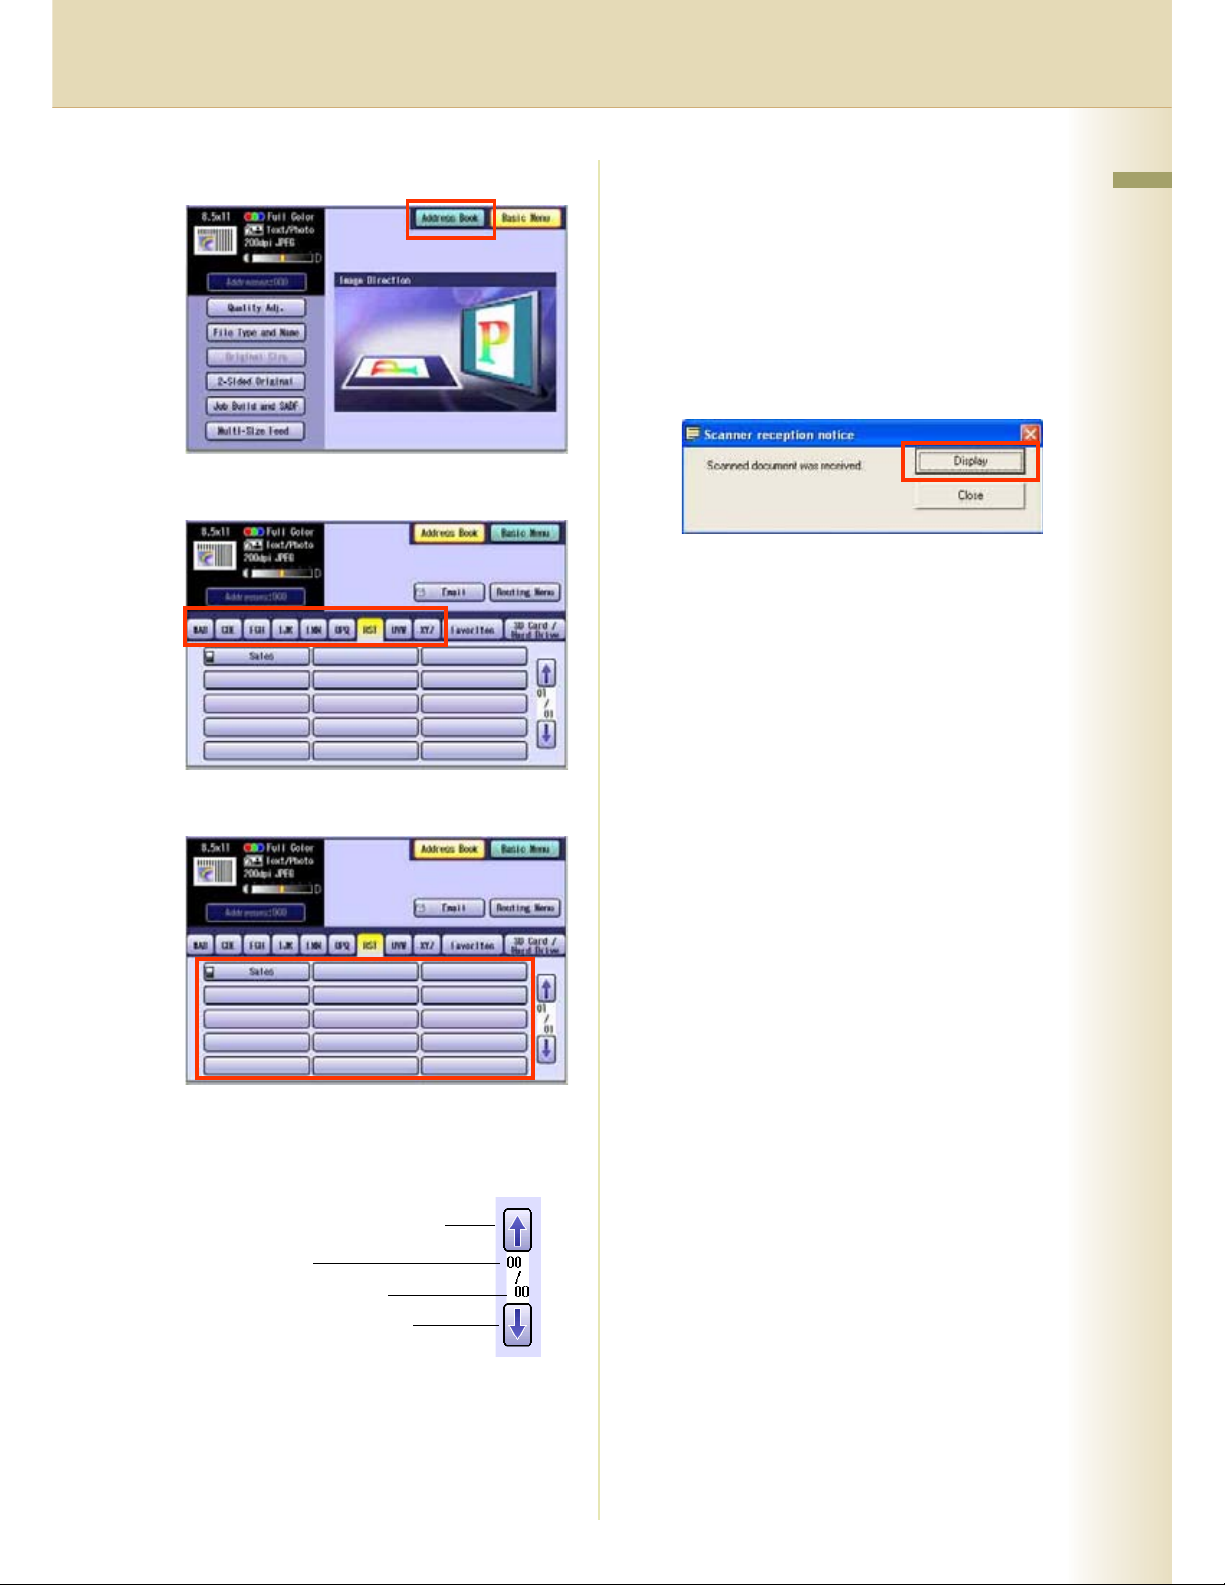
4
Select the location or destination.
To the Internal Hard Disk Drive
z Refer to Scan to the Internal Hard Disk
Drive (see page 14).
To the Computer
A reception notice appears on the destination
PC's display.
z Refer to the Scan to the Computer (see
page 16).
Chapter 1 Getting To Know Your Machine
To S a v e
SD memory
Card or
PCMCIA/PC
Card
Internal Hard
Disk Drive
Select “SD Card/Hard
Drive”, and then select “SD
Card” or “PC Card”.
Select “SD Card/Hard
Drive”, and then select
“Image Box”.
To T r a n s mi t
To the
Computer
Email
Refer to Scan to Email (see page 18).
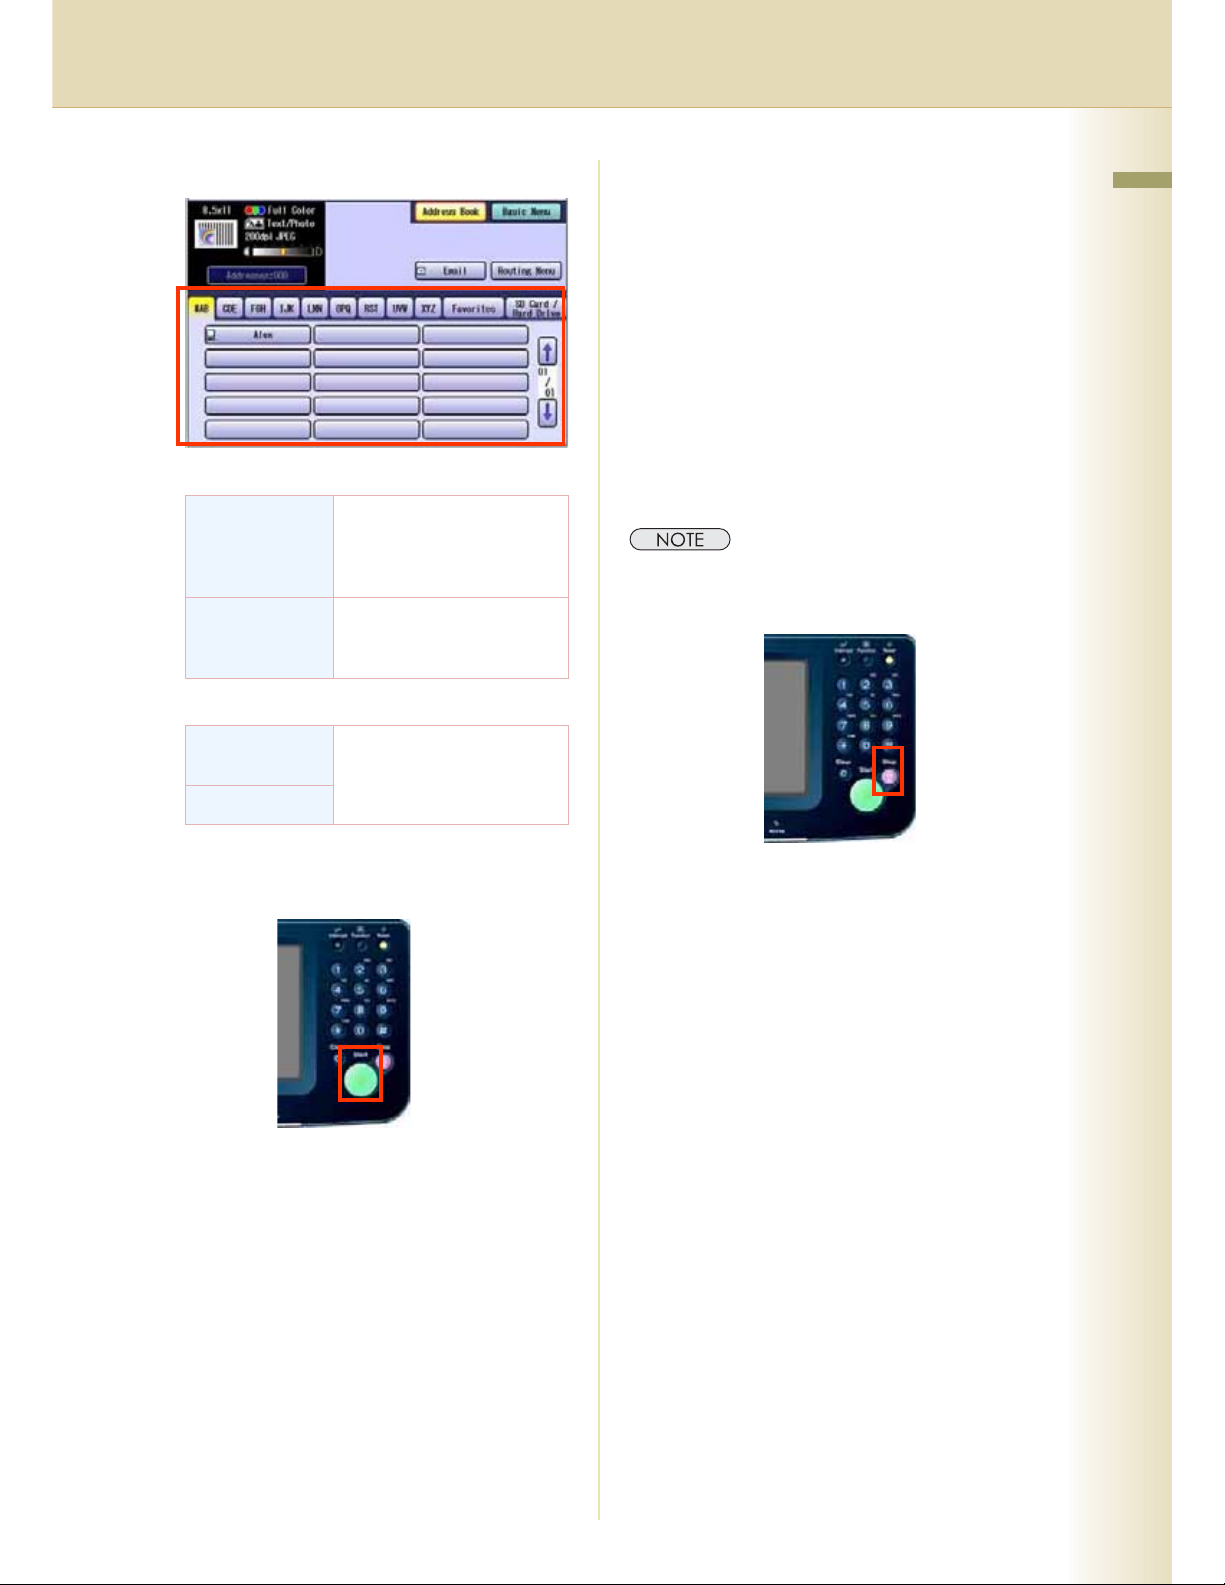
5
Press the Start key.
Select desired destination
from the address book
To E m ai l
z Refer to the Scan to Email (see page 18).
z When canceling the operation, press the Stop key
on the Control Panel, and then select “Yes” on the
Touch Panel Display.
z When scanning from the Platen Glass, place
the next original, and then follow the
instructions described on the touch panel
display.
Transferring the scanned image(s) to the SD
Memory Card or PCMCIA/PC Card, PC or
Email.
To the SD Memory Card or PCMCIA/PC
Card
z Refer to Scan to the SD Memory Card (see
page 10).
z Refer to the Scan to the PCMCIA/PC Card
(see page 12).
7
Page 8
Sending an Email
Chapter 1 Getting To Know Your Machine
• There are two ways of sending an Email.
• Sending an Email using the Scan/Email Function : Available when Scan/Email Option is installed
on your device
• Sending an Email using the Internet Fax Function :Available when Internet Fax Option is installed
on your device
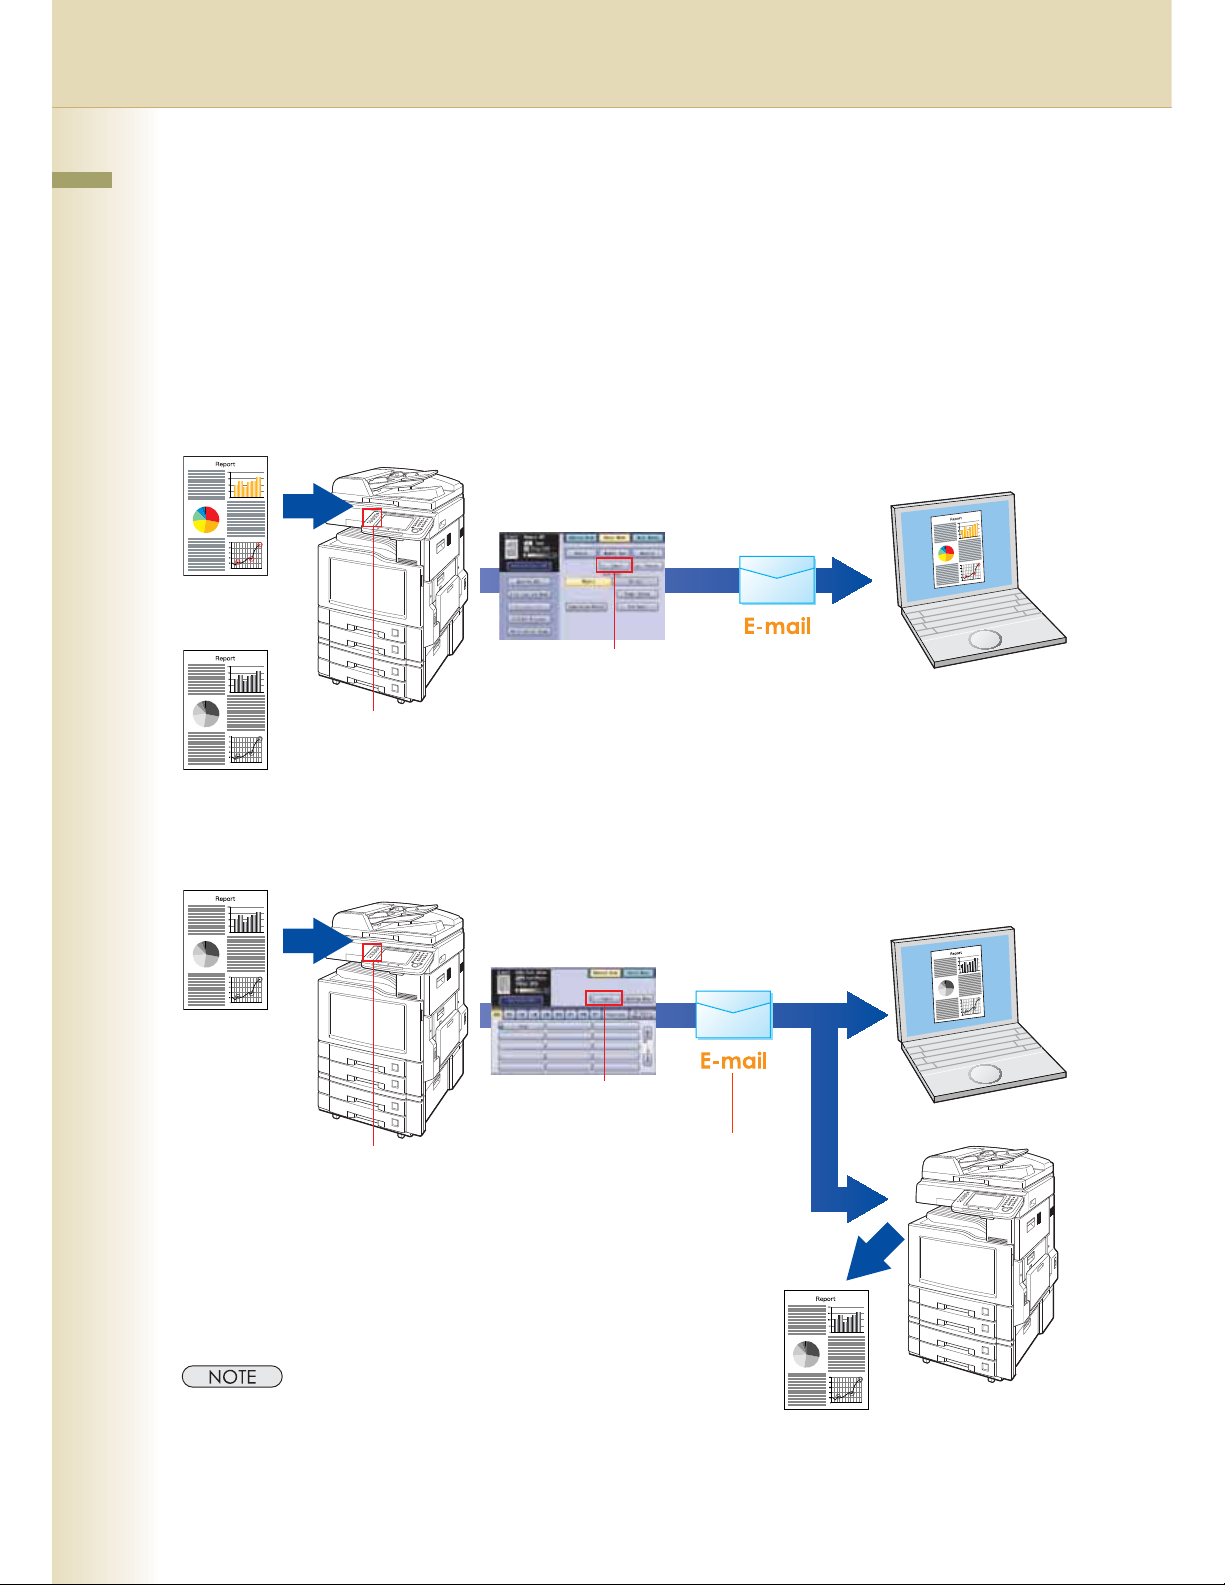
Scan/Email Function
Color Original
Sending an Email using
the Scan/Email Function
or
Monochrome
Original
Select “Email”.
Press the Scan/Email key.
Set the type of File to
attach (See page 36)
•JPEG
•PDF
• Compressed PDF
Ex: Color Original
Internet Fax Function
Monochrome
Original
Press the Fax key.
Sending an Email using
the Internet Fax Function
Select “Email”.
Set the type of File to attach
(Refer to the Chapter 3:
Setting a File Type and a
Filename in the Operating
Instructions for Fax
Functions)
•TIFF
•PDF
Internet Fax Device
Monochrome
8
z Each Email function can be set in the
Fax/Email Settings. Refer to the
Chapter 4 Fax/Email Settings in the
Operating Instructions (For Function
Parameters) on the provided CD-ROM.
PDF file can be printed when the optional Printer Controller
Module (for Adobe
device.
®
PostScript® 3TM) is installed on your
Page 9

Memo
Chapter 1 Getting To Know Your Machine
9
Page 10
Chapter 2
Chapter 2 Scan/Email Operations
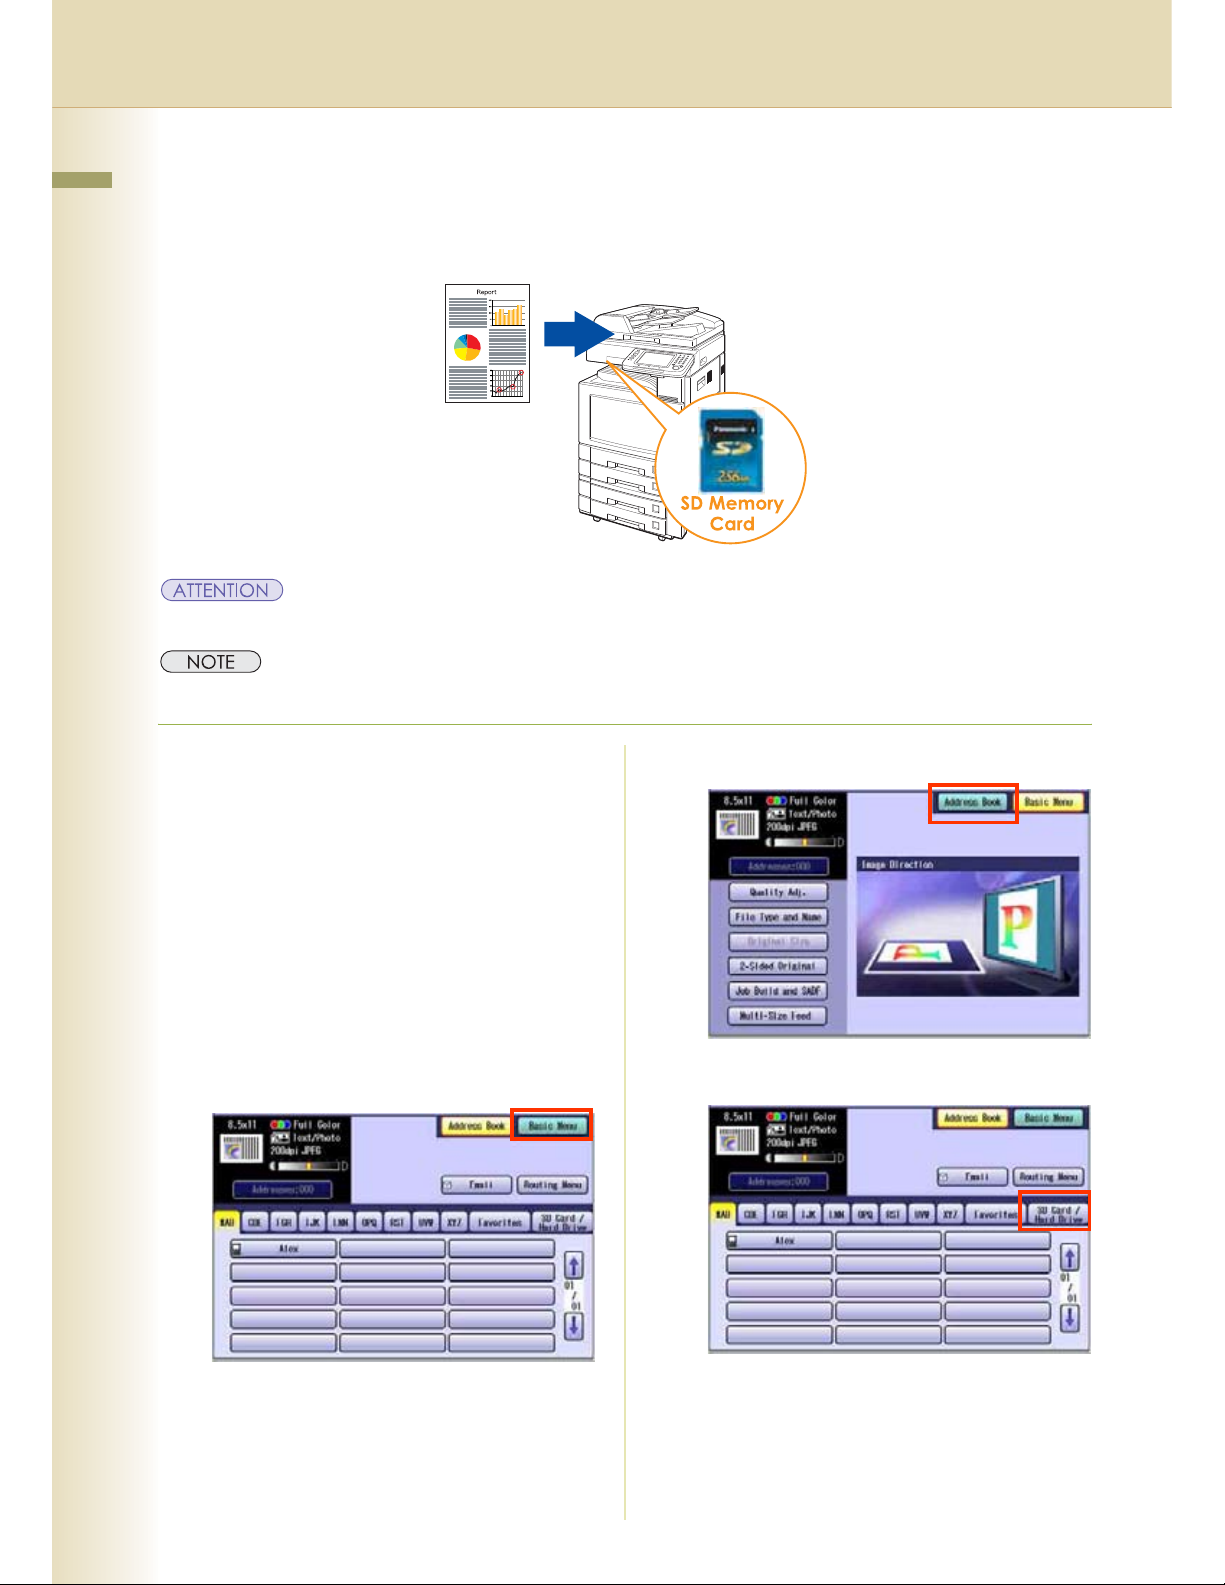
Scan to the SD Memory Card
The scanned image will be directly transferred to the SD Memory Card.
z Be sure to use only Genuine SD Memory Card. (Up to 1 GB)
z The SD logo is a trademark.
Scan/Email Operations
1
Place the original(s).
z For instructions on how to place originals,
refer to Basic Operation Procedure (see
page 6). For more details, refer to Placing
Originals (Copy) in the Operating
Instructions (for Basic Operations).
2
Press the Scan/Email key.
3
Select “Basic Menu” to configure the
required settings, and then select
“OK”.
Refer to Scanner Settings (see
pages 28-39).
4
Select "Address Book".
5
Select “SD Card/Hard Drive”.
10
Page 11
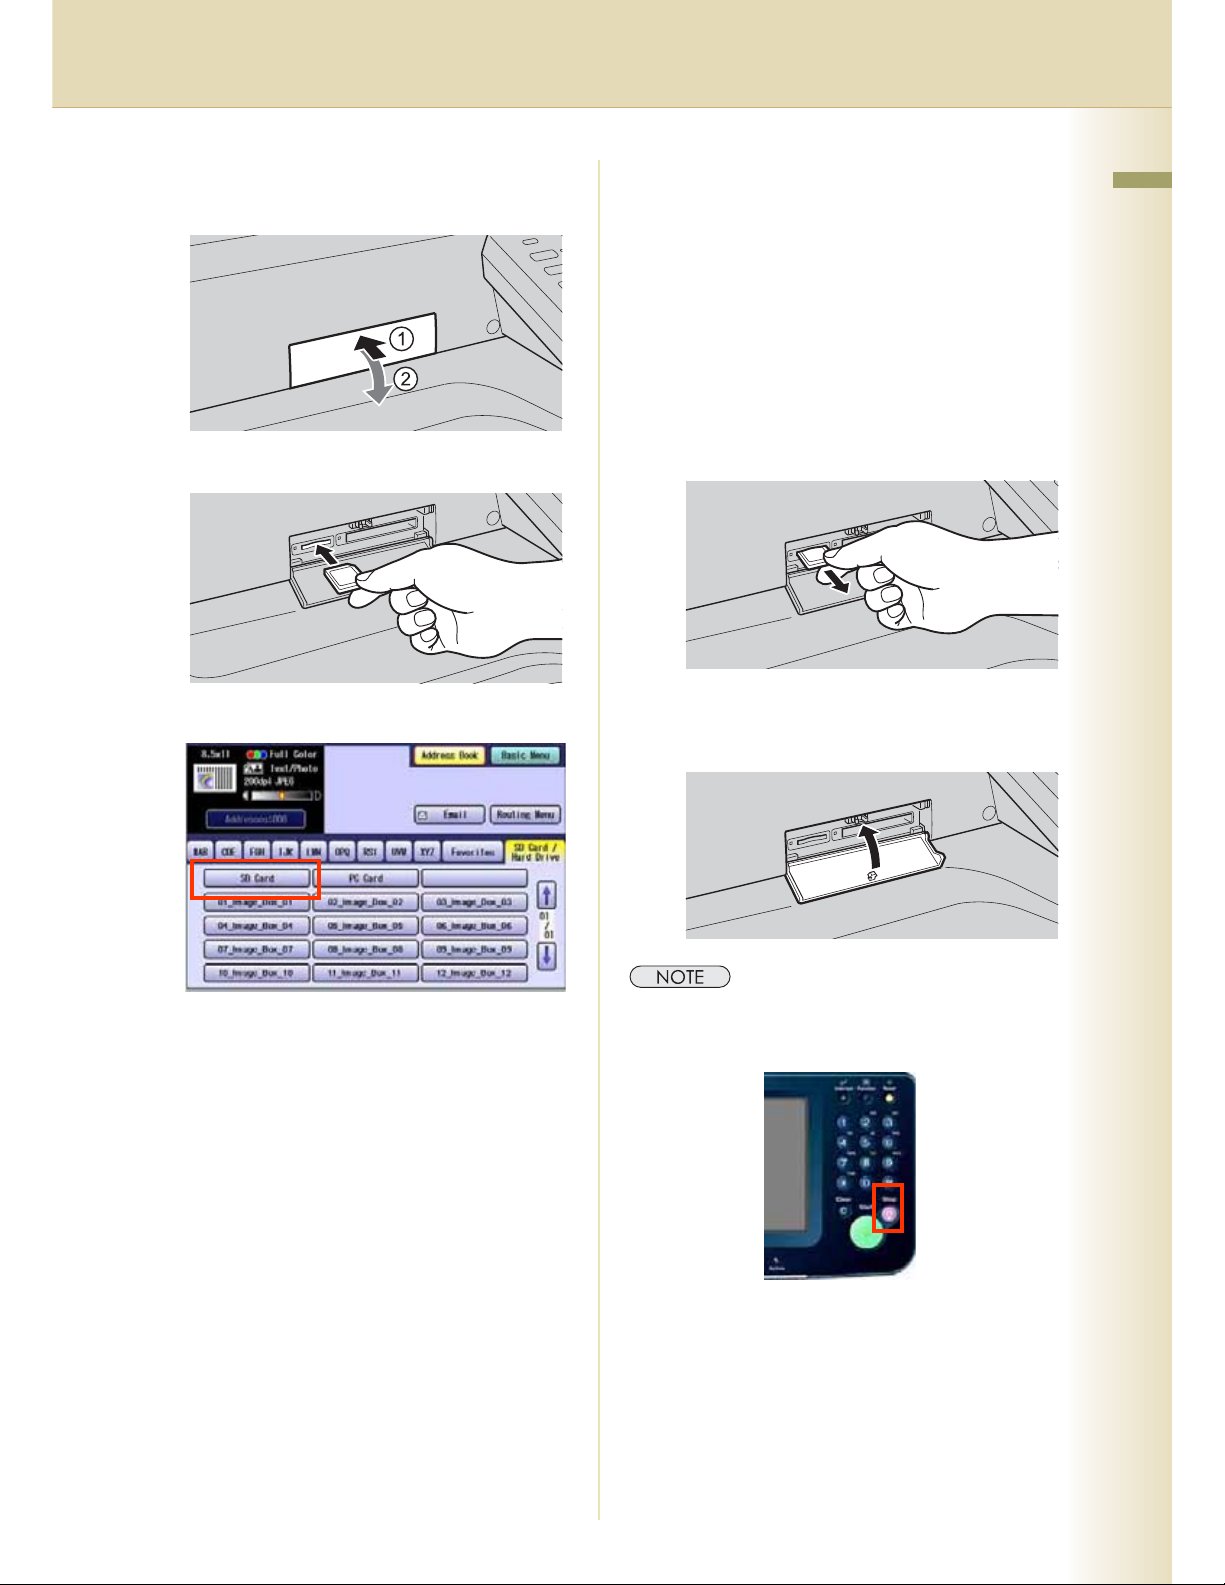
6
Insert the SD Memory Card.
ḧ Push the Slot Cover to open it.
Ḩ Insert the SD Memory Card as illustrated.
(Label side up).
7
Select “SD Card”.
z The data saved on the SD Memory Card
can be printed by this machine or another
DP-C262 or DP-C322. For more details,
refer to Printing from SD Memory Card/PC
in the Operating Instructions (for Basic
Operations). When printing PDF data or
high-compression PDF data, install and set
up the Memory Card Print Utility. For
details, refer to the Help of the Memory Cart
Print Utility on the Document Management
System CD-ROM.
9
Push the SD Memory Card, and then
remove it.
z Do not remove the SD Memory Card while
the Access Indicator is flashing.
Chapter 2 Scan/Email Operations
z Only one storage device can be selected at
a time. When the "SD Card" is selected as a
storage device, the scanned image cannot
be saved to the PCMCIA/PC Card or Hard
Disk Drive at the same time.
8
Press the Start key.
Scanned image is saved in the following
directory of the SD Memory Card.
z Directory:
\PRIVATE\MEIGROUP\PCC\DI\IMAGE
10
Close the Slot Cover.
z When canceling the operation, press the Stop key
on the Control Panel, and then select “Yes” on the
Touch Panel Display.
11
Page 12
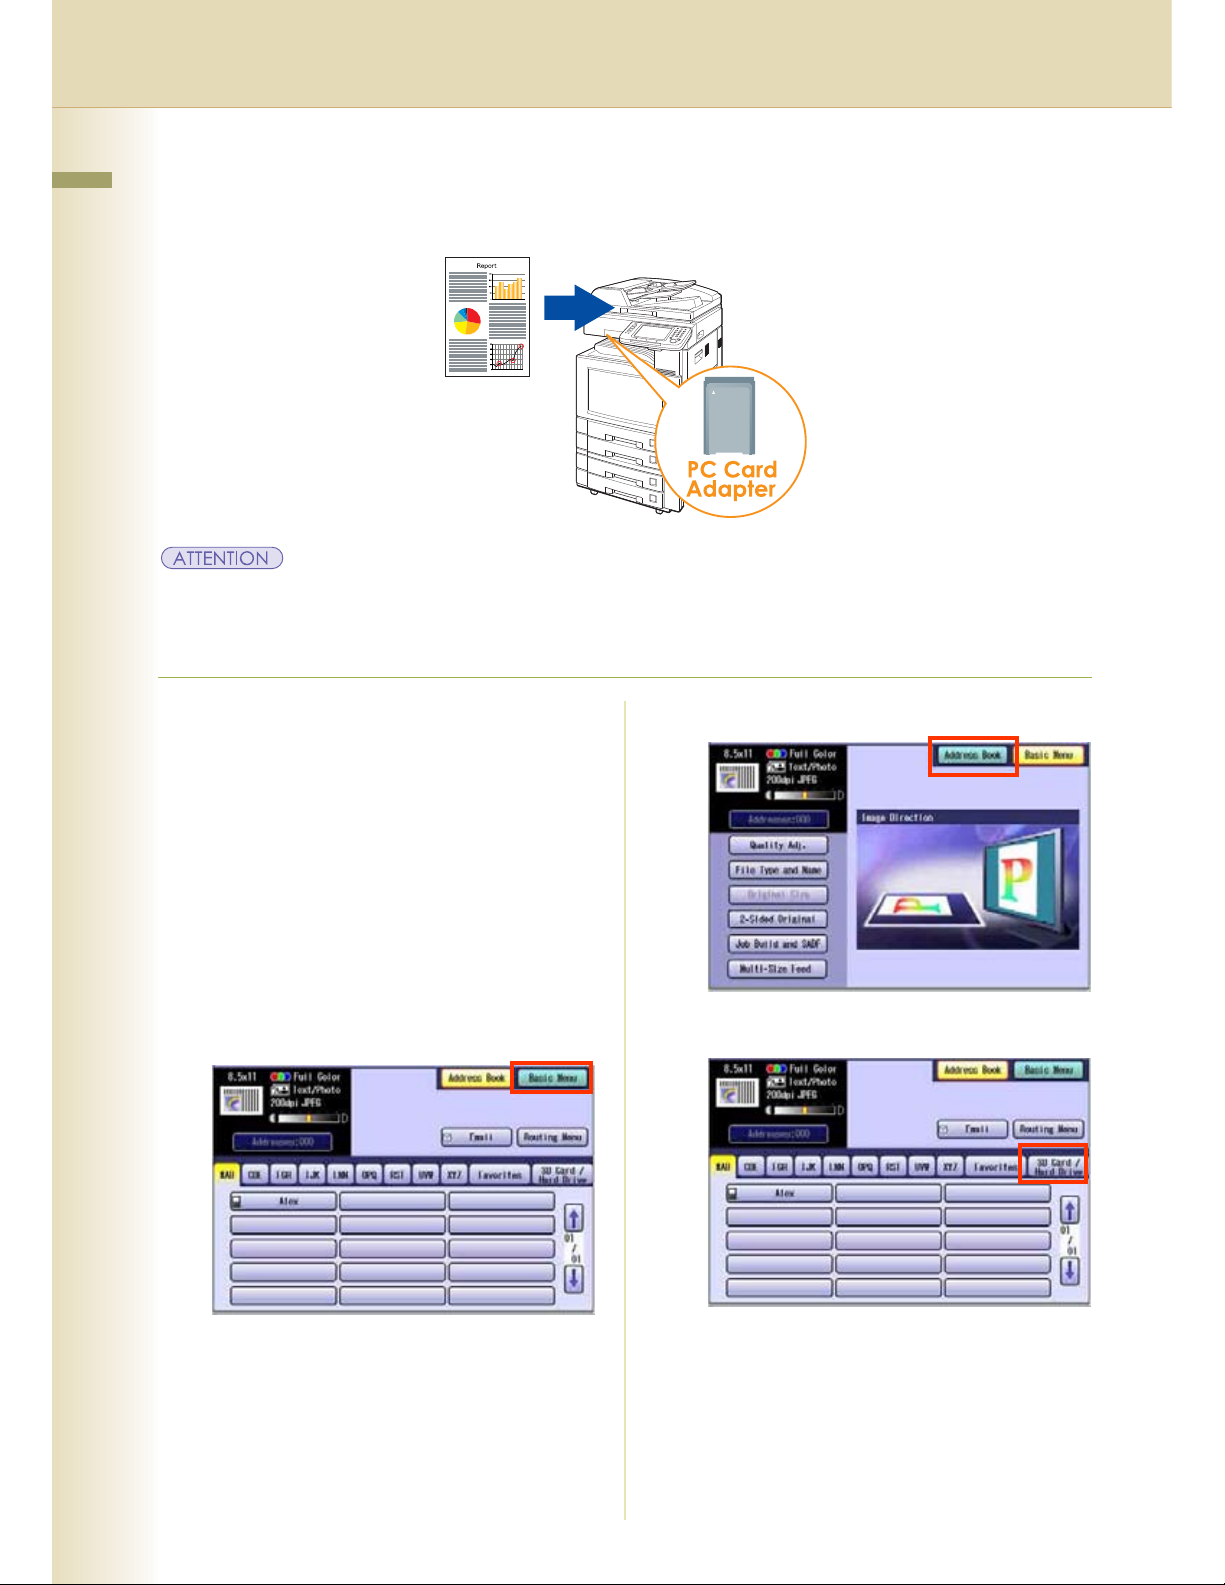
Scan to the PCMCIA/PC Card
Chapter 2 Scan/Email Operations
The scanned image will be directly transferred to the memory card into the PCMCIA/PC Card Adapter.
z Be sure to use only PCMCIA/PC Card Adapter (Type II) for Memory Card.
z For types of memory cards that can be used with the PC card adapter, refer to the document that came with the
PC Card Adapter.
1
Place the original(s).
z For instructions on how to place originals,
refer to Basic Operation Procedure (see
page 6). For more details, refer to Placing
Originals (Copy) in the Operating
Instructions (for Basic Operations).
4
Select "Address Book".
2
Press the Scan/Email key.
3
Select “Basic Menu” to configure the
required settings, and then select
“OK”.
Refer to Scanner Settings (see
pages 28-39).
5
Select “SD Card/Hard Drive”.
12
Page 13
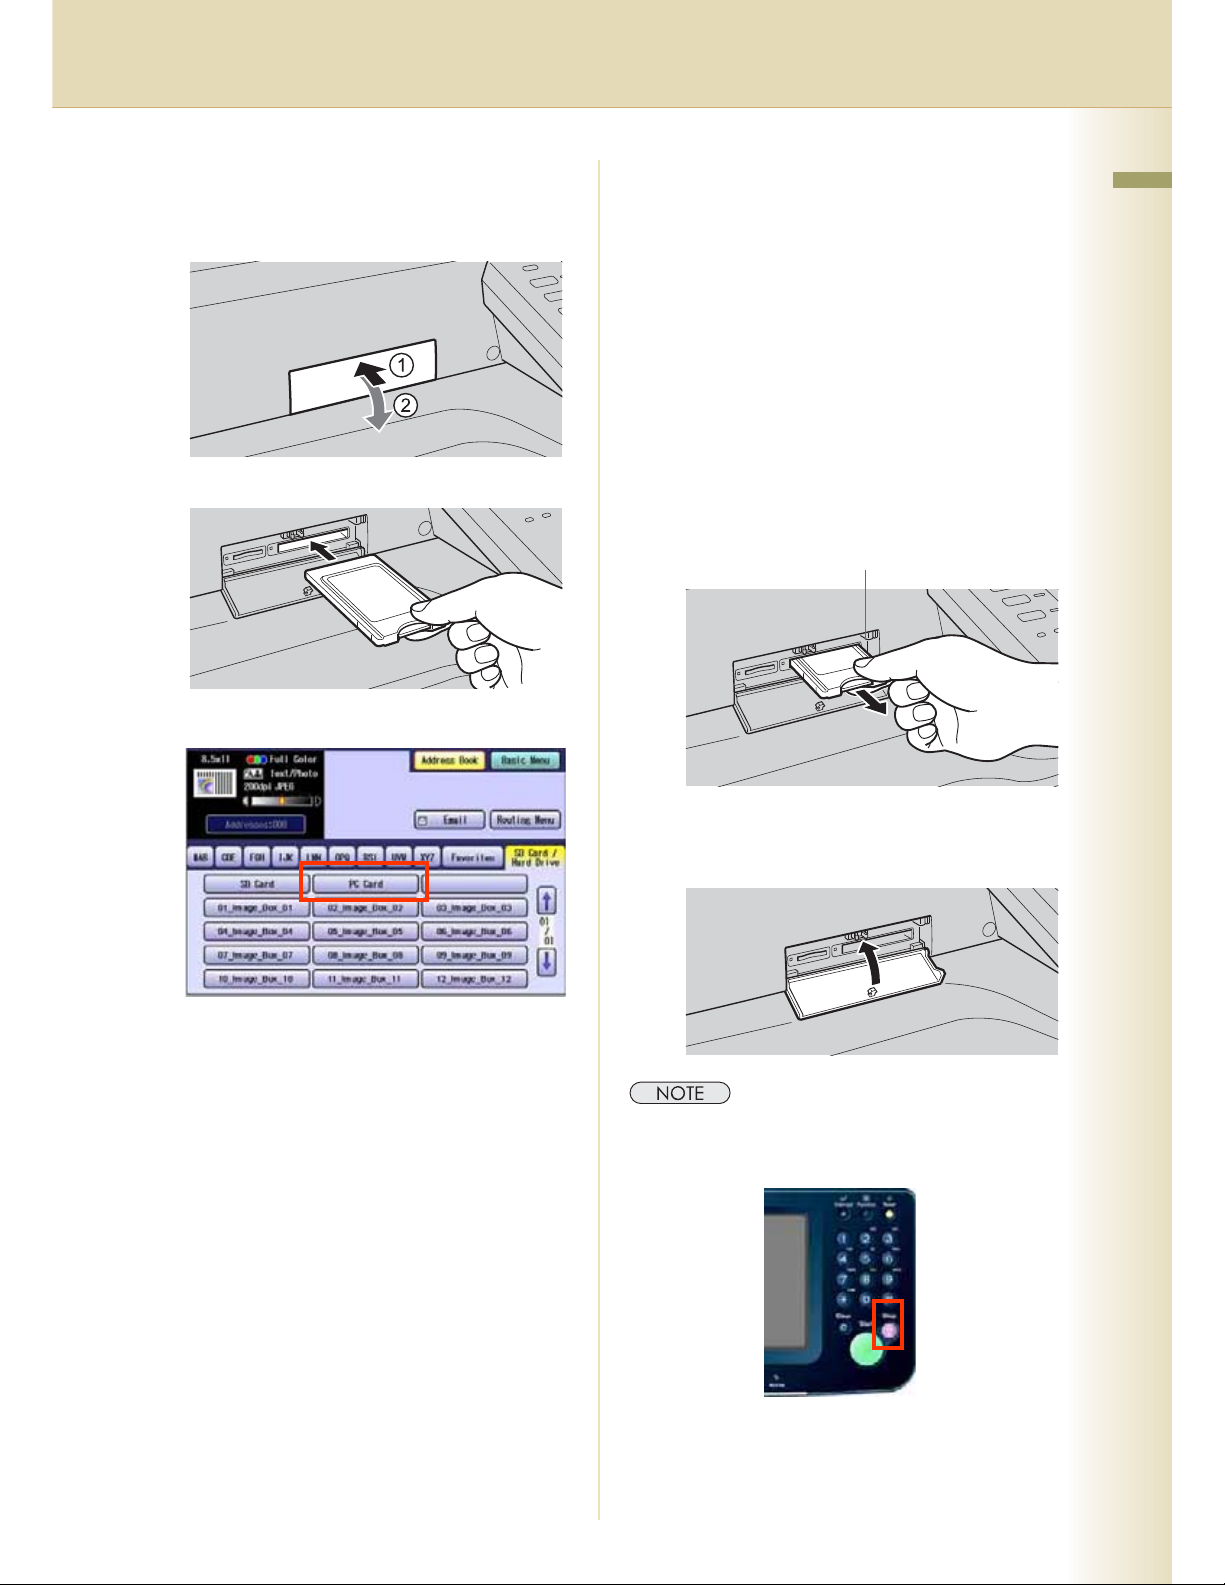
6
Insert a PCMCIA/PC Card Adapter
with a memory card.
ḧ Push on the slot cover to open it.
Ḩ Insert a PCMCIA/PC card into the PCMCIA/
PC Card slot as illustrated. (Label side up)
7
Select “PC Card”.
z The data saved on the memory card in the
PC Card Adapter can be printed by this
machine or another DP-C262 or DP-C322.
For more details, refer to Printing from SD
Memory Card/PC in the Operating
Instructions (for Basic Operations). When
printing PDF data or high-compression PDF
data, install and set up the Memory Card
Print Utility. For details, refer to the Help of
the Memory Cart Print Utility on the
Document Management System CD-ROM.
9
Push the Eject button on the right side
of PCMCIA/PC Card slot, and then
remove the PCMCIA/PC Card
Adapter.
Eject button
Chapter 2 Scan/Email Operations
z Only one storage device can be selected at
a time. When the "PC Card" is selected as a
storage device, the scanned image cannot
be saved to the SD Memory Card or Hard
Disk Drive at the same time.
8
Press the Start key.
The scanned image is saved into the
PCMCIA/PC Card.
The scanned data is saved on the following
directory of the memory card.
z Directory:
\PRIVATE\MEIGROUP\PCC\DI\IMAGE
z Do not remove the PCMCIA/PC Card while
the Access Indicator is flashing.
10
Close the Slot Cover.
z When canceling the operation, press the Stop key
on the Control Panel, and then select “Yes” on the
Touch Panel Display.
13
Page 14
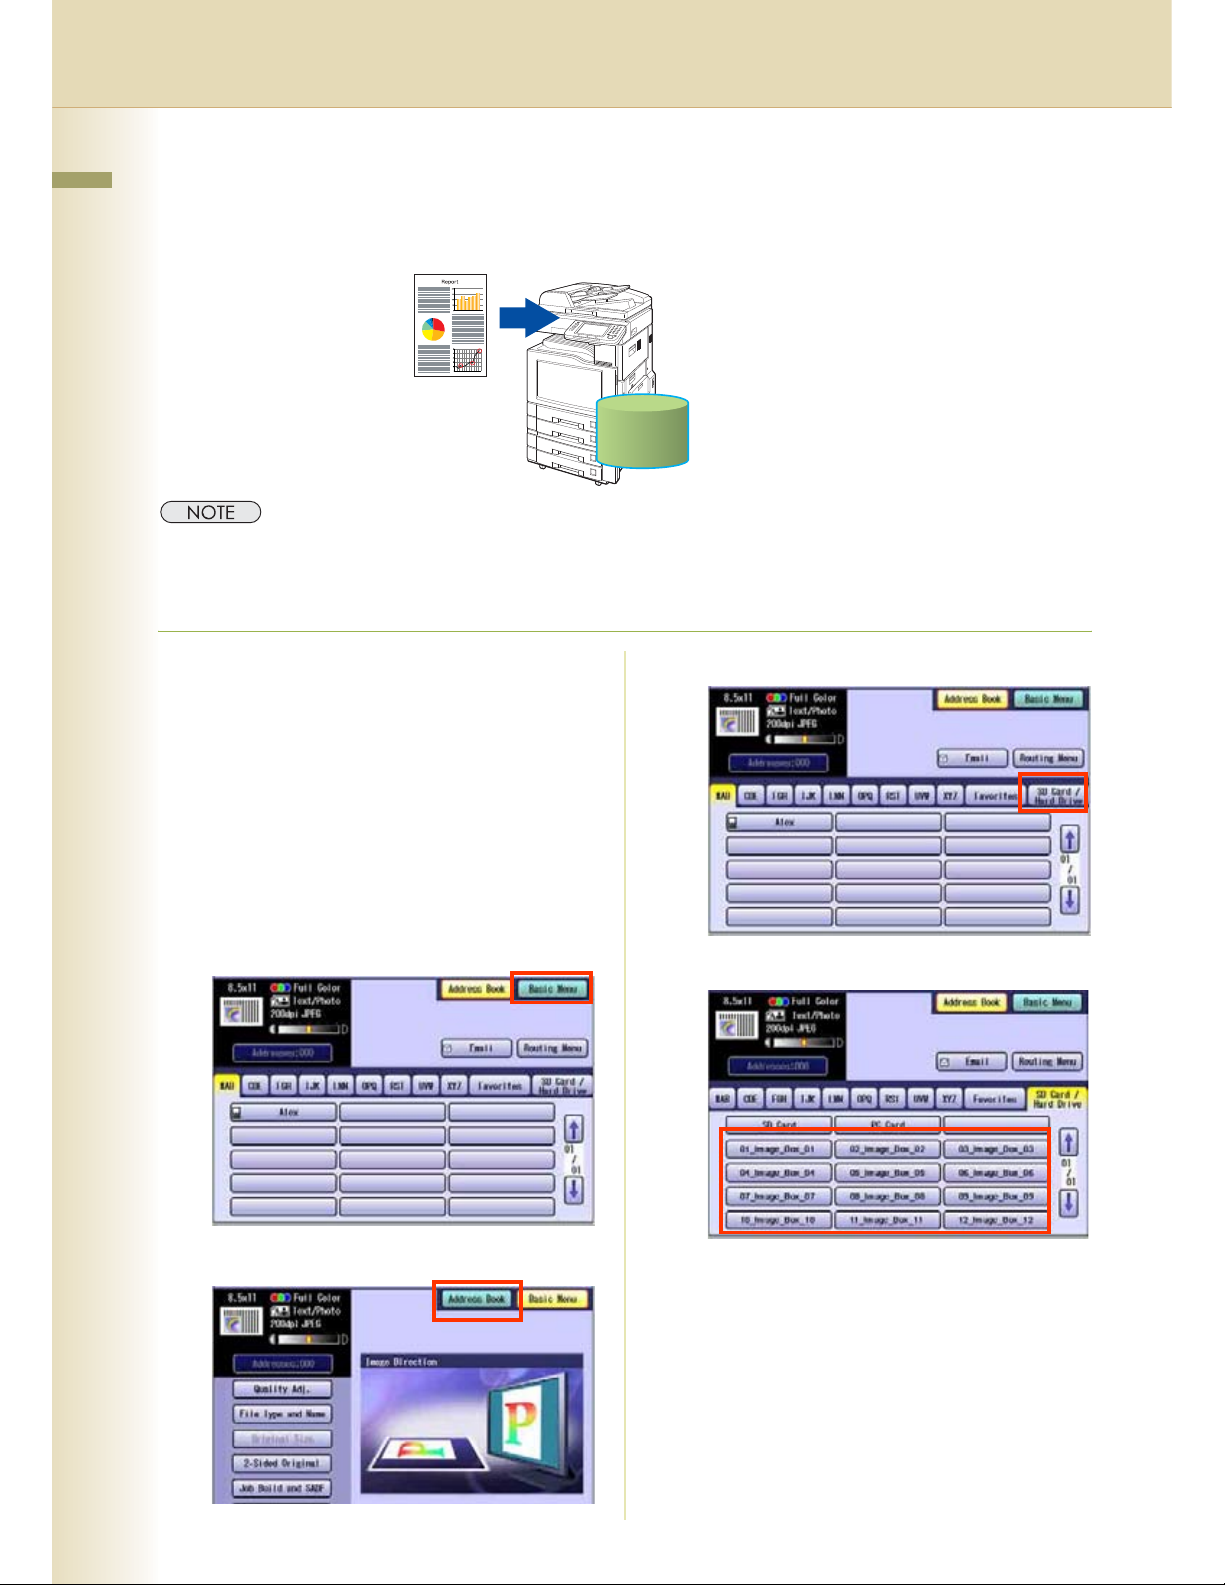
Scan to the Internal Hard Disk Drive
Chapter 2 Scan/Email Operations
The scanned image can be saved to the Internal Hard Disk Drive, and then saved data can be
retrieved from computer via a network.
Hard Disk Drive
z The hard disk is provided with 12 image boxes. For instructions on how to change the image box name, refer to
Editing Image Box Name (see page 44).
z All data saved on the hard disk can be deleted with a scanner function. For more details, refer to Chapter 5
"Scanner Settings" in the Operating Instructions (for Function Parameters).
1
Place the original(s).
z For instructions on how to place originals,
refer to Basic Operation Procedure (see
page 6). For more details, refer to Placing
Originals (Copy) in the Operating
Instructions (for Basic Operations).
5
Select “SD Card/Hard Drive”.
2
Press the Scan/Email key.
3
Select “
required settings, and then select “
Refer to Scanner Settings (see
pages 28-39).
4
Select "Address Book".
Basic Menu
” to configure the
OK
”.
6
Select an Image Box in the Hard Disk Drive.
z
Only one Image Box can be selected at a time.
z When the Hard Disk Drive is selected to be
the storage destination, the scanned image
cannot be saved to the SD Memory Card or
PCMCIA/PC Card at the same time.
7
Press the Start key.
When the document scanning completes, the
scanned data is saved on the hard disk.
For instructions on how to download the saved
z
data, refer to
Hard Disk Drive (see page 15)
Retrieve Scanned Image from
.
14
Page 15
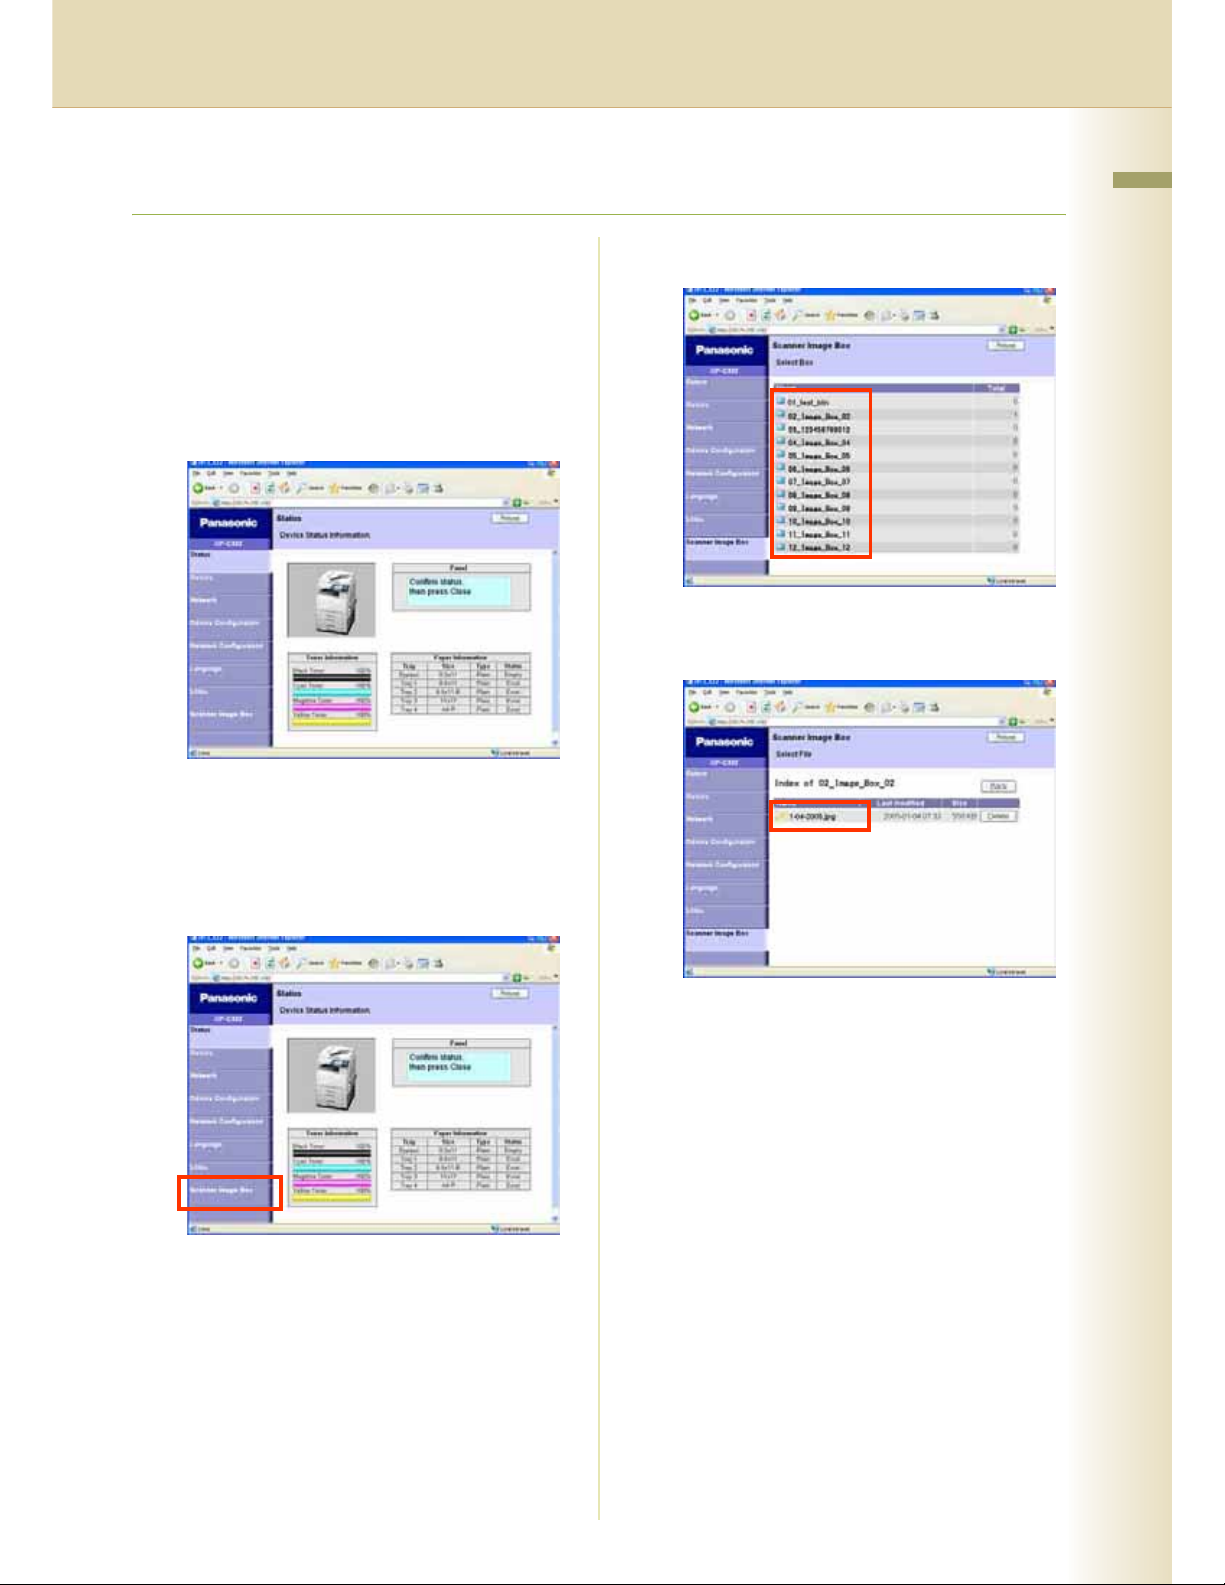
Retrieve Scanned Image from Hard Disk Drive
Chapter 2 Scan/Email Operations
1
Start a Web Browser, such as the
Internet Explorer, on your computer.
2
Enter the IP Address that has been set
on this machine.
Ex: http://10.74.232.130
z Machine Status will be displayed on the Web
browser.
3
Select an image box from its scanner
image box list, and then download the
image data from the image box onto
the computer.
ḧ Click "Scanner Image Box"
Ḩ Select an Image Box where image data is
saved.
ḩ Select a file where image data is saved.
z Open it with a left-click, and save it with a
right-click of your PC mouse.
15
Page 16
Scan to the Computer
Chapter 2 Scan/Email Operations
The scanned image will be transferred to desired computer.
z Before transferring the scanned image to your PC, it is necessary first to install the Panasonic Document
Management System software, and then setup the scanner configuration on your PC.
Refer to the Operating Instructions (For Setting Up) of provided booklet.
z Computers (with the following settings) on the network are automatically displayed in the Address Book. (They
are not displayed in "Favorites" on the Search tab.)
•The scanner settings are made with the Panasonic Communication Utility.
•The Panasonic Communication Utility has been activated.
(The Panasonic Communication Utility is automatically activated when Windows starts)
z The Panasonic Communication Utility can display up to 120 computers in the Address Book.
z The computer is automatically deleted from the Address Book under the the following cases:
•When the computer is logged off from the network
•When the Panasonic Communication Utility is terminated
16
1
Place the original(s).
z For instructions on how to place originals,
refer to Basic Operation Procedure (see
page 6). For more details, refer to Placing
Originals (Copy) in the Operating
Instructions (for Basic Operations).
2
Press the Scan/Email key.
3
Select “Basic Menu” to configure the
required settings, and then select
“OK”.
Refer to Scanner Settings (see
pages 28-39).
Page 17
4
Select "Address Book".
5
Select an alphabet tab.
7
Press the Start key.
When the scanned image is transferred to the
PC, the scanner reception notice appears on
the destination PC's display.
z When scanning from the Platen Glass, place
the next original, and then follow the
instructions described on the touch panel
display.
8
Click “Display”.
The Document Manager software starts.
z For more details, refer to the Operating
Instructions (Panasonic Document
Management System) on the provided
CD-ROM.
Chapter 2 Scan/Email Operations
6
Select a computer.
z Only one computer can be selected at a
time.
Scrolling Pages
To scroll to the previous page
Current page
Total number of pages
To scroll to the next page
17
Page 18

Scan to Email
Chapter 2 Scan/Email Operations
The scanned image can be emailed to network connected computers.
z JPEG (jpg) file is not available for multiple pages.
z JPEG (jpg) file is only available in Color/Gray Scale mode.
z TIFF file is only available in Monochrome mode.
When sending a multi-page color document:
<To a Single Address>
z
When attaching a color document in JPEG/PDF (except Compressed PDF) file, the machine sends an individual
Email for each scanned page. If you scan more than one page, the same number of Emails will be sent.
z To send a multi-page document as a single Email attachment, change the Fax Parameter “183 Color
Attachment” to “Multi”.
For more details, refer to Fax/Email Settings in the Operating Instructions (For Function Parameters).
<To Multiple Addresses>
z By default, the machine will send an Email with a multi-page (PDF) file, or multi-files (JPEG) color document.
z
A multi-page color scanned JPEG/PDF document tends to become very large in size.
If the attachment exceeds the maximum allowed data size for your network environment, send each page at a time.
18
1
Place the original(s).
z For instructions on how to place originals,
refer to Basic Operation Procedure (see
page 6). For more details, refer to Placing
Originals (Copy) in the Operating
Instructions (for Basic Operations).
2
Press the Scan/Email key.
3
Select “Email”.
Page 19
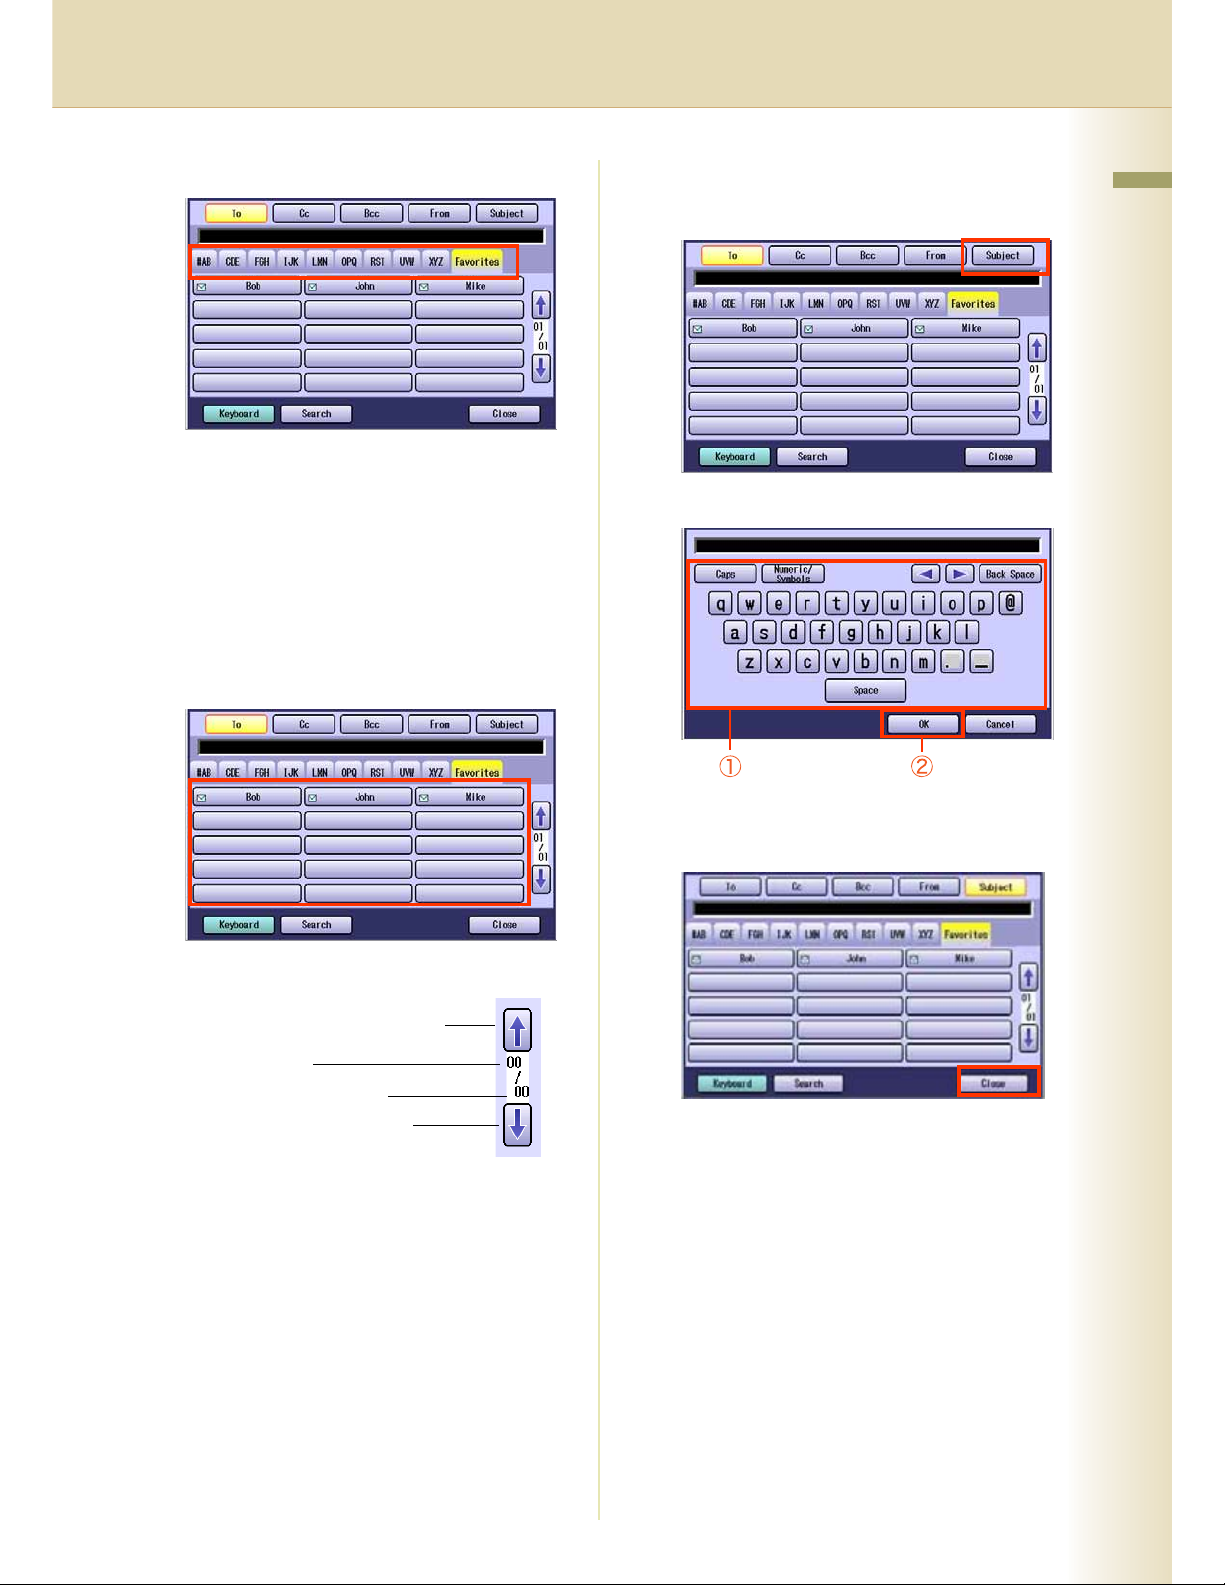
4
Select an alphabet tab.
z
When inputting the Email Address manually,
Keyboard
select “
Refer to the
Address Book (see page 24)
z When searching for address(es) via LDAP
server, refer to the Email Addressing from
LDAP server.
Refer to the Email Addressing from LDAP
Server (see page 22).
5
Select an email address.
”, and then input an address.
Add an Email Address to the
7
Input the subject if necessary.
ḧ Select “Subject”.
.
Ḩ Input a subject, and then select “OK”.
Chapter 2 Scan/Email Operations
Scrolling through pages
To scroll to the previous page
Current page
Total number of pages
To scroll to the next page
6
Select “Cc”, “Bcc” and/or “From”
address field and follow the same
procedures as in steps 4 and 5 if
necessary.
z Up to 40 characters.
8
Select “Close”.
<Continue to the Next Page>
19
Page 20

9
To confirm the selected or inputted
Chapter 2 Scan/Email Operations
Email Address.
ḧ Select "Addresses: ###".
(###: Number of selected email addresses)
Ḩ Select “OK”.
10
Select “Basic Menu” to configure the
required settings, and then select
“OK”.
Refer to Scanner Settings (see
pages 28 to 39).
11
Press the Start key.
Transferring the scanned image(s) to Email.
z When scanned image transfer fails, a
transfer error message is printed out.
20
Page 21

Memo
Chapter 2 Scan/Email Operations
21
Page 22

Email Addressing from LDAP Server
Chapter 2 Scan/Email Operations
You can search an Email Address through the server (LDAP Server) for computer names beginning
with a specified character(s).
z This function is available where the LDAP Server is configured.
1
Place the original(s).
z For instructions on how to place originals,
refer to Basic Operation Procedure (see
page 6). For more details, refer to Placing
Originals (Copy) in the Operating
Instructions (for Basic Operations).
2
Press the Scan/Email key.
3
Select “Email”.
6
Select “Global”.
7
Select “Search”.
4
Select “Search”.
5
Input the first few characters of the
computer name.
z Select “Local” to cancel the search for
computers and exit to the previous screen.
z Select the desired computer and select
“Add to Local” to add it to the address
book. Refer to Add an Email Address to
the Address Book (see page 24).
z For instructions on how to enter characters,
refer to Using the Keyboard in the
Operating Instructions (For Function
Parameters) on the provided CD-ROM.
The result of the Email address search is
shown on the display.
22
Page 23
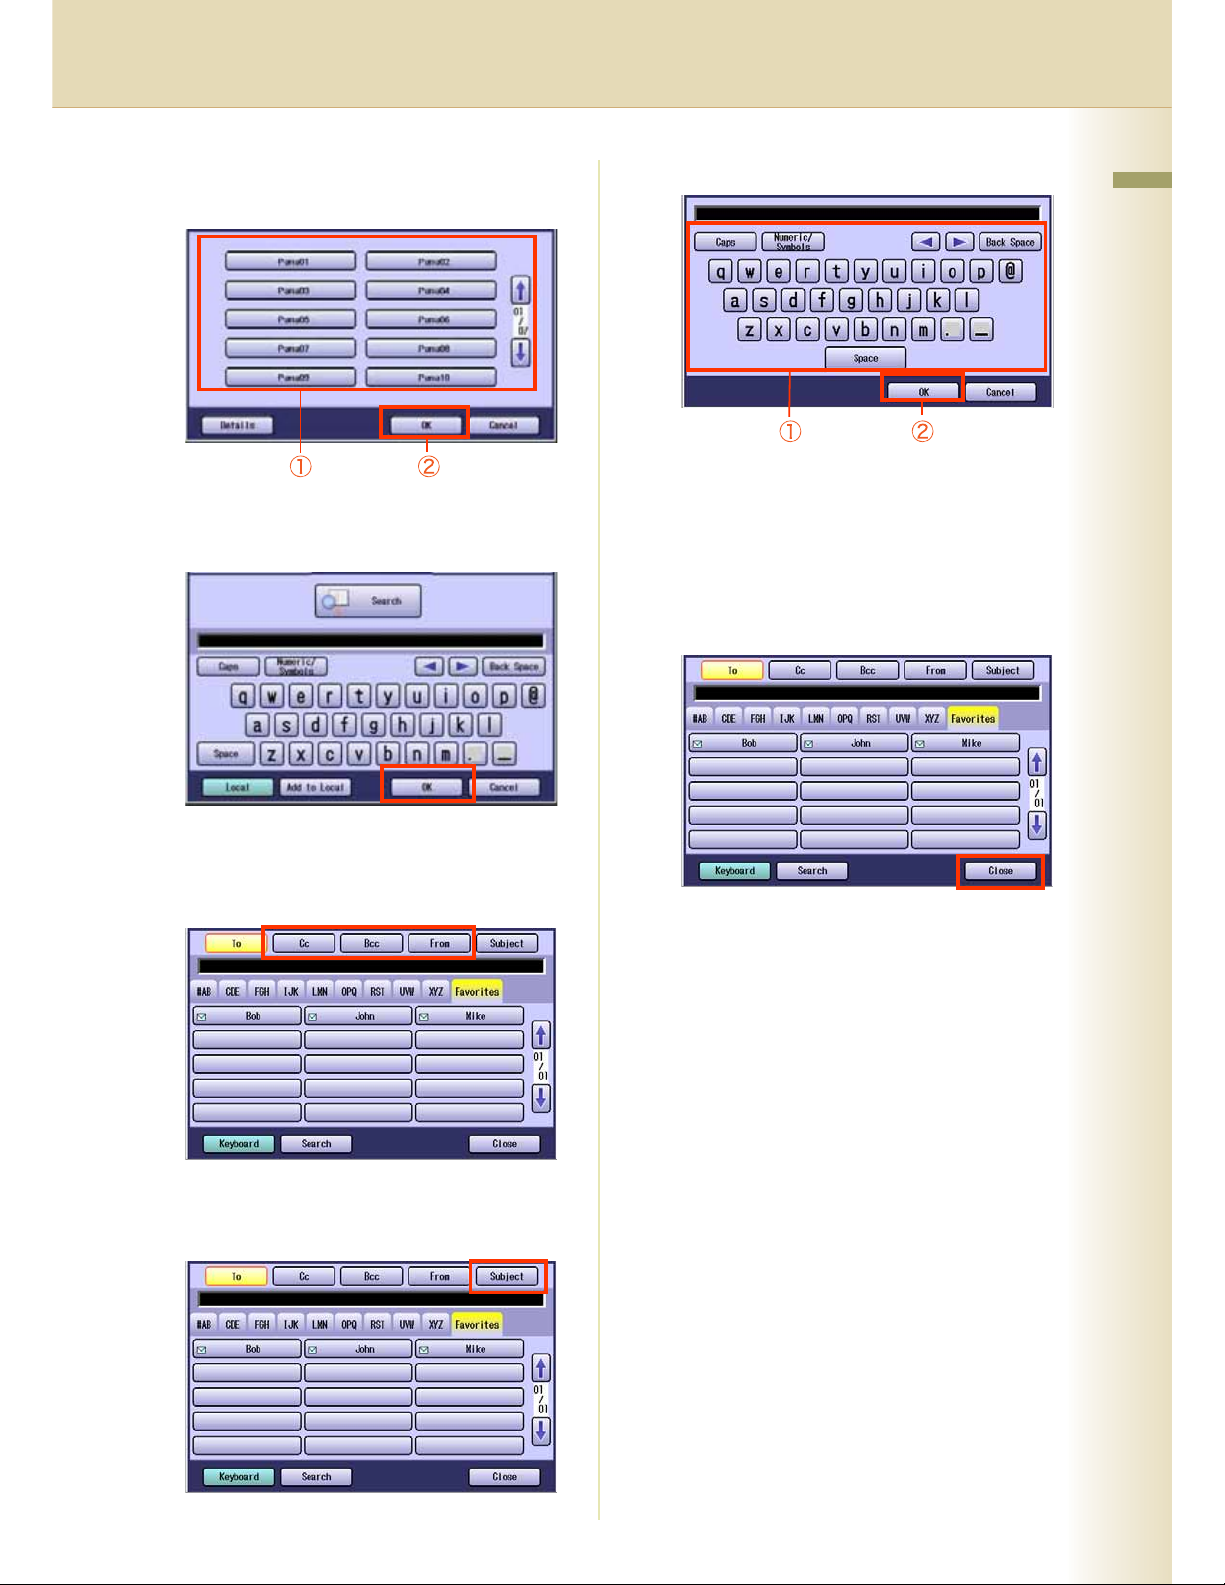
8
Select a compluter, and then select
“OK”.
Ḩ Input a subject.
Chapter 2 Scan/Email Operations
z Only one station can be selected at a time.
9
Select “OK”.
10
To select “Cc”, “Bcc” and/or “From”,
select the corresponding button, and
then perform steps 4 to 9.
z Up to 40 characters.
z For instructions on how to enter characters,
refer to Using the Keyboard in the
Operating Instructions (For Function
Parameters) on the provided CD-ROM.
12
Select “Close”.
z For the following steps, refer to steps 9 to 11
in Scan to Email (see page 18).
11
Input the Subject.
ḧ Select “Subject”.
23
Page 24

Add an Email Address to the Address Book
Chapter 2 Scan/Email Operations
Email addresses that have been entered from the Scan/Email basic screen can be added to the
address book.
1
Press the Scan/Email key.
2
Select "Email".
3
Select “Keyboard”.
5
Select “Add to Local”.
6
Select “Edit”.
4
Input an email address.
Ex: pcc@panasonic.com
z Up to 60 characters.
z For instructions on how to enter characters,
refer to Using the Keyboard in the
Operating Instructions (For Function
Parameters) on the provided CD-ROM.
7
Input a station name and a key name,
and then select “OK” to edit the station
name and key name selected in
step 5.
z Up to 15 characters.
z For instructions on how to enter characters,
refer to Using the Keyboard in the
Operating Instructions (For Function
Parameters) on the provided CD-ROM.
24
Page 25

8
Select “OK” to register the email
address as a station.
9
Select “OK”.
Chapter 2 Scan/Email Operations
z For the following steps, refer to steps 6 to 11
in Scan to Email (see page 18).
25
Page 26

Receiving an Email
Chapter 2 Scan/Email Operations
This function is only available when the optional Internet Fax Module (DA-NF320) is installed.
If the machine connects to a network as a POP Client, it can receive Email either automatically or
manually. The Email reception method from a POP Server varies depending on the POP settings
programmed in Function Parameters.
Configure to Receive Email
Program the following parameters in Function Parameters (Fax/Email Settings> Fax Parameters) to
receive Email:
Item Name Setting
146 POP Timer”
“
147 Auto POP Receive”
“
148 Del POP Receive Mail”
“
“149 Del POP Error Mail”
z For instructions on how to configure the POP Server, refer to Fax/Email Settings in the Operating Instructions
(For Function Parameters) on the provided CD-ROM.
z With POP manual reception preprogrammed on a program key, POP Email can be retrieved by a user name
other than the one preprogrammed as local station information.
Set the time interval for checking the Email on POP Server.
• Set an interval between 0 and 60 minutes.
• An interval setting of 0 minutes would not retrieve Email
automatically.
Set whether to send queries to the POP Server periodically.
• If there is Email, it is retrieved and printed.
• If this parameter is set to “Invalid”, only the number of the
incoming Email messages on the POP Server appears on
the display.
Set whether to delete the Email from the server after it has been
retrieved.
Set whether to delete Email from the server when the attached file is
in a format that cannot be printed.
Receiving Email Automatically
With “147 Auto POP Receive” set to “Valid” and POP acquisition interval set between 1 and 60
minutes in Function Parameters (Fax/Email Settings> Fax Parameters), queries are transmitted to the
POP Server periodically to check for new mail.
If there is Email on the POP Server when a query is transmitted, it is retrieved and printed
automatically.
26
Page 27

Receiving Email Manually
With “147 Auto POP Receive” set to “Invalid” in Function Parameters (Fax/Email Settings> Fax
Parameters), Email is received manually.
z With POP acquisition interval set between 1 and 60 minutes, queries are transmitted to the POP Server
periodically to check for new mail and the number of the incoming Email messages on the server appears on
the display.
1
Press the Fax key.
2
Check for incoming mail(s).
Chapter 2 Scan/Email Operations
3
Select “Basic Menu”.
4
Select “Get Email”.
The retrieved Email is printed.
27
Page 28

Chapter 3
Setting the Scanning Quality
Chapter 3 Scanner Settings
Documents, whether in Full Color or Monochrome, are scanned in three-colors.
z Color mode settings are reset to their factory defaults when:
-The machine is turned Off.
-The Reset key is pressed.
-A scan job is completed.
Scanner Settings
1
Select “Basic Menu”.
2
Set the desired scanning modes.
Quality Adjustment
Color Setting
Full Color Mode
Color Original Three-colors
Grayscale Mode
Color Original Grayscale
Black Mode
Color Original Monochrome
(Red, Green
and Blue)
(Halftone)
(Bi-level)
28
Quality Adj. (see page 28)
File Type and Name (see page 36)
(Continue from step 3)
Original Size:
From Platen Glass only.
When the original size is not correctly
detected, select “Original Size”, and then
select original size and touch “OK” on the
display.
2-Sided Original (see page 38)
Job Build and SADF (see page 39)
Multi-Size Feed:
When scanning mixed size originals, select
“Multi-Size Feed”.
Ex: 8.5 x 11" and 11 x 17" size originals
Monochrome Original
1
Select the Color Mode, and then “OK”.
Monochrome
(Bi-level)
Page 29

Setting Original Type and Scanning Density
Selecting Original Type
Text Text/Photo Photo
Chapter 3 Scanner Settings
Adjusting Scanning Density
Lighter
z The standard setting of “Original Type” and “Density” can be changed, refer to Scanner Settings in the
Operating Instructions (For Function Parameters) on the provided CD-ROM.
Selecting Original Type
1
Select the original type, and then
select “OK”.
Adjusting Scanning Density
1
Adjust the scanning density with
“Lighter” or “Darker”, and then select
“OK”.
Darker
Tex t Mainly a Text original.
Tex t/
Photo
Photo Mainly a Photo original.
Text and Photo combined original.
Lighter For dark image originals.
Darker For light image originals.
29
Page 30

Scanning Resolution
Chapter 3 Scanner Settings
You can set the appropriate resolution according to your originals.
z The standard setting of “Resolution” can be changed, refer to Scanner Settings in the Operating Instructions
(For Function Parameters) on the provided CD-ROM.
z Resolution settings are reset to their factory defaults when:
-The machine is turned Off.
-The Reset key is pressed.
1
Select a desired resolution, and then
select “OK”.
z Most originals such as photos can be
scanned without problems using the default
resolution (200 dpi) and picture quality level
(Full Color).
To scan smaller characters (8-point or
smaller) clearly, increase the resolution or
select Adjustment, and then select High
Quality for Compression (Full Color).
Since the file size increases with higher
resolutions, the transfer time becomes
longer depending on the specifications of
the network and computer you are using.
Example: The time required for transferring
an A4 size color photo scanned
at 600 dpi is three times as long
as that for the same photo
scanned at 200 dpi.
30
Page 31

Memo
Chapter 3 Scanner Settings
31
Page 32
Advanced Color Quality Settings
Chapter 3 Scanner Settings
The following picture qualities can be adjusted:
• Compression (Full Color)
• Compression (Grayscale)
• Compression (Black)
• Background Removal
• Contrast
z
The standard setting of “
Removal
Parameters) on the provided CD-ROM.
z The picture quality settings are reset to their default settings when:
-The machine is turned Off.
-The Reset key is pressed.
” and “
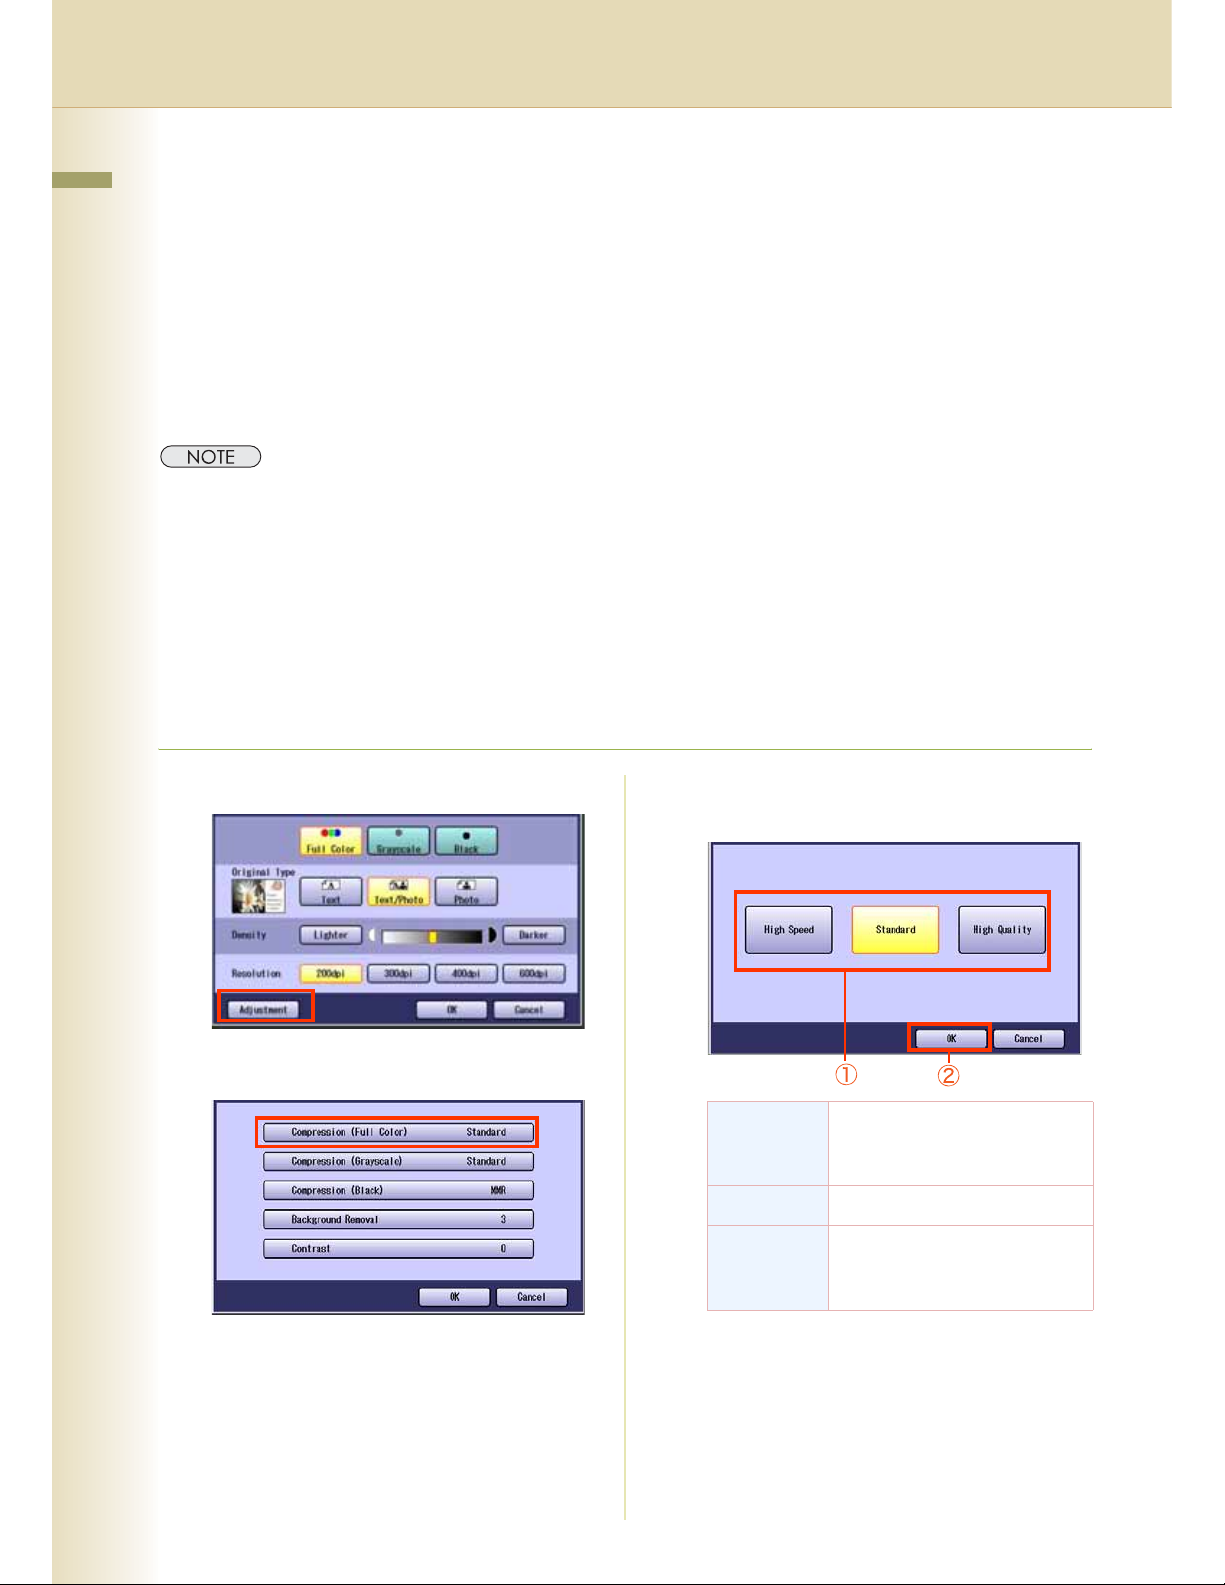
Compression (Full Color)
Select picture quality in Full Color mode.
Compression (Full Color)
Contrast
” can be changed,
”, “
Compression (Grayscale)
refer to Scanner Settings in the Operating Instructions (For Function
”, “
Compression (Black)
”, “
Background
1
Select “Adjustment”.
2
Select “Compression (Full Color)”.
3
Select a picture quality, and then select
“
OK
”.
High Speed Low picture quality.
Transferring data at the higher
speed.
Standard Standard picture quality.
High
Quality
High picture quality.
Transferring data at the slower
speed.
32
Page 33

4
Select “OK”.
Chapter 3 Scanner Settings
33
Page 34

Compression (Grayscale)
Chapter 3 Scanner Settings
Selects picture quality, and then compression
mode in Grayscale mode.
1
Select “Adjustment”. (See page 32)
2
Select “Compression (Grayscale)”.
3
Select an image quality, and then
select “OK”.
Compression (Black)
Documents can be scanned with a
Monochrome setting.
1
2
3
Select “Adjustment”. (See page 32)
Select “Compression (Black)”.
Select a compression, and then select
“OK”.
34
4
Select “OK”.
High Speed Low picture quality.
Transferring data at the higher
speed.
Standard Standard picture quality.
High
Quality
High picture quality.
Transferring data at the slower
speed.
4
Select “OK”.
MH Modified Huffman format:
Lowest compression
MR Modified Read format: Higher
compression than MH
MMR Modified MR format: Higher
compression than MR
JBIG Joint Bi-level Image format:
Higher compression than MMR
Page 35

Background Removal
Color documents can be scanned in
monochrome with their background removed.
This feature is convenient for scanning
newspapers, background-colored documents or
the like.
Contrast
The scanning contrast can be adjusted to match
the original.
Higher
Lower
Chapter 3 Scanner Settings
When the Photo original is selected in the Original
Type (see page 29), this Background Removal
setting is not available.
1
Select “Adjustment”. (See page 32)
2
Select “Background Removal”.
3
Adjust the Background Removal level
with “-” and “+”, and then select “OK”.
1
Select “Adjustment”. (See page 32)
2
Select “Contrast”.
3
Adjust the contrast level “Lower” or
“Higher”, and then select “OK”.
4
Select “OK”.
(6 steps)
+ Background-color is darker
- Background-color is lighter
4
Select “OK”.
Lower For darker original
Higher For lighter original
35
Page 36

Setting the File Type and/or File Name
Chapter 3 Scanner Settings
Documents can be scanned with a file type specified. While files are named after their date by default,
documents may also be scanned with a filename specified.
z The standard setting of “File Type and Name” can be changed, refer to Scanner Settings in the Operating
Instructions (For Function Parameters) on the provided CD-ROM.
z The “File Type and Name” setting is reset to its standard setting when:
-The machine is turned Off.
-The Reset key is pressed.
1
Select “Basic Menu”.
3
Select a file type.
2
Select “File Type and Name”.
JPEG For Color Photo/Grayscale
originals
PDF For Photo and Text combined
originals
Compressed
PDF
When the "Black" is selected with the
"Quality Adj.", "PDF" or "TIFF" is selected.
TIFF For Monochrome originals
PDF For Photo and Text combined
z When a Full Color or Grayscale type original
is selected in the Color Mode, only JPEG,
PDF or Compressed PDF file type can be
selected.
z When a Black type original is selected in the
Color Mode, TIFF or PDF file type is only
selected.
z When the Compressed PDF is selected, the
selected Resolution will be automatically
adjusted to the 300dpi. “Original Type”, and
“Background Removal” cannot be set.
z When the Compressed PDF is selected, the
selected Compression (Full Color) or
(Grayscale) will be automatically adjusted to
"High Speed" (see page 32).
An Acrobat PDF file format
which is compressed at a
higher compression ratio.
originals
36
Page 37

4
Select a File Name type.
To enter File Name
ḧ Select “Custom”.
z When the Date/Time is selected for the File
Name, the file name will automatically
default to Date/Time format.
Ḩ Enter a filename by using the onscreen
keyboard, and then select “OK”.
Chapter 3 Scanner Settings
z Up to 20 characters.
z When scanning to the SD Memory Card or
PCMCIA/PC Card, display limitation is up to
8 characters on the screen in lower case
letters.
z For instructions on how to enter characters,
refer to Using the Keyboard in the
Operating Instructions (For Function
Parameters) on the provided CD-ROM.
37
Page 38

Scanning 2-Sided Originals
Chapter 3 Scanner Settings
2-Sided Originals can be scanned and the binding position is selectable.
The standard setting of 2-Sided/Original can be changed, refer to Scanner Settings in the Operating Instructions
(For Function Parameters) on the provided CD-ROM.
1
Place the Original(s) on the ADF.
z For instructions on how to place originals,
refer to Basic Operation Procedure (see
page 6). For more details, refer to Placing
Originals (Copy) in the Operating
Instructions (for Basic Operations).
2
Press the Scan/Email key.
5
Select a bind position, and then select
“OK”.
Long Edge
3
Select “Basic Menu”.
4
Select “2-Sided Original”.
Short Edge
6
Select "Address Book", and then
select a destination.
7
Press the Start key.
z When canceling the operation, press the Stop key
on the Control Panel, and then select “Yes” on the
Touch Panel Display.
38
Page 39

When Scanning the Special Originals (Thin paper, etc.)
from ADF
Special originals (like thin paper, etc.) can be fed from the ADF and scanned continuously using the
Job Build and SADF Mode.
Chapter 3 Scanner Settings
1
Place one original. (Minimum 50 g/m
z For instructions on how to place originals,
refer to Basic Operation Procedure (see
page 6). For more details, refer to Placing
Originals (Copy) in the Operating
Instructions (for Basic Operations).
2
Press the Scan/Email key.
3
Select “Basic Menu”.
2
)
5
Select "Address Book", and then
select a destination.
z For more details, refer to Basic Operation
Procedure (see page 6).
6
Press the Start key.
z Place the next original within 5 sec. of last
scanned original.
z If “Another Original? Yes or No” message is
displayed, select "No" if you do not have any
more documents to scan.
4
Select “Job Build and SADF”.
z When canceling the operation, press the Stop key
on the Control Panel, and then select “Yes” on the
Touch Panel Display.
39
Page 40

Chapter 4
Editing the Address Book
Chapter 4 Adding to the Address Book
The IP and Email Addresses in the address book can be edited or deleted.
Edit an Email Address
The Email address can be edited.
1
Press the Function key.
2
Select “Scanner Settings”.
4
Select “19 Edit Address Book:
Email”.
Adding to the Address Book
3
Select “10-19”, and then scroll to the
next page using .
5
Select an address tab.
6
Select an email address to edit, and
then select “OK”.
40
Page 41

7
Edit the email address, and then
select “OK”.
z Enter an Email Address (up to 60
characters).
z For instructions on how to enter characters,
refer to Using the Keyboard in the
Operating Instructions (For Function
Parameters) on the provided CD-ROM.
8
Enter a station name, and then select
“OK”.
12
Select “Close”.
13
Press the Reset key.
Chapter 4 Adding to the Address Book
9
Enter a key name, and then select
“OK”.
10
Select “Yes” or “No”.
11
Select “Cancel”.
The Email Address is updated.
41
Page 42

Delete an Email Address
Chapter 4 Adding to the Address Book
The Email Addresses in the address book can be deleted.
1
On the Scanner Settings screen (see
page 40), select “21 Delete Address:
Email”.
z For instructions on how to display the
Scanner Settings screen, refer to steps 1 to
3 in the Edit an Email Address (see page
40).
2
Select an address tab.
4
5
6
Select “Yes”.
The Email Addresses is deleted.
Select “Cancel”.
Select “Close”.
42
3
Select the desired Email Address, and
then select “OK”.
7
Press the Reset key.
Page 43

Memo
Chapter 4 Adding to the Address Book
43
Page 44

Editing Image Box Name
Chapter 4 Adding to the Address Book
The image box name can be changed.
z For instructions on how to save Scanned image to an image box, refer to Scan to the Internal Hard Disk
Drive (see page 14).
z When the image data is registered into the image box, image box name can not be changed.
1
Press the Function key.
2
Select “Scanner Settings”.
4
Select “25 Edit Image Box Name”.
5
Select the desired image box name.
44
3
Select “20-29” , and then scroll to the
next page using .
6
Input the new image box name, and
then select “OK”.
z Up to 15 characters.
z For instructions on how to enter characters,
refer to Using the Keyboard in the
Operating Instructions (For Function
Parameters) on the provided CD-ROM.
Page 45

7
Input a button name, and then select
“OK”.
z Up to 12 characters.
8
Select “OK” or “Cancel”.
Chapter 4 Adding to the Address Book
9
Select “Close”.
10
Press the Reset key.
45
Page 46

Chapter 5
Glossary
Chapter 5 Appendix
Term Meaning
Appendix
10Base-T/
100BaseTX
Address
Book
Address
Book
Dialing
ADF
(Automatic
Document
Feeder)
Automatic
print
reduction
Automatic
Reception
BPS (Bits
Per
Second)
An Ethernet standard for Local Area Network (LAN).
The 10/100 refers to its 10/100 Mbps bandwidth, the base to single baseband, and the T to the Twisted pair.
The cable uses two pairs of unshielded twisted wires.
The Address Book is a convenient directory that stores contact Phone Numbers and Email Addresses for
easy retrieval at a future time.
A dialer that enables you to dial an entire Telephone Number/Email Address by pressing one key.
The mechanism that feeds a stack of document, to the scanner one page at a time.
Automatically reduces a received document so that it can be printed onto a standard size piece of plain
paper. For example, your machine will reduce an incoming legal size page to 75% of its original size so it
can fit on a letter size paper.
The mode that allows you to receive fax documents without user intervention.
The amount of data that is transmitted over the phone line. Your machine can start at each Max. Modem
speed and automatically steps down to suitable speed depending on the phone line condition and the
receiving machines capabilities.
CD-ROM CD-ROM media is read-only media that holds about 650 MB of data. It's generally accepted as the easiest
way to distribute software. CD-ROM drives can also read audio CDs even though they are in a different
format than standard CD-ROM media.
Client Clients are computers that run software programs used to contact and obtain data from Server software
program on another computer, often across a great distance.
Coding
method
DDS
(Document
Distribution
System)
Density Signifies the scanning sensitivity in terms of lightness and darkness of your original pages. The degree of
Dept. Code
(Department
Code)
DHCP Dynamic Host Configuration Protocol - a standard method for assigning IP addresses automatically to the
Direct
Dialing
The data compression method is used by machine. Your machine utilizes Modified Huffman (MH), Modified
Read (MR), Modified Modified Read (MMR) and Joint Bi-level Experts Group (JBIG) coding methods.
The Document Distribution System automatically distributes received data (Scanner data, data received via
FAX, and data received via Internet Fax) to specified recipients via a predefined delivery mechanism. The
system administrator uses the system to specify the delivery mechanisms and the recipients.
color or darkness of an image or photograph.
This operation, require the user to input a preset number of digits (Department Code) before being given
access to a function of the machine, such as transmission for example. The Department Name of selected
Department Code is printed on the Header of each page sent, Cover Sheet, Comm. Journal and Individual
Transmission Journal.
devices on a TCP/IP network. As a new device connects, the DHCP server assigns an IP address from a
list of available addresses. The device retains this IP address for the duration of the session - once the
device disconnects the IP address becomes available for use again.
The method of dialing where you enter the entire telephone number or Email Address with the keypad.
46
Page 47

Term Meaning
Direct
SMTP
Disk Drive A peripheral storage device that holds, spins, reads and writes magnetic or optical disks. It may be a
Allows Internet Fax machines to communicate directly with each other within the Firewall (Intranet) without
going through the Mail Server, thus alleviating the burden on the Mail Server.
receptacle for disk cartridges, disk packs or floppy disks, or it may contain non-removable disk platters like
most hard disks.
Chapter 5 Appendix
Domain
Name
dpi Abbreviation of dots per inch, which indicates the resolution of images. The more dots per inch, the higher
Drum Along with the laser, this is one of the basic components of a laser printer. A light-sensitive drum on which
DTMF
(Dual Tone
Multi
Frequency)
ECM (Error
Correction
Mode)
Email
Address
Ethernet A very common method of networking computers and equipment in a LAN.
Fax Board In a multi-functional device, this is a Fax capability built onto a printed circuit board which can send and
A unique name that identifies an Internet site.
Domain Names always have 2 or more parts, separated by dots.
The part on the left is the most specific, and the part on the right is the most general.
the resolution. A common resolution for laser printers is 600 dots per inch. This means 600 dots across and
600 dots down, so there are 360,000 dots per square inch.
the image is generated by the laser beam as the pattern of an electric charge. The toner particles adhere to
this pattern after the drum has brushed against the developing roller. (a.k.a. OPC Drum)
Dialing method that sends a different set of frequencies for each digit of the telephone keypad. Commonly
refers to touch tone dialing.
The ability to correct transmission errors as detected during the transmitting.
The address for sending and receiving data by Email. It consists of User name, Sub-domain name and
Domain name.
A local-area network (LAN) architecture was developed by Xerox Corporation in cooperation with DEC and
Intel in 1976.
receive facsimiles. The multi-functional device is normally able to scan in a document and transmit it over a
phone line to another fax machine. Also, it can receive faxes from other machines and print them out.
Fax
Forward
Fax
Parameter
List
File A task that has been stored into the memory of your unit. Examples are deferred transactions.
Fixed
Reduction
FTP Short for File Transfer Protocol, the protocol for exchanging files over the Internet.
Function
Keys
G3 (Group 3)Refers to the standards and transmission capabilities of the current generation of facsimile machines.
The ability to forward all incoming faxes to the registered stations.
The list that contains the home fax parameters settings that you have programmed into your machine.
The method that allows you to determine one reduction rate, such as 75%, for all incoming documents.
FTP works in the same way as HTTP for transferring Web pages from a server to a user's browser and
SMTP for transferring electronic mail across the Internet in that, like these technologies, FTP uses the
Internet's TCP/IP protocols to enable data transfer.
FTP is most commonly used to download a file from a server using the Internet or to upload a file to a
server (e.g., uploading a Web page file to a server).
The key that will be utilized to begin an operation or configuration of a feature.
47
Page 48

Term Meaning
Chapter 5 Appendix
Group
Dialing
Halftone A scanning technique to distinguish levels of gray from black and white.
The ability to program many telephone numbers into a single station so that many locations can be dialed in
sequence utilizing a single keystroke.
Handshaking
Hard Disk This is commonly the slang term for a hard drive is closed and the disks are hard (usually metal). The
HDD (Hard
Disk Drive)
Header A row of information that is transmitted by the sending machine and printed on the top of each page by the
Homepage The page that your Browser displays when it starts up or main web page for a business, organization, etc.
Host Any computer on a network that is repository for services available to other computers on the network.
Image
Memory
Size
The exchange of a group of control signals that communicate between the transmitter and receiver. These
signals determine the condition at which communication can occur.
closed system gives the possibility of a device that physically stores data in your multi-functional machine/
computer. It's much like a floppy disk, but the system is more precise, so the drive is faster and can hold
more data.
The physical component of a PC which performs the basic operations on the hard disk-including rotating
the disk & reading/writing data to the disk.
receiving unit. This identifies the transmitting unit and information about the transmission, such as time and
date.
A Host must have a unique Host name within a domain.
The host is the first (left most) section of the Fully Qualified Domain Name (FQDN).
The reminder of the FQDN is the domain and often tells you something about where your machine is
located ( i.e., at Panasonic)
Ex:
Your machine's Email Address is: Fax@fax01.panasonic.com
In the example above "fax01" is the host and "panasonic.com" is the domain.
This signifies the amount of memory available in your unit capable of storing pages of documents. All page
units of measure are based on the ITU-T Image No.1.
Install To add hardware or load a software application onto your multi-functional machine/computer.
Internet The Internet is a vast collection of inter-connected networks that all use the TCP/IP protocols, on which you
can send an Email, chat to people electronically or search for information on almost any subject you care to
think of. Quite simply it is a “network of computer networks”.
Internet
FAX
Intranet A private network inside a company or organization that uses the same kinds of software that you would
IP Address A unique number used to identify equipment or host computers on the Internet.
ISP
(Internet
Service
Provider)
ITU-T
(C.C.I.T.T.)
ITU-T
Image No.1
The Internet fax uses the Internet to send faxes. The transmission and reception take place via store-andforward mode on the Internet using Internet Email.
In store-and-forward mode the facsimile protocol “stops” at the gateway to the Internet and is reestablished
at the gateway leaving the Internet.
find on the public internet, but that is only for internal use.
An institution that provides access to the Internet in some form, usually for money.
International Telecommunication Union - Telecommunication, formerly known as C.C.I.T.T
An Industry standard document that allows comparisons of the transmission speeds and capabilities of
machines.
48
Page 49

Term Meaning
JPEG Short for Joint Photographic Experts Group, and pronounced jay-peg. JPEG is a lossy compression
technique for color images. Although it can reduce files sizes to about 5% of their normal size, some detail
is lost in the compression. JPEG is a graphical format that is widely used in WWW pages.
Key Name An alternate to the station name that can be programmed for each Address Book dialing key.
Keypad A group of numeric keys located on your Control Panel.
Chapter 5 Appendix
LAN (Local
Area
Network)
LCD Liquid Crystal Display. The display area of your machine.
MAC
Address
Mail
Gateway IP
Address
Mailing List A system that allows people to send an Email to one address, whereupon their message is conveyed to
Manual
Reception
MAPI
(Messaging
Application
Program
Interface)
MDN
(Message
Delivery
Notice)
A Local Area Network is a computer network system and printer limited to an immediate area, such as an
Office, Factory, and University used to integrate and exchange data.
A hardware address that uniquely identifies each node of a network. In IEEE 802 networks, the Data Link
Control (DLC) layer of the OSI Reference Model is divided into two sublayers: the Logical Link Control
(LLC) layer and the Media Access Control (MAC) layer. The MAC layer interfaces directly with the network
medium. Consequently, each different type of network medium requires a different MAC layer.
The Address of the Mail Server.
The Internet Fax communicates with your existing Mail Server for all communication traffic.
multiple subscribers on the Mailing List.
A mode that requires operator intervention to receive an incoming document.
Acronym for Message Application Programming Interface.
A standard Windows interface for messaging that enables different mail programs and other mail-aware
applications like word processors and spreadsheets to exchange messages and attachments with each
other.
This Message Delivery Notice (MDN) is the requested by the sender for a delivery processing confirmation
indicating that the message (Email) was read.
Memory The term memory identifies data storage that comes in the form of chips, which holds information that your
machine needs to use. The word storage is used for memory that exists on disks.
Memory
Transmission
MIME
(Multipurpo
se Internet
Mail
Extension)
Modem A device that converts signals from your fax machine into signals that can be transmitted over telephone
Module A self-contained hardware or software component that interacts with a larger system.
Network Any time you connect 2 or more computers together so that they can share resources, you have a
Overlap
Print
The documents are scanned into memory before actual connection to the phone line for transmission.
A standard used for attaching non-text (image) files to Internet Email messages.
lines.
Hardware modules are often made to plug into a main system. Program modules are designed to handle a
specific task within a larger program.
computer network. Connect 2 or more networks together and you have an internet.
Documents too long to be reduced are automatically printed on two pages with 10 mm overlap.
49
Page 50

Term Meaning
Chapter 5 Appendix
Panasonic
SuperSmoothing
PC The Personal Computer - Quite Simply a computer designed to be used by one person at a time.
PC Card A credit card sized removable module for portable computers. PC Cards are used to attach modems,
An electronic image enhancement (Panasonic Super Smoothing) that will create a particular pattern for the
improvement of copy quality.
network adapters, sound cards, radio transceivers, solid state disks and hard disks to a portable computer.
PCL
(Printer
Control
Language)
PDF
Polling The ability to retrieve a document from another machine.
Polling
Password
POP (Post
Office
Protocol)
Print
Reduction
Mode
Protocol A standard process, a set of rules & conditions that perform a particular function. A word which is very
PSTN
(Public
Switched
Telephone
Network)
The page description language, which has become a de facto standard used in many printers and
typesetters. PCL Level 6 streamlines the graphics and font commands, reducing the amount of information
that has to be sent to the printer.
®
Portable Document Format (PDF) is a universal file format that preserves all the fonts, formatting,
Adobe
graphics, and color of any source document, regardless of the application and platform used to create it.
A 4-digit programmed code that enables the security of a document being polled.
POP refers to the way Email software such as Eudora or your machine gets Email from a mail server.
You must always have a POP account that you tell your Email software to use to retrieve your mail.
The methods used to determine how an incoming document will be reduced to print onto the paper loaded
in your machine.
common in PC & Internet Terminology.
Ex: FTP (File Transmission Protocol), IP Address (Internet Protocol Address), TCP/IP (Transmission
Control Protocol Internet Protocol), POP (Post Office Protocol)
Public Switched Telephone Network. Network of interconnected switching equipment and transmission
facilities.
50
Receiver
Password
Relay
Address
Relay
Network
Resolution This relates to the quality of a viewed image either on the PC Screen or printed output. For printed images
Router
(Gateway)
A 4-digit password that is checked before a document is received.
A 3-digit code that identifies your machine is programmed in a relay network.
A group of machines that communicate via a relay station.
the resolutions is measured in dots per inch or DPI. The higher the DPI the better the resolution and better
image quality.
A special purpose computer ( or software package) that handles the connection between 2 or more
networks.
Gateways act like traffic cops, they spend their time looking at the destination addresses of the packets
passing through them and deciding which route to send them on.
Page 51

Term Meaning
SD Card
(Secure
Digital
Memory
Card)
A flash memory card that provides secure storage for your machine, which is also popular with handheld
devices such as digital cameras, cell-phones, and PDAs.
Chapter 5 Appendix
Selective
Reception
Server A computer, or a software package, that provides a specific kind of service to client software running on
Sleep Mode The lowest power state that the machine enters after the specified time without actually turning off.
SMTP
(Simple
Mail
Transfer
Protocol)
Software Software is basically a series of instructions that causes the PC to do something.
Station
Name
Stored
Document
SubAddress
A function that can be set so that your unit will receive from only those machines programmed into your
dialer.
other computers.
A single server machine could have several different server software packages running on it, thus providing
many different servers to clients on the network.
An accepted standard used extensively on the Internet for transferring Email messages between
computers. The standard defines exactly how the message will be sent, any controls, format of the
message etc.
The Operating System such as DOS is known as Systems Software. Application Programs such as a Word
Processor or Spreadsheet perform the main tasks for which we use the PC.
Alphanumeric ID which can be programmed for each phone number or Email Address location in the
Address Book.
Documents that have been scanned and now are saved in your machine's memory.
ITU-T recommendation for further routing, forwarding or relaying of incoming faxes.
SubAddressing
Password
Subnet
Mask
Substitute
Memory
Reception
TCP/IP TCP/IP stands for Transmission Control Protocol/Internet Protocol. It is quite simply a standard set of
Thumbnails A miniature display of a page or an image. Thumbnails enable you to see the layout of many pages/images
TIFF Tagged Image File Format. One of the many different types of File Format used on PC's. An image file
ITU-T recommendation for additional security that corresponds to the Sub-Address.
A mask bit used to manage sub-segments of the network which is defined with network IDs.
Your machine's ability to save an incoming document into its memory, when it runs out of recording paper or
toner.
protocols that govern the basic workings of the Internet that was implemented in 1982.
The TCP part is all about ensuring that data is transmitted correctly between 2 computers. If any errors
occur these are detected & the data is retransmitted. The data transmitted is split up into small portions
called Data packets. The IP part of TCP/IP is how these data packets are moved from one point to another.
Each computer on the internet has a unique IP address & the data packets are moved from the source to
the destination through many different computers & this is controlled via TCP/IP. This protocol is used on
the Internet & also by computers which are part of a LAN.
on the screen at once. Generally, thumbnails are too small to show the actual text/image.
format for attachments of graphic data for smooth transmission between different units.
The coding method of this format supports the same coding as Modified Huffman (MH) and multiple-page
image data.
51
Page 52

Term Meaning
Chapter 5 Appendix
TIFF Image
Viewer
Time Zone By setting the Time Zone of your area on the device's Control Panel, the received Email will display in the
Toner A special type of ink used by copy machines and laser printers. Toner consists of a dry, powdery substance
An application software to view the contents of TIFF-F File.
Some TIFF Image Viewers may not display the data properly.
correct Date & Time order, regardless of the time difference of the sender's area.
To confirm your Time Zone, check the "Date/Time Properties" of your Computer. For more details, consult
with your system administrator.
that is electrically charged so that it adheres to an invisible image that has been charged onto a drum, plate,
or piece of paper with the opposite polarity.
Transmission
Reservation
Verification
Stamp
View mode
- File List
View mode
- Journal
The ability to reserve a transmission while your unit is performing another function.
A user selectable transmission verification stamp which can be placed on scanned documents that are
successfully transmitted or stored in memory.
Allows you to view the brief contents of the File List through the LCD display without having to print the
Memory File List.
Allows you to view the brief contents of the journal through the LCD display without having to print the
journal.
52
Page 53

Memo
Chapter 5 Appendix
53
Page 54

The following trademarks and registered trademarks are used throughout this manual:
Microsoft, Windows, Windows NT, Windows Server, Outlook & Windows logo are either registered trademarks or
trademarks of Microsoft Corporation in the USA and other countries.
Adobe, Acrobat Reader & Adobe logo are either registered trademarks or trademarks of Adobe Systems
Incorporated.
All other trademarks identified herein are the property of their respective owners.
TM
PEERLESSPage
PEERLESSPrint
is a trademark of the PEERLESS Systems Corporation; and,
TM
and Memory Reduction Technology® are registered trademarks PEERLESS Systems
Corporation; and, COPYRIGHT © 2002 PEERLESS Systems Corporation
Universal Font Scaling Technology (UFST) and all typefaces have been licensed from Agfa Monotype
®
and the Agfa rhombus are registered trademarks of Agfa-Gevaert N.V. registered in the U.S. Patent and
Agfa
®
Trademark Office and may be registered in other jurisdictions. Monotype
registered in the U.S. Patent and Trademark Office and may be registered in other jurisdictions. ColorTune
is a registered trademark of AMT
®
is a
registered trademark of Agfa-Gevaert N.V. registered in the U.S. Patent and Trademark Office and may be
TM
registered in other jurisdictions. Profile Tool Kit
, Profile StudioTM and Profile OptimizerTM are trademarks of
AMT and may be registered in certain jurisdictions.
Novell and NetWare are registered trademarks of Novell, Inc. in the United tates and other countries.
© 2005 Panasonic Communications Co., Ltd. All Rights Reserved.
Unauthorized copying and distribution is a violation of law.
The contents of these Operating Instructions are subject to change without notice.
USA Only
WARRANTY
PANASONIC DIGITAL DOCUMENT COMPANY MAKES NO WARRANTIES, GUARANTEES OR
REPRESENTATIONS, EXPRESSED OR IMPLIED, TO CUSTOMER WITH RESPECT TO THIS PANASONIC
MACHINE, INCLUDING BUT NOT LIMITED TO, ANY IMPLIED WARRANTY OF MERCHANTABILITY OR
FITNESS FOR A PARTICULAR PURPOSE.
PANASONIC DIGITAL DOCUMENT COMPANY ASSUMES NO RISK AND SHALL NOT BE SUBJECT TO
LIABILITY FOR ANY DAMAGE, INCLUDING, BUT NOT LIMITED TO DIRECT, INDIRECT, SPECIAL,
INCIDENTAL OR CONSEQUENTIAL DAMAGES OR LOSS OF PROFITS SUSTAINED BY THE CUSTOMER IN
CONNECTION WITH THE USE OR APPLICATION OF THIS PANASONIC MACHINE. SEE YOUR DEALER
FOR DETAILS OF DEALER’S WARRANTY.
For Service, Call:
Panasonic Digital Document Company,
Unit of Panasonic Corporation of North America
Two Panasonic Way
Secaucus, New Jersey 07094
http://panasonic.co.jp/pcc/en
Panasonic Canada Inc.
5770 Ambler Drive, Mississauga,
Ontario L4W 2T3
http://www. panasonic.ca
LO0305-5085
PJQMC0270ZF
August 2005
Published in Japan
 Loading...