

Page 1
Copying on Two Sides
You cannot make two sided copies
onto paper size smaller than
5.5 x 8.5".
You cannot make two sided copies if
the settings for front and back pages
differ.
You cannot make two sided copies
on paper that is over 28 lbs.
Basic Features
(2 Sided)
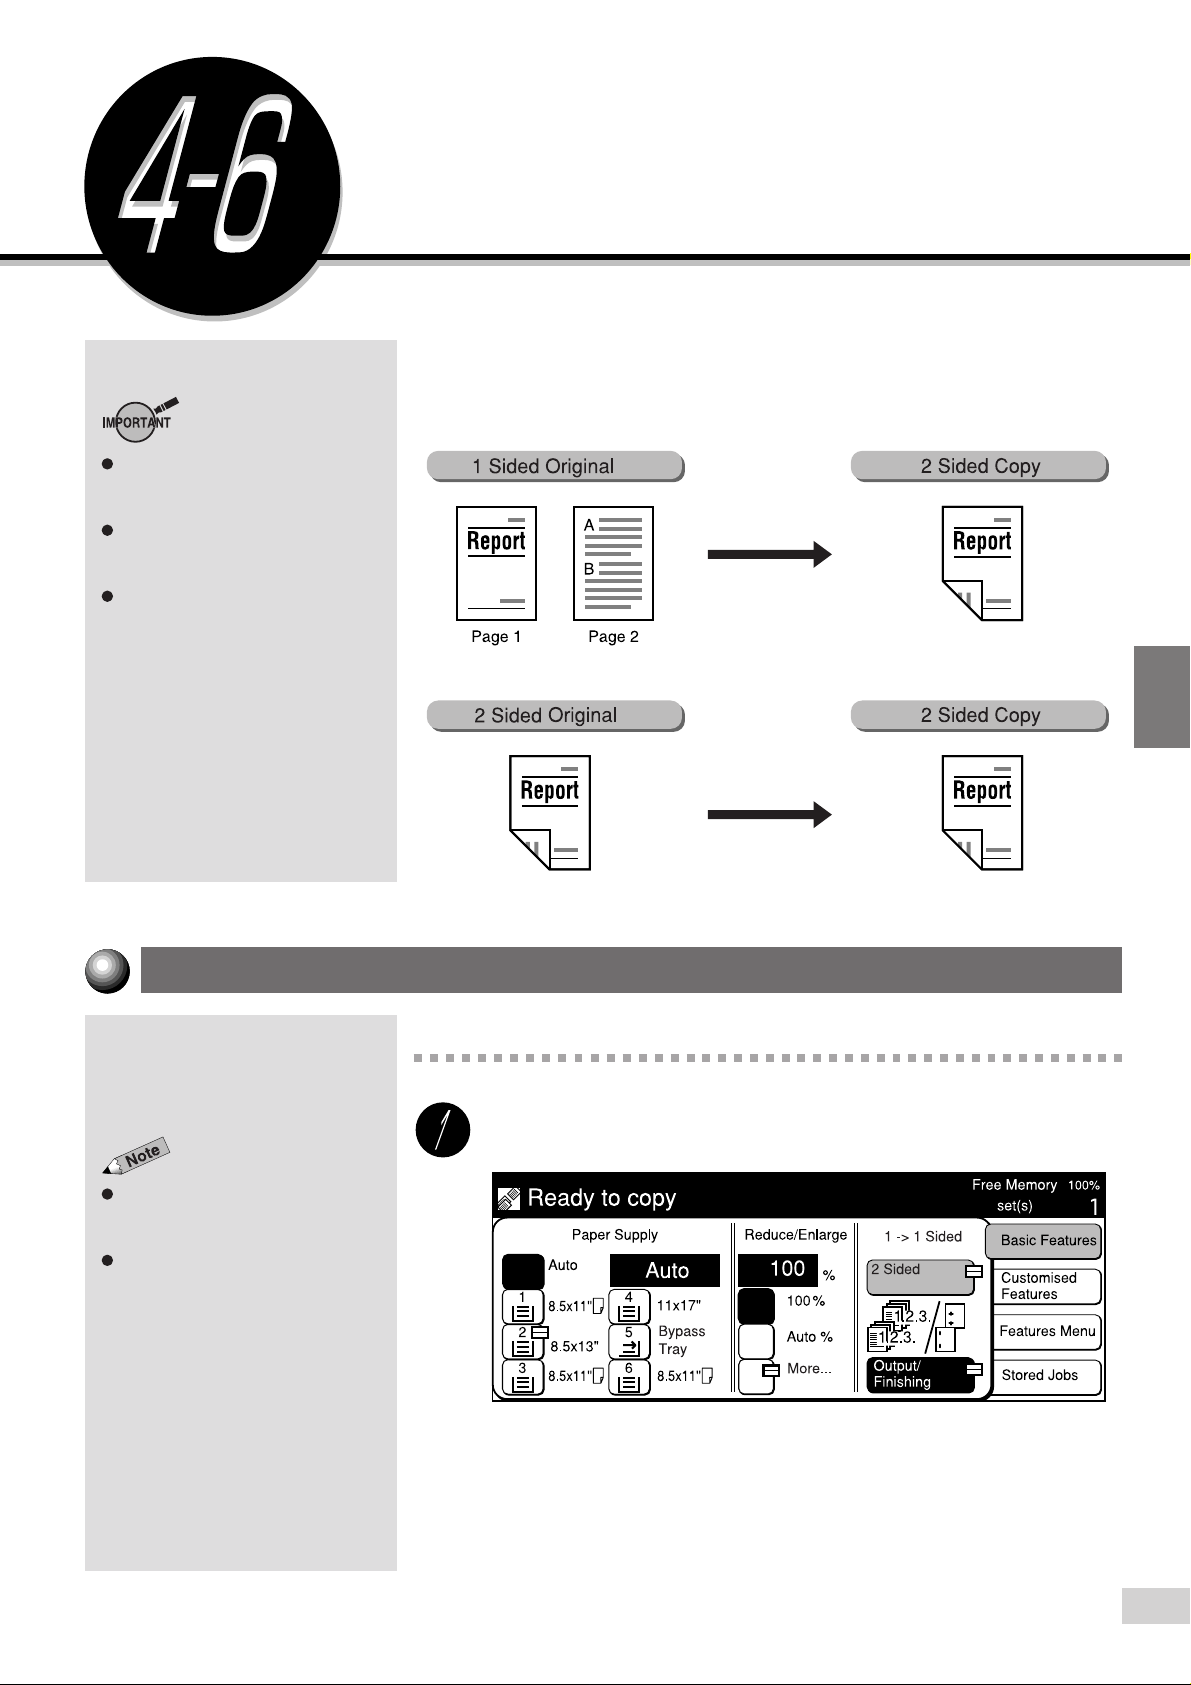
You can make two sided copies from one or two sided documents.
However, to make two sided copies from a two sided document, you need
to have the DADF installed.
Making Two Sided Copies from One Sided Originals
Procedure
On the Basic Features screen, select 2 Sided.
The screen on the right has the Tray
6 (High Capacity Feeder), and
Finisher installed.
2 Sided can also be selected on the
Features Menu screen.
4
4-6 Copying on Two Sides (2 Sided)
59
Page 2
Basic Features
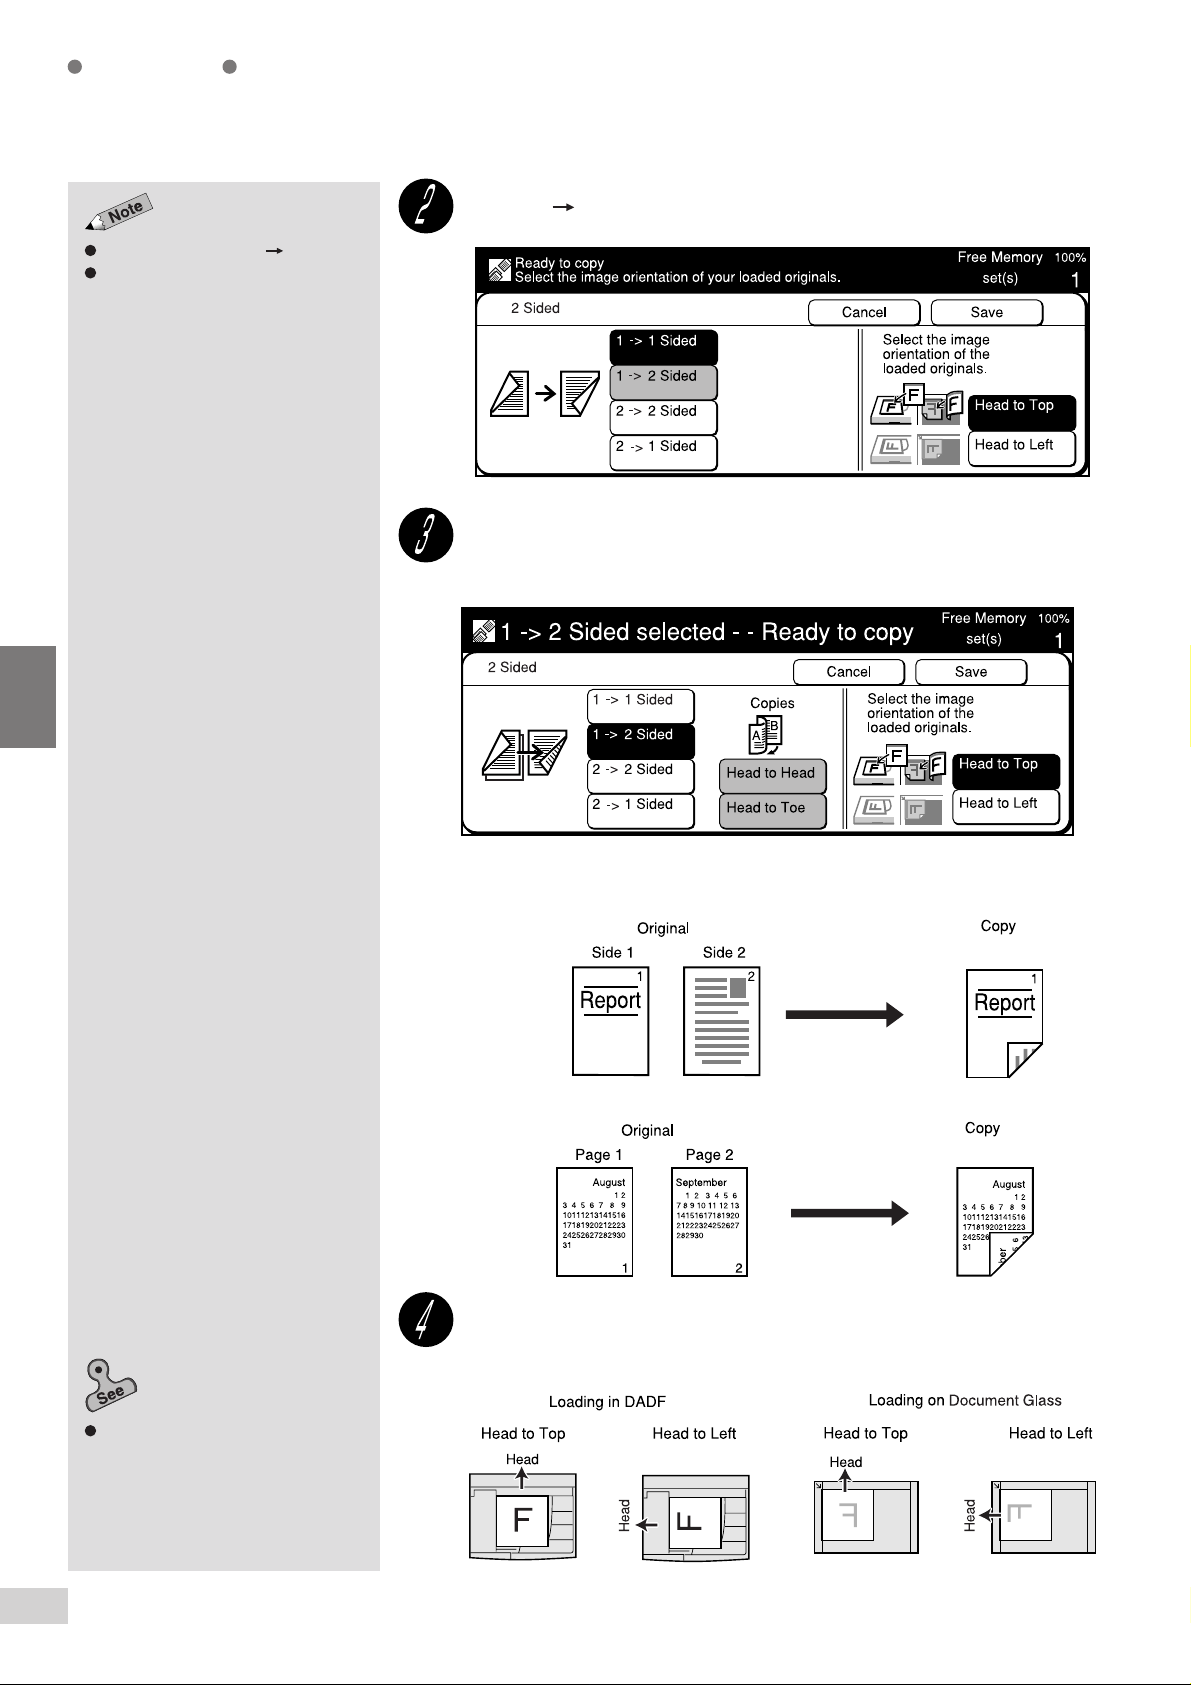
The factory default is 1 1 Sided.
Select Cancel to cancel the settings.
Select 1 2 Sided.
Select Head to Head or Head to Toe as the image orientation
of the copy.
4
Head to Head: When all sides of a document have the same orientation.
Head to Toe: When the orientation of side two is the reverse of side one.
Chapter 3 Loading Documents
information on how to load
documents.
4-6 Copying on Two Sides (2 Sided)
60
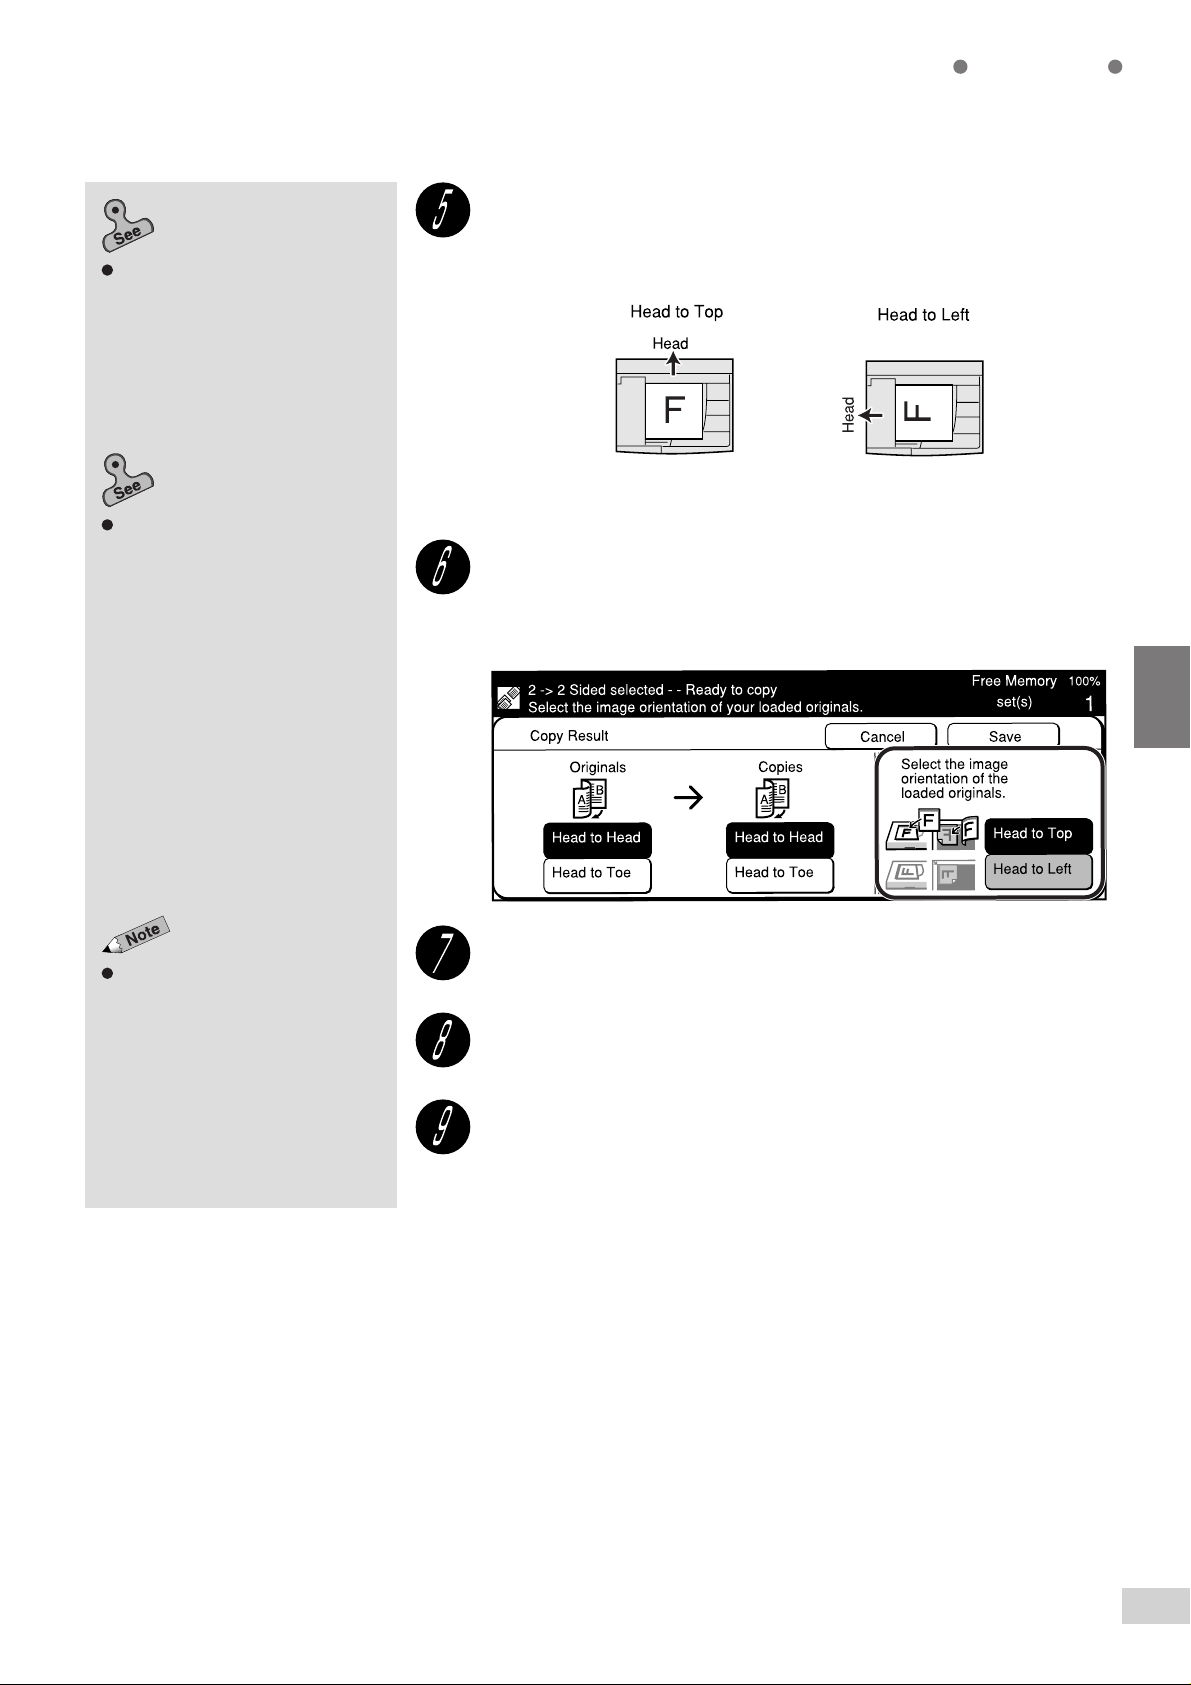
Load the original in the orientation of Head to Top, or Head to
Left.
for
Page 3
5-10: Selecting the Original
Orientation (Original Orientation)
details.
Some features cannot be selected
together with this feature. See
Appendix B: Possible Combinations
of Features
If the total sheet number of your
document is an odd number, the last
sheet will be made a one sided
copy. If you place the document on
the Document Glass, then you have
to repeatedly place each page and
press Start to make two sided
copies. If the last scanned page is
side one, select End Job.
for details.
for
Basic Features
Select the corresponding document orientation of the original
loaded, and select Save.
Select Head to Top or Head to Left.
Select other features if necessary.
Enter the required number of sets by using the keypad and
press Start.
The copies are made on both sides of the paper.
4
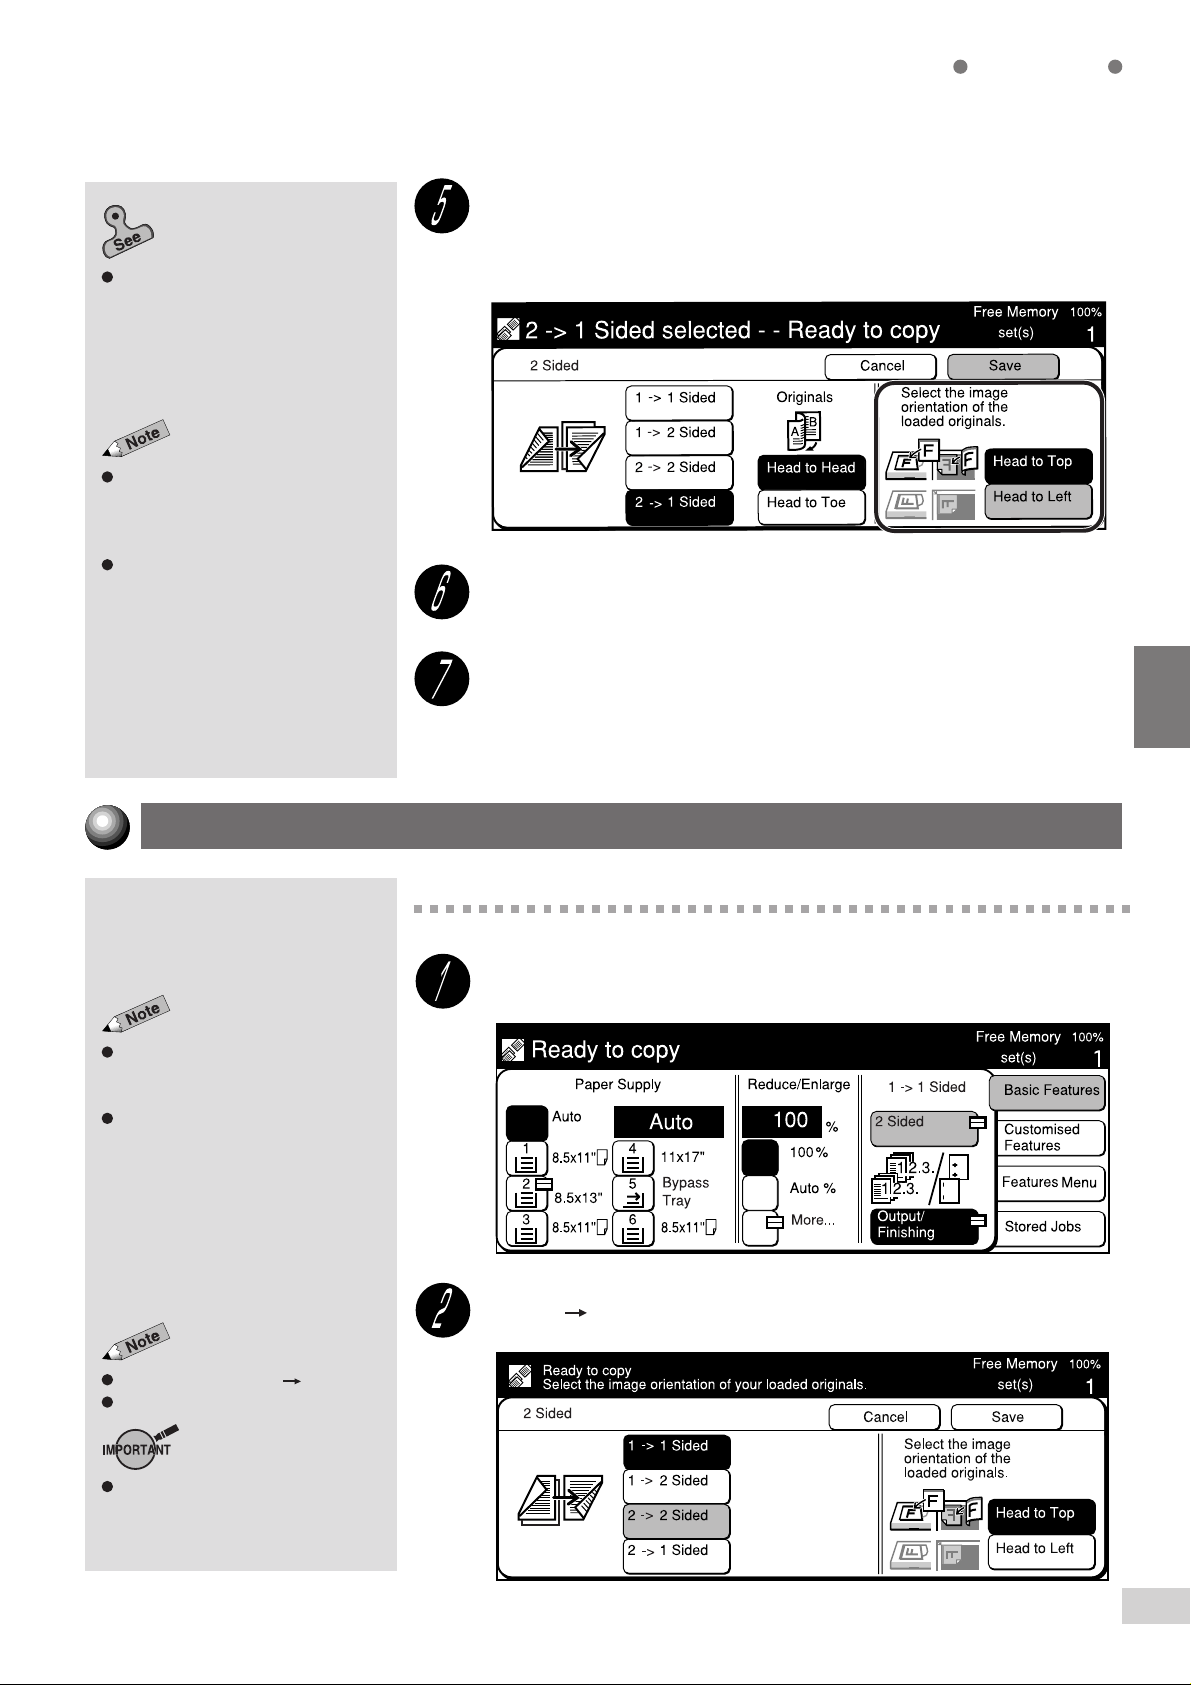
Making Two Sided Copies from Two Sided Originals
Procedure
On the Basic Features screen, select 2 Sided.
The screen on the right has the Tray
6 (High Capacity Feeder), and
Finisher installed.
2 Sided can also be selected on the
Features Menu screen.
Select 2 2 Sided.
The factory default is 1 1 Sided.
Select Cancel to cancel the settings.
When making two sided copies, use
the DADF. The document glass can
only be used for making one sided
copies.
4-6 Copying on Two Sides (2 Sided)
61
Page 4
Basic Features
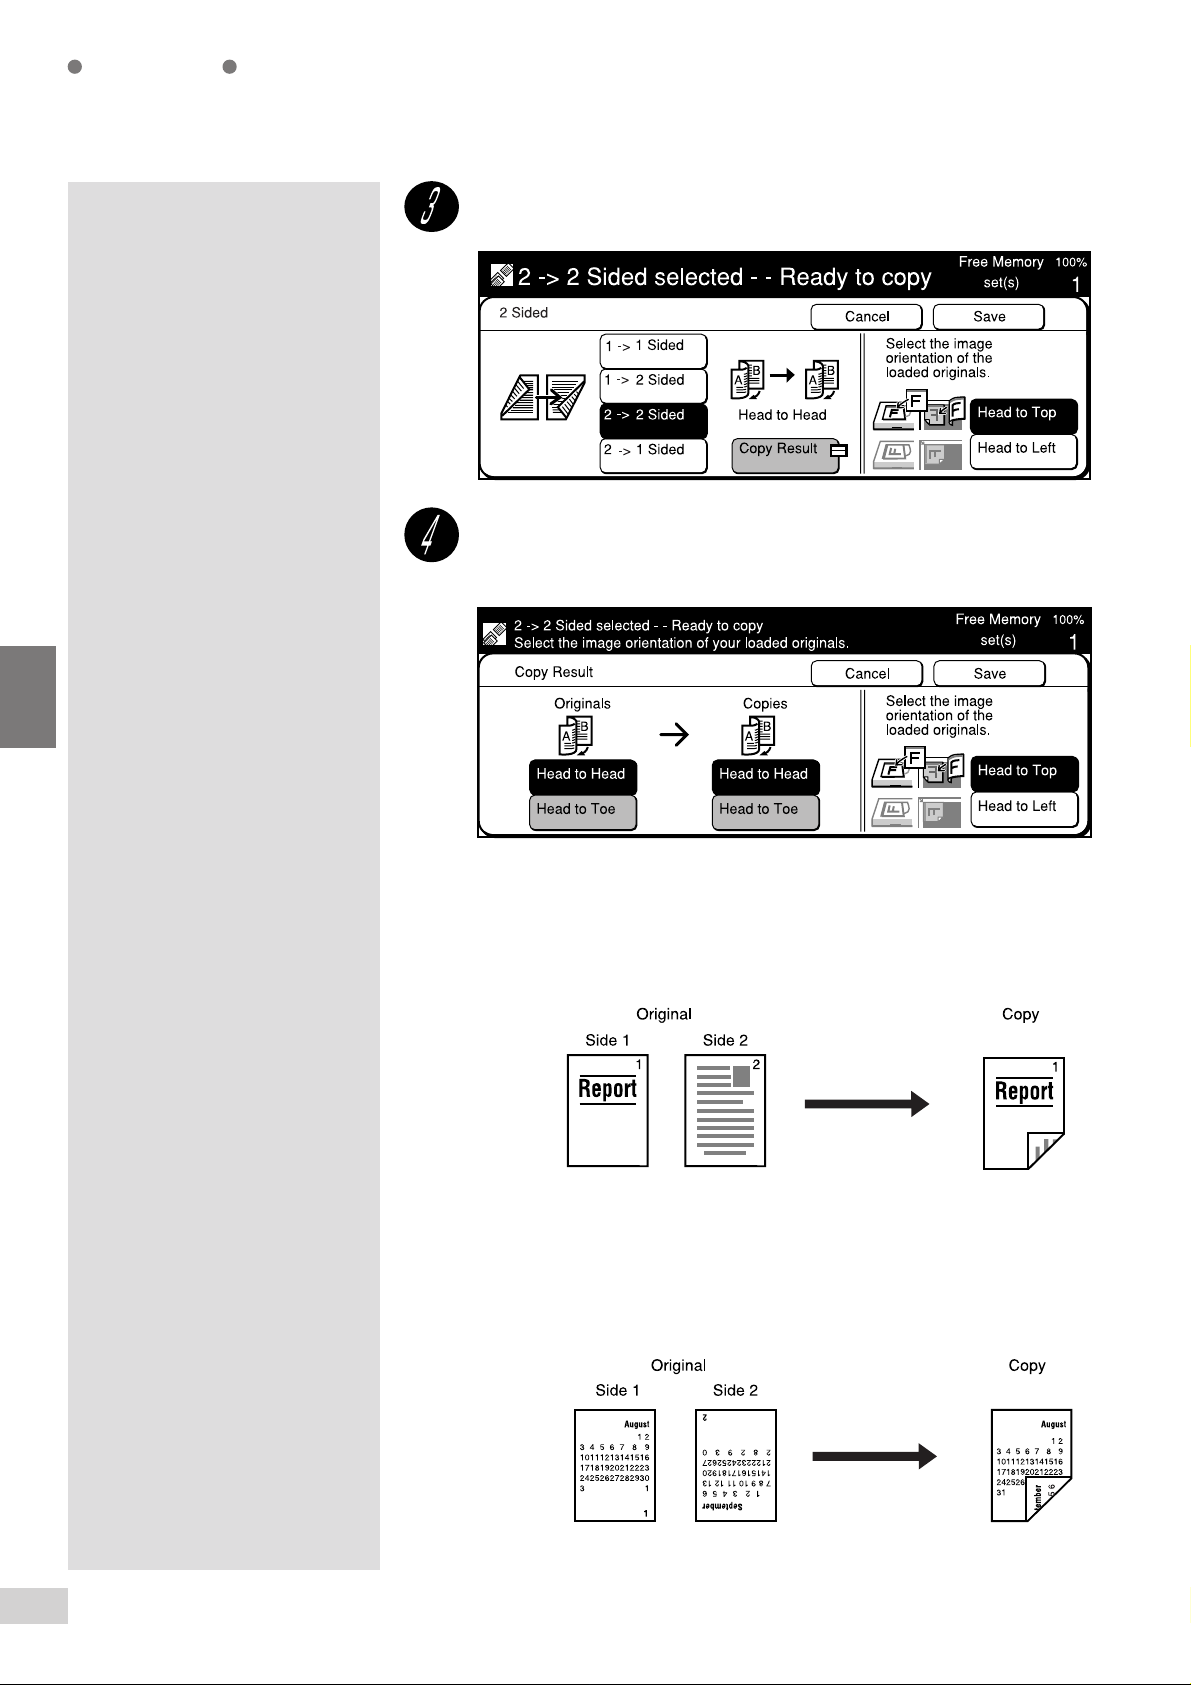
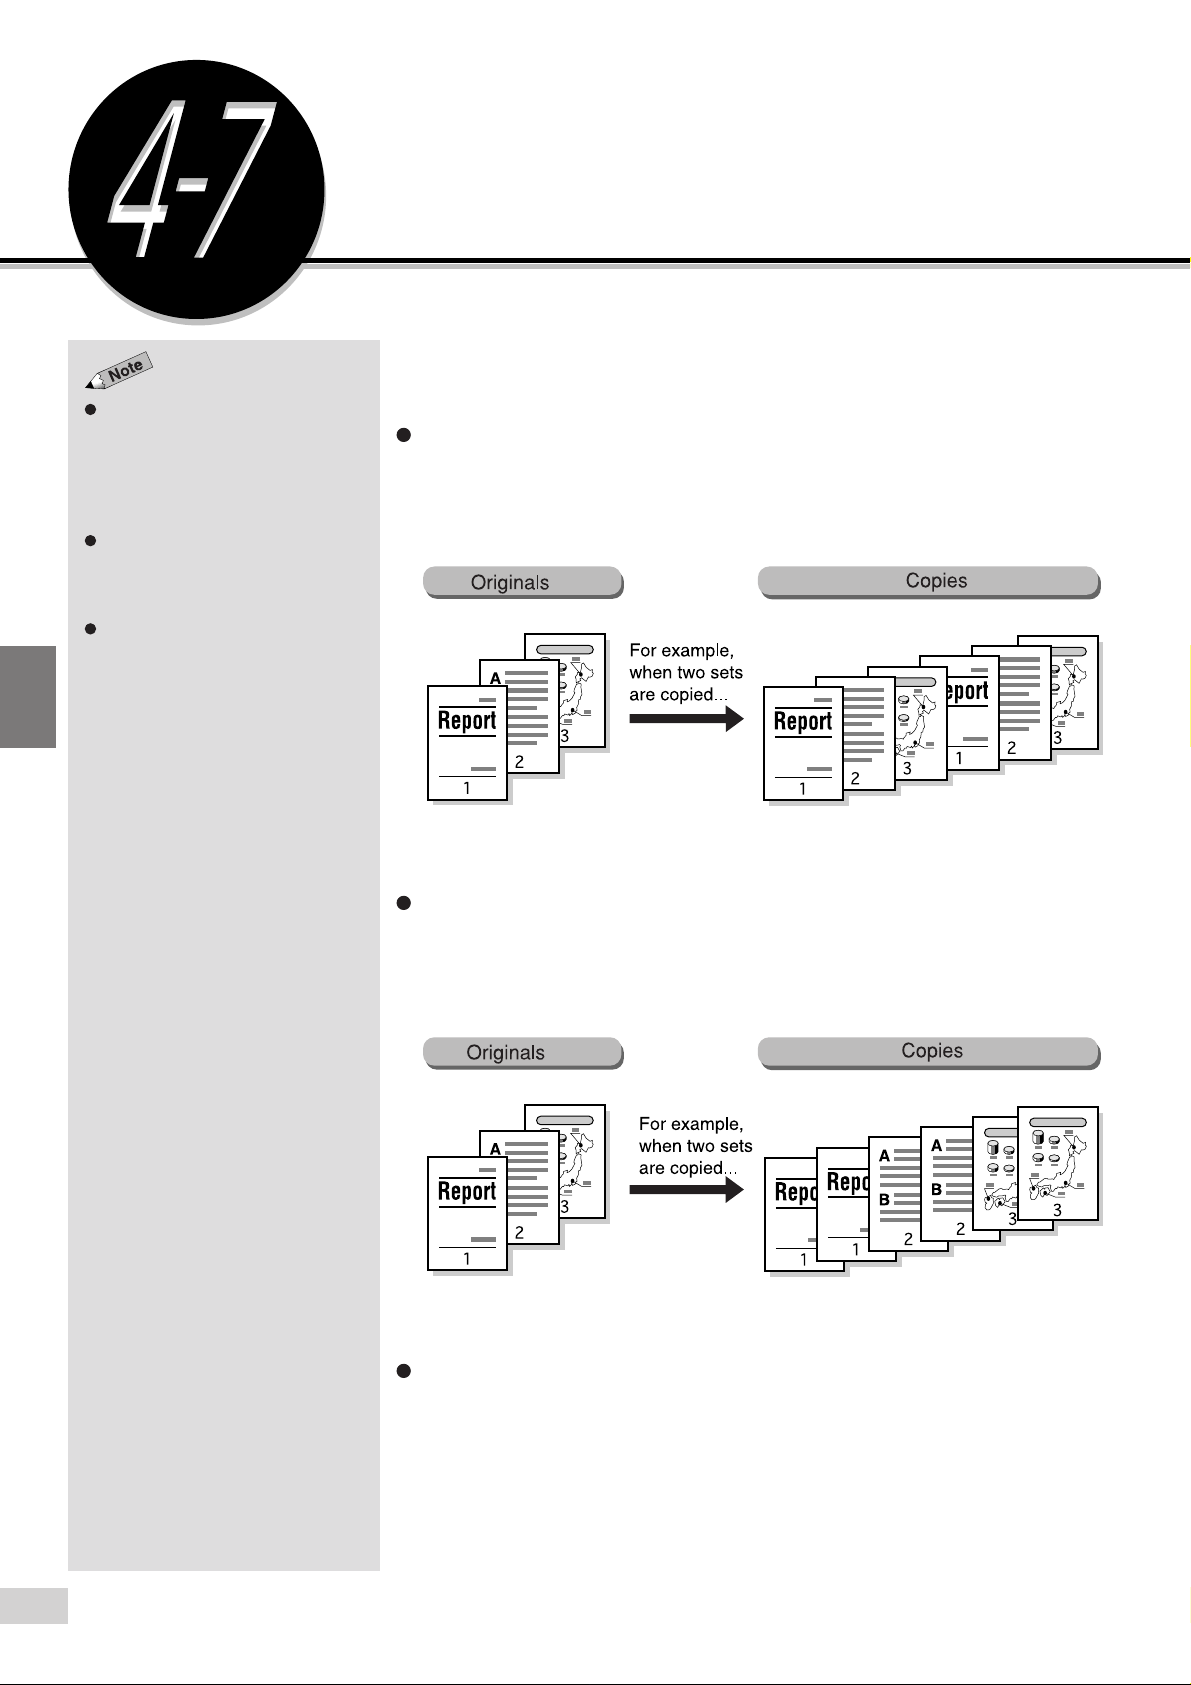
Select Copy Result.
Select the image orientation of both the documents and the
copies.
4
Head to Head: When all sides of a document have the same orientation.
When the copy result is where sides one and two have the
same orientation.
Head to Toe: When the orientation of side two of a document is the reverse
of side one.
When the copy result is such that the orientation of side two is
the reverse of side one.
4-6 Copying on Two Sides (2 Sided)
62
Page 5
Chapter 3 Loading Documents
information on how to load
documents.
5-10: Selecting the Original
Orientation (Original Orientation)
details.
for
for
Basic Features
Load the original in the DADF.
Load the original in the orientation of Head to Top or Head to Left.
Select the corresponding document orientation of the original
loaded.
Select Head to Top or Head to Left.
Some features cannot be selected
together with this feature. See
Appendix B: Possible Combinations
of Features
for details.
4
Select Save twice.
Select other features if necessary.
Enter the required number of sets by using the keypad and
press Start.
The copies are made on both sides of the paper.
4-6 Copying on Two Sides (2 Sided)
63
Page 6
4
Basic Features
If the optional Offset Catch Tray is
installed, each set is offset from the
previous copy. This means that the
edge of each set is placed to the left
or right of the previous copy set to
allow easy separation.
For paper sizes which are valid for
offset, see
(Optional) of Appendix A:
Specifications
For Collated option, you can select
Face Up for output orientation and
the collated sets will be delivered
face up. For details, refer to
Setup of 6-1: List of Custom Preset
Functions
Offset Catch Tray
.
System
.
Collating Copy Output
(Output/Finishing)
You can choose to output multiple sets of the copies in three ways:
Collated/Finishing
The copies are sorted according to their page sequence and the
specified number of sets are delivered facing downwards.
Uncollated (per page)
The copies are sorted by page according to the copy sequence and the
specified number of sets are delivered facing upwards.
Auto
The required number of collated sets is output if you load your originals
into the DADF and press Start.
4-7 Collating Copy Output (Output/Finishing)
64
Page 7
Chapter 3 Loading Documents
information on how to load
documents.
The screen on the right has the Tray
6 (High Capacity Feeder), and
Finisher installed.
Output/Finishing can also be
selected on the Features Menu
screen
for
Basic Features
Procedure
Load the document.
Use the DADF. If the number of originals is 51 and above, divide them into
smaller numbers for loading. A total of up to 700 sheets can be scanned
continuously.
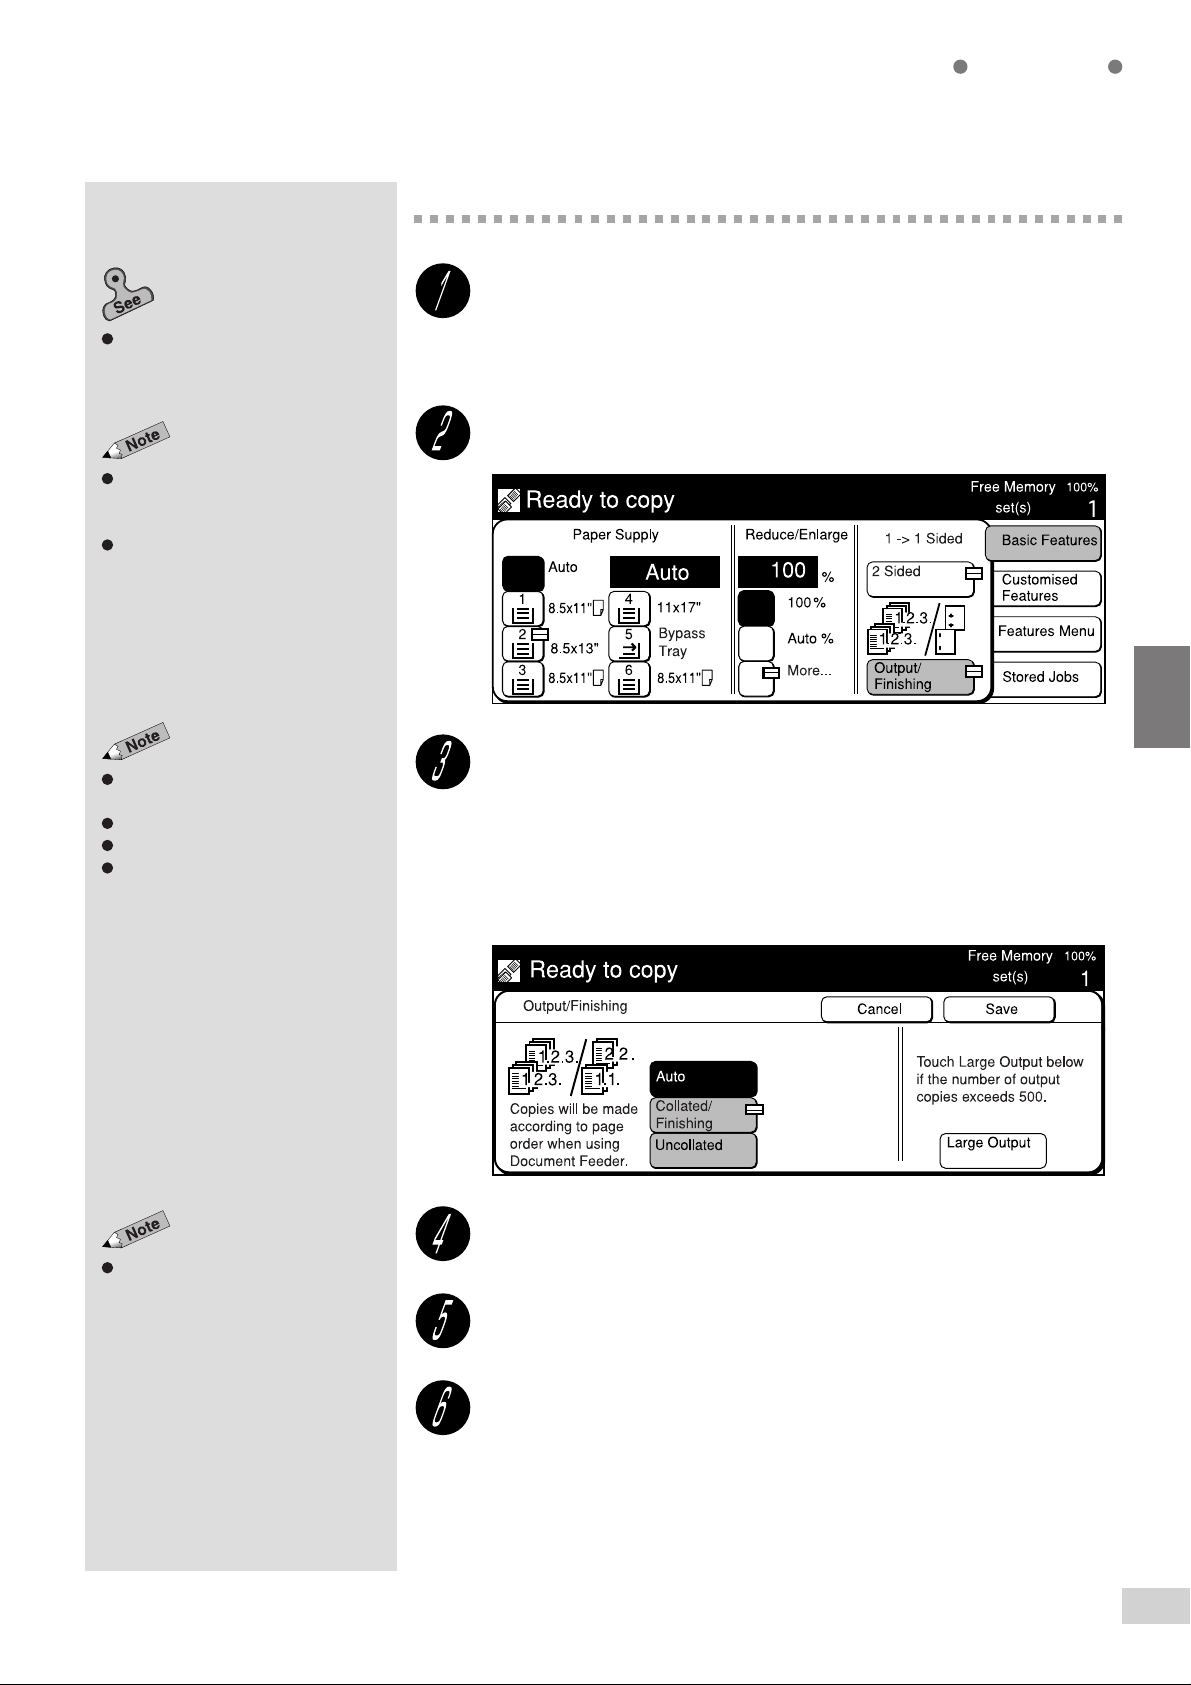
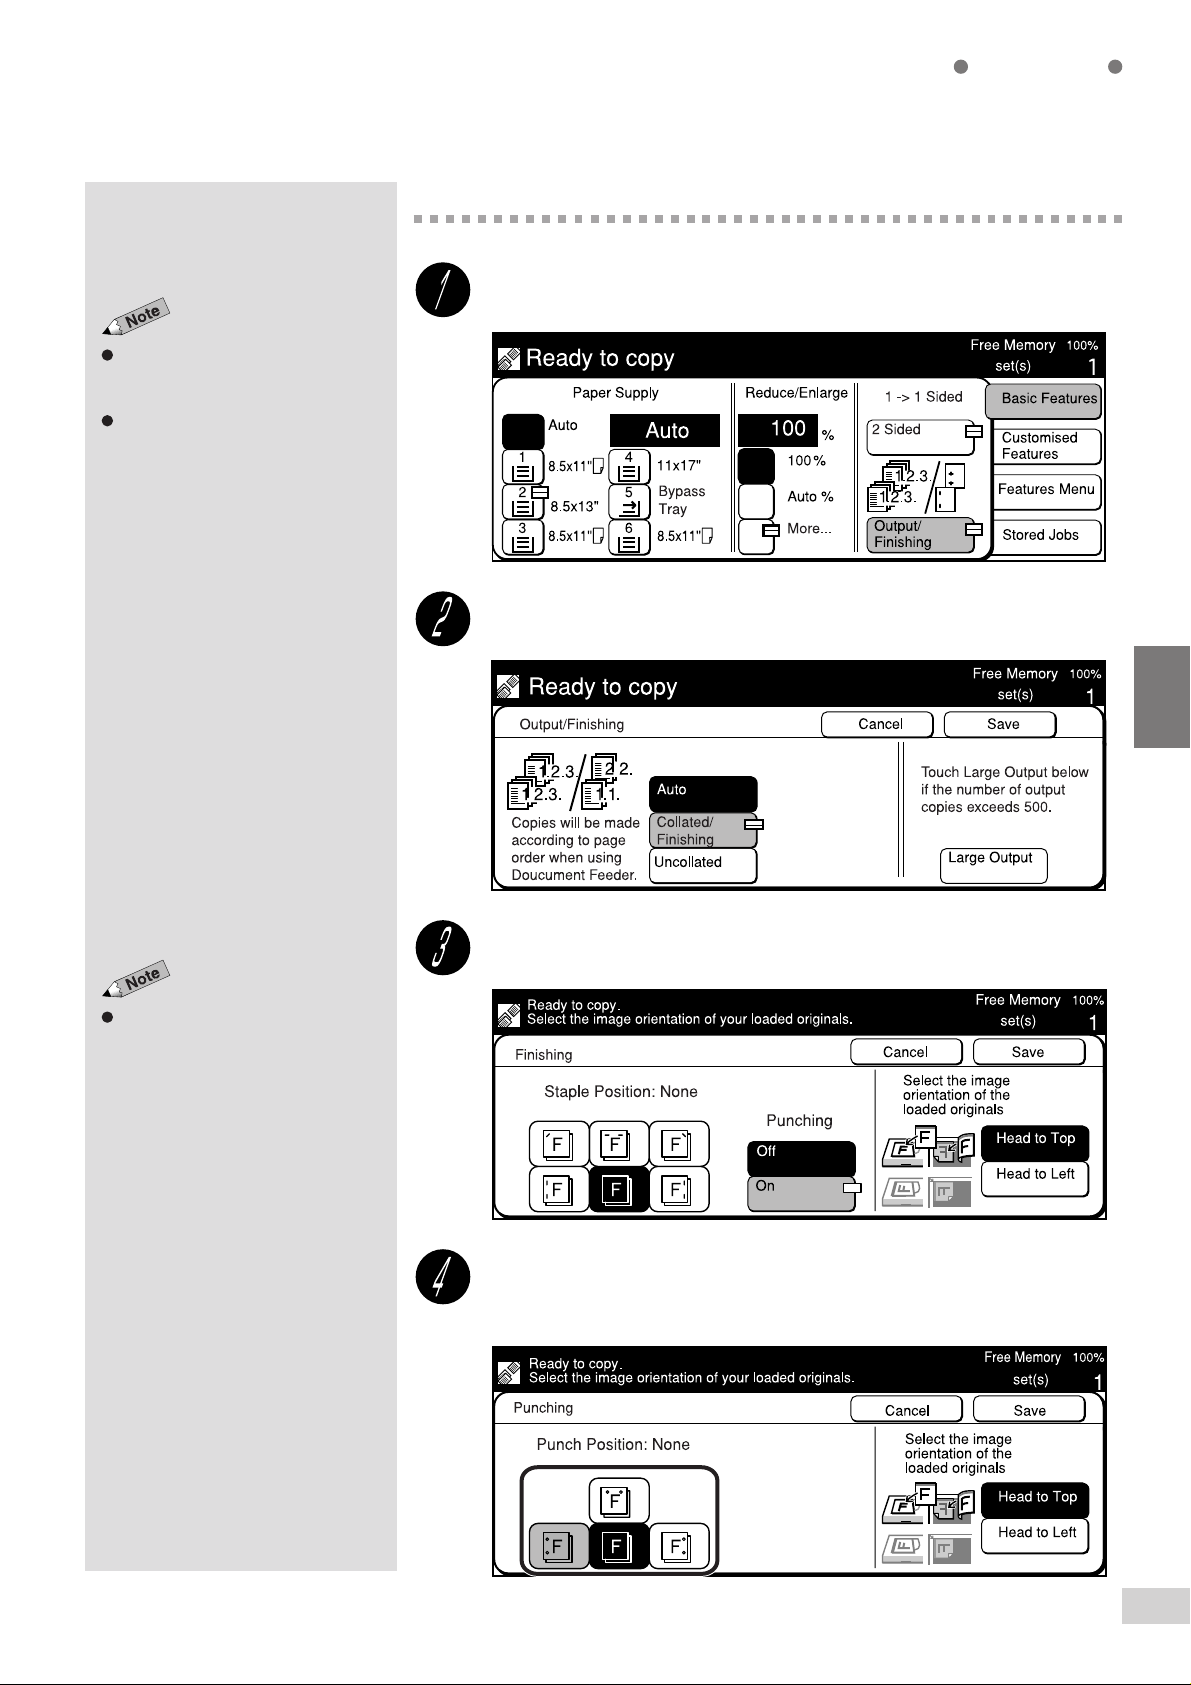
From the Basic Features screen, select Output/Finishing.
The screen on the right has the
finisher feature installed.
The factory default is Auto.
Select Cancel to cancel the settings.
If the punch scrap container
becomes full, the Large Output
feature cannot be used. See
Emptying the Punch Scrap
Container
Some features cannot be selected
together with this feature. See
Appendix B: Possible Combinations
of Features
.
for details.
8-7:
4
To produce collated sets from the documents loaded on the
Document Glass, select Collated/Finishing. To produce
uncollated sets from the originals loaded onto the DADF, select
Uncollated.
When the Finisher is installed, select Large Output if your output is more than
500 copies. The output will be delivered to finisher Tray 2.
Select Save.
Select other features if necessary.
Enter the required number of sets by using the keypad and
press Start.
4-7 Collating Copy Output (Output/Finishing)
65
Page 8
Basic Features
If you have selected Collated and
you place your document on the
Document Glass, then you will have
to repeatedly place each page and
press Start to scan. Repeat this
process until there are no more
pages to scan. Then select End
Job.
Continuous scanning is valid up to a
total of 700 sheets.
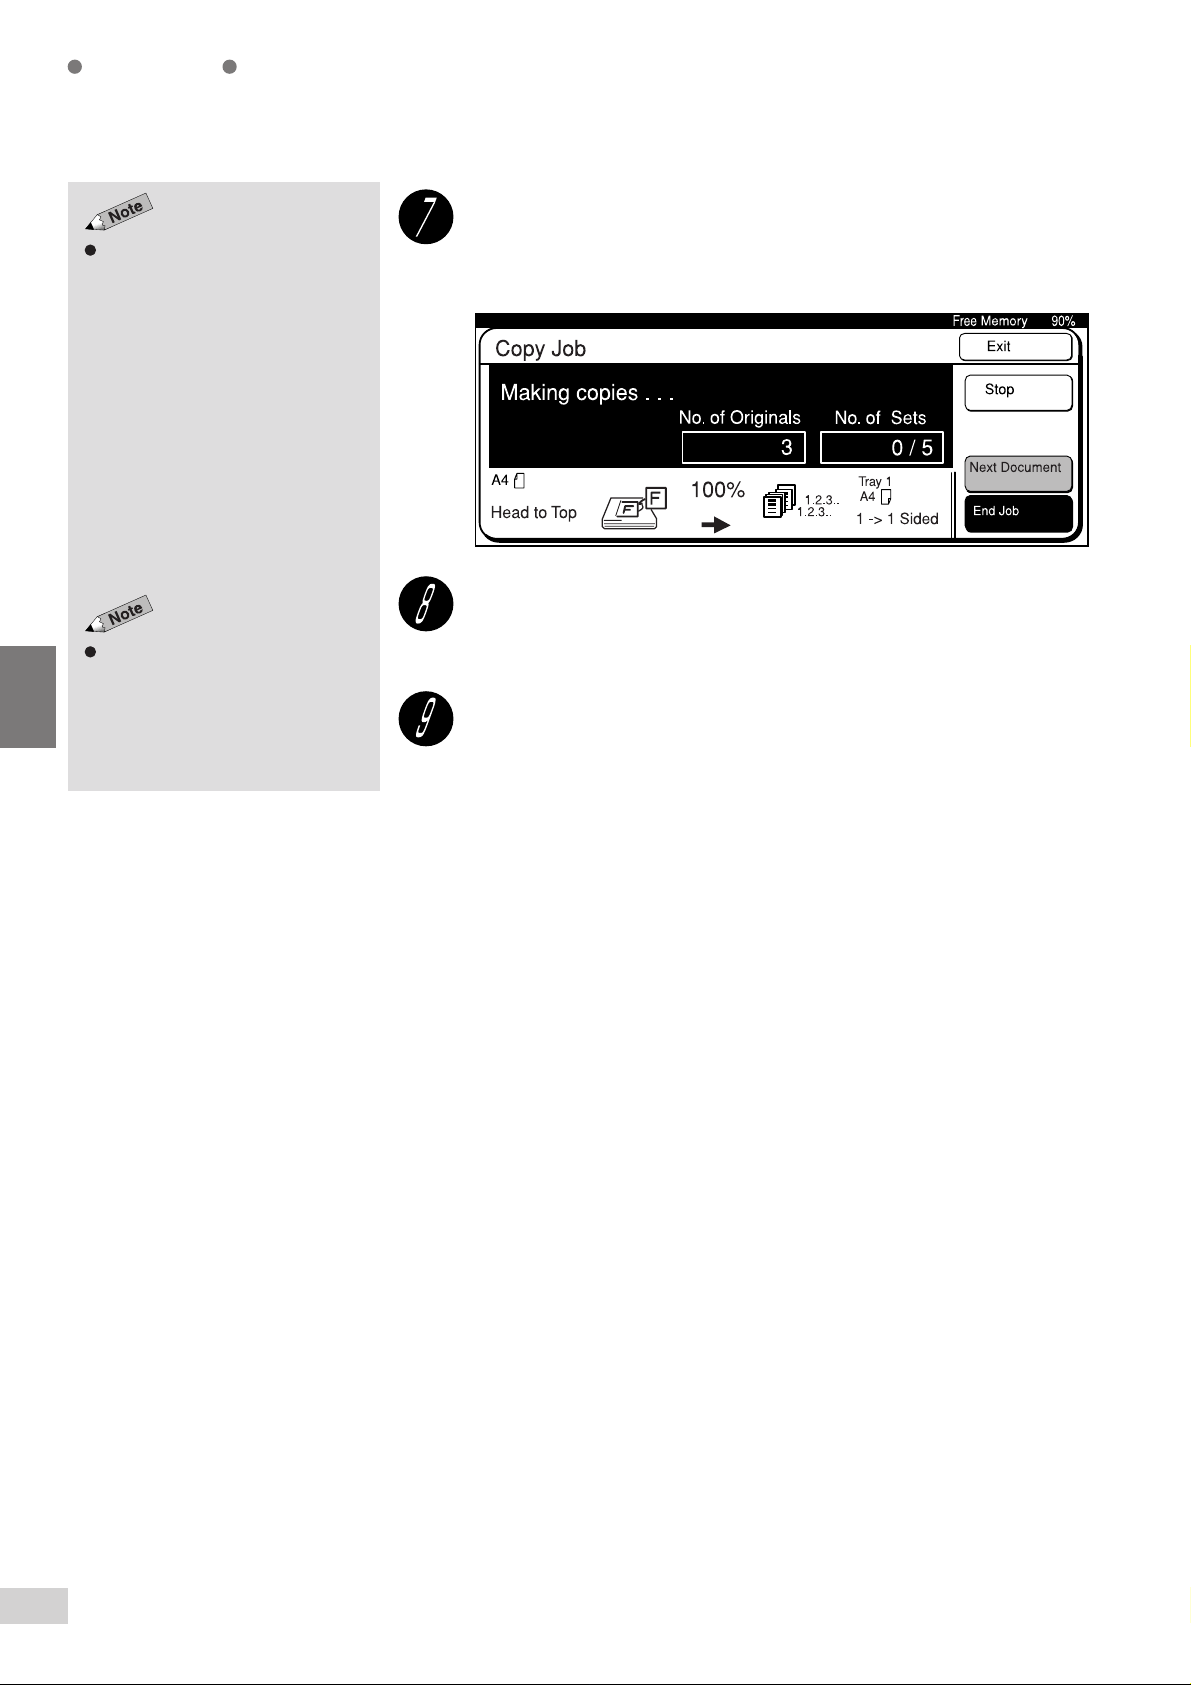
When there is an original to be scanned next, select Next
Document, which is displayed on the screen when scanning is
in progress.
After the first original has been scanned, load the next original
and press Start.
Scanning continues.
4
After the last original has been scanned, select End Job.
Copying starts, and the specified copy output is discharged.
4-7 Collating Copy Output (Output/Finishing)
66
Page 9
Stapling
Stapling and Large Output cannot
be selected for interrupting copy job.
If the punch scrap container is full,
the Stapling and Large Output
features become invalid. See
Emptying the Punch Scrap
Container
See
Stapling cannot be done on the
length of paper larger than A4 or
8.5 x 11”.
.
Appendix C: Stapling
8-7:
.
Basic Features
(Stapling)
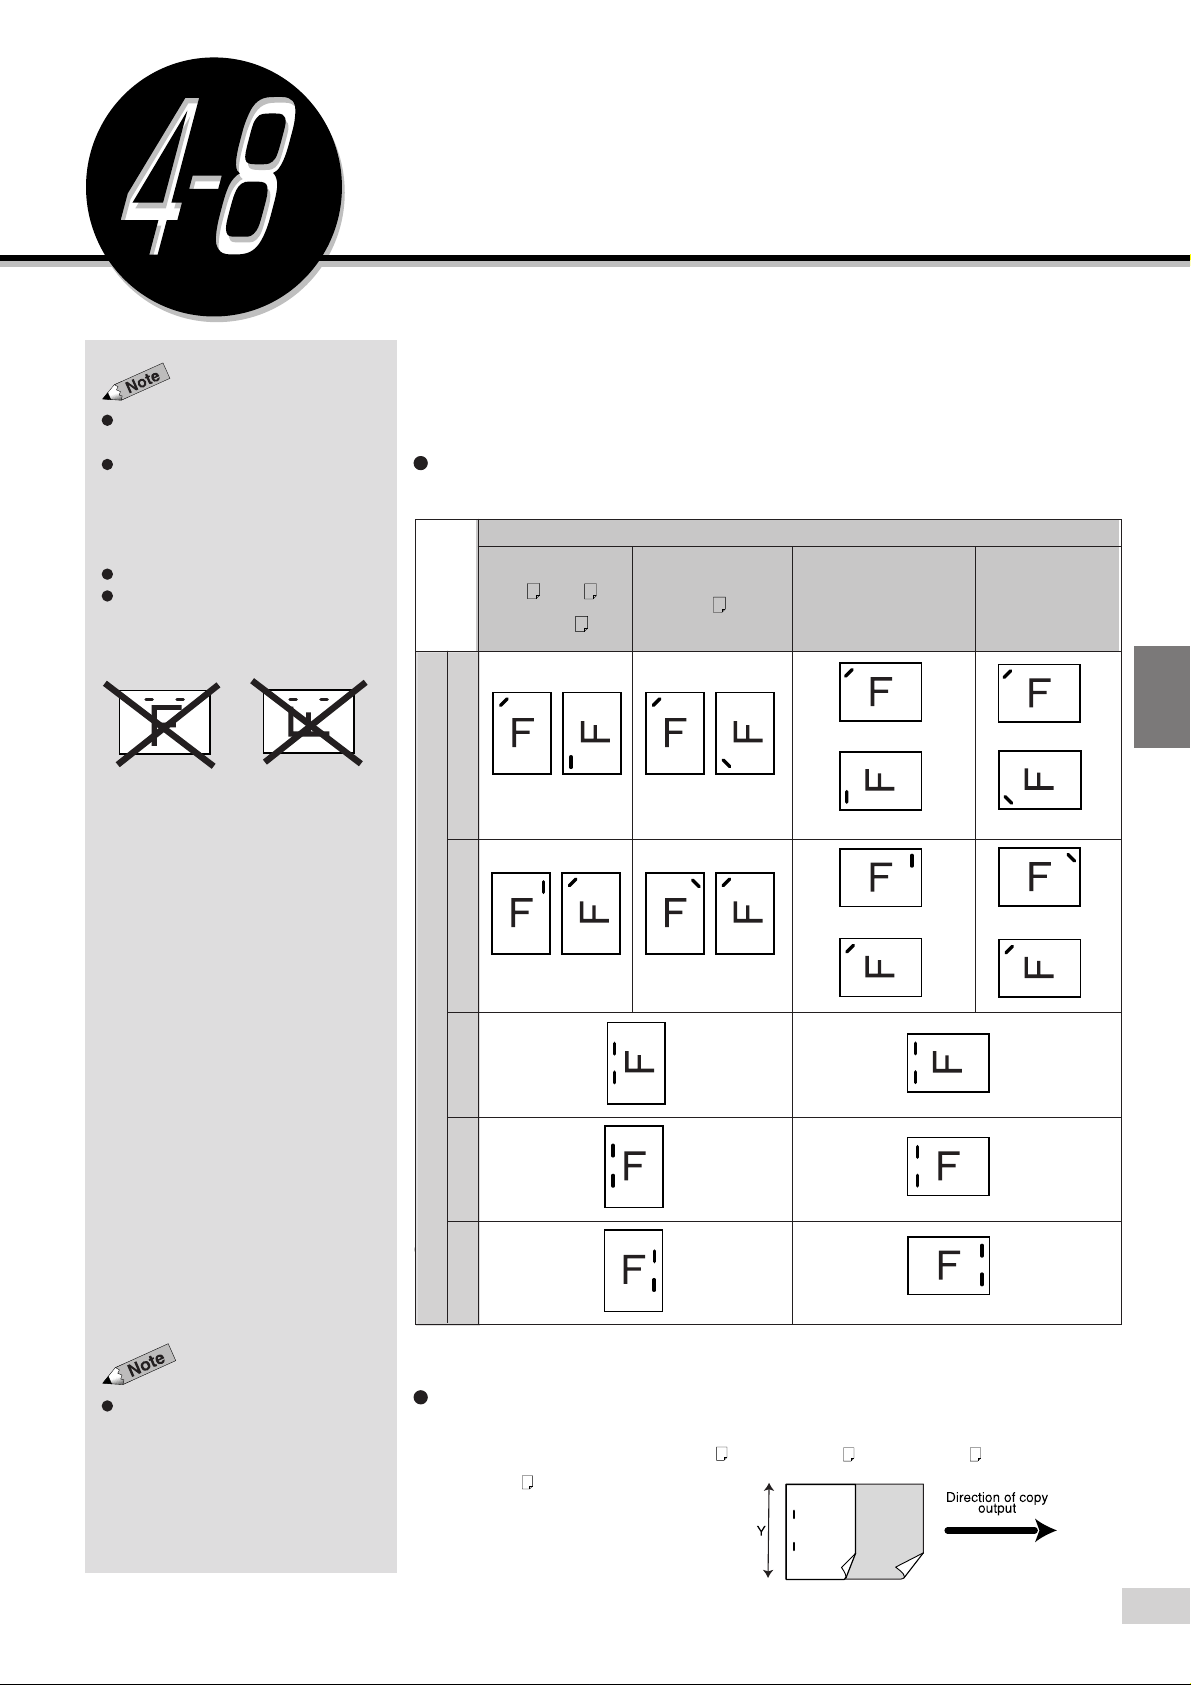
The Stapling feature allows you to have your copies sorted by page sequence,
stapled and delivered set by set if the Finisher is installed. Up to 50 sheets of
paper can be stapled together.
Applicable Paper Size/Orientation, and stapling positions are shown
below.
Paper Size/Orientation
B5, A4, B4, 8K (267
A5 , B5
8.5 x 11”
A4
x 388 mm), 8.5 x 11",
8.5 x 13", 8.5 x 14",
11 x 17"
A3
Top Left
Stapling positions
Top Right
Top Double
Left Double
Right Double
@
4
You can make copies of mixed size
documents on same size paper and
staple them. Select Auto for Paper
Size, and Reduce/Enlarge, and On
for Stapling.
* For single stapling, depending on the paper size, stapling can be made parallel to the edge of the
paper.
For stapling on paper of mixed sizes (only when DADF is used):
Stapling is possible when the length of Y is the same.
Possible combinations are A5
8.5 x 11"
and 11 x 17".
and A4, B5 and B4, A4 and A3,
4-8 Stapling (Stapling)
67
Page 10
Basic Features
The screen on the right has the Tray
6 (High Capacity Feeder), and
Finisher installed.
Output/Finishing can also be
selected on the Features Menu
screen.
Procedure
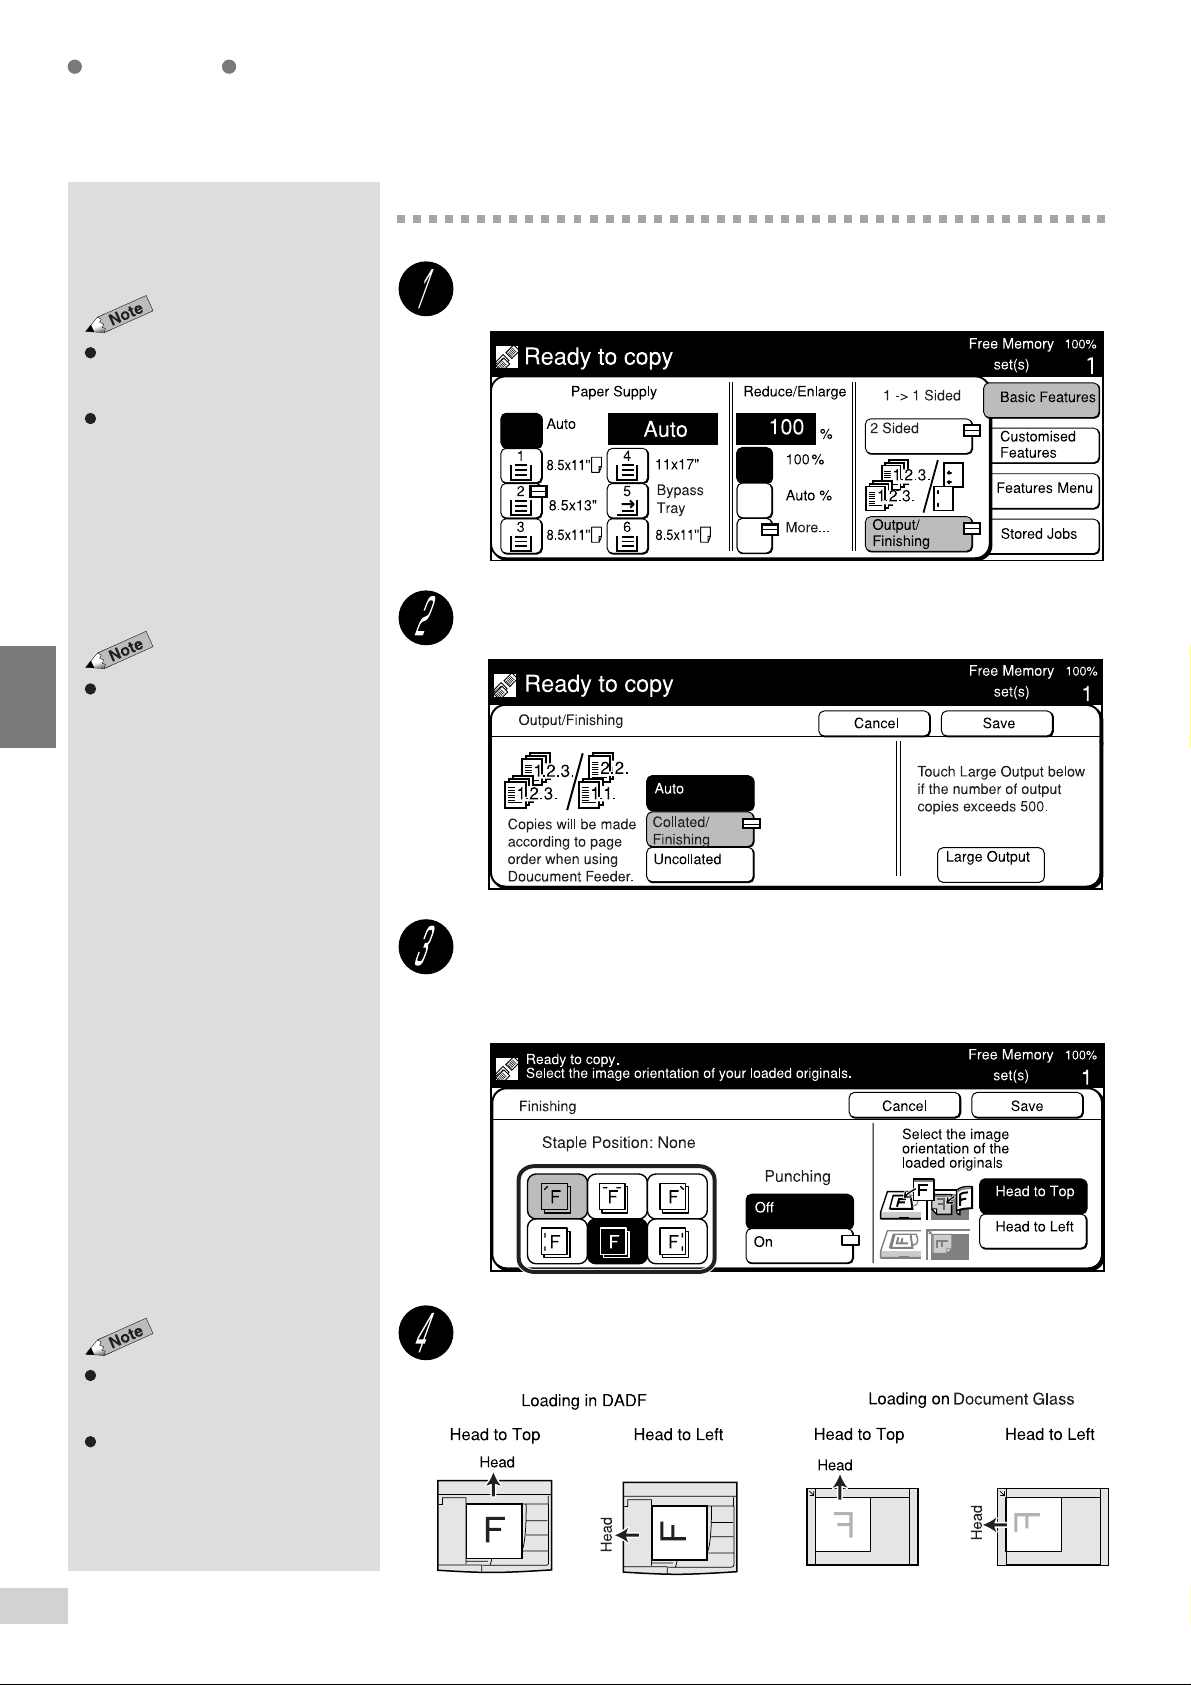
On the Basic Features screen, select Output/Finishing.
Select Collated/Finishing.
4
Select Cancel to cancel the settings.
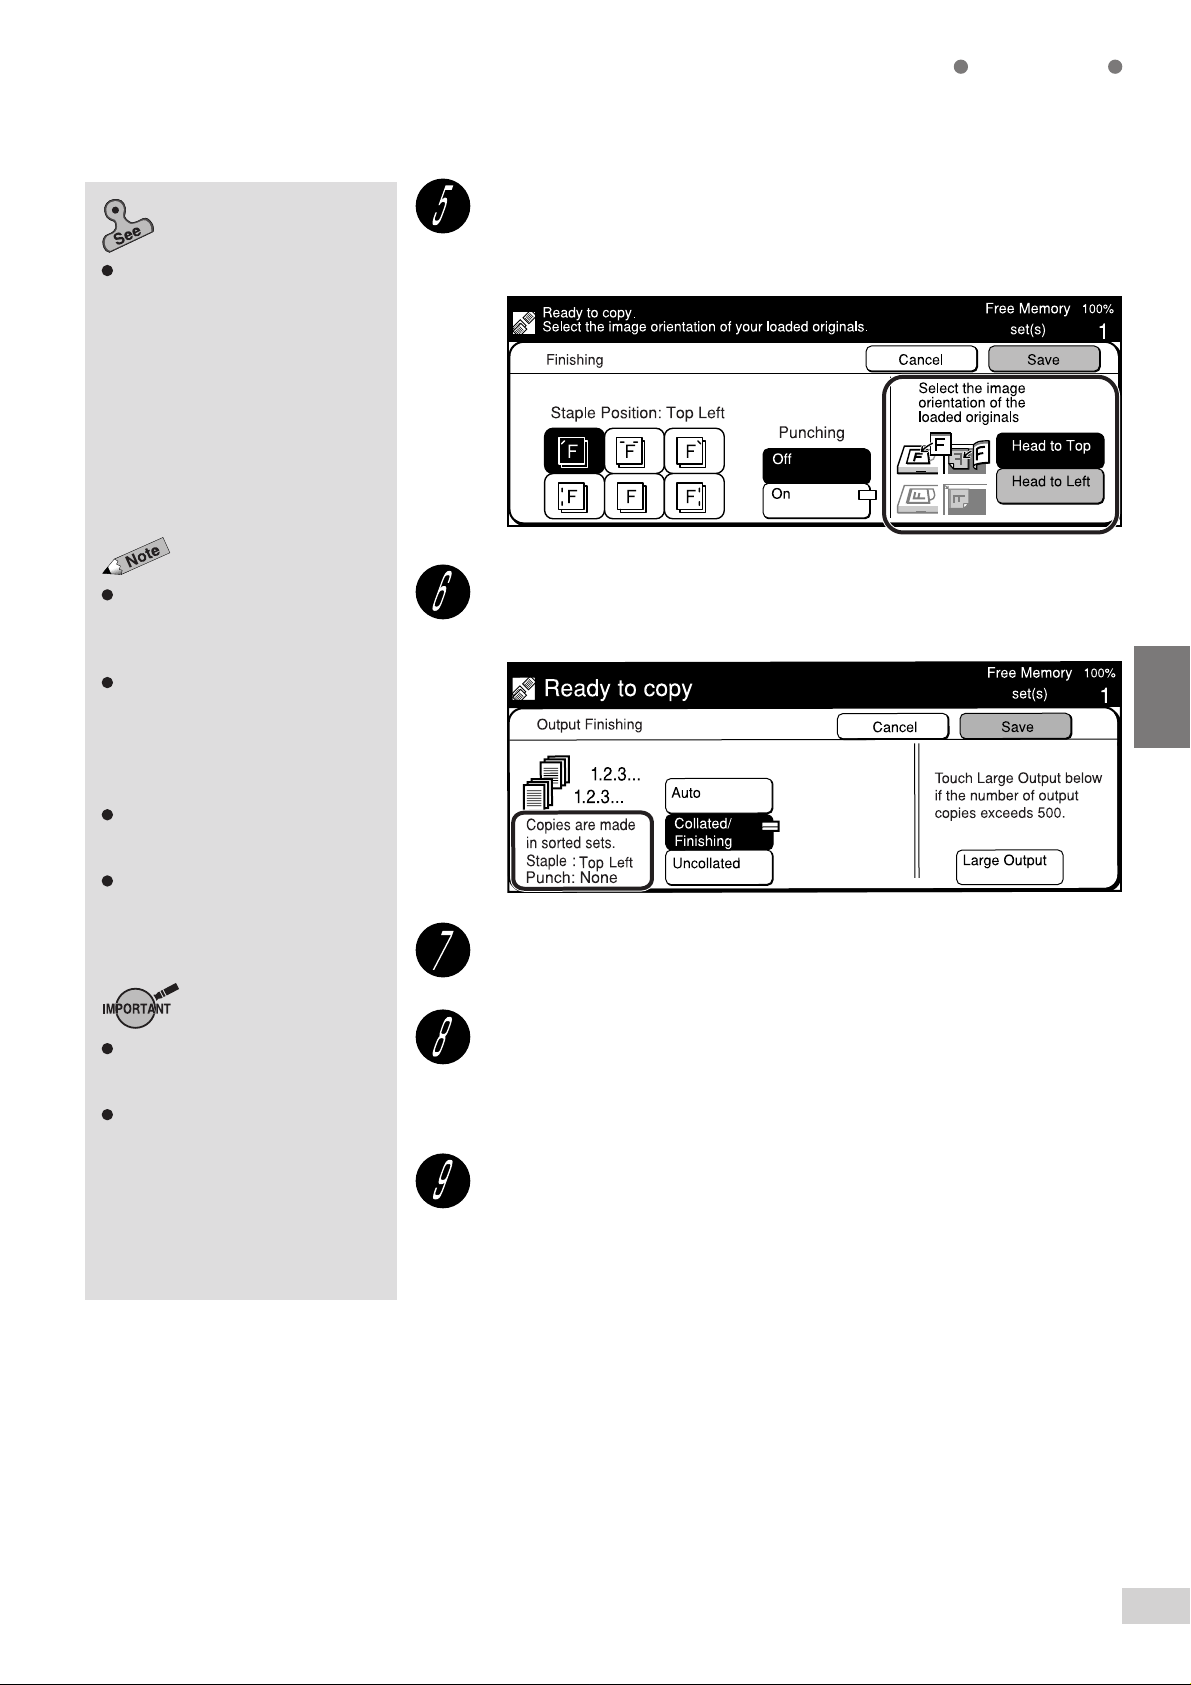
Select stapling position from Top Left, Top Right, Top Double,
Left Double or Right Double.
For example, select Top Left (top left button).
Chapter 3 Loading Documents
information on how to load
documents.
When loading mixed size originals,
use the DADF.
4-8 Stapling (Stapling)
68
for
Load the original in the orientation of Head to Top, or Head to
Left.
Page 11
5-10: Selecting the Original
Orientation (Original Orientation)
the details.
for
Basic Features
Select the corresponding document orientation of the original
loaded, and select Save.
Select Head to Top or Head to Left.
To stop the copy job, press Stop on
the control panel or touch Stop
displayed on the screen. See
Stopping a Copy Job
You cannot press the Start button if
a message requesting you to
replace the staple cartridge is
displayed. In this case, replenish the
staple cartridge. See
the Staple Cartridge
If Stapling feature is off in Step 3,
then the copies will be delivered to
finisher Tray 1.
Some features cannot be selected
together with this feature. See
Appendix B: Possible Combinations
of Features
Do not remove any paper from
finisher Tray 2 while copying is in
progress.
Copying stops when finisher Tray 2
becomes full with 100 sets or 1500
sheets (750 sheets for sizes larger
than A4). Remove the copies from
finisher Tray 2, then press Start to
resume copying.
for details.
for details.
8-6: Replacing
for details.
4-11:
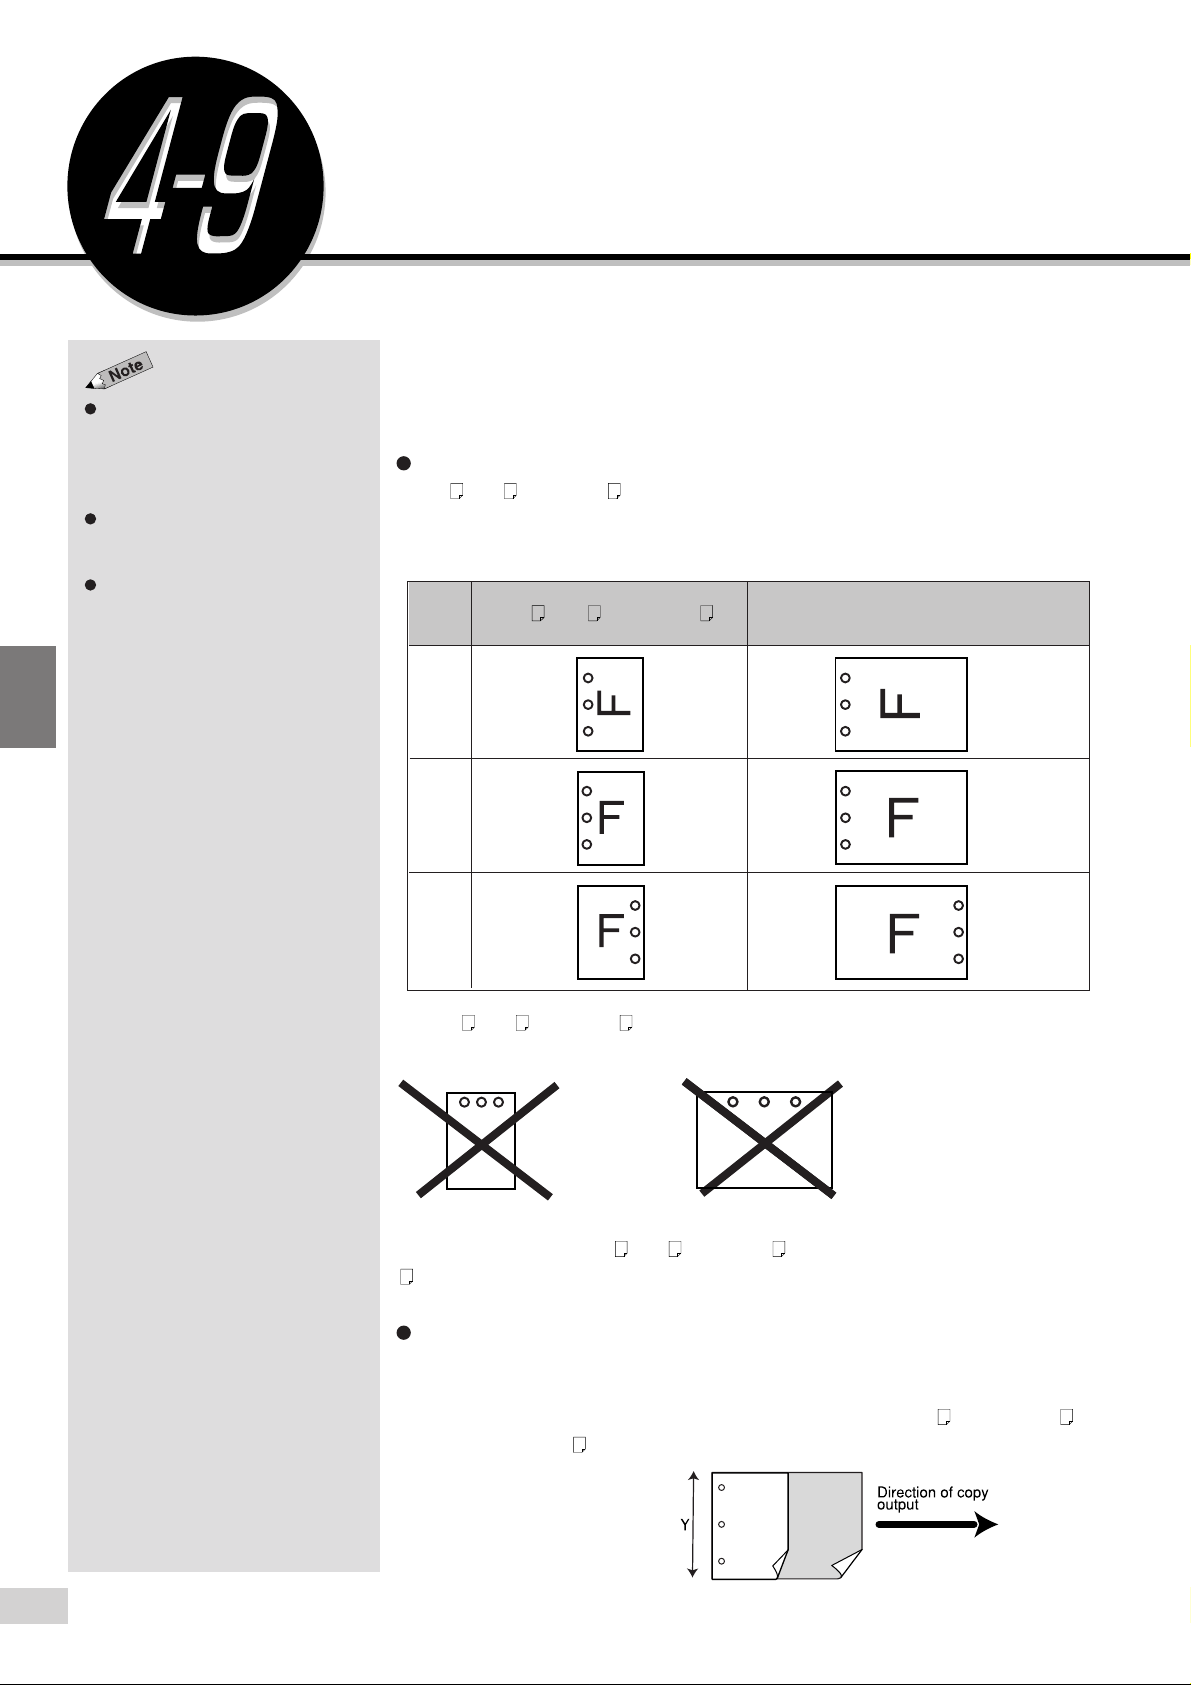
Confirm the settings at the lower left side of the screen and
select Save.
4
Select other features if necessary.
Enter the required number of sets by using the keypad and
press Start.
The copies are collated set by set, stapled, and delivered to finisher Tray 2.
You can remove the copies from finisher Tray 2 after all the
copies are delivered and the machine stops.
4-8 Stapling (Stapling)
69
Page 12
Basic Features
The machine will stop punching
holes once the punch scrap
container is full. See
the Punch Scrap Container
details.
Punching and Large Output
cannot be selected for interrupting
copy job.
The first copy page may slip out
when copying (punching mode and
no stapling mode) by using
optional Finisher.
8-7: Emptying
for
Punching Holes
(Punching)
When the Finisher (optional) is installed, copies can be made and output
with punched holes. Paper sizes that can be punched and the positions of
holes are as follows.
Paper sizes that can be punched and the positions of holes
B5 , A4 , 8.5 x 11" paper: Holes are punched at the long edge.
B4, A3, 11 x 17" paper: Holes are punched at the short edge.
B5 , A4 , 8.5 x 11" B4, A3, 11 x 17"
Top Side
4
Left Side
Right Side
For B5 , A4 , 8.5 x 11" size, holes cannot be punched on the short edge.
For
B4, A3, 11 x 17" size, holes cannot be punched on the long edge.
Also, when punching B5 , A4 , 8.5 x 11" size paper, check that the paper of
orientation is loaded in the tray.
4-9 Punching Holes (Punching)
70
Punching holes on paper of mixed sizes (applicable only when DADF is
used):
When Y is the same for paper of mixed sizes, punching holes is possible
However, only the following combinations are possible: B5 and B4, A4
and A3, 8.5 x 11" and 11 x 17".
Page 13
The screen on the right has the Tray
6 (High Capacity Feeder), and
Finisher installed.
Output/Finishing can also be
selected on the Features Menu
screen.
Basic Features
Procedure
On the Basic Features screen, select Output/Finishing.
Select Collated/Finishing.
Select Cancel to cancel the settings.
4
Then select On for Punching.
Select Top Side, Left Side, or Right Side.
For example, select Left Side (left button).
4-9 Punching Holes (Punching)
71
Page 14

Basic Features
Chapter 3 Loading Documents
information on how to load
documents.
For documents of mixed sizes, use
the DADF.
5-10: Selecting the Original
Orientation (Original Orientation)
details.
for
for
Load the original in the orientation of Head to Top, or Head to
Left.
Select the corresponding document orientation of the original
loaded, and select Save.
Select Head to Top or Head to Left.
4
Select Cancel to cancel the settings.
Some features cannot be selected
together with this feature. See
Appendix B: Possible Combinations
of Features
To stop the copy job, press Stop on
the control panel or touch Stop
displayed on the screen. See
Stopping a Copy Job
If the Punching feature is Off in Step
3, copies will be output to Finisher
Tray 1.
for details.
4-11:
for details.
Confirm the settings at the lower left side of the screen and
select Save.
Select other features if necessary.
Do not remove any paper from
Finisher Tray 2 while copies are
being output.
Copying stops when Finisher Tray 2
becomes full with 100 sets or 1500
sheets (750 sheets for sizes greater
than A4). Remove the copies from
Finisher Tray 2, then press Start to
resume copying.
4-9 Punching Holes (Punching)
72
Enter the required number of sets by using the keypad and
press Start.
The copies are punched and delivered to Finisher Tray 2.
You can remove the copies from Finisher Tray 2 after all the
copies are delivered and the machine stops.
Page 15
Resetting the Copy Sets and
Feature Settings to Their Defaults
If you made a mistake while entering the value for the number of sets to be
copied, you can select the Clear C button from the Control Panel to clear and
then re-enter the value. This button can also be used to clear settings of the
previous copy job.
Select Clear All on the Control Panel to clear all settings and return them to
their defaults.
Resetting the Number of Copy Sets
Basic Features
Procedure
Press Clear C.
The number of sets to be copied returns to 1.
Re-enter a value by using the
keypad.
Resetting the Feature Settings
Procedure
Press Clear All.
All settings are cleared and returned to their defaults.
To cancel an auto start copy job,
press Stop and then Clear All.
4
Time-Outs
Preset Functions
in
6-1: List of Custom
for details.
Job Program Incomplete/End of Job Time-Outs
These time-out features will automatically reset all settings to their
defaults if the machine has been left idle for a certain period of time.
4-10 Resetting the Copy Sets and Feature Settings to Their Defaults
73
Page 16
Basic Features
Stopping a Copy Job
To stop a copy job, pressing Stop will stop the job temporarily. Press Clear
C or Clear All after that to stop the copy job.
Procedure
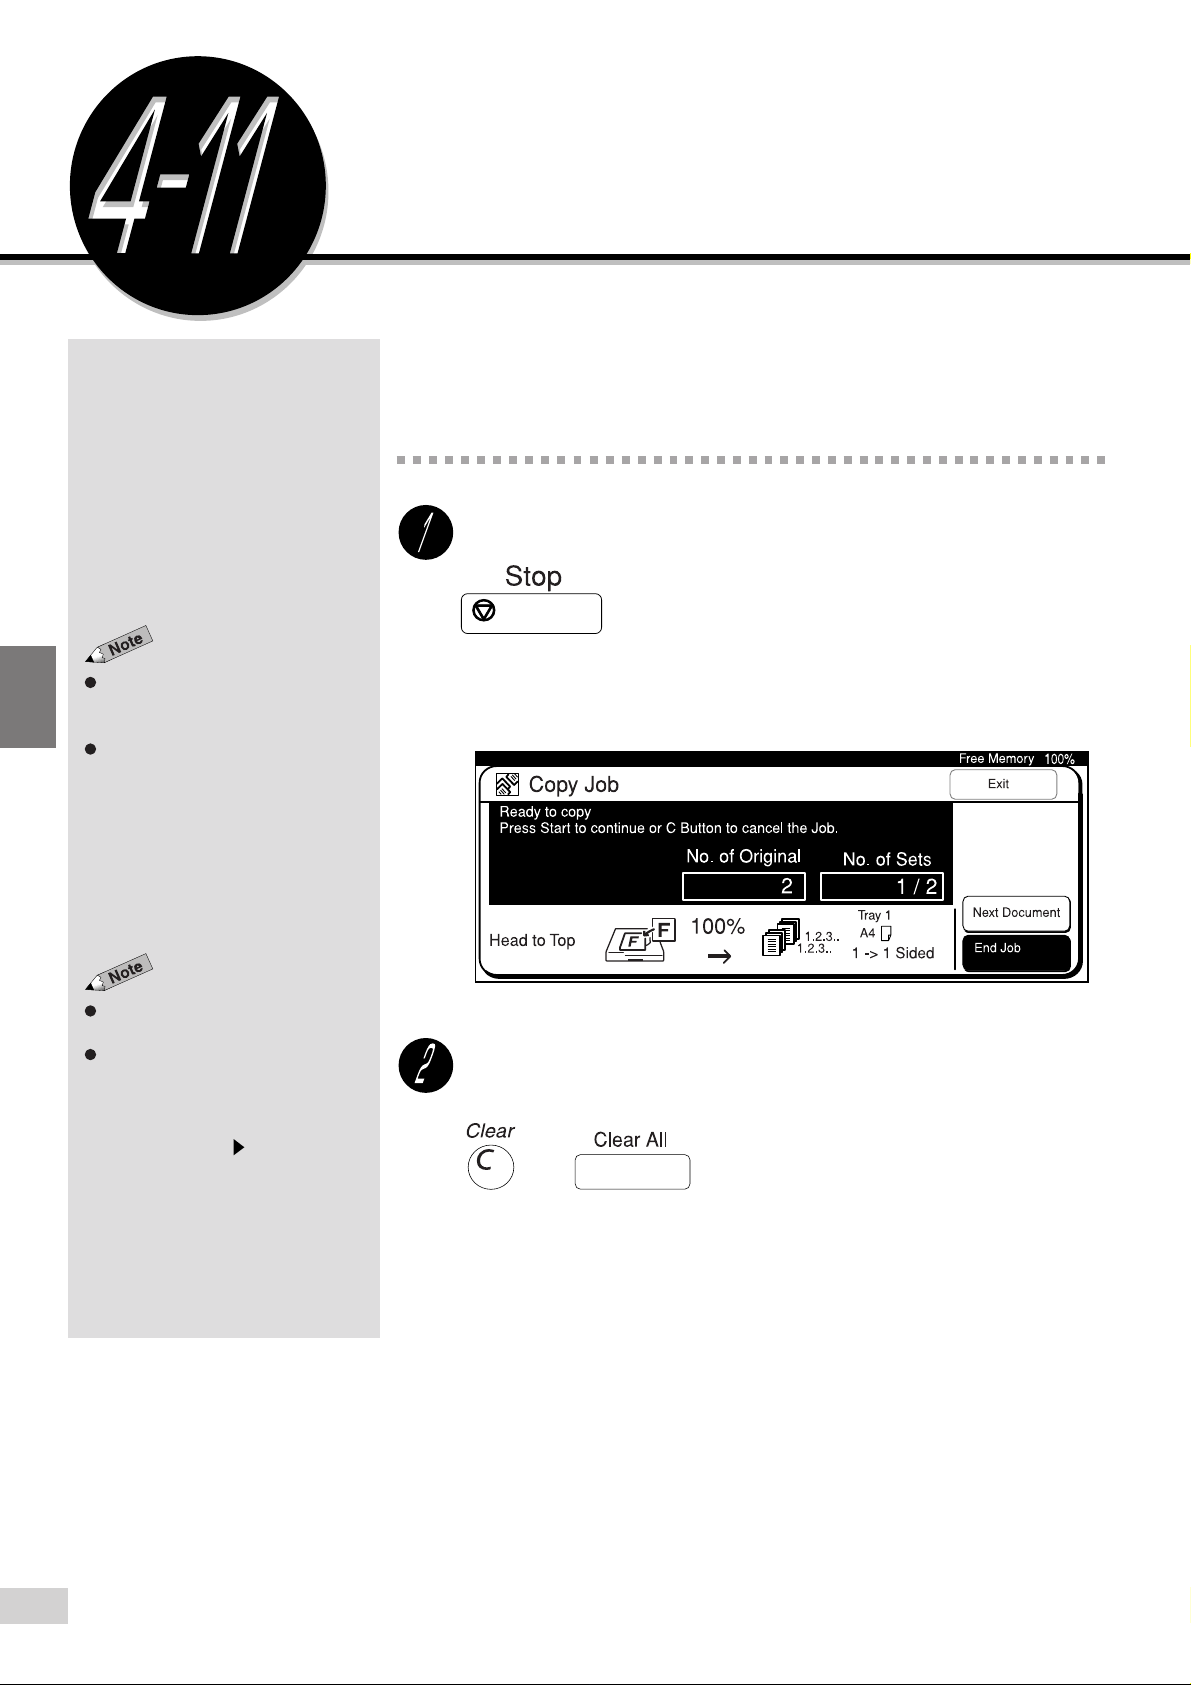
Press Stop.
4
If there is an Auto Start copy job, the
Auto indicator light on the top left of
the Start button will be lit.
If the copy in progress screen is
displayed, select Stop on the screen
to halt the copy operation.
To resume copying after a copy job
has been stopped, press Start.
If there are copy/print jobs, which
have been temporarily stopped
(waiting for operation), you cannot
proceed with the next copy job.
Press Job Status Stop to display
the job status of the stopped job
(waiting for operation). To resume
the stopped job, select it, and press
Start. To cancel it, press Clear C or
Clear All.
The current copy job is stopped temporarily. The screen below is displayed. A
waiting copy job that uses the Auto Start feature is also stopped temporarily.
Press Clear C or Clear All.
or
The copy job is stopped.
4-11 Stopping a Copy Job
74
Page 17
Interrupting a Copy Job
Interrupting job is up to 200 sheets
for one sided documents and 100
sheets for two sided documents.
The Interrupt feature cannot be used
when two jobs are programmed by
using the Program Ahead feature.
Basic Features
You can interrupt a copy job that is in progress for an urgent job. Once the
urgent job is done, the copier will resume the interrupted copy job.
Interrupting a copy job cannot be carried out under the conditions below:
When documents are being scanned in the DADF.
•
When documents are being scanned on the Document Glass up to
•
selection of End Job.
Procedure
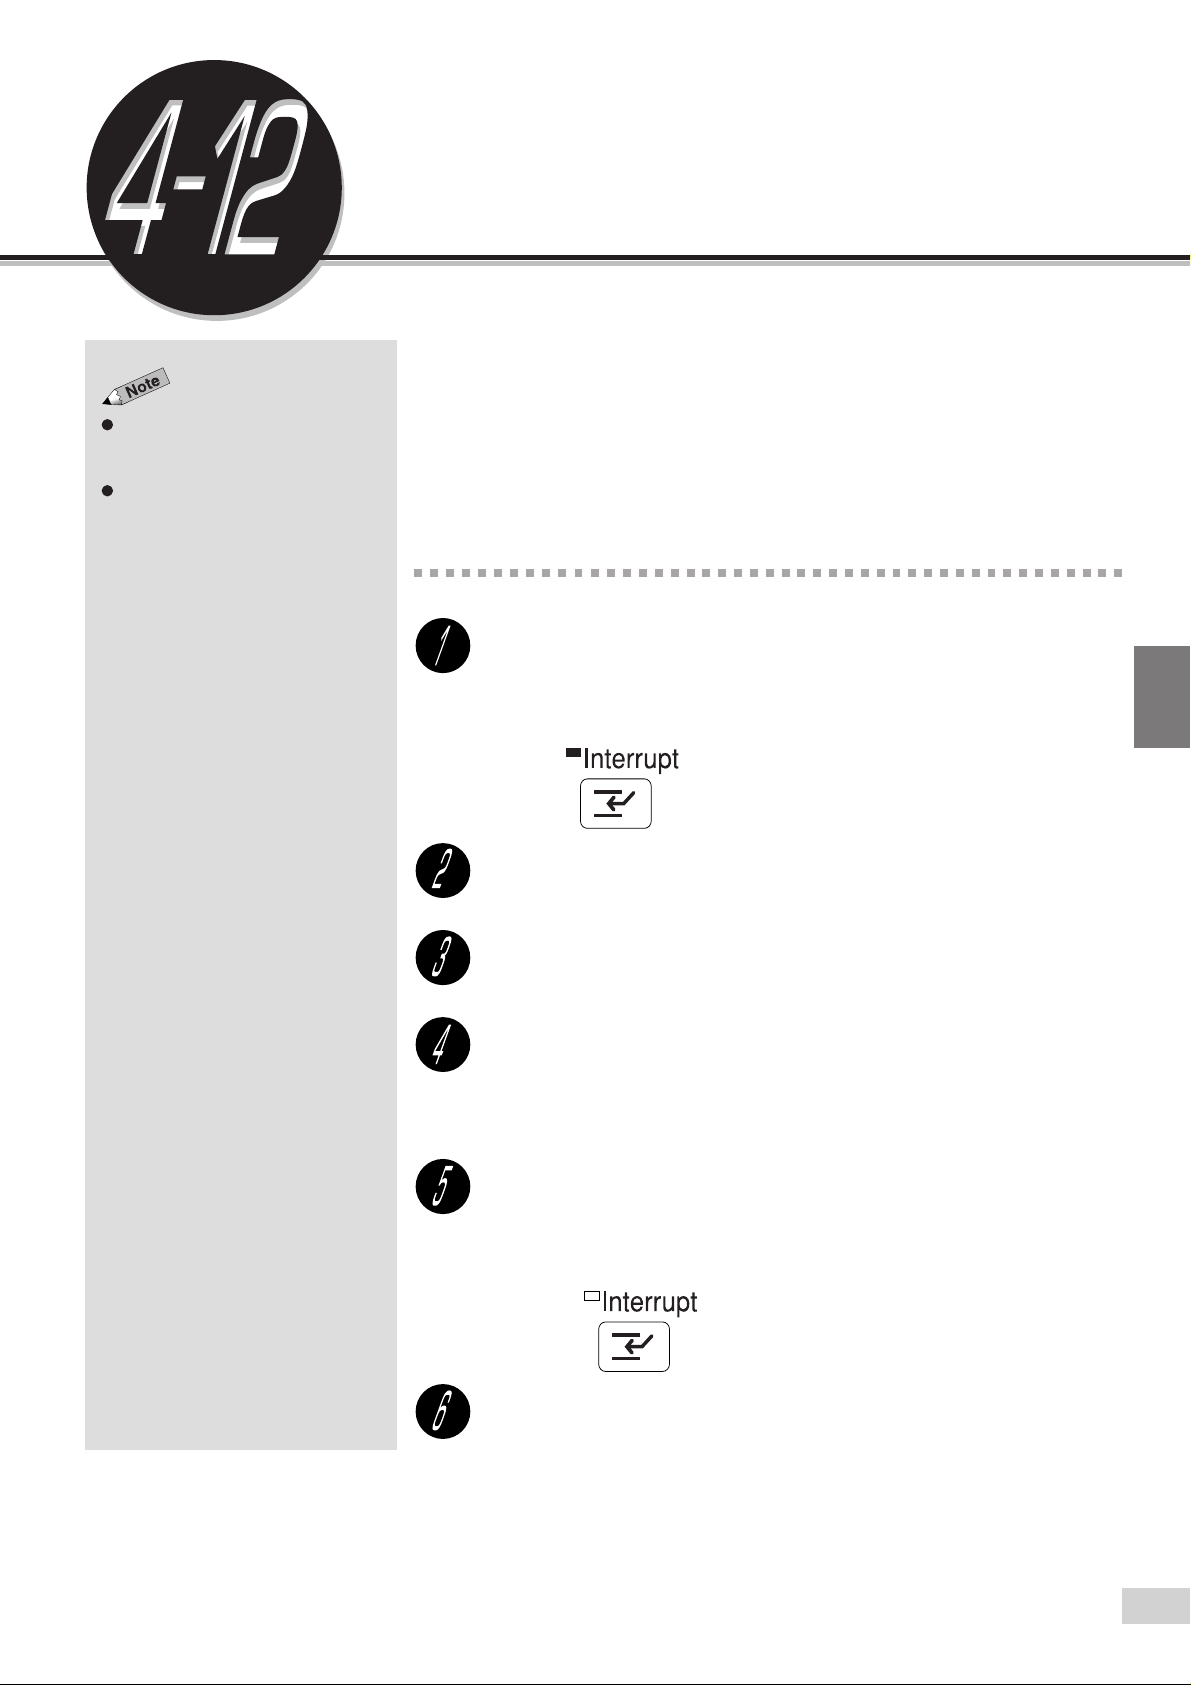
Press Interrupt.
The indicator light at the top left of the Interrupt button lights up indicating that
the current copy job has been interrupted.
Load the documents of the interrupting job.
Select other features if necessary.
Enter the required number of sets by using the keypad and
press Start.
The interrupting job starts.
After the interrupting job has ended, press Interrupt.
The indicator light at the top left of the Interrupt button is off indicating that the
interrupt mode has been cancelled.
4
Press Start.
The interrupted job resumes.
4-12 Interrupting a Copy Job
75
Page 18
4
Basic Features
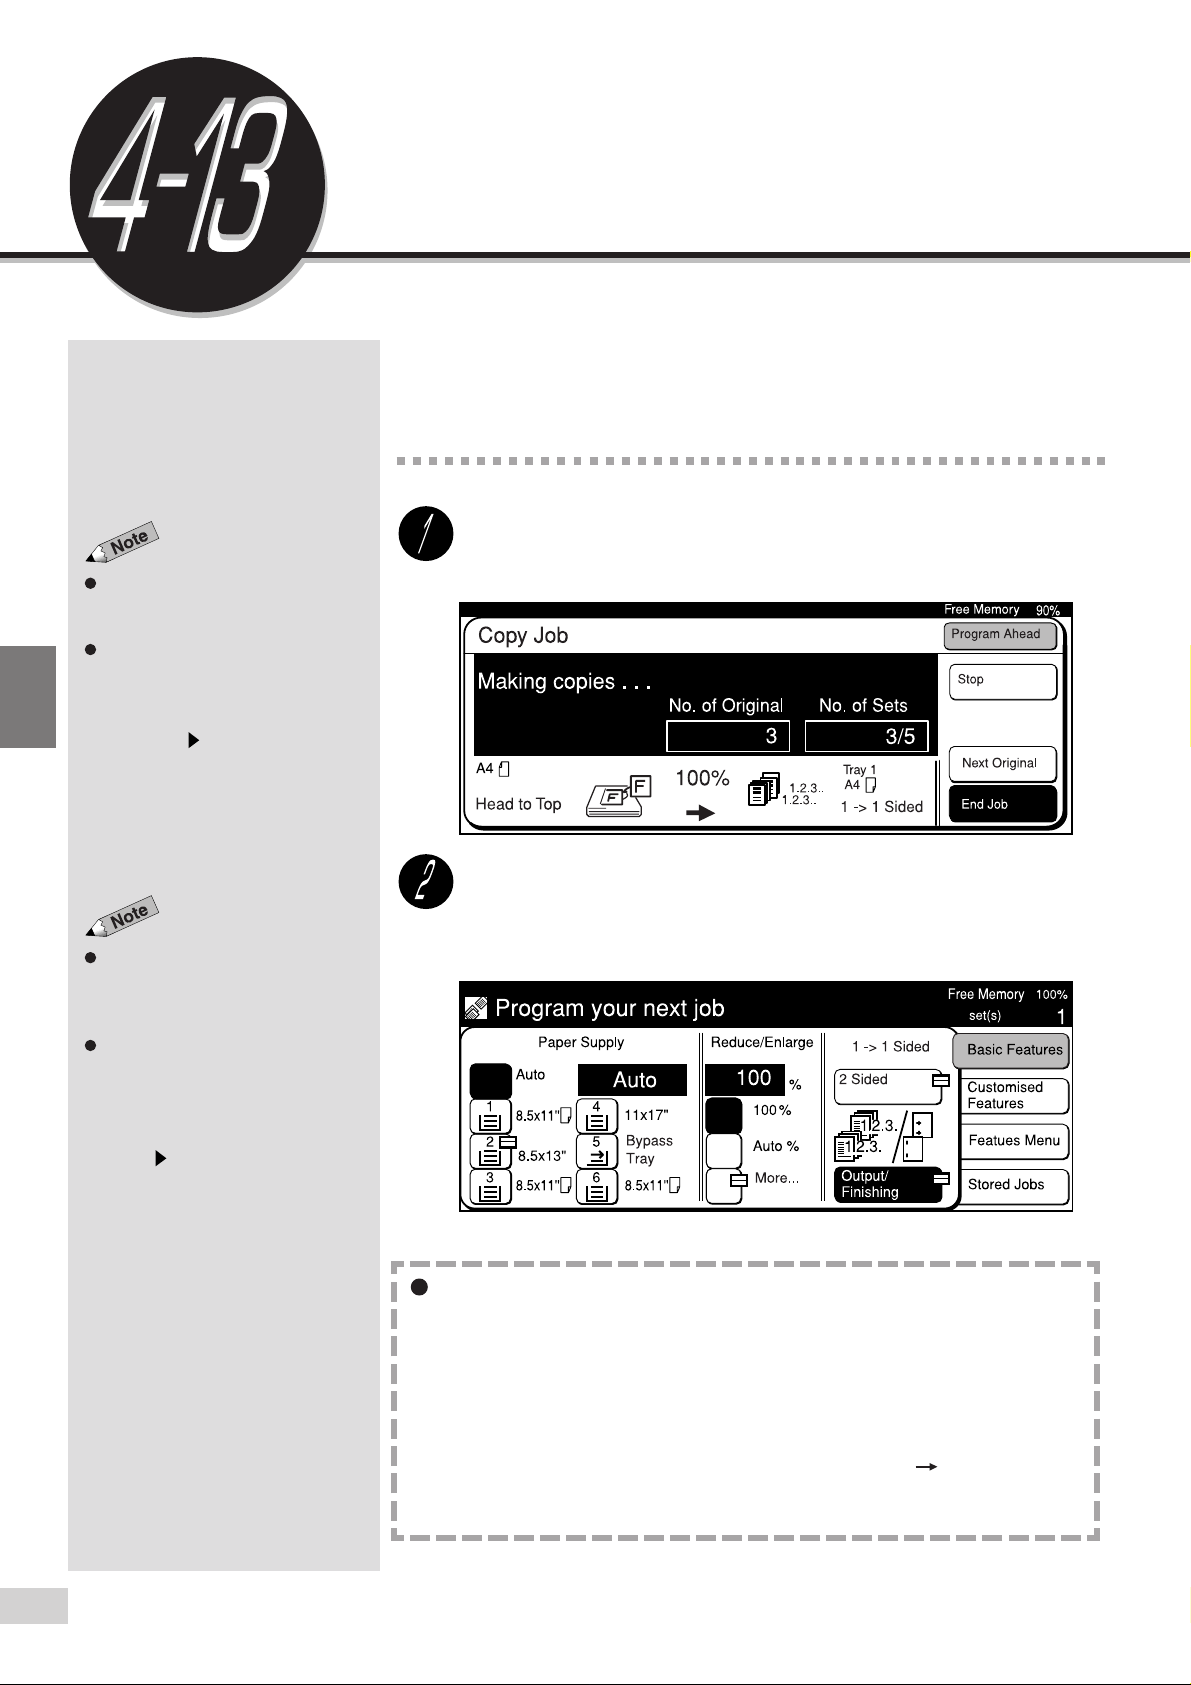
Programming Ahead
The Program Ahead feature allows you to make selections for, and perform
scanning of jobs in advance, while preceding jobs are being output.
Procedure
While the screen below is being displayed, select Program
Ahead.
On a model with printer function,
select Exit, which is displayed in
place of Program Ahead.
If there is a copy/print job, which has
been temporarily stopped (waiting
for operation), you cannot proceed
with the second copy job. Press
Job Status Stop to display the
job status of the stopped job (waiting
for operation). To resume the
stopped job, select it, and press
Start. To cancel it, press Clear C or
Clear All.
After scanning of the job to be
programmed ahead is completed,
the job will be placed at the end of
the queue for execution.
To cancel a Program Ahead job,
which has been scanned, select
Stop on the screen displayed, then
press Clear C or Clear All. If the
display has changed, press Job
Status Stop, and select the job to
be cancelled.
Press Clear C or Clear All to cancel
the job.
Make selections for the next job, load your documents and
press Start to begin scanning.
The job will start automatically after the preceding job has been completed.
When Number of Documents is 51 and Above
The number of documents which can be loaded in the DADF is up to
50 sheets. You can repeat this, by adding documents, for up to a total
of 700 sheets (350 sheets in the case of 2 sided documents) for
continuous scanning.
select Next Original. When scanning has ended, add documents and
select Start to continue scanning. If there are no additional documents
to be scanned, select End Job. But, when Stapling, 1 2 Sided, Multi-
Up (N Up) is selected, scanning cannot be continued by adding
documents.
When the initial document is being scanned,
4-13 Programming Ahead
76
Page 19

5
Added Features
5-1 Overview of Added Features ...................................... 78
5-2 Adjusting Copy Density (Lighter/Darker) .................... 80
5-3 Making a Copy According to Original Type
(Original Type) ............................................................ 82
5-4 Copying Several Documents onto One Copy
(Multi-Up (N Up))......................................................... 84
5-5 Loading Mixed Size Originals
(Mixed Size Originals)................................................. 87
5-6 Copying Facing Pages onto Separate Sheets
(Book Copying) ........................................................... 90
5-7 Setting the Margins (Image Shift) ............................... 92
5-8 Erasing the Edges and Copying All
(Edge Erase/Copy All) ................................................ 96
5-9 Interleaving Blank Sheets Between Transparencies
(Transparency Separators) ......................................... 99
5-10 Selecting the Original Orientation
(Original Orientation)................................................... 102
5-11 Rotating and Copying in Different Directions
(Image Rotation) ......................................................... 104
5-12 Selecting the Original Size (Original Size) .................. 106
5-13 Enhancing Sharpness (Sharpness) ............................ 108
5-14 Creating Negative-like Images (Negative Image) ....... 110
5-15 Creating Mirror Images (Mirror Image) ....................... 112
5-16 Repeating an Image (Repeat Image) ......................... 114
5-17 Making Duplex Copies of Facing Pages
(Book Duplex) ............................................................. 117
5-18 Inserting Covers (Covers) ........................................... 120
5-19 Making a Sample Set (Sample Set)............................ 123
5-20 Creating a Booklet (Booklet Creation) ........................ 125
5-21 Job Memory Operations ............................................. 128
5-22 Using the Document/Copy Counter ............................ 136
Page 20
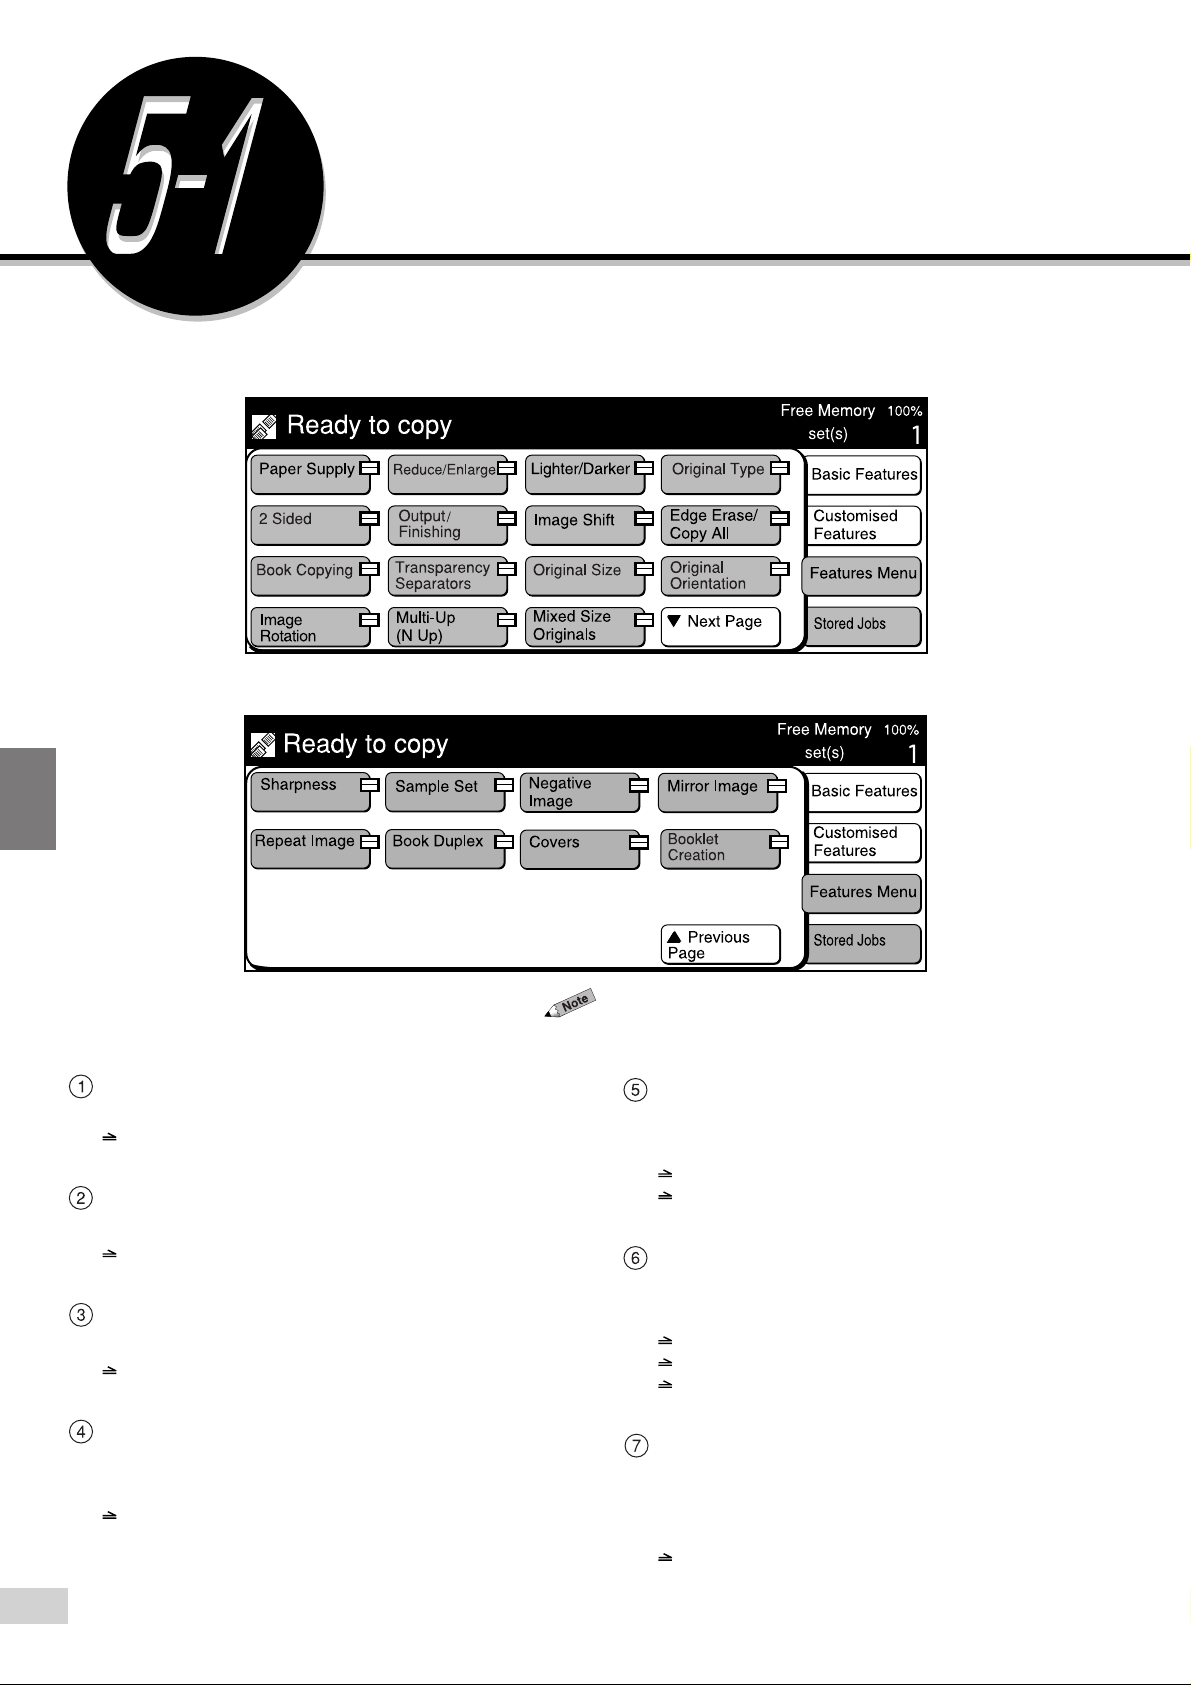
Added Features
Overview of Added Features
5
Paper Supply
Select this option to select the paper size.
4.2: Selecting a Paper Tray (Paper Supply)
Reduce/Enlarge
Select this option to reduce/enlarge a copy image.
4.3: Reducing/Enlarging (Reduce/Enlarge)
Lighter/Darker
Select this option to adjust the density of a copy.
5.2: Adjusting Copy Density (Lighter/Darker)
The above screen has the Finisher installed.
2 Sided
Select this option to make two sided or one sided
copies.
4-5: Copying on One Side (2 Sided)
4-6: Copying on Two Sides (2 Sided)
Output
Select this option to specify the method to output the
copies.
4-7: Collating Copy Output (Output/Finishing)
4-8: Stapling (Stapling)
4-9: Punching Holes (Punching)
Document Type
Select this option to make a copy that matches the
document type.
5-3: Making a Copy according to Original Type
(Original Type)
5-1 Overview of Added Features
78
Image Shift
Select this option to determine the position of the
document's image (up/down/left/right) on the copy
and to insert the binding shift.
5-7: Setting the Margins (Image Shift)
Page 21

Added Features
Edge Erase/Copy All
Select this option to make copies with the document
cover open, or to make copies from booklets.
5-8: Erasing the Edges and Copying All
(Edge Erase/Copy All)
Book Copying
Select this option to make separate left-page and
right-page copies from a bound document.
5-6: Copying Facing Pages onto Separate Sheets
(Book Copying)
Transparency Separators
Select this option to insert blank sheets as
separators between the copied transparencies.
5-9: Interleaving Blank Sheets Between
Transparencies (Transparency Separators)
Original Size
Select this option to specify the size of the document.
5-12: Selecting the Original Size (Original Size)
Sharpness
Select this option to enhance or reduce the sharpness
of an image.
5-13: Enhancing Sharpness (Sharpness)
Sample Set
Select this option to output a sample set for verification
before proceeding to output the actual copies.
5-19: Making a Sample Set (Sample Set)
Negative Image
Select this option to create negative-like copies by
reversing the black and white sections of the original
image.
5-14: Creating Negative-like Images
(Negative Image)
Mirror Image
Select this option to make copies by reversing the left/
right-page of the document.
5-15: Creating Mirror Images (Mirror Image)
Original Orientation
Select this option to specify the orientation of the
loaded document.
5-10: Selecting the Original Orientation
(Original Orientation)
Image Rotation
Select this option to make copies after rotating the
document image by 90 degrees.
5-11: Rotating and Copying in Different Directions
(Image Rotation)
Multi-Up (N Up)
Select this option to copy several documents onto one
copy.
5-4: Copying Several Documents onto One Copy
(Multi-Up (N Up))
Mixed Size Originals
Select this option to load documents of different sizes
at the same time.
5-5: Loading Mixed Size Originals
(Mixed Size Originals)
Repeat Image
Select this option to make copies with repeated images
of the original.
5-16: Repeating an Image (Repeat Image)
Book Duplex
Select this option to make duplex copies that are the
same as the bound document.
5-17: Making Duplex Copies of Facing Pages
(Book Duplex)
Covers
Select this option to insert covers, such as colored
paper, for the copies.
5-18: Inserting Covers (Covers)
Booklet Creation
Select this option to create booklets from one or twosided documents.
5-20: Creating a Booklet (Booklet Creation)
Stored Jobs
Select this option to register defined copy jobs in the
Job Memory.
5-21: Job Memory Operations
5
5-1 Overview of Added Features
79
Page 22
Added Features
After you have adjusted the copy
density, you can still darken the copy
by increasing the toner level if you
find that the copy is still too light.
See 8-3: Increasing the Toner Level
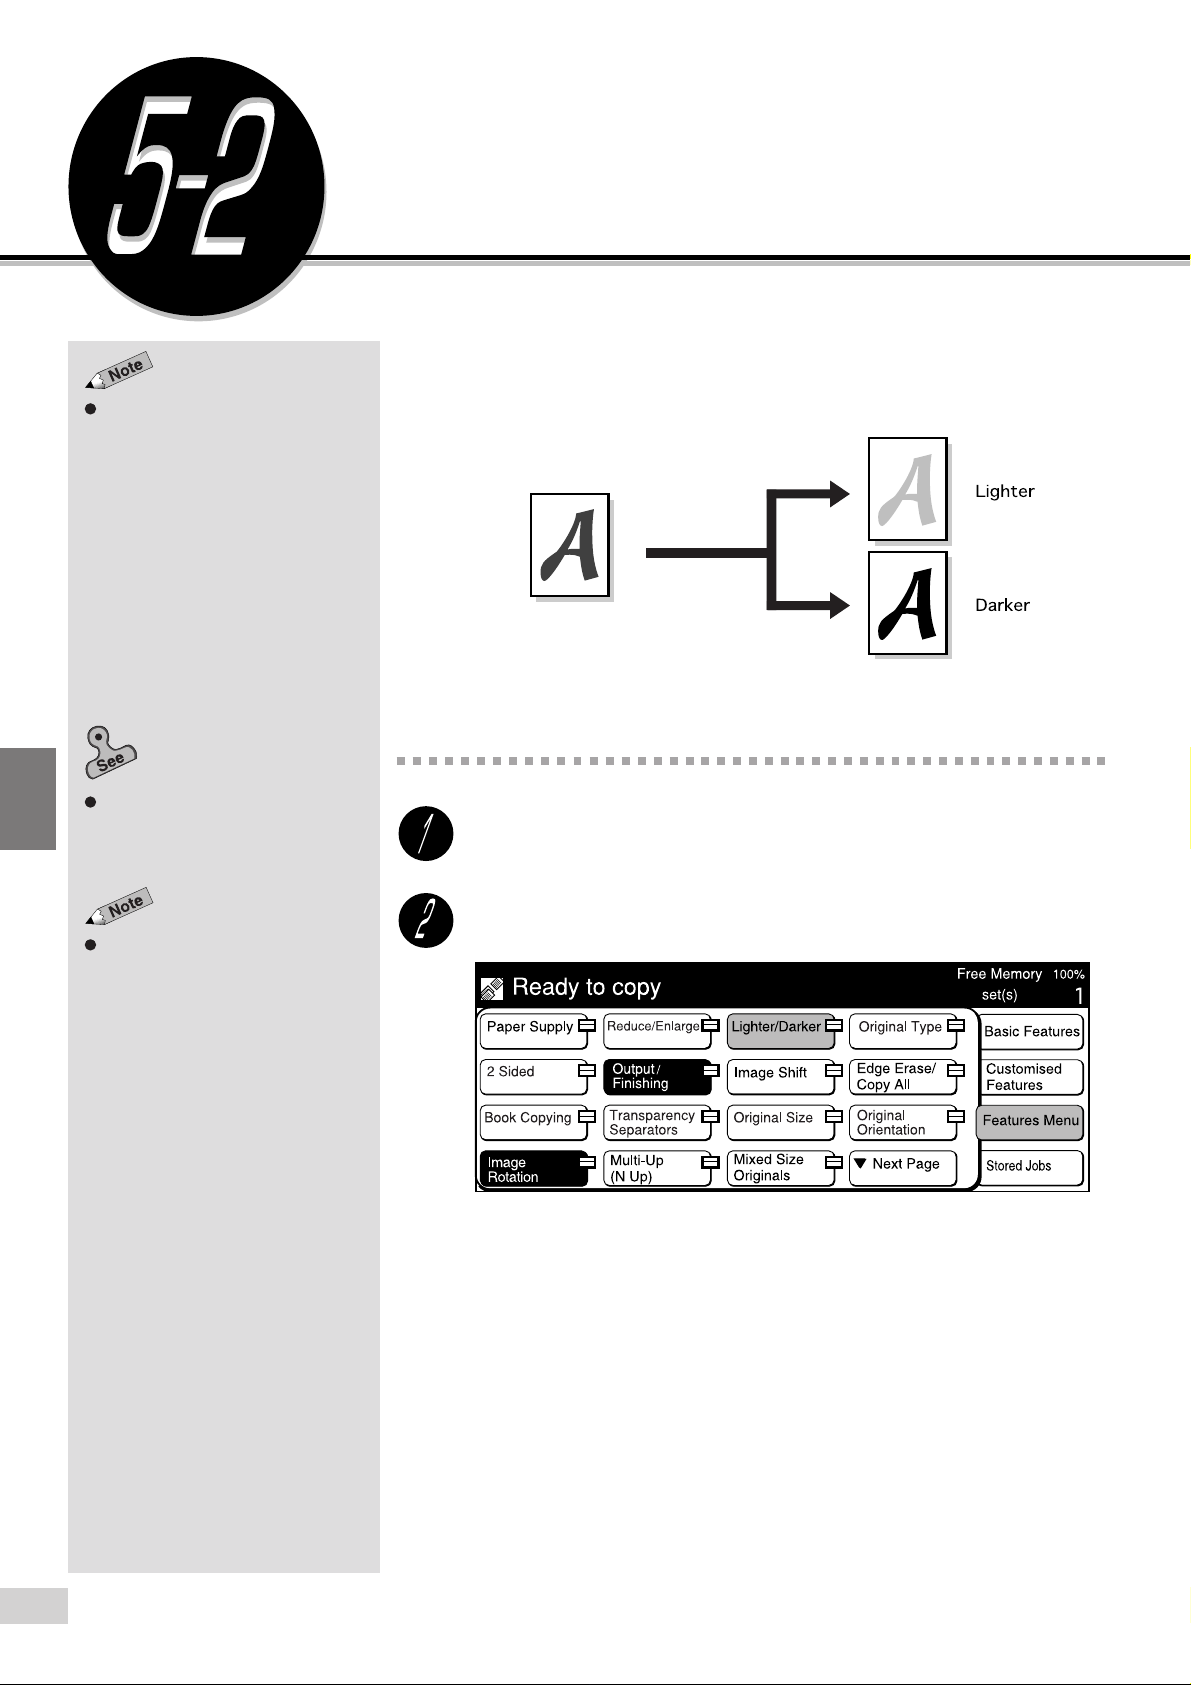
Adjusting Copy Density
(Lighter/Darker)
The Lighter/Darker feature allows you to adjust the copy density by using
the seven-grade density scale provided. The default is Normal.
.
5
See
Chapter 3 Loading Documents
for information on how to load
documents.
The screen on the right has the
Finisher installed.
Procedure
Load the document.
Select Features Menu. Then select Lighter/Darker.
5-2 Adjusting Copy Density (Lighter/Darker)
80
Page 23
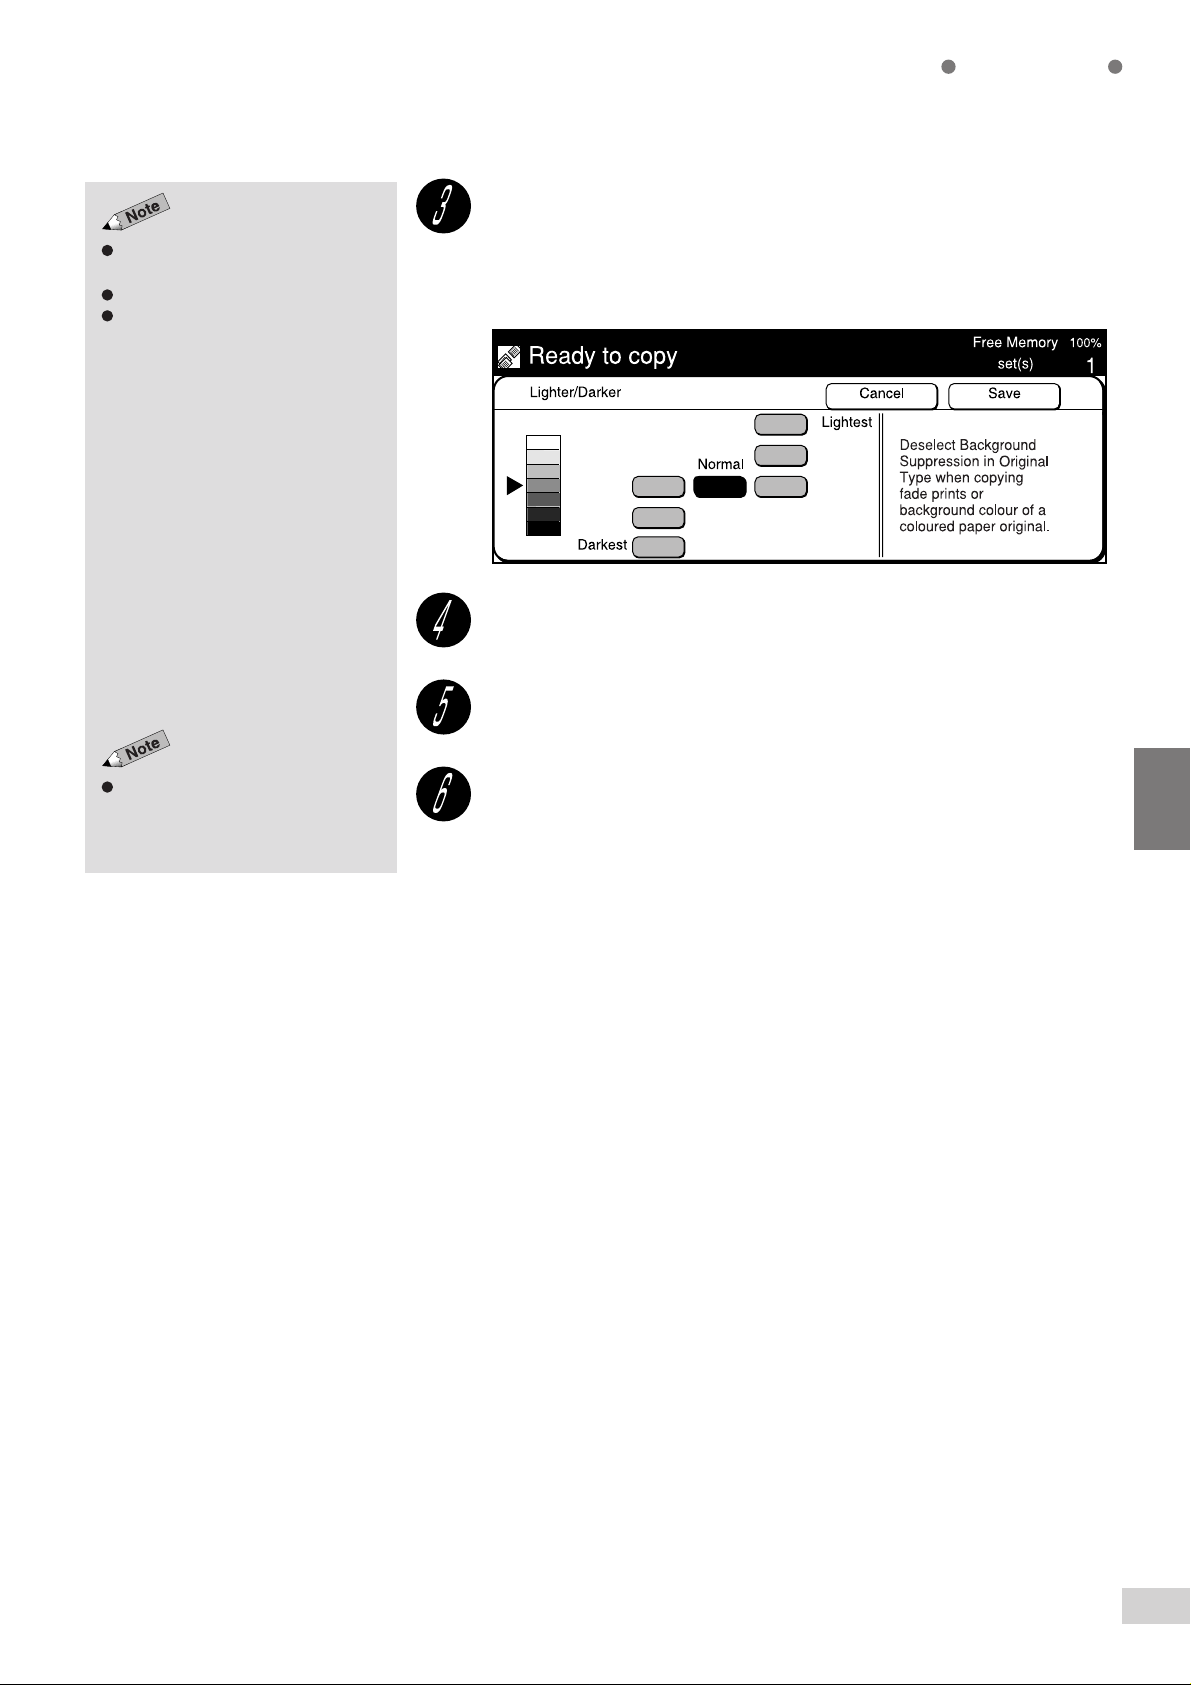
The factory default for Lighter/
Darker is Normal.
Select Cancel to cancel the settings.
You can remove the background
color on the document by selecting
Background Suppression in
Original Type.
See
5-3: Making a Copy according
to Original Type (Original Type)
details.
for
Added Features
Use the buttons in Lighter/Darker to select the desired copy
density.
To make a lighter copy, touch a button near Lightest. To make a darker copy,
touch a button near Darkest.
Select Save.
Some features cannot be selected
together with this feature. See
Appendix B: Possible Combinations
of Features
for details.
Select other features if necessary.
Enter the required number of sets by using the keypad and
press Start.
The copies are made according to the copy density value selected in Step 3.
5
5-2 Adjusting Copy Density (Lighter/Darker)
81
Page 24
Added Features
The default original type can be
changed by using Tools Mode. The
factory default is Text & Photo with
Background Suppression
selected.
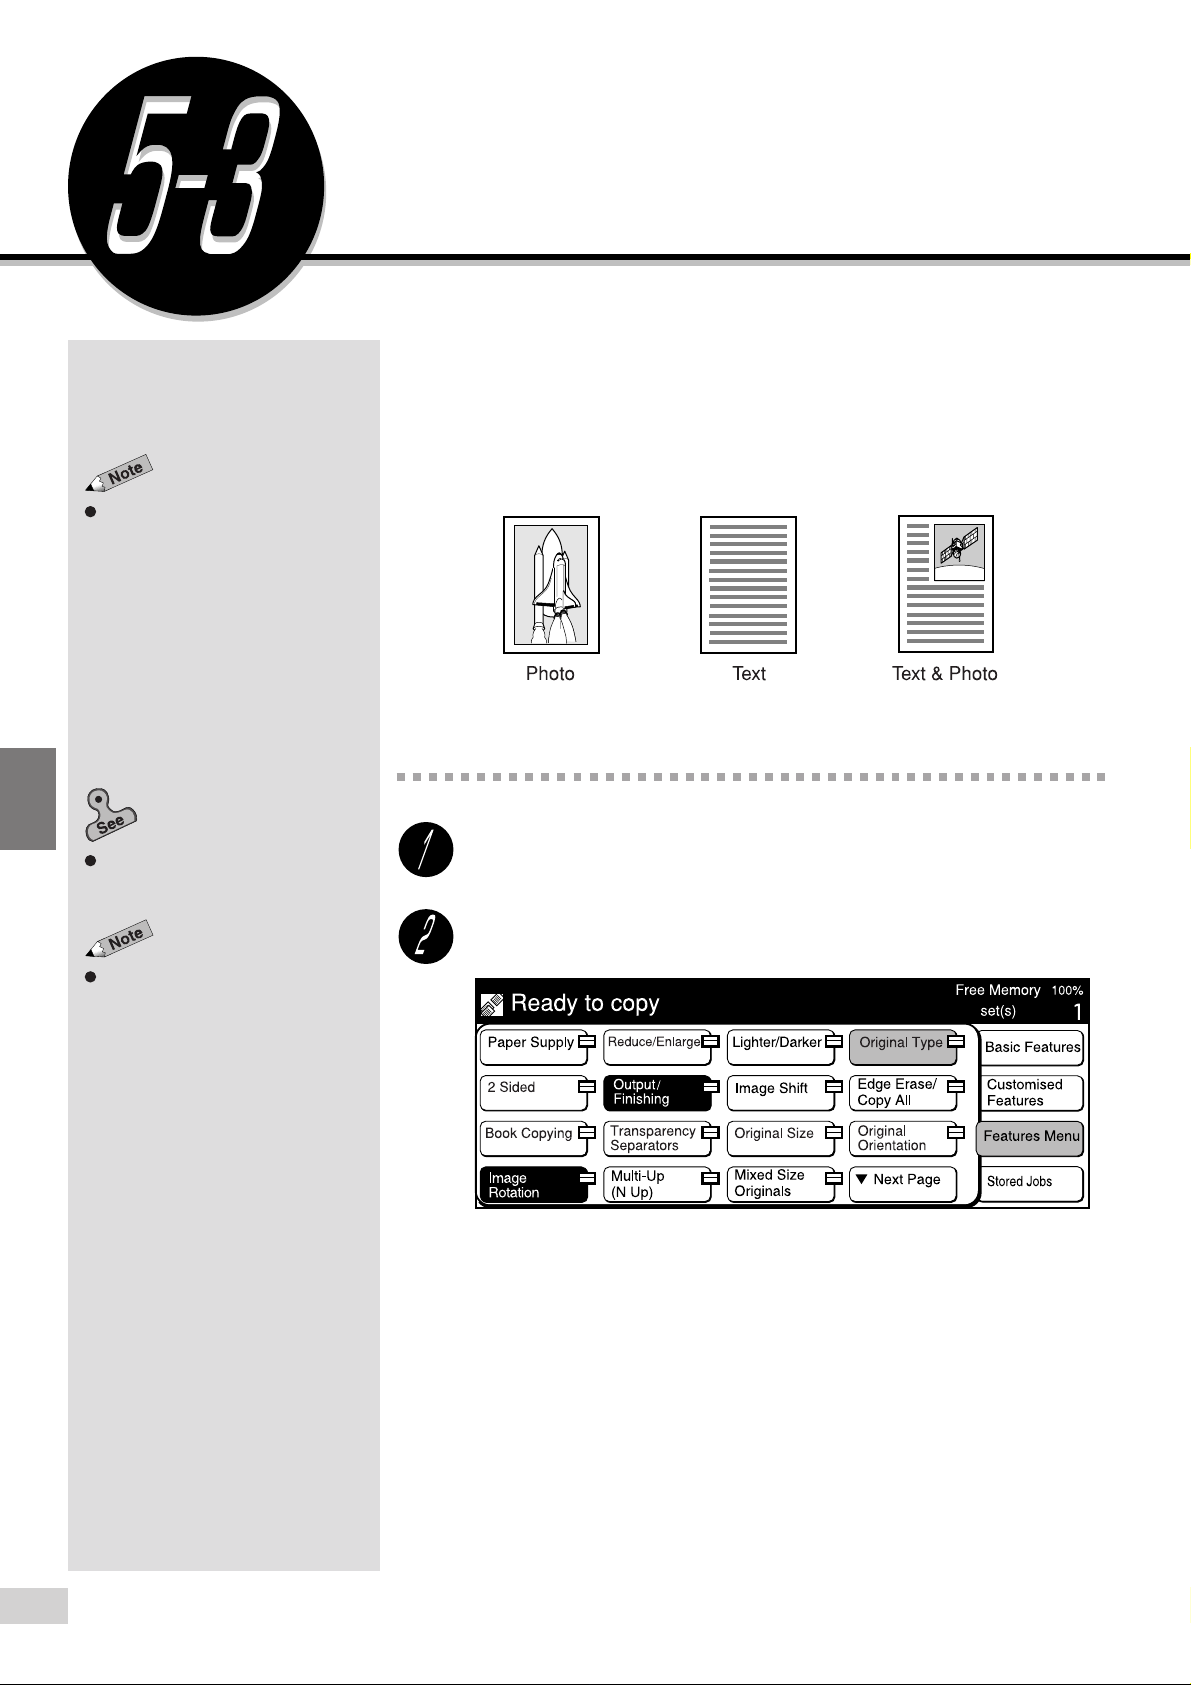
Making a Copy According to
Original Type
(Original Type)
The Original Type feature allows you to make copies of photographs, text
or text with photographs by selecting their matching original type.
Also, if you have selected Text or Text & Photo, you can choose to remove
the background color of texts and so forth by enabling the Background
Suppression feature.
5
Chapter 3 Loading Documents
information on how to load
documents.
The screen on the right has the
Finisher installed.
for
Procedure
Load the document.
Select Features Menu. Then select Original Type.
5-3 Making a Copy According to Original Type (Original Type)
82
Page 25

Select Cancel to cancel the settings.
The factory default, Background
Suppression is being selected.
Added Features
Select an original type.
When the document consists of both photograph and text:
Select Text & Photo.
Select Background Suppression to remove the background color.
When the document consists of mainly text:
Select Text. Select Background Suppression to remove the background
color.
When the document consists of mainly photographs:
Select Photo.
Some features cannot be selected
together with this feature. See
Appendix B: Possible Combinations
of Features
for details.
Confirm the settings, and select Save.
Select other features if necessary.
Enter the required number of sets by using the keypad and
press Start.
The copies are made according to the document type selected in Step 3.
5
5-3 Making a Copy According to Original Type (Original Type)
83
Page 26

Added Features
Two, four, or eight sheets of
documents are reduced and copied
onto the selected paper.
Copying Several Documents
onto One Copy
(Multi-Up (N Up))
The Multi-Up (N Up) feature allows you to use the DADF to copy two, four or
eight sheets of documents onto one copy.
5
5-4 Copying Several Documents onto One Copy (Multi-Up (N Up))
84
Page 27

The screen on the right has the
Finisher installed
If Multi-Up (N Up) is selected,
Reduce/Enlarge becomes Auto %
and two, four, or eight sheets of
documents are reduced to fit, and
copied onto the selected paper.
Added Features
Procedure
Select the tray with the desired paper size loaded from Basic
Features screen under Paper Supply.
Select Features Menu. Then select Multi-Up (N Up).
Image order refers to the order in
which two, four, or eight sheets of
documents are copied onto one
sheet of paper. See diagram on
previous page.
Select either 2 Up, 4 Up or 8 Up.
For example, select 2 Up.
5
Select a button below Image Order.
5-4 Copying Several Documents onto One Copy (Multi-Up (N Up))
85
Page 28

Added Features
Loading documents in the DADF
3-2: Loading Documents
load documents.
5-10: Selecting the Original
Orientation (Original Orientation)
on how to
Load the document into the DADF.
Load the document in the orientation of Head to Top, or Head to Left.
in
Select the corresponding document orientation of the original
loaded, then select Save.
Select Head to Top or Head to Left.
5
Select Cancel to cancel the settings.
Some features cannot be selected
together with this feature. See
Appendix B: Possible Combinations
of Features
for details.
Confirm the settings, and select Save.
Select other features if necessary.
Enter the required number of sets by using the keypad and
press Start.
Two documents are copied onto one piece of paper.
5-4 Copying Several Documents onto One Copy (Multi-Up (N Up))
86
Page 29

Added Features
Loading Mixed Size Originals
(Mixed Size Originals)
The Mixed Size Originals feature allows you to use the DADF to load
documents of different sizes, and scan them all at the same time. Copies of
these documents are output according to the sizes of their originals.
Alternatively, you can choose to make copies of these documents on a
selected paper size.
Select Mixed Size Originals and
Auto for Paper Supply.
Select Mixed Size Originals and
Auto % for Reduce/Enlarge.
When making copies matching the size of the document
5
When making copies on a selected paper size
5-5 Loading Mixed Size Originals (Mixed Size Originals)
87
Page 30

Added Features
Copying on Paper Size Matching the Document Size
Procedure
5
Loading documents in the DADF
3-2: Loading Documents
load documents.
Paper Supply can also be selected
on the Features Menu screen. The
factory default is Auto.
Reduce/Enlarge can also be
selected from the Features Menu.
The factory default is 100%.
The screen on the right has the
Finisher installed.
in
on how to
Load all documents such that they are properly inserted in the
DADF.
On the Basic Features screen, select Auto in Paper Supply
and 100% in Reduce/Enlarge.
Select Features Menu. Then select Mixed Size Originals.
Select Cancel or Off to cancel the
settings.
Some features cannot be selected
together with this feature. See
Appendix B Possible Combinations
of Features
for details.
Check that On is selected.
Confirm the settings, and select Save.
Select other features if necessary.
Enter the required number of sets by using the keypad and
press Start.
Copies are made according to their respective document sizes.
5-5 Loading Mixed Size Originals (Mixed Size Originals)
88
Page 31

Copying onto a Selected Paper Size
Procedure
Added Features
Loading documents in the DADF
3-2: Loading Documents
load documents.
4-2: Selecting a Paper Tray (Paper
Supply)
on paper tray selection.
4-3: Reducing/Enlarging (Reduce/
Enlarge)
Paper Supply and Reduce/
Enlarge can also be selected from
the Features Menu.
The screen on the right has the
Finisher installed.
on reduction or enlargement.
in
on how to
Load all documents such that they are properly inserted in the
DADF. Load
On the Basic Features screen, select the paper tray with the
desired paper size in Paper Supply.
Select Auto % in Reduce/Enlarge on the Basic Features
screen.
Select Features Menu. Then select Mixed Size Originals.
5
Select Cancel or Off to cancel the
settings.
Some features cannot be selected
together with this feature. See
Appendix B: Possible Combinations
of Features
for details.
Check that On is selected.
Confirm the settings, and select Save.
Select other features if necessary.
Enter the required number of sets by using the keypad and
press Start.
Copies of the respective documents are fitted onto the selected paper size by
reducing/enlarging them accordingly.
5-5 Loading Mixed Size Originals (Mixed Size Originals)
89
Page 32

Added Features
This feature can only be used when
the document is placed on the
Document Glass.
The division section (binding shift
section of the original) at the center
of a bound document will be copied
with a 2 to 4 mm offset.
Non standard size documents or
documents whose sizes cannot be
detected cannot be accurately
copied as two equal portions.
Copying Facing Pages onto
Separate Sheets
(Book Copying)
The Book Copying feature allows you to make copies of a document with
facing pages and binding margin.
5
Procedure
Select Features Menu. Then select Book Copying.
The screen on the right has the
Finisher installed.
Book Copying can also be selected
on the Customized Features Menu
screen.
Select Left Page Then Right, Right Page Then Left, or Top
Page Then Bottom.
For example, select Left Page Then Right.
The factory default for Book
Copying is Off.
Select Cancel to cancel the settings.
5-6 Copying Facing Pages onto Separate Sheets (Book Copying)
90
Left Page
Then Right
Right Page
Then Left
Top Page
Then Bottom
Page 33

Confirm the settings, and select Save.
Added Features
Some features cannot be selected
together with this feature. See
Appendix B: Possible Combinations
of Features
Loading documents in the DADF
3-2: Loading Documents
load documents.
If the number of sets is 1, copying
will be done in the order of A to B
with the first page discharged facing
up.
for details.
in
on how to
Select other features if necessary.
Place the document on the Document Glass.
5
If you have also selected 2 Sided,
the following will result:
Left Page Then Right
•
The left page is copied onto side
one and the right page is copied
onto side two of the paper.
Right Page Then Left
•
The right page is copied onto side
one and the left page is copied
onto side two of the paper.
Top Page Then Bottom
•
The top page is copied onto side
one and the bottom page is copied
onto side two of the paper.
Enter the required number of sets by using the keypad and
press Start.
The document with facing pages is copied on separate sheets of paper.
5-6 Copying Facing Pages onto Separate Sheets (Book Copying)
91
Page 34

Added Features
The default value of Image Shift can
be changed by using the Tools
Mode. The factory default is No
Shift.
When loading document on the
document glass and selecting
Image Shift, be sure to input the
document size. See
the Original Size (Original Size)
method on document size input.
5-12: Selecting
Setting the Margins
(Image Shift)
The Image Shift feature allows you to move the position of the original
image up, down, left, right or center. Also, it allows you to set a top, bottom,
left, or right margin.
Image is shifted to each corner
for
5
Image is shifted to center of paper (Auto Center (Centre))
The center of the document is shifted to match the center of the paper for
copying.
Setting margin
Margin is set by shifting the document top, bottom, left, or right
between 1-432 mm at 1 mm intervals for copying.
5-7 Setting the Margins (Image Shift)
92
Page 35

The screen on the right has the
Finisher installed.
Added Features
Procedure
Select Features Menu. Then select Image Shift.
Select Side 1.
The factory default is No Shift.
Select Cancel to cancel the settings.
5
Select the position to shift the document to.
For example, set a left margin of 10 mm Set button (Right) at 10 mm.
• Corner Shift: Select .
• Auto Center (Centre): Select Auto Center (Centre).
• Margin: Use
margin between 0 - 432 mm.
buttons to set up, down, left, or right
5-7 Setting the Margins (Image Shift)
93
Page 36

Added Features
Chapter 3 Loading Documents
information on how to load
documents.
for
Load the document.
• When loading document in DADF:
Load document in the orientation of Head to Top or Head to Left.
5
When the document is loaded on the
document glass, and if input of the
document size were not done,
image shift will not be executed
correctly.
See
5-12: Selecting the Original
Size (Original Size)
The factory default is Head to Top.
See 5-10: Selecting the Original
Orientation (Original Orientation)
the details.
The direction of image shift (up/
down/left/right) is determined by the
document orientation. If the
document orientation of the
document loaded is different from
that of the paper, the origin of the
shift (up/down) will also be different,
and hence, image shift will not be
performed correctly.
.
for
• When loading document on the Document Glass:
Load document in the orientation of Head to Top or Head to Left.
Enter the document size with Original Size fromFeatures
Menu.
Select the corresponding document orientation of the original
loaded.
Select Head to Top or Head to Left.
5-7 Setting the Margins (Image Shift)
94
Confirm the settings, and select Save.
Page 37

Select Cancel to cancel the settings.
The factory default is Mirror Shift.
Normally, you should select Mirror
Shift when inserting the binding shift
on a two-sided copy.
Added Features
Select Side 2 when making two-sided copies, and define the
image and binding shifts. Select Mirror Shift if you want side
two of the document to be a mirror image of side one.
Confirm the settings, and select Save twice.
When paper is the same size as the
document, and Reduce/Enlarge is
at 100% (factory default), copy
position will not be shifted.
Some features cannot be selected
together with this feature. See
Appendix B: Possible Combinations
of Features
for details.
Select the paper size from Paper Supply and % from Reduce/
Enlarge.
When Image Shift, or Auto Center (Centre) is selected, select a paper size
larger than the document, or adjust Reduce/Enlarge.
5
Select other features if necessary.
Enter the required number of sets by using the keypad and
press Start.
Copies are made according to the image shift settings made.
5-7 Setting the Margins (Image Shift)
95
Page 38

5
Added Features
When Copy All is selected,
depending on the type of document
used, the edges of the copies made
may contain marks or image loss
may result.
The Edge Erase default value can
be changed by using the Tools
Mode. The factory default is Normal
(T&B, L&R: 2 mm and
Center: 0 mm)
No copying can be done onto the 2
mm border area of the paper.
If you have selected Reduce/
Enlarge, the area for edge erase will
also be reduced/enlarged.
If you have selected Book Copying,
Edge Erase will be based on the
entire image of the document.
If you have also selected Multi-Up
(N Up) and Center (Centre) Erase,
then Edge Erase will be based on
the individual original image.
Erasing the Edges and
Copying All
(Edge Erase/Copy All)
When copying with the document cover open or when copying bound
documents, shadows are sometimes found at the edges or center of the
copies made. These shadows can be erased with the feature, Edge Erase.
It is also possible to make a copy without erasing these shadows by
selecting Copy All.
Erasing the shadows of documents (Edge Erase)
Set the amount of erase of shadows on the top, bottom, left, or right,
center of the document. The part which Edge Erase is set will not be
copied (that is, will be erased).
Copying onto whole area of paper (Copy All)
Amount of erase is 0 mm, and the entire page is copied.
5-8 Erasing the Edges and Copying All (Edge Erase/Copy All)
96
Page 39

The screen on the right has the
Finisher installed.
Added Features
Procedure
Select Features Menu. Then select Edge Erase/Copy All.
Select Copy All to copy the entire page. To erase edges,
select Variable Erase.
The factory default is Normal (T&B:
2 mm, L&R: 2 mm and Center: 0
mm).
Select Cancel to cancel the settings.
5
If you have selected Variable Erase, use buttons to select
a value for Top & Bottom Edges (2-50 mm), Left & Right Edges
(2-50 mm) and Center (Centre) Erase (0-50 mm).
For example, select Top & Bottom Edges: 10 mm and Left & Right Edges:
10 mm.
5-8 Erasing the Edges and Copying All (Edge Erase/Copy All)
97
Page 40

Added Features
Load document in the orientation of Head to Top or Head to Left.
5
Chapter 3 Loading Documents
information on how to load
documents.
5-10: Selecting the Original
Orientation (Original Orientation)
details.
for
for
Select the corresponding document orientation of the original
loaded, and select Save.
Select Head to Top or Head to Left.
Some features cannot be selected
together with this feature. See
Appendix B: Possible Combinations
of Features
for details.
Confirm the settings, and select Save.
Select other features if necessary.
Enter the required number of sets by using the keypad and
press Start.
Copies are made according to the edge erase settings defined in Steps 2 and 3 .
If you make copies with the document cover open, avoid
looking directly at the copy lamp. Direct eye exposure can
cause eye fatigue or damage.
5-8 Erasing the Edges and Copying All (Edge Erase/Copy All)
98
Page 41

Added Features
Interleaving Blank Sheets
Between Transparencies
(Transparency Separators)
The Transparency Separators feature allows you to make copies on
transparencies and output them with blank sheets of paper inserted
as transparency separators between them. You can also make copies
for distribution (N Sets) at the same time.
Transparencies, transparency
separators, and paper for
distribution copies must be of the
same size and loaded in the same
orientation.
The sizes must be either
A4 or 8.5 x 11".
When making copies on transparencies with separators (Blank
Separators)
5
When making distribution copies besides the transparencies (Blank
Separators & N Sets)
5-9 Interleaving Blank Sheets Between Transparencies (Transparency Separators)
99
Page 42

Added Features
Procedure
Load the document.
5
Chapter 3 Loading Documents
how to load documents.
The screen on the right has the
Finisher installed.
The factory default is No
Separators.
Select Cancel to cancel the settings.
on
Select Features Menu. Then select Transparency
Separators.
Select Blank Separators. When making distribution copies at
the same time, select Blank Sep & N Sets.
For example, select Blank Sep & N Sets.
Confirm the selection of the tray loaded with transparencies
and the tray containing paper to be used as separators.
Paper for separators/distribution
copies must be of the same size as
the transparencies (select either A4
or 8.5 x 11").
The factory default is Tray 5
(Bypass) for transparencies. The
default can be changed by using
Tools Mode screen.
5-9 Interleaving Blank Sheets Between Transparencies (Transparency Separators)
100
To change tray settings, select Paper Tray Settings.
(If not changing tray settings, proceed to Step 6.)
Page 43

The screen on the right has the Tray
6 (High Capacity Feeder) installed.
Auto, Tray 1, Tray 6 (High Capacity
Feeder) cannot be used as the tray
for transparencies.
Auto, Tray 5 (Bypass) cannot used
as the tray for separators and
distribution sets.
Select different trays for
transparencies and separators/
distribution copies.
Select Cancel to cancel the settings.
Added Features
Select the paper tray to be used, and select Save.
Confirm the settings, and select Save.
Loading Paper in Tray 5 (Bypass)
2-3: Loading Paper
Some features cannot be selected
together with this feature. See
Appendix B: Possible Combinations
of Features
.
for details.
of
Load transparencies in
Tray 5 (Bypass).
Load them in the same orientation
as the separators/paper used for
distribution sets.
(If the tray is changed in
Step 5, load them in that
tray.)
Select other features if necessary.
If Blank Sep & N Sets is selected in Step 3, enter the number
of sets for distribution copies with the keypad.
Only one set of the transparencies is copied.
Press Start.
Copies are made on the transparencies and they are delivered with separators
inserted between them.
If Blank Sep & N Sets is selected, the number of sets entered for distribution
copies are also delivered.
5
5-9 Interleaving Blank Sheets Between Transparencies (Transparency Separators)
101
Page 44

Added Features
The default value of Original
Orientation can be changed by using
Tools Mode. The factory default is
Head to Top.
If you have also selected Book
Copying or Book Duplex besides
Original Orientation, the following
are automatically selected:
For Right Page Then Left or Left
Page Then Right
Head to Top
For Top Page Then Bottom
Head to Left
Selecting the Original
Orientation
(Original Orientation)
The Original Orientation feature allows you to specify the text orientation of
the document if you have selected 2 Sided, Multi-Up (N Up), Image Shift,
Edge Erase/Copy All, Repeat Image or Stapling/Punching (optional).
Select Head to Left if the orientation of the document is such that the head
of the document aligns with the left guide of the Document Glass.
Procedure
Load the document.
5
Chapter 3 Loading Documents
information on how to load
documents.
For Head to Left, do not load
documents as follows.
The screen on the right has the
Finisher installed.
Original Orientation can also be
selected on the Customized
Features screen.
for
Select Features Menu. Then select Original Orientation.
5-10 Selecting the Original Orientation (Original Orientation)
102
Page 45

Select Cancel to cancel the settings.
Added Features
Select the corresponding document orientation of the original
loaded.
Select Head to Top or Head to Left.
Select Save.
Some features cannot be selected
together with this feature. See
Appendix B: Possible Combinations
of Features
for details.
Select other features if necessary.
Enter the required number of sets by using the keypad and
press Start.
Copies are made in the orientation selected in Step 3.
5
5-10 Selecting the Original Orientation (Original Orientation)
103
Page 46

Added Features
The default value of Image Rotation
can be changed by using Tools
Mode. As the factory default of
Image Rotation is On, you do not
need to enable it. See
Defaults
Preset Functions
how to define the settings.
When paper is loaded in Tray 5
(Bypass), Image Rotation is invalid.
in
6-1: List of Custom
Feature
for information on
Rotating and Copying in
Different Directions
(Image Rotation)
The Image Rotation feature allows you to make copies in the correct
orientation even if the orientation of the paper is different from the loaded
document. This is because the machine will automatically rotate the image
of the document to match the orientation of the paper.
The factory default of Image Rotation is set to On.
5
Image Rotation will be valid if any of the following conditions is met.
When document is loaded in DADF
When document is loaded on the document glass, and Auto is selected
for Paper Supply, and Auto % for Reduce/Enlarge
When document is loaded on the document glass, and document size is
input
When the following features are selected:
Image Shift (Corner Shift, Auto Center (Centre)), Book Copying, Multi-
Up (N Up), Repeat Image, Book Duplex
5-11 Rotating and Copying in Different Directions (Image Rotation)
104
Page 47

Procedure
Load the document.
Added Features
Chapter 3 Loading Documents
information on how to load
documents.
The screen on the right has the
Finisher installed.
Image Rotation can also be
selected on the Customized
Features screen.
The factory default of Image
Rotation is On.
Select Off to cancel Image Rotation.
for
Select Features Menu. Then select Image Rotation.
The factory default of Image Rotation is On.
5
Some features cannot be selected
together with this feature. See
Appendix B: Possible Combinations
of Features
for details.
Confirm the settings, and select Save.
Select other features if necessary.
Enter the required number of sets by using the keypad and
press Start.
Copies are delivered with images automatically rotated if the orientations of the
document and the paper are different.
5-11 Rotating and Copying in Different Directions (Image Rotation)
105
Page 48

Added Features
When making copies of name cards,
receipts, etc., the use of Original
Size will allow the blank parts of
these to be neatly copied.
If you have to make copies of non
standard size documents frequently,
it will be useful to customize these
sizes as defaults and save their
settings beforehand. In this way, you
do not have to select them each time
when you make copies. See
Original Size Defaults
Custom Preset Functions
in
6-1: List of
for details.
Selecting the Original Size
(Original Size)
The Original Size feature allows you to specify the document size to copy if
you wish to copy a non standard size document or part of the document.
Also, you have to specify the size of the document to copy in the case of
highly permeable media like transparencies as their document sizes cannot
be easily detected by the machine.
The ruler markings around the document glass is useful for measuring the
size of the document.
5
The document area to be copied differs as follows when the document is
loaded onto the DADF or the document glass.
5-12 Selecting the Original Size (Original Size)
106
Page 49

Procedure
Added Features
Chapter 3 Loading Documents f
information on how to load
documents.
The screen on the right has the
Finisher installed.
Original Size can also be selected
from the Customised Features
screen.
The factory default of Document
Size Input is Auto Detect.
Select Cancel to cancel the settings.
When copying an open bound
document, specify the dimensions of
the combined area of its facing
pages as the document size. When
copying only one side of an open
bound document, specify only the
area of the side that is to be copied.
You can also simply use the ruler
markings on the document glass to
determine the size of your original.
When buttons are pressed
continuously, the screen changes
rapidly.
or
Load the document.
Select Features Menu. Then select Original Size.
Select the desired original size.
Use the buttons to enter the length (X) and width (Y) of the document
manually. You can specify a value between 1-432 mm for the length (X) and a
value between 1-297 mm for the width (Y).
5
Confirm the settings, and select Save.
Some features cannot be selected
together with this feature. See
Appendix B: Possible Combinations
of Features
for details.
Select other features if necessary.
Enter the required number of sets by using the keypad and
press Start.
Copies are made according to the size specified in Step 3.
5-12 Selecting the Original Size (Original Size)
107
Page 50

Added Features
The default value for Sharpness can
be changed by using the Tools
Mode. The factory default is
Normal.
This feature is not available if you
have selected Text for Document
Type.
Enhancing Sharpness
(Sharpness)
The Sharpness feature allows you to enhance or reduce the
sharpness of the image outline of a document if you have selected
Photo, or Text & Photo for Original Type.
5
Chapter 3 Loading Documents
information on how to load
documents.
The screen on the right has the
Finisher installed.
for
Procedure
Load the document.
Select Features Menu. Then select Next Page.
5-13 Enhancing Sharpness (Sharpness)
108
Page 51

The factory default is Normal.
Select Cancel to cancel the settings.
Added Features
Select Sharpness.
Select one option between Sharper and Softer.
Some features cannot be selected
together with this feature. See
Appendix B: Possible Combinations
of Features
for details.
5
Confirm the settings and select Save.
Select the other features if necessary.
Enter the required number of sets by using the keypad and
press Start.
Copies of the document image are made according to the sharpness selected
in Step 4.
5-13 Enhancing Sharpness (Sharpness)
109
Page 52

Added Features
Creating Negative-like Images
(Negative Image)
The Negative Image feature allows you to create negative-like copies
by reversing the black and white regions of the document. In the case
of a color document, the negative copy is achieved by reversing the
brightness of the document.
5
Chapter 3 Loading Documents
information on how to load
documents.
The screen on the right has the
Finisher installed.
for
Procedure
Load the document.
Select Features Menu. Then select Next Page.
Select Negative Image.
5-14 Creating Negative-Like Images (Negative Image)
110
Page 53

Select Cancel or Off to cancel the
settings.
Added Features
Check that On is selected.
Confirm the settings, and select Save.
Some features cannot be selected
together with this feature. See
Appendix B: Possible Combinations
of Features
for details.
Select other features if necessary.
Enter the required number of sets by using the keypad and
press Start.
Copies in the form of negative images of the document are made by reversing
its black and white regions or brightness.
5
5-14 Creating Negative-Like Images (Negative Image)
111
Page 54

Added Features
Creating Mirror Images
(Mirror Image)
The Mirror Image feature allows you to make copies containing mirror
images of your documents.
Procedure
5
Chapter 3 Loading Documents
how to load documents.
The screen on the right has the
Finisher installed.
on
Load the document.
Select Features Menu. Then select Next Page.
Select Mirror Image.
5-15 Creating Mirror Images (Mirror Image)
112
Page 55

Select Cancel or Off to cancel the
setting.
Added Features
Check that On is selected.
Confirm the settings, and select Save.
Select other features if necessary.
Some features cannot be selected
together with this feature. See
Appendix B: Possible Combinations
of Features
for details.
Enter the required number of sets by using the keypad and
press Start.
A mirror image of the document is copied.
5
5-15 Creating Mirror Images (Mirror Image)
113
Page 56

Added Features
This feature is only available when
the document is placed on the
Document Glass.
The factory default for Reduce/
Enlarge is 100%.
In the case of non standard size, or
when you wish to repeat only a part
of the image, enter the document
size, and specify the the scan area.
See
5-12: Selecting the Original
Size (Original Size)
of specifying the document size.
on the method
Repeating an Image
(Repeat Image)
The Repeat Image feature allows you to reduce the document image and
repeat it on a single sheet of copy paper. The same image can be repeated
up to six times to create six identical images on both short and long edges.
To copy the image in the same size as the original, set the number of
repeats so that they fit on the paper.
If Auto % is selected for Reduce/Enlarge, the repeated images will be
reduced/enlarged to fit the paper selected, and copied.
5
Procedure
Select Features Menu. Then select Next Page.
The screen on the right has the
Finisher installed.
Select Repeat Image.
5-16 Repeating an Image (Repeat Image)
114
Page 57

Select Cancel to cancel the settings.
Added Features
Select On.
Use the buttons to select the number of image repetitions
from 1-6 for the length and width of the paper.
For example, select 2 for repetitions on both short and long edges.
3-2:
Loading Documents
load documents.
5-10: Selecting the Original
Orientation (Original Orientation)
details.
on how to
for
5
Load the document on the Document Glass.
Load in the document the orientation of Head to Top, or Head to Left.
Select the corresponding document orientation of the original
loaded, and select Save.
Select Head to Top or Head to Left.
5-16 Repeating an Image (Repeat Image)
115
Page 58

Added Features
Paper Supply and Reduce/Enlarge
can also be selected on the
Features Menu screen.
The Auto option is not available for
Paper Supply.
Some parts of the repeated image
will not be shown if they cannot be
accommodated on the copy paper
based on the selected Reduce/
Enlarge ratio.
Some features cannot be selected
together with this feature. See
Appendix B: Possible Combinations
of Features
for details.
Select the paper size under Paper Supply, and % under
Reduce/Enlarge.
If Auto % of Reduce/Enlarge is selected, the repeated images are reduced or
enlarged to fit the selected paper.
When you wish to specify a certain Reduce/Enlarge ratio, select a paper size
which the repeated images will fit into.
Confirm the settings, and select Save.
Select other features if necessary.
Enter the required number of sets by using the keypad and
press Start.
Copies are made with required number of repetitions selected in Step 4.
5
5-16 Repeating an Image (Repeat Image)
116
Page 59

This feature can only be used when
the document is placed on the
document glass.
You cannot make copies on paper
whose size is smaller than A5 with
this feature.
Added Features
Making Duplex Copies of
Facing Pages
(Book Duplex)
The Book Duplex feature allows you to make duplex copies of a
bound document. The copies are assigned a page numbering
sequence which is the same as the bound document. For this
feature, a blank page is automatically inserted in front like the
example shown in the diagram below.
The screen on the right has the
Finisher installed.
Procedure
5
Select Features Menu. Then select Next Page.
Select Book Duplex.
5-17 Making Duplex Copies of Facing Pages (Book Duplex)
117
Page 60

Added Features
5-10: Selecting the Original
Orientation (Original Orientation)
details.
Select Cancel to cancel the settings.
for
Select one of the following:
• Off
• Left Page Then Right
• Right Page Then Left
• Top Page Then Bottom
5
3-2: Loading Documents
load documents on the document
glass.
on how to
Place the bound document on the Document Glass as shown
in the following diagram.
5-17 Making Duplex Copies of Facing Pages (Book Duplex)
118
Page 61

Confirm the settings, and select Save.
Added Features
Some features cannot be selected
together with this feature.
Appendix B: Possible Combinations
of Features
for details.
See
Select other features if necessary.
Enter the required number of sets by using the keypad and
press Start.
Load the next document if any, and press Start.
After the last page has been scanned, select End Job.
Copies are made and assigned with the same page number sequence as the
bound document.
5
5-17 Making Duplex Copies of Facing Pages (Book Duplex)
119
Page 62

Added Features
Inserting Covers
(Covers)
The Covers feature allows you to use another type of paper (for
example, colored/heavy weight paper) and insert them as the first
page of the copies made.
5
Chapter 3 Loading Documents
information on how to load
documents.
The screen on the right has the
Finisher installed.
for
Procedure
Load the document.
Select Features Menu. Then select Next Page.
5-18 Inserting Covers (Covers)
120
Page 63

The factory default is No Covers.
Select Cancel to cancel the settings.
Added Features
Select Covers.
Select Front Cover.
Select the same size for paper used
for covers and that use for body
pages.
The factory default tray for cover
paper is Tray 5 (Bypass).
The default can be changed by
using Tools Mode screen.
Auto cannot be selected for Paper
Supply.
Select the same size and orientation
of paper used for covers as those for
the body pages.
The screen on the right has the Tray
6 (High Capacity Feeder) installed.
5
Confirm the selection of the tray used for the cover as well as
the tray used for body pages.
When using other trays, select Paper Tray Settings.
(When not changing the tray, proceed to Step 7.)
Select the paper tray to be used and select Save.
5-18 Inserting Covers (Covers)
121
Page 64

Added Features
Loading paper in Tray 5 (Bypass)
2-3: Loading Paper
Some features cannot be selected
together with this feature.
Appendix B: Possible Combinations
of Features
.
See
for details.
of
Confirm the settings, and select Save.
Load paper for covers in
Tray 5 (Bypass).
Load paper in the same
orientation as paper used for
copying the body pages.
(If another tray is selected
in Step 6, load paper in
that tray.)
Select other features if necessary.
Enter the required number of sets by using the keypad and
press Start.
Copies with covers are delivered.
5
5-18 Inserting Covers (Covers)
122
Page 65

This feature cannot be used during
Auto Start.
Added Features
Making a Sample Set
(Sample Set)
If you need to make many sets of a document, the Sample Set feature
allows you to output only one set of the document for checking. The
remaining sets will only be copied after the sample set is confirmed.
Procedure
Chapter 3 Loading Documents
information on how to load
documents.
The screen on the right has the
Finisher installed.
Sample Set can also be selected on
the Customized Features screen.
for
Load the document.
Select Features Menu. Then select Next Page.
5
Select Sample Set.
5-19 Making a Sample Set (Sample Set)
123
Page 66

Added Features
Select Cancel or Off to cancel the
settings.
Check that On is selected.
Confirm the settings, and select Save.
Select other features if necessary.
5
Some features cannot be selected
together with this feature. See
Appendix B: Possible Combinations
of Features
for details.
Enter the required number of sets by using the keypad and
press Start.
Only one set is copied.
Check the sample set.
Press Start to output the remaining sets.
To change the settings, press Clear C to clear and re-select.
5-19 Making a Sample Set (Sample Set)
124
Page 67

Creating a Booklet
(Booklet Creation)
The Booklet Creation feature enables one sided or two sided
documents to be copied as a booklet.
Added Features
Procedure
Load the document.
Select Features Menu. Then select Next Page.
5
5-20 Creating a Booklet (Booklet Creation)
125
Page 68

Added Features
The factory default orientation is
Left Bind.
Select Booklet Creation.
Select the image orientation of the loaded originals and the
desired binding location.
See below about the copy results based on the selected binding location and
original orientation.
For example, select Left Bind, and Head to Left.
5
Select Head to Top or Head to Left
based on the image orientation of
originals loaded. If the selection is
incorrect, the desired copy result will
not be achieved.
Orientation of document and copied image
5-20 Creating a Booklet (Booklet Creation)
126
“1” indicates the first page of the originals, and “3” indicates the third page. An odd-number
page is copied on side 1, and an even-number page is copied on side 2.
Page 69

If the selection for two sided
originals is incorrect, the desired
copy result will not be achieved.
Added Features
Select Originals/Image Order.
For two sided originals, select Head to Head or Head to Toe.
Then select Original Order or Last Original as Back Cover.
If Last Original as Back Cover is selected, the last page of the originals will be
copied as the back cover of the booklet.
Select Cancel to cancel the settings.
Some features cannot be selected
together with this feature.
Appendix B: Possible Combinations
of Features
for details.
See
5
Confirm the settings, and select Save.
Select other features if necessary.
Enter the required number of sets by using the keypad and
press Start.
Copies are made as a booklet.
5-20 Creating a Booklet (Booklet Creation)
127
Page 70

Added Features
Job Memory Operations
The Stored Jobs feature allows you to save the frequently used features as
a job in the job memory. Up to eight jobs can be saved and each job can be
accessed by touching its corresponding button.
Registering a Routine Job in the Job Memory
This section explains the procedures for registering copy job settings in the
job memory. There are two methods and both allow you to achieve the
same purpose.
5
Chapter 4 Basic Features
Chapter 5 Added Features
details.
and
for
Using Stored Jobs
•
Using the Settings/Meter Check button
•
Using Stored Jobs
Procedure
Use the Basic Features screen, Customized Features screen
and Features Menu screen to select the features that you wish
to save in Stored Jobs.
Select Stored Jobs.
The currently stored jobs are displayed.
5-21 Job Memory Operations
128
Page 71

Added Features
Select Store Current Selections.
Select a job number to save the selections. You can select a
number from 1-8. For example, select 5.
Enter a job memory name of not more than 18 characters.
See
Text Input Method
the name.
on the next page for more information on how to enter
Select Save.
The job programmed in Step 1 is stored in Job Number 5.
5
5-21 Job Memory Operations
129
Page 72

5
Added Features
Users in Japan will find the
Katakana characters displayed on
the keys when you select the
Japanese Katakana button.
Text Input Method
Enter the name of job memory alphabets by using the keys shown on the
screen once the Enter Job Name screen is displayed.
To enter alphabets and numbers ............................. Select Alphanumeric
To enter symbols ...................................................... Select Symbol
To delete a character ............................................... Select Backspace
To enter a blank space............................................. Select Space Bar
To enter lowercase or uppercase characters .......... Select Shift Case
Example: To enter “2 Up”.
1. Select Alphanumeric.
2. Select 2.
3. Select Space Bar.
4. Select Shift Case.
5. Select U.
6. Select P.
7. Select Save.
5-21 Job Memory Operations
130
Page 73

The screen on the right is when the
Auditron feature is enabled. See
Chapter 9 Using the Auditron
Feature
for details.
On models with the printer feature,
the screen on the right differs.
Select Store/Modify to display
Stored Jobs (Store/Delete) screen.
Added Features
Using the Settings/Meter Check button
Procedure
Press Settings/Meter Check.
Select Stored Jobs (Store/Delete).
The jobs currently stored are displayed.
5
Store/Modify Job can also be used
to change the settings of a
registered job.
Chapter 4 Basic Features
Chapter 5 Added Features
details.
and
for
Select a job number from 1-8 to store or modify.
For example, select 5.
Use the Basic Features screen, Customized Features screen
and Features Menu screen to select the features that you wish
to save in Stored Jobs.
5-21 Job Memory Operations
131
Page 74

Added Features
After making your selections, press Start to save the job.
Select Enter Job Name.
Select a job from job numbers 1-8 in order to change its name.
For example, select 5.
5
Enter a job name of not more than 18 characters.
See
Text Input Method
for more information on how to enter the name.
Select Close.
The job programmed in Step 4 is stored in Job Number 5.
Select Close until the default screen is displayed.
5-21 Job Memory Operations
132
Page 75

Overwriting Jobs Stored in the Job Memory
The procedures for overwriting the contents and name of a registered job in
the job memory is the same as those used for storing the job.
Select a job number to overwrite the contents of a registered job. Select
Yes when the following screen is displayed.
The screen on the right appears
after you have exited from the
Stored Jobs screen.
Added Features
The job is overwritten by the new contents.
Deleting a Job Stored in the Job Memory
This section explains the procedures for deleting a registered job from the
job memory.
Procedure
Press Settings/Meter Check.
5
5-21 Job Memory Operations
133
Page 76

Added Features
The screen on the right is when the
Auditron feature is enabled. See
Chapter 9 Using the Auditron
Feature
for details.
On models with the printer feature,
the screen on the right differs.
Select Store/Modify to display
Stored Jobs (Store/Delete) screen.
Select Stored Jobs (Store/Delete).
The jobs currently stored are displayed.
Select Delete Job. Then select a job number from 1-8 to
delete.
For example, select 3.
5
Select Yes.
Select Close until the default screen is displayed.
5-21 Job Memory Operations
134
Page 77

Copying by Using the Job Memory
This section describes the procedures for performing copying jobs by
accessing the jobs that were saved beforehand.
Stored Jobs cannot be selected
when an interrupt job is in progress.
Procedure
Load the document.
Added Features
Chapter 3 Loading Documents
information on how to load
documents.
On a model with printer function, you
can copy and scan documents with
the Retrieve Stored Jobs button.
See the relevant Operating
Instruction (Printer) and Operating
Instructions (Scanner) for the
details.
for
Select Stored Jobs.
The currently stored jobs are displayed.
5
Select a job number from 1-4 to retrieve its programmed
selections and carry out a copy job.
For example, select 3.
Press Start.
Copies are made based on the settings programmed in the job.
5-21 Job Memory Operations
135
Page 78

5
Added Features
The following types of copies are not
recorded by the counter:
Blank paper inserted by the
•
machine.
In the case of two sided copying,
the machine will automatically
insert a blank page to the copies
made if the document contains
odd number of pages.
Blank paper inserted as
•
separators when copies are made
on transparencies (only when
blank paper is inserted).
First and last blank pages when
•
copies are made by using Book
Duplex feature.
Paper jammed in the machine or
•
paper not copied as the machine
has stopped due to a machine
fault.
Paper which is fed for fuser
•
cleaning.
Using the Document/
Copy Counter
After copies have been made, the Document/Copy Counter feature allows
you to check the number of sheets of documents scanned as well as the
number of copies made. To make use of this feature, contact your local
authorized Panasonic service representative.
Number of Originals Scanned
It shows the total number of documents scanned after the Reset button is
selected.
Number of Copies Made
It shows the total number of copies made after the Reset button is selected.
Procedure
Press Settings/Meter Check.
The screen on the right is when the
Auditron feature is enabled. See
Chapter 9 Using the Auditron
Feature
.
Select Document/Copy Counter.
5-22 Using the Document/Copy Counter
136
Page 79

Select Reset to return the Number
of Originals Scanned and Number of
Copies Made counters to 0.
Added Features
Check the readings.
Select Close until the default screen is displayed.
The default screen returns.
5
5-22 Using the Document/Copy Counter
137
Page 80

This page is intentionally left blank.
 Loading...