

Page 1
Digital Imaging System
Operating Instructions (For Copier)
DP-6000/7000
Options
DA-FS700/MA700/XT700/TR700
Before operating this machine, please read
these instructions completely and keep these
operating instructions for future reference.
English
Page 2

TRADEMARKS/COPYRIGHTS
The following trademarks and registered trademarks are used throughout this manual.
Microsoft, MS-DOS, Windows, and Windows NT are either registered trademarks or trademarks
of Microsoft Corporation in the United States and/or other countries.
i386, i486, and Pentium are either registered trademarks or trademarks of Intel Corporation.
Adobe, the Adobe logo, Adobe PostScript, Acrobat, Acrobat Reader, and Acrobat logo are either
registered trademarks or trademarks of Adobe Systems Incorporated in the United States and/or
other countries.
Apple, the Apple logo, LaserWriter, Mac, Mac logo, Macintosh, Power Macintosh, and TrueType
are either registered trademarks or trademarks of Apple Computer, Inc. in the United States and/
or other countries.
Novell, Novell Client, Novell Directory Services, Novell Distributed Print Services, Netware,
intraNetware, NDPS, NDS, , IPX, IPX/SPX, NDS Admin, NDS Administrator are either registered
trademarks or trademarks of Novell, Inc., in the United States and/or other countries.
Panasonic Document Imaging Company has made every effort to supply trademark information
about company names, products and services mentioned in this documentation. All third party
and/or other trademarks identified herein are the property of their respective owners.
Copyright © 2001 by Matsushita Graphic Communication Systems, Inc.
All rights reserved.
Copyright protection claimed includes all forms and matters of copyrightable material and
information now allowed by statutory or judicial law or hereinafter granted, including without
limitation, material generated from the software programs that are displayed on the screen such
as styles, templates, icons, screen displays, looks, etc.
Contents are subject to change without notice.
Printed in Japan.
Page 3
Preface
Thank you for choosing Panasonic DP-6000/7000 Series. This manual aims to provide all the information
necessary for effectively operating the copier together with notes on safety precautions and maintenance tips.
To get the most out of your copier, please read the manual carefully and completely before using the machine.
Keep this manual handy as a quick reference should you encounter any difficulties when using the copier.
In this manual, safety instructions are preceded by the symbol .
Always read and follow the instructions before performing the required procedures.
Safety Notes, Compliances Certifications, and Other Notices
Safety Notes
Your DP-6000/7000 and its supplies have been designed and tested to meet strict safety requirements. These
include safety agency examination and approval, and compliance with established environmental standards.
Please read the following instructions carefully before operating the DP-6000/7000.
Failure to follow the recommendations in this section may result in personal injury or rescinding of the
Dealer's Warranty/Maintenance Agreement.
Ozone Safety
Make sure that the machine is installed in a spacious or well-ventilated room so as not to increase the amount
of ozone in the air. Since ozone is heavier than air, it is recommended that air at floor level be ventilated.
Laser Safety
Use of controls, adjustments or performance procedures other than those specified herein, may result in
hazardous laser radiation exposure.
This equipment complies with safety standards. With specific regard to laser safety, the equipment complies
with performance standards for laser products set by government agencies as a Class I laser product and
does not emit hazardous lights, the beam is totally enclosed during all modes of customer
operation and maintenance.
i
Page 4
FCC
This equipment has been tested and found to comply with the limits for a Class A digital device, pursuant to
Part 15 of the FCC Rules. These limits are designed to provide reasonable protection against harmful
interference when the equipment is operated in a commercial environment. This equipment generates, uses,
and can radiate radio frequency energy and, if not installed and used in accordance with the instruction
manual, may cause harmful interference to radio communications. Operation of this equipment in a residential
area is likely to cause harmful interference in which case the user will be required to correct the interference
at his own expense.
Responsible Party: Matsushita Electric Corporation of America
One Panasonic Way, Secaucus, NJ 07094
Technical Support: Panasonic Document Imaging Company/
Technical Support Department
Two Panasonic Way, Secaucus, NJ 07094
1-800-225-5329
Email:
The user could lose the authority to operate this equipment if any unauthorized changes or modifications are
made to this equipment.
consumerproducts@panasonic.com
Shielded cables must be used with this equipment to maintain compliance with FCC regulations.
European Union
This product complies with the requirements of EC Council Directives 73/23/EEC amended by 93/68/EEC,
and 89/336/EEC amended by 92/31/EEC and 93/68/EEC.
WARNING
This product is certified, manufactured and tested in compliance with strict safety and radio
frequency interference regulations. Any unauthorized alteration, which includes the addition of
new functions or the connection of external devices, may impact this certification. Please contact
your local authorized Panasonic representative for a list of approved accessories.
WARNING
This is a Class A product. In a domestic environment this product may cause radio frequency
interference in which case the user may be required to take adequate measures.
The user could lose the authority to operate this equipment if any unauthorized changes or
modifications are made to this equipment.
ii
Page 5

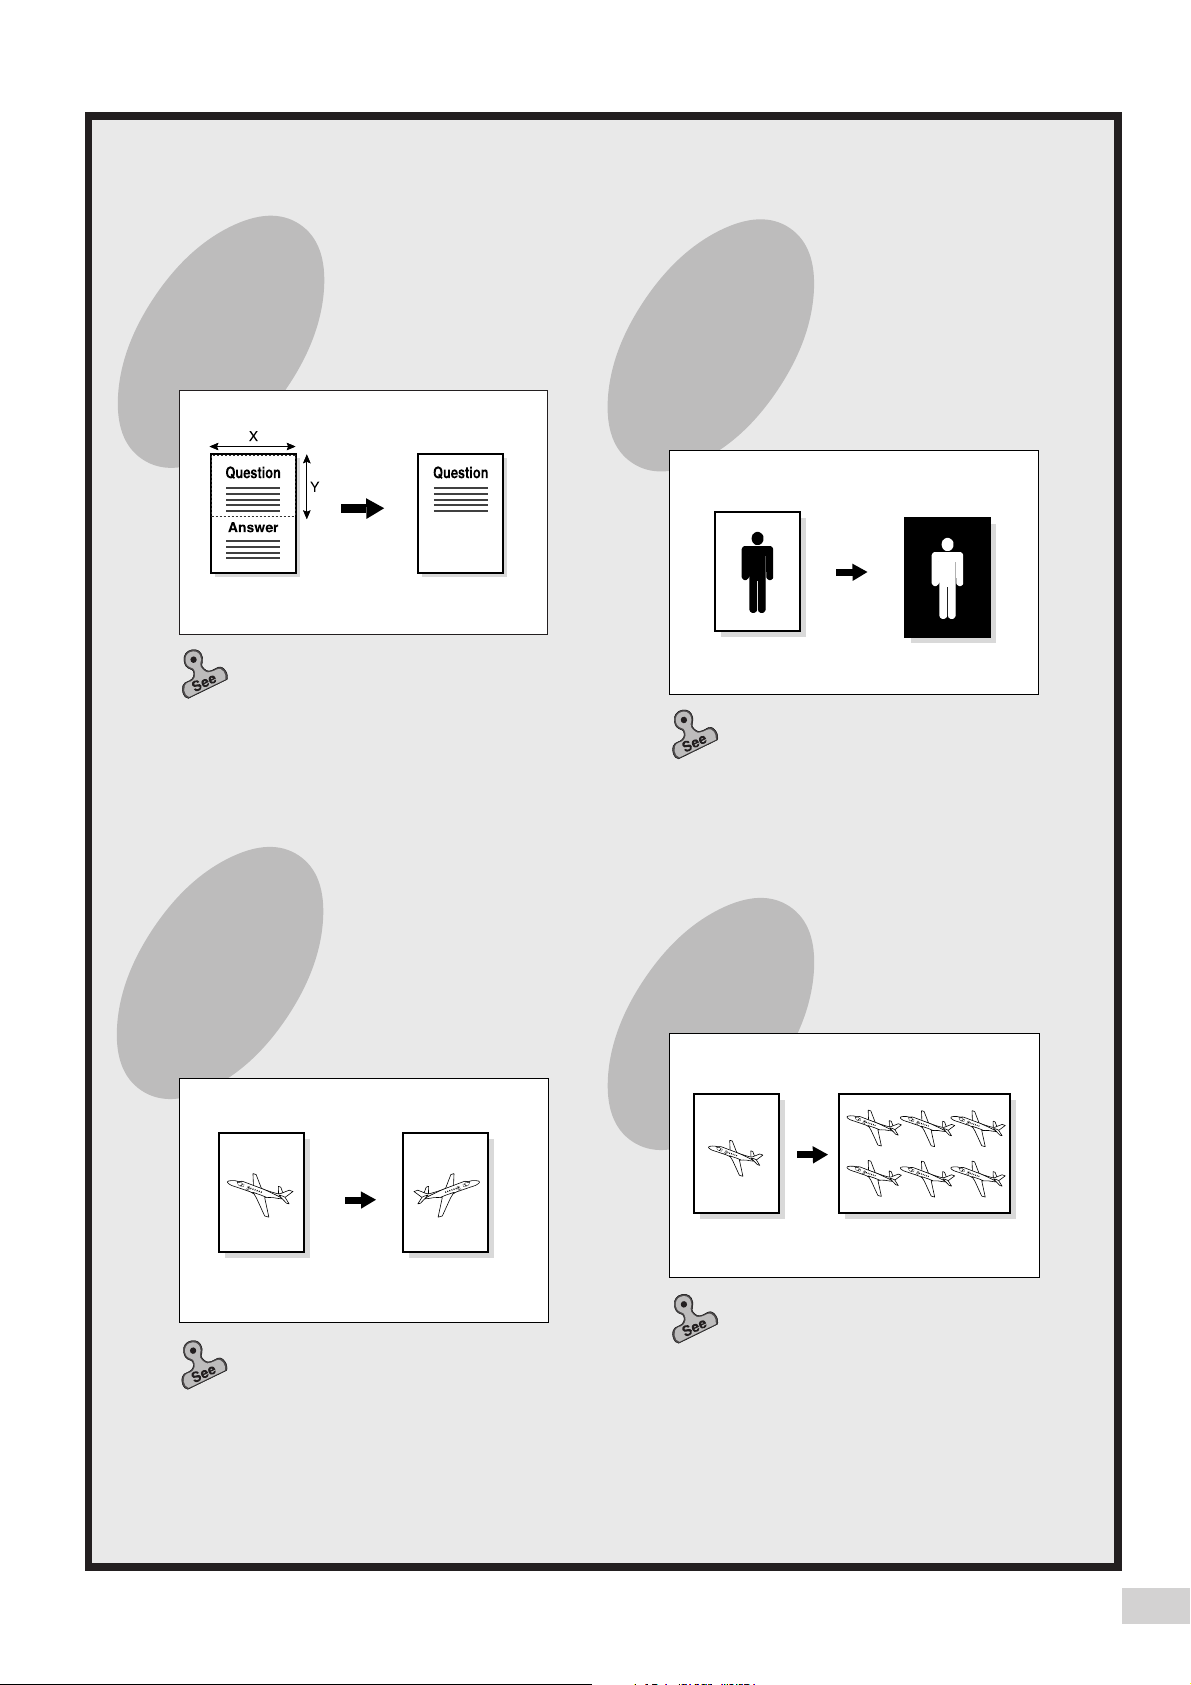
DP-6000/7000 Series
Useful Features
Making Copies of
Odd Sizes
You can make copies by
changing the length/width of
your document.
4-4 Reducing/Enlarging the
Length and Width (Independent
X-Y%)
Copying Multiple
Documents on one
Page
You can copy multiple pages
onto a single sheet of paper.
Making Sorted Sets
You can select to output the copies
as collated sets.
4-7 Collating Copy Output
(Output/Finishing)
Copying Mixed Size
Originals
Mixed size documents can be
copied simultaneously without
having to specify the size of
each original.
5-4 Copying Several Documents
onto One Copy (Multi-Up (N Up))
5-5 Loading Mixed Size Originals
(Mixed Size Originals)
iii
Page 6
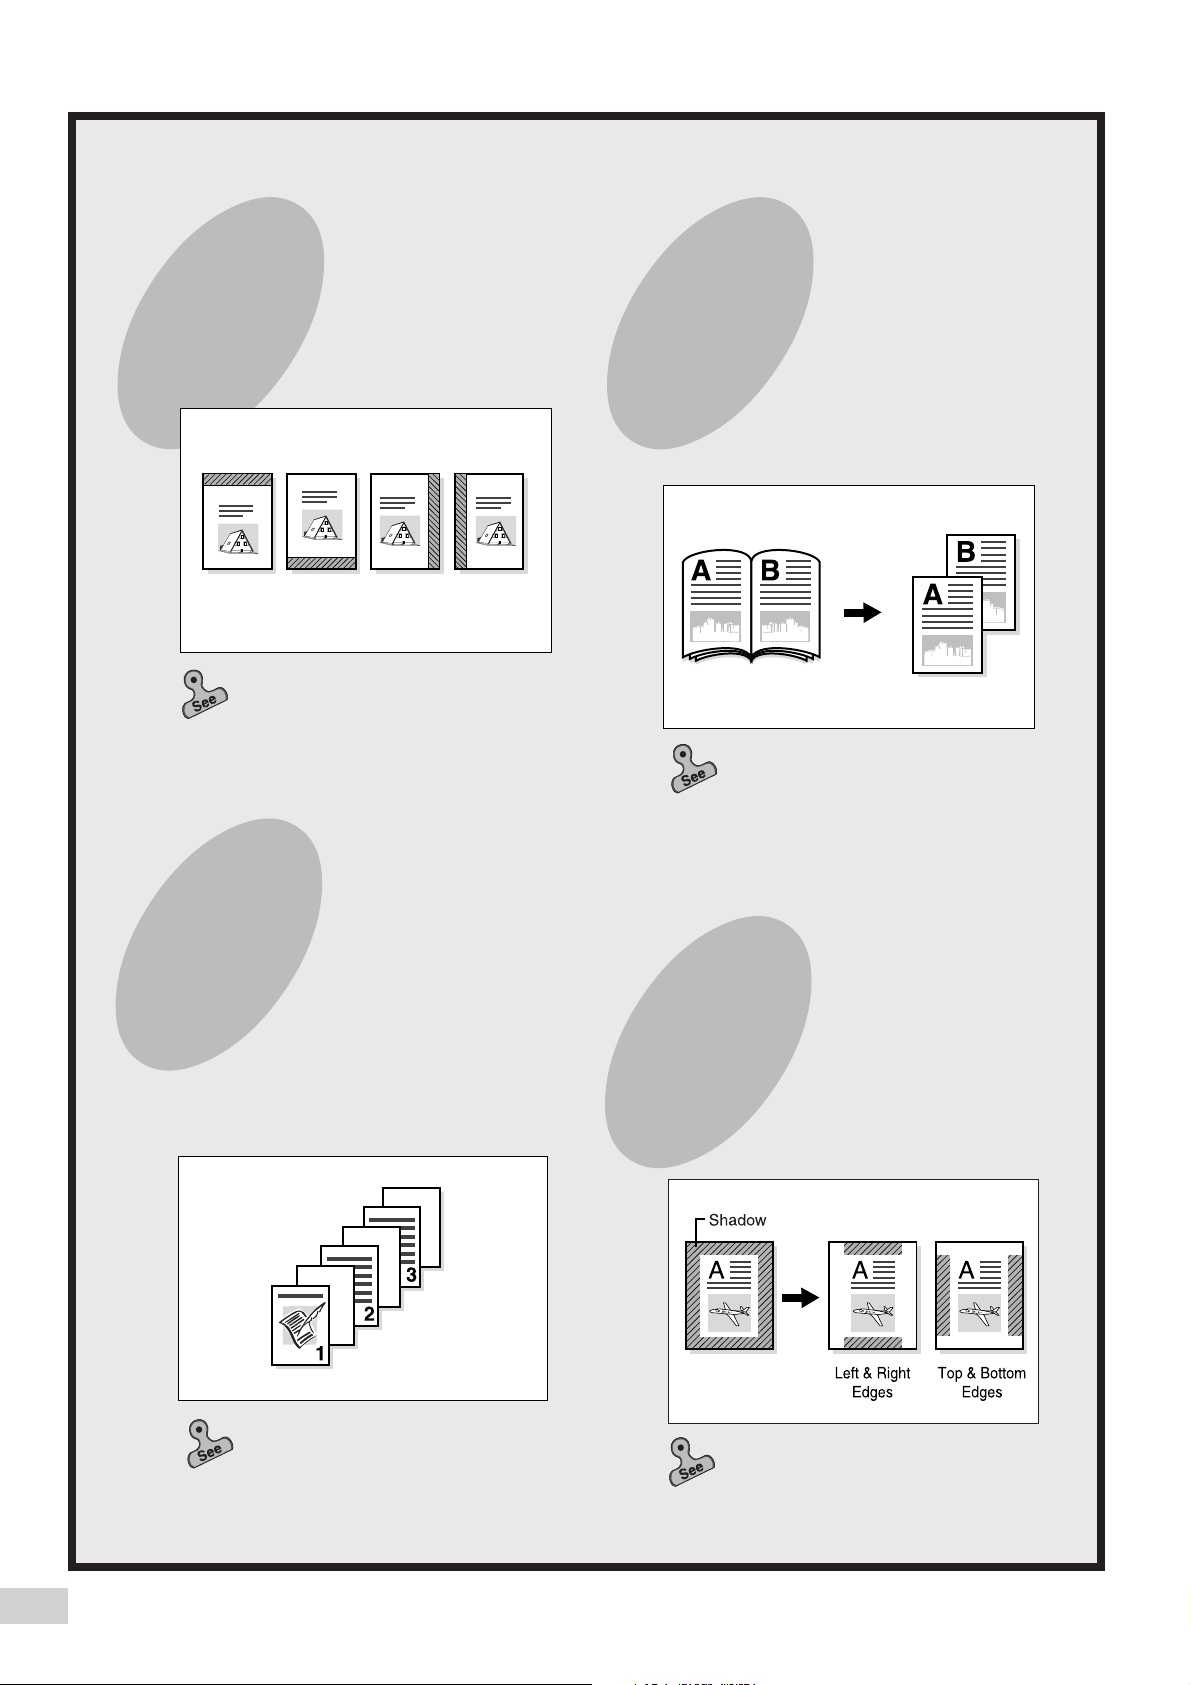
Creating a Binding
Making Copies of a
Margin
You can shift the copy image to
create a binding margin at the
edge.
5-7 Setting the Margins (Image
Shift)
Bound Document
onto Separate
Sheets
You can make copies from a
bound document onto separate
sheets of paper.
5-6 Copying Facing Pages onto
Separate Sheets (Book Copying)
Inserting Blank
Sheets Between
Copied
Transparencies
You can insert blank sheets as
separators between the copied
transparencies. Copies for
distribution can also be made
simultaneously.
5-9 Interleaving Blank Sheets
between Transparencies
(Transparency Separators)
Erasing Shadows
on Copies
You can erase dark lines
usually found on copies made
with the document cover open,
or when the copies are made
from bound documents.
5-8 Erasing the Edges and
Copying All (Edge Erase/Copy All)
iv
Page 7
Specifying the Size
Creating a
of a Document
You can specify the area of the
document you wish to copy.
5-12 Selecting the Original Size
(Original Size)
Negative-type
Image
You can create a negative-type
image on a copy by reversing
the black and white areas of the
original.
5-14 Creating Negative-like
Images (Negative Image)
Creating Mirror
Images
You can create a copy
containing the mirror image of a
document by reversing its
orientation.
5-15 Creating Mirror Images
(Mirror Image)
Repeating an Image
You can copy an image and
repeat it on a paper.
5-16 Repeating an Image
(Repeat Image)
v
Page 8
Making Duplex
Enhancing the
Copies of Facing
Pages
You can make two sided copies
of documents with facing
pages.
5-17 Making Duplex Copies of
Facing Pages (Book Duplex)
Stapling/Punching
Holes in Copies
Sharpness of a
Photo
You can enhance or reduce the
sharpness of a photo.
5-13 Enhancing Sharpness
(Sharpness)
Inserting Covers
You can insert a cover such as
a colored sheet as the front
copy.
(optional)
You can staple and output the
copies. Alternatively, you can
punch holes in the copies.
This feature is only available
when the optional Finisher is
installed.
4-8 Stapling (Stapling)
4-9 Punching Holes (Punching)
5-18 Inserting Covers (Covers)
Storing Jobs in
Memory
You can store the jobs which you
frequently perform into memory.
5-21 Job Memory Operation
s
vi
Page 9

Using These Operating
Instructions
This manual consists of the following chapters.
Chapter 1 Getting to Know Your Copier
This chapter contains operating instructions about your copier like information on the major components, the
methods of switching the power On and Off and how to use the touch panel display.
After the copier has been properly installed, be sure to read this chapter completely before operating the machine.
Chapter 2 Loading Paper
This chapter covers the types of paper that can be used on this copier, the precautions on paper handling and the
methods on how to load paper in the respective trays. Read this chapter before loading paper in the trays.
Chapter 3 Loading Documents
This chapter covers the types of original documents that can be used on this copier, the precautions on document
handling and how to load the documents. Read this chapter before loading documents on the copier.
Chapter 4 Basic Features
This chapter describes the basic copying operations and nice-to-know applications so that users can perform
normal copying jobs required in a typical office environment. Read this chapter before performing any copying
operations.
Chapter 5 Added Features
This chapter describes how to use the special features and the many versatile ways of making copies. Read this
chapter after you have understood and know how to use the features described in
Chapter 4 Basic Features
Chapter 6 Custom Presets
This chapter provides information required to preset the parameters of the copying features to facilitate daily
operations of the copier. For instance, the default screen, the default values, the tone and the time can all be
preset.
This chapter shows the contents of those parameters that can be selected and explains how to select them with
the use of examples. Read this chapter before selecting the parameters.
.
vii
Page 10

Chapter 7 Troubleshooting
This chapter describes the actions to be taken in the event of errors or machine faults. Read this chapter for
instructions on how to resolve these errors if they occurred.
Chapter 8 Daily Care
This chapter provides information on regular maintenance such as replacing drum/toner cartridges, checking the
meters and cleaning the machine. Read this chapter when necessary.
Chapter 9 Using the Auditron Feature
This chapter explains the Auditron feature of this copier. Auditron is the feature that captures information on the
number of copies made by each account user. Read this chapter when managing account data of the users.
Appendix
The appendix includes information on the specifications, the possible combinations of features, and the stapling
function of the machine.
viii
Page 11
Conventions
The manual uses the following conventions.
ix
Page 12
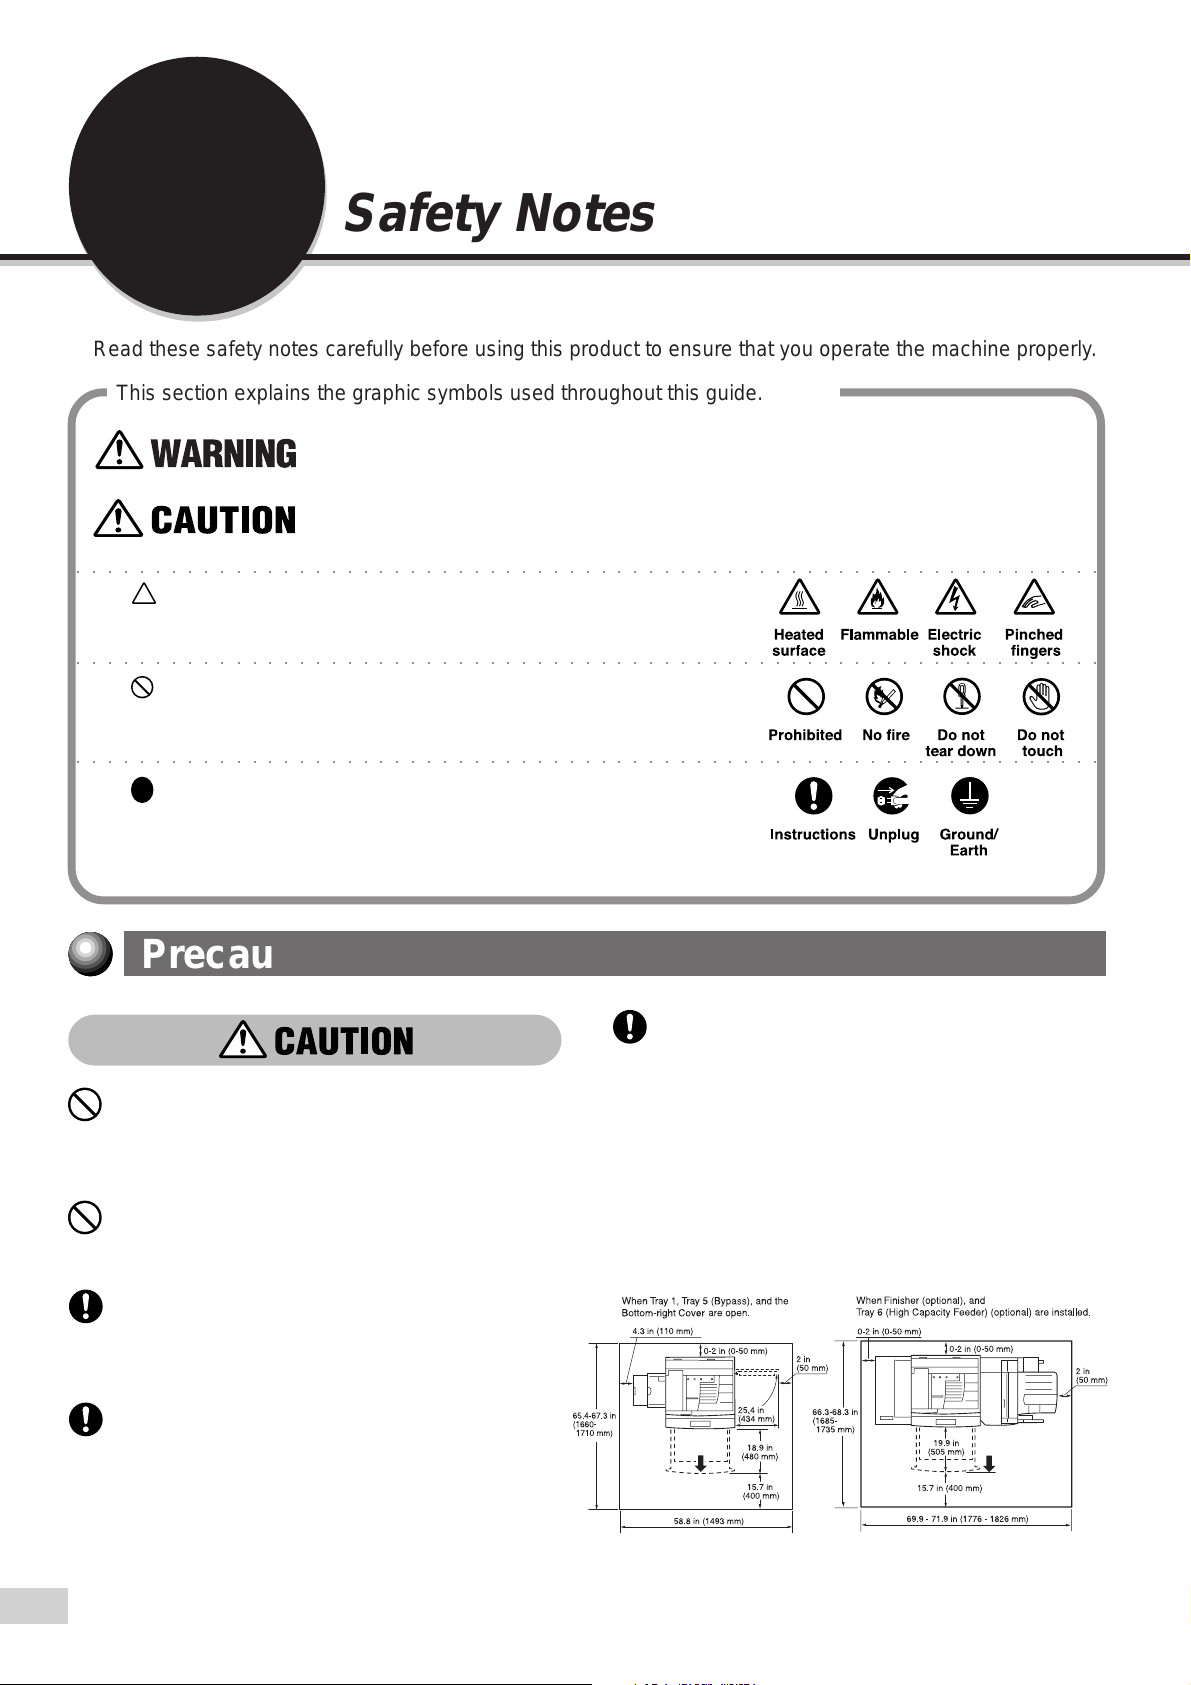
Safety Notes
Read these safety notes carefully before using this product to ensure that you operate the machine properly.
This section explains the graphic symbols used throughout this guide.
Warnings alert you to potential hazard that could result in serious injury or death.
Cautions alert you to operations that may result in minor injury or damage to the
machine.
○○○○○○○○○○○○○○○○○○○○○○○○○○○○○○○○○○○○○○○○○○○○○○○○○○○○○○○○○○○○○○○○○
This symbol is used to alert operators to a specific operating
procedure that requires close attention. Read and follow
instructions carefully to ensure the task is accomplished safely.
○○○○○○○○○○○○○○○○○○○○○○○○○○○○○○○○○○○○○○○○○○○○○○○○○○○○○○○○○○○○○○○○○
This symbol is used to alert operators to a specific operating
procedure that must not be performed. Read and follow
instructions carefully.
○○○○○○○○○○○○○○○○○○○○○○○○○○○○○○○○○○○○○○○○○○○○○○○○○○○○○○○○○○○○○○○○○
This symbol is used to alert operators to a specific operating
procedure that should be emphasized for operating safety.
Read instructions carefully before performing the required
procedure.
Precautions for Installation and Relocation
The machine has ventilation holes on its bottom.
A poorly ventilated machine can cause
excessive internal heat and fire.
Do not place the machine in a hot, humid, dusty,
or poorly ventilated environment. Prolonged
exposure to these adverse conditions can cause
fire or electric shocks.
Do not place the machine near heaters or
volatile, flammable, or combustible materials
such as curtains that may catch fire.
Place the machine on a level and sturdy surface
that can withstand the machine weight of 418 lbs
or 190 kg If tilted, the machine may fall over and
cause injuries.
When relocating the machine, contact your local
authorized Panasonic service representative.
The accompanying diagram shows the minimum
clearances required for normal operation,
consumable replacement, and maintenance to
ensure your machine operates at peak
performance. Your authorized Panasonic
representative will provide necessary support for
the proper installation of the machine.
x
Page 13
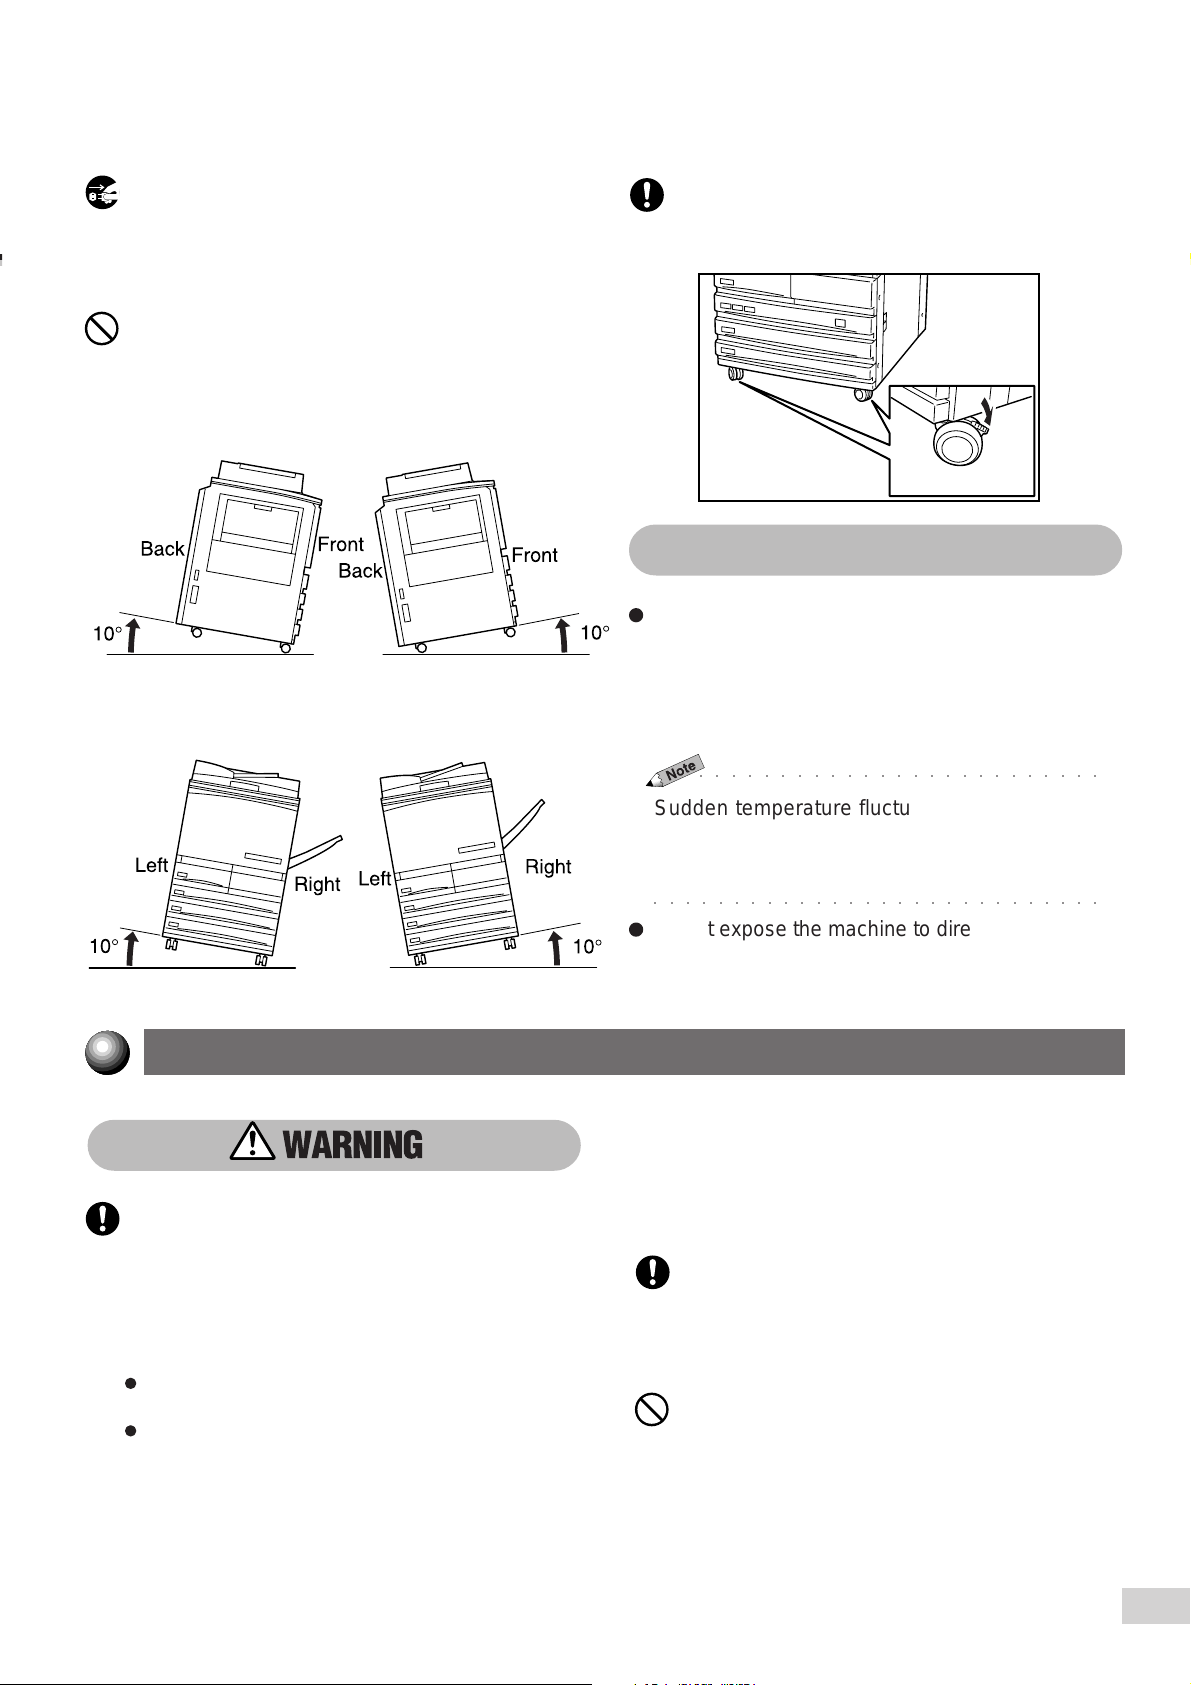
When moving the machine, be sure to unplug
the Power Cord from the outlet. If the machine
is moved with the Power Cord connected, it can
cause damage to the cord which could result in
fire or electric shocks.
When moving the machine, do not tilt it more
than indicated below. If tilted excessively, the
machine may fall over and cause injuries.
After the machine is installed, be sure to lock the
caster stoppers. An unlocked machine may fall
over or slide and cause injuries.
Other Precautions
The machine is capable of operating normally
within the following recommended environmental
limits. The temperature range is 50°-95°F,
humidity range is 15-85% (without condensation).
The humidity should be 47.5% or below at 95°F,
and 85% at 95°F or below.
○○○○○○○○○○○○○○○○○○○○○○○○○
Sudden temperature fluctuations can affect copy
quality. Rapid heating of a cold room can cause
condensation inside the machine, directly interfering
with image transfer.
○○○○○○○○○○○○○○○○○○○○○○○○○○○○
Do not expose the machine to direct sunlight.
Exposure to direct sunlight can adversely affect
the machine’s performance.
Power Requirements and Ground Connection
Never use multi-plug adaptors to plug multiple
power plugs in the same outlet. Be sure to
operate the machine on a single-use
Two power specifications are listed below. The
specifications that apply to your machine
depend on your machine configuration. Connect
the power plug only to a properly rated power
outlet. Otherwise, it can cause fire or electric
shocks. If in doubt, contact your local
authorized Panasonic service representative.
Rated voltage: 120 VAC
Rated frequency: 60 Hz
Rated voltage: 220 - 240 VAC
Rated frequency: 50/60 Hz
receptacle. Multiple connectors can cause
the outlet to overheat and cause fire.
Ensure that the plug connection is free of dust.
In a damp environment, a contaminated
connector can draw a non-negligible amount of
current that can generate heat and eventually
cause a fire over an extended period of time.
Always use the Power Cord provided with your
machine. When an extension Power Cord is
required, always use a properly rated cord. In USA,
it is 125 V/15 A. In other countries, contact your
local authorized Panasonic service representative.
If you use a cord with an unspecified current rating,
the machine or plug may emit smoke or become
hot to the touch externally .
xi
Page 14
Do not attempt to rework, pull, bend, chafe, or
otherwise damage the Power Cord. Do not
place a heavy object on the cord. A damaged
cord can cause fire or electric shocks.
Never touch a Power Cord with wet hands.
Danger of electric shock exists.
Stop operation immediately if your machine
produces smoke, smell, excessive heat, or
unusual noise, or if water is spilt onto the
machine. These conditions can cause fire.
Immediately switch off and unplug the machine,
and contact your local authorized Panasonic
service representative.
If the Power Cord is broken or insulated wires are
exposed, ask your local authorized Panasonic
service representative for a replacement. Using a
damaged cord can cause fire or electric shocks.
To prevent fire or electric shocks, your machine
must be grounded. If in doubt, contact your local
authorized Panasonic service representative.
Never connect the ground wire to any of the
following:
Gas pipe, which can be ignited and explode
Telephone line ground wire or lightning rod,
which can draw an excessive electric current
if hit by lightning
Water faucet or pipe whose electrical
conductivity is broken by a non-metal part
Be sure to switch Off and unplug the machine
before accessing the interior of the machine for
cleaning, maintenance, or fault clearance.
Access to a live machine's interior can cause
electric shocks.
When the machine is not used over an extended
period of time, switch it Off and unplug it. If an
unused machine is left connected to a power
source for a long period, degraded insulation
can cause electric shocks, current leakages, or
fire.
Once a month, unplug the machine and check
the Power Cord for the following:
The Power Cord is plugged firmly into a
receptacle.
The plug is not excessively heated, rusted, or
bent.
The plug and receptacle are free of dust.
The cord is not cracked or frayed.
If you notice any unusual conditions, contact your
local authorized Panasonic service representative.
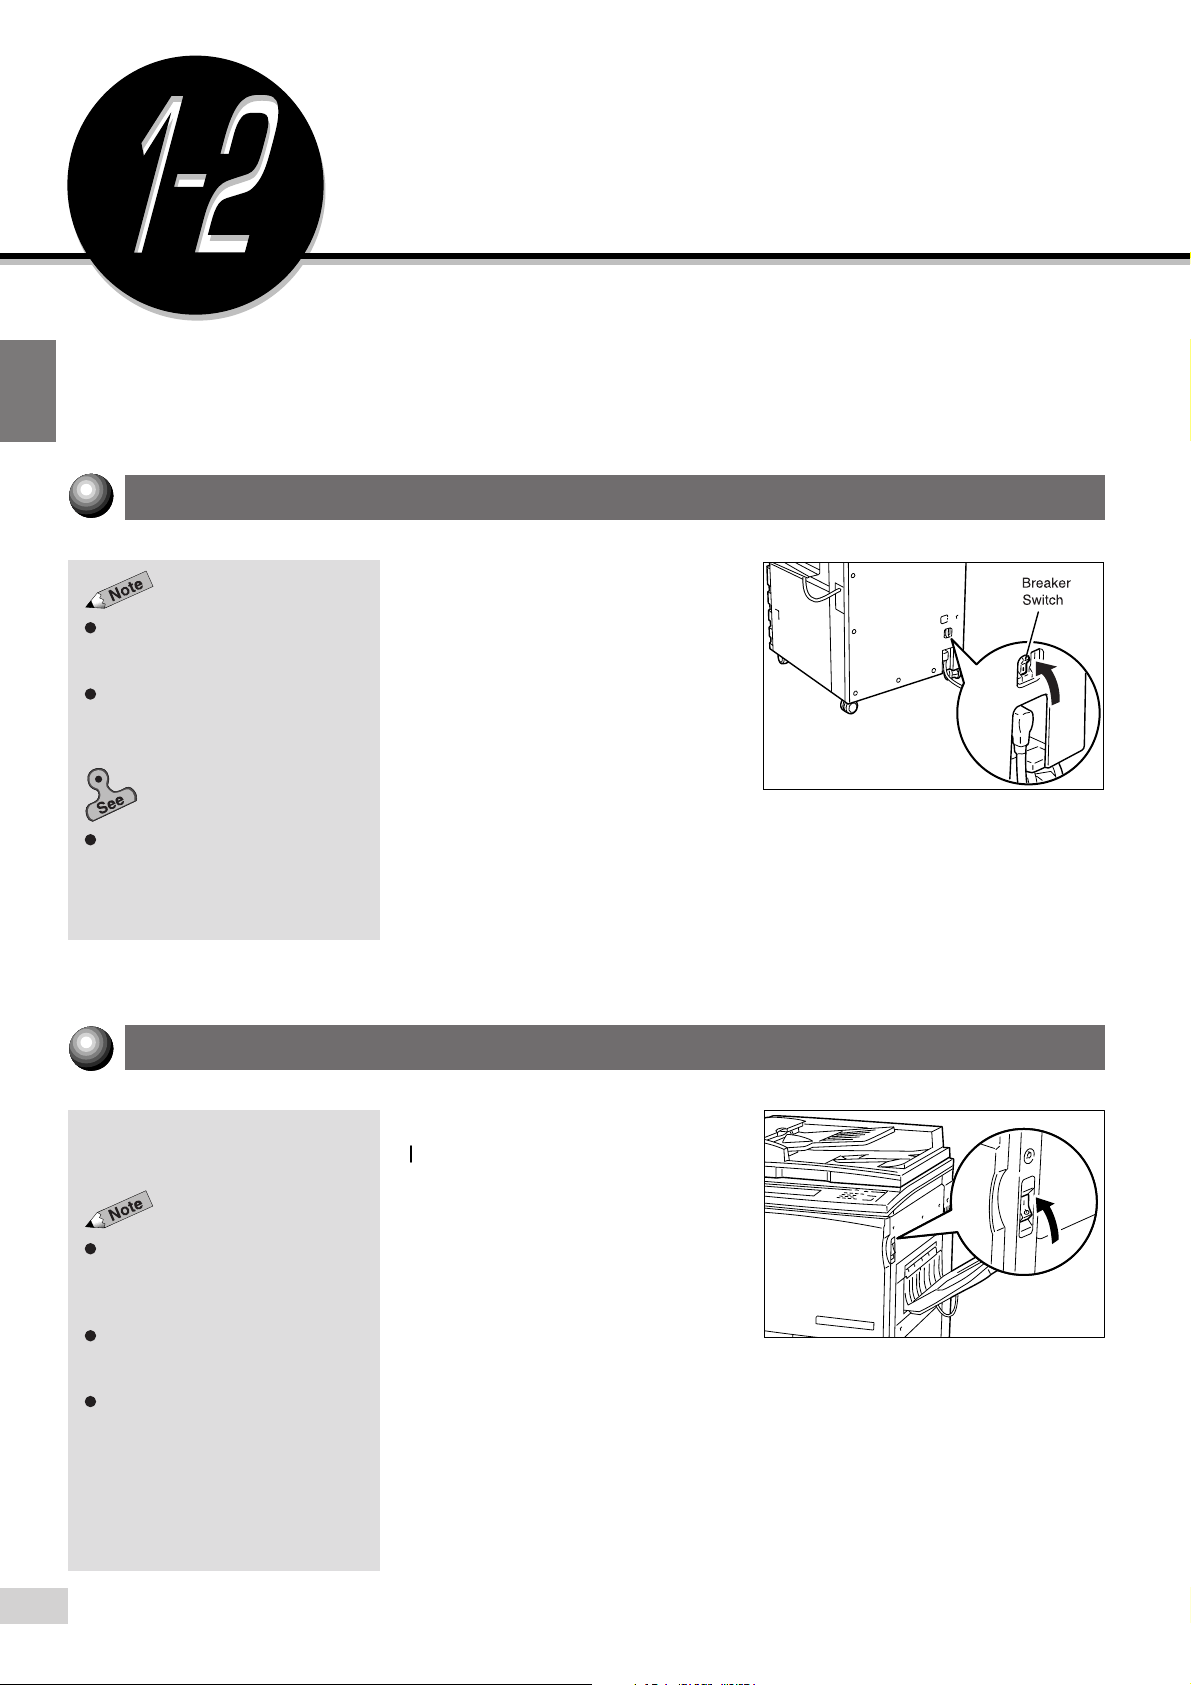
This machine has a ground fault interrupter. Once
a month, check the protection circuit for correct
operation using the following procedure. If the
circuit does not operate, an electric shock can
occur on a poorly grounded component. If you
notice any unusual conditions, contact your local
authorized Panasonic service representative.
Press the power switch to the " " position.
Do not unplug the machine while it is on.
Unplugging a live connector can deform the plug
and cause a fire.
When unplugging the machine, grasp the plug
instead of the cord. Forcibly pulling on a cord
can damage it and cause fire or electric shocks.
Press the test button below the breaker
switch with the tip of a ball pen. When the
breaker switch is turned from " " to " ",
the circuit is OK.
Turn the breaker switch, then the power
switch to the " " position.
xii
Page 15
Other Precautions
When installed at a certain location, the machine
may cause interference with radio and television
reception. If you notice flickering or distorted
images or noises on your audio-visual units, your
machine may be causing radio interference.
Switch it Off, and if the interference disappears,
the machine is the cause of radio interference.
Perform the following procedures until the
interference is corrected:
Move the machine, and the TV and radio away
from each other.
Reposition or re-orientate the machine and/or
the TV and radio.
Operating Safeguards
Do not place any liquid container such as
a vase or coffee cup on the machine.
Spilt water can cause fire or electric
shocks.
Unplug the machine, TV, and radio, and replug
them into outlets that operate on different
circuits.
Re-orientate the TV and/or radio antennas and
cables until the interference stops. For an
outdoor antenna, you should ask your local
electrician for support.
Use coaxial cable antennas.
The machine has a built-in circuit for protection
against lightning-induced surge current. If
lightning strikes in your neighborhood, switch Off
the machine. Disconnect the Power Cord from the
machine, and reconnect them only when lightning
has stopped.
Since radiation emitted inside the machine is
completely confined within the protective
housings and external covers, the laser beam
cannot escape from the machine during any
phase of user operation. Do not perform any
operation apart from the instructions given in the
manual. There may be a danger of laser beam
leakage.
Do not place any metal part such as staples or
clips on the machine. If metal and flammable
parts entered the machine, they can short
internal components, and cause fire or electric
shocks.
If debris (metal or liquid) entered the machine,
switch Off and unplug the machine. Contact your
local authorized Panasonic service representative.
Operating a debris-contaminated machine can
cause fire or electric shocks.
Never open or remove machine covers that are
secured with screws unless specifically
instructed in this manual. A high voltage
component can cause electric shocks.
Do not try to alter the machine configuration, or
modify any parts. An unauthorized modification
can cause smoke or fire.
This equipment is certified as a Class 1 laser
product under IEC60825 and FDA (Food and
Drug Administration:USA). This means that the
machine does not emit hazardous laser
radiation.
Do not place any heavy object on the machine.
An off-balance machine can fall over or the
heavy object can fall, causing injuries.
If you make copies with the document cover
open, avoid looking directly at the copy lamp.
Direct eye exposure can cause eye fatigue or
damage.
Do not use a highly flammable spray near the
machine. It can cause fire.
When copying a thick document, do not use
excessive force to press it against the document
glass. The glass may break and cause injuries.
Do not touch areas on or near the Fuser Unit
that are affixed with the label, “Hot Surface”.
You can get burnt as a result. Do not forcefully
remove paper that are in the Fuser Unit or
wrapped around the Heat Roller. You can get
burnt as a result. Switch Off the machine, and
contact your local authorized Panasonic service
representative.
xiii
Page 16

Do not place a heavy object or lean your elbow
on the touch-sensitive panel or display. The
panel or display can break and the broken glass
can cause injuries.
Do not use papers that conduct electricity (for
example, origami paper, carbon paper and
coated paper). If the paper is jammed in the
machine, it can result in a short circuit or fire.
Do not staple document with punched holes
(e.g. perforated paper available in the market)
as the resultant detached staples can injure your
fingers.
When sliding out a Paper Tray, pull it out slowly.
If pulled out with too much force, the tray can hit
and injure your knees.
When pushing back the Tray, be careful so that
your fingers are not hurt by the pincers.
When opening the Transfer Unit, be careful so
that your fingers are not hurt by the pincers.
Do not reach your hand to the back of the
Transfer Unit. You can injure your hand this
way, or your fingers may be hurt by the pincers.
When removing jammed paper, make sure that
no pieces of torn paper are left in the machine.
A piece of paper remaining in the machine can
cause a fire.
If a sheet of paper cannot be removed or is
wrapped around the Heat Roller, do not try to
remove it by yourself. Doing so can cause
injuries. Switch Off the machine immediately,
and contact your local authorized Panasonic
service representative.
It is recommended to ventilate the room to keep
the environment comfortable during continuous
copying runs in a small room.
When removing jammed staples, take care not
to injure your fingers.
Other Precautions
When clearing a paper jam or other fault, follow
the appropriate procedures given in this manual.
As the cooling fan is always switched On to
prevent the machine from overheating, it is not an
error. Do not block the ventilation outlets of the
machine.
This DP-6000/7000 utilizes tin-lead solder, and
has a fluorescent lamp containing a small amount
of mercury. Disposal of these materials may be
regulated in your community due to environmental
considerations. For disposal or recycling
information please contact your local authorities,
or the Electronics Industries Alliance:
"www.eiae.org".
xiv
Consumable Safeguards
Never throw a Drum Cartridge into an open
flame. Toner remaining in the cartridge can
cause an explosion and you can get burnt.
Never throw a Toner Cartridge into an open
flame. It can cause an explosion and you can
get hurt.
Never throw developer or a developer container
into an open flame. It can cause an explosion
and you can get hurt.
Never heat the drum in a cartridge, or scratch its
surface. A heated or scratched drum can be
hazardous to your health.
Other Precautions
Do not unpack consumables before use. Store
consumables in a cool, dry, and clean
environment, away from an open flame, and out of
direct exposure to sunlight.
When using consumables, read and observe
operating instructions and safeguards written on
the package and container.
Page 17
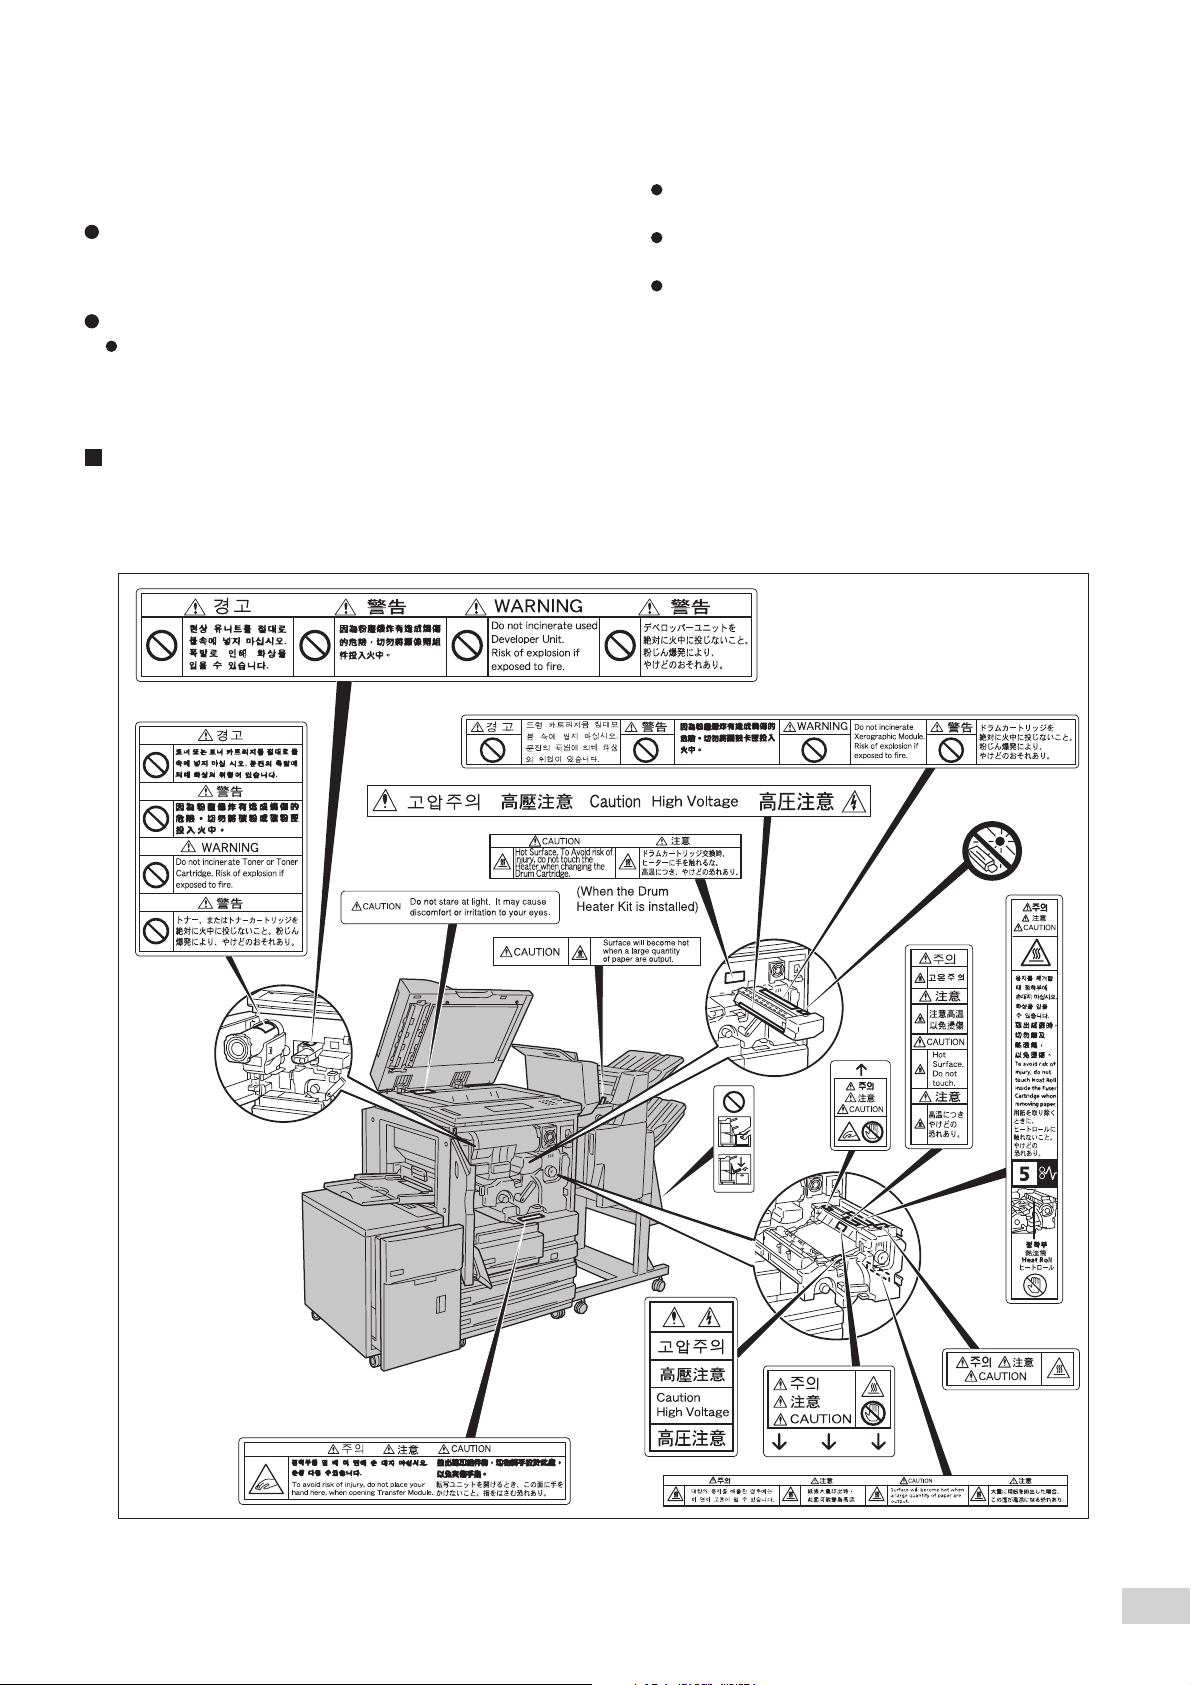
- Handling Instructions -
Used Drum Cartridges and Toner Cartridges should
be properly disposed of. Contact your local authorized
Panasonic service representative for disposal.
Administer emergency treatment as follows:
If toner gets into your eyes, rinse them well with
plenty of clean water. Consult a doctor, if
necessary.
If toner adheres to your skin, wash it with soap
and water, then rinse it well.
If you inhale toner, exit the area immediately
and gargle with plenty of water.
If you swallow toner, induce vomiting and
consult a doctor immediately.
Locations of Warning and Caution Labels
To ensure your safety in operating the copier, please read the Warning and Caution Labels pasted on the
internal parts of the machine carefully.
xv
Page 18

The Objective of the
International Energy Star
Program
As a member of the International ENERGY STAR® Program,
Panasonic confirms that this product satisfies the requirements
for International
T o protect the global environment and conserve energy sources, the International
Energy Star Program encourages the following product features. Panasonic
confirms the DP-6000/7000 Series satisfy the requirements for this program.
ENERGY STAR
Two-sided Copying Feature
To reduce the volume of copy paper used, the two-sided copying feature is set
as a default for this machine. You can copy two single-sided originals on both
sides of a sheet of paper. You can also make single-sided copies.
See
4-6: Copying on Two Sides (2 Sided)
details.
®
Program standards.
of these Operating Instructions for
Auto Power Off Feature
This product has a power-saving feature, which turns the machine Off
automatically if it is On and not operated for a certain period of time. The default
auto shut-off time is set at 60 minutes and above. See
6.1: List of Custom Preset Functions
of these Operating Instructions for details.
Time-Outs
in
Sleep Mode Feature
This product has a power-saving feature, which switches the machine to the
sleep mode automatically if the machine is not operated for a certain period of
time. In this mode, the machine consumes minimum power. The default sleep
mode start time is set as 60 minutes. See the
Operating Instructions (Printer).
Low Power Mode Feature
This product has a power-saving feature, which switches the machine to the
low power mode automatically if the machine is On and not operated for a
certain period of time. In this mode the machine lowers the fuser temperature
and saves power consumption. The default low power mode start time is set
at 15 minutes. The recovery time for low power mode is 29 seconds for
machines that prints 50, 60, or 70 copies per minute. See
List of Custom Preset Functions
of these Operating Instructions for details.
Time-Outs
in
6.1:
xvi
Page 19
Table of Contents
Preface
Useful Features
Using These Operating Instructions
Conventions
Safety Notes
The Objective of the International Energy Star Program
Chapter 1 Getting to Know Your Copier
1-1 Main Components and Their Functions.....................................................................................2
1-2 Switching On and Off.................................................................................................................6
Breaker Switch ..............................................................................................................6
Switching On the Power................................................................................................6
Switching Off the Power................................................................................................7
Switching Off the Power Automatically..........................................................................7
Auto Start ......................................................................................................................7
1-3 Using the Touch Panel Display .................................................................................................. 8
1-4 Entering Password (When the Auditron Feature is Enabled) ................................................. 13
1-5 Saving Power .......................................................................................................................... 15
Entering Power Saver Mode Automatically.................................................................16
Using the Power Saver Mode .....................................................................................16
Chapter 2 Loading Paper
2-1 What Paper to Use ..................................................................................................................18
Weights of Paper.........................................................................................................18
Paper Size and Tray Loading Capacity.......................................................................18
Types of Special Media...............................................................................................19
2-2 Storing and Handling Paper .................................................................................................... 20
Handling Curled Paper................................................................................................20
2-3 Loading Paper .........................................................................................................................21
Loading Paper in Trays 1 to 4 .....................................................................................21
Loading Paper in Tray 5 (Bypass)...............................................................................23
Loading Paper in Tray 6 (High Capacity Feeder) (optional)........................................24
2-4 Changing the Paper Tray Size ................................................................................................ 25
Changing the Size of Tray 1........................................................................................25
Changing the Size of Trays 2 to 4...............................................................................27
Changing the Size of Tray 6 (High Capacity Feeder) (optional)..................................31
xvii
Page 20

Chapter 3 Loading Documents
3-1 Documents .............................................................................................................................. 34
Loading Documents in the DADF................................................................................34
Placing Documents on the Document Glass...............................................................35
3-2 Loading Documents ................................................................................................................36
Loading Documents in the DADF................................................................................36
Placing Documents on the Document Glass...............................................................37
Screen Display When Using Document Glass............................................................38
Chapter 4 Basic Features
4-1 Overview of Basic Features ....................................................................................................40
4-2 Selecting a Paper Tray (Paper Supply) ................................................................................... 42
4-3 Reducing/Enlarging (Reduce/Enlarge) .................................................................................... 43
Size-for-Size Copying .................................................................................................44
Reduction or Enlargement ..........................................................................................45
Preset Percentage Change.........................................................................................46
Variable Percentage Change (Variable %)..................................................................47
4-4 Reducing/Enlarging the Length and Width (Independent X-Y%) ............................................ 49
Specifying X/Y Percentage Change (Variable X-Y%) .................................................50
Specifying Original/Copy Size (Calculator%) ..............................................................52
Automatic X/Y Percentage Change (Auto-Fit) ............................................................54
4-5 Copying on One Side (2 Sided)...............................................................................................56
4-6 Copying on Two Sides (2 Sided) ............................................................................................. 59
Making Two Sided Copies from One Sided Originals .................................................59
Making Two Sided Copies from Two Sided Originals..................................................61
4-7 Collating Copy Output (Output/Finishing)................................................................................64
4-8 Stapling (Stapling) ...................................................................................................................67
4-9 Punching Holes (Punching).....................................................................................................70
4-10 Resetting the Copy Sets and Feature Settings to Their Defaults............................................73
Resetting the Number of Copy Sets............................................................................73
Resetting the Feature Settings....................................................................................73
4-11 Stopping a Copy Job ............................................................................................................... 74
4-12 Interrupting a Copy Job ...........................................................................................................75
4-13 Programming Ahead................................................................................................................76
Chapter 5 Added Features
5-1 Overview of Added Features...................................................................................................78
5-2 Adjusting Copy Density (Lighter/Darker) .................................................................................80
5-3 Making a Copy According to Original Type (Original Type) .....................................................82
5-4 Copying Several Documents onto One Copy (Multi-Up (N Up)) ............................................. 84
5-5 Loading Mixed Size Originals (Mixed Size Originals)..............................................................87
Copying on Paper Size Matching the Document Size ................................................88
Copying onto a Selected Paper Size ..........................................................................89
5-6 Copying Facing Pages onto Separate Sheets (Book Copying)............................................... 90
5-7 Setting the Margins (Image Shift)............................................................................................92
5-8 Erasing the Edges and Copying All (Edge Erase/Copy All).....................................................96
5-9 Interleaving Blank Sheets Between Transparencies (Transparency Separators) ................... 99
5-10 Selecting the Original Orientation (Original Orientation) .......................................................102
5-11 Rotating and Copying in Different Directions (Image Rotation).............................................104
xviii
Page 21

5-12 Selecting the Original Size (Original Size) ............................................................................ 106
5-13 Enhancing Sharpness (Sharpness).......................................................................................108
5-14 Creating Negative-like Images (Negative Image).................................................................. 110
5-15 Creating Mirror Images (Mirror Image).................................................................................. 112
5-16 Repeating an Image (Repeat Image) .................................................................................... 114
5-17 Making Duplex Copies of Facing Pages (Book Duplex)........................................................ 117
5-18 Inserting Covers (Covers) .....................................................................................................120
5-19 Making a Sample Set (Sample Set) ...................................................................................... 123
5-20 Creating a Booklet (Booklet Creation)................................................................................... 125
5-21 Job Memory Operations........................................................................................................128
Registering a Routine Job in the Job Memory ..........................................................128
Overwriting Jobs Stored in the Job Memory .............................................................133
Deleting a Job Stored in the Job Memory .................................................................133
Copying by Using the Job Memory ...........................................................................135
5-22 Using the Document/Copy Counter.......................................................................................136
Chapter 6 Custom Presets
6-1 List of Custom Preset Functions ...........................................................................................140
Paper Tray Attributes.................................................................................................140
Feature Defaults........................................................................................................141
Audio Tones ..............................................................................................................142
Original Size Defaults................................................................................................143
Original/Paper Size Sensing .....................................................................................143
Time-Outs..................................................................................................................144
R/E Presets ...............................................................................................................144
Change of Access Number .......................................................................................145
Screen Layout ...........................................................................................................145
System Setup............................................................................................................146
Image Quality ............................................................................................................146
6-2 Displaying the Tools Mode Screen ........................................................................................147
Displaying the Tools Mode Screen............................................................................147
Exiting the Tools Mode Screen..................................................................................148
6-3 Configuring the Machine with Tools Mode............................................................................. 149
Selecting the Feature Defaults..................................................................................149
Changing the Access Number of the Administrator...................................................152
Configuring a Screen (Default/Basic/Customized)....................................................154
Chapter 7 Troubleshooting
7-1 Troubleshooting.....................................................................................................................164
When an Error Message is Displayed.......................................................................164
When Other Problems Occurred...............................................................................164
7-2 Paper Jams ...........................................................................................................................168
Paper Jam at Trays 1-4.............................................................................................168
Paper Jam at Tray 5 (Bypass)...................................................................................169
Paper Jam at Tray 6 (High Capacity Feeder)............................................................170
Paper Jam at Lower Right Section of the Machine ...................................................173
Paper Jam Inside the Machine..................................................................................175
Paper Jam at the Output Tray...................................................................................178
Paper Jam Inside the Finisher ..................................................................................180
Paper Jam at the Finisher Tray.................................................................................181
xix
Page 22

7-3 Document Jams ....................................................................................................................183
Document Jam at the Feeding Point of the DADF ....................................................183
Document Jam Inside the DADF...............................................................................184
Document Jam at the Document Tray.......................................................................186
Document Jam Underneath the DADF .....................................................................187
7-4 Stapler Faults ........................................................................................................................189
Chapter 8 Daily Care
8-1 Cleaning the Copier...............................................................................................................194
Cleaning Document Cover, Document/Scanning Glass............................................194
Cleaning the DADF Film/Roller Sections ..................................................................195
8-2 Consumables ........................................................................................................................197
8-3 Increasing the Toner Level ....................................................................................................198
8-4 Replacing the Toner Cartridge...............................................................................................200
8-5 Replacing the Drum Cartridge...............................................................................................203
8-6 Replacing the Staple Cartridge .............................................................................................206
8-7 Emptying the Punch Scrap Container ...................................................................................208
8-8 Checking the Billing Meter.....................................................................................................210
8-9 Making Clean Copies ............................................................................................................212
Chapter 9 Using the Auditron Feature
9-1 Auditron .................................................................................................................................216
9-2 Displaying the Auditron Administration Mode Screen............................................................218
Displaying the Auditron Administration Mode Screen ...............................................218
Exiting the Auditron Administration Mode..................................................................219
9-3 Confirming the Account Data.................................................................................................220
Confirming Data of Own Account..............................................................................220
Confirming Data of Every Account ............................................................................221
9-4 Editing the Account Data .......................................................................................................223
9-5 Deleting the Account Data.....................................................................................................227
9-6 Enabling/Disabling Auditron ..................................................................................................229
9-7 Defining Automatic Display of the Password Entry Screen ................................................... 231
9-8 Changing the Auditron Access Number.................................................................................233
Appendix
A Specifications ........................................................................................................................ 236
B Possible Combinations of Features....................................................................................... 239
C Stapling .................................................................................................................................243
D Options and Supplies ............................................................................................................245
Index 246
xx
Page 23

1
Getting to Know Your Copier
1-1 Main Components and Their Functions........................ 2
1-2 Switching On and Off.................................................... 6
1-3 Using the Touch Panel Display ..................................... 8
1-4 Entering Password
(When the Auditron Feature is Enabled)....................... 13
1-5 Saving Power................................................................ 15
Page 24
1
Getting to Know Your Copier
Main Components and
Their Functions
Main Components
Duplex Automatic
1
Document Feeder (DADF)
Power Switch
2
Output Tray (optional)
3
4
Lower Right Cover
Paper Trays 1 to 4
5
6
Front Door
Control Panel
7
Document Glass
8
Tray 6 (High Capacity Feeder) (optional)
9
Top Cover of Tray 6 (High Capacity Feeder)
10
Tray 5 (Bypass)
11
Automatically feeds a stack of documents, one sheet at a time, for
scanning. For copying a two-sided document, side one is scanned first
and the document is flipped in the DADF for side two to be scanned. The
DADF serves as the document cover when the document to be copied is
placed on the document glass.
Switches On/Off the power of the machine.
Receives copies made from the machine. If the optional offset catch tray
is installed, each copy set is offset from the previous copy set. This
means that the edge of each set is placed to the left or right of the
previous copy set to allow easy separation.
Open this cover to clear paper jams.
Load paper stock in these trays.
Open this door to clear paper jams or replace the Drum/Toner Cartridge.
Contains operating buttons, indicator lights and the touch panel display.
Set originals here.
Up to 3600 sheets of paper can be loaded.
Open this cover to clear paper jams.
Load special media and non standard size paper here.
2
1-1 Main Components and Their Functions
Page 25
Getting to Know Your Copier
1
12 Finisher (optional) Enables stapling and hole-punching.
Finisher Tray 1 Receives copy output other than stapled, punched, or high capacity.
13
14
Finisher Tray 2 Receives stapled, punched, or high capacity copy output.
Finisher Top Cover Open this cover to remove jammed paper.
15
16
Finisher Front Door Open this door to remove jammed paper, and replace or remove staples.
17
Fuser Unit
18
Transfer Unit
19
Drum Cartridge Comprises devices such as a photoreceptor drum and charge corona.
Toner Cartridge Contains toner (image forming powder).
20
Breaker Switch
21
Fixes the printed image on the paper by fusing the toner. Do not touch this unit as it is
extremely hot.
Transfers the toner image on the drum to the paper. Pull out this unit to clear paper jams.
Controls the power supply to the machine. Once leakage is detected, this switch will
automatically interrupt the power supply to the machine. It is usually left in the “I” position.
* Indicates that the feature may not be available on certain models.
1-1 Main Components and Their Functions
3
Page 26
1
Getting to Know Your Copier
Control Panel
1
2
1
Brightness Adjustment Dial
2
Touch Panel Display
3
Settings/Meter Check Button
Password Button
4
5
Interrupt Button/Indicator
6
Power Saver (On/Off) Button
4
1-1 Main Components and Their Functions
Adjusts the brightness of the Touch Panel display.
Touch the feature buttons on this panel to select the desired options for a copy, scan
or print job.
Press this button to go to the Settings/Meter Check screen or screen for setting printer
specifications if the printer function is installed. You can also check the meter reading.
Press this button to enter the Password (by department/account user) when the
Auditron feature is enabled.
Press this button to interrupt the current copy or print job for an urgent job. The indicator
light at the upper left lights up when this button is pressed.
Press this button to reduce the power consumption of the machine and put it in the
Power Saver mode which is indicated by the illuminated button. To return to the Ready
(Copy) mode, press the lit Power Saver button.
Page 27
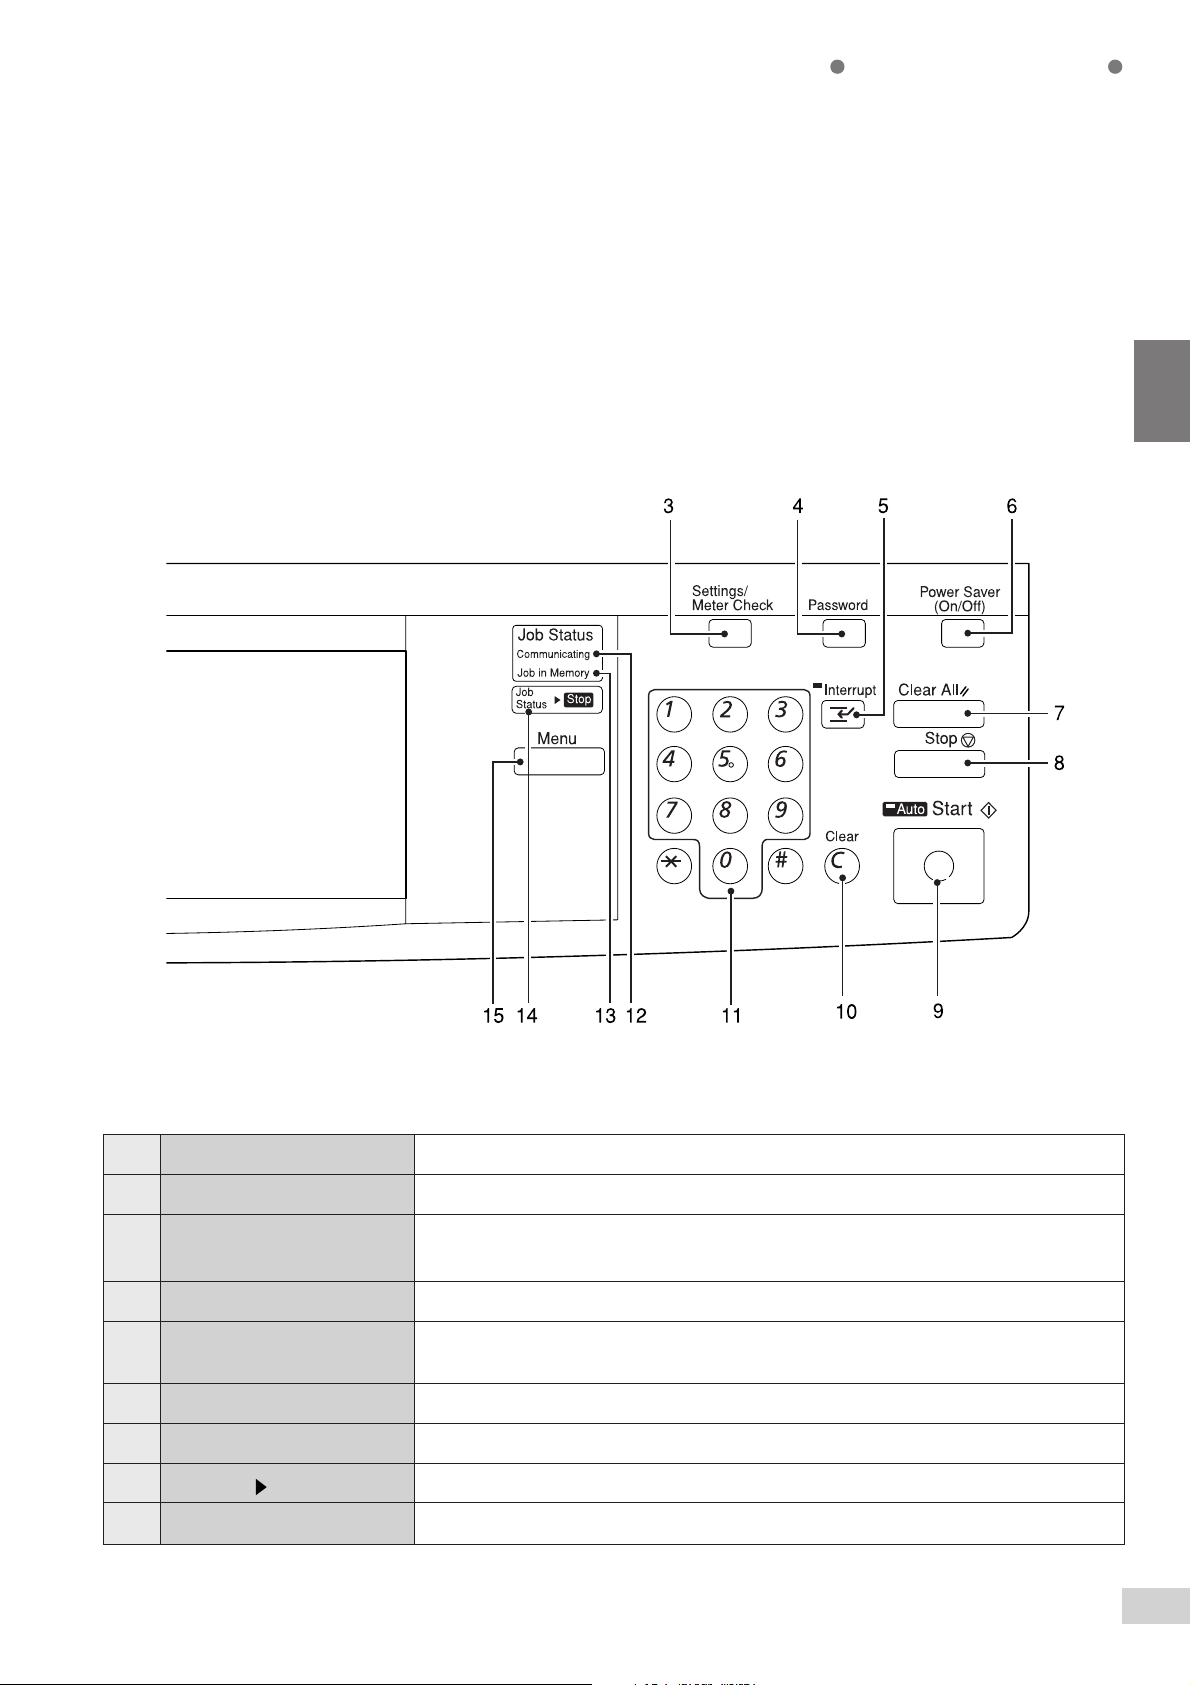
Getting to Know Your Copier
1
Clear All Button Press this button to clear all settings and return to the default screen.
7
Stop Button Press this button to stop the current copy or print job.
8
Start Button
9
10
Clear C Button Press this button to delete a wrong character entry, and stop a copy or print job.
11
Numeric Keypad
Communicating Indicator* The indicator lights up when print or scan data are being transmitted.
12
Job in Memory Indicator* The indicator lights up when data are accumulated in the memory of the machine.
13
Job Status Stop Button* Press this button when checking or cancelling the status of copy, print or scan jobs.
14
15
Menu Button* Press this button to display the menu screen.
Press this button to start copying or scanning.
The Auto indicator light at the upper left lights up when Auto Start is activated.
Use the keys to enter the number of sets to be copied, or numeric values for feature
settings.
* For models with the printer feature
1-1 Main Components and Their Functions
5
Page 28
1
Switching On and Off
Switch On the power before operating the copier.
This section will show you how to switch the copier On/Off.
Breaker Switch
If the breaker trips repeatedly,
contact your local authorized
Panasonic service representative.
Check the Ground Fault Interrupter
once a month to ensure that it works
correctly.
The Breaker Switch is
normally set to the "I" position.
However, when it is not used
for an extended period of time
or when it is to be relocated,
switch it to the "O" position.
Power requirements and ground
connection
explanation on the Ground Fault
Interrupter.
of
Safety Notes
for an
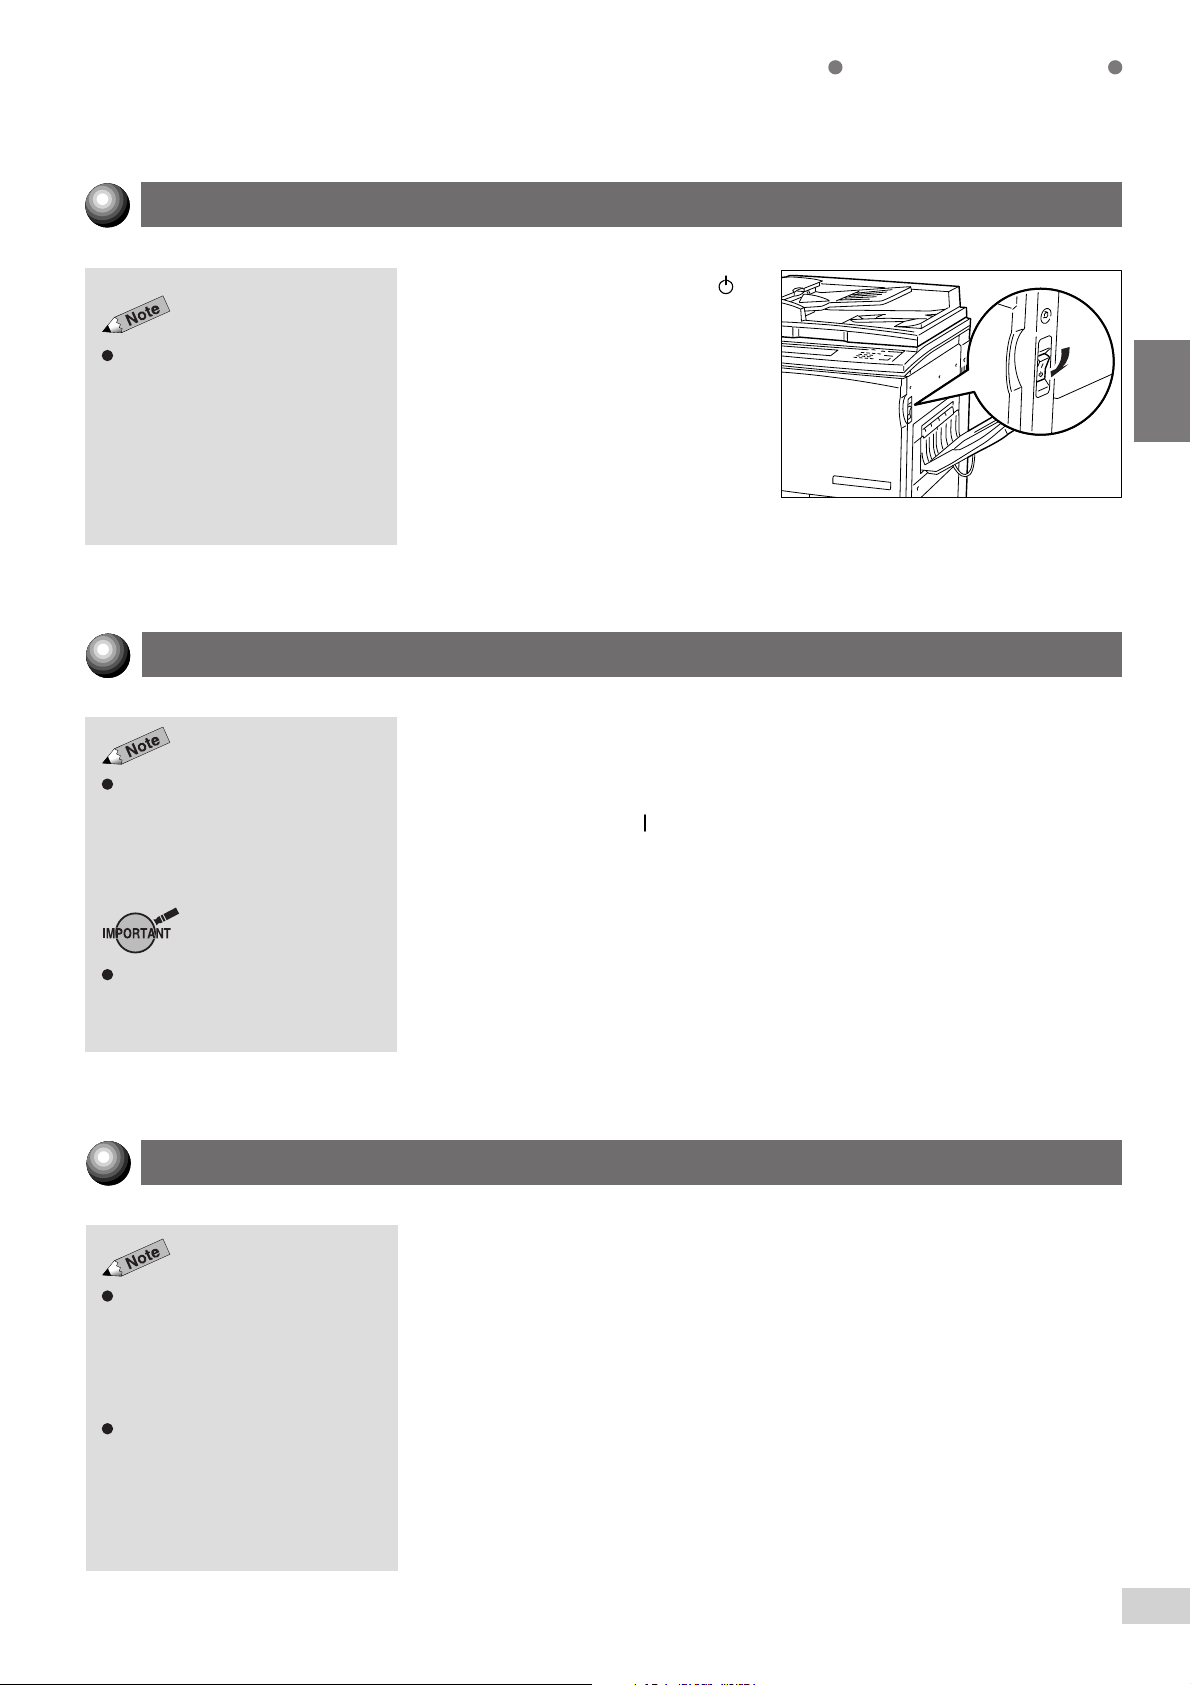
Switching On the Power
Turn the power switch to the
" position.
"
The power is switched On.
You can change the default screen
from the Basic Features screen to
any other screen and the new
screen will be displayed.
The machine will be in the Ready
mode approximately three minutes
after the power is switched On.
When the Power Saver mode is On,
the display will still be Off and the
Power Saver indicator will be On.
1-2 Switching On and Off
6
After a while, the default screen
appears on the display.
Page 29
Switching Off the Power
Turn the power switch to the " "
position.
If the machine is switched On but
has been left unused for a fixed
period of time, the Power Saver
feature will reduce the power
consumption of the machine to
conserve energy. See
Power
for details.
1-5: Saving
The power is switched Off.
Getting to Know Your Copier
1
1
Switching Off the Power Automatically
The Auto Power Off feature will be enabled if the machine has been left
unused for a certain duration (factory default is 60 minutes) while the power
This feature is available for models
with only the copy function. See
Time-Outs in 6-1: List of Custom
Preset Functions
the settings.
The Auto Power Off feature is not
available for models with the printer
feature.
on how to change
is On.
Press the switch to the "
" position to switch On the power.
Auto Start
Load the document while the message "Please wait.." is being displayed.
Then press the Start button. The document will automatically be scanned
When the Auto Start feature is
activated, "Please wait ... Job will
start automatically." appears on the
message area of the display. The
indicator light at the top left corner of
the Auto indicator is lit.
You can cancel the Auto Start
feature by pressing the Stop button
and then the Clear C button.
once the machine is ready to copy. This is called the Auto Start feature.
1-2 Switching On and Off
7
Page 30
1
Getting to Know Your Copier
Using the Touch Panel Display
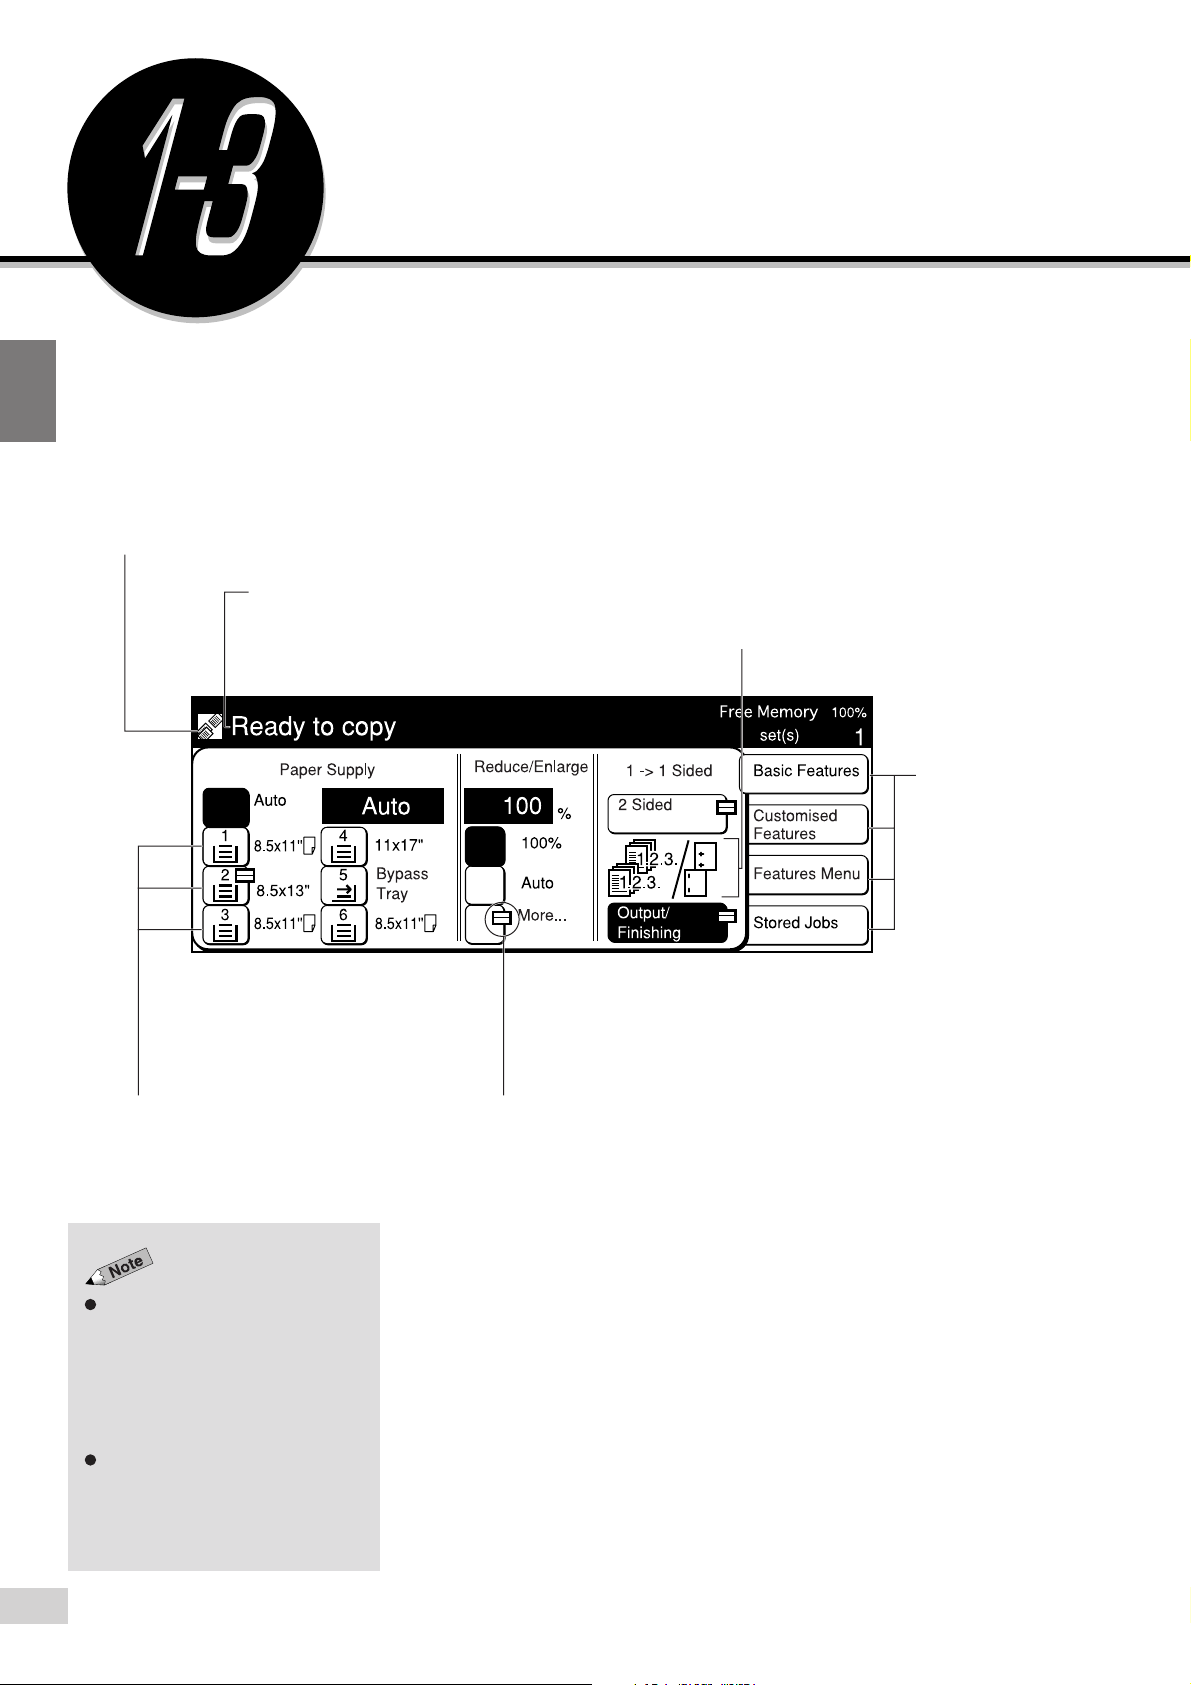
Feature Status Mark
The status of a feature is indicated by a mark.
Message Area
The status of the machine and its operating
instructions are displayed here. The number on
the right indicates the number of sets to be copied.
You can select a feature shown on the Touch Panel display by touching its
corresponding button on the display. Here, the Basic Features screen is
used to explain the respective parts of a screen.
In this section, the Touch Panel display will be referred to as the “display”.
Feature Icon
Explanation on a feature and its settings
are represented pictorially.
The above Paper Supply display is a sample.
Each default setting is
Tray 1 : 8.5 x 11" (A4)
Tray 2 to 4 : 11 x 17" (A3)
Tray 6 : 8.5 x 11" (A4).
Above Trays can be changed.
Feature Button
Touch this button to select or program a
feature. The currently selected button is
highlighted.
The features shown on the display
(includes message in the message
area or the screen) will depend on
the installed options and the model
of the machine. In the above
example, Tray 6 (High Capacity
Feeder), and Finisher are installed.
For models with the printer feature,
see the
Operating Instructions (For
Printer).
Select one of these
buttons to change
the display.
Pop-up Mark
This mark indicates that the button has a pop-up
screen for additional selections. Select this button
to display the pop-up screen.
1-3 Using the Touch Panel Display
8
Page 31

The System Administrator can use
the Tools Mode to select the screens
to be displayed. See sections on
Feature Defaults
in
6-1: List of Custom Preset
Functions
and
for details.
Screen Layout
Getting to Know Your Copier
Changing the Display Screen
Four screens are available for selection on the display. They are the Basic
Features screen, Customized Features screen, Features Menu screen and
Stored Jobs screen.
Select the Basic Features, Customized Features, Features Menu or Stored
Jobs button located on the right-hand side of the display. The corresponding
screen of the selected button will be displayed. The factory default screen
when you switch On the power is the Basic Features screen.
The features on the Basic Features screen and the Customized Features
screen are also shown on the Features Menu screen. Select the screen that
best meets your operating requirements.
1
The screen on the right has the Tray
6 (High Capacity Feeder), and
Finisher installed.
The screen on the right has the
Finisher installed.
Basic Features (factory default)
Customized Features (factory default)
Features Menu
Stored Jobs (factory default)
1-3 Using the Touch Panel Display
9
Page 32

1
Getting to Know Your Copier
Selecting a Feature
Touch a displayed button to select a feature or value. See “Chapters 4 to 6”
for details.
When the feature name is displayed on the button:
When there is a pop-up mark attached to the button:
1-3 Using the Touch Panel Display
10
Page 33

Getting to Know Your Copier
When there are Scroll Buttons
Functions of the Reset, Cancel and Close/Save Buttons
Returns all the selected features and values to their
original settings when the screen was first displayed.
1
Cancels all the selected features and values of the
displayed screen and returns to the previous screen.
Registers all the settings and returns to the previous
screen.
When a Button Is Not Available
An unavailable button is dim and grey in color.
1-3 Using the Touch Panel Display
11
Page 34

1
Getting to Know Your Copier
Message Pop-up and Confirmation Pop-up Screens
A message pop-up screen will be displayed to show warning or caution
notes. Select Close to exit from this screen.
A confirmation pop-up screen will be displayed when an action requires your
confirmation. Select either Yes or No to exit from this screen.
Message Pop-up Screen
Confirmation Pop-up Screen
Error Message Screen
An error message screen will be displayed when it is time to replace one of
the consumables or when an error will result if you continue to use the copier.
This screen will also be displayed when there is paper jammed in the machine
or when an internal system failure has occurred. Follow the instructions shown
on the screen to resolve the problem.
Power Saver Screen
The display on the screen disappears and the Power Saver indicator light is
On when the Power Saver feature is activated. Press the Power Saver (On/
Off) button again to display the default screen.
1-3 Using the Touch Panel Display
12
Page 35

Chapter 9 Using the Auditron
Feature
for details on the functions
and settings of the Auditron feature.
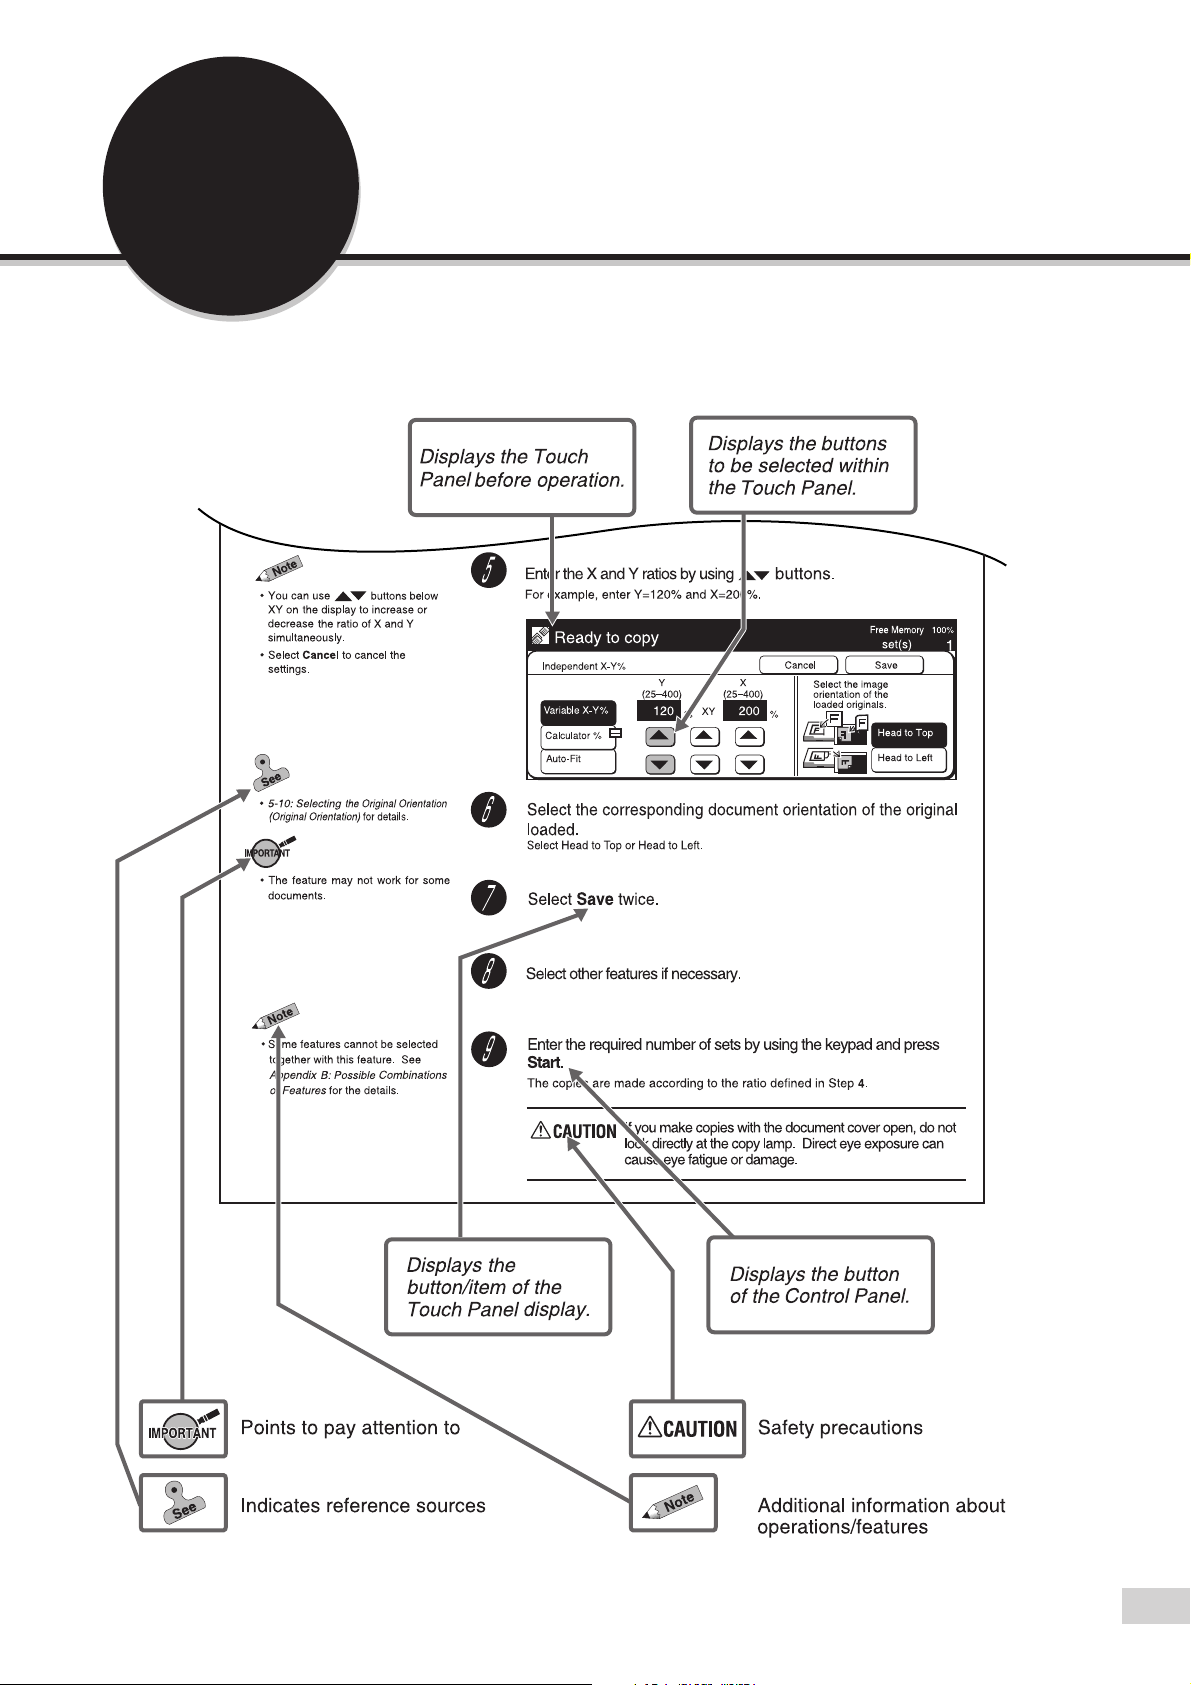
Entering Password
(When the Auditron Feature is Enabled)
The Auditron feature allows you to control the number of copies that a
department (account user) can make by assigning a password to the user.
The diagram shows the relationship between the Password Entry screen
and the default screen. This section describes the procedures for entering
the password when the Auditron mode is On.
1
The screen on the right has the Tray
6 (High Capacity Feeder), and
Finisher installed.
1-4 Entering Password (When the Auditron Feature is Enabled)
13
Page 36

1
Getting to Know Your Copier
If you made a mistake while entering
the password, press the Clear C
button to clear and re-enter.
Procedure
When the Password screen is being displayed, enter your
Password by using the keypad.
Each input digit is represented by an asterisk.
You can change the maximum
display time (time-out) of the default
screen by using the Auditron
Administration Mode. See
Defining Automatic Display of the
Password Entry Screen
9-7:
for details.
Select Confirm.
The default screen appears.
1-4 Entering Password (When the Auditron Feature is Enabled)
14
After you have finished with your copying, press Password to
return to the Password Entry screen.
Page 37

Saving Power
Normal power consumption during
machine standby is 270 W.
When the machine is not used for a
set period of time, it automatically
goes into the low power mode
(Power Saver mode) (factory default
is 15 minutes). In addition, after a
set period of time, it shifts to the
power Off mode (Sleep Mode)
(factory default is 60 minutes).
These time-out periods can be
changed. See
of Custom Preset Functions
details.
Time-Outs
in
6-1: List
for
The machine has a power-saving feature, which lowers the power
consumption when copying is stopped for a period of time. This consists of
two modes based on the level of power consumption.
Low Power Mode (Power Saver Mode)
Power consumption: 120 V model: 206 W, 220-240 V model:208 W
The power of the control panel and fuser unit lowers. The display is unlit.
The Power Saver light on the control panel is lit.
To copy, press the Power Saver (On/Off) button.
The Power Saver light is unlit and the Power Saver mode is cancelled.
Power Off Mode (Sleep Mode)
Power consumption: 120 V model: 6 W, 220-240 V model: 7 W
The power switch automatically changes to the "
" position and the
power is switched Off.
To copy, turn the power switch to the "I" position.
The power is switched On and the display shows the default screen.
1
When the machine is not used for a
set period of time, it automatically
goes into the low power mode
(factory default is 15 minutes). In
addition, after a set period of time, it
shifts to the Sleep Mode (factory
default is 60 minutes).
For models which come with the
printer feature, see the
Instructions (For Printer)
setting the power-saving feature.
Sleep mode can be disabled. See
the
Operating Instructions (For
Printer).
Operating
regarding
For Models Which Come with the Printer Feature
Low Power Mode
The power of the control panel and fuser unit lowers. The display is unlit.
The Power Saver light on the control panel is lit.
To copy, press the Power Saver (On/Off) button.
Operating Instructions (For Printer)
Sleep Mode
The power of the fuser unit is cut. The display is unlit.
The Power Saver light on the control panel is lit.
To copy, press the Power Saver (On/Off) button.
The Power Saver light is unlit and Power Saver mode is cancelled.
1-5 Saving Power
15
Page 38

1
Getting to Know Your Copier
Entering Power Saver Mode Automatically
When the machine is not used for a set period of time, it automatically goes
into the Low Power Mode (Power Saver Mode). In addition, after a set
By factory default, the shift to Power
Saver mode and Auto Power Off
mode after the last copy job or
action is set as 15 minutes and 60
minutes respectively. These time-out
periods can be changed. See
Outs in 6-1: List of Custom Preset
Functions
For models which come with the
printer feature see the
Instructions (For Printer)
setting the power-saving feature.
Sleep mode can be disabled. See
the
Printer).
for details.
Operating Instructions (For
Time-
Operating
regarding
period of time, it shifts to the Power Off Mode (Auto Power Off Mode).
For Models Which Come with the Printer Feature
When the machine is not used for a set period of time, it automatically goes
into the Low Power Mode. In addition, after a set period of time, it shifts to
the Sleep Mode.
Using the Power Saver Mode
You can enable the Low Power Mode manually when you are not making
copies for a period of time.
Procedure
Press Power Saver (On/Off).
The power saver light is turned On and the machine is in the Power Saver
Mode.
Disabling the Power Saver Mode
Procedure
When the machine in low power
mode is not used for a set period of
time, it shifts to the Power Off mode
(Auto Power Off mode), and power
is cut. To copy, switch the power On
again.
1-5 Saving Power
16
Press Power Saver (On/Off).
The power saver light is turned Off and the Power Saver Mode is disabled.
Page 39

2
Loading Paper
2-1 What Paper to Use ..................................................... 18
2-2 Storing and Handling Paper........................................ 20
2-3 Loading Paper ............................................................ 21
2-4 Changing the Paper Tray Size.................................... 25
Page 40

Loading Paper
Weights of Paper
What Paper to Use
This section describes the paper stock that can be used on this machine.
2
The weights of paper for the respective trays are as shown below.
The Tray 6 (High Capacity Feeder) is
optional.
For two-sided copying, use
15 - 34 lbs paper.
Tray 1 15 - 34 lbs
Trays 2 to 4 15 - 34 lbs
Tray 5 (Bypass) 15 - 58 lbs
Tray 6 (High 15 - 34 lbs
Capacity Feeder)
Tray Paper Weight
Paper Size and Tray Loading Capacity
The applicable paper size and the loading capacity for the respective
trays are shown below.
Do not use paper with glue or tape
on it.
For curled paper, uncurl them before
loading.
You cannot make two-sided copies
onto paper smaller than 5.5 x 8.5".
Tray Valid Paper Sizes
Tray 1 A5, A5 , B5 , A4 , 5.5 x 8.5", 8.5 x 11" 1000 sheets
Trays 2 to 4
Tray 5
(Bypass)
A5, A5 , 5.5 x 8.5", B5, B5 , A4, A4 , 8.5 x 11",
8.5 x 11" , 8.5 x 13", 8.5 x 14", B4, Pa Kai, A3, 11 x 17"
A6, B6, A5, A5 , B5, B5 , A4, A4 , B4, A3, Pa Kai,
5.5 x 8.5", 8.5 x 11", 8.5 x 11" , 8.5 x 13", 8.5 x 14", 11 x 17"
Paper Tray
Capacity
550 sheets
each
50 sheets
each
2-1 What Paper to Use
18
Tray 6 (High
Capacity
Feeder)
B5 , A4 , 8.5 x 11" 3600 sheets
Page 41

Types of Special Media
The types of media for the respective trays are as shown below.
Loading Paper
The special media mentioned on the
right cannot be used for 2-Sided
copying.
Do not use paper with glue or tape
on it.
Special Media cannot be loaded in
Trays 1 and 6 (High Capacity
Feeder) (optional).
Load perforated paper with the holes
toward the back of the tray.
Tray
Trays 2 to 4
Tray 5 (Bypass)
Special Media
Transparencies, perforated paper (30-hole)
Transparencies, perforated paper (30 hole),
tracing paper, label stock
2
Do not use conductive paper, e.g folding paper, carbonic
paper and coated paper. When paper jam occurs, they
can cause fire or electric shocks.
2-1 What Paper to Use
19
Page 42

Loading Paper
Storing and Handling Paper
Observe the following when storing paper:
Always store paper in a cabinet or at a place with low humidity. Damp
•
paper may cause jams or affect the image quality.
Always re-pack unused paper, preferably with desiccant.
•
Always store paper on a flat surface to prevent bending or curling.
•
2
Observe the following when handling paper:
Do not combine and load paper left-over from different reams into a tray.
•
Do not use folded or wrinkled paper.
•
Do not load mixed size paper into a tray.
•
Always fan transparencies or labels before loading to prevent jamming
•
or multi-sheet feeding.
Handling Curled Paper
If the output paper curls badly and cannot be properly delivered to the
output tray, remove the paper stock from the selected tray. Turn the stack
of paper over in the tray so that the last sheet is now the first sheet. Then
re-load the paper stock into the paper tray.
2-2 Storing and Handling Paper
20
Page 43

During a copy job, paper can be
added to a tray not selected for the
current job that is in progress.
Loading Paper
Loading Paper
The following screen will appear when paper runs out during a copy job.
Add paper according to the displayed instructions. After adding the paper,
you can resume the copy job by pressing the Start button.
2
This section will show you how to add paper to Trays 1 to 4, Tray 5 (Bypass),
and Tray 6 (High Capacity Feeder).
Loading Paper in Trays 1 to 4
Add paper to Trays 1 to 4 according to the procedures shown below.
The capacity of Tray 1 is 1000
sheets while Trays 2 to 4 each has a
capacity of 550 sheets.
Procedure
Pull out the empty tray until
it stops.
When pulling out a
paper tray, do it
slowly. If pulled out
with too much force,
the tray can hit and
injure your knees.
Do not load paper above the MAX fill
line.
Align and load the paper
stock against the right side
of the tray with the side
where the image is to be
copied facing upwards.
2-3 Loading Paper
21
Page 44

2
Loading Paper
Push the tray in slowly
until it stops.
The message, "Ready to copy.
Press Start to continue or press C
button to cancel the job." appears
on the display once you have
properly replenished the tray.
2-3 Loading Paper
22
Page 45

Loading Paper in Tray 5 (Bypass)
Load special media, non-standard size paper, which cannot be loaded in
Trays 1-4, Tray 6 (High Capacity Feeder) (optional), and Tray 5 (Bypass).
The Tray 5 (Bypass) has a capacity
of 50 sheets. The paper size is as
follows.
*However, image which can be copied
on the Y axis is up to 11 inches.
Load perforated paper with the holes
toward the back of the tray.
When copying on OHP film
(8.5 x 11" or A4), please set the
OHP film in Landscape orientation.
Procedure
Open Tray 5 (Bypass) by
holding the grip on the left
side of the machine.
If necessary, pull out the
Extension Tray.
Loading Paper
2
Do not place things other than
media on Tray 5 (Bypass). Also, do
not make copies while holding the
edge of the paper. The wrong paper
size may be detected leading to
paper jams.
Make sure that the Paper Guide is
set so that it touches the paper.
Skewed paper will cause the copy
image to be slanted.
When copies are made by placing
the original on the document glass,
there may be a loss of image due to
error in size detection. As such,
enter the size of the original with the
Original Size feature, or use the
DADF.
Do not move the Paper Guide after
the Start button has been pressed
and until copying has stopped.
Load paper with the side to
be copied facing up and
inserting them till they
touch the back of the tray.
Make sure the edges of paper
towards you are aligned.
Move the Paper Guide to
touch the paper.
Tray 5 (Bypass) under Paper
Supply of the Basic Features
screen becomes selectable.
2-3 Loading Paper
23
Page 46

Loading Paper
Loading Paper in T ray 6 (High Capacity Feeder) (optional)
Load paper in Tray 6 (High Capacity Feeder) (optional) by following the
procedures below.
Tray 6 (High Capacity Feeder) is
optional.
The capacity of Tray 6 (High
Capacity Feeder) (optional) is 3600
sheets.
Procedure
Pull the tray out slowly until
it stops.
2
Do not load paper above the MAX fill
line.
When pulling out a
paper tray, do it
slowly. If pulled out
with too much force,
the tray can hit and
injure your knees.
Align and load the paper
against the right side of the
tray with the side where
the image is to be copied
facing upwards.
Push the tray in slowly until
it stops.
2-3 Loading Paper
24
Page 47

Changing the Paper Tray Size
Changing the Size of Tray 1
Follow the procedures shown below to change the size of Tray 1 in order to
load paper stock of the desired size.
2.1 What Paper to Use
information on the types of paper
stock that can be used.
Original/Paper Size Sensing
List of Custom Preset Functions
information on the Tools Mode
screen.
Paper jam may occur if the paper
size has not been changed correctly.
for
of
6.1:
for
For changing paper size A5
Mode screen.
Procedure
Pull Tray 1 out until it
stops.
When pulling out a
paper tray, do it
slowly. If pulled out
with too much force,
the tray can hit and
injure your knees.
5.5 x 8.5", you have to do it via the Tools
2
Remove any paper still in
the tray.
Pinch and hold the release
on the Lever as shown in
the diagram. Then push
the Lever to the rear of the
tray.
2-4 Changing the Paper Tray Size
25
Page 48

2
Loading Paper
Place paper stock of the
desired size against the
bottom-right corner of the
tray.
Pinch and hold the release
on the Lever again and
push the Lever forward
until it touches the edge of
the paper.
After changing from A5 5.5 X 8.5”,
there is a need to adjust settings in
Tools Mode screen. See
Paper Size Sensing
Custom Preset Functions
Original/
of
6.1: List of
.
Paste the new Paper Size
Label on the front of the
tray.
Push Tray 1 in slowly until
it stops.
2-4 Changing the Paper Tray Size
26
Page 49

Changing the Size of Trays 2 to 4
Request assistance from your System Administrator if you need to change
the size of Trays 2 to 4. Your System Administrator can follow the
procedures shown below to make the changes.
After changing paper size, follow the
steps from Step 9 to adjust settings
on the Tools Mode screen.
Procedure
Loading Paper
Pull out the tray that you
want to change until it
stops.
When pulling out a
paper tray, do it
slowly. If pulled out
with too much force,
the tray can hit and
injure your knees.
Remove any paper still in
the tray.
2
Use a screwdriver to
remove the three screws
as shown in the diagram.
2-4 Changing the Paper Tray Size
27
Page 50

2
Loading Paper
Place paper stock of the
desired size against the
bottom-right corner of the
tray.
Adjust the Paper Guides
according to the size of the
paper.
If the Paper Guides are not fastened
properly, paper jam may occur.
Remove the paper from
the tray and use a
screwdriver to fasten the
screws as shown in the
diagram.
Check that the Paper Guides are
locked at the holes with the screws
tightened. Then re-load the paper.
Paste the new Paper Size
Label on the front of the
tray.
Push the tray in slowly until
it stops.
Refer to the procedures described
on the following page to change
the paper size.
2-4 Changing the Paper Tray Size
28
Page 51

The screen on the right has the
Auditron mode enabled. For details,
refer to
Chapter 9 Using the Auditron
Feature
.
Loading Paper
Press Settings/Meter Check on the control panel.
Select Tools Mode.
2
If you made a mistake while entering
the Access Number, press the Clear
C button to clear and re-enter.
The factory default Access Number
is "11111".
Changing the Access Number of the
administrator in
Machine with Tools Mode
information on how to change the
Access Number.
For models with the printer feature,
the screen displayed differs.
6-3: Configuring the
for
Enter the Access Number of the System Administrator by using
the keypad and select Confirm.
Each input digit is represented by an asterisk.
Select Paper Tray Attributes.
Select Paper Sizes.
2-4 Changing the Paper Tray Size
29
Page 52

2
Loading Paper
The tray can also be selected
directly by touching its button on the
display.
As Tray 1 and Tray 6 (High Capacity
Feeder) (optional) can automatically
detect the loaded paper size, they
are not shown on the screen on the
right.
Select the tray that you have changed by using the
buttons. Then select Change Settings.
For example, select Tray 3.
Select the desired preset paper size.
If the preset paper size is measured in inches, select Inch
Size. Then select the desired paper size.
Select Save once and Close twice.
Select Exit Tools.
The paper size of the selected tray is changed.
2-4 Changing the Paper Tray Size
30
Page 53

Loading Paper
Changing the Size of Tray 6 (High Capacity Feeder) (optional)
This section explains the procedures for changing the paper sizes to be
loaded in Tray 6 (High Capacity Feeder).
Tray 6 (High Capacity Feeder) is
optional.
Paper jam may occur if paper size
has not been changed correctly.
Paper sizes that can be loaded are B5
Procedure
Pull Tray 6 (High Capacity
Feeder) out slowly until it
stops.
When pulling out a
paper tray, do it
slowly. If pulled out
with too much force,
the tray can hit and
injure your knees.
, A4 , and 8.5 x 11" .
2
Remove any paper still in
the tray.
Turn the screw to remove
the Inner Guide.
Adjust the Inner Guide to
the hole and fasten the
screw. When changing to
or 8.5 x 11" ,
A4
proceed to Step 7.
2-4 Changing the Paper Tray Size
31
Page 54

2
Loading Paper
When B5 is changed to A4 or
8.5x11" , remove the Horizontal
Guide from the (B5) slot and store it
on the right side of the tray and
tighten the screw.
When the paper size is
changed to B5
, remove
the Horizontal Guide from
the right side of the tray.
Insert the Horizontal Guide
into the (B5) slot and
fasten the screw.
Place the paper against
the bottom-right corner of
the tray.
Paste the new Paper Size
Label on the front of the
tray.
Push the tray in slowly until
it stops. When pushing
back Tray 6 (High Capacity
Feeder), do not place your
hand on the front of the
tray. You may hurt your
fingers if you do so.
2-4 Changing the Paper Tray Size
32
Page 55

3
Loading Documents
3-1 Documents.................................................................. 34
3-2 Loading Documents.................................................... 36
Page 56

Loading Documents
Documents
Place document on the Document Glass or load it in the Duplex Automatic
Document Feeder (DADF).
3
Edge Erase/Copy All is not available
when copying some types of
documents.
Place the following types of documents on the Document Glass. They will
cause jams when loaded in the DADF.
Documents that are relatively heavy, for example, brochures and booklets
Torn, wrinkled, paste-up, punched-hole, folded or curled documents
Paper-clipped or stapled documents
Documents with carbon on the reverse side
Highly transparent documents such as transparencies and tracing paper
that have been pencilled
Heat-sensitive paper
Observe the precautions described in the following sections when loading
documents in the DADF or when placing them on the Document Glass.
Loading Documents in the DADF
Do not hold on to a document while it is being fed into the scanner. This
may cause a document misfeed.
Do not allow excessive sheets of documents to accumulate in the
Do not load any documents that
have correction fluid or carbon on
them.
Document Tray. Never place anything on the Document Tray as it may
result in a document jam.
When opening the DADF, gently lift it up until it stops. Never force it up.
The DADF cannot detect the size of transparencies and tracing paper.
The DADF accepts the following types of documents.
3-1 Documents
34
Page 57

Paper Weight is a measure of the
substance of paper expressed in
pounds (lbs), which does not
depend on the number of sheets in
the ream.
Original/Paper Size Sensing
List of Custom Preset Functions
information on how to define
automatic document size sensing.
in
6-1:
for
Loading Documents
Paper Weight : 1-Sided : 10 - 34 lbs or 38 - 128 g/m
•
2-Sided : 13 - 28 lbs or 50 - 105 g/m
Capacity : 50 sheets
•
2
2
When using the DADF, the paper sizes, which can be automatically
detected by the machine are A5, A5 , B5, B5 , A4, A4 , 8.5 x 11"*,
8.5 x 11"
, B4, A3, 11 x 17", and 8.5 x 13".
However, using Tools Mode, you can change A5 to 5.5 x 8.5”, A4 to 8.5 x
1 1”, A4
to 5.5 x 11” , B4 to 8K (267 x 388 mm), A3 to 11 x 17”, and
8.5 x 13" to 8.5 x 14".
3
Placing Documents on the Document Glass
The largest document size that can be placed on the Document Glass is
shown below. There is no limit on the smallest size.
Do not load any documents that
have correction fluid or carbon on
them.
For highly transparent documents,
they may not be automatically
detected. Specify their sizes with
the Original Size feature.
Original/Paper Size Sensing
List of Custom Preset Functions
information on how to define
automatic document size sensing.
in
6-1:
for
When using the Document Glass, the paper sizes, which can be
automatically detected by the machine are A6, B6, B6
8.5", 5.5 x 8.5"
, B5, B5 , A4, A4 , 8.5 x 11" , 8.5 x 11", 8.5 x 14" (or
8.5 x 13"), B4, 8K (267 x 388 mm), A3, and 11 x 17".
If you make copies with the document cover open, avoid
looking directly at the copy lamp. Direct eye exposure can
cause eye fatigue or damage.
When copying a thick document, do not use excessive
force to press it against the Document Glass. The glass
may break and cause injuries.
, A5, A5 , 5.5 x
3-1 Documents
35
Page 58

Loading Documents
Loading Documents
Load the documents in the DADF or place it on the Document Glass.
Loading Documents in the DADF
The DADF lets you load a stack of documents for feeding to the scanner
one sheet at a time, and output them after scanning. 50 sheets can be
loaded each time, thus saving time of loading documents manually.
3
The DADF cannot be used for some
types of documents. See
documents in the DADF
Documents
For originals of mixed sizes, see
Loading Mixed Size Originals (Mixed
Size Originals)
Align the lead edges of your
documents.
Document feeder jams may occur if
the Document Guide is not
positioned correctly.
for the details.
.
Loading
in
3-1:
5-5:
Procedure
Align the lead edges of your documents.
Remove any paper clips, staples and Post-it® Notes before making copies.
Load documents face up
(side one should face up in
the case of two sided
copying) against the rear
guide.
The confirmation light becomes lit.
Move the Document Guide
to gently touch the
document.
3-2 Loading Documents
36
Note when copying 51 sheets of documents or more
50 documents can be loaded each time, but documents can be added
for continuous scanning up to a total of 700 sheets (350 sheets for
two-sided copying). During the scanning of the first document loaded,
select Next Document on the screen. After scanning has ended, add
documents and press Start to continue scanning other documents.
Select End Job if there are no further documents for scanning.
However, when Stapling, 1 -> 2 Sided, or Multi-Up (N Up) is selected, no
documents can be added for scanning.
Page 59

Placing Documents on the Document Glass
Procedure
Placing documents on the
Document Glass in
for information on the types of
documents that can be placed on
the Document Glass.
For documents of mixed sizes, see
5-5: Loading Mixed Size Originals
(Mixed Size Originals)
Open the document cover until the
cover is completely released from the
sensor rod (approximately 11.8 in
(30 cm) and above). Otherwise, the
machine may not be able to accurately
detect the size of the document.
3-1: Documents
.
Open the document cover.
Place the document face
down and align it with the
upper-left corner of the
Document Glass.
Loading Documents
3
When copying highly transparent
documents such as tracing paper or
transparencies, stains on the
document cover may also be copied.
To prevent this, cover the document
with a piece of white paper the same
size as the document before closing
the document cover.
If a document is folded or curled, its
size may not be correctly detected.
Put a stack of white paper of the
same size on the document, and
make sure it comes into close
contact with the Document Glass.
You need to specify the document
size if you have selected certain
features. See
Original Size (Original Size)
details.
For collated copying, up to 700
sheets can be continuously
scanned. See
Output (Output/Finishing)
collated-copying.
By factory default, document
orientation is set to Head to Top.
See
5-10: Selecting the Original
Orientation (Original Orientation)
Do not place the document like this
if you have selected Head to Left.
5-12: Selecting the
for
4-7: Collating Copy
for
.
Close the document cover.
When copying a
thick document, do not
use excessive force to
press it against the
Document Glass. The
glass may break and
cause injuries.
Document Orientation
When a feature such as, 2 Sided, Multi-Up (N Up), Image Shift, Edge
Erase/Copy All, Repeat Image, or Stapling/Punching (optional) is
selected, and if the document orientation is wrong, copies cannot be made
correctly. Documents are loaded as Head to Top or Head to Left (see
diagram below). After loading documents, be sure to set their orientation
(Head to Top or Head to Left) under Original Orientation on the copy
screen of each feature or on the Features Menu screen.
3-2 Loading Documents
37
Page 60

3
Loading Documents
Screen Display When Using Document Glass
The message "Size Mismatch" may be displayed if you have pressed the
Start button after placing your document on the Document Glass and
See
5-12: Selecting the Original
Size (Original Size)
the document size.
The display of this screen can be
enabled via the Tools Mode screen.
See
System Setup
Custom Preset Functions
This screen is not displayed by
factory default.
on how to input
in
6-1: List of
.
selecting the copy function.
Size here refers to the image size that is calculated based on the document
size detected by the machine and the specified ratio.
The Size Mismatch message screen will be displayed if the machine is
unable to detect the document size and the image size does not fit the
selected paper size. This may result in image loss when the document is
copied.
If the copy to be made is either option 1, 2 or 3 on the left side of the screen,
check that Copy without Rotation is selected and press Start. The copy
will be made without rotating the image regardless of the Image Rotation
setting. (When this screen is displayed, Copy without Rotation is already
selected.)
If Copy Anyway is selected, the copy will be made based on the document
size detected by the machine and the selected features. Sometimes image
loss may result after the image is rotated because of the loading method or
the document size. In this case, first enter the area to be copied by using
the Original Size feature.
"Size Mismatch" will not be displayed in the following instances.
• Paper Supply or Reduce/Enlarge is set to Auto and Auto %
respectively.
• Independent X-Y% is selected.
• A non standard size paper is selected.
• The area to be copied is entered by using the Original Size
feature.
• Image Shift ( , Auto Center (Centre)), Multi-Up (N Up),
Repeat Image, Book Copying, or Book Duplex is selected.
3-2 Loading Documents
38
Page 61

4
Basic Features
4-1 Overview of Basic Features........................................ 40
4-2 Selecting a Paper Tray (Paper Supply) ...................... 42
4-3 Reducing/Enlarging (Reduce/Enlarge) ....................... 43
4-4 Reducing/Enlarging the Length and Width
(Independent X-Y%) .................................................. 49
4-5 Copying on One Side (2 Sided) .................................. 56
4-6 Copying on Two Sides (2 Sided)................................. 59
4-7 Collating Copy Output (Output/Finishing) ................... 64
4-8 Stapling (Stapling) ...................................................... 67
4-9 Punching Holes (Punching) ........................................ 70
4-10 Resetting the Copy Sets and Feature Settings to Their
Defaults....................................................................... 73
4-11 Stopping a Copy Job................................................... 74
4-12 Interrupting a Copy Job............................................... 75
4-13 Programming Ahead ................................................... 76
Page 62

Basic Features
The screen below has the Tray 6
(High Capacity Feeder), and
Finisher installed.
Overview of Basic Features
The icons and buttons on the display that are used for carrying out a basic
copy job are shown in the diagram below. This diagram shows their
locations on the control panel as well as the features that they have.
You will find it useful to familiarize yourself with the respective locations of
the icons and buttons before operating the machine.
4
Paper Supply
For selecting the
paper size
Reduce/Enlarge
For making reduced/
enlarged copies
2 Sided
For making 2-sided
copies
Output/Finishing
(Collate/Uncollate/
Stapling/Punching)
For selecting the type of
output and finishing
4-1 Overview of Basic Features
40
Page 63

Interrupt
For interrupting the current job
with an urgent job
Basic Features
Clear All
For clearing and returning the
selected settings to their
default values
Keypad
For entering numerical
values such as number
of sets
Clear C
For clearing a mistake
made when entering a
value with the keypad
4
Stop
For stopping a copy job
Start
For starting a copy job
4-1 Overview of Basic Features
41
Page 64

4
Basic Features
A message will appear on the
display if the auto-selected tray has
no paper or the machine is unable to
detect the size of the document.
Follow the displayed instructions.
A message will appear on the
display if the selected tray has no
paper. Follow the displayed
instructions.
By factory default, Auto Paper
Selection is applicable to Tray 1,
Tray 2, and Trays 3, 4, 6 (High
Capacity Feeder) (optional).
Request the Tools Mode
administrator to set the tray you wish
to assign for Auto Paper Selection.
See
Paper Tray Attributes
List of Custom Preset Functions
in
6-1:
Selecting a Paper Tray
(Paper Supply)
Before starting a copy job, select a paper tray with the required paper size.
There are two methods of selecting a paper tray:
Auto Paper Selection (Auto)
The machine will detect the document size, match it with the percentage
selected in Reduce/Enlarge and determine which paper size to use.
Operator's Selection
You will select the desired paper tray.
.
Procedure
Chapter 3 Loading Documents
information on how to load
documents.
The screen on the right has the Tray
6 (High Capacity Feeder), and
Finisher installed.
The factory default for Paper Supply
is Auto.
Paper Supply can also be selected
on the Features Menu screen.
You cannot select Auto for Paper
Supply and Auto % for Reduce/
Enlarge at the same time. Once you
have selected Auto % for Reduce/
Enlarge, the Auto option in Paper
Supply is automatically disabled.
Some features cannot be selected
together with this feature. See
Appendix B: Possible Combinations
of Features
for details.
for
Load the document.
On the Basic Features screen, select Auto in Paper Supply.
Alternatively, select the tray with the desired paper size.
For example, select 1.
Select other features if necessary.
Enter the required number of sets by using the keypad and
press Start.
The copies are made on paper from the selected tray.
If Auto is selected, the copies are made on paper from the tray designated for
Auto Paper Selection.
4-2 Selecting a Paper Tray (Paper Supply)
42
Page 65

Reducing/Enlarging
Enter the vertical and horizontal
ratios of the document. The machine
will convert these into length and
width, and produce the copy
accordingly. See
Enlarging the Length and Width
(Independent X-Y%)
on the Independent X-Y% feature.
4-4: Reducing/
for information
Basic Features
(Reduce/Enlarge)
The Reduce/Enlarge feature allows you to adjust the size of your copy
image. There are two methods to choose from:
Size-for-Size Copying (100%)
The copied image is the same size as the original image.
Reduction or Enlargement
You can reduce/enlarge an image by using one of the following methods:
Selecting Auto%
The machine determines the appropriate ratio for Reduce/Enlarge so
that the copy image fits onto the selected paper.
Preset Percentage Change
You can select one of the seven preset ratios.
Variable Percentage Change (Variable %)
You can specify a reduction or enlargement ratio between 25-400%.
Copy
Original
Ledger
Legal
Letter
Invoice
Ledger
100%
121%
129%
200%
Legal
77%
100%
100%
155%
Letter
65%
79%
100%
129%
4
Invoice
50%
61%
65%
100%
4-3 Reducing/Enlarging (Reduce/Enlarge)
43
Page 66

Basic Features
Size-for-Size Copying
You can make an exact copy of the original by selecting 100% in Reduce/
Enlarge on the Basic Features screen.
Procedure
4
Chapter 3 Loading Documents
information on how to load
documents.
The factory default for Reduce/
Enlarge is 100%.
Reduce/Enlarge can also be
selected on the Features Menu
screen.
The screen on the right has the Tray
6 (High Capacity Feeder), and
Finisher installed.
Some features cannot be selected
together with this feature. See
Appendix B: Possible Combinations
of Features
for details.
for
Load the document.
On the Basic Features screen, select 100% in Reduce/Enlarge.
Select other features if necessary.
Enter the required number of sets by using the keypad and
press Start.
The copies are made at 100%.
4-3 Reducing/Enlarging (Reduce/Enlarge)
44
Page 67

Reduction or Enlargement
If you have selected Auto % in Reduce/Enlarge, the machine determines an
appropriate reduction or enlargement ratio so that the copy image fits onto
the paper from the tray which you have selected in Paper Supply.
Procedure
Load the document.
Chapter 3 Loading Documents
information on how to load
documents.
for
On the Basic Features screen, select the tray with the desired
paper size in Paper Supply.
For example, select 4.
Basic Features
Paper Supply can also be selected
on the Features Menu screen.
The screen on the right has the Tray
6 (High Capacity Feeder), and
Finisher installed.
The factory default for Reduce/
Enlarge is 100%.
Reduce/Enlarge can also be
selected on the Features Menu
screen.
You cannot select Auto for Paper
Supply and Auto % for Reduce/
Enlarge at the same time. Once you
have selected Auto % for Reduce/
Enlarge, the Auto option in Paper
Supply is automatically disabled.
4
On the Basic Features screen, select Auto % in Reduce/
Enlarge.
Select other features if necessary.
Some features cannot be selected
together with this feature. See
Appendix B: Possible Combinations
of Features
for details.
Enter the required number of sets by using the keypad and
press Start.
The copies are made according to the ration that matches the paper size
specified in Step 2.
4-3 Reducing/Enlarging (Reduce/Enlarge)
45
Page 68

Basic Features
Preset Percentage Change
Procedure
The values of the preset ratios can
be changed. If you use a ratio more
frequently than those shown on the
right, then you will find it convenient
to change one of those preset ratios
to the one that you frequently use.
See
R/E Presets
Custom Preset Functions
information on how to change the
preset ratios.
of
6.1: List of
for
Load the document.
On the Basic Features screen, select Reduce/Enlarge.
4
Chapter 3 Loading Documents
information on how to load
documents.
The screen on the right has the Tray
6 (High Capacity Feeder), and
Finisher installed.
The factory default for Reduce/
Enlarge is 100%.
Reduce/Enlarge can also be
selected on the Features Menu
screen.
Select Cancel to cancel the settings.
Some features cannot be selected
together with this feature. See
Appendix B: Possible Combinations
of Features
for details.
for
Select the button with the desired preset ratio.
For example, select 64% 11 x 17" 8.5 x 11".
Select Save.
Select other features if necessary.
4-3 Reducing/Enlarging (Reduce/Enlarge)
46
Enter the required number of sets by using the keypad and
press Start.
The copies are made according to the ratio specified in Step 3.
Page 69

Variable Percentage Change (Variable %)
You can make copies by selecting a ratio between 25-400%.
Procedure
Load the document.
Chapter 3 Loading Documents
information on how to load
documents.
Paper Supply can also be selected
on the Features Menu screen.
The screen on the right has the Tray
6 (High Capacity Feeder), and
Finisher installed.
for
On the Basic Features screen, select Reduce/Enlarge.
Basic Features
4
The factory default for Reduce/
Enlarge is 100%.
Reduce/Enlarge can also be
selected on the Features Menu
screen.
Select Variable %.
4-3 Reducing/Enlarging (Reduce/Enlarge)
47
Page 70

Basic Features
Touch C on the screen if you made a
mistake while entering the ratio.
Select Cancel to cancel the settings.
Use buttons, or the keypad displayed on the screen to
enter the ratio.
For example, enter 120%.
Select Save twice.
4
Some features cannot be selected
together with this feature. See
Appendix B: Possible Combinations
of Features
for details.
Select other features if necessary.
Enter the required number of sets by using the keypad and
press Start.
The copies are made according to the ratio specified in Step 4.
4-3 Reducing/Enlarging (Reduce/Enlarge)
48
Page 71

Basic Features
Reducing/Enlarging the
Length and Width
(Independent X-Y%)
The Independent X-Y% feature allows you to make copies with independent
length or width of the original. There are three methods available.
Specifying X/Y Percentage Change (Variable X-Y%)
If you have also selected Auto
Center (Centre) for Image Shift,
then the image will be copied onto
the center of the paper as shown in
the diagram on the right.
You can select a ratio between 25400% in 1% increments.
You can enter a length (Y) between
1-999 mm in 1 mm increment.
The machine will automatically
adjust the ratio to 25% if the
calculated ratio is below 25%, and
400% if the calculated ratio is above
400%.
Y
X
Specifying Original/Copy Size (Calculator %)
Automatic X/Y Percentage Change (Auto-Fit)
You can make copies of
the originals by
selecting different ratios
for X and Y. The image
will be copied according
to your selected values.
4
Copies will be made
based on the ratios
calculated by the
machine from the input
measurements of the
document and the
desired copy.
When this is selected with Image
Rotation Off, the resulting output
will be as illustrated on the right.
The machine will make
copies of the originals
by calculating the X and
Y ratios so that the
image can fit onto the
selected paper size.
4-4 Reducing/Enlarging the Length and Width (Independent X-Y%)
49
Page 72

4
Basic Features
Specifying X/Y Percentage Change (Variable X-Y%)
You can make copies of your original by specifying its X and Y ratios
separately. The image will be copied according to the ratios that you have
entered.
Procedure
On the Basic Features screen, select Reduce/Enlarge.
The factory default for Reduce/
Enlarge is 100%.
Reduce/Enlarge can also be
selected on the Features Menu
screen.
The screen on the right has the Tray
6 (High Capacity Feeder), and
Finisher installed.
Select Cancel to cancel the settings.
Select Independent X-Y%.
Select Variable X-Y%.
4-4 Reducing/Enlarging the Length and Width (Independent X-Y%)
50
Page 73

Y ou can use buttons below XY on
the display to increase or decrease the
ratio of X and Y simultaneously.
Select Cancel to cancel the settings.
Basic Features
Enter the X and Y ratios by using buttons.
For example, enter Y = 120% and X = 200%.
Load the original in the orientation of Head to Top, or Head to
Left.
Chapter 3 Loading Documents
information on how to load
documents.
Set the document orientation
correctly because if it is different
from the orientation of original
loaded, XY is different and their
reduction or enlargement becomes
different as a result.
See
5-10: Selecting the Original
Orientation (Original Orientation)
details.
for
for
4
Select the corresponding document orientation of the original
loaded.
Select Head to Top or Head to Left.
Some features cannot be selected
together with this feature. See
Appendix B: Possible Combinations
of Features
for details.
Select Save twice.
Select other features if necessary.
Enter the required number of sets by using the keypad and
press Start.
The copies are made according to the ratios specified in Step 4.
4-4 Reducing/Enlarging the Length and Width (Independent X-Y%)
51
Page 74

Basic Features
Specifying Original/Copy Size (Calculator %)
The machine will make copies of your original based on the ratios calculated
from the measurements of the original and the copy that you have entered.
4
The machine will automatically
adjust the ratio to 25% if the
calculated ratio is 25% or below, and
400% if the calculated ratio is 400%
and above.
The factory default for Reduce/
Enlarge is 100%.
Reduce/Enlarge can also be
selected on the Features Menu
screen.
The screen on the right has the Tray
6 (High Capacity Feeder), and
Finisher installed.
Select Cancel to cancel the settings.
Procedure
On the Basic Features screen, select Reduce/Enlarge.
Select Independent X-Y%.
Select Calculator %.
4-4 Reducing/Enlarging the Length and Width (Independent X-Y%)
52
Page 75

Use the ruler markings surrounding
the Document Glass to set the area
of the original for scanning.
Select Cancel to cancel the settings.
Basic Features
Check that there is a button on the left of Original Size under
Y. Enter the length of the document by using the keypad.
For example, enter "210 mm".
Select Enter/Next.
The button moves to the left of Copy Size under Y.
To change the value, select Enter/
Next to move to the value you want.
Chapter 3 Loading Documents
information on how to load
documents.
Set the document orientation
correctly because if it is different
from the orientation of original
loaded, XY is different and their
reduction or enlargement becomes
different as a result.
See
5-10: Selecting the Original
Orientation (Original Orientation)
details.
You cannot select Save until you
have entered all the measurements
for the document and paper size.
Some features cannot be selected
together with this feature. See
Appendix B: Possible Combinations
of Features
for details.
for
for
Select the value of X in the same way as explained from Steps
5 to 6.
The machine calculates the XY ratio and it is displayed.
Load the original in the orientation of Head to Top, or Head to
Left.
Select the corresponding document orientation of the original
loaded.
Select Head to Top or Head to Left.
Select Save twice.
Select other features if necessary.
Enter the required number of sets by using the keypad and
press Start.
The copies are made according to the specified copy sizes.
4
4-4 Reducing/Enlarging the Length and Width (Independent X-Y%)
53
Page 76

Basic Features
Automatic X/Y Percentage Change (Auto-Fit)
The machine will make copies of your original by calculating the X and Y
ratios so that the image can fit onto the selected paper size.
Procedure
On the Basic Features screen, select the tray with the desired
paper size in Paper Supply.
Paper Supply can also be selected
on the Features Menu screen.
The screen on the right has the Tray
6 (High Capacity Feeder), and
Finisher installed.
For example, select 4.
4
On the Basic Features screen, select Reduce/Enlarge.
The factory default for Reduce/
Enlarge is 100%.
Reduce/Enlarge can also be
selected on the Features Menu
screen.
Select Independent X-Y%.
Select Cancel to cancel the settings.
4-4 Reducing/Enlarging the Length and Width (Independent X-Y%)
54
Page 77

Select Cancel to cancel the settings.
Basic Features
Select Auto-Fit.
Load the original in the orientation of Head to Top, or Head to
Left.
Chapter 3 Loading Documents
information on how to load
documents.
To disable Image Rotation, set it to
Off on the Customized Features
screen or Features Menu screen.
Some features cannot be selected
together with this feature. See
Appendix B: Possible Combinations
of Features
for details.
for
4
Select the corresponding document orientation of the original
loaded.
Select Head to Top or Head to Left.
Select Save twice.
Select other features if necessary.
Enter the required number of sets by using the keypad and
press Start.
The copies are made by enlarging or reducing the original image size so that it
fits onto the selected paper size.
5-11: Rotating and Copying in
Different Directions (Image Rotation)
Automatic Image Rotation
When the document orientation of the original and paper loaded differs,
the image will be copied by rotating it so that they are the same.
(Factory default: Image Rotation is On.) To copy a portrait original in
landscape orientation, select rotation to be off so that the desired
alteration to XY ratio is achieved.
4-4 Reducing/Enlarging the Length and Width (Independent X-Y%)
55
Page 78

Basic Features
Copying on One Side
(2 Sided)
The 2 Sided feature allows you to make one sided copies from one sided
documents or two sided documents,
To make one sided copies from a two sided document, use the DADF.
4
Procedure
On the Basic Features screen, select 2 Sided.
The screen on the right has the Tray
6 (High Capacity Feeder), and
Finisher installed.
2 Sided can also be selected on the
Features Menu screen.
4-5 Copying on One Side (2 Sided)
56
Page 79

The factory default is 1 1 Sided.
Select Cancel to cancel the settings.
When making two sided copies, use
the DADF. The Document Glass
can only be used for making one
sided copies.
Select Cancel to cancel the settings.
Basic Features
Select either 1 1 Sided or 2 1 Sided.
For example, select 2 1 Sided.
Select Head to Head or Head to Toe as the image orientation
of the document if you have selected 2 1 Sided.
Head to Head When all sides of a document have the same orientation.
Head to Toe When the orientation of side two is the reverse of side one.
4
4-5 Copying on One Side (2 Sided)
57
Page 80

Basic Features
Chapter 3 Loading Documents
information on how to load
documents.
For 2 1 Sided copying, use the
DADF.
5-10: Selecting the Original
Orientation (Original Orientation)
details.
for
for
Load the original in the orientation of Head to Top, or Head to
Left.
Select the corresponding document orientation of the original
loaded.
Select Head to Top or Head to Left.
4
Some features cannot be selected
together with this feature. See
Appendix B: Possible Combinations
of Features
for details.
Select Save.
Select other features if necessary.
Enter the required number of sets by using the keypad and
press Start.
The copies are made on one side of the paper.
4-5 Copying on One Side (2 Sided)
58
Page 81

Copying on Two Sides
You cannot make two sided copies
onto paper size smaller than
5.5 x 8.5".
You cannot make two sided copies if
the settings for front and back pages
differ.
You cannot make two sided copies
on paper that is over 28 lbs.
Basic Features
(2 Sided)
You can make two sided copies from one or two sided documents.
However, to make two sided copies from a two sided document, you need
to have the DADF installed.
Making Two Sided Copies from One Sided Originals
Procedure
On the Basic Features screen, select 2 Sided.
The screen on the right has the Tray
6 (High Capacity Feeder), and
Finisher installed.
2 Sided can also be selected on the
Features Menu screen.
4
4-6 Copying on Two Sides (2 Sided)
59
Page 82

Basic Features
The factory default is 1 1 Sided.
Select Cancel to cancel the settings.
Select 1 2 Sided.
Select Head to Head or Head to Toe as the image orientation
of the copy.
4
Head to Head: When all sides of a document have the same orientation.
Head to Toe: When the orientation of side two is the reverse of side one.
Chapter 3 Loading Documents
information on how to load
documents.
4-6 Copying on Two Sides (2 Sided)
60
Load the original in the orientation of Head to Top, or Head to
Left.
for
Page 83

5-10: Selecting the Original
Orientation (Original Orientation)
details.
Some features cannot be selected
together with this feature. See
Appendix B: Possible Combinations
of Features
If the total sheet number of your
document is an odd number, the last
sheet will be made a one sided
copy. If you place the document on
the Document Glass, then you have
to repeatedly place each page and
press Start to make two sided
copies. If the last scanned page is
side one, select End Job.
for details.
for
Basic Features
Select the corresponding document orientation of the original
loaded, and select Save.
Select Head to Top or Head to Left.
Select other features if necessary.
Enter the required number of sets by using the keypad and
press Start.
The copies are made on both sides of the paper.
4
Making Two Sided Copies from Two Sided Originals
Procedure
On the Basic Features screen, select 2 Sided.
The screen on the right has the Tray
6 (High Capacity Feeder), and
Finisher installed.
2 Sided can also be selected on the
Features Menu screen.
Select 2 2 Sided.
The factory default is 1 1 Sided.
Select Cancel to cancel the settings.
When making two sided copies, use
the DADF. The document glass can
only be used for making one sided
copies.
4-6 Copying on Two Sides (2 Sided)
61
Page 84

Basic Features
Select Copy Result.
Select the image orientation of both the documents and the
copies.
4
Head to Head: When all sides of a document have the same orientation.
When the copy result is where sides one and two have the
same orientation.
Head to Toe: When the orientation of side two of a document is the reverse
of side one.
When the copy result is such that the orientation of side two is
the reverse of side one.
4-6 Copying on Two Sides (2 Sided)
62
Page 85

Chapter 3 Loading Documents
information on how to load
documents.
5-10: Selecting the Original
Orientation (Original Orientation)
details.
for
for
Basic Features
Load the original in the DADF.
Load the original in the orientation of Head to Top or Head to Left.
Select the corresponding document orientation of the original
loaded.
Select Head to Top or Head to Left.
Some features cannot be selected
together with this feature. See
Appendix B: Possible Combinations
of Features
for details.
4
Select Save twice.
Select other features if necessary.
Enter the required number of sets by using the keypad and
press Start.
The copies are made on both sides of the paper.
4-6 Copying on Two Sides (2 Sided)
63
Page 86

4
Basic Features
If the optional Offset Catch Tray is
installed, each set is offset from the
previous copy. This means that the
edge of each set is placed to the left
or right of the previous copy set to
allow easy separation.
For paper sizes which are valid for
offset, see
(Optional) of Appendix A:
Specifications
For Collated option, you can select
Face Up for output orientation and
the collated sets will be delivered
face up. For details, refer to
Setup of 6-1: List of Custom Preset
Functions
Offset Catch Tray
.
System
.
Collating Copy Output
(Output/Finishing)
You can choose to output multiple sets of the copies in three ways:
Collated/Finishing
The copies are sorted according to their page sequence and the
specified number of sets are delivered facing downwards.
Uncollated (per page)
The copies are sorted by page according to the copy sequence and the
specified number of sets are delivered facing upwards.
Auto
The required number of collated sets is output if you load your originals
into the DADF and press Start.
4-7 Collating Copy Output (Output/Finishing)
64
Page 87

Chapter 3 Loading Documents
information on how to load
documents.
The screen on the right has the Tray
6 (High Capacity Feeder), and
Finisher installed.
Output/Finishing can also be
selected on the Features Menu
screen
for
Basic Features
Procedure
Load the document.
Use the DADF. If the number of originals is 51 and above, divide them into
smaller numbers for loading. A total of up to 700 sheets can be scanned
continuously.
From the Basic Features screen, select Output/Finishing.
The screen on the right has the
finisher feature installed.
The factory default is Auto.
Select Cancel to cancel the settings.
If the punch scrap container
becomes full, the Large Output
feature cannot be used. See
Emptying the Punch Scrap
Container
Some features cannot be selected
together with this feature. See
Appendix B: Possible Combinations
of Features
.
for details.
8-7:
4
To produce collated sets from the documents loaded on the
Document Glass, select Collated/Finishing. To produce
uncollated sets from the originals loaded onto the DADF, select
Uncollated.
When the Finisher is installed, select Large Output if your output is more than
500 copies. The output will be delivered to finisher Tray 2.
Select Save.
Select other features if necessary.
Enter the required number of sets by using the keypad and
press Start.
4-7 Collating Copy Output (Output/Finishing)
65
Page 88

Basic Features
If you have selected Collated and
you place your document on the
Document Glass, then you will have
to repeatedly place each page and
press Start to scan. Repeat this
process until there are no more
pages to scan. Then select End
Job.
Continuous scanning is valid up to a
total of 700 sheets.
When there is an original to be scanned next, select Next
Document, which is displayed on the screen when scanning is
in progress.
After the first original has been scanned, load the next original
and press Start.
Scanning continues.
4
After the last original has been scanned, select End Job.
Copying starts, and the specified copy output is discharged.
4-7 Collating Copy Output (Output/Finishing)
66
Page 89

Stapling
Stapling and Large Output cannot
be selected for interrupting copy job.
If the punch scrap container is full,
the Stapling and Large Output
features become invalid. See
Emptying the Punch Scrap
Container
See
Stapling cannot be done on the
length of paper larger than A4 or
8.5 x 11”.
.
Appendix C: Stapling
8-7:
.
Basic Features
(Stapling)
The Stapling feature allows you to have your copies sorted by page sequence,
stapled and delivered set by set if the Finisher is installed. Up to 50 sheets of
paper can be stapled together.
Applicable Paper Size/Orientation, and stapling positions are shown
below.
Paper Size/Orientation
B5, A4, B4, 8K (267
A5 , B5
8.5 x 11”
A4
x 388 mm), 8.5 x 11",
8.5 x 13", 8.5 x 14",
11 x 17"
A3
Top Left
Stapling positions
Top Right
Top Double
Left Double
Right Double
@
4
You can make copies of mixed size
documents on same size paper and
staple them. Select Auto for Paper
Size, and Reduce/Enlarge, and On
for Stapling.
* For single stapling, depending on the paper size, stapling can be made parallel to the edge of the
paper.
For stapling on paper of mixed sizes (only when DADF is used):
Stapling is possible when the length of Y is the same.
Possible combinations are A5
8.5 x 11"
and 11 x 17".
and A4, B5 and B4, A4 and A3,
4-8 Stapling (Stapling)
67
Page 90

Basic Features
The screen on the right has the Tray
6 (High Capacity Feeder), and
Finisher installed.
Output/Finishing can also be
selected on the Features Menu
screen.
Procedure
On the Basic Features screen, select Output/Finishing.
Select Collated/Finishing.
4
Select Cancel to cancel the settings.
Select stapling position from Top Left, Top Right, Top Double,
Left Double or Right Double.
For example, select Top Left (top left button).
Chapter 3 Loading Documents
information on how to load
documents.
When loading mixed size originals,
use the DADF.
4-8 Stapling (Stapling)
68
for
Load the original in the orientation of Head to Top, or Head to
Left.
Page 91

5-10: Selecting the Original
Orientation (Original Orientation)
the details.
for
Basic Features
Select the corresponding document orientation of the original
loaded, and select Save.
Select Head to Top or Head to Left.
To stop the copy job, press Stop on
the control panel or touch Stop
displayed on the screen. See
Stopping a Copy Job
You cannot press the Start button if
a message requesting you to
replace the staple cartridge is
displayed. In this case, replenish the
staple cartridge. See
the Staple Cartridge
If Stapling feature is off in Step 3,
then the copies will be delivered to
finisher Tray 1.
Some features cannot be selected
together with this feature. See
Appendix B: Possible Combinations
of Features
Do not remove any paper from
finisher Tray 2 while copying is in
progress.
Copying stops when finisher Tray 2
becomes full with 100 sets or 1500
sheets (750 sheets for sizes larger
than A4). Remove the copies from
finisher Tray 2, then press Start to
resume copying.
for details.
for details.
8-6: Replacing
for details.
4-11:
Confirm the settings at the lower left side of the screen and
select Save.
4
Select other features if necessary.
Enter the required number of sets by using the keypad and
press Start.
The copies are collated set by set, stapled, and delivered to finisher Tray 2.
You can remove the copies from finisher Tray 2 after all the
copies are delivered and the machine stops.
4-8 Stapling (Stapling)
69
Page 92

Basic Features
The machine will stop punching
holes once the punch scrap
container is full. See
the Punch Scrap Container
details.
Punching and Large Output
cannot be selected for interrupting
copy job.
The first copy page may slip out
when copying (punching mode and
no stapling mode) by using
optional Finisher.
8-7: Emptying
for
Punching Holes
(Punching)
When the Finisher (optional) is installed, copies can be made and output
with punched holes. Paper sizes that can be punched and the positions of
holes are as follows.
Paper sizes that can be punched and the positions of holes
B5 , A4 , 8.5 x 11" paper: Holes are punched at the long edge.
B4, A3, 11 x 17" paper: Holes are punched at the short edge.
B5 , A4 , 8.5 x 11" B4, A3, 11 x 17"
Top Side
4
Left Side
Right Side
For B5 , A4 , 8.5 x 11" size, holes cannot be punched on the short edge.
For
B4, A3, 11 x 17" size, holes cannot be punched on the long edge.
Also, when punching B5 , A4 , 8.5 x 11" size paper, check that the paper of
orientation is loaded in the tray.
4-9 Punching Holes (Punching)
70
Punching holes on paper of mixed sizes (applicable only when DADF is
used):
When Y is the same for paper of mixed sizes, punching holes is possible
However, only the following combinations are possible: B5 and B4, A4
and A3, 8.5 x 11" and 11 x 17".
Page 93

The screen on the right has the Tray
6 (High Capacity Feeder), and
Finisher installed.
Output/Finishing can also be
selected on the Features Menu
screen.
Basic Features
Procedure
On the Basic Features screen, select Output/Finishing.
Select Collated/Finishing.
Select Cancel to cancel the settings.
4
Then select On for Punching.
Select Top Side, Left Side, or Right Side.
For example, select Left Side (left button).
4-9 Punching Holes (Punching)
71
Page 94

Basic Features
Chapter 3 Loading Documents
information on how to load
documents.
For documents of mixed sizes, use
the DADF.
5-10: Selecting the Original
Orientation (Original Orientation)
details.
for
for
Load the original in the orientation of Head to Top, or Head to
Left.
Select the corresponding document orientation of the original
loaded, and select Save.
Select Head to Top or Head to Left.
4
Select Cancel to cancel the settings.
Some features cannot be selected
together with this feature. See
Appendix B: Possible Combinations
of Features
To stop the copy job, press Stop on
the control panel or touch Stop
displayed on the screen. See
Stopping a Copy Job
If the Punching feature is Off in Step
3, copies will be output to Finisher
Tray 1.
for details.
4-11:
for details.
Confirm the settings at the lower left side of the screen and
select Save.
Select other features if necessary.
Do not remove any paper from
Finisher Tray 2 while copies are
being output.
Copying stops when Finisher Tray 2
becomes full with 100 sets or 1500
sheets (750 sheets for sizes greater
than A4). Remove the copies from
Finisher Tray 2, then press Start to
resume copying.
4-9 Punching Holes (Punching)
72
Enter the required number of sets by using the keypad and
press Start.
The copies are punched and delivered to Finisher Tray 2.
You can remove the copies from Finisher Tray 2 after all the
copies are delivered and the machine stops.
Page 95

Resetting the Copy Sets and
Feature Settings to Their Defaults
If you made a mistake while entering the value for the number of sets to be
copied, you can select the Clear C button from the Control Panel to clear and
then re-enter the value. This button can also be used to clear settings of the
previous copy job.
Select Clear All on the Control Panel to clear all settings and return them to
their defaults.
Resetting the Number of Copy Sets
Basic Features
Procedure
Press Clear C.
The number of sets to be copied returns to 1.
Re-enter a value by using the
keypad.
Resetting the Feature Settings
Procedure
Press Clear All.
All settings are cleared and returned to their defaults.
To cancel an auto start copy job,
press Stop and then Clear All.
4
Time-Outs
Preset Functions
in
6-1: List of Custom
for details.
Job Program Incomplete/End of Job Time-Outs
These time-out features will automatically reset all settings to their
defaults if the machine has been left idle for a certain period of time.
4-10 Resetting the Copy Sets and Feature Settings to Their Defaults
73
Page 96

Basic Features
Stopping a Copy Job
To stop a copy job, pressing Stop will stop the job temporarily. Press Clear
C or Clear All after that to stop the copy job.
Procedure
Press Stop.
4
If there is an Auto Start copy job, the
Auto indicator light on the top left of
the Start button will be lit.
If the copy in progress screen is
displayed, select Stop on the screen
to halt the copy operation.
To resume copying after a copy job
has been stopped, press Start.
If there are copy/print jobs, which
have been temporarily stopped
(waiting for operation), you cannot
proceed with the next copy job.
Press Job Status Stop to display
the job status of the stopped job
(waiting for operation). To resume
the stopped job, select it, and press
Start. To cancel it, press Clear C or
Clear All.
The current copy job is stopped temporarily. The screen below is displayed. A
waiting copy job that uses the Auto Start feature is also stopped temporarily.
Press Clear C or Clear All.
or
The copy job is stopped.
4-11 Stopping a Copy Job
74
Page 97

Interrupting a Copy Job
Interrupting job is up to 200 sheets
for one sided documents and 100
sheets for two sided documents.
The Interrupt feature cannot be used
when two jobs are programmed by
using the Program Ahead feature.
Basic Features
You can interrupt a copy job that is in progress for an urgent job. Once the
urgent job is done, the copier will resume the interrupted copy job.
Interrupting a copy job cannot be carried out under the conditions below:
When documents are being scanned in the DADF.
•
When documents are being scanned on the Document Glass up to
•
selection of End Job.
Procedure
Press Interrupt.
The indicator light at the top left of the Interrupt button lights up indicating that
the current copy job has been interrupted.
Load the documents of the interrupting job.
Select other features if necessary.
Enter the required number of sets by using the keypad and
press Start.
The interrupting job starts.
After the interrupting job has ended, press Interrupt.
The indicator light at the top left of the Interrupt button is off indicating that the
interrupt mode has been cancelled.
4
Press Start.
The interrupted job resumes.
4-12 Interrupting a Copy Job
75
Page 98

4
Basic Features
Programming Ahead
The Program Ahead feature allows you to make selections for, and perform
scanning of jobs in advance, while preceding jobs are being output.
Procedure
While the screen below is being displayed, select Program
Ahead.
On a model with printer function,
select Exit, which is displayed in
place of Program Ahead.
If there is a copy/print job, which has
been temporarily stopped (waiting
for operation), you cannot proceed
with the second copy job. Press
Job Status Stop to display the
job status of the stopped job (waiting
for operation). To resume the
stopped job, select it, and press
Start. To cancel it, press Clear C or
Clear All.
After scanning of the job to be
programmed ahead is completed,
the job will be placed at the end of
the queue for execution.
To cancel a Program Ahead job,
which has been scanned, select
Stop on the screen displayed, then
press Clear C or Clear All. If the
display has changed, press Job
Status Stop, and select the job to
be cancelled.
Press Clear C or Clear All to cancel
the job.
Make selections for the next job, load your documents and
press Start to begin scanning.
The job will start automatically after the preceding job has been completed.
When Number of Documents is 51 and Above
The number of documents which can be loaded in the DADF is up to
50 sheets. You can repeat this, by adding documents, for up to a total
of 700 sheets (350 sheets in the case of 2 sided documents) for
continuous scanning.
select Next Original. When scanning has ended, add documents and
select Start to continue scanning. If there are no additional documents
to be scanned, select End Job. But, when Stapling, 1 2 Sided, Multi-
Up (N Up) is selected, scanning cannot be continued by adding
documents.
When the initial document is being scanned,
4-13 Programming Ahead
76
Page 99

5
Added Features
5-1 Overview of Added Features ...................................... 78
5-2 Adjusting Copy Density (Lighter/Darker) .................... 80
5-3 Making a Copy According to Original Type
(Original Type) ............................................................ 82
5-4 Copying Several Documents onto One Copy
(Multi-Up (N Up))......................................................... 84
5-5 Loading Mixed Size Originals
(Mixed Size Originals)................................................. 87
5-6 Copying Facing Pages onto Separate Sheets
(Book Copying) ........................................................... 90
5-7 Setting the Margins (Image Shift) ............................... 92
5-8 Erasing the Edges and Copying All
(Edge Erase/Copy All) ................................................ 96
5-9 Interleaving Blank Sheets Between Transparencies
(Transparency Separators) ......................................... 99
5-10 Selecting the Original Orientation
(Original Orientation)................................................... 102
5-11 Rotating and Copying in Different Directions
(Image Rotation) ......................................................... 104
5-12 Selecting the Original Size (Original Size).................. 106
5-13 Enhancing Sharpness (Sharpness) ............................ 108
5-14 Creating Negative-like Images (Negative Image) ....... 110
5-15 Creating Mirror Images (Mirror Image) ....................... 112
5-16 Repeating an Image (Repeat Image) ......................... 114
5-17 Making Duplex Copies of Facing Pages
(Book Duplex) ............................................................. 117
5-18 Inserting Covers (Covers)........................................... 120
5-19 Making a Sample Set (Sample Set)............................ 123
5-20 Creating a Booklet (Booklet Creation) ........................ 125
5-21 Job Memory Operations ............................................. 128
5-22 Using the Document/Copy Counter ............................ 136
Page 100

Added Features
Overview of Added Features
5
Paper Supply
Select this option to select the paper size.
4.2: Selecting a Paper Tray (Paper Supply)
Reduce/Enlarge
Select this option to reduce/enlarge a copy image.
4.3: Reducing/Enlarging (Reduce/Enlarge)
Lighter/Darker
Select this option to adjust the density of a copy.
5.2: Adjusting Copy Density (Lighter/Darker)
The above screen has the Finisher installed.
2 Sided
Select this option to make two sided or one sided
copies.
4-5: Copying on One Side (2 Sided)
4-6: Copying on Two Sides (2 Sided)
Output
Select this option to specify the method to output the
copies.
4-7: Collating Copy Output (Output/Finishing)
4-8: Stapling (Stapling)
4-9: Punching Holes (Punching)
Document Type
Select this option to make a copy that matches the
document type.
5-3: Making a Copy according to Original Type
(Original Type)
5-1 Overview of Added Features
78
Image Shift
Select this option to determine the position of the
document's image (up/down/left/right) on the copy
and to insert the binding shift.
5-7: Setting the Margins (Image Shift)
 Loading...