


AAC WMA MP3 CD Player/Receiver Récepteur/lecteur CD avec lecture AAC/WMA/MP3 Reproductor de CD, AAC, WMA y MP3/receptor
Model: CQ-C500U
Operating Instructions Manuel d’instructions Manual de Instrucciones
•Please read these instructions (including “Limited Warranty” and “Customer Services Directory”) carefully before using this product and keep this manual for future reference.
•Prière de lire attentivement ces instructions (y compris la « Garantie limitée » et le « Répertoire des services à la clientèle ») avant d’utiliser ce produit et conserver ce manuel d’instructions pour s’y référer ultérieurement.
•Lea con atención estas instrucciones antes de utilizar el producto y guarde este manual para poderlo consultar en el futuro.

Safety Information
Read the operating instructions for the unit and all other components of your car audio system carefully before using the system. They contain instructions about how to use the system in a safe and effective manner. Panasonic assumes no responsibility for any problems resulting from failure to observe the instructions given in this manual.
This pictograph intends to alert you to the presence of important operating instructions
 and installation instructions. Failure to heed the Warning instructions may result in severe injury or death.
This manual uses pictographs to show you how to use the product safely and to alert you to potential dangers resulting from improper connections and operations. The meanings of the pictographs are explained below. It is important that you fully understand the meanings of the pictographs in order to use this manual and the system properly.
This pictograph intends to alert you to the presence of important operating instructions and installation
 instructions. Failure to heed the instructions may Caution result in injury or material damage.
 Warning
Observe the following warnings when using this unit.
The driver should neither watch the display nor operate the system while driving.
Watching the display or operating the system will distract the driver from looking ahead of the vehicle and can cause accidents. Always stop the vehicle in a safe location and use the parking brake before watching the display or operating the system.
Use the proper power supply.
This product is designed for operation with a negative grounded 12 V DC battery system. Never operate this product with other battery systems, especially a 24 V DC battery system.
Keep batteries and insulation film out of reach of infants.
Batteries and insulation film can be ingested, so keep them out of the reach of infants. If an infant ingests a battery or insulation film, please seek immediate medical attention.
Protect the Deck Mechanism.
Do not insert any foreign objects into the slot of this unit.
Do not disassemble or modify the unit.
Do not disassemble, modify the unit or attempt to repair the product yourself. If the product needs to be repaired, consult your dealer or an authorized Panasonic Servicenter.
Do not use the unit when it is out of order.
If the unit is out of order (no power, no sound) or in an abnormal state (has foreign objects in it, is exposed to water, is smoking, or smells), turn it off immediately and consult your dealer.
The remote control unit should not lie about in the car.
If the remote control unit lies about, it could fall on the floor while driving, get wedged under the brake pedal, and lead to a traffic accident.
Refer fuse replacement to qualified service personnel.
When the fuse blows out, eliminate the cause and have it replaced with the fuse prescribed for this unit by a qualified service engineer. Incorrect replacement of the fuse may lead to smoke, fire, and damage to the product.
Observe the following warnings when installing.
Disconnect the lead from the negative (–) battery terminal before installation.
Wiring and installation with the negative (–) battery terminal connected may cause electrical shock and injury due to a short circuit.
Some cars equipped with the electrical safety system have specific procedures of battery terminal disconnection.
FAILURE TO FOLLOW THE PROCEDURE MAY LEAD TO THE UNINTENDED ACTIVATION OF THE ELECTRICAL SAFETY SYSTEM RESULTING IN DAMAGE TO THE VEHICLE AND PERSONAL INJURY OR DEATH.
Never use safety-related components for installation, grounding, and other such functions.
Do not use safety-related vehicle components (fuel tank, brake, suspension, steering wheel, pedals, airbag, etc.) for wiring or fixing the product or its accessories.
Installing the product on the air bag cover or in a location where it interferes with airbag operation is prohibited.
Check for piping, gasoline tank, electric wiring, and other items before installing the product.
If you need to open a hole in the vehicle chassis to attach or wire the product, first check where the wire harness, gasoline tank, and electric wiring are located. Then open the hole from outside if possible.
Never install the product in a location where it interferes with your field of vision.
Never have the power cord branched to supply other equipment with power.
After installation and wiring, you should check the normal operation of other electrical equipment.
The continuation of their using in abnormal conditions may cause fire, electrical shock or a traffic accident.
In the case of installation to an airbag-equipping car, confirm warnings and cautions of the vehicle manufacturer before installation.
Make sure the leads do not interfere with driving or getting in and out of the vehicle.
Insulate all exposed wires to prevent short circuiting.
|
CQ-C500U |
|
|

Caution
Observe the following cautions when using this unit.
Keep the sound volume at an appropriate level.
Keep the volume level low enough to be aware of road and traffic conditions while driving.
This unit is designed for use exclusively in automobiles. Do not operate the unit for a prolonged period with
the engine turned off.
Operating the audio system for a long period of time with the engine turned off will drain the battery.
Do not expose the unit to direct sunlight or excessive heat.
Otherwise these will raise the interior temperature of the unit, and it may lead to smoke, fire, or other damage to the unit.
Do not use the product where it is exposed to water, moisture, or dust.
Exposure of the unit to water, moisture, or dust may lead to smoke, fire, or other damage to the unit. Make especially sure that the unit does not get wet in car washes or on rainy days.
Set the volume level to low enough before the AUX connection is completed.
Failure to observe this, the loud noise may come out and damage your speakers and your hearing. Direct connection of the speaker/headphone output of an external device without any attenuator may distort sound or damage the connected external device.
Observe the following cautions when installing.
Refer wiring and installation to qualified service personnel.
Installation of this unit requires special skills and experience. For maximum safety, have it installed by your dealer. Panasonic is not liable for any problems resulting from your own installation of the unit.
Follow the instructions to install and wire the product.
Not following the instructions to properly install and wire the product could cause an accident or fire.
Take care not to damage the leads.
When wiring, take care not to damage the leads. Prevent them from getting caught in the vehicle chassis, screws, and moving parts such as seat rails. Do not scratch, pull, bend or twist the leads. Do not run them near heat sources or place heavy objects on them. If leads must be run over sharp metal edges, protect the leads by winding them with vinyl tape or similar protection.
Use the designated parts and tools for installation.
Use the supplied or designated parts and appropriate tools to install the product. The use of parts other than those supplied
or designated may result in internal damage to the unit. Faulty installation may lead to an accident, a malfunction or fire.
Do not block the air vent or the cooling plate of the unit.
Blocking these parts will cause the interior of the unit to overheat and will result in fire or other damage.
Do not install the product where it is exposed to strong vibrations or is unstable.
Avoid slanted or strongly curved surfaces for installation. If the installation is not stable, the unit may fall down while driving and this can lead to an accident or injury.
Installation Angle
The product should be installed in a horizontal position with the front end up at a convenient angle, but not more than 30˚.
The user should bear in mind that in some areas there may be restrictions on how and where this unit must be installed. Consult your dealer for further details.
Wear gloves for safety. Make sure that wiring is completed before installation.
To prevent damage to the unit, do not connect the power connector until the whole wiring is completed.
Do not connect more than one speaker to one set of speaker leads. (except for connecting to a tweeter)
Observe the following cautions when handling the battery for the remote control unit.
•Use only specified battery (CR2025).
•Match the polarity of the battery with the ( ) and ( ) marks in the battery case.
•Replace a dead battery as soon as possible.
•Remove the battery from the remote control unit when not using it for an extended period of time.
•Insulate the battery (by placing them in a plastic bag or covering them with vinyl tape) before disposal or storage.
•Dispose of the battery according to the local regulations.
•Do not disassemble, recharge, heat or short the battery. Do not throw a battery into a fire or water.
In case of battery leakage
•Thoroughly wipe the battery liquid off the battery case and insert new battery.
•If any part of your body or clothing comes into contact with battery liquid, wash it with plenty of water.
•If battery liquid comes into contact with your eyes, wash them with plenty of water and get immediate medical attention.
English
Safety Information
CQ-C500U |
|
|
|

Safety Information
Caution
THIS PRODUCT IS A CLASS I LASER PRODUCT.
USE OF CONTROLS OR ADJUSTMENTS OR PERFORMANCE OF PROCEDURES OTHER THAN THOSE SPECIFIED HEREIN MAY RESULT IN HAZARDOUS RADIATION EXPOSURE.
DO NOT OPEN COVERS AND DO NOT REPAIR BY YOURSELF. REFER SERVICING TO QUALIFIED PERSONNEL.
The following applies only in the U.S.A.
Part 15 of the FCC Rules
FCC Warning:
Any unauthorized changes or modifications to this equipment would void the user’s authority to operate this device.
Notice
This product contains a CR Coin Cell Lithium Battery which contains Perchlorate Material - special handling may apply. See www.dtsc.ca.gov/hazardouswaste/perchlorate.
Before Reading These Instructions
Panasonic welcomes you to our constantly growing family of electronic products owners.
We endeavor to give you the advantages of precise electronic and mechanical engineering, manufactured with carefully selected components, and assembled by people who are proud of the reputation their work has built for our company. We know this product will bring you many hours of enjoyment, and after you discover the quality, value and reliability we have built into it, you too will be proud to be a member of our family.
The instruction manual consists of 2 books. One is “Operating Instructions” describing the operations of the main unit. The other is “System Upgrade Guidebook” describing the optional devices such as CD changer.
Accessories
|
|
OO-OOOOO |
|
|
|
|
OO-OOOOO |
|
|
|
|
|
|
|
||
|
|
|
|
|
|
|
|
|
|
|
|
|
||||
|
|
|
|
|
|
|
|
|
|
|
|
|
|
|
|
|
|
|
|
|
|
|
|
|
|
|
|
|
|
|
|
|
|
|
|
|
|
|
|
|
|
|
|
|
|
|
|
|
|
|
Operating |
|
System Upgrade |
Installation |
Product |
Customer Care |
|
Instructions |
Guidebook |
Instructions |
Registration |
Plan |
||
(YGFM286068) |
(YGFM262853) |
(YGFM294421) |
Card |
|
||
|
|
|
|
Instruction kit |
|
|
|
|
|
|
Q’ty: 1 set |
|
|
POWER |
|
|
|
|
|
|
SOURCE MENU |
|
|
|
|
|
|
SRC |
SEL |
|
|
|
|
|
SET |
|
VOL |
|
|
|
|
BAND |
MUTE |
|
|
|
|
|
1 |
2 |
3 |
|
|
|
|
RANDOM |
SCAN |
REPEAT |
|
|
|
|
4 |
5 |
6 |
|
|
|
|
7 |
8 |
9 |
|
|
|
|
TUNE |
|
TUNE |
|
|
|
|
# |
0 |
DISP |
|
|
|
|
NUMBER |
|
|
|
|
|
|
CAR AUDIO
Remote Control |
Power Connector |
Lock Cancel |
Mounting Bolt |
Rubber |
||
Unit |
|
Plate |
(5 mm ) |
Bushing |
||
(including a battery) |
|
|
|
|
|
|
(CR2025) |
(YGAJ021012) |
|
|
|
|
|
(EUR7641010) |
|
|
(YEP0FZ5698) |
|
|
|
Q’ty: 1 |
Q’ty: 1 |
|
|
Q’ty: 1 set |
|
|
CQ-C500U

Before
Accessories (continued)
Customer Services Directory
|
|
|
|
|
|
|
|
|
|
|
|
|
|
|
Mounting |
Trim Plate |
Removable |
||
Collar |
|
|
Face Plate |
|
|
|
|
Case |
|
(YEFX0217263A) |
|
(YEFC051011) |
|
(YEFA131839A) |
Q’ty: 1 |
|
Q’ty: 1 |
|
Q’ty: 1 |
Notes:
•The number in parenthesis underneath each accessory part name is the part number for maintenance and service.
•Accessories and their parts numbers are subject to modification without prior notice due to improvements.
•Mounting Collar and Trim Plate are mounted on the main unit at shipment.
English
U.S.A.
Obtain Product Information and Operating Assistance; locate your nearest Dealer or Servicenter; purchase
Parts and Accessories; or make Customer Service and Literature requests by visiting our Web Site at:
http://www.panasonic.com/support or, contact us via the web at: http://www.panasonic.com/contactinfo
You may also contact us directly at: 1-800-211-PANA (7262),
Monday-Friday 9 am-9 pm; Saturday-Sunday 10 am-7 pm, EST.
For hearing or speech impaired TTY users, TTY : 1-877-833-8855
Accessory Purchases:
Purchase Parts, Accessories and Instruction Books online for all Panasonic Products by visiting our Web Site at:
http://www.pasc.panasonic.com or, send your request by E-mail to:
npcparts@panasonic.com
You may also contact us directly at:
1-800-332-5368 (Phone) 1-800-237-9080 (Fax Only) (Monday-Friday 9 am to 8 pm, EST.)
Panasonic Services Company
20421 84th Avenue South, Kent, WA 98032
(We accept Visa, MasterCard, Discover Card, American Express, and Personal Checks)
For hearing or speech impaired TTY users, TTY : 1-866-605-1277
Service in Puerto Rico
Panasonic Puerto Rico, Inc.
Panasonic Sales Company Factory Servicenter:
Ave. 65 de Infantería, Km. 9.5, San Gabriel Industrial Park,
Carolina, Puerto Rico 00985
Phone (787) 750-4300, Fax (787) 768-2910
CANADA
WARRANTY SERVICE
FOR PRODUCT OPERATION ASSISTANCE, please contact:
Our Customer Care Centre:
Telephone #: |
(905) 624-5505 |
1-800 #: |
1-800-561-5505 |
Fax #: |
(905) 238-2360 |
Email link: |
“Contact Us” on www.panasonic.ca |
FOR PRODUCT REPAIRS, please locate your nearest Authorized Servicentre at www.panasonic.ca:
Link : “Servicentres™ locator” under “Customer support”
IF YOU SHIP THE PRODUCT TO A SERVICENTRE
Carefully pack and send prepaid, adequately insured and preferably in the original carton.
Include details of the defect claimed, and proof of date of original purchase.
Safety Information, Before Reading These Instructions
CQ-C500U

Limited Warranty
Reading These Instructions
U.S.A.
PANASONIC CONSUMER ELECTRONICS COMPANY,
DIVISION OF PANASONIC CORPORATION OF NORTH AMERICA One Panasonic Way, Secaucus, New Jersey 07094
PANASONIC SALES COMPANY,
DIVISION OF PANASONIC PUERTO RICO, INC.
Ave. 65 de infanteria, Km. 9.5, San Gabriel Industrial Park
Carolina, Puerto Rico 00985
PANASONIC AUTO PRODUCTS
LIMITED WARRANTY
LIMITED WARRANTY COVERAGE
If your product does not work properly because of defects in materials and workmanship.
Panasonic Consumer Electronics Company or Panasonic Sales Company (collectively referred to as “the warrantor”) will, for the length of the period indicated in the chart below, which starts with the date of original purchase (“warranty period”), at its option either
(a) repair your product with new or refurbished parts, or (b) replace it with a new or refurbished product. The decision to repair or replace will be made by the warrantor.
Categories |
Parts |
Labor |
|
|
|
Audio Components (except items listed |
One (1) Year |
One (1) Year |
below) |
|
|
MXE Series Audio Components (except items |
Two (2) Years |
Two (2) Years |
listed below) |
|
|
|
|
|
Speakers |
One (1) Year |
Not |
Defective Car Audio Speakers under warranty |
|
Applicable |
must be exchanged at the place of purchase. |
|
|
Contact your Dealer for details. |
|
|
Accessories (in exchange for defective items) |
Ninety (90) |
Not |
|
Days |
Applicable |
During the “Labor” warranty period, there will be no charge for labor. During the “Parts” warranty period, there will be no charge for parts. You must carry in or mail in your product prepaid during the warranty period. If nonrechargeable batteries are included, they are not warranted. This warranty only applies to products purchased and serviced in the United States or Puerto Rico. This warranty is extended only to the original purchaser of a new product which was not sold “as is”. A purchase receipt or other proof of the original purchase date is required for warranty service.
CARRY-IN OR MAIL-IN SERVICE
For Carry-In or Mail-In Service in the United States, call 1-800-211- PANA (7262) or visit
Panasonic Web Site: http://www.panasonic.com
For assistance in Puerto Rico, call Panasonic Sales Company (787)- 7504300 or fax (787)-768-2910.
LIMITED WARRANTY LIMITS AND EXCLUSIONS
This warranty ONLY COVERS failures due to defects in materials and workmanship, and DOES NOT COVER normal wear and tear or cosmetic damage. The warranty ALSO DOES NOT COVER damages which occurred during shipment, failures which are caused by products not supplied by the warrantor, failures which result from accident, misuse, abuse, neglect, bug infestation, mishandling, misapplication, alteration, faulty installation, set-up adjustment, maladjustment of consumer control, improper maintenance, improper antenna, inadequate signal reception or pickup, power line surge, improper voltage supply, lightning, modification, commercial use (such as use in hotels, offices, restaurants, or other business uses) or rental use of the product, or service by anyone other than the technician from Factory Servicenter or other authorized service centers, or damage that is attributable to acts of God.
THERE ARE NO EXPRESS WARRANTIES EXCEPT AS LISTED UNDER “LIMITED WARRANTY COVERAGE”. THE WARRANTOR IS NOT LIABLE FOR INCIDENTAL OR CONSEQUENTIAL DAMAGES RESULTING FROM THE USE OF THIS PRODUCT, OR ARISING OUT
OF ANY BREACH OF THIS WARRANTY. (As examples, this excludes damages for lost time, cost of having someone remove or re-install an installed unit if applicable, travel to and from the sevicer, and loss of media, data or other memory contents. The items listed
are not exclusive, but are for illustration only.) ALL EXPRESS
AND IMPLIED WARRANTIES, INCLUDING THE WARRANTY OF MERCHANTABILITY, ARE LIMITED TO THE PERIOD OF THE LIMITED WARRANTY.
Some states do not allow the exclusion or limitation of incidental or consequential damages, or limitations on how long an implied warranty lasts, so the exclusions may not apply to you.
This warranty gives you specific legal rights and you may also have other rights which vary from state to state. If a problem with this product develops during or after the warranty period, you may contact your dealer or Servicenter. If the problem is not handled to your satisfaction, then write to warrantor’s Consumer Affairs Department at the addresses of the warrantor.
PARTS AND SERVICE WHICH ARE NOT COVERED BY THIS LIMITED WARRANTY ARE YOUR RESPONSIBILITY.
Customer’s Record
Model
No.
Serial
No.
Dealer’s
No.
Code
No.
Dealer’s
Address
Date of
Purchase
CANADA
Panasonic Canada Inc.
5770 Ambler Drive, Mississauga Ontario L4W 2T3
PANASONIC PRODUCT LIMITED WARRANTY
Panasonic Canada Inc. warrants this product to be free from defects in materials and workmanship and agrees to remedy any such defect for a period as stated below from the date of original purchase.
CAR AUDIO PRODUCT – ONE (1) YEAR, PARTS AND LABOUR
(The labour to install or remove the product is not warranted) ACCESSOIRES - NINETY (90) DAYS, (IN EXCHANGE FOR DEFECTIVE ITEMS)
LIMITATIONS AND EXCLUSIONS
This warranty does not apply to products purchased outside Canada or to any product which has been improperly installed, subjected to usage for which the product was not designed, misused or abused, damaged during shipping, or which has been altered or repaired in any way that affects the reliability or detracts from the performance, nor does it cover any product which is used commercially. Dry cell batteries are also excluded from coverage under this warranty.
This warranty is extended to the original end user purchaser only. A purchase receipt or other proof of the original purchase date is required before warranty service is performed.
THIS EXPRESS, LIMITED WARRANTY IS IN LIEU OF ALL OTHER WARRANTIES, EXPRESS OR IMPLIED, INCLUDING ANY IMPLIED WARRANTIES OF MERCHANTABILITY AND FITNESS FOR A PARTICULAR PURPOSE.
IN NO EVENT WILL PANASONIC CANADA INC. BE LIABLE FOR ANY SPECIAL, INDIRECT OR CONSEQUENTIAL DAMAGES.
In certain instances, some jurisdictions do not allow the exclusion or limitation of incidental or consequential damages, or the exclusion of implied warranties, so the above limitations and exclusions may not be applicable.
CQ-C500U

Contents
English
Français
Español
|
• Safety Information |
|
|
• Before Reading These Instructions |
|
Common |
• Features |
|
• Controls Layout |
||
|
||
|
• Preparation (Clock Adjustment etc.) |
|
|
• General |
|
|
• Sound Control |
|
Each Source |
• Radio |
|
• CD Player |
||
|
||
|
• MP3/WMA/AAC Player |
|
|
• Audio Setting |
|
|
• Function Setting |
|
|
• Troubleshooting |
|
Needed |
• Error Display Messages |
|
• Notes on Discs |
||
|
||
|
• Maintenance/Fuse |
|
As |
• Specifications |
|
|
30
58
2
4
8
9
10
11
13
14
16
18
22
23
24
27
28
28
29
CQ-C500U

Features
Hands-Free Phone System
Connection of the optional Hands-Free Phone System (HandsFree Kit featuring Bluetooth® technology: CY-BT100U) allows users to talk on a handsfree cellular phone if the phone supports Bluetooth.
Notes:
•This unit is designed only for receiving calls. It cannot send calls.
•This unit does not support CY-BT200U.
Bluetooth®
The Bluetooth word mark and logo are owned by the Bluetooth SIG, Inc. and any use of such marks by Matsushita Electric Industrial Co., Ltd. is under license. Other trademarks and trade name are those of their respective owners.
Expansion Module (Hub Unit)
Connection of the Expansion Module (hub unit, CY-EM100U) allows users to connect up to 4 optional devices shown below. Even simultaneous connection of the Sirius Satellite Radio and XM Satellite Radio is feasible.
Wide Array of Components for System Upgrade
Various optional components allow users to obtain availability of wide range of system upgrade. Upgrading the system delivers relaxed AV space in a car. For further information, refer to the separate System Upgrade Guidebook.
•CD Changer
The optional adapter (Conversion Cable for DVD/CD Changer: CA-CC30U) allows you to connect the optional Panasonic CD changer unit (CX-DP880U).
•iPod®
The optional adapter (Direct Cable for iPod®: CA-DC300U) allows you to connect the optional iPod series.
iPod is a trademark of Apple Computer, Inc., registered in the U.S.A. and other countries.
•XM Satellite Radio
You can connect the optional XM receiver (XMD1000) with optional Digital Adaptor Cable (XMDPAN110).
Note: The optional XM Direct2 CNP2000UC/the optional Connection Cable CNPPAN1 cannot be used with this unit.
For details, refer to the operating instructions for the XM receiver.
•Sirius Satellite Radio
You can connect the optional Sirius Satellite Radio receiver (SIR-PAN1) with optional Interface Adaptor (CA-PANSC1U). Note: The optional Sirius Satellite Radio receiver SC-C1/the optional Interface Adaptor CA-LSR01U cannot be used with this unit.
•Hands-Free Phone System
SQ (Sound Quality)
You have 6 preset modes (FLAT, ROCK, POP, VOCAL, JAZZ, CLUB). You can customize your settings for these and save them for instant recall.
SQ3 (3-Band Sound Quality)
Center frequency and level are adjustable in each of 3 bands. This lets you fine-tune sound quality for each genre to suit carinterior acoustics and your personal preferences. ( page 13)
AUX (AUX1) Input Terminal
The AUX input terminal is equipped on the front panel.
Your mobile audio player and other devices are connectable to this unit without any difficulty.
CQ-C500U

Controls Layout
Note: This instruction manual explains operations for use with the buttons on the main unit. (Different operations excluded)
Main Unit
Remote Control Unit
|
|
|
|
|
|
|
|
|
|
|
|
|
|
BAND ( page 14) |
SOURCE ( page 12) |
LIST ( P 14 of System Upgrade Guidebook) |
English |
||||||||||
Play/Pause |
PWR Power ( page 11) |
DISC ( P 10 of System Upgrade Guidebook) |
|||||||||||
|
|||||||||||||
( page 16, 18) |
|
|
|
|
FOLDER ( page 18) |
|
|
|
|
||||
APM Auto Preset Memory |
|
|
|
|
|
|
|
|
|
|
|
||
( page 15) |
|
SQ Sound Quality ( page 13) |
OPEN ( page 16, 18) |
|
|||||||||
|
|
|
|
||||||||||
|
|
|
|
DISP Display ( page 11) |
|
|
|
|
|||||
|
|
|
|
|
|
|
|
|
|
|
|
|
|
|
|
|
|
|
|
|
|
|
|
|
|
|
|
|
|
|
|
|
|
|
|
|
|
|
|
|
|
|
|
|
|
|
|
|
|
|
|
|
|
|
|
VOL Volume ( page 12)
PUSH SEL Select ( page 22, 23)
Remote control sensor |
MUTE ( page 12) |
TUNE ( page 14)
TRACK (FILE) ( page 16, 18)
1 to 6 ( page 14) |
AUX1 ( page 12) |
|
3 |
(SCROLL) ( page 17, 19) |
|
4 |
(RANDOM) ( page 17, 19) |
|
5 |
(SCAN) ( page 17, 19) |
|
6 |
(REPEAT) ( page 17, 19) |
|
Features, Controls Layout
Number Buttons
0 |
– 9 0 to 9 |
SEL Select |
|
|
|
VOL Volume |
|
|
MENU |
|
|
|
: Up |
# |
|
POWER |
|
|
|
: Down |
|
SRC (SOURCE) |
|
|
|
|
|
NUMBER Number |
|
|
|
|
||
RANDOM |
RANDOM |
|
POWER |
|
|
|
4 |
|
SOURCE MENU |
|
|
||
|
|
|
SRC |
SEL |
|
|
|
|
|
|
|
|
|
SCAN5 |
|
|
SET |
|
VOL |
|
SCAN |
|
|
|
|
||
BAND |
BAND |
MUTE |
|
MUTE |
||
|
|
Pause/Play |
1 |
2 |
3 |
|
REPEAT |
REPEAT |
SET |
RANDOM |
SCAN |
REPEAT |
|
6 |
|
APM Auto Preset |
4 |
5 |
6 |
|
|
|
Memory |
7 |
8 |
9 |
|
|
|
|
|
|||
7 |
9 |
|
TUNE |
|
TUNE |
|
|
# |
0 |
DISP |
DISP Display |
||
|
|
|
||||
TUNE |
NUMBER |
|
|
TRACK (FILE) |
|
|
CAR AUDIO |
8 |
|
0 |
|
DISC (FOLDER) |
|
LIST |
|
CQ-C500U

Preparation
Demonstration
Cancellation of
Remote Control Preparation
Clock Adjustment
The demonstration message appears for initial use.
1 ACC |
switch to the |
position. |
2 Press [PWR] (Power).
3 Hold down [VOL] (PUSH SEL: Select) for 2 sec. or more to open the menu.
4 Press [VOL] (PUSH SEL: Select) to select the Demonstration setting.
(“DEMO” is displayed)
5 .
remote control, press [0] ( ).
Notes:
•To return to the regular mode, press [DISP].
•Refer to the section on “Function Setting” ( page 23).
•When “NO DISC” is displayed, the Demonstration cannot be cancelled.
Preparation Before |
|
Warning |
|
the insulation film |
|
||
|
Keep batteries and insulation film out of reach of |
||
from the backside of |
|
||
|
infants. If an infant ingests a battery, please seek |
||
remote control gently. |
|
||
|
immediate medical attention. |
||
|
|
||
|
Insulation film |
Cautions |
|
Battery Replacement |
• Remove and dispose of an old battery immediately. |
||
• Do not disassemble, heat or short a battery. Do not |
|||
Remove the battery |
Tough pointed object |
throw a battery into a fire or water. |
|
holder with the remote |
|
• Follow local regulations when disposing of a |
|
control unit placed on a |
|
battery. |
|
flat surface. |
|
• Improper use of a battery may cause overheating, |
|
Stick your thumbnail |
|
an explosion or ignition, resulting in injury or a fire. |
|
into the groove, and |
|
|
|
push the holder in |
|
Notice |
|
the direction of the |
|||
|
This product contains a CR Coin Cell Lithium |
||
arrow, and at the |
|||
|
Battery which contains Perchlorate Material - special |
||
same time. |
Back side |
||
handling may apply. |
|||
Pull it out in the |
|||
|
See www.dtsc.ca.gov/hazardouswaste/perchlorate. |
||
direction of the |
|
||
|
|
||
arrow using a tough |
|
Note: Battery Information: |
|
pointed object. |
|||
|
|||
Put a battery in the case |
|
Battery Type: Panasonic lithium battery (CR2025) |
|
|
(Included in the remote control) |
||
with ( ) side facing up. |
|
||
|
Battery Life: Approximately 6 months under normal use |
||
Put the case back. |
|||
|
(at room temperature) |
||
|
|
||
The 12-hour system is used for the clock.
1 Press [PWR] (Power).
2 Press [DISP].
3 Hold down [DISP] for 2 sec. or more.
4 Adjust the hour and press [DISP].
[ ]: Forward
[ ]: Backward
5 Adjust the minute and press [DISP] to confirm the adjustment.
[ ]: Forward
[ ]: Backward
Notes:
•Adjust the clock when “ADJUST” appears on the display.
•Hold down [ ] or [ ] to change numbers rapidly.
•When “NO DISC” is displayed, the clock cannot be adjusted.
CQ-C500U
General
This chapter explains how to turn on or off the power, how to adjust the volume, etc.
Power On/off (PWR: Power)
Plate Removing/Mounting |
(Anti-Theft System) |
Face |
|
Display Change (DISP: Display)
Power On
Press [PWR] (Power).
Power Off
Hold down [PWR] (Power) for 1 sec. or more.
English |
You can remove the face plate to prevent it from being stolen.
Removing
1 Turn off the power. ( above)
2 Press [OPEN]. The face plate will be opened.
3 Pushleft. the face plate to the 


4 Pull it out toward you.
5 Put the face plate the case.
Cautions
•This face plate is not waterproof. Do not expose it to water or excessive moisture.
•Do not remove the face plate while driving your car.
•Do not place the face plate on the dashboard or nearby areas where the temperature rises to high.
|
General |
|
Mounting |
||
Preparation, |
||
1 Fit the face plate with its left hole on the |
||
left pin provided on the main unit. |
|
|
2 Fit the other hole on the other pin |
|
|
applying slight pressure. |
|
•Do not touch the contacts on the face plate or on the main unit, since this may result in poor electrical contacts.
•If dirt or other foreign substances get on the contacts, wipe them off with clean and dry cloth.
•To avoid damaging the face plate, do not push it down or place objects on it while it is open.
The display changes as follows every time [DISP] is pressed.
At Power
Clock display (Default)
Display Off
At Power-on:
When the power is set to ON, refer to the description for each source mode.
CQ-C500U |
11 |
|
|

General
Volume Adjustment (VOLUME)
Temporary Volume Off (Down) MUTE (ATT: Attenuation)
Source Selection (SOURCE)
Up |
Note: The volume level can be set independently for |
Down |
each source. (For radio, one volume setting for AM, one |
|
volume setting for all FMs) |
Setting Range: 0 to 40 |
|
Default: 18 |
|
Volume Off (down)
.
Cancel
Press [MUTE] again.
Note: You can select mute or attenuation. ( page 23)
The source changes as follows every time [SOURCE] is pressed.
AUX1 (AUX1 in) (3.5 mm stereo)
From line output of external sound/audio device (ex. Silicon-audio player, HDD player, etc.)
 Caution
•Set the volume level to low enough before the AUX connection is completed.
Failure to observe this, the loud noise may come out and damage your speakers and your hearing.
Radio
FM1, |
page |
14) |
Player
When loading CD ( page 16)
When loading MP3/WMA/AAC disc ( page 18)
AUX1
|
Device |
the AUX1 |
terminal of this unit |
|
|
|
|||
|
|
|
|
|
|
|
|
|
|
|
|
|
|
|
System-up Connector
When an optional device is connected:
Shift to connected device When connecting CD changer
When connecting iPod
When connecting XM Receiver
When connecting Sirius Receiver
OR
When an expansion module is connected:
The devices connected to the ports 1 to 4 are activated in sequence after shifting to AUX2 (device connected to the AUX terminal of the expansion module).
Note: For information about connectable devices, refer to the System Upgrade Guidebook or the instruction manual for each device.
12 |
CQ-C500U |
|
|

Sound Control
SQ (Sound Quality)
SQ Selection Based on Genre
SQ Adjustment
You have 6 preset modes (FLAT, ROCK, POP, VOCAL, |
|
||
JAZZ, CLUB). You can customize your settings for these |
|
||
and save them for instant recall. |
(FLAT) flat frequency response: |
||
|
|
||
SQ Changeover |
does not emphasize any part. (Default) |
||
|
|||
1Press [SQ] to activate the SQ selection mode. |
|
||
2Press [SQ] to select the sound type as follows. |
(ROCK) speedy and heavy sound: |
||
|
|
||
Press [DISP] to return to the regular mode. |
exaggerates bass and treble. |
||
|
|||
Notes: |
|
(POP) wide-ranged and deep sound: |
|
• After pressing [SQ] on the main unit, you can also |
|||
select a sound type by pressing the preset buttons [1] |
slightly emphasizes bass and treble. |
||
to [6]. |
|
|
|
• Please refer to page 22 for the adjustment to each |
|
||
speaker and an optional subwoofer. |
(VOCAL) clear sound: |
||
· Bass adjustment |
|||
emphasizes middle tone and slightly |
|||
· Treble adjustment |
|||
emphasizes treble. |
|||
· Balance adjustment |
|||
|
|||
· Fader adjustment |
|
||
· Subwoofer level adjustment |
(JAZZ) jazz-specific deep sound: |
||
· Subwoofer low pass filter |
|||
· Re-master setting |
sound with emphasis on sharpness of high- |
||
|
|
hat and echo saxophone. |
|
|
|
(CLUB) club and disco-specific sound: |
|
|
|
reproduction of realism being in a club. |
|
adjust the characteristics of the currently |
1 Press [VOL] (PUSH SEL: |
||
selected sound type (SQ). ( above) |
|||
Select) to open the menu |
|||
It is also possible to preset up to 5 different adjusted |
|||
|
|||
SQs. |
|
2 Press [VOL] (PUSH SEL: Select) to |
|
|
|
||
SQ3 (3-Band Sound Quality) |
select a mode to be adjusted. |
||
Center frequency and level are adjustable in each of |
3 Adjust each band. |
||
3 bands. This lets you fine-tune sound quality for each |
1/2: center frequency up/down |
||
genre to suit car-interior acoustics and your personal |
[ ] [ ]: Band selection |
||
preferences. |
|
[ |
|
Tone/SQ adjustable range: 12 dB to 12 dB (by 2 dB) |
Band |
||
SQ Low/Bass: |
±12 dB (at 60 Hz, 80 Hz, 100 Hz, |
||
Level |
|||
|
200 Hz) |
||
|
Frequency |
||
SQ Mid: |
±12 dB (at 500 Hz, 1 kHz, 2 kHz, |
||
|
|||
|
3 kHz) |
4 Hold down the numeric button [2] to [6] |
|
SQ High/Treble: ±12 dB (at 8 kHz, 10 kHz, 12 kHz, |
|||
|
15 kHz) |
for 2 sec. or more. |
|
• The bass/treble control level of each frequency is fixed |
• The adjusted SQ is preset in the number of the selected |
to the frequency that has been selected for SQ. |
button, and return to the regular mode resumes. |
|
• When you suspend the SQ preset adjustment, each level |
To return an adjusted SQ to the default setting |
remains your recent adjustment until a new SQ presetting |
1Press [SQ], and select the SQ which is to be returned |
operation is performed or you call up the SQ preset. |
to the default setting. (Only for main unit) |
Notes: |
2Hold down [BAND] for 2 sec. or more. |
• You cannot save any SQ presetting value in [1] button. |
|
• Any SQ adjustments will not change the call up screen |
|
names such as ROCK and JAZZ. |
|
• Do not activate SQ and Bass/Treble at the same time to |
|
avoid causing sound distortion. |
English
General, Sound Control
CQ-C500U |
13 |
|
|

Radio
This chapter explains how to listen to the radio.
Operation Flow
Radio Mode
Display Change (DISP:
1 Pressmode.[SOURCE] to select the radio [BAND] to select a band.
3 Select a station.
Frequency Adjustment
[ ] (TUNE): Higher
[ ] (TUNE): Lower
Note: Hold down for 0.5 sec. or more and release for station search.
Preset Station Selection
Press the numeric button [1] to [6].
Band
|
|
|
|
|
|
|
|
|
|
|
|
|
|
|
|
|
|
|
|
|
|
|
|
|
|
|
|
|
|
|
|
|
|
|
|
|
|
|
|
Lights while |
|
receiving an |
Frequency |
|
|
|
|||
|
|
|
Preset Number |
||||||
FM stereo signal. |
|
|
|
|
|
||||
|
|
|
|
|
|
|
|
|
|
Frequency
Clock time
Display Off
14 |
CQ-C500U |
|
|

Station Preset (APM: Auto Preset Memory)
to 6 stations can be preset in AM, FM1, FM2, and FM3 respectively.
Auto Preset Memory (APM) |
English |
|
Stations with good receiving conditions automatically |
||
|
||
preset. |
|
|
Select a band. |
|
|
Hold down [BAND] (APM) for 2 sec. or |
|
|
more. |
|
|
The preset stations under best receiving conditions |
|
|
are received for 5 sec. each after presetting the |
|
|
stations (SCAN). To stop scanning, press the |
|
|
numeric |
|
Note: New stations overwrite existing saved stations.
Manual Station Preset
Tune in to a station.
Hold down the numeric button [1] to [6] for 2 sec. or more.
Radio
|
|
|
|
15 |
|
|
|
|
|
|
|
|
CQ-C500U |
|
|
|
|
|
|

CD Player
Cautions |
|
|
place objects on it while it is open. |
|
|
• Do not pinch your finger or hand in the face plate. |
|
• This unit does not support 8 cm {3"} discs. |
• Do not insert foreign matter into the disc slots. |
||
• Do not insert a disc when |
|
indicator lights |
• Refer to the section on “Notes on CD/CD Media (CD-ROM, |
|
|||
|
|||
because a disc is already loaded. |
CD-R, CD-RW)” ( page 28). |
||
discs. ( page 28) |
• A disc which has both CD-DA data and MP3/WMA/AAC data |
||
seal or label attached. |
on it may not be reproduced normally. |
||
plate, do not push it down or |
|
||
already loaded, press [SOURCE] to mode.
[OPEN] to open the face plate.
disc with the printed side facing
may take some time to start playing.
Flow |
[ ] (Eject) |
|
|
|
Printed side |
|
|
||
|
|
|
||
Operation |
3 Close the face plate manually. |
4 Select a desired portion. |
||
|
||||
|
Notes: |
|
Track Selection |
|
|
• The unit recognizes the disc and starts playing |
|||
|
automatically. |
|
[ ] (TRACK): Next track |
|
|
• The power will be turned on automatically when a disc |
|||
|
[ ] (TRACK): Preceding track (press twice) |
|||
|
is loaded. |
|
||
|
|
Note: Hold down for fast forward/reverse. |
||
|
|
|
||
|
Disc Eject |
|
Pause |
|
|
1Press [OPEN]. |
|
||
|
|
Press [ ]. |
||
|
2Press [ ] and take the disc out. |
|||
|
Press again to cancel. |
|||
|
3Close the face plate manually. |
|
||
|
|
|
||
|
Mode indicators |
|
|
|
|
Lights when each mode is activated. |
|
||
Display |
Random play |
Lights when the disc is loaded. |
||
Repeat play |
||||
|
|
|
||
CD Mode |
|
|
|
|
|
Track number |
Time |
|
|
CQ-C500U
Display Change (DISP: Display)
(RANDOM, SCAN, REPEAT)
Random, Scan, Repeat Play
by Remote |
Unit |
Functions Only |
Control |
Track/play time
Disc title/Track title
Clock time
Display off
Notes:
•To have another circle scroll while a title is displayed, press [3] (SCROLL). If the number of displayed characters is 8 or less, the characters do not scroll.
•“NO TEXT” is displayed when there is no information on the disc.
English
Play
the available tracks are |
a random sequence. |
|
Press [4] (RANDOM) |
. |
lights. |
Press again to cancel. |
|
|
Scan Play
first 10 seconds of each track is played in sequence.
Press [5] (SCAN). |
|
|
|
||
Press again to cancel. |
|
|
Player |
||
|
|
|
|
||
Repeat Play |
|
|
|||
|
|
|
|||
current track is |
|
|
|
CD |
|
Press [6] (REPEAT) |
. |
lights. |
|||
|
|||||
Press again to cancel. |
|
|
|
||
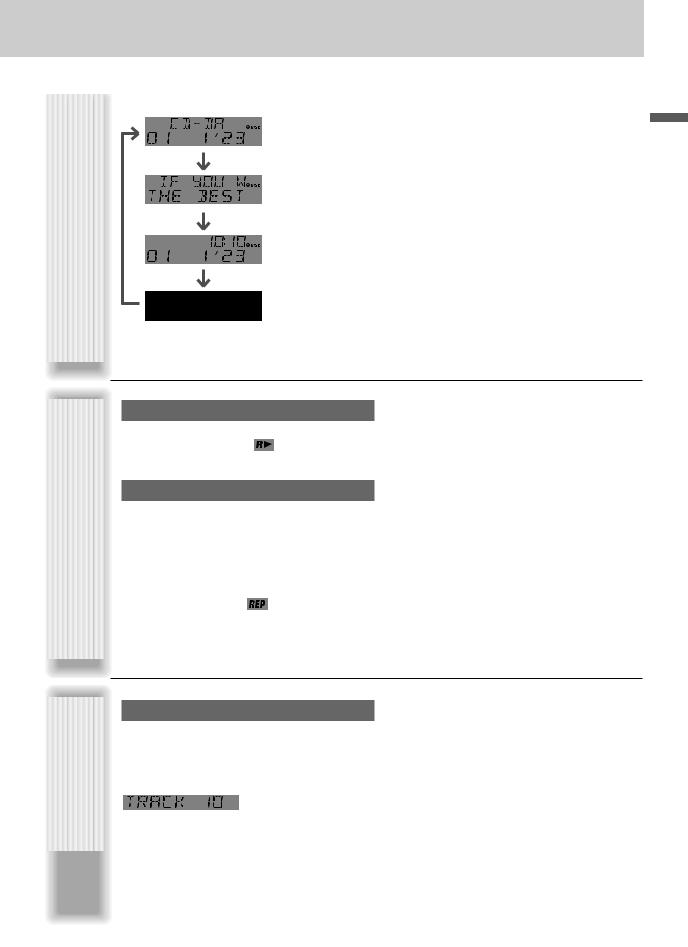
Direct Access
A track can be directly selected.
Example: track number 10
1 Press [#] (NUMBER).
2 Press [1] [0].
.
Notes:
•To suspend direct selection, press [DISP].
•Random, Scan and Repeat plays are canceled once [#] is pressed.
CQ-C500U |
17 |
|
|

MP3/WMA/AAC Player
Cautions |
|
• Do not pinch your finger or hand in the face plate. |
|
• Do not insert foreign matter into the disc slots. |
|
• This unit does not support 8 cm {3"} discs. |
• Refer to the section on “Notes on CD/CD Media (CD-ROM, |
|
• Do not insert a disc when |
indicator lights |
CD-R, CD-RW)” ( page 28). |
because a disc is already loaded. |
• A disc which has both CD-DA data and MP3/WMA/AAC data |
|
• Do not use irregularly shaped discs. ( page 28) |
on it may not be reproduced normally. |
|
• Do not use discs that have a seal or label attached. |
• Refer to the section on “Notes on MP3/WMA/AAC” ( page |
|
• To avoid damaging the face plate, do not push it down or |
20). |
|
place objects on it while it is open. |
|
|
When a disc is already loaded, press [SOURCE] to select the MP3/WMA/AAC mode.
1 Press [OPEN] to open the face plate.
2 Load a disc with the printed side facing up.
Flow |
|
Note: It may take some time to start playing. |
4 Select a desired portion. |
|
|
|
|||
|
|
|
||
Operation |
|
[ ] (Eject) |
Folder Selection |
|
|
Printed side |
[ ] (FOLDER): Next folder |
||
|
|
|
[ ] (FOLDER): Preceding folder |
|
|
|
3 Close the face plate manually |
File Selection |
|
|
|
[ ] (TRACK): Next file |
||
|
|
Notes: |
[ ] (TRACK): Preceding file (press twice) |
|
|
|
• The unit recognizes the disc and starts playing |
||
|
|
Note: Hold down for fast forward/reverse. |
||
|
|
automatically. |
||
|
|
|
|
|
|
|
• The power will be turned on automatically when a disc |
Pause |
|
|
|
is loaded. |
|
|
|
|
Press [ ]. |
||
|
|
|
||
|
|
Disc Eject |
Press again to cancel. |
|
|
|
1Press [OPEN]. |
|
|
|
|
2Press [ ] and take the disc out. |
|
|
|
|
3Close the face plate manually. |
|
|
MP3/WMA/AAC |
DisplayMode |
Play Mode indicators |
File type |
Lights when the disc is loaded. |
Folder number |
File number |
|||
|
|
Lights when each mode is activated. |
|
|
|
|
Random play |
|
|
|
|
Repeat play |
|
|
|
|
Folder Random, Folder |
|
|
|
|
Repeat, Folder Scan |
|
|
*ID3/WMA |
SettingTag |
Hold down [3] (SCROLL) for 2 sec. or |
When a folder name is displayed: |
|
|
TAG OFF: The file name is displayed. |
|||
|
|
more |
TAG ON: The album title is displayed. |
|
|
|
|
TAG OFF: The folder name is displayed. |
|
|
|
|
When a file name is displayed: |
|
|
|
|
TAG ON: The title/artist name is displayed. |
|
|
|
(Default) |
|
|
CQ-C500U

Display Change (DISP: Display)
(RANDOM, SCAN, REPEAT)
Random, Scan, Repeat Play
Remote Control Unit
Functions Only by
Press [DISP].
Folder/File
Play time
(Data reading)
Folder name (Album name*)/File name (title and artist name*)
Clock time
Display off
Notes:
•To have another circle scroll while a text is displayed, press [3] (SCROLL). If the number of displayed characters is 8 or less, the characters do not scroll.
•“NO TEXT” is displayed when there is no information on the disc.
•ID3/WMA/AAC tag information is displayed for the album name and title/artist name.
English
Play |
Folder Scan Play |
All the available files are |
a random sequence. |
|
Press [4] (RANDOM) |
. |
lights. |
Press again to cancel. |
|
|
Folder Random Play
All the files in the current folder are played in a random sequence.
Hold |
(RANDOM) for 2 sec. or |
more. |
lights. |
Hold down again to cancel.
Scan Play
The first 10 seconds of each file is played in sequence.
Press [5] (SCAN). Press again to cancel.
From the next folder, the first 10 seconds of the first file in each folder is played in sequence.
[5] (SCAN) for 2 sec. or more. lights.
Hold down again to cancel.
Repeat Play
The current file is repeated.
Press [6] (REPEAT). |
lights. |
Press again to cancel. |
|
Folder Repeat Play
The current folder is repeated.
Hold |
(REPEAT) for 2 sec. or |
more. |
lights. |
Hold down again to cancel.
MP3/WMA/AAC Player
Direct Access
A file in the current folder can be directly selected. Example: file number 10
1 Press [#] (NUMBER).
2 Press [1] [0].
.
Notes:
•For folder selection, enter a number after pressing [#] twice.
•To suspend direct selection, press [DISP].
•Random, Folder Random, Scan, Folder Scan, Repeat and Folder Repeat plays are canceled once [#] is pressed.
CQ-C500U |
19 |
|
|

Notes on MP3/WMA/AAC
Player
What is MP3/WMA/AAC?
MP3* (MPEG Audio Layer-3) and WMA (Windows MediaTM Audio) are the compression formats of digital audio.
The former is developed by MPEG (Motion Picture Experts Group), and the latter is developed by Microsoft Corporation. Using these compression formats, you can record the contents of about 10 music CDs on a single CD media (This figures refer to data recorded on a 650 MB CD-R or CD-RW at a fixed bit rate of 128 kbps and a sampling frequency of 44.1 kHz).
*MPEG Layer-3 audio coding technology licensed from Fraunhofer IIS and Thomson.
AAC is an abbreviation for “Advanced Audio Coding”.
It has been defined as a standard for audio compression technology using MPEG 2 and MPEG 4.
Note: MP3/WMA/AAC encoding and writing software is not supplied with this unit.
Points to remember when making
MP3/WMA/AAC files
Common
•High bit rate and high sampling frequency are recommended for high quality sounds.
•Selecting Variable Bit Rate (VBR) is not recommended because playing time is not displayed properly and sound may be skipped.
•Selecting Variable Bit Rate (VBR) is not recommended because Re-master function may have little effect in some cases.
•The playback sound quality differs depending on the encoding circumstances. For details, refer to the instructions of your own encoding software and writing software.
MP3
•It is recommended to set the bit rate to “128 kbps or more” and “fixed”.
WMA
•It is recommended to set the bit rate to “64 kbps or more” and “fixed”.
•Do not set the copy protect attribute on the WMA file to enable this unit to play back.
AAC
•It is recommended to set the bit rate to “128 kbps or more” and “fixed”.
•The formats and extensions for AAC data vary according to the encoder software used.
•AAC files which can be played on this unit have the “.m4a” extension and were encoded with Apple iTunes® version 6.
•The file extension for files encoded with the iTunes Apple Lossless Encoder is “.m4a”, but such files cannot be played on this player.
•Files under copyright protection cannot be played.
Display Information
Displayed items
• CD-TEXT |
• MP3 (ID3 tag) |
Disc title |
Album name |
Track title |
Title name/artist name |
• MP3/WMA/AAC |
• WMA (WMA tag) |
Folder name |
Album name |
File name |
Title name/artist name |
•AAC (Song information)
Album name
Title name/artist name
Displayable characters
•Displayable length of file name/folder name: within
32 characters. (Unicoded file and folder names are reduced by half in the number of displayable characters.)
•Name files and folders in accordance with the standard of each file system. Refer to the instructions of writing software for details.
•ASCII character set and special characters in each language can be displayed.
•Some Cyrillic characters in the Unicode can be
displayed.
ASCII character set
A to Z, a to z, digits 0 to 9, and the following symbols: (space) ! ” # $ % & ’ ( ) * + , - . / : ; < = > ? @ [ \ ] ˆ _ ` { | } ~
Special Characters
À Á Â Ã Å à á â ã å Ä ä Ò Ó Ô Õ Ö ò ó ô õ ö
Ù Ú Û Ü ù ú û ü
Notes:
•With some software in which MP3/WMA/AAC format files have been encoded, the character information may not be displayed properly.
•Undisplayable characters and symbols will be
converted into an asterisk ).
•It is recommended that the length of the file name is less than 8 (excluding the file extension).
iTunes is a trademark of Apple Computer, Inc., registered in the U.S. and other countries/regions.
Windows Media, and the Windows logo are trademarks, or registered trademarks of Microsoft Corporation in the United States and/or other countries/regions.
Caution
Never assign the “.mp3”, “.wma” or “.m4a” file name extension to a file that is not
in the MP3/WMA/AAC format. This may not only produce noise from the speaker damage, but also damage your hearing.
CQ-C500U
Notes on MP3/WMA/AAC (continued)
Recording MP3/WMA/AAC files on a CD-media
•You are recommended to minimize the chances of making a disc that contains both CD-DA files and MP3/WMA/AAC files.
•If CD-DA files are on the same disc as MP3, WMA or AAC files, the songs may not play in the intended order, or some songs may not play at all.
•When storing MP3 data, WMA data and AAC data on the same disc, use different folders for each data.
•Do not record files other than MP3/WMA/AAC files and unnecessary folder on a disc.
•The name of an MP3/WMA/AAC file should be added by rules as shown in the following descriptions and also comply with the rules of each file system.
•The file extension “.mp3”, “.wma” or “.m4a” should be assigned to each file depending on the file format.
• You may encounter trouble in playing MP3/WMA/AAC |
|
|
English |
||
• This unit does not have a play list function. |
||
files or displaying the information of MP3/WMA/AAC |
|
|
files recorded with certain writing software or CD |
|
|
recorders. |
|
|
• Although Multi-session recording is supported, the use |
|
|
of Disc-at-Once is recommended. |
|
|
Supported file systems |
|
|
ISO 9660 Level 1/Level 2, Apple Extension to ISO 9660, |
|
|
Joliet, Romeo |
|
|
Note: Apple HFS, UDF 1.50, Mix CD and CD Extra are |
|
|
not supported. |
|
Compression formats
(Recommendation: “Points to remember when making MP3/WMA/AAC files” on the previous page)
Compression method |
Bit rate |
VBR |
Sampling frequency |
|
|
|
|
MPEG 1 audio layer 3 (MP3) |
32 k – 320 kbps |
Yes |
32, 44.1, 48 kHz |
|
|
|
|
MPEG 2 audio layer 3 (MP3) |
8 k – 160 kbps |
Yes |
16, 22.05, 24 kHz |
|
|
|
|
MPEG 2.5 audio layer 3 (MP3) |
8 k – 160 kbps |
Yes |
8, 11.205, 12 kHz |
|
|
|
|
Windows Media Audio Ver. 2, 8, 9* |
32 k – 192 kbps |
Yes |
32, 44.1, 48 kHz |
|
|
|
|
MPEG 4 Advanced Audio Coding Low |
24 k – 320 kbps |
Yes |
11.025, 12, 16, 22.05, 24, 32, |
Complexity (AAC LC) |
|
|
44.1, 48 kHz |
|
|
|
|
* WMA 9 Professional/LossLess/Voice are not supported.
Folder selection order/file playback order |
|
|
|
|
|
|
|
|
|
|
|
|
|
|
|
|
|
|
|
|
|
|
|
Player |
||
|
|
|
|
|
|
|
|
|
|
|
|
|
|
|
|
|
|
|
|
|
|
|
|
|||
Maximum number of files/folders |
|
|
|
Root folder |
|
|
|
|
|
|
|
|
|
|||||||||||||
|
|
|
(Root Directory) |
|
|
|
|
|
|
|
|
|
||||||||||||||
1 |
|
|
|
|
|
|
|
|
|
|
||||||||||||||||
• Maximum number of files: 511 (files + folders) |
|
|
|
|
|
|
|
|
|
MP3/WMA/AAC |
||||||||||||||||
|
|
|
|
|
|
|
|
|
|
|
|
|
|
|
|
|
|
|
|
|
|
|
|
|
||
• Maximum number of files in one folder: 255 |
|
|
|
2 |
|
|
|
|
|
|
|
|
|
|
|
Folder Selection |
|
|
|
|
|
|||||
|
|
|
|
|
|
|
|
|
|
|
|
|
|
|
||||||||||||
• Maximum depth of trees: 8 |
|
|
|
|
|
|
|
|
|
|
|
|
|
|
|
|
|
In the order |
|
|
|
|
|
|
|
|
|
|
|
|
|
|
|
|
|
|
|
|
|
|
|
|
|
|
|
|
|
|
|
|
|||
|
|
|
|
|
|
|
|
|
|
|
|
|
|
|
|
|
|
1 |
|
|
|
8 |
|
|
||
|
|
|
|
|
|
|
|
|
|
|
|
|
|
|
|
|
|
|
|
|
|
|
||||
• Maximum number of folders: 255 (Root folder is |
|
|
|
|
|
|
|
|
|
|
|
|
|
|
|
|
|
|
|
|
|
|
|
|
||
|
|
|
|
|
|
|
|
4 |
|
|
|
|
|
|
File Selection |
|
|
|
|
|
|
|
||||
|
|
|
|
|
|
|
|
|
|
|
|
|
|
|
|
|
||||||||||
included.) |
|
|
|
|
|
|
|
|
|
|
|
|
|
|
|
|
|
|
|
|
|
|
|
|
||
|
|
|
|
|
|
|
|
|
|
|
|
|
|
|
|
|
|
|
|
|
|
|
|
|||
|
|
|
3 |
|
|
|
|
|
|
|
|
|
|
|
In the order |
|
|
|
|
|
|
|
||||
Notes: |
|
|
|
|
|
|
|
|
|
|
|
|
|
|
|
|
|
|
|
|
|
|||||
|
|
|
|
|
|
|
|
|
|
|
|
|
|
|
|
|
|
|
|
|
|
|
|
|
|
|
|
|
|
|
|
|
|
|
|
|
|
|
|
|
|
|
|
|
|
|
|
|
|
|
|
|
|
|
|
|
|
|
|
|
|
5 |
|
|
|
|
|
|
|
|
|
|
|
|
|
|
|
|||
• You can shorten the duration between data read and |
|
|
|
|
|
|
|
|
|
|
|
|
|
|
|
|
|
|
|
|
|
|
|
|||
|
|
|
|
|
|
|
|
|
|
|
|
|
|
|
|
|
|
|
|
|
|
|
|
|
|
|
|
|
|
|
|
|
|
|
|
6 |
|
|
|
|
|
|
|
|
|
|
|
|
|
|
|
||
playback by decreasing the quantity of files or folders, |
|
|
|
|
|
|
|
|
|
|
|
|
|
|
|
|
|
|
|
|
|
|
|
|
||
|
|
|
|
|
|
|
|
|
|
|
|
|
|
|
|
|
|
|
|
|
|
|
|
|
|
|
or the depth of the hierarchy. |
|
|
|
|
|
|
|
|
|
|
|
|
|
|
|
|
|
|
|
|
|
|
|
|
|
|
• This unit counts the number of folders irrespective of |
|
|
|
|
|
|
|
|
|
|
|
|
|
|
8 |
|
|
|
|
|
|
|
|
|
|
|
|
|
|
|
|
|
|
|
|
|
|
|
|
|
|
|
|
|
|
||||||||
the presence or absence of an MP3/WMA/AAC file. |
|
|
|
|
|
|
|
|
|
|
|
|
|
|
|
|
|
|
|
|
|
|
|
|
|
|
|
|
|
|
|
|
|
|
|
|
|
|
|
|
|
|
|
|
|
|
|
|
|
|
|
|
|
• If the selected folder does not contain any MP3/WMA/ |
|
|
|
|
|
|
|
|
|
|
|
|
|
|
|
|
|
|
|
|
|
|
|
|||
|
|
|
|
|
|
|
|
7 |
|
|
|
|
|
|
|
|
|
|
|
|
|
|
|
|
||
|
|
|
|
|
|
|
|
|
|
|
|
|
|
|
|
|
|
|
|
|
|
|||||
AAC files, the nearest MP3/WMA/AAC files in the order |
|
|
Tree 1 Tree 2 Tree 3 |
Tree 4 |
|
|
Tree 8 |
|
||||||||||||||||||
of playback will be played. |
|
|
|
|
|
|
|
|
|
|
|
|
|
|
|
|
|
|
|
|
|
(Max.) |
|
|||
•Playback order may be different from other MP3/ WMA/AAC players even if the same disc is used.
•“ROOT” appears when displaying the root folder name.
Copyright |
No warranty |
It is prohibited by copyright laws to copy, distribute and |
Above description complies with our investigations |
deliver copyrighted materials such as music without |
as of September 2007. It has no warranty for |
the approval of copyright holder except enjoying |
reproducibility and displayability of MP3/WMA/AAC. |
yourself personally. |
|
|
|
CQ-C500U |
21 |
|
|

Setting
Adjustment to each speaker and an optional subwoofer
1 Press [VOL] (PUSH SEL: Select) to open the menu.
2 Press [VOL] (PUSH SEL: Select) to select a mode to be adjusted.
3 Turn [VOL] clockwise or counterclockwise to adjust.
|
Notes: |
|
|
|
• The sequence and contents of setting items may |
|
|
|
depend on the conditions of devices to be connected. |
|
|
|
For further information, refer to the System Upgrade |
|
|
|
Guidebook or the instruction manuals for the devices |
|
|
|
to be connected. |
|
|
|
• To return to the regular mode, press [DISP]. |
|
|
Display |
• If no operation takes place for more than 5 seconds |
|
|
in audio setting (2 seconds in the volume adjustment, |
|
||
10 seconds in the SQ adjustment), the display returns |
|
||
|
|
||
|
to the regular mode. |
|
|
|
• The volume can also be adjusted directly using [VOL] |
|
|
Menu |
on the main unit. ( page 12) |
|
|
• Please refer to page 13 for calling up a preset SQ. |
|
||
|
|
||
|
|
|
|
Audio |
Volume Adjustment |
|
|
(Setting range: 0 to 40, |
|
|
|
|
|
|
|
|
1: Up |
|
|
|
2: Down |
|
|
Bass Adjustment
(Setting range: 12 dB to 12 dB, 2 dB Step, Default: Bass 0 dB)
1: Up
2: Down
Treble Adjustment
(Setting range: 12 dB to 12 dB, 2 dB Step, Default: Treble 0 dB)
1: Up
2: Down
Note: Do not activate SQ and Bass/Treble at the same time to avoid causing sound distortion.
SQ Adjustment
( page 13)
(Adjustable range: 12 dB to 12 dB (by 2 dB)) Setting range:
SQ Low/Bass:
SQ Mid:
SQ High/Treble:
Balance Adjustment
(Setting range: L (left) 15 to R (right) 15 and Center, Default: Center)
1: Right enhanced
2: Left enhanced
Fader Adjustment
(Setting range: R (rear) 15 to F (front) 15 and Center, Default: Center)
1: Front enhanced
2: Rear enhanced
Subwoofer Level Adjustment
(Setting range : mute ( ), 6 dB to 6 dB, 2 dB Step, Default: 0 dB)
1: Up
2: Down
Subwoofer Low Pass Filter
(Setting range: 80 Hz, 120 1: 120 Hz
2: 80 Hz
Re-master Setting
High-range signal lost through MP3/WMA/AAC compression is reproduced to more closely recreate the pre-compression sound.
(Setting range: On/Off, Default: 1: On
2: Off
Notes:
•At high bit rates, the Re-master function may have little effect.
•It is only effective for playback of MP3/WMA/AAC data.
CQ-C500U

Function Menu Display
Setting
1 Hold down [VOL] (PUSH SEL: Select) for 2 sec. more to open the menu
2 Press [VOL] (PUSH SEL: Select) to select a mode to be adjusted.
3 Turn [VOL] clockwise or counterclockwise to adjust.
Notes:
•The sequence and contents of setting items may depend on the conditions of devices to be connected. For further information, refer to the System Upgrade Guidebook or the instruction manuals for the devices to be connected.
•To return to the regular mode, press [DISP].
•If no operation takes place for more than 5 seconds in function setting, the display returns to the regular mode.
Demonstration
You can set up the monitor to display or hide the demonstration screen.
1: On (Default)
2: Off
Note: Button operation with either the main unit or remote control allows users to cancel the demonstration screen for 20 seconds and enable the selected operation even in the demo-on mode.
Display Color Selection
You can select display color. Default: OCEAN (aqua blue)
Variety: OCEAN (aqua blue), SKY (sky blue), FOREST (green), ORANGE (amber), FIRE (red), PINK (deep pink), ROSE (pink), STORM (7 colors)
OCEAN (aqua blue)
ORANGE (amber)
STORM (7 colors)
Mute/Attenuation
You can select mute or
1: Volume down by |
|
|
|
|
|
|
|
|
|
|
|
|
|
|
|
|
|
|
|
|
|
|
|
|
|
English |
|
|
|
|
|
|
|
|
|
|
|
|
|
|
|
|
|
|
|
|
|
|
|
|
|
|
|
|
|
|
|
|
|
|
|
|
|
|
|
|
|
|
|
|
|
|
|
|
|
|
|
|
|
|
10 steps |
|
|
|
|
|
|
|
|
|
|
|
|
|
|
|
|
|
|
|
|
|
|
|
|
|
|
|
|
|
|
|
|
|
|
|
|
|
|
|
|
|
|
|
|
|
|
|
|
|
|
|
|
|
2: Volume off (Default) |
|
|
|
|
|
|
|
|
|
|
|
|
|
|
|
|
|
|
|
|
|
|
||||
|
|
|
|
|
|
|
|
|
|
|
|
|
|
|
|
|
|
|
|
|
|
|||||
|
|
|
|
|
|
|
|
|
|
|
|
|
|
|
|
|
|
|
|
|
|
|||||
|
|
|
|
|
|
|
|
|
|
|
|
|
|
|
|
|
|
|
|
|
|
|
|
|
|
|
|
|
|
|
|
|
|
|
|
|
|
|
|
|
|
|
|
|
|
|
|
|
|
|
|
|
|
|
|
|
|
|
|
|
|
|
|
|
|
|
|
|
|
|
|
|
|
|
|
|
|
|
|
|
AUX1 Skip |
|
|
||||||||||||||||||||||||
If AUX1 is not used, the AUX1 mode is skipped when |
|
|||||||||||||||||||||||||
selecting the source. |
|
|||||||||||||||||||||||||
1: On (Skip disabled.) |
|
|
|
|
|
|
|
|
|
|
|
|
|
|
||||||||||||
(Default) |
|
|
|
|
|
|
|
|
|
|
|
|
|
|
||||||||||||
|
|
|
|
|
|
|
|
|
|
|
|
|
|
|
|
|
|
|
|
|
|
|
|
|||
|
|
|
|
|
|
|||||||||||||||||||||
|
|
|
|
|
|
|
||||||||||||||||||||
2: Off (Skip enabled.) |
|
|
|
|
|
|
Audio Setting, Function Setting |
|||||||||||||||||||
|
|
|
|
|
|
|
|
|
|
|
|
|
|
|
|
|
|
|
|
|
|
|
|
|
|
|
|
|
|
|
|
|
|
|
|
|
|
|
|
|
|
|
|
|
|
|
|
|
|
|
|
|
|
|
|
|
|
|
|
|
|
|
|
|
|
|
|
|
|
|
|
|
|
|
|
|
|
|
|
|
|
|
|
|
|
|
|
|
|
|
|
|
|
|
|
|
|
|
|
|
|
|
|
|
|
|
|
|
|
|
|
23 |
|
|
|
|
|
|
|
|
CQ-C500U |
|
|
|
|
||
|
|
|
|
|

Troubleshooting
If You Suspect Something Wrong
Check and take steps as described below.
If the described suggestions do not solve the problem, it is recommended to take the unit to your nearest authorized Panasonic Servicenter. The product should be serviced only by qualified personnel. Please refer the checking and the repair to professionals. Panasonic shall not be liable for any accidents arising out of neglect of checking the unit or your own repair after your checking.
Never take measures especially those other than indicated by italic letters in “Possible solution” described below because those are too dangerous for users to handle themselves.
 Warning
•Do not use the unit in an irregular condition, for example, without sound, or with smoke or a foul smell, which can cause ignition or electric shock. Immediately stop using the unit and consult your dealer.
•Never try to repair the unit by yourself because it is dangerous to do so.
Common
Problem
No power to the unit
Sound is not generated.
Noise
Noise is made in step with engine revolutions.
Possible cause Possible solution
The power cord (battery, power and ground) is connected in the wrong way.
Check the wiring.
Fuse blows out.
Eliminate the cause of fuse blowout and replace the fuse with new one.
Consult your dealer.
MUTE is set to ON.
Set MUTE to OFF.
The wiring of speaker lines are not correct, or a break or poor contact arises.
Check the wiring in accordance with the wiring diagram. ( Installation Instructions)
There is an electromagnetic-wave generator such as a cellular phone near the unit or its electrical lines.
Keep an electromagnetic-wave generator such as a cellular phone away from the unit and the wiring of the unit. In case that noise cannot be eliminated due to the wiring harness of the car, consult your dealer.
The contact of the ground lead is poor.
Make sure that the ground lead is connected to an unpainted part of the chassis securely.
Alternator noise comes from the car.
Change the wiring position of the ground lead.
Mount a noise filter.
|
|
|
|
|
|
24 |
|
|
|
|
|
|
|
|
|
||
|
|
|
CQ-C500U |
||
|
|
|
|
|
|

Common (continued)
Radio
Problem
Some operations are not executable.
No sound from speaker(s)
The speaker channels are reversed between right and left.
The sound field is not clear in the stereo mode.
Central sound does not settled.
The power fails unintentionally.
Possible cause Possible solution
Some operations are not executable in particular modes such as menu mode.
Read the operating instructions carefully and cancel the mode. If the unit is still out of order, consult your dealer.
Balance/Fader setting is not appropriate.
Readjust Balance/Fader.
There is a break, a short circuit, poor contact or wrong wiring regarding the speaker wiring.
Check the speaker wiring.
The speaker wiring is confused between right and left.
Perform the speaker wiring in accordance with the wiring diagram.
The plus and minus terminals at right and left channels of speakers are connected reversely.
Perform the speaker wiring in accordance with the wiring diagram.
The safety device works.
Consult your dealer, or your nearest Panasonic Servicenter.
Poor reception or noise
The number of auto preset stations is less than 6.
Preset stations cannot be stored.
Antenna installation or wiring of antenna cable is faulty.
Check whether the antenna mounting position and its wiring are correct. In addition, check to see whether the antenna ground is securely connected to the chassis.
No power is supplied to the antenna amplifier (when using a film antenna, etc.).
Check the wiring of the antenna power lead.
The number of receivable stations is less than 6.
Move to an area where receivable stations number is maximum, and try presetting.
The contact of the battery lead is poor, or the battery lead is not always powered.
Make sure that the battery lead is connected securely, and preset stations again.
English
Troubleshooting
CQ-C500U |
25 |
|
|

Troubleshooting
CD
MP3/WMA/AAC
Problem
No playback or disc ejected
Sound skipping or noise
Sound skipping due to vibration
Disc unejectable
Possible cause Possible solution
The disc is inserted upside down.
Insert a disc correctly.
There is a flaw or foreign material on the disc.
Remove the foreign material, or use a flawless disc.
There is a flaw or foreign material on the disc.
Remove the foreign material, or use a flawless disc.
The unit is not sufficiently secured.
Secure the unit to the console box.
The unit is tilted at over 30˚ in the front-to-end direction.
Make the angle 30˚ or less.
Something such as a peeled label obstructs the disc coming out.
Consult your dealer.
The microcontroller in the unit operates abnormally due to noise or other factors.
Unplug the power cord and plug it again. In case the unit is still out of order, consult your dealer.
No playback or disc ejected
The CD-R/RWs that are playable on other devices are not playable on this unit.
Sound skipping or noise
The noise is heard with “RE-MASTER” at “ON”.
The disc has unplayable formatted data.
Refer to the description about MP3/WMA/AAC for playable sound data except CD-DA (i.e. music CD).
The playability of some CD-R/RWs may depend on the combination of media, recording software and recorder to be used even if these CD-R/RWs are playable on other devices such as a PC.
Make CD-R/RWs in different combination of media, recording software and recorder after referring to the description about MP3/WMA/AAC.
There is a flaw or foreign material on the disc.
Remove the foreign material, or use a flawless disc. For MP3/WMA/AAC, refer to the description about MP3/WMA/AAC.
Playing Variable Bit Rate (VBR) files may cause sound skipping.
Play Non-VBR files.
With some CDs, noise may be heard in the treble range when playing the MP3/ WMA/AAC files created from those CDs with “RE-MASTER” at the “ON” setting.
If noise is heard, set “RE-MASTER” to “OFF”.
|
|
|
|
26 |
|
|
|
|
CQ-C500U |
||
|
|
|
|

 Remote control unit


Problem
No response to pressing buttons
Possible cause Possible solution
The battery is inserted in the wrong direction. A wrong battery is inserted.
Insert a correct battery in the correct direction.
The battery is weak.
Replace the battery with new one.
The aiming direction of the remote control unit is wrong.
Aim the remote control unit at the sensor of the unit and press buttons.
The sensor is exposed to direct sunlight. (The remote control unit may not be operable when the sensor is exposed to direct sunlight. In such a case, the system is not faulty.)
Block off sunlight to the sensor.
Error Display Messages
Display |
Possible cause Possible solution |
|||
|
|
|
The disc is dirty or upside down. |
|
|
|
|
||
|
|
|
Check the disc. |
|
|
|
|
The disc has scratches. |
|
|
|
|
||
|
|
|
Check the disc. |
|
|
|
|
No operation by some cause. |
|
|
|
|
||
|
|
|
Unplug the power cord and plug it again. In case the unit is still out of |
|
(After 5 seconds) |
||||
order, consult your dealer. ( Installation Instructions) |
||||
|
|
|
||
|
|
|
|
|
CD/MP3/WMA/AAC |
|
|
|
|
|
The player for some reason cannot read the file you are trying to play. (File |
|
|
|
|
|
||
|
|
|
|
|
||
|
|
|
|
|
||
|
|
|
|
|
|
|
|
|
|
|
|
|
recorded in an unsupported file system, compression scheme, data format, file |
|
|
(After 5 seconds) |
||||
|
|
name extension, damaged data, etc.) |
||||
|
|
|
|
|
|
|
|
|
|
|
|
|
Select a file that the player can read. Check the type of data recorded on |
|
|
|
|
|
|
|
|
To next file automatically |
the disc. Create a new disc if necessary. |
||||
|
|
|||||
|
|
|
A WMA file can be copyrighted. |
|||
|
|
|
|
|||
|
|
(After 5 seconds) |
||||
The file protected by copyright is not playable.
To next file automatically
Note: Refer to the System Upgrade Guidebook for error messages regarding optional products.
English
 Troubleshooting, Error Display Messages
CQ-C500U |
27 |
|
|
 Loading...