


 Loading...
Interactive Flat Panel
User manual

TABLE OF CONTENTS |
|
SAFETY................................................................................................ |
4 |
Safety Instructions...................................................................................................................... |
4 |
Copyright.................................................................................................................................... |
5 |
Disclaimer.................................................................................................................................. |
5 |
Trademark Recognition.............................................................................................................. |
5 |
FCC............................................................................................................................................ |
5 |
Declaration of Conformity for EU Countries............................................................................... |
6 |
WEEE......................................................................................................................................... |
6 |
INTRODUCTION................................................................................... |
7 |
Package Contents...................................................................................................................... |
7 |
Standard Accessories........................................................................................................... |
7 |
Optional Accessories............................................................................................................ |
7 |
Product Overview....................................................................................................................... |
8 |
Front View............................................................................................................................. |
8 |
Rear View.............................................................................................................................. |
9 |
Remote Control......................................................................................................................... |
10 |
SETUP AND INSTALLATION.............................................................. |
12 |
Wall Mounting Installation......................................................................................................... |
12 |
Wall Mount Specifications.................................................................................................... |
12 |
Installing an External Mini Computer................................................................................... |
15 |
Stand Mounting Installation (Optional)...................................................................................... |
16 |
Using the Remote Control......................................................................................................... |
19 |
Installing/Replacing the Remote Control Batteries.............................................................. |
19 |
Remote Control Operating Range....................................................................................... |
20 |
Making Connection................................................................................................................... |
21 |
Connecting to Power............................................................................................................ |
21 |
Connecting External Devices............................................................................................... |
21 |
USING THE DEVICE........................................................................... |
25 |
Turning the Power On/Off......................................................................................................... |
25 |
Setup Wizard............................................................................................................................. |
26 |
BASIC OPERATIONS......................................................................... |
28 |
Home Screen Overview............................................................................................................ |
28 |
General Settings....................................................................................................................... |
29 |
Selecting an Input Source.................................................................................................... |
30 |
Activating the Low Blue Light Function................................................................................ |
30 |
Adjusting the Volume Level.................................................................................................. |
31 |
Adjusting the Backlight Level............................................................................................... |
31 |
Configuring the Audio Settings............................................................................................. |
32 |
2 English

Configuring the Screen Settings.......................................................................................... |
32 |
Configuring the Display Settings.......................................................................................... |
33 |
Configure the Adjust Settings (for VGA input only).............................................................. |
33 |
Side Toolbar.............................................................................................................................. |
34 |
Viewing the Recent Tasks.................................................................................................... |
34 |
Annotations Tool................................................................................................................... |
35 |
Screen Freezing................................................................................................................... |
36 |
Other Utilities....................................................................................................................... |
37 |
Cloud Drive.......................................................................................................................... |
42 |
Advanced Settings.................................................................................................................... |
43 |
Configuring the Network Settings........................................................................................ |
44 |
USING THE APPS............................................................................... |
46 |
Note .......................................................................................................................................... |
47 |
Advanced Options................................................................................................................ |
51 |
Screenshare ............................................................................................................................. |
52 |
ShareSender App Compatibility Table................................................................................. |
52 |
Mobile Device...................................................................................................................... |
52 |
Computer............................................................................................................................. |
54 |
Finder ....................................................................................................................................... |
56 |
Managing the Files............................................................................................................... |
56 |
Playing Multimedia Files...................................................................................................... |
57 |
Screen Lock ............................................................................................................................. |
62 |
Browser .................................................................................................................................... |
64 |
Keeper ...................................................................................................................................... |
64 |
System Update ......................................................................................................................... |
65 |
ADDITIONAL INFORMATION............................................................. |
69 |
Specifications............................................................................................................................ |
69 |
Dimensions............................................................................................................................... |
71 |
65-inch................................................................................................................................. |
71 |
75-inch................................................................................................................................. |
72 |
86-inch................................................................................................................................. |
73 |
Supported Timing List............................................................................................................... |
74 |
RS232 Protocol Function List.................................................................................................... |
75 |
RS232 Pin Assignments...................................................................................................... |
75 |
RS232 RJ45 Control Connection......................................................................................... |
75 |
SET Command..................................................................................................................... |
76 |
GET Command.................................................................................................................... |
78 |
LED Indicator............................................................................................................................ |
80 |
Troubleshooting........................................................................................................................ |
80 |
Maintenance.............................................................................................................................. |
81 |
Cleaning the Screen............................................................................................................ |
81 |
Clean the Front Frame......................................................................................................... |
81 |
Optoma Global Offices.............................................................................................................. |
82 |
English 3

SAFETY
Please follow all warnings, precautions and maintenance as recommended in this user manual.
Safety Instructions
Only use attachments/accessories specified by the manufacturer.
Do not block any ventilation openings. To ensure reliable operation of the device and to protect from over heating, it is recommended to install the device in a location that does not block ventilation. Do not put the device in an enclosure such as a book case or a cabinet that restricts air flow.
Do not use the device near water or moisture. To reduce the risk of fire and/or electric shock, do not expose the device to rain or moisture.
Do not install near heat sources such as radiators, heaters, stoves or any other apparatus such as amplifiers that emits heat.
Do not let objects or liquids enter the device. They may touch dangerous voltage ports or short out parts that could result in fire or electric shock.
Do not place the device on an unstable surface. The device may fall over resulting in injury or the device may become damaged.
Do not setup the device in places where it might be subjected to vibration or shock.Do not use any hard or sharp object to operate the touch screen.
Do not use the device if it has been physically damaged or abused. Physical damage/abuse would be (but not limited to):
±±The device has been dropped.
±±Power supply cord or plug has been damaged.
±±Liquid has been spilled on to the device.
±±The device has been exposed to rain or moisture.
±±Something has fallen in the device or something is loose inside.
Do not attempt to service the device yourself. Opening or removing covers may expose you to dangerous voltages or other hazards. Please call Optoma before you send the device for repair.
Disconnect the power plug from AC outlet if the device is not being used for a long period of time.
Remove the batteries from the remote control before storage. If the batteries are left in the remote for long periods, they may leak.
Turn off and unplug the power plug from the AC outlet before cleaning the device.
Use a soft dry cloth with mild detergent to clean the display housing. Do not use abrasive cleaners, waxes or solvents to clean the device.
See the device enclosure for safety related markings.
The device should only be repaired by appropriate service personnel.
4 English

Copyright
This publication, including all photographs, illustrations and software, is protected under international copyright laws, with all rights reserved. Neither this manual, nor any of the material contained herein, may be reproduced without written consent of the author.
© Copyright 2018
Disclaimer
The information in this document is subject to change without notice. The manufacturer makes no representations or warranties with respect to the contents hereof and specifically disclaims any implied warranties of merchantability or fitness for any particular purpose. The manufacturer reserves the right to revise this publication and to make changes from time to time in the content hereof without obligation of the manufacturer to notify any person of such revision or changes.
Trademark Recognition
Kensington is a U.S. registered trademark of ACCO Brand Corporation with issued registrations and pending applications in other countries throughout the world.
HDMI, the HDMI Logo, and High-Definition Multimedia Interface are trademarks or registered trademarks of HDMI
Licensing LLC in the deviceed States and other countries.
Google, the Google logo, and Google Drive are trademarks or registered trademarks of Google LLC. OneDrive is a trademark and brand of Microsoft Corporation.
All other product names used in this manual are the properties of their respective owners and are Acknowledged.
FCC
This device has been tested and found to comply with the limits for a Class B digital device pursuant to Part 15 of the FCC rules. These limits are designed to provide reasonable protection against harmful interference in a
residential installation. This device generates, uses and can radiate radio frequency energy and, if not installed and used in accordance with the instructions, may cause harmful interference to radio communications.
However, there is no guarantee that interference will not occur in a particular installation. If this device does cause harmful interference to radio or television reception, which can be determined by turning the device off and on is encouraged to try to correct the interference by one or more of the following measures:
Reorient or relocate the receiving antenna.
Increase the separation between the device and receiver.
Connect the device into an outlet on a circuit different from that to which the receiver is connected.Consult the dealer or an experienced radio/television technician for help.
Notice: Shielded cables
All connections to other computing devices must be made using shielded cables to maintain compliance with FCC regulations.
Caution
Changes or modifications not expressly approved by the manufacturer could void the user's authority, which is granted by the Federal Communications Commission, to operate this projector.
Operation Conditions
This device complies with Part 15 of the FCC Rules. Operation is subject to the following two conditions:
1.This device may not cause harmful interference and
2.This device must accept any interference received, including interference that may cause undesired operation.
English 5

Notice: Canadian users
This Class B digital apparatus complies with Canadian ICES-003.
Remarque à l'intention des utilisateurs canadiens
Cet appareil numerique de la classe B est conforme a la norme NMB-003 du Canada.
Declaration of Conformity for EU Countries
EMC Directive 2014/30/EC (including amendments)Low Voltage Directive 2014/35/EC
R & TTE Directive 1999/5/EC (if product has RF function)
WEEE
Disposal instructions
Do not throw this electronic device into the trash when discarding. To minimize pollution and ensure utmost protection of the global environment, please recycle it.
6 English
INTRODUCTION
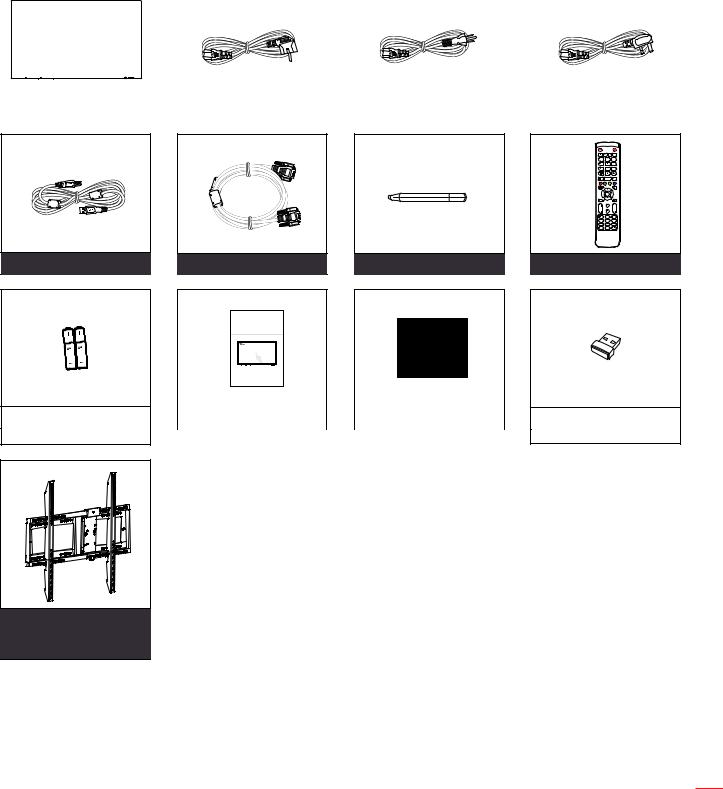
Package Contents
Carefully unpack and verify that you have the items listed below under standard accessories. Some of the items under optional accessories may not be available depending on the model, specification and your region of purchase. Please check with your place of purchase. Some accessories may vary from region to region.
The warranty card is only supplied in some specific regions. Please consult your dealer for detailed information.
Standard Accessories
|
|
|
|
|
|
|
|
|
|
|
|
|
|
|
|
|
|
|
|
|
|
|
|
|
|
|
|
|
|
|
|
|
|
|
|
|
|
|
|
|
|
|
|
Interactive Flat Panel |
|
European Power Cord |
|
American Power Cord |
|
UK Power Cord |
||||
|
|
|
|
|
|
|
|
|
|
|
USB Touch Cable |
VGA Cable |
Writing Pen (x3) |
Remote Control |
|
Interactive Flat Panel |
|
|
|
Basic User Manual |
|
|
Batteries |
|
Basic User Manual |
|
UM CD |
|
TP-Link TL-WN725N |
(for remote control) |
|
|
|
|
|
Wi-Fi Dongle |
Wall Mount with PC Vesa Bracket (OWMFP01)
Optional Accessories
ST01 (Stand)
OMPC-i5 (solt in PC, intel i5 CPU, 8G RAM, 128G SSD)OMPC-i7 (slot in PC, intel i7 CPU, 8G RAM, 256G SSD)
Note For European warranty Information, please visit www.optoma.com.
English 7
INTRODUCTION
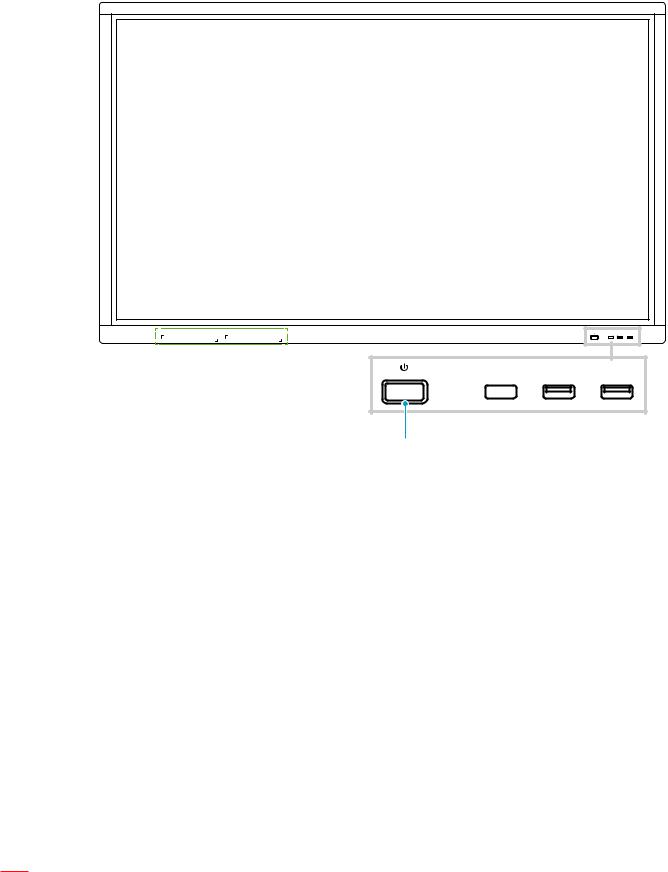
Product Overview
Front View
1 |
2 |
No. Item
1.Touch screen
2.Writing pen placements (x2)
3.Power button with LED indicator
USB USB
3 |
4 |
5 |
No. Item
4.IR receiver
5.USB 2.0 ports (x2)
Note The front USB 2.0 ports are full channel USB ports. USB ports can be used irrespective of the chosen input source.
8 English
INTRODUCTION
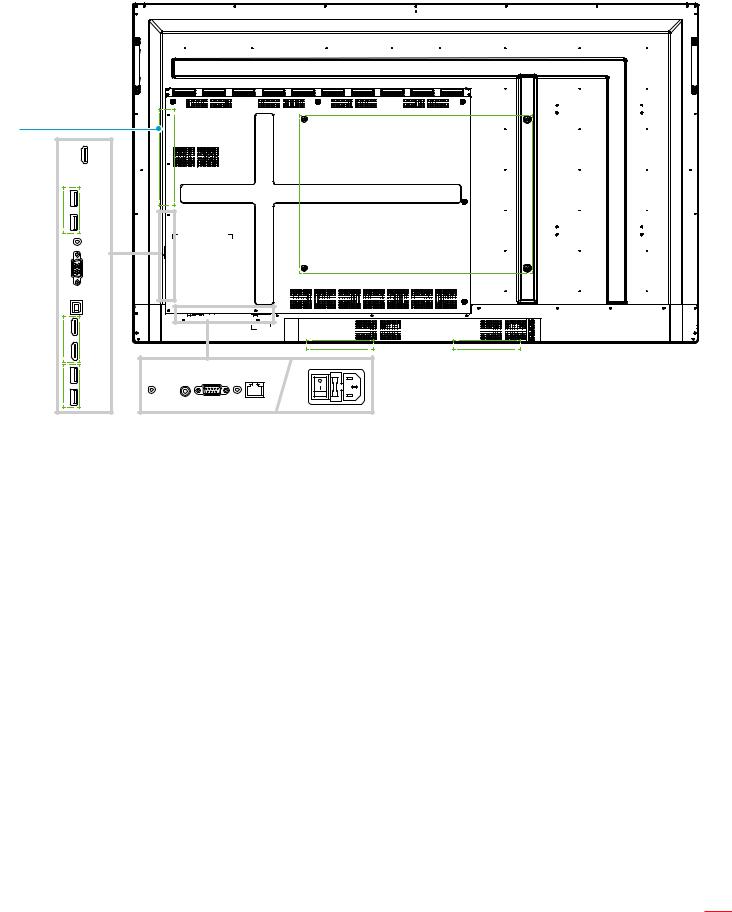
Rear View
1 |
|
|
|
|
|
|
|
|
|
|
2 |
|
|
|
|
|
|
|
|
|
|
3 |
|
|
|
|
|
|
|
|
|
|
|
.3 USB |
|
|
|
|
|
|
|
|
|
4 |
|
|
|
|
|
|
|
|
|
|
|
0.3 |
|
|
|
|
|
|
|
|
|
5 |
|
|
|
|
|
|
|
|
|
|
6 |
|
|
|
|
|
|
|
|
|
|
7 |
|
|
|
|
|
|
|
|
|
|
8 |
IN HDMI |
|
|
|
|
|
|
|
|
|
|
|
|
|
|
|
|
|
|
|
|
|
2 IN |
|
|
|
|
|
|
|
|
|
|
2USB |
COAX OUT |
RS232 |
AUDIO OUT |
LAN |
|
|
|
|
|
9 |
AV IN |
|
|
|
|
|
||||
|
|
|
|
|
|
|
|
|
|
|
|
0.2 |
|
|
|
|
|
|
|
|
|
|
10 |
11 |
12 |
13 |
14 |
15 |
16 |
17 |
18 |
17 |
No. Item
1.Handles (x2)
2.OPS slot
3.HDMI Out port
4.USB 3.0 ports (x2)
5.Audio In jack
6.VGA port
7.Touch USB port
8.HDMI 2.0 ports (x2)
9.USB 2.0 ports (x2)
No. Item
10.Composite Video jack
11.Coaxial Out jack
12.RS232 port
13.Audio Out jack
14.LAN port
15.Power switch
16.AC In socket
17.12W speakers (x2)
18.Mounting holes for wall mount
English 9

INTRODUCTION
Remote Control
1 |
2 |
|
3 |
5 |
|
4 |
6 |
|
|
||
|
7 |
|
8 |
9 |
|
|
||
10 |
12 |
|
|
||
11 |
15 |
|
13 |
||
16 |
||
14 |
||
18 |
||
|
||
17 |
|
|
19 |
|
|
21 |
20 |
|
|
||
23 |
22 |
|
|
||
24 |
25 |
|
|
26 |
|
27 |
|
No. |
Button |
|
Description |
1. |
Power ( |
) |
Turn on/off the device. |
|
|
|
|
2. |
Mute ( |
) |
Turn off the sound temporarily. |
|
|
|
|
3. |
Start |
|
Perform the same function as the Windows key on a computer keyboard. |
|
|
|
|
4. |
Space |
|
Perform the same function as the Space key on a computer keyboard. |
|
|
|
|
5. |
Alt+Tab |
|
Perform the same function as the Alt and Tab keys on a computer keyboard. |
|
Pressing both keys, you can switch between all open applications (windows). |
||
|
|
|
10 English
INTRODUCTION
No. |
Button |
Description |
||||
6. |
Alt+F4 |
|
|
Perform the same function as the Alt and F4 keys on a computer keyboard. Pressing |
||
|
|
both keys, you can close the current window. |
||||
|
|
|
|
|
||
|
|
|
|
|
||
7. |
Numeric keys |
Numeric input keys |
||||
|
|
|
|
|
||
8. |
Display |
Show the current input source and information. |
||||
|
|
|
|
|
|
|
9. |
Repeat ( |
) |
No function. |
|||
|
|
|
|
|
|
|
10. |
Home |
|
|
Return to the Home screen. |
||
|
|
|
|
|
|
|
11. |
Input |
|
|
Select the input source. |
||
|
|
|
|
|
|
|
12. |
Menu |
|
|
Display or hide the OSD menu. |
||
|
|
|
|
|
|
|
13. |
Red ( |
) |
|
Lock or unlock the Power button (on the device) and touch functions. |
||
|
|
|
|
|
|
|
14. |
Green ( |
) |
Lock or unlock the Power button (on the device) function. |
|||
|
|
|
|
|
|
|
15. |
Yellow ( |
) |
Lock or unlock the touch function. |
|||
|
|
|
|
|
|
|
16. |
Blue ( |
) |
Freeze the screen. |
|||
|
|
|
|
|
|
|
17. |
Blank ( |
|
|
) |
Blank the screen. |
|
|
|
|||||
|
|
|||||
|
|
|
|
|
||
18. |
Backspace ( ) |
Perform the same function as the Backspace key on a computer keyboard. |
||||
|
|
|
|
|
||
19. |
Navigation keys |
Select an item or option. |
||||
|
(pqtu) |
|
||||
20. |
Enter |
|
|
Confirm the selection. |
||
|
|
|
|
|
|
|
21. |
Note( |
) |
|
Launch the Note app. |
||
|
|
|
|
|
|
|
22. |
Back |
|
|
Return to the previous screen. |
||
|
|
|
|
|
|
|
23. |
PgUp |
|
|
Perform the same function as the PgUp key on a computer keyboard. |
||
|
|
|
|
|
||
24. |
Channel keys |
No function. |
||||
|
|
|
|
|
||
25. |
Volume keys |
Adjust the volume level. |
||||
|
|
|
|
|
|
|
26. |
PgDn |
|
|
Perform the same function as the PgDn key on a computer keyboard. |
||
|
|
|
|
|
||
27. |
Function keys |
Perform the same function as the F1 ~ F12 function keys on a computer keyboard. |
||||
(F1 ~ F12) |
||||||
|
|
|||||
|
|
|
|
|
||
Note If the PC module is not installed into the OPS slot, all computer-related keys will have no function. |
||||||
English 11

SETUP AND INSTALLATION
Wall Mounting Installation
Use only the supplied wall mount kit. It includes the following items:
Screw A (x4) Screw B (x8) Screw C (x2)
Dual mounting brackets and wall mount |
Anchor (x8) |
Washer (x8) |
Wall Mount Specifications |
|
|
|
Model Name |
VESA Grid |
Screw Type & Length |
|
65-inch |
600 x 400 mm |
M8*25L |
|
75-inch |
800 x 400 mm |
M8*25L |
|
86-inch |
800 x 600 mm |
M8*25L |
|
|
|
482mm |
800mm |
|
|
404mm |
|
|
|
|
4 |
|
|
|
- |
|
|
400mm |
M8×25mm |
|
|
|
|
|
65-inch |
|
75-inch |
594mm |
800mm |
|
|
280mm |
|
|
|
|
4 |
|
|
|
- |
|
|
600mm |
M8×25mm |
|
|
|
|
|
|
|
86-inch |
|
|
12 English

SETUP AND INSTALLATION
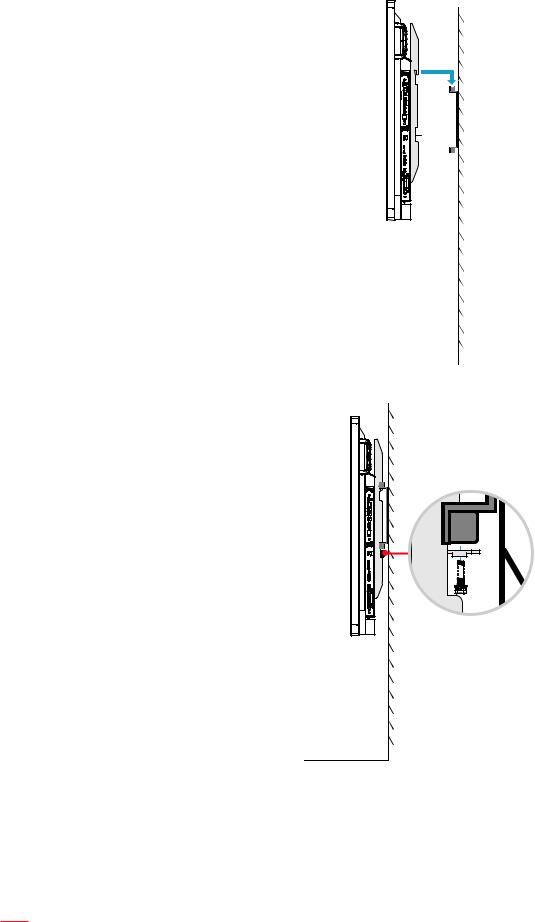
To mount the device on the wall, complete the following steps:
1.Install the dual mounting brackets on the rear of the device. Then secure the brackets with four screws (A).
 A
A
2.Drill eight small holes on the mounting location and insert the anchors into the holes.
3.Position the wall mount on the wall. Then secure the wall mount with eight screws (B) through the washers into the installed anchors on the wall.


 B
B
English 13
SETUP AND INSTALLATION
4.Align and hook the dual mounting brackets to the wall mount.
5.Secure the dual mounting brackets and the wall mount with two screws (C).

 C
C
Note
The maximum wall mount kit load capacity:160kg (352lbs).
The wall mount should be installed into concrete wall to ensure installation firmness.
Screws must be tightly secured. However, to avoid damage to the mounting brackets, wall mount, or device, do not overtighten the screws.
The installation should only be performed by qualified technicians. Improper installation may cause the device to fall or malfunction.
Please note that damage resulting from incorrect installation will void the warranty.
14 English
SETUP AND INSTALLATION
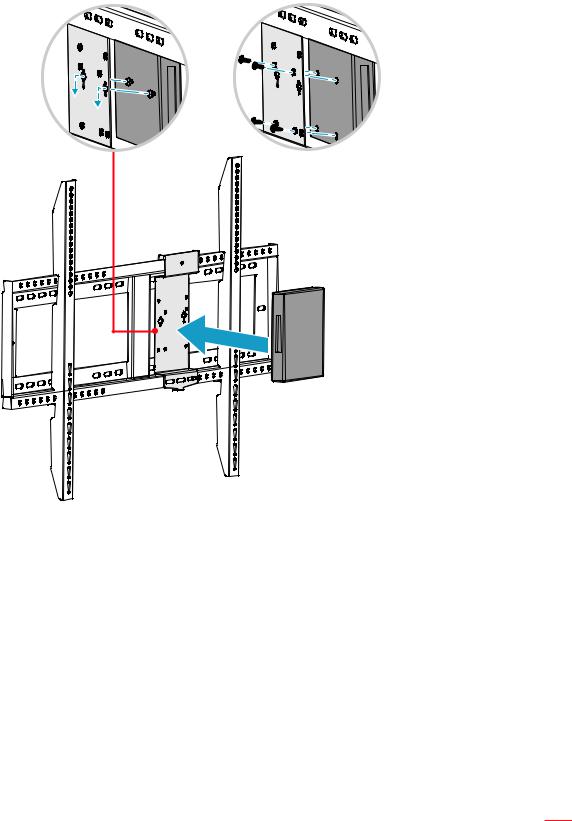
Installing an External Mini Computer
Install the mini PC bracket on the rear side of the wall mount. Then complete one of the following to install the mini computer:
Install the screws onto the mini computer. Then align and hook the mini computer to the mini PC bracket.Align and install the mini computer to the mini PC bracket. Then secure it with four screws.
OR
English 15
SETUP AND INSTALLATION
Stand Mounting Installation (Optional)
The stand mount kit includes the following items:
Pen tray (x1) |
Wheel (x4) |
Screw J (x16) |
Screw H (x4) |
Nut G (x4) |
Washer G1 (x4) Split Ring Lock |
||||
|
|
|
|
|
Washer G2 (x4) |
|
|
|
|
|
|
|
|
|
|
|
|
Stand pole (x2) Stand base (x1) Screw K (x4) Washer K1 (x4) Nut K2 (x4)
To mount the device on the stand, complete the following steps:
1.Install the dual mounting brackets on the rear of the device. Then secure the brackets with four screws (A).
 A
A
Note Dual mounting brackets, wall mount, and screws (A) are included in the wall mount kit. Refer to “Wall Mounting Installation” on page 12.
16 English

SETUP AND INSTALLATION
2.Flip the stand base so that you can see the screw holes for the wheel. Then install the wheel onto its slot and secure it with four screws (J).
Repeat the same procedure to install the remaining three wheels.
 J
J
3.Place the stand base on the stable surface. Then install the stand pole onto its slot and secure both standoffs with two nuts (G) through the washers (G2 and G1).
Repeat the same procedure to install another stand pole.
G1 
G2 
G 


English 17

SETUP AND INSTALLATION
4.Align the pen tray with the screw holes on the middle part of the poles. Then secure the pen tray with four screws (H).
5.Install the wall mount on the upper part of the poles. Then insert the screws (K) through the screw holes from the rear side of the poles.
6.Place the washers (K1) and the nuts (K2) into the screws. Then tighten the nuts (K2) to secure the wall mount in place.
K
K2
K1
H 


7.Align and hook the dual mounting brackets to the installed wall mount on the stand poles.
18 English
SETUP AND INSTALLATION
Using the Remote Control
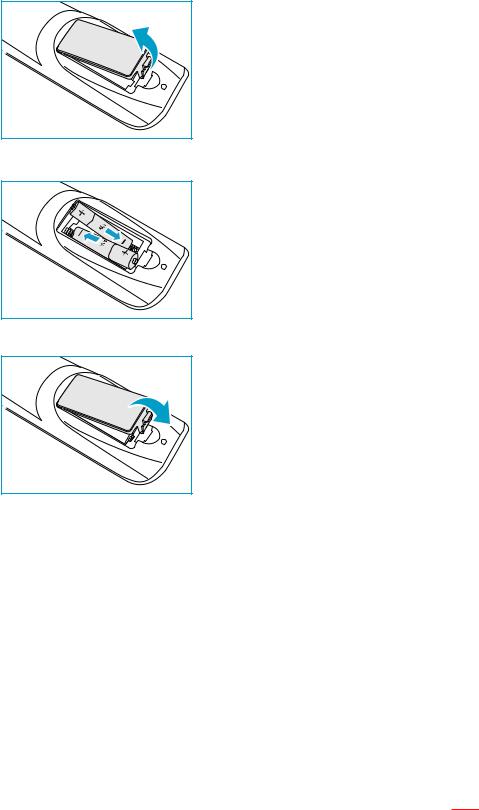
Installing/Replacing the Remote Control Batteries
Two AAA size batteries are supplied for the remote control.
IMPORTANT! Replace only with the same or equivalent type batteries.
1.Remove the cover of the battery compartment.
2.Insert the two batteries with correct polarity (+/-) as shown inside the battery compartment.
3.Replace the cover.
CAUTION
Improper use of batteries can result in chemical leakage or explosion. Be sure to follow the instructions below.
Do not mix batteries of different types. Different types of batteries have different characteristics.
Do not mix old and new batteries. Mixing old and new batteries can shorten the life of new batteries or cause chemical leakage in old batteries.
Remove batteries as soon as the are depleted. Chemicals that leak from batteries that come in contact with skin can cause a rash. If you find any chemical leakage, wipe thoroughly with a cloth.
The batteries supplied with this product may have a shorter life expectancy due to storage conditions.If you will not be using the remote control for an extended period of time, remove the batteries.
When you dispose of the batteries, you must obey the law in the relative area or country.
English 19

SETUP AND INSTALLATION
Remote Control Operating Range
When using the remote control, make sure to point it within ±30° to the IR receiver on the device. The distance between the remote control and the IR sensor window should not be longer than 8 meters.
Make sure that there are no obstacles between the remote control and the IR sensor window on the device that might obstruct the infra-red beam.
Make sure the IR transmitter of the remote control is not being used in sunlight or fluorescent lamps directly.
If the remote control is closed to Inverter-Type fluorescent lamps, it might become ineffective from time to time.
If the remote control and the device are within a very short distance, the remote control might become ineffective.
 30° 30°
8M
20 English
SETUP AND INSTALLATION
Making Connection
Connecting to Power
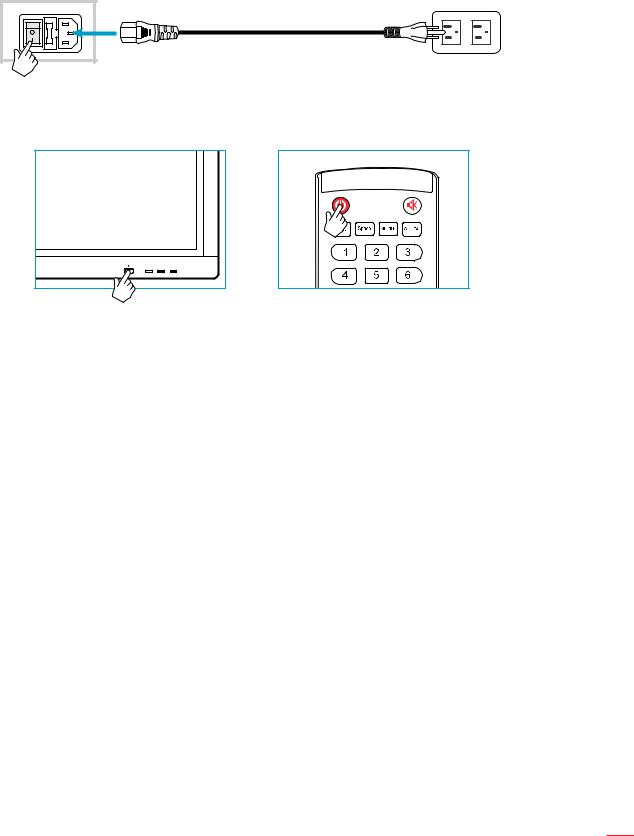
1.Connect one end of the power cord to the AC In socket of the device.
2.Connect the other end of the power cord to a power outlet or a power supply.
3.Set the Power switch to ON (I). The device will automatically enter standby mode.
Connecting External Devices
IMPORTANT! To use the touch screen function, make sure to connect one end of the USB cable to the Touch USB port of the device and the other end of the cable to the USB port of your external device.
HDMI input connection
Connect your computer to the device using an HDMI cable.
TOUCH |
HDMI IN |
HDMI IN 2 |
Connect your video source to the device using an HDMI cable.
|
|
|
|
|
|
|
|
|
|
|
|
|
|
HDMI IN |
|
|
HDMI IN 2 |
|||
|
|
|
|
|
|
|
|
|
|
|
|
|
|
|
|
|
|
|
|
|
English 21
SETUP AND INSTALLATION
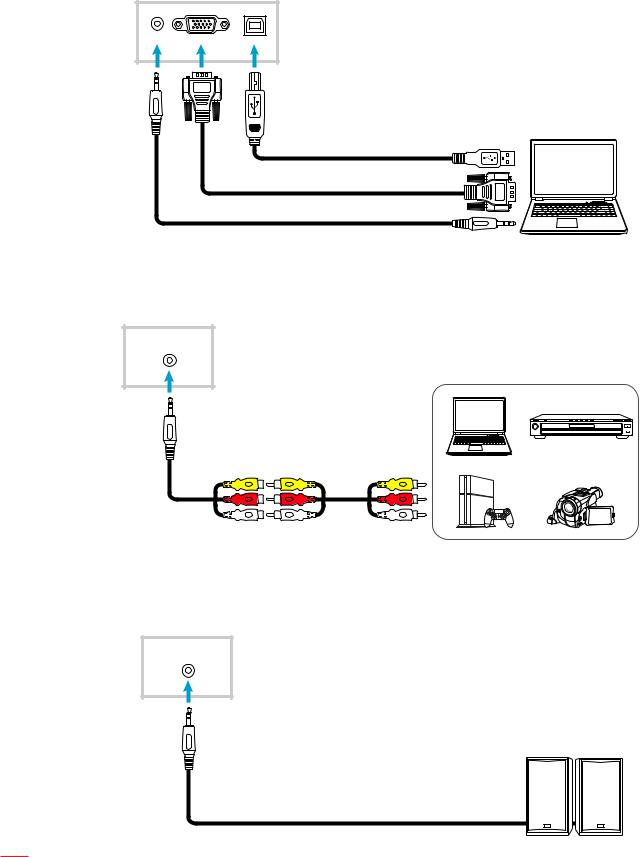
VGA input connection
Connect your computer to the device using a VGA cable.
Note For audio input, connect one end of an audio cable to the Audio In jack of the device and the other end of the cable to the audio jack of your computer.
PCAUDIO IN |
TOUCH |
AV input connection
Connect your A/V device to the device using an appropriate video cable.
AV IN
Audio output connection
Connect your external speakers to the device using an audio cable.
AUDIO OUT
22 English

SETUP AND INSTALLATION
Coaxial output connection
Connect your audio equipment to the device using a coaxial cable.
COAX OUT
HDMI output connection
Connect your projector to the device using an HDMI cable.
HDMI OUT
USB connection
Connect your USB peripheral device to the device using a USB cable.
Note For the USB disk drive or Wi-Fi dongle connection, simply plug it into one of the available USB ports.
USB USB
USB 3.0 |
USB |
2.0 |
USB 2.0 |
|
|
|
|
|
|
English 23
SETUP AND INSTALLATION
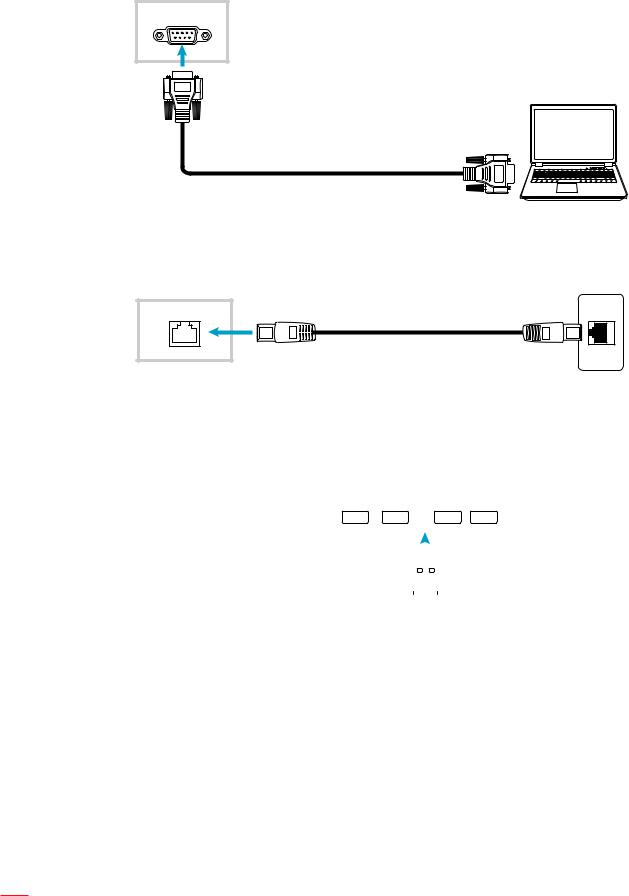
RS232 connection
Connect your computer to the device using a RS232 cable.
RS232
LAN connection
Connect your router to the device using an Ethernet cable.
LAN
Wi-Fi connection
Plug the Wi-Fi dongle into one of the rear USB ports. It can receive the signal in the area where there is Wi-Fi network.
|
|
|
|
|
|
|
|
|
|
|
|
|
|
|
|
|
|
|
|
|
|
|
USB 3.0 |
|
|
USB 3.0 |
|
|
|
|
|
USB 2.0 |
|
|
USB 2.0 |
||||||
|
|
|
|
|
|
|
|
|
|
|
|
|
|
|
|
|
|
|
|
|
|
|
|
|
|
|
|
|
|
|
|
|
|
|
|
|
|
|
|
|
|
|
|
|
|
|
|
|
|
|
|
|
|
|
|
|
|
|
|
|
|
|
|
|
|
|
|
|
|
|
|
|
|
|
|
|
|
|
|
|
|
|
|
|
|
|
|
|
|
|
|
|
|
|
|
|
|
|
|
|
|
|
|
|
|
|
|
|
|
|
|
|
|
|
|
|
|
|
|
|
|
|
|
|
|
|
|
|
|
|
|
|
|
|
|
|
|
|
|
|
|
|
|
|
|
|
24 English
USING THE DEVICE
Turning the Power On/Off
Powering on
Note After the power cord is properly connected, make sure the Power switch to ON (I).
Press the Power button to turn on the device. The LED indicator lights blue, indicating it is ready to use.
Note You can also press the  button on the remote control to turn on the device.
USB |
USB |
Powering off
Press the Power button for 3 seconds to turn off the device. When the LED indicator lights red, this indicates the device has entered standby mode.
Note
You can also press the  button on the remote control to turn off the device.
The device still consumes power when it is in standby mode. It is highly recommended to unplug the power cord from the power outlet if the device will not be used for an extended period of time.
English 25
Loading...