


English
Table of Contents
Usage Notice |
|
Precautions ........................................................................................................ |
2 |
Introduction |
|
Product Features ............................................................................................... |
4 |
Package Overview ............................................................................................. |
5 |
Product Overview ............................................................................................... |
6 |
Main Unit ...................................................................................................... |
6 |
Panel Control ................................................................................................ |
7 |
Connection Ports .......................................................................................... |
7 |
Remote Control with Mouse Function & Laser Pointer ................................ |
8 |
Installation |
|
Connecting the Projector ................................................................................... |
9 |
Powering On/Off the Projector ........................................................................... |
10 |
Power On the Projector ................................................................................ |
10 |
Power Off the Projector ................................................................................ |
11 |
Adjusting the Projected Image ........................................................................... |
12 |
Adjusting the Projector Height ...................................................................... |
12 |
Adjusting the Projector Zoom/Focus ............................................................ |
13 |
Adjusting Projection Image Size .................................................................. |
13 |
User Controls |
|
Panel Control & Remote Control ........................................................................ |
14 |
On-Screen Display Menus ................................................................................ |
17 |
How to Operate ............................................................................................ |
17 |
Image-I (Computer mode) ............................................................................ |
18 |
Image-I (Video mode)................................................................................... |
19 |
Image-II (Computer mode) ........................................................................... |
21 |
Image-II (Video mode).................................................................................. |
22 |
Audio ............................................................................................................ |
23 |
Language ..................................................................................................... |
24 |
Management ................................................................................................. |
25 |
PIP ................................................................................................................ |
26 |
Appendices |
|
Troubleshooting ................................................................................................. |
27 |
Changing the Lamp ............................................................................................ |
30 |
Specifications ..................................................................................................... |
31 |
Compatibility Modes ........................................................................................... |
32 |
1
English
Usage Notice
Precautions
Follow all warnings, precautions and maintenance as recommended in this user’s guide to maximize the life of your unit.
WarningDo not look into the lens. The bright light may hurt your eyes.
WarningTo reduce the risk of fire or electric shock, do not expose this product to rain or moisture.
WarningPlease do not open or disassemble the product as this may cause electric shock.
WarningWhen changing the lamp, please allow unit to cool down, and follow all changing instructions.
WarningThis product will detect the life of the lamp itself. Please be sure to change the lamp when it shows warning messages.
WarningAfter changing a new lamp, please reset the lamp life from OSD menu.
WarningBefore switching off the product, please keep the cooling fan running for a few minutes.
WarningWhen connecting the projector to computer, please turn on the projector first.
WarningTo reduce the risk of injury to the eyes, do not look directly into the laser light on the remote control and do not point the laser light into anyone’s eyes. This remote control is equipped with a Class II laser that emits radiation.
WarningWhen the lamp reaches the end of its life, it will burn out and may make a loud popping sound. If this happens, the projector will not turn back on until the lamp module has been replaced. To replace the lamp, follow the procedures listed under “Changing the Lamp”.
2

English
Usage Notice
Do:
vTurn off the product before cleaning.
vUse a soft cloth moistened with mild detergent to clean the display housing.
vDisconnect the power plug from AC outlet if the product is not being used for a long period of time.
Don’t:
vBlock the slots and openings on the unit provided for ventilation.
vUse abrasive cleaners, waxes or solvents to clean the unit.
vUse under the following conditions:
-Extremely hot, cold or humid environment.
-In areas susceptible to excessive dust and dirt.
-Near any appliance generating a strong magnetic field.
-Place in direct sunlight.
3

English
Introduction
Product Features
This product is an XGA single chip 0.7” DLPTM projector. The outstanding features of it are listed as follows:
uTrue XGA, 1024 x 768 addressable pixels
u3.8 lbs (1.7 kgs) compact design
uHigh contrast ratio 1600 : 1
uSingle chip DLPTM technology
uPureProgressiveTM processing technology for artifact-free film materials.
uHDTV compatible (480i,480P,720P,1080i)
uNTSC/NTSC4.43/PAL/PAL-M/PAL-N/SECAM and HDTV compatible
uHigh-tech DVI connection for digital and analog video connectivity
uFull function remote with mouse control and laser pointer
uMultimedia audio integration
uUser friendly multilingual on-screen display menu
uAdvanced electronic keystone correction and high quality full screen re-scaling image
uUser friendly control panel
uLuxurious carrying case included
uSXGA compression and VGA, SVGA re-sizing
u150 Watts user replaceable P-VIP lamp
uMac compatible
4

English
Introduction
Package Overview
This projector comes with all the items shown below. Check to make sure your unit is complete. Contact your dealer immediately if anything is missing.
1 |
2 |
Projector with lens cap |
RS232 Cable |
Power Cord |
3 |
4 |
5 |
S-Video Cable |
Audio Cable |
Composite Video Cable |
6
M1-A to VGA and USB |
Battery x 2 |
Remote Control with |
cable |
|
Mouse Function and |
|
|
Laser Pointer |
User’s Guide |
Carrying Case |
Quick Start Card |
Warranty Card |
5

English
Introduction
Product Overview
Main Unit
7
5
4
3
8
9
10
6
1
2
1.Panel Control
2.Power Connector
3.Connection Ports
4.Focus Ring
5.Zoom Lens
6.Zoom Ring
7.Speaker
8.Remote Control Receiver
9.Elevator Button
10.Elevator Foot
6

English
Introduction
Panel Control
6
7
9 |
8 |
5
4
2 |
1 |
3
1.Lamp Warning LED
2.Temperature Warning LED
3.Power Indicator Light
4.Power /Standby
5.Menu (On/Off)
6.Four Directional Select Keys
7.Enter
8.Re-sync
9.Source
Connection Ports
1 |
2 |
3 |
4 |
5 |
6 |
7 |
1.KensingtonTM Lock Hole
2.Monitor Loop-Through Connector
3.RS232 Input Connector
4.Composite Video Input Connector
5.Audio Input
6.S-Video Input Connector
7.VESA M1-DA Analog RGB/Digital/HDTV/Component Video/USB Mouse Input Connector
7
English
Introduction
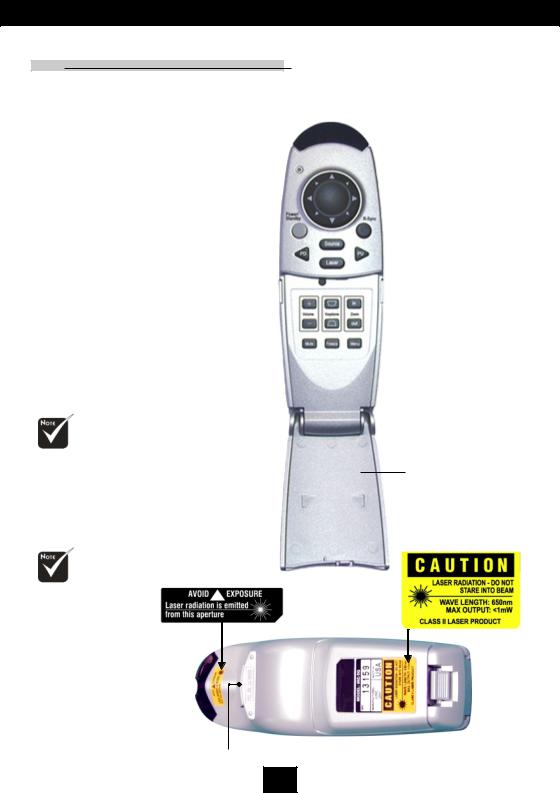
vClose the cover of the remote control when you want to use the remote mouse.
 Caution : To
reduce the risk of injury to the eyes, do not look directly into the laser light on the remote control and do not point the laser light into anyone’s eyes. This remote control is equipped with a Class II laser that emits radiation.
Remote Control with Mouse Function & Laser Pointer
LED |
|
|
|
|
|
|
|
|
|
|
|
|
|
Multi-Directional |
|
|
|
|
|
|
|
|
|
|
|
|
|
||
|
|
|
|
|
|
|
|
|
|
|
|
|
|
|
Power / Standby |
|
|
|
|
|
|
|
|
|
|
|
|
|
Selector |
|
|
|
|
|
|
|
|
|
|
|
|
|
Re-sync |
|
|
|
|
|
|
|
|
|
|
|
|
|
|
||
Page Down |
|
|
|
|
|
|
|
|
|
|
|
|
|
Source |
|
|
|
|
|
|
|
|
|
|
|
|
|
||
Laser |
|
|
|
|
|
|
|
|
|
|
|
|
|
Page Up |
|
|
|
|
|
|
|
|
|
|
|
|
|
||
|
|
|
|
|
|
|
|
|
|
|
|
|
||
Pointer |
|
|
|
|
|
|
|
|
|
|
|
|
|
Keystone Correction |
|
|
|
|
|
|
|
|
|
|
|
|
|
|
|
Volume ( + / - ) |
|
|
|
|
|
|
|
|
|
|
|
|
|
Zoom In / |
|
|
|
|
|
|
|
|
|
|
|
|
|
||
|
|
|
|
|
|
|
|
|
|
|
|
|
Zoom Out |
|
|
|
|
|
|
|
|
|
|
|
|
|
|
|
|
Mute |
|
|
|
|
|
|
|
|
|
|
|
|
|
Menu |
|
|
|
|
|
|
|
|
|
|
|
|
|
||
Freeze |
|
|
|
|
|
|
|
|
|
|
|
|
|
|
|
|
|
|
|
|
|
|
|
|
|
|
|
|
Cover
Enter Key
8
English
Installation
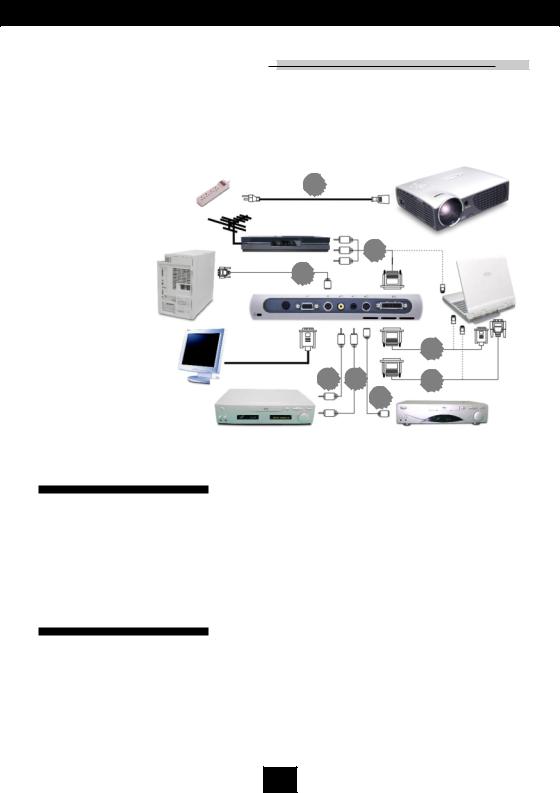
Connecting the Projector
2
Antenna
7
Digital Tuner Output
1
RS232
DVI
RGB
|
|
6 |
5 |
4 |
8 |
|
|
3 |
Video Output |
|
S-Video Output |
1.RS232 Cable
2.Power Cord
3.S-Video Cable
4.Audio Cable
5.Composite Video Cable
6.M1-A to VGA and USB Cable
7.M1-A to HDTV and USB Cable (optional)
8.M1-D to DVI-D and USB Cable (optional)
v To ensure the projector works well with your computer, please configure the display mode of your graphic card to make it less than or equal to 1024 X 768 resolution. Make sure timing of the display mode is compatible with the projector. Refer to the “Compatibility Modes” section on page 32.
9
English
Installation
Power On/Off the Projector
Powering On the Projector
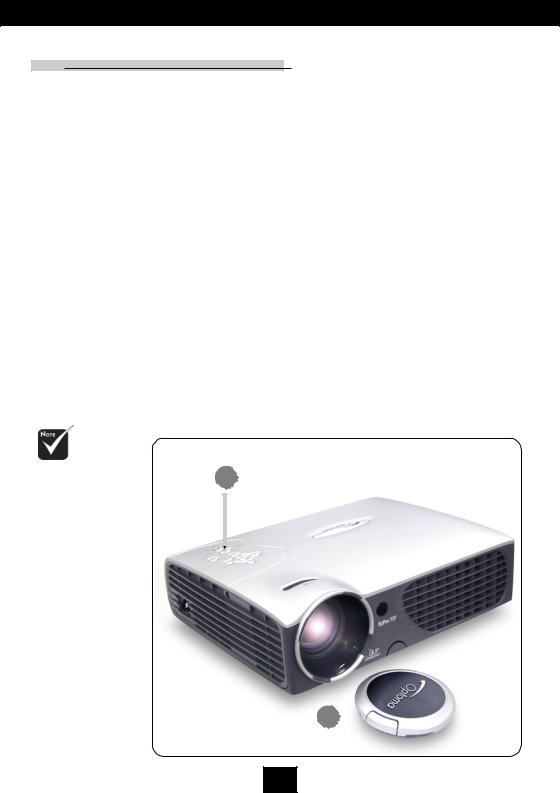
1.Remove the lens cap.Œ
2.Ensure that the power cord and signal cable are securely connected.
3.Turn on the lamp by pressing “Power/Standby” button on the control panel. •
The startup screen will be displayed for 20 seconds and the Power/Standby indicator will light solid green.
4.Turn on your source (computer, notebook, or video player , etc...) The projector will detect your source automatically.
vIf the screen displays “No Signal” , please make sure the signal cables are securely connected.
vIf you connect multiple sources at the same time, use the “Source” button on the Remote Control or Panel Control to switch.
vTurn on the projector |
2 |
|
first and then the |
||
Power / Standby |
||
computer. |
Lens cap |
1 |
10
 Loading...