

OPTOELECTRONICS BC0164AAA390 Users Manual

Chapter 8.
Messaging & Contacts
8.1 Text Messaging
8.2 Multimedia Messaging Servic
8.3 E-mai
8.2 Using Contact
l
s
e

Chapter 8. Messaging & Contacts
Messaging is the unified point of access for all message types within your device. With Messaging, you
can send and receive text messages, e-mails, and MMS messages.
Contacts helps you to manage your contact information. Using Contacts you can quickly communicate
with people.
This section describes the procedure on sending and receiving different kinds of messages, and using
Contacts to manage addresses and phone numbers.
8.1 Text Messaging
Creating a Text Message
1. Tap > Messaging > Text Messages.
2. In the message list, tap Menu > New.
3. Do either of the following:
• Enter the recipient’s text message number in the To field. Insert a
semicolon (;) between multiple text message numbers.
• Tapping Menu > Add Recipient, and then select a name.
• Enter your message and tap Send. Text messages are sent
immediately.
128
Using Preset Text Messages
You can quickly insert preset or frequently used messages into your text message. While
composing a message, tap Menu > My Text and select a preset message to insert.
To edit a preset message:
1. While composing a message, tap Menu > My Text > Edit My Text Messages.
2. Select a message and edit.
3. Tap
Reading a Text Message
1. Tap > Messaging > Text Message.
2. Select Inbox under Text Messages.
3. In the message list, tap the text message you want to read.
.
129
130
Chapter 8. Messaging & Contacts
Requesting Message Delivery Notification
1. Tap > Messaging > Text Messages.
2. Tap Menu > New.
3. Tap Menu > Message Options.
4. Select this check box to request a message delivery notification.
5. Tap
.
To change options for the Text Message, tap > Messaging > Menu > Tools >
Options, and select the type of options to change.

8.2 Multimedia Messaging Service
Creating and sending Multimedia Message Service (MMS) messages to your friends and family is fun
and easy. You can include or capture photos or video clips, include or record audio, add text, then
send them along with your MMS message.
Composing a MMS Message
MMS messages can be composed in a combination of various slides where each of the slides can
be any combination of audio or video clip, an image, and/or text.
1. Tap > Messaging, and select MMS.
2. Tap Menu > New.
3. In To, Cc, and/or Bcc, enter recipient e-mail addresses. Insert a semicolon (;) between multiple
addresses. You can tap Menu > Add Recipient to add recipients.
131
132
Chapter 8. Messaging & Contacts
4. In Subject, enter a subject.
5. To create a slide, do any combinations of the following:
• Tap Insert Picture/Video and select an picture or video clip.
• Tap Insert Audio and select an audio clip.
• Tap Insert Text and enter a message.
• Tap Menu > Insert > Sound Recorder and tap RECORD (
audio clip. Tap STOP (
• Tap Menu > Options > Background Color and select a background color for the slide.
6. Tap Send.
After the first slide is filled with content, you can tap Menu > Slides > Insert to add
another slide to your MMS message.
Previewing a MMS Message
You can preview a MMS message before sending it.
1. To preview your MMS message, tap Menu > Preview after you composed your message.
2. Tap Done or Replay.
Reading a MMS Message
1. Tap > Messaging > MMS.
) button to stop recording.
) button to record a new

2. Select Inbox under MMS.
3. In the message list, tap the MMS message you want to read.
Configuring MMS Settings
1. Tap > Messaging > MMS.
2. Tap Menu > MMS Settings.
3. Select the type of options to change.
4. Tap
.
Most of the time, you have to configure MMS settings in Messaging as well as a GPRS
connection in order to use MMS.
133
Chapter 8. Messaging & Contacts
8.3 E-mail
Setting Up an Internet E-mail Account Manually
Before you set up your Internet e-mail account, please ensure that you have the necessary
information.
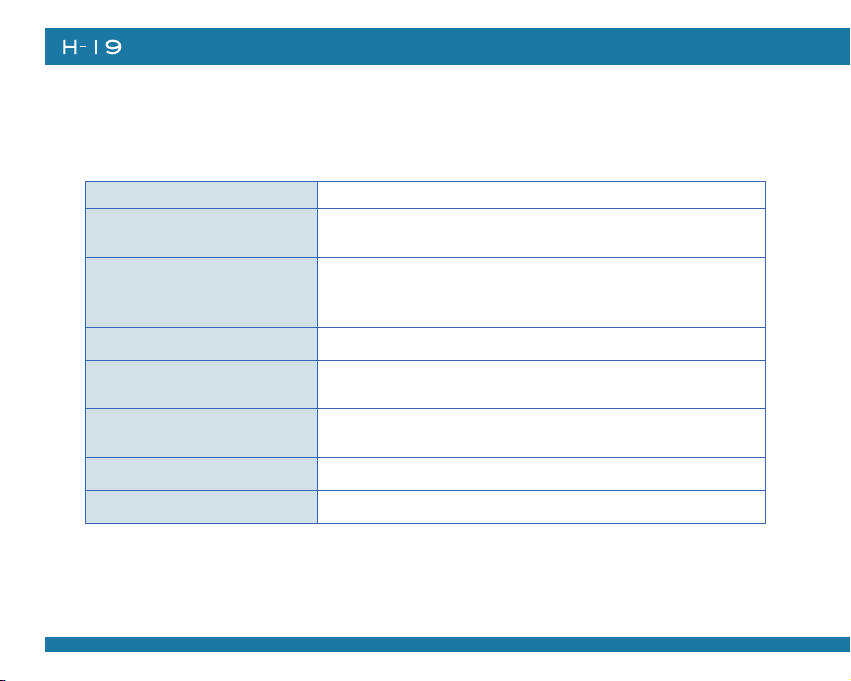
Setting Description
User name Usually the first part of your e-mail address, which appears be-
fore the “at” sign (@).
Password Choose a strong password. You will have the option to save
your password, so that you do not need to enter it each time
you connect to your e-mail server.
Domain The domain name. This may be required.
Server type The type of e-mail server that hosts your mailbox (POP3 or
IMAP4).
Account name A name for this account. You must use a different name for
each account that you set up.
Network The type of network your e-mail server connects to.
Incoming mail server The name of your e-mail server (POP3 or IMAP4).
134

Setting Description
Require SSL connection Select this to ensure you always receive e-mail for this account
using an SSL connection. This enables you to receive personal
information more securely. Please note that if you select this and
your ISP does not support an SSL connection, you will not be
able to connect to receive e-mail.
Outgoing mail server The name of your outgoing e-mail server (SMTP).
Outgoing server requires authentication
Outgoing server settings Your outgoing e-mail server may require different authentication
Use different user name for
outgoing server
User name Your user name for the outgoing e-mail server.
Password Your password for the outgoing e-mail server.
Domain The domain name of the outgoing e-mail server.
Require SSL connection (Outgoing mail server only)
Your outgoing e-mail server (SMTP) may require authentication.
Note: Your user name and password from above will be used.
settings than your incoming e-mail server.
A check box that lets you enter separate settings for your outgo-
ing e-mail server.
A connection that enables you to send personal information
more securely. Note that if you select this and your ISP does not
support an SSL connection, you will not be able to send e-mail.
135
Chapter 8. Messaging & Contacts
136
No w y ou ar e rea dy to set up y our
account:
1. Tap > Messaging > New E-mail
Account.
2. Enter your e-mail address, select the
check box of Try to get e-mail settings
automatically from the Internet, and
tap Next.
3. Ta p N e x t, a n d t h e A u t o S e tu p
automatically enters your servers settings.
4. Enter the name you want to appear when
you send messages, then tap Next.
5. Ent er your passwo rd. Sel ect Sav e
password if you want, or you can enter
the password each time you send and
receive e-mail. Then tap Next.
If Auto Setup was not successful, enter required information (Incoming mail server, User
name, Password, Outgoing mail server) manually until setup is complete.
To change options for an e-mail account, tap > Messaging > Menu > Tools >
Options, and select the type of options to change.
If you save your password and then lose your device, someone finding your device might be
able to gain access to your e-mail.
6. In Automatic Send/Receive, select a
frequency for sending/receiving e-mail.
Tap Review all download settings to
change your e-mail settings; otherwise,
tap Fi n i s h to start downloading
messages.
137
138
Chapter 8. Messaging & Contacts
Composing an E-mail Message
1. Tap > Messaging.
2. Select an e-mail account.
3. Tap Menu > New.
4. In To, Cc and/or Bcc, enter recipient e-mail addresses. Insert a semicolon (;) between multiple
addresses.
5. In Subject, enter a subject.
6. Enter a message.
7. Tap Send. E-mail messages are stored in Outbox and are sent to recipients the next time you
synchronize or connect to your e-mail server and send and receive mail.
You can quickly enter e-mail addresses from your contact cards. Tap on To and select a
recipient from the list. Then, select the recipient’s e-mail address.
Reading an E-mail Message
1. Tap > Messaging.
2. Select an e-mail account.
3. Tap Inbox under this e-mail account.
4. In the message list, tap the e-mail message you want to read.
E-mail Message Options
1. Tap > Messaging, and select an e-mail account.
2. Tap Menu > New.
3. Tap Menu > Message Options.
4. Select the type of options to change.
5. Tap
.
8.4 Using Contacts
Contacts is your address book and information storage for the people and businesses you
communicate with. It stores phone numbers, e-mail addresses, home addresses, and any other
information that relates to a contact, such as a birthday or an anniversary date. You can also add a
picture or assign a ring tone to a contact.
From the contact list, you can quickly communicate with people. Click a contact in the list for a
summary of contact information. From there, you can call or send a message.
If you use Outlook on your PC, you can synchronize contacts between your device and PC.
139
140
Chapter 8. Messaging & Contacts
Creating a New Contact
1. Tap > Contacts > New.
2. Select Outlook Contact.
3. Enter information for the new contact.
4. Tap
.
If someone who isn't in your list of contacts calls you, you can create a contact from Call
History. Tap and hold the item and then select Save to Contacts on the pop-up submenu.
To save an existing contact to your SIM card, open the contact and tap Menu > Save to
SIM.
Viewing and Editing Contact Information
1. Tap > Contacts.
2. Tap the contact whose information you want to view. You can quickly search through Contacts
by entering the first letter of the contact.
3. To edit the information, tap Menu > Edit.
4. Do any of the following:
• Tap Picture and select a picture you
want to add.
• Tap Ring tone and select the ring tone
you want.
5. When finished making changes, tap
.
141
Chapter 8. Messaging & Contacts
Sending an E-mail to a Contact
1. Tap > Contacts.
2. Tap the contact you want to send an e-mail to.
3. Tap the e-mail address.
4. Select the e-mail account to use.
5. Enter a subject, compose your message, and then tap Send.
Sending a Text Message to a Contact
1. Tap > Contacts.
2. Tap the contact you want to send a text message to, and tap Menu > Send Text Message.
3. Compose your message, and tap Send.
Creating a SIM Contact
Contacts can be created and stored on a subscriber identity module (SIM.) If you move the SIM to
another device, your SIM contacts are moved as well.
1. Tap > Contacts.
2. Tap New > SIM Contact.
3. Enter the name and phone number of the contact and tap
.
Remember to install a valid SIM to your device before creating a SIM Contact.
142

Chapter 9.
Using Barcode Reader
9.1 Setting Barcode Reader
9.2 Scanning and Reading Barcode
labels
Chapter 9. Using Barcode Reader
In the top of your device, a reader for barcode/2D code reading and decoding is built in, with which
various types of barcode/2D code labels are decoded into readable information such as letters and
numbers. Settings of barcode/2D code reader can be changed to fit your specific requests.
9.1 Setting Barcode Reader
Changing Options in Barcode Reader
Barcode reader is set to be disabled by default, please remember to activate it before scanning.
1. Tap > Settings > System tab > Barcode settings > Options tab.
2. Check the check box of Barcode reader or/and Keyboard hook.
When Keyboard hook is enabled, data is received as key message; when Keyboard hook is
disabled, data is stored in the memory buffer temporarily. To retrieve the data, use specific
software development kit (SDK) and compatible Windows application program interfaces (APIs).
You can download the SDK from http://www.opticon.com.
144
Keyboard hook can convert received characters to keyboard messages; therefore, you can
read barcode in applications such as Notes, Tasks, Excel Mobile and Word Mobile as long
as you enable the keyboard hook.
3. In Read Mode, tap the upward/downward arrow to
toggle between Multiple and Single. Multiple read
mode enables reading of multiple barcodes within a
specified time after one time triggering, while being
in single read mode needs the reader to be triggered
again to read another label.
4. In B uzzer, check the checkbox of Goodread
sound. It enables the function of playing a sound
effect after a barcode has been decoded successfully.
You can change the sound effect by tapping the
upward/downward arrow and play the sound effect
you choose by tapping the Sound button on the
screen.
145

146
Chapter 9. Using Barcode Reader
5. In Additional trigger key, tap the upward/downward arrow to
choose another access key for the reader. Otherwise you can set the
additional trigger key to be none.
Choosing Barcode Types
Your device is capable of scanning and decoding
various barcode types; to check what kind of
barcode is readable and to assign specific barcode
types to scan for, do as follows:
1. Tap > Settings > System tab > Barcode
settings > Barcodes tab.
2. Select specific barcode types or select all of
them.
3. Tap
.
 Loading...