

Page 1

H-21
USER MANUAL
Version 1.0
Page 2

Copyright 2010 All rights Reserved
Opticon Corporation H021 User Manual
Page 3

Federal Communications Commission
(FCC) Statement
This equipment has been tested and found to comply with the limits for a
Class B digital device, pursuant to part 15 of the FCC rules.
Rule 15.21: Y ou are cautioned that changes or modifications not expressly
approved by the part responsible for compliance could void the user’s authority
to operate the equipment.
These limits are designed to provide reasonable protection against harmful
interference in a residential installation. This equipment generates, uses and
can radiate radio frequency energy and, if not installed and used in accordance
with the instructions, may cause harmful interference to radio communications.
However, there is no guarantee that interference will not occur in a particular
installation. If this equipment does cause harmful interference to radio or
television reception, which can be determined by turning the equipment off and
on, the user is encouraged to try to correct the interference by one or more of
the following measures:
• Reorient or relocate the receiving antenna.
• Increase the separation between the equipment and receiver.
• Connect the equipment into an outlet on a circuit different from that to
• which the receiver is connected.
• Consult the dealer or an experienced radio/TV technician for help.
This device complies with Part 15 of the FCC Rules.Operation is subject to
the following two conditions:
1. this device may not cause harmful interference and
2. this device must accept any interference received, including interference
that may cause undesired operation of the device.
FCC RF Radiation Exposure Statement:
For body worn operation, this phone has been tested and meets FCC RF
exposure guidelines when used with an accessory that contains no metal and
that positions the handset a minimum of 1.5 cm from the body. Use of other
accessories may not ensure compliance with FCC RF exposure guidelines.
III
Page 4

IV
Page 5

Ta b l e of C o n t e n t s
Introduction 3
H-21 Views and Descriptions . . . . . . . . . . . . 3
Front and Rear View . . . . . . . . . . . . . . . . . . . . . . . . . . . . . . . . . . . . .3
Right and Left View . . . . . . . . . . . . . . . . . . . . . . . . . . . . . . . . . . . . . .5
Top and Bottom View. . . . . . . . . . . . . . . . . . . . . . . . . . . . . . . . . . . . .6
Unpacking the H-21 . . . . . . . . . . . . . . . . . . . 7
Accessories List . . . . . . . . . . . . . . . . . . . . . . . . . . . . . . . . . . . . . . . . .8
SIM Card Installation . . . . . . . . . . . . . . . . . 9
Removing the Battery Cover . . . . . . . . . . . . . . . . . . . . . . . . . . . . . . .9
Installing the SIM Card. . . . . . . . . . . . . . . . . . . . . . . . . . . . . . . . . . .11
Battery Installation . . . . . . . . . . . . . . . . . 12
Installing the Battery . . . . . . . . . . . . . . . . . . . . . . . . . . . . . . . . . . . .13
Replacing the Battery Cover . . . . . . . . . . . . . . . . . . . . . . . . . . . . . .13
Removing the Battery . . . . . . . . . . . . . . . . 14
Locking the Battery Cover . . . . . . . . . . . . 15
Power and Battery Settings . . . . . . . . . . . 15
Viewing Battery Power. . . . . . . . . . . . . . . . . . . . . . . . . . . . . . . . . . .16
Optimizing Battery Power. . . . . . . . . . . . . . . . . . . . . . . . . . . . . . . . .16
Charging the Battery . . . . . . . . . . . . . . . . . . . . . . . . . . . . . . . . . . . .16
Mini-SD Cards . . . . . . . . . . . . . . . . . . . . . . 16
Inserting a Mini-SD Card . . . . . . . . . . . . . . . . . . . . . . . . . . . . . . . . .16
Removing a Mini-SD Card . . . . . . . . . . . . . . . . . . . . . . . . . . . . . . . .16
Connecting a Headset . . . . . . . . . . . . . . . . 16
Connecting a Wrist Strap . . . . . . . . . . . . . 16
Getting Started 17
Powering On . . . . . . . . . . . . . . . . . . . . . . . 17
Powering Off . . . . . . . . . . . . . . . . . . . . . . . 17
Entering and Exiting Sleep Mode . . . . . . . 17
Calibrating the Touchscreen. . . . . . . . . . . 18
Locking/Unlocking the H-21 . . . . . . . . . . . 18
Programming Buttons . . . . . . . . . . . . . . . . 20
Backlight Settings . . . . . . . . . . . . . . . . . . 21
Today Screen . . . . . . . . . . . . . . . . . . . . . . . 22
Page 6

Ta b l e of C o n t e n t s
Accessing the Today Screen . . . . . . . . . . . . . . . . . . . . . . . . . . . . . .23
Changing Today Screen Items. . . . . . . . . . . . . . . . . . . . . . . . . . . . .23
Start menu . . . . . . . . . . . . . . . . . . . . . . . . 24
Input Methods . . . . . . . . . . . . . . . . . . . . . . 25
Switching Input Methods . . . . . . . . . . . . . . . . . . . . . . . . . . . . . . . . .26
Using the Touch Screen Keyboard . . . . . . . . . . . . . . . . . . . . . . . . .28
Using Letter Recognizer. . . . . . . . . . . . . . . . . . . . . . . . . . . . . . . . . .29
Using Block Recognizer. . . . . . . . . . . . . . . . . . . . . . . . . . . . . . . . . .30
Using Transcriber. . . . . . . . . . . . . . . . . . . . . . . . . . . . . . . . . . . . . . .31
Setting up Calendar . . . . . . . . . . . . . . . . . 32
Creating Appointments. . . . . . . . . . . . . . . . . . . . . . . . . . . . . . . . . . .32
Deleting Appointments. . . . . . . . . . . . . . . . . . . . . . . . . . . . . . . . . . .34
Changing the Reminder Time . . . . . . . . . . . . . . . . . . . . . . . . . . . . .36
Changing the Calendar View . . . . . . . . . . . . . . . . . . . . . . . . . . . . . .36
Writing Notes . . . . . . . . . . . . . . . . . . . . . . 36
Setting the Default Input Method . . . . . . . . . . . . . . . . . . . . . . . . . . .37
Creating a New Note . . . . . . . . . . . . . . . . . . . . . . . . . . . . . . . . . . . .37
Switching Between Typing/Writing Mode. . . . . . . . . . . . . . . . . . . . .38
Editing a Handwritten Note. . . . . . . . . . . . . . . . . . . . . . . . . . . . . . . .39
Deleting a Note. . . . . . . . . . . . . . . . . . . . . . . . . . . . . . . . . . . . . . . . .39
Creating a Default Template . . . . . . . . . . . . . . . . . . . . . . . . . . . . . .40
Recording Voice Notes . . . . . . . . . . . . . . . 41
Adding a Voice Recording to a Note . . . . . . . . . . . . . . . . . . . . . . . .42
Creating Tasks. . . . . . . . . . . . . . . . . . . . . . 43
Deleting a Task . . . . . . . . . . . . . . . . . . . . . . . . . . . . . . . . . . . . . . . .44
Editing a Task. . . . . . . . . . . . . . . . . . . . . . . . . . . . . . . . . . . . . . . . . .45
Sorting/Filtering Tasks . . . . . . . . . . . . . . . . . . . . . . . . . . . . . . . . . . .46
Setting Task Options . . . . . . . . . . . . . . . . . . . . . . . . . . . . . . . . . . . .47
Enabling Tasks to Be Displayed on the Today Screen . . . . . . . . . .48
Phone Operations 51
Making a Phone Call . . . . . . . . . . . . . . . . . 51
Accessing the Phone Screen. . . . . . . . . . . . . . . . . . . . . . . . . . . . . .51
Making a Call by Entering a Phone Number . . . . . . . . . . . . . . . . . .51
Making a Call from Call History . . . . . . . . . . . . . . . . . . . . . . . . . . . .52
Making a Call from Contacts . . . . . . . . . . . . . . . . . . . . . . . . . . . . . .52
Using Speed Dial . . . . . . . . . . . . . . . . . . . . . . . . . . . . . . . . . . . . . . .53
Deleting a Speed Dial Entry. . . . . . . . . . . . . . . . . . . . . . . . . . . . . . .54
Page 7

Ta b l e of C o n t e n t s
Accepting/Rejecting a Call . . . . . . . . . . . . . . . . . . . . . . . . . . . . . . . .55
Retrieving a Voicemail Message . . . . . . . . . . . . . . . . . . . . . . . . . . .55
Configuring Settings. . . . . . . . . . . . . . . . . 55
Activating PIN Security. . . . . . . . . . . . . . . . . . . . . . . . . . . . . . . . . . .55
Setting the Ring Tone and Ring Type . . . . . . . . . . . . . . . . . . . . . . .56
Setting the Phone Profile . . . . . . . . . . . . . . . . . . . . . . . . . . . . . . . . .56
Changing the Ringer Volume. . . . . . . . . . . . . . . . . . . . . . . . . . . . . .57
Blocking Incoming and Outgoing Calls. . . . . . . . . . . . . . . . . . . . . . .58
Displaying Caller ID . . . . . . . . . . . . . . . . . . . . . . . . . . . . . . . . . . . . .59
Call Forwarding . . . . . . . . . . . . . . . . . . . . . . . . . . . . . . . . . . . . . . . .60
Call Waiting . . . . . . . . . . . . . . . . . . . . . . . . . . . . . . . . . . . . . . . . . . .61
Fixed Dialing. . . . . . . . . . . . . . . . . . . . . . . . . . . . . . . . . . . . . . . . . . .62
Selecting a Network Manually . . . . . . . . . . . . . . . . . . . . . . . . . . . . .63
In-Call Options . . . . . . . . . . . . . . . . . . . . . 64
Answering Another Call . . . . . . . . . . . . . . . . . . . . . . . . . . . . . . . . . .64
Conference Call . . . . . . . . . . . . . . . . . . . . . . . . . . . . . . . . . . . . . . . .64
Turning On/Off the Speakerphone . . . . . . . . . . . . . . . . . . . . . . . . . .64
Muting the Microphone. . . . . . . . . . . . . . . . . . . . . . . . . . . . . . . . . . .65
Contacts and Messaging 67
Using Contacts . . . . . . . . . . . . . . . . . . . . . 67
Creating a New Contact. . . . . . . . . . . . . . . . . . . . . . . . . . . . . . . . . .67
Viewing and Editing Contact Information . . . . . . . . . . . . . . . . . . . . .67
Creating a SIM Contact . . . . . . . . . . . . . . . . . . . . . . . . . . . . . . . . . .68
Using Text Messaging . . . . . . . . . . . . . . . . 69
Writing a New Text Message . . . . . . . . . . . . . . . . . . . . . . . . . . . . . .69
Using Preset Text Messages . . . . . . . . . . . . . . . . . . . . . . . . . . . . . .70
Reading a Text Message . . . . . . . . . . . . . . . . . . . . . . . . . . . . . . . . .71
Requesting Message Delivery Notification. . . . . . . . . . . . . . . . . . . .72
Sending a Text Message to a Contact. . . . . . . . . . . . . . . . . . . . . . .73
Sending e-mail . . . . . . . . . . . . . . . . . . . . . . 74
Setting Up an Internet E-mail Account. . . . . . . . . . . . . . . . . . . . . . .74
Composing an E-mail Message . . . . . . . . . . . . . . . . . . . . . . . . . . . .78
Reading an E-mail Message . . . . . . . . . . . . . . . . . . . . . . . . . . . . . .78
E-mail Message Options . . . . . . . . . . . . . . . . . . . . . . . . . . . . . . . . .79
Sending an E-mail to a Contact . . . . . . . . . . . . . . . . . . . . . . . . . . . .80
Internet Access 83
Page 8

Ta b l e of C o n t e n t s
Connecting to the Internet. . . . . . . . . . . . 83
Creating a GPRS Connection . . . . . . . . . . . . . . . . . . . . . . . . . . . . .83
Creating a Proxy Connection . . . . . . . . . . . . . . . . . . . . . . . . . . . . . .87
Deleting a Connection . . . . . . . . . . . . . . . . . . . . . . . . . . . . . . . . . . .89
Using Internet Explorer . . . . . . . . . . . . . . 90
Browsing the Internet . . . . . . . . . . . . . . . . . . . . . . . . . . . . . . . . . . . .90
Adding a Web Page to the Favorite List. . . . . . . . . . . . . . . . . . . . . .91
Deleting a Favorite. . . . . . . . . . . . . . . . . . . . . . . . . . . . . . . . . . . . . .93
Changing the Size of Text on Web Pages . . . . . . . . . . . . . . . . . . . .94
Showing or Hiding Pictures on Web Pages . . . . . . . . . . . . . . . . . . .94
Viewing a Page in Full Screen Mode . . . . . . . . . . . . . . . . . . . . . . . .95
Sending a Link via E-mail. . . . . . . . . . . . . . . . . . . . . . . . . . . . . . . . .95
Copying Text from a Web Page. . . . . . . . . . . . . . . . . . . . . . . . . . . .96
Clearing Temporary Files, Cookies, or History. . . . . . . . . . . . . . . . .98
Using Wireless Manager . . . . . . . . . . . . . . 98
Opening Wireless Manager . . . . . . . . . . . . . . . . . . . . . . . . . . . . . . .98
Enabling and Disabling a Feature . . . . . . . . . . . . . . . . . . . . . . . . . .99
Connecting to a Wi-Fi Network . . . . . . . . 100
Connecting to a Wi-Fi Network. . . . . . . . . . . . . . . . . . . . . . . . . . . .100
Creating a Wireless Connection. . . . . . . . . . . . . . . . . . . . . . . . . . .101
Editing a Wireless Network . . . . . . . . . . . . . . . . . . . . . . . . . . . . . .104
Synchronization 107
Using ActiveSync . . . . . . . . . . . . . . . . . . . 107
System Requirements . . . . . . . . . . . . . . . . . . . . . . . . . . . . . . . . . .107
Installing and setting up ActiveSync. . . . . . . . . . . . . . . . . . . . . . . .107
Where to Download ActiveSync. . . . . . . . . . . . . . . . . . . . . . . . . . .108
Synchronizing Your Information . . . . . . . 108
Starting and Stopping Synchronization Manually. . . . . . . . . . . . . .108
Changing ActiveSync Settings . . . . . . . . 109
Changing Which Information is Synchronized . . . . . . . . . . . . . . . .109
Synchronization using Bluetooth . . . . . . . . . . . . . . . . . . . . . . . . . .110
Bluetooth 113
Bluetooth Modes. . . . . . . . . . . . . . . . . . . 113
Enabling Bluetooth. . . . . . . . . . . . . . . . . . . . . . . . . . . . . . . . . . . . .113
Making Your Device Visible . . . . . . . . . . . . . . . . . . . . . . . . . . . . . .113
Page 9

Ta b l e of C o n t e n t s
Pairing With Devices in Range. . . . . . . . . . . . . . . . . . . . . . . . . . . .114
Beaming Information . . . . . . . . . . . . . . . . . . . . . . . . . . . . . . . . . . .117
Barcode Scanner 121
Setting Up Barcode Reader . . . . . . . . . . . 121
Enabling Barcode Reader . . . . . . . . . . . . . . . . . . . . . . . . . . . . . . .121
Setting to Multiple or Single Read Mode . . . . . . . . . . . . . . . . . . . .121
Setting Good Read Notification . . . . . . . . . . . . . . . . . . . . . . . . . . .122
Selecting Recognized Barcode Types . . . . . . . . . . . . . . . . . . . . . .122
Scanning and Reading Barcode Labels . . 122
Applications 125
Data Backup. . . . . . . . . . . . . . . . . . . . . . . 125
Backing up Data. . . . . . . . . . . . . . . . . . . . . . . . . . . . . . . . . . . . . . .125
Recovering Data. . . . . . . . . . . . . . . . . . . . . . . . . . . . . . . . . . . . . . .126
Managing Memory. . . . . . . . . . . . . . . . . . . 127
Checking Available Storage. . . . . . . . . . . . . . . . . . . . . . . . . . . . . .127
Closing a Running Program. . . . . . . . . . . . . . . . . . . . . . . . . . . . . .127
Third Party Applications . . . . . . . . . . . . . 128
Windows Live Messenger . . . . . . . . . . . . . . . . . . . . . . . . . . . . . . .128
Windows Media . . . . . . . . . . . . . . . . . . . . . . . . . . . . . . . . . . . . . . .132
Office Mobile . . . . . . . . . . . . . . . . . . . . . . . . . . . . . . . . . . . . . . . . .134
GPS . . . . . . . . . . . . . . . . . . . . . . . . . . . . . 138
GPS Settings . . . . . . . . . . . . . . . . . . . . . . . . . . . . . . . . . . . . . . . . .138
Using AGPS. . . . . . . . . . . . . . . . . . . . . . . . . . . . . . . . . . . . . . . . . .139
Receiving Better Satellite Signals . . . . . . . . . . . . . . . . . . . . . . . . .140
Important Notice about Using GPS . . . . . . . . . . . . . . . . . . . . . . . .140
Appendix 141
Specifications . . . . . . . . . . . . . . . . . . . . . 141
Page 10

X
Page 11

Safety Information
Please read the following information carefully before you start using this
device to avoid any damages caused by improper usage:
• The device is not charged when you take it out of the box. Charge the
battery for at least 8 hours before first use. Do not remove the battery while
charging.
• Do not use batteries which have not been specified by the manufacturer
and qualified with the system per the standard of IEEE-Std-1725 -2006, as
this may present a risk of fire, explosion, leakage or other hazard.
• Do not charge the battery with an unspecified AC Adapter, as this may
cause damage to both the device and the battery.
• When discarding the batteries, dispose of them in a proper manner,
according to the battery manufacturer’s instructions and your local laws.
• Power off the device and remove the battery before inserting a SIM card.
Make sure the SIM card snaps correctly into the SIM socket.
• Do not open the device housing or tamper with the device, as it will void
your warranty.
• Do not apply excessive force on this product, as it may cause damage to
the screen or the internal component.
• Do not use the device at gas or refueling stations, chemical plants, and
places containing explosives or flammable materials. Observe local
guidelines.
• Use only manufacturer specified stylus. Do not scratch the screen with
sharp objects.
• Do not clean the screen with chemical detergents. Only use cloths
specifically designed for cleaning liquid displays or a soft cloth moisturized
with water drops, to wipe the device screen.
• Do not expose the device to direct sunlight or leave the device in a humid
environment for extended periods of time as this may cause damage to the
device and battery.
• Do not immerse the device in water.
• The device may interfere with the navigation and/or communication
systems on aircraft. The use of the device on an aircraft is prohibited by
laws in most countries. Observe local guidelines.
• This product may cause medical equipment to malfunction. The use of this
device is forbidden in most hospitals and medical clinics. Observe local
guidelines.
• Use hands-free devices if you need to use the telephony services while
driving a vehicle. Observe local guidelines.
• Do not use headphones at a high volume for prolonged periods of time to
avoid permanent hearing loss.
Page 12

Safety of Laser Products
International Standards Laser Class 2
This product using laser complies with JIS C6802: 2005 Class 2,
IEC60825 -1+A2: 2001 Class 2 and 21CFR 1040.10 and 1040.11 except for
deviations pursuant to Laser Notice No.50, dated June 24, 2007.
Class 2 Laser devices are not considered to be hazardous when used for
their intended purpose.
Use of controls, adjustment of procedures other than those specified
herein may result in hazardous laser light exposure.
The user should not view directly into the light beam with optical
instruments, it may pose an eye hazard.
Specific Absorption Rate
Specific Absorption Rate (SAR) is a measurement of the amount of radio
waves absorbed by the body during mobile phone use. This phone meets
government and regulatory standards.
Maximum SAR Values
• CE: 0.578 W/kg(10g) Head
• FCC: 1.27W/Kg(1g) Head, 1.17 W/Kg(1g) Body
Safety of Audio Equipment
The Headphones and Earphones used with this device comply with
maximum sound pressure level measurement methodology and limit
considerations as outlined in EN 50332-1:2000.
CAUTION! Do not use headphones at a high volume for
prolonged periods of time. Permanent hearing loss may occur.
Page 13
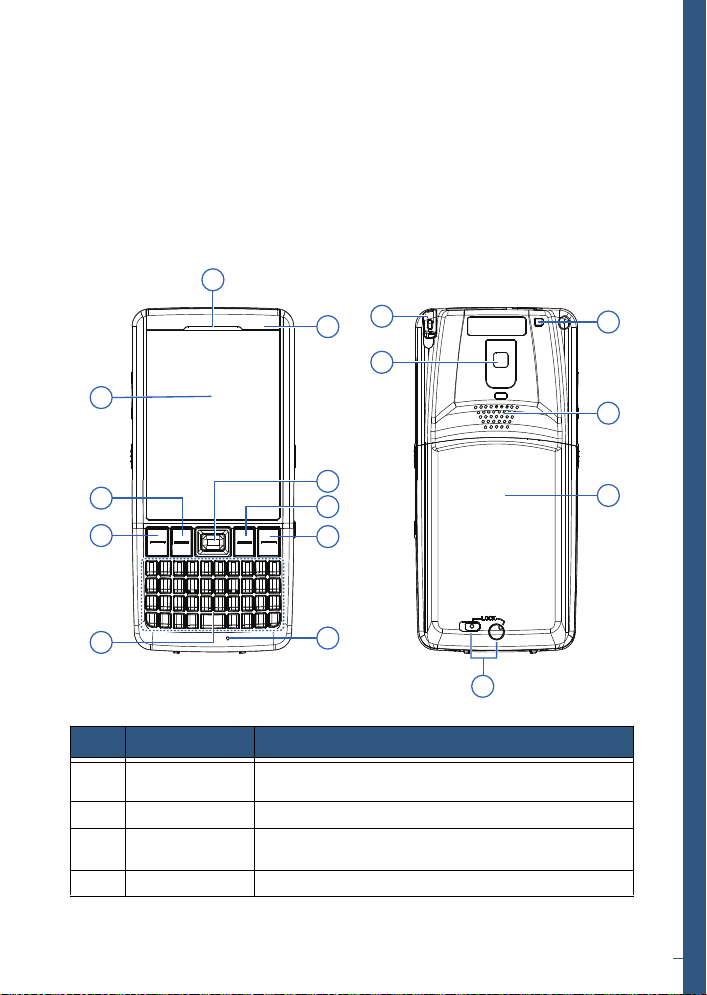
Introduction
6
2
9
3
4
10
11
12
16
1
14
13
15
7
8
5
This chapter provides an overview of the H-21. The menu buttons, external
views and features are also described.
H-21 Views and Descriptions
Front and Rear View
No. Item Description
1 Telephone
Receiver
2 Display 2.8-inch TFT LCD with touch screen.
3 Soft Key (Left) Performs the command as defined in the icon on
4 Talk Key Press this key to dial or answer a call.
Listen to a phone call here.
screen (above the key).
3
Page 14
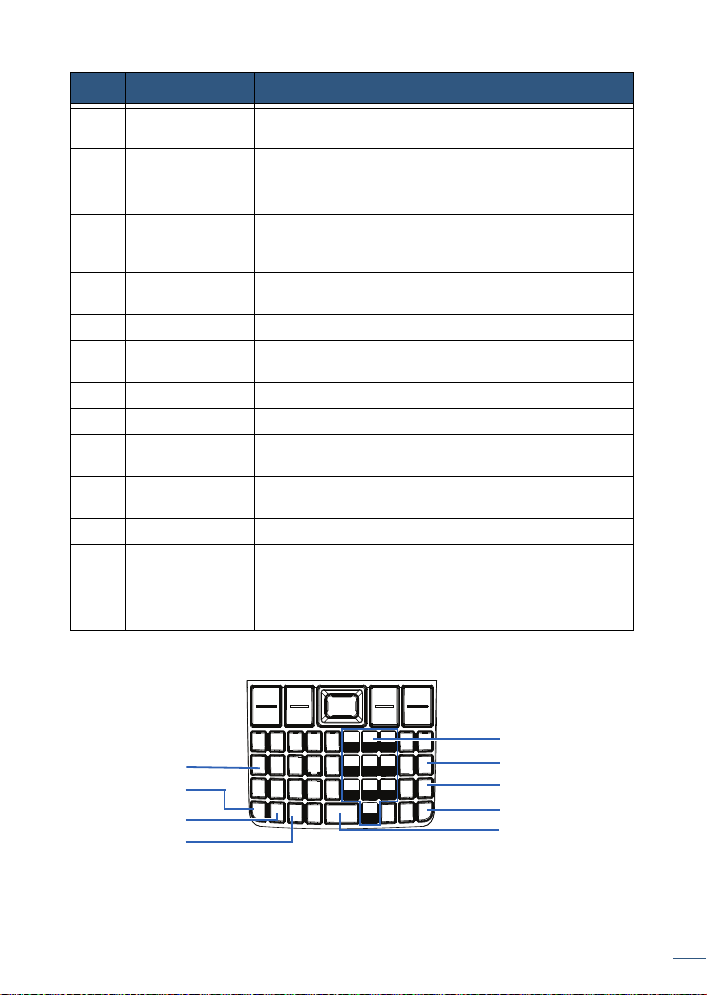
No. Item Description
Numberic keypad
Ctrl key
Enter key
Del key
Sym key
Char key
Fn key
Caps/Shift key
Tab/Space key
5QWERTY
Keypad
6 Phone and
Battery Status
LED
75-Way
Navigation Key
8 Soft Key (Right) Performs the command as defined in the icon on
9 End Key Press to end a call or close an application.
10 Microphone Speak into the high sensitivity microphone when
11 Stylus Navigate or interact with the touch screen.
12 Camera 3.2 mega pixel camera with LED light.
13 Eyelet for wrist
strap
14 Speaker Listen to audio media or listen to a phone call
15 Battery Cover Remove it to install battery and SIM card.
16 Cover latches • Lock Release: Slide to lock/unlock the battery
Use the keypad to enter letters or numbers through
the numberic pad.
• Missed Call/Missed Message: Red Blinking
• Low Power: Red Blinking
• Battery Charging: Solid Orange
Press the multi directional control up, down, left, or
right to move through menus; carry out the selection
by pressing the center button.
screen (above the key).
using the phone or recording a voice note.
Fix a wrist strap here.
hands-free.
cover.
• Lock Button: Turn to lock/unlock the battery
cover.
Keypad and Functions Keys
4
Introduction
Page 15
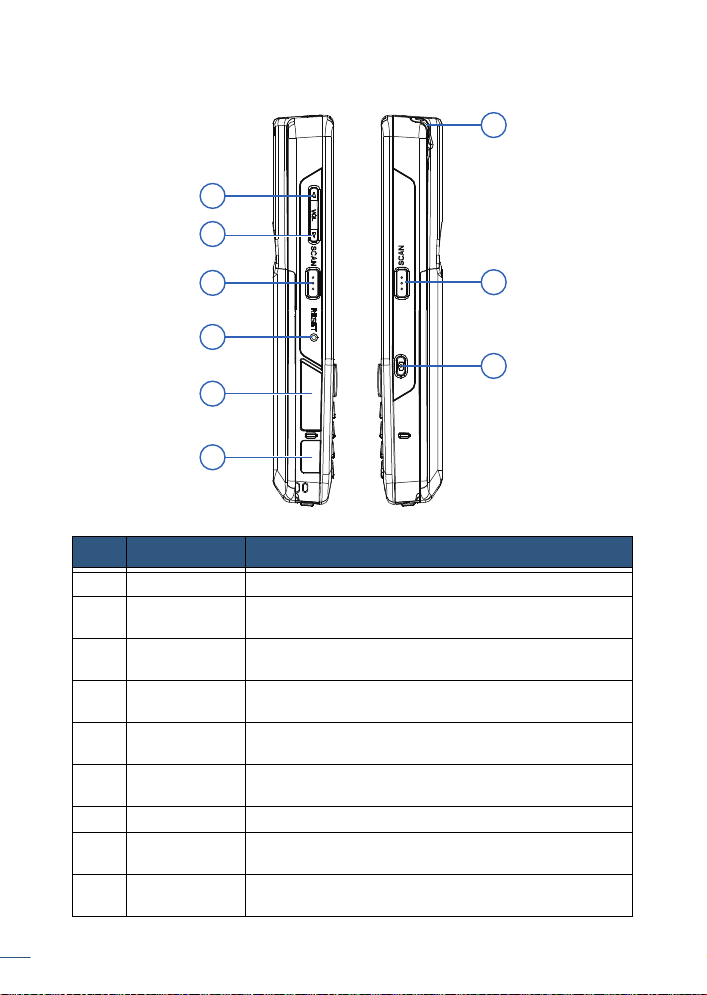
Right and Left View
3
4
5
1
6
2
7
8
9
No. Item Description
1 Volume Up Press the Volume Up button to turn up the volume.
2 Volume Down Press the Volume Down button to turn down the
3 Scan Key
(Left)
4 Reset Press the Reset button with the stylus to soft-reset
5Mini-SD card
slot
6 IR Receiver Sends and receives data to devices within close
7 Stylus Navigate or interact with the touch screen.
8 Scan Key
(Right)
9 Capture Turn on the camera function to capture still photos or
volume.
Press the scan key to read barcodes.
your device.
Insert a micro-SD card to expand device memory.
range.
Press the key to scan and decode a bar code.
movies.
5
Introduction
Page 16
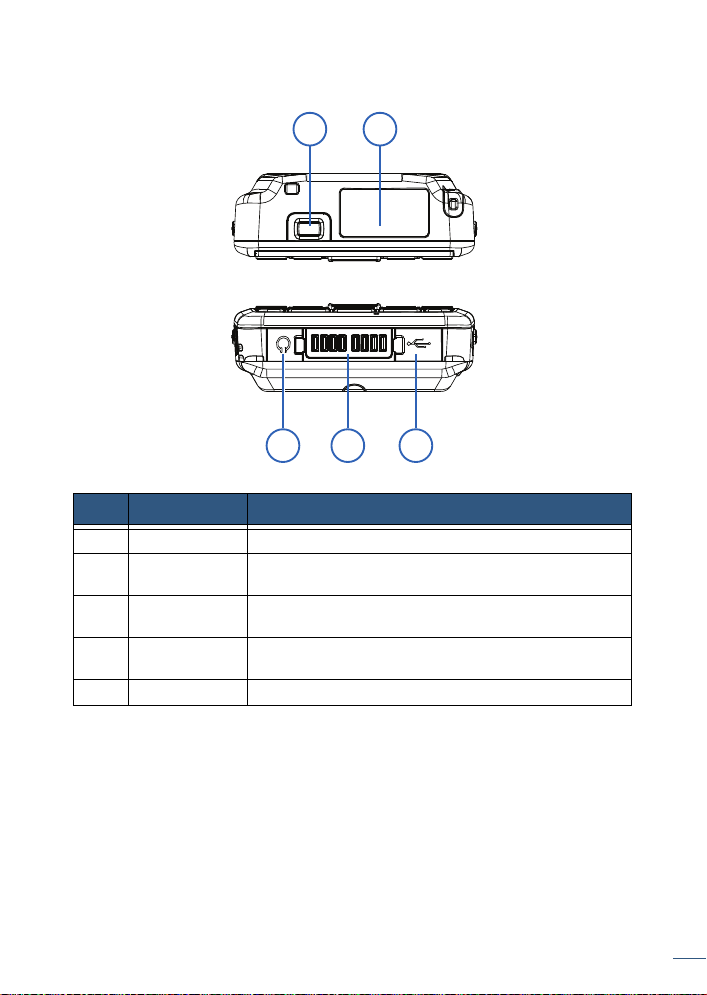
Top and Bottom View
1 2
5 4 3
No. Item Description
1 Power Button Power on or off the device.
2 Scanner Point the reading window of the scanner in the
3 Mini-USB Port Connect a mini USB cable for PC sync and battery
4 Sync Jack Connect to cradle (optional) to recharge battery or
5 Headphones Connect a 2.5 mm Earphone.
direction of a bar code.
charging.
synchronize information.
6
Introduction
Page 17
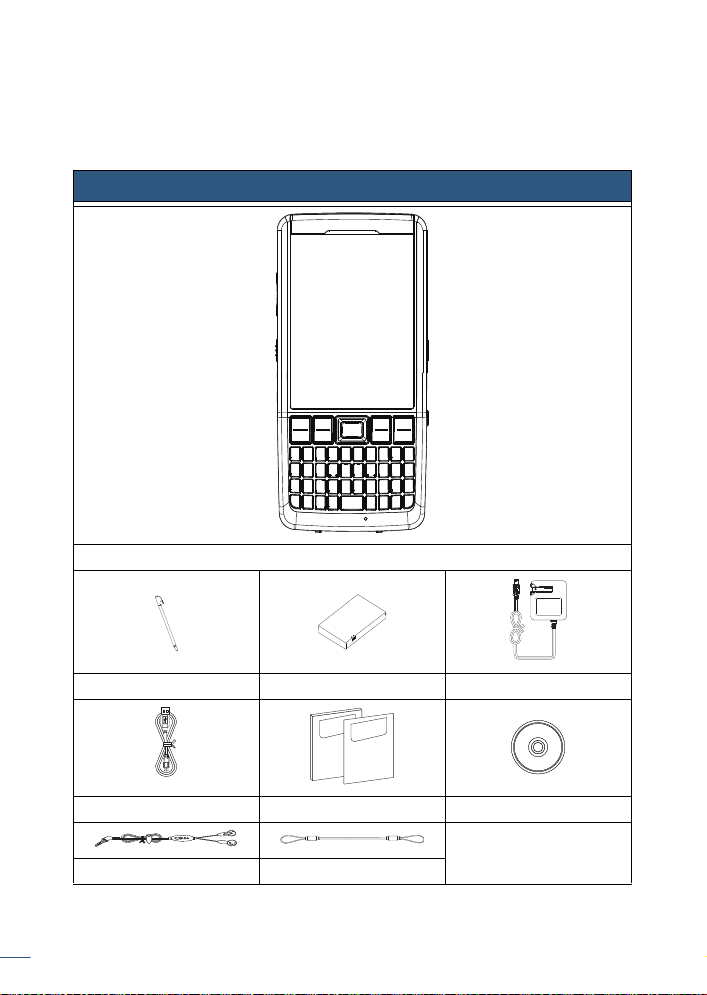
Unpacking the H-21
Please ensure that all items listed in the following table are present and in
good condition. If there is anything missing or damaged, contact your dealer
immediately.
Package Contents
H-21
7
Introduction
Stylus Battery USB Adapter
Manual
QSG
USB Cable User Manual and QSG CD
Headphones Wrist Strap
Page 18

Accessories List
The following accessories are optional. Contact your H-21 dealer for more
information about acquiring optional accessories.
Optional Accessories
Cradle Car Kit
8
Introduction
Page 19
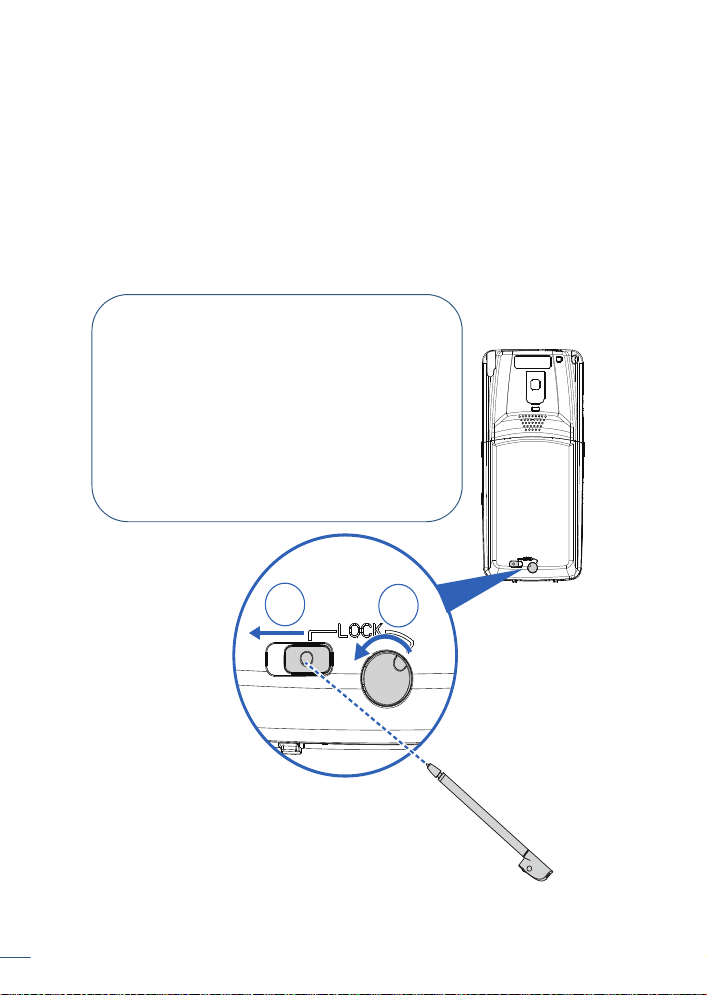
SIM Card Installation
A
B
STEP 1:
Use the tip of the stylus to perform the following
procedures. Do not use excessive force.
• First slide the Lock Release to the unlock
position (A).
• Then turn the Lock Button to the unlock
position (B).
NOTE: The battery cover locks will only unlock
in this order.
You must install a SIM card to use the phone functions of your H-21.
Perform the following procedures to install the SIM card.
NOTE: Power off the device and remove the battery before inserting a SIM
card. Make sure the SIM card snaps correctly into the SIM socket.
Removing the Battery Cover
CAUTION! Make sure the device is turned off before you attempt
to remove the battery cover. Otherwise the device will shut off
automatically and unsaved data may be lost.
9
Introduction
Page 20
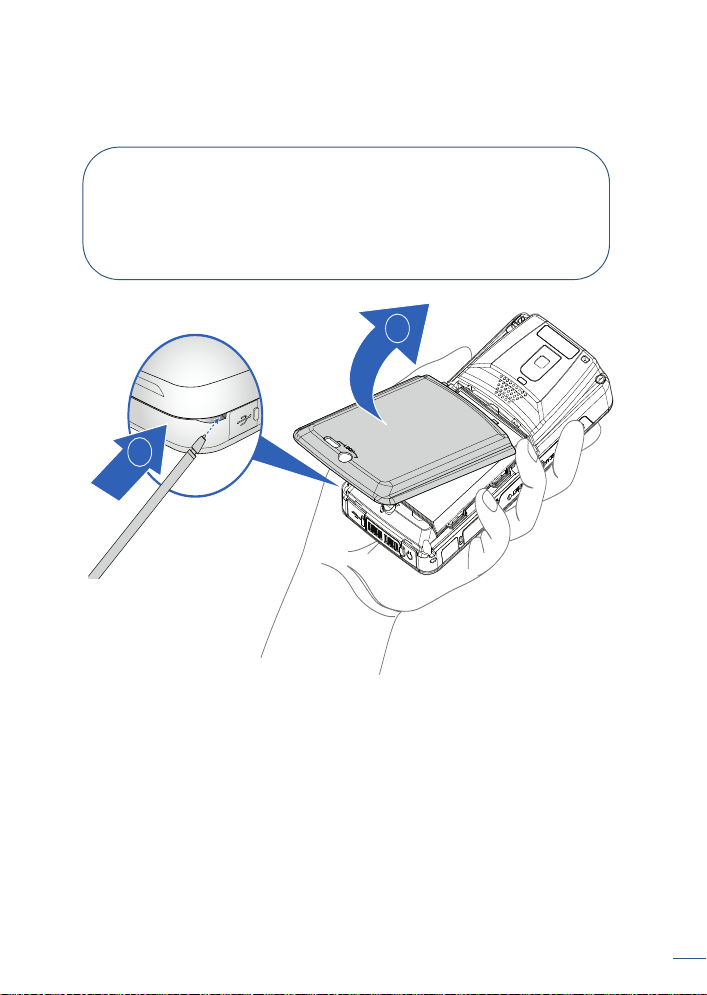
Removing the Battery Cover cont.
B
A
STEP 2:
1. Hold the stylus in your writing hand and the device in your opposite
hand.
2. Insert the stylus into the groove closest to you (A).
3. Push the stylus in an upward motion to separate the battery cover
from the device (B).
CAUTION! To avoid injury during the following step, hold the
device in front of you and direct the force away from your body.
10
Introduction
Page 21
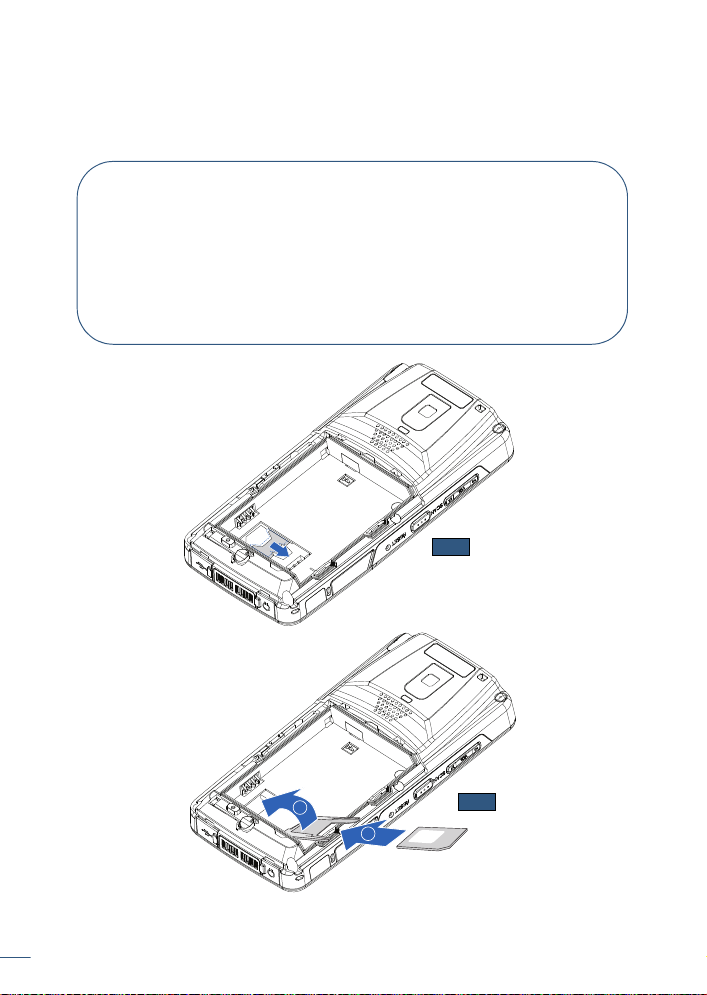
Installing the SIM Card
STEP 1:
Slide the SIM card
bracket in the direction
of the arrow to unlock.
Refer to Fig. 1
STEP 2:
Align the SIM card in
the bracket (A). Ensure
the contacts face up
with the beveled edge
facing the bottom of the
device.
Refer to Fig. 2
STEP 3:
Rotate the SIM card
bracket back into place
(B).
Refer to Fig. 2
Fig. 1
Fig. 2
Once the battery cover and battery has been removed, you can install the
SIM card. Perform the following procedures to complete the installation of the
SIM card.
B
A
11
Introduction
Page 22
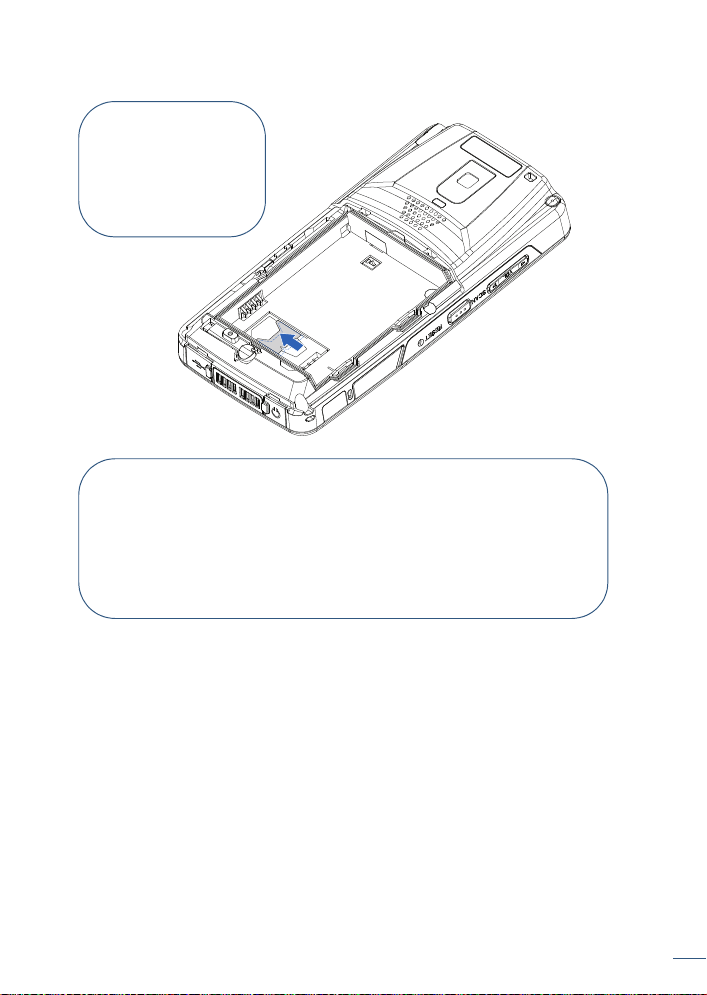
Installing the SIM card cont.
STEP 4:
Press the bracket and
SIM card down and slide
in the direction of the
arrow to lock.
STEP 5:
Install the battery. See “Installing the Battery” on page 13.
STEP 6:
Replace the battery cover. See “Replacing the Battery Cover” on
page 13.
Battery Installation
The H-21 is not charged when you take it out of the box. Charge the
battery for at least 8 hours before the first use. Perform the following procedures
to install the battery.
12
Introduction
Page 23
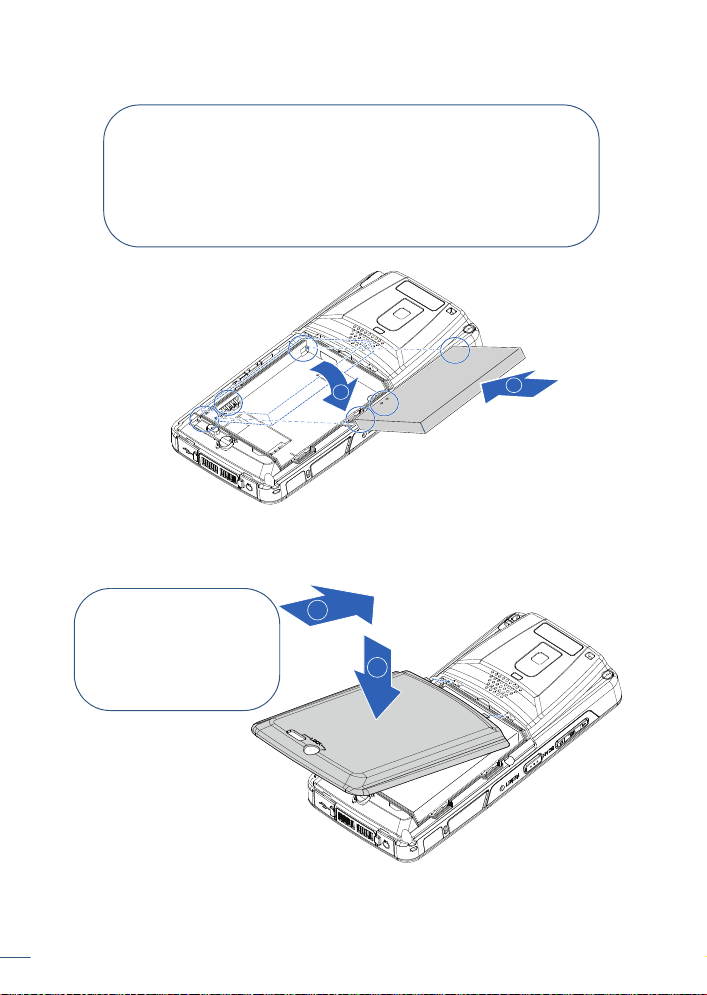
Installing the Battery
B
A
STEP 1:
Remove the battery cover.
See “Removing the Battery
Cover” on page 9.
STEP 2:
Align the contacts on the battery
with the connectors on the battery
bay and insert as shown (A).
Lower the battery in place (B).
STEP 1:
Align the battery cover
with the top of the battery
bay and insert (A). Lower
the cover in place (B).
Replacing the Battery Cover
13
Introduction
A
B
Page 24
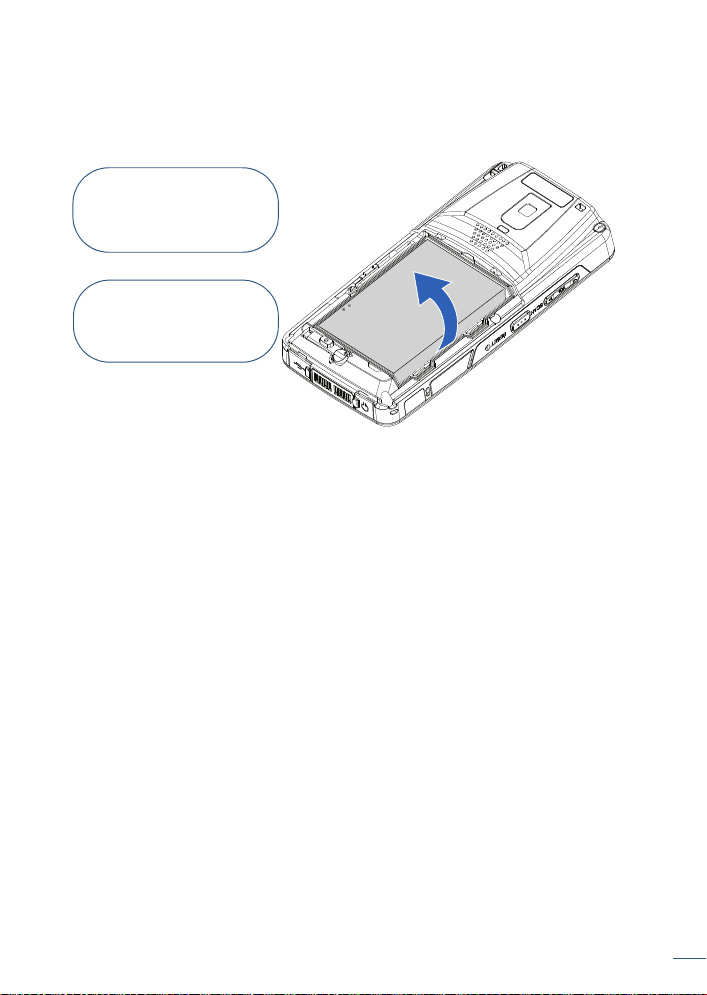
Removing the Battery
STEP 2:
Lift the battery in the
direction of the arrow, as
shown, to remove it.
STEP 1:
Remove the battery cover.
See “Removing the Battery
Cover” on page 9.
To exchange the battery at any time, perform the following procedures to
remove the battery.:
14
Introduction
Page 25
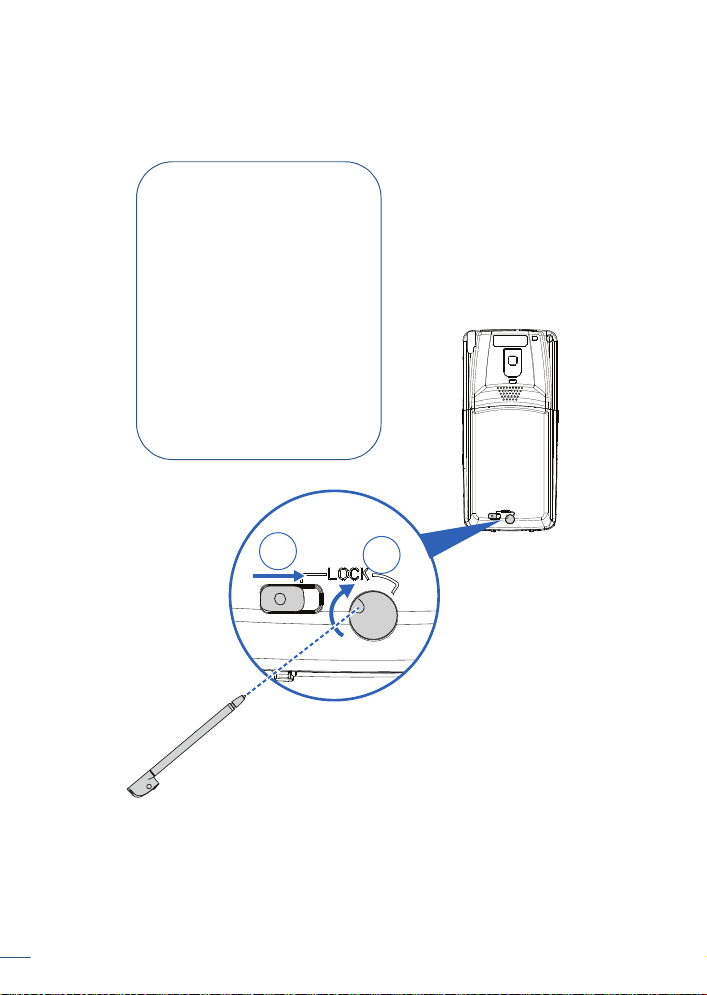
Locking the Battery Cover
B
A
STEP 1:
Use the tip of the stylus to
perform the following
procedures. Do not use
excessive force.
• First turn the Lock Button
to the lock position (A).
• Then slide the Lock
Release to the lock
position (1).
NOTE: The battery cover
locks will only lock in this
order.
Before you can power the device on, you must lock the battery cover.
Perform the following procedures to lock the battery cover.
Power and Battery Settings
signal strength, temperature of the environment in which you use your phone,
features and settings, and more.
15
Introduction
The life and performance of your battery depend on many factors including
Page 26

Viewing Battery Power
1. Tap Start > Settings > Power.
The main and backup battery life displays.
2. Tap OK to save and exit.
Optimizing Battery Power
To get the most out of the life of your battery, set the H-21 to shut down
after the system becomes idle for a specific amount of time.
1. Tap Start > Settings > Power > Advanced.
2. Select the amount of idle time before the device shuts down.
3. Tap OK to save and exit.
Charging the Battery
To charge the battery, do one of the following options:
• Connect one end of the USB adapter to the device and plug the opposite
end into a wall outlet.
• Connect the device to a PC using the supplied USB cable.
Mini-SD Cards
The H-21 contains a micro-SD card slot for expanding the device’s
memory.
Inserting a Mini-SD Card
CAUTION! Inserting the micro-SD card in the wrong direction can
cause damage to the card and the device.
1. Lift the micro-SD card slot cover. See “H-21 Views and Descriptions” on
page 3.
2. Insert the micro-SD card with the logo side down.
3. Push down until the card clicks into place.
Removing a Mini-SD Card
1. Press the micro-SD card inward to eject the card.
2. Remove the micro-SD card from the card slot.
Connecting a Headset
1. Locate the headphones port on the bottom of the phone. See “Top and
Bottom View” on page 6.
2. Peel back the rubber door.
3. Insert the provided headphones into the headphones port.
Connecting a Wrist Strap
Introduction
16
Page 27
Getting Started
This chapter will instruct you on how to perform general operations such as
powering the H-21 on and off, using the Today Screen and Start Menu, and
setting up various organizational tools.
Powering On
1. Move both battery cover locks to the lock position.
NOTE: The Power button will not work unless the battery cover is locked.
See “Locking the Battery Cover” on page 15.
2. Press the Power button located along the top of the device. See “H-21
Views and Descriptions” on page 3.
Powering Off
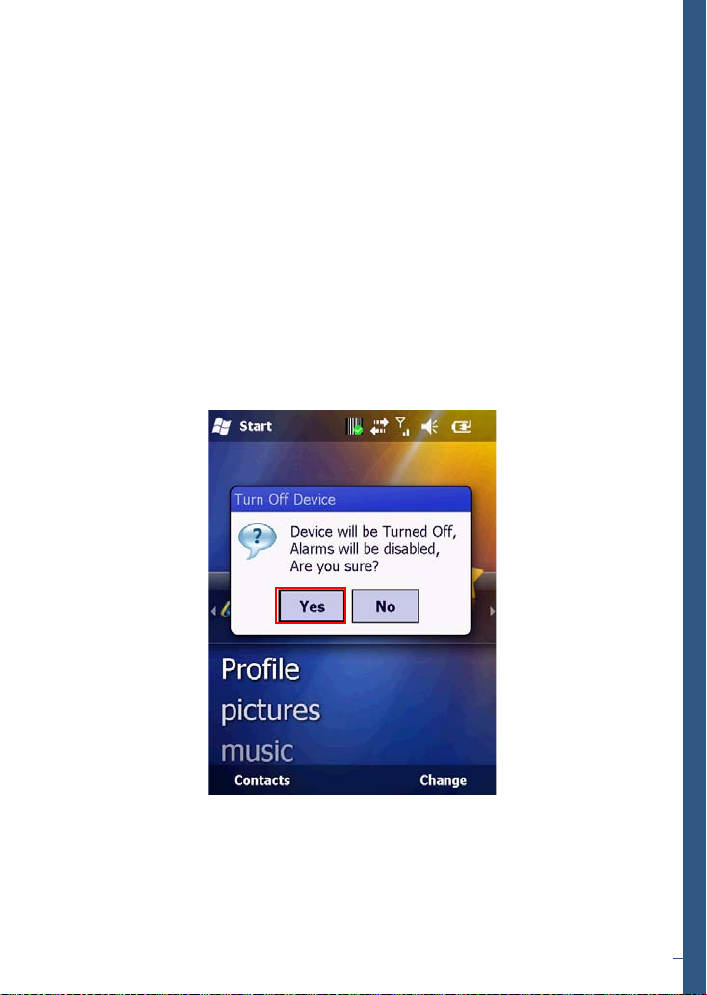
1. Press and hold the Power button for 3 seconds.
2. The system displays a confirmation screen. Tap Yes when prompted.
Entering and Exiting Sleep Mode
Sleep mode is an energy-saving mode that still allows you to receive
phone calls and messages.
17
Page 28
To put the device in sleep mode:
• Press the Power button once for less than 1 second.
To return from sleep mode:
• Press the Power button again for less than 1 second.
Calibrating the Touchscreen
Calibration ensures that the correct screen items are activated when
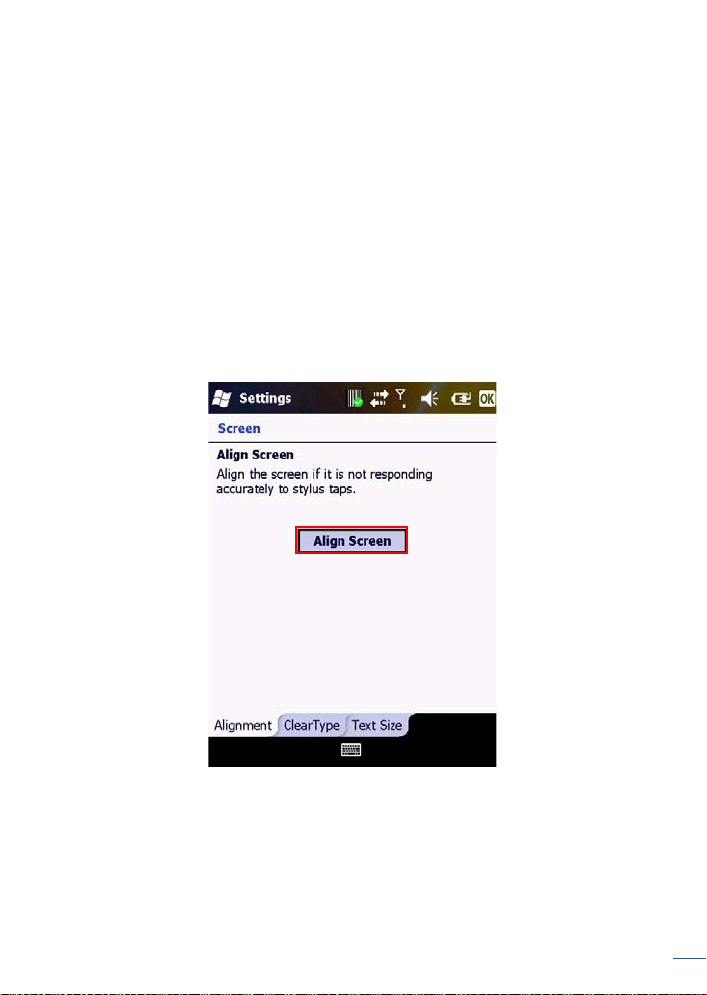
tapped. The first time you power on the H-21, the system will ask you to
calibrate the touchscreen. Tap the center of the cross using the stylus until the
calibration is complete.
To recalibrate the screen at any time:
1. Tap Start > Settings > System > Screen > Alignment.
2. Tap the Align Screen button and follow the on screen instructions.
3. Tap OK to save and exit.
Locking/Unlocking the H-21
Locking protects the screen from accidental key presses.
To lock/unlock the keyboard and touchscreen:
1. Tap Start > Lock.
18
Getting Started
Page 29
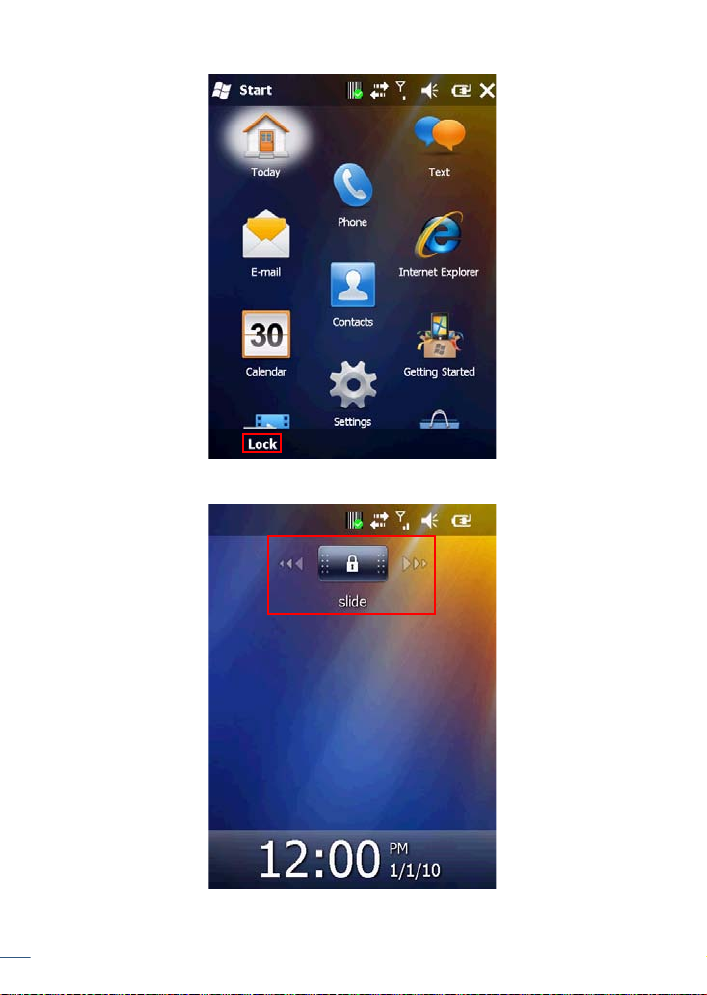
The keyboard and touchscreen are locked.
2. To unlock the screen simply slide the Lock button to either the right or left.
19
Getting Started
Page 30
Programming Buttons
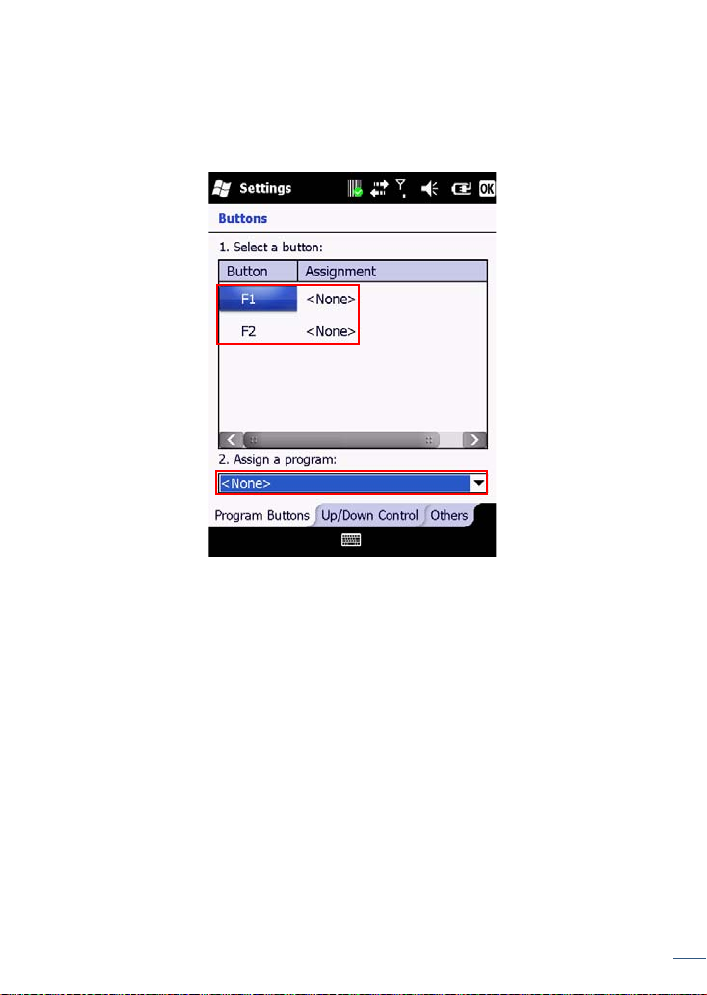
To assign a function to the F1, F2, F3 and F4 buttons:
1. Tap Start > Settings > Personal > Buttons > Program Buttons.
2. Select a button (F1, F2) and assign a program from the drop down menu.
3. Tap OK to save and exit.
To edit the Up/Down control and Repeat Rate:
1. Tap Start > Settings > Personal > Buttons > Up/Down Control.
2. Drag the slider next to the appropriate option to change the setting.
20
Getting Started
Page 31
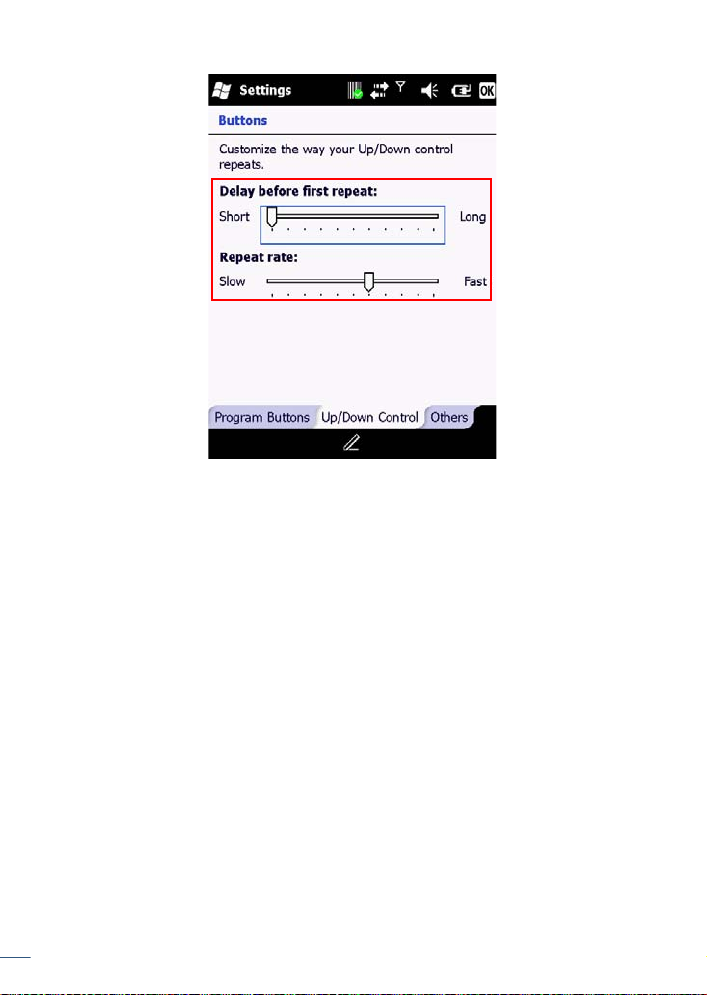
3. Tap OK to save.
Backlight Settings
1. Tap Start > Settings > System > Backlight.
2. Customize the following settings:
21
Getting Started
Page 32
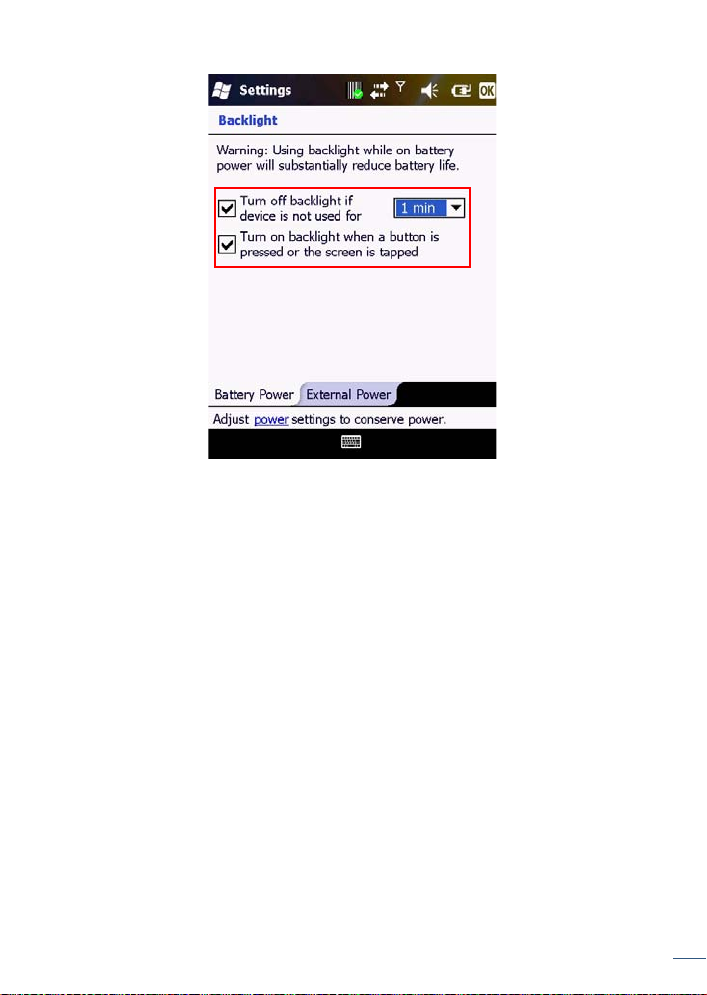
• Select the time for the backlight to turn off if the device is not in use.
• Enable or disable the backlight when a button is pressed or the screen is
tapped.
3. Tap OK to save and exit.
Today Screen
The T oday Screen is usually the first screen that displays when you turn on
the H-21. It displays a list of shortcuts to phone functions, programs, and
favorites. The Today screen looks like this:
Getting Started
22
Page 33
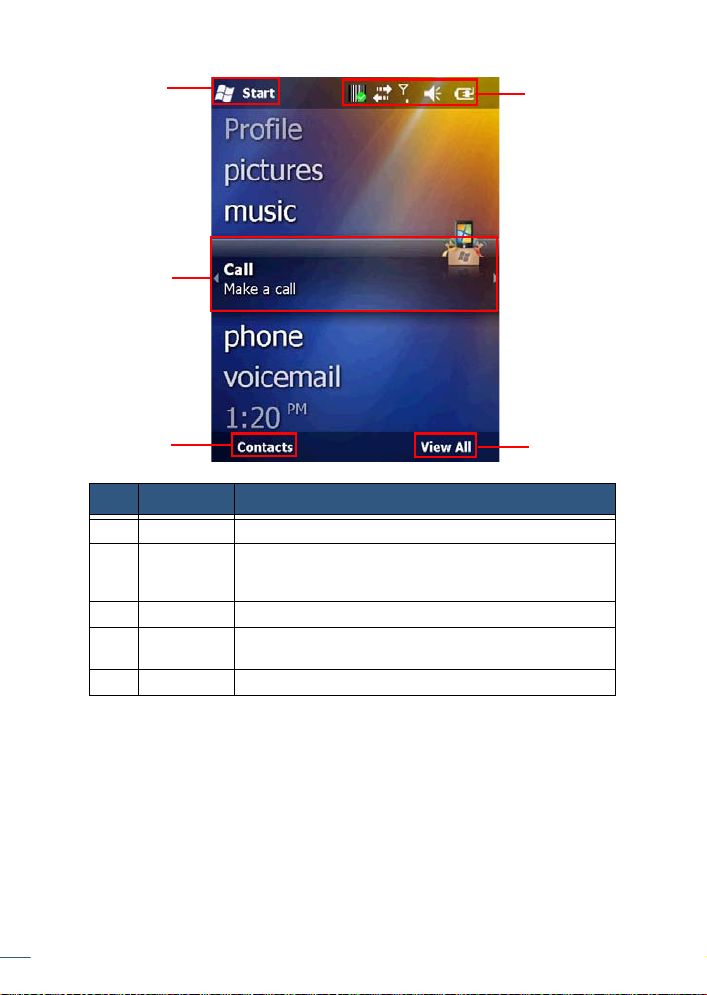
No. Name Description
1
2
3
4
5
1 Start Button Tap to access the Start Menu
2 Highlighted
3 Contacts Tap to access Contacts
4 Status Bar Displays Barcode Reader, ActiveSync, Phone,
5 Item Option Displays an option specific to the highlighted item
Accessing the Today Screen
•Tap Start > Today.
Changing Today Screen Items
Getting Started
1. Tap Start > Settings > Today > Items.
2. Select the check box next to the items you want included on the Today
screen. Deselect the check box next to the items you don’t want included
on the Today screen.
23
Item
Tap to access a function or application. User can
scroll to the right or the left of the highlighted item for
additional options
Volume, and Battery Status
Page 34
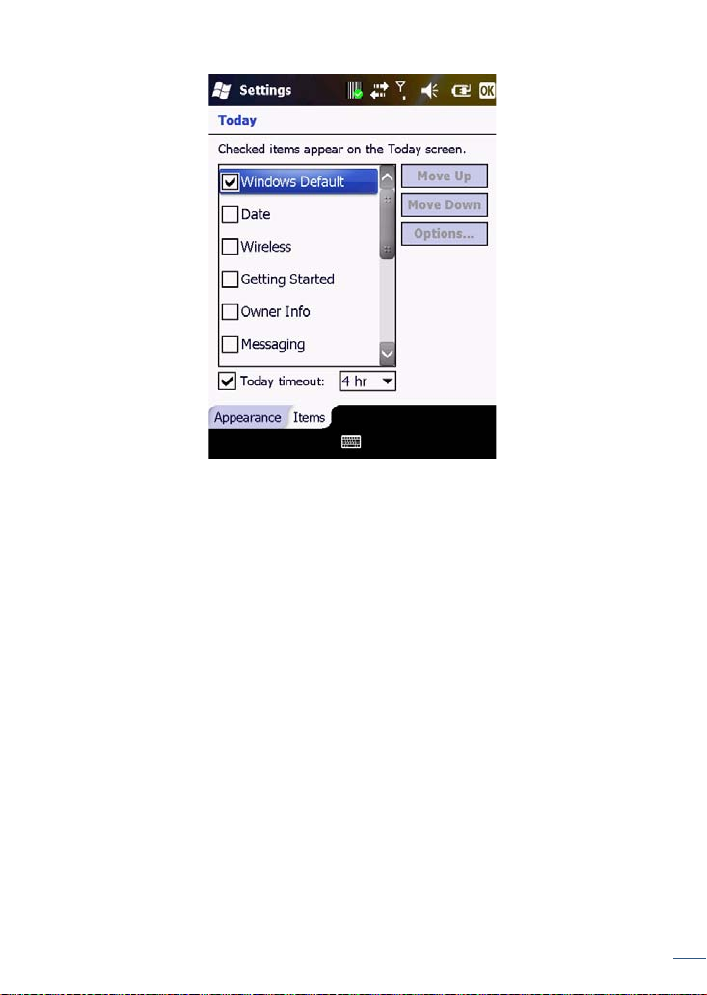
3. Tap OK to save and exit.
Start menu
The Start menu displays icons to all the basic functions and applications.
24
Getting Started
Page 35
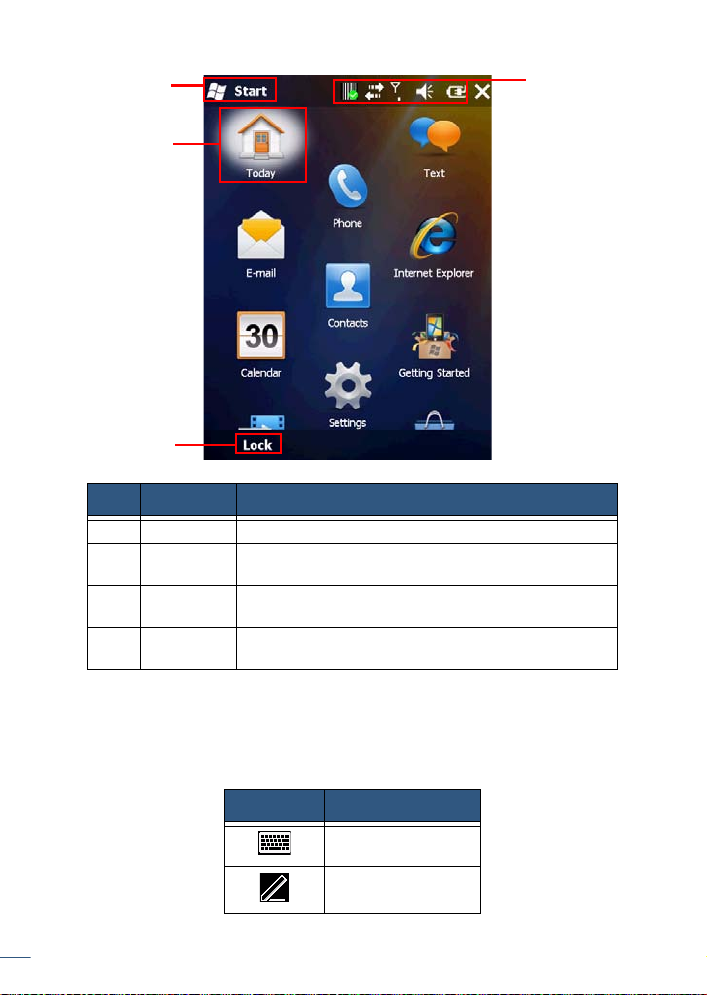
No. Name Description
1
2
3
4
1 Start Button Tap to access the Start Menu
2 Highlighted
3 Lock Locks the keyboard and touchscreen from
4 Status Bar Displays Barcode Reader, ActiveSync, Phone,
Input Methods
The H-21 is enabled with 4 different input modes: Keyboard, Letter
Recognizer, Block Recognizer, and Transcriber. You can enter texts and
numbers by using the keypad or the touch screen.
25
Getting Started
Item
Tap to access a function or application
accidental key presses
Volume, and Battery Status
Icon Input Mode
Keyboard
Letter Recognizer
Page 36
Icon Input Mode
Block Recognizer
Transcriber
Switching Input Methods
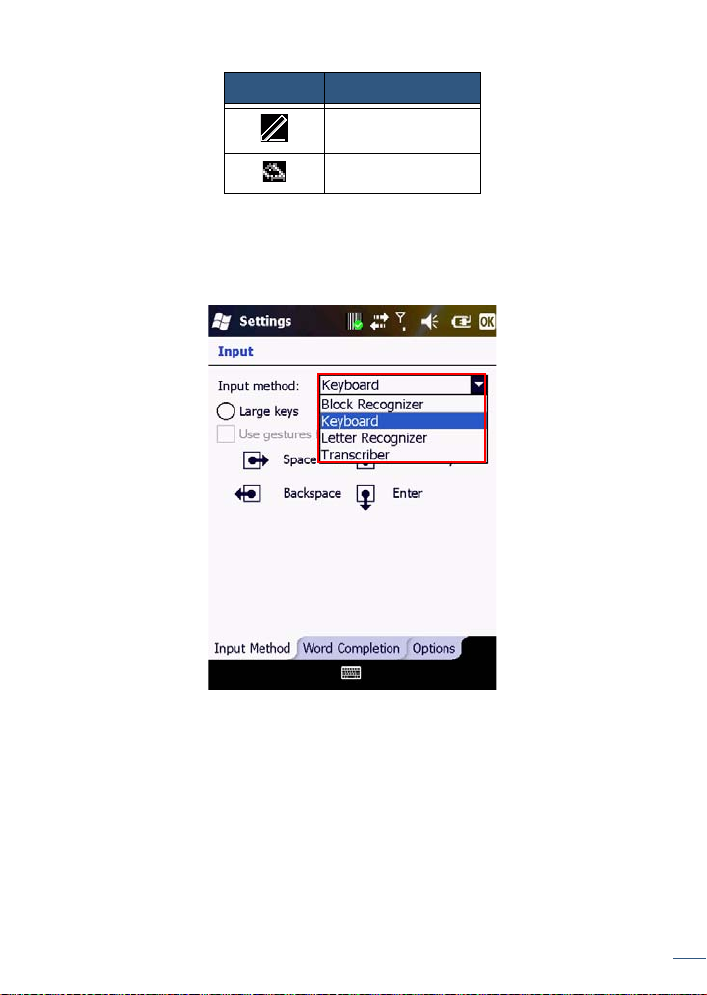
To switch input meth ods from the settings menu:
1. Tap Start > Settings > Personal > Input.
2. Select the desired input method from the drop down menu.
3. Tap OK to save and exit.
To switch input methods using the input icon:
1. Tap the input icon located along the bottom center of th e screen.
An up arrow appears next to the input icon.
26
Getting Started
Page 37
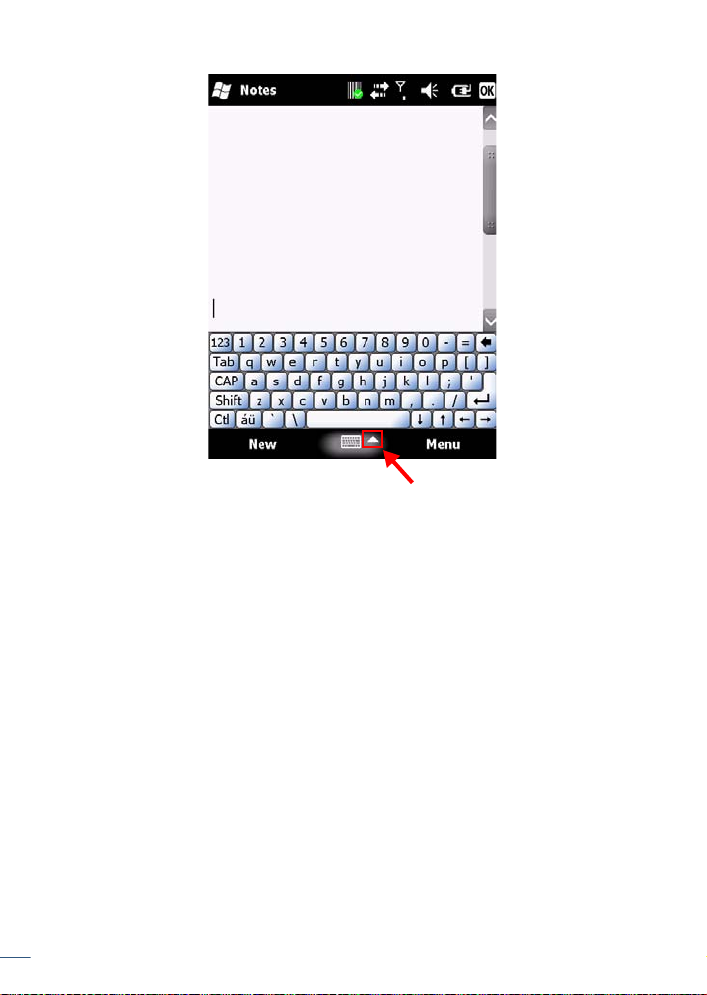
2. Tap the up arrow and select the desired input method from the pop up
menu.
27
Getting Started
Page 38
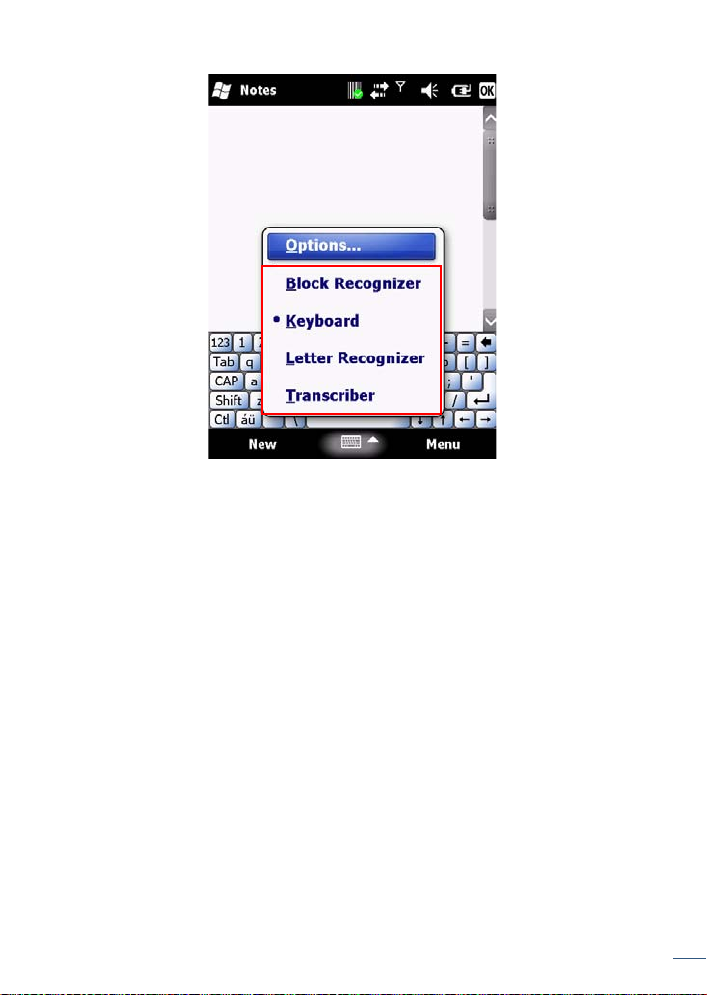
Using the Touch Screen Keyboard
The touch screen keyboard allows you to enter text by tapping keys with
your stylus.
1. Select the touch screen keyboard as your input method. See “Switching
Input Methods” on page 26.
2. Tap the input icon located along the bottom center of th e screen.
The touch screen keyboard displays.
Getting Started
28
Page 39
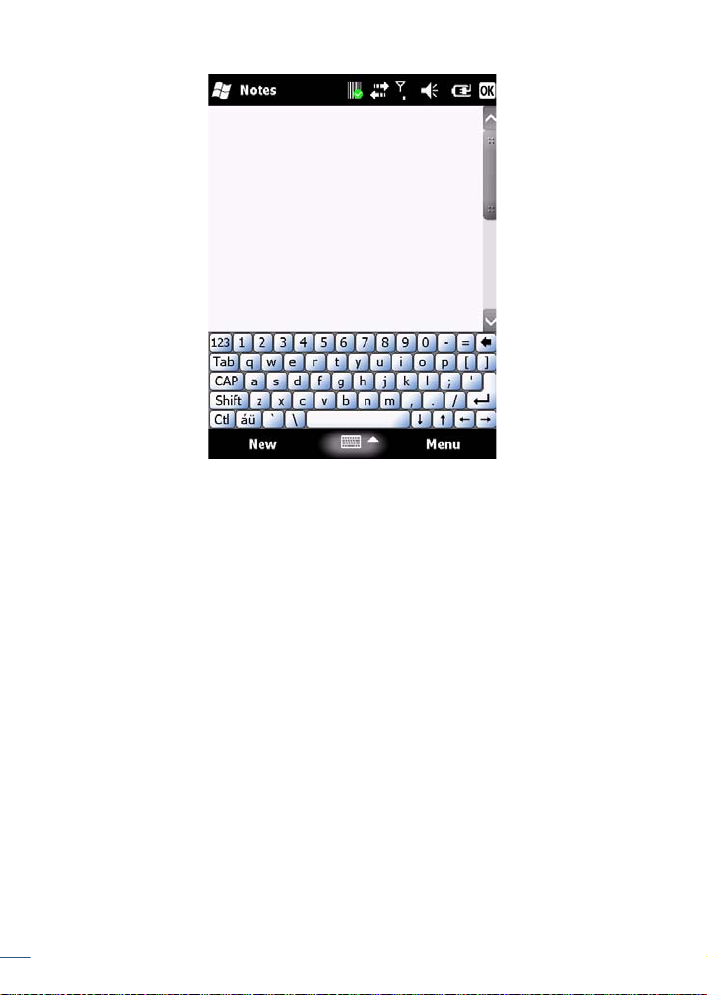
3. To enter text, use your stylus to tap the keys on the touch screen keyboard.
Using Letter Recognizer
Letter recognizer interprets familiar handwriting styles, one symbol, letter,
or number at a time.
1. Select the letter recognizer as your input method. See “Switching Input
Methods” on page 26.
2. Tap the input icon located along the bottom center of th e screen.
The letter recognizer displays.
29
Getting Started
Page 40
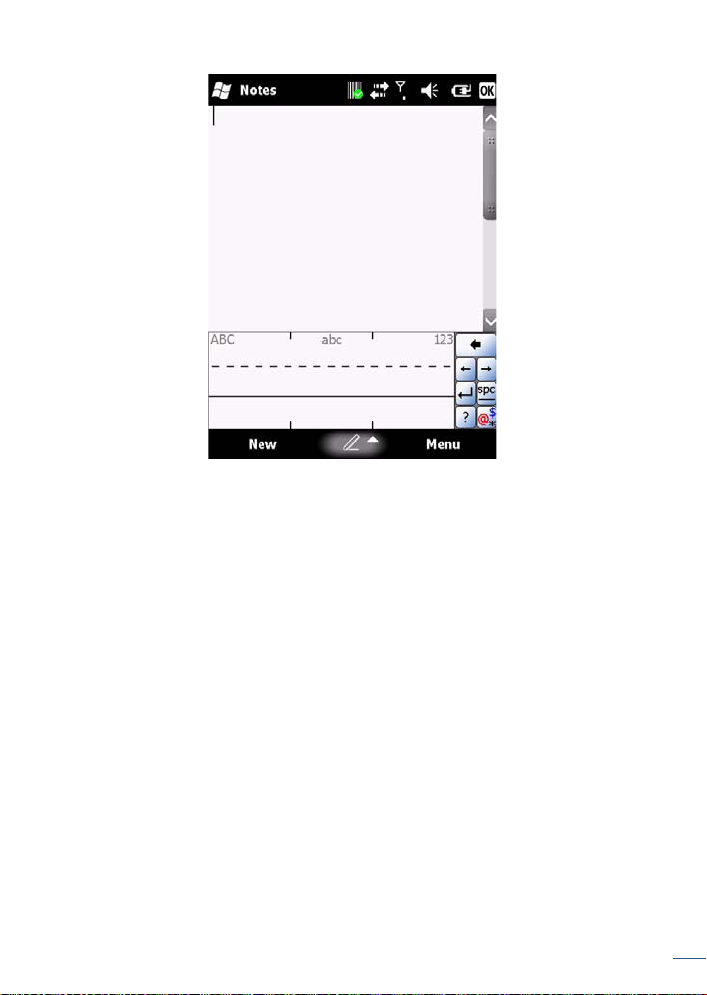
3. Do one of the following to begin entering text:
• Enter uppercase letters in the left (ABC) box.
• Enter lowercase letters in the middle (abc) box.
• Enter numbers and symbols in the right (123) box.
Using Block Recognizer
Block recognizer interprets letters written in one stroke.
1. Select the block recognizer as your input method. See “Switching Input
Methods” on page 26.
2. Tap the input icon located along the bottom center of th e screen.
The block recognizer displays.
Getting Started
30
Page 41
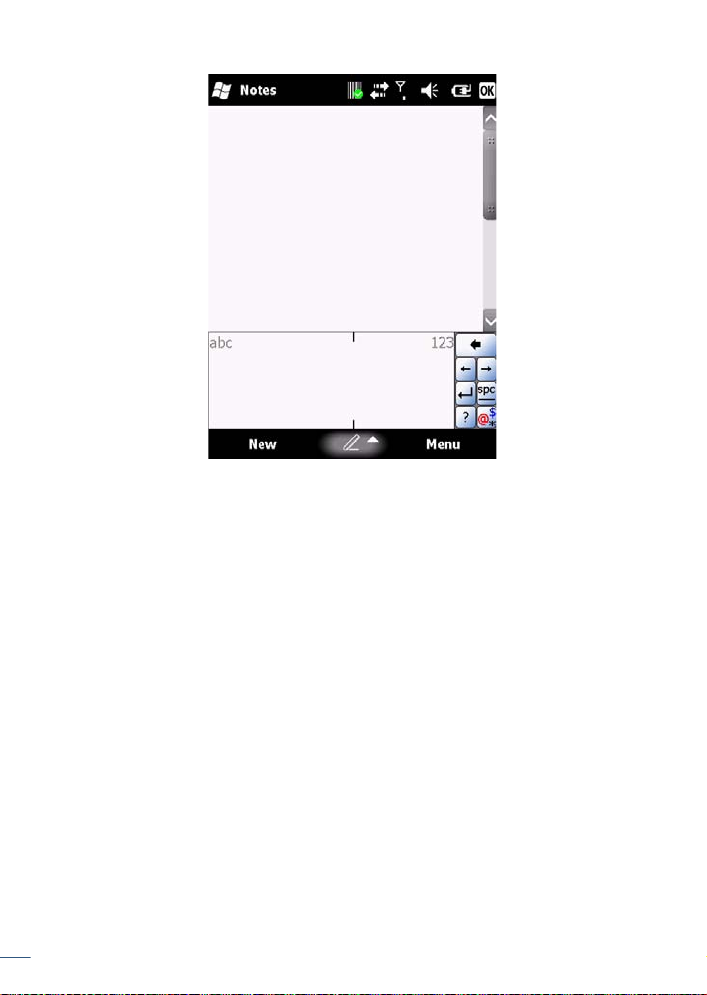
3. Do one of the following to begin entering text:
• Enter lowercase letters in the left (abc) box.
• Enter numbers in the right (123) box.
• Enter symbols by tapping once in either the left or right box and begin
writing.
Using Transcriber
Transcriber recognizes cursive and/or print handwriting.
1. Select the transcriber as your input method. See “Switching Input
Methods” on page 26.
2. Tap the input icon located along the bottom center of th e screen.
The transcriber displays.
31
Getting Started
Page 42
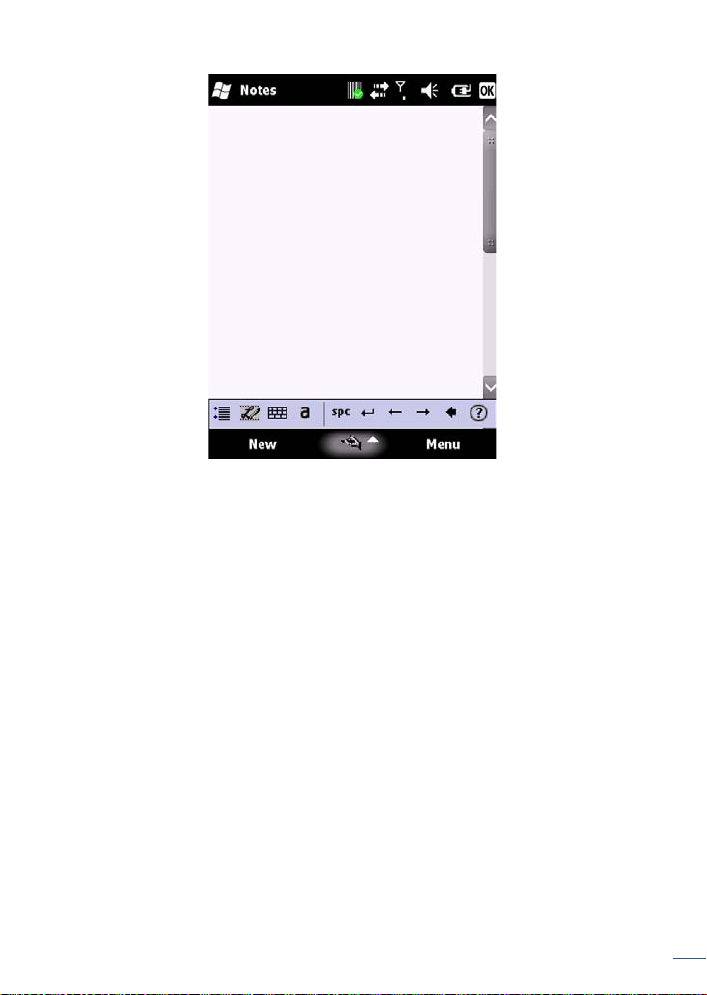
3. To enter text, use your stylus to write anywhere on screen.
Setting up Calendar
Calendar can be used to schedule appointments, such as meetings or
events. Appointments of the day can be displayed on the Today screen.
There are five different appointment views: Day, Week, Month, Year, and
Agenda.
Creating Appointments
1. Tap Start > Calendar.
2. Tap Menu > New Appointment.
3. Select whether the appointment is all day from the All Day drop down
menu.
Getting Started
32
Page 43
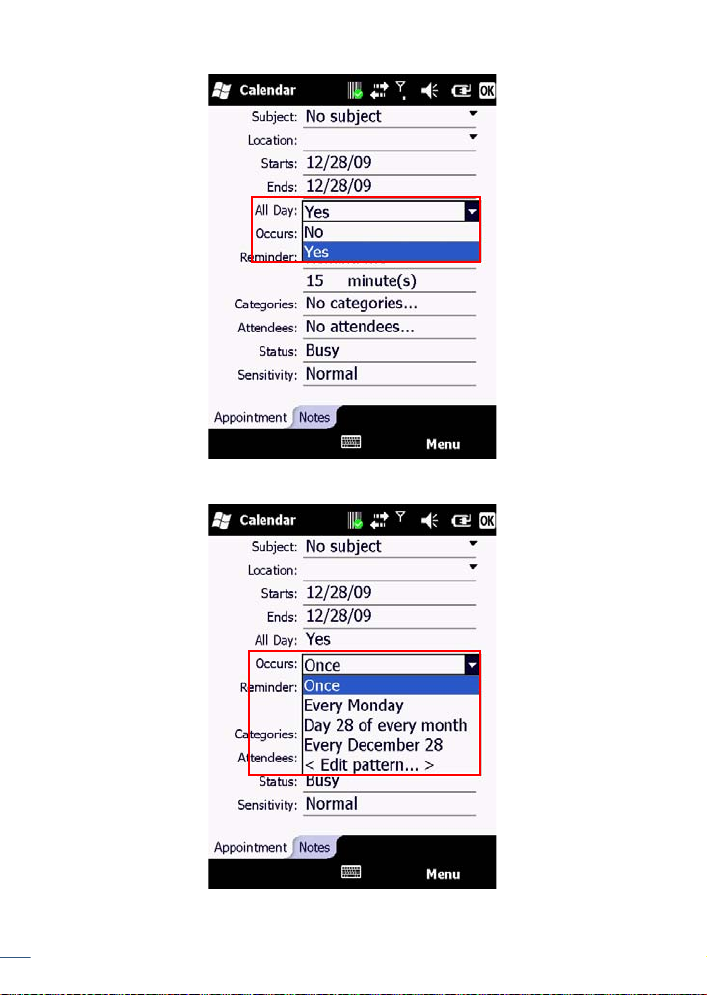
4. If the appointment is reoccurring, select how often it should recur from the
Occurs drop down menu.
5. Tap to select the Categories and Attendees.
33
Getting Started
Page 44
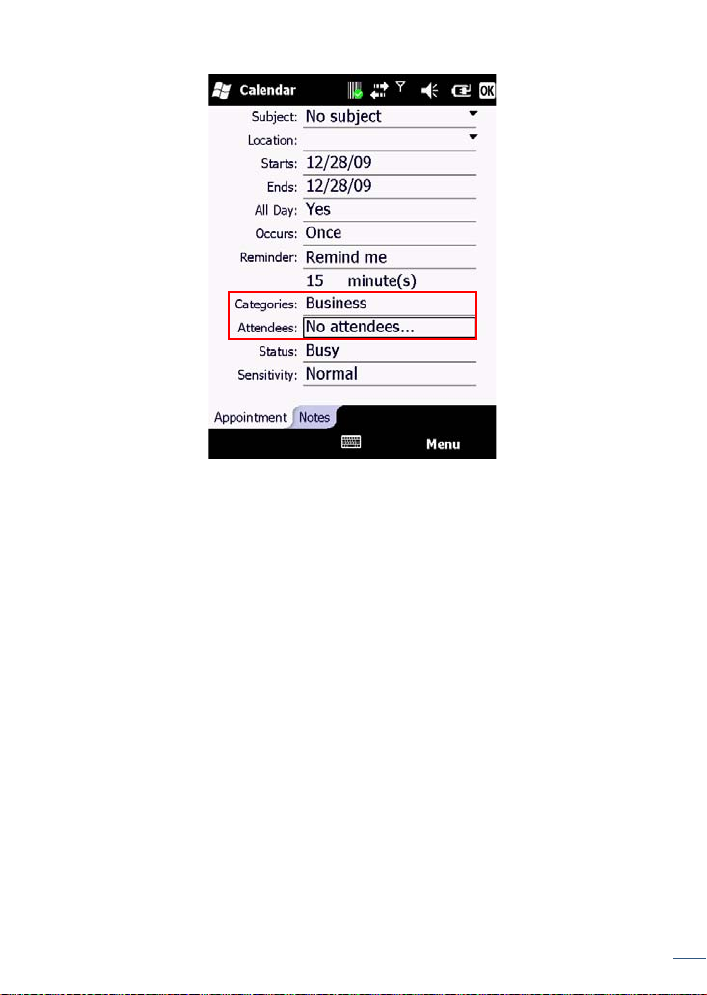
6. Tap the Notes tab to add notes to the appointment if necessary.
7. Tap OK to save and exit.
Deleting Appointments
1. Tap Start > Calendar.
2. From Agenda view, select the appointment to delete.
3. Tap Menu > Delete Appointment.
34
Getting Started
Page 45
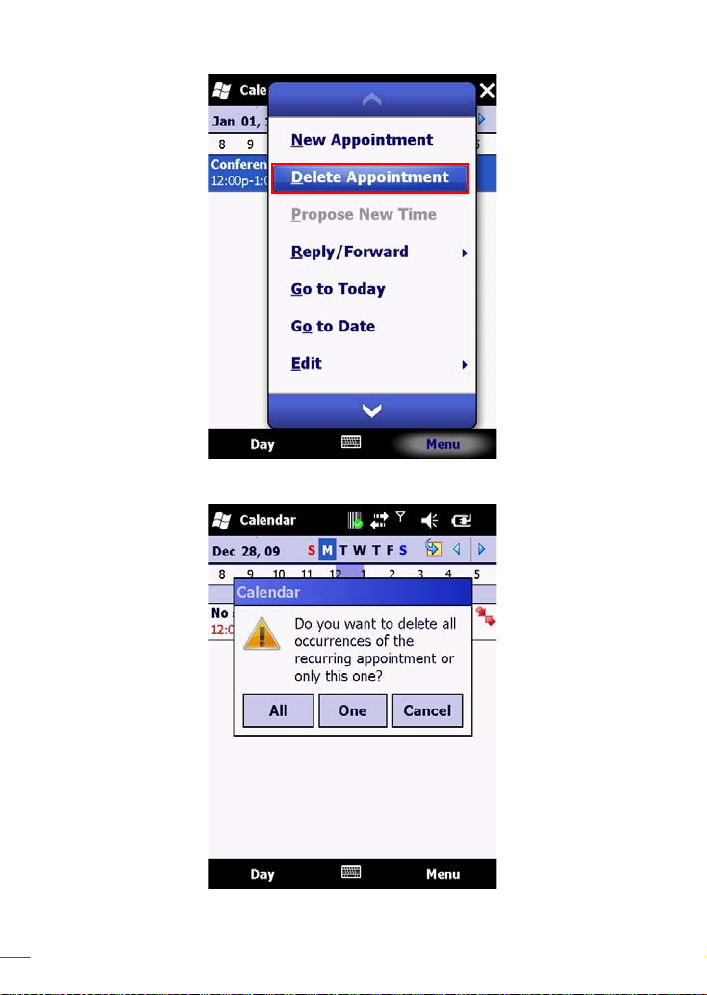
4. For recurring appointments, tap All to delete the set. To delete only the
selected instance, tap One.
35
Getting Started
Page 46
NOTE: If the appointment has been synchronized with your PC, it will be
deleted from your PC the next time you synchronize. If the appointment
has not be synchronized, it will only be deleted from the H-21.
Changing the Reminder Time
1. Tap Start > Calendar.
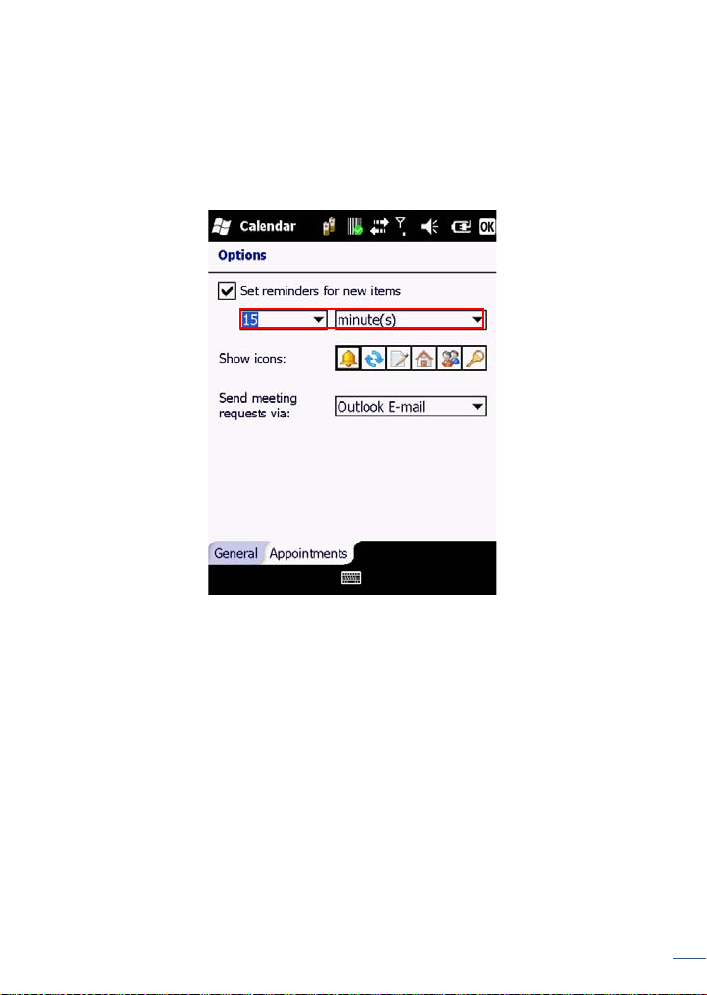
2. Tap Menu > Tools > Options > Appointment.
3. Select the reminder time from the drop down menus.
4. Tap OK to save and exit.
Changing the Calendar View
1. Tap Start > Calendar.
2. Tap Menu > Tools > Options > General.
3. Select a default view from the Start in drop down menu.
• Agenda View: Displays the current day’s activities.
• Day View: Displays a single day’s schedule in a planner layout.
• Week View: Displays a weekly schedule.
• Month View: Displays free and booked days during the month.
• Year View: Displays a calendar for the entire year.
4. Tap OK to save and exit.
Writing Notes
Notes allows you to quickly compose reminders, to-do lists, meeting notes,
and more. You can write using the stylus, keypad, or touchscreen keypad.
Getting Started
36
Page 47
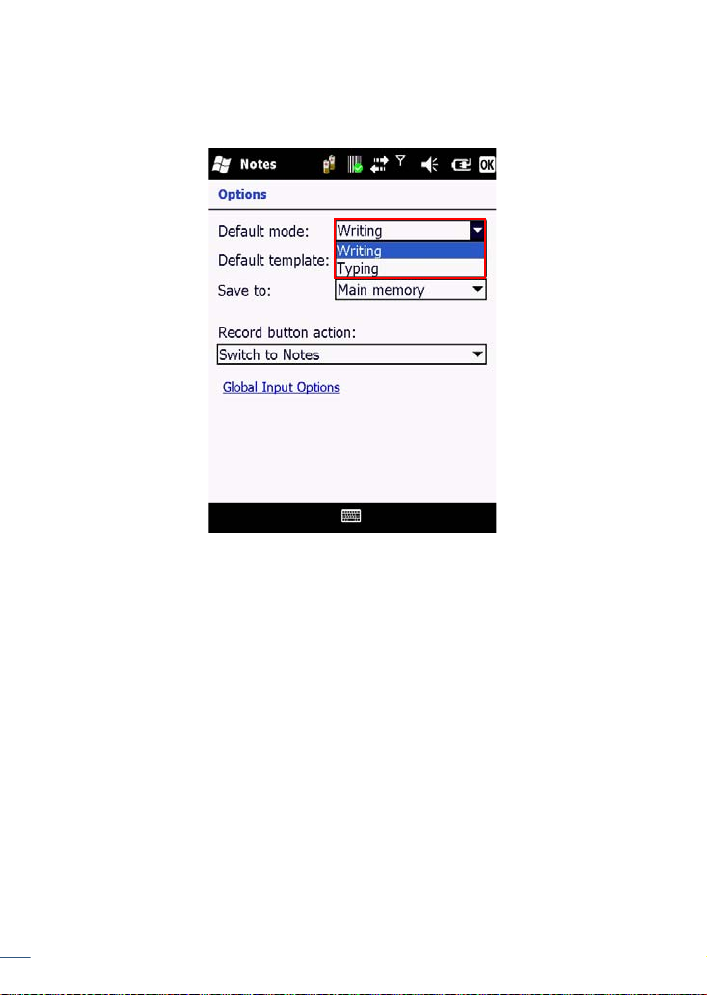
Setting the Default Input Method
1. Tap Start > Notes.
2. Tap Menu > Options.
3. Select one of the following methods from the Default drop down menu.
• Writing: Handwrite notes using the stylus.
• Typing: Type notes u sing the keypad or touchscreen keypad.
4. Tap OK to save and exit.
Creating a New Note
1. Tap Start > Notes.
2. Tap New.
A blank template displays.
37
Getting Started
Page 48
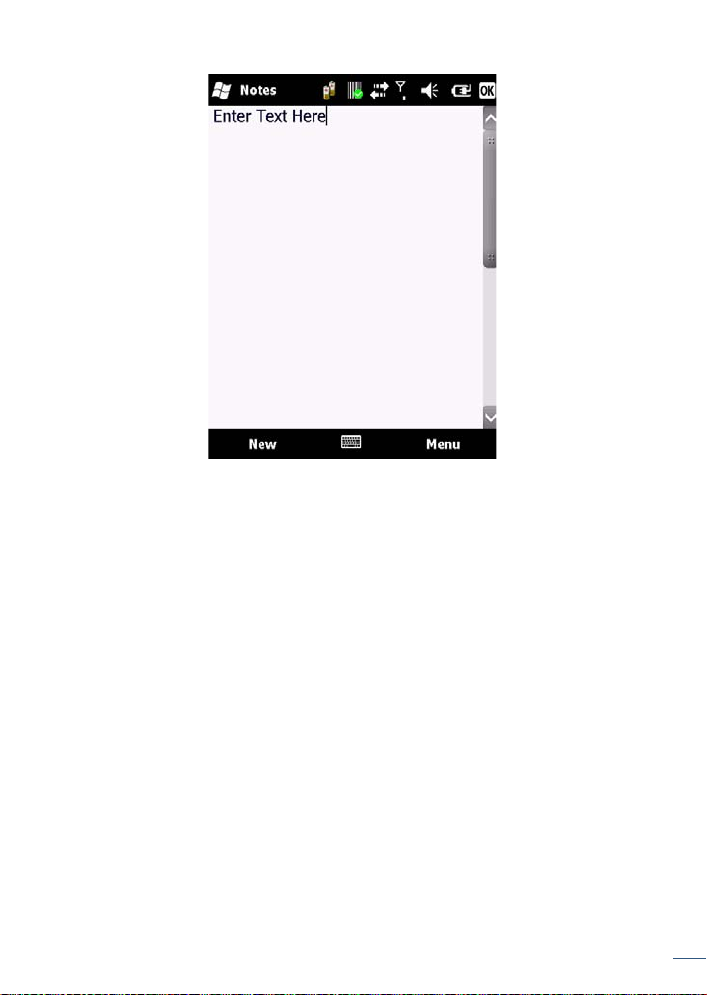
3. Begin entering your text.
4. Tap OK to save your note.
Switching Between Typing/Writing Mode
1. Tap Start > Notes.
2. Create a new note or open an existing note.
3. Tap Menu > Draw to switch to a different mode.
38
Getting Started
Page 49
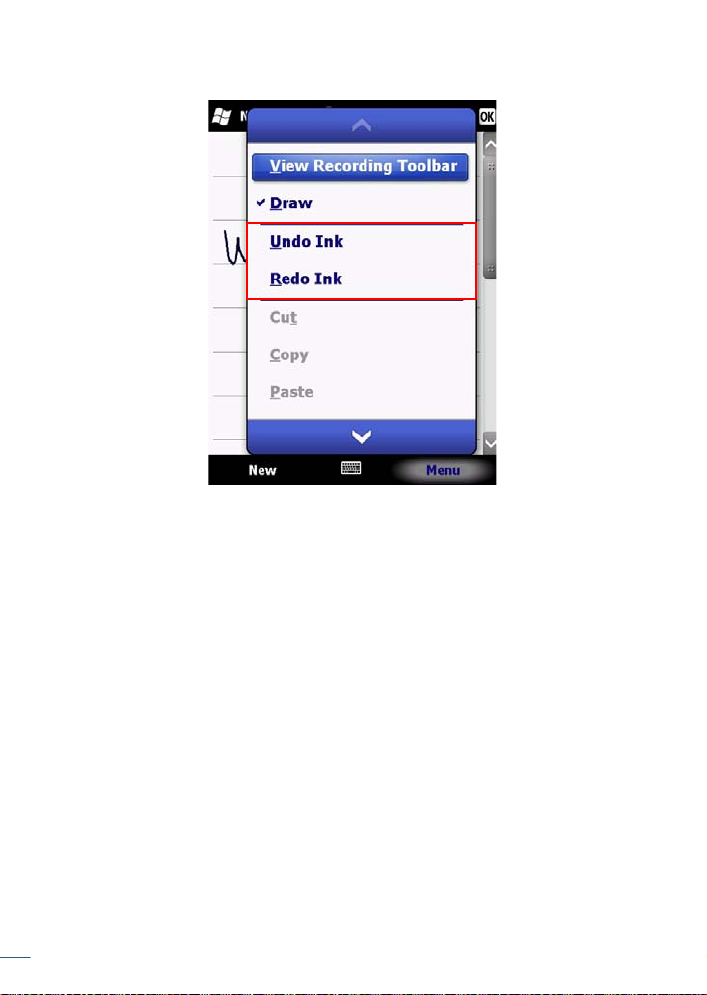
Editing a Handwritten Note
To edit a handwritten note, do one of the following options:
•Tap Menu > Undo Ink to reverse an action.
•Tap Menu > Redo Ink to re-execute an undone action.
•Tap Edit > Select All to select all material.
•Tap Edit > Clear to delete all selected material.
Deleting a Note
1. Tap Start > Notes.
2. Tap and hold the note using the stylus.
A menu displays.
39
Getting Started
Page 50
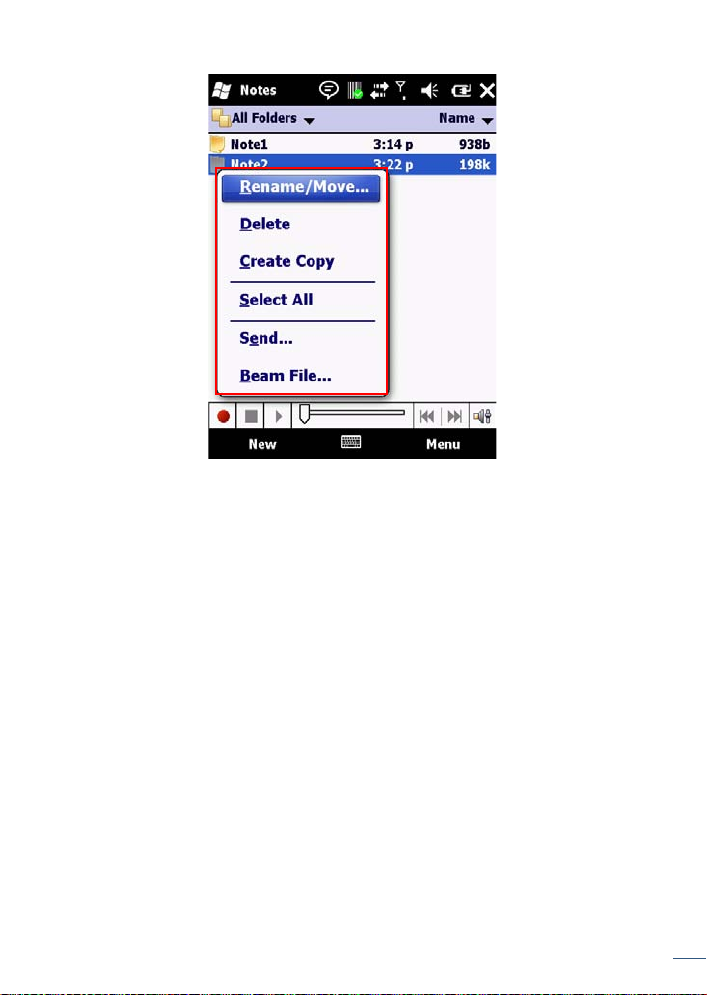
3. Select Delete from the drop down menu.
4. Tap the Yes button to deleted the note.
Creating a Default Template
1. Tap Start > Notes.
2. Create a note for saving as a template.
3. In the note list, select the new note and tap Menu > Rename/Move.
4. Enter a name for the template in the Name field.
5. Select Templates from the Folder drop down menu.
Getting Started
40
Page 51
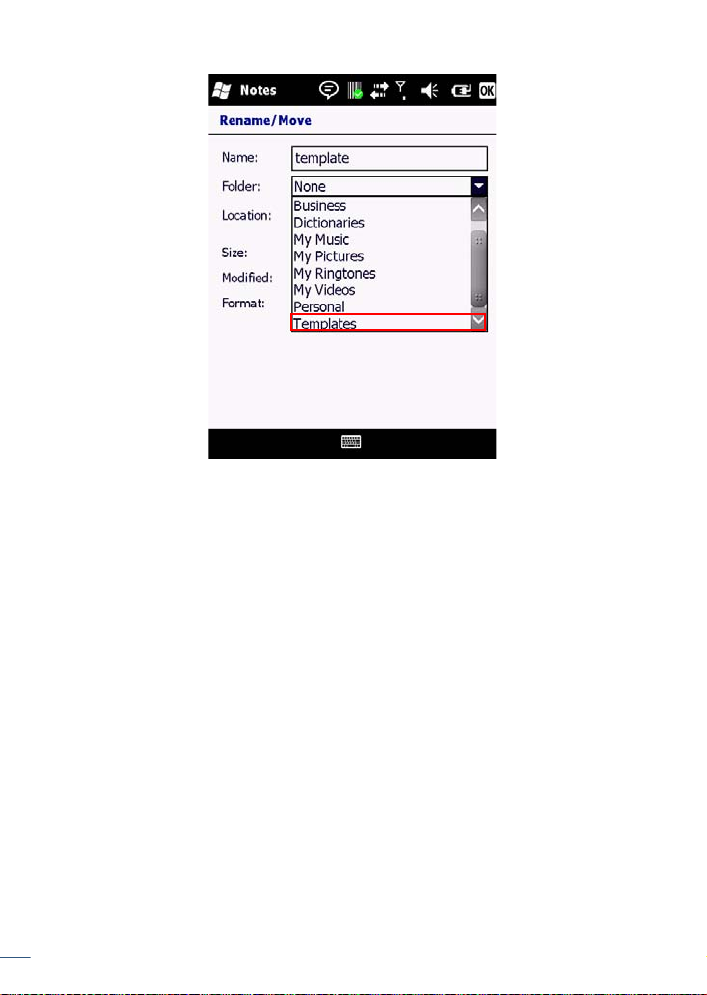
6. Tap OK to return to the note list.
Recording Voice Notes
1. Tap Start > Notes.
2. If the recording toolbar is not displayed, tap Menu > View Recording
Toolbar.
3. Tap the Record button on the toolbar and speak into the microphone.
41
Getting Started
Page 52
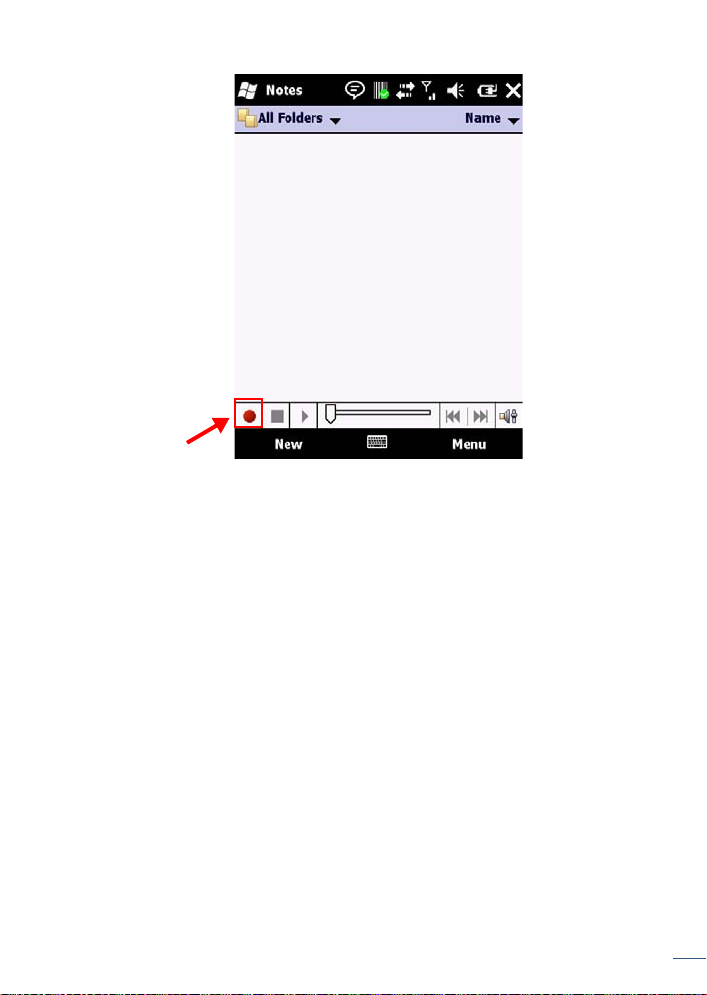
4. Tap the Stop button on the toolbar when finished.
5. Tap OK to return to the notes list.
Adding a Voice Recording to a Note
1. Tap Start > Notes.
2. Create a new note or open an existing note.
3. If the recording toolbar is not displayed, tap Menu > View Recording
Toolbar.
4. Tap the Record button on the toolbar and speak into the microphone.
5. Tap the Stop button on the toolbar when finished.
The audio file icon displays on the note.
Getting Started
42
Page 53
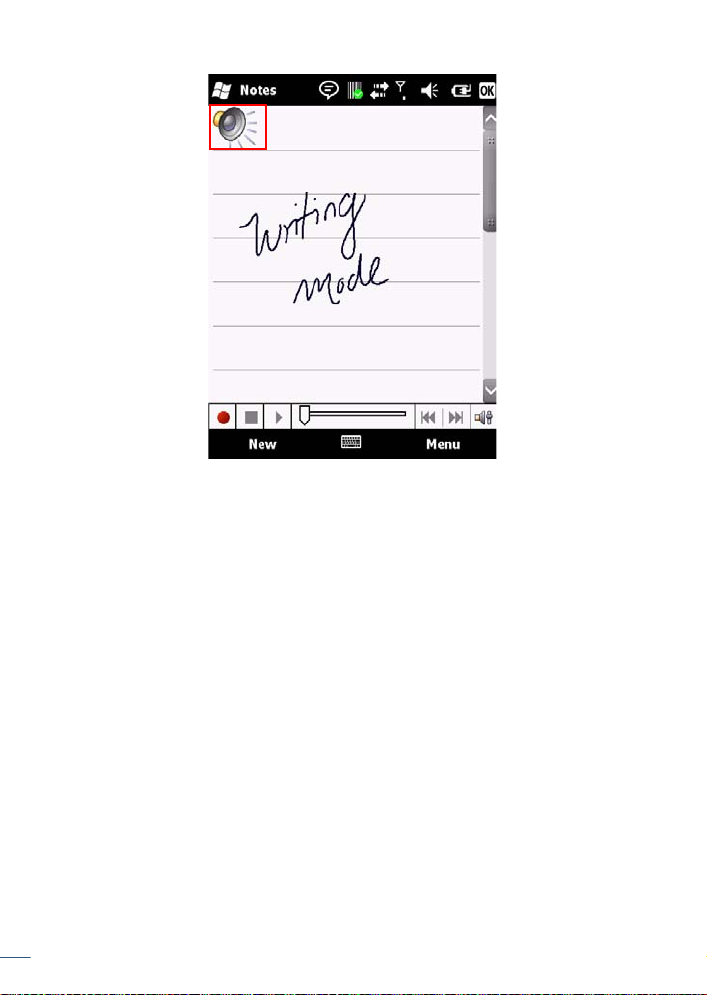
6. Tap the audio file icon to play back the voice note.
7. Tap OK to return to the notes list.
Creating Tasks
T asks help you keep track of things you need to do. You can program tasks
to be one time or recurring, set reminders, and organize them by category. If
you use Outlook on your PC, you can synchronize tasks between your H-21 and
PC.
To create a new task:
1. Tap Start > Tasks.
2. Do one of the following options:
• In the Tap here to add a new task box, enter the task name and press
Enter.
•Tap Menu > New Task.
3. Enter or select a subject from the Subject field.
43
Getting Started
Page 54
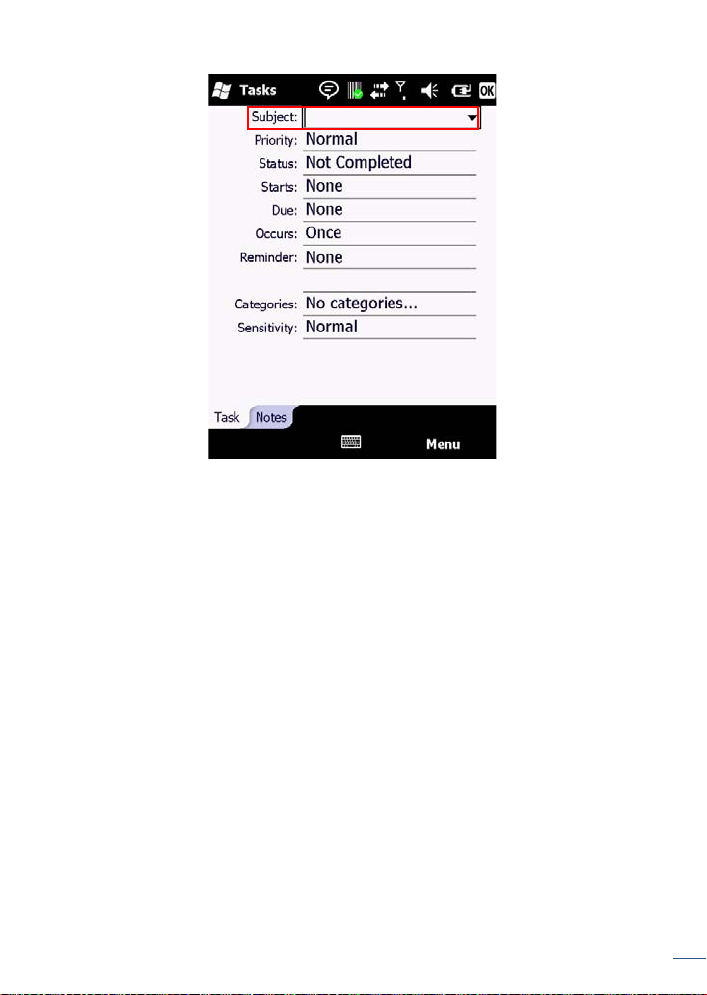
4. Select a completion status from the Status drop down menu.
5. Pick the start and due time using the on screen calendar.
6. Set a reminder date/time from the Reminder field.
7. Select a category from the Category drop down menu.
8. Select a sensitivity setting from the Sensitivity drop down menu.
9. Tap OK to save and exit.
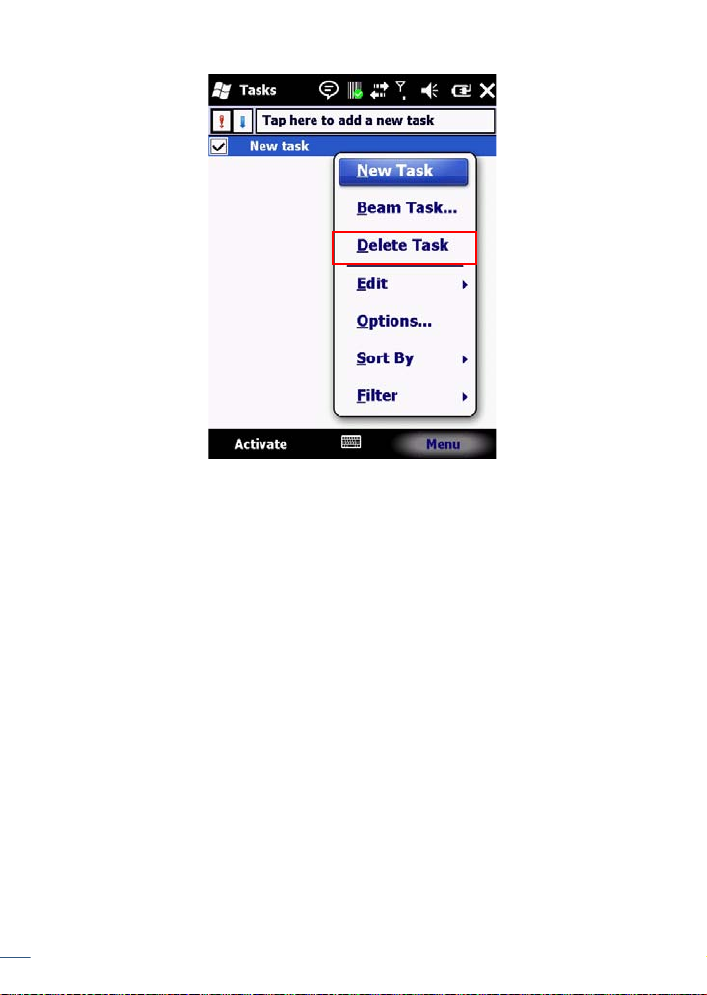
Deleting a Task
1. Tap Start > Tasks.
2. Select the task from the tasks list.
3. Tap Menu > Delete Task to delete the selected task.
44
Getting Started
Page 55
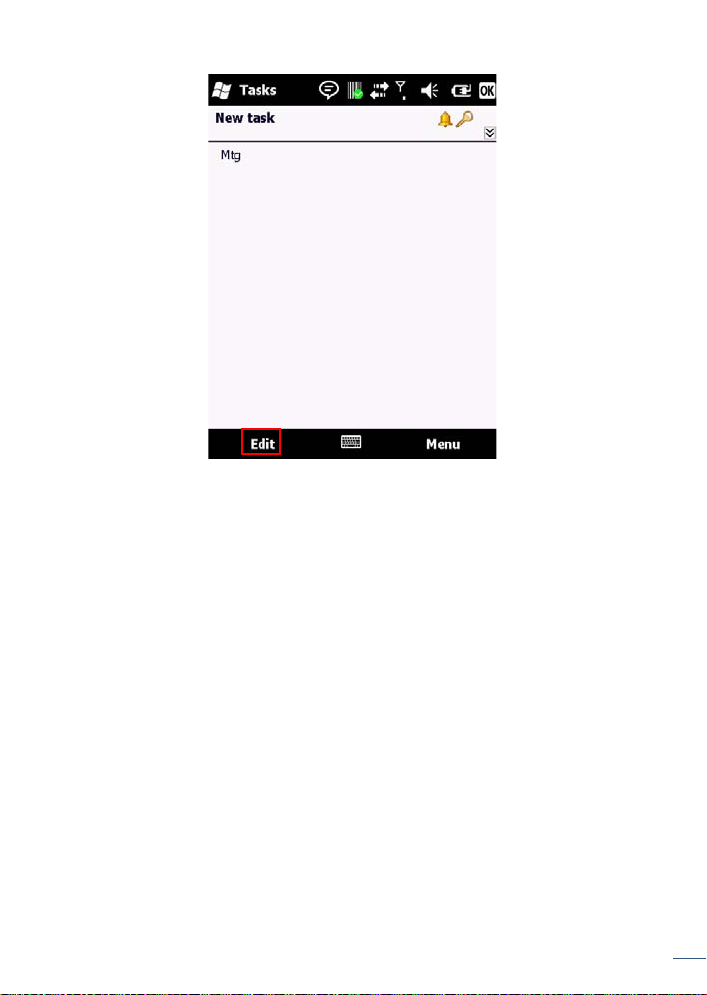
Editing a Task
1. Tap Start > Tasks.
2. Select the task from the tasks list.
3. Tap Edit and make any necessary changes.
45
Getting Started
Page 56
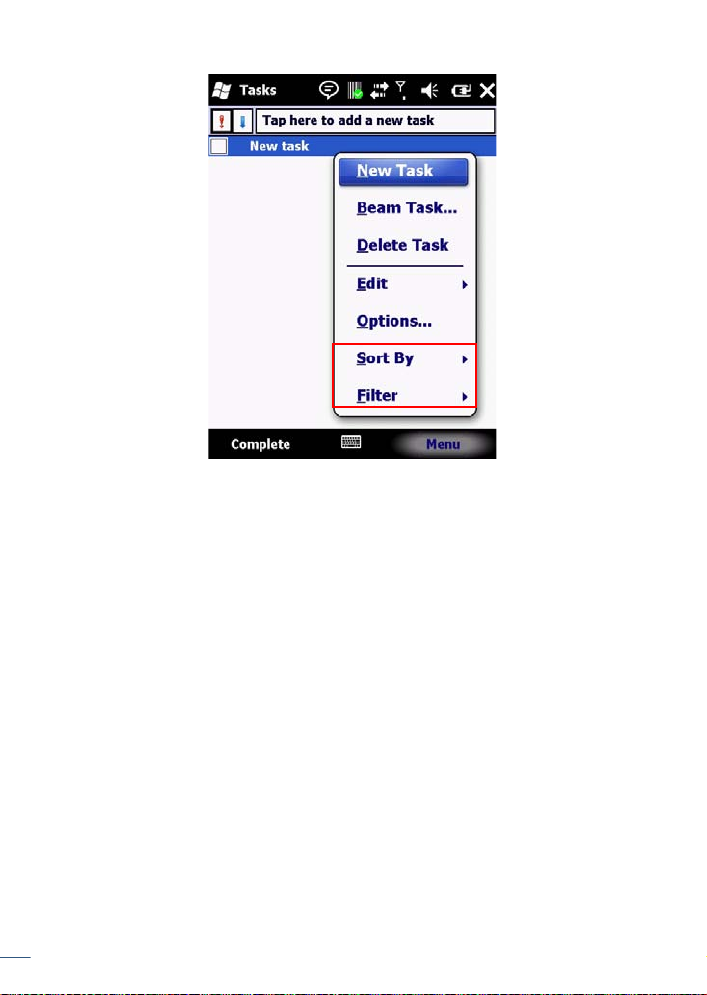
Sorting/Filtering Tasks
1. Tap Start > Tasks.
2. Do one of the following options:
• Sort: Tap Menu > Sort by and select the sorting option (Priority, Subject,
Start Date, Due Date).
• Filter: Tap Menu > Filter and select the filtering option (All Tasks,
Recently Viewed, No Categories, Active Tasks, Completed Tasks).
Getting Started
46
Page 57
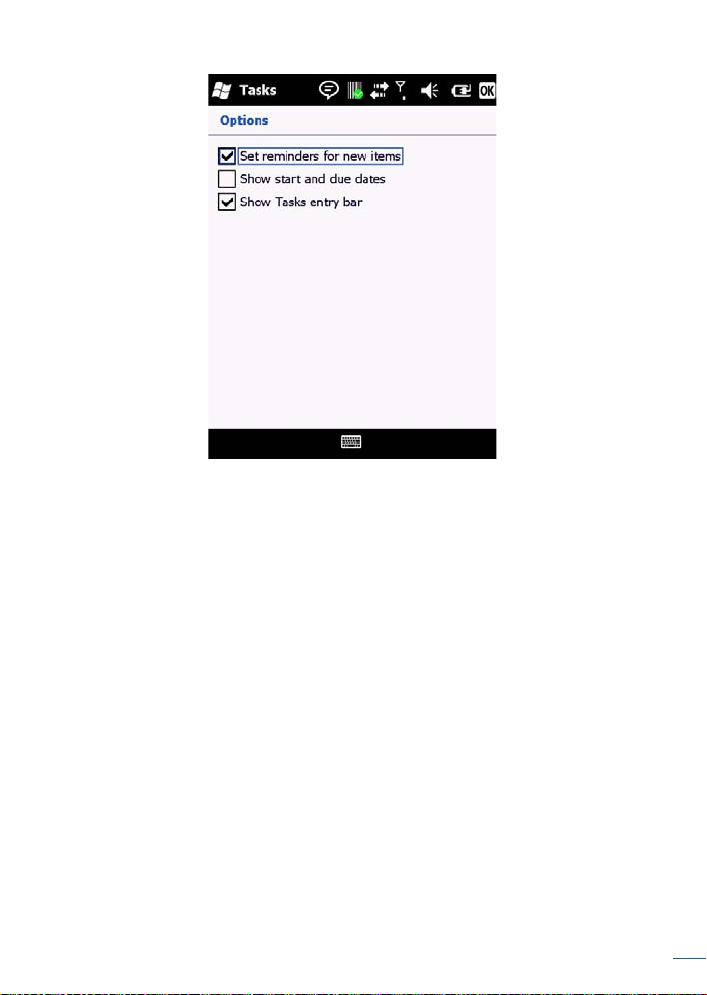
Setting Task Options
1. Tap Start > Tasks.
2. Tap Menu > Options.
3. Customize the following options:
• Set reminders for new items
• Show start and due dates
• Show Tasks entry bar
47
Getting Started
Page 58
Enabling Tasks to Be Displayed on the Today Screen
1. Tap Start > Settings > Today > Items.
2. Select Tasks, then tap Options.
3. Under Display number of, select the type of tasks to be displayed on the
Today screen.
Getting Started
48
Page 59
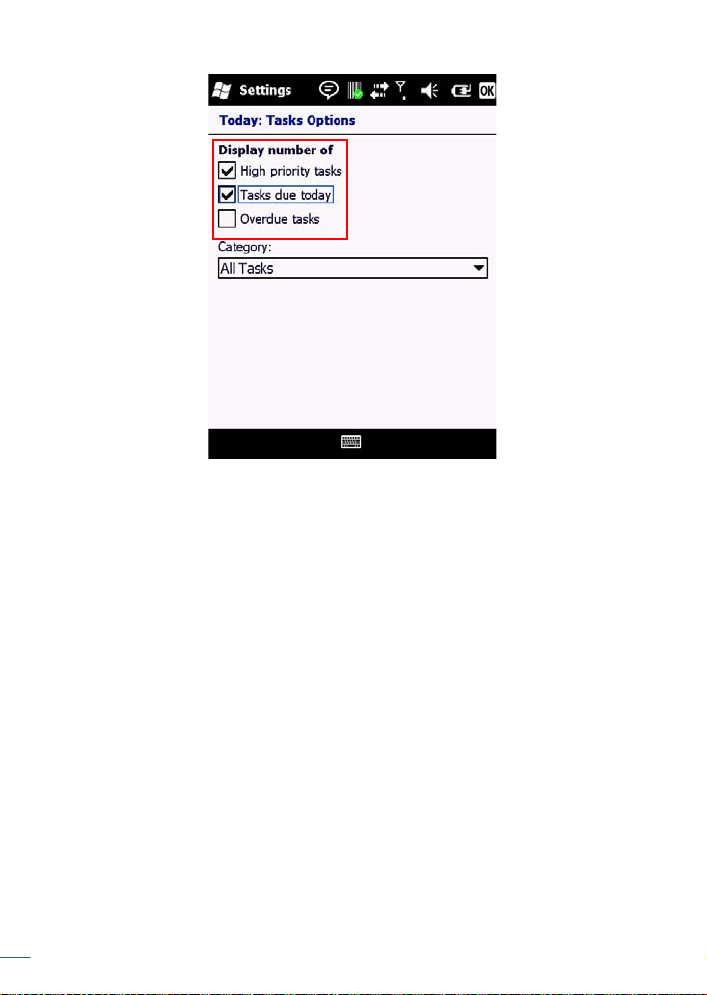
4. Tap OK to save and exit.
49
Getting Started
Page 60

50
Getting Started
Page 61
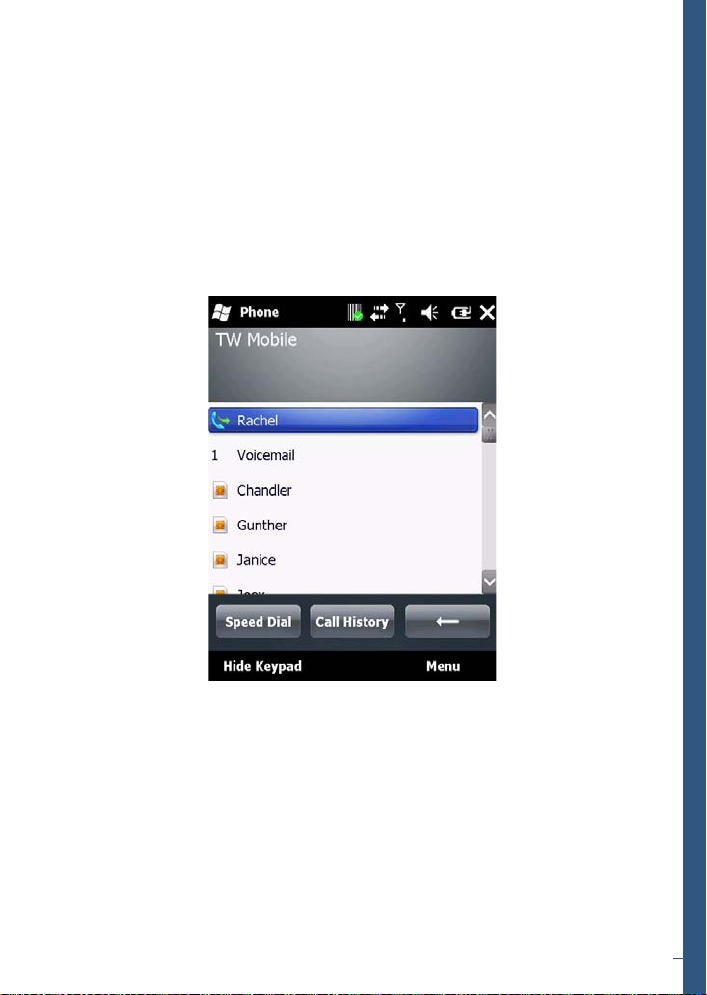
Phone Operations
This chapter instructs you on how to use various phone operations of the
H-21. You can make, receive, and keep track of calls, and send text messages
(SMS) and multimedia messages (MMS).
Making a Phone Call
Accessing the Phone Screen
From the Phone screen, you can make calls and manage contacts.
To access the Phone screen, do one of the following options:
• Press the TALK key on your keypad.
•Tap Start > Phone.
Making a Call by Entering a Phone Number
1. Tap Start > Phone.
2. Enter a phone number using the keypad or touch screen keyboard. To turn
on the touch screen keyboard, see “Using the Touch Screen Keyboard” on
page 28.
3. Do one of the following:
51
Page 62
• If you see the number or contact name you want to call, select it and press
the TALK key.
• If you do not see the number or contact name, finish entering the number
and press the TALK key.
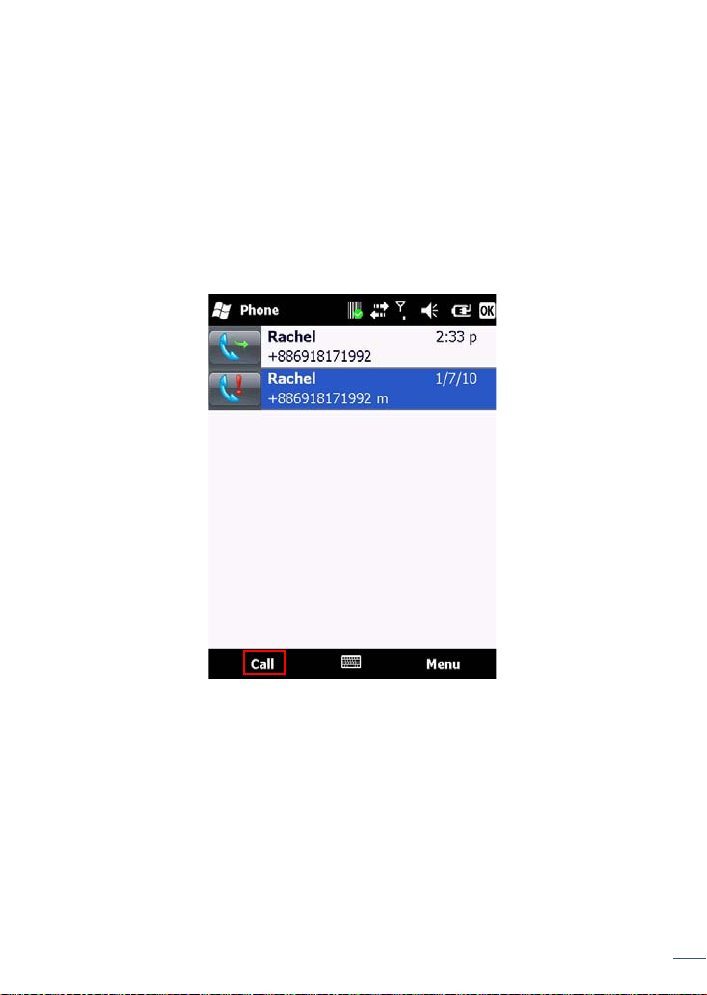
Making a Call from Call History
Call History displays calls you have made, received, and missed.
1. Tap Start > Phone.
2. Tap Keypad to view the keypad buttons.
3. Tap Call History.
4. Select the name or phone number to call.
5. Tap Call or press the TALK key to dial the number.
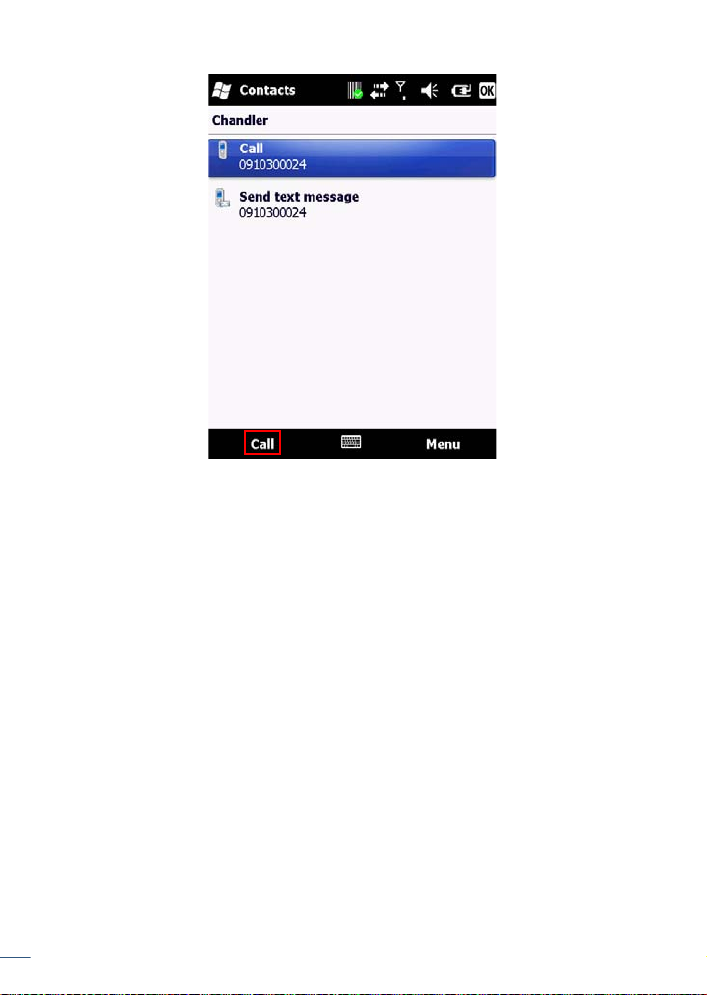
Making a Call from Contacts
1. Tap Start > Contacts.
2. Tap the desired contact in the list.
NOTE: You can quickly find a contact by entering the first letter of the
contact or the first number of their phone number.
3. Select the number you want to dial.
4. Tap Call or press TALK.
Phone Operations
52
Page 63
Using Speed Dial
Create speed dial entries for frequently used numbers so you can call a
contact by pressing a single key. A speed dial entry can only be created for
numbers stored in contacts.
To create a speed dial entry for a contact:
1. Tap Start > Contacts.
2. Select the desired contact.
3. Select the phone number for which to create a speed dial.
4. Tap Menu > Add to Speed Dial.
53
Phone Operations
Page 64
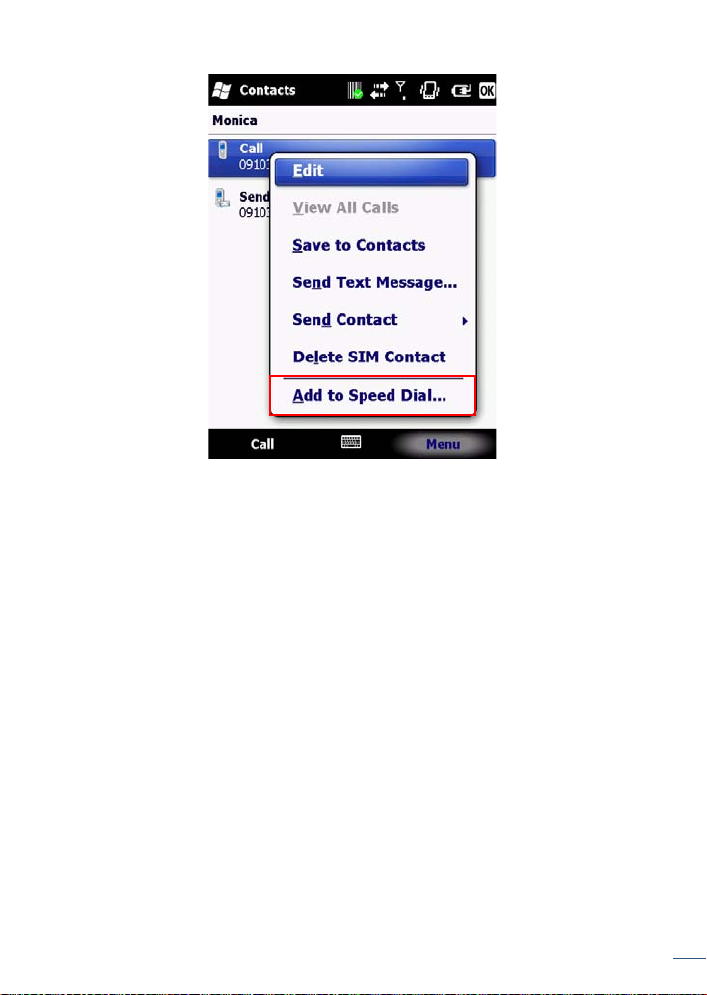
5. In Location, select the speed dial number to use.
6. Tap OK to save and exit.
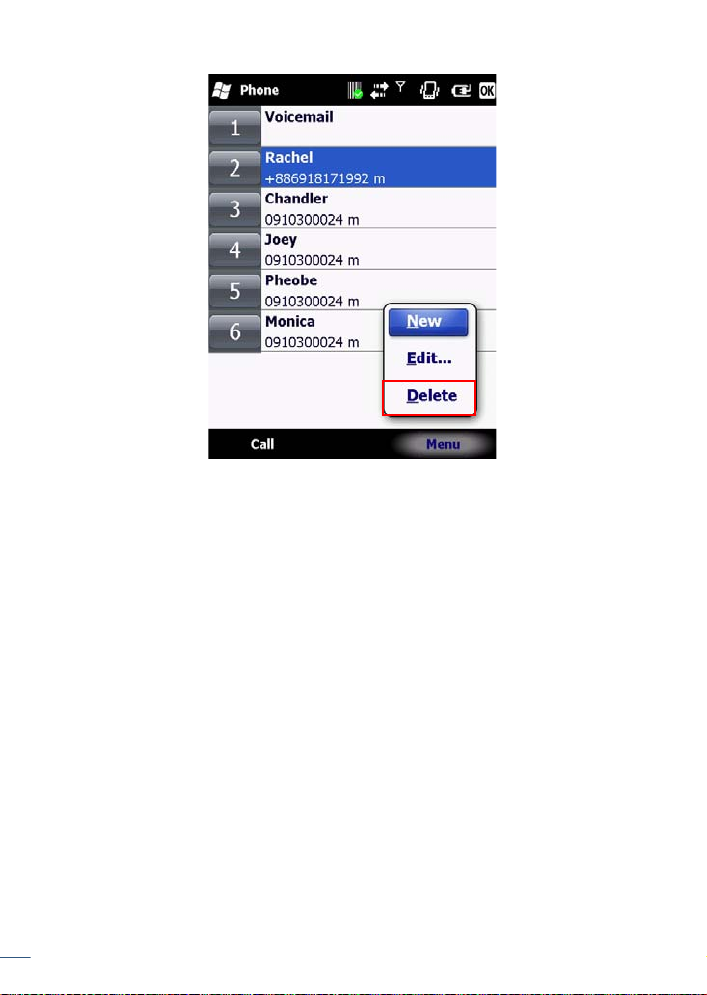
Deleting a Speed Dial Entry
1. Tap Start > Phone.
2. Tap Keypad to view the keypad buttons.
3. Tap Speed Dial > Menu > Delete to delete the entry.
54
Phone Operations
Page 65
Accepting/Rejecting a Call
To accept a call
• Tap Answer or press the TALK key to accept an incoming call.
To reject a call
• Tap Ignore or press END to hang up.
Retrieving a Voicemail Message
• Press and hold 1 to access your voice mailbox. Follow the operator’s
instructions to listen to your message.
Configuring Settings
Activating PIN Security
Most SIM cards are preset with a personal identification number (PIN)
provided by your wireless service provider. When PIN Security is enabled, you
will be prompted to enter your PIN whenever you use your device.
1. Tap Settings > Personal > Phone > Security.
2. Select the check box next to Require PIN when phone is used.
3. Enter the PIN provided by your wireless service provider.
4. Tap Enter.
55
Phone Operations
Page 66
NOTE: If your PIN is entered incorrectly three times, the SIM card will be
blocked. If this happens, obtain a PIN Unblocking Key (PUK) from your
wireless service provider.
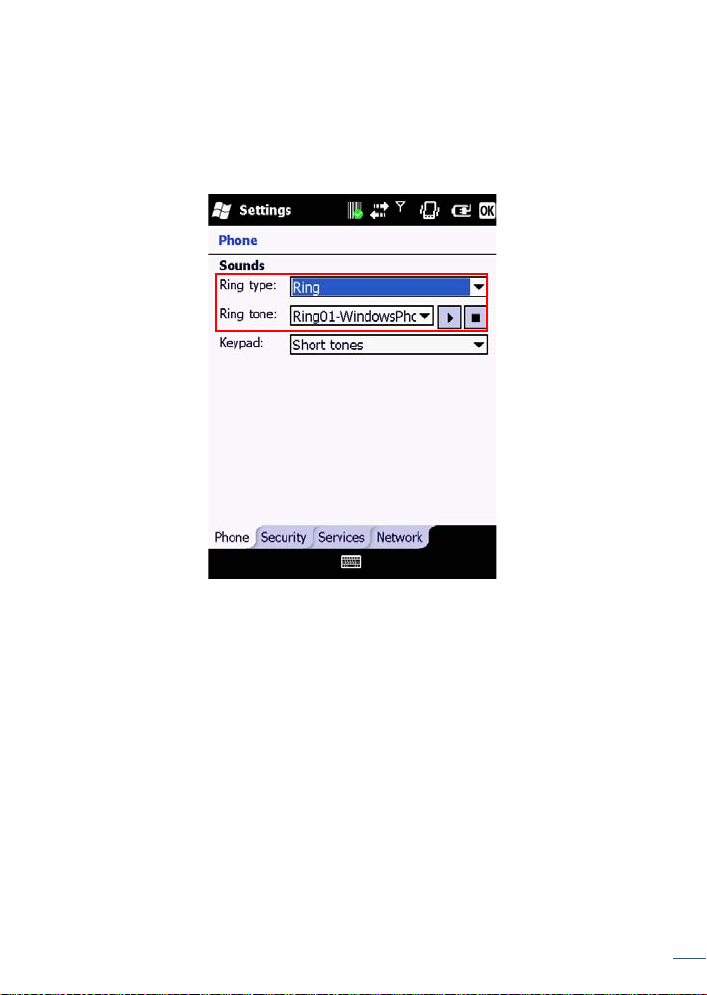
Setting the Ring Tone and Ring Type
1. Tap Settings > Personal > Phone.
2. Customize the following options:
• Select a Ring type from the drop down menu.
• Select a Ring tone from the drop down menu.
NOTE: To use a custom sound file as a ring tone, use ActiveSync on your
PC to copy sound files into the /Windows/Rings folder on your device.
Setting the Phone Profile
1. Tap Start > Settings > Personal > Phone mode.
2. Select the radio button next to one of the following phone profiles:
56
Phone Operations
Page 67
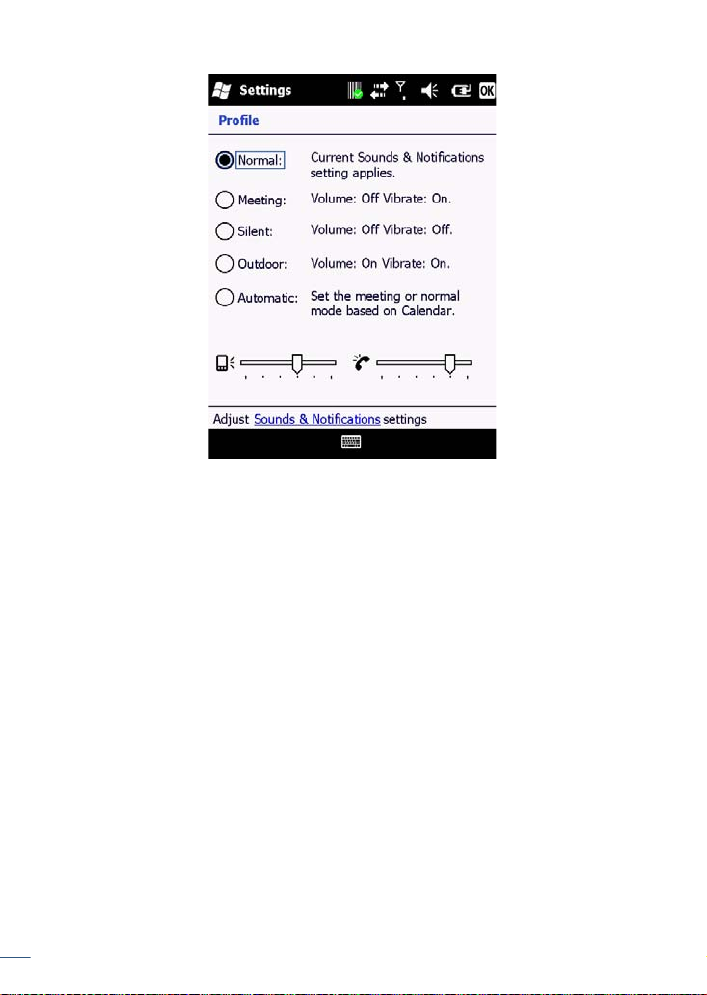
• Normal: Current Sounds & Notifications setting applies.
• Meeting: Volume Off, Vibrate On.
• Silent: Volume Off, Vibrate Off.
• Outdoor: Volume On, Vibrate On.
• Automatic: Set the meeting or normal mode based on Calendar.
3. Drag the sliders along the bottom of the screen to customize each profile’s
ringer volume and vibration strength.
Changing the Ringer Volume
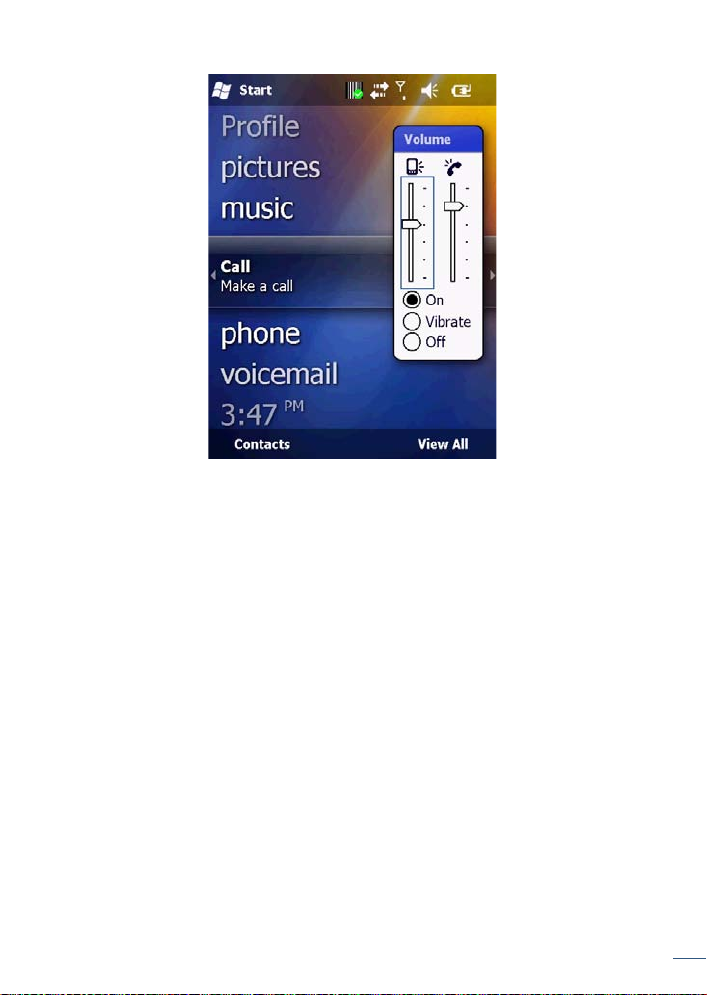
1. Press the VOLUME key located on the left side of the device.
2. Adjust the slider to the appropriate volume level by sliding the bar with the
stylus or pressing the VOLUME UP or VOLUME DOWN key.
57
Phone Operations
Page 68
Blocking Incoming and Outgoing Calls
You will not be able to receive or make calls according to the options you
choose.
1. Tap Start > Settings > Personal > Phone > Services.
2. Tap Call Barring > Get Settings.
3. Choose the type of calls you want to block:
58
Phone Operations
Page 69
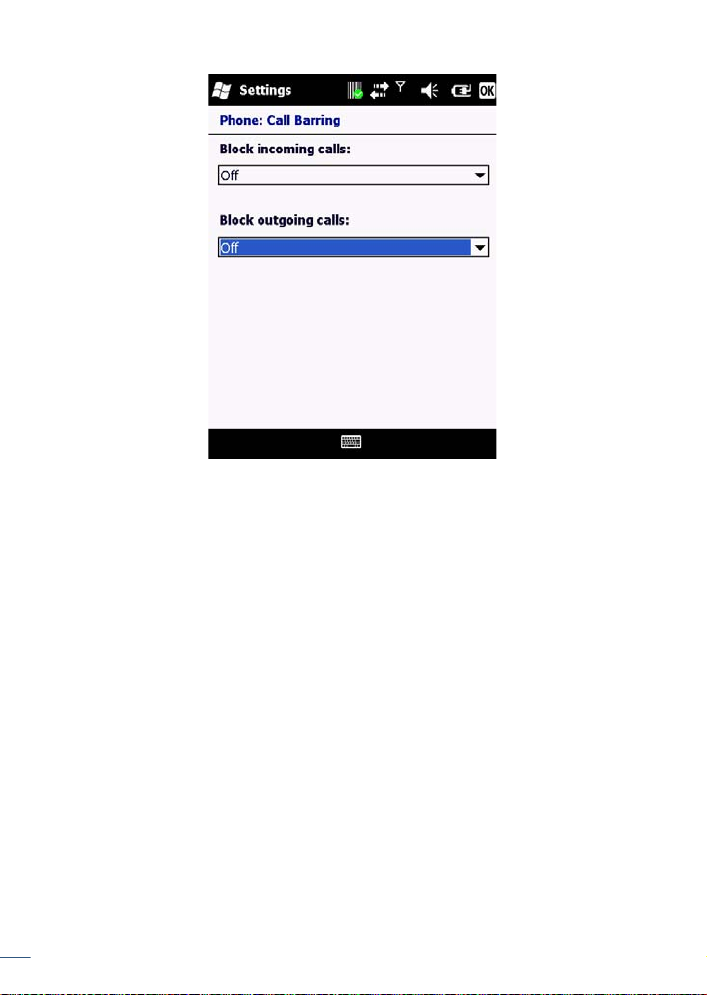
• Block incoming calls: All calls, When roaming, Off.
• Block outgoing calls: All calls, International, International except to home
country, Off.
4. Tap OK to save and exit.
Displaying Caller ID
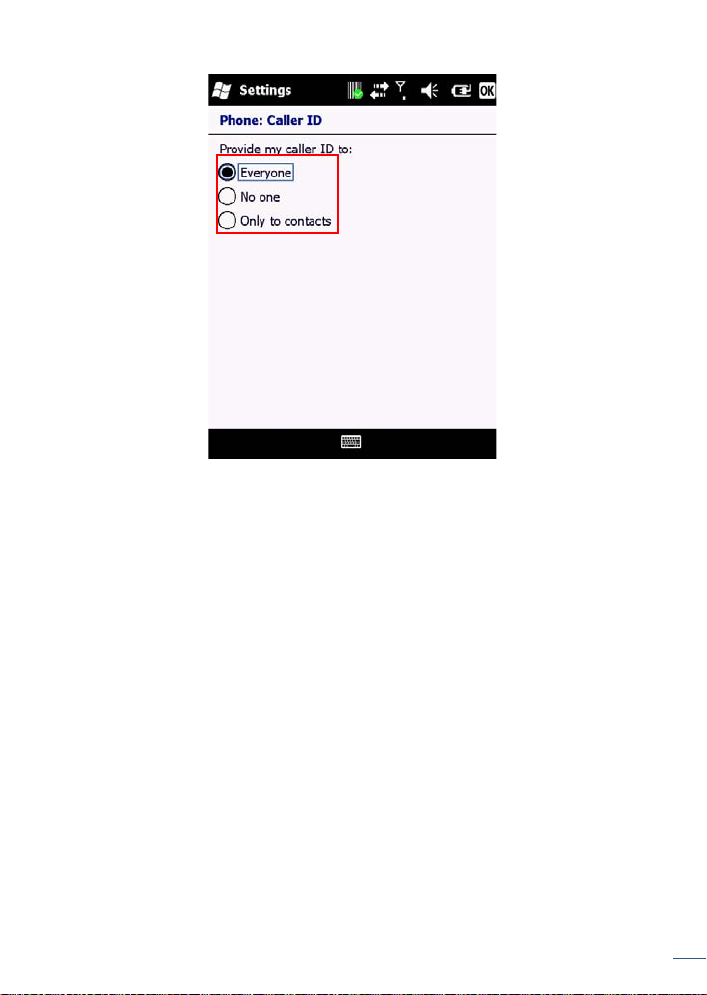
Caller ID allows your number to be displayed to the party you dial.
1. Tap Start > Settings > Personal > Phone > Services.
2. Tap Caller ID > Get Settings.
3. Select Everyone, No one or Only to contacts.
59
Phone Operations
Page 70
4. Tap OK to save and exit.
Call Forwarding
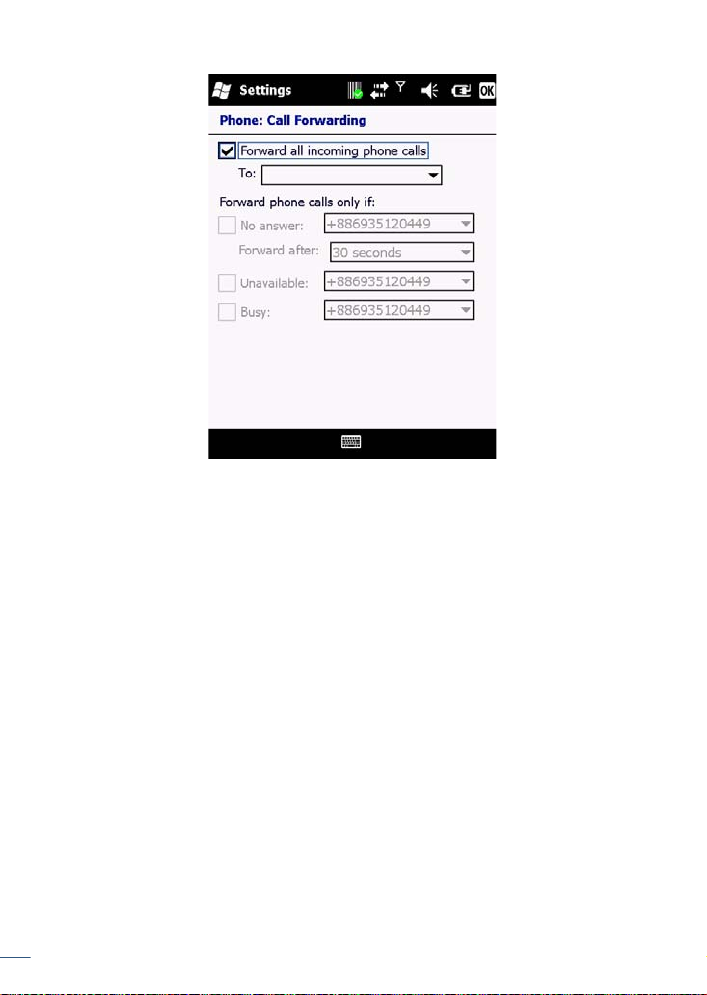
Call forwarding allows you to forward calls to another number.
1. Tap Start > Settings > Personal > Phone > Services.
2. Tap Caller Forwarding > Get Settings.
3. To forward all calls to one number:
• Select the check box next to Forward all incoming phone calls and enter
the number in the field below.
Phone Operations
60
Page 71
4. Tap OK to save and exit.
Call Waiting
Call waiting notifies you of an incoming call when you’re on the phone with
another party.
1. Tap Start > Settings > Personal > Phone > Services.
2. Tap Caller Waiting > Get Settings.
3. Select Notify me or Do not notify me.
61
Phone Operations
Page 72
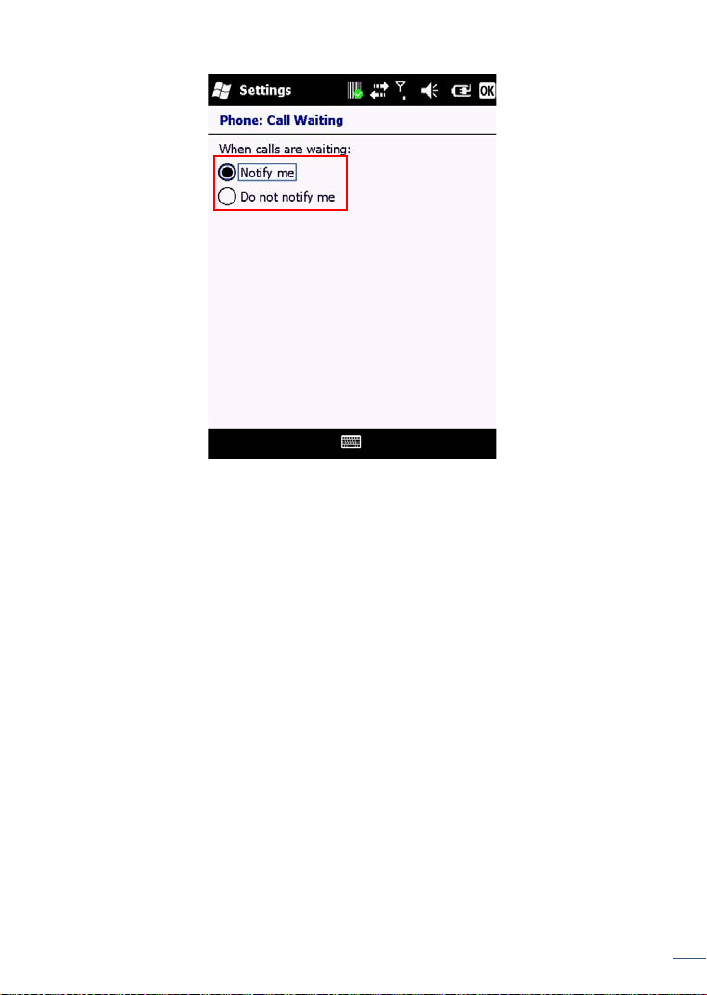
4. Tap OK to save and exit.
Fixed Dialing
Fixed dialing allows outgoing calls to only specific numbers. This function
can be used by parents to restrict the phone numbers their child can dial.
1. Tap Start > Settings > Personal > Phone > Services.
2. Tap Fixed Dialing > Get Settings.
3. Select the check box next to Enable fixed dialing.
4. Tap Menu > Add.
Phone Operations
62
Page 73
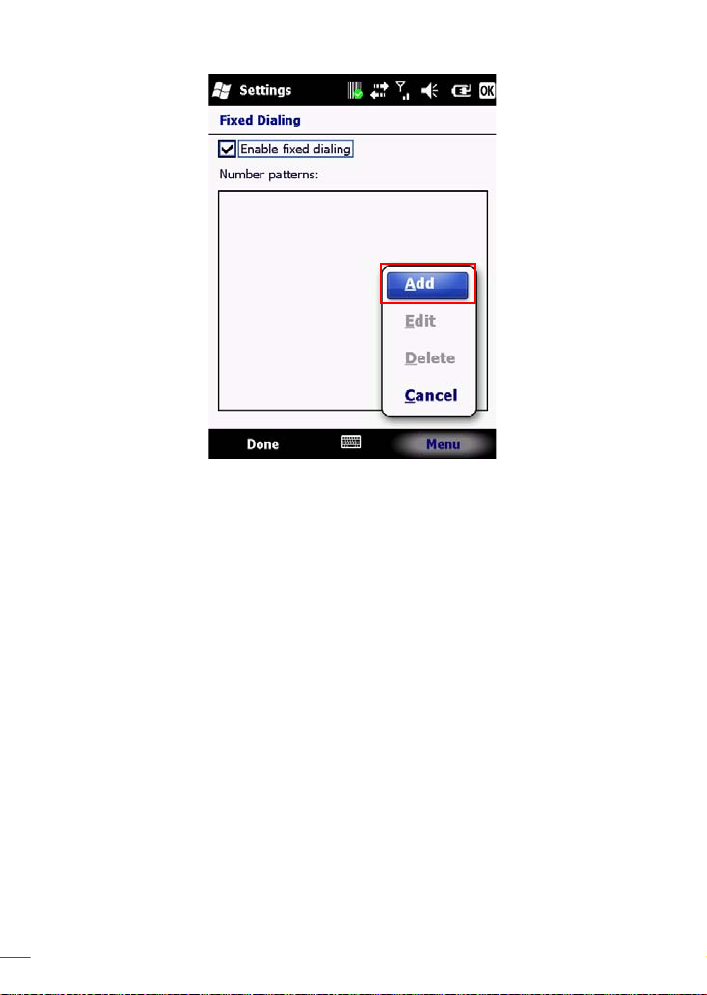
5. Enter the name and phone number.
6. Tap OK to save and exit.
Selecting a Network Manually
1. Tap Start > Settings > Personal > Phone > Network.
2. In the Network selection list, tap Manual.
63
Phone Operations
Page 74
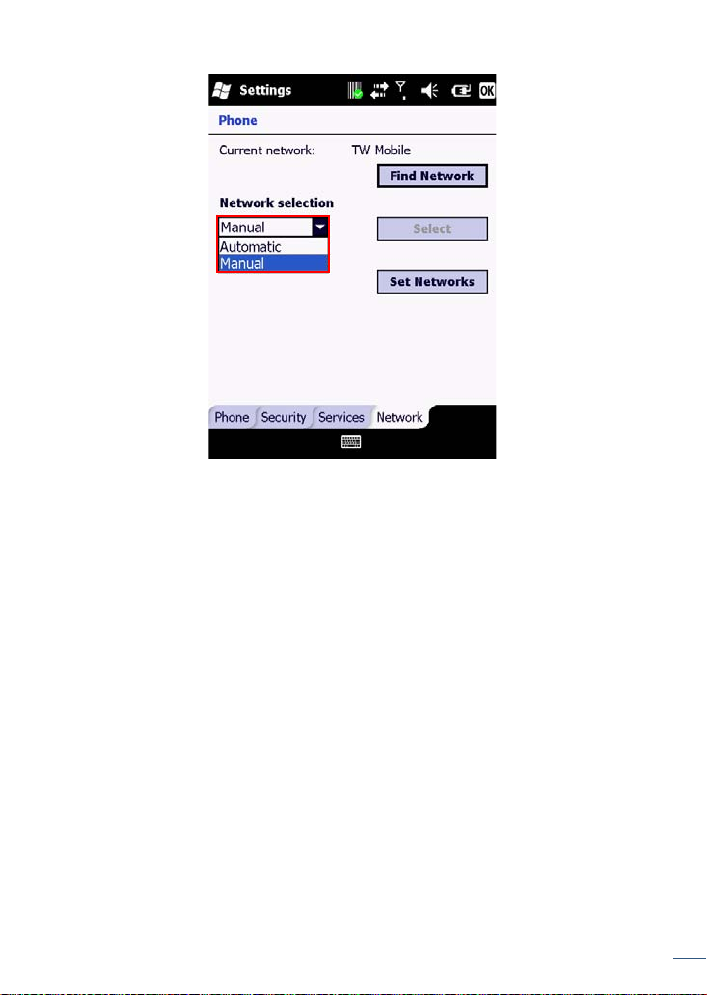
3. Select the network you want to use from the list of available networks.
4. Tap OK to save and exit.
In-Call Options
If you receive another incoming call while on the phone, the H-21 provides
options for managing multiple calls at the same time. When you are notified of
the incoming call, you can ignore, accept, switch, or set up a conference call
between all three parties.
Answering Another Call
•Tap Answer to accept the second call and put the first call on hold.
•Tap Swap to switch between two calls.
• To end the second call and return to the first call, press the END key.
Conference Call
1. To start a conference call, do one of the following options:
• Put a call on hold and dial a second number
• Accept a second incoming call when you have one in progress
2. Tap Menu > Conference.
Turning On/Off the Speakerphone
Speakerphone allows you to use the H-21 hands-free or let others hear
your conversation using the built in speakerphone.
Phone Operations
64
Page 75

•Tap Speaker On during a call to turn the speaker on.
•Tap Speaker Off to turn the speaker off.
Muting the Microphone
To turn off the microphone during a call so the caller cannot hear you, do
the following:
1. Tap Mute to turn the microphone off.
2. Tap Unmute to turn the microphone on.
65
Phone Operations
Page 76

66
Phone Operations
Page 77
Contacts and Messaging
This chapter instructs you on using Contacts to manage addresses and
phone numbers, and Messaging to send and receive SMS, MMS, and e-mail
messages.
Using Contacts
Contacts allows you to store phone numbers, e-mail addresses, birthdays,
and other information that relates to a contact. Simply tap on a contact to quickly
call or text message them. If you use Outlook on your PC, you can synchronize
contacts between your device and PC.
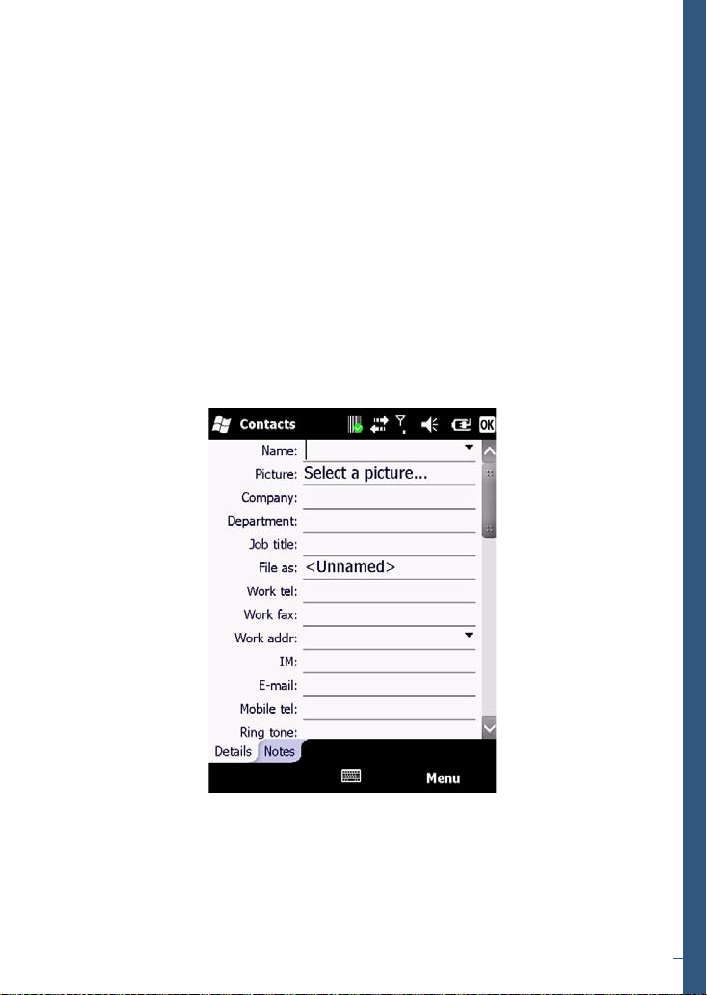
Creating a New Contact
1. Tap Start > Contacts > New.
2. Select Outlook Contact.
3. Enter information for the new contact.
4. Tap OK to save and exit.
Viewing and Editing Contact Information
1. Tap Start > Contacts.
2. Tap the contact whose information you want to view.
67
Page 78
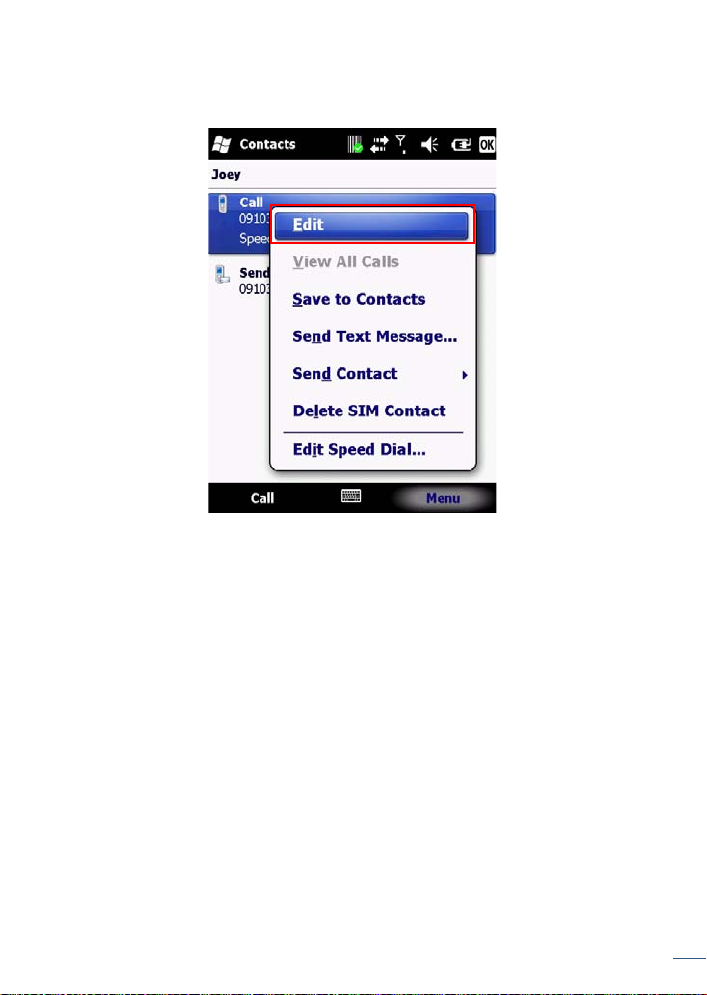
NOTE: You can quickly search through contacts by entering the first lette r
of the contact.
3. Tap Menu > Edit.
4. Make any necessary changes.
5. When finished making changes, tap OK to save and exit.
Creating a SIM Contact
Contacts can be stored directly to your SIM card memory.
1. Tap Start > Contacts.
2. Tap New > SIM Contact.
3. Enter the name and phone number of the contact.
68
Contacts and Messaging
Page 79
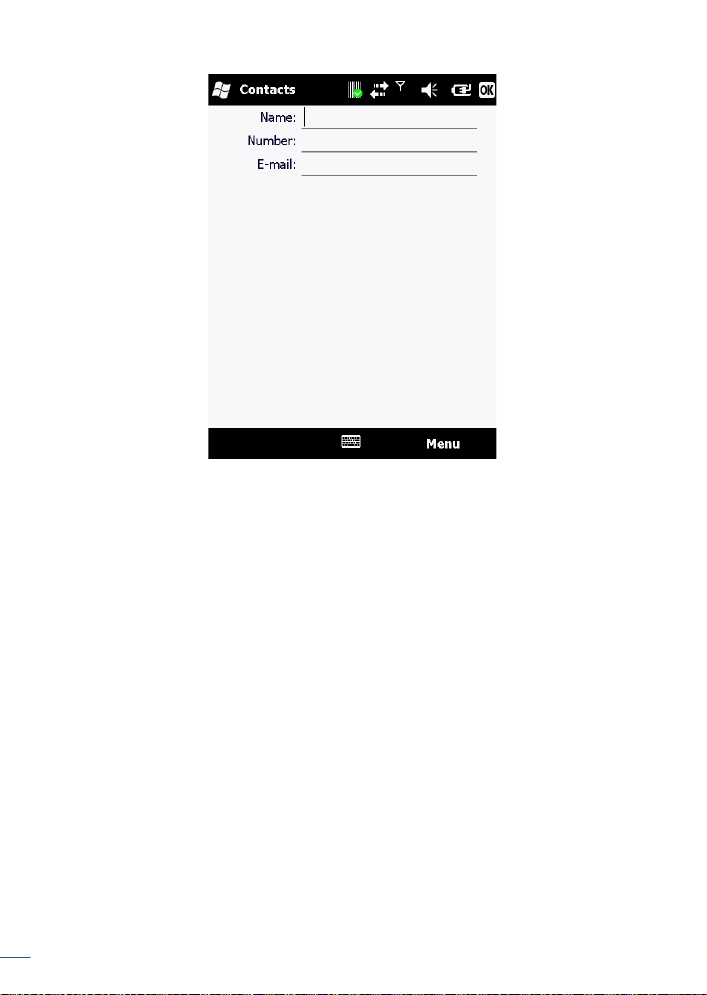
4. Tap OK to save and exit.
Using Text Messaging
Writing a New Text Messa ge
1. Tap Start > Text Messages.
2. Tap Menu > New.
3. Do one of the following options:
69
Contacts and Messaging
Page 80
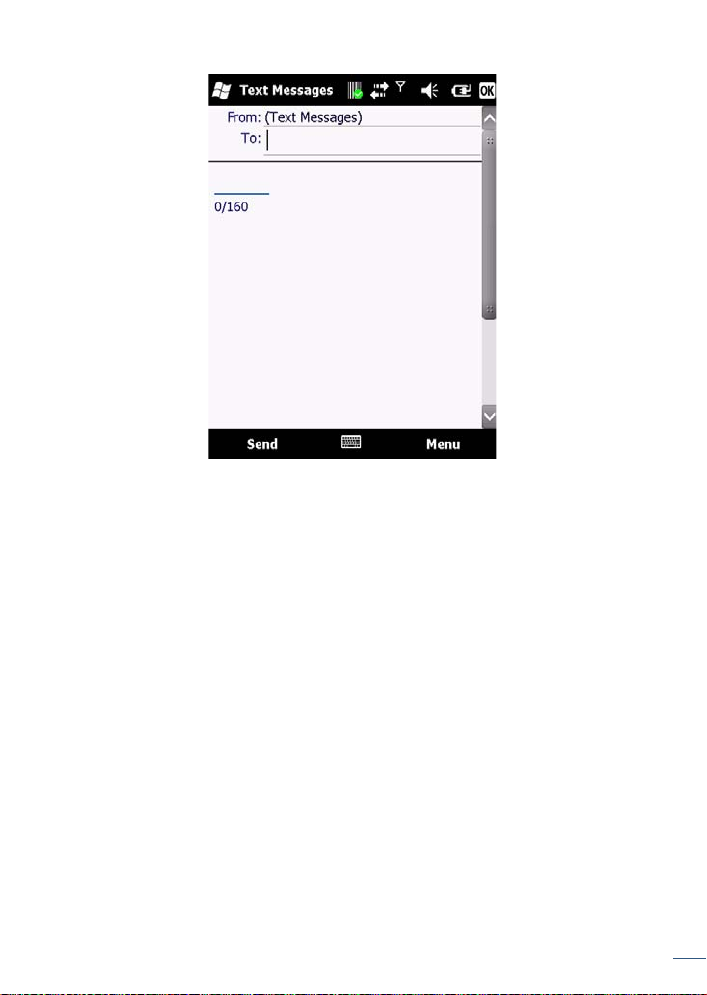
• In the To field, enter the recipient’s number.
NOTE: Insert a semicolon (;) between numbers to send to multiple
contacts.
•Tap Menu > Add Recipient and select a contact from the contacts list.
4. Enter your message and tap Send.
Text messages are sent immediately.
Using Preset Text Messages
You can insert frequently used messages into your text message. While
writing a message, tap Menu > My Text and select the preset message to
insert.
To edit a preset message:
1. Tap Menu > My Text > Edit My Text Messages.
2. Select a message and edit.
Contacts and Messaging
70
Page 81
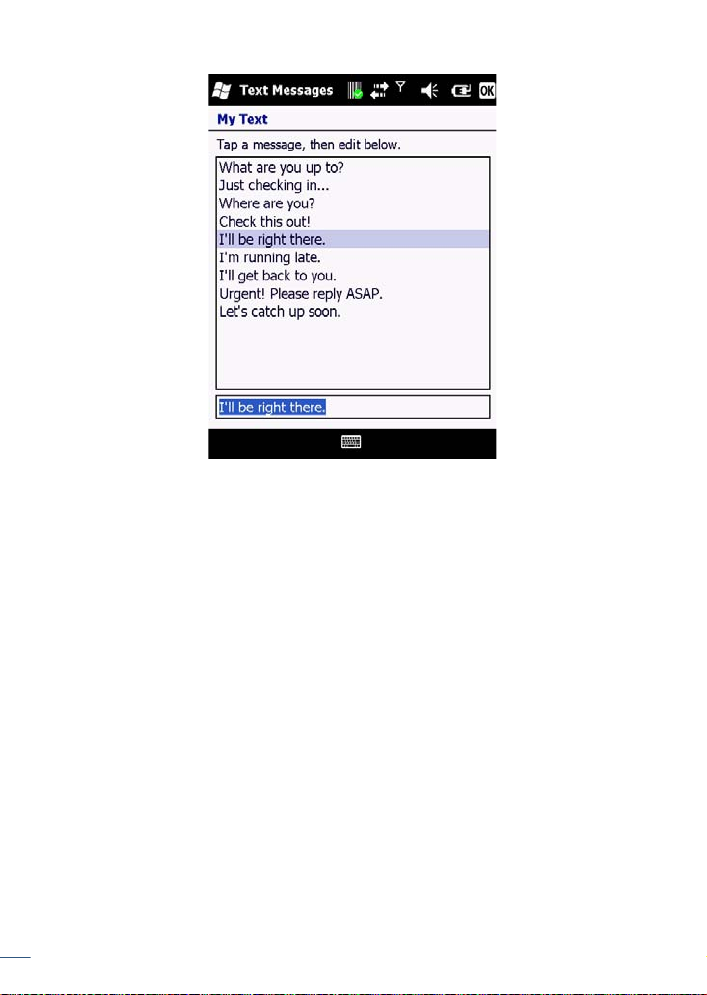
3. Tap OK to save and exit.
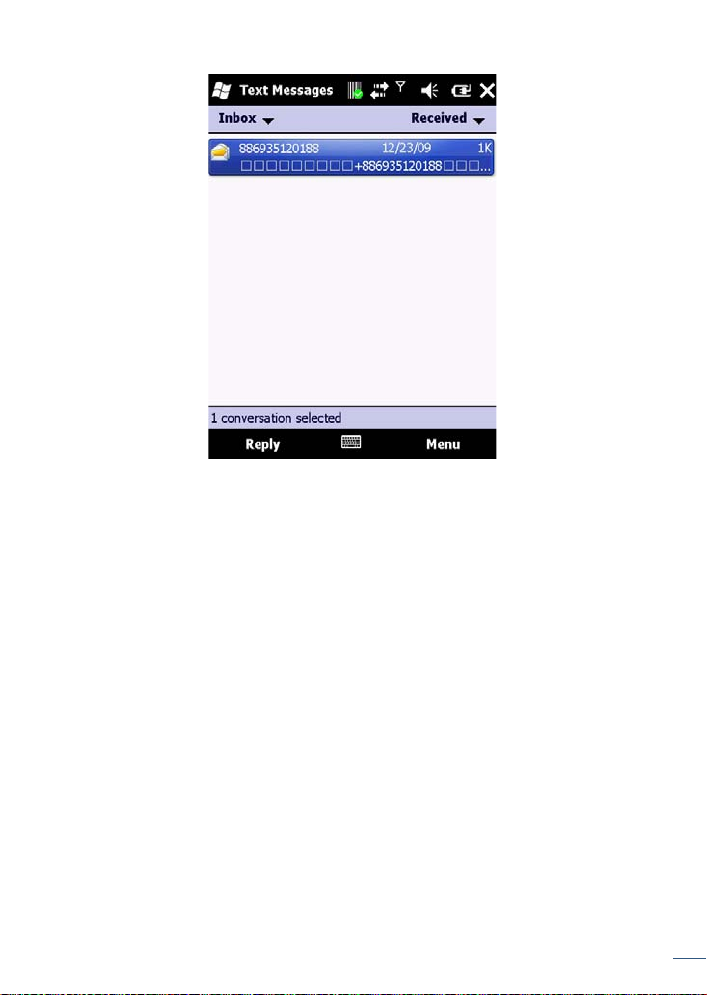
Reading a Text Message
1. Tap Start > Text Message.
2. In the message list, tap the text message you want to read.
71
Contacts and Messaging
Page 82
Requesting Message Delivery Notification
1. Tap Start > Text Messages.
2. Tap Menu > New.
3. Tap Menu > Message Options.
4. Select the check box next to Request message delivery notification.
Contacts and Messaging
72
Page 83
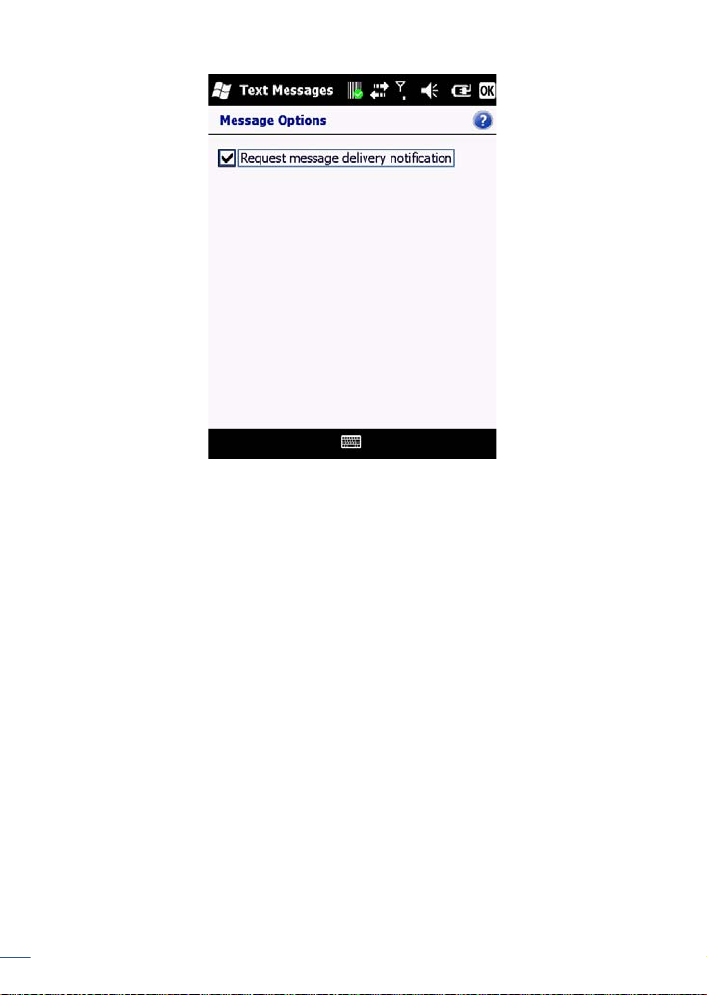
5. Tap OK to save and exit.
Sending a Text Message to a Contact
1. Tap Start > Contacts.
2. Select the contact you want to send a text message to, and tap Menu >
Send Text Message.
73
Contacts and Messaging
Page 84
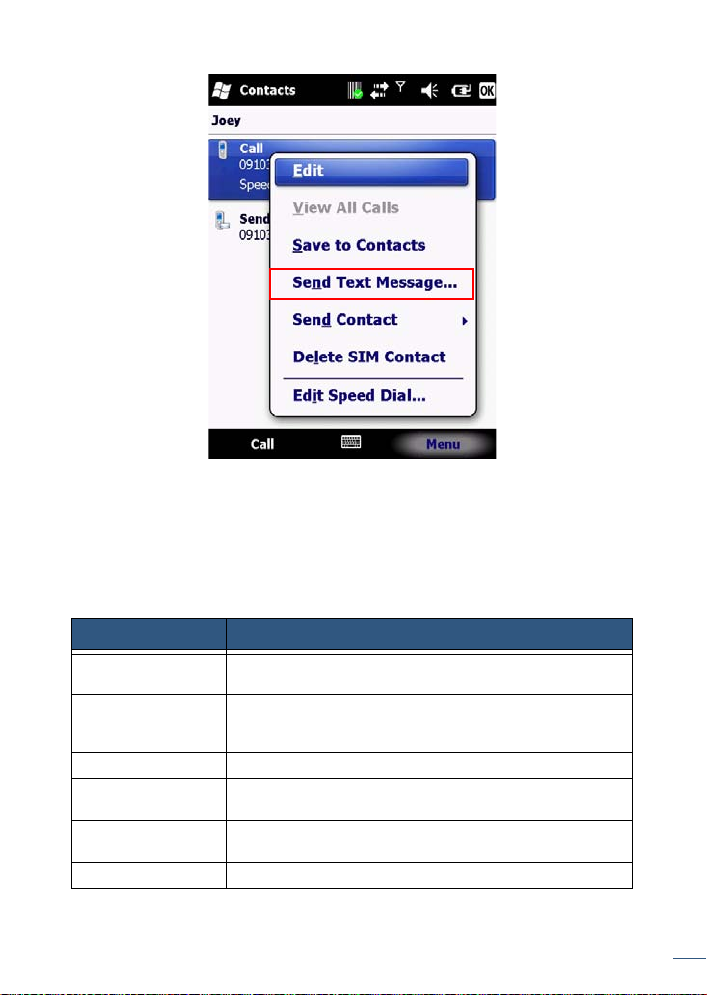
3. Write your message, and tap Send.
Sending e-mail
Setting Up an Internet E-mail Account
Before you set up your e-mail account, please prepare the following
information:
Item Description
User name The first part of your e-mail address, which appears
Password A strong password. You can save your password, so
Domain name The domain name may be required.
Server type The type of e-mail server that hosts your mailbox (POP3
Account name An account name. You must use a unique name for
Network The type of network your e-mail server connects to.
before the “at” sign (@).
that you do not need to enter it each time you connect to
your e-mail server.
or IMAP4).
each account that you set up.
Contacts and Messaging
74
Page 85
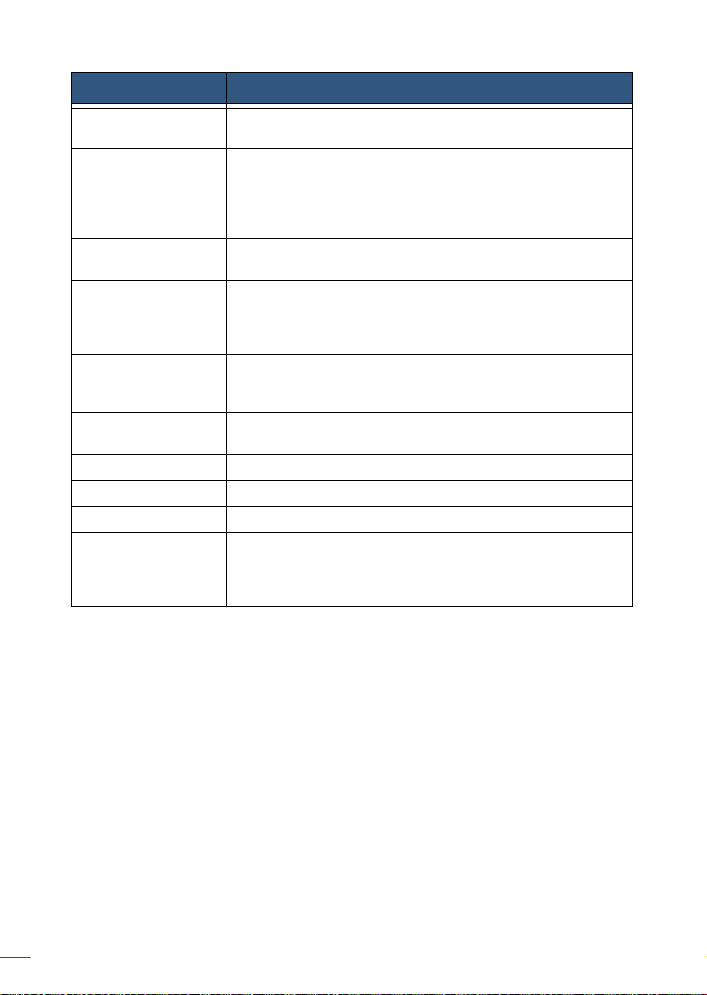
Item Description
Incoming mail
server
Require SSL
connection
Outgoing mail
server
Outgoing server
required
authentication
Outgoing sever
settings
Different user name
for outgoing server
User name Your outgoing e-mail server user name.
Password Your outgoing e-mail server password.
Domain name The outgoing e-mail server domain name.
Require SSL
connection
(outgoing mail
server only)
The name of your e-mail server (POP3 or IMAP4).
Ensures that received e-mail for this account uses an
SSL connection.
NOTE: If you select this and your ISP does not support
an SSL connection, you will not be able to connect to
receive e-mail.
The name of your outgoing e-mail server (SMTP).
Your outgoing e-mail server (SMTP) may require
authentication.
NOTE: Your user name and password from above will
be used.
Your outgoing e-mail server may require different
authentication settings than your incoming e-mail
server.
An option that allows you to enter separate settings for
your outgoing e-mail server.
Enables you to send personal information more
securely.
NOTE: If you select this and your ISP does not support
an SSL connection, you will not be able to send e-mail.
To set up your account:
1. Tap Start > E-mail > Setup E-mail.
2. Enter your e-mail address.
3. Select the check box next to Try to get e-mail settings automatically
from the Internet and tap Next.
75
Contacts and Messaging
Page 86
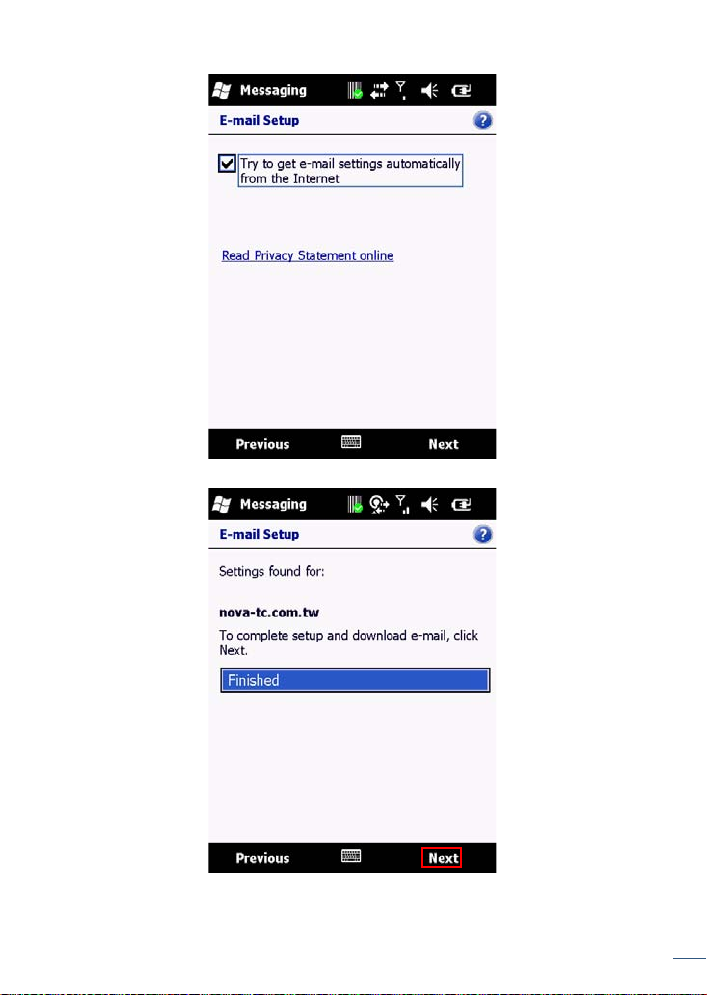
4. After Auto Setup has successfully entered your servers settings, tap Next.
5. Enter the name you want to appear when you send e-mail and tap Next.
Contacts and Messaging
76
Page 87
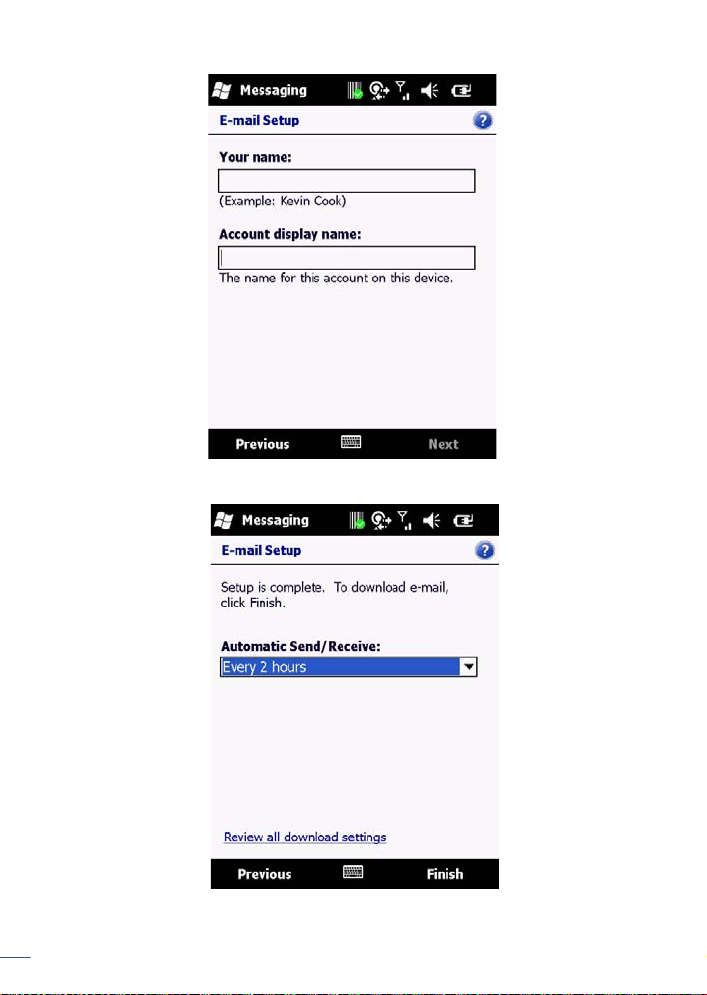
6. In the Automatic Send/Receive drop down menu, select a frequency for
sending/receiving e- mail.
7. Tap Review all download settings to edit your e-mail settings.
77
Contacts and Messaging
Page 88
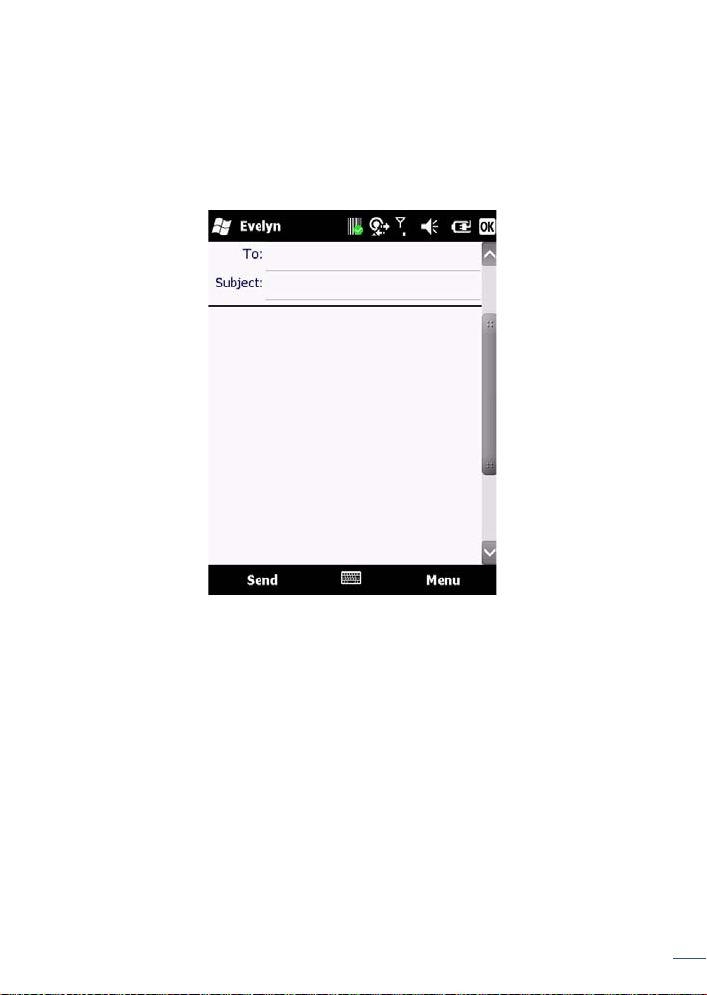
8. Tap Finish to start downloading messages.
Composing an E-mail Message
1. Tap Start > E-mail.
2. Select an e-mail account.
3. Tap Menu > New.
4. Enter recipient e-mail addresses in the To, Cc, or Bcc field. Insert a
semicolon (;) between multiple addresses.
5. Enter a subject in the Subject field.
6. Enter a message.
7. Tap Send.
E-mail messages are stored in Outbox and are sent to recipients the next
time you synchronize to your PC or connect to your e-mail server and send
and receive mail.
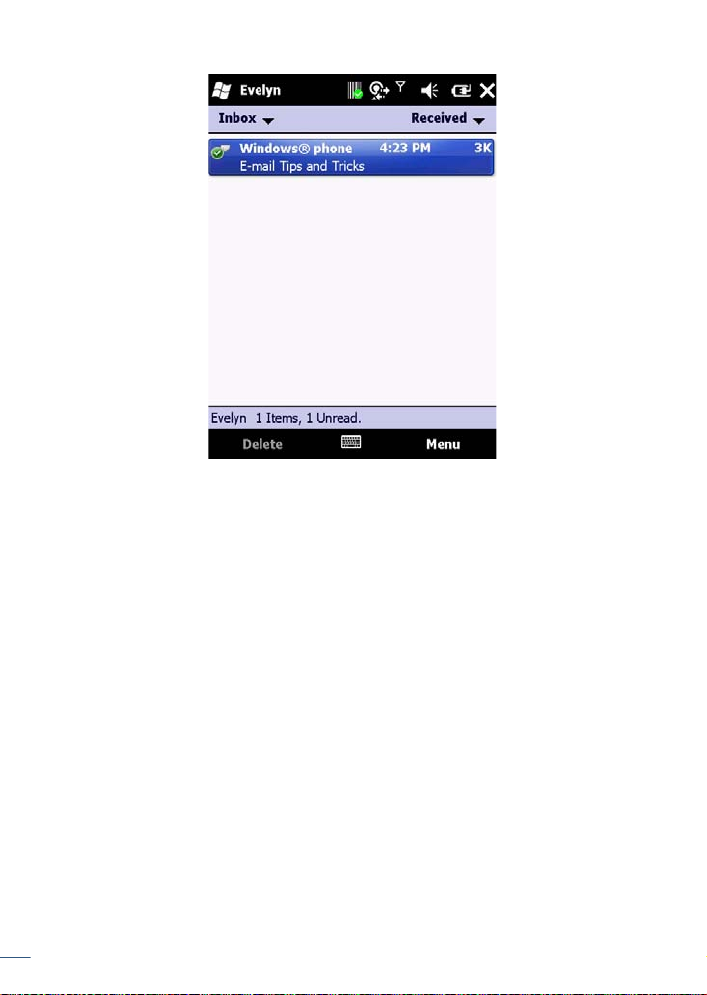
Reading an E-mail Message
1. Tap Start > E-mail.
2. Select an e-mail account.
3. Tap the e-mail you want to read in the message list.
78
Contacts and Messaging
Page 89
E-mail Message Options
1. Tap Start > E-mail and select an e-mail account.
2. Tap Menu > New.
3. Tap Menu > Message Options.
4. Select the options to change (Priority, Security, Permission, Language).
79
Contacts and Messaging
Page 90
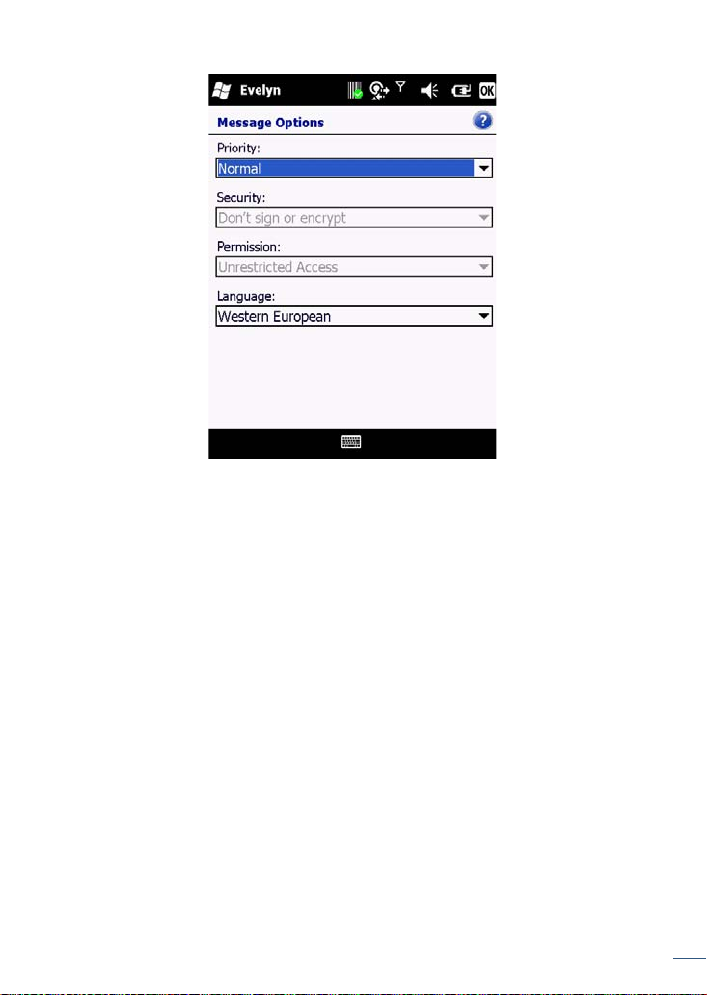
5. Tap OK to save and exit.
Sending an E-mail to a Contact
1. Tap Start > E-mail.
2. Tap Menu > New.
3. Tap Menu > Add Recipi ent.
80
Contacts and Messaging
Page 91
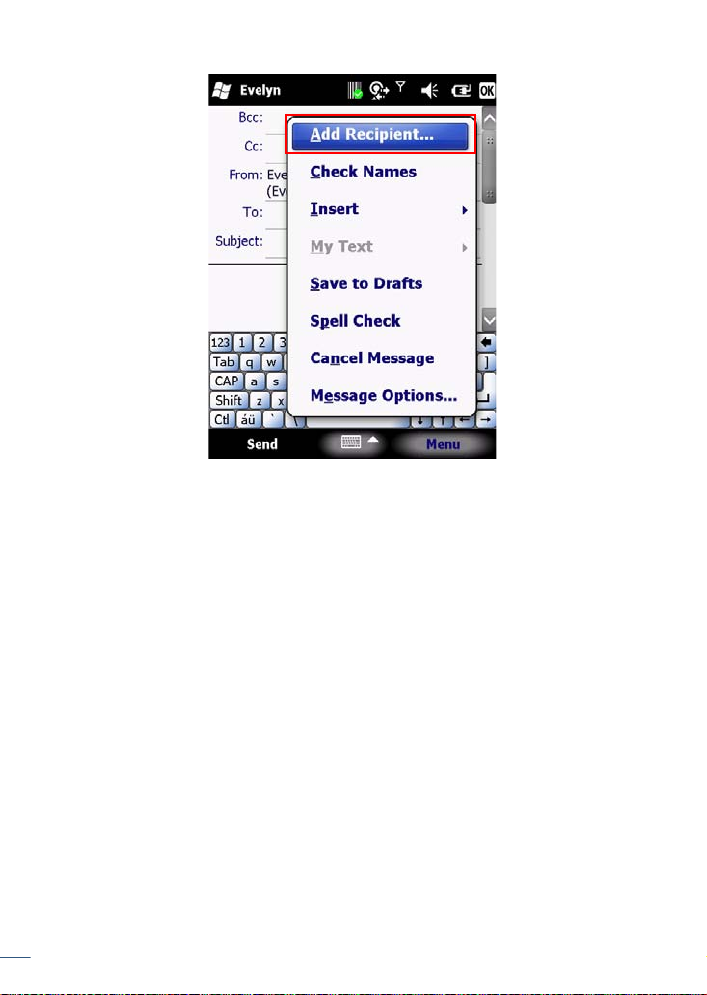
4. Select the contact you want to send an e-mail to.
5. Enter a subject, compose your message, and tap Send.
81
Contacts and Messaging
Page 92

82
Contacts and Messaging
Page 93
Internet Access
Connecting to the Internet
This chapter instructs you on how to access the Internet using the H-21.
You can establish a connection via GPRS or Proxy for browsing the Web,
downloading e-mails, using MSN Messenger, and more. To manually set up a
connection, obtain the following information from your Internet Service Provider
(ISP):
• User name
• Password
• Access point name (required for GPRS connection)
• Domain name (required for accessing a corporate network or an intranet)
Creating a GPRS Connection
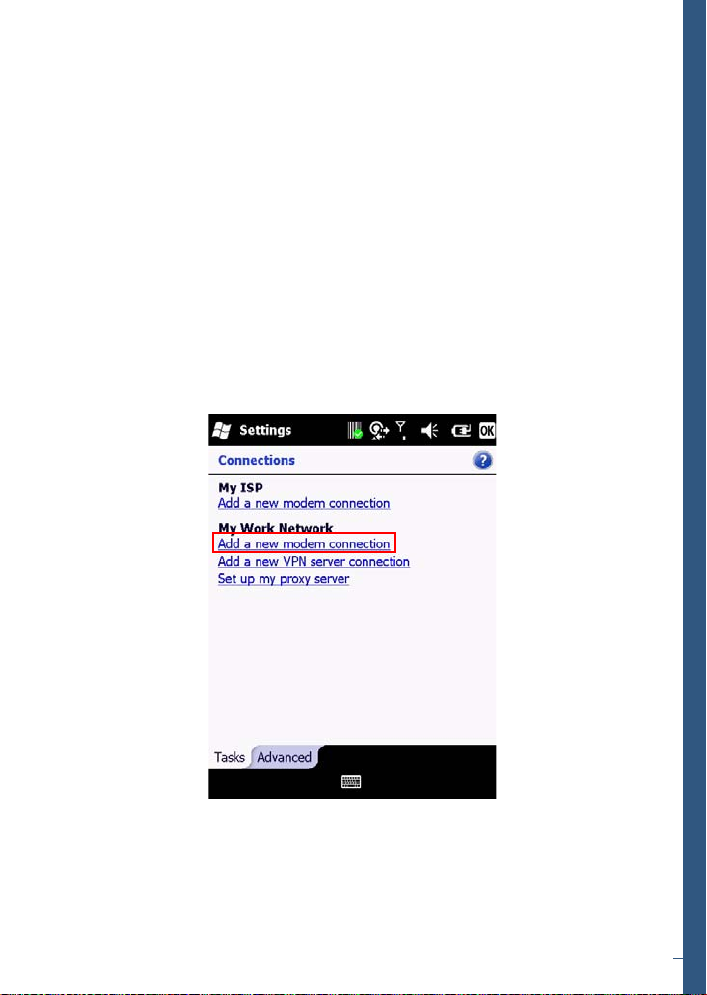
1. Tap Start > Settings > Connections > Connections > Tasks.
2. Tap Add a new modem connection.
3. Enter the following information:
83
Page 94
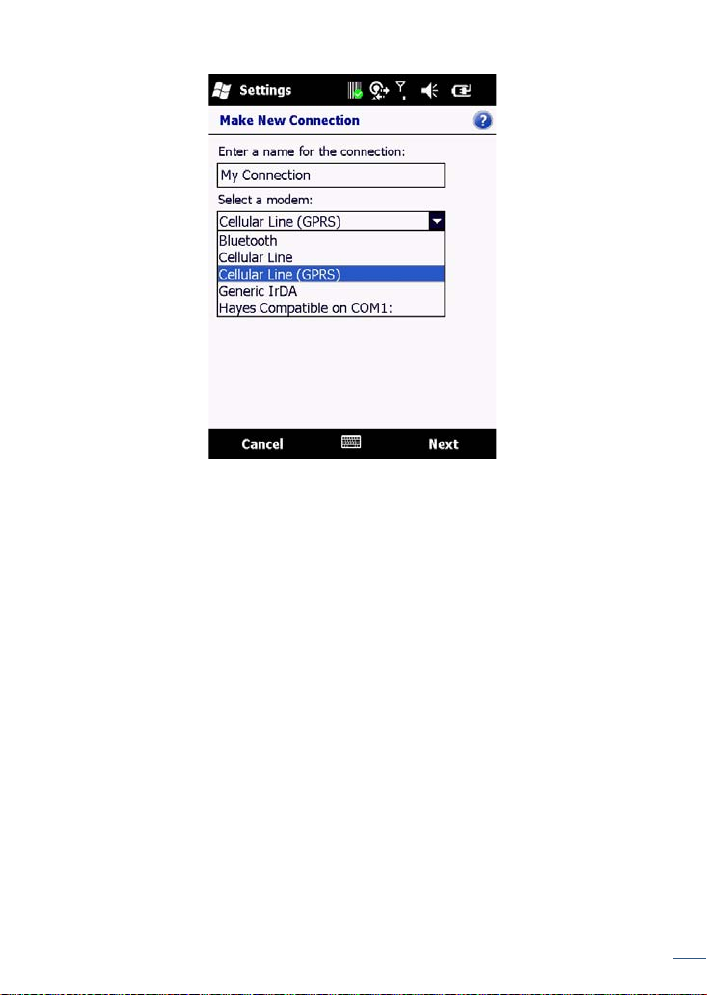
• Enter a name for the connection.
•In the Select a modem drop down menu, select Cellular Line (GPRS) and
tap Next.
4. In the Access point name field, enter the access point name and tap
Next.
Internet Access
84
Page 95
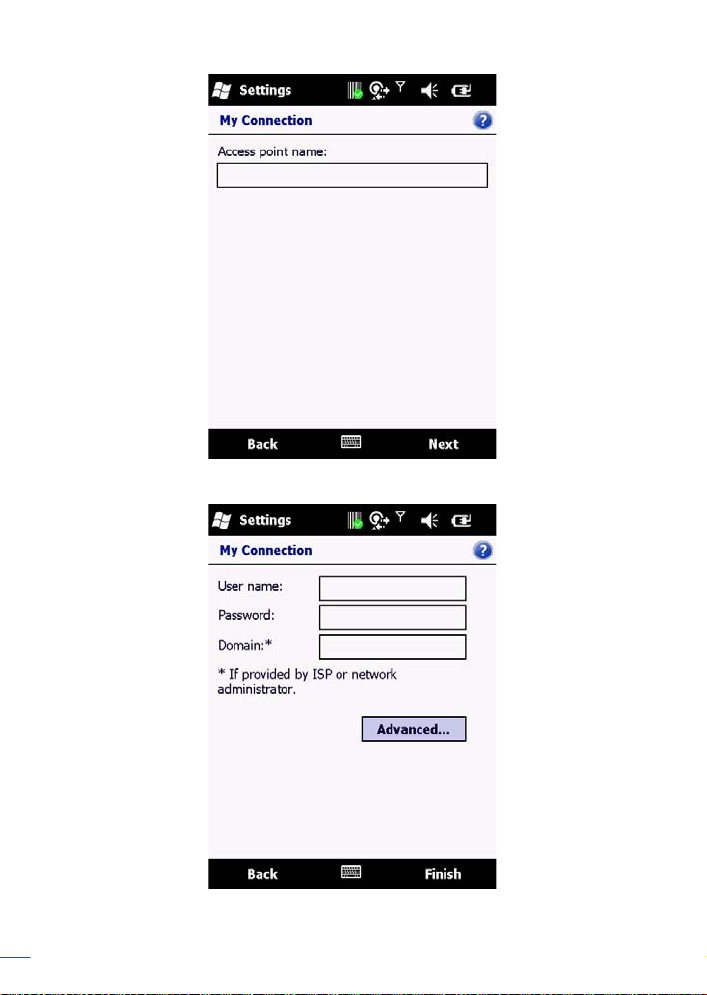
5. In the User name field, enter your user name for the GPRS network, if
required.
• In the Password field, enter your password, if required.
85
Internet Access
Page 96
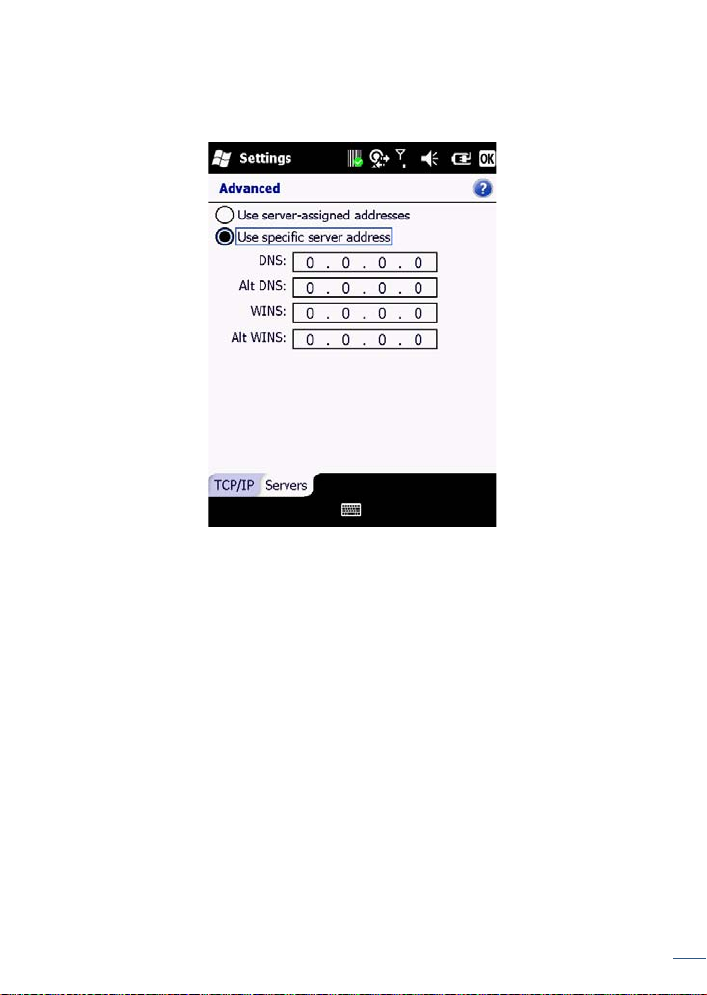
•In the Domain field, enter your domain name, if provided by your ISP.
6. Tap Advanced > Servers.
7. Select the check box next to Use specific server address and enter the
following information:
• In the DNS field, enter the primary Domain Name System (DNS) address,
if required.
• In the Alt DNS field, enter the secondary DNS address, if required.
8. Tap the TCP/IP tab.
9. Select the check box next to Use specific IP address and enter the
Internet Protocol (IP) address for the device, if required.
86
Internet Access
Page 97
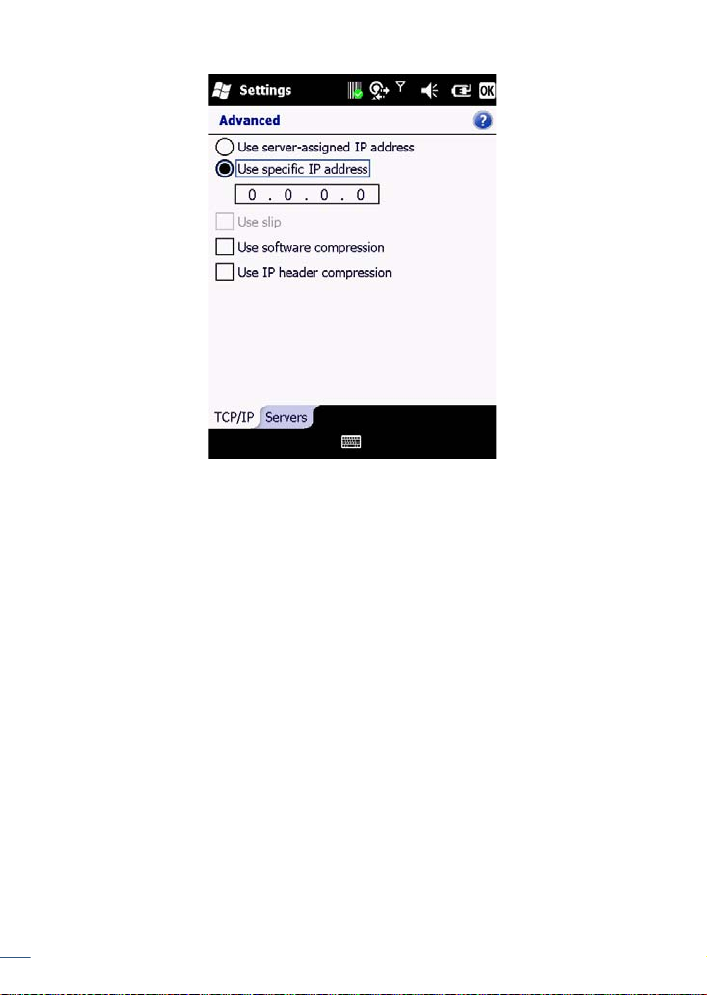
The device uses this connection when you open a program that connects
to the Internet.
10. Tap OK to update the settings.
11. Tap Finish to complete the connection setup.
Creating a Proxy Connection
Every network connection is different. You should gather all of the relevant
information or network settings you need before starting this process.
1. Tap Start > Settings > Connections > Connections > Tasks.
2. Tap Set up my proxy server.
87
Internet Access
Page 98
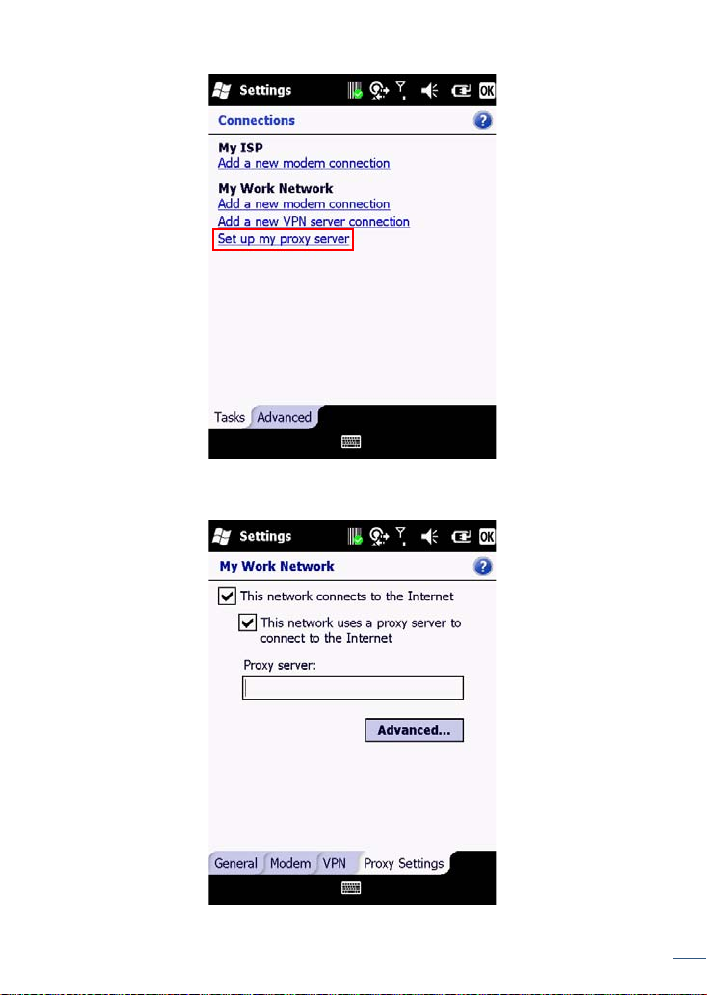
3. Select the check box next to This network connects to the Internet.
4. Select the check box next to This network uses a proxy server to
connect to the Internet.
Internet Access
88
Page 99
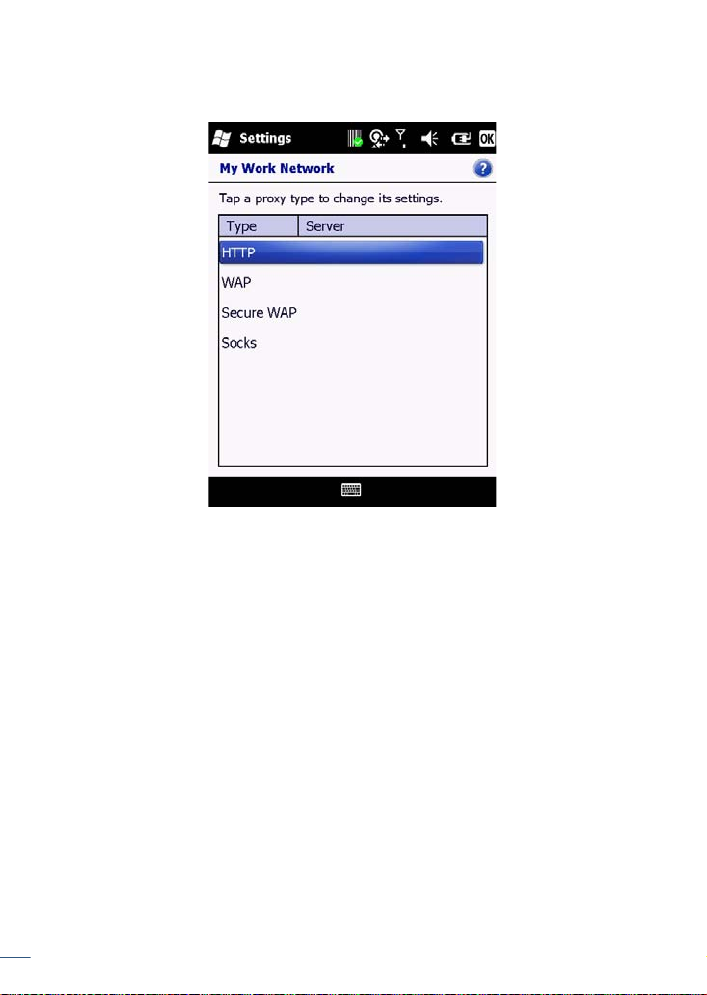
5. Enter the proxy server name under the Proxy server field.
6. If the proxy server uses a different port or requires a user name and
password tap Advanced.
• Select the proxy type to change its settings.
• Enter a user name, password, and/or port number in the proper fields.
7. Tap OK to save and exit.
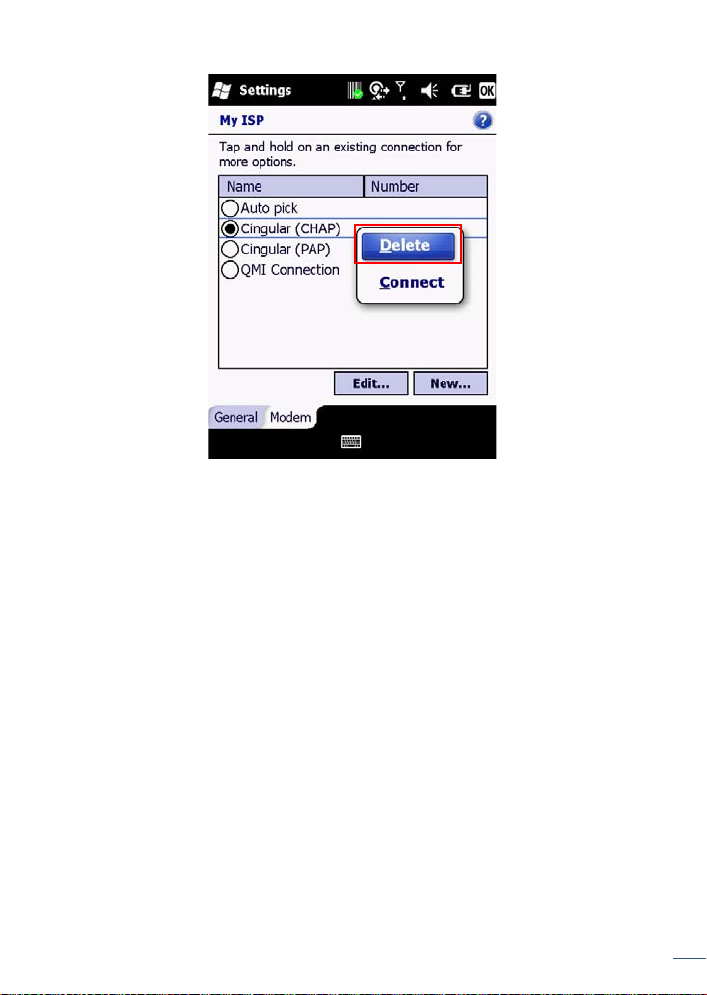
Deleting a Connection
1. Tap Start > Settings > Connections > Connections > Tasks.
2. Tap Manage existing connections.
3. Tap and hold on the connection you want to delete.
4. Select Delete.
89
Internet Access
Page 100
5. Tap OK to save and exit.
Using Internet Explorer
Internet Explorer Mobile is web browser optimized for use on your mobile
phone. Y ou can use Internet Explorer Mobile to browse the Internet after setting
up a valid Internet connection. See “Connecting to the Internet” on page 83.
Browsing the Internet
NOTE: A valid connection must be established before you can browse the
Internet.
NOTE: Accessing the Internet using your mobile phone may incur extra
charges from your mobile service provider. Contact your mobile service
provider for more information.
1. Tap Start > Internet Explorer.
2. Do one of the following options:
Internet Access
90
 Loading...