

Page 1

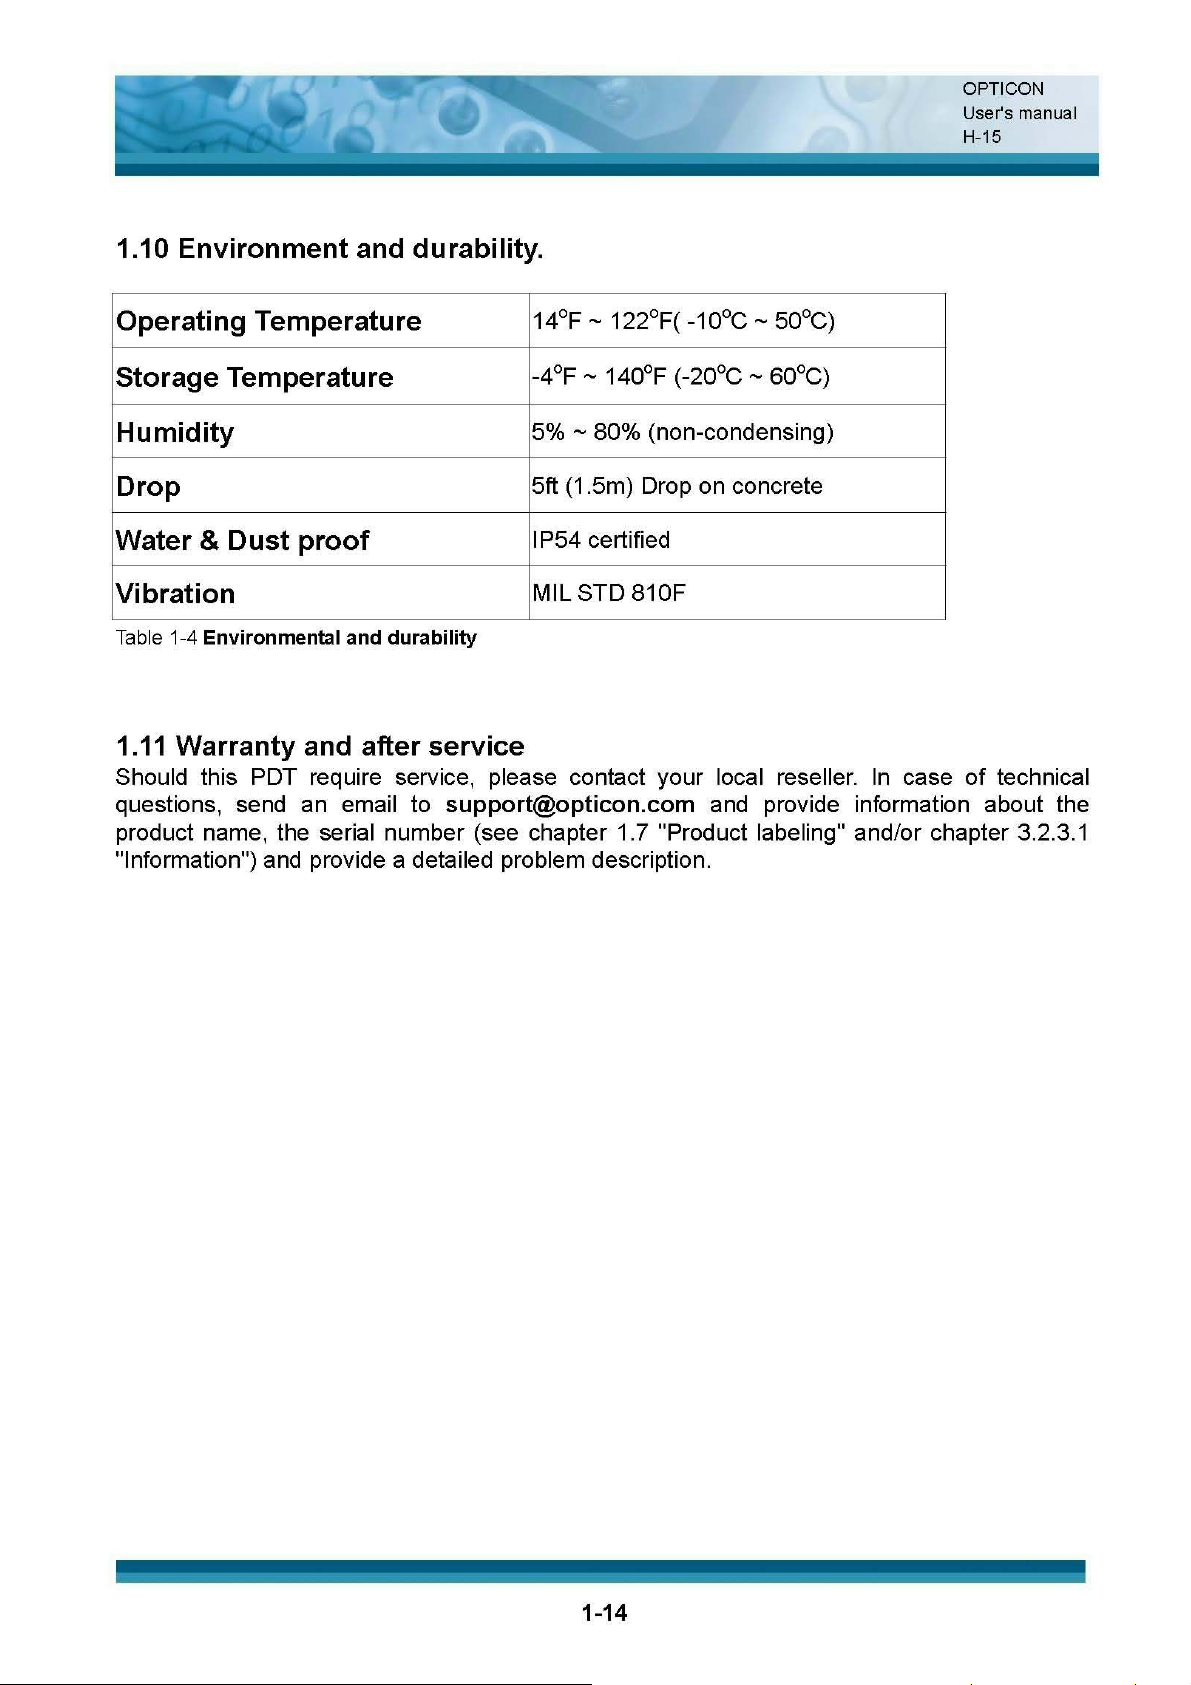
USER'S MANUAL
H-15
Ruggedized Portable Data Terminal.
July/14/2008 Ver: 0.2
Page 2

OPTICON
User's manual
H-15
DocumentΚH-15 User's manual
DistributedΚOpticon Sensors Europe B.V., Hoofddorp
CAUTION: This information is subject to change without prior notice.
Copyright 2008, Opticon Sensors Europe B.V. All rights reserved.
This manual may not, in whole or in part, be copied, photocopied, reproduced, translated or
converted to any electronic or machine readable form without prior written consent of Opticon
Sensors Europe.
Limited warranty and disclaimers
UNDER ALL CIRCUMSTANCES THIS MANUAL SHOULD BE READ ATTENTIVELY, BEFORE
INSTALLING AND OR USING THE PRODUCT.
Serial number
A serial number appears on all Opticon products. This official registration number is strictly related to
the device purchased. Make sure that the serial number appearing on your Opticon device has not
been removed. Removing the serial number might affect the warranty conditions and liability
disadvantageously, so please be strict at maintaining the label with serial number on the Opticon
product.
Warranty / Warranty period / Liability
Unless otherwise agreed in a contract, all Opticon products are warranted for the period of two years
after purchase, covering defects in material and workmanship. Opticon will repair or, at its opinion,
replace products that prove to be defective in material or workmanship under proper use during the
warranty period. Opticon will not be liable in cases where modifications are made by the customer. In
such case the standard repair charge will be applicable. The standard charge for repair will also be
applicable in cases where no defect is found at all. These rules also apply for products that are still
under warranty. Under no circumstance will Opticon Sensors Europe, be liable for any direct, indirect,
consequential or incidental damages arising out of use or inability to use both the hardware and
software, even if Opticon has been informed about the possibility of such damages.
Packaging
The packing materials are not harmful for the environment. We recommend that you save all packing
material, as it should be used whenever you need to transport your scanner (eg. for service).
Damage caused by improper repacking is not covered by the warranty.
Trademark
Trademarks used are property of their respective owners.
Opticon Sensors Europe B.V.
email support department: [email protected]
Internet: www.opticon.com
Page 3

Table of Contents
Chapter 1. Introduction............................................................... 1-1
1.1 About this Manual.................................................................1-1
1.2 User and Product Safety......................................................1-2
1.3 Battery Safety ......................................................................1-3
1.4 CE Statement.......................................................................1-4
1.5 FCC Statement.....................................................................1-8
1.6 Recycling & disposal instructions.........................................1-9
1.7 Regulatory information. ........................................................1-9
1.8 Product Labeling ................................................................1-10
1.9 System Specifications........................................................1-12
1.10 Environment and durability...............................................1-14
OPTICON
User's manual
H-15
1.11 Warranty and after service................................................1-14
Chapter 2. Getting started........................................................ 2-15
2.1 Check the package ............................................................2-15
2.2 General View of the PDT ...................................................2-16
2.2.1 PDT front side view....................................................2-16
2.2.2 PDT back side view ...................................................2-16
2.3 Charging the Battery Pack .................................................2-18
2.3.1 Installing the battery pack ..........................................2-18
2.3.2 Charging the PDT with Cradle and Power Adapter....2-20
2.3.3 Charging the PDT and battery pack with Cradle........2-21
2.4. Handling the PDT..............................................................2-23
2.4.1 Starting the PDT ........................................................2-23
2.4.2 Power on / off.............................................................2-23
2.4.3 Calibration of the touch Screen..................................2-24
2.4.4 Adjusting the brightness.............................................2-24
2.4.5 To mute the sound .....................................................2-25
2.4.6 Using the stylus .........................................................2-25
2.4.7 Using the Keypad ......................................................2-25
2.5 Navigating the Display .......................................................2-35
2.5.1 Setting Time and Date ...............................................2-35
2.5.2 Entering the Data.......................................................2-35
2.5.3 The Command Bar ....................................................2-36
2.5.4 The Task Bar..............................................................2-36
2.5.5 The Soft Keypad ........................................................2-37
2.5.6 Setting Up Wireless LAN RF......................................2-37
Page 4

2.5.7 Reading bar codes, 1D laser version.........................2-39
2.5.8 Help ...........................................................................2-39
2.6 Power management...........................................................2-40
2.6.1 Suspend Mode...........................................................2-40
2.6.2 Resuming...................................................................2-41
2.7 Resetting the PDT..............................................................2-41
2.7.1 Warm Reset...............................................................2-41
2.7.2 Cold Reset.................................................................2-41
Chapter 3. PDT settings............................................................. 3-1
3.1 Introduction ..........................................................................3-1
3.2 Control Panel .......................................................................3-1
3.2.1 Bluetooth Device Properties ........................................3-2
OPTICON
User's manual
H-15
3.2.2 Certificates...................................................................3-5
3.2.3 Control Center .............................................................3-7
3.2.4 Date/Time ..................................................................3-10
3.2.5 Dialing Properties ......................................................3-11
3.2.6 Display Properties......................................................3-13
3.2.7 Input Panel.................................................................3-15
3.2.8 Internet Options .........................................................3-16
3.2.9 Keyboard ...................................................................3-19
3.2.10 Network and Dial-up Connections ...........................3-20
3.2.11 Owner ......................................................................3-24
3.2.12 Password.................................................................3-25
3.2.13 PC Connection.........................................................3-26
3.2.14 Power ......................................................................3-27
3.2.15 Regional Settings.....................................................3-29
3.2.16 Remove Programs...................................................3-30
3.2.17 Stylus.......................................................................3-30
3.2.18 System.....................................................................3-32
3.2.19 Volume & Sounds Properties...................................3-34
3.3 Taskbar and Start Menu .....................................................3-35
Chapter 4. Communication......................................................... 4-1
4.1 Installing & Setting Up Microsoft ActiveSync........................4-1
4.1.1 Installing Microsoft ActiveSync on the Host PC ...........4-1
4.1.2 Connecting PDT to Host PC ........................................4-1
4.2 Using ActiveSync .................................................................4-1
4.2.1 Setting up a Partnership ..............................................4-1
Page 5

4.2.2 ActiveSync File Synchronization ..................................4-2
4.3 Networking ...........................................................................4-3
Chapter 5. Software Applications ............................................... 5-1
5.1 Introduction ..........................................................................5-1
5.2 Software Applications...........................................................5-1
5.2.1 Calculator.....................................................................5-1
5.2.2 Inbox............................................................................5-1
5.2.3 Internet Explorer ........................................................5-10
5.2.4 Messenger.................................................................5-12
5.2.5 Microsoft WordPad ....................................................5-13
5.2.6 Remote Connection ...................................................5-17
5.2.7 Windows Explorer......................................................5-19
OPTICON
User's manual
H-15
5.3 DiskOnChip........................................................................5-20
5.3.1 Saving to Flash..........................................................5-20
5.3.2 DiskOnChip Location .................................................5-20
5.3.3 DiskOnChip Size........................................................5-21
Page 6

OPTICON
User's manual
H-15
Chapter 1. Introduction
Congratulations on purchasing the Opticon H-15 Portable Data Terminal (PDT), a Microsoft
Windows®CE .Net rugged PDT. Its special combination of features makes it perfect for using in
a wide range of applications. These features as:
Intel® XScaleTM PXA270 312MHz 32 bits RISC processor
Windows® CE .NET 5.0 Operating System
64 MB SDRAM & 128 MB Flash ROM
User accessible MicroSD slot
240 x 320, 2.4” Color TFT display with touch panel
Numeric keypad
802.11b/g Wireless LAN Built In
Bluetooth Built In(Support SPP, DUN, UID)
Integrated 1D bar code reader
1.1 About this Manual
The following chapters contained in this manual are:
Chapter 1: Introduction, General information about the PDT.
Chapter 2: Getting started, Describe the basic use of the PDT.
Chapter 3: Setting, Provide basic instructions for customizing the PDT.
Chapter 4: Communication, Describe how to use all kinds of communication of the PDT.
Chapter 5: Software Application, Describe the installed applications on the PDT.
For configuration of the bar code reader, refer to the Opticon Universal Menu Book.
The Universal Menubook can be downloaded from www.opticon.com
1-1
Page 7

OPTICON
User's manual
H-15
1.2 User and Product Safety
x Do not stare into the laser or LED beam directly or shine it into eyes.
x Never use strong pressure onto the screen or subject it to severe impact, as the LCD panel
could become cracked and possibility cause personal injury. If the LCD panel is broken,
never touch the liquid inside because the liquid irritates the skin.
x Although the PDT has passed the test of IP54 standard for water and dust resistance,
avoid prolonged exposure to rain or other concentrated moisture. Such conditions exceeds
the IP54 standard, and could result in water or other contaminants entering into the PDT.
x Use only the original approved AC Adapter with the PDT. Use of an unapproved AC
Adapter could result in electrical problems, or even cause a fire or electrical shock to the
user.
x Do not disassemble the PDT. Servicing should be done by Opticon only. If the PDT or
accessories gets damaged due to wrong handling or unauthorized repair, warranty is void.
In case the warranty seals are broken, warranty is void too.
x Make regularly back-ups of all important data.
x Under no circumstance will Opticon be liable for any direct, indirect, consequential or
incidental damages aging out of the use or inability to use both the hardware and software
and/or any data loss, even if Opticon has been informed about the possibility of such
damages.
x LASER RADIATION DO NOT STARE INTO BEAM CLASS 2 LASER PRODUCT
1-2
Page 8

OPTICON
User's manual
H-15
1.3 Battery Safety
CAUTION: Risk of Explosion if Battery is replaced by an Incorrect Type. Dispose of Used
Batteries According to the Instructions.
Lithium-ion battery packs might get hot, explode, ignite and/or cause serious injury if exploded
by abusive using. Please follow the safety warnings listed as below:
x Do not throw the battery pack in fire. Do not expose the battery to high temperatures.
x Do not connect the positive battery pack with negative battery pack to each other with any metal
object (like wire).
x Do not carry or store battery pack together with metal objects.
x Do not pierce the battery pack with nails or drills, strike the battery pack with a hammer,
step on the battery pack or otherwise expose it to strong impacts, shocks or excessive
force.
x Do not solder onto the battery pack.
x Do not expose battery pack to liquid or allow the battery contacts to get wet.
x Do not disassemble or modify the battery pack. The battery pack contains safety and
protection measures, which, if damaged, may cause the battery pack to generate heat,
explode or ignite.
x Do not discharge the batteries outside the H-15 series PDT. Do not use the battery in
another device then the PDT or CRD-15 series cradles. Otherwise, the battery pack can be
damaged, or its life expectancy reduced. If the device causes any abnormal current to flow, it
may cause the battery pack to become hot, explode or ignite and cause serious injury.
x In the event the battery pack leaks and the fluid gets into one’s eye, do not rub the eye.
Rinse well with water and immediately seek medical care. If left untreated, the battery fluid
could cause damage to the eye.
1-3
Page 9

OPTICON
User's manual
H-15
1.4 CE Statement
Europe – EU Declaration of Conformity
This device complies with the essential requirements of the R&TTE Directive 1999/5/EC.
The following test methods have been applied in order to prove presumption of conformity
with the essential requirements of the R&TTE Directive 1999/5/EC:
- EN 60950-1: 2006
Safety of Information Technology Equipment
- EN50371 : (2002-03)
Generic standard to demonstrate the compliance of low power electronic and electrical
apparatus with the basic restrictions related to human exposure to electromagnetic fields
(10 MHz-300 GHz) -- General public
- EN 300 328 V1.7.1: (2006-10)
Electromagnetic compatibility and Radio spectrum Matters (ERM); Wideband
Transmission systems; Data transmission equipment operating in the 2,4 GHz ISM band
and using spread spectrum modulation techniques; Harmonized EN covering essential
requirements under article 3.2 of the R&TTE Directive
- EN 301 489-1 V1.6.1: (2005-09)
Electromagnetic compatibility and Radio Spectrum Matters (ERM); ElectroMagnetic
Compatibility (EMC) standard for radio equipment and services; Part 1: Common
technical requirements
1-4
Page 10

OPTICON
User's manual
H-15
- EN 301 489-17 V1.2.1 (2002-08)
Electromagnetic compatibility and Radio spectrum Matters (ERM); ElectroMagnetic
Compatibility (EMC) standard for radio equipment and services; Part 17: Specific
conditions for 2,4 GHz wideband transmission systems and 5 GHz high performance
RLAN equipment
This device is a 2.4 GHz wideband transmission system (transceiver), intended for use in all
EU member states and EFTA countries, except in France and Italy where restrictive use
applies.
In Italy the end-user should apply for a license at the national spectrum authorities in order to
obtain authorization to use the device for setting up outdoor radio links and/or for supplying
public access to telecommunications and/or network services.
This device may not be used for setting up outdoor radio links in France and in some areas
the RF output power may be limited to 10 mW EIRP in the frequency range of 2454 – 2483.5
MHz. For detailed information the end-user should contact the national spectrum authority in
France.
0984
ýesky
[Czech]
Dansk
[Danish]
Deutsch
[German]
[Jméno výrobce] tímto prohlašuje, že tento [typ zaĜízení] je ve
shodČ se základními požadavky a dalšími pĜíslušnými
ustanoveními smČrnice 1999/5/ES.
Undertegnede [fabrikantens navn] erklærer herved, at følgende
udstyr [udstyrets typebetegnelse] overholder de væsentlige krav og
øvrige relevante krav i direktiv 1999/5/EF.
Hiermit erklärt [Name des Herstellers], dass sich das Gerät
[Gerätetyp] in Übereinstimmung mit den grundlegenden
1-5
Page 11

OPTICON
User's manual
H-15
Anforderungen und den übrigen einschlägigen Bestimmungen der
Richtlinie 1999/5/EG befindet.
Eesti
[Estonian]
Käesolevaga kinnitab [tootja nimi = name of manufacturer] seadme
[seadme tüüp = type of equipment] vastavust direktiivi 1999/5/EÜ
põhinõuetele ja nimetatud direktiivist tulenevatele teistele
asjakohastele sätetele.
English Hereby, [name of manufacturer], declares that this [type of
equipment] is in compliance with the essential requirements and
other relevant provisions of Directive 1999/5/EC.
Español
[Spanish]
Por medio de la presente [nombre del fabricante] declara que el
[clase de equipo] cumple con los requisitos esenciales y
cualesquiera otras disposiciones aplicables o exigibles de la
Directiva 1999/5/CE.
ǼȜȜȘȞȚțȒ
[Greek]
ȂǼ ȉǾȃ ȆǹȇȅȊȈǹ [name of manufacturer] ǻǾȁȍȃǼǿ ȅȉǿ [type of
equipment] ȈȊȂȂȅȇĭȍȃǼȉǹǿ ȆȇȅȈ ȉǿȈ ȅȊȈǿȍǻǼǿȈ
ǹȆǹǿȉǾȈǼǿȈ Ȁǹǿ ȉǿȈ ȁȅǿȆǼȈ ȈȋǼȉǿȀǼȈ ǻǿǹȉǹȄǼǿȈ ȉǾȈ
ȅǻǾīǿǹȈ 1999/5/ǼȀ.
Français
Par la présente [nom du fabricant] déclare que l'appareil [type
[French]
Italiano
[Italian]
Latviski
[Latvian]
Lietuviǐ
[Lithuanian]
Nederlands
[Dutch]
Malti
[Maltese]
d'appareil] est conforme aux exigences essentielles et aux autres
dispositions pertinentes de la directive 1999/5/CE.
Con la presente [nome del costruttore] dichiara che questo [tipo di
apparecchio] è conforme ai requisiti essenziali ed alle altre
disposizioni pertinenti stabilite dalla direttiva 1999/5/CE.
Ar šo [name of manufacturer / izgatavotƗja nosaukums] deklarƝ,
ka [type of equipment / iekƗrtas tips] atbilst DirektƯvas 1999/5/EK
bnjtiskajƗm prasƯbƗm un citiem ar to saistƯtajiem noteikumiem.
Šiuo [manufacturer name] deklaruoja, kad šis [equipment type]
atitinka esminius reikalavimus ir kitas 1999/5/EB Direktyvos
nuostatas.
Hierbij verklaart [naam van de fabrikant] dat het toestel [type van
toestel] in overeenstemming is met de essentiële eisen en de
andere relevante bepalingen van richtlijn 1999/5/EG.
Hawnhekk, [isem tal-manifattur], jiddikjara li dan [il-mudel
tal-prodott] jikkonforma mal-ƫtiƥijiet essenzjali u ma provvedimenti
oƫrajn relevanti li hemm fid-Dirrettiva 1999/5/EC.
1-6
Page 12
OPTICON
User's manual
H-15
Magyar
[Hungarian]
Polski
[Polish]
Português
[Portuguese
]
Slovensko
[Slovenian]
Slovensky
[Slovak]
Alulírott, [gyártó neve] nyilatkozom, hogy a [... típus] megfelel a
vonatkozó alapvetõ követelményeknek és az 1999/5/EC irányelv
egyéb elõírásainak.
Niniejszym [nazwa producenta] oĞwiadcza, Īe [nazwa wyrobu] jest
zgodny z zasadniczymi wymogami oraz pozostaáymi stosownymi
postanowieniami Dyrektywy 1999/5/EC.
[Nome do fabricante] declara que este [tipo de equipamento] está
conforme com os requisitos essenciais e outras disposições da
Directiva 1999/5/CE.
[Ime proizvajalca] izjavlja, da je ta [tip opreme] v skladu z
bistvenimi zahtevami in ostalimi relevantnimi doloþili direktive
1999/5/ES.
[Meno výrobcu] týmto vyhlasuje, že [typ zariadenia] spĎĖa základné
požiadavky a všetky príslušné ustanovenia Smernice 1999/5/ES.
Suomi
[Finnish]
Svenska
[Swedish]
[Valmistaja = manufacturer] vakuuttaa täten että [type of equipment
= laitteen tyyppimerkintä] tyyppinen laite on direktiivin 1999/5/EY
oleellisten vaatimusten ja sitä koskevien direktiivin muiden ehtojen
mukainen.
Härmed intygar [företag] att denna [utrustningstyp] står I
överensstämmelse med de väsentliga egenskapskrav och övriga
relevanta bestämmelser som framgår av direktiv 1999/5/EG.
1-7
Page 13
Page 14
LED AND LASER SAFETY INFORMATION
x Class II Laser Product
x Do not stare at the Laser or shine into eyes
x Do not allow young children to use the product without adult supervision
x Do not replace/repair the Laser, these are not user replaceable
x Do not shine the Laser on a shiny reflective surface
x LASER RADIATION DO NOT STARE INTO BEAM CLASS 2 LASER PRODUCT
1.6 Recycling & disposal instructions.
OPTICON
User's manual
H-15
Do not throw this product in the home waste bin. For proper end-of-life treatment
consult the Environmental care section of www.opticon.com
1.7 Regulatory information.
For CE, FCC, RoHS and other Document of Conformities, consult the Regulatory
section of www.opticon.com
1-9
Page 15

1.8 Product Labeling
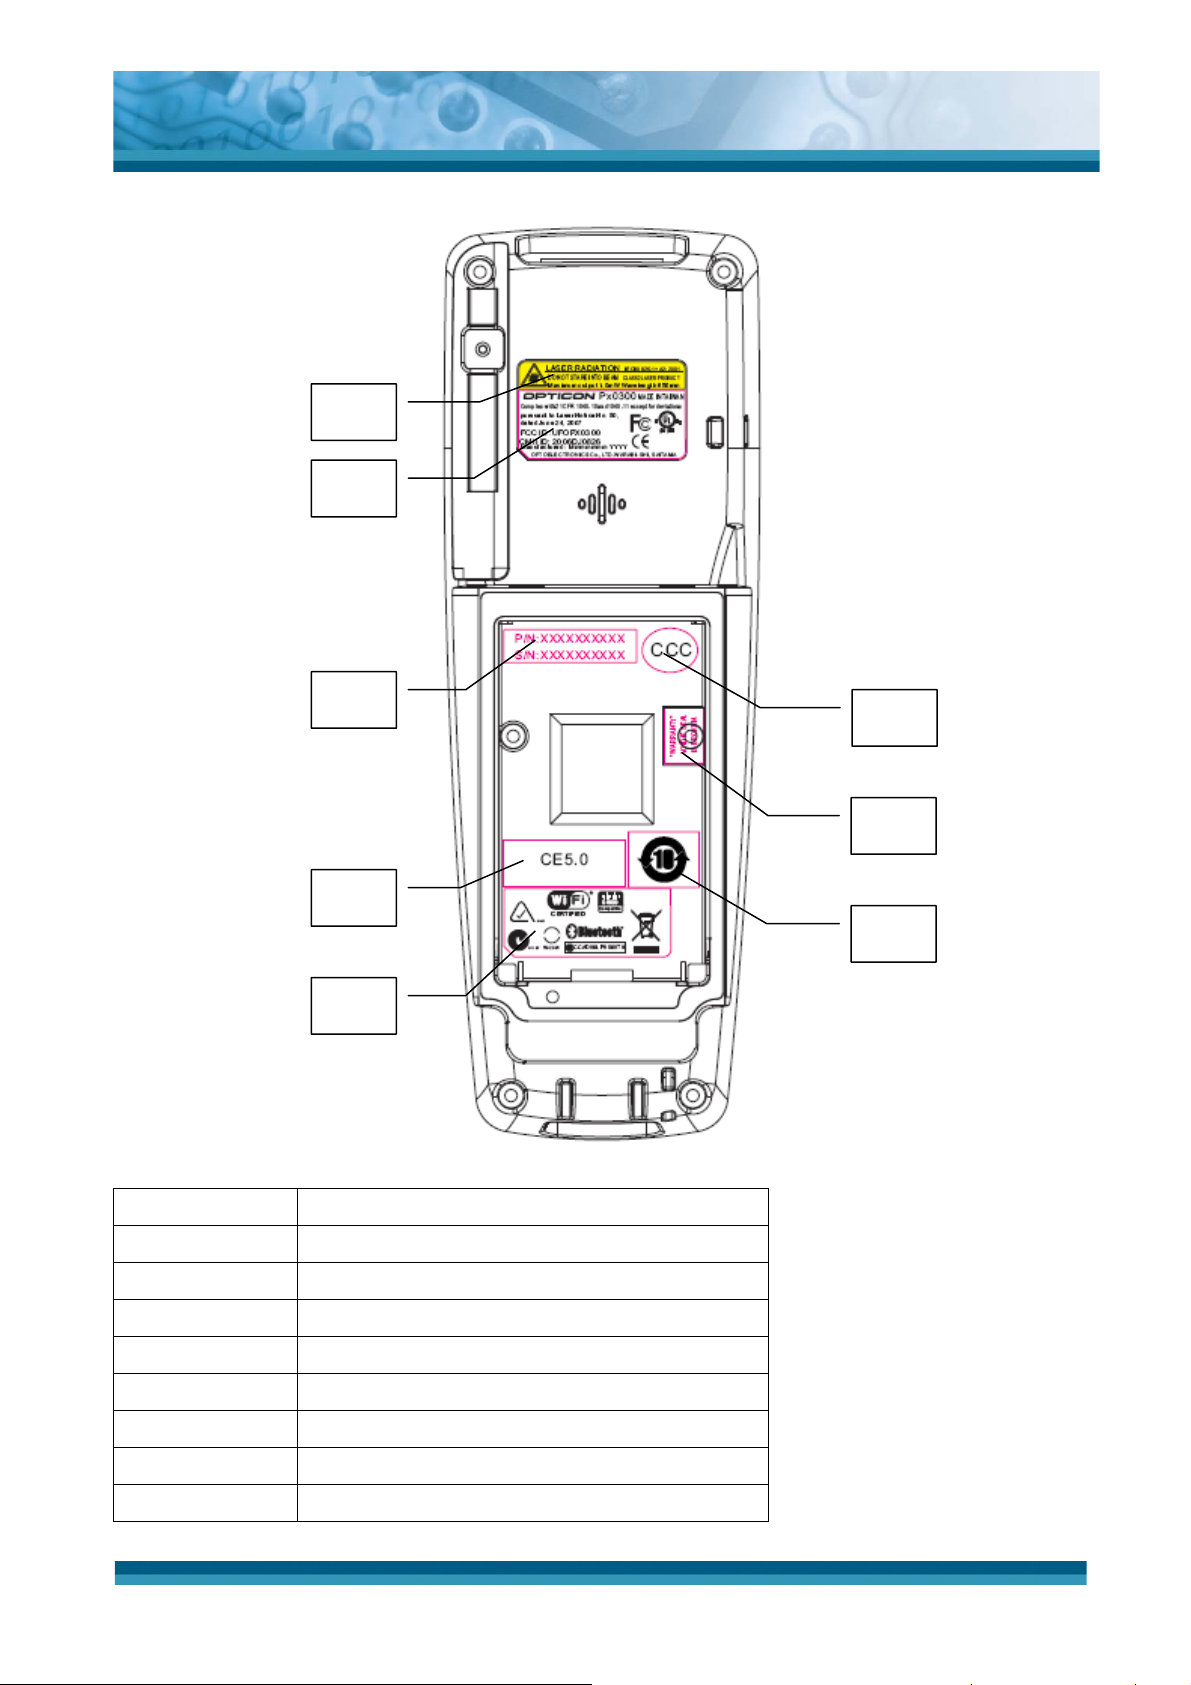
The PDT has several labels as showed in Figure 1-1 and 1-2.
2
1
OPTICON
User's manual
H-15
Figure 1-1 Product Labeling (Front and side views)
Label nr. Description
1 LCD panel protection film
2 Opticon logo
Table 1-1 Front labeling
1-10
Page 16
1.
2.
OPTICON
User's manual
H-15
3.
6.
8.
Figure 1-2 Product Labeling (Rear view)
Label no. Description
1 Laser radiation warning label
4.
5.
7.
2 System and regulatory label
3 Serial number and Article number
4 China regulatory label
5 Warranty seal PDT
6 Windows CE .NET label
7 Warranty label China RoHS
8 Other regulatory label
Table 1-2 Rear labeling
1-11
Page 17
OPTICON
User's manual
H-15
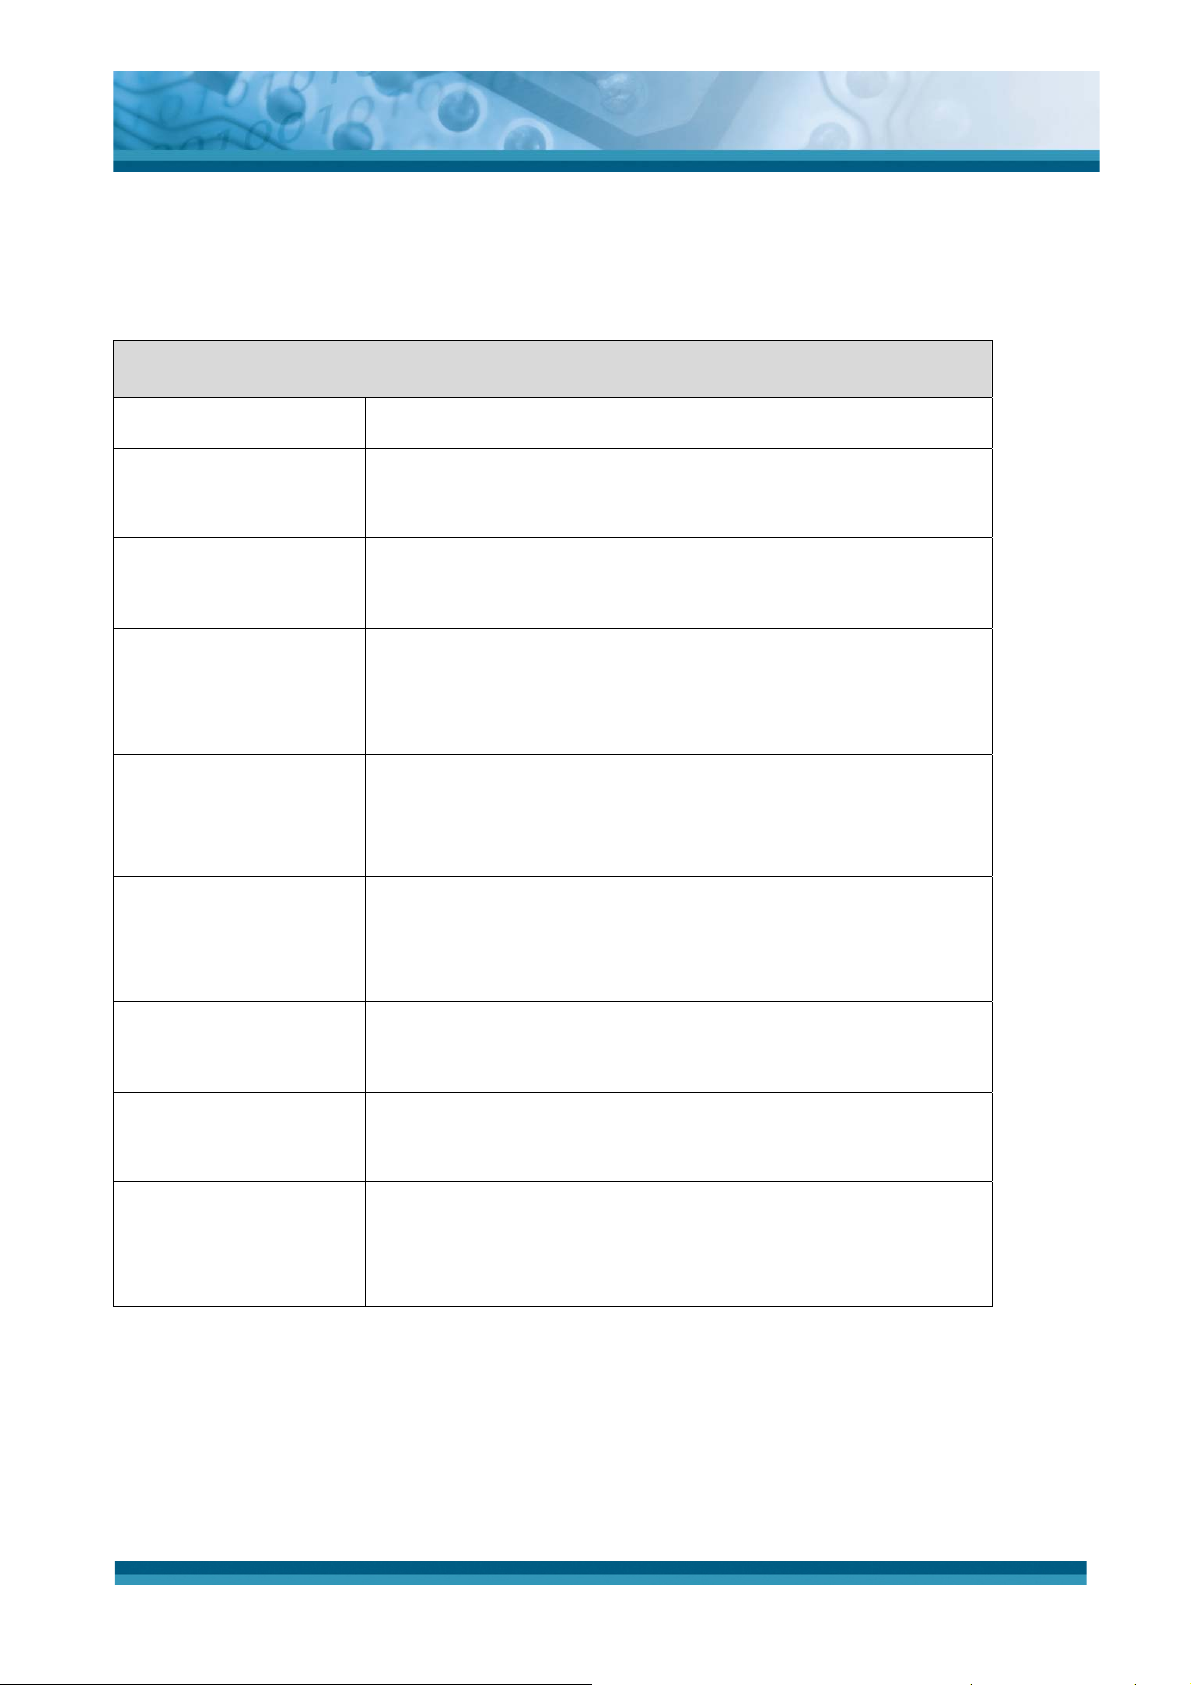
1.9 System Specifications
The H-15 detailed specifications as follows. Unless otherwise noted, all the specifications are
subject to change without prior notification.
H-15
Processor
Memory
Display
Audio
Radio Support
Communication
Ports
- 312MHz Intel PXA270 32 bits RISC CPU
- 128 MB Flash ROM
- 64 MB SDRAM
- 240 x 320 2.4” TFT 256K Color LCD with LED
backlight
- One speaker output
- Wireless LAN: 802.11b/g Built In
- Bluetooth: Ver 2.0, class II Built In
- USB: Support USB v1.1 client.
(Support by H-15 Cradle Only)
Scan Engine
Expansion Slot
LED
- Default: 1D laser bar code reader
- One MicroSD Card slot
(MicroSD memory only, no SDIO support)
- One Bi-color LED for charging indication(R/G)
- One Bi-color LED for bar code reader indicator(R/G)
1-12
Page 18

H-15
- Standard Li-Ion battery pack, 3.7V, 1880mAh
- Advanced smart battery
- Built-in battery charger
OPTICON
User's manual
H-15
Power System
Button/Key
Dimensions and
Weight
- 3.7V/105mAh rechargeable backup battery
- Battery cover sensor switch
- Power adapter:
100~240VAC, 50/60Hz input ;
5VDC, 2.6A output
- Power button
- 5 Trigger Buttons (Navigation, Scan)
- 4 application keys
- 2 direction Buttons (SHIFT, FN)
- 6 Control Buttons (Q1, Q2, ESC, BS, Caps, Power)
- 12 Numeric Keys (include 0~9 , Enter, Point)
- Dimensions:
L : 168 mm
W: 62 mm
H: 24 ~ 28 mm Approx.
- Weight:
Color
Optional
Peripherals and
Accessories
Software
Table 1-3 System Specification
217.6 g with standard battery pack Approx.
- Black
NONE.
- Microsoft Windows CE 5.0 Professional
1-13
Page 19
Page 20
Chapter 2. Getting started
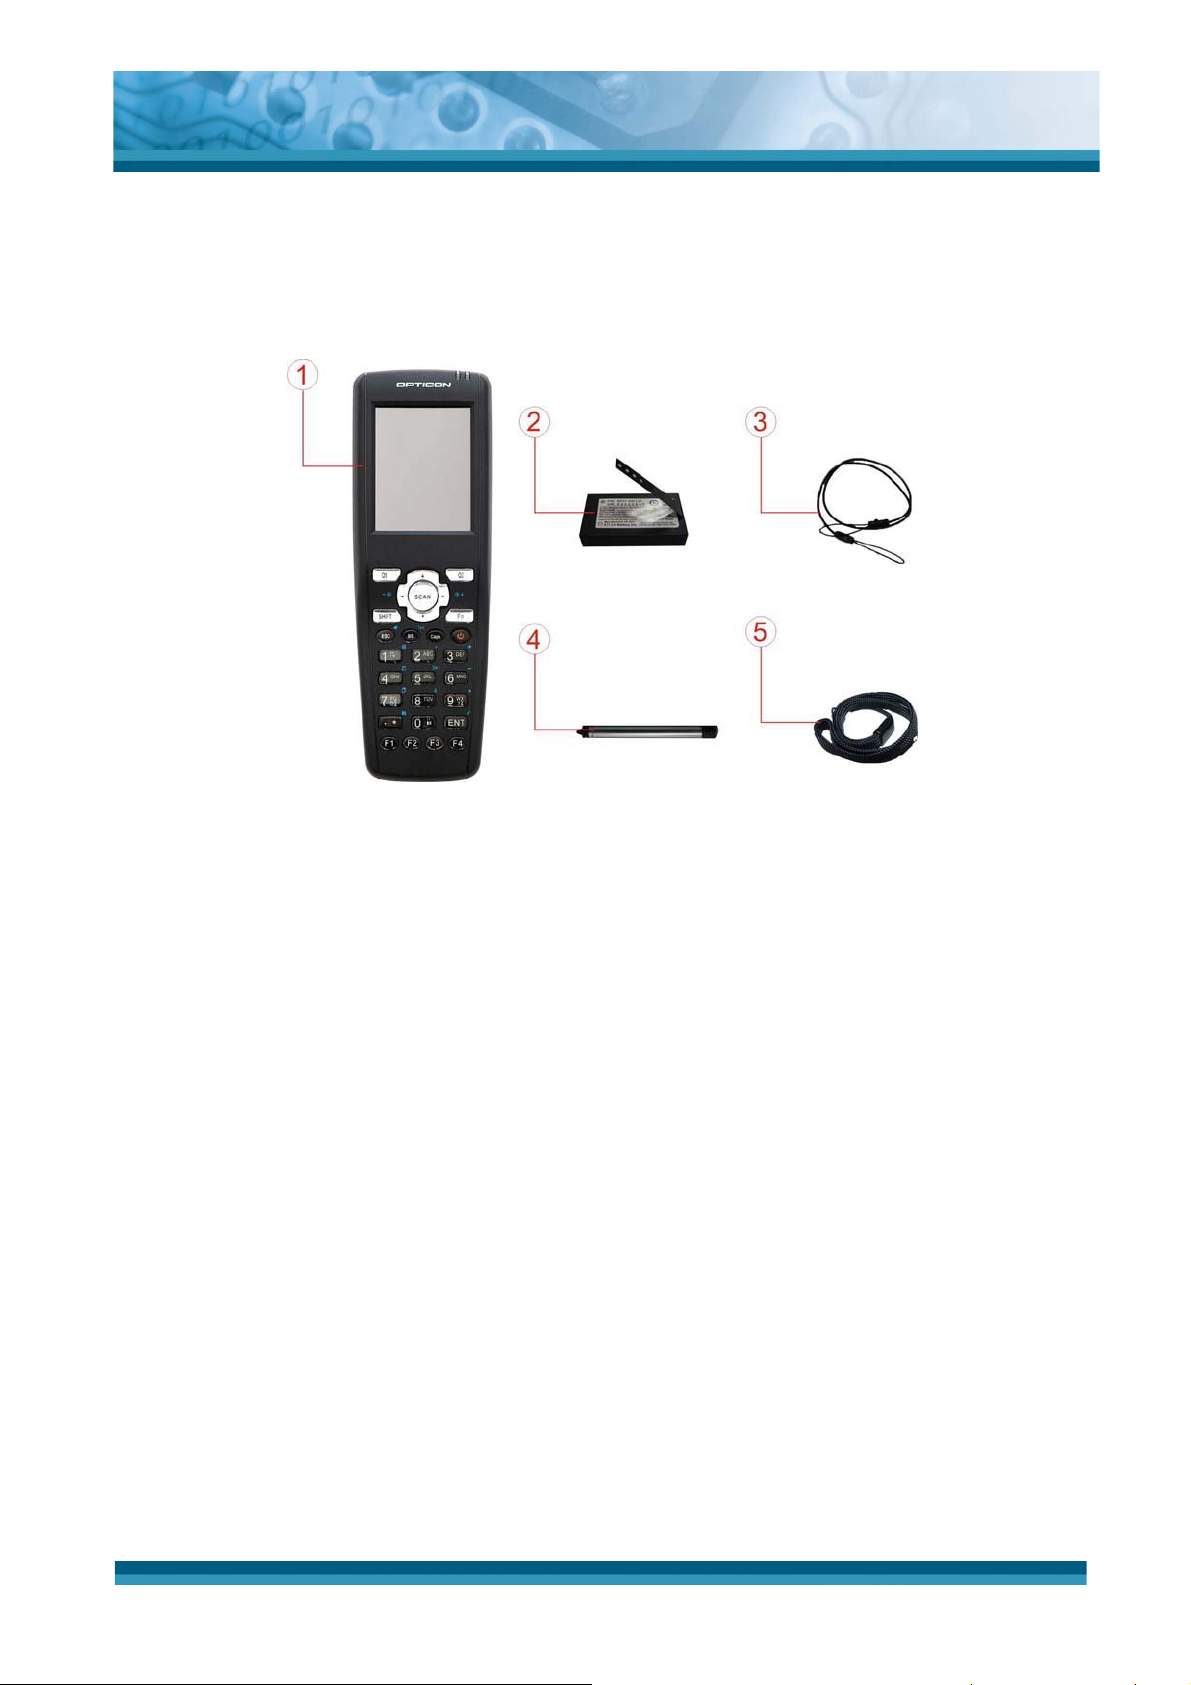
2.1 Check the package
Open the package and check if no parts are missing or damaged:
OPTICON
User's manual
H-15
Figure 2-1 Package contents
1. H-15 PDT
2. Standard battery pack (3.7VDC/1880mAh)
3. Spring Cord for Stylus
4. Stylus
5. Wrist Strap
6. Quick Guide(not shown in the picture)
2-15
Page 21

2.2 General View of the PDT
2.2.1 PDT front side view
OPTICON
User's manual
H-15
2.2.2 PDT back side view
Figure 2-2 PDT front view
Figure 2-3 PDT rear view
2-16
Page 22
OPTICON
User's manual
H-15
1 Bar code reader LED
indicator
“Red” color Bar code reader on
“Green” color Successful reading
“Red” color Charging battery 2 Charge LED indicator
“Green” color Battery fully charged
3 LCM / touch panel User input on touch panel by stylus
4 Scan key Start scanning bar codes by pressing
Navigation/scan keys
5 Power key Put the PDT into suspend mode
Awake the PDT from suspend mode
6 F1 ~ F4 key Application keys, hot keys of application program
defined by end user.
7 Navigation key Navigation keys for left, right, up and down
directions
8 Alpha-Numeric keys Numeric keys, change to alpha keys
9 Alpha key Toggle alpha-mode for alpha-numeric keys
10 Fn key This key is used in combination with other keys to
type special characters and perform system
functions.
11 Enter key This key confirms data entry
12 USB Synchronization
A connector to support DC-IN and USB Client.
port
13 Scan window Bar code reader window
14 Stylus Use the stylus for selecting items and entering
information.
15 Battery Cover Protect battery pack and remain IP54 rating
16 Battery cover latch To keep battery cover locked
17 Speaker 1W speaker for audio output
18 DC Power Jack A connector to input power supply to PDT.
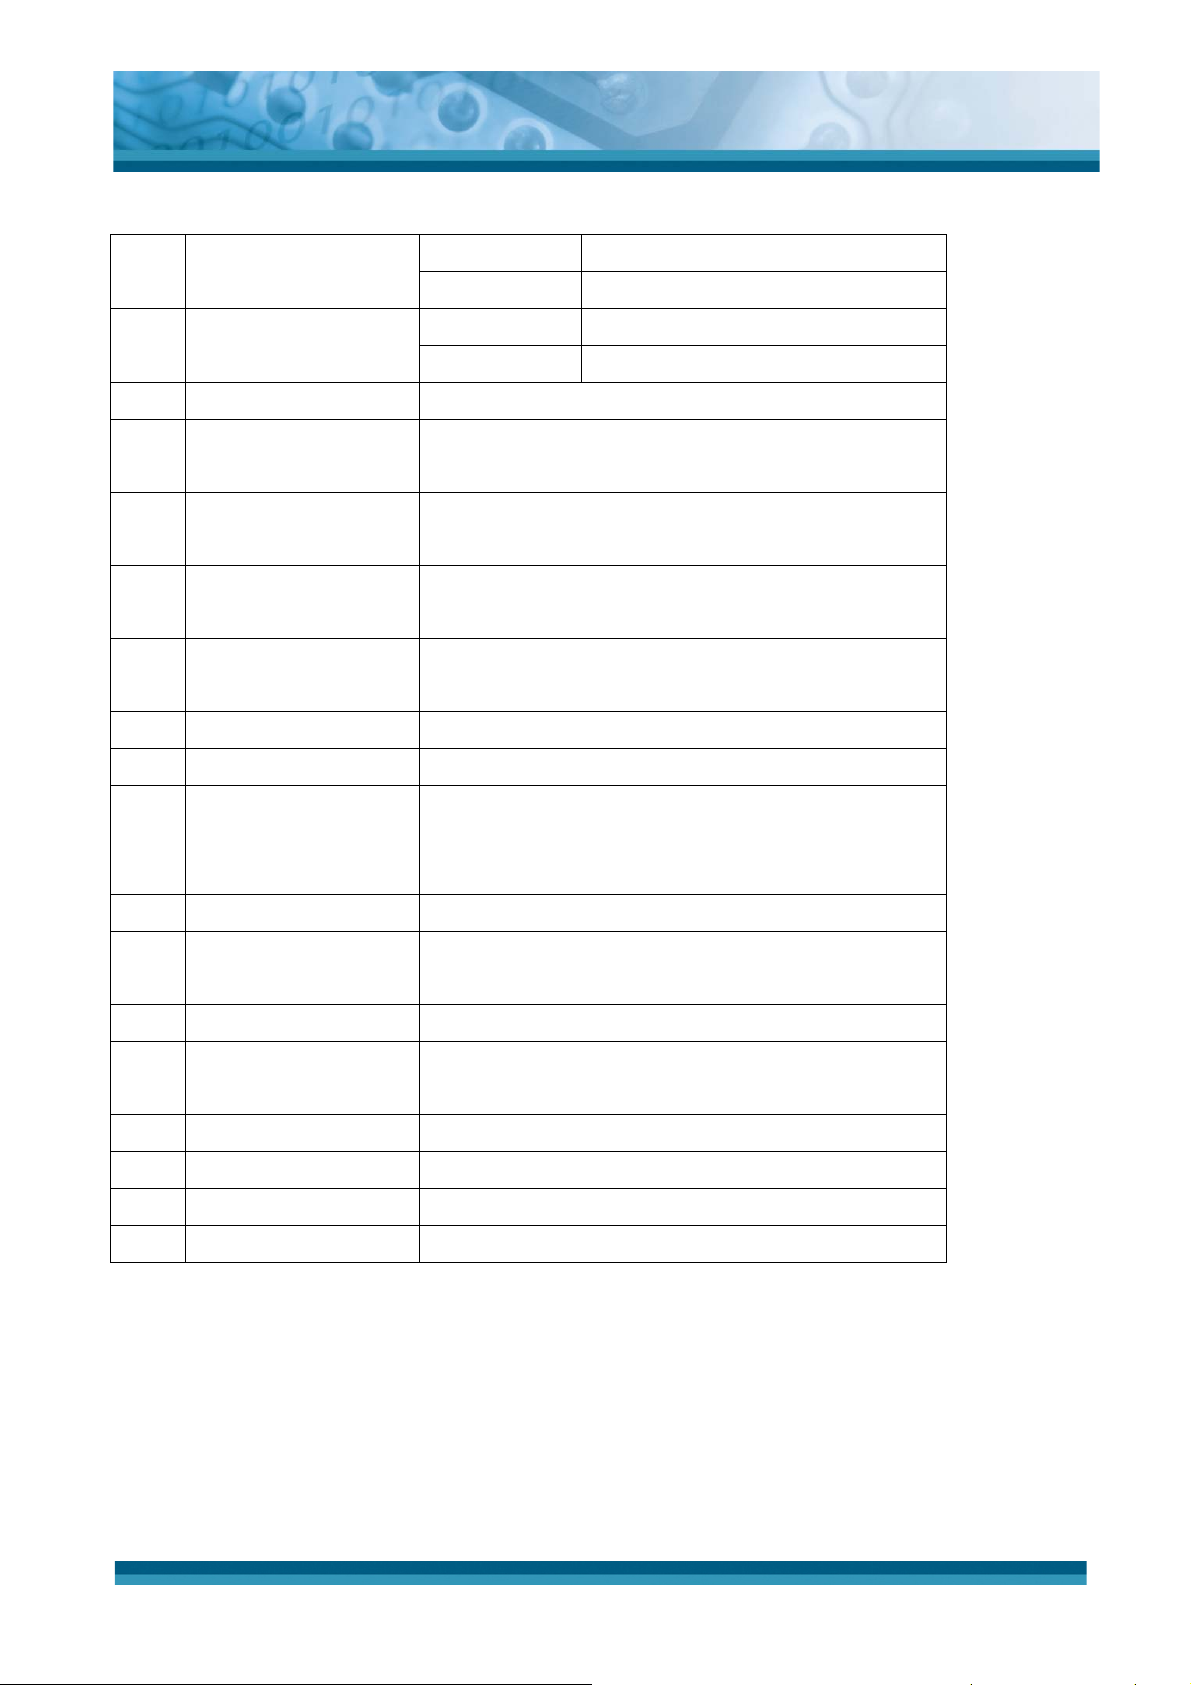
Table 2-1 Description of PDT General View
2-17
Page 23
OPTICON
User's manual
H-15
2.3 Charging the Battery Pack
Before using the PDT, install and charge the battery by executing the steps described in this
paragraph.
2.3.1 Installing the battery pack
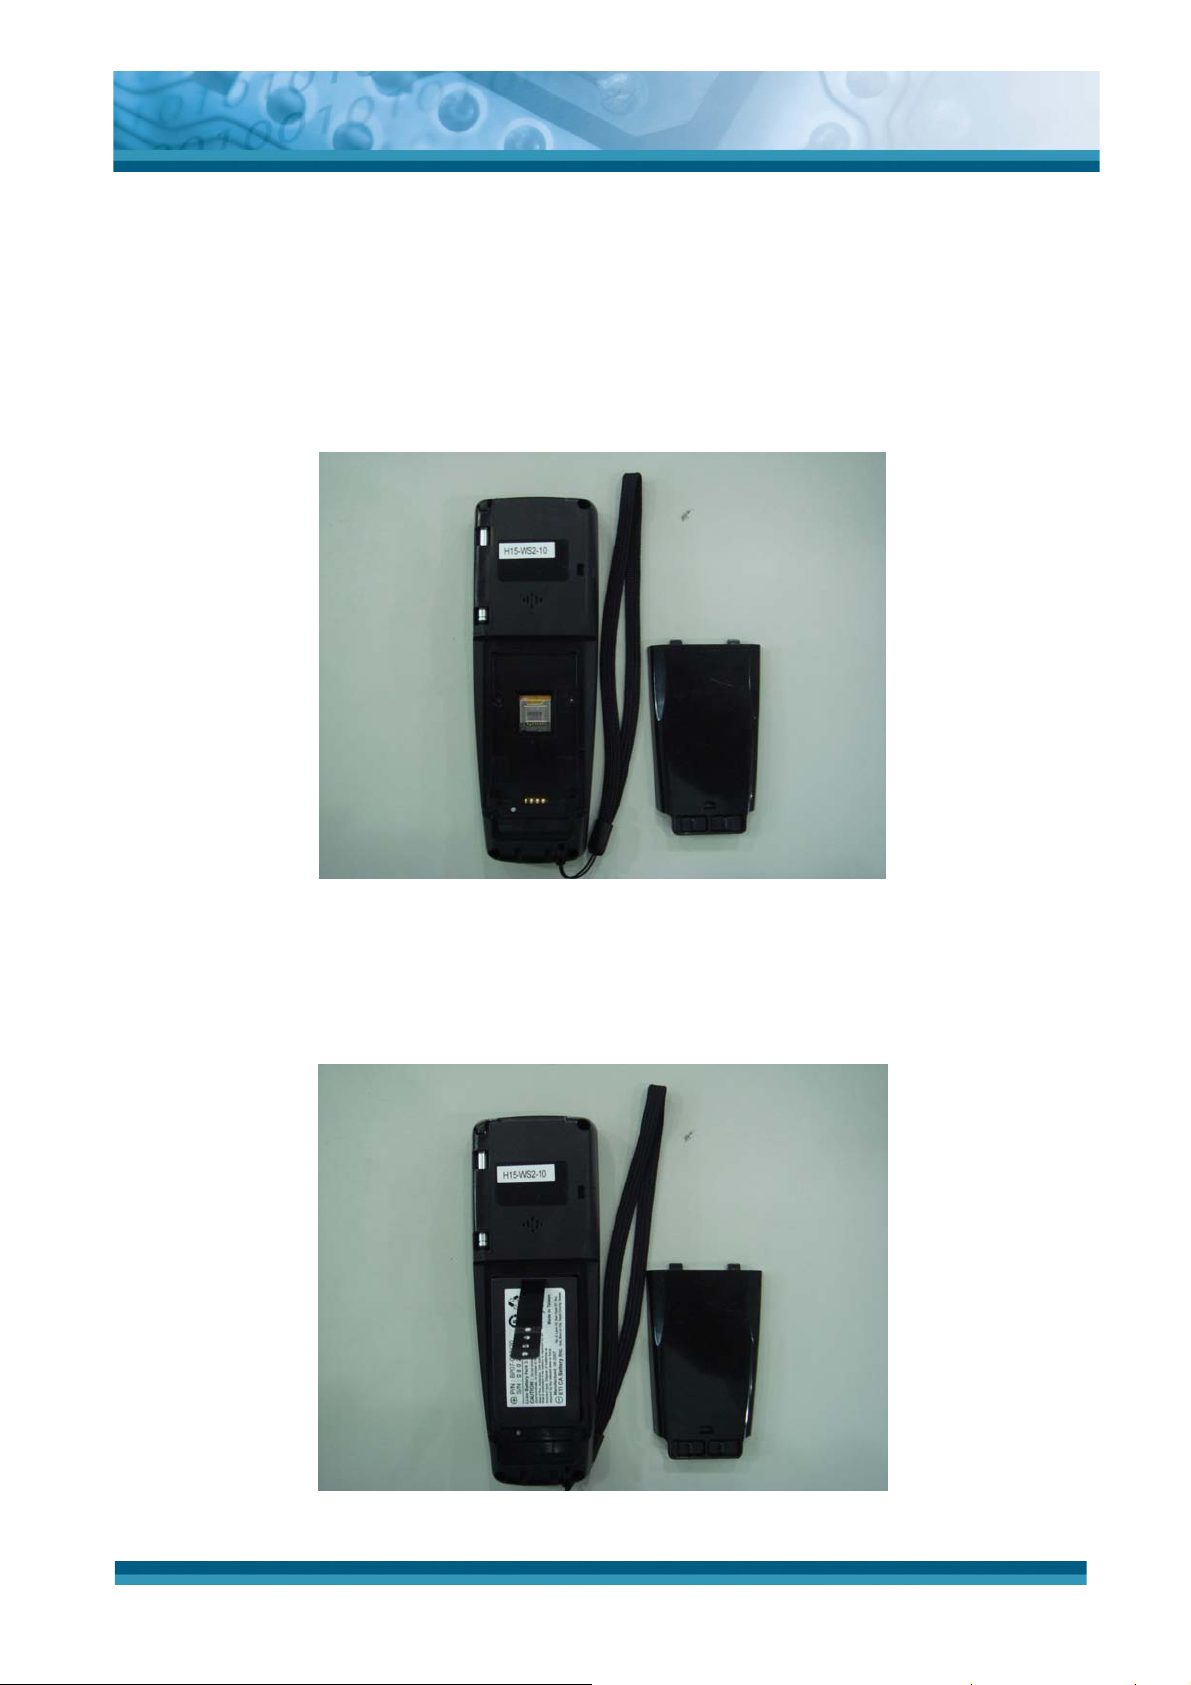
1. Turn both battery cover latches downwards and lift the battery cover away from the PDT.
Figure 2-4 Detach the battery cover from PDT
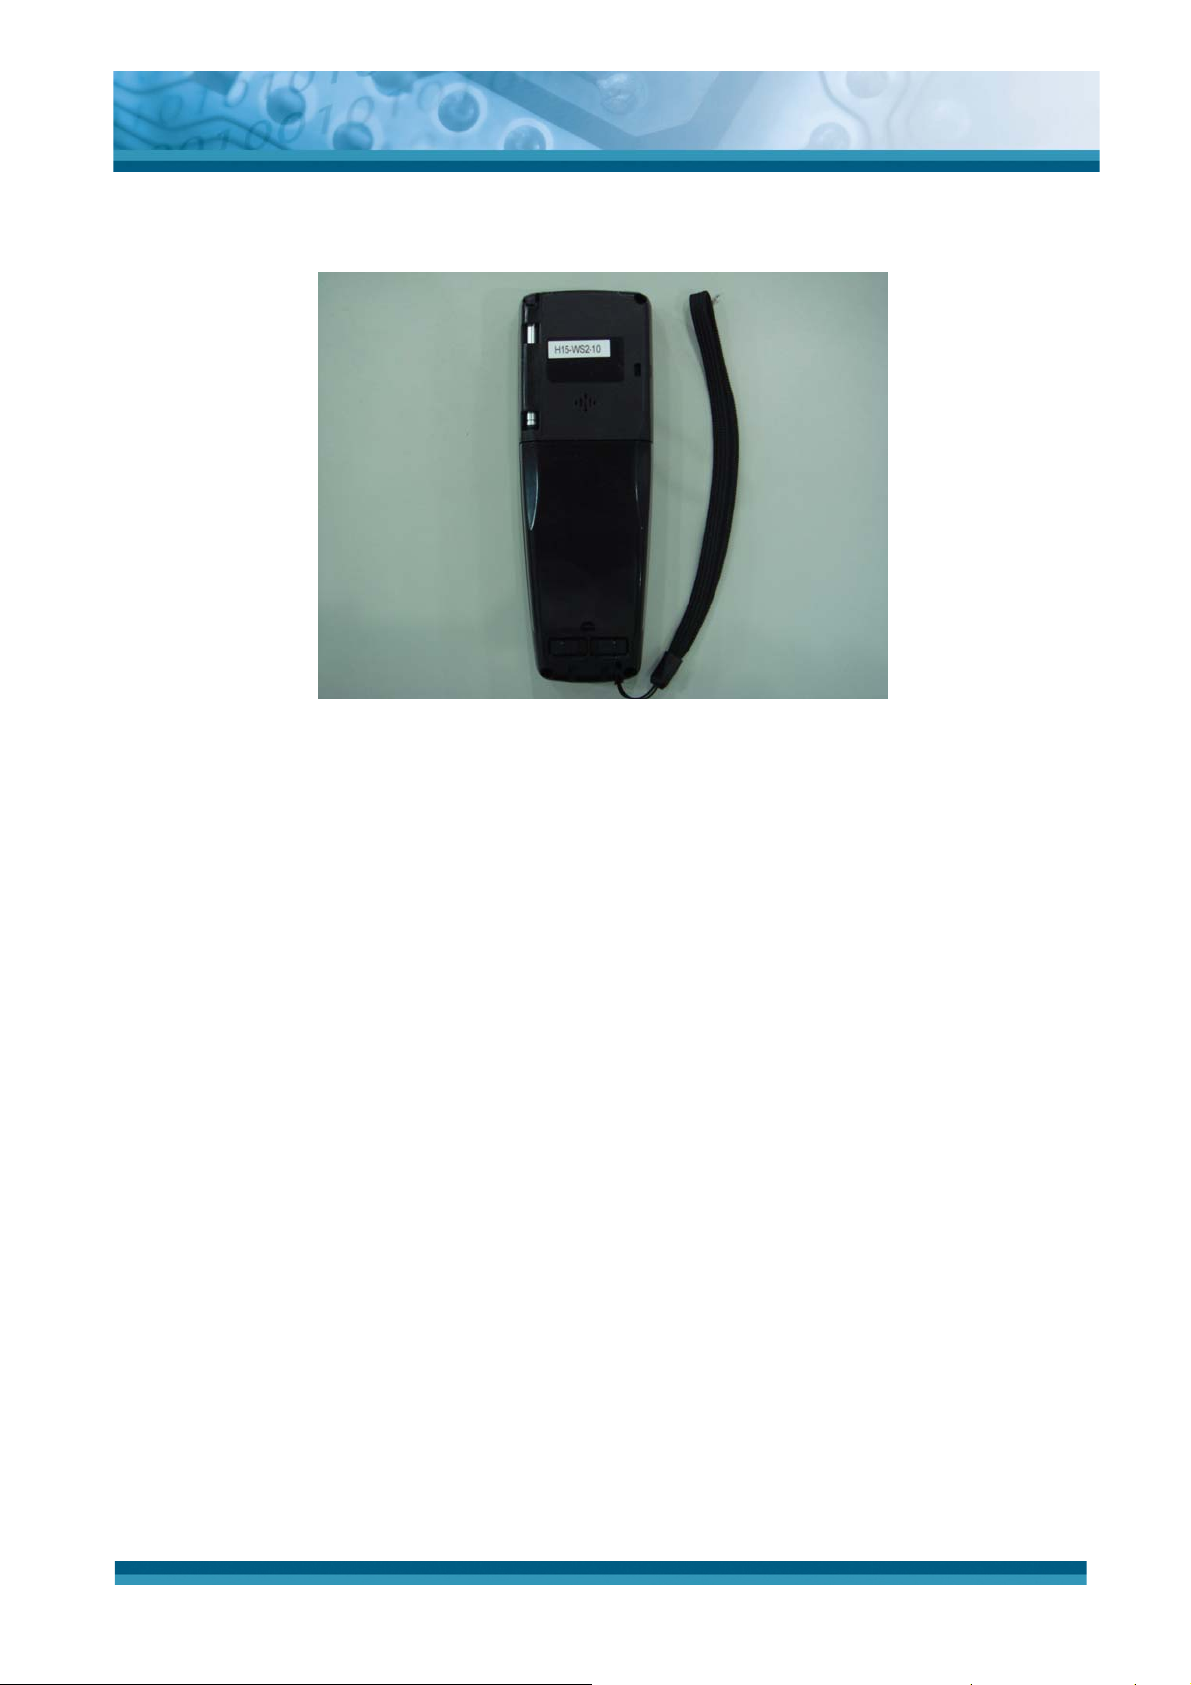
2. Insert the battery pack into the battery compartment with the label facing upwards, and
ensuring the battery snaps into it's place.
Figure 2-5 Insert the battery pack
2-18
Page 24
OPTICON
User's manual
H-15
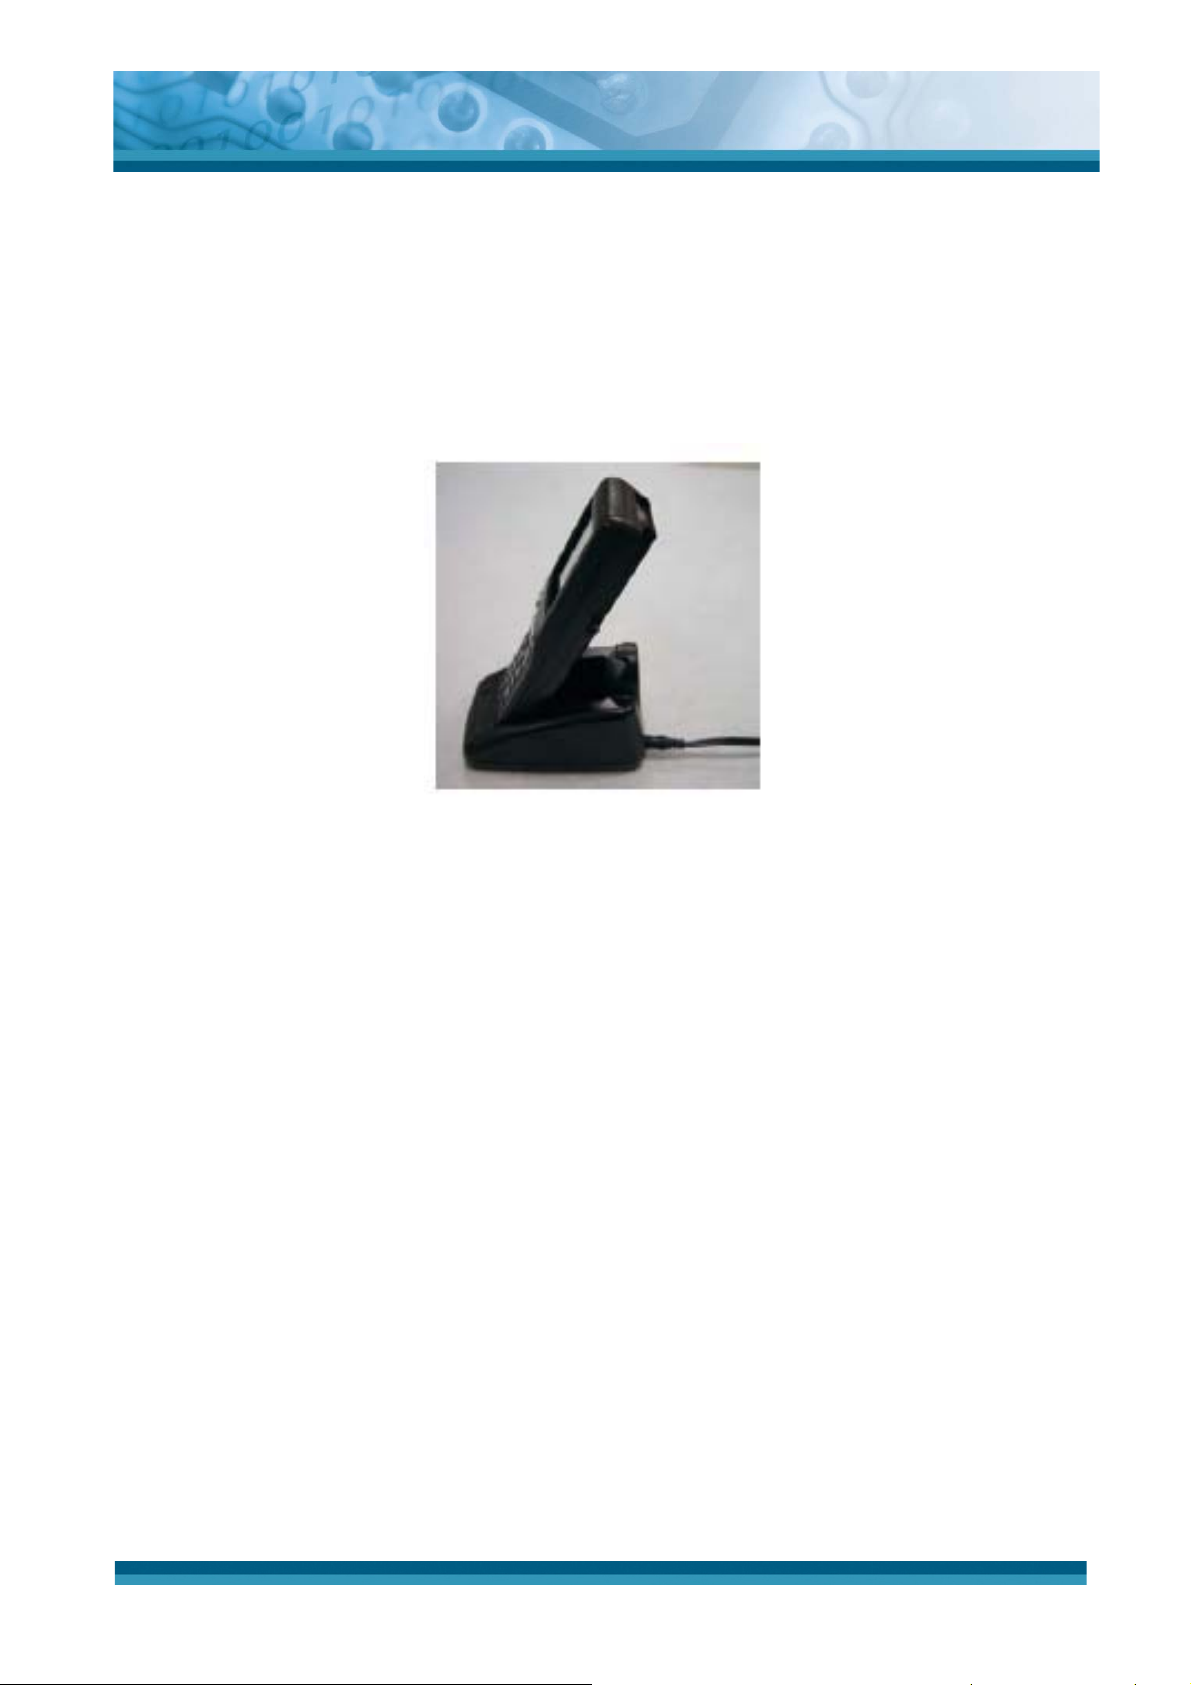
3. Install the battery cover by inserting the top first, and then press the bottom in firmly. Turn
both the battery cover latches upwards to secure the cover to the PDT.
Figure 2-6 Replace the battery cover
2-19
Page 25
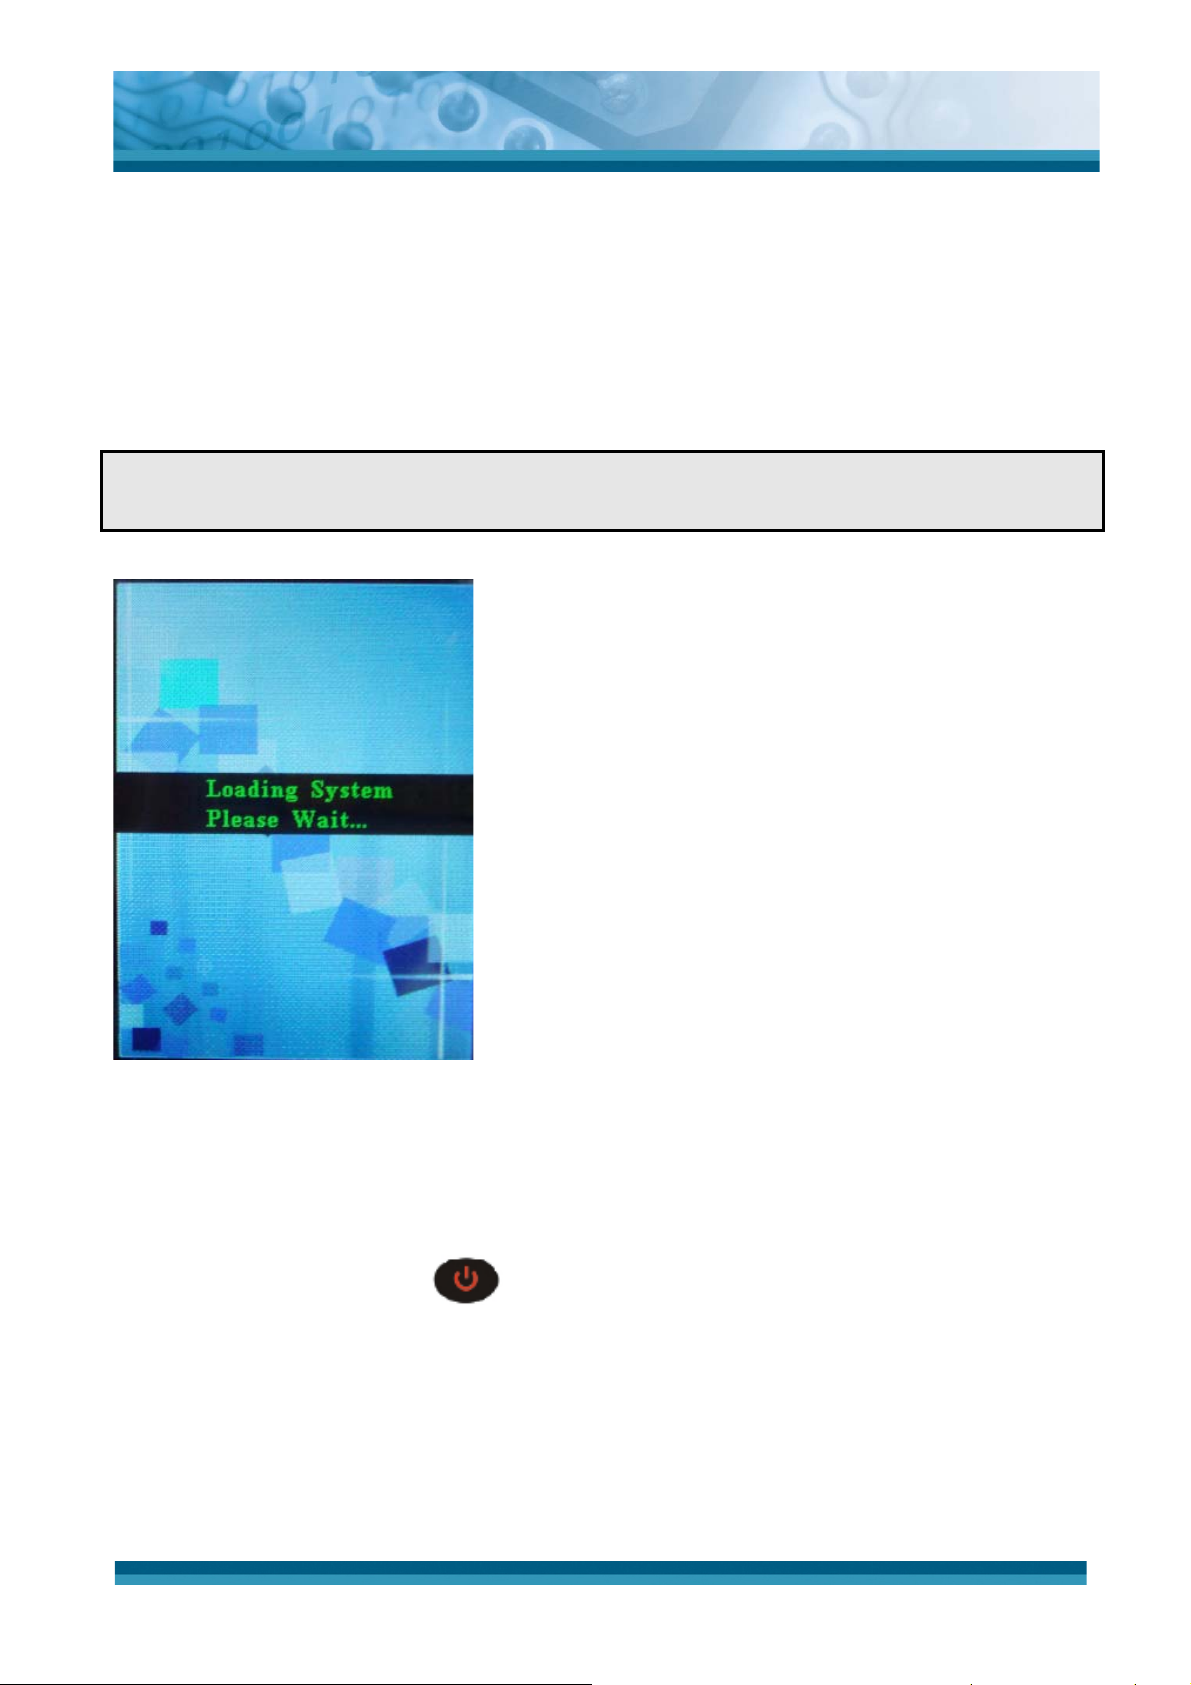
2.3.2 Charging the PDT with Cradle and Power Adapter
1. Put PDT into Single Dock.
2. Plug in the connector of the power adapter to the Single Dock.
3. Connect the power cord to the power adapter.
4. Connect the power cord to a power source.
OPTICON
User's manual
H-15
Figure 2-7 Charging with CRD-15 cradle
5. Charging time : to charge the battery pack for the first time, it needs approximately 6
hours. Subsequent charging time is approximately 4 hours.
x When charging the battery pack, the charge LED indicator on the PDT turns on Red.
x After the battery pack is fully charged, the charge LED indicator turns to Green.
2-20
Page 26

2.3.3 Charging the PDT and battery pack with Cradle
a) Put the another battery pack into Cradle:
1. Connect the power cord to the power adapter
2. Plug in the connector of the power adapter to the CRD-15
3. Connect the power cord to a power source
4. Insert the PDT into the CRD-15
OPTICON
User's manual
H-15
Figure 2-8 Charging with CRD-15 cradle
2-21
Page 27

b)Place the spare battery pack into the CRD-15 spare battery charging slot :
1. Connect the power cord to the power adapter
2. Plug in the connector of the power adapter to the CRD-15
3. Connect the power cord to a power source
4. Insert the battery pack into the CRD-15 spare battery slot
OPTICON
User's manual
H-15
Figure 2-9 Charging with CRD-15 cradle
x When charging the battery pack in the CRD-15 spare battery slot, the CRD-15
charging LED indicator turns on Red.
x After the battery pack is fully charged, this LED indicator turns to Green.
CAUTION: Do not remove the battery pack too long from PDT after you have already
full-charged the battery pack and backup battery pack and start to use the PDT.
Otherwise the data stored inside SDRAM memory will be lost. Please also keep in
mind power the PDT off if you want to change the main Battery pack.
2-22
Page 28
OPTICON
User's manual
H-15
2.4. Handling the PDT
2.4.1 Starting the PDT
Press the power key to turn ON/OFF the PDT. If the PDT does not power on, perform a cold
boot, see chapter 2-7 Resetting.
CAUTION: When a battery is fully inserted in PDT for the first time, the PDT powers on
and boots automatically.
When the PDT is powered on for the first
time, it initializes its system. A splash
screen (figure 2-10) appears for a short
Figure 2-10 Starting the PDT
2.4.2 Power on / off
To turn ON the PDT
period of time followed by the WinCE 5.0
window.
Press the power key briefly (
). If the PDT does not power on, perform a cold reset,
see chapter 2.7.
While the PDT initializes its file system, the splash screen displays for about 30 seconds
followed by the calibration screen. Every time you perform a cold reset, these screens will
appear.
To turn OFF the PDT
Press the power key again. This action does not actually turn off the PDT, it only turns the PDT
into suspend mode. All running applications remain as you left them, until you press the power
2-23
Page 29
key again to resume operation of the PDT.
2.4.3 Calibration of the touch Screen
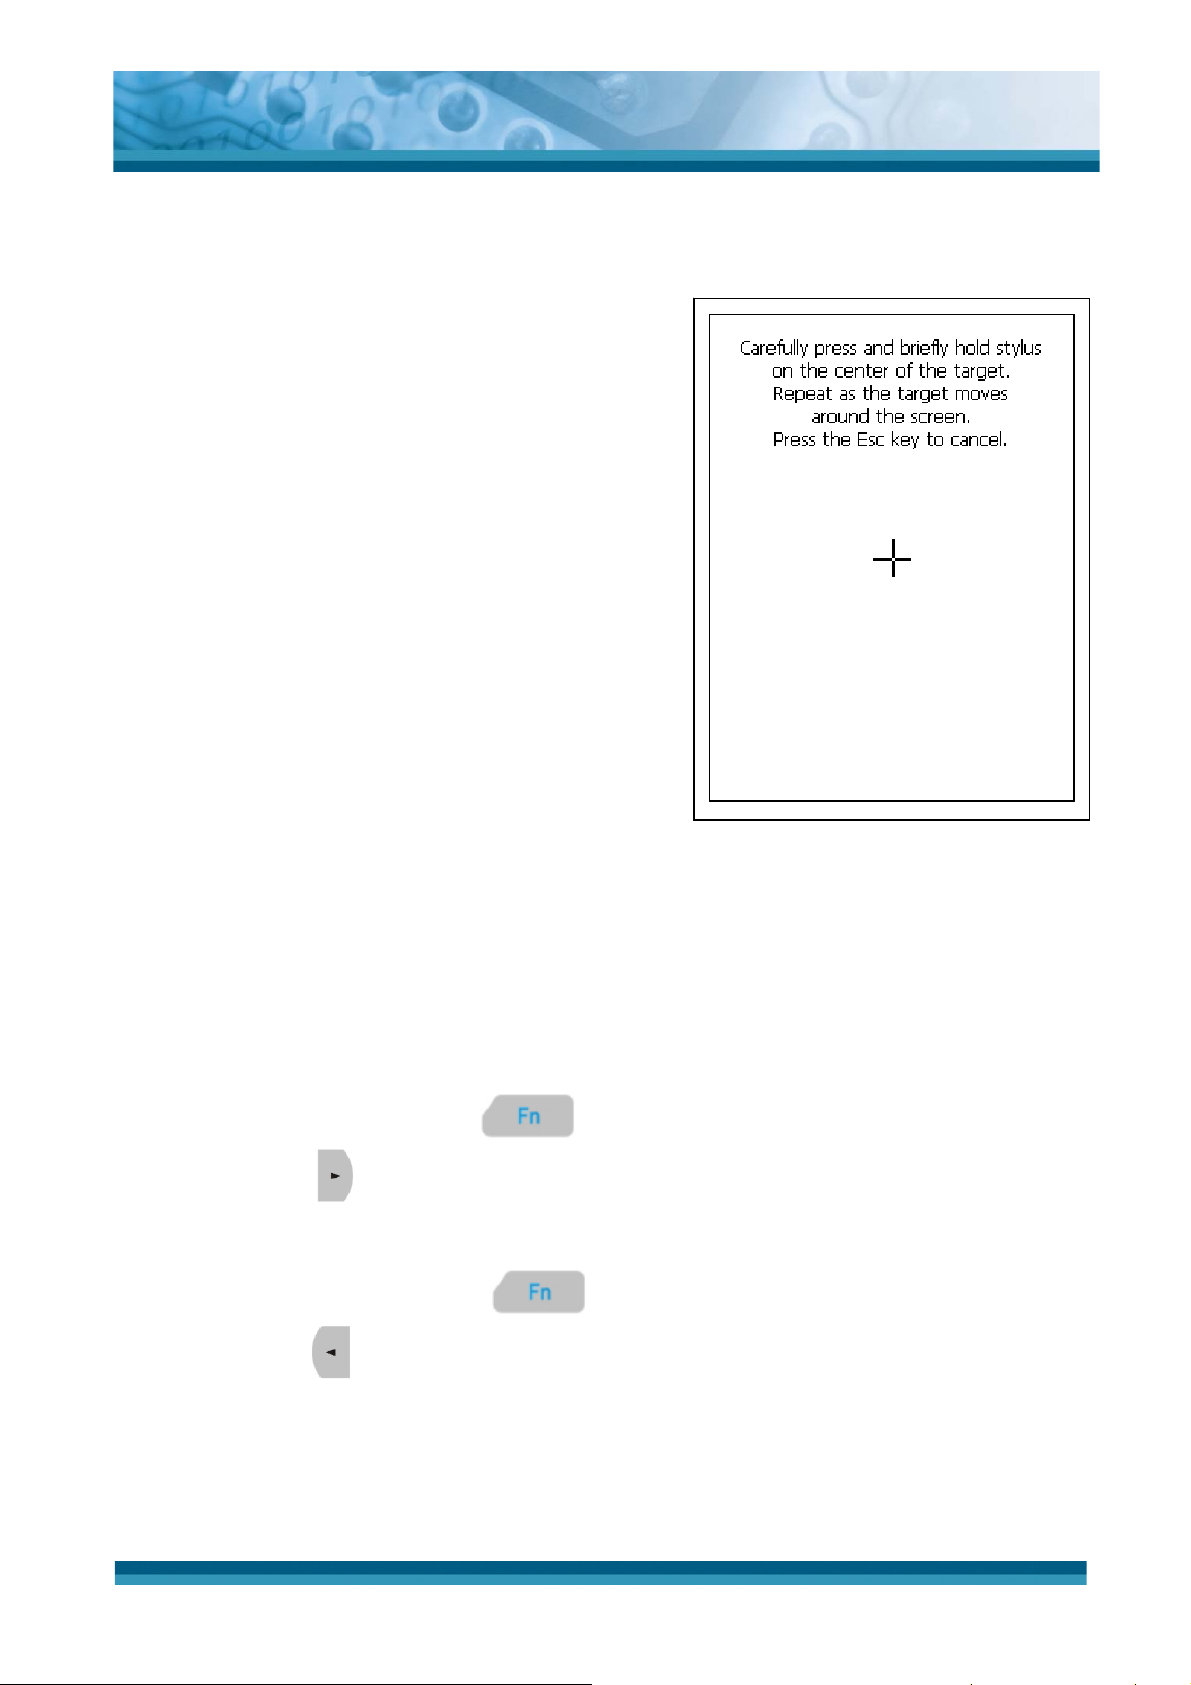
On the initial boot-up of the PDT, the stylus
calibration screen opens. Use the stylus to press
and hold briefly on the center of each target as it
around moves the screen.
If necessary, adjust the backlight on the PDT to
make the screen readable (see chapter 2.4.4
Adjusting the brightness).
When you experience that the touch screen
function is poor or the operation does not match
the exact location it should be, please recalibrate the
screen by using the stylus to tap the Start > Settings
> Control Panel > Stylus, to open the “Calibration”
to recalibrate again.
OPTICON
User's manual
H-15
Figure 2-11Calibration
2.4.4 Adjusting the brightness
The factory default for the brightness is in middle level. You can adjust the brightness to meet
your environment and comfort as:
1) Increase brightness: Press the
key and then press on the right key of
Navigation key
2) Decrease brightness: Press the key and then press on the left key of
Navigation key
3) The display will dim automatically, if you do not perform any operation for a specific period
of time. This will help to save the battery power. You can set up the specific period of time
to see chapter 2.7 as reference.
2-24
Page 30
2.4.5 To mute the sound
OPTICON
User's manual
H-15
To mute the sound, press the
key first, and then press the key to turn off
and on of the sound.
2.4.6 Using the stylus
The stylus is located next to hand-strap on the rear of the PDT as illustrated in figure 2-3
PDT rear view. The stylus function is similar as the mouse on a PC. Use the stylus to:
1) Navigate the display, select menu item and open optional applications.
2) Tap the characters on soft keyboard panel.
3) Hold the stylus on the screen and drag across the screen to select multiple items.
CAUTION: Never use a pen, pencil or any other sharp object on the display to avoid
damage of the touch screen.
2.4.7 Using the Keypad
2-25
Page 31
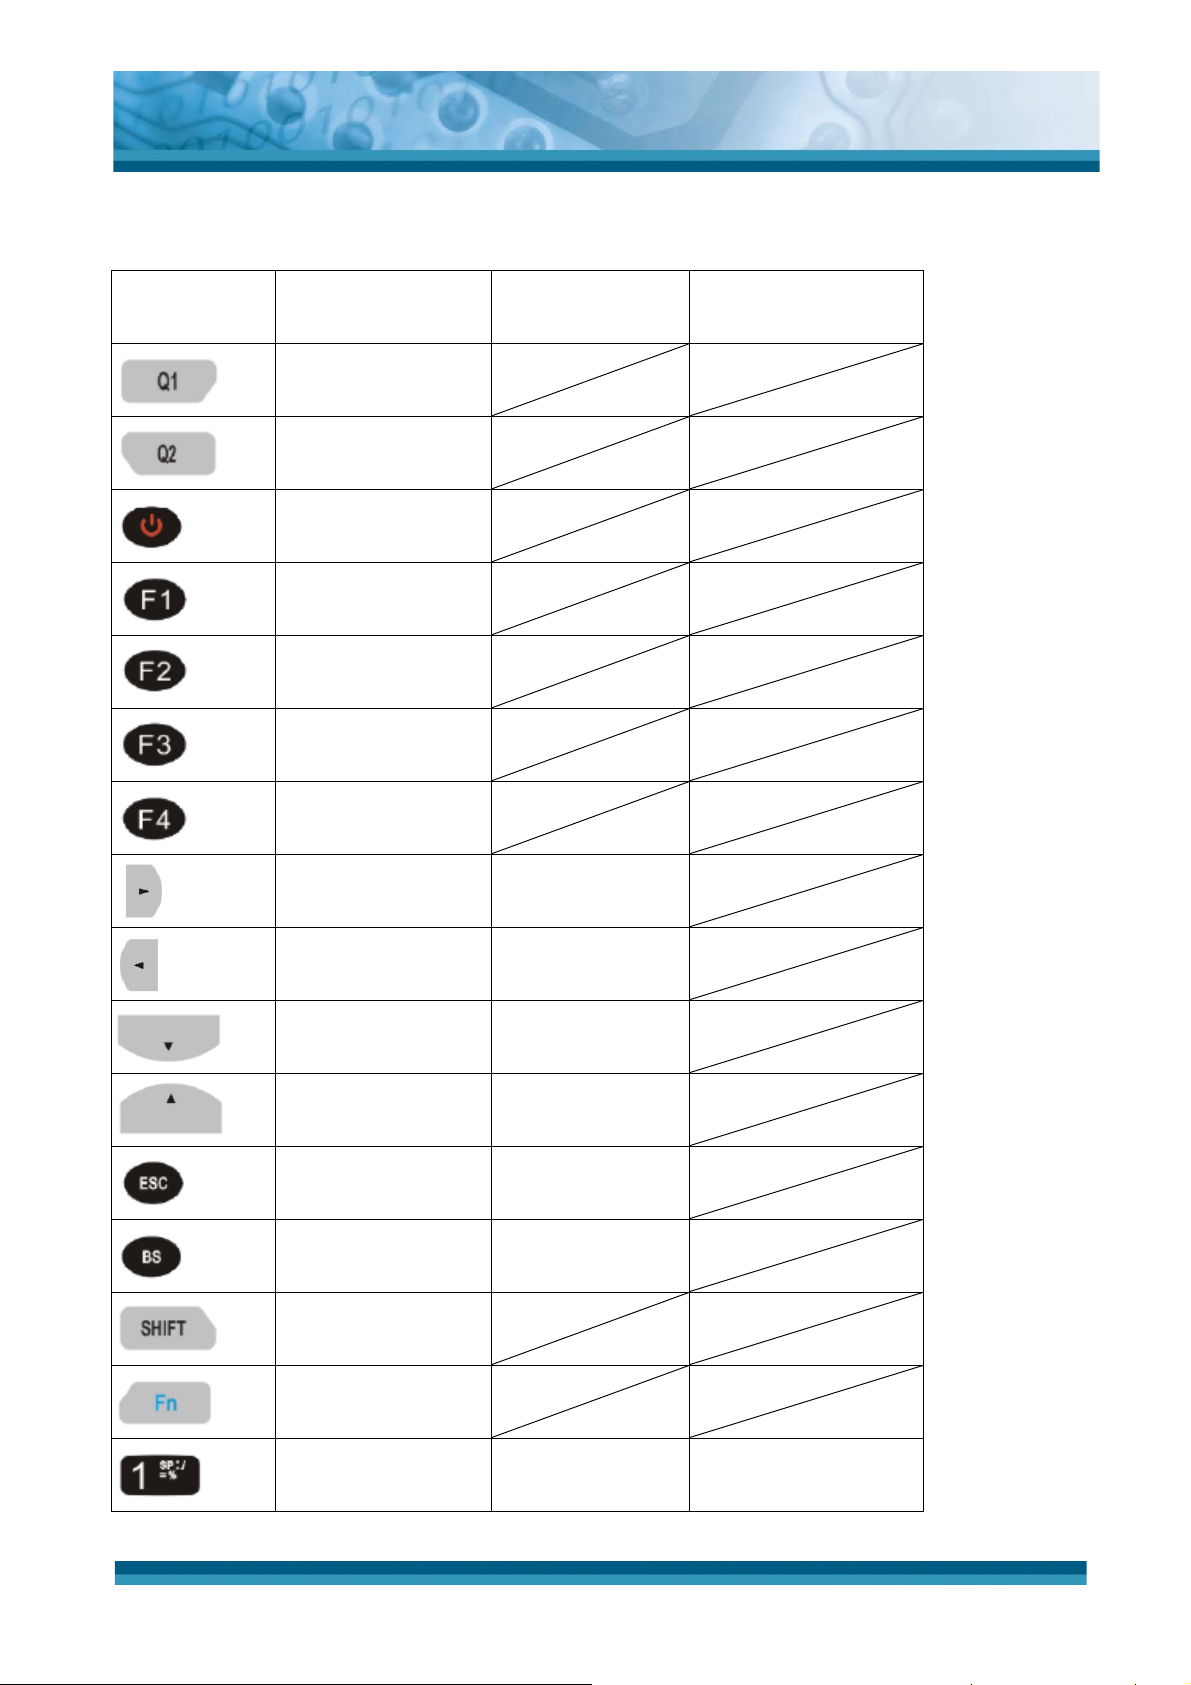
Figure 2-12 PDT Keypad
OPTICON
User's manual
H-15
Key Main Function
User configurable
Default : None
User configurable
Default : None
Power On/Off
Internet Explorer
Microsoft
WordPad
Inbox
File Explorer
Fn + Main
Function
Shift + Main
Function
Right
Backlight
Increase
Backlight
Left
Decrease
Down Page Down
Up Page Up
ESC Audio Mute
Backspace
TAB (Tabulation)
Change to letters
Function change
1
й (at)
SpaceΚ а = %
2-26
Page 32
OPTICON
User's manual
H-15
Key Main Function
2 ’
3
Ѐ (Plus Sign) Ҡʳ ҡʳ Ң
4 Paste
5
6
Del (Delete)
Ё (Minus Sign)
7 Copy
8
ϟ (AND) Ұʳ ұʳ Ҳ
Fn + Main
Function
Shift + Main
Function
ҝʳ Ҟʳ ҟ
ңʳ Ҥʳ ҥ
Ҧʳ ҧʳ Ҩ
ҩʳ Ҫʳ ҫ
Ҭʳ ҭʳ Үʳ ү
9
Ϡ (Asterisk) ҳʳ Ҵʳ ҵʳ Ҷ
0 €
. (Point)
Start Menu
Enter
Caps
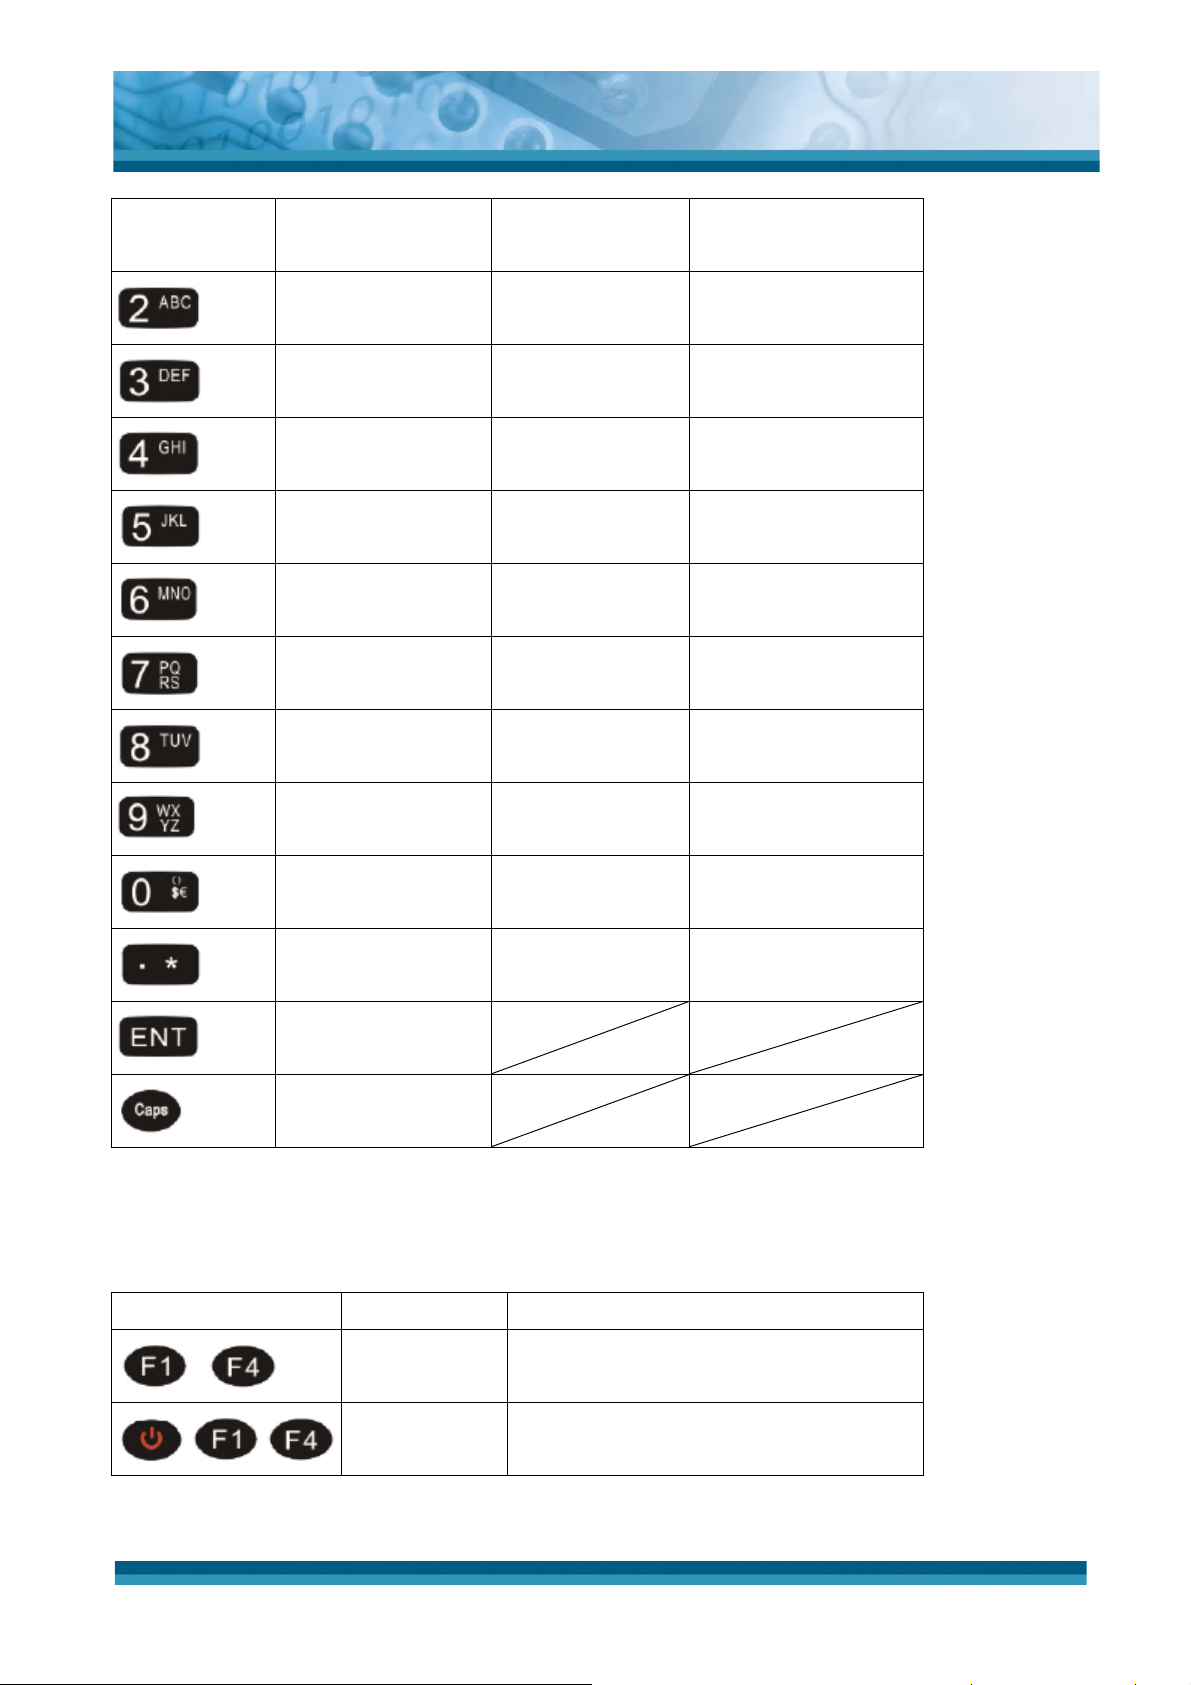
Table 2-2 Keypad list
Reset Key Functionality Definition
Press “F1” and “F4” button
Warm Reset
simultaneously.
θʳ ι $ €
* Δʳ Ι
Cold Reset
Table 2-3 Special reset key combinations
Press “Power”, “F1” and “F4” button
simultaneously.
2-27
Page 33
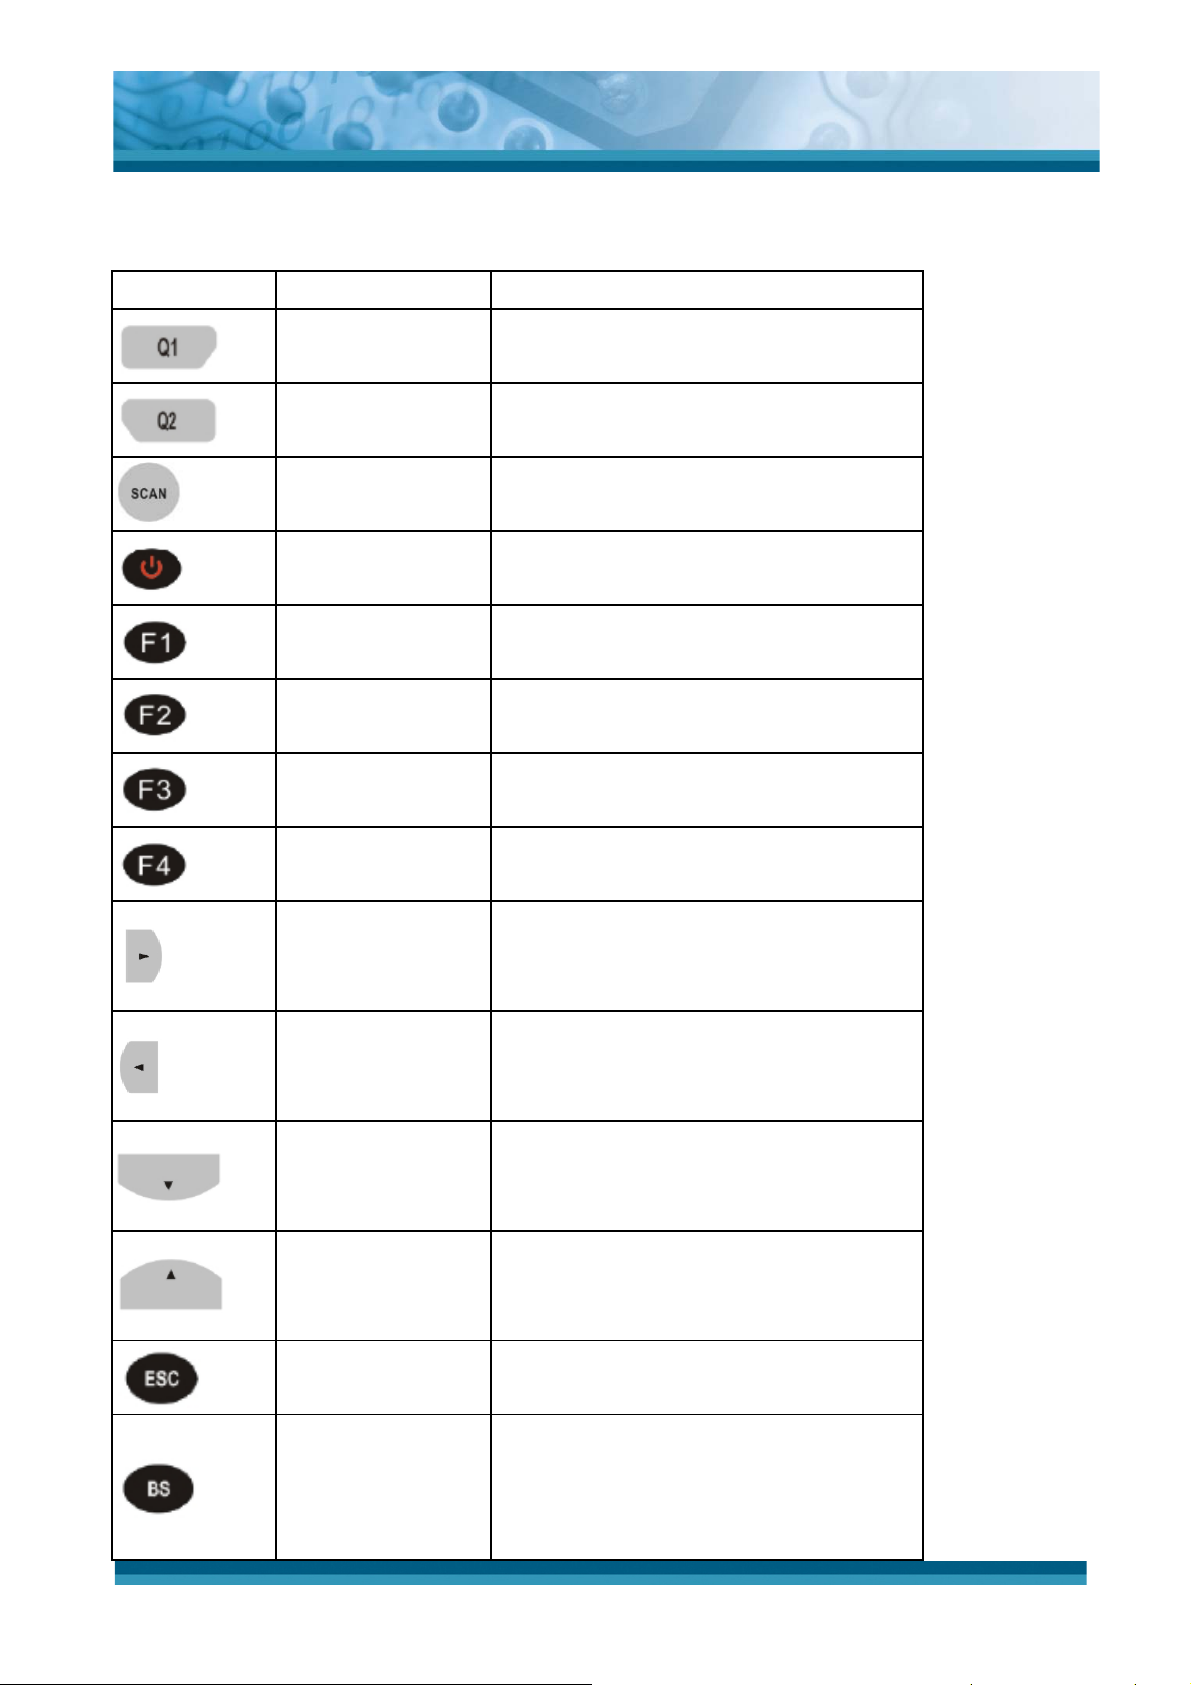
Key Main Function Definition
OPTICON
User's manual
H-15
User configurable
Default : None
User configurable
Default : None
Main BarCode
Scan Key
Power On/Off
Internet Explorer
Microsoft
WordPad
Inbox
File Explorer
Configure its function by
demand
.
Configure its function by
demand
.
customer
customer
Activates the scan function of PDT.
Puts the terminal into and wakes the
terminal from suspend mode.
Application key 1, User can define F1
function from setting.
Application key 2, User can define F2
function from setting.
Application key 3, User can define F3
function from setting.
Application key 4, User can define F4
function from setting.
Right
Left
Down
Up
ESC
Backspace
Move the cursor one character to the
right. The cursor will move continuously
if button remains is pressed.
Move the cursor one character to the
left. The cursor will move continuously if
button remains pressed.
Move the cursor down one row or line
The cursor will move continuously if
button remains pressed.
Move the cursor up one row or line The
cursor will move continuously if button
remains pressed.
This key performs a cancel action
“Backspace” key, it moves the cursor
back one space each time the key is
pressed. It deletes the previous
character each time it is pressed if you
2-28
Page 34
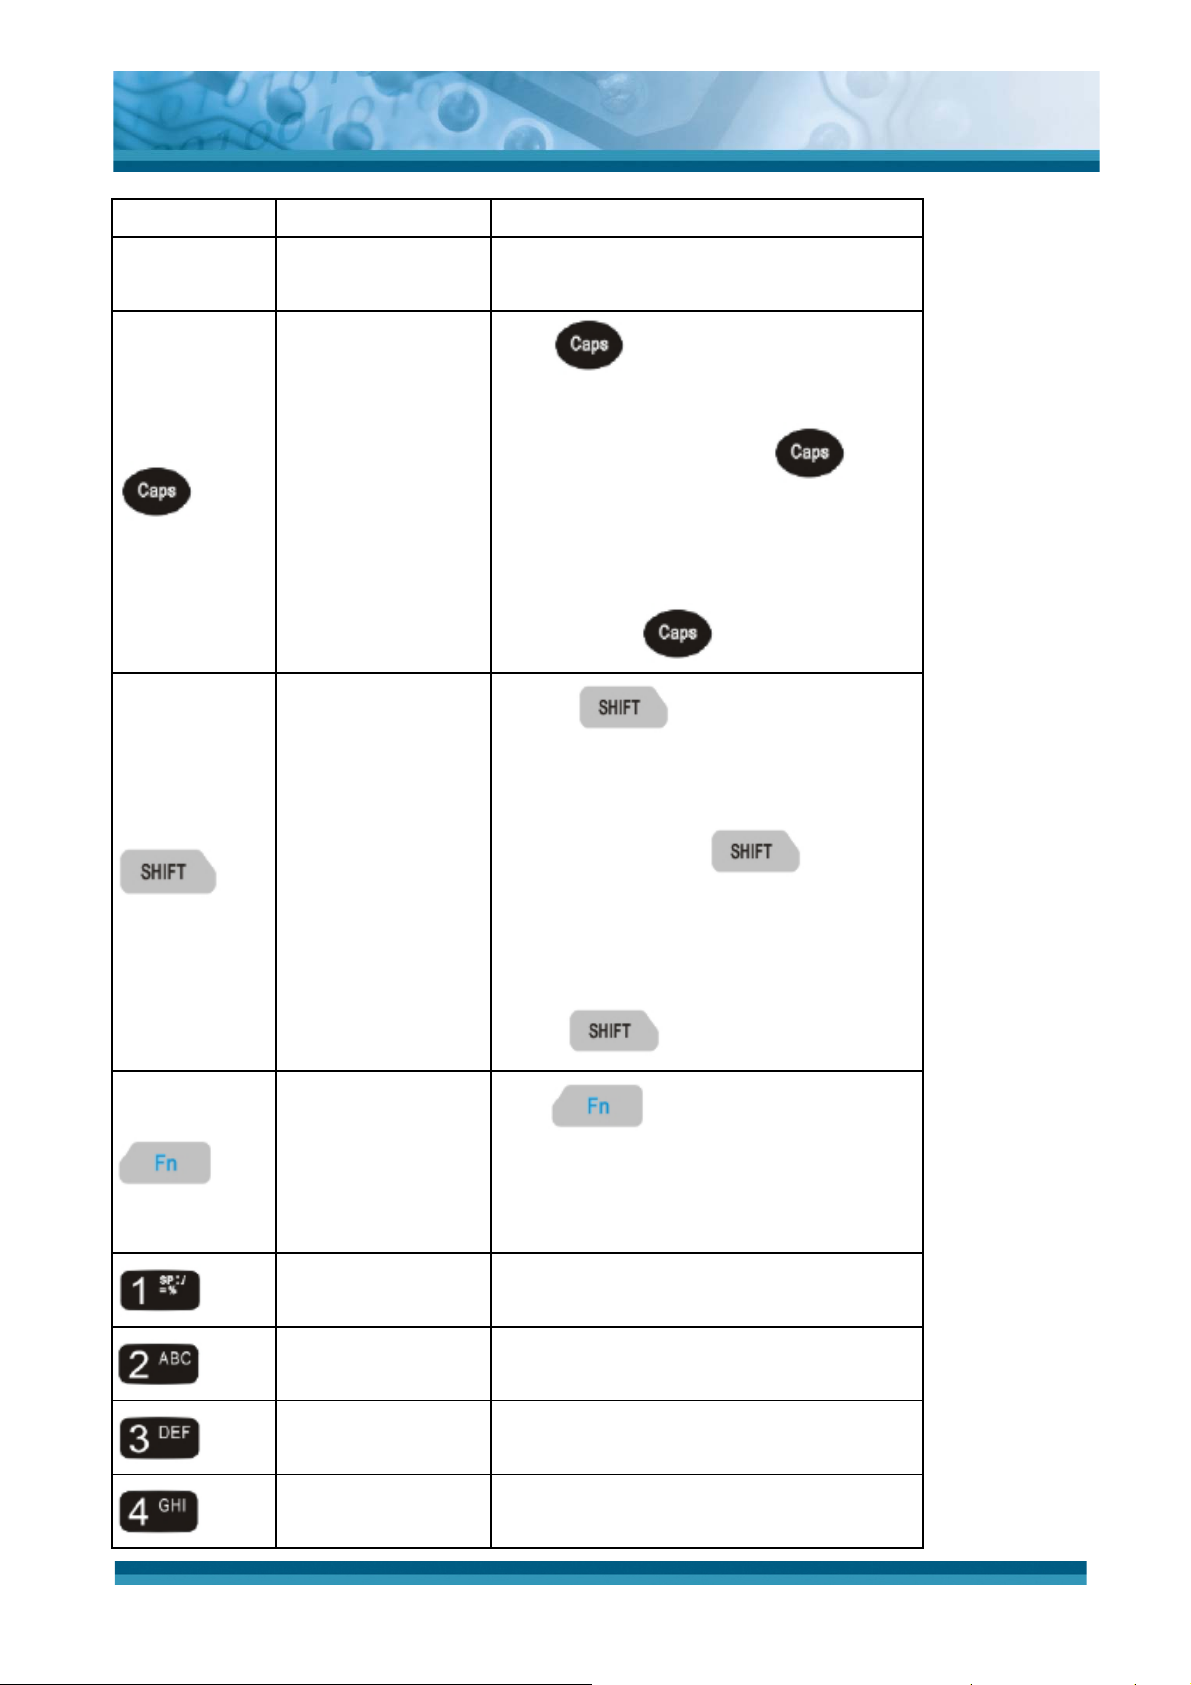
Key Main Function Definition
are typing text. The cursor will move
continuously if button remains pressed.
OPTICON
User's manual
H-15
Change to upper
case
Change to letters
The
between upper case and lower case
modes, When you press the
the “A” icon appears at the task bar to
indicate that Caps(upper case) mode is
actived. The keypad stays in Caps mode,
until you press
1. The
key enables you to toggle
key,
again.
key enables you to
toggle between the numeric and Shift
modes.
2. When you press
key, the
“Shift” icon appears at the task bar to
indicate Shift mode is enabled. The
Function change
1
2
3
4
keypad stays in the Shift mode until you
press
The
key again.
key is used in
combination with other keys to type
special characters and perform system
functions.
Number key “1”
Number key “2”
Number key “3”
Number key “4”
2-29
Page 35
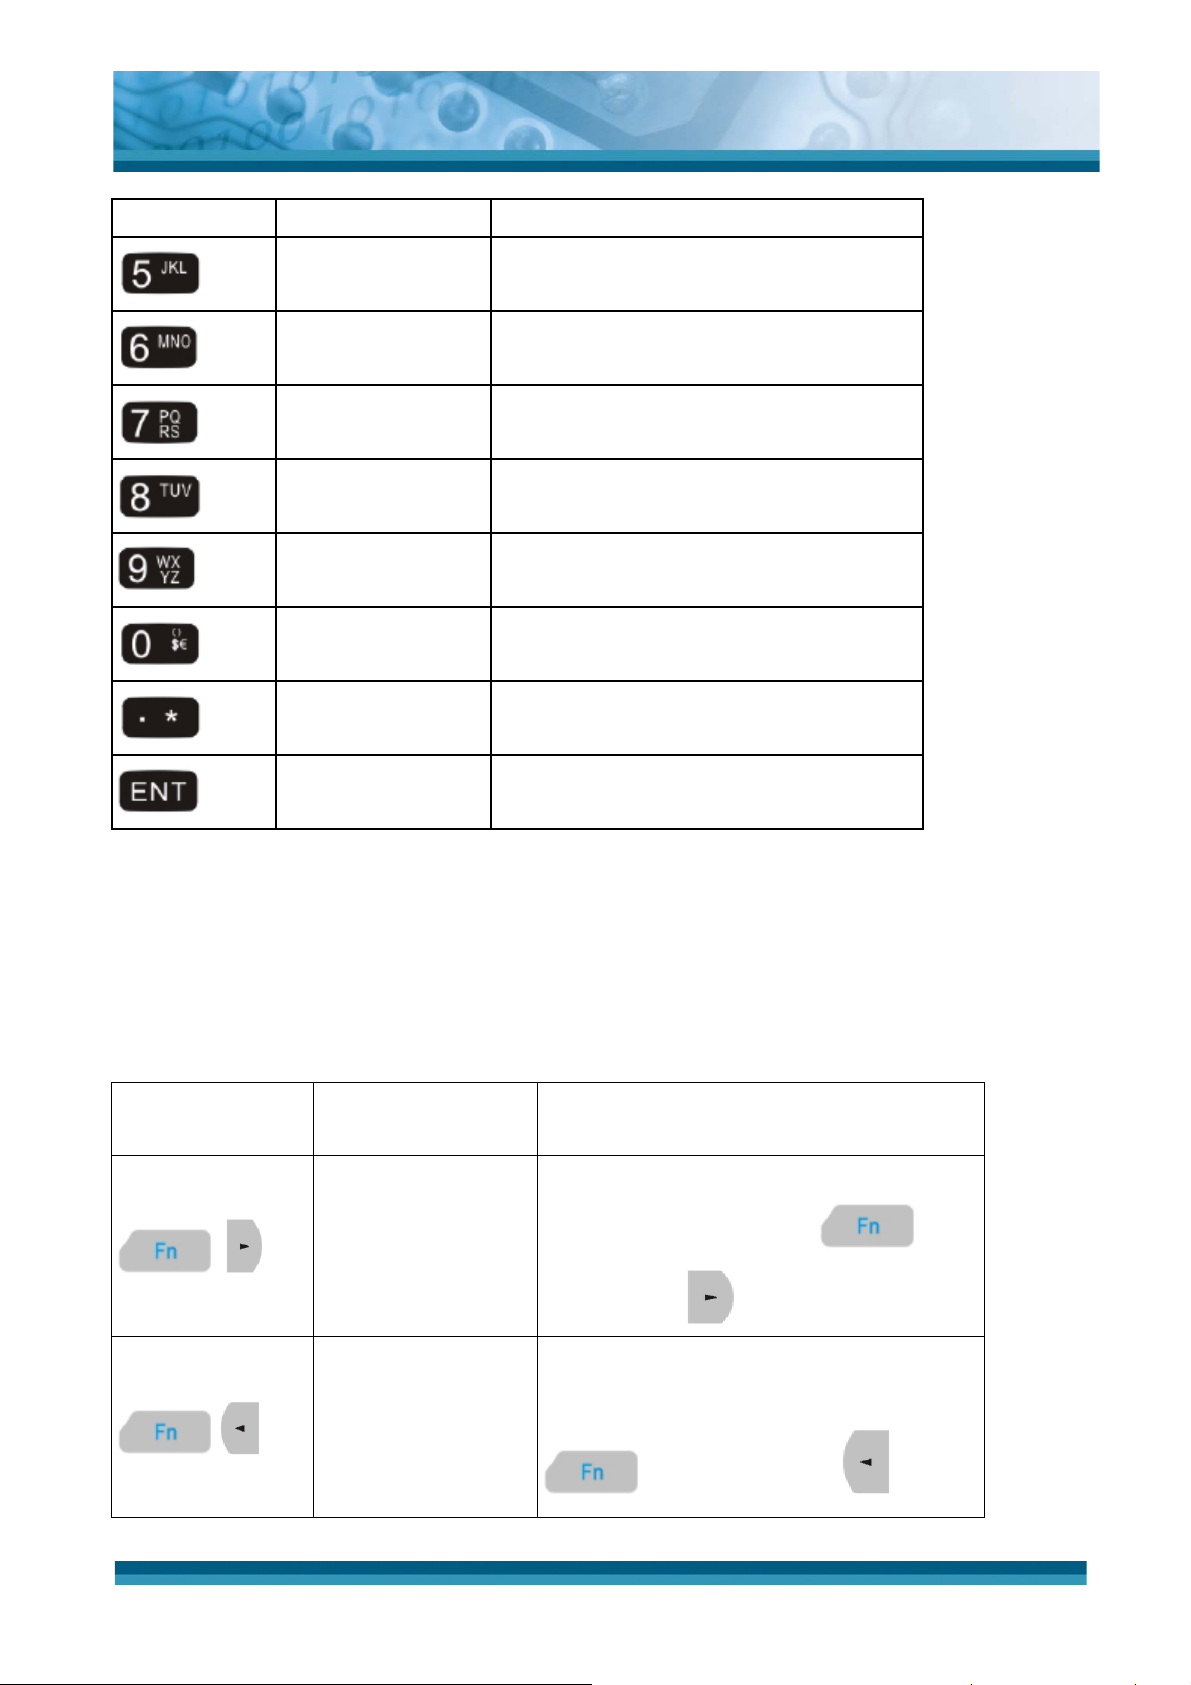
Key Main Function Definition
OPTICON
User's manual
H-15
5
6
7
8
9
0
.
Enter
Number key “5”
Number key “6”
Number key “7”
Number key “8”
Number key “9”
Number key “0”
Dot key
This key confirms data entry
Table 2-4 Definition of main Function
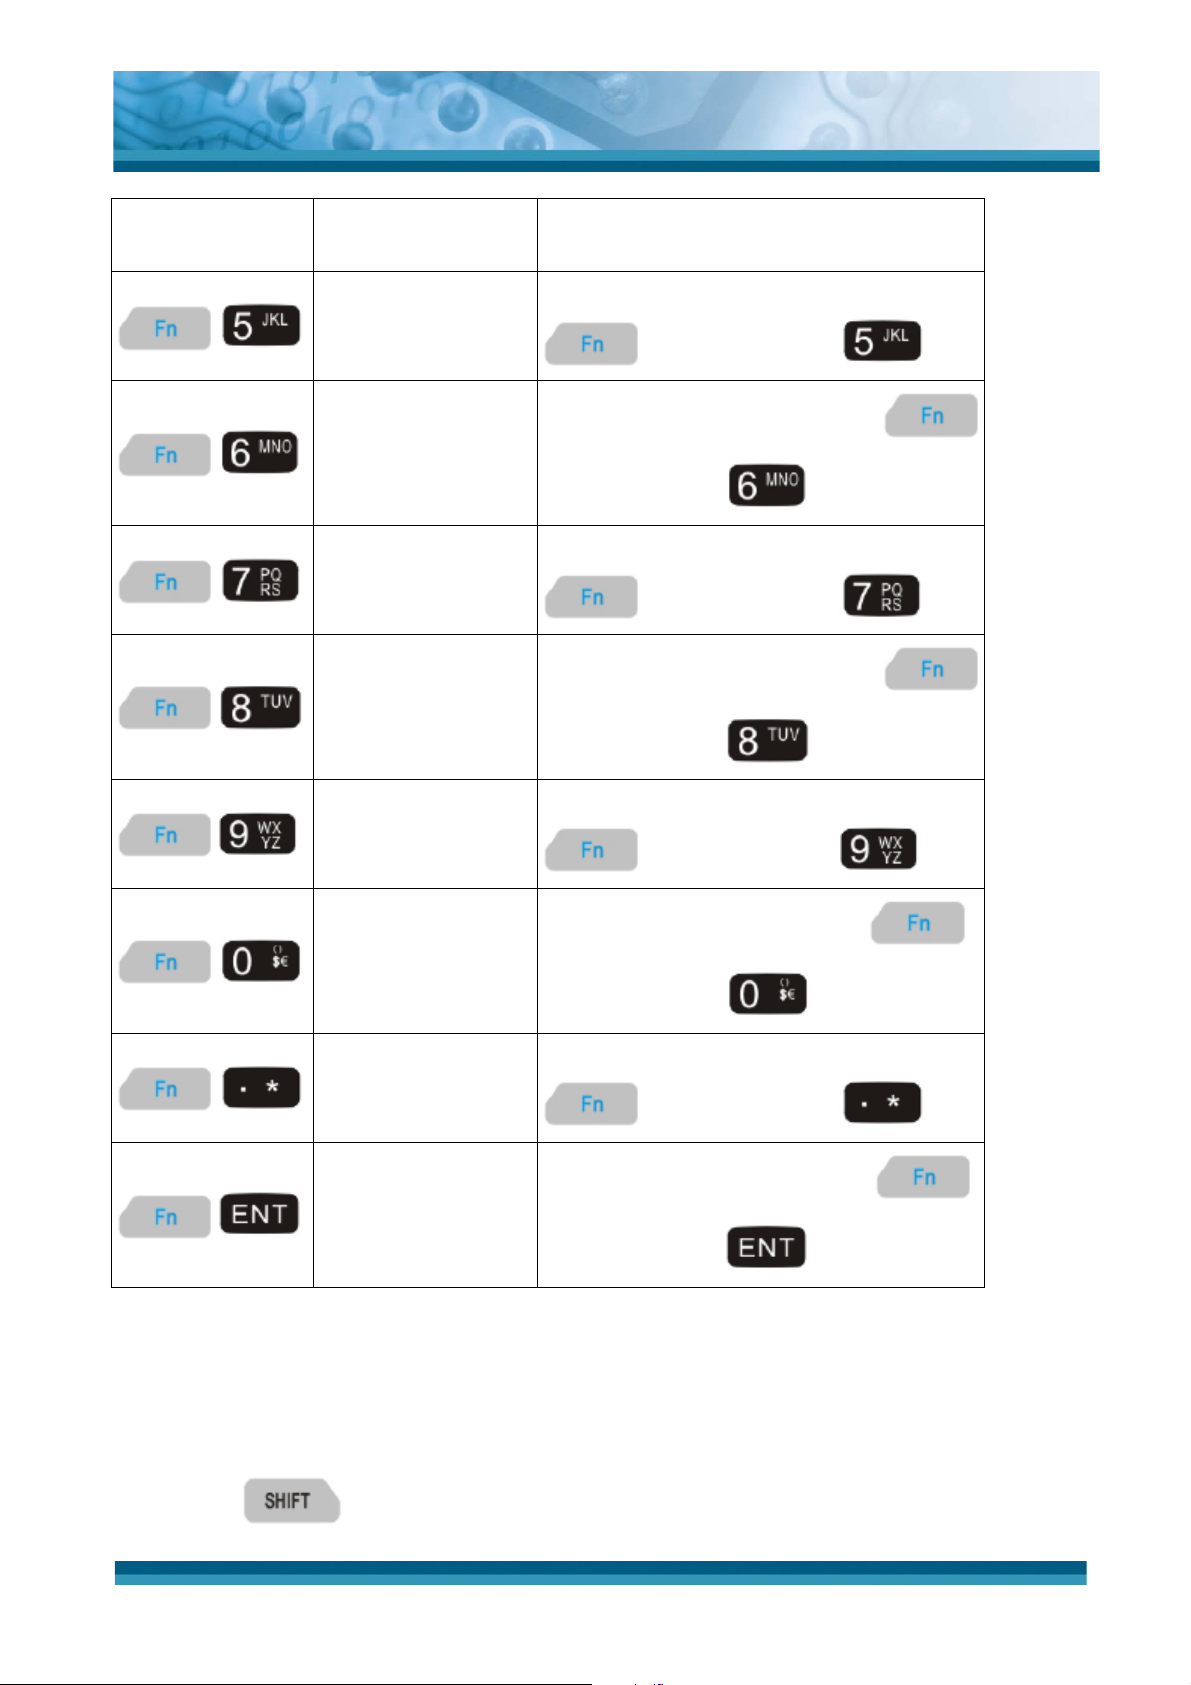
2.4.7.1 Special Function by “Fn” + main Function
The “Fn” key is used in combination with other keys to type special characters and perform
system functions.
Fn + Main
Key Sequence
Definition
Function
To Increase the LED backlight brightness
Backlight
(to make it lighter), press
key,
Increase
followed by
key.
To Decrease the LED backlight
brightness (to make it darker), press
Backlight
Decrease
key, followed by key.
2-30
Page 36
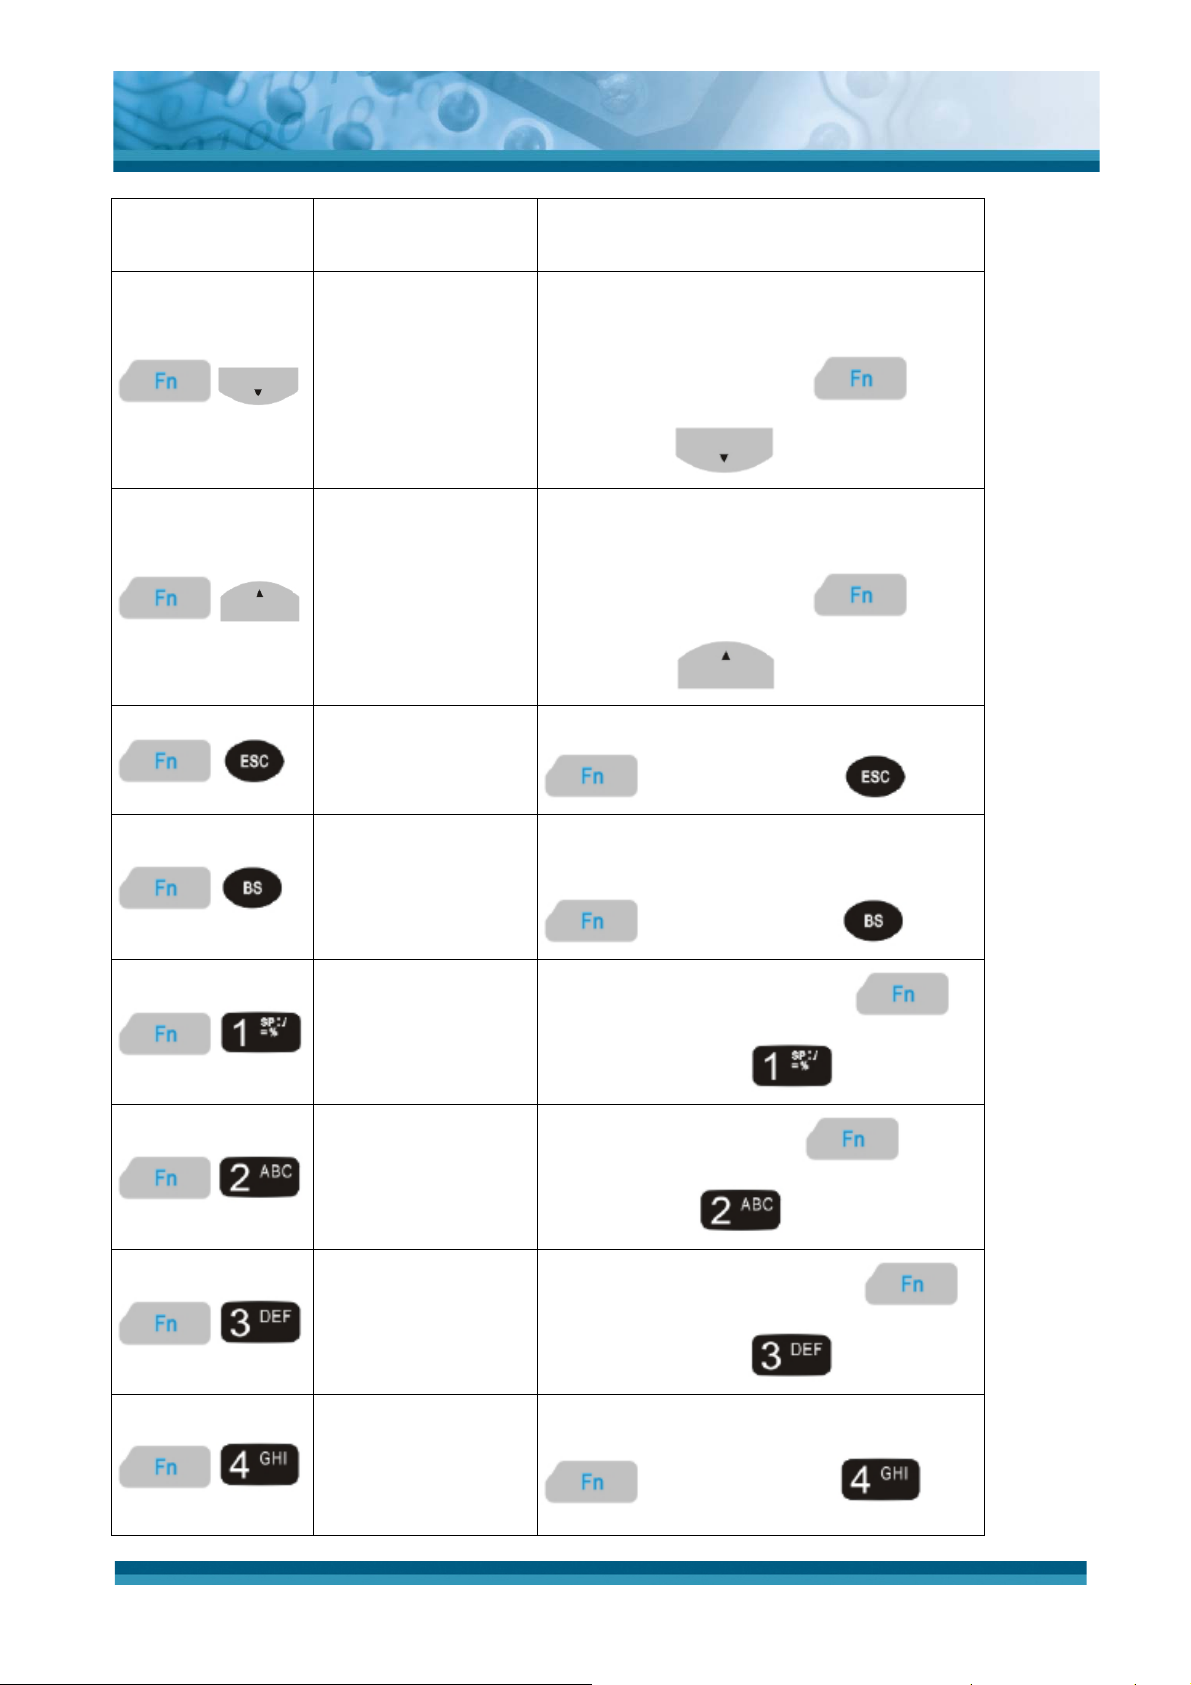
OPTICON
User's manual
H-15
Key Sequence
Fn + Main
Function
Page Down
Page Up
Audio Mute
Definition
To Move the cursor down one page. (The
cursor will move continuously if button
remains pressed), press
followed by
key.
key,
To Move the cursor up one page. (The
cursor will move continuously if button
remains pressed), press
key,
followed by key.
To Toggle the audio mute/on, press
key, followed by key.
TAB (Tabulation)
@ (at)
’
Ѐ (Plus Sign)
To move the cursor to the next tab stop or
the next control (on a form), press
key, followed by key.
Enter an {@, at} by pressing
key, then pressing key.
Enter a { ’ } by pressing
then pressing
key.
key,
Enter a plus sign by pressing
key, then pressing key
Paste
Use the “Paste” function, by pressing
key, followed by key.
2-31
Page 37
OPTICON
User's manual
H-15
Key Sequence
Fn + Main
Definition
Function
Use the “Delete” function, by pressing
Del (Delete)
key, followed by key.
Enter a minus sign by pressing
Ё (Minus Sign)
key, followed by key.
Use the “Copy” function, by pressing
Copy
key, followed by key.
Enter an AND sign by pressing
ϟ (AND)
key, followed by key.
Ϡ (Asterisk)
€ (euro)
Start Menu
Я (Backslash)
Table 2-5 Special Function key define
Enter an asterisk sign by pressing
key, followed by key.
Enter a Euro sign by pressing
key, followed by key.
Display the Start menu by pressing
key, followed by key.
Enter a backslash by pressing
key, followed by key.
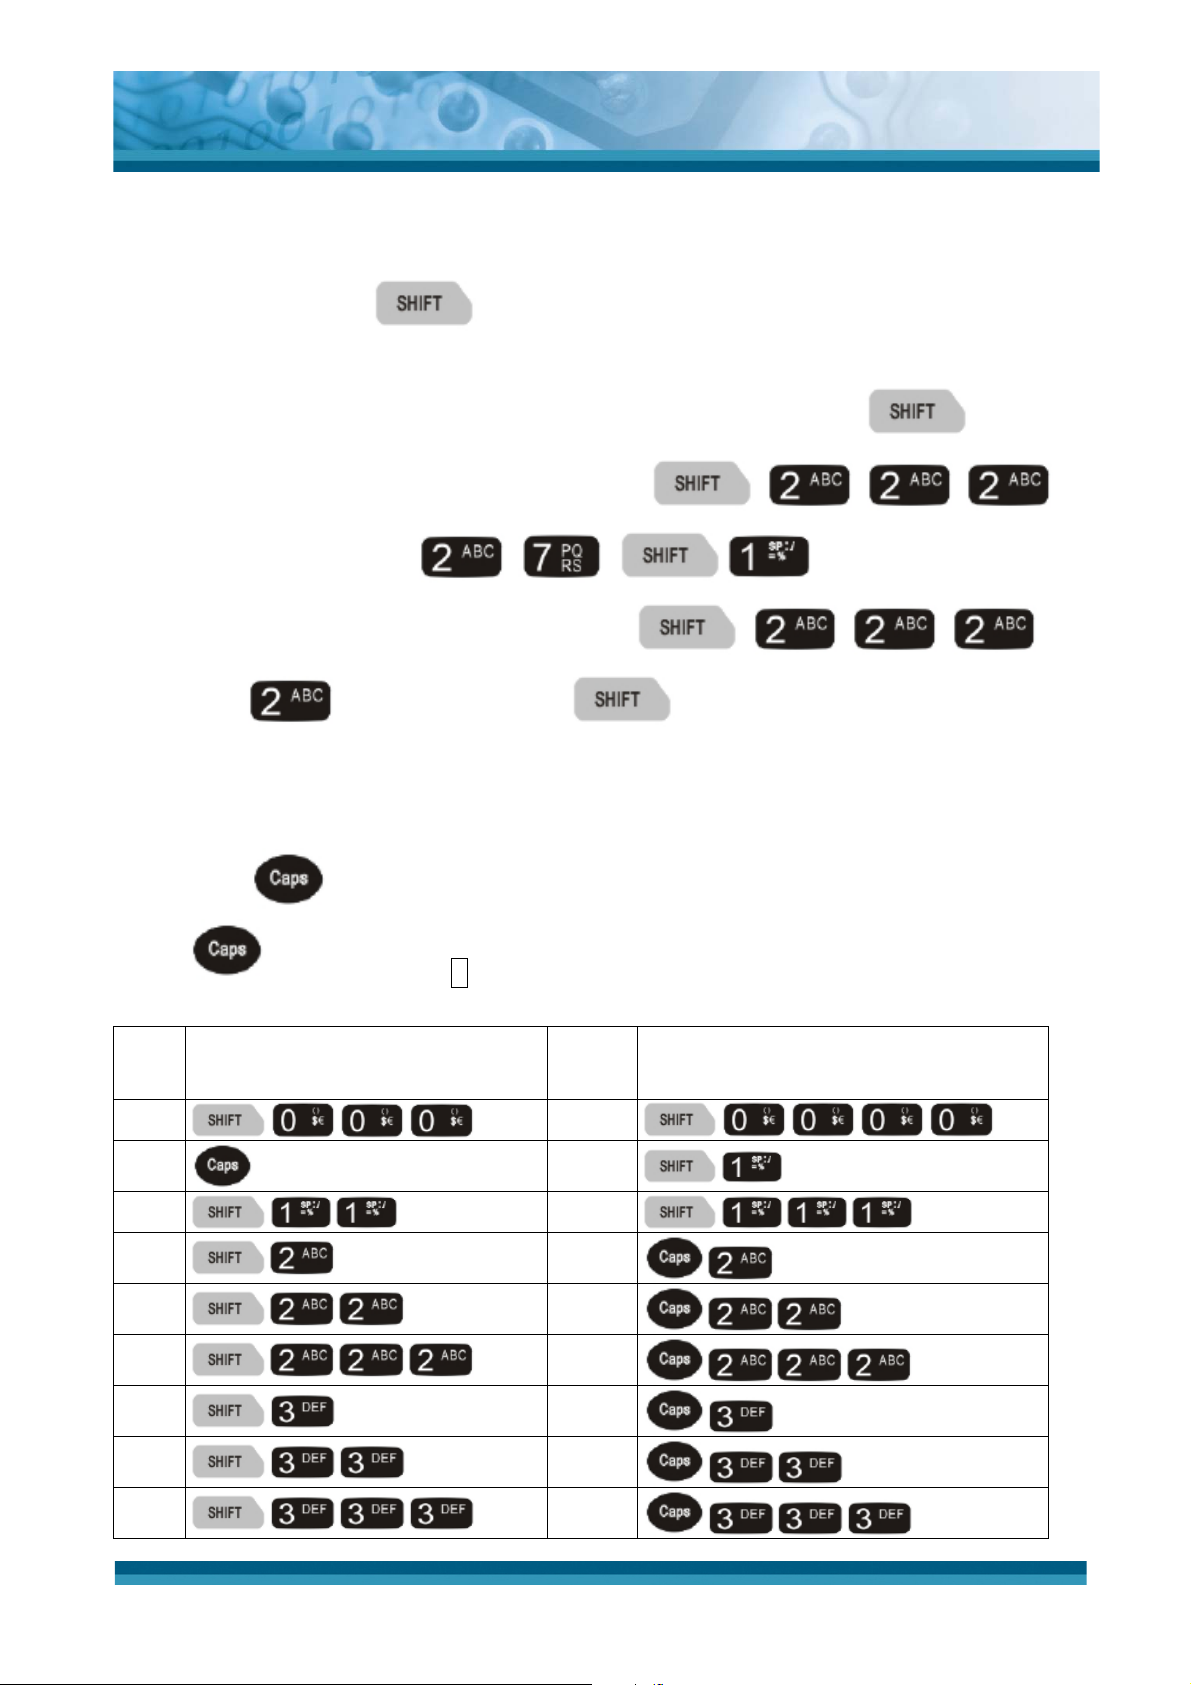
2.4.7.2 Shift keys by “Shift” + main Function
1. The
key enables you to toggle between the Numeric and Shift modes.
2-32
Page 38
OPTICON
User's manual
H-15
Numeric mode is when you type numbers with number keys. Shift mode is when you
type letters with the number keys.
2. When you press
key, the “Shift” icon appears at the task bar to indicate
Shift mode is enabled. It means Shift mode is disabled if the “Shift” icon is not present
at Task bar. The keypad stays in the Shift mode until you press
key again.
For an example to type “cap1” word, press
< wait 0.5 seconds > .
3. If you want to type a lowercase “c”, press
(The key three times, the key is needed if it’s the first Shift
character keying in). If a letter that is on the same key as the last letter entered, wait
two seconds after you pressed the last key, then you can enter the correct series of
keystrokes to create the next letter.
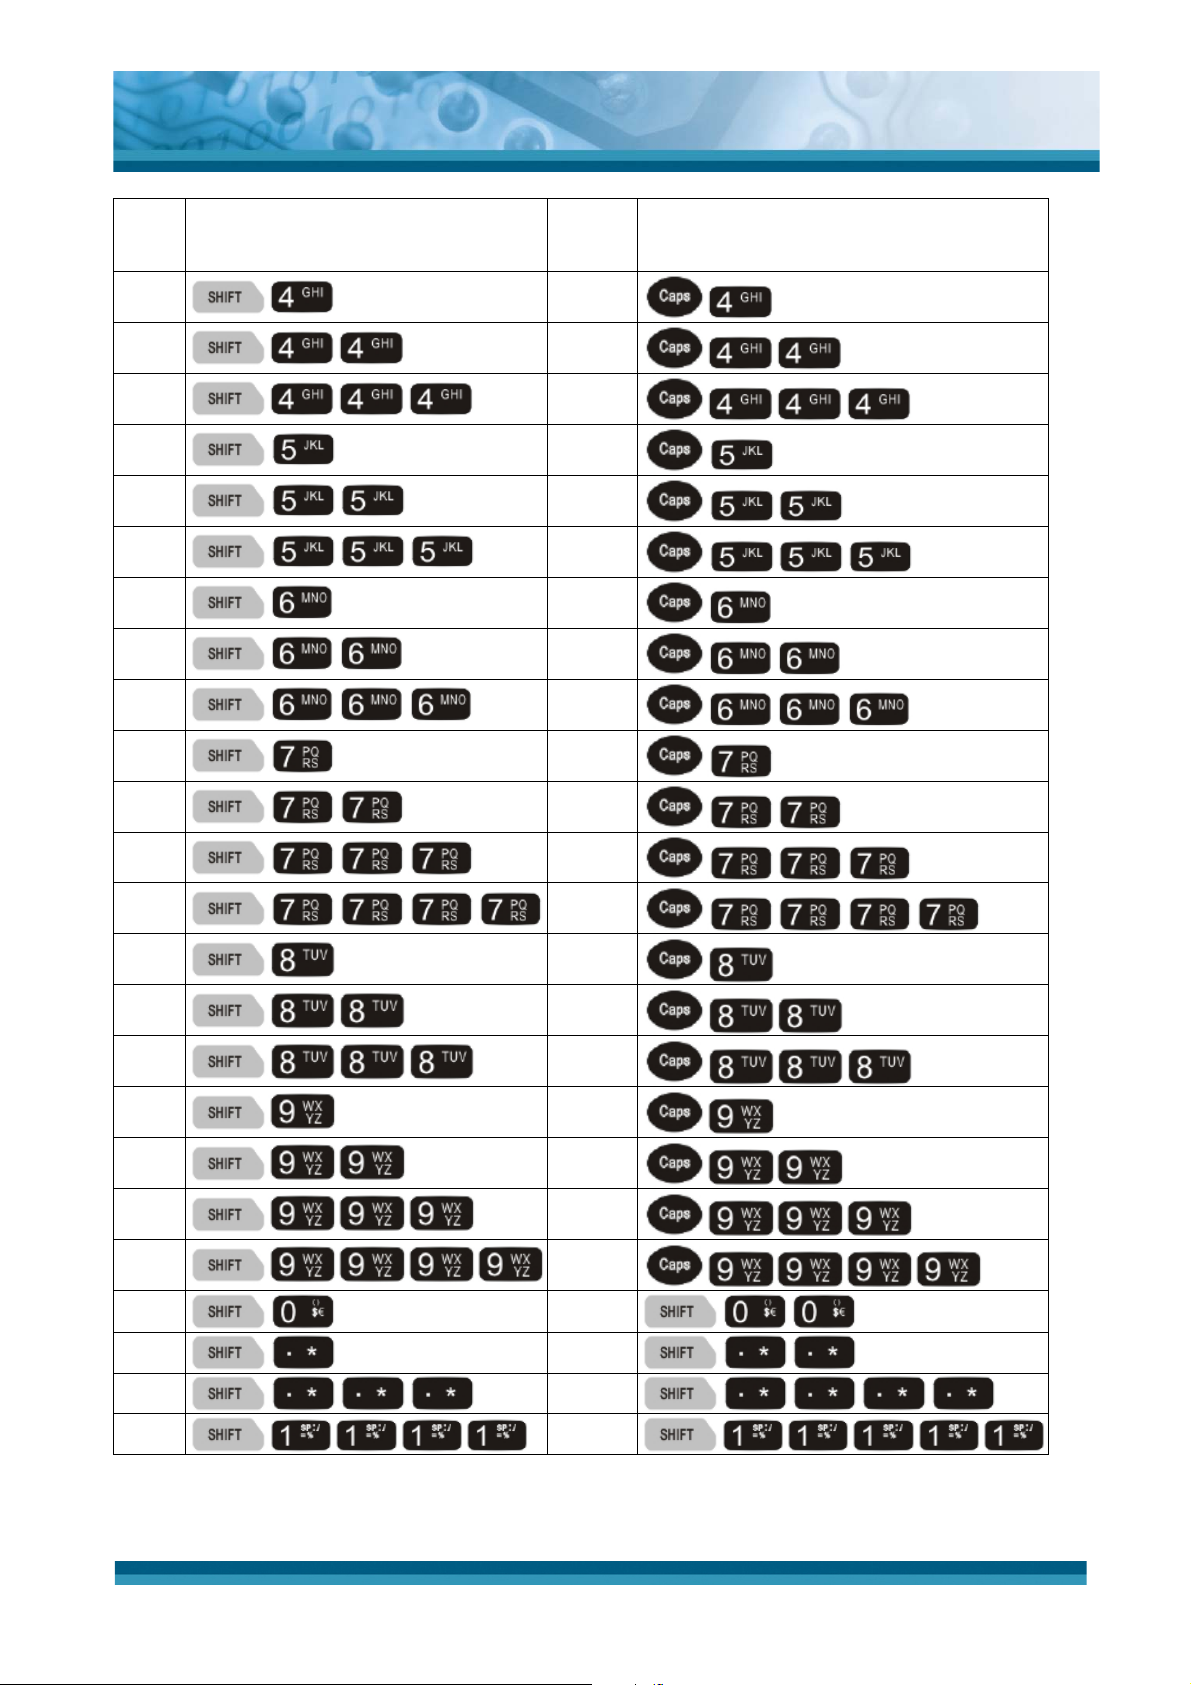
4. Press
key to set the Caps mode, the Caps mode remains until you press
key again. The “A” icon appears at the task bar during Caps mode.
To
Press the Keys
enter
г
Caps
Κ а
ҷ ҝ
Ҹ Ҟ
ҹ ҟ
Һ Ҡ
һ ҡ
Ҽ
To
Press the Keys
enter
€
Ң
2-33
Page 39
OPTICON
User's manual
H-15
To
Press the Keys
enter
ҽ ң
Ҿ Ҥ
ҿ ҥ
Ӏ Ҧ
Ӂ ҧ
ӂ Ҩ
Ӄ ҩ
ӄ Ҫ
Ӆ ҫ
ӆ Ҭ
To
Press the Keys
enter
Ӈ ҭ
ӈ Ү
Ӊ ү
ӊ Ұ
Ӌ ұ
ӌ Ҳ
Ӎ ҳ
ӎ Ҵ
ӏ ҵ
Ӑ Ҷ
θ ι
*
Δ
Ι
Ј и
Table 2-6 Shift + Numeric keys define
@
2-34
Page 40
OPTICON
User's manual
H-15
2.5 Navigating the Display
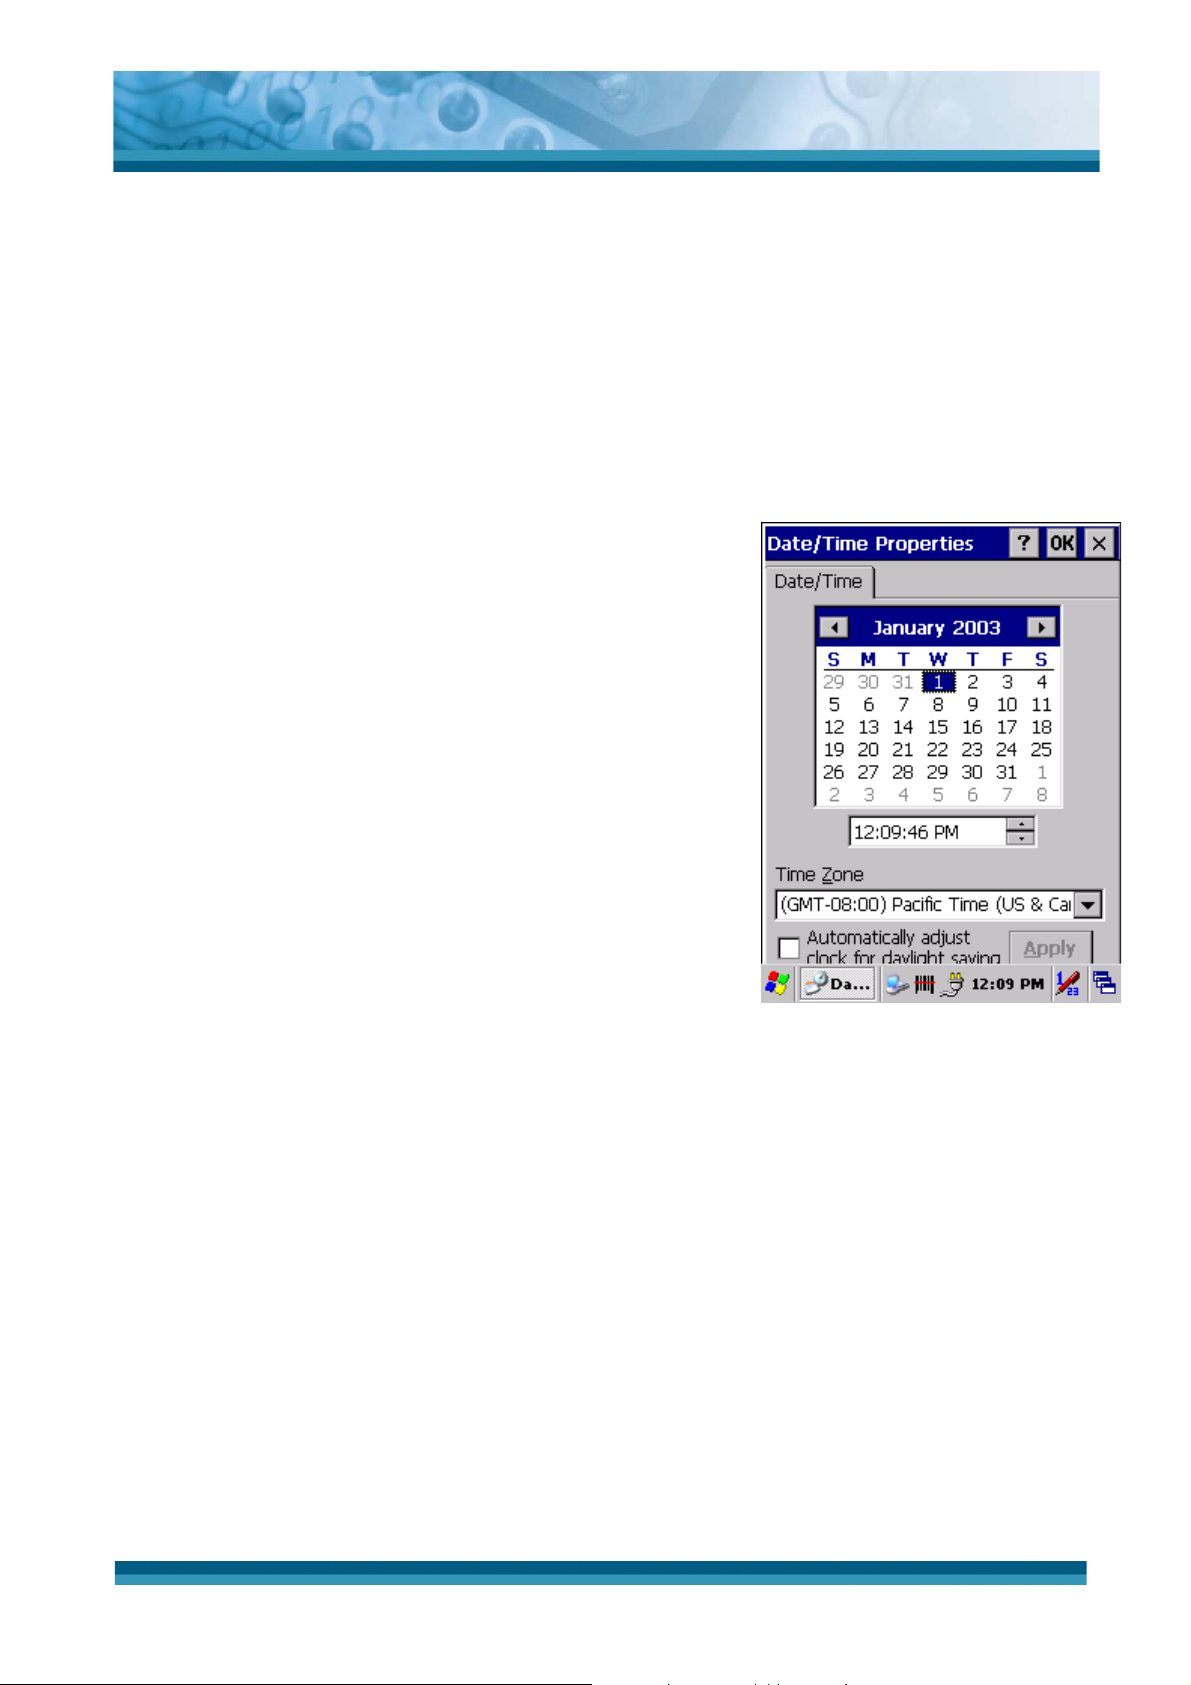
2.5.1 Setting Time and Date
In the Date/Time options, you can change the year, month, date, time, time zone, or select
automatic adjust for daylight saving time. To set or change the date and time:
1. Select Start > Settings > Control Panel > Date/Time.
2. To change the year, select the year. Select the up
arrow to increase the value, select the down arrow to
decrease the value. Or you can type a new value
in the field.
3. Select the month to open a pull-down list of months
or press the arrow buttons to either side of the month
to increase or decrease the month.
4. To change the time, select the hour, minute, seconds,
or AM/PM and select the up arrow to increase the
value; select the down arrow to decrease the value.
Or you can type a new value in the field.
5. Select your correct time zone from the pull-down list.
6. To automatically adjust the clock for daylight saving
time, enable the checkbox at the bottom of the screen.
7. Select Apply to save your changes or select OK to
exit the Date/Time settings.
2.5.2 Entering the Data
Figure 2-13 Date/Time properties
To select and open programs, select Start > Programs from the task bar to open a list of
available programs. If the program has an icon on the desktop, double-tap to open it.
There are several ways to enter data in an application on the PDT:
z Use the keypad to enter alpha-numeric characters, Refer to “2.4.7 Using the keypad”.
z
Use the stylus on the touch screen, Refer to “2.4.6 Using the stylus”.
z Select text in the same way you select the text on a PC. Use the stylus to highlight the
desired text by dragging the stylus across the desired text, double-tapping to select one
word and triple-tapping to select an entire line/paragraph. Refer to “2.4.6 Using the
stylus”.
z
Use the soft input panel with the stylus. Refer to “2.5.5 The Soft Keypad”
2-35
Page 41
OPTICON
User's manual
H-15
z Use the bar code reader to input the data from a bar code. Press one of the three trigger
keys to start the bar code reader. The bar code data will enter in the current application’s
open window. Refer to “2.5.7 Reading bar codes”.
For more information on factory installed applications, Refer to Chapter 4 “ Software
Programs”.
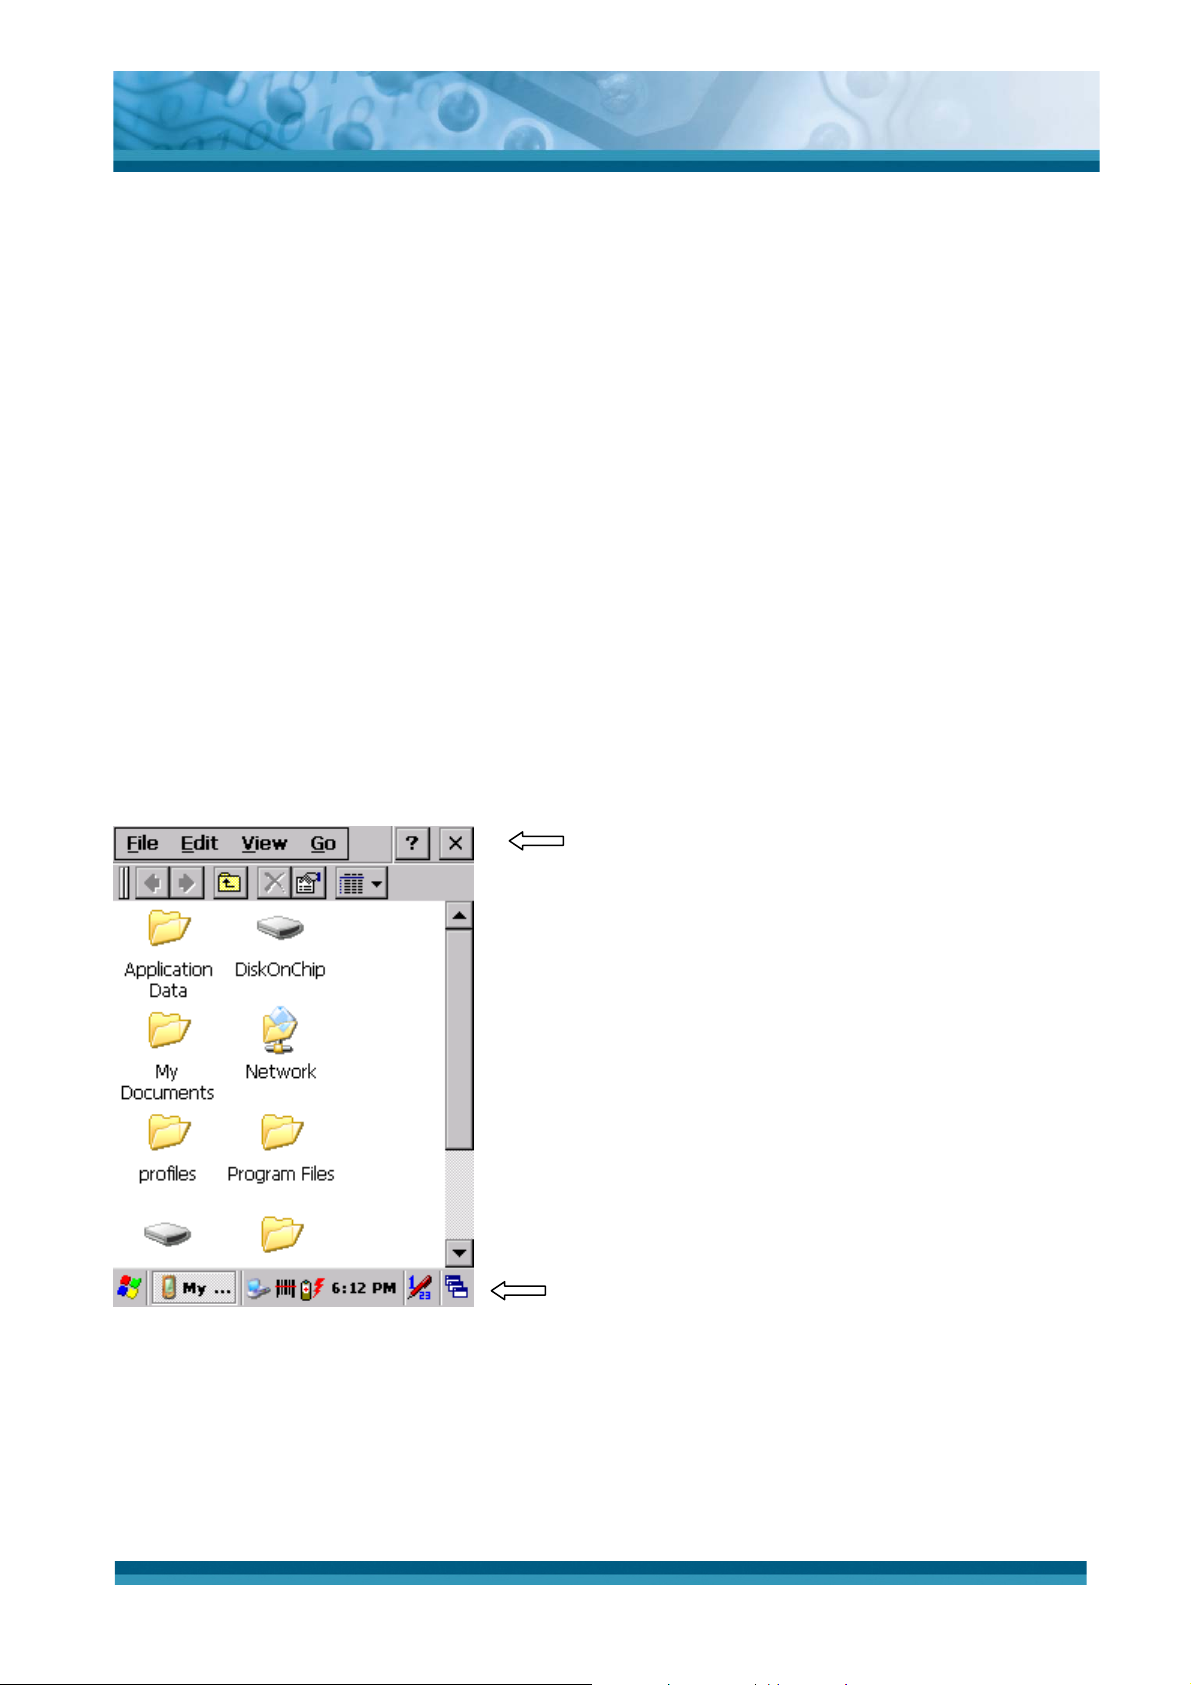
2.5.3 The Command Bar
Use the Command bar at top of the screen to perform tasks in programs, such a opening a
file, or editing a file.
2.5.4 The Task Bar
The Task bar at the bottom of the screen displays the icon, an icon for the active program,
the current time, and system icons for utilities loaded in memory. The Task bar includes
menu names, buttons, and the keyboard icon, which opens and closes the Soft Input Panel
(SIP). The Task bar allows you to select and close programs. Refer to Figure 2-15 to view
the Task bar.
Command Bar
Figure 2-14 Task Bar & Command Bar
Task Bar
2-36
Page 42
OPTICON
User's manual
H-15
2.5.5 The Soft Keypad
In applications that accept keypad input, the Soft Input Panel (SIP) can be used to enter data
using the stylus. The SIP is a software, QWERTY-style keyboard.
To open the SIP, tap the keyboard icon to open the menu and select Hide Input Panel to
close the keyboard.
Use the stylus to select letters, numbers, or symbols from the Soft Input Panel for the
current application.
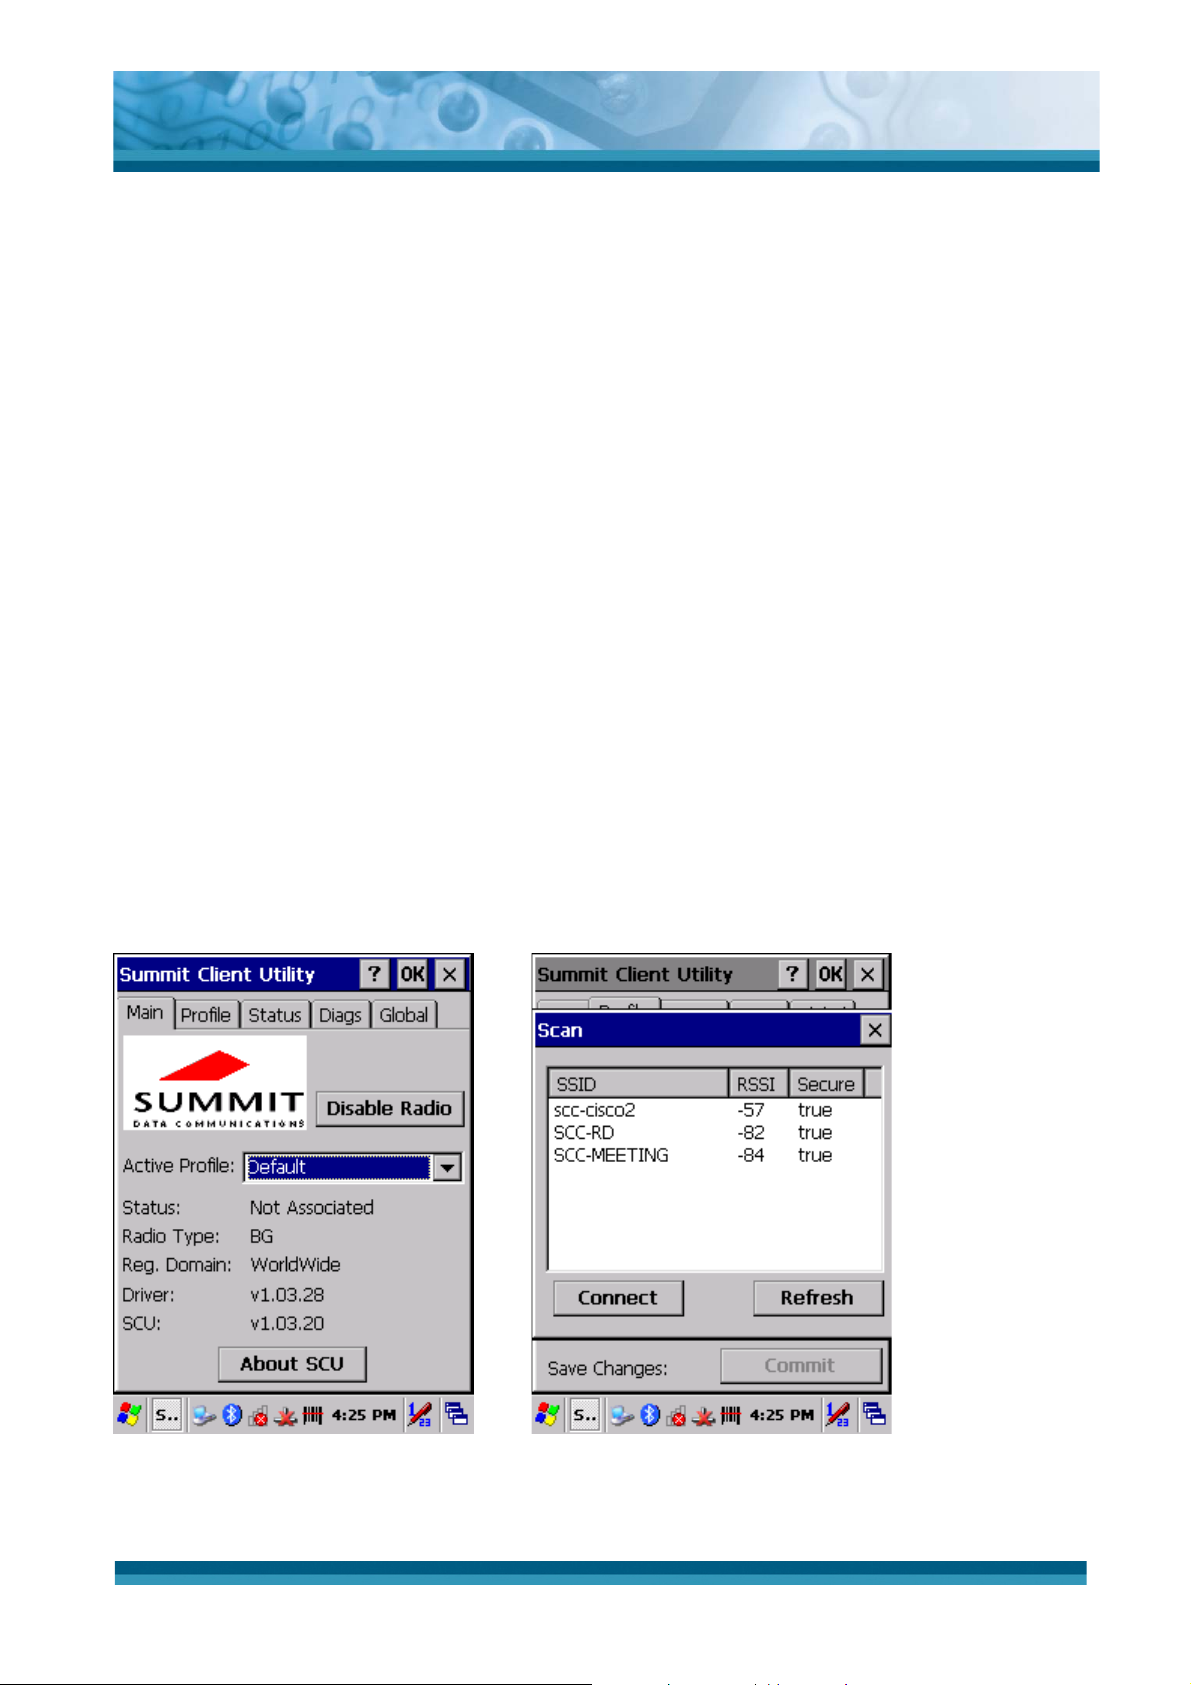
2.5.6 Setting Up Wireless LAN RF
Setting Up Wireless LAN
1) Press "Start" – "Programs" -- "Summit" –"WLAN" to open Summit Client Utility.
2) Tap Main tab, tap "Enable/Disable Radio" button to Enable or Disable the WLAN.
3) Tap Profile tab, tap "Scan" button to connect/refresh the network.
4) Select a network, tap the "Connect" button or double tap it to create a new profile SSID.
5) And setting encryption of the network then press "Commit" button to commit it.
6) Finally, you can view the SSID of the active profile on Main tab and select it to use the
network.
Note: availability depends on PDT model.
Figure 2-15 WLAN Manager Figure 2-16 WLAN Manager
2-37
Page 43
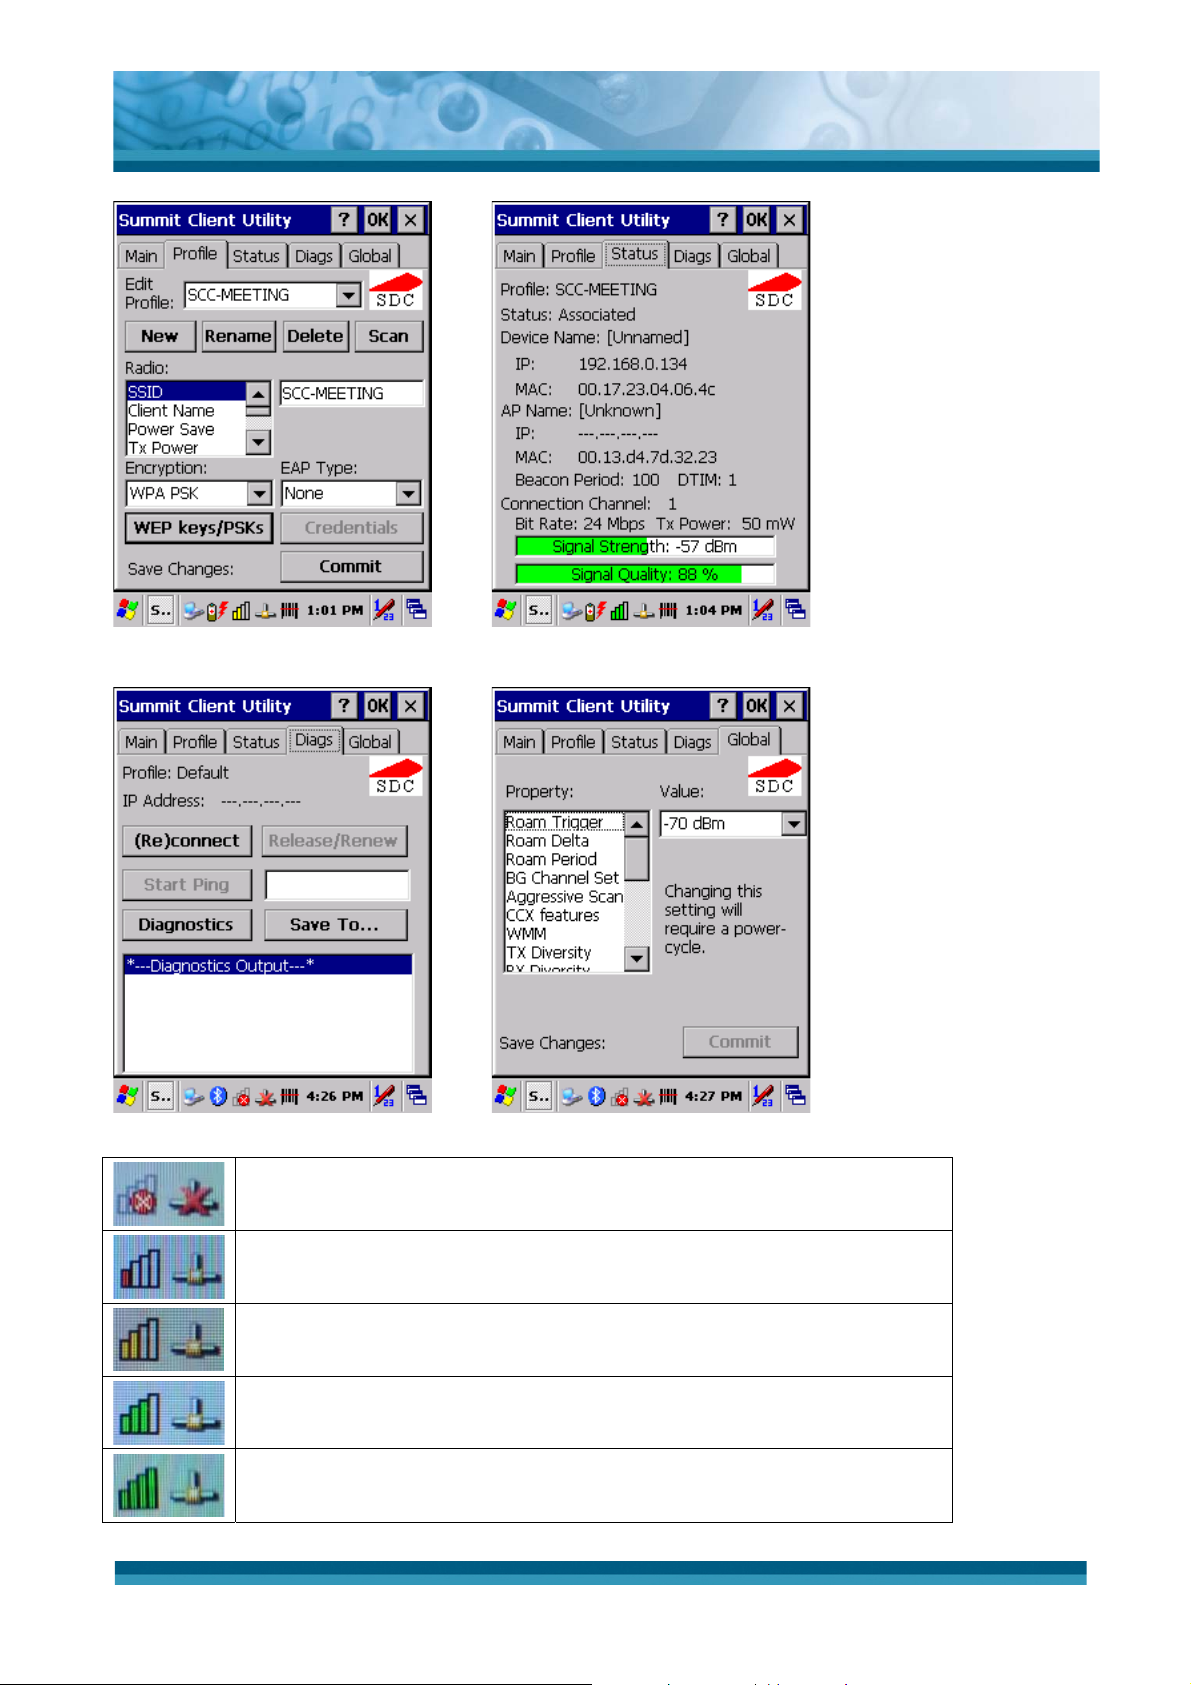
Figure 2-17 WLAN Manager Figure 2-18 WLAN Manager
OPTICON
User's manual
H-15
Figure 2-19 WLAN Manager Figure 2-20 WLAN Manager
802.11b/g WLAN is not connected to a network.
802.11b/g WLAN signal is Low.
802.11b/g WLAN signal is Average.
802.11b/g WLAN signal is Good.
802.11b/g WLAN signal is Very Good.
2-38
Page 44
OPTICON
User's manual
H-15
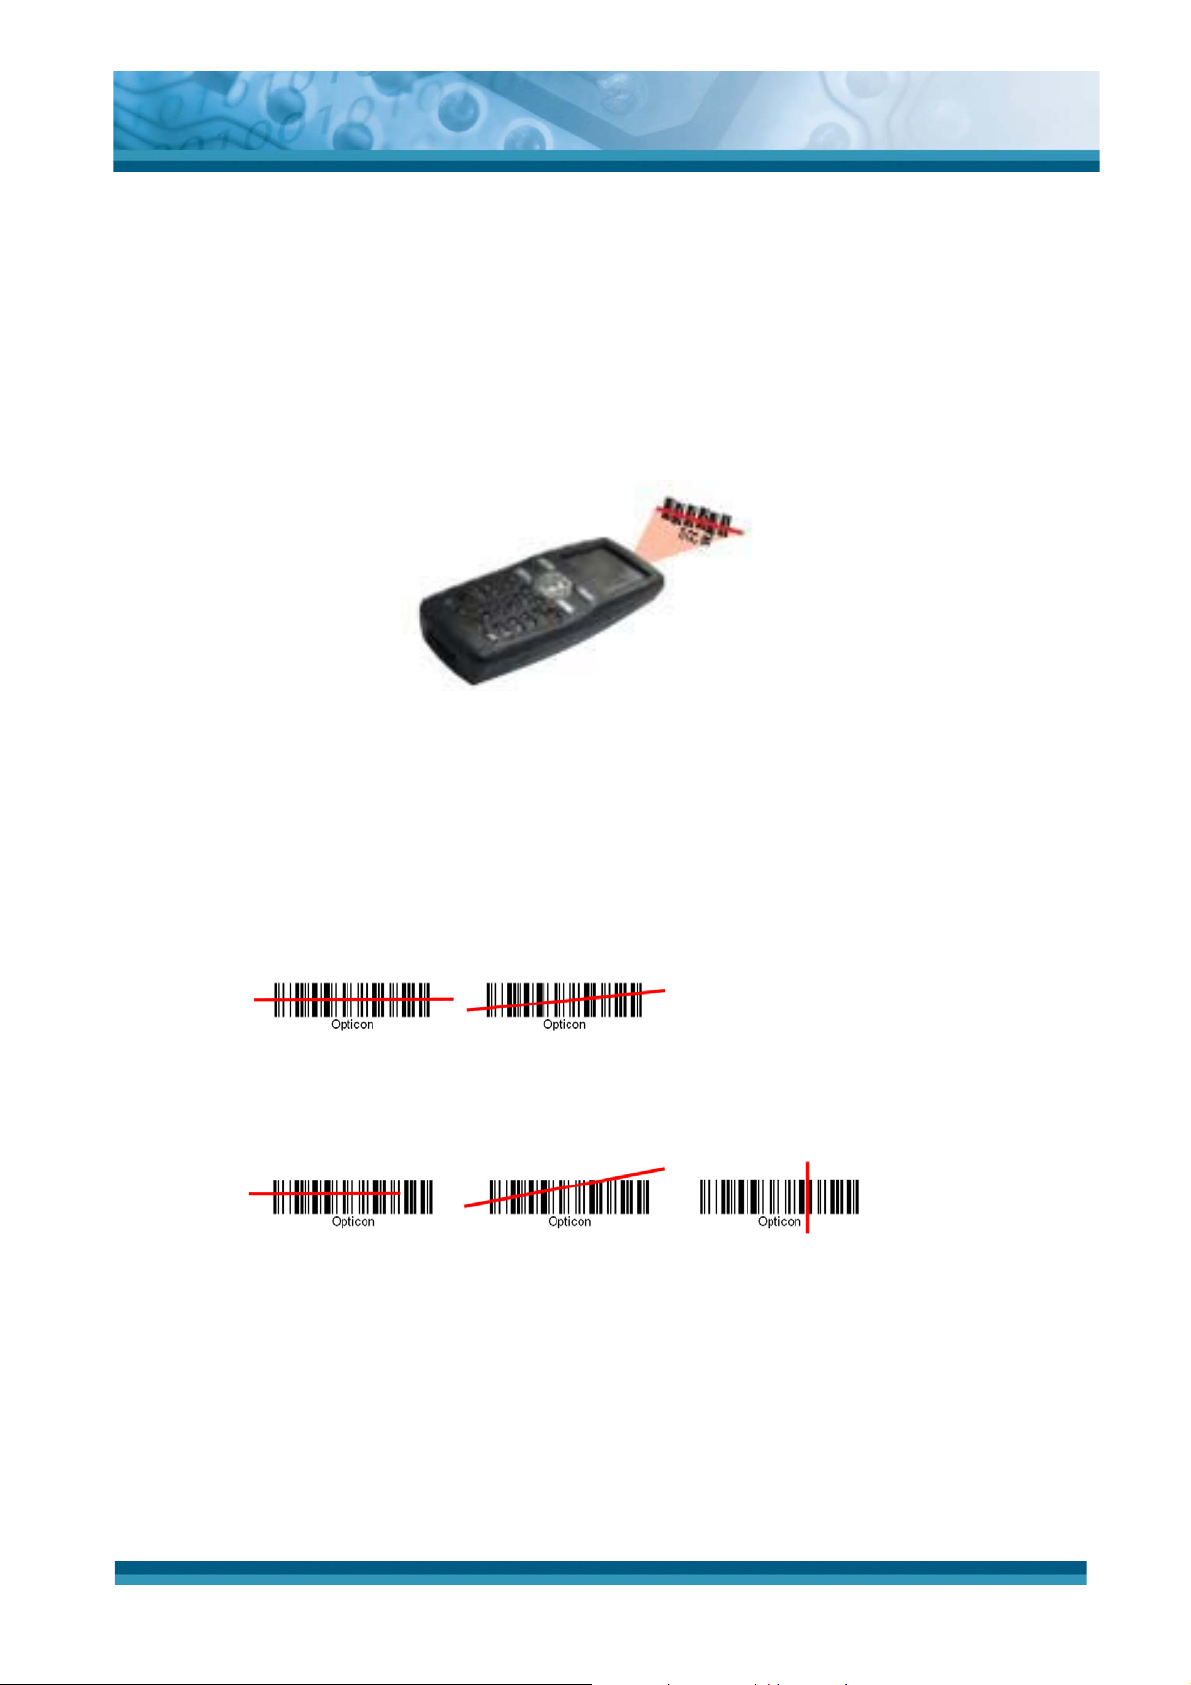
2.5.7 Reading bar codes, 1D laser version.
To use the scanning function, complete the following steps:
1. If you have not already done so, remove the protective plastic film before using devices
equipped with a 1D laser bar code reader.
2. Run the WordPad software program.
3. Press one of the three bar code reader trigger buttons.
4. Aim the scanning beam at the center of bar code.
5. Good scanning position.
The reading range is from 50 to 650mm distance.
1) Decrease the scanning distance to the bar code when scanning small bar
codes.
2) Increase the scanning distance from the bar code when scanning large bar
codes
3) The scanning area is visible by a red laser beam.
6. Bad scanning position.
1) Make sure that the laser beam sweeps across whole bar code.
2) Scanning operations may fail if the laser beam is positioned as below.
7. Upon reading a bar code, the red LED indicator turns on until the trigger is release or
after five seconds. The green LED and the beep tone indicates a good read.
Note: this product scans using laser light. Never look directly into the laser light or shine
the laser light into the eyes.
2.5.8 Help
Tap “?” to get information for each program.
2-39
Page 45
2.6 Power management
2.6.1 Suspend Mode
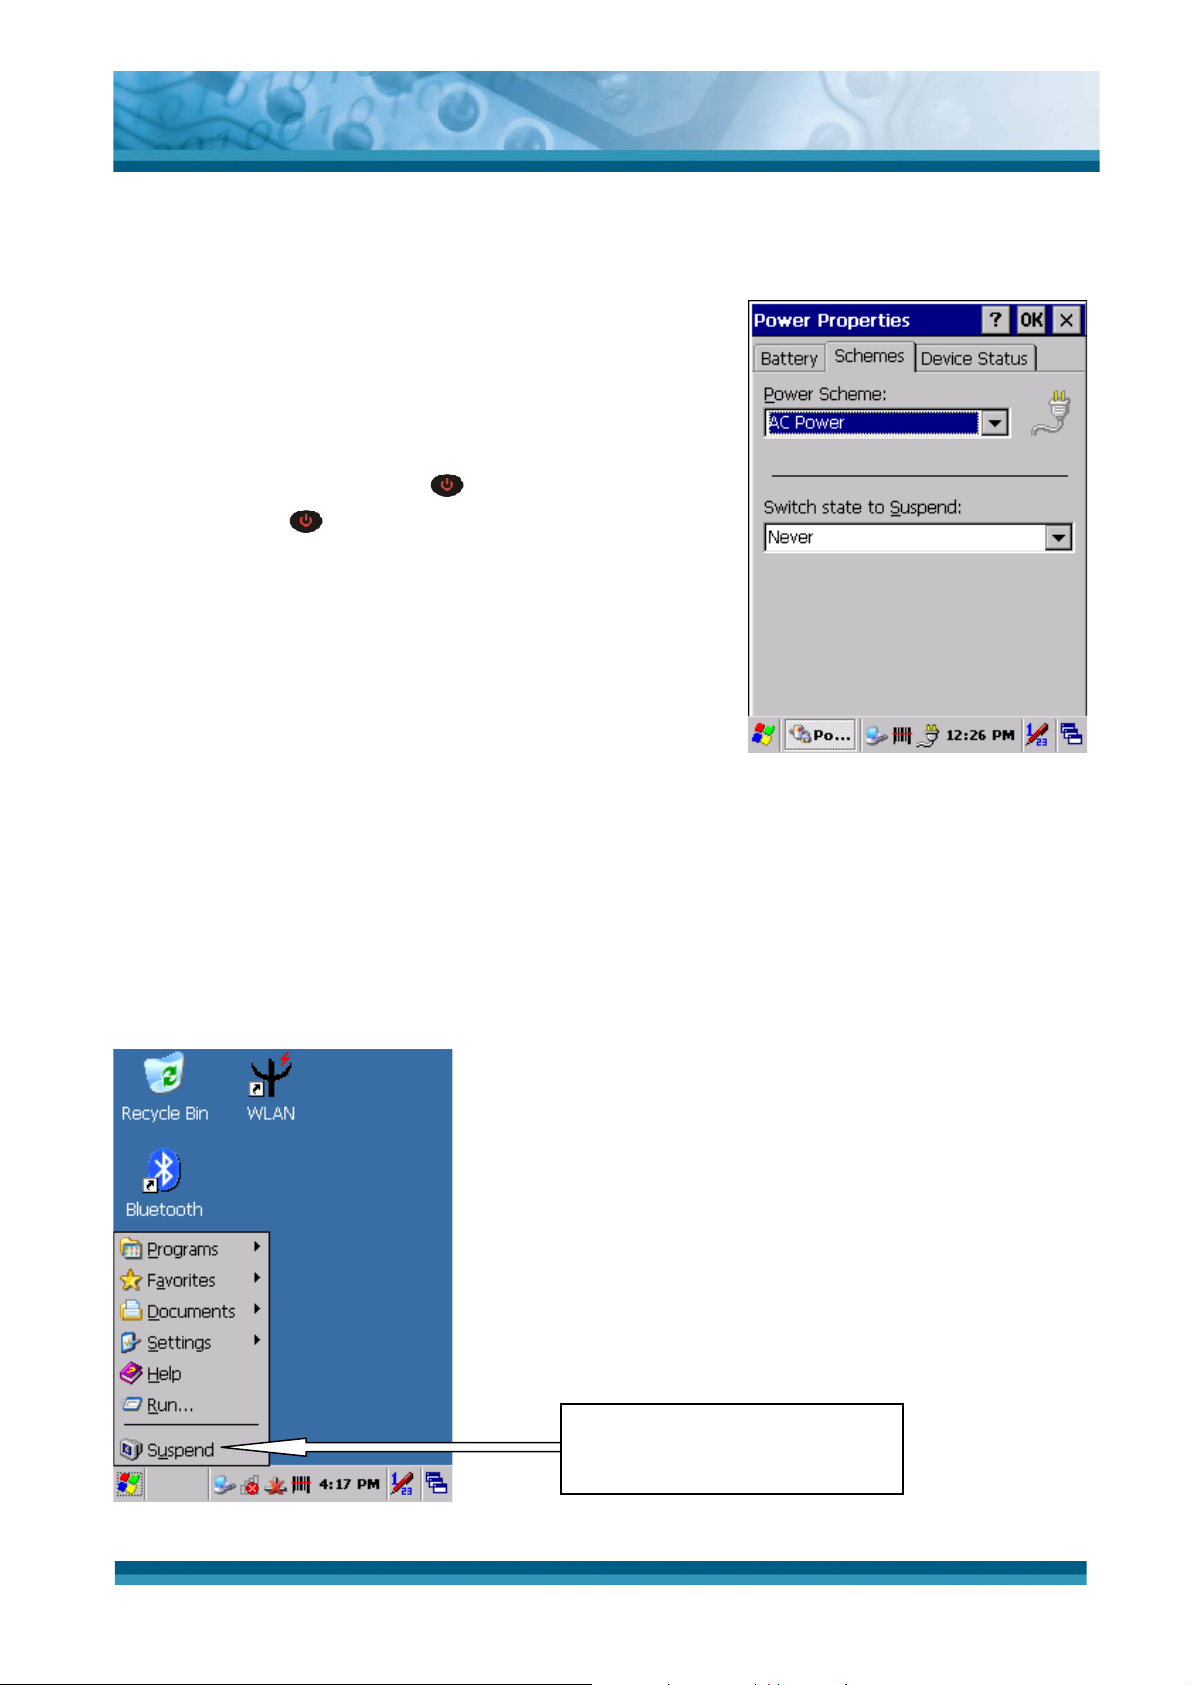
The PDT will go into a suspend mode when it is idle
for a period of time. The idle duration can be customized
using the Power control panel (refer to Figure “Schemes
Tab”) Suspend mode works and looks just like you have
OPTICON
User's manual
H-15
turned the unit off. Press the
PDT, Press the
key again for the PDT to resume its
key to suspend the
Previous state. Use the Battery power control panel to
set the duration to switch state to Suspend mode when
system using battery power. This will save battery power
when PDT is not in use.
Figure 2-21 Schemes Tab
Suspending:
The following conditions will suspend:
z Press <Power> key while the unit is on.
z
The duration timer of item “Switch state to Suspend” expires, which indicates that there
has been no user activity for a specified of time.
z
The battery pack is almost empty.
z Tap Start > Suspend
Figure 2-22 Suspend
Tap here to let PDT enter
into suspend mode
2-40
Page 46

OPTICON
User's manual
H-15
2.6.2 Resuming
Use the following method to resume (wake up the PDT):
z Press <Power> key to suspend or resume (wake up).
When a battery pack completely discharges while the unit is in suspend mode, the PDT
remains suspended until discharged battery condition is corrected.
2.7 Resetting the PDT
2.7.1 Warm Reset
A warm reset is a transition from the on, idle, or suspend power state that close all
applications, clears the working RAM, but preserves the file system.
Reason to Warm Reset: If an application “hangs”, initiate a warm reset to terminate the
application only.
Process to Warm Reset: To warm reset, press “F1” and “F4” button simultaneously.
After Warm Reset:
z The desktop appears with the application shortcuts on the screen.
z
The custom settings in the registry are persistent.
2.7.2 Cold Reset
CAUTION:
Try warm reset before you initiate Cold Reset. All applications will be
Closed and working RAM and all files will be cleared if you initiate the
Cold Reset. It is strongly recommended to back up your files to
FlashROM, Flashcard or PC.
1) You can use Cold Reset to initialize the PDT if WINCE.NET OS lock up or Warm Reset
has no effect.
2) To perform Cold Reset, press “Power”, “F1” and “F4” button simultaneously.
3) PDT will initiate boot up after Cold Reset.
2-41
Page 47
OPTICON
User's manual
H-15
Chapter 3. PDT settings
3.1 Introduction
To view available options for PDT’s setting, tap Start > Settings. Then, there are three items
inside Settings: “Control Panel”, “Network and Dial-up” and “Taskbar and Start”.
3.2 Control Panel
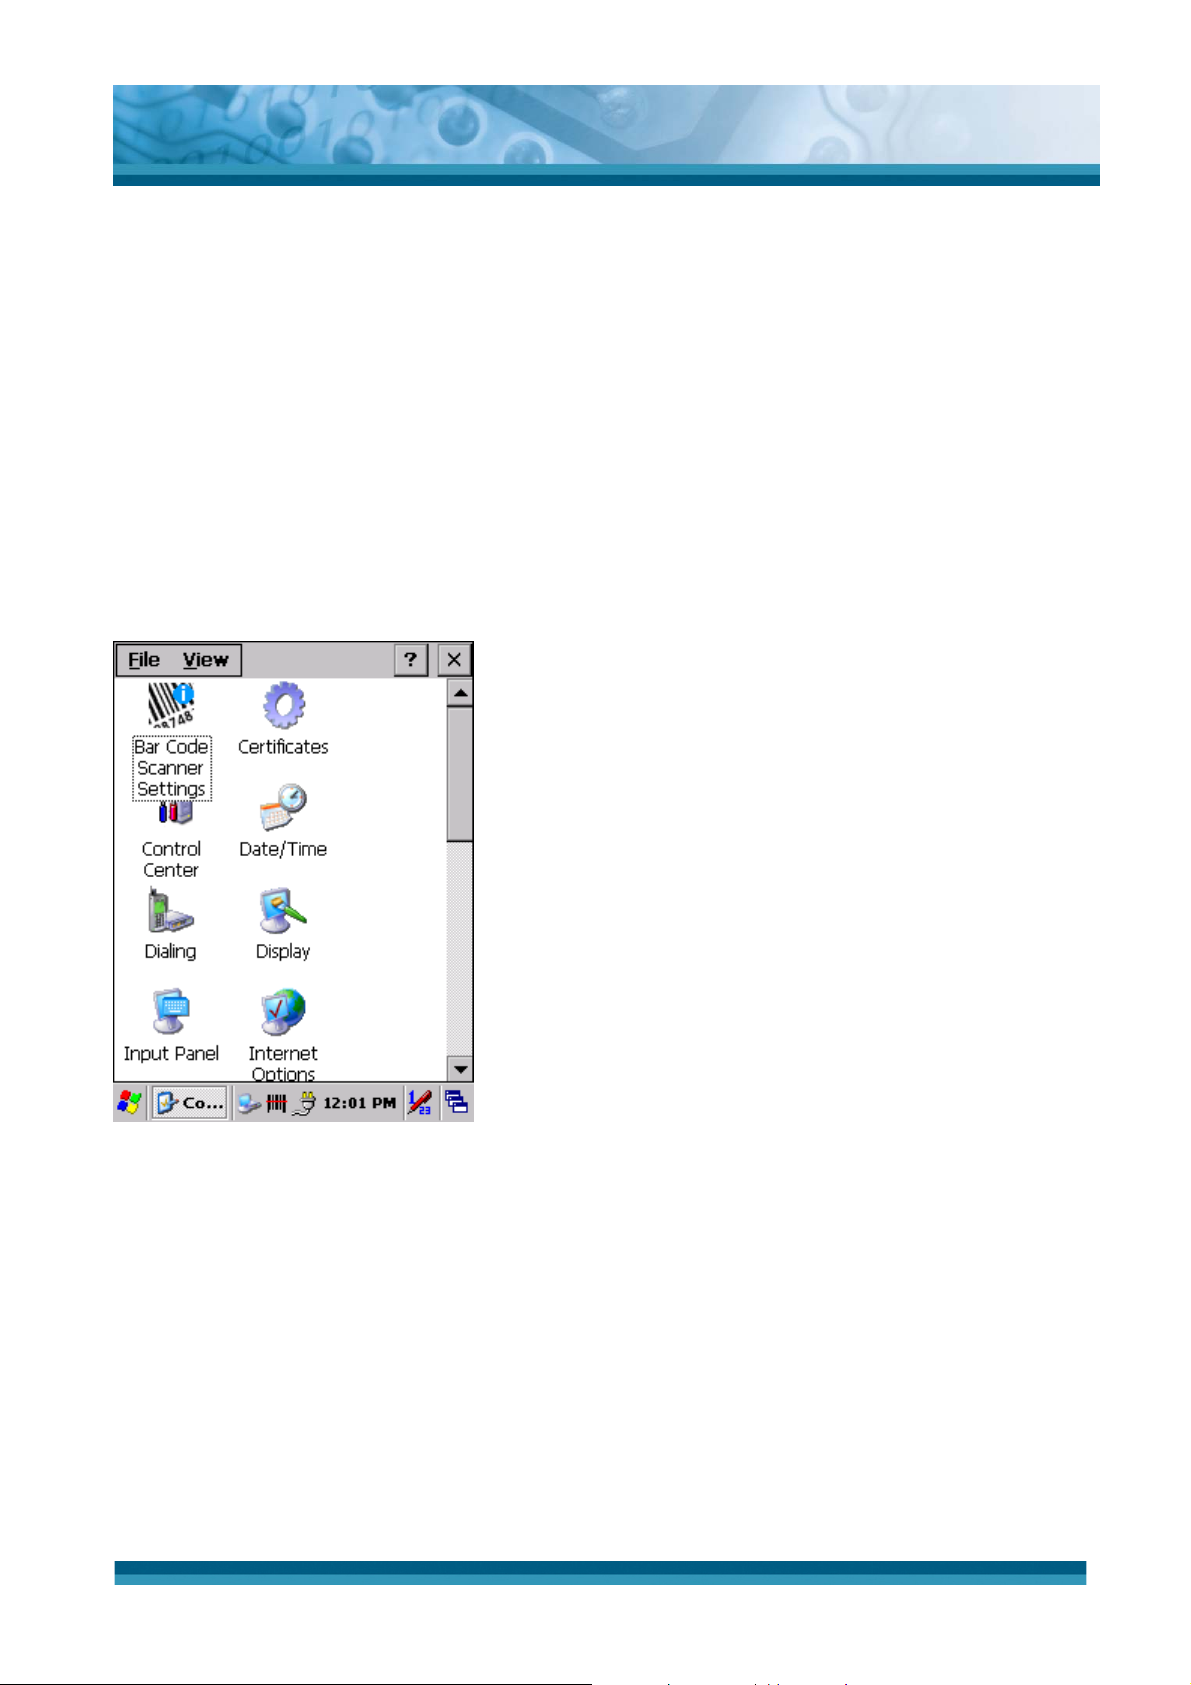
To view the Control Panel and settings you can modify by tapping Start > Settings >
Control Panel.
Figure 3-1 Control Panel
3-1
Page 48

3.2.1 Bluetooth Device Properties
ICON ITEM & FUNCTION
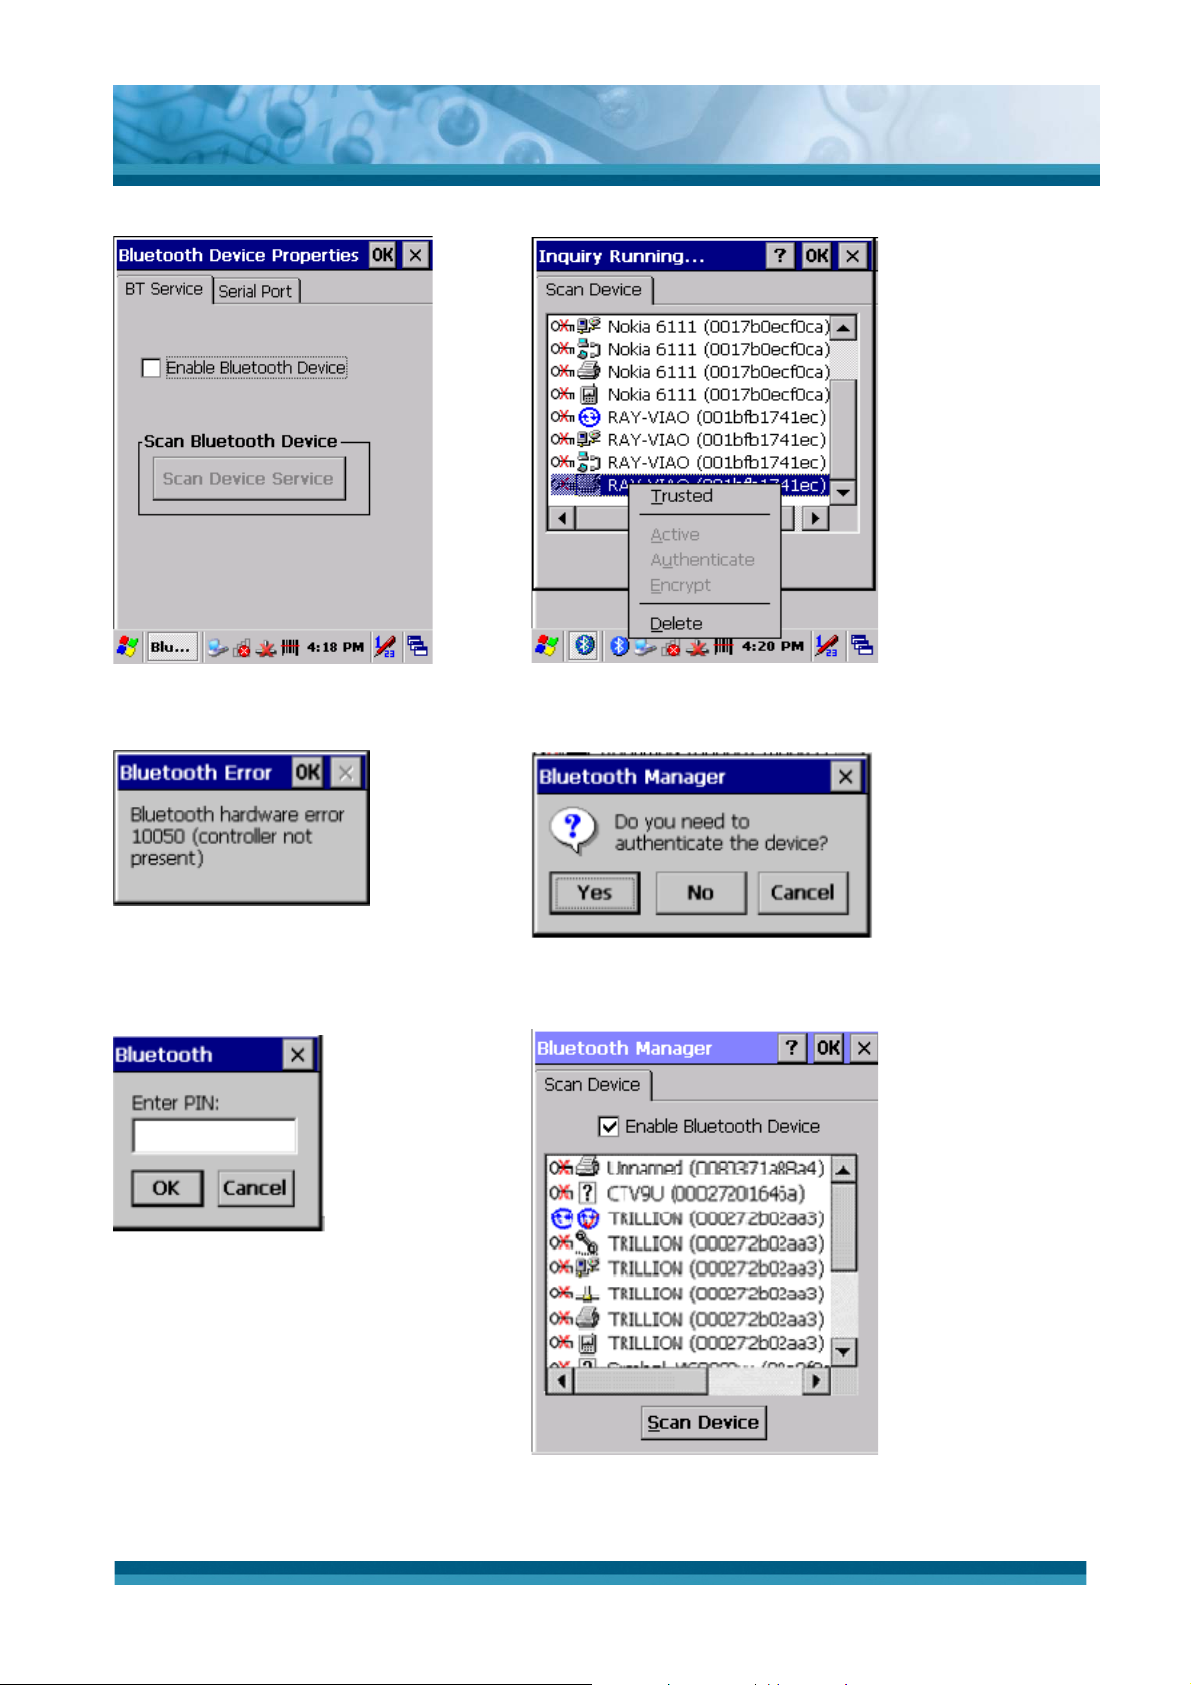
z “Scan Device” Tab ( Figure 3-2) :
9 Tap the Scan Device button to initiate a scan for Bluetooth
devices. The Bluetooth manager lists the Bluetooth devices
that it finds, see Figure 3-3. If Bluetooth hardware is not
found in the PDT, the Bluetooth Hardware Error window
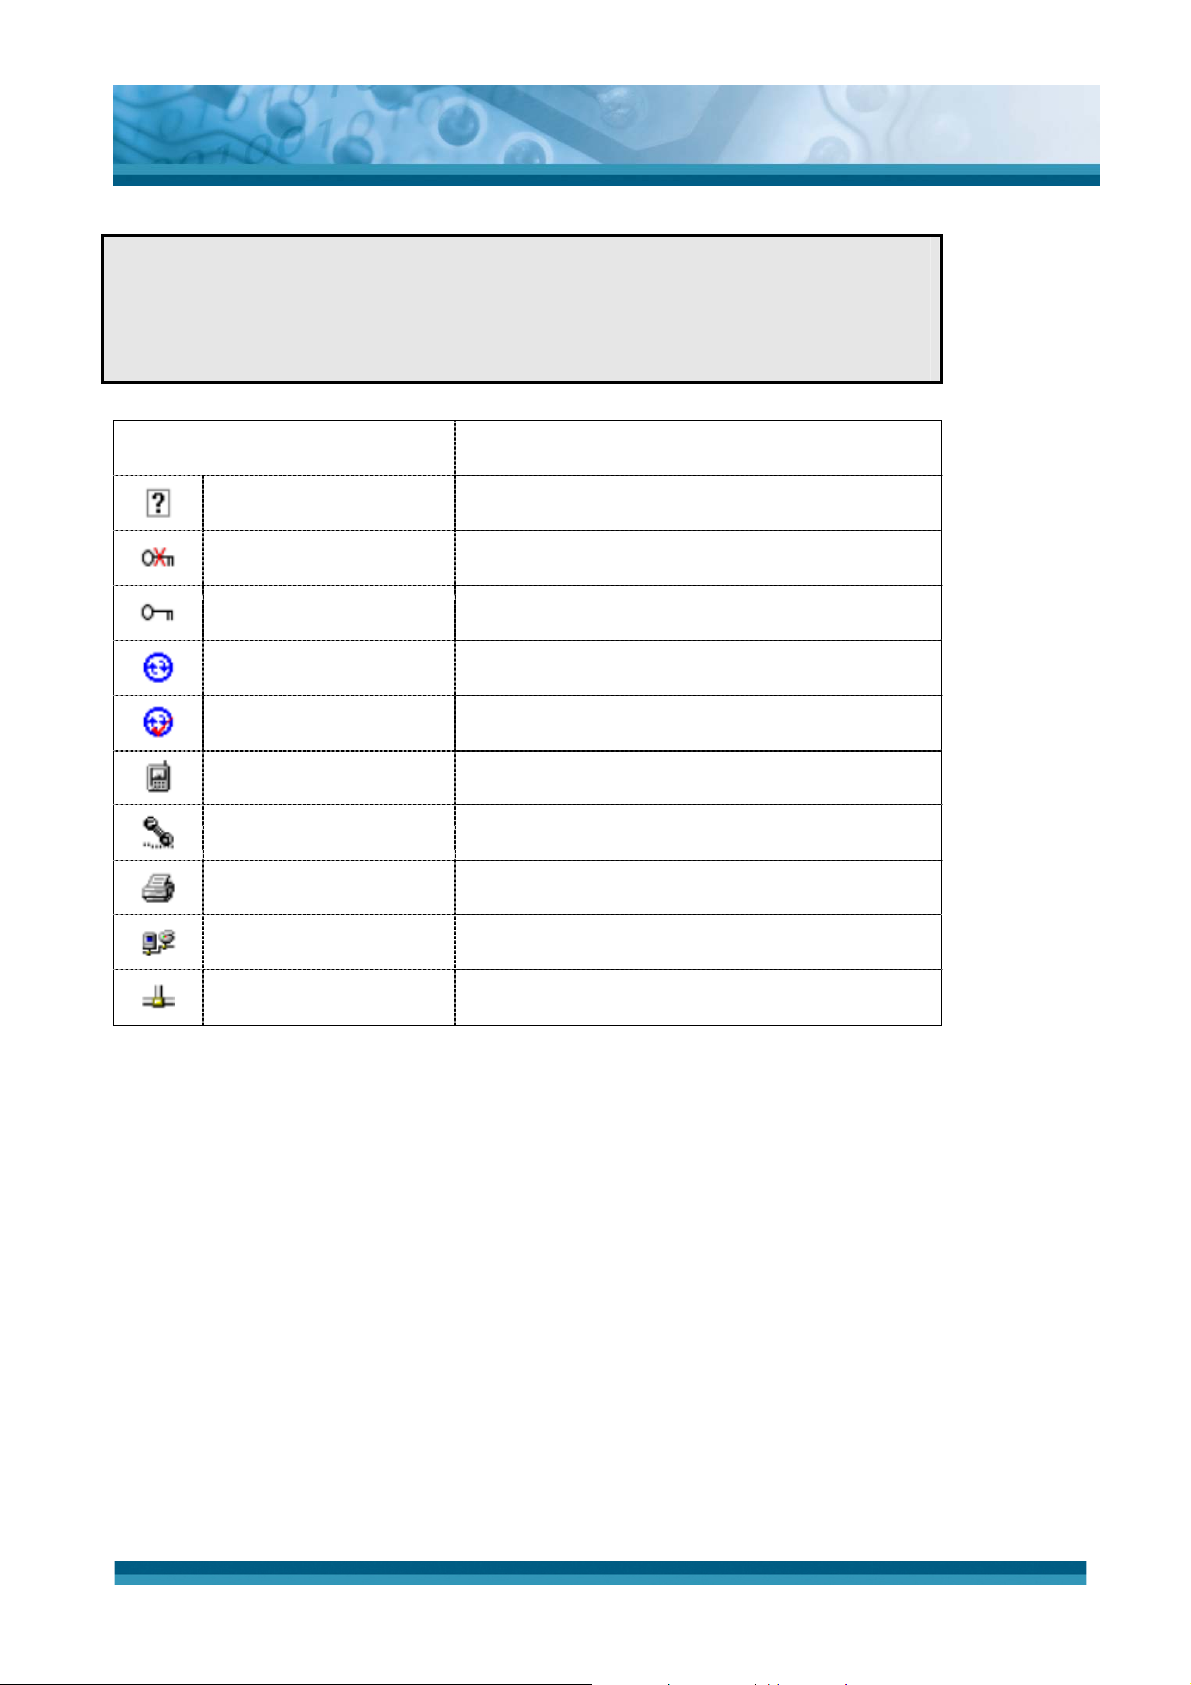
appears, see Figure 3-4. Table 3-1 described the
Bluetooth Icons.
9 Double tap the device to connect to on the device list. The
Bluetooth Manager Authentication window appears. Tap
OPTICON
User's manual
H-15
No to connect to the device without authentication, or tap
Yes to authenticate the device before connecting. (Figure
3-5)
9 If the Yes button was selected in the Bluetooth Manager
Authentication window, the enter PIN windows appears.
Enter a PIN (between 1 and 16 alpha numeric characters)
in the Enter PIN: text box, and tap OK. The mobile
computer sends the PIN request to the device for bonding.
(Figure 3-6)
9 When prompted, the same PIN must be entered on the
other device. When the PIN is entered correctly on the
other device, the bonded icon appears on the device
list. (Figure 3-7)
Table 3-1 Bluetooth Device Properties
3-2
Page 49
OPTICON
User's manual
H-15
Figure 3-2 Bluetooth Manager Window Figure 3-3 Bluetooth Manager Window
Figure 3-4 Bluetooth Error Window Figure 3-5 Bluetooth Manager Window
Figure 3-6 Bluetooth Enter PIN Window Figure 3-7 Bluetooth Manager Window
3-3
Page 50
Note:
If the device to which the PDT is bonding does not appear in the list, ensure it
is turned on, in discoverable mode, and within range (30 feet / 10 meters) of
the PDT.
Icon Description
Unknown device icon Device is not defined
Locked icon Device is locked and can not be bonded to.
Not locked icon Device is not locked and can be bonded to.
Bluetooth device icon Bluetooth device
OPTICON
User's manual
H-15
Bonded device icon Bonded Bluetooth device
Mobile device icon Device is a mobile device
Phone icon Device is a phone.
Printer icon Device is a printer
Network icon Device is a network.
Linked icon Device is linked.
Table 3-2 Bluetooth Icons
3-4
Page 51
OPTICON
User's manual
H-15
3.2.2 Certificates
Certificates are used by some applications for establishing trust and for secure
communications.
Certificates are signed and issued by certificate authorities and are valid for a prescribed
period of time. Windows CE manages multiple certificate stores.
ICON ITEM & FUNCTION
z “Store” Tab ( Figure 3-8) :
9 In the Stores tab, select the certificate store you wish to
view or modify from the drop-down list (Figure 3-9).
9
The “Trusted Authorities “store lists the top-level
certificates for authorities you trust.( Figure 3-10 , Figure
9
9
z “Store” Tab :
9 To add a certificate or associated private key to the
9 To view more details of the selected certificate, such as the
9 To delete the selected certificate from the store, choose
Table 3-3 Certificates
3-11)
The “My Certificates “store contains your personal
certificates, which you use to identify yourself.
Intermediate certificate authorities that help establish a
chain of trust are stored in the “Other Authorities” store.
selected store, select “Import” (Figure 3-12).
expanded name or expiration date, choose “View”.
“Remove”.
3-5
Page 52
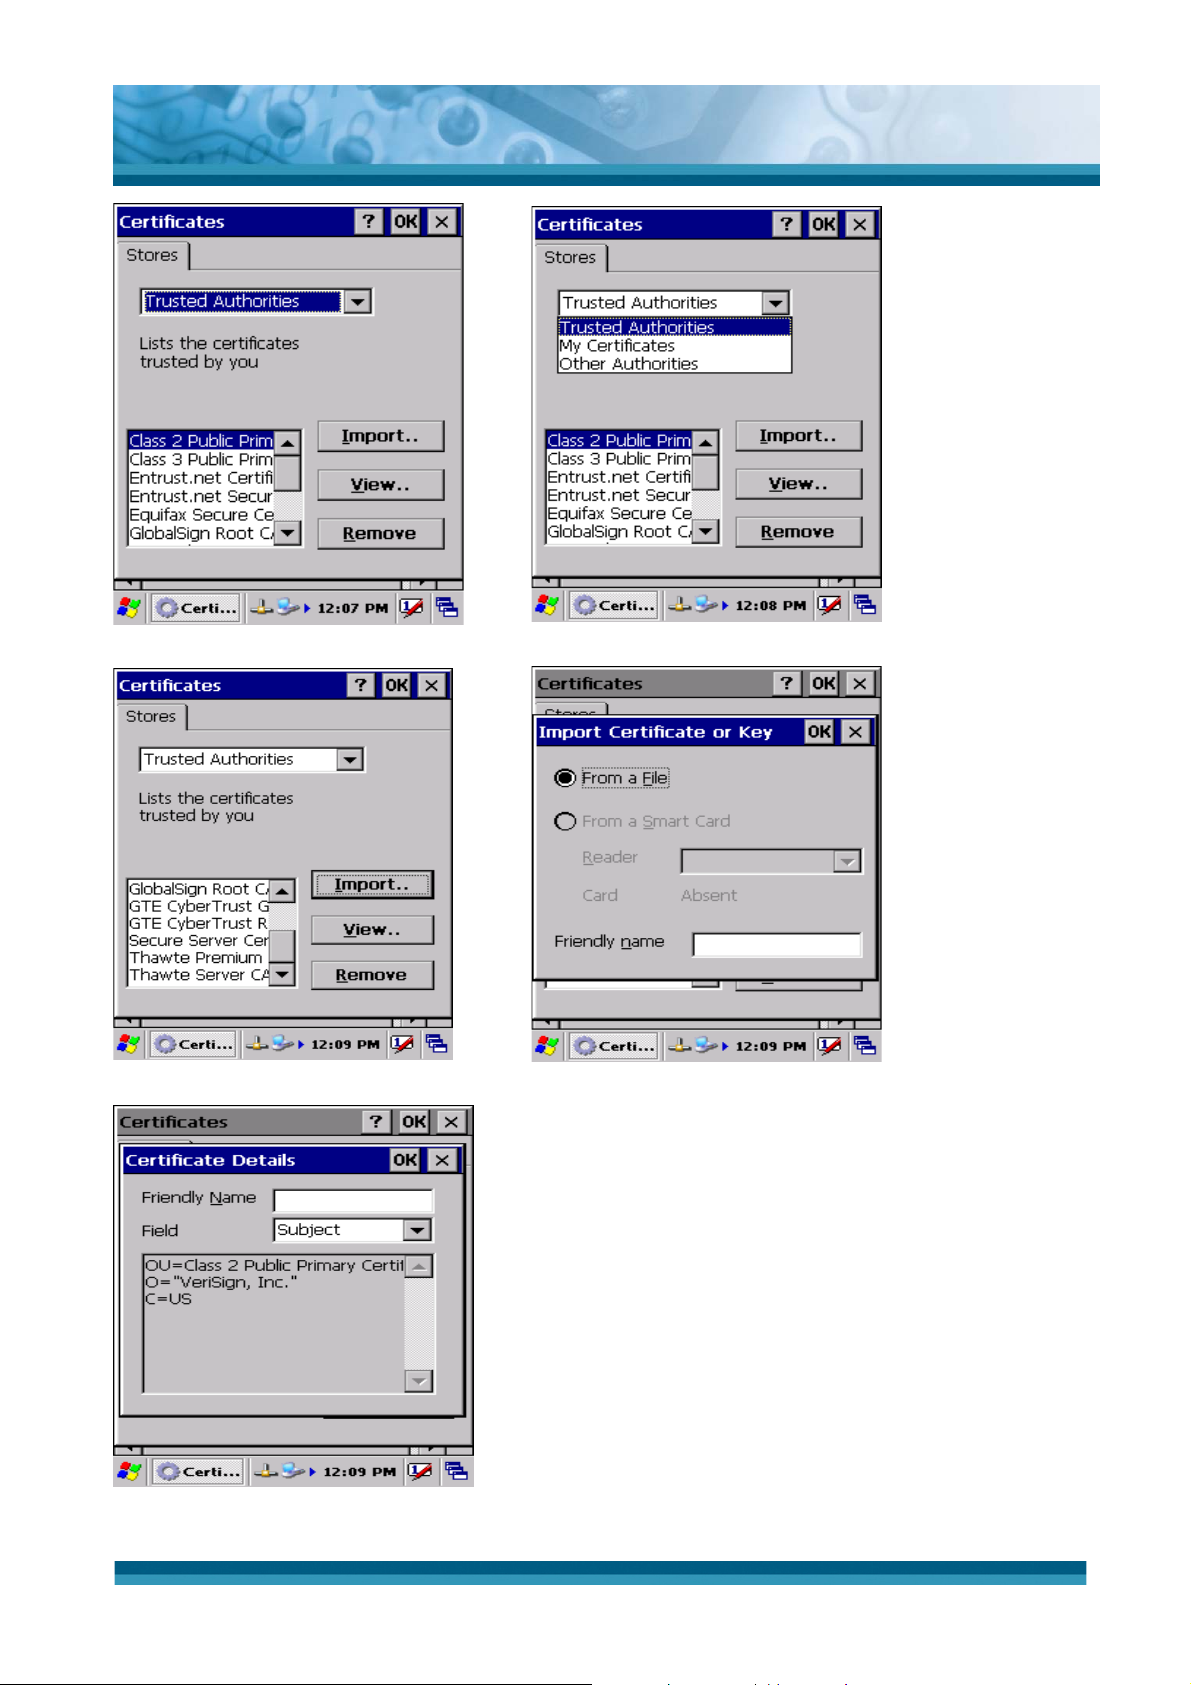
Figure 3-8 Certificates Figure 3-9 Certificates
OPTICON
User's manual
H-15
Figure 3-10 Certificates Figure 3-11 Certificates
Figure 3-12 Certificates
3-6
Page 53
OPTICON
User's manual
H-15
3.2.3 Control Center
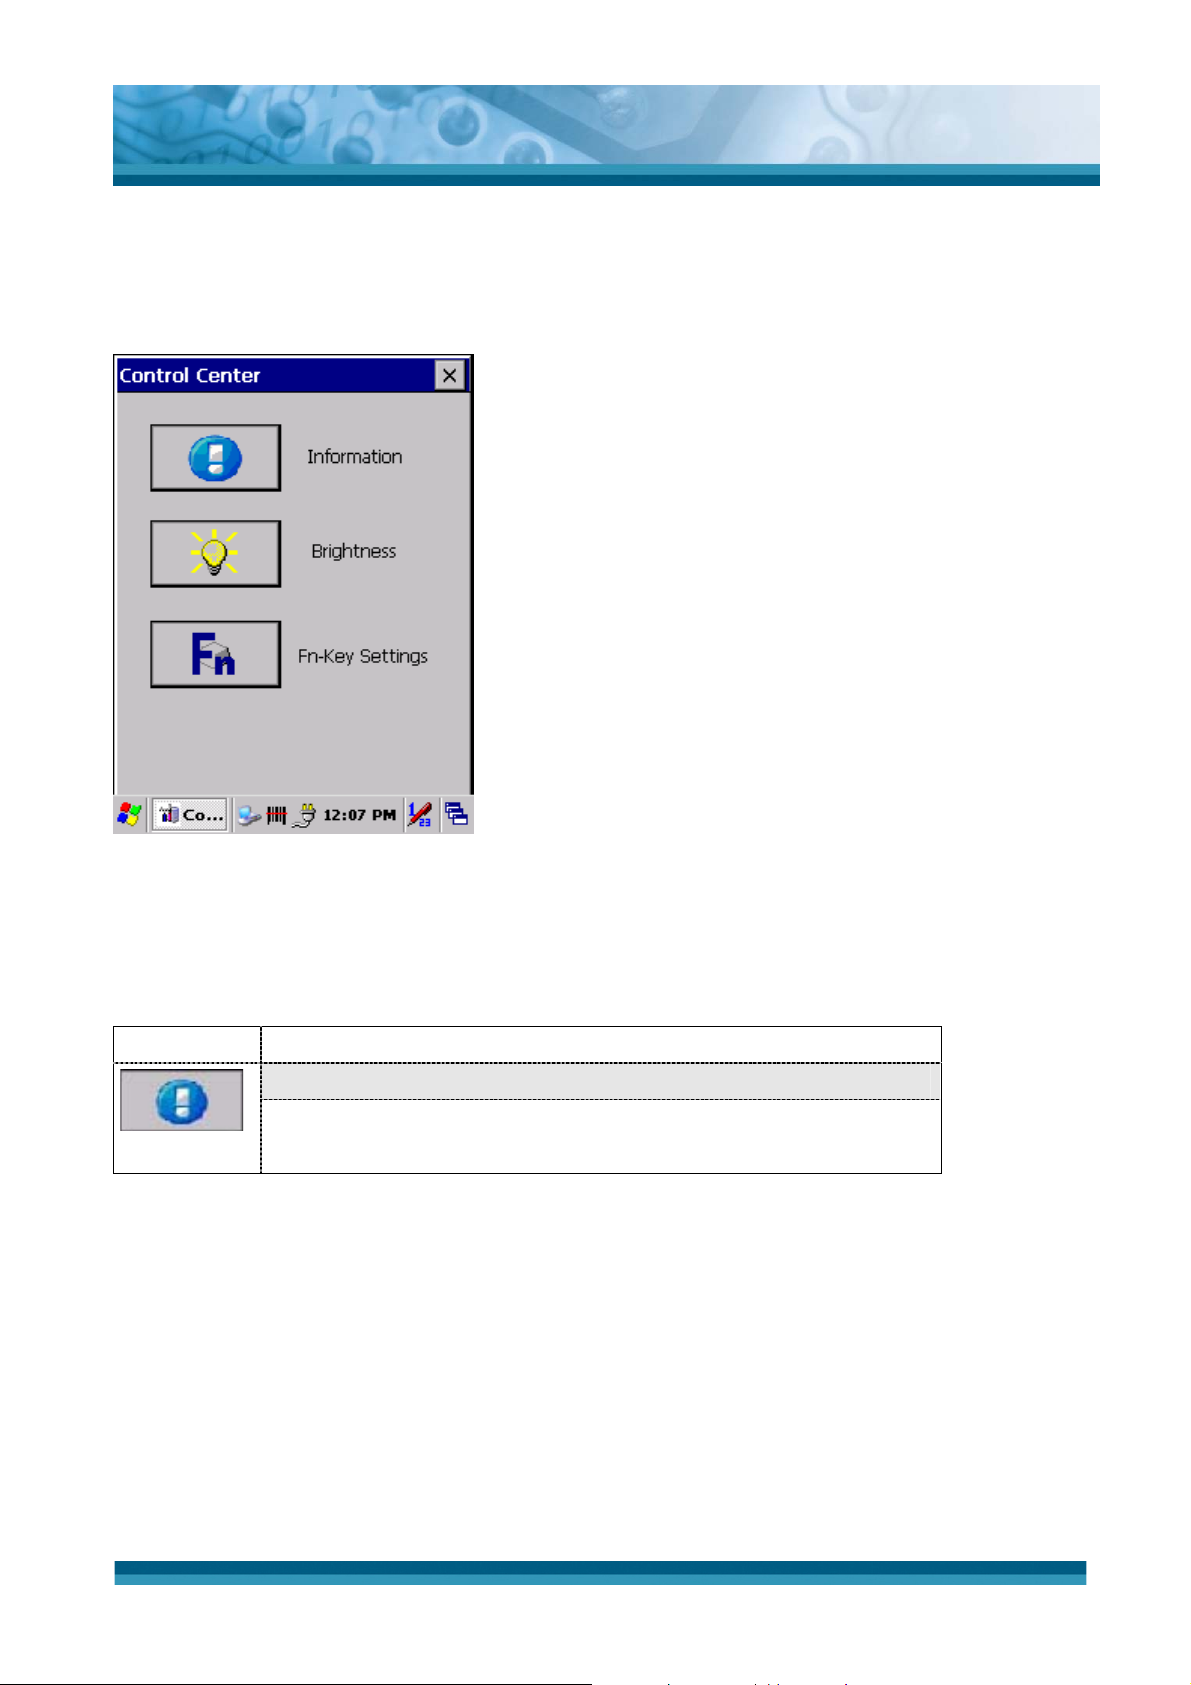
The Control Center includes four Property buttons. These are property buttons for PDT
device information, display brightness, and Fn-Key Settings.
Figure 3-13 Control Center
3.2.3.1 Information
ICON ITEM & FUNCTION
z “Information” Tab :
9 Provide Software version, MAC address, Bluetooth ID,
Serial No. and Configuration No.
Table 3-4 Information
3-7
Page 54
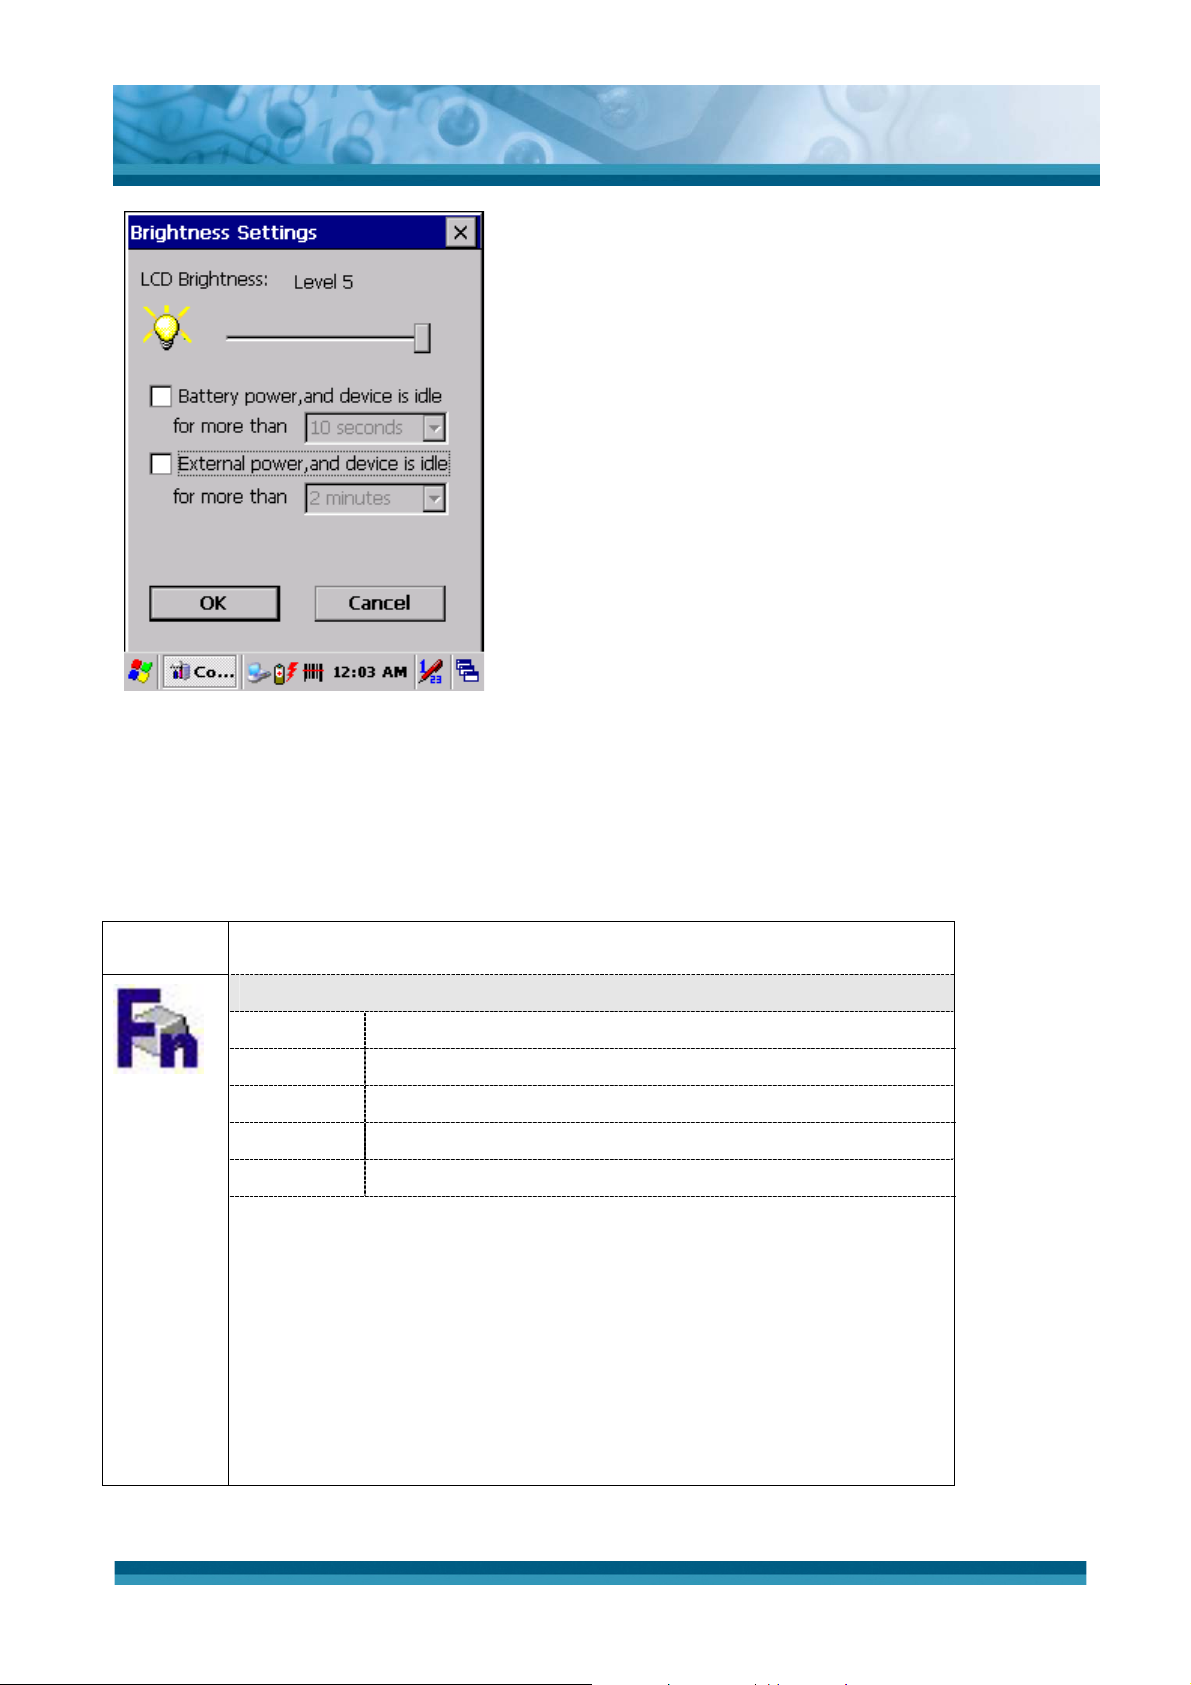
3.2.3.2 Brightness
ICON ITEM & FUNCTION
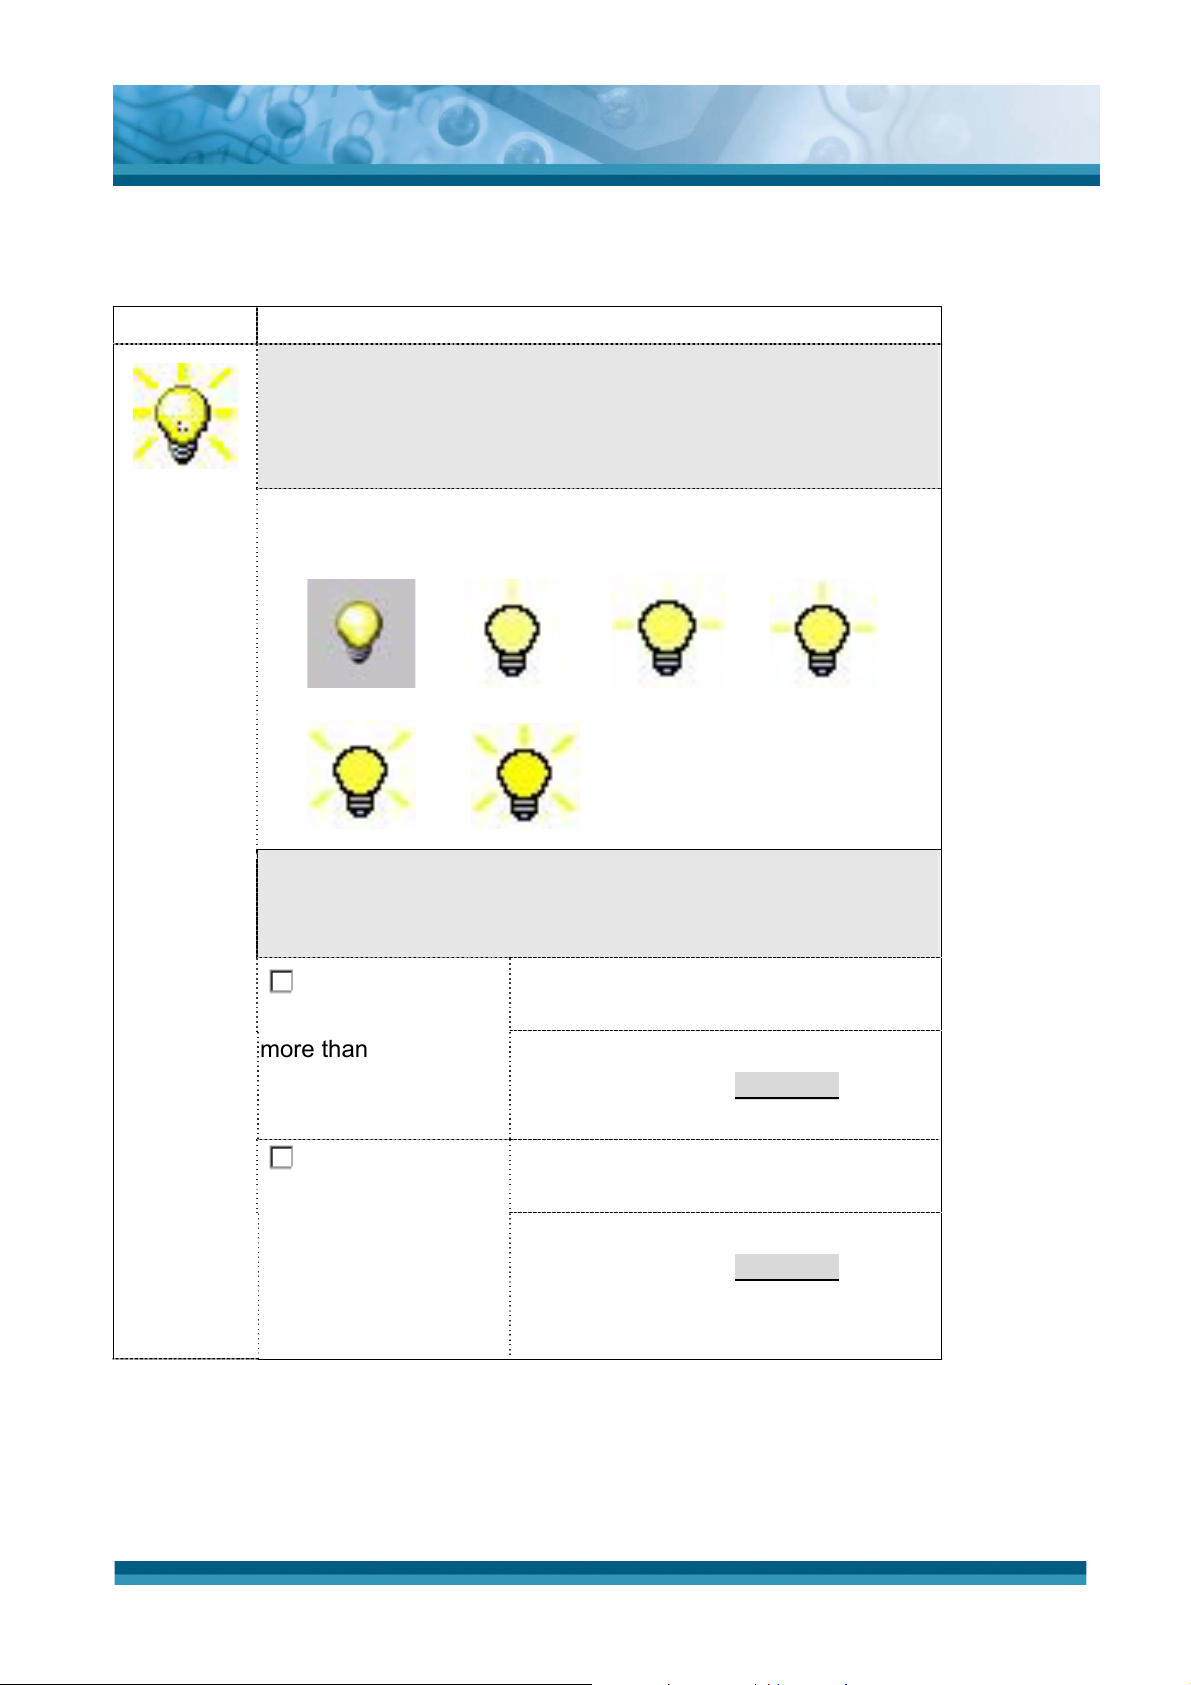
LCD Brightness
Tune the LCD brightness by tapping right-arrow & left-arrow.
Can also tune the LCD brightness by pressing right-direction
key or left-direction key of keypad.
Amounts 6 steps: Every step have corresponding picture of
self.
OPTICON
User's manual
H-15
0.
1. 2. 3.
4. 5.
Backlight Timeout
Save battery life by automatically turning off the backlight when
not used.
Battery Power,
and device is idle for
more than
The table must disable when its item is
not marked.
The table has 15 seconds, 30
seconds, 1 minute, 2 minutes and 5
minutes.
External Power,
and device is idle for
more than
The table must disable when its item is
not marked.
The table has 15 seconds, 30
Table 3-5 Brightness
seconds, 1 minute, 2 minutes and 5
minutes.
3-8
Page 55
OPTICON
User's manual
H-15
Figure 3-14 Brightness
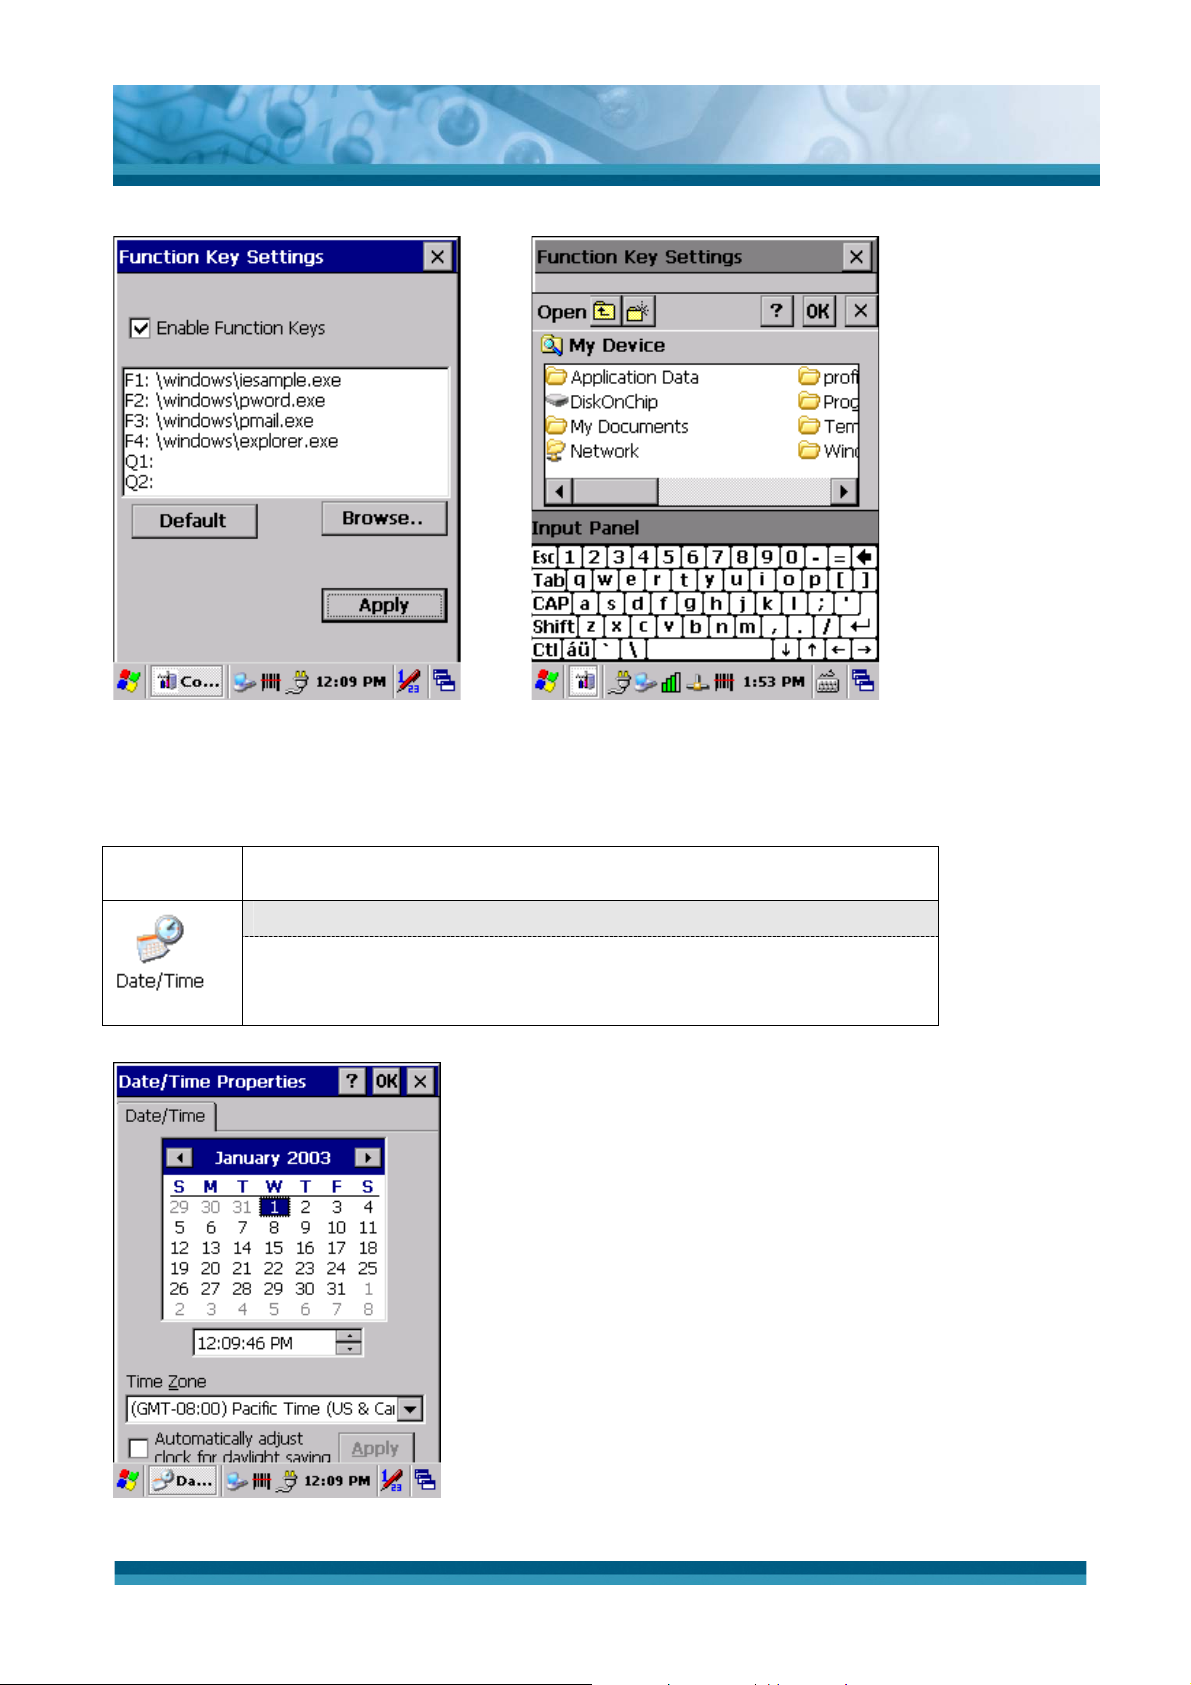
3.2.3.3 Fn-key Settings
ICON ITEM & FUNCTION
z Fn-Key Setting (Figure 3-15)
Fn Key The Application Program of default setting
F1 Internet Explorer
F2 Microsoft WordPad
F3 Inbox
F4 Windows Explorer
9 To assign your favorite application program to F1, F2, F3 and
F4 hot keys.
9 Choose one of F1, F2, F3 and F4 from pull-down list.(Figure
9
9 Select one application program you want from program list,
9
Table 3-6 Fn-Key
3-16)
To tap “Browse…” inside “Assign program” applet.
then, choose “OK”. (Figure 3-16)
To tap “Default” to return back to default setting. (Figure 3-15)
3-9
Page 56
OPTICON
User's manual
H-15
Figure 3-15 Fn-Key Settings Figure 3-16 Fn-Key Settings
3.2.4 Date/Time
ICON ITEM & FUNCTION
z “Date/Time” Tab :( Figure 3-17)
9 Please see the detail information of 2.5.1 Setting Time
and Date
Table 3-7 Date/Time
Figure 3-17 Date/Time Settings
3-10
Page 57

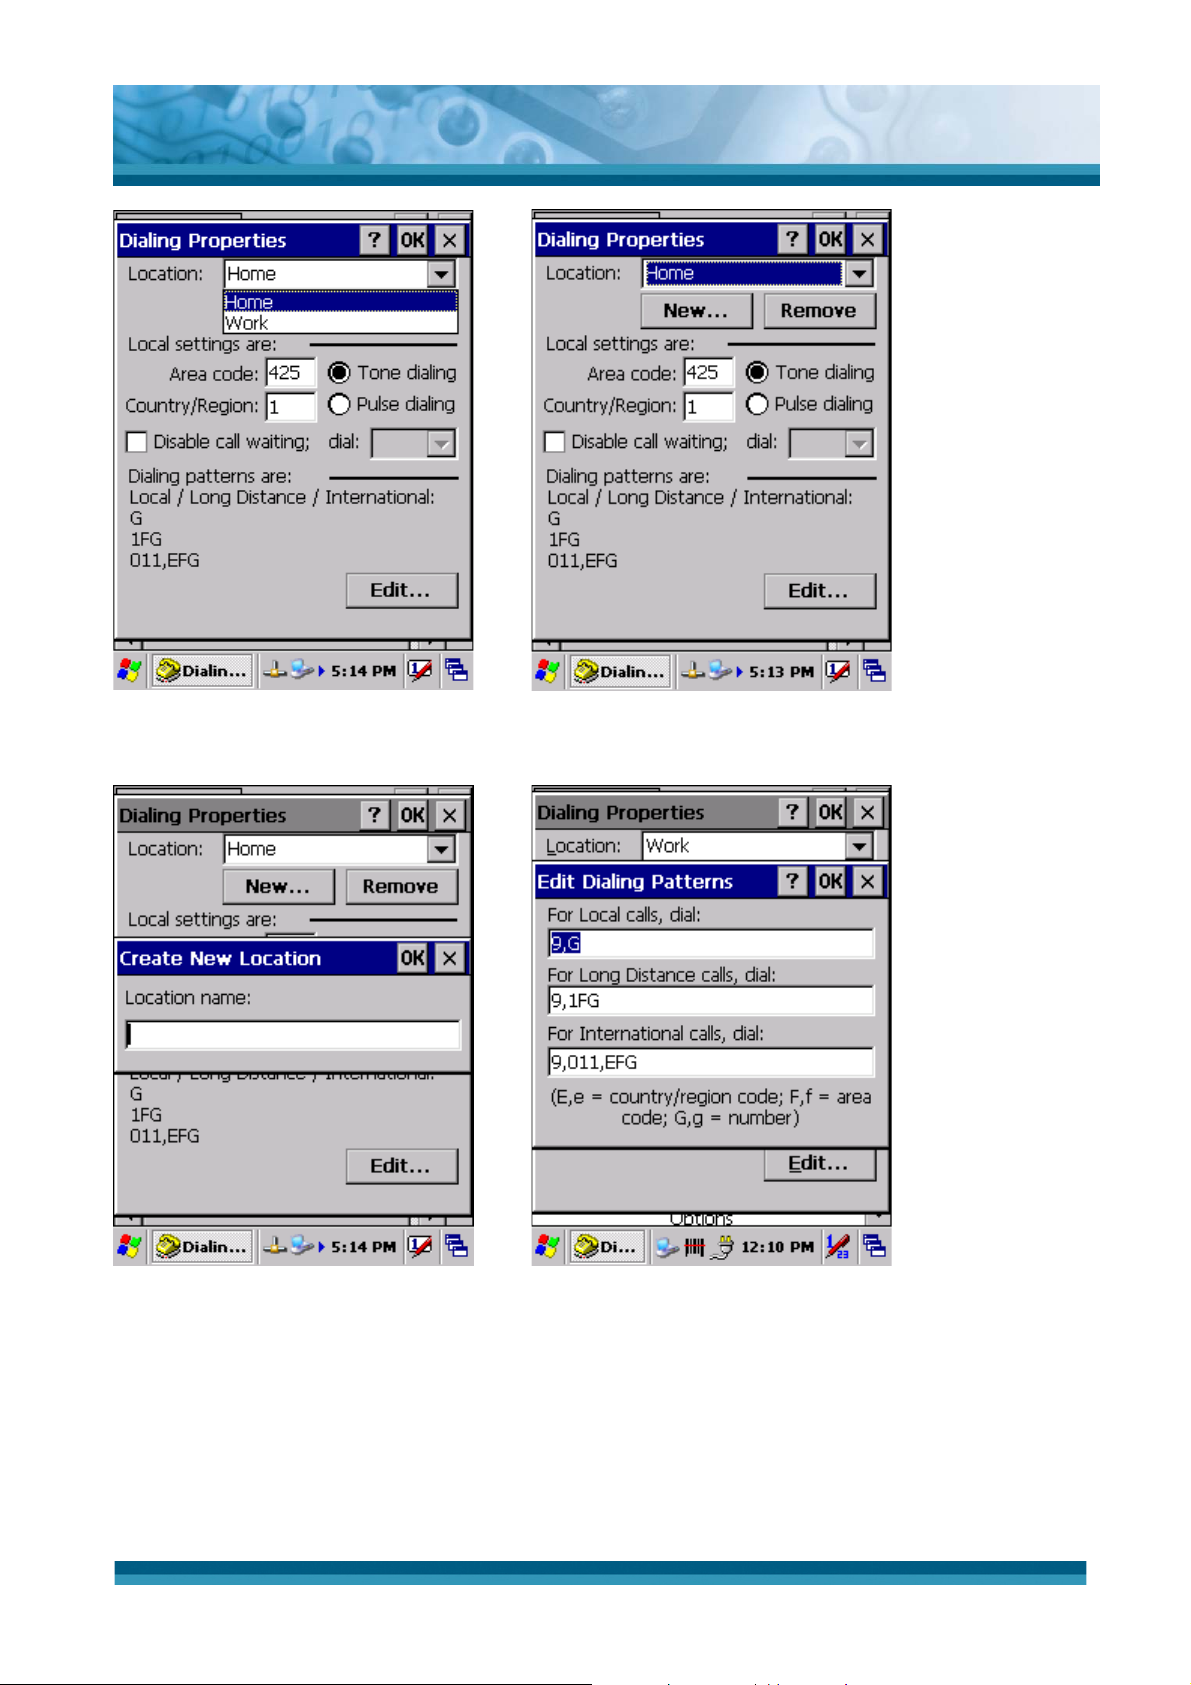
3.2.5 Dialing Properties
ICON ITEM & FUNCTION
z “Dialing Properties” Tab :( Figure 3-18)
9 In the When dialing from list, select the “Location” where
you want to change settings.(Figure 3-19)
9
To create a new location, select “New”. Enter the name of
the location, and then select “OK”.(Figure 3-20)
9 Enter or edit the area code and local country code as
needed.
9 In Dial using, select “Tone dialing” or “Pulse dialing”.
Most phone lines are tone.
OPTICON
User's manual
H-15
9 To automatically disable call waiting, select “Disable call
waiting by dialing”, select the appropriate number
sequence in the list, or enter a new sequence.
z Editing dialing patterns (Figure 3-21)
9 Using the codes listed in the topic; revise the dialing
patterns as needed.
Notes:
If you need to use character other than the ones listed
here, use manual dialing.
Hyphens and spaces in dialing strings are ignored.
Some modems may not respond to the following
characters, even though your device lets you add them
to the dial string.
Table 3-8 Dialing properties
3-11
Page 58
OPTICON
User's manual
H-15
Figure 3-18 Dialing Properties Figure 3-19 Dialing Properties
Figure 3-20 Dialing Properties Figure 3-21 Dialing Properties
3-12
Page 59
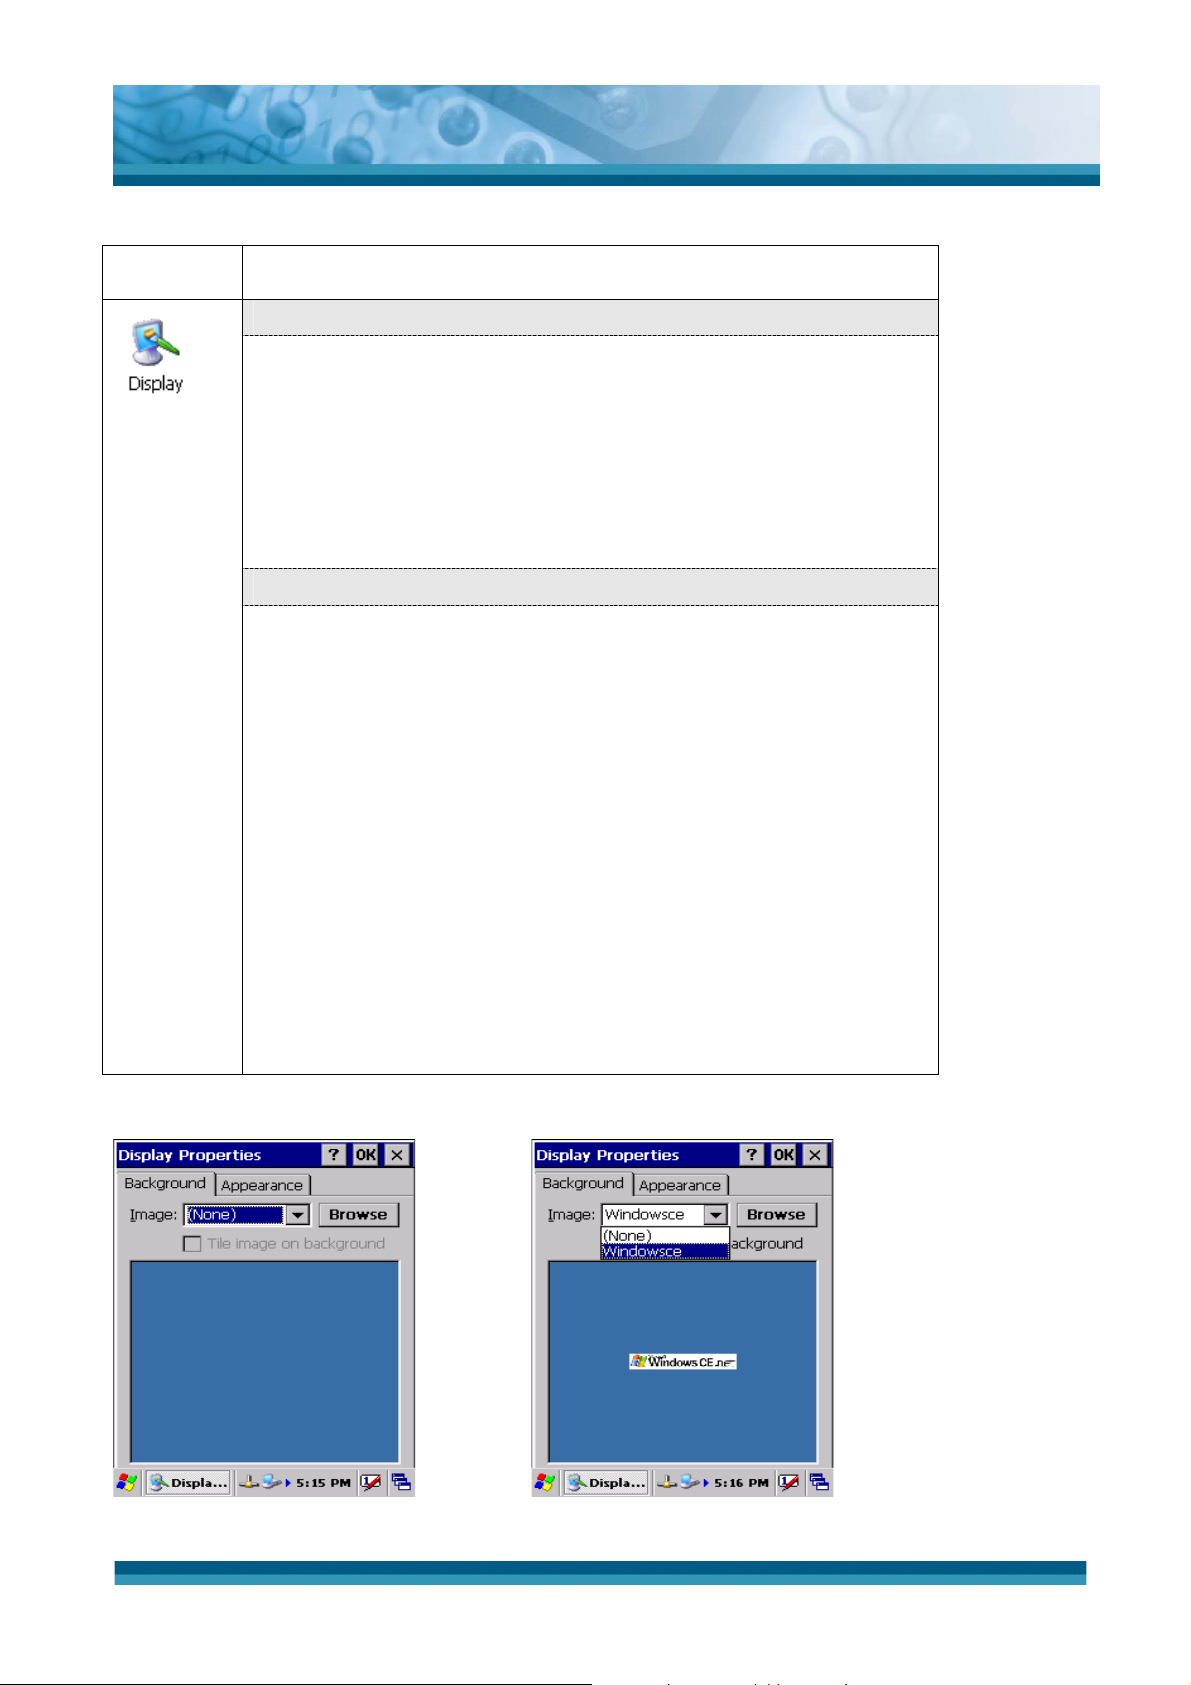
3.2.6 Display Properties
ICON ITEM & FUNCTION
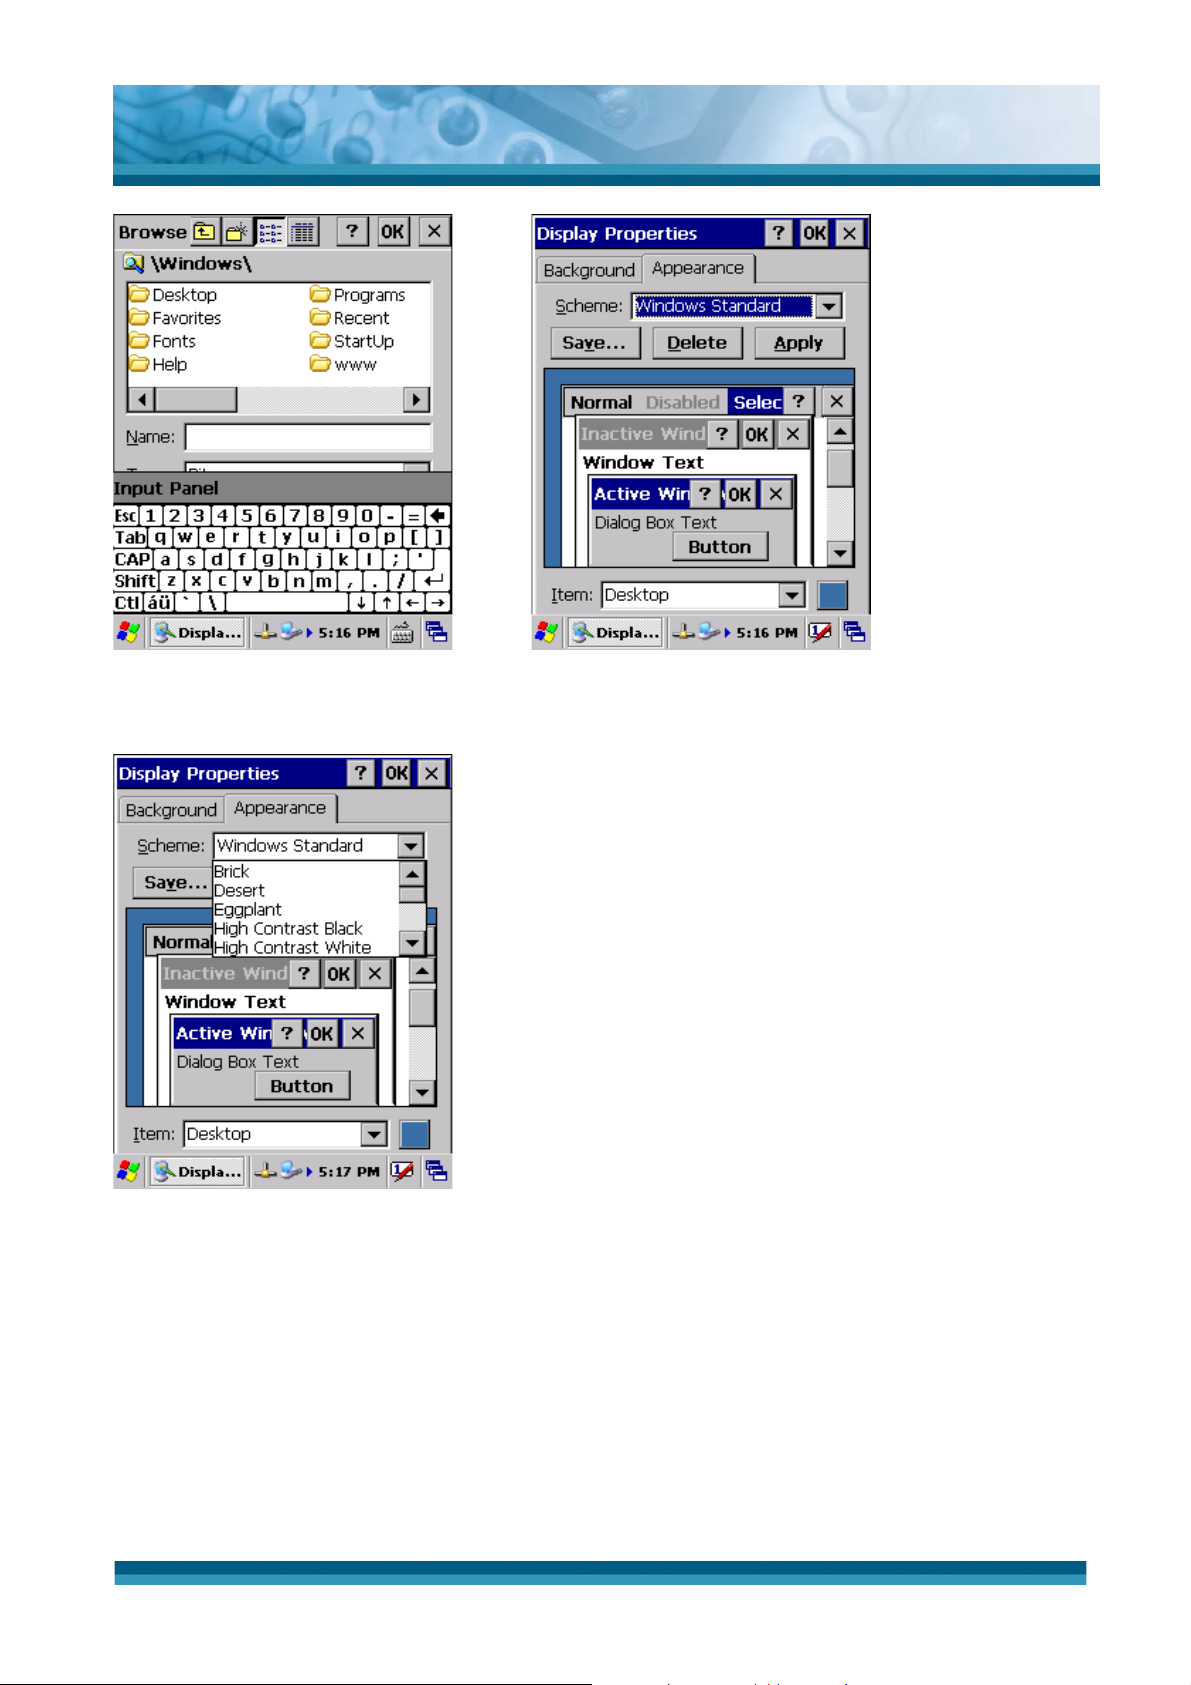
z “Background” Tab :( Figure 3-22)
9 From the “Image” list, select an image you want as the
background of the desktop.(Figure 3-23)
9 To locate an image in another folder, select
“Browse”.(Figure 3-24)
9
To have the image cover the entire background, select “Tile
image on background”
z “Appearance” Tab(Figure 3-25)
9 Change the color scheme :( Figure 3-26)
¾
From the” Scheme” list, select a scheme.
OPTICON
User's manual
H-15
¾ View your choice in the preview box. If you like the
scheme, select “Apply”.
9 Create a custom color scheme:
¾ From the “Item” list, select a display item.
¾
From the “Basic colors” list, select a color, and select
“OK”.
¾ View your color selection(s) in the Preview box.
¾ To save the scheme, select “Save”.
¾
In the “Save this color scheme as” box, enter a name
for the scheme, and select “OK”.
¾
Select “Apply”.
Table 3-9 Display properties
Figure 3-22 Display properties Figure 3-23 Display properties
3-13
Page 60
OPTICON
User's manual
H-15
Figure 3-24 Display properties Figure 3-25 Display properties
Figure 3-26 Display properties
3-14
Page 61
3.2.7 Input Panel
ICON ITEM & FUNCTION
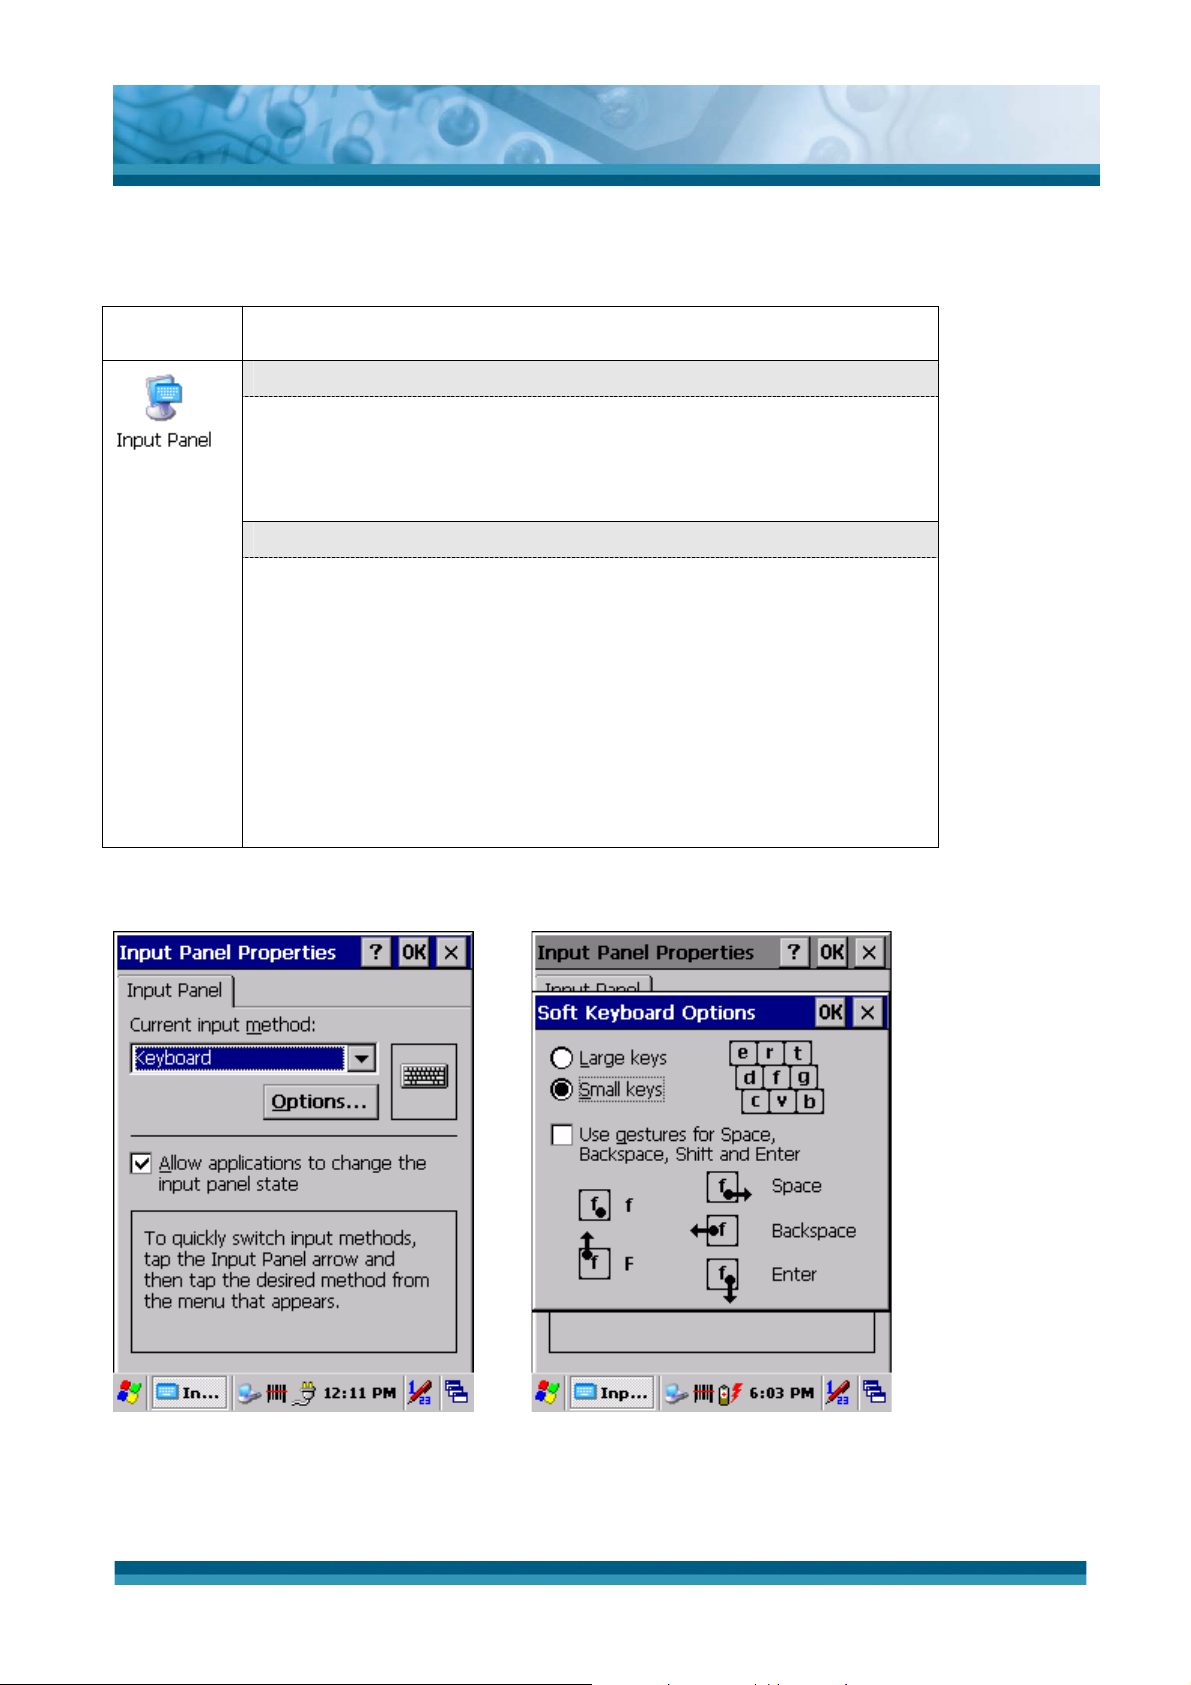
z “Input panel” Tab :( Figure 3-27)
9 Select the input method you want to change.
9 To change the Soft Keyboard Options , tap “Option”
(Figure 3-28) .
z “Options” Tab :
9 Change the soft keyboard options as desired, selecting
from:
¾
Large or small keys
OPTICON
User's manual
H-15
¾
Using gestures for space, black-space shift, and enter.
9 To exit the soft keyboard Options, press “OK” on the
control bar, or press the <Enter> key on the keypad.
9
To exit the Input Panel, press “OK” on the control bar, or
press the <Enter> key on the keypad.
Table 3-10 Display properties
Figure 3-27 Input Panel Properties Figure 3-28 Input Panel Properties
3-15
Page 62
3.2.8 Internet Options
ICON ITEM & FUNCTION
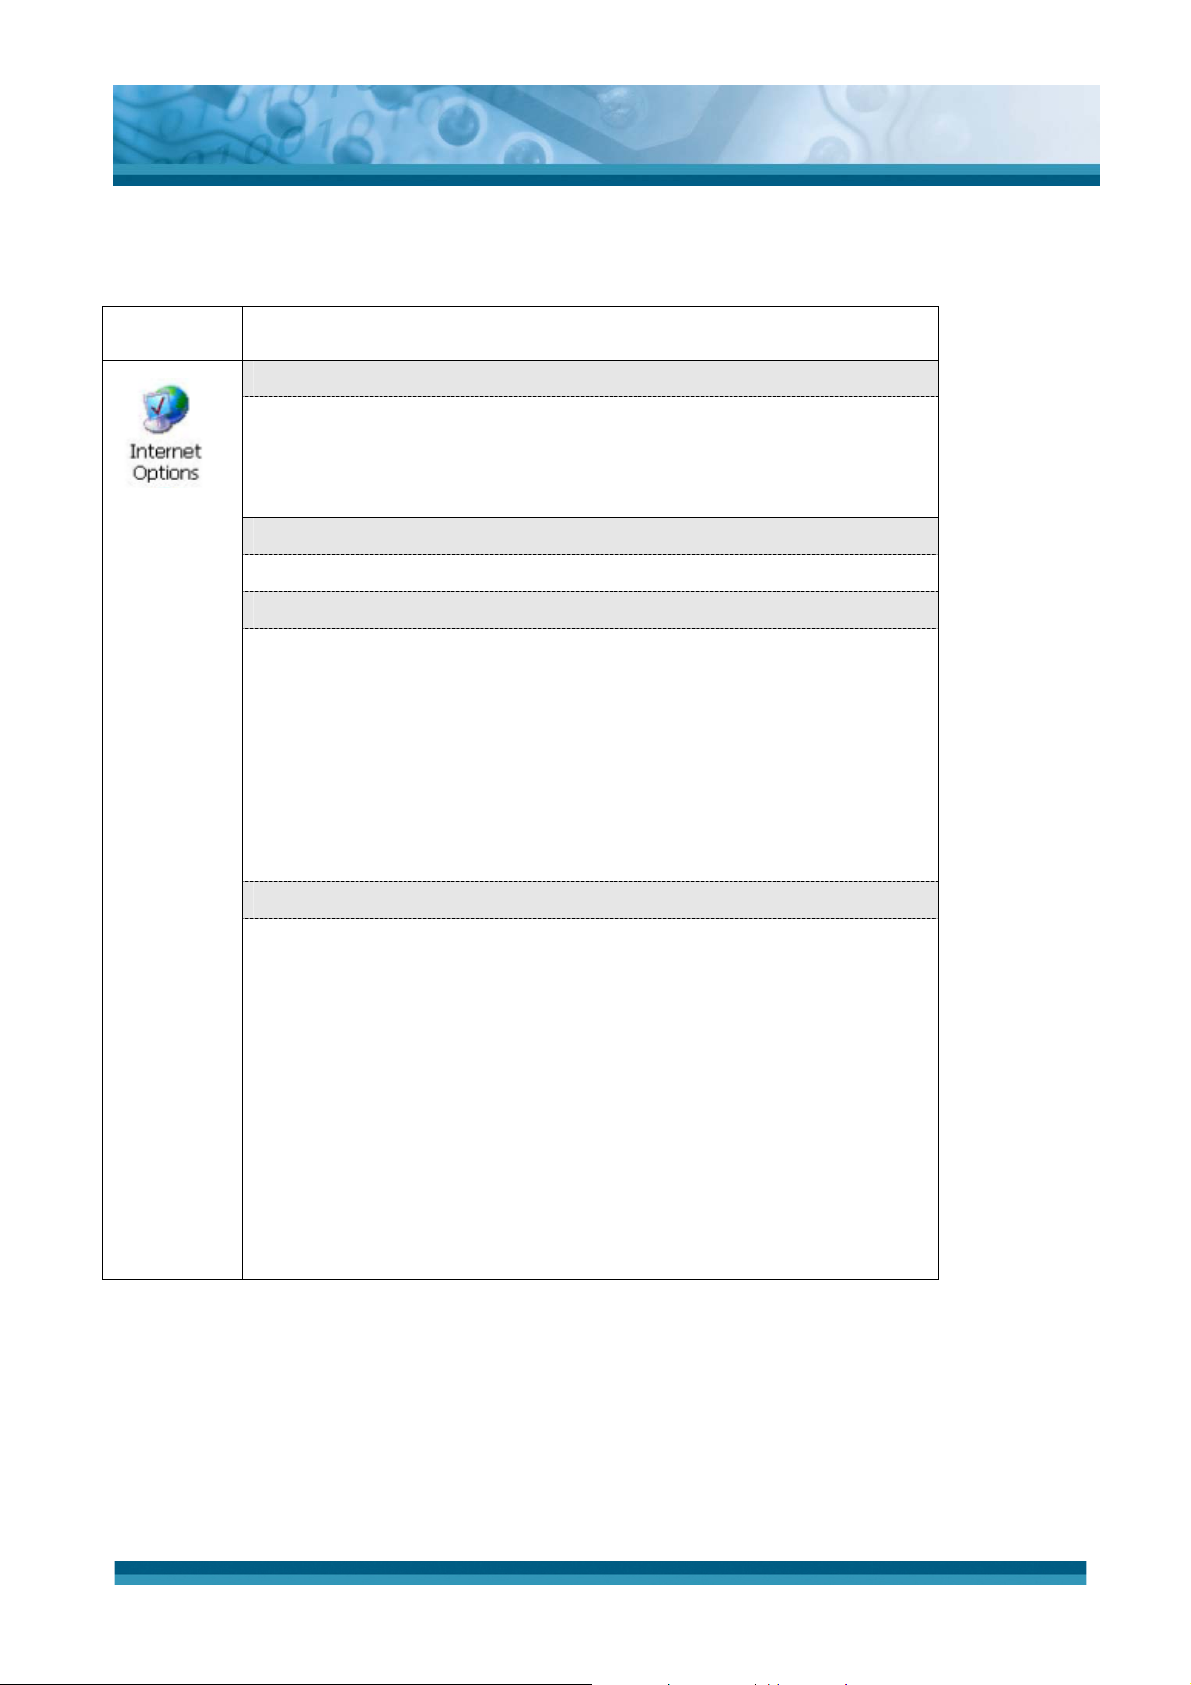
z “General” Tab :( Figure 3-29)
9 Type in the URL of desired start page and the desired
search engine. You also change the Cache Size, clear the
Cache and Clear the History..
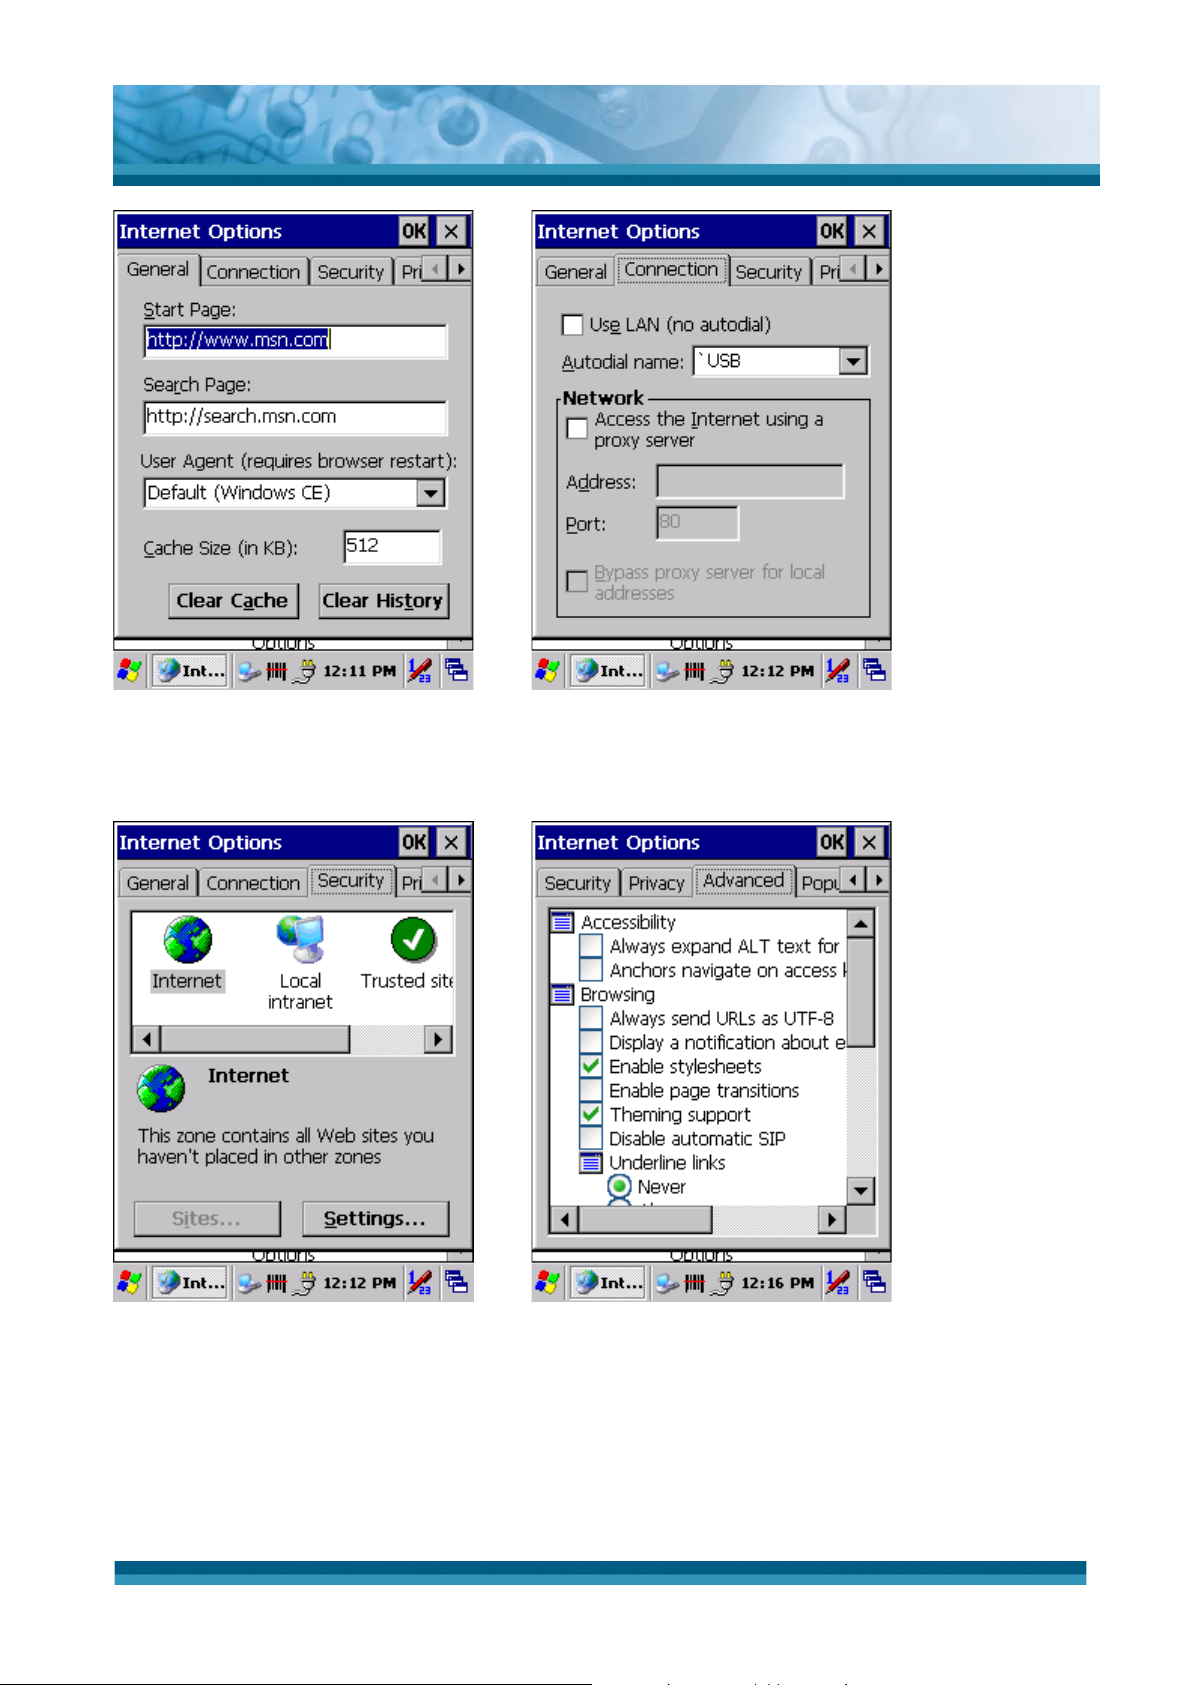
z “Connection” Tab :( Figure 3-30)
9 Modify the network access setting as desired.
z “Security” Tab (Figure 3-31)
9 Modify the security settings as desired. You can enable any
OPTICON
User's manual
H-15
of the following by tapping the checkbox:
¾
Allow cookies
¾
Allow TLS 1.0 security
¾
Allow SSL 2.0 security
¾
Allow SSL 3.0 security
¾ Warm when switching across secure and insecure areas.
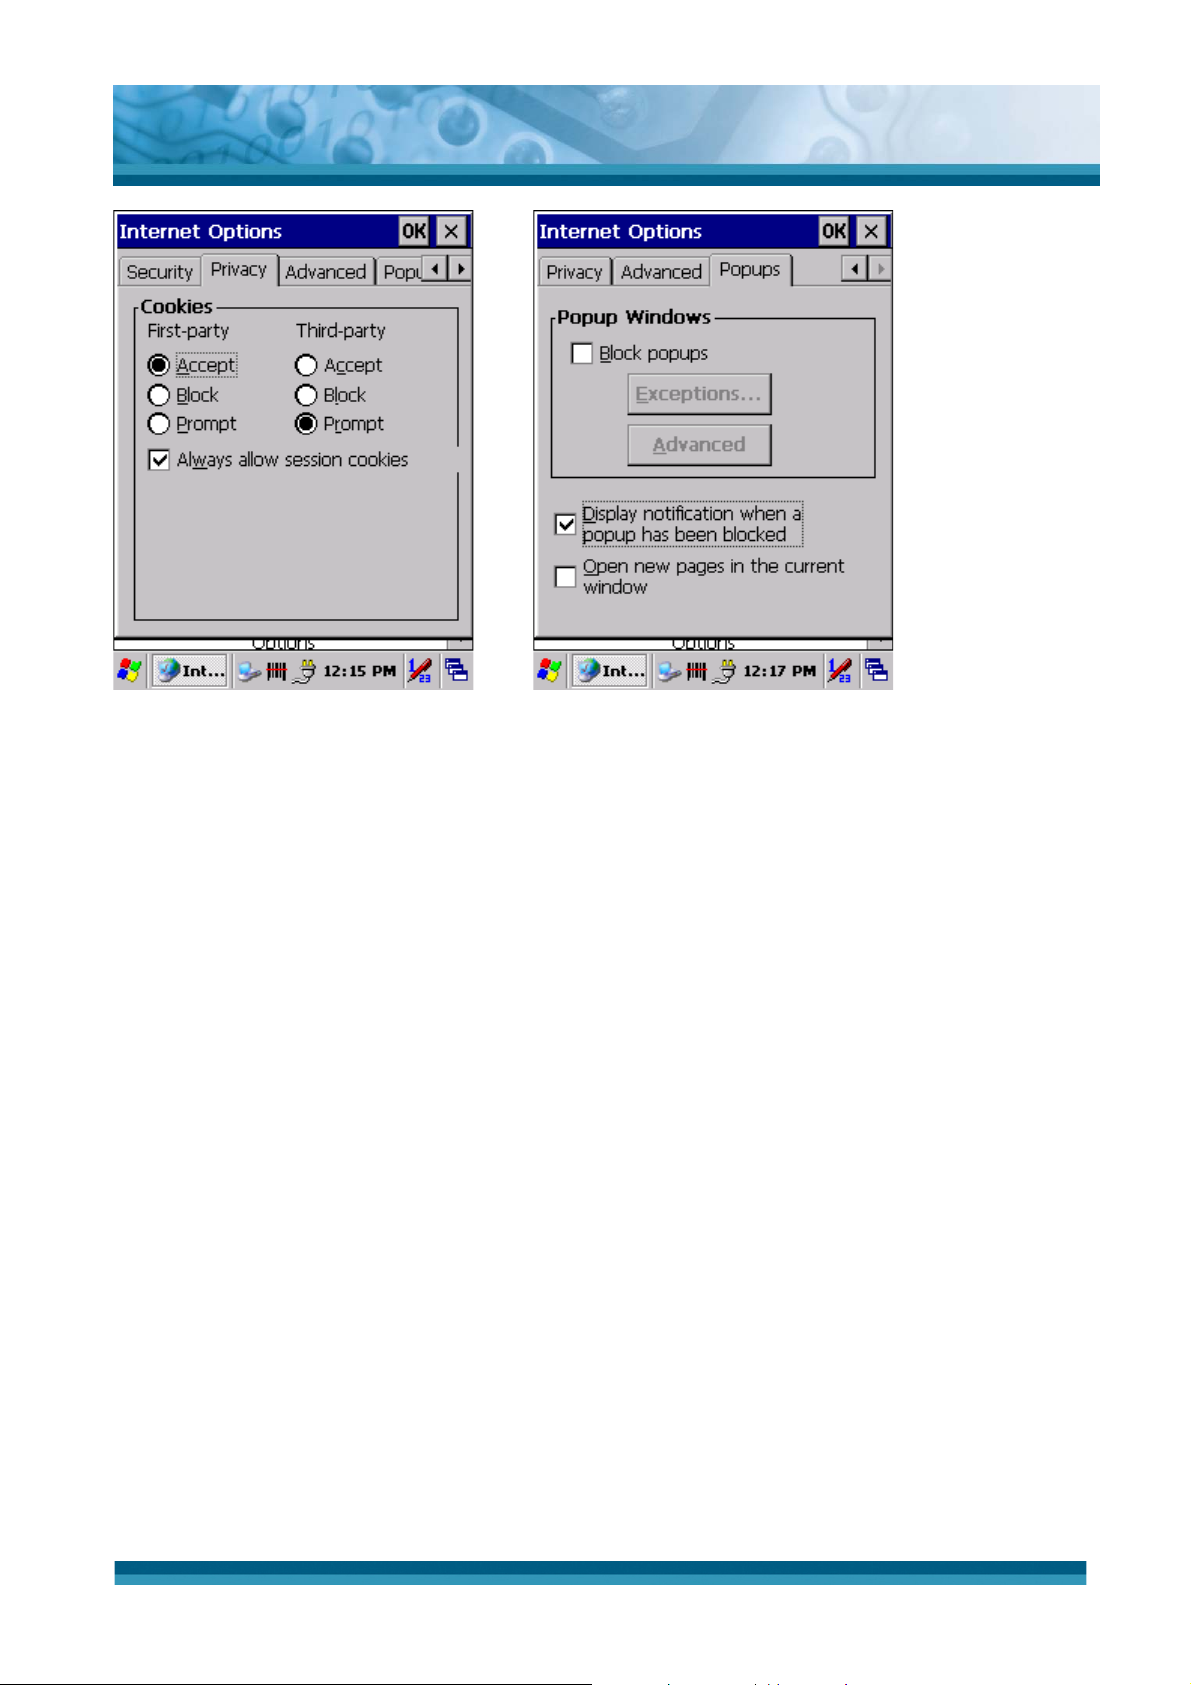
z “Advanced” Tab (Figure 3-32)
9 Modify the security settings as desired. You can enable any
of the following by tapping the checkbox:
¾
Display Image in pages
¾
Play sounds in pages
¾
Enable scripting
¾
Display a notification about every script error
¾
Underline links-
Ϥʳ
Never
Ϥʳ Always
Ϥʳ Hover
Table 3-11 Internet Options
3-16
Page 63
OPTICON
User's manual
H-15
Figure 3-29 Internet Settings Figure 3-30 Internet Settings
Figure 3-31 Internet Settings Figure 3-32 Internet Settings
3-17
Page 64
OPTICON
User's manual
H-15
Figure 3-33 Internet Settings Figure 3-34 Internet Settings
3-18
Page 65
3.2.9 Keyboard
ICON ITEM & FUNCTION
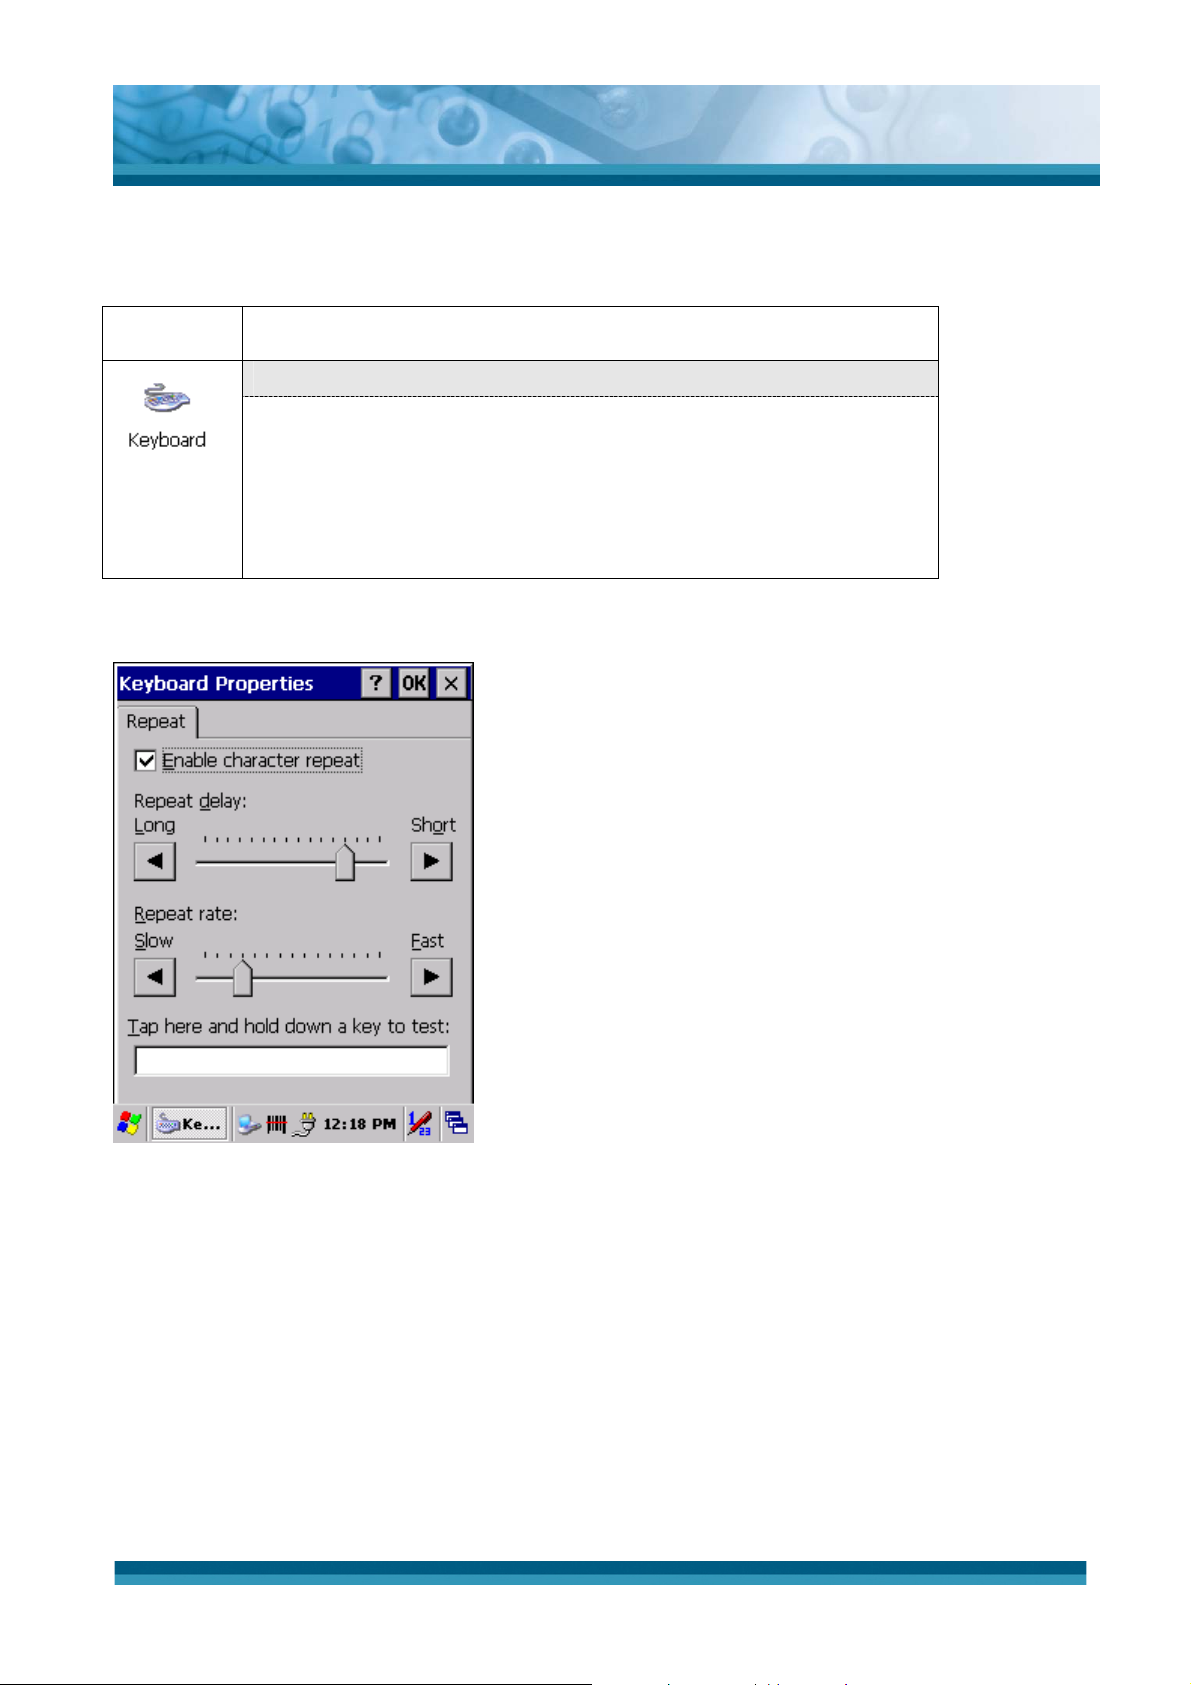
z “Repeat” Tab :( Figure 3-35)
9 To change the amount of time between depressions before
repetition starts, adjust the Repeat delay slider
9
To change the repeat rate, adjust the Repeat rate slider.
9 Test your new setting.
9 Tap “ OK” to exit the “Keyboard” Tab.
Table 3-12 Keyboard
OPTICON
User's manual
H-15
Figure 3-35 Keyboard Properties
3-19
Page 66

3.2.10 Network and Dial-up Connections
ICON ITEM & FUNCTION
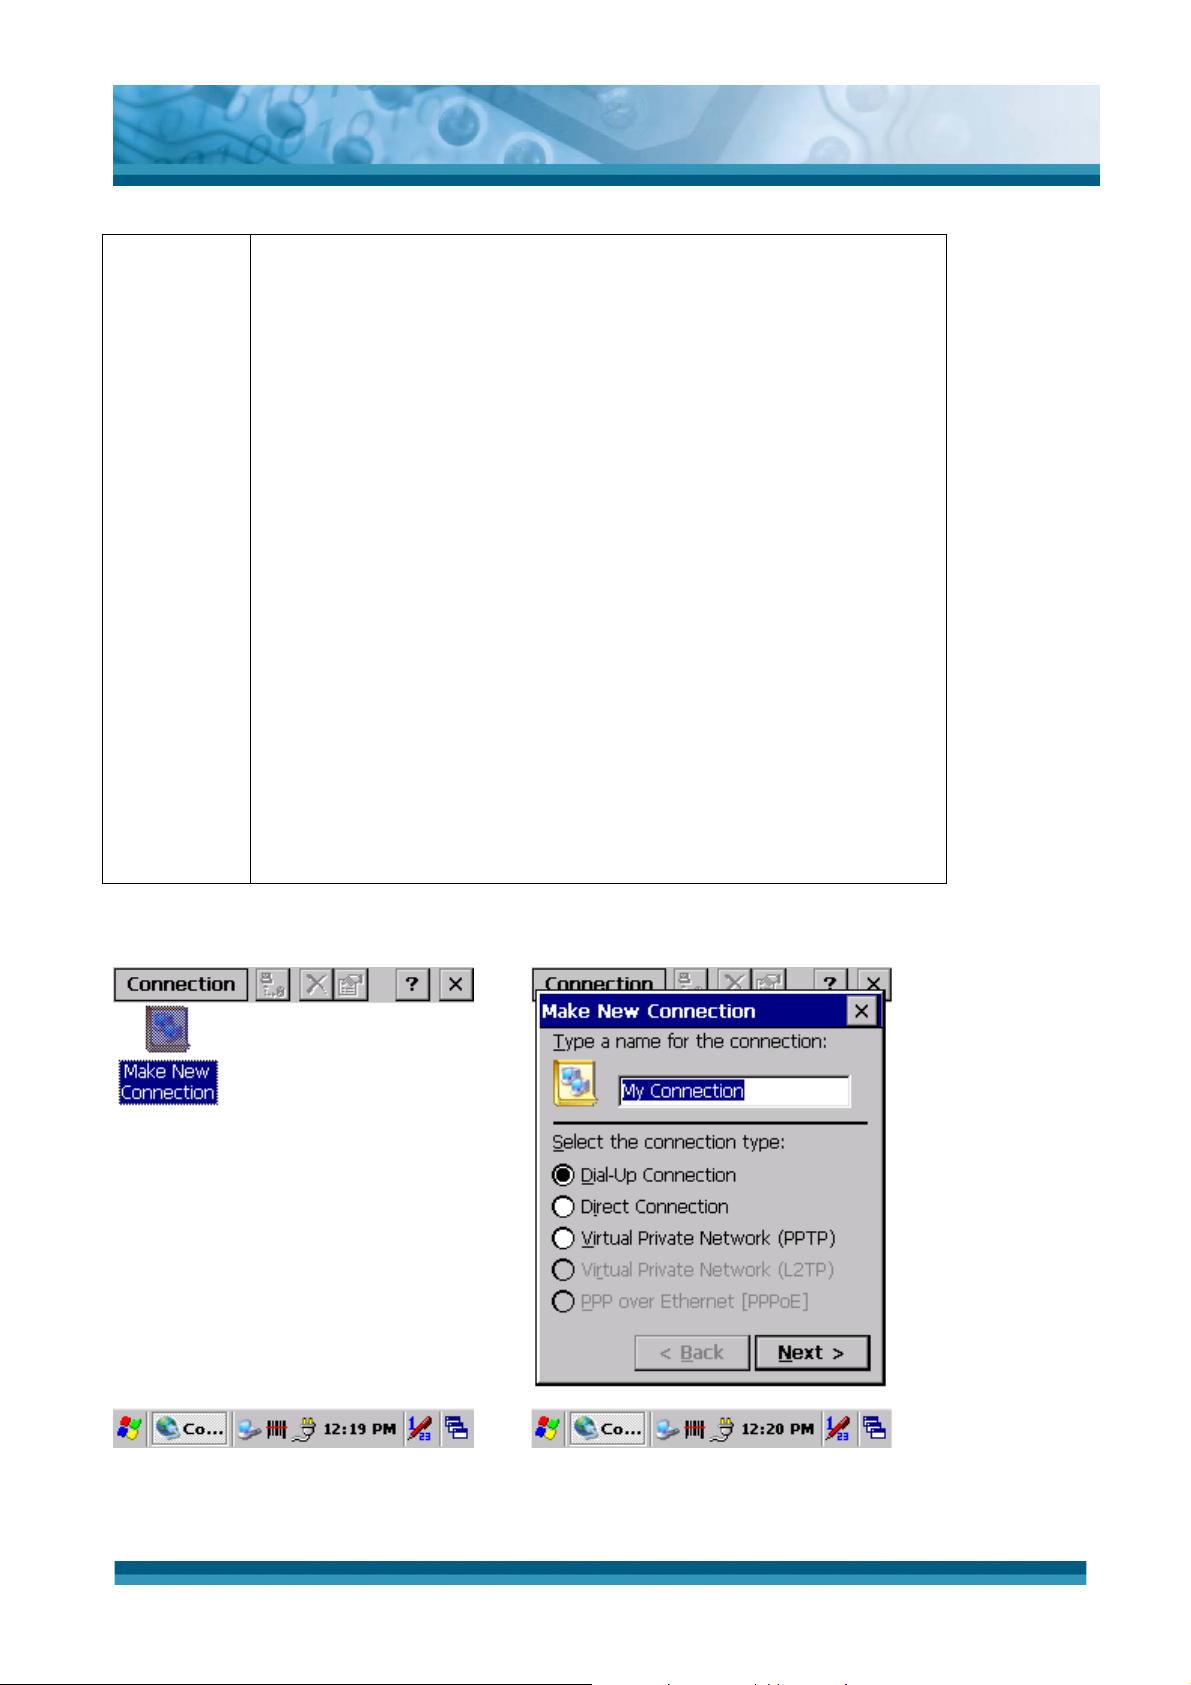
z “Connection” Tab : ( Figure 3-36)
9 To create a “Dial-up Connection”:
¾
Double-tap the “Make New connection”.
¾
In the “Make New Connection” dialog box, enter a name
for the connection.
¾ Select “Dial-Up Connection”.
¾
Select the “Next” button.
¾ Select the modem you want use.
¾ Select “Configure”
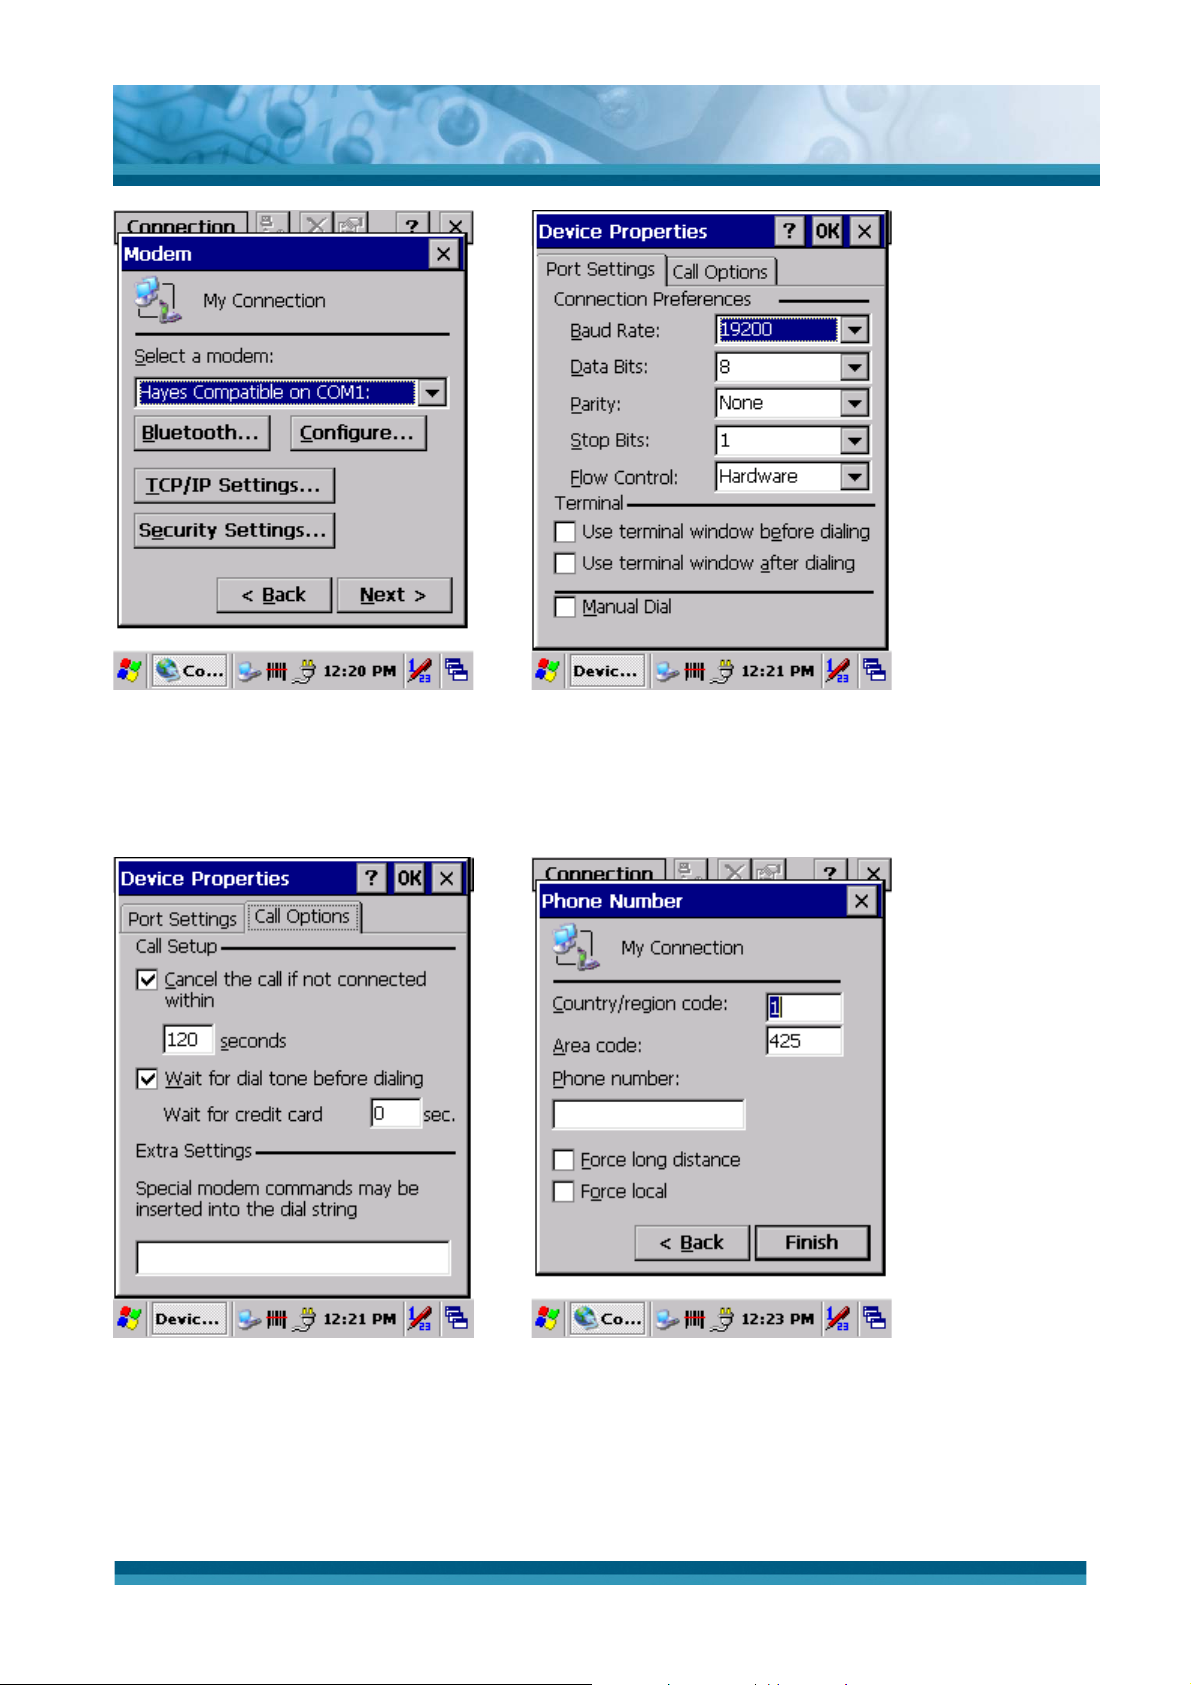
OPTICON
User's manual
H-15
¾
Under “Connection Reference”, use the default settings
provided. If you can’t connect using these settings, see
your ISP or network administrator for specific
information. If you want to always enter a phone number
before connecting, Select “Manual Dial”. Select “OK”.
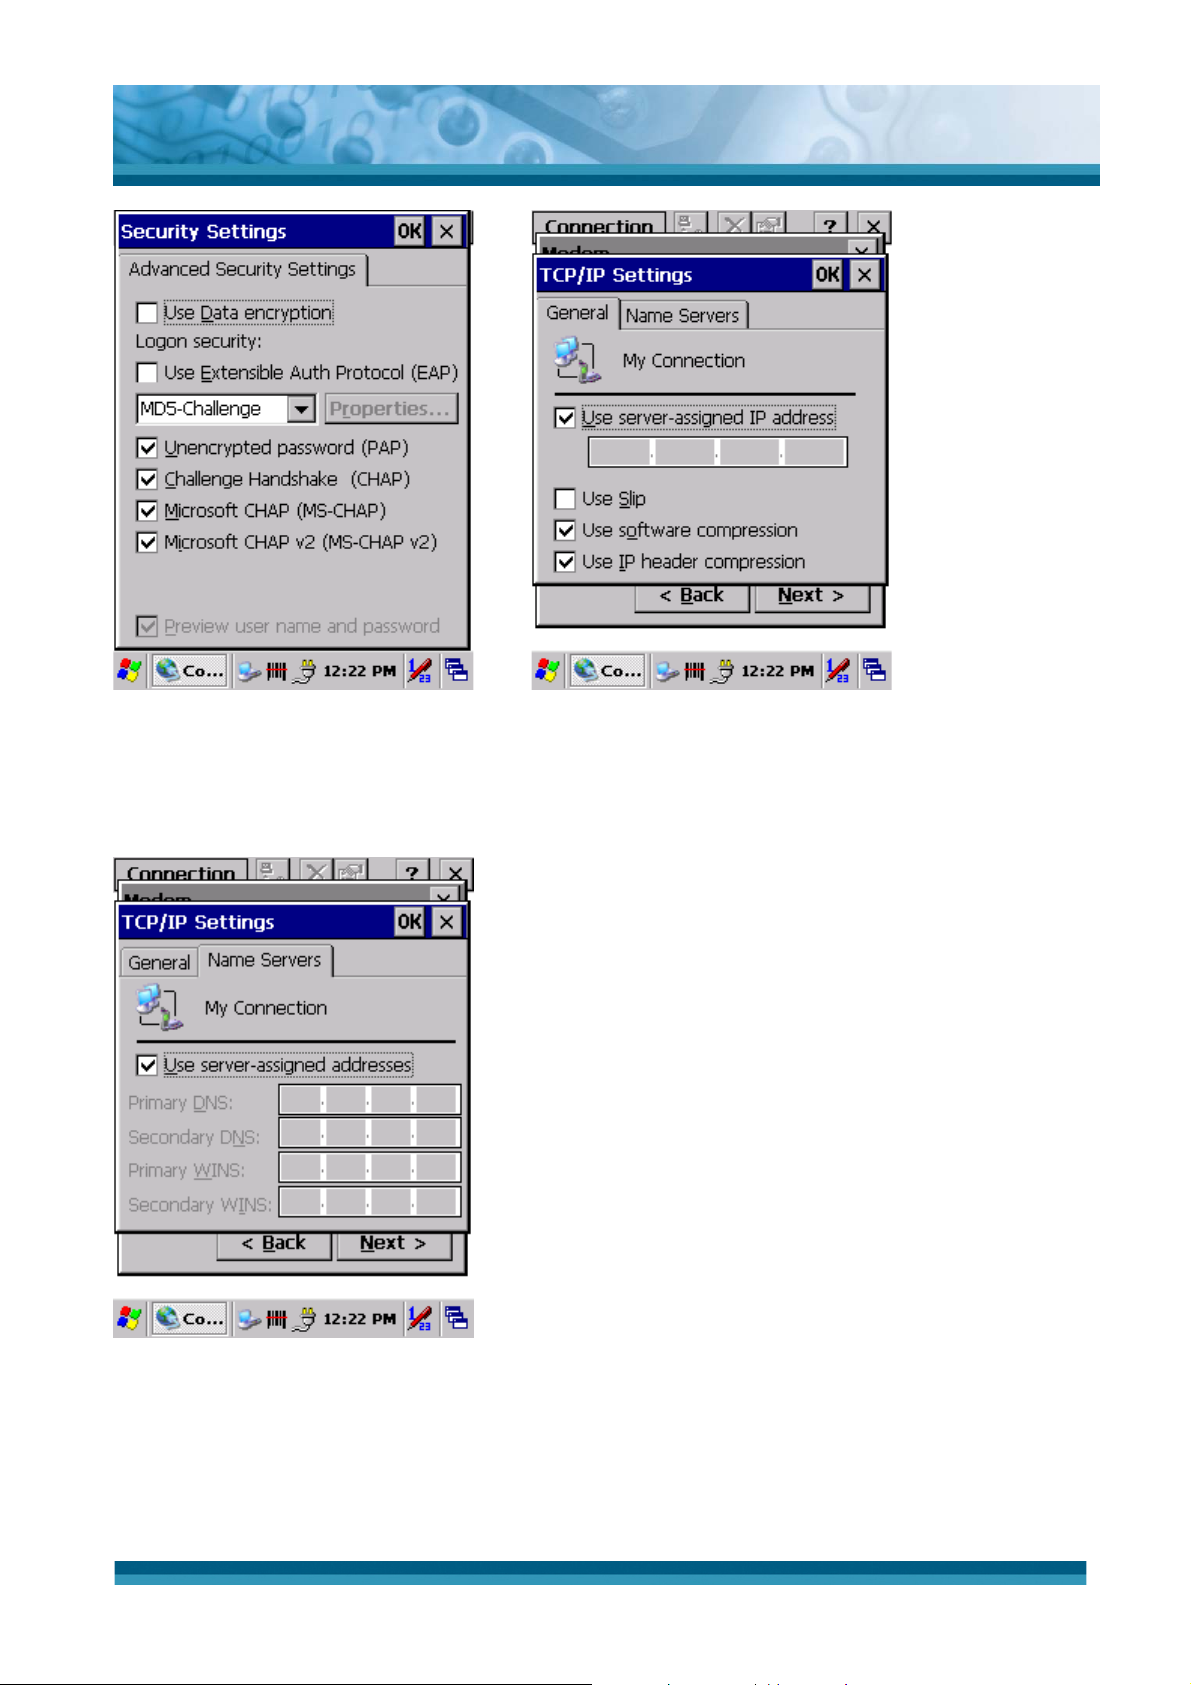
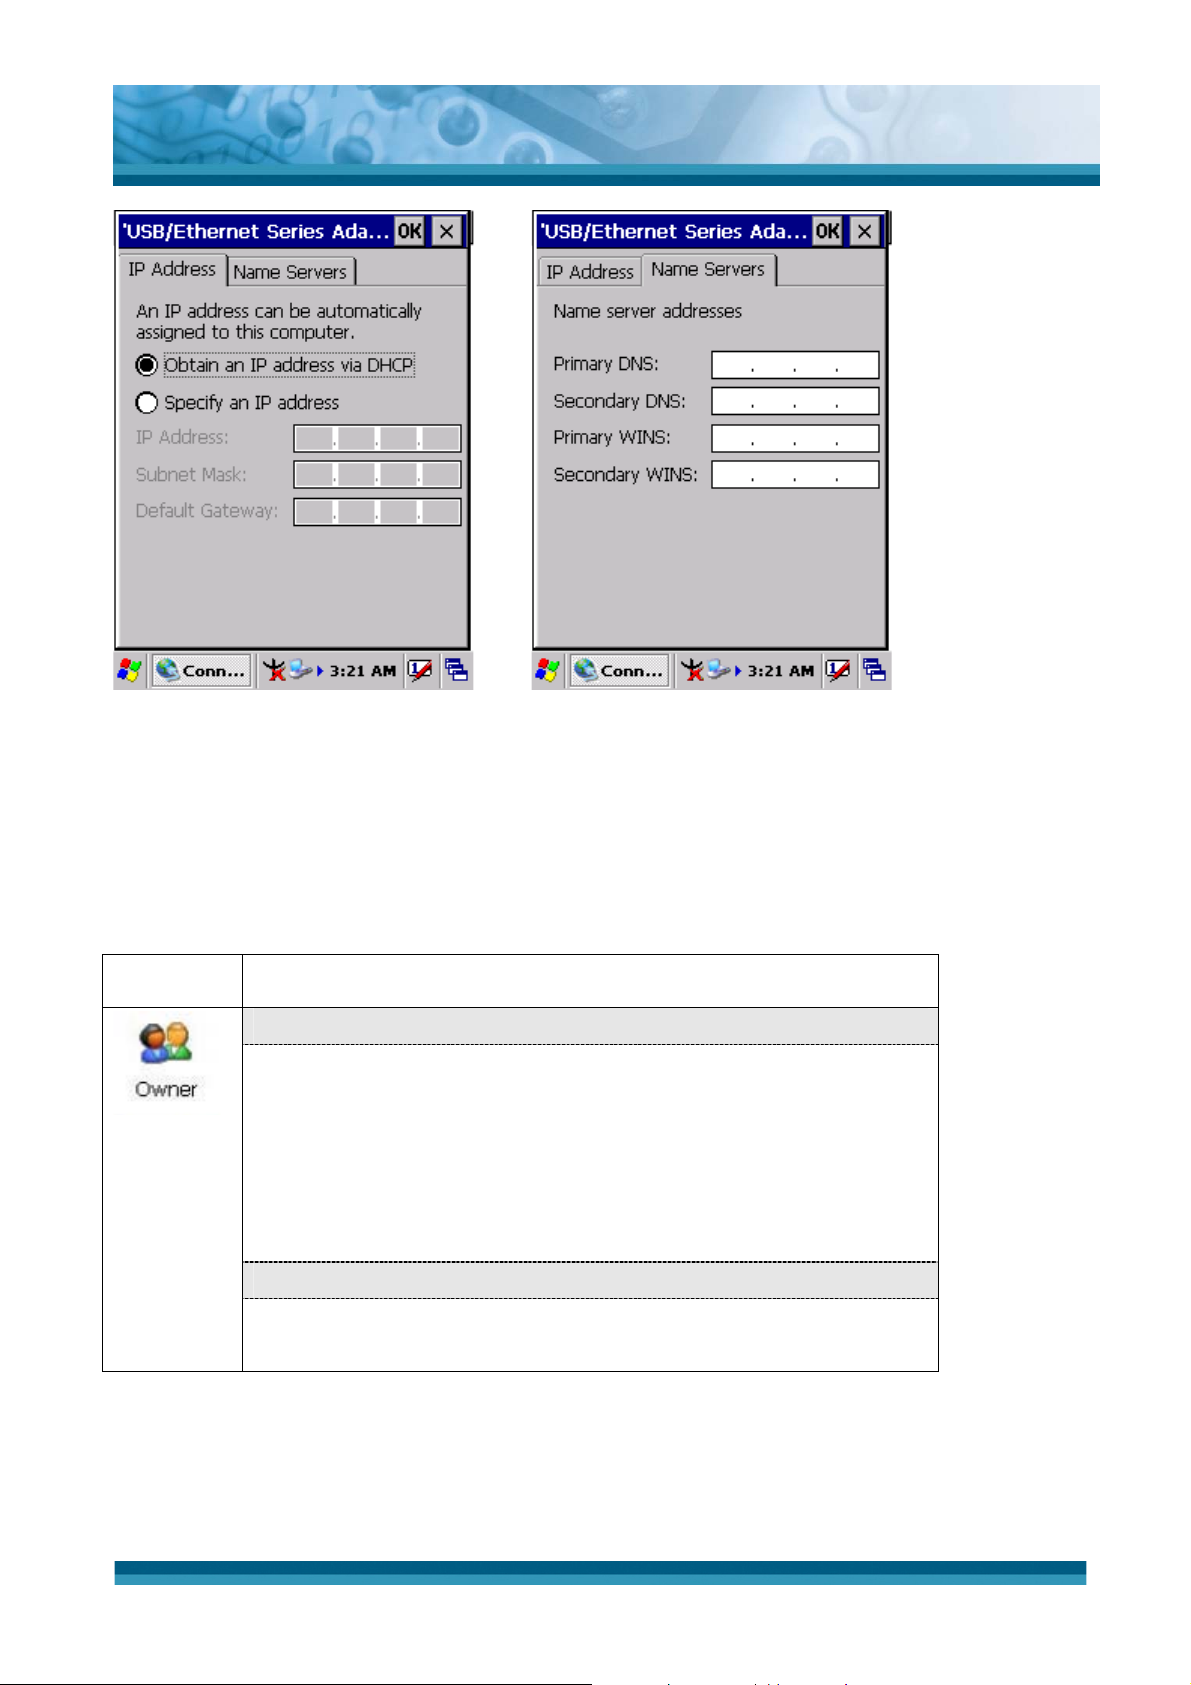
¾ Select “TCP/IP Settings”. In the “General” tab, ensure
“Use Server-assigned IP address” is selected. In the
“Name Servers” tab, ensure “Use Server-assigned
addresses” is selected, and select “OK”. If you are
unable to connect with these default settings, see your
ISP or network administrator for specific TCP/IP
information.
¾ Select the “Next” button and type the telephone number.
¾
Select the “Finish” button.
The connection you just created appears as an icon in the
“Network and Dial-up Connections” folder.
9
Set up a point-to-Point Protocol(PPP) account with an
ISP and obtain the following information:
¾
Access telephone number
¾
User name
¾ Password
3-20
Page 67
Once you have established an account, create a new
connection on your device. When creating this connection, you
should be able to use all of the default TCP/IP settings provided
in the Make New Connection Wizard. If you can’t connect using
the default settings, contact your ISP or access your ISP’s Web
site for specific TCP/IP information as well as primary and
secondary DNS address.
9 Modify connection setting
¾
Select Start > Settings > Network and Dialup
Connections
¾ Select the icon for connection settings you want to
modify.
OPTICON
User's manual
H-15
¾ Select File > Properties, or double- tap the appropriate
icon.
¾
Select desired options. There may be additional settings
that depend on the connection. To modify, select the icon
and select the icon and select Advanced Settings…
from the menu.
Table 3-13 Network and Dial-up Connections
Figure 3-36 Network and Dial-up
Connections
Figure 3-37 Network and Dial-up
Connections
3-21
Page 68
OPTICON
User's manual
H-15
Figure 3-38 Network and Dial-up
Connections
Figure 3-39 Network and Dial-up
Connections
Figure 3-40 Network and Dial-up
Connections
Figure 3-41 Network and Dial-up
Connections
3-22
Page 69
OPTICON
User's manual
H-15
Figure 3-42 Network and Dial-up
Connections
Figure 3-43 Network and Dial-up
Connections
Figure 3-44 Network and Dial-up
Connections
3-23
Page 70
OPTICON
User's manual
H-15
Figure 3-45 Network and Dial-up
Connections
3.2.11 Owner
ICON ITEM & FUNCTION
z “Identification” Tab : (Figure 3-47)
9 Fill in or edit the data as desired.
9
To have this information displayed when you start your
device, select “Display Owner Identification” at Power
On.
9 To set up identification for remote networks, see Setting up
identification for remote networks.
z “Network ID” Tab: (Figure 3-48)
Figure 3-46 Network and Dial-up
Connections
9 Enter the user name, password, and domain name you use
Table 3-14 Owner
to log on to remote network.
3-24
Page 71
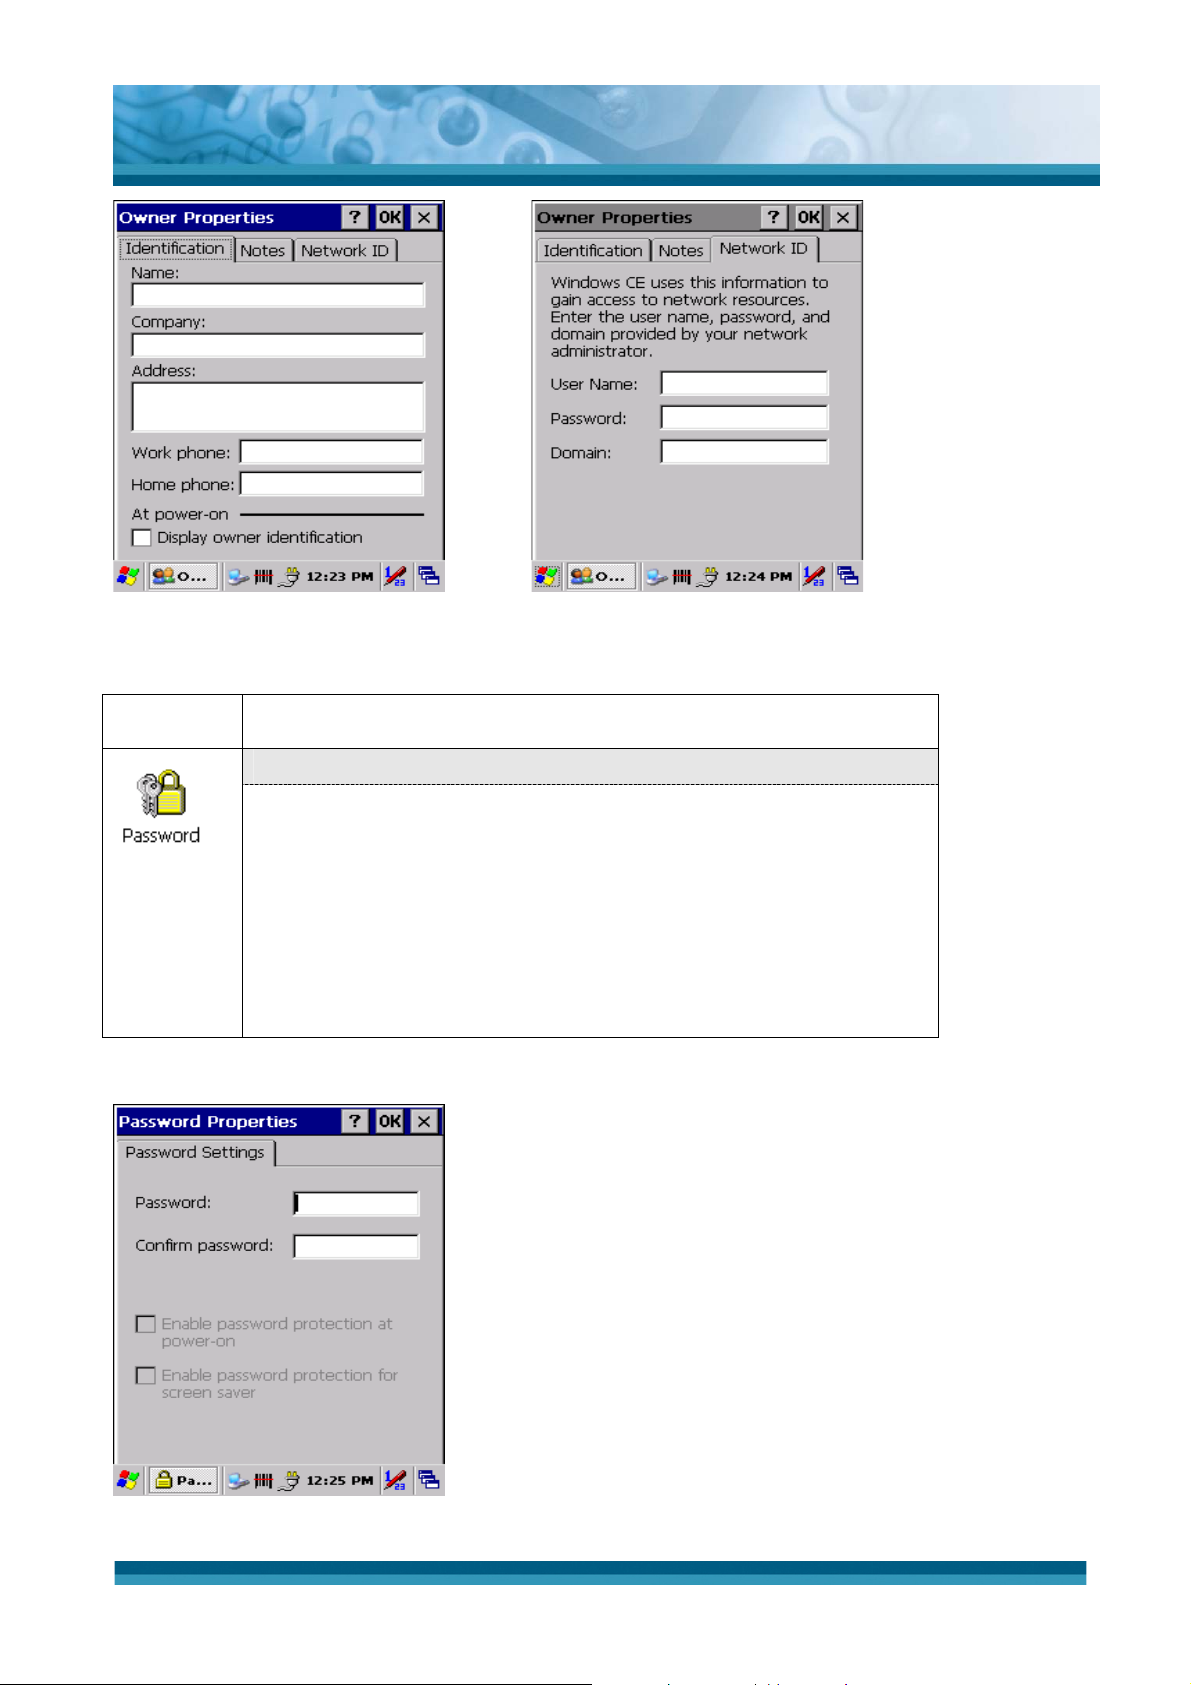
Figure 3-47 Owner Properties Figure 3-48 Owner Properties
OPTICON
User's manual
H-15
3.2.12 Password
ICON ITEM & FUNCTION
z “Password Setting” Tab : (Figure 3-49)
9 Enter the password
9 In the “Confirm password “box, enter the password again.
9
To require the password on startup, select “Enable
password protection at power- on“. and/or select
“Enable password protection for screen saver”
9
To exit the Password control panel, press “OK” from the
control bar, or press the <Enter> key on the keypad.
Table 3-15 Password
Figure 3-49 Password Properties
3-25
Page 72
3.2.13 PC Connection
ICON ITEM & FUNCTION
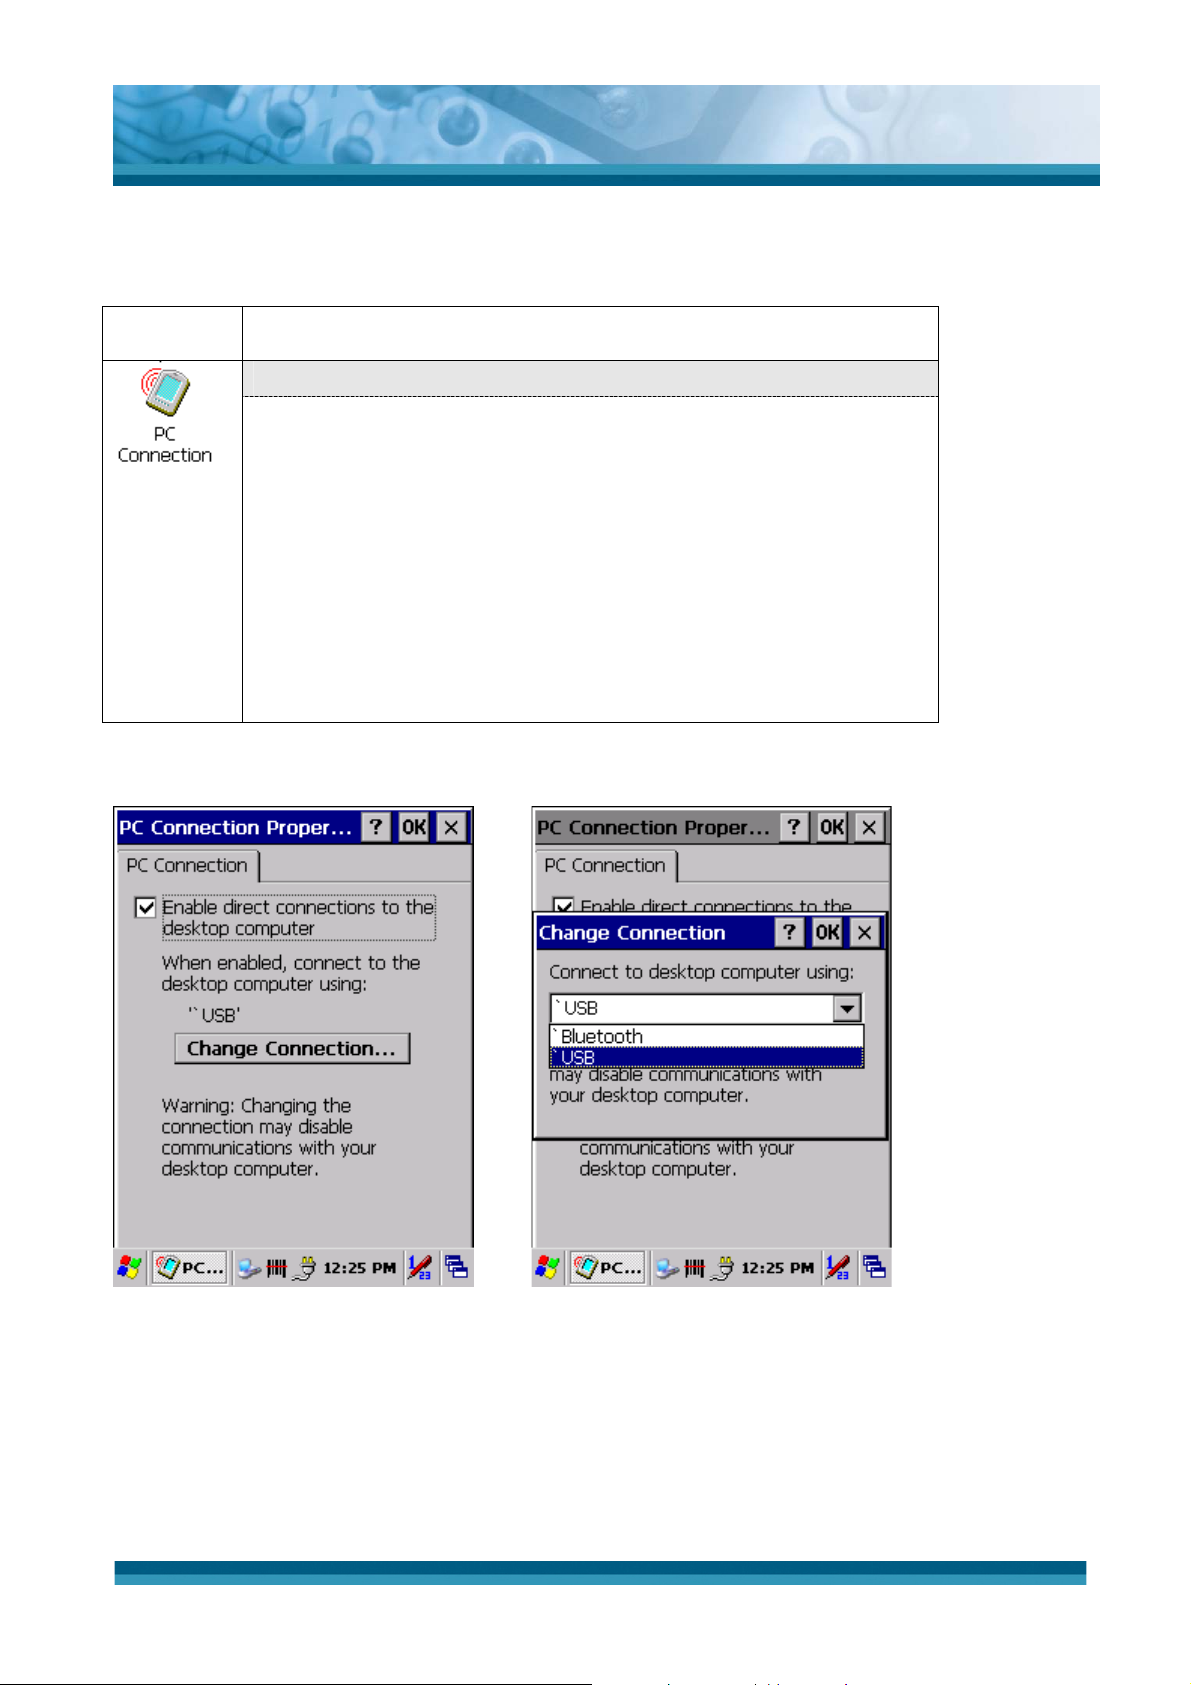
z “PC Connection” Tab : (Figure 3-50)
9 Select the first checkbox to enable direct connections to the
desktop computer. (Figure 3-50)
9
Tap the “Change Connection…” button to modify the
connection method from USB or Serial. (Figure 3-51)
9
To exit the “Change Connection” dialog, press “OK” from
the control bar, or press the <Enter> key on the keypad.
9
To exit the “PC Connection” properties control panel,
press “OK” from the control bar, or press the <Enter> key
OPTICON
User's manual
H-15
on the keypad.
Table 3-16 PC Connection
Figure 3-50 PC Connection Figure 3-51 PC Connection
3-26
Page 73
3.2.14 Power
ICON ITEM & FUNCTION
z “Battery” Tab : (Figure 3-52)
9 Provide change level indicators for Main battery and
Backup battery.
9 Provide remaining power capacity of main battery.
9
If a “Main Batteries very Low” warning message shows, the
remaining battery life is around 30 minutes before PDT
shuts down. ( Figure 3-56)
9 The PDT will shutdown if the main batteries capacity is
around 0%
OPTICON
User's manual
H-15
Note:
9
To exit Battery control panel, press “OK” from the
command bar, or press <Enter> key on keypad.
z “ Schemes” Tab: (Figure 3-53)
9 The Scheme Tab allows you to determine the time to
switch state to Suspend mode when using either Battery
Power or AC Power.
9
Select Battery Power or AC Power as the power scheme
from the pull-down list.( Figure 3-53)
9 Select the time to suspend mode from the pull-down list.
( Figure 3-54)
z “Device Status” Tab: ( Figure 3-55)
Provide power level of the device – The power level ranges
from “ High(D0)” which means the device is at the highest
power level to “Off(D4)” which means the device is at the lowest
power level.
This ICON inside the Task Bar shows that AC adapter provides
power to the PDT
The ICON inside the Task Bar shows that AC adapter provides
the power to the PDT and is charging the main batteries..
Table 3-17 Power
3-27
Page 74
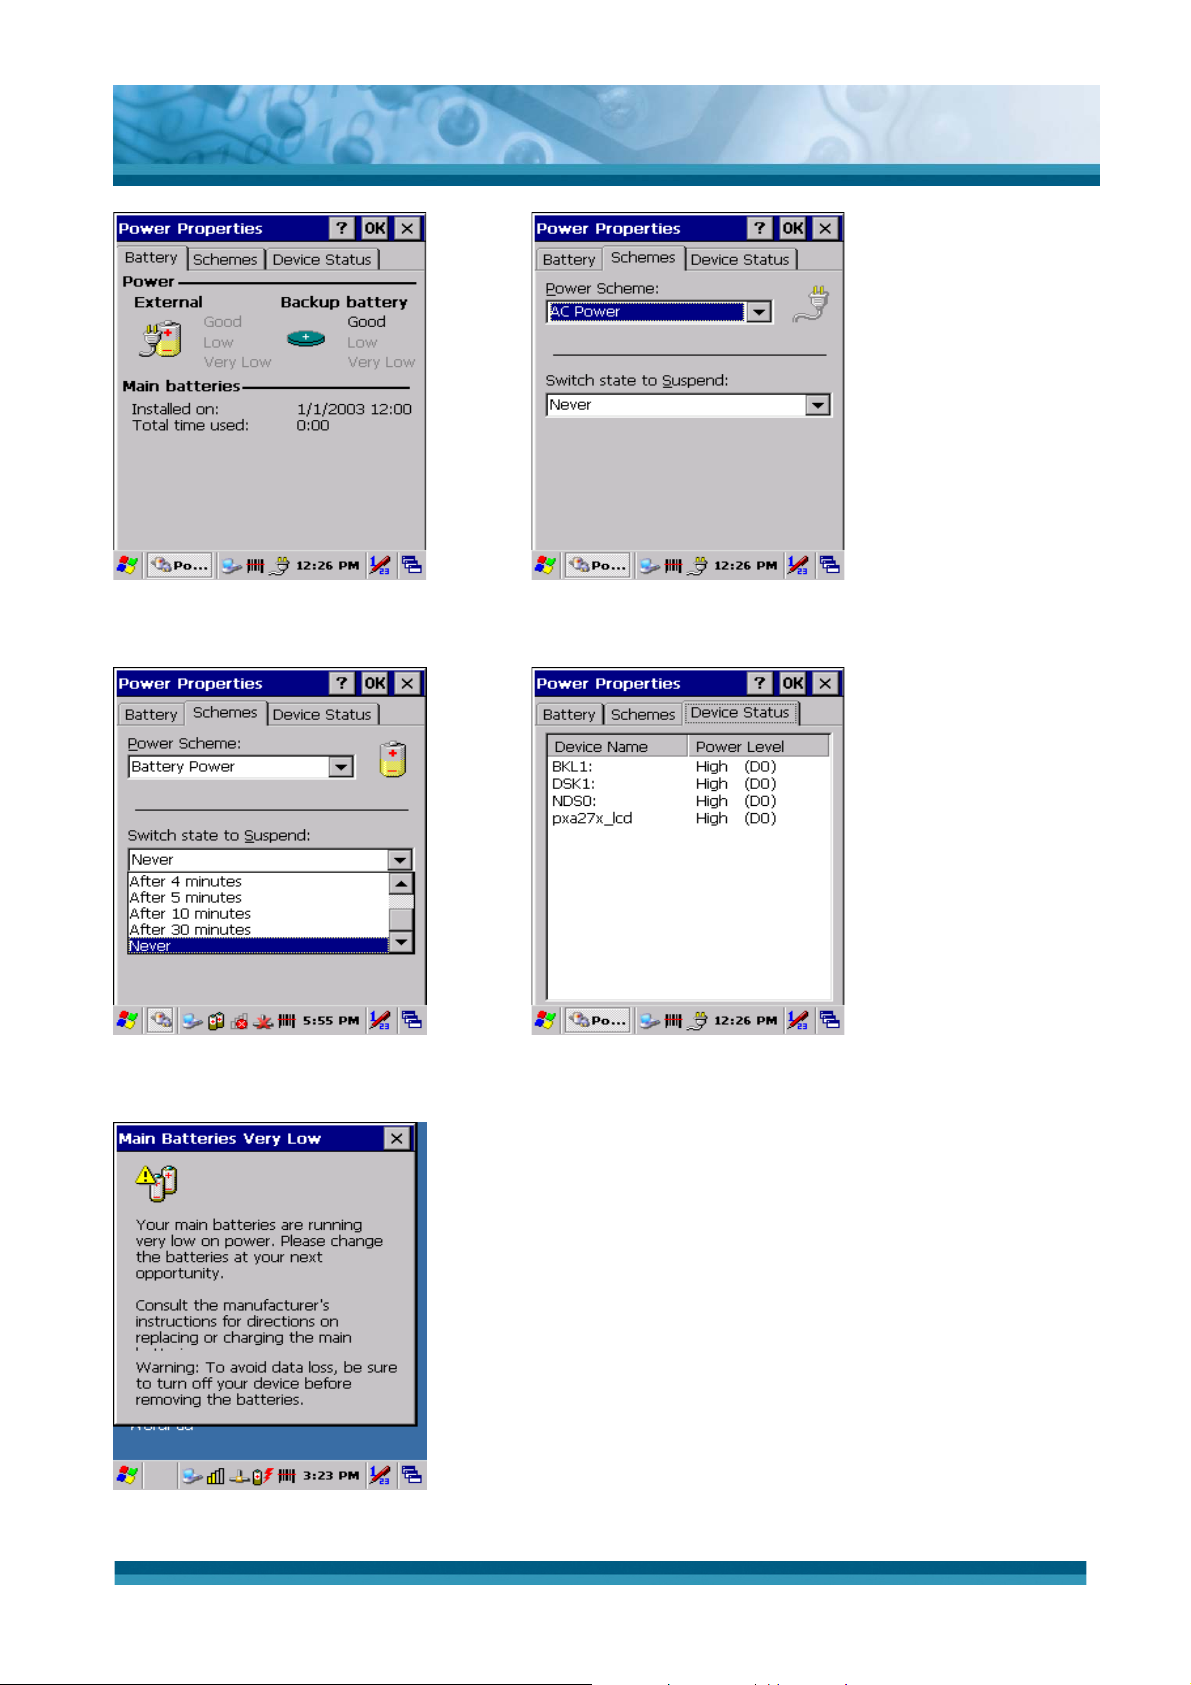
Figure 3-52 Power Figure 3-53 Power
OPTICON
User's manual
H-15
Figure 3-54 Power Figure 3-55 Power
Figure 3-56 Power
3-28
Page 75
3.2.15 Regional Settings
ICON ITEM & FUNCTION
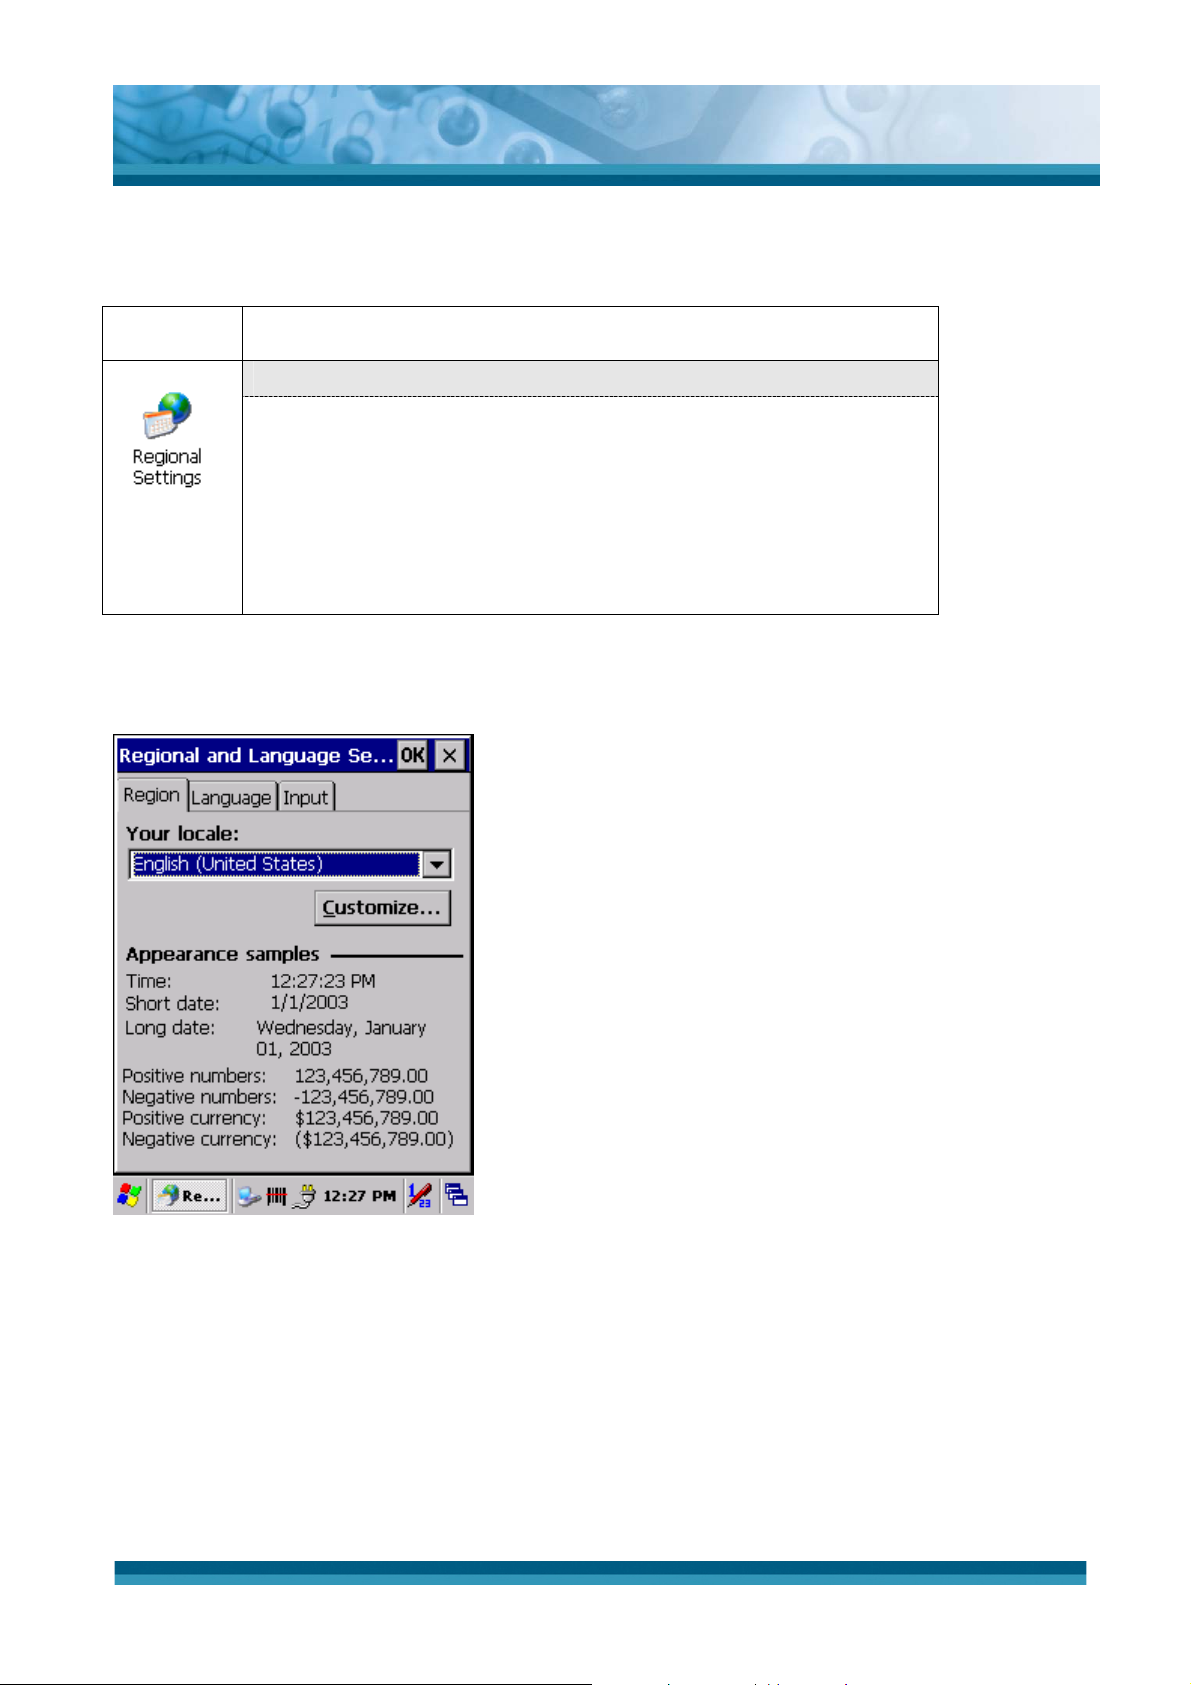
z “Region” Tab : (Figure 3-57)
9 Select the desired location/language.
9 Review the Appearance samples in the bottom half of the
screen.
9
Select the Tab at the top for any settings you wish to
change, Options to modify include Number, Currency,
Time, and Date.
Table 3-18 Regional Settings
OPTICON
User's manual
H-15
Figure 3-57 Regional Settings
3-29
Page 76
3.2.16 Remove Programs
ICON ITEM & FUNCTION
z “Remove Programs” Tab :
9 Only user installed programs can be removed.
¾
Select the program you wish to remove from the list and
press “remove” button.
Table 3-19 Remove Programs
3.2.17 Stylus
OPTICON
User's manual
H-15
ICON ITEM & FUNCTION
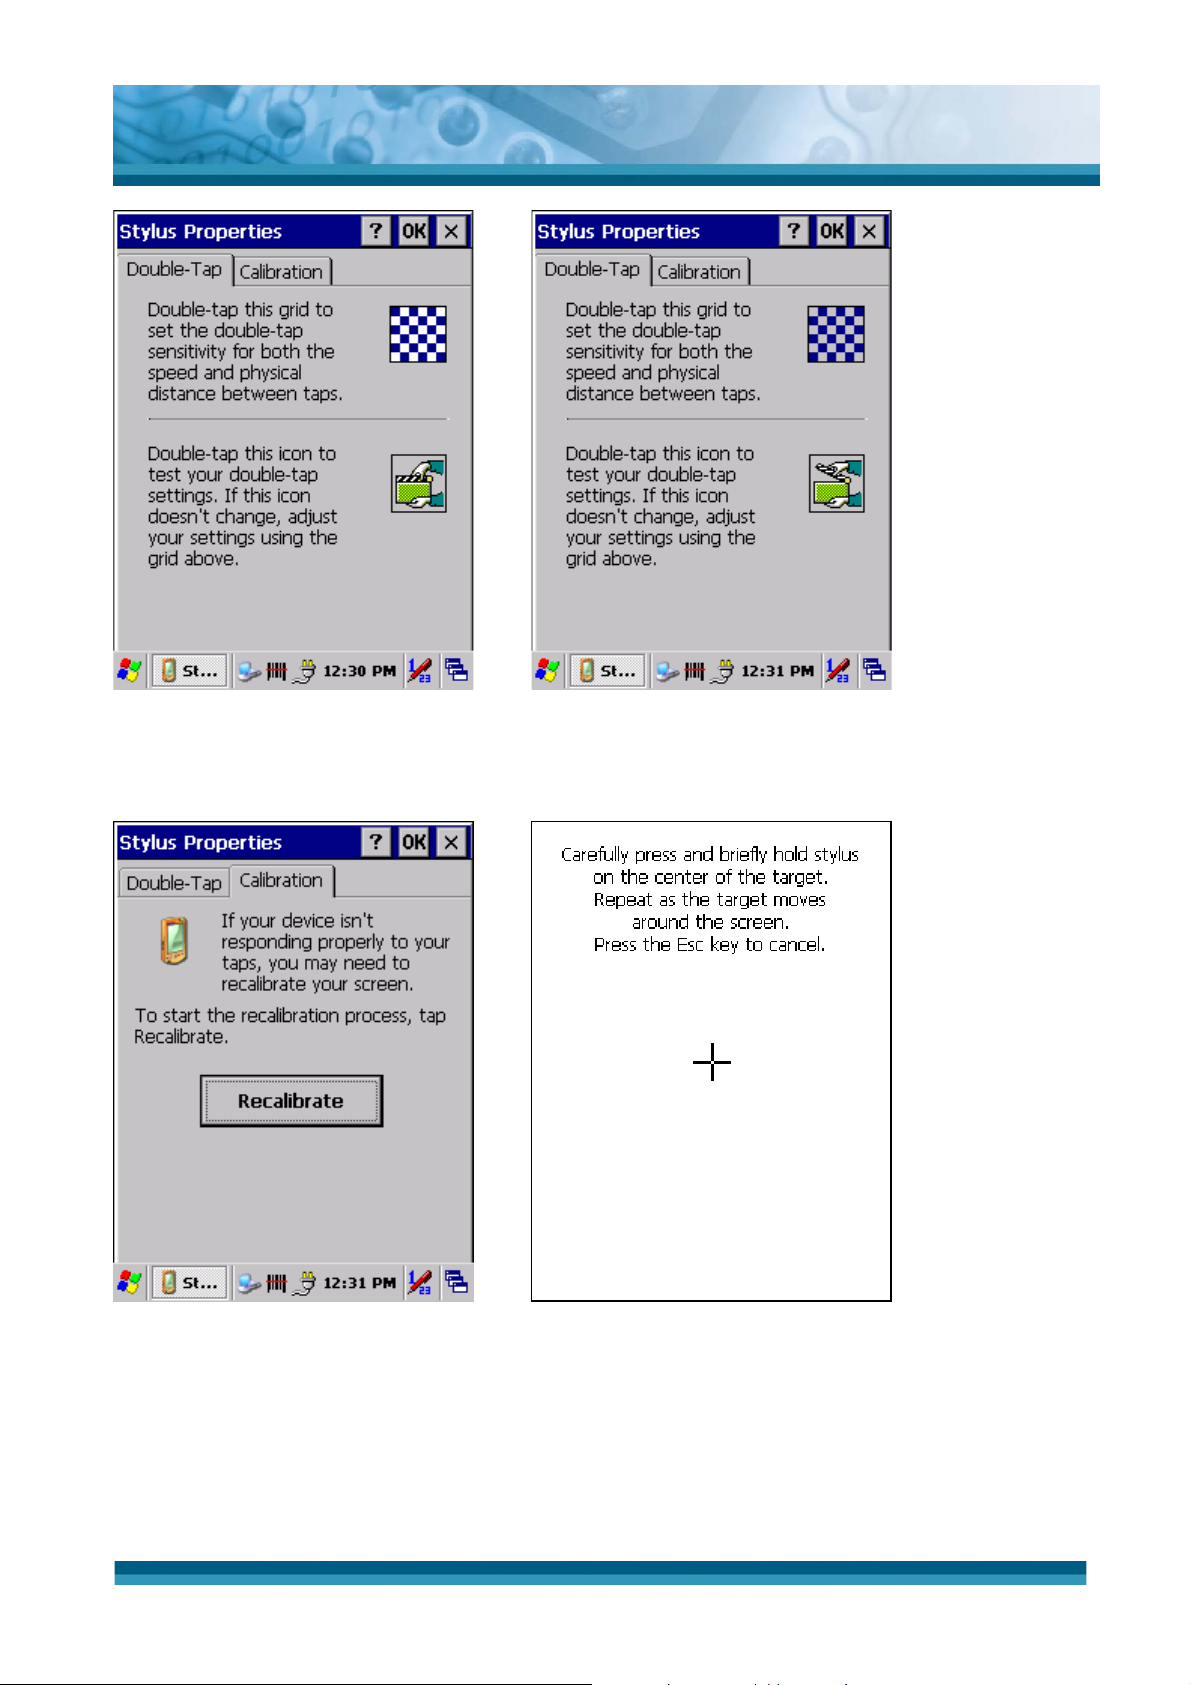
z “Double-Tap” Tab : (Figure 3-58,Figure 3-59)
9 Double-tap the checkerboard grip at a comfortable speed.
9
Double-tap clapboard to test your settings.
9
The function is OK if the figures are changed from Figure
3-59 to Figure 3-60.
9 To tap “OK” to exit the Stylus Properties.
z “Calibration”: (Figure 3-60, Figure 3-61)
9 In the Welcome Wizard, you tapped a target with the stylus
to set the amount of pressure needed for the screen to
respond to your stylus taps.
9 Please also see 2.4.3 Calibration of the touch Screen
Table 3-20 Stylus
3-30
Page 77
OPTICON
User's manual
H-15
Figure 3-58 Stylus Properties Figure 3-59 Stylus Properties
Figure 3-60 Stylus Properties Figure 3-61 Stylus Properties
3-31
Page 78
3.2.18 System
ICON ITEM & FUNCTION
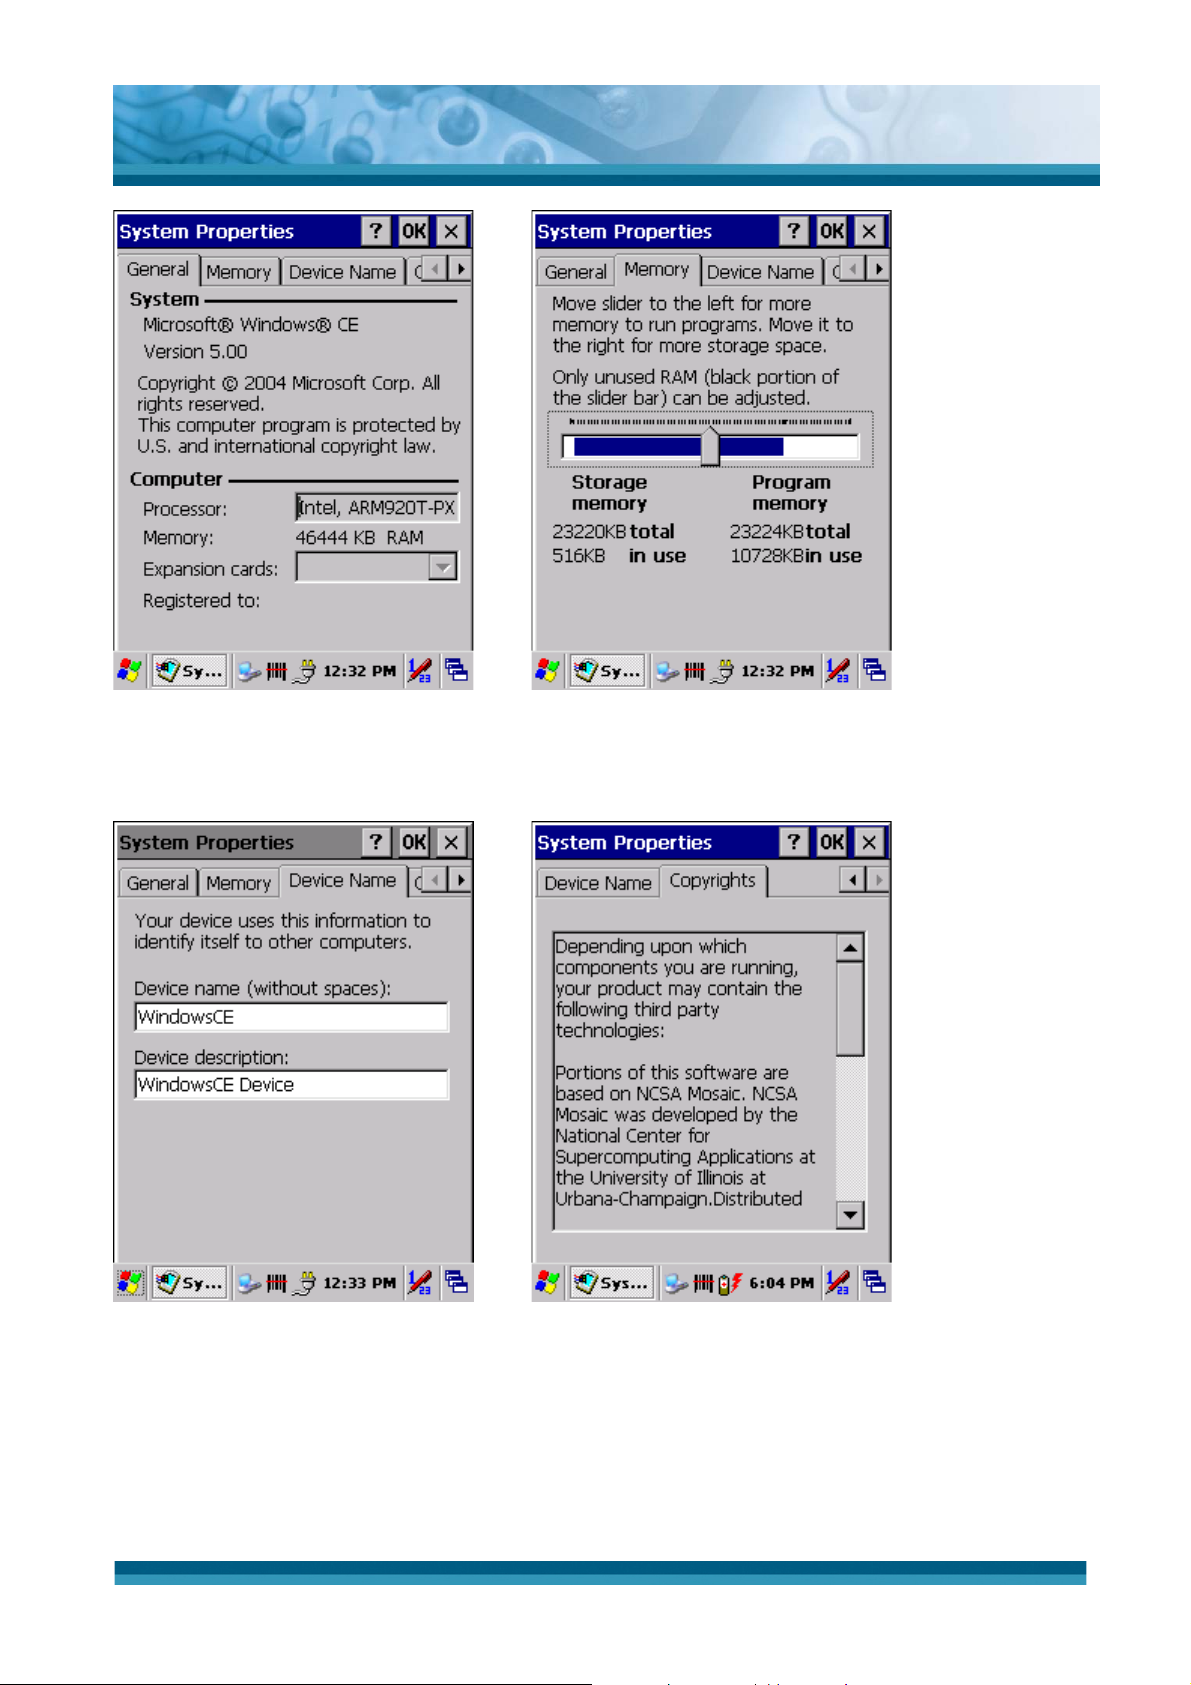
z “General” Tab : (Figure 3-62)
9 To show:
¾
Firmware information
¾
Information about Processor type, Memory size,
Expansion card
z “Memory”: (Figure 3-63)
9 Move the slider to adjust memory allocation. Default
storage memory is normally set to about 8MB with the
reminder assigned to Program memory.
OPTICON
User's manual
H-15
9 Press the “OK” key on the Keypad.
Note: the difference is occupied by OS between the RAM
size in Information properties and total memory size of
storage memory and program memory
z “Device Name” Tab : (Figure 3-64)
9 Your device uses this information to identify itself to other
9
9 To close the Device Name, press the “OK” button, or press
z “Copyrights” Tab: (Figure3-65)
9 Refer to this tab for specific copyright data. As a user, you
Table 3-21 System
computers.
The input panel will open to facilitate data entry.
the <Enter> key on keypad.
are responsible to read this statement.
3-32
Page 79
OPTICON
User's manual
H-15
Figure 3-62 System Properties Figure 3-63 System Properties
Figure 3-64 System Properties Figure 3-65 System Properties
3-33
Page 80
3.2.19 Volume & Sounds Properties
ICON ITEM & FUNCTION
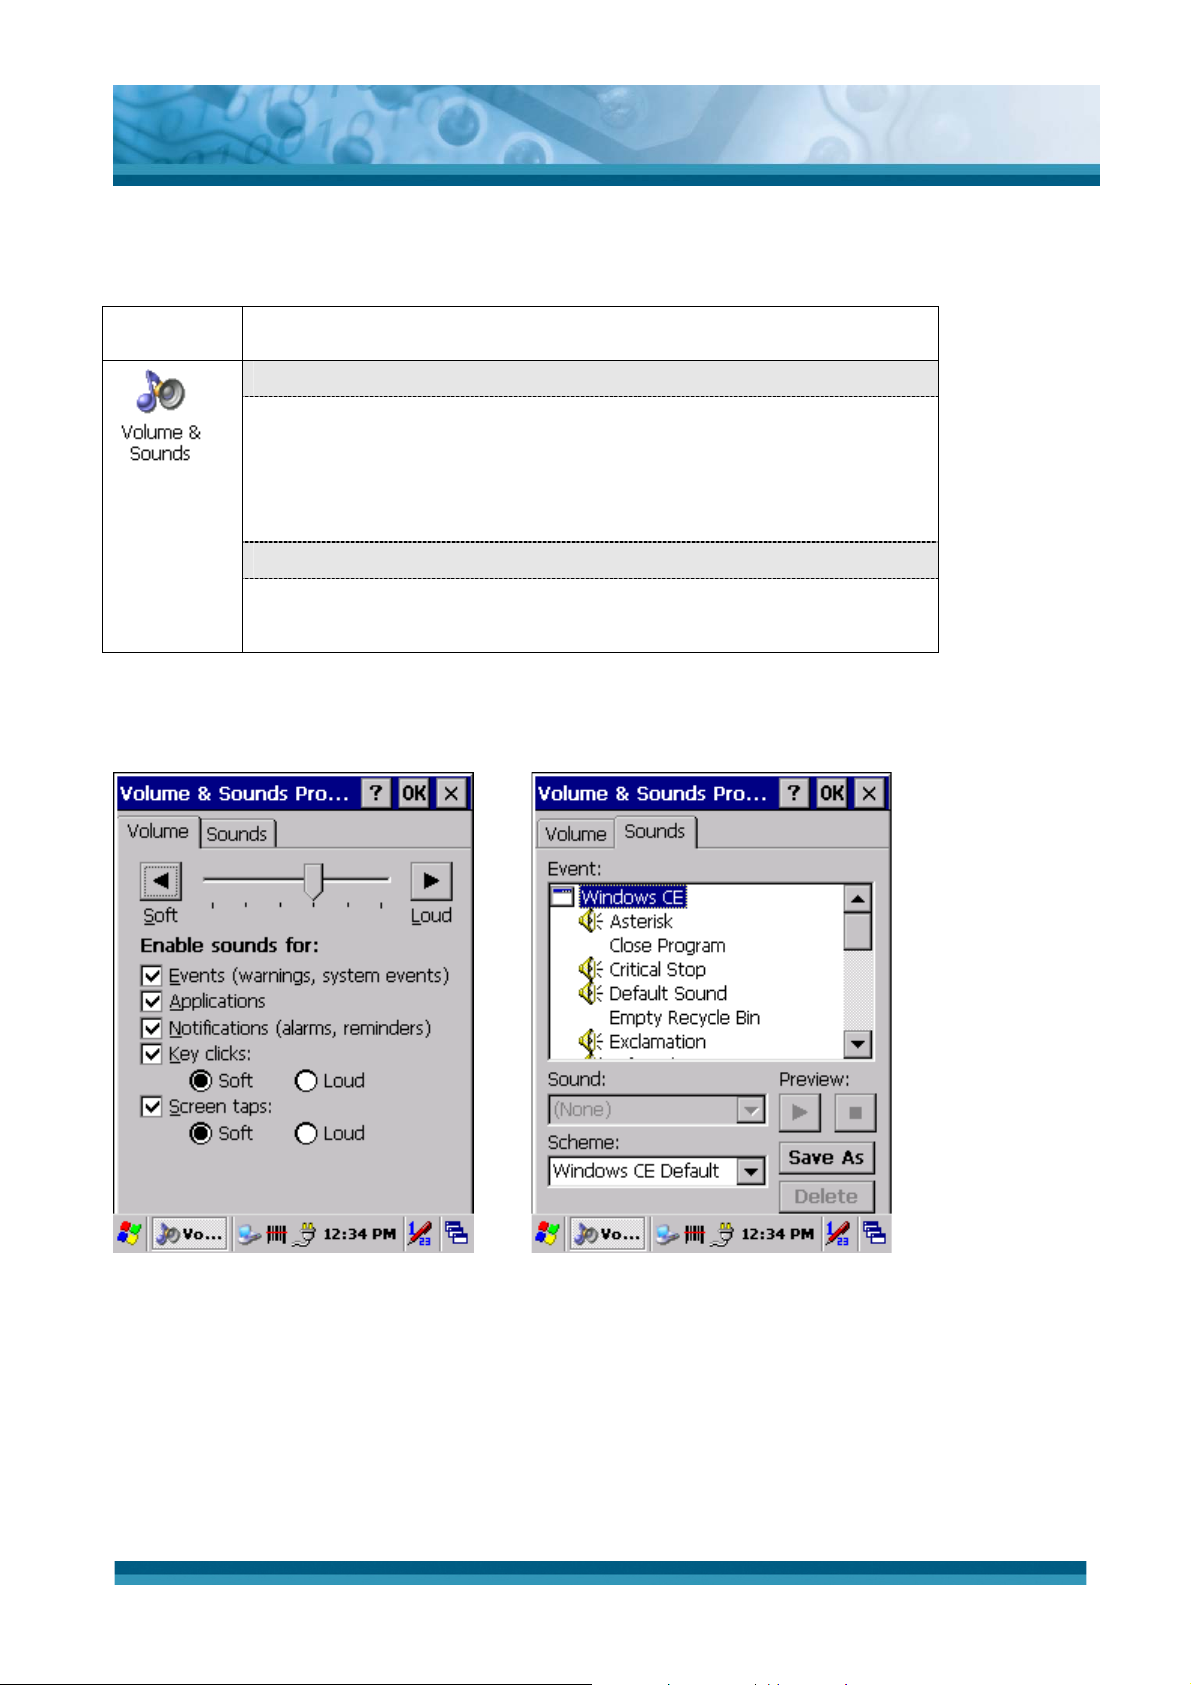
z “Volume” Tab : (Figure 3-66)
9 The factory default for Volume is the forth level. You can
adjust the volume to your environment and comfort.
¾ Set the volume by adjusting the slider from Soft to
Loud, or press Right or Left edge of Navigation keys
z “Sounds ” Tab: (Figure3-67)
9 Enable the desired sounds for key clicks, screen taps,
notifications, and applications.
Table 3-22 Volume & Sound
OPTICON
User's manual
H-15
Figure 3-66 Volume & Sound Figure 3-67 Volume & Sound
3-34
Page 81

3.3 Taskbar and Start Menu
ICON ITEM & FUNCTION
OPTICON
User's manual
H-15
Taskbar
and Start
Menu
z “General” Tab :
9 In this tab, You can change the position of the Taskbar and
Start menu
¾ Is always on top or not
¾
Auto hide or not
¾
Show Clock or not
z “Advanced ” Tab:
9 Tap the “Clear” button to remove the contents of the
Documents Menu.
9 Enable “Expand Control Panel” to list all icons of Control
Panel from top to bottom.
Table 3-23 Taskbar and Start menu
3-35
Page 82

OPTICON
User's manual
H-15
Chapter 4. Communication
4.1 Installing & Setting Up Microsoft ActiveSync
4.1.1 Installing Microsoft ActiveSync on the Host PC
Microsoft ActiveSync is a file transfer tool to synchronize the files on a PC with the files on
your PDT.
To install Microsoft ActiveSync, complete the following steps on the PC:
1. Go to the Microsoft website www.microsoft.com. In the search field, search for "active
sync". Download the latest current version of ActiveSync.
2. Install the latest version of Microsoft ActiveSync on the host PC.
3. Open ActiveSync.
4. Select File > Communication Settings from ActiveSync’s menu bar.
5. Go to “Using ActiveSync” on page 4-1 to continue using ActiveSync.
4.1.2 Connecting PDT to Host PC
1. You can use the USB port from the CRD-15 cradle to the Host PC.
z To use the cradle, you must first insert the PDT into the slot, making sure that the unit is
firmly seated the cradle.
z
To use the cable, connect the USB cable to the CRD-15 cradle.
2. Connect the USB cable to the Host PC’s USB port.
3. Connect the cradle to the power adapter and power source.
4.2 Using ActiveSync
Use ActiveSync to transfer and synchronize files between the PDT with cradle and the Host
PC.
4.2.1 Setting up a Partnership
During the Microsoft ActiveSync installation, you were prompted to create a partnership with
your mobile device. When you set up a partnership, you select synchronization and file
conversation settings, which are contained in a file on your desktop computer. This file
enables your desktop computer to recognize your device. Only devices that have a
partnership with a desktop computer can synchronize information between the two computers.
For more information on partnerships, please refer to your Microsoft ActiveSync
documentation or help file.
4-1
Page 83
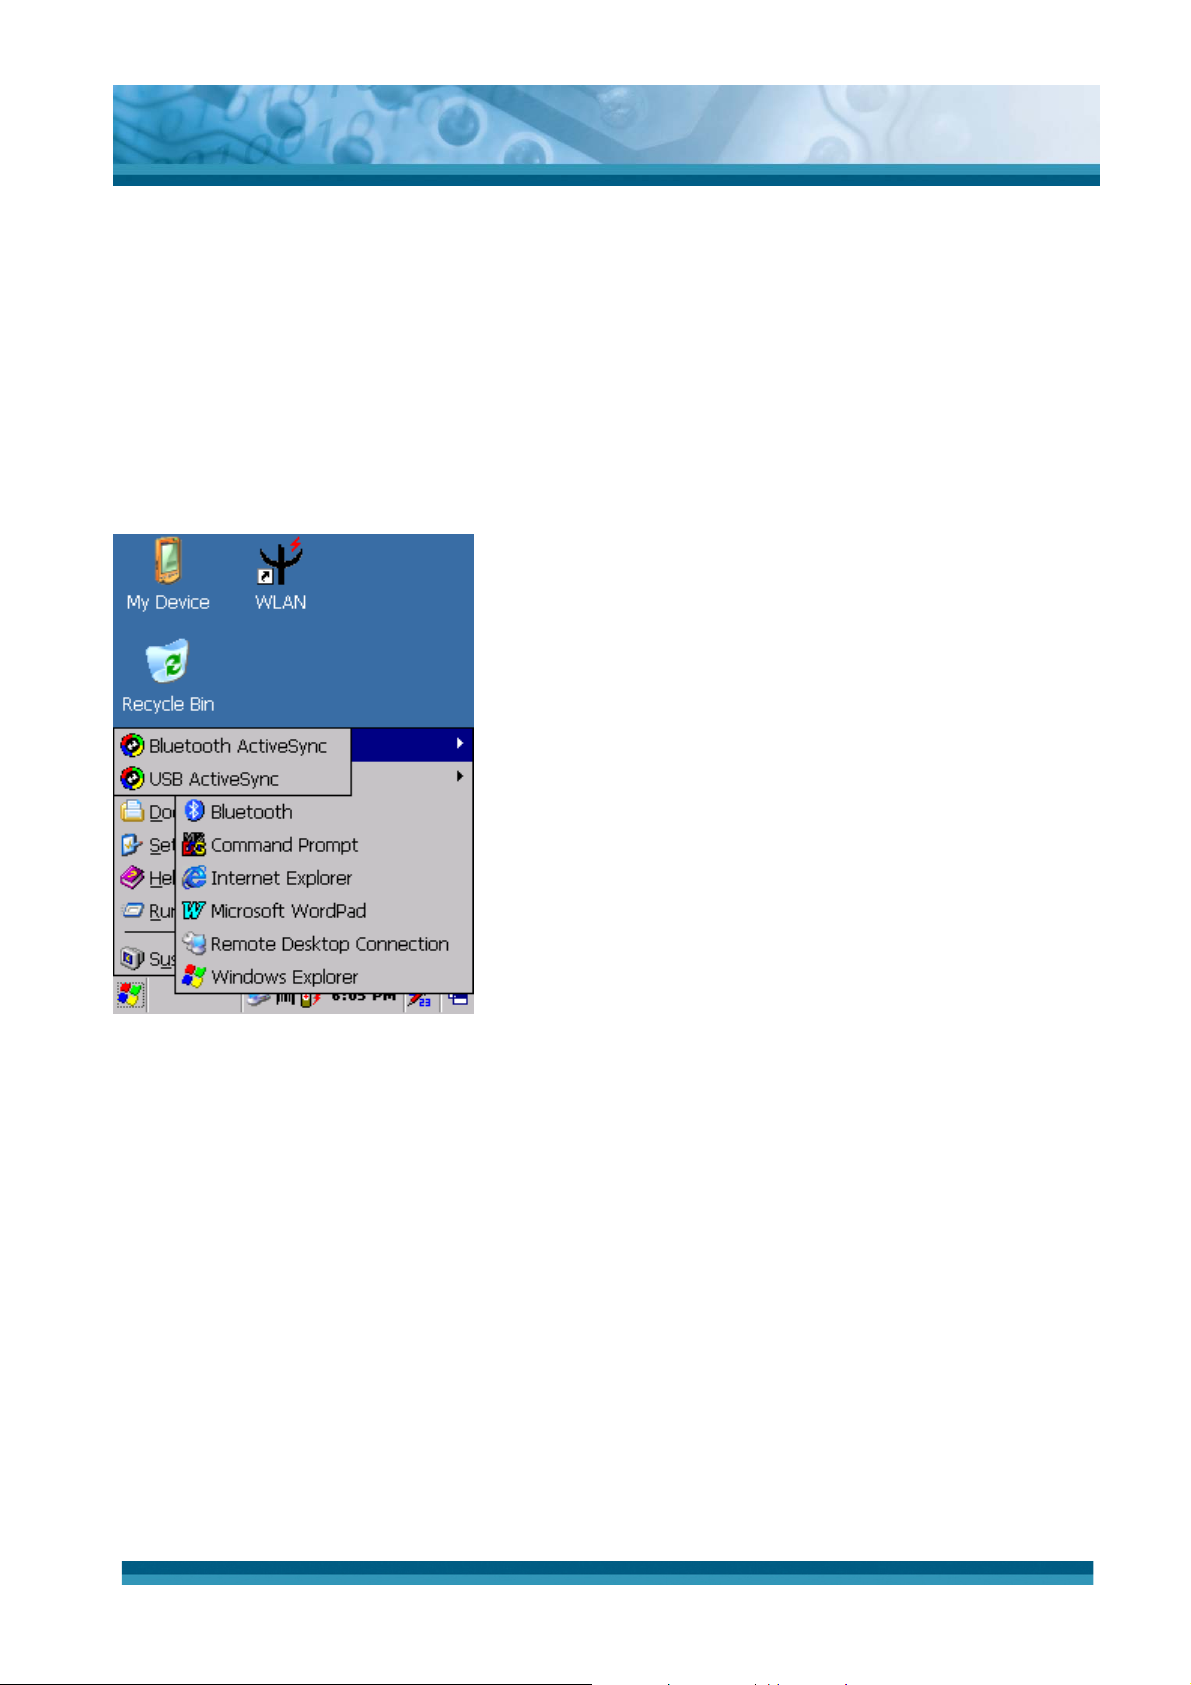
OPTICON
User's manual
H-15
Transferring Files:
To transfer files, complete the following steps on the host PC:
9 Select Start> Programs >Communication > USB ActiveSync.
9
Double-click on the selected ActiveSync icon
9
After you have established a connection with PDT, tap the “Explore” button at the top of
the ActiveSync window (or select Explore from the File menu).
9 Navigate to the target directory on your PDT and copy the desired file by using the
Copy/paste method or dragging and dropping the desired file(s) into the folder.
Figure 4-1 Communication
4.2.2 ActiveSync File Synchronization
ActiveSync files synchronization requires an ActiveSync partnership between the PDT and the
Host PC. Refer to “Setting up a Partnership”, above:
9
Select the files in the synchronization configuration for the PDT partnership.
9 Select Tools > Options from the ActiveSync command bar to configure the
synchronization options.
9 Place the file to be synchronized in the Synchronization folder created you’re My
Documents directory. Defaults to the desktop. During the ActiveSync connection, all files
in the Synchronization folder will be synchronized to the \My Documents directory on
the PDT.
4-2
Page 84
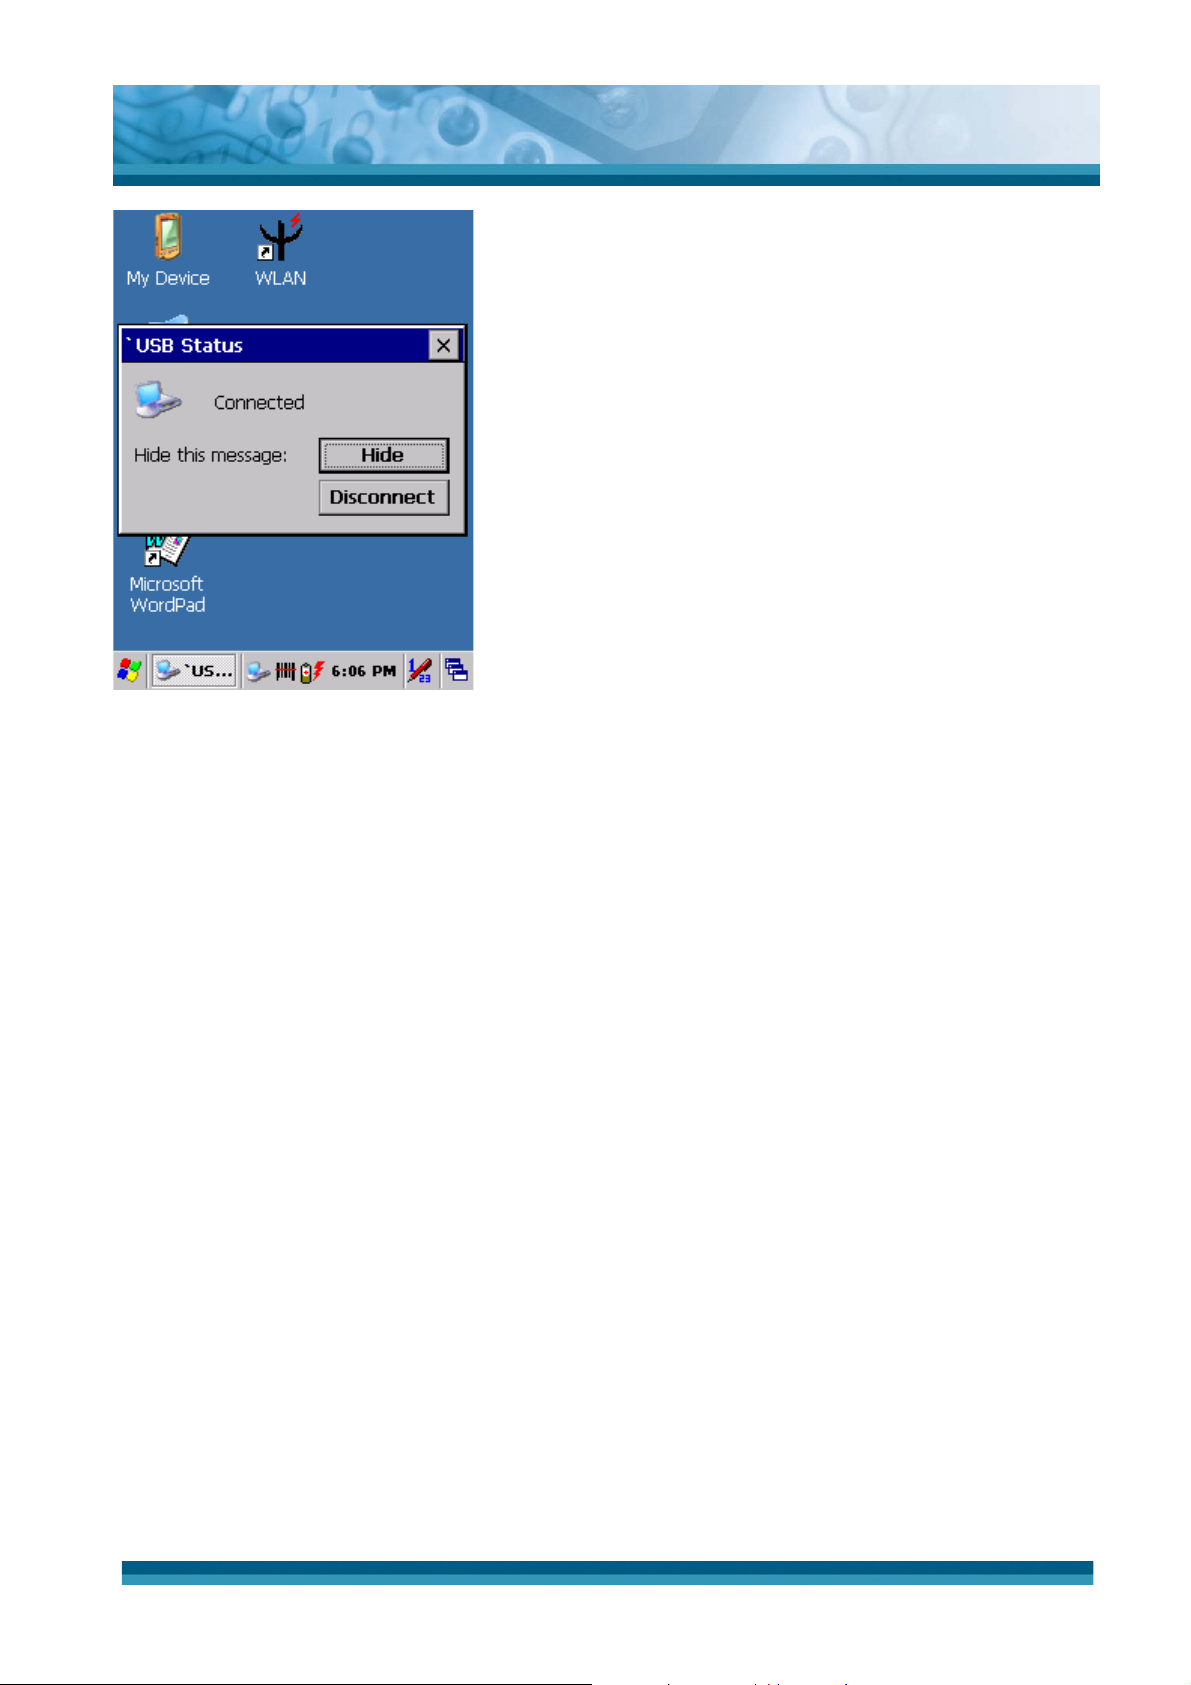
OPTICON
User's manual
H-15
Figure 4-2 Connected
4.3 Networking
Please see the 3.2.11 Owner, Table 3-14 Owner on page 3-24 for setting up the
network ID. And see the 2.5.6 Setting Up Wireless LAN RF to setup the 802.11b/g Wireless
LAN for RF connecting.
4-3
Page 85

Chapter 5. Software Applications
5.1 Introduction
The PDT includes several applications for example Calculator, email, etc.
You can switch to any software application by tapping the Start Menu.
5.2 Software Applications
5.2.1 Calculator
It can be used for basic calculations with “+”, “-“ “*” and “/“.
9 Procedure:
¾ Tap numeric number
OPTICON
User's manual
H-15
¾ Tap one operator “+”, “-“, “*” or “/”
¾ Then, tap another numeric number
¾
Tap another operator or numeric number if needed
¾ Tap “=” to get result
9 Button Function:
¾
“MC” – Memory Clear : clear the memory
¾
“MS” – Memory Store : store the displayed value to memory
¾
“MR” – Memory Recall : Display the most recent stored value
¾
“M+” – Add stored numeric number into the displayed numeric value.
¾
“Backspace” – Same as “ backspace” key
¾
“CE” – Clear current keying numeric number. Same as “ Delete” key
¾
“C” – Clear the current calculation. Same as “ESC” key.
5.2.2 Inbox
Use Inbox to send and receive e-mail messages in the following ways:
9 Synchronize e-mail messages with Microsoft Exchange or Outlook on the Host
Computer.
9
Send and receive e-mail messages by connecting directly to an e-mail server through
an Internet server provider (ISP) or a network.
To setup “Inbox”:
9 Select Start> Programs> Inbox to open it.
9
Select Service> Options from the command bar. Drag the dialog to show the right
edge to configure e-mail.
9 Select “Add…” (Note 1)
5-1
Page 86

OPTICON
User's manual
H-15
9 In the “Service Type” list, select POP3 Mail or IMAP4 Mail. (POP3 is the most
common mail protocol for ISPs).Enter a unique name for e-mail service in the “Service
name” field. This name cannot be changed later.
9
Select “OK”.
9 The Mail Service Setup wizard appears after you add a service. If you are adjusting the
setting of an existing service, select Service> Options, select the service you are
using, and then Properties. In the Service Definition dialog box, complete the
following entries as needed:
¾ Connection: Select the name of the connection you created to connect to the mail
server. If you are receiving e-mail through a network(Ethernet) connection, select
Network Connection. If you want Inbox to use your current connection, select
(none). If you have not created a connection, select Create new connection.
Double-tap the “Make new Connection” icon, and follow the instructions in wizard.
When finished, select Inbox in the Taskbar and continue setting up Inbox.
¾ POP3 Host(POP3 only): Enter the name of the mail server you use to receive and
send messages.
¾ Server(IMAP4 only): Enter the name of the mail server you use to receive and send
messages.
¾ User ID: Enter the user name or mailbox ID assigned to you.
¾
Password: Enter the password you use to access this mail account. If you do not
want to be prompted to enter the password each time you connect, select “Save
password”.
¾
Domain(Windows NT): Enter your Windows NT domain name. This name is
required only when connecting to networks, such as a corporate network, that use
Windows NT domain security. This is not required for most ISP accounts. If you
have trouble connecting, try clearing this box.
¾ SMTP Host: If your mail service uses a separate server for SMTP, enter the name
in the box. If you’re setting up a POP3 Mail service with an ISP, the ISP must use an
SMTP mail gateway.
¾ Return Address: By default, the return address is set to username@POP3host or
username@Servername. Depending on the service you are using. If this is not
your e-mail address, enter the correct address in the box.
9 Set general preferences:
If you are adjusting the setting of an existing service, select Service> Options, select the
service you are using, select Properties, and then select Next. In the General
Preferences dialog box, choose any of the following settings, all of which are optional:
¾ Disconnect service after actions are performed: Select to automatically
5-2
Page 87

OPTICON
User's manual
H-15
disconnect from the server upon completion of all pending actions. This option
minimizes connect time and cost.
¾ Check for new messages every: select the time interval(in minutes) at which you
want the device to check for new mail. If this option is turned off, you must check for
new mail manually by selecting Services> Send/Receive Mail.
¾
Display a message box when new mail arrives (POP3 only): Select to be informed
that new mail has arrived.
¾ Display a message box when new mail arrives (IMAP4 only): Select to be
informed that new mail has arrived.
¾ Send using MIME format (POP3 only): Select to send messages with extended
characters.
¾ Only display messages from last 3 days: Select how many day’s messages
you want downloaded.
9 Set inbox preferences
If you are adjusting the settings of an existing service, select Services> Options, select
the service you are using, select Properties, and then select New twice. In the Inbox
Preferences dialog box, choose any of the following options:
¾ Get message headers only: Select to save storage space and time by downloading
only headers. You can download a full copy of the message later by selecting the
message and then Services> Get Full Copy.
¾ Include <number> lines: Select to set the message length (approximate number of
lines) that you want to download.
¾ Get Full Copy of messages: Select to receive a full copy of all messages. In
addition to the message body, any options you select in When getting full copy will
be downloaded. Selecting this option increases the amount of time needed to
download messages.
¾ Only synchronize folder hierarchy under Inbox (IMAP4 only): Select to speed
download time by preventing the complete downloaded of the folder list every time
you connect.
¾ Get meeting requests (POP3 only): Select to download and store copies of meeting
requests when getting full copies of messages. This setting applies whether you
have chosen to download full copies of messages by default, or you selectively
download full copies of messages by opening the message and selecting Services>
Get Full Copy Limitations apply.
¾ Get file attachments (POP3 only): Select to download and save message
attachments when getting full copies of messages. This option may use significant
RAM and slow download time. This setting applies whether you have chosen to
5-3
Page 88

OPTICON
User's manual
H-15
download full copies of messages by default, or if you selectively download full
copies of messages and selecting Services> Get Full Copy.
¾ Get file attachments and meeting requests (IMAP4 only): Select to download and
store meeting requests and message attachments when getting full copies of
messages. This setting applies you have chosen to download full copies of
messages by default, or if you selectively download full copies of messages by
opening the message and selecting Services> Get Full Copy Limitations apply.
¾ Only if small than (IMAP4 only): Select to restrict the size of the attachments you
download. Set to 10K if you want to receive meeting requests only.
9 Include the original message in a reply:
¾
Select Services> Options> Compose tab.
¾
Under Reply, select Include Body. This setting will place a copy of the original
message beneath your response text.
¾ To indent the original message, select Indent.
¾
To add leading characters (such as>) to the original message lines, select Add
leading character, and enter the character you want.
9 Save copies of sent messages:
By default, sent messages are not saved on your device.
¾ Select Services> Options> Compose tab.
¾
Select Keep copy of sent mail in Sent folder.
9 Set the action to follow deleting, moving, or responding to a message:
¾
Select Services> Options > Read tab.
¾ Select desired options.
9 Delete a message:
Select the message and select File> Delete. Messages are moved to Deleted (local)
folder and deleted according to the option you have selected in Services> Options>
Delete tab:
¾ On connect/disconnect: Deletes messages when you connect or disconnect from
your mail service or exit Inbox.
¾ Immediately: Deletes messages as soon as you select File> Delete.
¾
Manual: Deletes messages when you select File> Empty Deleted (local)
Note: If you are working offline, messages that have been deleted from the device the next
time you connect.
5-4
Page 89

OPTICON
User's manual
H-15
9 Empty the Deleted (local) folder:
¾
Select File> Empty Deleted (local). This permanently deletes messages in the
Deleted (local) folder.
¾ To check or adjust the current settings for deleting messages, select Services>
Options> Delete tab.
9 Move or copy a message:
Caution: When you move a message that you have received through POP3 or
synchronization to a folder you created on your device, the copy of the message on the server
is deleted. This prevents duplicate copies of messages. Although the complete message is
moved, message attachments will be deleted if you have not selected the option to download
attachments. Once the message is moved, you will be able to access the message only from
your device.
¾ Select the message
¾ Select File> Move To or File> Copy To.
¾ Select the destination folder. If you are working offline, the message will be moved or
copied from the server the next time you connect.
9 Folder-
Create a folder:
¾
Select File> Folder> New Folder
¾ Type a name for the folder.
Delete a folder:
¾ Select the folder you want to delete
¾ Select File> Delete
Designate a folder as offline:
Only IMAP4 folders can be designated as offline. All IMAP4 default folders, such as
Inbox, are automatically designated as offline. Messages in offline folders can be
viewed when you are disconnected from your mail server. If a folder is not designated
as offline, you will be able to read and respond to messages in that folder only when
connected to the server.
¾ To designate a folder as offline, select the folder and then select Service > Offline
Folder.
Rename a folder:
Select the folder you want to rename.
¾
5-5
Page 90

OPTICON
User's manual
H-15
¾ Select File> Folder> Rename Folder.
¾
Type the new name for the folder.
Notes:
z Default folders, such as Inbox, can’t be renamed.
z
Folders you create for IMAP4 mail servers can’t be renamed.
Synchronize folders while connected:
When you synchronize folders, the contents of your device folders and mail server
folders are compared and updated. New mail messages are downloaded, and
messages in your device Outbox folder are sent. The synchronization behavior
depends on how you connect to your mail server.
¾ When you connect to a POP3 server, the Inbox and Outbox folders on your device
are synchronized with the corresponding folders on the mail server. To synchronize
after the initial connection, select Services> Send/Receive Mail.
¾ When you connect to an IMAP4 server, Inbox, Outbox, and all folders marked as
offline are synchronized. To synchronize all folders after the initial connection,
select Services> Synchronize Folders. To synchronize just the selected folder
and the Outbox folder, select Services> Send/Receive Mail.
9 Compose and send a message:
¾
In list view, select Compose> New Message
¾ Enter the address of one or more recipients, separating them with a semicolon. If
the recipient is listed in the Address Book, enter a few letters of the recipient’s
name and select Compose> Check Name. If there is only one match, the e-mail
address is inserted. If there is more than one match, select the correct address
from the Choose E-mail Recipients dialog box. If there is no match then add a
new e-mail address through Choose E-mail Recipients.
¾
To attach a file, select File> attachments> Add Attachment.
¾
Select File> Send. If you are working offline, the message is moved to the Outbox
folder and will be sent the next time you connect.
Tip: to see more header information, select the triangle in the lower-right corner of the
header area. Select the triangle again to collapse the header area.
9 Save a message:
¾ Select File> Save to save the message you are composing or editing.
The message is not sent and is saved in the inbox folder of the active service.
9 Reply to or forward a message:
¾ Open the message, and then select Compose> Reply to Sender, Reply to All, or
5-6
Page 91

OPTICON
User's manual
H-15
Forward.
¾ Enter your response.
¾ Select File> Send.
Tips:
z Selections in the Options dialog box determine whether the original text is included.
z
To see more header information, select the inverted triangle in the lower-right corner of
the header area. Select the triangle again to collapse the header area.
9 Check Inbox status:
¾
In list view, select Compose> Status. You can view details such as the number of
messages to be sent, deleted, and copied, and the number of attachments to be
downloaded.
9 Download message from the server:
When you download messages, you need to create two connections: a remote
connection and a mail server connection. The remote connection connects you and your
ISP or network. The mail server connection downloads messages from your mail server
to Inbox on your device. When you select Services> Connect in Inbox, Inbox starts a
remote connection using the connection you specified when setting up the current mail
service. If you are already connected through a remote connection other than the one you
specified in the service, you will be asked if you want to use the current connection. If you
choose not to, you will need to disconnect from the current connection before you can
check for new messages.
¾ Select the Services menu and make sure that the service you want to use is
selected (the selected service has a bullet next to it.)
¾ Select Services> Connect. The messages on your device and mail server are
synchronized: new messages are downloaded to the device Inbox folder,
messages in the device Outbox folder are sent, and messages that have been
deleted on the server are removed from the device Inbox. Double-tap a message
list to open it.
¾ If you read a message and decide that you need the full copy, select File> Get
Full Copy while in the message window or Services> Get Full Copy while in list
view. This will also download message attachments and meeting requests if you
have those options selected in the Inbox Preferences dialog box. You can also
choose to download full copies of messages by default.
¾
When finished, select Services> Connect to disconnect. You also need to
disconnect your dial-up connection by double-tapping the icon in the status bar
and selecting Disconnect.
5-7
Page 92

OPTICON
User's manual
H-15
Notes:
z Receiving entire messages consumes storage memory.
z
The size column in the Inbox list view displays the local size and server size of a
message. Even when a message has been downloaded fully, these numbers may differ
because the size of a message can very between the server and the device.
z
When using IMAP4 to get Outlook + data, you will see the contents of your Journal folder.
File editing transactions and documents (such as Task items, e-mail message, and Word
documents) attached using drag and drop will appear as shortcuts on the device. A copy
of the document will not be moved to your device, and the shortcut on the device cannot
be used to access the documents associated with a journal entry to the device, attach
the document to the entry rather than dragging and dropping it. Also, be sure to set your
IMAP4 service to receive full copies of messages, attachments, and meeting requests.
For more information on using Journal, see the Help for the desktop version of Outlook.
9 Working with Message Attachments:
¾ If you receive messages through a remote mail server, in Inbox on the device, select
the Get file attachments and meeting requests (IMAP4) or Get meeting requests
(POP3) setting in the Inbox Preferences dialog box. For more information, see Set
Inbox preferences.
Notes:
z Embedded images and OLE objects cannot be received as attachments
z
Embedded messages can be viewed as an attachment when using IMAP4 to receive
e-mail. However, this features does not work if TNEF is enabled so that you can
receive meeting requests.
9
Check attachments status:
¾ An attachment sent with an e-mail message, whether it has been downloaded or not,
will appear as an icon at the bottom of the message in its own window pane. If you
don’t see this pane, select File> Attachments> Show Attachments. If TNEF is
turned on so you can receive meeting requests, you will not see attachments until they
are fully downloaded.
¾
To mark an attachment for downloading in a POP3 or IMAP4 service, double-click it.
The attachment will be downloaded the next time you connect. You can also set Inbox
to download attachments automatically when you get a full copy of a message. For
more information, see Receive attachments.
5-8
Page 93
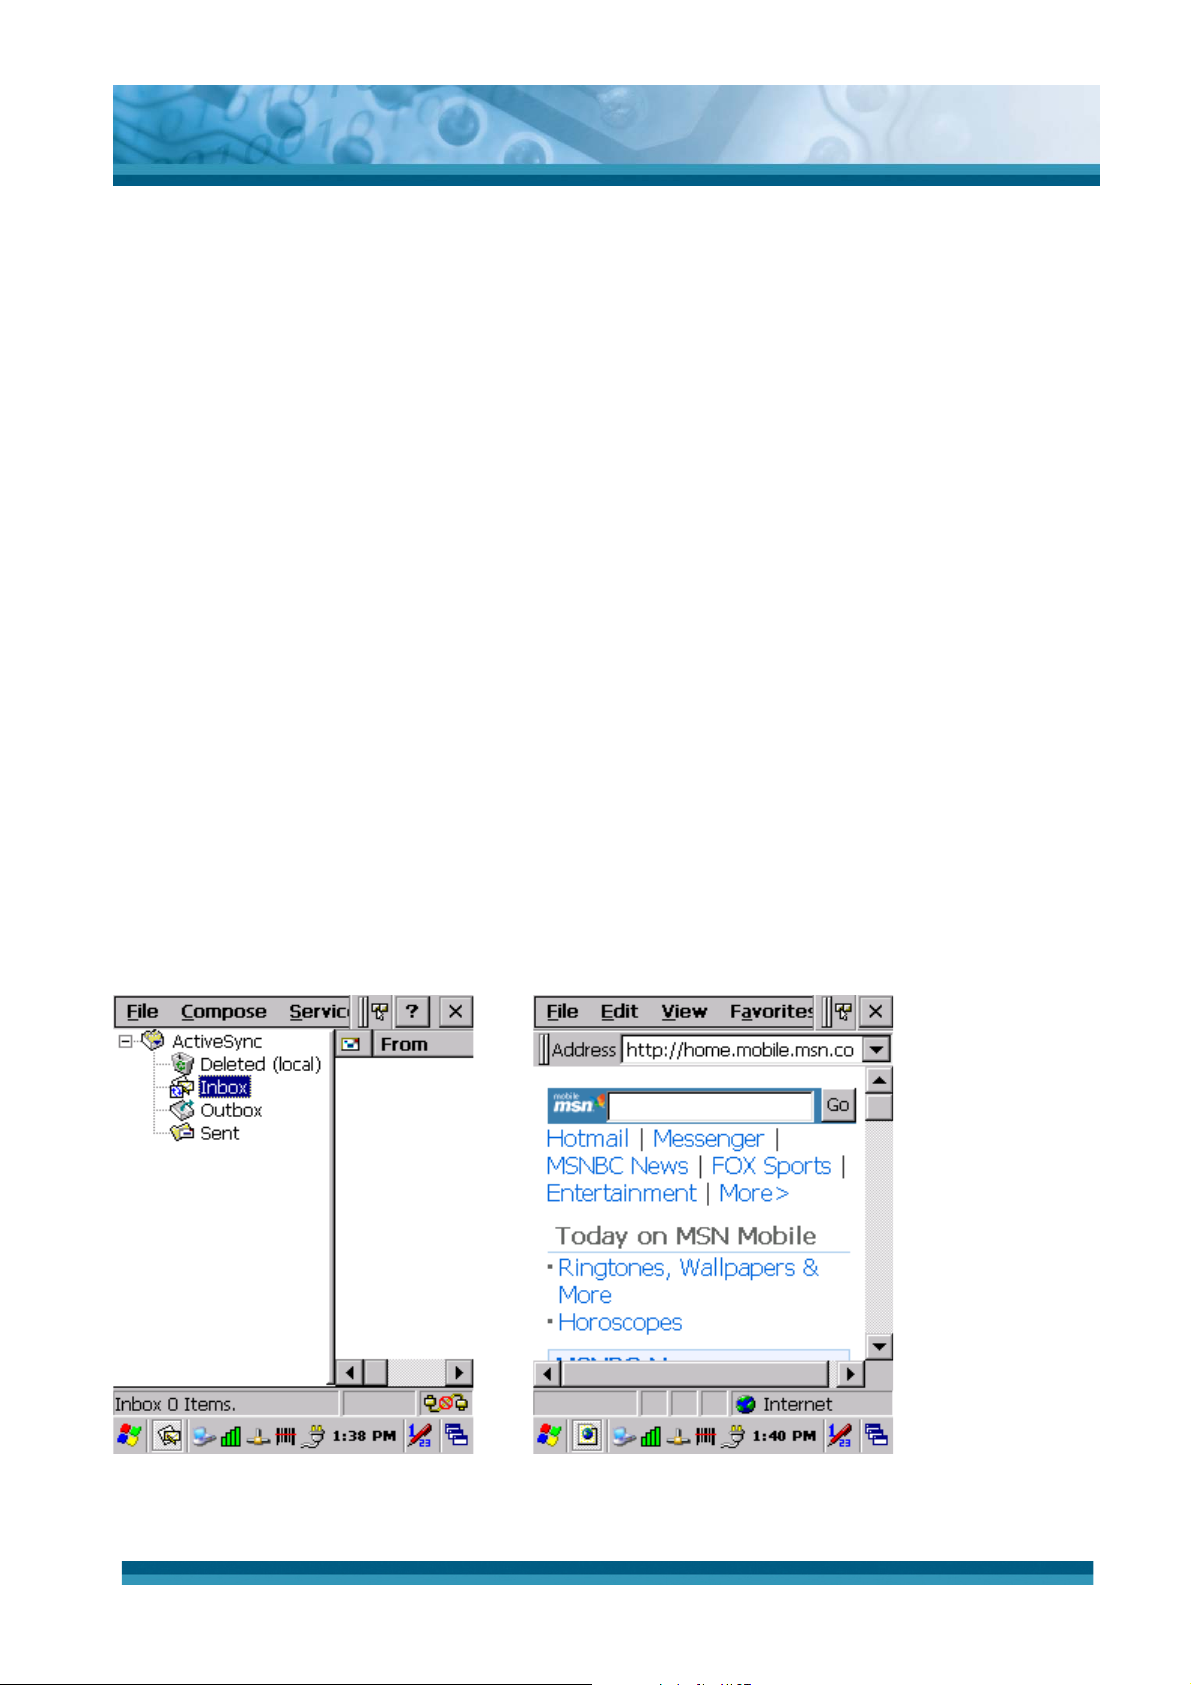
OPTICON
User's manual
H-15
9 Open an attachment:
¾ With the message open, double-tap the attachment’s icon at the bottom of the
message. If you don’t see this pane, select File> Attachments> Show Attachments.
9
Store an attachment:
¾
Select Service> Options> Storage tab.
¾ Select to store attachments on internal RAM or a storage card.
¾
If you use more than one storage card, select it from the list.
Note: Once you make the above selection, all attachments will be moved to the selected card.
9 Delete an attachment:
¾ To delete an attachment from a message you are sending, select the attachment,
and then select Edit> Clear or press the DEL key on the keypad.
¾ To delete an attachment you have received, delete the message.
9 Attach a file to a message:
¾
With the message open, select File> Attachments> Add Attachment.
¾ Select the file you want to attach.
Note:
OLE objects cannot be attached to Inbox messages.
Note 1: To add a mail service, select “Add”, To remove a mail service, select the service from
the Installed service box and select “Remove”. To view a mail service’s properties, select the
service from the Installed service box and then select Properties.
Figure 5-1 Inbox Figure 5-2 Internet Explorer
5-9
Page 94

OPTICON
User's manual
H-15
5.2.3 Internet Explorer
With Internet Explorer, you can view Web or intranet Web pages on your device. You will need
to use a modem or WLAN to connect to an Internet server provider (ISP) or network.
5.2.3.1 Connect to the Internet
Before you can view Web pages, you must set up a remote connection to your ISP or network.
5.2.3.2 Start Internet Explorer
9 Open Internet Explorer by selecting Start > Programs > Internet Explorer.
9 To get default home page, navigate to the desired default web page.
9 Select View > Internet Options from the command bar.
9
Enter the desired URL in the Start page field.
9
Press the OK button.
5.2.3.3 Navigation Control
Internet Explorer uses sliding menus for application and navigation control. Tap and drag the
sliding menus to the left or right to see the hidden menu items and toolbars.
To achieve more screen real estate in Internet Explorer, you can hide the Status bar and View
menu. From the top menubar, go to View > Hide Toolbars.
Once it is hidden, you must cold reset to access these features again. Refer to 2.7.2 “Cold
Reset “for more information.
5.2.3.4 Set up a proxy server
Proxy servers are often used when connecting to the Internet through a local network, such as
a corporate network, for added security.
9 Select View > Internet Options > Connection Tab.
9
Select Access the Internet using a proxy server.
9 Enter the proxy server address and port. For more information, see your administrator.
9
To bypass the proxy server for local address, such as corporate intranet pages, select
Bypass proxy for local address.
5.2.3.5 Enable Cookies
A cookie file contains information about your identity and preferences so that a Web site
can tailor information to your needs. The Web site sends the file and it is stored on your
mobile device.
9 Select View > Internet Options > Security Tab.
9
Select Allow cookies.
5-10
Page 95

5.2.3.6 Search for an Internet Site
9 Select View > Go > Search to search the web.
5.2.3.7 Go to an Internet address
9 Select Address Bar, if necessary to display the Address bar
9 Enter the address
9 Press “ENTER” key.
5.2.3.8 View previously visited sites
9 Tap the Arrow button at the right site of Address Bar
9
Select the Web Address you want to view.
OPTICON
User's manual
H-15
5.2.3.9 Add and view Favorites
9 Go to the page you want add
9 Select Favorites > Add To Favorites.
9 If necessary, locate the folder you want.
9
Confirm or change the name.
9 To view your favorite Web sites, select Favorites and the Web site you
want to view.
Note:
To organize your Favorites list, select Favorites > Organize Favorites.
5.2.3.10 Browse Web pages
9 To move to a page you have previously view, select View > Back
9
To move to the next page (provided you have viewed it previously), Select View >
Forward.
9
To return to your Home page, select View > Go > Home.
5.2.3.11 Refresh current page
9 Select View > Refresh.
5.2.3.12 Stop loading a page
9 Select View > Stop.
5.2.3.13 View current page
9 Select View > Internet Options
9
To view the protocol, page type, size, and address, selects the General tab.
5-11
Page 96

OPTICON
User's manual
H-15
9 To view security information about the page, select the Security tab.
5.2.3.14 View HTML source code
9 While viewing the page, select File > Save As and save the file as .txt file.
9
Open the file in a word processing program, such as WordPad.
5.2.3.15 Change home and search page settings
9 Open the page you want to use as your home or search page.
9 Select View > Go > Home or Search.
5.2.3.16 Save a copy of current page
You can save Web pages and view them later when you’re disconnected from the Internet
or Intranet without using cached memory.
9 Select File > Save As
9 Specify a folder location and give the file name.
5.2.3.17 Copy a Web page to a document
9 Select all or part of the Web page you want to copy.
9 Select Edit > Copy.
9 Go to the document where you want to place the information and select the location.
9 Select Edit > Paste.
5.2.3.18 Select security Options
9 Select View > Internet Options > Security tab
9 Select the security protocols you want.
5.2.3.19 Change the font size
9 Select View > Text Size and select the desired size.
5.2.4 Messenger
The Windows CE Messenger client application in Windows CE.NET allows you to
communicate real-time using text-based messaging, VOIP, and more.
9 See who’s online. See when your colleagues are online. You can also post your
presence information to a list of watchers that you define.
9
Talk instead of type Stop typing Talk with a colleague anywhere in the world using the
microphone and speakers. Windows Messenger supports high-quality voice.
9
Communicate using Session Initiation Protocol (SIP) or Hotmail contacts Windows
Messenger supports. Communication with your colleagues in the enterprise with a
SIP based communications service. You can also talk to your Hotmail contacts using
the .NET Messenger.
5-12
Page 97
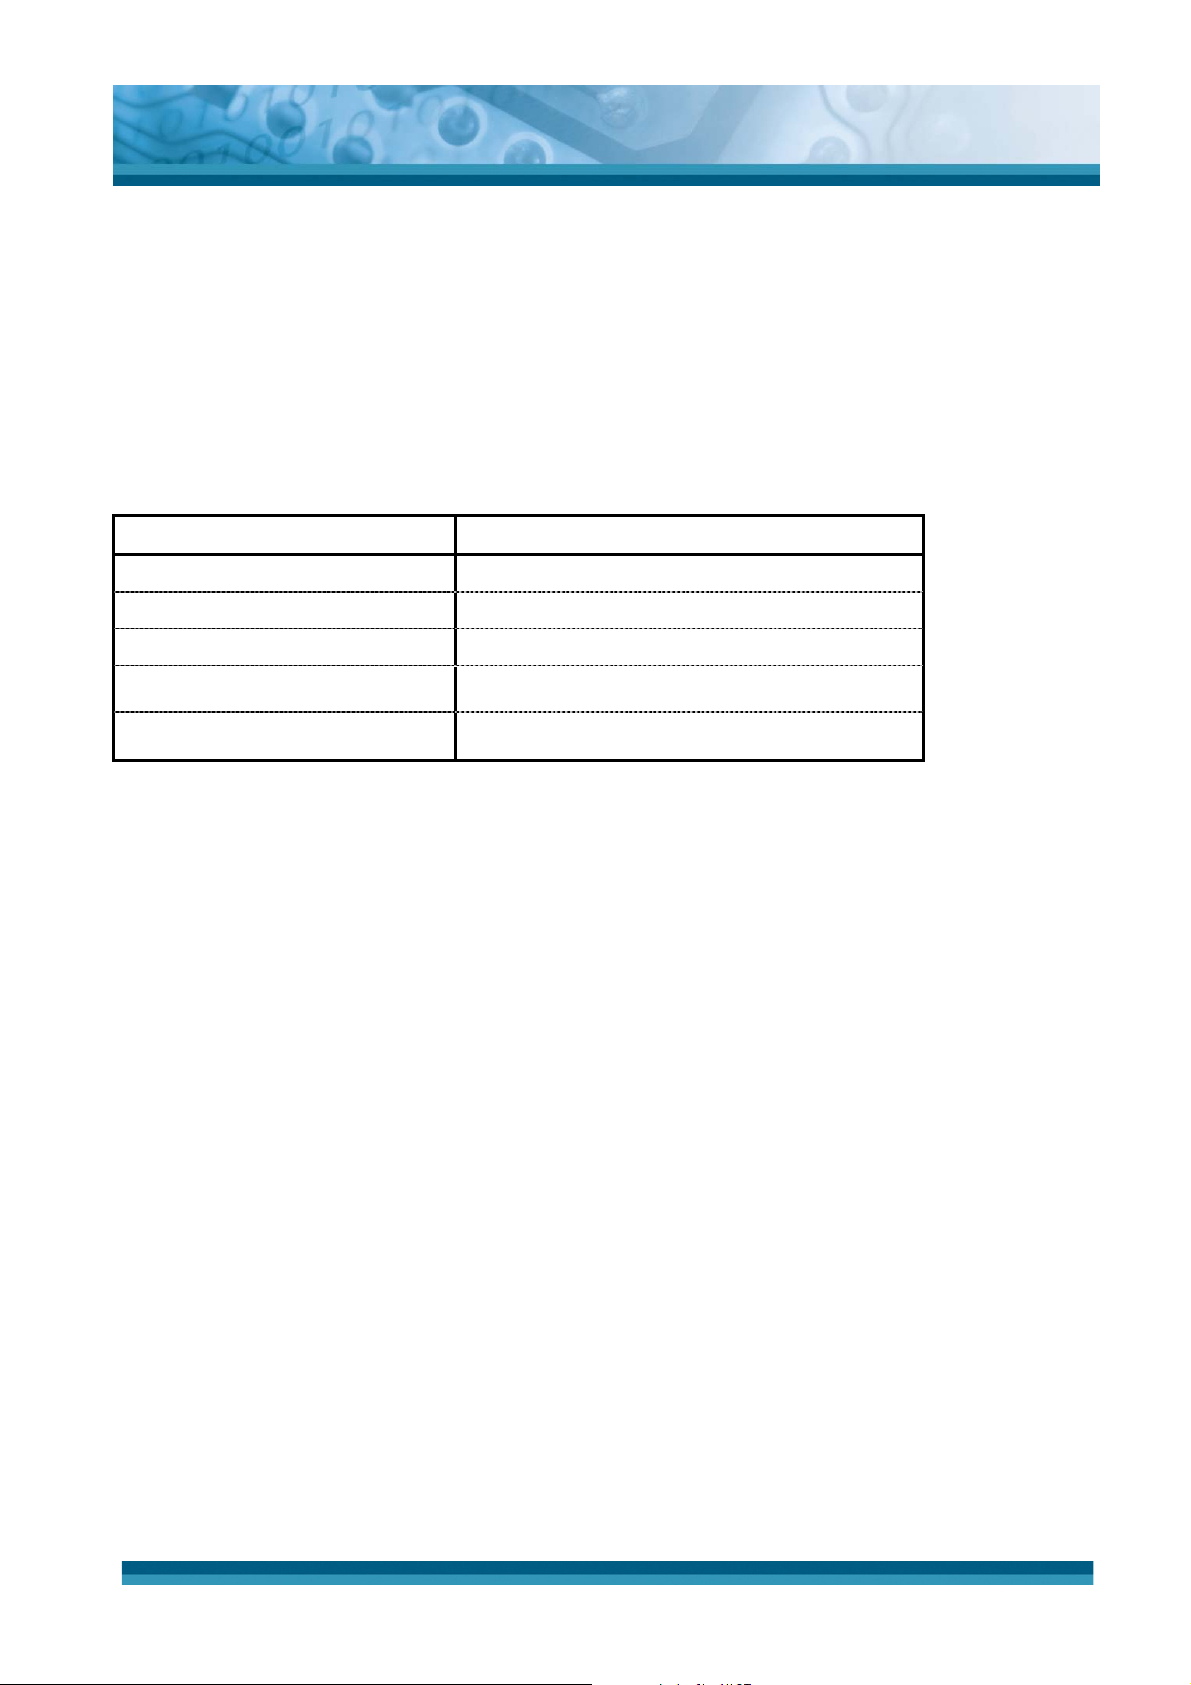
OPTICON
User's manual
H-15
5.2.5 Microsoft WordPad
You can create and edit documents and templates in WordPad, using buttons and menu
commands that are similar to those used in the desktop version of Microsoft Word. You
can work with files Normal or Outline view.
WordPad documents are usually saved as .pwd files, but you can also save documents
in other file formats, such as .rtf or .doc.
5.2.5.1 Selecting and Editing Text
9 Select text
To select Do this
Any amount of text Drag the stylus over the text.
A word Double-tap the word.
A single paragraph Triple-tap within the paragraph.
An entire document Select Edit > Select All
An picture Tap the picture
9 Find text
¾ To search for text in one part of a document, select that part. Otherwise, the whole
document is searched.
¾
Select Edit > Find
¾ Enter the text you want to find. For a paragraph, enter ^p. For a tab stop, enter ^t.
¾ Select the search options you want.
¾ To continue searching, select Edit > Find > Next.
9 Replace text
¾ To replace text in one part of document, select that part. Otherwise, the whole
document is searched.
¾ Select Edit > Replace.
¾ Enter the text you want to find and the text you want to replace it with. For a
paragraph, enter ^p. For a tab stop, enter ^t.
¾ Select the replacement options you want.
¾ Select Find Next.
¾
On the Find/Replace toolbar, select the appropriate button.
9
Move, copy, or delete text
¾ Select the text you want to move, copy, or delete.
¾ To move or delete text, select the Cut button. To copy the text, select the Copy
button.
5-13
Page 98

OPTICON
User's manual
H-15
¾ To paste the information, move the insertion point to the desired location, and select
the Paste button.
Notes:
z To undo an action, select Edit > Undo.
z
To restore the action, select Edit > Redo.
5.2.5.2 Formatting Text
9 Create bulleted and numbered lists
¾
Select the Bullets or Numbering button.
¾ Type the first item.
¾ Press ENTER, type the next item, and repeat as needed.
¾ Select the button again to end list formatting.
Note: To change the number style for the selected list, select Format > Paragraph, In the
Format list, select the style you want.
9 Set the default font
¾
Select Format > Font.
¾ Select the font you want.
¾ Select Set As Default
¾ To confirm that your changes will be applied to subsequent documents you create,
select Yes.
Note: To apply the default font and stylus to selected text, select Apply Default.
9 Select a different font
¾
Select the text you want to change. To select all text, select Edit > Select All.
¾
From the Font list, select the font you want.
¾
From the Font Size list, select a size.
Note: To see more formatting options, select Format > Font.
9 Change font formatting
¾ Select desired text.
¾ Select the Bold, Italic, or Underline button.
¾
To change the color, select Format > Font and select the color you want from the
Color list.
9 Adjust the paragraph alignment
Select the paragraph you want to align.
¾
¾
Select the Align Left, Center, or Align Right button.
Note: To see more formatting options, select Format > Paragraph.
5-14
Page 99

9 Indent a paragraph
¾ Select the paragraph you want to indent.
¾ Select Format > paragraph.
¾ Adjust the indentation settings as needed.
9 Set tabs
¾
Select Format > Tabs.
¾ Change the tab settings as needed.
5.2.5.3 Adjusting the Display
9 Wrap text in the window
¾
Select View > Wrap to Window.
OPTICON
User's manual
H-15
9 Display the document using the full screen
¾
Select View > Full Screen.
¾
To exit Full Screen view, select Restore.
¾
To move the Restore button, drag the bar on the left side.
9 Display or hide scroll bars
¾
Select View > Horizontal Scroll Bar or Vertical Scroll Bar.
9 Zoom in or out
¾
Select View > Zoom, and select the desired percentage.
Note: For Custom, enter the exact percentage and select OK.
5.2.5.4 Working in Outline View
9 Switch between Normal and Outline views
¾
Select View > Normal or Outline.
9 Assign and change outline levels
¾
Select View > Outline.
¾ Select the appropriate buttons on the toolbar.
5.2.5.5 Inserting Symbols
9 Place the insertion point where you want to insert the symbol.
9
Select Tools > Insert Symbols.
9
Select the symbol you want, and then select Insert.
5-15
Page 100

Tips:
If you select a different font ( or subset of a font), a different set of Symbols will be
displayed.
5.2.5.6 Printing a Document
9 Select File > Print.
9 Select the printing options you want.
Tips:
z Port list the available printer ports
z
If Network is selected from the Port list, enter the path to the network printer to the
Net Path box.
5.2.5.7 Setting a password for a Document
OPTICON
User's manual
H-15
9 Select File > password.
9 Type and verify the password.
9 You must save the document (File > Save) to return the password.
5.2.5.8 Converting Documents
9 About document conversion
If an e-mail program is installed on your device and you receive an attached Word
document or template created in Word version 6.0 or later, WordPad will convert the file
on your device. To view the document, simply open the attachment in your e-mail
program or open the file in the WordPad.
During conversion, some formatting attributes may be changed or lost. To avoid losing
these attributes permanently, close the file after viewing it rather saving the file on your
device. If you save the file, save with a different file name.
For more information about conversion performed on your device, see the following
topics.
9 Changes caused by Word document conversion
¾
Formatting
z
Borders and Shading
Borders and shading are not displayed in WordPad, but are restored when converted
back to a Word document. Shading is not restored when used in a table, but simple
borders are restored.
z Character formatting
Bold, italic, strikethrough, superscript, subscript, and hidden text are retained and
displayed. Other effects are changed or removed.
5-16
 Loading...