


OPTICON
User Manual
Preliminary
H-19 User Manual
Version : 0.1
Date : 96/07/10
ROM Version
20070601
1

OPTICON
User Manual
Preliminary
CAUTION: This information is subject to change without prior notice.
Version : 0.1
Date : 96/07/10
Copyright © 2007 Opticon. All Rights Reserved.
This manual may not, in whole or in part, be copied, photocopied, reproduced, translated or
converted to any electronic or machine readable form without prior written conse nt of Opticon.
Warranty
Unless otherwise agreed in a written contract, all Opticon products are warranted agains t
defects in materials and workmanship for two years after purchase. Opticon will repair or, at its
option, replace products that are defectiv e in materials or workmanship with pr oper use during
the warranty period. Opticon is not liable for damages caused by modifications made by a
customer. In such cases, standard repair charges will apply. If a product is returned under
warranty and no defect is f ound, standard repair charges will apply. Opticon assumes no liability
for any direct, indirect, consequential or incidental d amages arising out of use or inability to use
both the hardware and software, even if Opticon has been informed about the possibility of
such damages.
Packaging
The packing materials are recyclable. We recommend that you save all packing material to use
if you need to transport your scanner or send it for service. Damage caused by improper
packaging during shipment is not covered by the warranty.
IMPORTANT SAFETY INFORMATION
Please read the following information carefully before you start using this Opticon device to
avoid any damages caused by improper usage:
z The device is not charged when you tak e it out of the box. The batte ry should be charged
for at least 8 hours before first use. Do not remove the battery while charging.
z Do not use batteries, which have not been specified by the manufacturer, as this may
cause leakage or rupture.
z Do not charge the battery with an unspecified AC Adapter, as this may cause damage to
both the device and the battery.
z When discarding the batteries, dispose of them in a proper manner, according to the
battery manufacturer’s instructions and your local laws.
z Power off the device and remove the battery befor e inserting SIM card. Make sure the SIM
card snaps correctly into the SIM socket.
z Do not open the device housing or tamper with the device, as it will void your warranty.
z Do not apply excessive force on this product, as it may cause damage to the screen or the
2

OPTICON
User Manual
Preliminary
internal component.
z Do not use the device at gas or refueling stations, chemical plants, and places containing
explosives or flammable materials. Observe local guidelines.
z Use only manufacturer specified stylus. Do not scratch the screen with sharp objects.
z Do not clean the screen with chemical detergents. Only use cloths, specifically designed
for cleaning liquid displays, or a soft cloth moisturized with water drops, to wipe the
device screen.
z Do not expose the device to direct sunlight, or leave the device in a humid environment,
for extended periods of time, as this may cause damage to the device and battery.
z Do not immerse the device in water.
z The device may interfere with the navigation and/or communication syst ems on aircraft.
The use of the device on aircraft is prohibited by laws in most countries. Ob serve local
guidelines.
z This product may cause medical equipment to malfunction. The use of this device is
Version : 0.1
Date : 96/07/10
forbidden in most hospitals and medical clinics. Observe local guidelines.
z Use hands-free devices, if you need to use the telephony services, while driving a vehicle.
Observe local guidelines.
Safety of Laser Products
International Standards (Japan/EU/USA) Laser Class 1
Precautions about the Laser Device
This product using laser complies with JIS C6802: 2005 Class 1, IEC60825-1+A2: 2001 Class 1
and 21CFR 1040.10 and 1040.11 except for deviations pursuant to Laser Notice No.50, dated
July 26, 2001.
Class 1 Laser devices are not considered to be hazar dous when used for their intended purpose.
Use of controls, adjustment of procedures other than those specified herein may result in
hazardous laser light exposure.
The user should not view directly into the light beam with optical instruments, it may pose an
eye hazard.
Trademarks
Trademarks used are the property of their respective owners.
Opticon is a registered trademark. Microsoft, MS-DOS, Windows, Windows NT, Windows Server,
Windows Mobile, ActiveSync, Excel, Internet Explorer, MSN, Outlook, PowerPoint, and Word
are either registered trademarks or trademarks of Microsoft Corporation in the United States
and/or other countries.
3

OPTICON
User Manual
Preliminary
Version : 0.1
Date : 96/07/10
Table of Contents
Copyright © 2007 Opticon. All Rights Reserved.................2
Warranty.............................................................................2
Packaging ...........................................................................2
IMPORTANT SAFETY INFORMATION..................................2
Safety of Laser Products.....................................................3
Trademarks.........................................................................3
Chapter 1. Knowing Your Device......................................10
1.1 Introduction.............................................................................................11
Views of the Device..............................................................................11
The Stylus.................................................................................................13
Notification LEDs...................................................................................13
1.2 Accessories ...............................................................................................14
1.3 Install SIM Card and Battery.............................................................14
Installing the SIM Card.......................................................................14
Installing the Battery ..........................................................................15
1.4 Battery Information..............................................................................16
Reducing Risk of Fire or Burns.........................................................16
Checking the Battery Power .............................................................16
Optimizing the Power Performance...............................................17
Managing a Low Battery.....................................................................17
Charging the Battery............................................................................18
1.5 Mini-SD Cards..........................................................................................18
Inserting a Mini-SD Card into the Device ....................................18
Removing a Mini-SD Card from the Device.................................18
Chapter 2. Basic Operations .............................................19
2.1 Getting Started.......................................................................................20
Powering On/Off the Device.............................................................20
Calibrating Your Device......................................................................20
Locking/Unlocking the Device .........................................................21
Setting Buttons......................................................................................22
Changing the Backlight Settings.....................................................22
2.2 Input Methods ........................................................................................23
Keyboard ..................................................................................................23
Letter Recognizer..................................................................................23
Block Recognizer...................................................................................24
4

OPTICON
User Manual
Preliminary
Transcriber...............................................................................................24
Initial capital...........................................................................................25
Lowercase................................................................................................25
Numeric.....................................................................................................25
Uppercase.................................................................................................25
2.3 Today Screen Components.................................................................25
Today Screen...........................................................................................25
Icon Indicators.......................................................................................26
2.4 The Start Menu.......................................................................................27
List of All Programs..............................................................................28
List of All Settings.................................................................................29
2.6 Using Calendar........................................................................................31
Scheduling an Appointment..............................................................31
Deleting an Appointment...................................................................32
Version : 0.1
Date : 96/07/10
Changing Calendar Views ..................................................................34
Changing the Display of the Work Week......................................37
Setting the Default Input Mode.......................................................38
Creating a Note......................................................................................39
Creating a Stand-alone Voice Recording......................................40
Switching between Typing/Writing Modes.................................41
Editing a Handwritten Note...............................................................42
Adding a Voice Recording to a Note...............................................43
Deleting a Note......................................................................................45
Creating a Default Template.............................................................46
2.8 Using Tasks..............................................................................................49
Deleting a Task.......................................................................................54
Changing Task Priority........................................................................54
Sorting/Filtering Your Tasks.............................................................55
Setting Tasks Options..........................................................................55
Viewing Task Details............................................................................56
Charter 3. Phone Features................................................57
3.1 Making a Call...........................................................................................58
The Phone Screen..................................................................................58
Making a Call by Entering a Phone Number................................58
Making a Call from Call History........................................................59
Making a Call from Contacts.............................................................60
Making a Call from Speed Dial .........................................................61
5

OPTICON
User Manual
Preliminary
Receiving/Rejecting a Call................................................................64
3.2 Configuring the Phone.........................................................................64
Activating PIN Security.......................................................................64
Changing the Ring Type and Ring Tone........................................65
Blocking Incoming or Outgoing Calls............................................65
Displaying Caller ID..............................................................................66
Call Waiting.............................................................................................66
3.3 In-Call Options........................................................................................67
Answering Another Call ......................................................................67
Conference Call......................................................................................67
Turning On/Off the Speakerphone.................................................68
Muting the Microphone.......................................................................69
3.4 SIM Manager...........................................................................................69
Adding a Phonebook Entry to SIM Card .......................................69
Version : 0.1
Date : 96/07/10
Deleting Phonebook Entries from SIM Card...............................69
Saving Phonebook Entries to Contacts.........................................69
Chapter 4. Synchronizing Information .............................71
4.1 Installing and setting up ActiveSync..............................................72
4.2 Synchronizing Information................................................................72
Starting and Stopping Synchronization Manually.....................73
Changing Which Information is Synchronized...........................73
4.3 Changing Settings for an Information Type................................74
4.4 Synchronizing with Exchange Server.............................................74
4.5 Synchronizing via Bluetooth..............................................................75
Connecting to a PC Using Bluetooth..............................................75
Chapter 5. Bluetooth Connections....................................76
5.1 Overview of Bluetooth.........................................................................77
Bluetooth Modes....................................................................................77
Turning Bluetooth On or Off..............................................................77
Making Your Device Visible...............................................................78
5.2 Bluetooth Partnership (Bonding) ....................................................79
Creating a Bluetooth Partnership ...................................................79
5.3 Beaming Information (Bluetooth) ..................................................82
Receiving Beamed Information.......................................................82
Beaming an Item...................................................................................83
Chapter 6. Transferring Files To and From Your Device...84
6.1 Using ActiveSync....................................................................................85
6

OPTICON
User Manual
Preliminary
6.2 Transferring from Memory Cards ....................................................85
6.3 Using Bluetooth......................................................................................87
6.4 Transferring to a PC or Other Devices...........................................87
Version : 0.1
Date : 96/07/10
Chapter 7. Connecting to the Internet .............................88
7.1 Setting up Internet connections......................................................89
Creating a GPRS Connection.............................................................89
Creating a Proxy Connection ............................................................92
Deleting a Connection.........................................................................92
7.2 Using Internet Explorer Mobile........................................................93
Browsing the Internet.........................................................................93
Adding a Web Page to the Favorite List........................................94
Deleting a Favorite ...............................................................................94
Showing or Hiding Pictures on Web Pages .................................95
Changing Web Page Display Options.............................................95
Clearing History, Cookies, or Temporary Files...........................95
Viewing a Page in Full Screen Mode ..............................................95
7.3 Using Wireless Manager......................................................................96
Opening Wireless Manager................................................................96
Enabling and Disabling a Feature ...................................................97
Changing Regulatory Setting............................................................98
7.4 Using Wi-Fi Connection.......................................................................99
Connecting to a Wi-Fi Network........................................................99
Checking Wi-Fi Connection..............................................................101
Configuring Wi-Fi Settings...............................................................102
Chapter 8. Messaging & Contacts...................................104
8.1 Text Messaging.....................................................................................105
Creating a Text Message..................................................................105
Using Preset Text Messages............................................................105
Reading a Text Message...................................................................105
Requesting Message Delivery Notification................................106
8.2 E-mail.......................................................................................................106
Setting Up an Internet E-mail Account Manually ...................106
Composing an E-mail Message.......................................................108
Reading an E-mail Message ............................................................108
Message Options .................................................................................108
8.3 Changing Messaging Account Options.........................................108
8.4 Using Contacts......................................................................................109
7

OPTICON
User Manual
Preliminary
Creating a New Contact....................................................................109
Viewing and Editing Contact Information.................................109
Adding a Picture to a Contact.........................................................110
Assigning a Ring Tone to a Contact..............................................110
Finding a Contact ................................................................................110
Sending an E-mail to a Contact......................................................110
Sending a Text Message to a Contact..........................................110
Creating a SIM Contact.....................................................................110
Version : 0.1
Date : 96/07/10
Chapter 9. Using Barcode Reader...................................112
9.1 Setting Barcode Reader.....................................................................113
Changing Options in Barcode Reader..........................................113
Choosing Barcode Types...................................................................115
Advanced Setting ................................................................................115
Firmware Update.................................................................................120
9.2 Scanning and Reading Barcode labels.........................................123
Chapter 10. Other Applications.......................................126
10.1 Backup/Recover................................................................................127
Backup data...........................................................................................127
Recover data.........................................................................................130
10.2 Managing Memory ............................................................................131
Checking Available Storage.............................................................131
Closing a Running Program.............................................................132
Appendix.........................................................................134
A.1 Regulatory Notices..............................................................................135
European Union Notice .....................................................................135
Federal Communications Commission Notice..........................136
RF Exposure Information (SAR)....................................................136
SAR Information..................................................................................137
Exposure to Radio Frequency (RF) Signals...............................137
Warning!.................................................................................................138
A.2 PC Requirement to Run ActiveSync 4.5......................................139
A.3 Specifications........................................................................................140
System Information...........................................................................140
Dimension and Weight......................................................................140
Key and Indication..............................................................................140
Display.....................................................................................................140
Scanner/Barcode Reader.................................................................140
8

OPTICON
Connectivity ..........................................................................................141
External Memory Card.......................................................................141
Battery and Power..............................................................................141
WEEE Notice..........................................................................................141
RoHS Compliance................................................................................142
User Manual
Preliminary
Version : 0.1
Date : 96/07/10
9

OPTICON
User Manual
Preliminary
Chapter 1. Knowing Your Device
Version : 0.1
Date : 96/07/10
10
OPTICON
1.1 Introduction
Views of the Device
User Manual
Preliminary
Version : 0.1
Date : 96/07/10
2
1
3
4
5
6
12
11
14
15
7
9
8
10
13
16
17
18
19
20
21
25
22
23
24
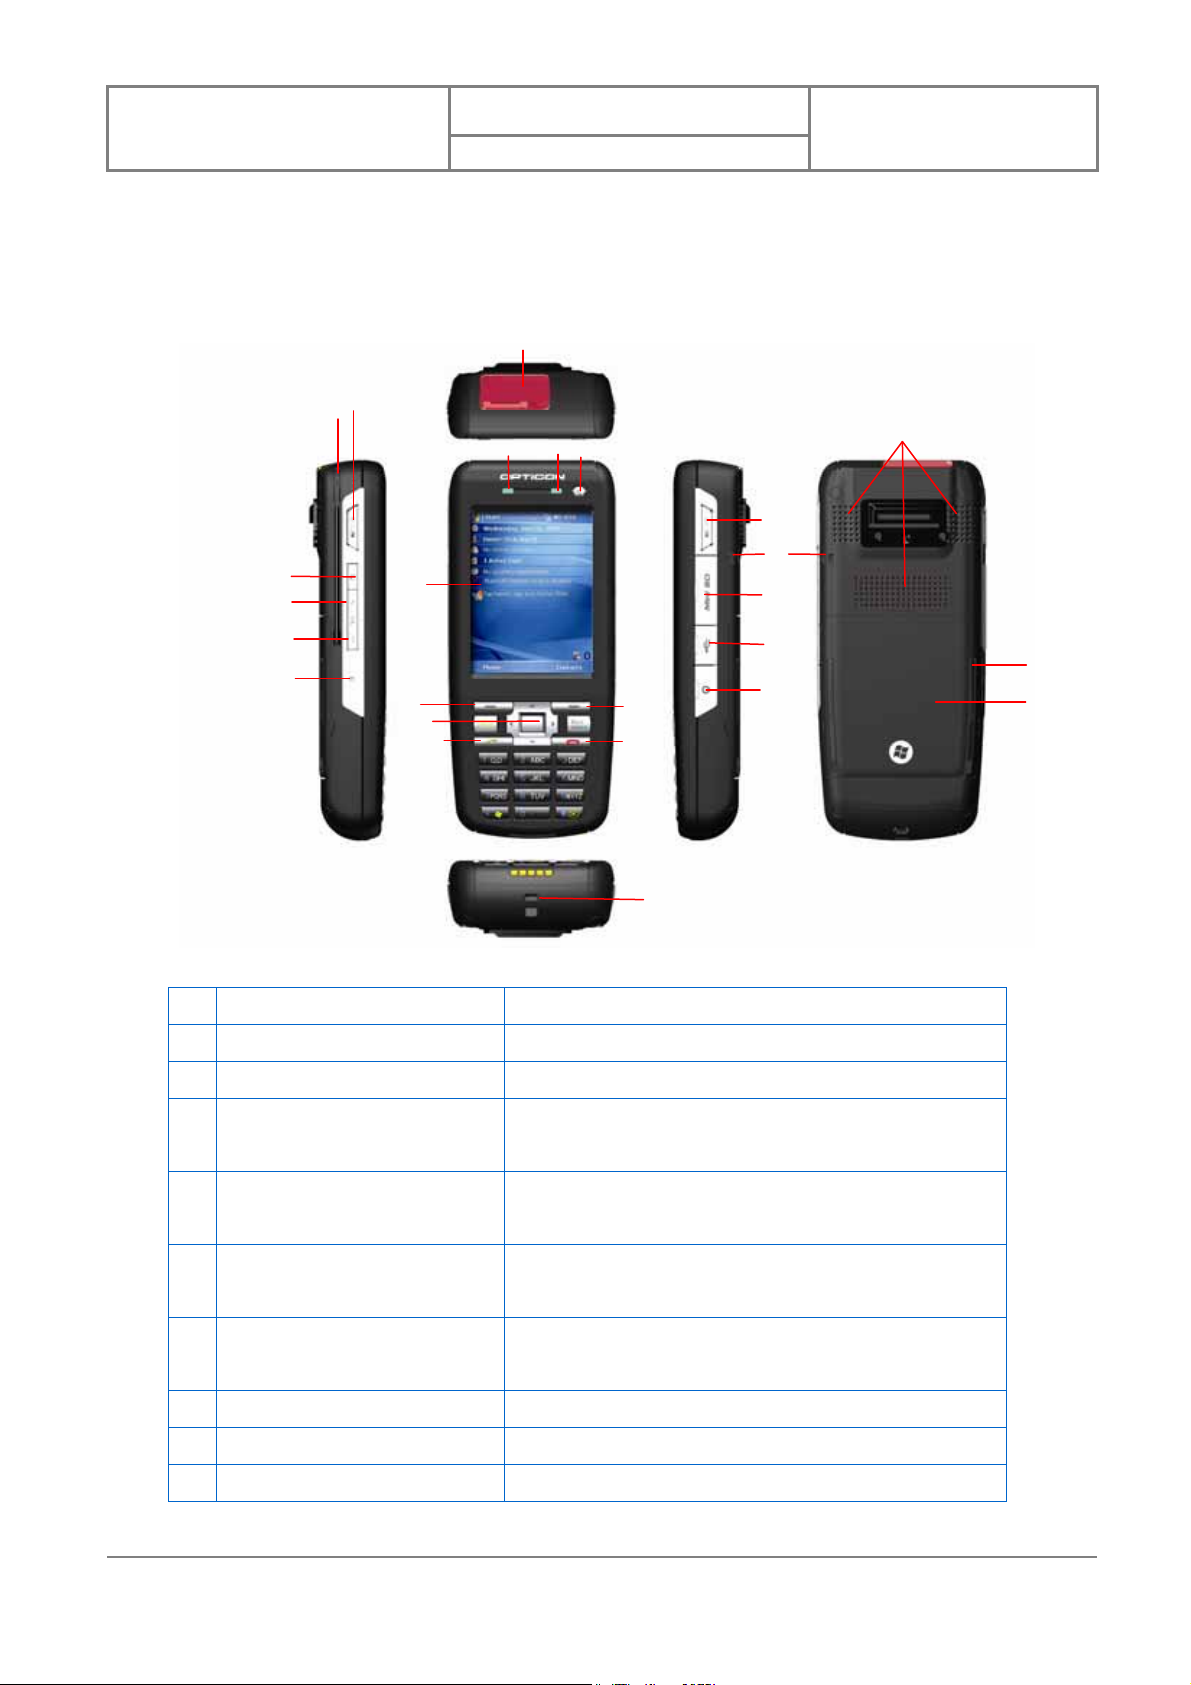
1 Stylus Write, draw, or make selection on the touch screen
2 Scan key (left) Press the key to scan and decode bar code/2D code
3 Record key Press and hold this key to record a voice note
4 Volume up Press the Volume up but ton to turn up the PDA receiver
volume
5 Volume down Press the Volume up but ton to turn up the PDA receiver
volume
6 RESET button Press the RESET button with stylus to soft-reset your
device
7 Scanner Point the reading window of the scanner in the
direction of bar code/ 2D code
8 Wi-Fi/Bluetooth LED Indicates Wi-Fi/Bluetooth Status
9 GSM/Battery LED Indicates GSM/Battery LED
10 Power button Power on or off the device
11
OPTICON
User Manual
Preliminary
11 Display 2.8-inch TFT LCD with touch screen
12 Soft key (left) Performs the command shown in the label above the
button
13 Soft key (right) Performs the command shown in the label above the
button
14 Navigation pad Press the multi directional control up, down, left, or
right to move through menus; carry out the selection
by pressing the center button.
15 Talk key Press this key to dial or answer a call
16 End key End a call or close Phone application
17 Scan key (right) Press the key to scan and decode bar code/ 2D code
18 Eyelet for wrist strap (1) Fix a wrist strap here
19 Mini-SD card slot Insert a mini-SD card to expand device memory
Version : 0.1
Date : 96/07/10
20 Mini USB connector Mini USB connector for PC sync and battery charging
21 Earphone Jack Connect a 2.5 mm Earphone
22 Speaker Listen to audio media or listen to a phone call
hands-free
23 Cover latch Slide both of the cover latches to remove the battery
cover
24 Battery cover Remove to place battery and SIM card
15 Eyelet for wrist strap (2) Fix a wrist strap here
Be sure to save all data in your device and then press the POWER button to switch your
device off before resetting the device or replacing the battery.
Cold Booting Your Device
You can execute a system cold boot to format both user store and DiskOnChip on y our device.
To prompt the instruction for cold boot, pr ess and hold the POWER button longer than 10
seconds immediately after pressing the RESET button . You can then choose one of the
following steps:
z Pressing the left key of the 5-way navigation key to format user store.
z Pressing the right key of the 5-way navigation key to format DiskOnChip.
z Press the up key of the 5-way navigation key to format both user store and
DiskOnChip.
12

OPTICON
User Manual
Preliminary
z Press any other key to exit.
The Stylus
z Use the stylus to tap a selection, to drag-and-drop an item, to write, or to draw on
the touch screen.
Version : 0.1
Date : 96/07/10
z Tap and hold the stylus on the screen,
submenu is displayed.
Notification LEDs
The device has 2 notification LEDs: the left is Wi-Fi/Bluetooth LED and the right is GSM/Battery
LED.
Bluetooth/Wi-Fi LED tells you about the device’s Bluetooth/Wi-Fi status:
Color Bluetooth on Wi-Fi on
Green Off Blink
Blue Blink Off
Green and blue blink alternately while both Bluetooth and Wi-Fi are on.
GSM/Battery LED lets you know that you have unanswered calls or tells y ou about the device’s
GSM/battery status:
Color Missed Call/
GSM on
icon is displayed and then a pop-up
GSM on
Charging
Low Power
Red Blink Off Blink Off
Orange Off Off Off Constantly on
Green Off Blink Off Off
(battery full)
(battery low)
13
OPTICON
1.2 Accessories
User Manual
Preliminary
Version : 0.1
Date : 96/07/10
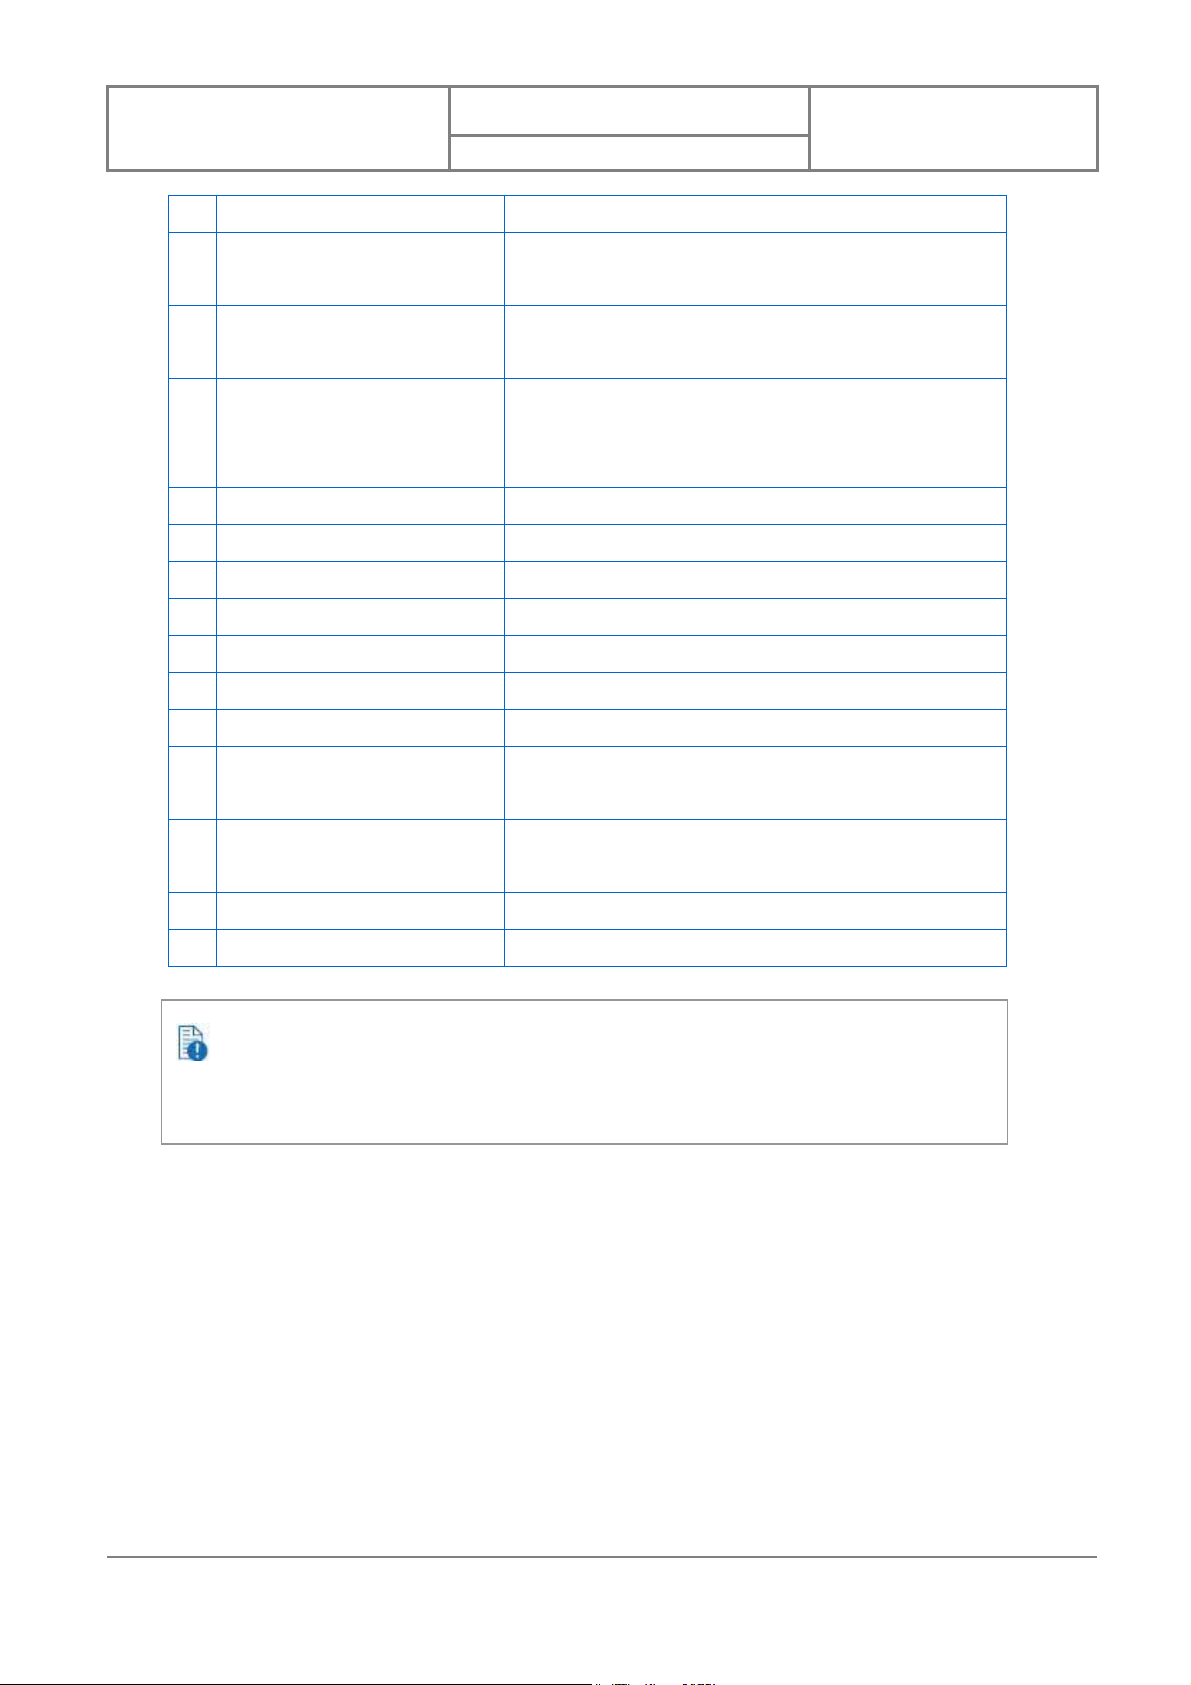
a AC Adapter Recharge the device battery
b Stereo headset Listen to a phone conversation hands-free
c USB Cable Connect the device to a PC
d Getting Started CD Windows Mobile
e User Manual/Quick Guide Provide instructions of device functions
f Pouch Protect the device
g Battery Rechargeable Li-ion polymer battery
h Stylus Write, draw, or make selection on the touch screen
i Cradle Recharge the device battery
TM
Getting Started Disc
1.3 Install SIM Card and Battery
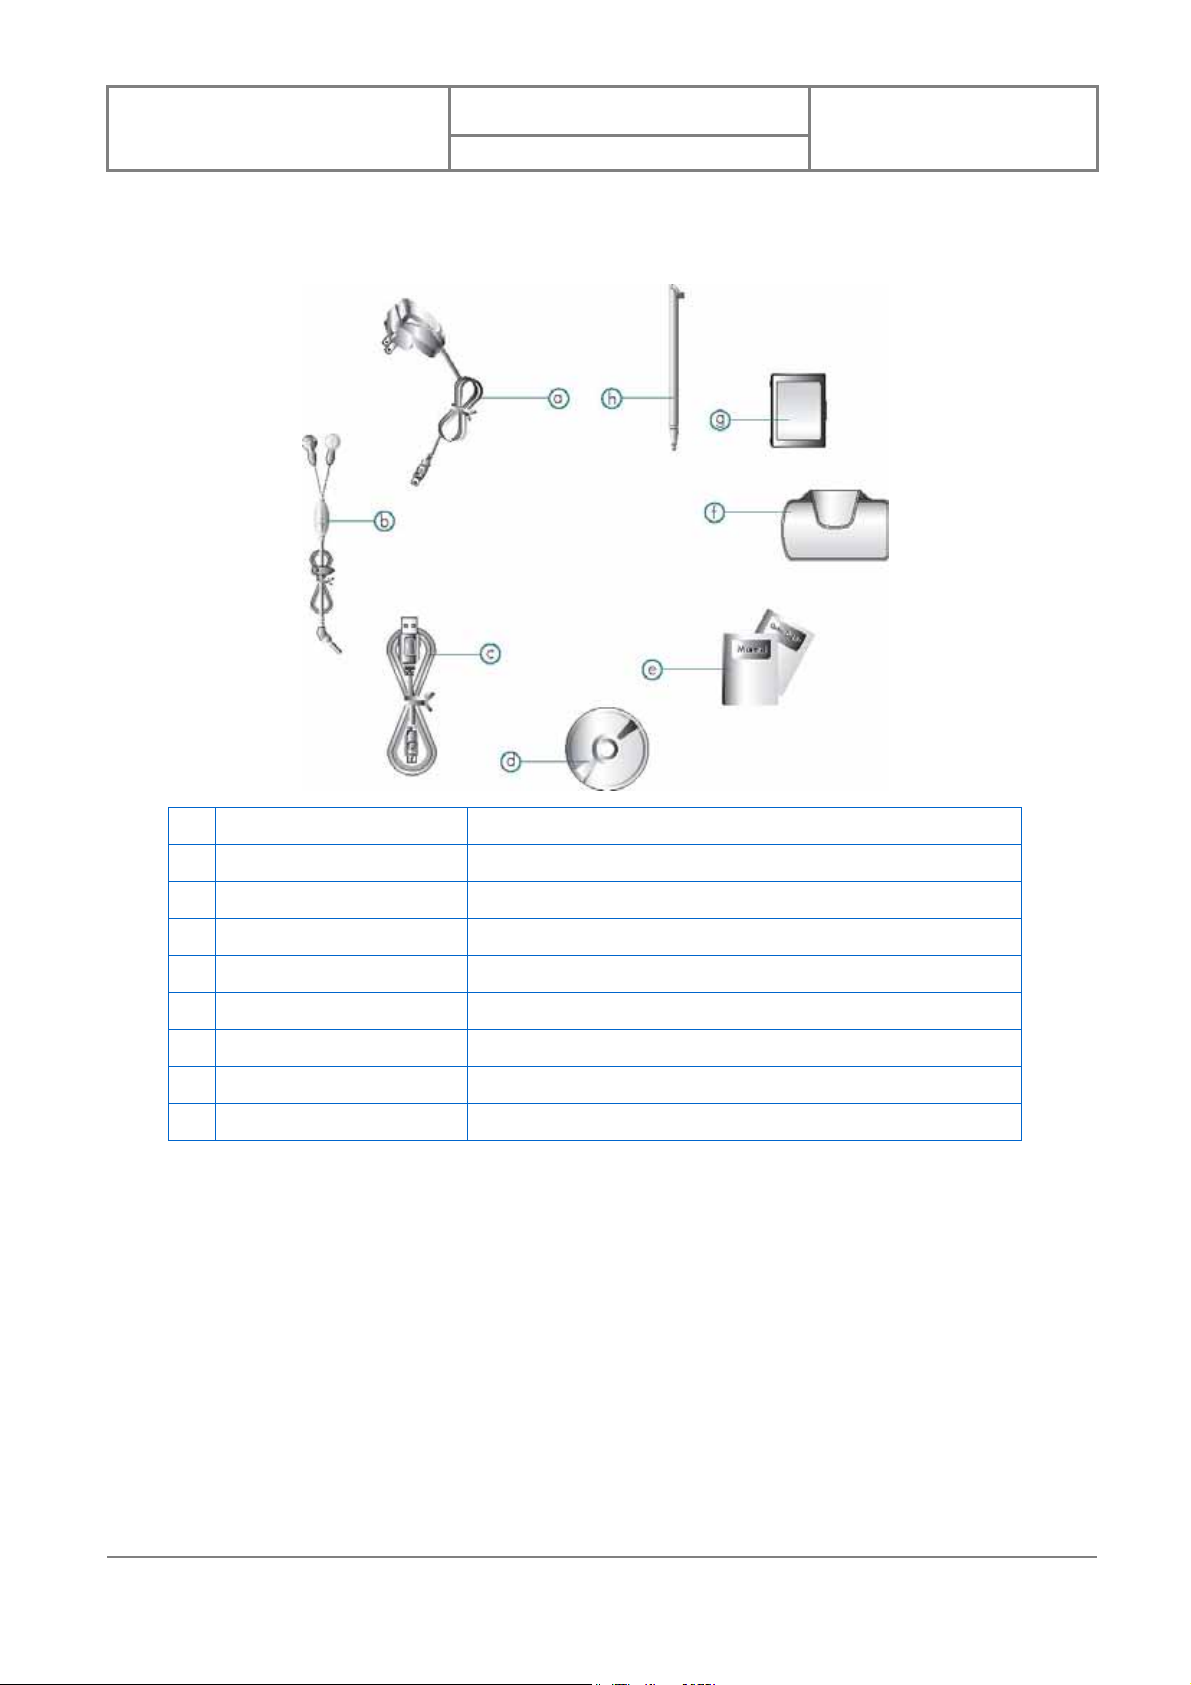
Installing the SIM Card
If you want to use phone features, you must install a GSM SIM card.
z Slide both of the cover latches down to remove the battery cover.
z Pull the plastic ribbon to remove the battery.
14
OPTICON
User Manual
Preliminary
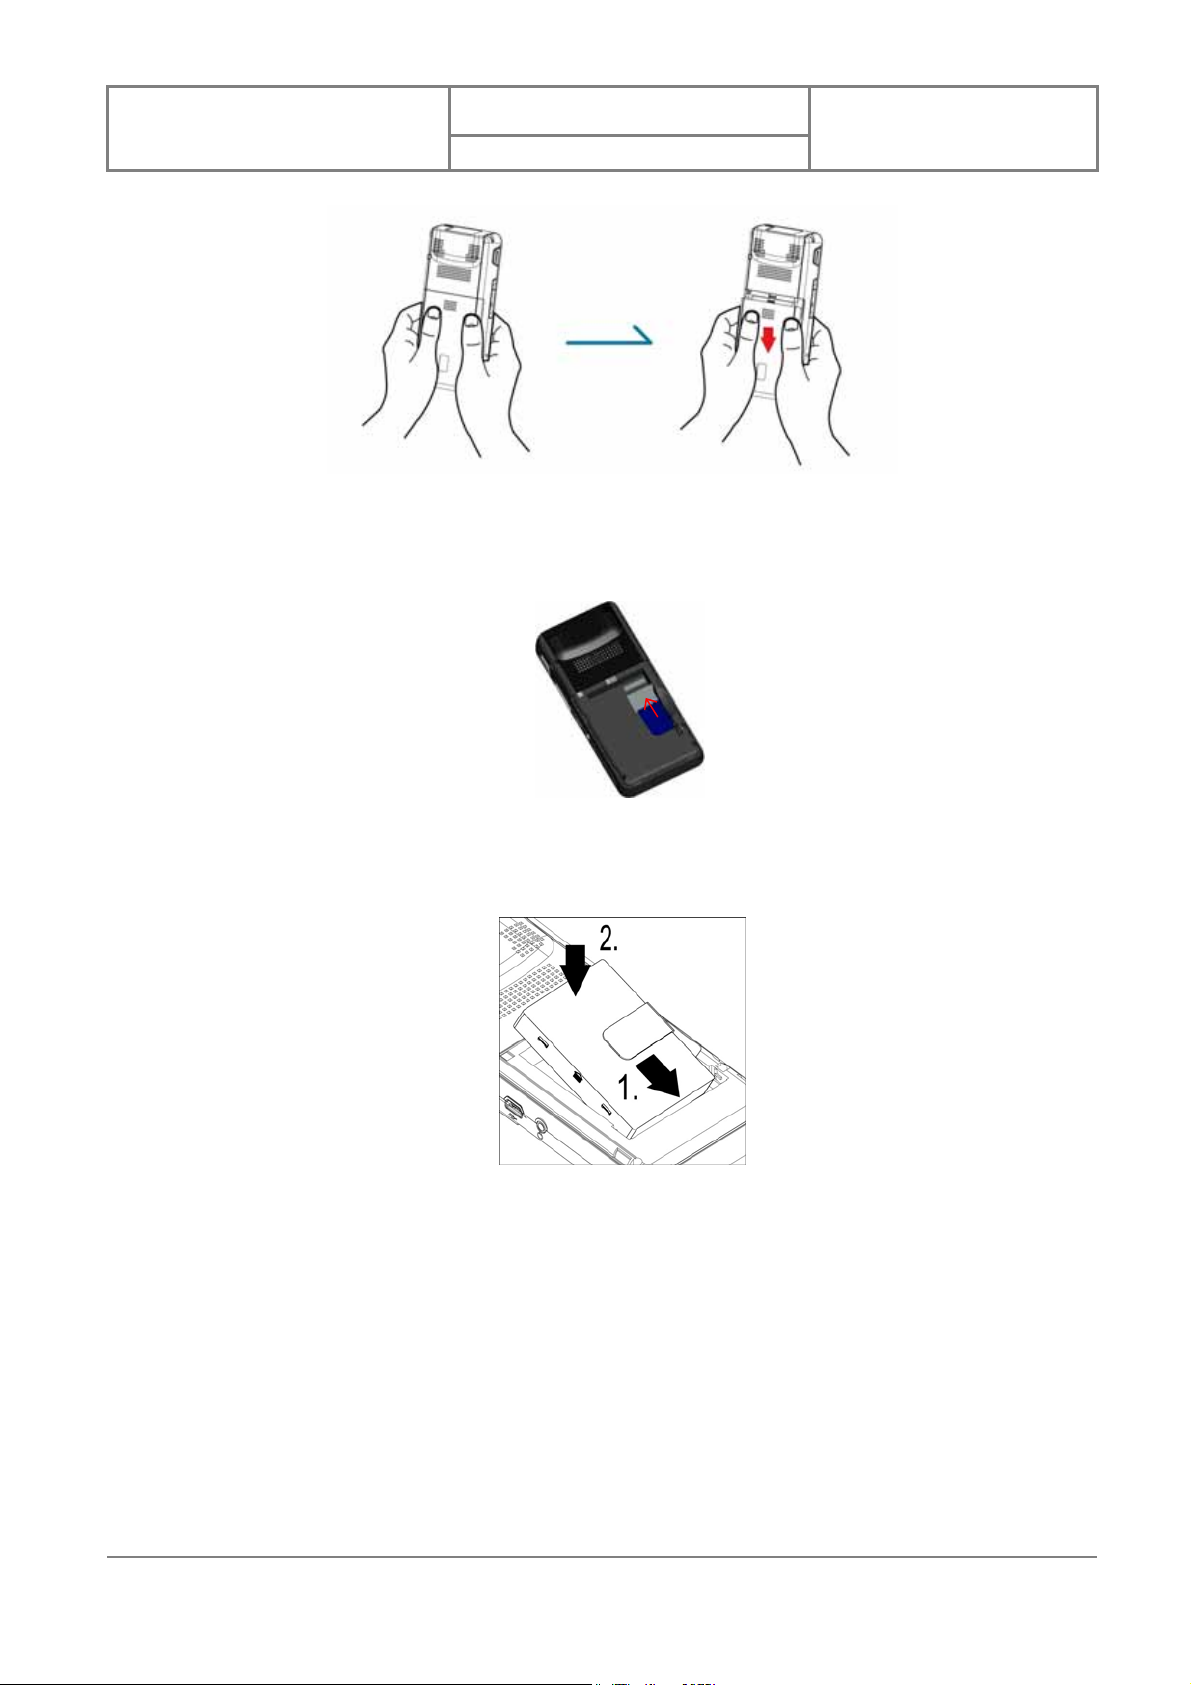
z Place the SIM card in the SIM card slot with the gold contacts facing down. The SIM
card’s cut-off corner should match the cut-off corner in the SIM card slot.
Version : 0.1
Date : 96/07/10
Installing the Battery
z Press the battery down forcefully into the battery slot and close the back cover.
15

OPTICON
User Manual
Preliminary
The device contains a rechargeable Li-ion polymer battery completely discharged and
should be charged for at least 8 hours before first use. Use only manufacturer-specified
original batteries. Damages caused by using batteries not specified by manufacturer are not
covered under warranty.
Please follow normal power off procedure to remove the battery or reboot the device,
otherwise unsaved data may be lost. For information of power off procedures, see “Chapter
2.1 Powering On/Off the Device”.
Version : 0.1
Date : 96/07/10
1.4 Battery Information
Battery performance depends on many factors, including your wireless service provider’s
network configuration, signal strength, the temperature of the environment in which you
operate your phone, the features and/or settings you select and use, items attached to your
phone’s connecting ports, and your voice, data, and other program usage patterns.
Battery life estimates (approximations):
z Talk time: 4 hours
z Standby time: 150 – 200 hours
Reducing Risk of Fire or Burns
z Do not attempt to open, disassemble, or service the battery pack.
z Do not crush, puncture, short external contacts, or dispose of in fire or water.
z Do not expose to temperatures above 60˚C (140˚F).
z Replace only with the battery pack designated for this product.
z Recycle or dispose of used battery as stipulated by local regulation.
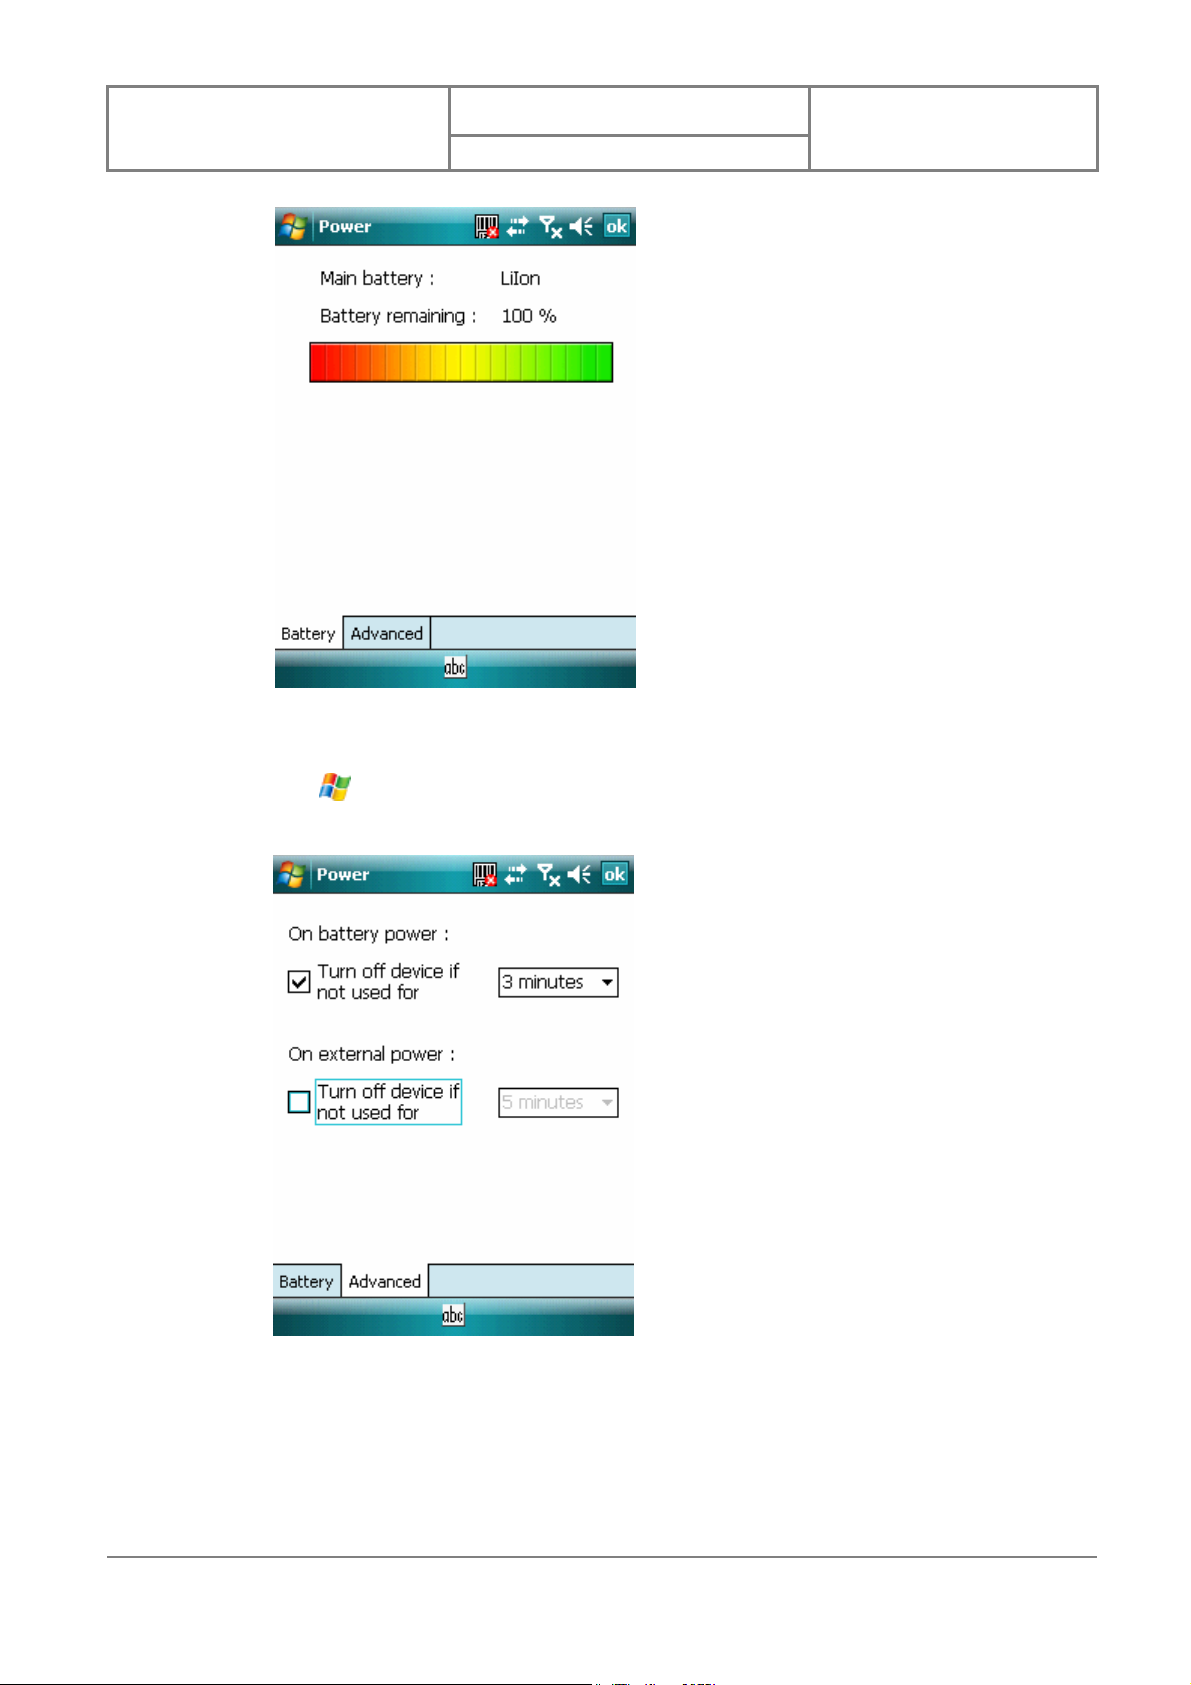
Checking the Battery Power
z Tap
> Settings > System tab > Power.
16
OPTICON
User Manual
Preliminary
Version : 0.1
Date : 96/07/10
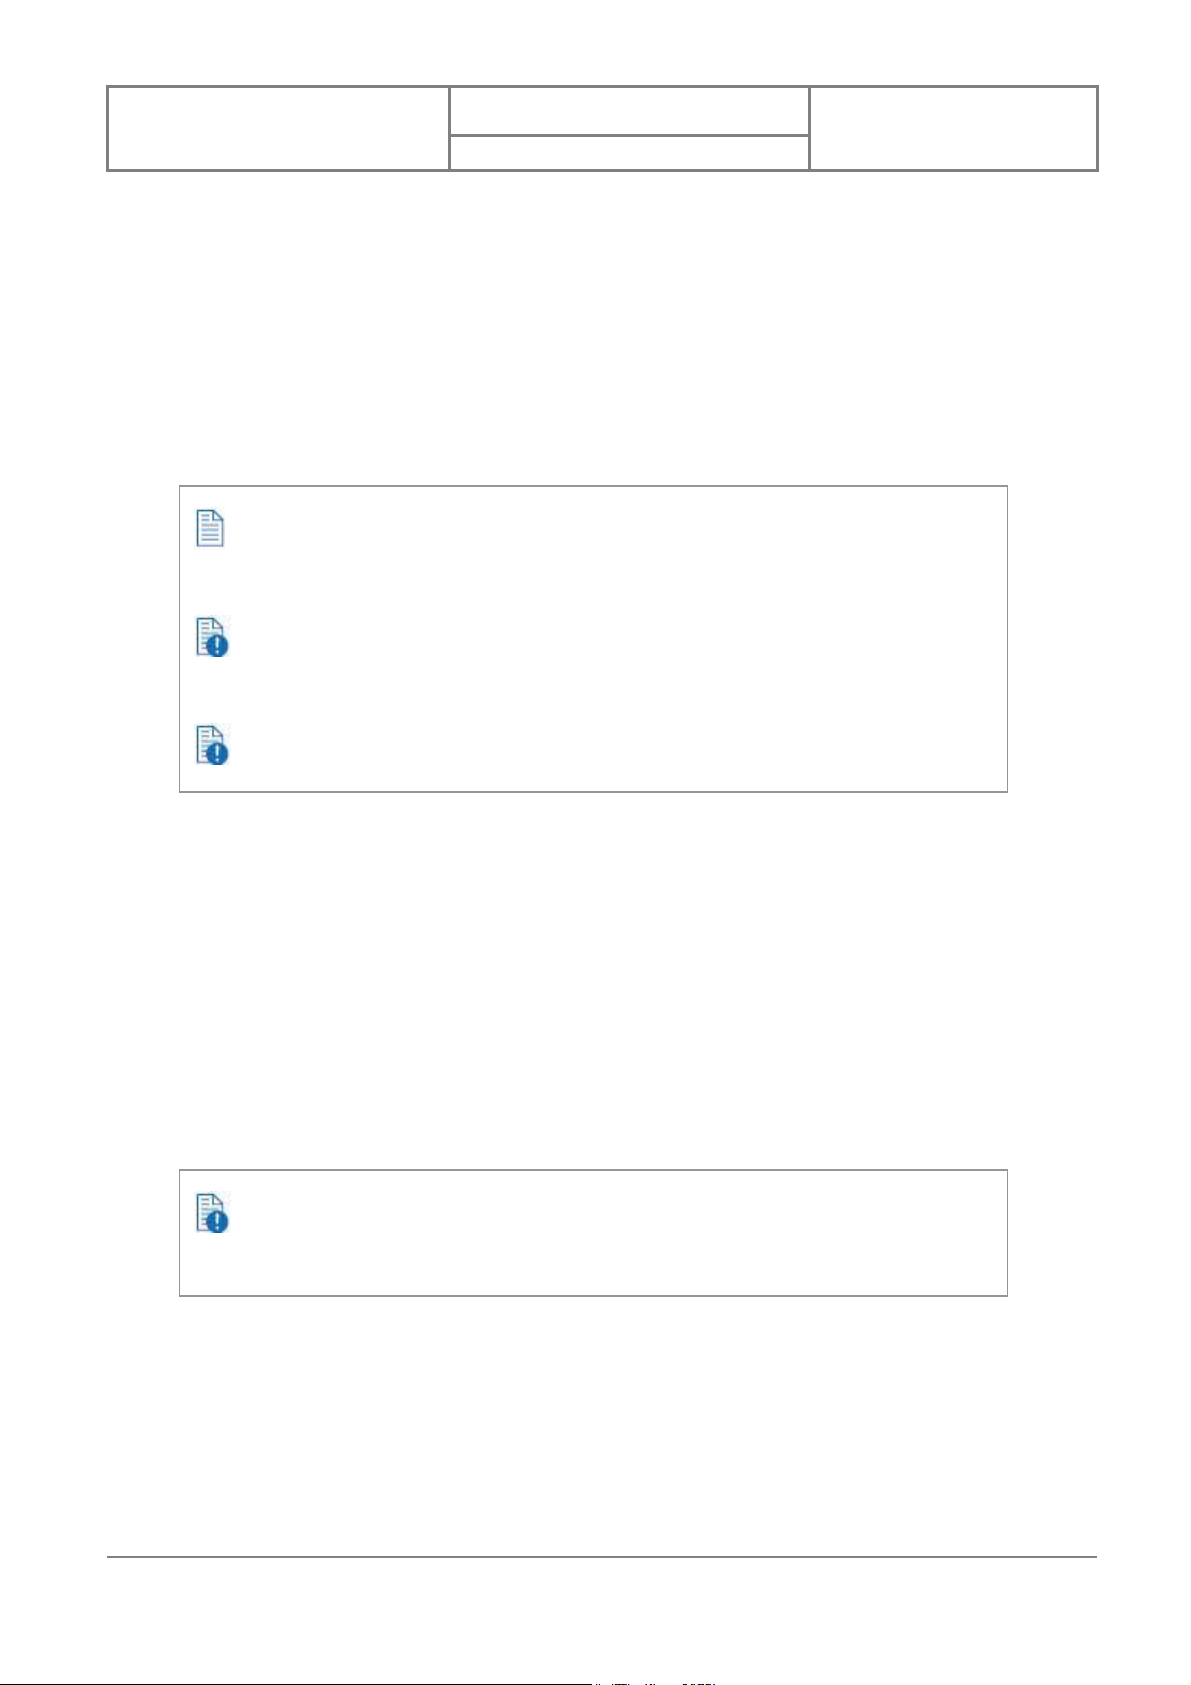
Optimizing the Power Performance
z Tap
for turning off the device if it is not in use.
> Settings > System tab > Power > Advanced, and adjust the time
Managing a Low Battery
When the low-battery warning appears, do the following:
1. Immediately save your current data.
2. Start charging the battery or turn off your phone.
17
OPTICON
User Manual
Preliminary
Charging the Battery
1. To charge the battery, place the battery into the battery slot c orrectly. See previous
section for how to install the battery.
2. Do one of the following:
z Connect the device with the AC adapter and plug the AC adapter into a power
outlet.
z Connect the device to a PC with the USB cable.
T o charge the device with the USB cable, y ou must connect the device to a functioning
USB port on a PC that is powered on.
Do not operate your device to temperatures above 40˚C (72˚F) while charging the
battery.
Version : 0.1
Date : 96/07/10
Do not leave the battery in a place above 60˚C (140˚F).
1.5 Mini-SD Cards
Mini-SD is one of the most popular formats for mobile devices. Your device contains a mini-SD
card slot in which you can expand the device’s memory up to 2GB. Mini-SD provides functions
such as built-in security for copyrighted content along with great perf ormance for storing music,
video, and photographs. Please note that mini HCSD (High Capacity SD) is not supported by
this device.
Inserting a Mini-SD Card into the Device
Lift the mini SD card slot cover and insert the mini SD card with the logo side down and push
into place until it clicks down and is held in place.
Mini-SD cards can only be inserted in one direction. Inserting the card in the wrong
direction by force can cause damage to the card and the card slot.
Removing a Mini-SD Card from the Device
1. Gently press the mini-SD card inward (you may feel some resistance) and the card
will eject itself.
2. Take out the mini-SD card from the card slot by hand.
18

OPTICON
User Manual
Preliminary
Chapter 2. Basic Operations
Version : 0.1
Date : 96/07/10
19
OPTICON
User Manual
Preliminary
Version : 0.1
Date : 96/07/10
2.1 Getting Started
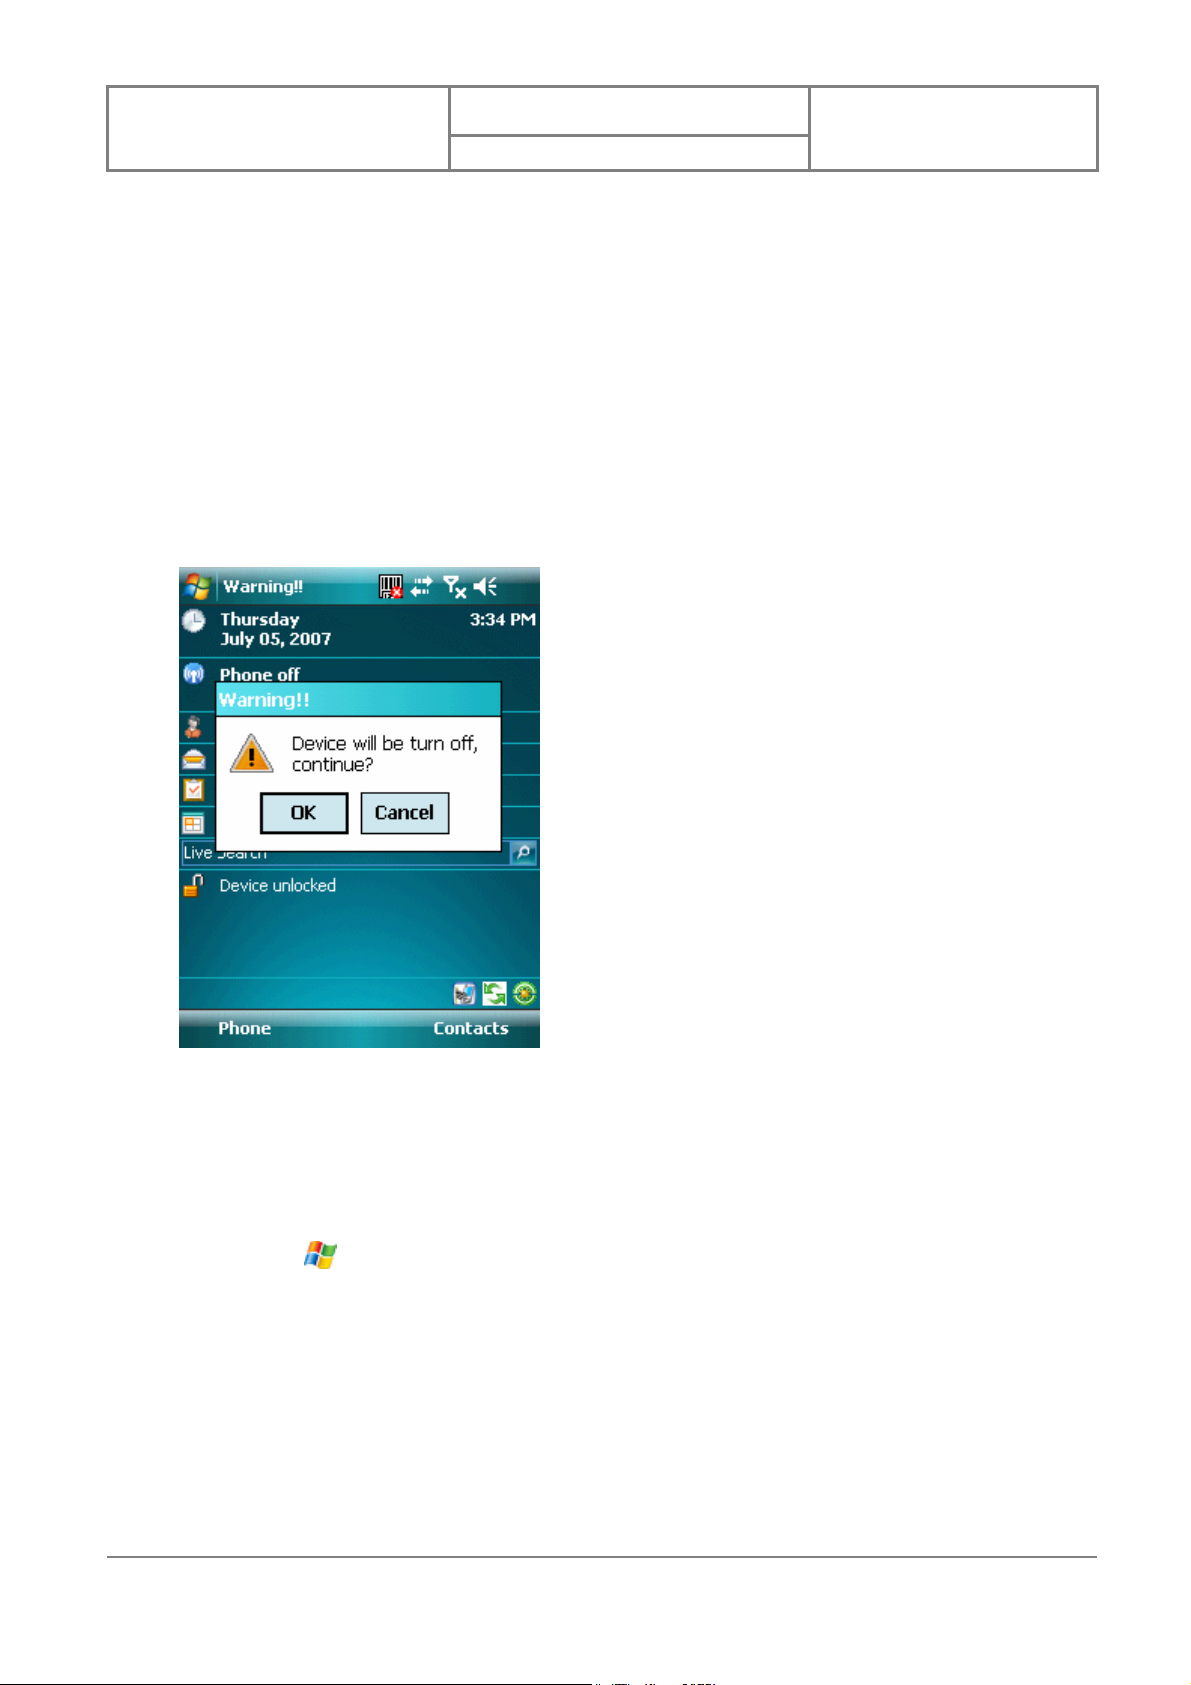
Powering On/Off the Device
Press the POWER button to turn on the device. The POWER button is located on the top side of
the device. When you power on the device for the first time, you are asked to calibrate the
device. Please refer to the “Calibrating your device” section in this chapter for calibr ation steps.
Press the POWER button again to switch the device to sleep mode. You can still receive phone
calls and messages when the device is operating on sleep mode. To power off the device
completely , p ress and hold the POWER button for 3 seconds and the system will pr ompt you to
power off the device.
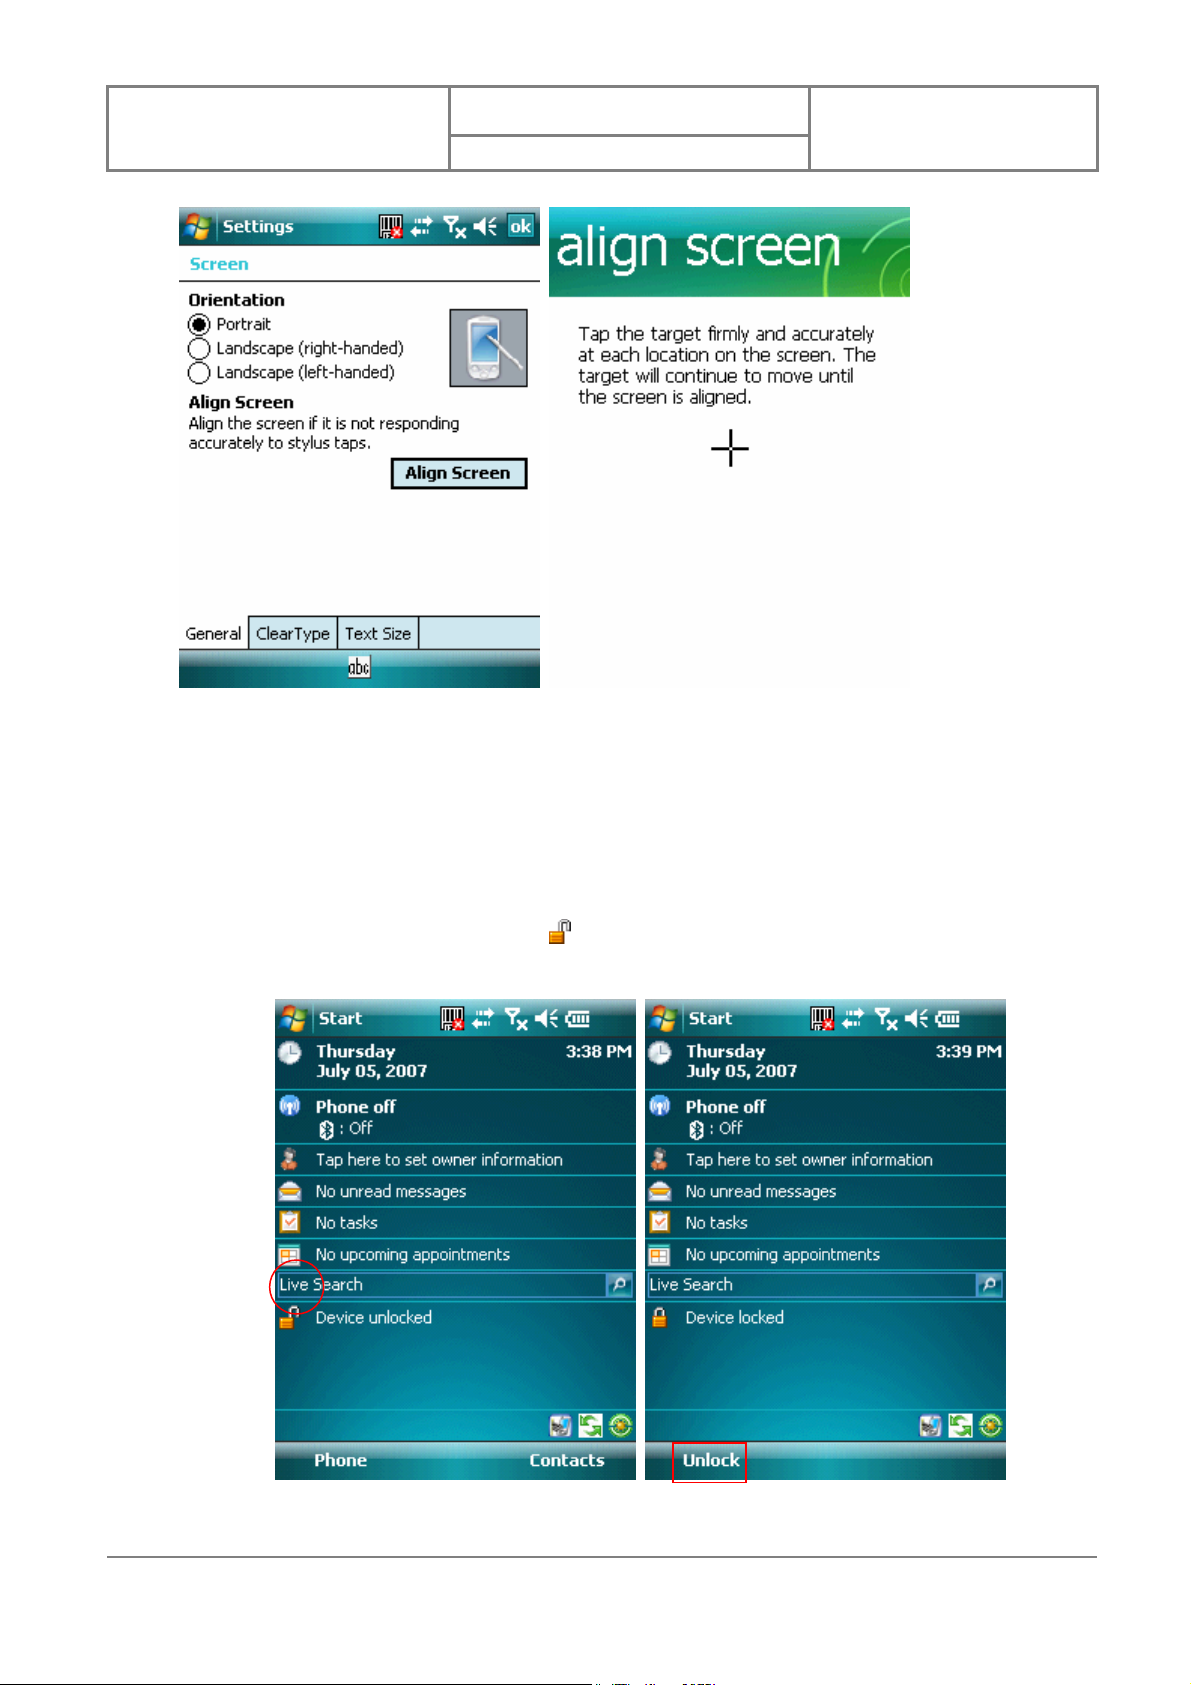
Calibrating Your Device
Calibrating the device ensures the tapped item is activ ated. To calibrate your device, tap the
center of the cross with the stylus as the cr oss moves around the screen. If you would like to
re-calibrate the device, follow the steps below:
1. Tap
2. Tap the Align Screen button and follow the on-screen instructions.
> Settings > System tab > Screen.
20
OPTICON
User Manual
Preliminary
Version : 0.1
Date : 96/07/10
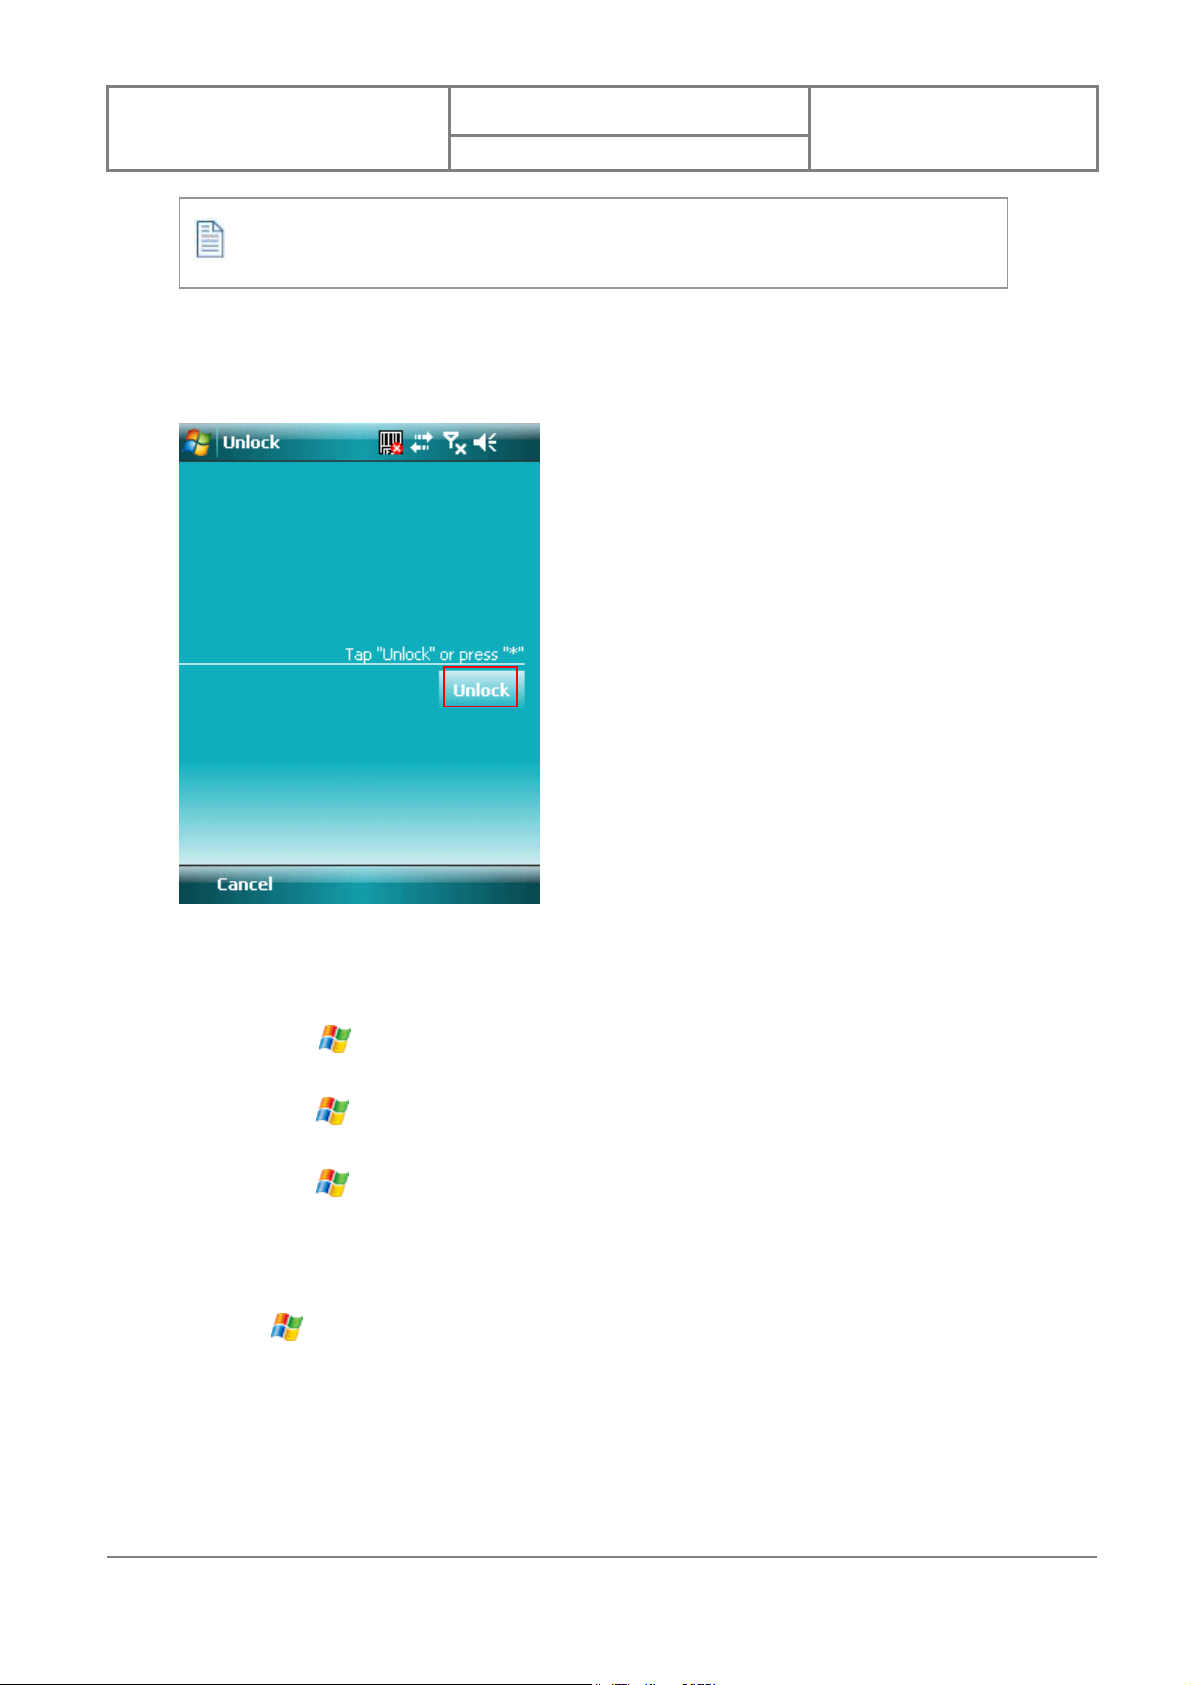
Locking/Unlocking the Device
Locking the device turns off keyboard and touch screen f unctionality. This is a helpful feature if,
for example, the device is turned on and in your pocket, and you want to prevent accidental key
presses.
z To lock the device, tap on the
locked, the left soft key label changes to Unlock.
icon on the Today Screen. Once the device is
21
OPTICON
User Manual
Preliminary
You can still receive calls and make emergency calls when the keypad is locked.
To unlock the device, tap the Unlock button on the Today screen first, a screen as below will
show. Press the “Fn” key and * to unlock the device, or just tap the Unlock button on the
screen.
Version : 0.1
Date : 96/07/10
Setting Buttons
To change functions for specific buttons in your device, do either of the following:
z Tap
Start or OK key) and assign a new program to replace the default one.
z Tap
screen to customize the way your Up/Down control repeats.
z Tap
not when your device is in sleep mode.
Changing the Backlight Settings
1. Tap
2. You can customize the following settings:
z Backlight settings while your device is using battery power.
z Backlight settings while your device is using external power.
z Brightness of backlight.
> Settings > Buttons > Program Buttons tab. Select a button (Record,
> Settings > Buttons > Up/Down Control tab. Drag the slider on the
> Settings > Buttons > Buttons Lock tab. Choose to lock all buttons or
> Settings > System tab > Backlight.
22
OPTICON
User Manual
Preliminary
Version : 0.1
Date : 96/07/10
2.2 Input Methods
The device contains 8 different input methods: K eyboard, Letter Recognizer, Block Recognizer,
T r anscriber, Initial capital, Lowercase, Numeric, T r anscriber and Uppercase. You can enter texts
and numbers by using the keypad or the touch screen. When you enter texts by using the
keypad, press a number key repeatedly until desired character appears. If the next letter you
want is located on the same key, wait until the cursor appears, then enter the letter.
Icon Input Method
Keyboard
Letter/Block Recognizer
Transcriber
Initial capital
Lowercase
Numeric
Uppercase
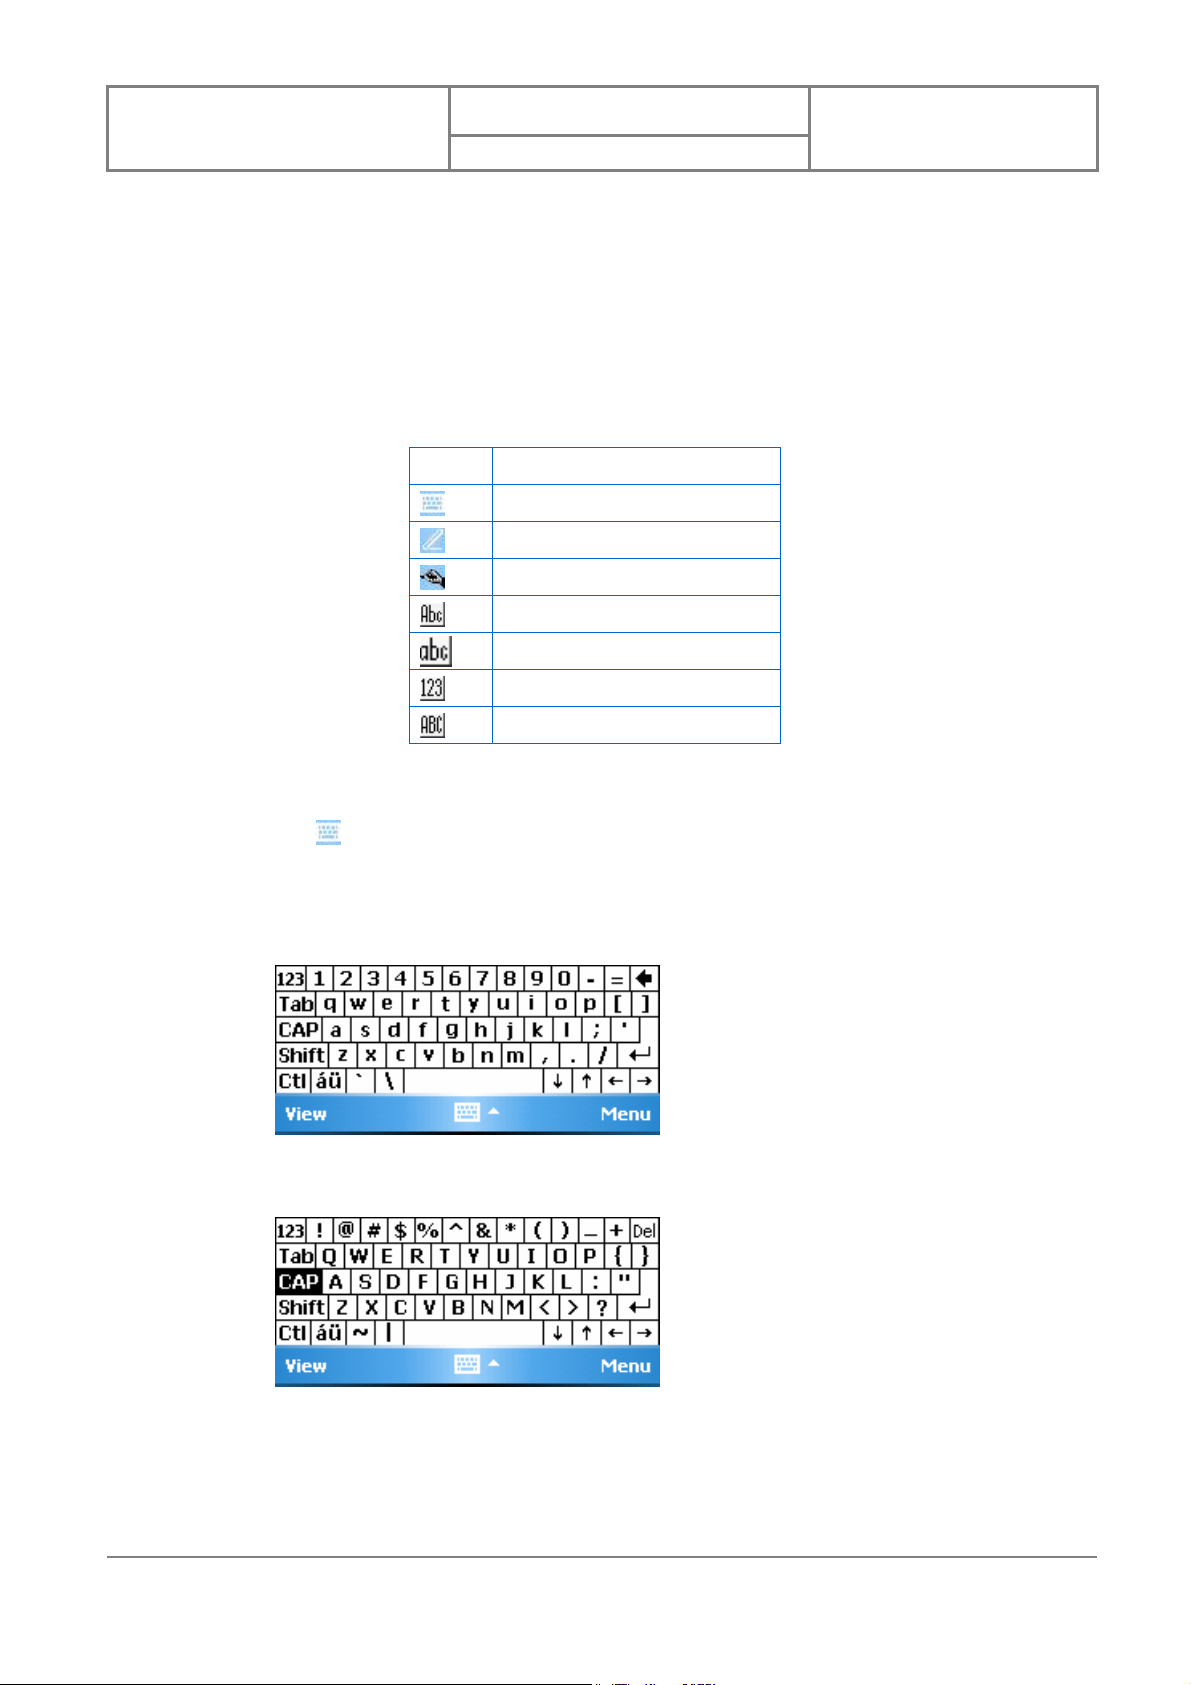
Keyboard
z Tap
input method, tap the input method selector arrow (the upward arrow next to the
input method icon) and select Keyboard.
z To enter text, tap the keys on the on-screen keyboard.
z Tap the CAP key on the on-scr een keyboard to enter capital letters and/or symbols.
to launch the on-screen keyboard. If on-screen K eyboard is not the selected
Letter Recognizer
Letter Recognizer recognizes one l etter, number, or symbol at a time.
23
OPTICON
User Manual
Preliminary
z T o laun ch Letter Recogniz er, tap the input method selector arrow (the upward arrow
next to the input method icon) and select Letter Recognizer.
z Write uppercase letters in the left recognition area (the ABC box).
z Write lowercase letters in the middle recognition area (the abc box).
z Write numbers and symbols in the right recognition area (the 123 box).
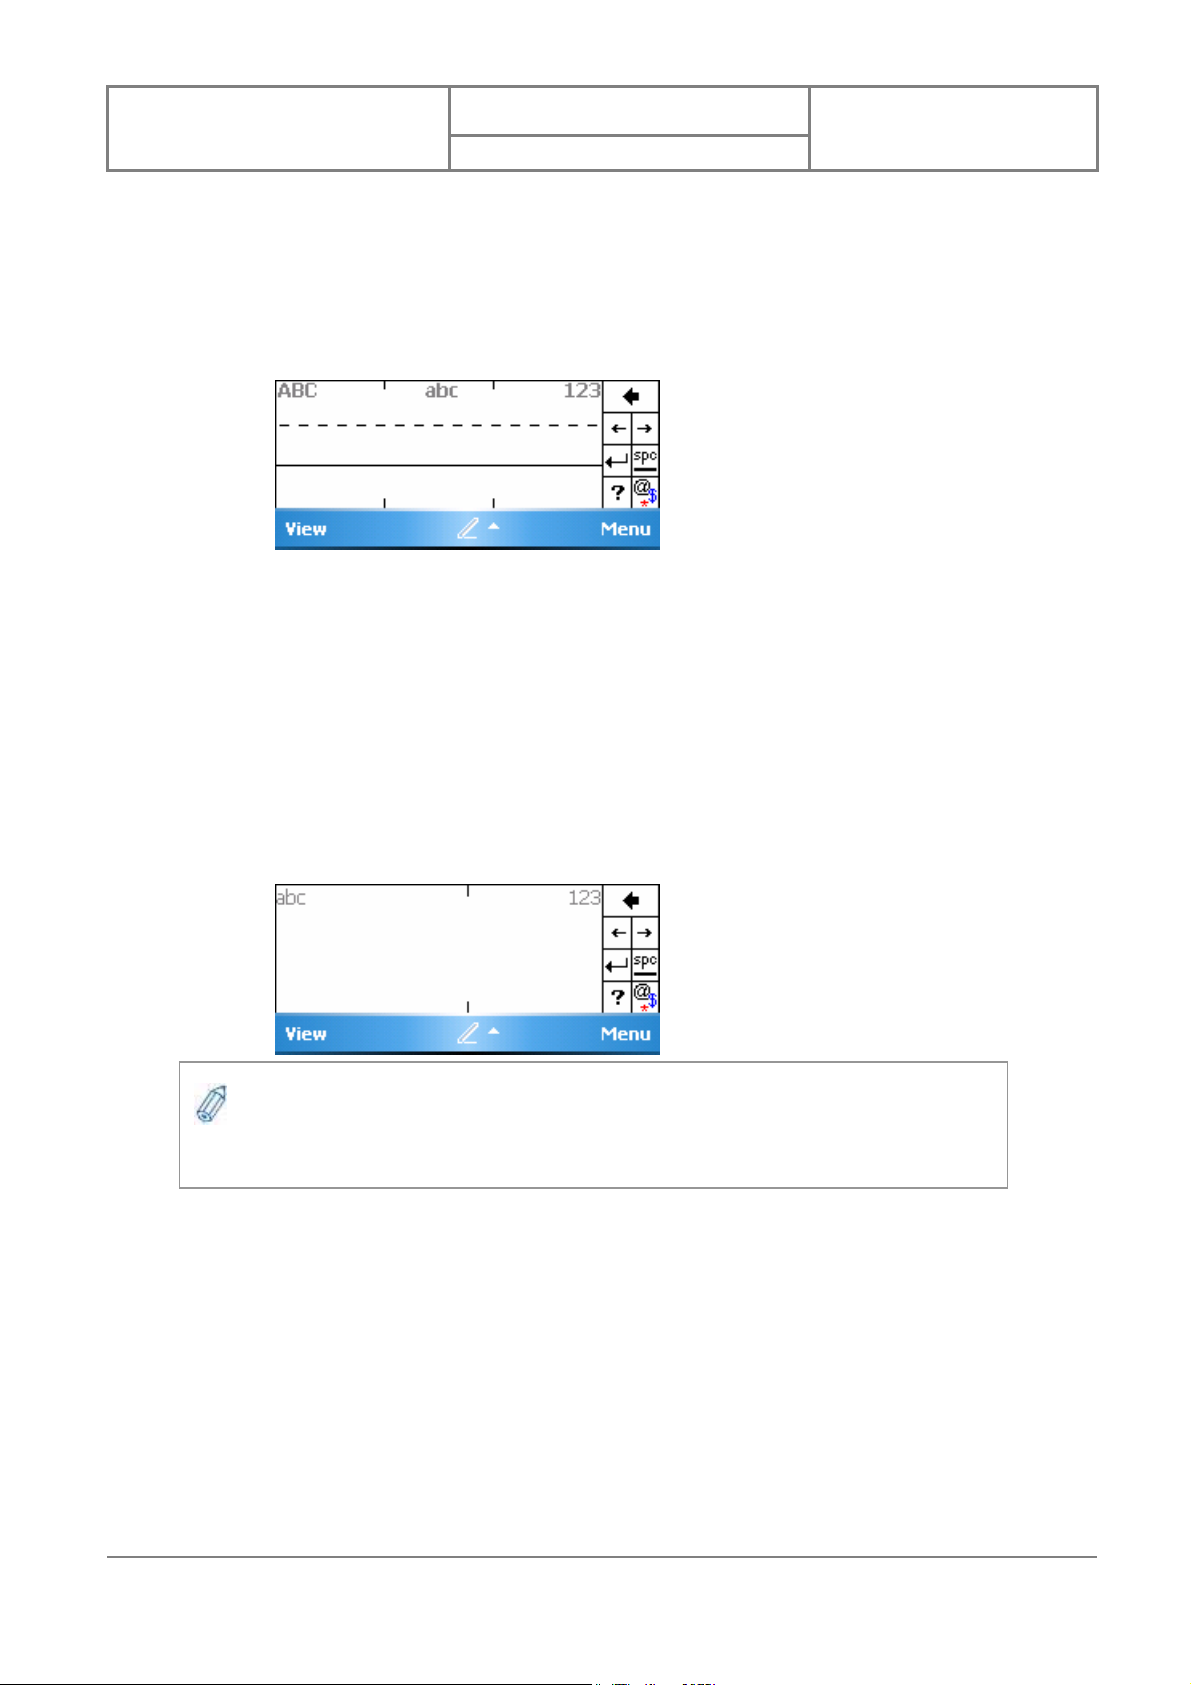
Block Recognizer
Block Recognizer recognizes letters written in one stroke.
Version : 0.1
Date : 96/07/10
z To launch Block Recognizer, tap the input method selector arrow (the upward arrow
next to the input method icon) and select Block Recognizer.
z Write lowercase letters in the text recognition area (the abc box).
z Write numbers in the numeric recognition area (the 123 box).
z T o input symbols, tap any r ecognition area, text or numeric, once and write symbols.
Tap ? in Letter or Block Recognizer to see a demo on how to write recognizable
characters.
Transcriber
Transcriber recognizes hand writings in cursive and/or print. It uses the full screen as its
recognition area. It interprets the movem ent of the stylus on the screen as you write.
z To launch Transcriber, tap the input method selector arrow (the upward arrow next
to the input method icon) and select Transcriber.
z Write anywhere on the screen.
24

OPTICON
User Manual
Preliminary
The Transcriber comes with a detailed help. Tap if you need further assistance.
Initial capital
To capitalize the first letter of every sentence you enter by the keypad, tap the in put method
selector arrow and select Initial capital.
Lowercase
To enter lowercase letters constantly by the keypad, tap the input method selector arrow and
select Lowercase.
Version : 0.1
Date : 96/07/10
Numeric
To enter numbers constantly by the key pad, tap the input method selector arrow and select
Numeric.
Uppercase
To enter uppercase letters by the keypad, tap the input method selector arrow and select
Uppercase.
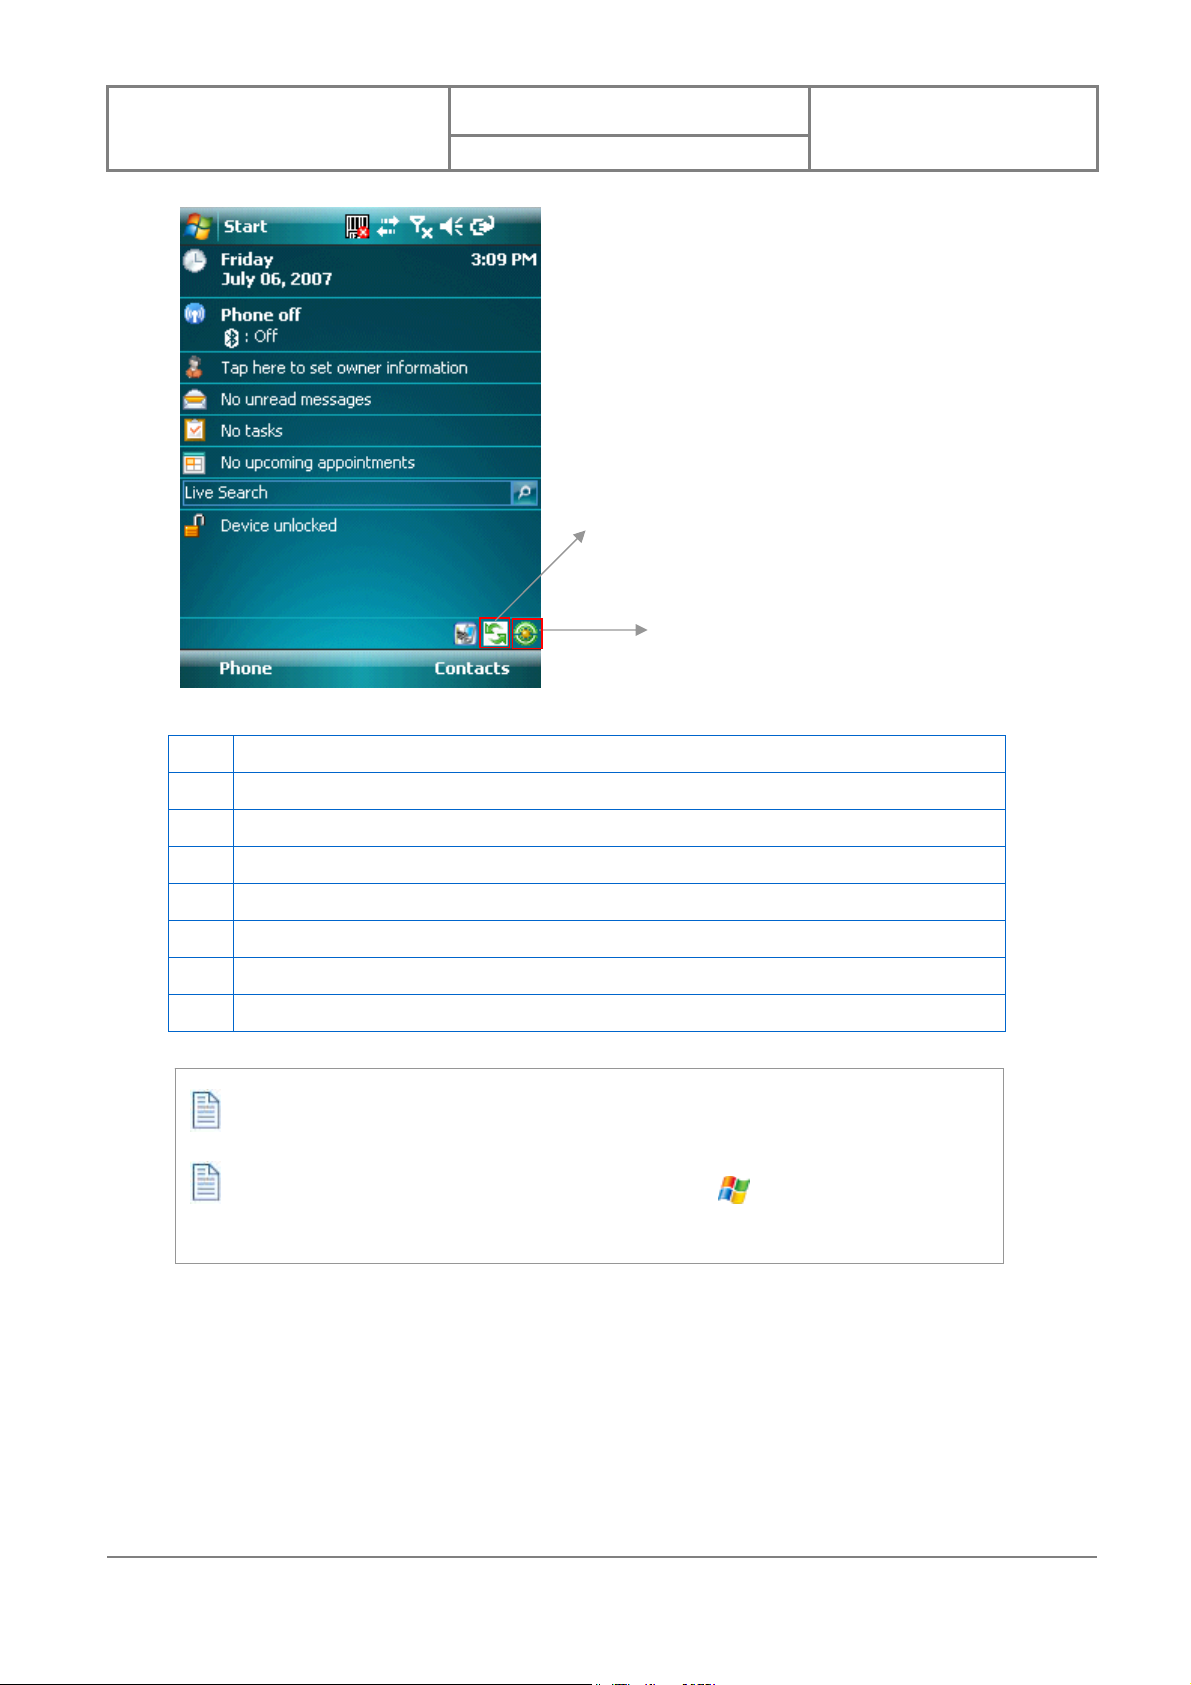
2.3 Today Screen Components
Today Screen
The Today Screen is usually the first screen that appears when you turn on the device f or the
first time each day. It displays a summary of information for the day, shows you the system
status and contains a list of shortcuts to programs. The Today screen looks like this:
25
OPTICON
①
②
③
④
⑤
⑥
⑦
User Manual
Preliminary
Version : 0.1
Date : 96/07/10
⑧
1 Date and time
2 Wireless status (GSM, Wi-Fi, and Bluetooth)
3 Owner information
4 Unread messages including text messages, MMS messages, and e-mails
5 Active tasks
6 Upcoming appointments
7 MSN Live Search
8 Device lock status
Tap here to rotate the screen
Tap here to trigger the Wireless Manager
You can also access the Today screen by selecting Today from the Start menu.
To change the items showed in the Today screen, tap > Settings > Today >
Items tab.
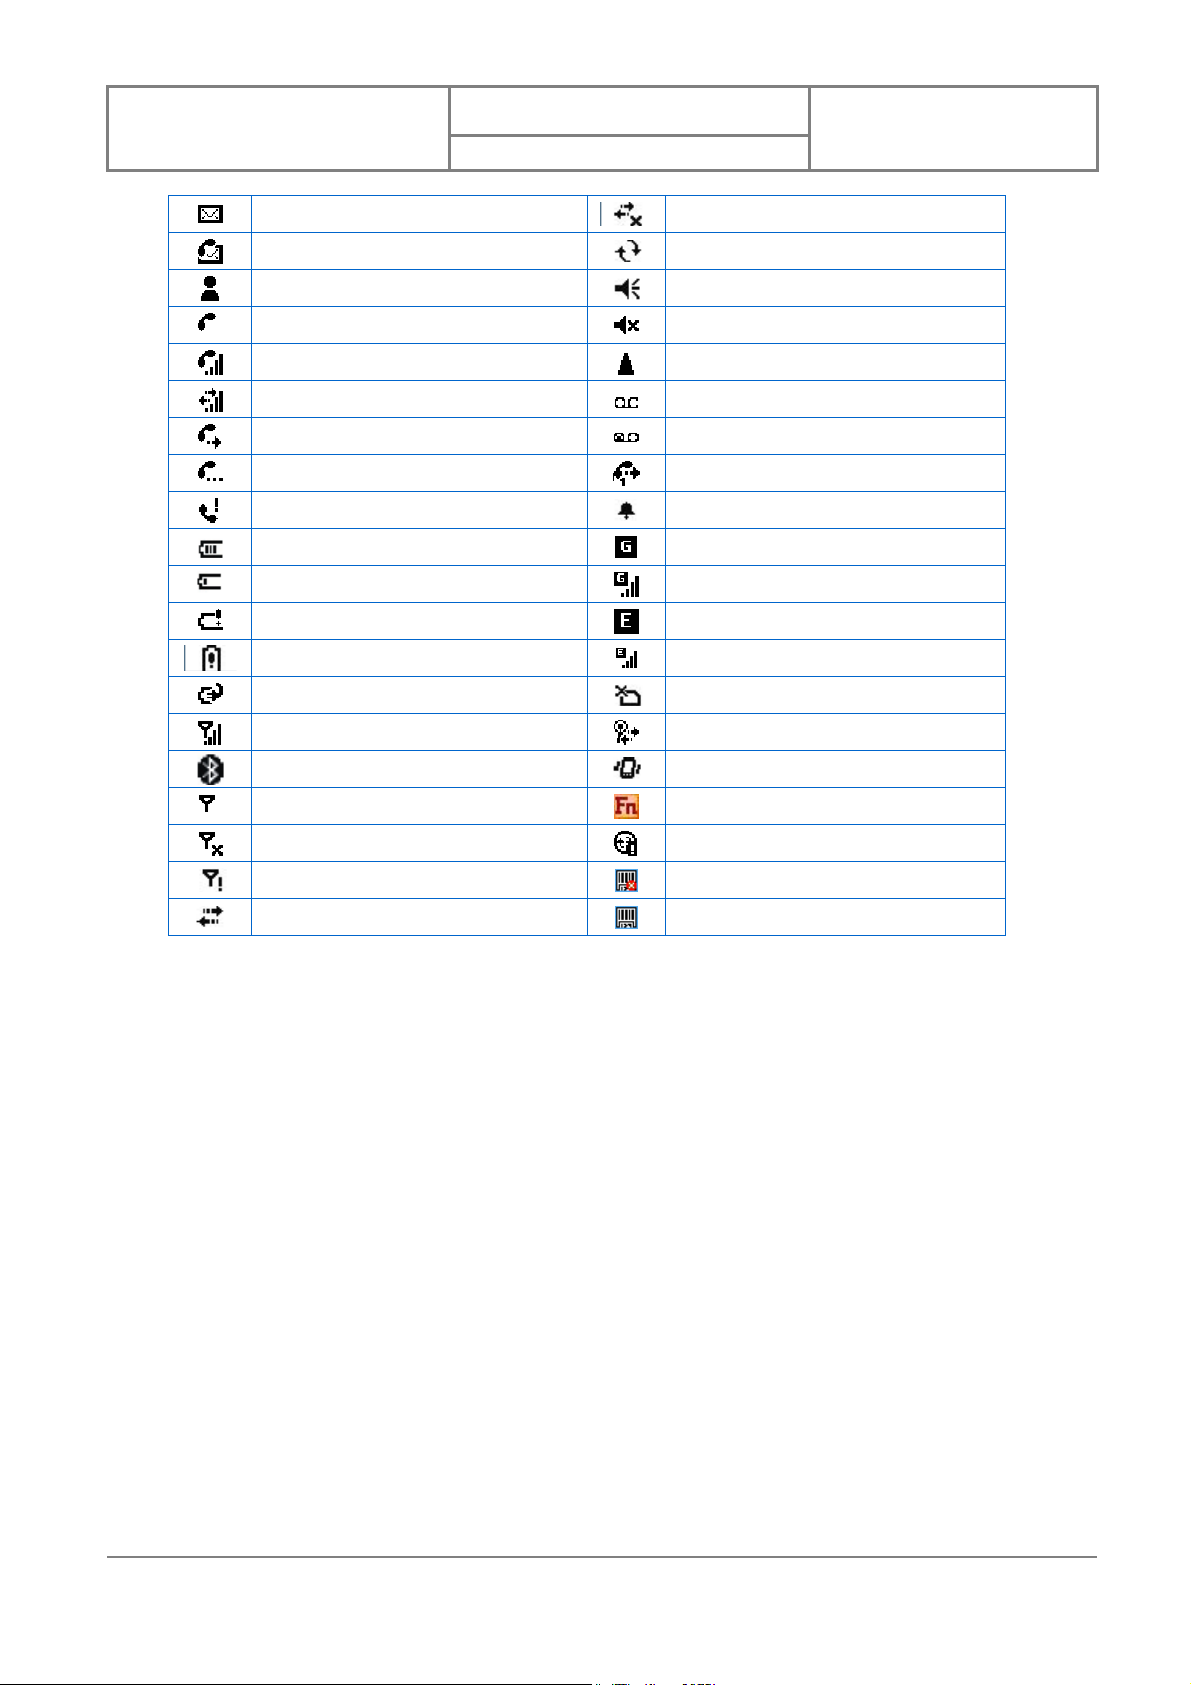
Icon Indicators
Status indicators appear at the top of the screen and on the Today screen. The following table
lists common status indicators and their meanings.
26
OPTICON
New e-mail or text message (SMS)
New voice mail
New instant message
Voice call
Voice call in progress
Data call in progress
Calls are forwarded
Call on hold
Missed call
Battery level 1
Battery level 2
Low battery
Extremely low battery
Battery charging
Signal strength
Bluetooth bonding in progress
No signal
Flight mode
No service
PC Connection is active
User Manual
Preliminary
Connection is not active
Synchronization in progress
Ringer on
Ringer off
Roaming
No Voice mail
Voice mail Lines 1
Call Forwarding Lines 1
Alarm
GPRS available
GRPS in use
EDGE available
EDGE in use
No SIM card installed
Wi-Fi connection in progress
Ringer in vibration mode
Function key on
Synchronization error
Barcode reader off
Barcode reader on
Version : 0.1
Date : 96/07/10
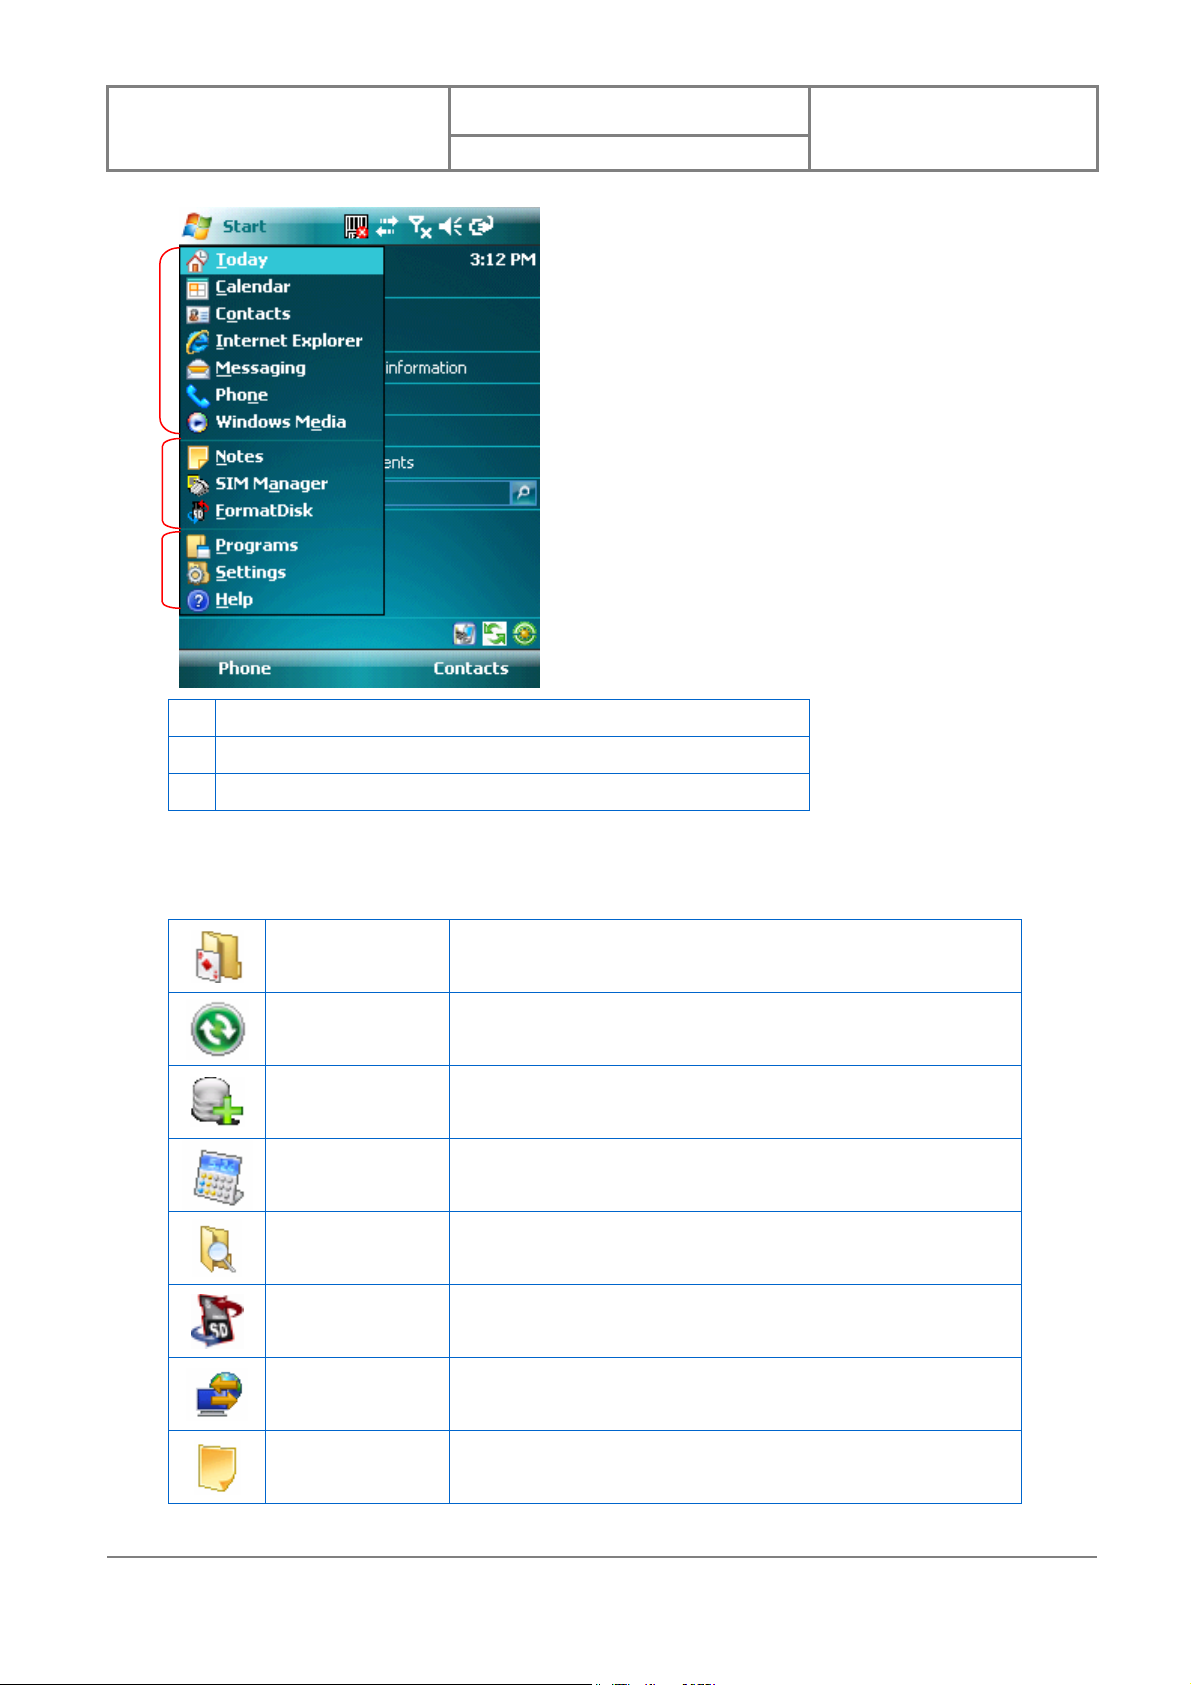
2.4 The Start Menu
The Start menu is divided into 3 groups as described in the following:
27
OPTICON
①
②
③
User Manual
Preliminary
Version : 0.1
Date : 96/07/10
1 Commonly used items
2 Recently accessed applications
3 List of all programs, device settings, and system help
List of All Programs
The following table lists icons of the programs that are already installed on your device.
Games Windows Mobile comes with 2 games: Bubble Breaker and
ActiveSync Synchronizes information between your device and a PC. See
Backup
Manager
Calculator Performs basic arithmetic and calculations such as addition,
File Explorer Lets you organize and manage the files on your device.
Solitaire.
“Chapter 4. Synchronizing Information” for details.
Lets you backup and recover your date. See “10.5
Backup/Recover” for details.
subtraction, multiplication, and division.
FormatDisk Lets you format the inserted mini-SD card and DiscOnChip in
Internet
Sharing
Notes See “2.7 Notes” for details
your device.
Lets you use your device as an external modem for a PC,
connecting through an USB port and Bluetooth.
28

OPTICON
Pictures &
User Manual
Preliminary
Collects, organizes, and sorts picture and video files in the My
Version : 0.1
Date : 96/07/10
Video
Search Searches the data stored in your device.
SIM Manager Lets you manager your SIM card. See “3.4 SIM Manager” for
Tasks Keeps track of your tasks. See “2.8 Using Tasks” for details.
List of All Settings
Personal
Buttons Configure the device’s buttons.
Input Input method configurations.
Lock Set a password to unlock the device.
Pictures folder on your device or on a storage card.
details.
System
Menus Configure the Start menu.
Owner
Information
Phone Configure the Phone features. See “Chapter 3 Phone F eatures”
Sounds &
Notifications
Today Configure the Today screen items and theme.
About Windows Mobile information and device name.
Backlight Configure the display backlight.
Enter information about the owner of the device.
for details.
Configure program and event sounds.
Barcode
Settings
Change settings of barcode scanner
29
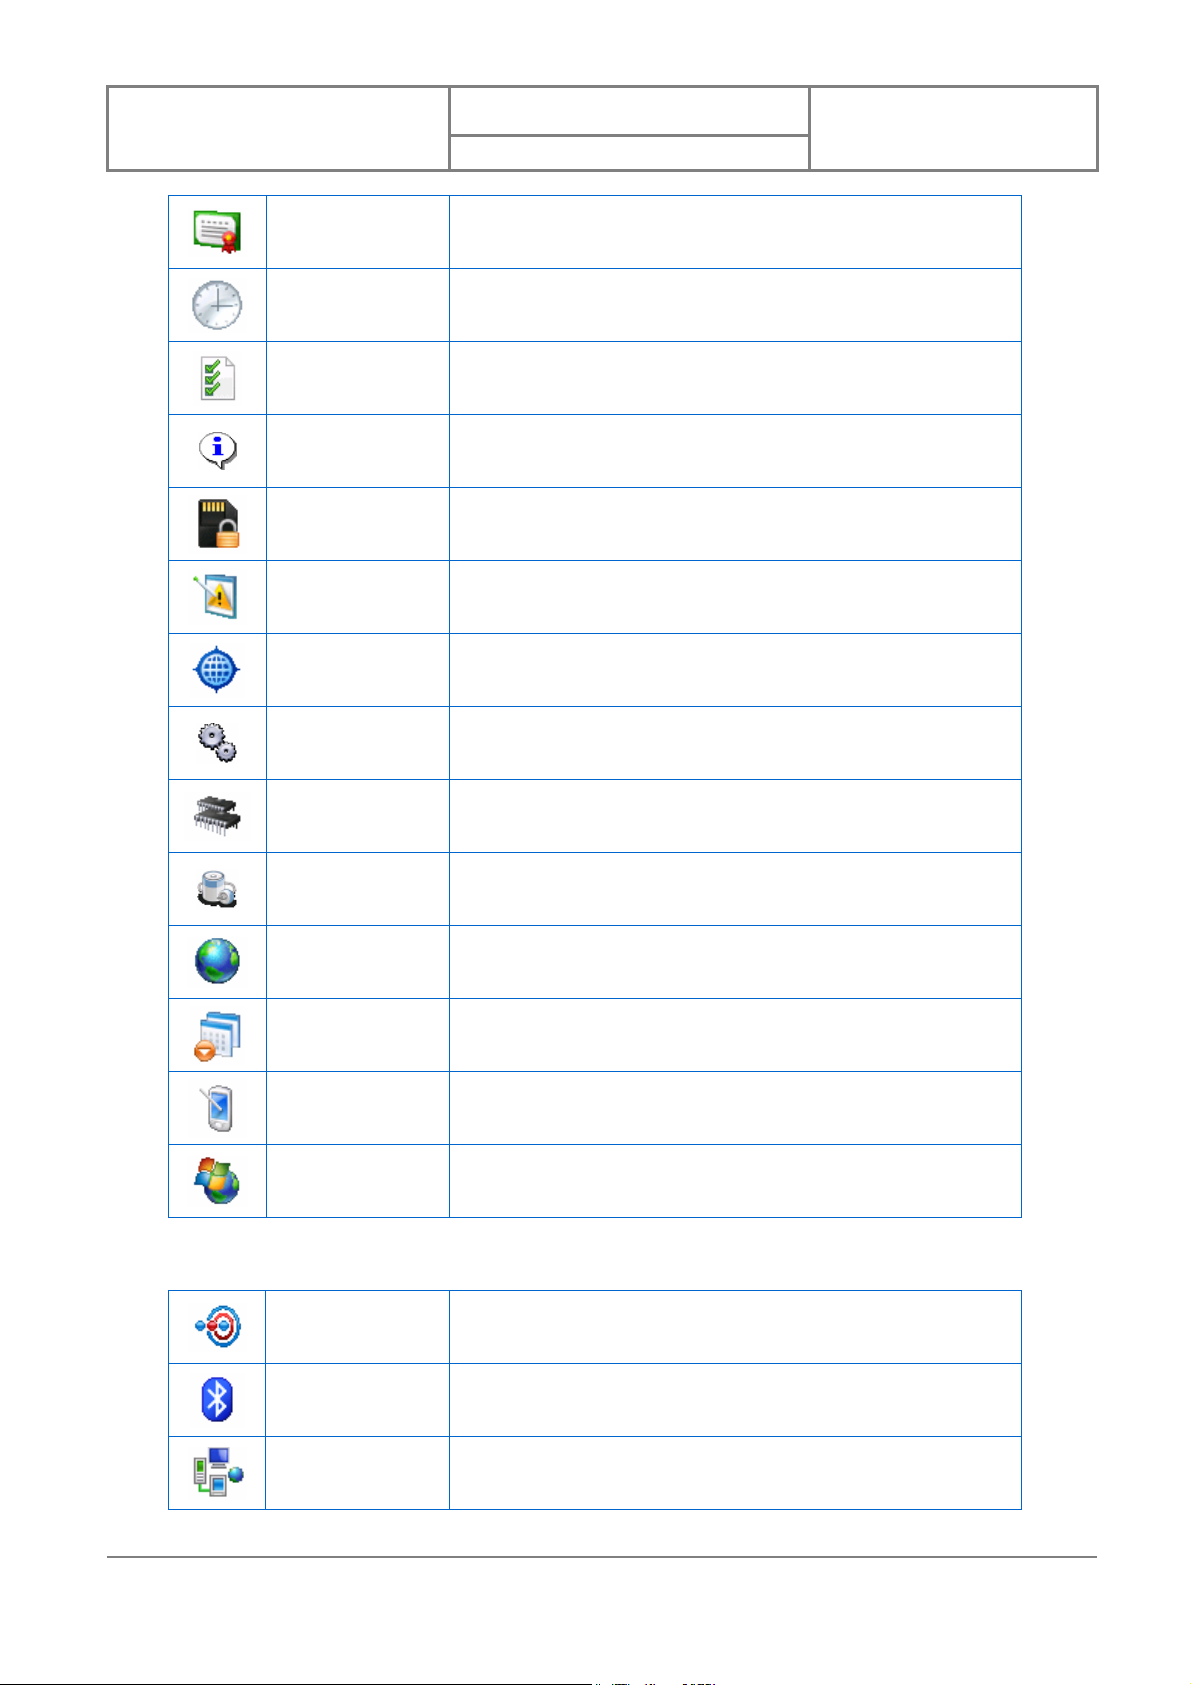
OPTICON
Certificates Manage personal and root certificates.
Clock & Alarms Set time and alarms.
User Manual
Preliminary
Version : 0.1
Date : 96/07/10
Customer
Feedback
Device Info Display the device software and hardware version.
Encryption
Error Reporting Enable or disable Microsoft product error reporting.
External GPS
Factory Reset Lets you reset all settings to manufacturer default.
Memory Memory and process management.
Power Power management settings.
Regional
Settings
Remove
Programs
Screen Lets you align the screen. See “Calibrating Your Device” of
Windows
Update
Connections
Beam Turn on/off the beam feature.
Bluetooth Configure Bluetooth settings. See “Chapter 5 Bluetooth
Connections Configure the device’s connections.
Configure the device’s locale.
Remove an installed application.
Chapter 2 for details.
Connections” for detail.
30