


URC-6540
URC-6541
Universal Remote
Universal-Fernbedienung
Télécommande Universelle
UK USER GUIDE & CODE BOOK . . . . . . . . . . . . . . . . . . . . . . . . . . . . . . . . . . |
p. 2 |
D BEDIENUNGSANLEITUNG & EINSTELLCODES . . . . p. 22
F MODE D’EMPLOI & LISTE DES CODES . . . . . . . . . . . . . . . . . . p. 42
Retain For Future Reference Sorgfältig aufbewahren
A conserver soigneusement

UK
Table of Contents
ABOUT YOUR AUDIO ZAPPER |
3 |
FEATURES AND FUNCTIONS |
5 |
INSTALLING THE BATTERIES |
7 |
INSTALLATION |
8 |
Direct Set-Up |
8 |
Key Lock/Unlock |
10 |
Input Select Toggle |
11 |
Search Method |
12 |
Quick Code Reference |
15 |
ADVANCED FEATURES |
16 |
Mode Reassignment |
16 |
Learning Feature |
17 |
TROUBLE SHOOTING |
20 |
Helpful Hints |
20 |
Consumer Help-Line |
21 |
SET-UP CODES |
62 |
2 |
WWW.ONEFORALL.COM |

About your AUDIO ZAPPER
Thank you for purchasing the AUDIO ZAPPER universal remote control (URC-6540 or URC-6541). Your Zapper package contains:
•The AUDIO ZAPPER Remote Control
•The AUDIO ZAPPER User Guide and Codebook
The User Guide and Code Book explains in simple steps how to set-up and operate your new universal remote control. You may need this guide again in the future, so please be sure to keep it.
Your AUDIO ZAPPER requires 2 new "AAA/LR03" Alkaline batteries.
Your AUDIO ZAPPER is a perfect solution for replacing the basic functions of your lost or broken audio remote control. You can operate the basic functions of your Amplifier/Tuner, CD Player, Mini Disc Player, and Audio Cassette Player. The AUDIO ZAPPER is also ideal for use in place of your complicated audio remote. With the Learning feature, you can easily customize the AUDIO ZAPPER for your favorite functions.
The illustration and the chart on the following pages describe the features and functions of the AUDIO ZAPPER universal remote control.
WWW.ONEFORALL.COM |
3 |

About your AUDIO ZAPPER
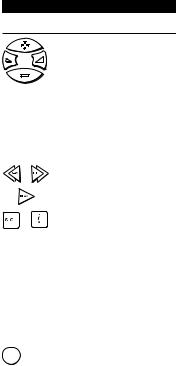
MAGIC |
Power |
Device
Keys
Programme +/
Track + 
Volume - |
|
Volume + |
||
|
|
|
|
|
Mute
Programme -/
Track -
Transport
Keys
4 |
WWW.ONEFORALL.COM |

Features and Functions
Function
MAGIC
TUN
CD
TAPE
MD
LED
The LED (Light Emitting Diode) flashes as soon as you press any valid key. It is also used during set-up for user feed back.
Magic Key
The MAGIC key is used to set-up your AUDIO ZAPPER and to access special features.
Power Key
The Power key will turn your Amplifier/Tuner both on and off when in the TUN mode. This key may also open and close your CD tray when in the CD mode.
Device Keys
The TUN, CD, TAPE, and MD keys select the component of your system to be controlled. Pressing the TUN key allows the remote to control the basic functions of your Amplifier/Tuner. After pressing the CD key, you can operate the basic functions of your CD player. After pressing the TAPE key, the transport keys operate your Audio Cassette Player. After pressing the MD key, you can operate the basic functions of your Mini-Disc player.
Mute Key
The Mute key operates the same function as the Mute key on your original remote control.
Volume +/-, Programme +/- Keys
The Volume keys control the volume level of your HI-FI.
After pressing the TUN key, the Programme +/ - keys change the pre-set stations up and down on your Tuner.
WWW.ONEFORALL.COM |
5 |
Features and Functions
Function
If Magic is first pressed, the programme +/ - keys will search up and down for the next available station of your tuner.
After pressing the CD key, the Programme +/– keys change the track of your CD player up and down. If Magic is first pressed, the Programme +/- change the disc up and down if this function is available for your CD player.
Transport Keys
The Play key will cause your CD, MD, or Audio Cassette to begin to play, depending upon what mode key you have selected. If Magic is first pressed, the Play key will cause the device to begin to record, when applicable.
The Stop and Pause keys operate the same function as on your original remote control.
After pressing the CD key, the FF and REW keys will search forward and reverse through the song that is playing.
After pressing the TAPE key, the FF and REW keys will operate as fast forward and rewind.
F Key (Function Key)
F
The F key allows you to select the input of your Amplifier/Tuner. Even if your original remote control has a separate key for each output (Tuner, CD, Tape, etc.), the AUDIO ZAPPER’s F key will send a different output selection with each key press.
6 |
WWW.ONEFORALL.COM |
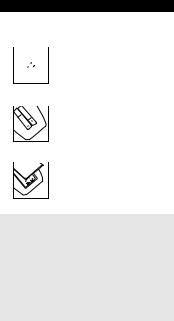
Installing the Batteries
The AUDIO ZAPPER needs 2 new "AAA/LRO3" alkaline batteries.
1
2
3
Remove the battery cover from the back of the AUDIO ZAPPER by pressing down on the tab.
Match the batteries to the +/- marks inside the battery case, then insert the batteries.
Press the battery cover back into place.
Important notes:
-It is best that you do not use rechargeable batteries.
-On the inside of the battery compartment door you will find a label on which to write your setup codes after your ZAPPER is set up for your devices. Please write down your codes for easy, future reference.
-Upon removing the batteries, your set-up codes and advanced programming will be retained.
WWW.ONEFORALL.COM |
7 |
Direct Set-Up
Setting Up Your Amplifier/Tuner
The following instructions allow you to set-up your Audio System whether it be a Micro-System, MiniSystem, or separate components.
Find your HI-FI code in the Set-Up code section (starting on page 62). Codes are listed by brand name. The most popular code is listed first. Make sure that your HI-FI set is switched on.
1
2
3
TUN
MAGIC
_ _ _ _ _ _
Press and release the TUN key.
Press and hold down MAGIC until the red light blinks twice (the light will blink once then twice).
Enter your 6-digit code according to the chart below.
The red light will blink twice.
VOL (+) |
= |
1 |
VOL ( -) |
= |
2 |
CH (+) |
= |
3 |
CH ( -) |
= |
4 |
Example: To enter Pioneer code 121312 you would press: Vol+, Vol-, Vol+, Ch+, Vol+, Vol-.
4 Now, aim the AUDIO ZAPPER at your HI-FI set and press POWER. If your HI-FI set switches off, turn your HI-FI set back on manually and try all the other keys on the AUDIO ZAPPER Keypad and fill in the "Set-Up table".
If all functions do not work properly, you should lock those functions that do work properly (refer to page 10 for Key Lock instructions), then try the next code in the list.
If all functions on the keypad work, except for input select please refer to page 11 for the Input Select Toggle.
Write the codes for your HI-FI in the boxes inside the battery compartment and on page 15 for easy future reference.
8 |
WWW.ONEFORALL.COM |

Direct Set-Up
Example for setting up a Pioneer Mini-System
One Amplifier/Tuner Set up code 121312 programmed on the TUN device key controls four of the function keys (Power, Volume +, Volume -, and F). These keys should be locked according to the instructions on page 10.
These functions will remain after locking each key. A second Amplifier/Tuner code 111143 could then also be programmed on the TUN device key to control the Programme + and Programme – for the Tuner.
Audio Zapper Key |
|
TUN code |
|
|
TUN code |
|||
|
|
|
121312 |
|
|
|
111143 |
|
POWER |
|
X |
|
|
|
|
||
Programme (+) |
|
|
|
|
|
|
X |
|
Programme (-) |
|
|
|
|
|
|
X |
|
Volume (+) |
|
X |
|
|
|
|
||
Volume (-) |
|
X |
|
|
|
|
||
F |
(input) |
|
X |
|
|
|
|
|
Set-Up Table |
|
|
|
|
|
|
||
|
|
|
|
|
|
|||
Audio Zapper Key |
Code: |
|
Code: |
|
Code: |
|||
|
|
|
|
|
|
|
||
POWER |
|
|
|
|
|
|
||
|
|
|
|
|
|
|
||
Programme (+) |
|
|
|
|
|
|
||
|
|
|
|
|
|
|
||
Programme (-) |
|
|
|
|
|
|
||
|
|
|
|
|
|
|
||
Volume (+) |
|
|
|
|
|
|
||
|
|
|
|
|
|
|
||
Volume (-) |
|
|
|
|
|
|
||
|
|
|
|
|
|
|
|
|
F |
(input) |
|
|
|
|
|
|
|
|
|
|
|
|
|
|
|
|
WWW.ONEFORALL.COM |
9 |

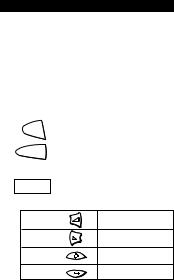
Key Lock/Unlock
The Key Lock feature allows you to retain a function from the currently programmed code. The locked keys remain even after another code has been programmed on the same device key.
To Lock a function:
1 |
TUN |
Press and release the device key |
|
||
|
|
(TUN, CD, TAPE or MD). |
2 |
MAGIC |
Press and hold down MAGIC |
|
|
until the red light blinks twice (the |
light will blink once then twice).
3 

4
Next, press Programme -,
Programme +, Programme -
(the LED will blink twice).
Now press the function that you would like to lock (the LED will blink twice). For example, Programme +.
To Unlock a function:
1 Press and release the device key.
|
TUN |
|
2 |
MAGIC Press and hold down MAGIC |
|
until the red light blinks twice (the |
||
|
light will blink once then twice).
3 

4
Next, press Programme -,
Programme +, Programme -
(the LED will blink twice).
Now press the function that you would like to unlock (the LED will blink four times).
Please note that steps 1-4 must be repeated for each function that you wish to lock or unlock.
10 |
WWW.ONEFORALL.COM |
Input Select Toggle (F Key)
The F (Function) key is designed to select the input of your HiFi. The Input Select Toggle allows you to use the F (Function) key to cycle through your inputs.
If the F key is not changing the input:
1 MAGIC Press and hold down MAGIC until the light blinks twice (the
light will blink once then twice).
2 |
Press Programme -, Programme +, |
|
|
|
Volume - (The light blinks twice). |
The Input Select Toggle is now programmed.
Setting Up a CD Player, Mini-Disc Player or Cassette Player
To program a CD Player, Mini-Disc Player, or Audio Cassette Player use the following instructions.
Insert a CD, Mini-Disc, or Audio Cassette into the appropriate player. Ensure that the output of your Amplifier/Tuner is selected for the device that you are going to program.
1
2
Press and release the CD, MD, or TAPE key.
Press and hold down MAGIC
MAGIC
until the red light blinks twice (the light will blink once then twice).
3 |
_ _ _ _ _ _ |
Enter your 6-digit code |
||||||
according to the chart below. |
||||||||
|
|
|
||||||
|
|
|
Codes are listed on pages 62-71. |
|||||
|
|
|
The red light will blink twice. |
|||||
|
|
|
|
|
|
|
||
|
|
VOL (+) |
= |
|
1 |
|||
|
|
|
|
|
|
|||
|
|
VOL (-) |
= |
|
2 |
|||
|
|
|
|
|
|
|||
|
|
CH (+) |
= |
|
3 |
|||
|
|
|
|
|
|
|
||
4 |
|
CH (-) |
|
= |
|
4 |
||
|
|
|
||||||
|
|
|
|
|||||
Press PLAY to verify that you have |
||||||||
|
programmed the correct code. |
|
||||||
WWW.ONEFORALL.COM |
11 |

Search Method
If your Audio System does not respond to the AUDIO ZAPPER after trying all the codes listed for your brand, try searching for your code. You may also try the Search Method when your brand is not listed at all. To search for your Amplifier/Tuner code:
1 |
|
Turn on your Amplifier/Tuner. |
|
|
|
2 |
TUN |
Press the TUN key on the AUDIO |
|
ZAPPER. |
|
|
|
|
3 |
MAGIC |
Then, press and hold the MAGIC |
|
|
key until the LED blinks twice (the |
|
|
LED will blink once then twice). |
4
5TUN
Next, press the Programme - key three times.
Next, alternate between TUN and POWER until your Amplifier/Tuner turns off. You may have to press these keys many times, so be patient. Remember, you must aim the AUDIO ZAPPER at your device the entire time you are searching for your code.
6 |
MAGIC When your device turns off, press |
|
and release MAGIC. |
The AUDIO ZAPPER should now be ready to operate your device. Turn your device back on manually and try all the remote's functions to ensure they are working properly. If some of the AUDIO ZAPPER’S commands are not operating correctly, you can lock the keys that do function correctly (see page 10), then try the search method again. In this method you should alternate between TUN and the key that is not functioning correctly in order to find the correct code for that function.
For example, the search may reveal a code that controls the Power and the Volume, but not the stations of your Tuner. You would then manually place your Amplifier in the Tuner mode, then alternate between TUN and Programme+ during the second search.
12 |
WWW.ONEFORALL.COM |

Search Method
Important notes:
-When you want to control your device, press the device key first (TUN, CD, TAPE, or MD).
-To search for the code for your CD Player or Audio Cassette Player, follow the same instructions above, only press the CD or TAPE key during step 2 and alternate between CD or TAPE and the PLAY key while performing the search.
-During step 5, you may have to press these keys many times (up to 150!), so be patient. Remember, you must aim the AUDIO ZAPPER at your device the entire time you are searching for your code.
After you have used the Search Method, you can find out which code the AUDIO ZAPPER responded to by blinking back the code. It's handy to know your Amplifier/Tuner, CD Player, MD Player, and Audio Cassette codes for future reference. Remember, you can only blink back your code after the AUDIO ZAPPER is operating your device.
To blink out your TUN code:
1 TUN
2 |
MAGIC |
Press the TUN key on the AUDIO ZAPPER.
Then, press and hold the MAGIC key until the LED blinks twice (the LED will blink once then twice).
3 
 4
4 
5
Next, press Programme-,
Programme-, Programme+.
For the first digit of your 6-digit code, press Volume+ and count all the red blinks.
For the second digit, press Volume - and count all the red blinks.
WWW.ONEFORALL.COM |
13 |

Search Method
6 |
|
|
|
For the third digit, press |
|
|
|
|
Programme+ and count all the |
|
|
|
|
red blinks. |
7
8
9
For the fourth digit, press Programme- and count all the red blinks.
For the fifth digit, press MUTE and count all the red blinks.
For the sixth digit, press PLAY and count all the red blinks.
Now you have your 6-digit code. Write the codes for your devices in the boxes in the battery compartment and on page 15 for easy, future reference.
Important note: To blink out the code for your CD Player, MD Player or Audio Cassette Player, follow the same instructions above, only press the CD, MD or TAPE key during step 1.
14 |
WWW.ONEFORALL.COM |

Quick Code Reference
The pages 62-71 list the codes for your equipment. The most popular codes for each brand are listed first.
Write down the codes for your devices in the boxes below and in the battery compartment for quick and easy reference.
Device Type Code
______________________ ■■■■■■
______________________ ■■■■■■
______________________ ■■■■■■
______________________ ■■■■■■
______________________ ■■■■■■
WWW.ONEFORALL.COM |
15 |

Advanced Features
Mode Reassignment
As the TUN, CD, and MD device keys all provide access to Amplifier/Tuner, Amplifier, CD and MD codes, it is not necessary to reassign device keys unless you would like to operate a second Audio Cassette Player. You could, as an example, use the MD key to operate Deck B of your Audio Cassette Player.
To reassign the MD device key as a second Audio Cassette device key:
1
2
3
4
MAGIC
TAPE
MD
Press and hold down MAGIC until the light blinks twice (the LED will blink once then twice).
Press Programme -, Programme -, Volume + (The LED blinks twice).
Press the TAPE key.
Press the MD key. (The LED blinks twice).
You can now program an Audio Cassette Player on the MD key (see page 11).
Note: To reset the key back to its original mode, press the MD key twice after step 2.
16 |
WWW.ONEFORALL.COM |

Advanced Features
Learning Feature
The AUDIO ZAPPER comes with a complete library of preprogrammed codes. After you have set up the AUDIO ZAPPER for your device, you may find that there are one or more keys which you had on your original remote which do not have a place on the AUDIO ZAPPER keypad.
As a convenience, the AUDIO ZAPPER offers a special Learning feature that allows you to copy any function from your original audio remote control onto the keypad of the AUDIO ZAPPER.
To use the Learning feature, please follow the instructions below. You can learn a function from your original remote control onto any key of the AUDIO ZAPPER except for the MAGIC key and the device keys (TUN, CD, TAPE, and MD). If you require to learn more per mode, you will need to place the learned function on a shifted key. Please see the next section titled Shifted Learning.
Before you start:
-Make sure your original remote control is working correctly.
-Make sure your AUDIO ZAPPER nor your original remote control are pointing at your device.
1 |
Place both remote controls (the AUDIO |
|
ZAPPER and your original) on a flat |
|
surface. Make sure the ends which you |
|
normally point at your device are facing |
|
each other. Keep the remotes at a |
|
distance of 2 to 5 cm. |
2 |
Press and hold down the MAGIC key until |
|
the light blinks twice (the light blinks once |
then twice).
3
4
Press Programme -, Volume -, Volume +
(the light will blink twice).
Press the device key (on the AUDIO ZAPPER remote) to select the mode to which you want to copy the learned function.
WWW.ONEFORALL.COM |
17 |
|
Advanced Features |
5 |
Press the key (on the AUDIO ZAPPER |
|
remote) where you want to place the |
|
learned function (the LED will flash rapidly). |
6 |
Press and hold the key (on your original |
|
remote) that you want to copy until the LED |
|
on the AUDIO ZAPPER blinks twice. |
7 |
If you want to copy other functions within |
|
the same mode, simply repeat steps 5 and 6 |
pressing the next key you want to copy by learning. If you would like to continue learning but in a different mode (with another original remote), repeat steps 4-6.
8
9
To exit the learning mode, press and hold MAGIC until the LED blinks twice.
Learning is mode specific. To access your learned function, press the appropriate device key first.
Shifted Learning
You can also learn a function on a key of the AUDIO ZAPPER without sacrificing the original AUDIO ZAPPER function. A Shifted Learning function can be put on any key EXCEPT the following: Device keys, Magic key.
To install a Shifted Learning function, simply follow steps 1-8 on the previous page. During step 5, press MAGIC one time before you press the key where you are placing the learned function.
To access the shifted function, press Magic and then the key you have learned on.
18 |
WWW.ONEFORALL.COM |

Advanced Features
To delete a learned function:
It is possible to delete all learned functions or only individual learned functions.
To delete individual learned functions, follow the steps as outline below.
1 |
Press and hold MAGIC until the light blinks |
|
twice (the light will blink once then twice). |
2 |
Press Programme -, Volume -, Volume - |
|
(the LED will blink twice). |
3 |
Press the device key in which the function |
|
will be deleted. |
4 |
Press twice on the learned key which will |
|
be deleted (the LED will blink twice).* |
5 |
If there is another key which you wish to |
|
delete, repeat steps 2-4. |
6 |
The original functions of the AUDIO ZAPPER |
|
will now be present. |
*To delete a Shifted Learned function, press MAGIC before you press the learned key to be deleted (during step 4).
To delete all learned functions across all modes:
1 |
Press and hold MAGIC until the light blinks |
|
twice (the light will blink once then twice). |
2 |
Press Programme -, Volume +, Volume - |
|
(the light will blink four times). |
Notes:
-During steps 2-8 (pg 17-18), you have approximately 10 seconds to conduct each step. If there is a gap of more than 10 seconds between two steps, you will have to start over at step number 2.
-If you learn a function on a key that already performs a function, the original AUDIO ZAPPER feature automatically becomes shifted. You can press MAGIC and then the key to access it.
-The Learning feature is mode specific. Therefore you can place one learned feature per mode on the same key.
-The AUDIO ZAPPER can learn approximately 16 functions.
-You can replace a learned function by placing another learned function on top.
-Learning should not be done in direct sunlight or under incandescent lights.
-Make sure you are using new batteries before following the instructions above.
-Upon changing the batteries, your learned functions will be retained.
WWW.ONEFORALL.COM |
19 |

Trouble Shouting
Helpful Hints |
|
Problem: |
Solution: |
|
|
The red light does not |
Replace batteries with 2 |
blink when you press |
new "AAA/LR03" |
a key? |
alkaline batteries. |
|
|
The AUDIO ZAPPER |
Make sure you are using |
does not respond after |
new batteries and are |
pressing a key? |
aiming the |
|
AUDIO ZAPPER at |
|
your device. |
|
|
The AUDIO ZAPPER |
A) Try all the codes listed |
does not operate your |
for your brand. |
device? |
B) Try the search method. |
|
|
Your brand is not listed |
Try the search method. |
in the AUDIO ZAPPER |
|
code section? |
|
|
|
The AUDIO ZAPPER |
A) Try all the codes listed |
is not performing |
for your brand. |
commands properly? |
B) Try the search method. |
|
|
A function does not |
A) Try all the codes listed |
work after trying all |
under your brand as |
the codes? |
well as the Key Lock on |
|
page 10. |
|
B) Use the learning |
|
feature on page 17 if |
|
your original remote is |
|
operating correctly. |
|
|
20 |
WWW.ONEFORALL.COM |
Trouble Shooting
CUSTOMER SERVICE
If you still have questions about the operation of your AUDIO ZAPPER universal remote and you could not find the answer(s) in the trouble shooting section, you may want to contact the customer service department for assistance.
You may care to visit our Internet-site:
www.oneforall.com
Our internet-site has many advantages:
-24 hours access
-no waiting time
-page for Frequently Asked Questions
-info about the ONE FOR ALL product range
Before contacting us, by Fax, E-mail or Phone, make sure you have the required information available by filling in the table below.
What do we need to know before you contact us:
1.That you have the URC-6540 or URC-6541
2.The date of purchase ( . . . . / . . . . / . . . . )
3.A list of your equipment/models/helpcodes(*): (see example below)
Helpcode(*) |
Type |
Brand |
model nr. |
Remote |
Setup |
|
|
|
|
model nr. |
Code |
4450805 |
Amp/Tuner |
Sony |
ST-V 710L |
RMT-V131B |
213123 |
|
|
|
|
|
|
|
|
|
|
|
|
|
|
|
|
|
|
|
|
|
|
|
|
Type/model numbers can often be found in your equipment owner’s manual or on the factory plate behind the device.
4. Then Fax, E-mail or Dial us:
In the UK |
In Australia |
e-mail : ofahelp@uebv.com |
e-mail : ofahelp@uebv.com |
fax: +31 53 432 9816 |
fax: +31 53 432 9816 |
tel.: 0808-1000306 (*) |
tel.: 1-800 064472 |
In Ireland |
In South Africa |
e-mail : ofahelp@uebv.com |
e-mail: ofahelp@uebv.com |
fax: +31 53 432 9816 |
fax: 011 248 4402 |
tel.: 1-800 553199 (*) |
tel.: 011 248 4400 |
(*) When you call us you will be asked to enter your helpcode(s). You only have to enter the helpcode(s) of those devices you have a problem with. The helpcode is a 7-digit code, which defines the ONE FOR ALL-model you have, the device type and the brand of your device. This helpcode can be found in the first column of the setup code list.
WWW.ONEFORALL.COM |
21 |

D
Inhaltsverzeichnis |
|
WISSENSWERTES AUDIO ZAPPER |
23 |
FUNKTIONSTASTEN |
25 |
BATTERIEWECHSEL |
27 |
EINSTELLEN DER AUDIO ZAPPER |
28 |
Direkteinstellung |
28 |
Taste-Sperre/Aufhebung der Tasten-Sperre 30 |
|
Input Selekt Möglichkeit |
31 |
Code-Suchlauf |
32 |
Code-Beschreibung |
35 |
ZUSÄTZLICHE FUNKTIONEN |
36 |
Gerätetaste neu belegen |
36 |
Lernfähigkeit |
37 |
NÜTZLICHE HINWEISE |
40 |
EINSTELLCODES |
62 |
22 |
WWW.ONEFORALL.COM |
 Loading...