


L I M I T E D L I F E T I M E W A R R A N T Y
Products manufactured and sold by OMEGA RESEARCH & DEVELOPMENT, INC. (the "Company"), are warranted to be free from defects in materials and workmanship under normal use. If a product sold by the Company proves to be defective, the Company will repair or replace it free of charge within the first year and thereafter all parts to be repaired will be free with only a nominal charge for Omega's labor and return shipping, to the original owner during the lifetime of the car in which it was originally installed.
All products for warranty repair must be sent postage prepaid to Omega Research & Development, Inc., P.O. Box 508, Douglasville, Georgia 30133, or send via UPS to: 981 N. Burnt Hickory Rd., Douglasville, Georgia 30134, with bill of sale or other dated proof of purchase. This warranty is nontransferable and does not apply to any product damaged by accident, physical or electrical misuse or abuse, improper installation,BACKalteration,COVERany use contrary to its intended
function, unauthorized service, fire, flood, lightning, or other acts of God.
This warranty PRINTER’Slimits the Company's liabilityNOTE:to the repair or replacement of the product. The Company shall not be responsible for removal and/or reinstallation
charges, damageproductionto r theft of he vehiclebackor its ontents,coverr any incidental or consequential damages caused by any failure or alleged failure of the product to
function properly. UNDERis color;NO CIRCUMSTANCESthis is aSHOULD THIS
WARRANTY, OR THE PRODUCT COVERED BY IT, BE CONSTRUED
AS A GUARANTEEplaceOR INSURANCEmarkerPOLICYcoverAGAINST. LOSS. The Company neither assumes nor authorizes any person or organization to make any
warranties or assume any liability in connection with the sale, installation, or use of this product.
This device complies with F.C.C Rules part 15. Operation is subject to the following two conditions: (1) This device may not cause harmful interference and,
(2) This device must accept any interference that may be received, including interference that may cause undesired operation.
The manufacturer is not responsible for any radio TV interference caused by unauthorized modifications to this equipment. Such modifications could void the user’s authority to operate the equipment.
Omega Research and Development, Inc.
P. O. Box 508
Douglasville, Georgia 30133
www.caralarm.com
08/07 MO-AL-1500-EDP
Excalibur
AL-1500-EDP
OPERATION MANUAL
FRONT COVER
PRINTER’S NOTE: production front cover is color; this is a place marker cover.
COPYRIGHT 2007: OMEGA RESEARCH & DEVELOPMENT, INC.

This device complies with FCC Rules part 15. Operation is subject to the following two conditions, (1) This device may not cause harmful interference and, (2) This device must accept any interference that may be received, including interference that may cause undesired operation.
The manufacturer is not responsible for any radio or TV interference caused by unauthorized modifications to this equipment. Such modifications could void the user's authority to operate the equipment.
Coin batteries used in the transmitter which is used to operate this security system may contain Perchlorate Material - special handling may apply. See www.dtsc.ca.gov/hazardouswaste/perchlorate
One or more of these patents may apply to this product:
#5,612,669 #5,654,688 #5,663,704 #5,729,191 #5,818,329 #5,612,578 #5,739,747 #382,558 #385,878 #5,750,942 #5,739,748 #5,719,551 #406,107 #701,285 #5,973,592 #5,982,277 #5,986,571 #6,011,460 #6,037,859 #6,049,268 #6,130,605 #6,130,606 #6,140,938 #6,140,939 #6,150,926 #6,144,315 #6,184,780 #6,188,326 #6,243,004 #6,249,216 #6,275,147 #6,297,731 #6,320,514 #6,320,498
Foreign Patent #199700312 #EP0817734B1 #98906445.6 #2,320,248 #701,285
Omega Research and Development, Inc.
www.caralarm.com
Complete Programmable Features Matrix
|
Features |
Ignition on, off, then press Valet Switch 5 times (Status Light turns on steady). |
||||
|
|
|
|
|
|
|
# |
Feature |
|
Default Setting |
Option |
2nd Option |
3rd Option |
|
|
|
|
|
||
1 |
SecureCode |
|
1 & 0 |
2 stages, of up to 9 presses each (total of 99 possible combinations) |
||
|
|
|
|
|
|
|
2 |
Last Door Arming |
|
OFF (L) |
ON w/o doorlock (U) |
ON w/ doorlock (2) |
|
|
|
|
|
|
|
|
3 |
Automatic Rearming |
OFF (L) |
ON w/o doorlock (U) |
ON w/ doorlock (2) |
|
|
|
|
|
|
|
|
|
4 |
Starter Interrupt Functions |
Alarm only (L) |
Off (U) |
Automatic (2) |
|
|
|
|
|
|
|
|
|
5 |
Ignition Activated Override |
OFF (U) |
ON (L) |
|
|
|
|
|
|
|
|
|
|
6 |
Doors Lock With Ignition On |
ON (L) |
OFF (U) |
|
|
|
|
|
|
|
|
|
|
7 |
Doors Unlock With Ignition Off |
ON (3) |
OFF (L) |
o/p 1 only (U) |
o/p 2 only (2) |
|
|
|
|
|
|
|
|
8 |
Open Door Bypass to above |
ON (L) |
OFF (U) |
|
|
|
|
|
|
|
|
|
|
9 |
Confirmation Chirps |
|
ON (L) |
OFF (U) |
exc. Valet (2) |
Valet only (3) |
|
|
|
|
|
|
|
10 |
Confirmation Chirp Volume |
Medium Loud (2) |
Low (L) |
Med Lo (U) |
Loud (3) |
|
|
|
|
|
|
|
|
11 |
Activated Alarm Cycle |
30 Seconds (L) |
60 Sec. (U) |
90 Sec. (2) |
120 Sec. (3) |
|
|
|
|
|
|
|
|
12 |
Lights On Upon Disarm |
ON (L) |
OFF (U) |
|
|
|
|
|
|
|
|
|
|
13 |
Disarm Upon Trunk Release |
ON (L) |
OFF (U) |
|
|
|
|
|
|
|
|
|
|
14 |
Arming Delay |
|
3 Seconds (L) |
15 Seconds (U) |
30 Seconds (2) |
45 Seconds (3) |
|
|
|
|
|
|
|
15 |
Steady Siren / Pulsed Horn |
Steady Siren (L) |
Pulsed Horn Lo (U) |
Pulsed Med. (2) |
Pulsed Hi (3) |
|
|
|
|
|
|
|
|
16 |
Alarm Functions Bypass |
OFF (U) |
ON (L) |
|
|
|
|
|
|
|
|
|
|
17 |
Ignition Anti-Carjacking |
OFF (U) |
ON (L) |
|
|
|
|
|
|
|
|
|
|
18 |
Door Anti-Carjacking |
OFF (U) |
ON (L) |
|
|
|
|
|
|
|
|
|
|
19 |
Remote Anti-Carjacking |
OFF (U) |
ON (L) |
|
|
|
|
|
|
|
|
|
|
20 |
Open Door Warning at Arm |
OFF (U) |
ON (L) |
|
|
|
|
|
|
|
|
|
|
21 |
III Button Operation |
|
Panic (L) |
3rd Chan. (U) |
4th Chan. (2) |
5th Chan. (3) |
|
|
|
|
|
|
|
22 |
Doorlock Functions |
|
.8 second (L) |
3 Seconds (U) |
Double Unlock (2) |
Total Closure (3) |
|
|
|
|
|
|
|
23 |
Factory Alarm Arm Output |
Arm (L) |
Parking Light (U) |
Chan. 4 Latch (2) |
Chan. 4 On Demand (3) |
|
|
|
|
|
|
|
|
24 |
Factory Alarm Disarm Output |
Disarm (L) |
Horn, med (U) |
Chan. 5 Latch (2) |
Chan. 5 On Demand (3) |
|
|
|
|
|
|
|
|
installation features
Page - 2 |
Page - 35 |

The final 3 Programmable Features are for the installer’s use.
Note: Features #23 and #24 involve two outputs of the Excalibur control unit which give the installer greater flexibility. These outputs can be programmed to perform several different functions. The primary function, or default setting, of these outputs are designed to be connected to the vehicle’s wiring so that operating the Excalibur will cause the factory alarm to also arm and disarm.
But there are also several other functions of these two outputs which may be programmed to operate, and more importantly, they must be configured by the installer to perform the desired operations.
Feature #23 Factory Alarm Arm Output Functions
Factory Default Setting |
Arm Output |
|
|
(press “ arm/lock” button to program ) |
|
Options: |
|
|
Parking Light Output |
(press “ disarm/unlock” button to program ) |
|
Channel 4 Latch Output |
(press “ II” button to program ) |
|
Channel 4 On Demand Output |
(press “ III” button to program ) |
|
The default setting of this feature is to arm the factory alarm when the Excalibur is armed. Other options for this output are a (-) Negative flashing parking light output, and an additional remote output, operated by the transmitter’s “ arm/ lock” and “ II” buttons together, and in two forms of operation: “Latch”, in which the output toggles (i.e.- turns on and turns off) with each buttons press, and “On Demand” which is output occurring while the buttons are being pressed. Feature #21 can change this channel’s button assignment.
Feature #24 Factory Alarm Disarm Output Functions
Factory Default Setting |
Disarm Output |
|
|
(press “ arm/lock” button to program ) |
|
Options: |
|
|
Horn Output |
(press “ disarm/unlock” button to program ) |
|
Channel 5 Latch Output |
(press “ II” button to program ) |
|
Channel 5 On Demand Output |
(press “ III” button to program ) |
|
The default setting of this feature is to disarm the factory alarm when the Excalibur is disarmed. Other options for this output are very popular application, operating the vehicle’s existing horn; either in conjunction with the electronic siren, or in place of the siren. Using both the siren and the horn creates an extremely effective security system. The remaining options are Channel 5, with the same operation parameters as described above for Channel 4, except that the “ disarm/unlock” and “ III” buttons operate it, and Feature #21 can also change this channel’s button assignment.
Page - 34
This Booklet Contains |
|
Introduction to the System ..................................................... |
4-6 |
Status Light, Valet Switch, Controller & Transmitter |
|
System Versatility - An Important Note ......................................... |
6 |
Using the Exclibur System ...................................................... |
7 |
Arming Using the Controller or Transmitter .......................... |
7-8 |
Arming Bypass, Sensor Bypass |
|
Automatic “Last Door Arming” of the System ....................... |
8-9 |
While the System is Armed, and should it Trigger ................. |
9-10 |
Prewarning |
|
Disarming the System Using the Controller or Transmitter ... 10-11 |
|
Safety Disarm Feature; Activation Alert; Automatic Rearming |
|
Disarming By Emergency Override ........................................ |
11-12 |
Remote Panic Feature .............................................................. |
12 |
Other Controller and Transmitter Operations ......................... |
13 |
Silent Arming & Disarming, Sensor Bypass;2nd, 3rd, 4th & 5th Channels |
|
Using the Valet Switch ............................................................ |
14-15 |
SecureCode .............................................................................. |
15 |
The Status Light ...................................................................... |
16 |
2-Way Controller ..................................................................... |
17-20 |
Icons & Programming |
|
Anti-Carjacking Protection ..................................................... |
21 |
Controller and Transmitter Protection .................................... |
22 |
How to Program Controllers or Transmitters ......................... |
22-23 |
Programmable Features List .................................................... |
24 |
How to Program Features ........................................................ |
25-26 |
Programmable Features Descriptions ..................................... |
26-34 |
Programmable Features Matrix ............................................... |
35 |
Limited Lifetime Warranty .............................................. |
Back Cover |
Page - 3
Introduction to the System
Congratulations for your choice of the most versatile, fully-featured vehicle security and convenience system available today, the Excalibur AL-1500-EDP by Omega Research and Development. To enjoy the most from your new system, please take a few moments to learn about the principal user components, and the basic operation of the system. These subjects are found in next several pages, followed by more detailed specifics of complete operations and features.
One of the components, typically mounted on the windshield, is the Window Unit module which contains the Status Lights and the Valet Switch. The window unit also receives and transmits the Echo technology
communications for the system’s 2-way operation.
The Red colored Status Lights report the operational status of the system at all times, and also serves as a visual deterrent to break-ins and theft. Specific description of the Status Light operation may be found on page 16.
The Valet Switch has three main functions:
•The Valet Switch can be used to turn off the system’s security functions, including any automatic arming or locking features (if used). Keyless entry functions will
still operate. This is placing the system into “Valet Mode”.
•The Valet Switch can also be used, in conjunction with
the vehicle’s ignition key, to perform an emergency disarming of the security system in the event the transmitter or transceiver is lost or becomes inoperable. This is referred to as “performing an Emergency Override”.
•The Valet Switch is used in the procedure of programming operational features and also for encoding transmitters and transceivers to the system.
A complete description of the Valet Switch and its operations is on pages 14-15.
The system can operated by two types of devices: the 2-Way Controller and the 1-Way Transmitter. Your system comes with one of each of these, pre-learned to operate the system. The controller, in addition to operating your system, also receives signals from the system, and displays a variety of system conditions on its LCD screen. This is the patented Echo 2-way technology. The transmitter will fully operate the system, but it can not receive signals nor report events from the vehicle. Your system can be operated by as many as four controllers and/or transmitters.
The controller and the transmitter both share the same four operational buttons, and their use to operate the Excalibur system is the same. These buttons and a brief description of what they do are:
The final 3 Programmable Features are for the installer’s use.
These features are described to explain their function; as these features are dependent upon the installation configuration within the vehicle, they should not be changed except by the original dealer or qualified installer.
Feature #22 Doorlocking Functions |
(installer feature) |
|
Factory Default Setting |
.8 Second Lock & Unlock Output |
|
|
(press “ arm/lock” button to program ) |
|
Options: |
|
|
3 Second Lock & Unlock Output (press “ disarm/unlock” button to program )
Double Pulse Unlock Output |
(press “ II” button to program ) |
Total Closure Lock Output |
(press “ III” button to program ) |
This single feature gives the installer several needed options, to match the security system’s doorlocking outputs to suite different vehicle requirements.
•The first setting (programmed by the “ arm/lock” button) has the system produce both the lock and unlock outputs as .8 second in duration. This is the most common form of output needed, which interfaces most vehicles.
•The second setting (programmed by the “ disarm/unlock” button) changes the lock and unlock outputs to be a longer 3 second pulse output. This is for certain vehicles which require a longer output pulse, typically cars having pneumatic doorlocking systems, although the longer setting is also more suitable in some newer-model vehicles.
•Some newer vehicles require a double pulse output to remotely unlock the doors and/or to disarm a factory-equipped security system, which is what the Double Pulse Unlock setting provides (it is programmed by the “ II” button ).
•The Total Closure Lock Output (programmed by the “ III” button) may be used with vehicles which are originally equipped with the total-closure feature. Typically, a total closure feature is when locking the vehicle’s doors if the key in the door is held to “lock” for a period of time the vehicle will close all windows and the sunroof, in addition to locking the doors.
Note: When this feature is turned on, during the 28 second period after arming the system, the lock output can be stopped on demand by the user by pressing the “ arm/lock” OR the “ disarm/unlock” button. Only the output itself will stoppressing either button again will normally operate the system, and at any time after the 28 second lock output period ends.
The following two features, when they are set for factory alarm “arm” or “disarm” output operation, will follow the setting of this feature.
Page - 4 |
Page - 33 |
Feature #18 Door Activated Anti-Carjacking Protection
Factory Default Setting |
Off |
(press “ disarm/unlock” button to program ) |
Option: |
On |
(press “ arm/lock” button to program ) |
This form of Anti-Carjacking is initiated by a door being opened. The AntiCarjacking protection, including the three ways to initiate it are described on page 21.
Feature #19 Remote Activated Anti-Carjacking Protection
Factory Default Setting |
Off |
(press “ disarm/unlock” button to program ) |
Option: |
On |
(press “ arm/lock” button to program ) |
This form of Anti-Carjacking is initiated by a signal from the controller or transmitter. The Anti-Carjacking protection, including the three ways to initiate it are described on page 21.
Feature #20 Open Door Warning Upon Arming
Factory Default Setting |
Off |
(press “ disarm/unlock” button to program ) |
Option: |
On |
(press “ arm/lock” button to program ) |
When this feature is turned on, if one of the vehicle's doors is open at the time that the system is armed via the controller or transmitter, the siren will chirp 3 times and the parking lights will flash 3 times instead of once.
Feature #21 “III” Button Operation
Factory Default Setting |
Panic |
|
(press “ arm/lock” button to program ) |
Options: |
|
3rd Channel |
(press “ disarm/unlock” button to program ) |
4th Channel |
(press “ II” button to program ) |
5th Channel |
(press “ III” button to program ) |
This feature changes how the controller’s or transmitter’s “ III” button operates. Normal operation, or the default setting, has the “ III” button operate the Panic feature. This feature allows changing it to instead operate the 3rd channel or either of the two other optional channel outputs. Panic can still be operated, by the alternative methods of pressing either the “ arm/lock” and “ disarm/unlock” button for 3 seconds. This feature can also assign the 4th and 5th channels to the “ III” button, in the same manner as the 3rd channel.
“ III” button |
“ P”rogram |
“ II” button |
button |
“ disarm/unlock” button
|
|
|
|
|
|
|
“ arm/lock” |
|
|
|
|
|
|
|
|||
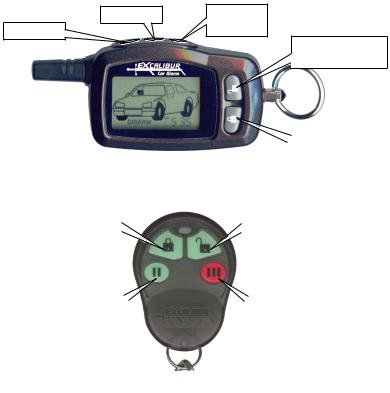
The 2-Way Controller |
|
|
button |
|||||
|
|
|
|
|||||
The 1-Way Transmitter |
|
|
|
|
||||
|
|
|
|
|
|
|
|
|
“ arm/lock” |
|
|
|
“ disarm/unlock” |
|
|||
button |
|
|
|
button |
|
|||
|
|
|
||||||
“ II” button |
|
|
|
|
“ III” button |
|
|
|
|||
|
“ arm/lock”
•Pressing and releasing the “ arm/lock” button arms the security system and locks the doors.
•Pressing and holding this button for three seconds will first arm, and then activate the Panic feature, locking the doors.
“ disarm/unlock”
•Pressing and releasing the “ disarm/unlock” button disarms the system and unlocks the doors unless the alarm is triggered, in which case it will disarm the activated alarm, but not unlock the doors unless the button is pressed again.
•Pressing and holding this button for three seconds will first disarm, and then activate the Panic feature, unlocking the doors.
•The unlock operation may be optionally configured during the system’s installation so that pressing this button once disarms the system and unlocks only the driver's door, and pressing a second time unlocks all of the doors.
•Pressing the “ arm/lock” and “ disarm/unlock” buttons together activates the 3rd channel output, which can be used to operate optional functions or devices.
Page - 32 |
Page - 5 |

“ II” or “ :”
•Pressing the “ II” button for two seconds can be used to activate an extra output, known as the “2nd channel”, for an optional function such as trunk release.
•Pressing and releasing this button twice arms or disarms the system without the confirmation chirps.
•Pressing this button immediately after arming will leave the alarm armed, but with the shock sensor feature bypassed.
“ III” or ...“ ”
•Pressing and holding the “ III” button for 3 seconds will activate the Panic feature, but without locking or unlocking the doors.
•The “ III” button can be reprogrammed so that it can operate an additional 3rd channel output, instead of operating Panic.
“ P” on the controller only.
•The controller has a fifth button, “ P”, which will illuminate the LCD screen when pressed. This is also the “ Programming” button; it is used to customize controller operations, which is explained on pages 19 and 20.
How the 2-Way Echo controller reacts is included in the following general system operation descriptions, and then a more detailed description the Echo’s icons and instructions for its programming are detailed on pages 17-20.
- IMPORTANT -
The Excalibur AL-1500-EDP is one of the most versatile vehicle security systems made. It has many programmable features which can offer more functions and operations which are described in the basic system instructions.
To a large degree, these extra features and operations are configured at the installation of the system. Please read the sections of this manual which explain programmable features, and please consult your installer for specifics on how your system is configured, and for installation options which may have used, or can be added to system after installation.
EXAMPLEthe Excalibur can sound the vehicle’s horn in place of or in addition to the electronic siren which is included with it. But the operations are described with the siren only.
Page - 6
there is a brief period of time in which a system activation, or alarm, cannot occur. This Arming Delay allows the system to completely process its sensory parameters, which can include allowing the vehicle to stabilize. In some cases more time is needed than the factory-set 3 seconds, and this feature offers three longer delay options.
Feature #15 Steady Siren or Pulsed Horn
Factory Default Setting |
Steady Siren |
|
(press “ arm/lock” button to program ) |
Options: |
|
Pulsed Horn Low |
(press “ disarm/unlock” button to program ) |
Pulsed Horn Medium |
(press “ II” button to program ) |
Pulsed Horn High |
(press “ III” button to program ) |
It is important to understand that the Excalibur has a primary audible output, for the electronic siren; and that it also has a programmable relay which among its applications is being used to sound the vehicle’s existing horn. This feature changes only the primary audible output, so that it can be utilized to sound the existing horn by itself. This is for cases when the programmable relay is desired for other features, such as unlocking the doors, or as an additional ignition or accessory output should it be needed for the remote starting operation.
The Steady Siren setting is exactly that- a steady output which the electronic siren requires. When programming this feature for using the output for the vehicle’s horn, the optional setting produce pulsed output on the system’s siren wire, in three different pulse timings, which allow a degree of customization of the horn’s sound during the alarm activation.
Feature #16 Alarm Functions Bypass
Factory Default Setting |
Off |
(press “ disarm/unlock” button to program ) |
Option: |
On |
(press “ arm/lock” button to program ) |
This feature converts the system into a strictly Remote Keyless Entry System by eliminating all antitheft alarm-oriented operations and features. When this feature is programmed on, the Excalibur has remote keyless entry operation only.
Feature #17 Ignition Activated Anti-Carjacking Protection
Factory Default Setting |
Off |
(press “ disarm/unlock” button to program ) |
Option: |
On |
(press “ arm/lock” button to program ) |
This form of Anti-Carjacking is initiated by the ignition key being turned on. The Anti-Carjacking protection, and the three ways to initiate it are described on page 21.
Page - 31
 Loading...