


"WE'VE GOT THE EDGE ON SECURITY"
OWNER'S MANUAL
MODEL: AL-1000SH
COPYRIGHT: OMEGA RESEARCH & DEVELOPMENT INC.1997

Table Of Contents
Note: This manual is written under the assumption that an optional door lock interface and an auxiliary sensor are installed with your Excalibur vehicle security system.
Transmitter Features ........................................................................................ |
4 |
Transmitter Operations .................................................................................... |
6 |
Arming The System Using The Transmitter .................................................... |
7 |
Passive System Arming By "Last Door Arming .............................................. |
8 |
Security System Armed And Triggered ........................................................... |
9 |
Disarming The System Using The Transmitter .............................................. |
10 |
Remote Panic Feature .................................................................................... |
12 |
Optional Trunk Release And 3rd Channel Output ......................................... |
13 |
Using The Easy Valet Switch ........................................................................ |
14 |
Red LED Status Indicator .............................................................................. |
15 |
Electronic Siren And Flashing Lights ............................................................ |
17 |
Backup Battery .............................................................................................. |
19 |
Impact And Glass Sensor With Prewarn Feature .......................................... |
20 |
Programming Transmitters ............................................................................ |
22 |
Programmable Features ........................................................................... |
24-31 |
Limited Lifetime Warranty ............................................................. |
Back Cover |
Page - 2

Introduction
Congratulations on your purchase of your new Excalibur security system and on joining over 8 million people worldwide who have trusted their vehicle's security to the designers of Omega Research & Development, Inc. To learn how to operate your security system, please become familiar with the following three principal user components: the Remote Transmitter, the Red LED Status Indicator and the Easy Valet Switch.
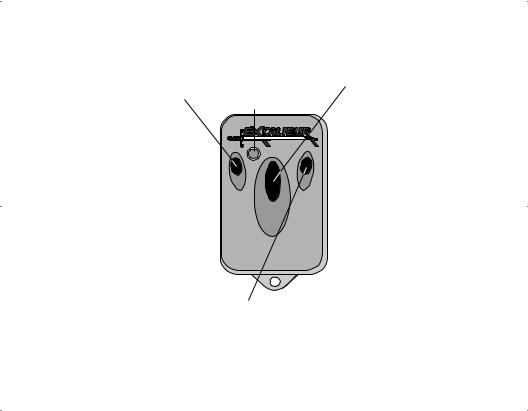
The Remote Transmitter: Each security system comes with two pre-learned transmitters, but can learn up to 4 different transmitters. The transmitter has three buttons: one large button in the middle and two smaller buttons. This system is preprogrammed, through a built-in learning routine, to have the transmitter buttons work in the following configuration:
The large button is used to arm, disarm and panic the security system.
The small left button is used, in conjunction with the large button, to operate remote sensor bypass, remote chirp elimination and remote valet. Used alone it operates the channel #3 output.
The small right button can be used to operate the trunk release feature.
This advanced transmitter design, featuring Surface Acoustical Wave Technology offers almost twice as much range as conventional systems. This helps overcome problems encountered in urban areas due to excessive amounts of interference.
Continued Next Page
Page - 3

The Easy Valet Switch: This switch prevents the security system from arming during extended stopovers at service stations, valet parking, car washes, etc. The Valet Switch is also used to temporarily override and disarm your security system in the event you lose your transmitter and to initiate the transmitter code learning process.
The Red LED Status Indicator: Informs you of 12 possible conditions the security system can be in and also serves as a visual deterrent to break-ins and theft.
Advanced System Features
Automatic Transmitter VerificationTM (Patent Pending): Your Excalibur vehicle security system is protected against a weakness shared by all other systems, even factory-equipped Remote Keyless Entry systems: a thief's ability to code his own, unauthorized transmitter to operate your system for the purpose of stealing your vehicle or it's contents. Note: For the first 8 hours after your new system is installed, every time the ignition switch is turned "on", the siren will chirp rapidly for two seconds. This will also occur in the event of a new transmitter code being entered into the system. Also, every time the ignition switch is turned "on", the LED Status Indicator will flash and pause for ten seconds, the number of flashes between each pause being equal to, and confirming, the number of transmitters encoded to operate your system. For example: two flashes and a pause indicate that only two
Page - 4

transmitters are coded to operate your system. In the event the system alerts you to a recent transmitter addition, or if the LED Status Indicator flashes a total different from the number of transmitters you have programmed to operate your system, you can now immediately reprogram your transmitters, effectively erasing any unauthorized transmitters.
The patent-pending Automatic Transmitter VerificationTM feature is the industry's first response addressing the growing problem of a professional thief defeating a vehicle security system by coding his own transmitter to operate the system. Previously, garage door openers were duplicated by burglars to gain home entry. Now when you leave your vehicle and keys with any individual for any reason, you will have the peace of mind of knowing that only your transmitters will operate the security system and that no other person has coded extra transmitters to steal your vehicle.
Transmitter Code JumpingTM: Each time you transmit a code to the security system, the transmitter and security system will advance to another code to use for the transmission. The Code JumpingTM Transmitter prevents a thief from using a "code grabber" device to record and play back a transmission for the purpose of disarming your vehicle security system. Please note that pressing the transmitter's arm / disarm button many times while it is out of range of the security system can advance its codes beyond the range of recognition. If this occurs, simply press the arm / disarm button a few times to synchronize the Code JumpingTM sequence between the transmitter and the security system control module.
Page - 5
Transmitter Operations
Small Left Transmitter Button- If this button is pressed and then the large button is pressed within 3 seconds, the security system will arm or disarm without siren confirmation chirps. If this button is pressed within 3 seconds after arming the system, Auxiliary sensor #1 will be turned off and Auxiliary sensor #2 will only have an instant trigger. If this button is pressed within 3 seconds after disarming, the system will enter Remote Valet. Pressing the small left transmitter button may be used to activate other optional modules through the 3rd channel output (Example: car starting equipment or power window roll up units).
Green LED Light- Illuminates and confirms transmission whenever a button is pressed.
Small Right Transmitter Button- If this button is pressed and held for 3 seconds, the security system will activate the trunk release function.
Page - 6
Large Transmitter Button- Pressing and releasing this button will arm and disarm the security system. If the optional doorlock interface is installed, the doors will lock upon arming, and unlock upon disarming. If you have the optional unlock driver's door feature, then upon disarming only the driver's door will unlock, and if the large button is pressed again within 5 seconds, all of the doors will unlock. Pressing and holding this button for 3 seconds will "Panic" the systemwhich will sound the siren, flash the exterior and interior lights and also lock the doors.

Arming The System Using The Transmitter
Arming The Security System Using The Transmitter: The security system can always be armed from the transmitter provided the ignition key is “off”, and the system is disarmed and not in the Valet Mode. To arm the system, after you exit the vehicle and close all of the doors, simply press and release the large transmitter button once, Instantly the exterior and interior lights will flash once, the siren will chirp once and the LED Status Indicator will begin to flash confirming that the system is armed. Further, the doors will lock and the starter interrupt relay will prevent any attempt to start the vehicle. Your security system is now fully armed, and is ready to respond if an intrusion attempt is detected.
Arming By-Pass: Upon arming, if any sensor circuit is inoperable, that circuit will be bypassed. For example, if the trunk is left open, you can still arm the system normally from the transmitter. The bypassed circuit will automatically be reinstated for protection 5 seconds after that circuit becomes operative, i.e., the trunk is closed. When a triggered circuit is in a bypassed state, all other operating circuits will be protected normally.
Sensor By-Pass: Your Excalibur system provides you with the convenient option of temporarily deactivating the auxiliary sensor (see page 20) without affecting any other trigger circuit. To deactivate the auxiliary sensor, simply press and release
Continued Next Page
Page - 7

the small left transmitter button within 3 seconds after pressing the large transmitter button when arming the system. You will hear a second siren chirp, confirming the security system has armed without the sensor circuit protecting the vehicle. The next time you arm the security system, the system will reset to its normal condition, and the optional sensor will again be part of your protection.
You can also pre-select your security system to automatically arm and lock the doors. This information is described in the following section.
Passive System Arming By "Last Door Arming"
Your security system can be programmed to arm automatically when the vehicle's last door is closed. The moment the last door closes, the siren will chirp once, the parking lights and dome lights will flash once and the LED Status Indicator will begin to flash rapidly. Thirty seconds later the siren will chirp again, the doors will lock (If the Passive Lock feature has been chosen) and the LED Status Indicator will slow to a steady flash, confirming that the security system is fully armed. However, if a point of entry is reopened before the single chirp at 30 seconds, the passive arming process stops, and will reset to start over again when that point of entry is reclosed.
"Automatic Last Door Arming" offers a high level of security, since it does not require you to remember to activate the security system when you leave your vehicle. Additionally, Automatic Last Door Arming may entitle you to an insurance discount. Note: Arming By-Pass (page 7) does not operate with the Automatic Last Door Arming feature. This bypass feature is designed to work only when arming from the
Page - 8

transmitter, because all protected entries must be closed prior to the Automatic Last Door Arming sequence to start. Note: To prevent the system from automatically arming while the vehicle is being refueled you should put the system in Valet Mode (page 14), keep your door open or turn on your dome light switch so that the system thinks your door is still open. We do not recommend leaving your ignition key turned "on". Note: Passive last door arming does not effect the operation of active arming.
Security System Armed And Triggered
While the security system is armed, the LED Status Indicator will be flashing. Should any intrusion attempt occur, your system will instantly "trigger". Once triggered, the security system will respond by:
1)The electronic siren will be activated. Once activated, it will change siren sounds every 5 seconds to attract more attention to the vehicle.
2)The exterior and interior lights will flash.
3)The doors will relock. This feature is so unique that the security system even
knows when a door is open and, if so, the system waits until the door is closed, at which time it relocks the doors, so that the thief cannot easily regain entry.
The siren and lights will stay activated for 60 seconds, unless you disarm your system with the transmitter or place the system in Valet Mode. If all protected entries are secure at the end of 60 seconds, the system will rearm automatically to protect against another entry attempt. However, if there is a protected entry still open or a
Continued Next Page
Page - 9

sensor still in a triggered state at the end of the 60 seconds, the system will retrigger for two more 60 second cycles. Should this occur the system will stop after a total of 3 minutes, while ignoring only the open entry or triggered circuit. Should the entry be closed, protection will begin instantly for that circuit.
After the security system has been triggered, after it resets the disarm confirmation will no longer be 2 chirps and the exterior and interior lights coming on immediately and staying on for 30 seconds. Instead, the system will respond by producing 4 siren chirps and flashing the lights 4 times before the lights stay on for 30 seconds. Also, the LED Status Indicator will indicate which zone activated the system. This is accomplished by the status indicator flashing one to four times between pauses, as defined on page 15, until the ignition key is turned "on".
Disarming The System Using The Transmitter
Disarming The System From The Transmitter: While the security system is in the armed state, pressing and releasing the large transmitter button once will instantly disarm the system and unlock the doors. If you have the optional unlock driver's door feature, then upon disarming only the driver's door will unlock, and if the large transmitter button is pressed again within 5 seconds or while a door is open, all of the doors will unlock.
Disarming is confirmed by two siren chirps and the exterior and interior lights
Page - 10
 Loading...