

Page 1

Setup Guide
Page 2

The information in this document is subject to change without notice and does not represent a commitment on the part of Native Instruments GmbH. The software described by
this document is subject to a License Agreement and may not be copied to other media.
No part of this publication may be copied, reproduced or otherwise transmitted or recorded, for any purpose, without prior written permission by Native Instruments GmbH.
“Native Instruments”, “NI” and associated logos are (registered) trademarks of Native Instruments GmbH.
Mac, Mac OS, GarageBand, Logic, iTunes and iPod are registered trademarks of Apple
Inc., registered in the U.S. and other countries.
Windows, Windows Vista and DirectSound are registered trademarks of Microsoft Corporation in the United States and/or other countries.
All other trademarks are the property of their respective owners and use of them does not
imply any affiliation with or endorsement by them.
Document authored by: Native Instruments
Document version: 1.0 (06/2011)
Special thanks to the Beta Test Team, who were invaluable not just in tracking down bugs,
but in making this a better product.
Disclaimer
Page 3

Germany
Native Instruments GmbH
Schlesische Str. 29-30
D-10997 Berlin
Germany
www.native-instruments.de
USA
Native Instruments North America, Inc.
6725 Sunset Boulevard
Los Angeles, CA 90028
USA
www.native-instruments.com
Contact
© Native Instruments GmbH, 2011. All rights reserved.
Page 4

Table of Contents
Table of Contents
1 Welcome to KONTAKT 5 .............................................................................................
1.1 What is Included in the Box? ...................................................................................................... 7
1.2 Setup Overview ........................................................................................................................... 7
2 Installation ...............................................................................................................
2.1 Read Before Installing ................................................................................................................ 8
2.2 Installing on Mac OS X ............................................................................................................... 8
2.3 Installing on Windows ................................................................................................................ 11
2.2.1 Start the Installation Program ................................................................................... 8
2.2.2 Select the Components to Install ............................................................................... 9
2.2.3 Set the Install Locations for Content ......................................................................... 10
2.2.4 Complete the Installation .......................................................................................... 11
2.3.1 Start the Installation Program ................................................................................... 12
2.3.2 Select the Features to Install ..................................................................................... 12
2.3.3 Define the Application’s Installation Path ................................................................. 14
2.3.4 Define an Installation Path for VST Plug-ins ............................................................. 15
2.3.5 Define a Library Path ................................................................................................. 16
2.3.6 Complete the Installation .......................................................................................... 17
3 Product Activation with Service Center .......................................................................
3.1 Activating Your Product Online ................................................................................................... 18
3.2 Updating Your Product ............................................................................................................... 22
3.1.1 Start Service Center ................................................................................................... 18
3.1.2 Log In Into Your User Account .................................................................................... 19
3.1.3 Activate the Product .................................................................................................. 20
3.1.4 Finish the Online Activation ....................................................................................... 21
3.2.1 Select Updates .......................................................................................................... 22
3.2.2 Download the Updates ............................................................................................... 23
7
8
18
KONTAKT 5 - Setup Guide - 4
Page 5

Table of Contents
3.3 Activating Your Product Offline .................................................................................................. 25
3.2.3 Open Your Download Folder and Install Updates ....................................................... 24
3.2.4 Install Updates .......................................................................................................... 24
3.3.1 Start the Offline Activation ........................................................................................ 25
3.3.2 Create the Activation Request File ............................................................................. 26
3.3.3 Enter the Serial Number ............................................................................................ 27
3.3.4 Transfer the Activation Request File .......................................................................... 28
3.3.5 Open the Activation Return File ................................................................................. 29
3.3.6 Finish the Offline Activation ...................................................................................... 30
4 Stand-alone Operation ...............................................................................................
4.1 Selecting an Audio Interface ....................................................................................................... 31
4.2 Optimizing Latency ..................................................................................................................... 32
4.3 Setting up MIDI Connections ...................................................................................................... 33
5 Plug-in Operation ......................................................................................................
6 Other Documentation and Support Resources ..............................................................
6.1 PDF Manuals .............................................................................................................................. 35
6.2 Video Tutorials ............................................................................................................................35
6.3 Knowledge Base/Readme/Online Support ................................................................................... 36
6.4 Forum ......................................................................................................................................... 36
6.5 Updates ...................................................................................................................................... 36
7 Troubleshooting and FAQ ...........................................................................................
7.1 Installation Folder Not Found by an Update Installer .................................................................. 37
7.2 Library Path Not Found by an Update Installer ........................................................................... 37
7.3 User Account Control and Internet Security ................................................................................ 37
7.4 How to Convert Songs Made with an Older Plug-in Version to the Latest Plug-in Version ........... 38
7.5 Location of the VST Plug-ins Folder on Windows ......................................................................... 38
7.6 The Plug-in Does Not Appear in My Sequencer ............................................................................ 39
31
34
35
37
KONTAKT 5 - Setup Guide - 5
Page 6

7.7 Sequencer Tutorials .................................................................................................................... 39
8 Product Returns ........................................................................................................
Table of Contents
40
KONTAKT 5 - Setup Guide - 6
Page 7

Welcome to KONTAKT 5
What is Included in the Box?
1 Welcome to KONTAKT 5
First of all, thank you for buying KONTAKT 5. This document will guide you through the
basic steps of setting up KONTAKT 5. After reading it, you should be able to install and
activate KONTAKT 5, as well as operate it both in stand-alone mode and as a plug-in in
your sequencer. We recommend that you take the time to read this guide in its entirety.
1.1 What is Included in the Box?
The KONTAKT 5 box contains:
▪ A set of five DVDs containing the KONTAKT 5 software installation program and sam-
ple library
▪ Your KONTAKT 5 serial number, which is located on the inside of the DVD case
▪ This Setup Guide
1.2 Setup Overview
This section provides a quick overview of the various steps necessary for getting KONTAKT 5 up and running: installation, activation, updates, and configuration, all of which will
be described in greater detail in further chapters of this guide.
▪ Installation: Insert the installation DVD into your DVD drive, locate the KONTAKT 5
setup file on the DVD and double-click it in order to start the installation procedure.
Carefully read and follow the on-screen instructions, accept the License Agreements,
and enter the password for your computer if prompted (Mac OS X only).
▪ Activation: Activate your product using the Service Center application. Online and Off-
line activation methods are available.
▪ Update: Download the latest software updates using the Service Center application.
Then browse to the download folder and install all downloaded updates.
▪ Configuration: Configure your new software for use with your audio and MIDI interfa-
ces.
▪ Suggestions for further reading, troubleshooting, FAQs, and information on product re-
turns can be found in the subsequent chapters of this guide.
KONTAKT 5 - Setup Guide - 7
Page 8

Read Before Installing
2 Installation
2.1 Read Before Installing
Before starting the KONTAKT 5 installation process, here are some points to be aware of:
▪ Make sure to keep the KONTAKT 5 installation DVDs in a safe place for future reference,
for example in case you need to install KONTAKT 5 on a new computer.
▪ Please carefully review the installer screens and the suggested installation paths in or-
der to avoid any unwanted folders being created on your hard disk.
▪ Always use the KONTAKT 5 installation program to install KONTAKT 5 on your comput-
er, even if you wish to install individual products. Running the installers from individual disk images will not result in a successful installation.
▪ It is possible to define alternative locations for the sample libraries during installation.
To see the exact default installation paths of the installed components, please refer to
section ↑2.2, Installing on Mac OS X (Mac OS X) or ↑2.3, Installing on Windows (Windows), respectively.
▪ Moving any folders related to Native Instruments software after installation is not rec-
ommended. Future software updates rely on the directory locations set during initial
installation.
▪ Installing all features of KONTAKT 5 requires about 25 gigabytes of free hard disk
space. Most of the space is required for sample libraries.
Installation
2.2 Installing on Mac OS X
By default, this folder, including a number of sub-folders, will be created during installation:
Macintosh HD/Applications/Native Instruments
We strongly recommend keeping this installation path.
2.2.1 Start the Installation Program
1. Insert the DVD labeled KONTAKT 5 Installation Disc into your DVD drive.
2. Once the KONTAKT 5 installation DVD icon appears on your Mac OS X desktop, double-click it to reveal the content of the DVD.
KONTAKT 5 - Setup Guide - 8
Page 9
Installing on Mac OS X
3. Locate the Kontakt 5 Installer Mac.mpkg file on the DVD and double-click it in order to
start the installation procedure.
4. Follow the on-screen instructions.
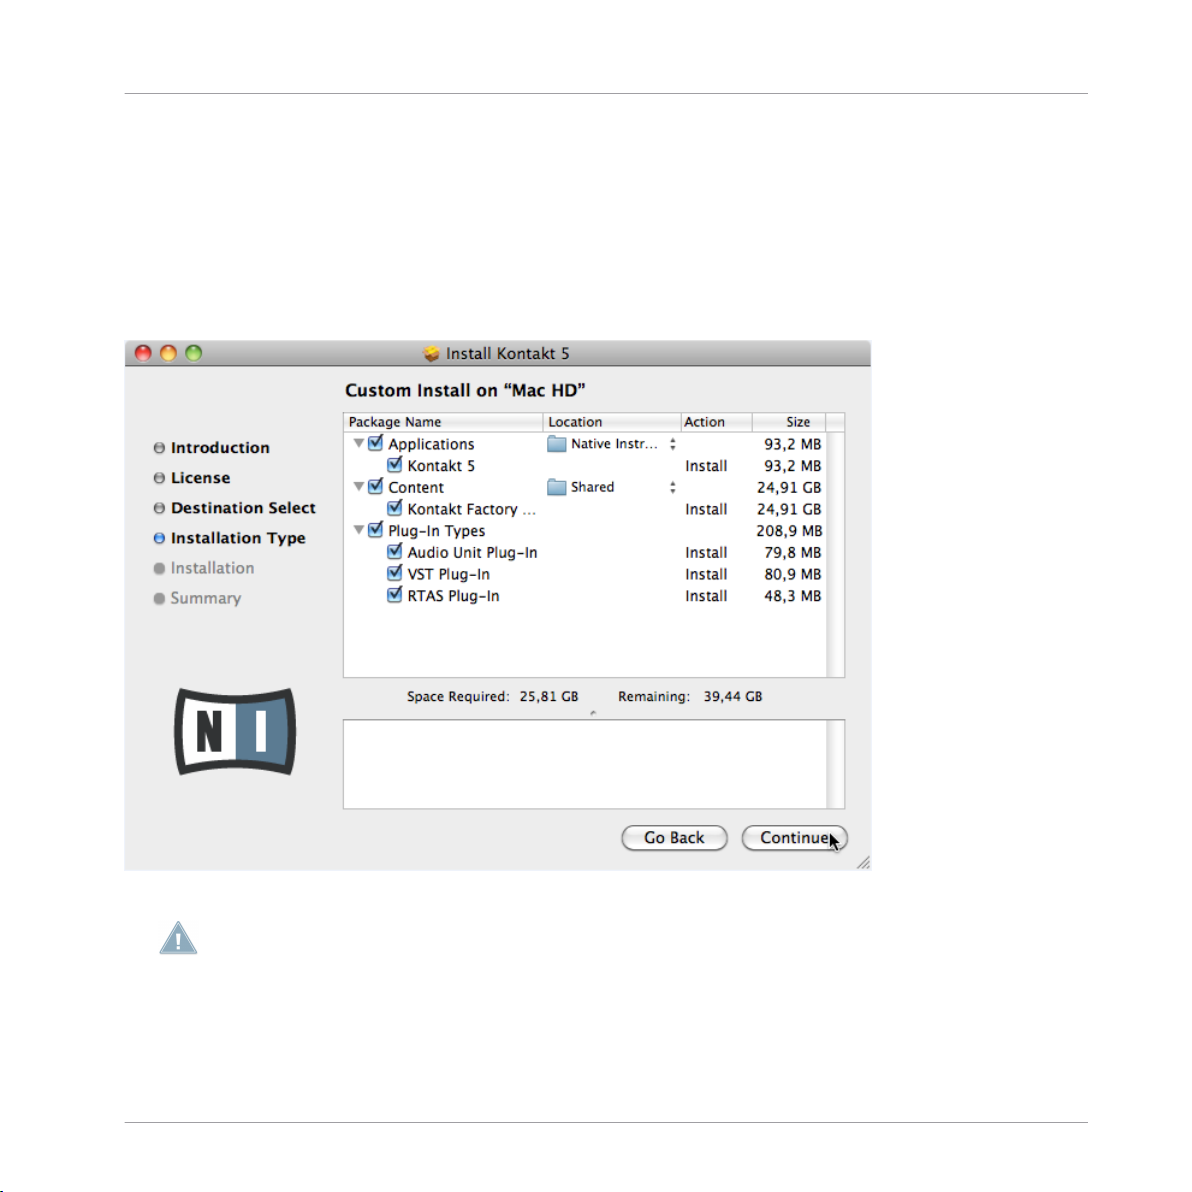
2.2.2 Select the Components to Install
The components available for installation appear grouped under the themes Applications,
Content, Service Center, and Plug-In Types. Click the triangles to expand the individual lists.
Installation
The components selection screen of the installation program.
The components listed under Content are only useful if their related application listed under
Applications are also installed. We recommend keeping all entries selected.
Applications: Determines whether the KONTAKT stand-alone application will be installed
(along with all files necessary for the software to run on your computer). You must leave
this checkbox checked in order to make use of the KONTAKT software.
KONTAKT 5 - Setup Guide - 9
Page 10

Installing on Mac OS X
Content: Determines whether the KONTAKT Factory Library will be installed. Leave this
checkbox checked to install the KONTAKT Factory Library.
Plug-In Types: Specifies the plug-in types (VST, Audio Unit or RTAS) to be installed. Select
the plug-in type(s) depending on which type is supported by your sequencer software. Audio Unit is used by many sequencers like Logic, Live, Digital Performer or Garage Band.
VST is used by Cubase, while RTAS is the native plug-in format for Pro Tools. Leave all
plug-in types selected if you are unsure which format is supported by your host application.
The Service Center application, which is required for product activation, will always be installed (unless the same or a newer version already exists on your computer).
Updating from KONTAKT 4
It is recommended to leave the sample libraries from KONTAKT 4 installed if you still
have unfinished songs relying on them. If you need to remove the KONTAKT 4 Factory Library beforehand in order to recover disk space, it is still possible to safely delete the library and update it with the new KONTAKT 5. Just follow these steps:
1. Delete the folder named Kontakt 4 Library, which contains all the Instruments and
samples of KONTAKT 4 (don’t worry, the Instruments and Multis you have in your
host project are still safe).
2. Open your project file — a Samples Missing dialog box will appear.
3.
Make sure
4.
Click the
5.
Point the browser to the Kontakt Factory Library folder and click OK.
6. To save time, you can browse for the correct sub-folder within the Samples folder of
the Kontakt Factory Library.
7. Resave the project.
Check for Alternate file types
Browse for Folder
button.
option is checked.
Installation
2.2.3 Set the Install Locations for Content
In the Location column you can select a target folder or volume for the KONTAKT Factory
Library.
Because the content requires a large amount of disk space, it is crucial that you select the
install location carefully. For optimum performance it is recommended to install the content
on a dedicated hard disk.
KONTAKT 5 - Setup Guide - 10
Page 11
Installing on Mac OS X
► After you have customized the installation as desired, click Continue and then follow the
on-screen instructions.
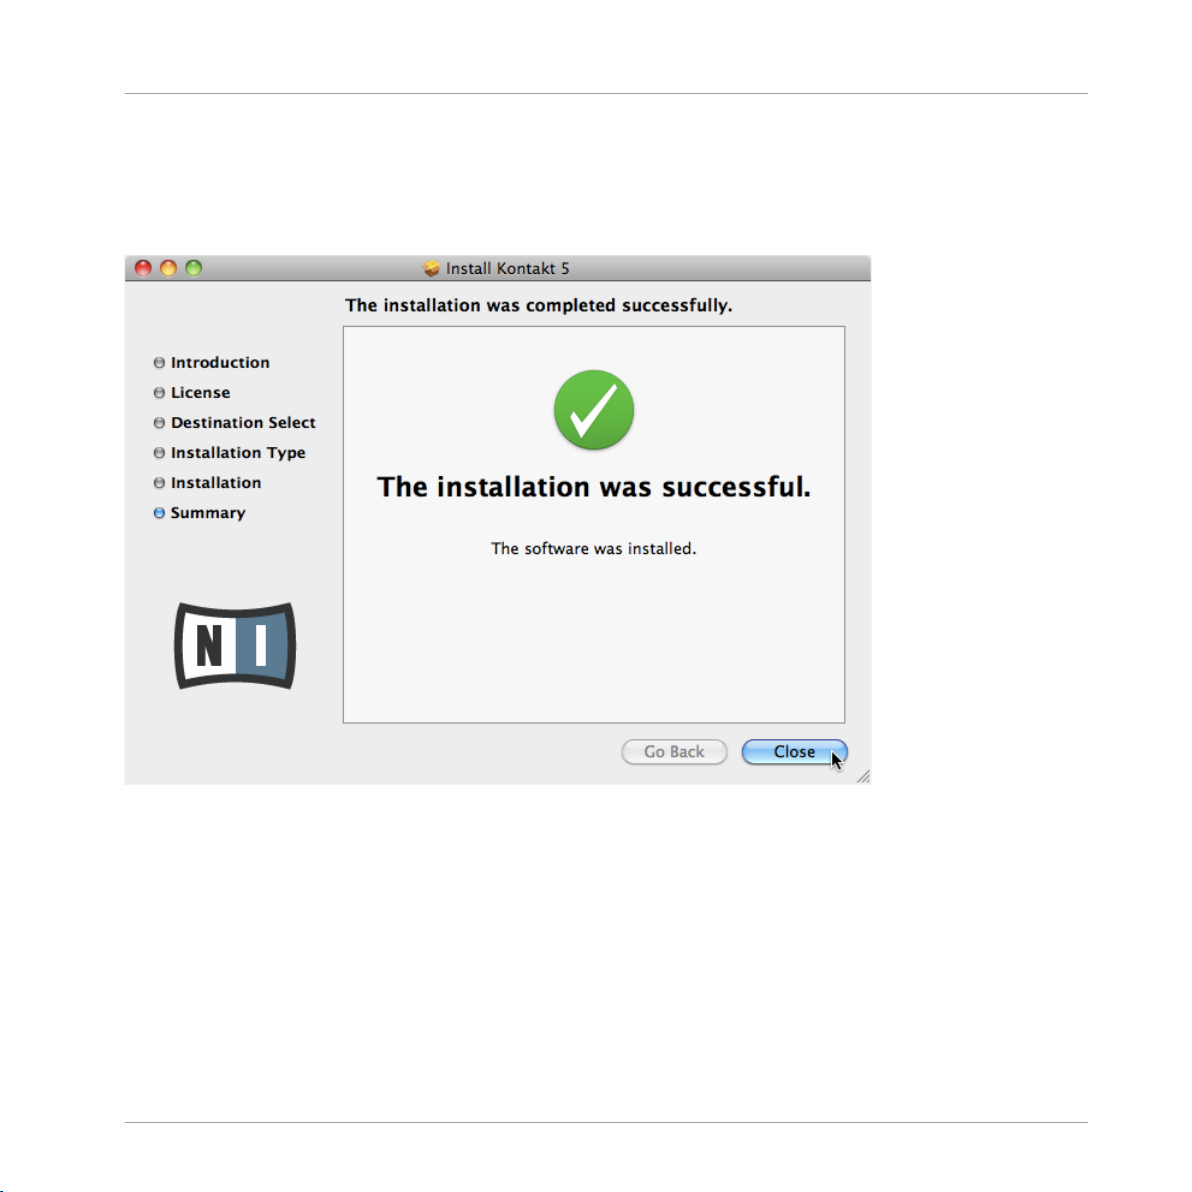
2.2.4 Complete the Installation
Installation
The final screen of the installation program.
► On the last screen of the installation program, click Close to complete the installation.
► Please activate your product using Service Center now, as explained in chapter ↑3,
Product Activation with Service Center of this Setup Guide.
2.3 Installing on Windows
By default, this folder, including a number of sub-folders, will be created during installation:
C:\Program Files\Native Instruments\
KONTAKT 5 - Setup Guide - 11
Page 12
Installing on Windows
We strongly recommend keeping this installation path.
2.3.1 Start the Installation Program
1. Insert the DVD labeled KONTAKT 5 Installation Disc into your DVD drive.
2. Once the KONTAKT 5 installation DVD icon is visible in Windows Explorer, doubleclick it to reveal the content of the DVD.
3. Locate the Kontakt 5 Setup PC.exe file on the DVD and double-click it in order to start
the installation procedure.
4. Follow the on-screen instructions.
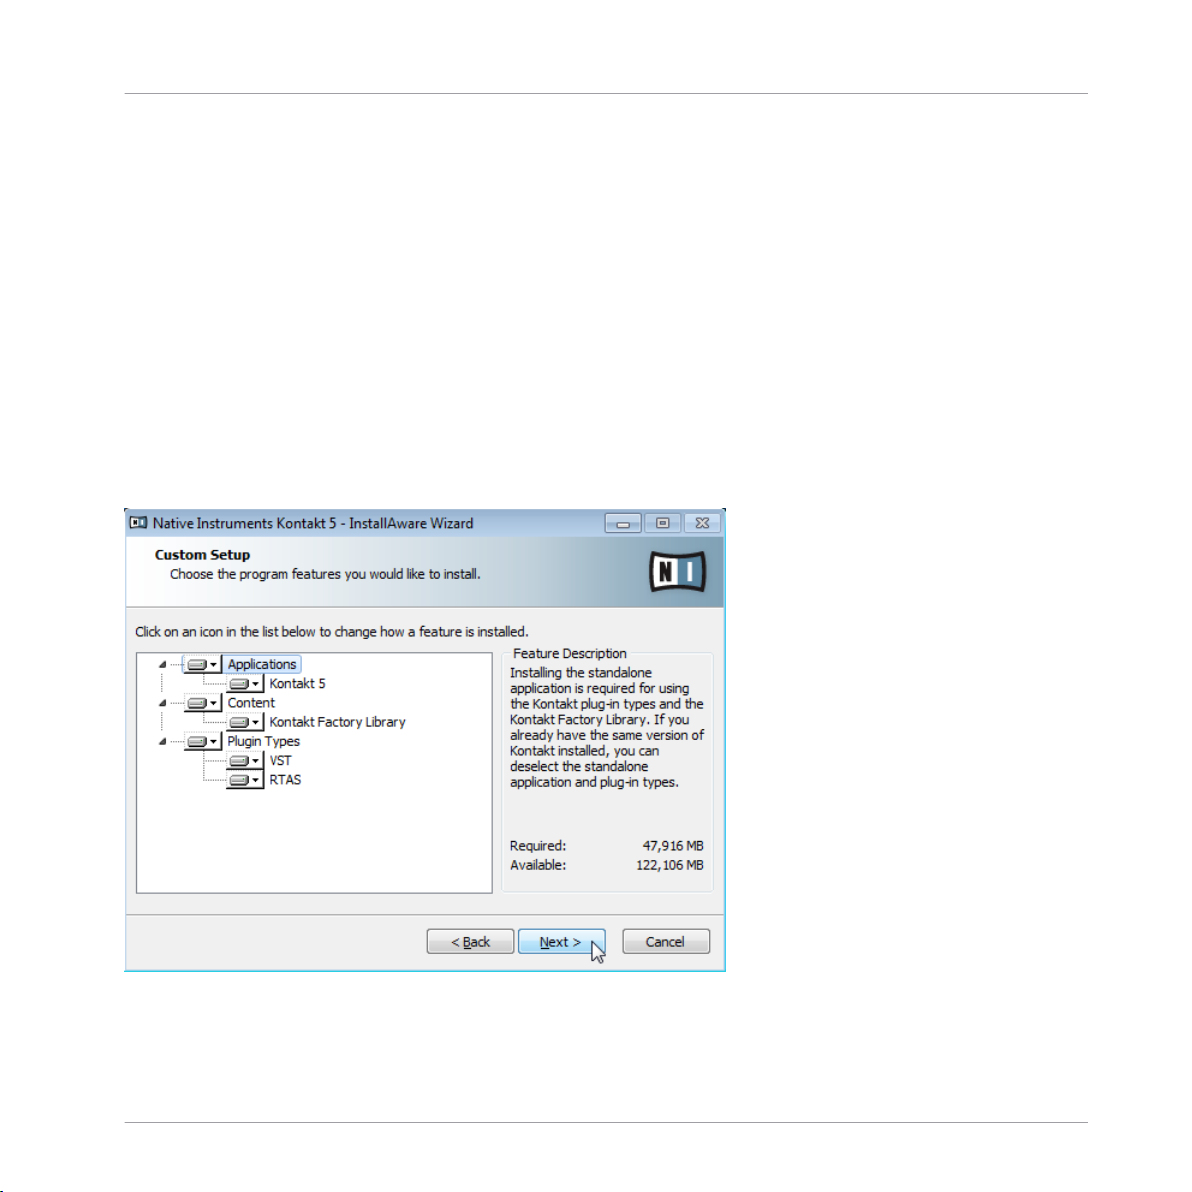
2.3.2 Select the Features to Install
The features available for installation appear grouped under the themes Applications, Content,
Plugin Types and Service Center. Click the triangles to expand the individual lists.
Installation
The components selection screen of the installation program.
KONTAKT 5 - Setup Guide - 12
Page 13

Installing on Windows
The features listed under Content are only useful if their related Applications are also installed.
We recommend keeping all features selected.
Applications: Determines whether the KONTAKT stand-alone application will be installed
(along with all files necessary for the software to run on your computer). You must leave
this feature selected in order to make use of the KONTAKT software.
Content: Determines whether the KONTAKT Factory Library will be installed. Leave this
checkbox checked to install the KONTAKT Factory Library.
Plugin Types: Specifies the plug-in types (VST or RTAS) to be installed. Select the plug-in
type(s) depending on which type is supported by your sequencer software. Leave all plugin types selected if you are not sure which format is needed by your host application
► To deselect individual features, click on the small hard disk icon next to each feature
and choose Entire feature will be unavailable.
► You can specify which plug-in types you want to install. VST is used by many sequenc-
ers like Cubase, Sonar or Live, while RTAS is the native plug-in format for Pro Tools.
Installation
The Service Center application, which is required for product activation, will always be installed (unless the same or a newer version already exists on your computer).
Updating from KONTAKT 4
It is recommended to leave the sample libraries from KONTAKT 4 installed if you still
have unfinished songs relying on them. If you need to remove the KONTAKT 4 Factory Library beforehand in order to recover disk space, it is still possible to safely delete the library and update it with the new KONTAKT 5. Just follow these steps:
1. Delete the folder named Kontakt 4 Library, which contains all the Instruments and
samples of KONTAKT 4 (don’t worry, the Instruments and Multis you have in your
host project are still safe).
2. Open your project file — a Samples Missing dialog box will appear.
3.
Make sure
Check for Alternate file types
option is checked.
KONTAKT 5 - Setup Guide - 13
Page 14

Installing on Windows
4.
Click the Browse for Folder button.
5.
Point the browser to the Kontakt Factory Library folder and click OK.
6. To save time, you can browse for the correct sub-folder within the Samples folder of
the Kontakt Factory Library.
7. Resave the project.
2.3.3 Define the Application’s Installation Path
Here you define the installation path for the KONTAKT 5 application.
Installation
The software installation path screen of the installation program.
This installation path is used for the applications and the documentation, not the content
libraries. You can specify the library path in an upcoming installer screen.
KONTAKT 5 - Setup Guide - 14
Page 15

Installing on Windows
2.3.4 Define an Installation Path for VST Plug-ins
If you have chosen to install VST plug-ins, this screen allows defining a VST plug-in path
on your computer. You can define a single path when running a 32-bit version of Windows.
If you are running a 64-bit version of Windows, you need to define separate paths for the
32-bit and 64-bit plug-in installation locations.
Do not select the same folder for the 32-bit and 64-bit plug-ins!
If you already have other 3rd party plug-ins installed on your computer, make sure to select
the same installation directory for your Native Instruments plug-ins. Please also check the
default VST plug-ins path configured in your host software. The same path has to be selected there, for the host software to detect any installed plug-ins.
Installation
The plug-in folder selection screen of the installation program.
Make sure to choose the correct VST plug-ins path in this screen. You can read more about
this topic in chapter ↑7, Troubleshooting and FAQ of this Setup Guide.
KONTAKT 5 - Setup Guide - 15
Page 16

Installing on Windows
2.3.5 Define a Library Path
On the next screen, you can select a target folder or volume for the KONTAKT Factory Library.
Because the sound library requires a large amount of disk space, it is crucial that you select
the install location carefully. For optimum performance it is recommended to install the
sound library on a dedicated hard disk.
► To install the sound library on a separate hard disk, click on Change… and browse to the
destination folder.
Installation
The Library Destination Folder selection screen of the installation program.
► After you have customized the installation as desired, click Next and then follow the on-
screen instructions.
KONTAKT 5 - Setup Guide - 16
Page 17

2.3.6 Complete the Installation
Installation
Installing on Windows
The final screen of the installation program.
► On the last screen of the installation program, tick the checkbox labeled Run Service Cen-
ter for product activation now to start the Service Center application automatically. Then click
Finish to complete the installation.
► After the installation has been completed, the Service Center application will be
launched. Please activate your product using Service Center now, as explained in chapter
↑3, Product Activation with Service Center of this Setup Guide.
KONTAKT 5 - Setup Guide - 17
Page 18

Product Activation with Service Center
Activating Your Product Online
3 Product Activation with Service Center
This section uses a placeholder name ("NI Product") on all screenshots. The relevant section
on your screen will display the name of the Native Instruments product you are activating.
3.1 Activating Your Product Online
Skip to chapter ↑3.3, Activating Your Product Offline if your computer is not connected to
the Internet.
3.1.1 Start Service Center
1. Locate the Service Center application on your hard disk. During installation, a folder
labeled Native Instruments was created in the Applications (Mac OS X) / Program Files
(Windows) folder. Within this folder, a subfolder labeled Service Center holds the corresponding application.
2. Double-click the Service Center application to start the activation procedure.
It is necessary to activate your Native Instruments product in order to use its full functionality.
KONTAKT 5 - Setup Guide - 18
Page 19

3.1.2 Log In Into Your User Account
Product Activation with Service Center
Activating Your Product Online
The log-in screen of Service Center.
► Log in with your e-mail address and Native Instruments password.
► If you do not have a Native Instruments account yet, click on Create new User Account. Fill
in the address form. The password will be sent to you via e-mail.
KONTAKT 5 - Setup Guide - 19
Page 20

3.1.3 Activate the Product
Product Activation with Service Center
Activating Your Product Online
The product activation screen of Service Center.
1. Enter the serial number in the number field. The serial number is located on a sticker
on the inside of the KONTAKT DVD case.
2.
Click Activate to proceed.
KONTAKT 5 - Setup Guide - 20
Page 21

3.1.4 Finish the Online Activation
Product Activation with Service Center
Activating Your Product Online
Service Center confirming the product activation.
Service Center confirms that the product has been activated successfully. A search for updates will start automatically.
▪ If updates for any of the activated products are available, the button in the bottom
right corner of the screen reads Update. To download the updates, click the Update button and proceed with chapter ↑3.2, Updating Your Product.
▪ If no updates are available, the button in the bottom right corner of the screen reads
Exit. You can click it to close Service Center.
KONTAKT 5 - Setup Guide - 21
Page 22

3.2 Updating Your Product
3.2.1 Select Updates
Product Activation with Service Center
Updating Your Product
The product update screen of Service Center.
1.
In Service Center, click the Update tab to view a list of available updates.
2. Select the updates you want to download by checking the checkboxes on the left. We
recommend downloading all preselected updates.
3.
Click Download. The download will start.
KONTAKT 5 - Setup Guide - 22
Page 23

3.2.2 Download the Updates
Product Activation with Service Center
Updating Your Product
The product update is being downloaded.
Depending on the file size and the speed of your internet connection, downloading the
files may take a while. We strongly recommend that you always install the latest updates.
KONTAKT 5 - Setup Guide - 23
Page 24

3.2.3 Open Your Download Folder and Install Updates
Product Activation with Service Center
Updating Your Product
Service Center confirming all updates were downloaded, and offering to open the download folder.
After all files have been downloaded successfully, you will be asked to open the download
folder.
► Click Yes to open the download folder.
► After the download folder has opened, you can quit Service Center by clicking Exit.
3.2.4 Install Updates
1. Launch the first installer file from the download folder.
2. Follow the instructions of the Installation Wizard.
KONTAKT 5 - Setup Guide - 24
Page 25

Product Activation with Service Center
Activating Your Product Offline
3. Proceed until you have installed all updates.
3.3 Activating Your Product Offline
If the computer you want to use Native Instruments products on is permanently not connected to the internet, you can activate the products utilizing the Offline activation procedure. Note that you will need a second computer that is connected to the internet.
3.3.1
Start the Offline Activation
The internet connection screen of Service Center.
1. Start Service Center. If no internet connection is detected, you will be redirected to
the Internet connection screen pictured above.
KONTAKT 5 - Setup Guide - 25
Page 26

Product Activation with Service Center
Activating Your Product Offline
2.
In the Continue without connection to the internet area at the bottom of the screen, click
Offline. You will be forwarded to the Activate screen.
3.3.2 Create the Activation Request File
The offline activation screen of Service Center.
► On the Activate screen, click Create. The Activate screen will display fields in which to en-
ter the serial number (see next step).
KONTAKT 5 - Setup Guide - 26
Page 27

3.3.3 Enter the Serial Number
Product Activation with Service Center
Activating Your Product Offline
The product activation screen of Service Center.
1. Enter the serial number in the number field. The serial number is located on a sticker
on the inside of the KONTAKT DVD case.
2.
Click Create to save the Activation Request File (ActivationRequestFile.html). A Save
File dialog will open and let you select a target folder.
3. Save the Activation Request File to the desired target folder.
KONTAKT 5 - Setup Guide - 27
Page 28

3.3.4 Transfer the Activation Request File
Product Activation with Service Center
Activating Your Product Offline
The offline activation procedure.
1. Copy the Activation Request file to a portable storage device and transfer it to a computer with internet connection.
2. Open the Activation Request file by double-clicking it.
3. Follow the instructions on the Service Center product activation web page. As a new
Native Instruments user you will need to create a new account before you can log in.
4. Transfer the Activation Return file back to your audio computer.
KONTAKT 5 - Setup Guide - 28
Page 29

3.3.5 Open the Activation Return File
Product Activation with Service Center
Activating Your Product Offline
The offline activation screen of Service Center.
1.
On your audio computer, start Service Center again. In the Continue without connection to
the internet area at the bottom of the screen, click Offline.
2.
Select the Activate tab and click Open to load the Activation Return file.
KONTAKT 5 - Setup Guide - 29
Page 30

3.3.6 Finish the Offline Activation
Product Activation with Service Center
Activating Your Product Offline
Service Center confirming the product activation.
After you have opened the Activation Return File, Service Center confirms that the product
has been activated successfully. You can quit Service Center by clicking Exit.
► To obtain updates for your products, log in under https://co.native-instruments.com/?
id=updates, using your Native Instruments user account information. Download all relevant updates from the Personal Update Manager to your internet computer, transfer them
to your music computer utilizing portable storage media, and install them.
KONTAKT 5 - Setup Guide - 30
Page 31

Stand-alone Operation
Selecting an Audio Interface
4 Stand-alone Operation
Once the installation process has finished, you will find the KONTAKT 5 installation folder, containing the application and the documentation resources, within the Native Instruments folder in your Applications (Mac OS X) or Program Files (Windows) folder.
When you launch KONTAKT 5 from its installation directory, it will start as a stand-alone
program with its own application menu, just like any other application on your computer.
The Audio and MIDI Settings
When you start an application in stand-alone mode for the first time, both its audio and
MIDI settings are not yet configured. In order to make the application receive MIDI notes
from your keyboard and play sound through your audio interface, you will first have to tell
it which Audio and MIDI hardware to use. This is done via the
pears automatically upon the first start.
You can open this dialog at any time by selecting the Options... entry from KONTAKT’s File
menu.
Options
dialog, which ap-
4.1 Selecting an Audio Interface
The Audio page of the Options dialog in Windows.
On the Audio page of the Options dialog, you can specify which audio device the application
should use for playback and adjust global playback parameters. The dialog provides the
following options:
▪
Driver: With this drop-down menu, you can select which of your operating system’s de-
vice driver architectures the application should use. The following is a list of common
audio driver formats and their characteristics:
◦ Core Audio: Only audio driver format for Mac OS X. Fast performance.
◦ ASIO: Recommended audio driver format for Windows. Designed for real-time audio
applications and fast performance. This type of driver is typically installed with professional grade audio interfaces.
◦ WASAPI: Current Windows audio driver standard format for Windows 7. Performance
depends on audio hardware and driver quality, which ranges from fast to poor.
KONTAKT 5 - Setup Guide - 31
Page 32

Stand-alone Operation
◦ DirectSound: Audio driver standard format used by older versions of Windows. Mod-
erate to poor performance.
◦ WDM: Audio driver standard format used by older versions of Windows. Moderate to
poor performance.
◦ MME: Legacy audio driver standard format native to early releases of Windows. Poor
performance, not recommended.
▪
Device: This menu lists all connected audio interfaces that match the driver architec-
ture chosen above. Select the audio interface that you’d like to use for playback here.
▪
Device driver configuration: On Windows, the ASIO Config button opens the control panel of
the selected audio interface. This button is not present on Mac OS X.
▪
Sample Rate
: This drop-down menu allows you to set the global playback sample rate at
which the application will operate. Common values are 44100 Hz for music and
48000 Hz for film production.
▪
Latency
: Displays the size of the audio playback buffer in samples. Small values will
shorten the delay between pressing a key and hearing the resulting sound (this is
called “latency”), but may cause drop-outs and stuttering when playing several voices
at the same time. Conversely, setting this to a higher value will make playback more
reliable at the cost of more latency.
Optimizing Latency
4.2 Optimizing Latency
The Latency setting controls the size of the playback buffer. In order to find the optimal buffer size for your system, we recommend that you begin by setting the latency to a healthy
middle value between 256 and 512 samples, then gradually decrease the value during
your normal work.
On Mac OS X, a dedicated Latency slider allows you to set the buffer size. On Windows, the
buffer size can be configured in the audio interface’s ASIO panel if you use a low latency
ASIO driver. The ASIO panel can be opened with the ASIO Config button in the Audio page of
the Options dialog. Some other Windows driver standard formats do not provide any options
to adjust the latency. If so, it is recommended to upgrade your audio driver and/or audio
interface.
If you are using low-latency drivers, but cannot get below a certain buffer size without getting drop-outs, consult the documentation of your audio hardware to find out whether you
can access it via an alternate driver, as some driver types allow more efficient low-level access to the hardware than others.
KONTAKT 5 - Setup Guide - 32
Page 33

Stand-alone Operation
Setting up MIDI Connections
4.3 Setting up MIDI Connections
The MIDI page of the Options dialog provides a list of all MIDI inputs and outputs available
on your system. These are ports of physical MIDI interfaces connected to your computer,
but also any virtual MIDI ports that may be provided by drivers or other applications to facilitate inter-application MIDI usage.
In order to make the application respond to MIDI data from the outside, you will have to
enable one or more ports that appear in the inputs list of the MIDI page. Make sure the
Inputs button is highlighted, and identify the port(s) that you intend to use for MIDI input
in the list. If the Status field on the right side of an entry reads Off, to activate the port,
click directly on the word Off, which will change the status to On.
The MIDI page of the Options dialog in Windows.
Some applications allow sending MIDI to external MIDI ports or to other applications:
► Click on the Outputs button in the upper left corner of the MIDI page (if accessible) and
activate the desired ports in the same fashion as described earlier in this section.
KONTAKT 5 - Setup Guide - 33
Page 34

Plug-in Operation
5 Plug-in Operation
You can also use KONTAKT as a VST (Virtual Studio Technology), AU (Audio Units), and
RTAS (Real Time Audio Suite) plug-in. Refer to the documentation of your host software to
learn which plug-in formats are compatible with your particular program, and for instructions on how to load virtual instruments or effect plug-ins.
The KONTAKT plug-in will be added to the plug-in menu inside your sequencer, and can
be loaded following your sequencer’s standard procedure. The procedure of loading virtual
instruments or effect plug-ins varies between sequencers.
The KONTAKT Factory Library was designed to be loaded into KONTAKT. Therefore its name
will not show up in your sequencer’s plug-in list. Instead, it will be added to KONTAKT’s
Browser, and can be loaded from there.
KONTAKT 5 - Setup Guide - 34
Page 35

Other Documentation and Support Resources
6 Other Documentation and Support Resources
6.1 PDF Manuals
The documentation for each component is available in PDF format and located within each
application’s/library’s installation directory on your hard disk. When using Native Instruments applications in stand-alone mode, you can also access these documents from the
application’s Help menu.
In addition to this guide, KONTAKT 5 provides the following documents:
▪ The Getting Started guide explains basic workflows, such as how to load patches and
use them in the application.
▪ The Application Reference is the primary information resource. It provides thorough
descriptions of all user interface elements, options, tools, editors, and sound processing modules of the application. You can use it both as a reference manual and a thorough guide for working with the application. In some products, this document is
named Operation Manual.
▪ The KONTAKT Factory Library manual provides information about the included sam-
ple library and the Instruments and Multis contained therein.
▪ The Readme.txt file contains last-minute information, a version history, and more.
Additionally, some products come with a Manual Addendum that covers changes and new
features introduced by the latest update(s), and with specific documents providing information about the included libraries or modules.
PDF Manuals
Windows users may need to install the free Adobe Reader software (www.adobe.com) or any
other application capable of opening PDF files in order to view these documents.
6.2 Video Tutorials
You can find a number of video tutorials on our website under the following url:
http://www.native-instruments.com/#/en/media-center/
Watch these videos to learn how to achieve common tasks in KONTAKT 5. We recommend
that you follow along with these instructions while the respective application is running on
your computer.
KONTAKT 5 - Setup Guide - 35
Page 36

Other Documentation and Support Resources
Knowledge Base/Readme/Online Support
6.3 Knowledge Base/Readme/Online Support
► Open the Service Center application and click on the Support button in the upper right
corner. Here you will find direct links to the Native Instruments Online Knowledge Base and
the Online Support Form.
The support form will ask you to enter information about your hardware and software setup. This information is essential for our support team to be able to provide you with quality assistance.
When communicating with the Native Instruments support team, keep in mind that the
more details you can provide about your hardware, your operating system, the version of
the software you are running, and the problem you are experiencing, the better they will be
able to help you. In your description, you should mention:
▪ How to reproduce the problem
▪ What you have already tried to fix the problem
▪ A description of your setup, including all hardware
▪ The brand and specifications of your computer
Always consult the Readme.txt file of a new software version. It contains important information and all last minute changes, which weren’t available for the manual.
6.4 Forum
In the Native Instruments User Forum you can discuss product features directly with other
users and with experts moderating the forum: http://www.native-instruments.com/forum
6.5 Updates
Whenever you encounter problems, it is recommended that you first download and install
any available software updates. Updates are released regularly to fix known problems and
to constantly improve the software. The version number of your software is displayed in the
About dialog for any Native Instruments application. This dialog can be opened by clicking
on the NI logo in the upper right corner of the user interface. Alternatively, you can find
the version numbers of all installed Native Instruments applications when showing the details for an application within the Overview tab of the Service Center. Updates are available
on the Update tab in Service Center or on our website under:
http://www.native-instruments.com/updates
KONTAKT 5 - Setup Guide - 36
Page 37

Troubleshooting and FAQ
Installation Folder Not Found by an Update Installer
7 Troubleshooting and FAQ
This section contains some of the most frequently asked questions and answers along with
references to Knowledge Base articles for additional details. In order to find an article,
please visit the Native Instruments website, navigate to the Knowledge Base in the Support section and enter the article number in the search field.
7.1 Installation Folder Not Found by an Update Installer
If you have manually moved the location of a Native Instruments application on your hard
disk, the installer, upon attempting to run an update, will display an error message and
abort the installation. You can correct the application path in Service Center from the Over-
view page. If an application cannot be found, a Locate button will appear on this page. Click
this button and browse to the actual location of the application.
7.2 Library Path Not Found by an Update Installer
If you have manually moved the folder containing your samples and presets (library folder)
or added a new hard disk to your computer, you can set a new path to the aforementioned
folder from within the associated application. This is usually done in the Options or Preferences menu of an application.
7.3 User Account Control and Internet Security
User Account Control (UAC) and any installed Internet security or anti virus software
should temporarily be disabled for installing KONTAKT 5, as they may interfere with the
installation. If you are concerned about the safety of your files, disconnect your computer
from the network during installation.
1. To open the UAC configuration options in Windows 7 or Vista, click on the Start button from the task bar, then enter UAC in the search field and press [Enter]. Disable
the check box for User Account Control in Windows Vista, or set the UAC slider all the
way to the bottom in Windows 7.
2. Check your Internet security or anti virus software’s documentation for instructions on
how to temporarily disable their protection services.
3. Once the installation is complete, make sure to re-enable User Account Control and
your Internet security / anti virus software.
KONTAKT 5 - Setup Guide - 37
Page 38

Troubleshooting and FAQ
How to Convert Songs Made with an Older Plug-in Version to the Latest Plug-in Version
7.4 How to Convert Songs Made with an Older Plug-in Version to the
Latest Plug-in Version
If you have an earlier major version of KONTAKT installed (e.g. KONTAKT 4 instead of
KONTAKT 5), installing the latest major version will not replace the older one. If you want
to transfer songs made with the older version to the new version, you will need to do this
manually. The following steps are required:
1. Open the song in your DAW.
2. Open all relevant Native Instruments plug-ins.
3. Export the patches or Multis from each Native Instruments plug-in instance to the
hard disk. It is recommended to save them in a dedicated song folder. Give the patches distinct names (e.g. use the track names from your song) to identify them later.
4. Replace each plug-in instance with the newer version.
5. Reload the saved patches into the appropriate plug-in instances.
6. Resave your song.
7.5 Location of the VST Plug-ins Folder on Windows
The VST plug-in versions of Native Instruments software can be installed to any location
on your hard disk. However, nearly every VST host or sequencer allows setting a default
VST plug-ins path in its preferences. For this reason you have to make sure that you install
the Native Instruments VST plug-ins to the same folder as set within your host’s preferences, otherwise they will not appear in the application.
During installation, closely study the VST plug-ins setup screen and make sure that you select
the desired path by hand if the correct path is not detected automatically.
To find out more about the VST plug-ins path and the handling of VST plug-ins under 64bit versions of Windows, look for the following article in the Native Instruments Knowledge
Base: www.native-instruments.com/knowledge/questions/764
KONTAKT 5 - Setup Guide - 38
Page 39

Troubleshooting and FAQ
The Plug-in Does Not Appear in My Sequencer
7.6 The Plug-in Does Not Appear in My Sequencer
If a plug-in does not appear in your host, re-run the installer from the DVD labeled KONTAKT 5 Installation Disc and make sure the appropriate plug-in is selected for installation.
The specific steps necessary for loading virtual instruments or effect plug-ins vary between
sequencers. Please refer to the documentation for your host application for instructions on
how to load virtual instruments or effect plug-ins.
Windows: By default, Windows hides certain file types, such as plug-in files. As a result,
they will not appear when browsing to your VST plug-ins folder using Windows Explorer. In
order to be able to view plug-in files from Windows Explorer, you need to modify a Windows setting (“Show Hidden Files”). This is necessary if you want to manually check if the
plug-in files have been installed to the correct VST plug-ins folder.
The following Knowledge Base article explains how to modify this setting:
www.native-instruments.com/knowledge/questions/883
7.7 Sequencer Tutorials
The Native Instruments Knowledge Base contains several tutorials that demonstrate how
to use plug-ins within popular host sequencers:
http://www.native-instruments.com/sequencer-guides
At time of creation of this guide, Sequencer tutorials are available for Logic, Pro Tools, Cubase, Ableton Live, Sonar and Digital Performer, covering the following topics:
▪ How to insert Native Instruments plug-in software
▪ Plug-in Administration
▪ Automation
▪ Program Lists
▪ Multi Outs
▪ Troubleshooting
KONTAKT 5 - Setup Guide - 39
Page 40

Product Returns
8 Product Returns
Please contact our Technical Support team prior to returning an item. If your product
needs to be returned, they will assign you an RA (Return Authorization) number to expedite the processing of your return.
Contact Native Instruments Technical Support
http://www.native-instruments.com/support
KONTAKT 5 - Setup Guide - 40
 Loading...