

Page 1

Application Reference
Page 2

The information in this document is subject to change without notice and does not represent a commitment on the part of Native Instruments GmbH. The software described by
this document is subject to a License Agreement and may not be copied to other media.
No part of this publication may be copied, reproduced or otherwise transmitted or recorded, for any purpose, without prior written permission by Native Instruments GmbH, hereinafter referred to as Native Instruments.
“Native Instruments”, “NI” and associated logos are (registered) trademarks of Native Instruments GmbH.
Mac, Mac OS, GarageBand, Logic, iTunes and iPod are registered trademarks of Apple
Inc., registered in the U.S. and other countries.
Windows, Windows Vista and DirectSound are registered trademarks of Microsoft Corporation in the United States and/or other countries.
All other trade marks are the property of their respective owners and use of them does not
imply any affiliation with or endorsement by them.
Document authored by: Native Instruments
Document version: 1.0 (06/2011)
Special thanks to the Beta Test Team, who were invaluable not just in tracking down bugs,
but in making this a better product.
Disclaimer
Page 3

Germany
Native Instruments GmbH
Schlesische Str. 29-30
D-10997 Berlin
Germany
www.native-instruments.de
USA
Native Instruments North America, Inc.
6725 Sunset Boulevard
5th Floor
Los Angeles, CA 90028
USA
www.native-instruments.com
Contact
© Native Instruments GmbH, 2011. All rights reserved.
Page 4

Table of Contents
Table of Contents
1 Welcome to KONTAKT ................................................................................................
1.1 What is KONTAKT? ...................................................................................................................... 15
1.2 The Documentation ..................................................................................................................... 15
1.2.1 About this Application Reference ............................................................................... 15
1.2.2 Other Documentation ................................................................................................. 15
2 Setup ........................................................................................................................
2.1 Stand-alone Operation ............................................................................................................... 17
2.2 Plug-in Operation ....................................................................................................................... 21
2.1.1 Low Memory Warning on Start-Up .............................................................................. 18
2.1.2 Audio Configuration ................................................................................................... 18
2.1.3 Latency Optimization ................................................................................................. 20
2.1.4 MIDI Configuration .................................................................................................... 20
2.2.1 Changing Outputs in Pro Tools .................................................................................. 22
2.2.2 Changing Outputs in Logic 8 ..................................................................................... 22
3 User Interface Elements .............................................................................................
3.1 Info Pane .................................................................................................................................... 23
3.2 Knobs ......................................................................................................................................... 23
3.3 Buttons .......................................................................................................................................25
3.4 Drop-Down Menus ...................................................................................................................... 25
3.5 Scroll Bars .................................................................................................................................. 26
3.6 Value Fields ................................................................................................................................ 27
3.7 Saving and Loading Presets ....................................................................................................... 27
3.8 MIDI Learn .................................................................................................................................. 28
3.8.1 Assigning MIDI Controllers ........................................................................................ 28
3.8.2 Removing MIDI Controller Assignments ..................................................................... 29
4 KONTAKT: The Big Picture .........................................................................................
15
17
23
30
KONTAKT 5 - Application Reference - 4
Page 5

4.1 Building Blocks .......................................................................................................................... 30
4.1.1 Core Building Blocks ................................................................................................. 31
4.1.2 Tools .......................................................................................................................... 32
5 The KONTAKT Window ...............................................................................................
5.1 Stand-alone Menu ...................................................................................................................... 35
5.2 The Main Control Panel ...............................................................................................................36
5.3 Options Dialog ............................................................................................................................ 44
5.4 Purge Menu ................................................................................................................................ 56
5.5 System Performance Meters ....................................................................................................... 58
5.6 Minimized View ...........................................................................................................................58
5.2.1 User Interface Switches ............................................................................................. 36
5.2.2 Files Menu ................................................................................................................. 37
5.3.1 Interface Tab ............................................................................................................. 45
5.3.2 Engine Tab ................................................................................................................ 46
5.3.3 Handling Tab ............................................................................................................. 48
5.3.4 Load / Import Tab ...................................................................................................... 50
5.3.5 Database Tab ............................................................................................................ 52
5.3.6 Memory Tab ............................................................................................................... 53
6 The Rack Multi Instrument Mode) ...............................................................................
6.1 Multi Instrument Header ............................................................................................................. 60
6.2 Instrument Header ...................................................................................................................... 61
6.3 Instrument Header (Minimized) .................................................................................................. 64
6.4 Performance View ....................................................................................................................... 64
7 The Rack Instrument Edit Mode) .................................................................................
7.1 Instrument Options Dialog .......................................................................................................... 70
7.1.1 Instrument Tab .......................................................................................................... 71
7.1.2 DFD Tab ..................................................................................................................... 72
7.1.3 Controller Tab ............................................................................................................ 73
Table of Contents
34
60
66
KONTAKT 5 - Application Reference - 5
Page 6

Table of Contents
7.1.4 Infos Tab ................................................................................................................... 74
8 Loading and Creating Instruments ..............................................................................
9 Loading and Creating Instrument Banks ......................................................................
10 The On-Screen Keyboard ...........................................................................................
11 The Master Editor ......................................................................................................
12 The Browser ..............................................................................................................
12.1 Files Tab ..................................................................................................................................... 86
12.2 Importing Non-Native Files Into KONTAKT ................................................................................... 94
12.3 Libraries Tab .............................................................................................................................. 99
12.4 Database Tab ............................................................................................................................. 101
12.1.1 Upper (Container) Pane ............................................................................................ 87
12.1.2 Middle (Objects) Pane ............................................................................................... 88
12.1.3 Instrument Navigator Pane ........................................................................................ 90
12.1.4 Audition Strip ........................................................................................................... 91
12.1.5 Refresh and Eject Buttons ......................................................................................... 92
12.1.6 The View Menu ........................................................................................................... 92
12.2.1 Direct Access to Foreign Formats ............................................................................... 94
12.2.2 Batch Import ............................................................................................................. 96
12.2.3 Importing From Other Media ...................................................................................... 97
12.2.4 Format-Specific Notes ............................................................................................... 98
12.3.1 Loading and saving Instruments and Multis ............................................................. 99
12.3.2 Info and Function Menu ............................................................................................. 100
12.3.3 Add Library Button ..................................................................................................... 100
12.3.4 Library Activation ...................................................................................................... 101
12.4.1 Overview of the Database Browser ............................................................................ 102
12.4.2 Building the Database ............................................................................................... 104
12.4.3 Searching by Attributes ............................................................................................. 106
12.4.4 Searching by Keywords .............................................................................................. 111
76
81
83
84
86
KONTAKT 5 - Application Reference - 6
Page 7

Table of Contents
12.5 Monitor Tab ................................................................................................................................ 121
12.6 Modules Tab ............................................................................................................................... 125
12.7 Automation Tab .......................................................................................................................... 127
12.4.5 Configuring and Sorting the Results List ................................................................... 112
12.4.6 Assigning Attributes .................................................................................................. 113
12.4.7 Defining Your Own Attribute Sets .............................................................................. 118
12.7.1 Assigning MIDI Controllers (alternative way) ............................................................. 129
12.7.2 Removing MIDI Controller Assignments ..................................................................... 130
13 The Quick-Load Catalog .............................................................................................
13.1 Building a Catalog ..................................................................................................................... 133
13.2 Loading Objects from the Catalog .............................................................................................. 134
14 The Outputs Section .................................................................................................
14.1 Panel Controls ............................................................................................................................ 137
14.2 Working with Output Channels ................................................................................................... 137
14.3 Working with Aux Channels ........................................................................................................ 139
14.4 Outputs in Host Mode ................................................................................................................. 139
15 The Group Editor .......................................................................................................
15.1 Control Header ............................................................................................................................142
15.2 Group List ................................................................................................................................... 145
15.3 Voice Groups ...............................................................................................................................147
15.4 Group Start Options .................................................................................................................... 148
15.1.1 Edit All Groups ........................................................................................................... 142
15.1.2 Group Selector ........................................................................................................... 143
15.1.3 Edit ............................................................................................................................ 143
15.1.4 Group Solo ................................................................................................................. 145
15.1.5 Select by MIDI ............................................................................................................ 145
16 The Mapping Editor ...................................................................................................
16.1 Mapping Samples Manually ....................................................................................................... 152
131
136
141
151
KONTAKT 5 - Application Reference - 7
Page 8

16.2 Mapping Samples Automatically ................................................................................................ 154
16.3 Managing Zones ......................................................................................................................... 156
16.4 Control Strip ............................................................................................................................... 158
16.5 Edit Menu ................................................................................................................................... 161
16.6 Batch Tools .................................................................................................................................163
16.3.1 Editing Parameters in the Status Bar ........................................................................ 157
16.3.2 Editing Parameters Graphically ................................................................................. 157
16.3.3 Editing Parameters via MIDI ...................................................................................... 158
17 The Wave Editor ........................................................................................................
17.1 Tool Bar ...................................................................................................................................... 168
17.2 Status Bar .................................................................................................................................. 171
17.3 Waveform View ........................................................................................................................... 173
17.4 Grid Panel ...................................................................................................................................175
17.5 Sample Loop Tab ........................................................................................................................ 181
17.6 Sync / Slice Tab .......................................................................................................................... 185
17.7 Zone Envelopes ...........................................................................................................................192
17.8 Sample Editor ............................................................................................................................. 198
17.4.1 Fix Mode .................................................................................................................... 176
17.4.2 Auto Mode .................................................................................................................. 178
17.4.3 Editing Slices Manually ............................................................................................. 180
17.6.1 Using the Beat Machine ............................................................................................ 186
17.6.2 Using the Time Machine ............................................................................................ 187
17.6.3 Mapping Slices Manually ........................................................................................... 188
17.6.4 Mapping Slices Automatically ................................................................................... 189
17.7.1 Assigning and Selecting Envelopes ........................................................................... 192
17.7.2 Adjusting Assignment Parameters ............................................................................ 194
17.7.3 Editing Envelopes ...................................................................................................... 194
17.7.4 Utility Functions ........................................................................................................ 196
Table of Contents
166
KONTAKT 5 - Application Reference - 8
Page 9

Table of Contents
17.8.1 Edit Operations .......................................................................................................... 200
17.8.2 Transform Operations ................................................................................................ 201
18 The Script Editor .......................................................................................................
18.1 Loading a Script ......................................................................................................................... 203
18.2 Saving Script Settings ................................................................................................................ 204
18.3 Editing and Saving a Script ........................................................................................................204
19 The Source Module ...................................................................................................
19.1 Sampler ...................................................................................................................................... 206
19.2 DFD .............................................................................................................................................208
19.3 Tone Machine ............................................................................................................................. 209
19.4 Time Machine ............................................................................................................................. 211
19.5 Time Machine II ......................................................................................................................... 211
19.6 Time Machine Pro ...................................................................................................................... 212
19.7 Beat Machine ............................................................................................................................ 213
19.8 S1200 Machine ...........................................................................................................................215
19.9 MP60 Machine ............................................................................................................................ 215
20 The Amplifier Module ................................................................................................
21 Signal Processors in KONTAKT ...................................................................................
21.1 Group Insert Effects .................................................................................................................... 221
21.2 Bus Insert Effects ....................................................................................................................... 222
21.3 Instrument Insert Effects ............................................................................................................ 223
21.4 Instrument Send Effects ............................................................................................................. 224
21.5 Adding Modules .......................................................................................................................... 225
21.6 Deleting Modules ........................................................................................................................ 225
21.7 Editing Module Parameters ........................................................................................................ 225
21.8 Common Parameters ................................................................................................................. 226
21.9 Signal Processors in the Outputs Section ................................................................................... 226
21.9.1 Output Channel Inserts ............................................................................................. 227
202
206
216
219
KONTAKT 5 - Application Reference - 9
Page 10

Table of Contents
21.10 Types of Signal Processors ......................................................................................................... 229
21.9.2 Aux Channels ............................................................................................................. 228
22 Effects ......................................................................................................................
22.1 AET Filter .................................................................................................................................... 230
22.2 Compressor ................................................................................................................................ 240
22.3 Solid Bus Comp .......................................................................................................................... 242
22.4 Limiter ........................................................................................................................................ 243
22.5 Transient Master ........................................................................................................................ 244
22.6 Tape Saturator ............................................................................................................................244
22.7 Distortion ....................................................................................................................................245
22.8 Lo-Fi ........................................................................................................................................... 245
22.9 Saturation .................................................................................................................................. 246
22.10 Cabinet .......................................................................................................................................247
22.11 Skreamer .................................................................................................................................... 247
22.12 Twang .........................................................................................................................................248
22.13 Rotator ....................................................................................................................................... 249
22.14 Surround Panner .........................................................................................................................249
22.1.1 About Authentic Expression Technology ..................................................................... 230
22.1.2 Creating a Velocity Morph .......................................................................................... 232
22.1.3 Creating an Articulation Morph ................................................................................. 233
22.1.4 Create AET Morph Layer Dialog .................................................................................. 236
22.1.5 Morph Map Editor ...................................................................................................... 237
22.1.6 AET Filter Module Controls ......................................................................................... 239
22.14.1 Explanation of channel abbreviations: ..................................................................... 251
22.14.2 Controls ..................................................................................................................... 255
22.14.3 Surround Panner Automation .................................................................................... 256
22.14.4 Host/MIDI Automation ................................................................................................ 256
22.14.5 Internal Modulation .................................................................................................. 256
230
KONTAKT 5 - Application Reference - 10
Page 11

22.15 Stereo Modeller ........................................................................................................................... 257
22.16 Delay .......................................................................................................................................... 258
22.17 Chorus ........................................................................................................................................ 259
22.18 Flanger ....................................................................................................................................... 259
22.19 Phaser ........................................................................................................................................ 260
22.20 Convolution ................................................................................................................................ 261
22.21 Reverb ........................................................................................................................................ 263
22.22 Gainer .........................................................................................................................................264
22.23 Inverter ....................................................................................................................................... 265
22.24 Send Levels ................................................................................................................................ 265
23 Filters .......................................................................................................................
23.1 Lowpass Filters ........................................................................................................................... 269
23.1.1 SV LP1 ....................................................................................................................... 269
23.1.2 SV LP2 ....................................................................................................................... 269
23.1.3 SV LP4 ....................................................................................................................... 269
23.1.4 Ladder LP1 ................................................................................................................ 270
23.1.5 Ladder LP2 ................................................................................................................ 270
23.1.6 Ladder LP3 ................................................................................................................ 271
23.1.7 Ladder LP4 ................................................................................................................ 271
23.1.8 AR LP2 ....................................................................................................................... 272
23.1.9 AR LP4 ....................................................................................................................... 272
23.1.10 AR LP2/4 .................................................................................................................... 272
23.1.11 Daft ........................................................................................................................... 273
23.1.12 PRO-53 ...................................................................................................................... 273
23.1.13 Legacy LP1 ................................................................................................................ 273
23.1.14 Legacy LP2 ................................................................................................................ 274
23.1.15 Legacy LP4 ................................................................................................................ 274
23.1.16 Legacy LP6 ................................................................................................................ 274
Table of Contents
267
KONTAKT 5 - Application Reference - 11
Page 12

Table of Contents
23.2 Highpass Filters ......................................................................................................................... 275
23.3 Bandpass ................................................................................................................................... 281
23.4 Peak/Notch ................................................................................................................................. 284
23.1.17 Legacy Ladder ........................................................................................................... 275
23.2.1 SV HP1 ....................................................................................................................... 275
23.2.2 SV HP2 ....................................................................................................................... 276
23.2.3 SV HP4 ....................................................................................................................... 276
23.2.4 Ladder HP1 ................................................................................................................ 276
23.2.5 Ladder HP2 ................................................................................................................ 277
23.2.6 Ladder HP3 ................................................................................................................ 277
23.2.7 Ladder HP4 ................................................................................................................ 278
23.2.8 AR HP2 ...................................................................................................................... 278
23.2.9 AR HP4 ...................................................................................................................... 278
23.2.10 AR HP2/4 ................................................................................................................... 279
23.2.11 Daft HP ...................................................................................................................... 279
23.2.12 Legacy HP1 ................................................................................................................ 280
23.2.13 Legacy HP2 ................................................................................................................ 280
23.2.14 Legacy HP4 ................................................................................................................ 280
23.3.1 SV BP2 ....................................................................................................................... 281
23.3.2 SV BP4 ....................................................................................................................... 281
23.3.3 Ladder BP2 ................................................................................................................ 281
23.3.4 Ladder BP4 ................................................................................................................ 282
23.3.5 AR BP2 ...................................................................................................................... 282
23.3.6 AR BP4 ...................................................................................................................... 283
23.3.7 AR BP2/4 ................................................................................................................... 283
23.3.8 Legacy BP2 ................................................................................................................ 283
23.3.9 Legacy BP4 ................................................................................................................ 284
23.4.1 SV Notch .................................................................................................................... 284
KONTAKT 5 - Application Reference - 12
Page 13

Table of Contents
23.5 Multi ........................................................................................................................................... 286
23.6 Effect Filters ............................................................................................................................... 289
23.7 EQs ............................................................................................................................................. 292
23.4.2 Ladder Peak ............................................................................................................... 285
23.4.3 Ladder Notch ............................................................................................................. 285
23.4.4 Legacy BR4 ................................................................................................................ 286
23.5.1 SV Par. LP/HP ............................................................................................................ 286
23.5.2 SV Par. BP/BP ............................................................................................................ 287
23.5.3 SV Ser. LP/HP ............................................................................................................. 287
23.5.4 3x2 Versatile ............................................................................................................. 288
23.6.1 Formant I ................................................................................................................... 290
23.6.2 Formant II .................................................................................................................. 290
23.6.3 Phaser ....................................................................................................................... 291
23.6.4 Vowel A ...................................................................................................................... 291
23.6.5 Vowel B ...................................................................................................................... 292
23.7.1 Solid G-EQ ................................................................................................................. 293
24 Modulation in KONTAKT .............................................................................................
24.1 Modulation Sources .................................................................................................................... 295
24.2 Modulation Destinations ............................................................................................................. 296
24.3 Creating Modulation Assignments .............................................................................................. 296
24.4 Deleting Modulation Assignments .............................................................................................. 298
24.5 Assignment Controls .................................................................................................................. 299
25 Modulation Sources ..................................................................................................
25.1 Envelopes ................................................................................................................................... 302
25.2 LFOs ........................................................................................................................................... 306
25.1.1 AHDSR Envelope Controls .......................................................................................... 302
25.1.2 DBD Envelope Controls .............................................................................................. 303
25.1.3 Flexible Envelopes ..................................................................................................... 304
295
302
KONTAKT 5 - Application Reference - 13
Page 14

Table of Contents
25.3 Other Modulators ........................................................................................................................ 308
25.4 External Sources ......................................................................................................................... 311
25.2.1 LFO Controls .............................................................................................................. 307
25.3.1 32-Step Modulator .................................................................................................... 309
25.3.2 Envelope Follower ...................................................................................................... 310
25.3.3 Glide .......................................................................................................................... 310
26 Keyboard Shortcuts ...................................................................................................
26.1 Global Keys ................................................................................................................................. 313
26.2 Browser ...................................................................................................................................... 314
26.3 Instrument Edit Mode ................................................................................................................. 314
26.4 Group Editor ............................................................................................................................... 314
26.5 Mapping Editor ........................................................................................................................... 314
26.6 Wave Editor ................................................................................................................................ 315
27 File Formats ..............................................................................................................
Index ........................................................................................................................
313
316
322
KONTAKT 5 - Application Reference - 14
Page 15

Welcome to KONTAKT
What is KONTAKT?
1 Welcome to KONTAKT
We at Native Instruments would like to thank you for purchasing KONTAKT – it's because
of customers like you that we can continue developing ground-breaking music software.
We hope that this application reference will provide you with all the information you need
to make use of KONTAKT's features to their full capacity.
1.1 What is KONTAKT?
Simply put, KONTAKT is one of the leading sampling solutions in the audio industry. As
such, it allows you to play back and process audio samples – but that doesn't even begin
to convey the full range of its capabilities. With KONTAKT, you can create sophisticated
sample-based virtual instruments, process their audio signals with powerful DSP structures, build complex performance setups with extensive modulation routings, and gain access to a huge number of third-party sample libraries. And it's easy, too – KONTAKT's user
interface lets you fully concentrate on the sections that are relevant to the task at hand,
while not getting tangled up in other technicalities.
1.2 The Documentation
KONTAKT comes with a number of documentation resources, both in printed and electronic form. We won't suggest you should go ahead and read through all of them right now, but
you might want to get an overview of what's there. That way, whenever you're stuck at
some point, you'll know where to look for help.
1.2.1 About this Application Reference
This Application Reference is the most important documentation resource. It provides thorough descriptions of all the user interface elements, options, tools, editors, and sound
processing modules of KONTAKT. You can use it both as a reference manual and a thorough guide to working with the application.
1.2.2 Other Documentation
We prepared a wealth of information about all aspects of KONTAKT, most of which you
can find in the form of PDF documents within the KONTAKT installation directory on your
hard drive. When you're using the stand-alone version of KONTAKT, you can access these
KONTAKT 5 - Application Reference - 15
Page 16

Welcome to KONTAKT
The Documentation
documents via the Help menu at the top of the application window (Windows) or your
desktop (Mac). Otherwise, just locate the installation directory on your workspace and
open the files with a PDF reader of your choice.
In addition to this guide, KONTAKT comes with the following documents:
▪ The Getting Started document will guide you through the basic steps of setting up
KONTAKT and then get you acquainted with the fundamental aspects of its user interface. After reading it, you should be able to start KONTAKT both in stand-alone
mode and as a plug-in in your sequencer, find, load and play sounds, and know your
way around the user interface. Because of this, we recommend that you take the time
to read this guide in its entirety.
▪ The Library Manual lists and describes the contents of the extensive library of ready-
to-play instruments that comes with KONTAKT. This can be found in the Kontakt Factory Library folder.
▪ The KSP Reference Manual documents the built-in scripting language, which allows In-
strument creators to embed scripts that can dynamically alter MIDI data and playback
parameters in their patches. As such, it's targeted towards advanced users.
▪ The KONTAKT Player Getting Started explains how you can load and use third-party
sample Libraries that come bundled with the KONTAKT PLAYER with KONTAKT 5.
This guide is only installed with KONTAKT PLAYER.
KONTAKT 5 - Application Reference - 16
Page 17

Stand-alone Operation
2 Setup
Once the installation process has finished, you should find the KONTAKT 5 installation directory on your hard drive. It contains the KONTAKT 5 application and the documentation
resources as described in the previous chapter.
Before you start KONTAKT for the first time, it's worth explaining that it has two fundamentally different modes of operation. You have the choice of running KONTAKT as a normal application, in which case it will behave like any other program on your computer – we
refer to this as the “stand-alone version” in the documentation – or, alternatively, you can
use it as a virtual instrument plug-in within your sequencer or DAW (Digital Audio Workstation) application. The most important difference between these modes concerns the way in
which KONTAKT handles MIDI and audio streams. In stand-alone operation, KONTAKT
will address your MIDI and audio hardware directly (which requires you to specify some
details about your hardware and drivers), while in the case of using KONTAKT as a plugin, these will be taken care of by the sequencer host application. The following sections
will explain both modes in more detail.
2.1 Stand-alone Operation
When you launch the KONTAKT 5 application in the installation directory, KONTAKT will
start as a stand-alone program that provides its own application menu, just like any other
application on your computer. In this mode, KONTAKT will receive MIDI data from one or
more ports of a MIDI interface and send audio signals directly to your audio interface. This
can be very useful if you don't need the additional functionality of a full-blown sequencer
environment for your task at hand, for instance when you're using KONTAKT as a live performance instrument or as a sampling host on a stand-alone computer. Also, when you're
creating or editing complex sample libraries yourself, using the stand-alone version is often easier than opening KONTAKT in a sequencer.
When you start KONTAKT in stand-alone mode for the first time, both audio and MIDI will
still be unconfigured. In order to make KONTAKT receive MIDI notes from your keyboard
and play sound in response, you'll first have to tell it which hardware it should use. This is
done via the Options dialog, which should appear automatically upon the first start.
Setup
KONTAKT 5 - Application Reference - 17
Page 18
Stand-alone Operation
Options button
You can also open this dialog at any time by clicking on the Options button at the top of the
main window. This is the central place for configuring all aspects of KONTAKT's user interface and its sample playback engine. In this chapter, we'll only describe the Audio and
MIDI tabs at the bottom; you can find thorough explanations of the other options later in
this manual.
2.1.1 Low Memory Warning on Start-Up
Sometimes a memory warning is displayed when running several stand-alone instances of
KONTAKT simultaneously. This “low memory” warning dialog appears when KONTAKT is
running with no admin privileges or if a second instance of KONTAKT is started and is requesting RAM which the first instance has already reserved.
Hence, running several stand-alone instances of KONTAKT simultaneously is not recom-
mended.
2.1.2 Audio Configuration
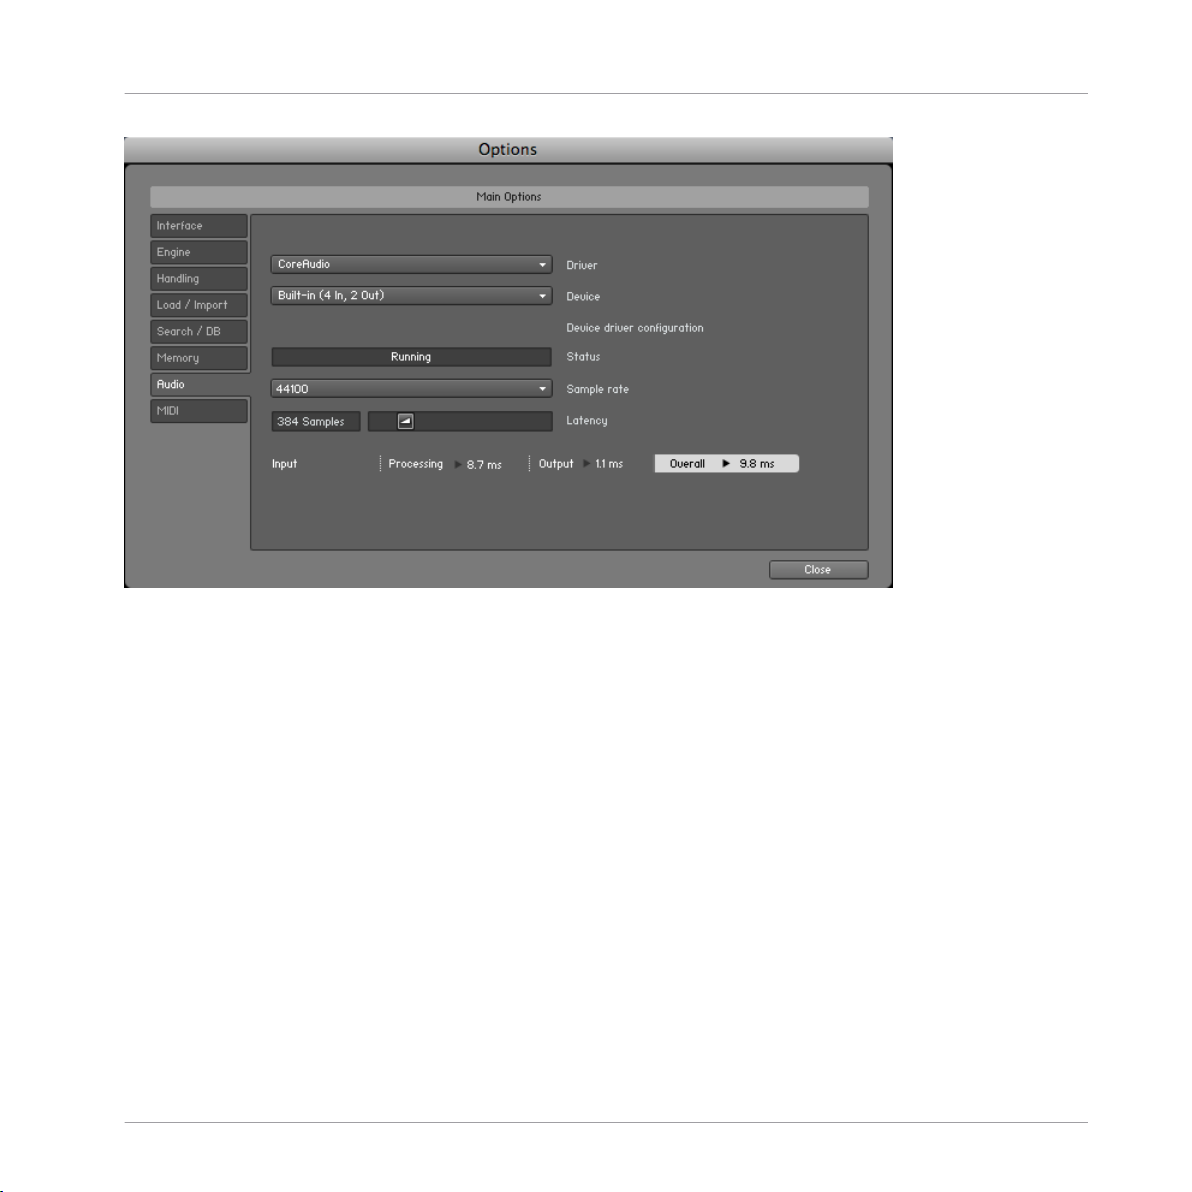
On the Audio tab of the Options dialog, you can specify which audio device KONTAKT
should use for playback and adjust global playback parameters.
Setup
KONTAKT 5 - Application Reference - 18
Page 19
Stand-alone Operation
Audio tab of the Options dialog.
The dialog provides the following options:
Driver: With this drop-down menu, you can select which of your operating system's device
driver architectures KONTAKT should use. Most professional audio devices provide ASIO,
CoreAudio (Mac) or WASAPI (Windows) drivers.
Device: This menu lists all connected audio interfaces that match the driver architecture
chosen above. Use this to select the audio interface that you'd like to use for playback.
Sample rate: This drop-down menu allows you to set the global playback sample rate at
which KONTAKT will operate. Common values are 44100 Hz for music and 48000 Hz for
film production. Note that this doesn't have anything to do with the sampling rate at which
your samples have been recorded – if the playback rate doesn't match a sample's recording rate, KONTAKT will handle all necessary conversion steps transparently for you.
Latency: The size of the audio playback buffer in samples. Small values will shorten the
delay between pressing a key and hearing the resulting sound (this is called “latency”),
but may cause drop-outs and stuttering when playing a lot of voices at the same time.
Conversely, setting this to a higher value will make playback more reliable at the cost of
more latency.
Setup
KONTAKT 5 - Application Reference - 19
Page 20
Stand-alone Operation
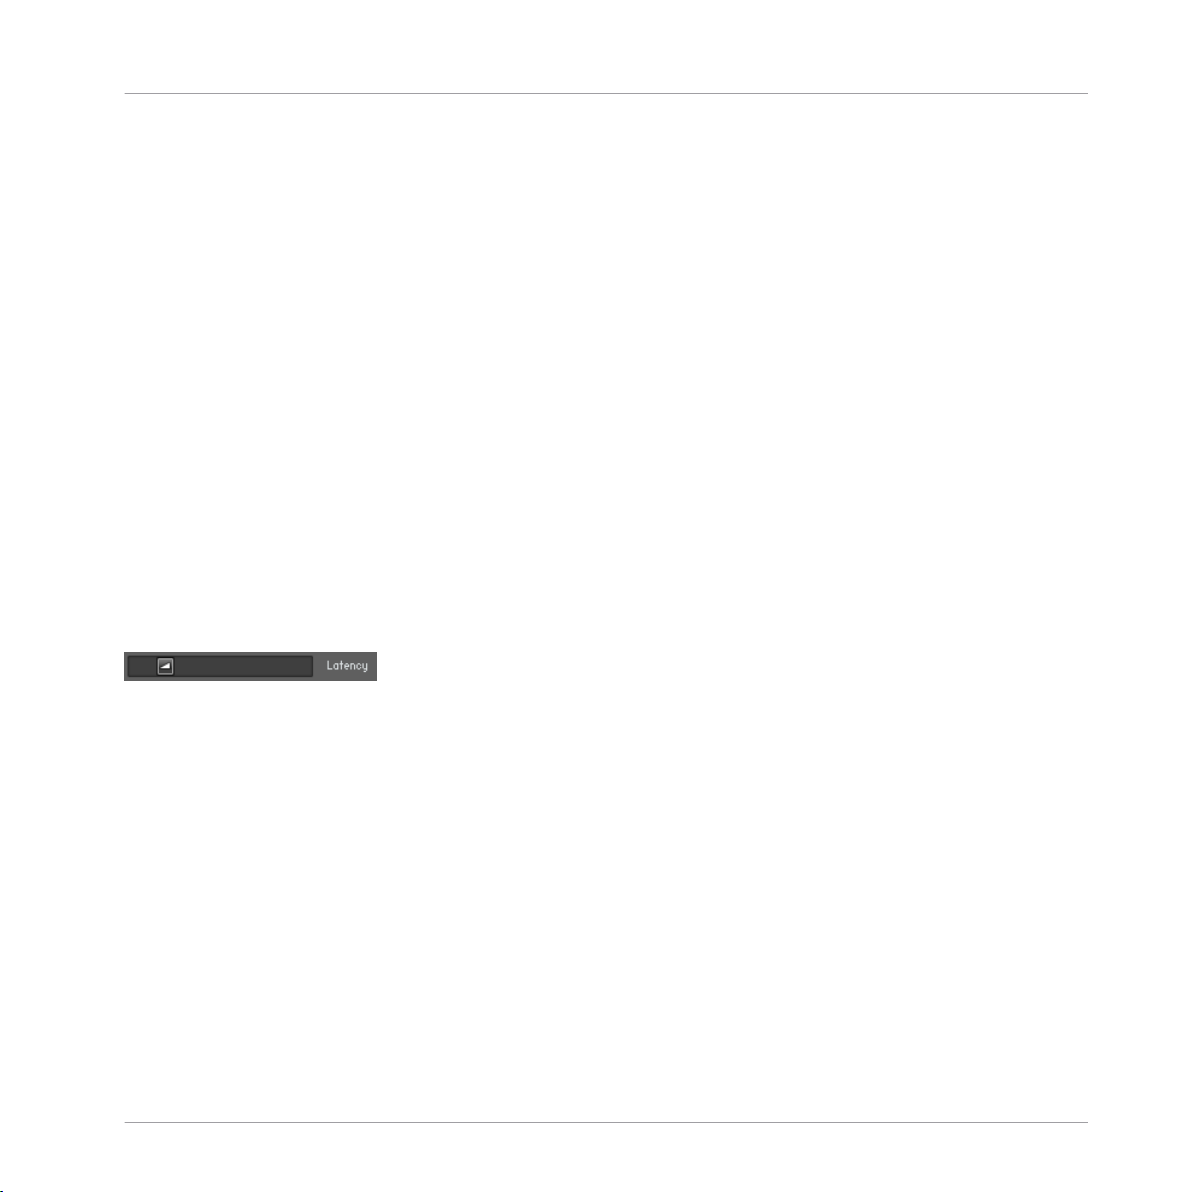
2.1.3 Latency Optimization
The load that typical digital audio calculations generate on your processor is often not constant and predictable; parameter changes, additional voices or other processes can all
cause momentary peaks in the load, which can result in drop-outs or other audio artifacts
if not properly compensated for. That's why audio programs don't send the audio signals
they generate directly to the hardware, but write them to a short buffer in memory instead,
which is what is then sent to the actual hardware. This concept allows the program to
bridge short irregularities in the stream calculation and thus be more resistant to processing peaks.
Of course, this “safety net” comes at a price – the buffering causes a delay, known as latency, between the triggering of a note and the actual sound. This delay gets longer with
increasing buffer sizes. Hence, it's vital to tune the buffer size in order to find a good compromise between latency and playback reliability. The optimal value depends on such diverse factors as your CPU, memory and hard disk access times, your audio hardware and
drivers, and your operating system environment.
In order to find the optimal buffer size for your system, we recommend that you begin by
setting the
Latency
slider described in the previous section to a healthy middle value be-
tween 384 and 512 samples, then gradually decrease the value during your normal work.
Setup
Latency Slider
When you begin to notice drop-outs, increase the buffer again by a small amount.
Generally, it's a good idea to have as few other applications as possible running in the
background when working with audio software. Also, if you can't get below a certain buffer
size without getting drop-outs, consult the documentation of your audio hardware to find
out whether you can access it via an alternate driver architecture, as some architectures
allow more efficient low-level access to the hardware than others.
2.1.4
MIDI Configuration
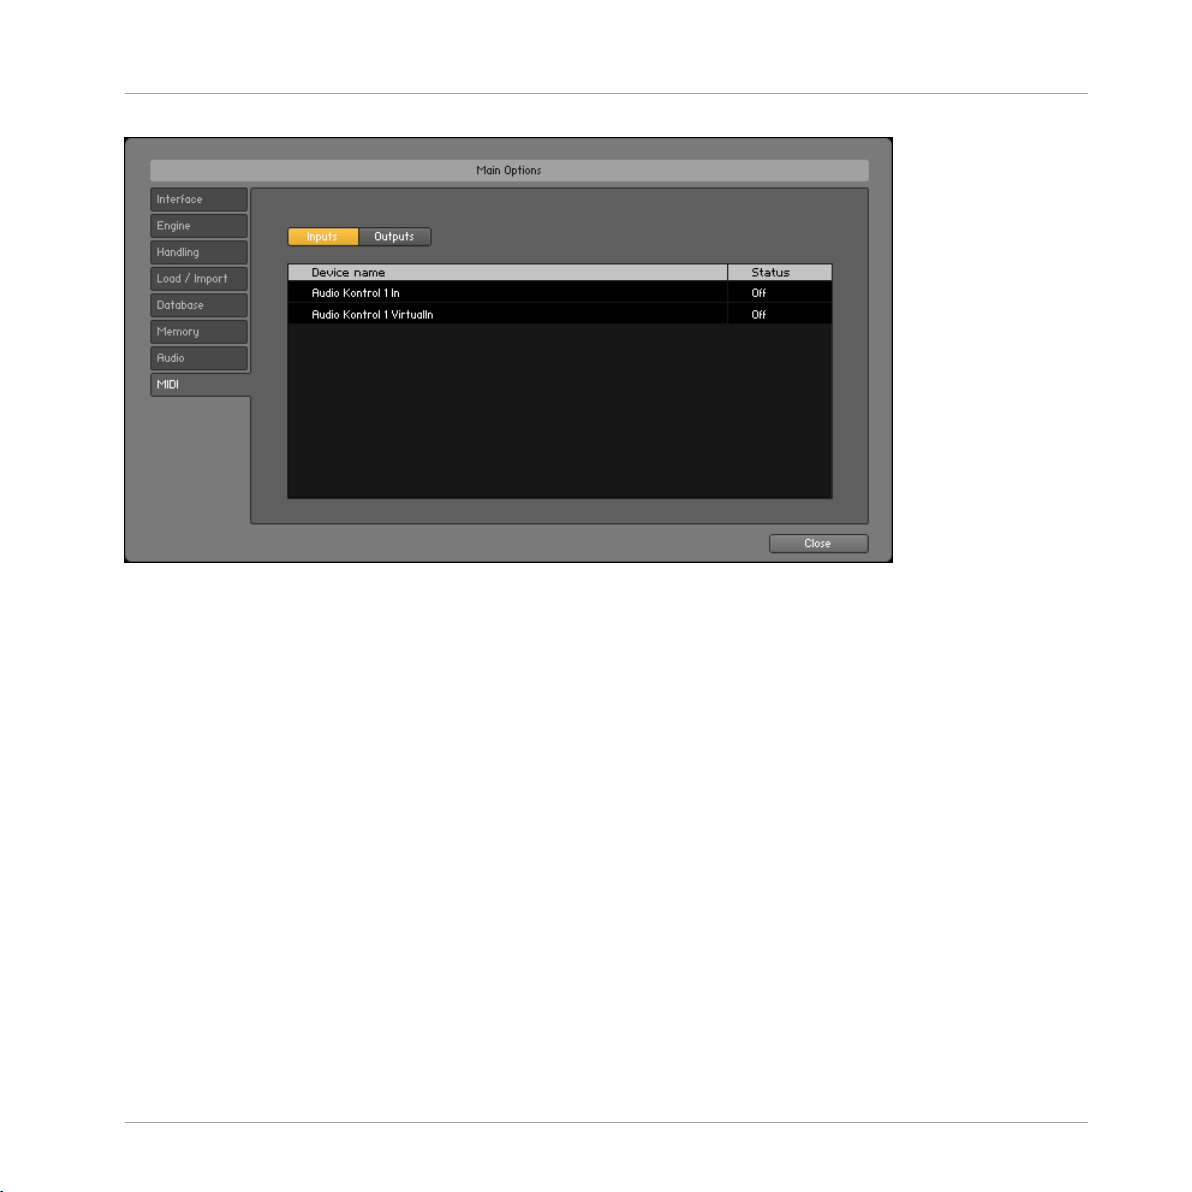
The MIDI tab of the Options dialog provides a list of all MIDI inputs and outputs that have
been found on your system. These are ports of physical MIDI interfaces connected to your
computer, but also any virtual MIDI ports that may be provided by drivers or other applications to facilitate inter-application MIDI usage.
KONTAKT 5 - Application Reference - 20
Page 21
Plug-in Operation
MIDI tab of the Options dialog.
In order to make KONTAKT respond to MIDI data from the outside, you'll have to enable
one or more ports that appear in the inputs list of the MIDI tab. Make sure the Inputs button
is highlighted and identify the port(s) that you intend to use for MIDI input in the list. If
the Status field on the right side of an entry reads Off, click on that value and assign one of
the MIDI port identifiers (A-D). This enables the respective port, which will later be identified by the selected letter throughout the user interface.
Setup
2.2 Plug-in Operation
The plug-in version of KONTAKT allows you to use it as a virtual instrument inside your
sequencer or DAW. That way, you can run multiple instances of KONTAKT side-by-side
along with your other sound generators and effect plug-ins, trigger them with the data of
MIDI tracks from within your sequencer, and directly feed their audio output into the signal flow of your virtual mixer.
Depending on your operating system and choices upon installation, KONTAKT provides
VST, Audio Units (AU), and RTAS plug-in formats.
KONTAKT 5 - Application Reference - 21
Page 22

Plug-in Operation
Refer to the documentation of your sequencer to find out which of these formats is the
right one in your case; if you have enabled the appropriate format at installation time,
KONTAKT 5 should appear in the plug-in selection list inside your sequencer. If it doesn't,
re-run the installer from the KONTAKT DVD and make sure the appropriate plug-in is
marked for installation.
Note that RTAS plug-ins are supported in Digidesign hosts only. For other hosts, check the
documentation for which plug-in version to use.
The way in which virtual instrument plug-ins are integrated into the workflow very much
depends on your sequencer; consult its documentation to find out how to instantiate and
work with the KONTAKT plug-in.
2.2.1 Changing Outputs in Pro Tools
1. After changing the output configuration in Pro Tools, you need to close the session
running.
2. Unplug KONTAKT. Quit Pro Tools.
3. Restart Pro Tools.
4. Plug in a new instance of KONTAKT. Reopen your session.
When setting the new output configuration for KONTAKT make sure to select this configuration as default setting.
Setup
2.2.2 Changing Outputs in Logic 8
Make sure KONTAKT’s output configuration matches the channel setup chosen in Logic 8.
Otherwise signals might be routed to the wrong Aux channel.
KONTAKT 5 - Application Reference - 22
Page 23
User Interface Elements
3 User Interface Elements
During your work with KONTAKT, you will discover that most elements that let you interact
with the program are being used consistently throughout the whole interface. The handling
of these common elements is always the same, only the context in which they appear will
vary. In this chapter, we'll explain the basic types of elements that you will encounter, and
what you can do with them. Before we begin, though, there's a helpful function you should
know about before all others, since it will reliably serve as a reference whenever you're not
sure what a specific knob, menu or other interface element does: the Info Pane.
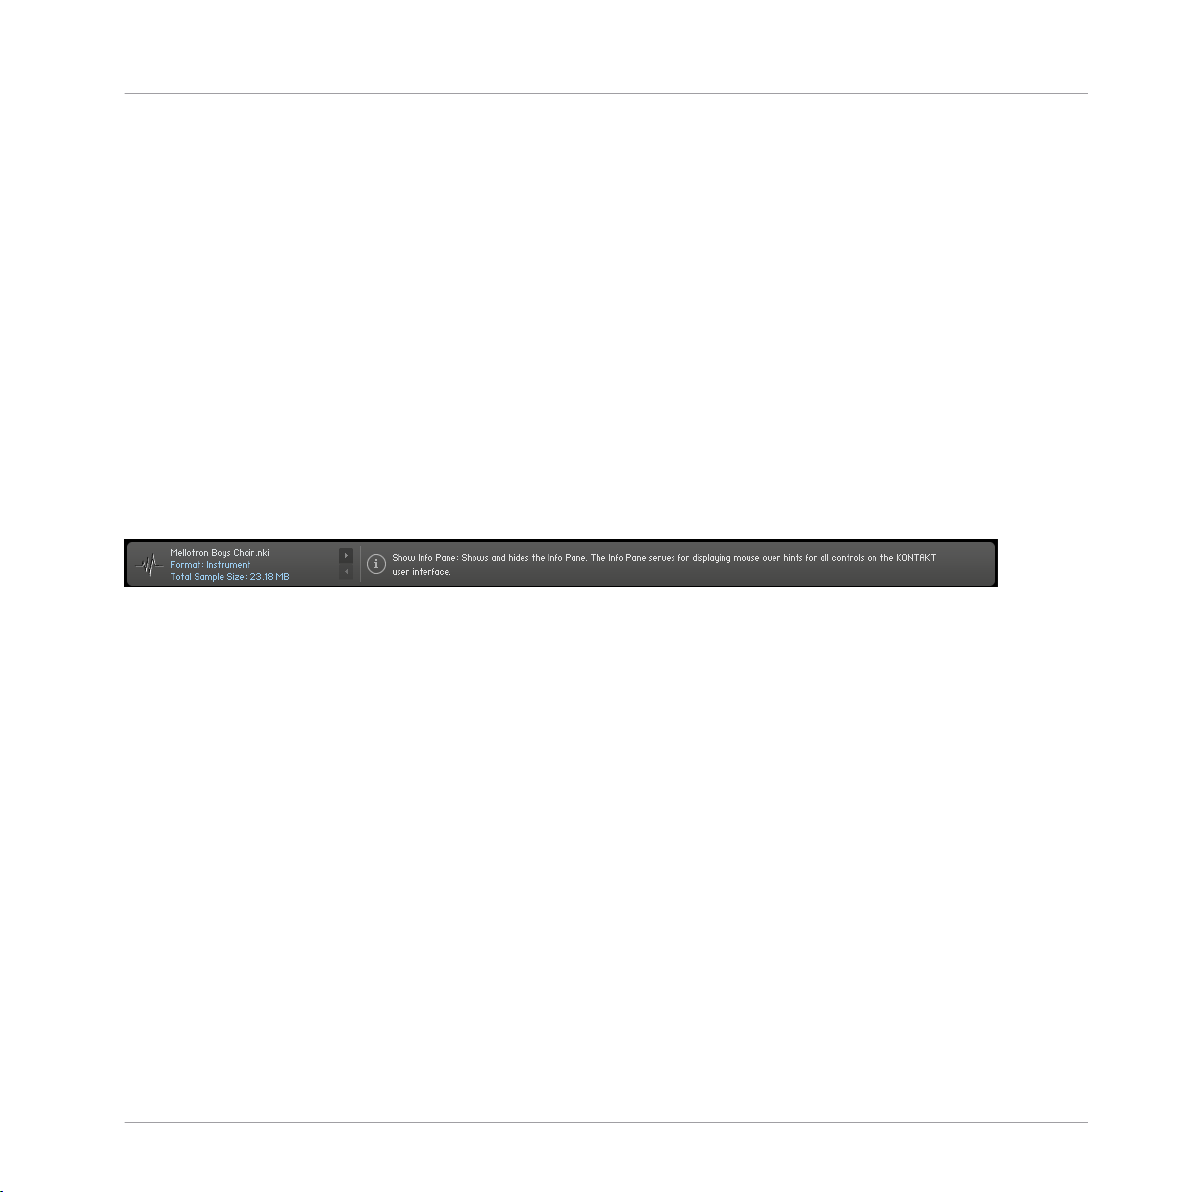
3.1 Info Pane
The Info Pane is an area located at the bottom of your KONTAKT window, just above the
bottom-most status bar. If you don't see it, click on the button labeled Info at the top of the
window – this button toggles the visibility of the Info Pane.
The Info Pane, showing a description of the Browser button in the Main Control Panel.
On its right side, just below the large window section labeled Multi Rack, the Info Pane
will display a short help text about whatever control your mouse is currently hovering over.
If you don't know what a knob, button, menu entry, or in fact any other user interface element does, just hover your mouse over it while the Info Pane is visible and it will display a
hint for you.
Info Pane
Setting the Language of the Info Pane
The Info Pane help is available in five languages: English, German, French, Spanish and
Japanese. In addition, some other parts of the interface, such as the stand-alone menus,
have also been localized. You can set your preferred language via the new Language dropdown list in the Options dialog’s Interface tab. You need to restart KONTAKT after selecting
a new language. If you select Automatic, the language follows the language selection of
your operating system.
3.2 Knobs
Knobs are the most frequently used interface element for adjusting numeric parameters.
KONTAKT 5 - Application Reference - 23
Page 24
User Interface Elements
Bipolar knobs like this one have their zero (and default) setting at the top of their scale.
They're designed to resemble real rotary controls that you can find on mixing consoles and
other equipment.
▪ To change a knob value, click on it and drag your mouse upwards to move the knob
clockwise, or downwards to move it counter-clockwise.
▪ Some knobs can be adjusted more finely if you hold down the Shift key on your key-
board while moving the knob.
▪ You can reset a knob to its default value by clicking on it while holding the ctrl key if
you are on a Windows operating system, or the cmd key if you are on a Mac.
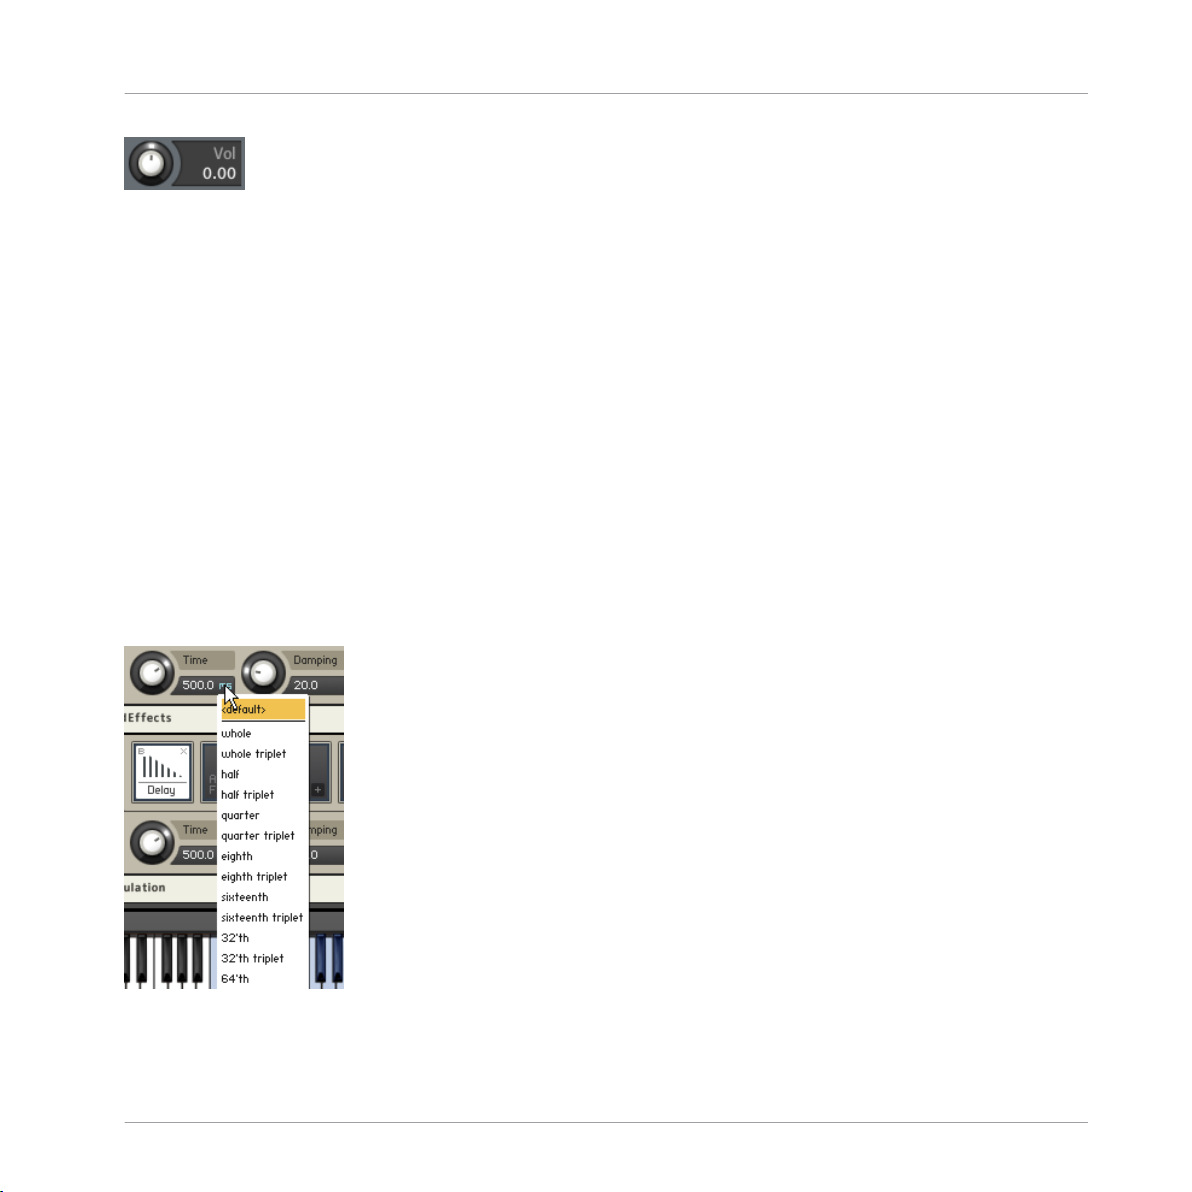
▪ Many time-related parameters throughout the KONTAKT environment can be
synchronized to your song tempo. Clicking on the unit that's being displayed in the
respective control's numeric readout will open a drop-down menu, which contains a
number of note values; selecting one of these, then dialing in the number of notes
that you'd like to be spanned by one cycle, will synchronize the parameter to the current tempo. If you want to switch the parameter back to unsynchronized operation,
just open the menu again and select its Default entry.
Knobs
The tempo synchronization drop-down menu allows you to choose a note value instead of an absolute time value for the respective control.
KONTAKT 5 - Application Reference - 24
Page 25
User Interface Elements
▪ To create a new modulation assignment, which uses a modulation signal source to
change a parameter over time, right-click on the respective knob and choose a modulation source from the drop-down menu that appears. How KONTAKT's modulation
system and the assignment of modulation sources work will be explained in detail in
chapter ↑24, Modulation in KONTAKT of this manual.
▪ Right-clicking on a knob can also allow you to set it to MIDI-Learn mode for quick as-
signment of a MIDI controller to the selected knob.
3.3 Buttons
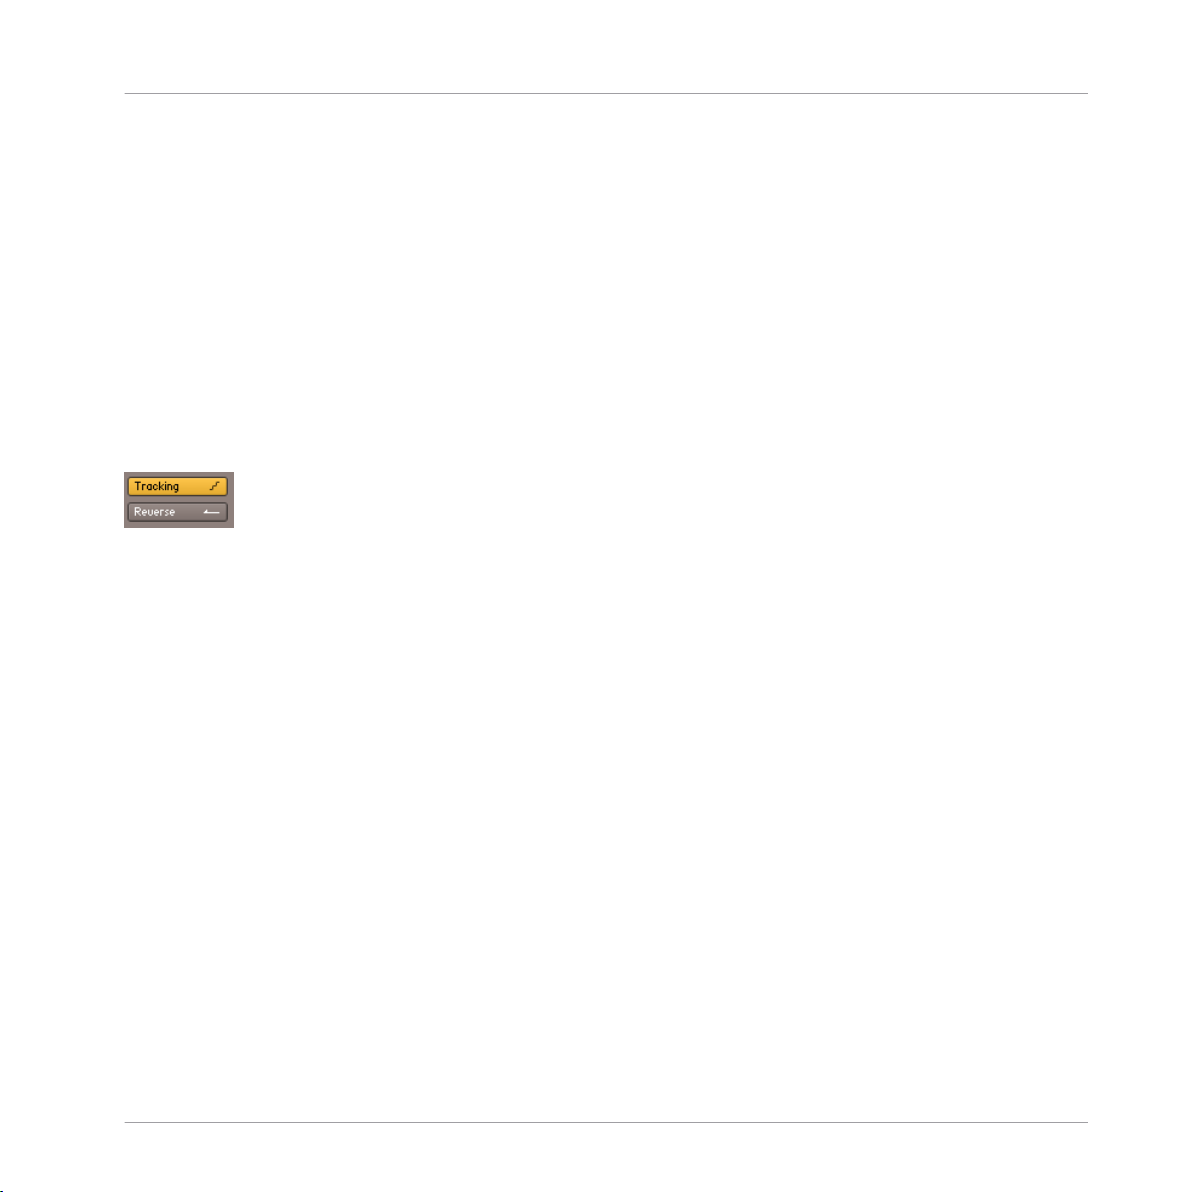
Buttons appear wherever a parameter can be switched on and off. Each click on a button
toggles it between those two states. The current state of a button is being indicated by its
background color; if a parameter is enabled, its button will be highlighted.
Active toggle buttons are highlighted.
3.4 Drop-Down Menus
These menus allow you to choose from a list of values. They look similar to buttons, but
with a small down arrow icon on their right side. Click on them to open the menu; it will
stay open until you have either selected a new value or clicked somewhere else in the
KONTAKT window, which leaves the previous value unchanged. Some menus have further
sub-menus; these will be indicated with a small right arrow next to their name. Moving the
selection bar to one of these items will open the respective sub-menu.
Buttons
KONTAKT 5 - Application Reference - 25
Page 26
User Interface Elements
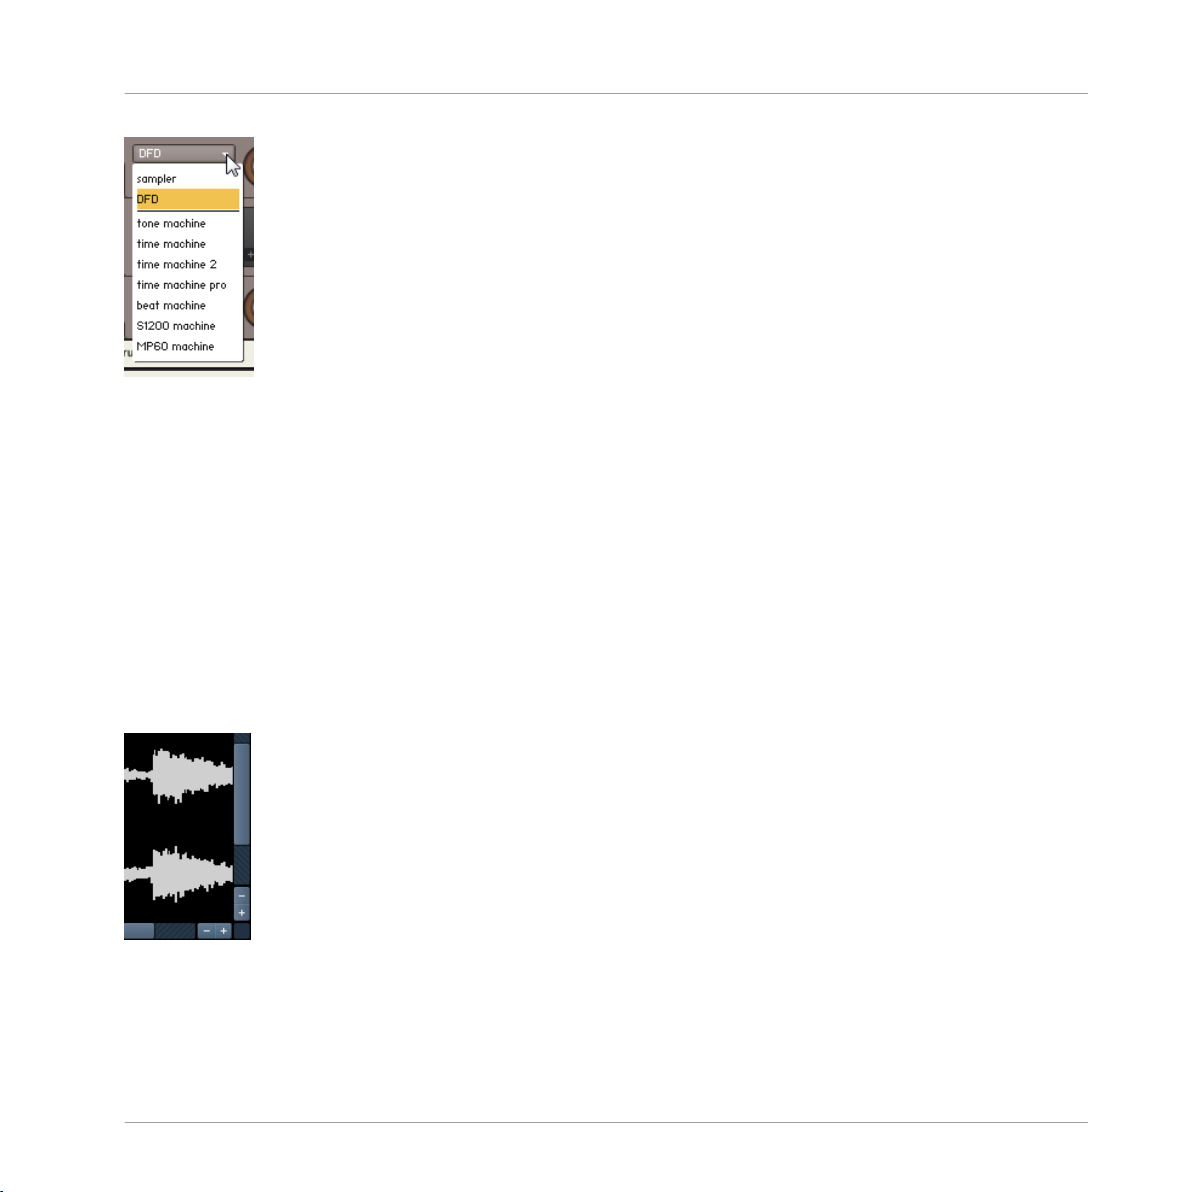
The mode drop-down menu of the Source Module.
3.5 Scroll Bars
Scroll bars appear at the bottom or right border of panes whose contents take up too much
space to be displayed in their entirety. Clicking on the position indicator bar and dragging
it will scroll the viewport across the content, while clicking on the empty space of a scrollbar will jump to the respective position. Some contents can also be zoomed in and out;
this is indicated by “+” and “-” buttons at one end of their scrollbar. Click on “+” to zoom
in, or “-” to zoom out. Some places in KONTAKT, namely the Mapping Editor and the
Wave Editor, provide an alternative way of zooming that you might find more convenient;
you can read all about this method, dubbed “rubber-band zooming”, in the chapters of the
respective editors.
Scroll Bars
Horizontal and vertical scroll bars in the Wave Editor.
KONTAKT 5 - Application Reference - 26
Page 27
User Interface Elements
3.6 Value Fields
Some fields contain editable – usually numeric – values without an additional control.
These frequently appear in places that don't provide enough space for knobs or other controls, such as rows of tables that can shrink or grow. There are various ways to edit their
value:
▪ Click on the field, then drag your mouse upwards to increase the value, or downwards
to decrease the value.
▪ When you hover your mouse pointer over the field, small up and down arrows will ap-
pear on its right side. Click on these to increase or decrease the value one step at a
time.
▪ Double-click on the field and enter a new value with the keyboard.
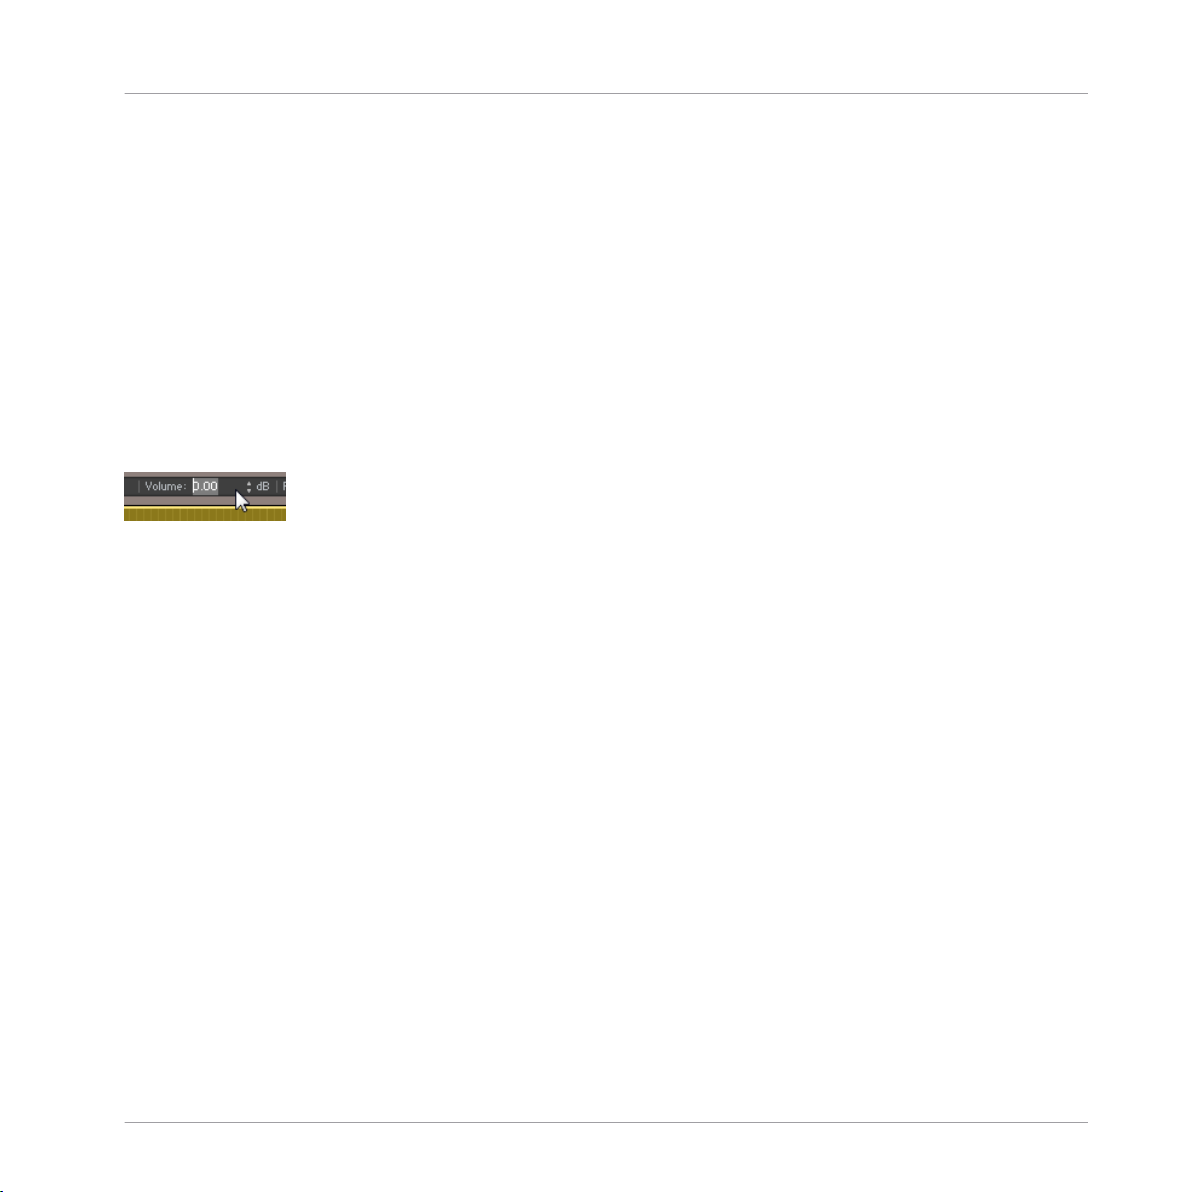
Value field
3.7 Saving and Loading Presets
Whenever you have created a setting that you're really happy with in any part of KONTAKT,
you might want to save it for later use in another context. The KONTAKT environment is
split up into modules, and most of these offer a preset drop-down menu that allows you to
manage presets for the respective module. Loading a preset in a module won't affect the
other modules in your Instrument – this modular approach lets you freely combine different presets into your own Instruments.
Presets are saved in files (file extension: .nkp) which reside in a series of sub-folders within a “presets” folder. KONTAKT creates two of these preset folders on your system: one
contains the factory presets, and is located in a directory which is not writable by normal
users; the other one resides within your home directory and will be used to store your own
presets. KONTAKT will create this user presets folder when you first start it up. On a Windows PC, the factory and user preset folders will be created in
C:\Program Files\Common Files\Native Instruments\Kontakt 5\presets
C:\Documents and Settings\[username]\My Documents\Native Instruments\Kontakt 5\presets
In the case of Windows Vista and Windows 7, the user presets folder will be located in
C:\Users\[username]\Documents\Native Instruments\Kontakt 5\presets
Value Fields
KONTAKT 5 - Application Reference - 27
Page 28

User Interface Elements
On a Mac, you can find the factory and user preset folders in
Macintosh HD/Library/Application Support/Native Instruments/Kontakt 5/presets
Macintosh HD/Users/[username]/Documents/Native Instruments/Kontakt 5/presets
KONTAKT comes with a large number of ready-made presets for most of its modules.
These are good starting points for your own settings, so it's worth browsing the Factory preset list of a module when you have a specific task in mind and don't know where to begin.
As mentioned, preset management in KONTAKT takes place within each module's preset
drop-down menu. You can access this by clicking on the drop-down menu labeled Pre or
Preset that is located on the left side of each module. It contains all preset files that were
found in the respective preset folders on your hard disk, with further subdirectories (if any)
appearing as sub-menus. The Save Preset entry at the bottom of the menu will open a dialog, which asks you for a filename. Enter a descriptive name and click on
Save
– from now
on, your settings will be available within the User submenu of the presets drop-down
menu. This won't work, however, if you change the path in the save dialog, so it's recommended that you always save your presets to the default path.
3.8 MIDI Learn
KONTAKT features a MIDI Learn function for all sliders and knobs. Once you have assigned one of KONTAKT’s controls to a knob or fader on your MIDI controller device, you
can conveniently access the corresponding parameter in KONTAKT.
MIDI Learn
3.8.1
Assigning MIDI Controllers
To assign any of KONTAKT's sliders or knobs to a certain MIDI controller:
1. Right-click the knob or slider you want to assign a MIDI controller to.
2. Select Learn MIDI CC# Automation.
3. Turn the knob or move the slider on your MIDI hardware controller. The control should
pick up the movement instantly. You can add additional MIDI controllers (CC#s) to
the same KONTAKT knob. You can also assign multiple knobs or sliders to the same
MIDI controller.
If you cannot assign MIDI controllers this way, see section ↑12.7, Automation Tab, for an
alternative assignment method.
KONTAKT 5 - Application Reference - 28
Page 29

3.8.2 Removing MIDI Controller Assignments
To remove an assignment made to a specific controller:
1. In KONTAKT, right-click the knob or slider.
2. Select Remove MIDI Automation: CC#.
User Interface Elements
MIDI Learn
KONTAKT 5 - Application Reference - 29
Page 30

KONTAKT: The Big Picture
Building Blocks
4 KONTAKT: The Big Picture
KONTAKT is an extremely powerful, complex, and capable instrument. Before getting into
specifics, let’s take a step back first and describe KONTAKT in general terms.
The structure of most samplers, hardware or software, is similar to that of a synthesizer: at
its source, some kind of sound generator outputs unprocessed signals in response to incoming MIDI notes; these signals are then processed in a variety of ways and sent to the
output. The difference is that the sound generator of a typical synthesizer creates its
source waveforms entirely by electrical or mathematical means, often being limited to a
range of well-defined waveforms, whereas a sampler can use any kind of previously recorded audio data – sampled acoustic instruments, sound effects, vocals, and (of course) any
classic waveform known from synthesizers as well.
KONTAKT's overall structure is not any different in this regard, albeit it is far more sophisticated than a lot of conventional samplers. For instance, KONTAKT does not force any
particular signal flow structure upon your Instruments – it has an entirely modular approach to sound processing and parameter modulation. Anything is possible, from triggering simple one-shot samples to building sophisticated virtual instruments that faithfully
reproduce all aspects of their acoustic counterparts and respond intelligently to your performance.
As usual, this power comes at a price, though; while you'll be able to load and play your
first KONTAKT Instruments right away, it will take some more practice to become a master
at creating your own Instruments. We hope this manual will help you achieve this; also,
whenever you're stuck, remember you can get helpful hints from the Info Pane described in
section ↑3.1, Info Pane at any time.
4.1
Building Blocks
The full functional range of KONTAKT's sampling environment is split up into smaller sections, which allows you to concentrate on the task currently at hand without getting distracted by other details. This functional division is also reflected on the user interface;
most elements that belong to a specific kind of task are kept within a separate pane, tab,
or dialog window.
KONTAKT 5 - Application Reference - 30
Page 31

KONTAKT: The Big Picture
Building Blocks
In this section, we'll further distinguish two general types of building blocks: the core
blocks, which are hierarchically organized and make up KONTAKT's chain of turning MIDI
data into sound, and the tools, which allow you to perform a wide range of peripheral management, configuration, and monitoring tasks.
4.1.1 Core Building Blocks
Let's follow KONTAKT's path of turning simple audio files into readily playable instrumental setups, starting from the smallest element and then working our way upwards:
▪ A Sample is a simple audio file on your hard disk. Samples may occasionally carry ad-
ditional metadata, but in their purest form, they don't provide anything other than a
recorded audio signal. An example of a Sample would be the digital recording of a
single piano note. Samples can appear in various formats, such as WAV, AIFF, or
REX.
▪ A Zone is KONTAKT's way to put a Sample into a playable context. Think of a Zone as
a wrapper around a single Sample; in addition to the Sample itself, the Zone contains
information about which MIDI data will make KONTAKT trigger this Sample, at what
pitch the sample was recorded, and a few other details. An example of a Zone would
be the aforementioned piano Sample, with the attached information that it should be
played without any transposition whenever KONTAKT receives an F3 note with a velocity value between 64 and 95. As Zones don't contain much additional data, they
only exist within a larger context and can't be saved and loaded separately.
▪ A Group is a container that allows you to combine a number of Zones. As every Zone
belongs to a Group (and only one), each Instrument will contain at least one Group;
usually, you'll add several more Groups in order to combine your Zones by means of
distinctive aspects – which aspects you choose is entirely up to you, but there are
some common approaches. All Zones that belong to a specific Group will share a
number of common parameters and signal flow modules; for instance, their Samples
will be played by the same sound Source Module. Consequently, if you want some of
your Zones played by a Source Module with different settings, you'll need to separate
them into their own Group first. In the course of this manual, modules that pertain to
a Group are being referred to as “Group-level modules”. A typical example of a Group
would be “all Zones in my Instrument that should be played at mezzoforte level”.
Groups can be saved and loaded separately as files with an .nkg extension.
KONTAKT 5 - Application Reference - 31
Page 32

KONTAKT: The Big Picture
Building Blocks
▪ An Instrument is the entity you'll encounter most frequently when you're working with
ready-made KONTAKT libraries. As its name suggests, it's the virtual equivalent of an
acoustic instrument – when being played, it produces a specific range of sounds, possibly at different timbres, dynamics, and articulations. Technically, a KONTAKT Instrument is a wrapper for a number of Groups, whose output signals will be mixed and
pass a common signal chain; the modules in this chain are said to reside on the “Instrument level”. A typical example of an Instrument would be “a piano”. Instruments
can be saved and loaded separately; native KONTAKT Instrument files have an .nki
extension.
▪ An Instrument Bank is the only optional element of KONTAKT's core hierarchy; in other
words, you don't have to use this feature if you don't want to. Instrument Banks allow
you to combine up to 128 Instruments into a container that responds to a single MIDI
input channel; you can then switch the active Instrument by sending MIDI program
change messages on this channel. This allows you to create General MIDI-compatible
sound sets, or combine Instruments that contain various articulations of the same
acoustic instrument into one slot. A typical example of an Instrument Bank would be
a number of violin Instruments that contain legato, detaché, staccato, and pizzicato
Samples, respectively, with the different articulations and playing techniques being
switchable via program change messages. Instrument Banks can be saved and loaded
separately as files with an .nkb extension.
▪ Finally, a Multi lets you freely combine up to 64 Instruments into a production setup.
The Multi is the topmost element of KONTAKT's core hierarchy. Each Instrument in a
Multi responds to a specific MIDI channel and will send its output signal to a specific
Output Channel, where the signals from all Instruments will be mixed and passed on
to a physical output of your audio interface or, alternatively, to your host program. A
typical example of a Multi would be “a jazz trio ensemble”. Multis can be loaded and
saved as files with an .nkm extension.
4.1.2
Tools
In addition to its core architecture, KONTAKT offers some tools that will simplify your everyday work:
KONTAKT 5 - Application Reference - 32
Page 33

KONTAKT: The Big Picture
Building Blocks
▪ The Browser is located on the left side of your KONTAKT window and can optionally
be hidden to save screen space; it provides a convenient way to organize and access
all KONTAKT-relevant files on your system, such as Instruments, Multis, or Banks.
The Browser pane also offers a number of additional utility functions; these will be
described in detail in chapter ↑12, The Browser.
▪ The Database keeps track of all files on your system that can be used by KONTAKT; it
allows you to browse and access these files without the heaviness of a full-featured
file system browser and lets you quickly search through large amounts of data. It's explained in detail within section ↑12.1, Files Tab.
▪ The Rack occupies the largest amount of space in your KONTAKT window; it operates
in one of two different modes. In Multi Instrument mode, the Rack will provide an
overview of all Instruments that are currently in your Multi, along with some general
parameters. Clicking on the wrench icon on the left side of an Instrument Header will
switch the Rack into Instrument Edit mode, which provides a flexible and adjustable
view of the contained module panels, editors, and modulation tables of this Instrument.
▪ The Outputs Section is a mixer-style environment in which you can adjust output lev-
els, assign Output Channels to physical outputs, and use signal processing modules
that operate on the output signals of all Instruments in your Multi.
▪ The virtual on-screen Keyboard, the Master Editor, the Info Pane and the Options Dialog
provide various utility functions and are being explained in detail within their respective sections of this manual.
KONTAKT 5 - Application Reference - 33
Page 34

5 The KONTAKT Window
Let's have a look at KONTAKT's main window during a typical session:
The KONTAKT Window
KONTAKT in action.
The user of this session has currently set up a number of Instruments in a way that allows
him to play them via different MIDI channels. Let's have a look at the visible main elements of the user interface:
KONTAKT 5 - Application Reference - 34
Page 35

The KONTAKT Window
▪ At the top of the user interface, the Main Control Panel provides buttons that toggle
the display of various optional interface parts, such as the Browser; it also includes
the file drop-down menu and access to the global functions and options, as well as
some status meters.
▪ The Browser (left side of the user interface) provides functions for managing your col-
lection of KONTAKT-relevant files. In the screenshot, it's currently switched to the
Files tab, which contains a file system navigator.
▪ The Rack, which takes up the largest part of the user interface, is currently in Multi
Instrument mode (Multi Rack); below its own header, it displays a number of Instrument Headers; these represent all Instruments in the current Multi.
▪ Within the Multi Rack, the Instrument Headers are shown at normal viewing size; they
contain the Instrument's name and various parameters, such as MIDI input channel,
output level, panning position, and tuning.
▪ An Instrument Header that has been minimized in order to save screen space.
▪ The Outputs Section displays a channel strip for each configured Output Channel, plus
four Aux Channels.
▪ The Info Pane, which displays some details of the currently selected Instrument file
below the Browser, and a brief explanation of the control at the mouse position below
the Rack.
▪ The Status Bar, where messages from running Scripts and, at startup, the Database
loading progress will appear.
Each of these sections is explained in detail within its own section of this manual.
Stand-alone Menu
5.1
Stand-alone Menu
In addition to the contents of the main window, the stand-alone version of KONTAKT provides a system drop-down menu labeled Help. It's located at the top of the desktop on
Macs, or at the top of the KONTAKT window on Windows PCs. The Help menu lets you
launch Native Instruments' Service Center application, access the additional PDF documents that are part of the KONTAKT installation and explain special topics, and point your
web browser to the KONTAKT website.
KONTAKT 5 - Application Reference - 35
Page 36
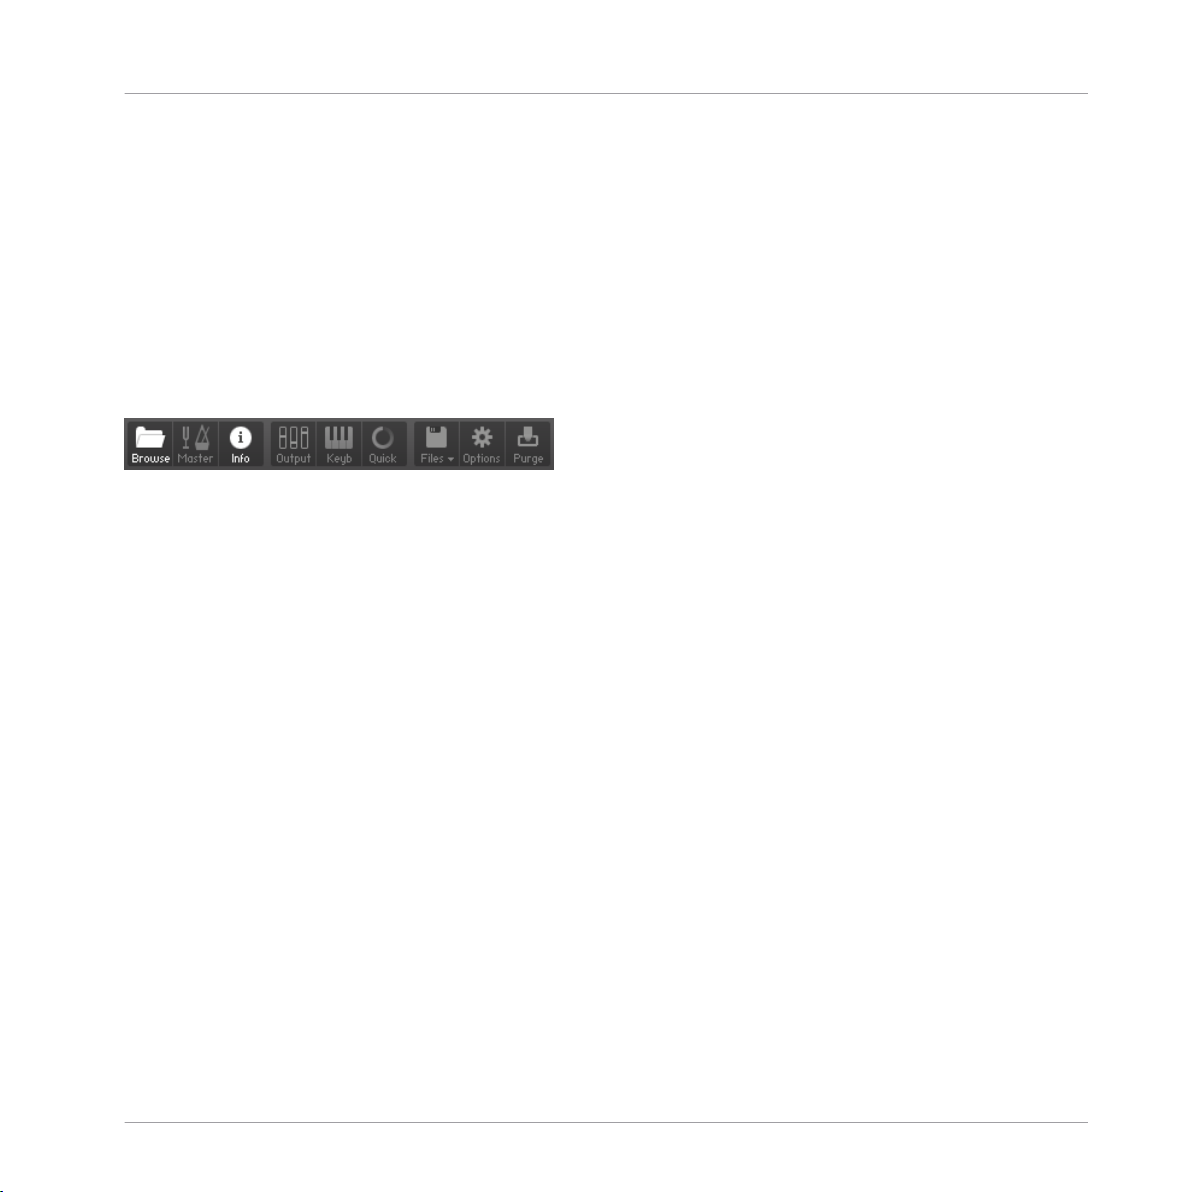
The KONTAKT Window
The Main Control Panel
5.2 The Main Control Panel
The Main Control Panel is the topmost row of elements in your KONTAKT window. Here
you can enable and disable the main parts of the user interface, access various global menus, open the Options Dialog, and view statistics about KONTAKT's overall resource usage.
5.2.1
User Interface Switches
The first six buttons of the Main Control Panel allow you to choose which key elements of
the KONTAKT interface should be displayed. These are toggle buttons, which means that
repeated clicks will alternately show and hide the respective elements.
Each button shows and hides a main interface element within KONTAKT's main window.
From left to right, here's what the buttons do:
Browse: Click this button to show or hide the Browser at the left side of the KONTAKT window. This is the only optional element that will shrink your actual window size when hidden. You can read all about the Browser in chapter ↑12, The Browser of this manual.
Master: This button will show or hide a panel with a number of global parameters and
common utility functions. This feature is explained in chapter ↑11, The Master Editor.
Info: This button toggles the visibility of the Info Pane, which will appear at the bottom of
the window. It displays information about the currently selected file (if the Browser is active) and the user interface element at which your mouse is currently pointing.
Output: This button will show or hide KONTAKT's Outputs Section, which is explained in
detail within chapter ↑14, The Outputs Section .
Keyb: Shows or hides the virtual On-Screen Keyboard, which allows you to generate note
and controller events, and indicates where Zones and keyswitches of your currently selected Instrument are placed. The On-Screen Keyboard is explained in chapter ↑10, The On-
Screen Keyboard.
Quick: Toggles the visibility of the Quick-Load menu, which is a user-defined browser for
quick access to your favorite KONTAKT related files. It is further described in chapter
↑13, The Quick-Load Catalog.
KONTAKT 5 - Application Reference - 36
Page 37

The KONTAKT Window
The Main Control Panel
5.2.2 Files Menu
The Files menu
This drop-down menu is marked with a disk icon. The Files menu contains the following
functions:
New instrument: Adds a new Instrument to your Multi.
Whenever you create a new Instrument, KONTAKT will use a default Instrument file as a
template, which is usually empty. Overwriting this file with your own version allows you to
define your own default settings. For instance, you might want new Instruments to contain a
Send Levels module in their Instrument Insert Effects chain from the get-go; just create a
new Instrument, insert the module into its chain, and choose the “Save as default instrument” command from the Save menu while the instrument is open for editing.
New instrument bank: Adds an empty Instrument Bank to your Multi. Instrument Banks are
described in detail in chapter ↑9, Loading and Creating Instrument Banks.
Load…: Opens a file selector dialog, asking you to locate and load any object that KONTAKT can handle, whether it's an Instrument (file extension: .nki), a Multi (.nkm), or an
Instrument Bank (.nkb).
Load recent…: This sub-menu contains an up-to-date list of files that you recently opened
in KONTAKT. Selecting one will load it.
KONTAKT 5 - Application Reference - 37
Page 38

The KONTAKT Window
The Main Control Panel
New instrument from list: This submenu provides access to the contents of your Quick-Load
catalog of Instruments as a hierarchical menu structure. Select an entry in order to add
the respective Instrument to your Multi. The Quick-Load catalog is explained in chapter
↑13, The Quick-Load Catalog.
New instrument bank from list: Provides access to the contents of your Quick-Load catalog
of Instrument Banks.
Save as…: This function allows you to save any Instrument in your Multi to an .nki file for
later re-use. When you move the mouse to this entry, a sub-menu will open, which contains a list of all Instruments in your current Multi. Selecting one of them will open a Save
dialog that lets you choose a location and change the name of the Instrument. Note that
the file name – without the .nki extension – will be used as the Instrument name that's
being displayed in the Instrument Header.
Below the file selector, the dialog lets you choose how KONTAKT should handle the Samples that are being referenced by the Instrument. When you have added these Samples to
your Instrument during your current session, they're still in their original location, and the
Zones in your Instrument reference them via their full paths; the various options in the
save dialog allow you to fine-tune this behavior before your Instrument is written to disk:
▪ Patch Only will keep the Samples in their original locations and leaves the file referen-
ces in their current state. This creates very small files, as only the Instrument parameters will be saved. Be aware, though, that this method can keep the relation between
the Instrument and its Samples in a rather fragile state; as soon as you move the
Samples to a different location or delete them, KONTAKT won't be able to find them
the next time you attempt to load the respective Instrument. In such cases, a “Samples Missing” dialog will appear, asking you in which places KONTAKT should search
for the Samples. The “Samples Missing” dialog and its options are explained in chapter ↑8, Loading and Creating Instruments.
While an Instrument is currently loaded in KONTAKT, never move its referenced Samples to
a different location manually. There's no guarantee that KONTAKT will keep all referenced
Samples entirely in memory, so trying to save the Instrument with Samples afterwards can
result in corrupted Sample data in such a scenario.
▪ If you enable the Absolute Sample Paths checkbox below the Patch Only option, the
Sample files will be referenced by the Instrument with their absolute paths; this has
the benefit that KONTAKT will still be able to find them when you move the Instrument file to a different location. However, if you know that the Samples already reside
KONTAKT 5 - Application Reference - 38
Page 39

The KONTAKT Window
The Main Control Panel
in a folder that will always be moved and backed up along with the destination folder
of your Instrument, you can keep the saved file reference relative to the Instrument
location by disabling the Absolute Sample Paths option.
▪ Patch + Samples will save the .nki file and copy the contained Samples to a new loca-
tion, changing the file references within the Instrument to the copies in the process.
If you leave the Sample Sub-Folder option below set to its Use Default value, KONTAKT will save the Sample files to a “Samples” folder inside the destination location
of your Instrument file; this folder will be created if it doesn't exist yet. That way, the
Samples will be kept close to the Instrument, which helps you keeping track of them
when doing backups or moving directories. You can also specify a different Sample
location, though; for example, you might want to use a common “Samples” folder
that resides in the directory of your project.
▪ Monolith will combine the Instrument and its referenced Samples into a single, large
file. This is the safest option to choose in terms of keeping Sample references intact,
as the Samples cannot accidentally get separated from the Instrument later. This is
also a good way to create Instruments that should be distributed to other users of
KONTAKT.
Should you choose to save the referenced Samples along with your Instrument data by selecting either Patch + Samples or Monolith, you further have the choice to save them in a
compressed format by checking the box below the sub-folder field. In this case, KONTAKT
will write the Samples using a proprietary, lossless audio codec that typically yields compression rates between 30% and 50%. This will not only improve access performance
when streaming the Instrument from disk, but will also reduce its memory footprint, as
KONTAKT will decompress the Samples on-the-fly from memory with very little CPU overhead. The downside of using compressed Samples, however, is that you cannot use external wave editors to access them directly anymore.
It's important to keep track of the ways the Sample and Instrument files on your hard disk
relate to each other; this protects you from unpleasant surprises when you move files
around, delete them, or recover KONTAKT data from a backup.
KONTAKT 5 - Application Reference - 39
Page 40

The KONTAKT Window
The Main Control Panel
When you are using KONTAKT as a plug-in inside your host program and save your session,
all Multi and Instrument data will be included in this session file. Sample references will be
saved in an absolute fashion, so you might get a “Samples Missing” dialog when you open
the session again after you have moved your Samples. If the Samples reside below KONTAKT's library path (which you can specify manually on the Load / Import tab of the Options
Dialog), though, the references will be saved relatively to this folder; this makes it possible
to share session files with KONTAKT instances across platforms. Hence, it's a good idea to
always keep your KONTAKT libraries somewhere below the folder that you've specified as
your library folder.
Save multi as…: This saves your current multi to an .nkm file on your hard disk. While the
resulting Multi file will contain all Instrument data, KONTAKT will still need to take care
of the Samples that are referenced by the Instruments. Thus, the save dialog offers the
same Sample management options as described in the Save as… paragraph above. Saving
a multi will also save the output routing options.
Save as default instrument: This command is only viewable when you are editing an instrument. It saves the selected Instrument as your default one so whenever you create a new
Instrument, either via the New Instrument command of the Files menu, or by dragging Samples from the Browser into the Rack, KONTAKT will use this Instrument as a template.
Save as default multi: This command will save your current Multi as a default template that
KONTAKT will load at startup or when you choose the Reset Multi command.
Reset multi: This will restore the default Multi that's loaded at start-up, removing all Instruments from your current Multi in the process.
Batch re-save: As explained in the paragraph about the Save function, KONTAKT Instru-
ments that include references to external Sample files can cause problems if either the Instrument or the Sample files are being moved to a different location. In such cases, you
will be presented with a “Samples Missing” dialog that asks you in which places KONTAKT should look for the missing files (see chapter ↑8, Loading and Creating Instru-
ments). While it's not a big problem to let KONTAKT locate the Samples of one or two In-
struments via this dialog, and then re-save them afterwards in order to make the changes
permanent, the described effect will be worsened by an order of magnitude if it occurs
with a whole library. This can happen if you move the library folder or its contained subfolders around, and makes it very tiresome to access the library, as every attempt of loading an Instrument will be answered with a “Samples Missing” dialog.
To fix the problem manually, you would have to load each Instrument, locate the missing
Sample files via the “Samples Missing” dialog, and re-save the Instrument to its original
location within the library folder. For large libraries, this is unfeasible. The Batch Re-save
KONTAKT 5 - Application Reference - 40
Page 41

The KONTAKT Window
The Main Control Panel
function automates this process; when you select it, a selection dialog will appear, asking
you to choose a folder. After clicking Choose, all Instrument, Multi, and Bank files in this
folder and its sub-folders will automatically be scanned for unresolved Sample references;
if any are found, the “Samples Missing” dialog will appear once, allowing you to specify
which places should be searched to resolve the references.
As the Batch Re-save process will overwrite the Instrument, Multi, and Bank files within your
selected folder, it's recommended to make a backup of this folder before you execute the
command.
Once KONTAKT has successfully located the Samples, the affected Instrument, Multi or
Bank files will be re-saved with corrected references, so afterwards, you'll have a consistent library again.
Collect samples/Batch compress: If you are working with a library of nkis that are referencing samples in multiple locations, or you wish to compress (or even de-compress) the samples of a library, this function allows you to compile samples, instruments, banks and multis into a single location.
KONTAKT 5 - Application Reference - 41
Page 42

The KONTAKT Window
The Main Control Panel
The Batch Compress Dialog
When you select this option, a dialog box will appear. Here you must select a source folder
(where your nki, nkb and nkm files are currently located) and a destination to which you
wish to have these files compiled and copied to.
There are two different folder creation strategies:
▪
Mirror source folder structure in the destination location: This mode keeps the folder structure of
the source folder when generating the destination folder structure, so there are no ex-
plicit "Instruments" and "Collected Samples" subfolders in the destination folder when
using this mode.
KONTAKT 5 - Application Reference - 42
Page 43

The KONTAKT Window
The Main Control Panel
One exception: When batch-compressing a source/library folder, if there is an Instrument in
the library folder that references a sample outside the source/library folder (and its subfolders), a "Collected Samples" subfolder will be generated in the destination folder and this
sample will be saved there.
▪
Collect Samples and create new destination folder structure: In this mode the folder substructure
of the target folder will be different from the source folder’s structure: Instrument
files will be saved in an "Instruments" subfolder, while all samples are saved in "Col-
lected Samples". This prevents having to resave the same sample more than once (if
it was referenced by more than one Instrument in the source folder for instance).
Whichever strategy you choose, samples and Instruments in the source folder will neither be
deleted nor updated. Impulse Response samples and wallpapers of the source Instruments
will be resaved as well, but without compression.
▪
For converting uncompressed samples to lossless compressed .ncw-files select Lossless
compressed NCW.
▪
For converting compressed .ncw-files back to an uncompressed format select Uncom-
pressed WAV / AIF.
Note that Batch Compress does not work for copy-protected libraries.
KONTAKT 5 - Application Reference - 43
Page 44
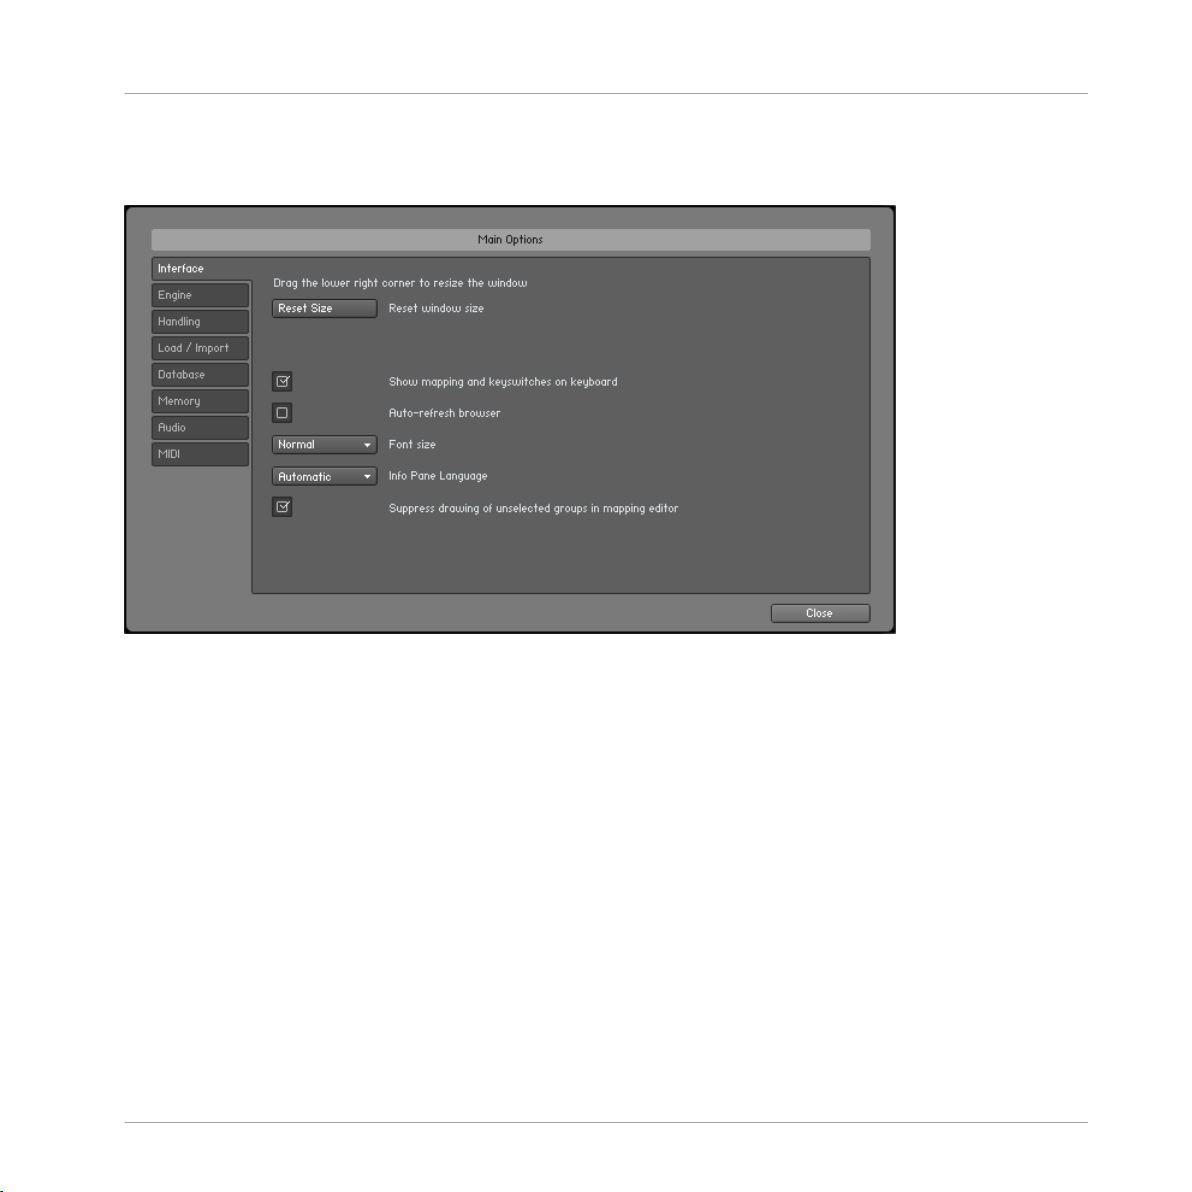
5.3 Options Dialog
The KONTAKT Window
Options Dialog
The Options Dialog
Clicking on the gear icon in the Main Control Panel will open the Options Dialog window.
This is where you can configure KONTAKT's global program preferences, such as interface
behavior, audio engine parameters, and import options. Preferences are divided into several categories, which you can access with the tabs on the left side of the Options Dialog
window.
KONTAKT 5 - Application Reference - 44
Page 45

5.3.1 Interface Tab
The KONTAKT Window
Options Dialog
Interface tab of the Options Dialog.
This page contains options that change the look and behavior of KONTAKT's user interface.
Reset Size: If KONTAKT's interface becomes too large and you can no longer access the
resizing handle to the bottom right of KONTAKT's window, you can use this button to reset
KONTAKT's window size.
Show Mapping and Keyswitches on Keyboard: If enabled, KONTAKT's virtual On-Screen Keyboard will highlight keys that trigger zones or keyswitches in your currently selected Instrument with different colors. By default, keys that trigger zones are colored blue and those
that trigger keyswitches are colored red, however some libraries may deviate from this convention.
Auto-refresh Browser: When enabled, the Browser will periodically check your file system
for changes and pick them up by itself, without requiring you to refresh it manually.
KONTAKT 5 - Application Reference - 45
Page 46

The KONTAKT Window
Font Size: This drop-down list allows you to choose between two interface font sizes; the
large font increases legibility, but takes up more screen space. Changing this option requires you to restart KONTAKT in order to take effect.
Language: KONTAKT can display hints in the Info Pane help area in English, German,
French, Spanish or Japanese. You can select one of these languages from the Language
drop-down list. If you select Automatic, KONTAKT will use your operating system's language settings.
5.3.2 Engine Tab
Options Dialog
Engine tab of the Options Dialog.
Default Volume for New Instruments and Volume Reset: This value will be used as a default
output volume for new and imported Instruments. Also, it's the value to which the output
volume slider will snap when you ctrl/cmd-click on it.
CPU Overload Protection: High voice counts can make the audio engine overload your CPU
during operation; in such cases, the engine can choke and be rendered unusable until you
restart it manually via the Restart Engine button (marked with an exclamation mark) on the
Engine tab of the Browser. This scenario can be avoided with the overload protection
KONTAKT 5 - Application Reference - 46
Page 47

The KONTAKT Window
mechanism, which allows KONTAKT to kill voices when the CPU load gets critical. The
Relaxed, Medium, and Strict settings affect how cautious KONTAKT will be about this. Relaxed will not start killing voices until the CPU is very close to overloading, and thus will
give you the highest voice count while still providing some protection against overloading;
if the CPU load is still too high, try one of the stricter settings.
Multiprocessor Support: KONTAKT can make use of multiple CPUs or dual-core processors.
To switch multi-processor support on and off and to set the number of processors / cores
you want to use for KONTAKT, select the corresponding entry from the Multiprocessor support menu. Multi-processor settings are saved independently for a) the stand-alone and b)
all plug-in versions. On multi-processor or multi-core systems, many factors influence the
system’s behavior. When running KONTAKT as a plug-in, multi-processor mode can sometimes cause crackles and drop-outs. Whether or not these noises occur during playback
strongly depends on your individual software and hardware setup. Therefore, the only option is to test which multi-processor setting works best for you when using the KONTAKT
plug-in. Note that multi-processor support is disabled for the KONTAKT plug-in per default (off entry in the Multiprocessor Support menu).
For stand-alone usage, we generally recommend turning multi-processor support on. Use
the above setting in the Engine tab of the Options dialog to enable multi-processor support
according to the number of processors or cores installed.
Send MIDI to Outside World: This drop-down menu allows you to choose which classes of
MIDI events will be sent to KONTAKT's MIDI output ports. All menu entries will be toggled
between on (indicated with a small diamond next to the entry) and off state when you click
on them. The available event classes are:
▪ GUI Keyboard: MIDI events that are generated when you click on KONTAKT's virtual
On-Screen Keyboard.
▪ Script Generated CCs: MIDI controller events that originate from running Scripts.
▪ Script Generated Notes: Note-on and note-off events that originate from running
Scripts.
▪ Incoming CCs: This will create a loop-back that will mirror incoming MIDI controller
events at the MIDI output.
▪ Incoming Notes: A loop-back that will mirror incoming MIDI note events at the MIDI
output.
Offline Interpolation Quality: This option allows you to specify an HQI (interpolation) quality
setting to be used during offline bouncing and freezing that's different from the one specified in the Source Modules of your Instruments. For instance, you might want to keep your
Options Dialog
KONTAKT 5 - Application Reference - 47
Page 48
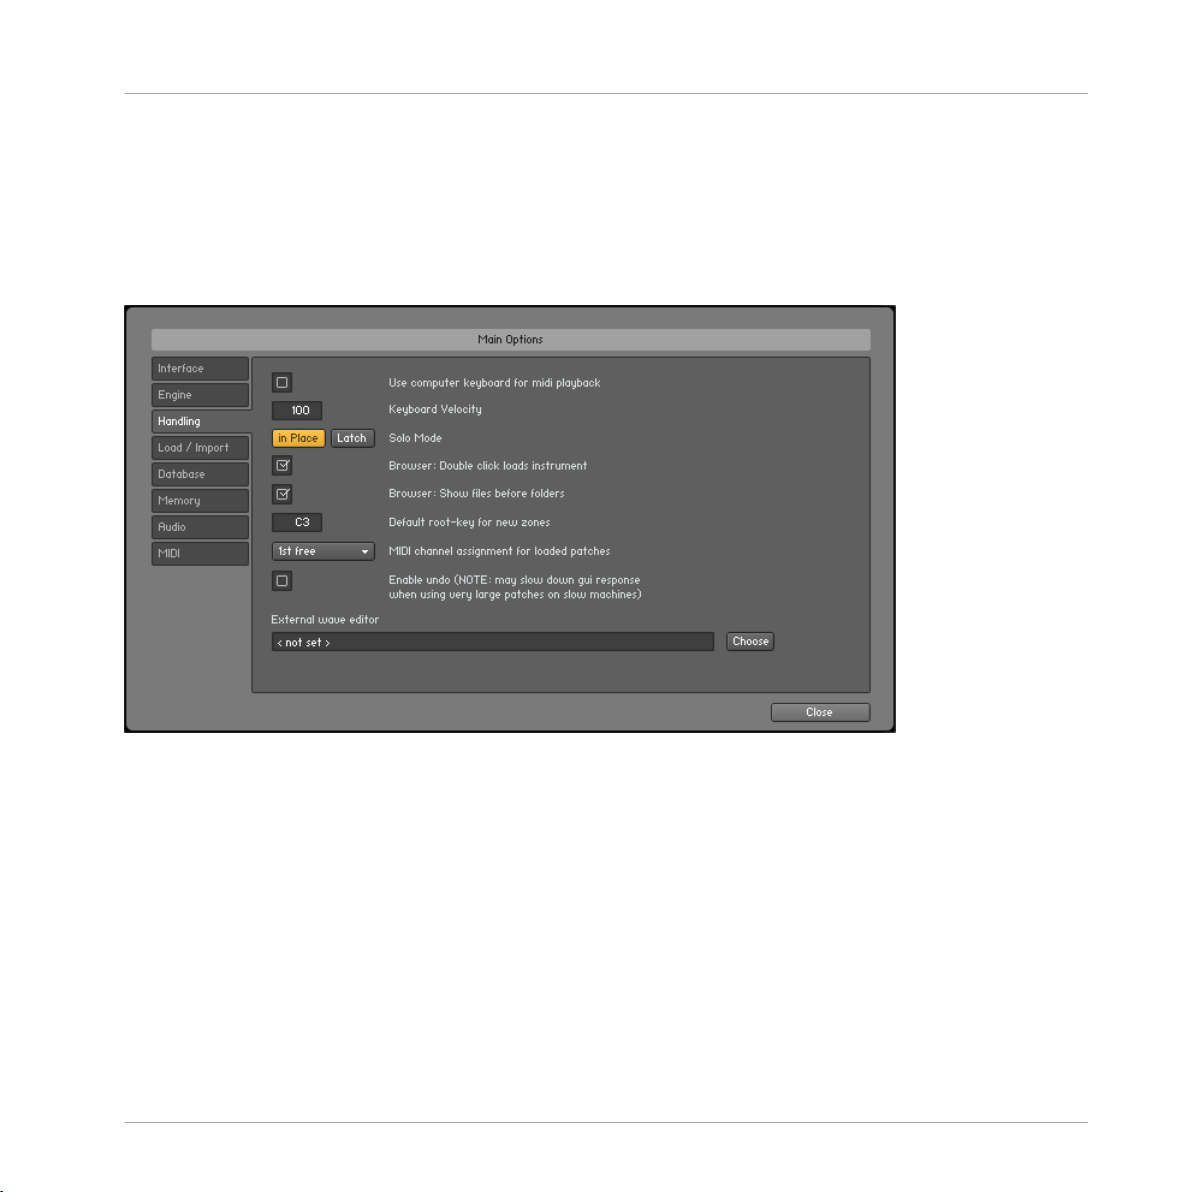
The KONTAKT Window
Source Modules set to Standard in order to save CPU resources during arrangement, but
switch to Perfect for bounces to get the best possible quality during mixdown. The default
setting is Like Realtime, which will use each Source Module's HQI setting during offline
operation.
5.3.3 Handling Tab
Options Dialog
Handling tab of the Options Dialog.
Use Computer Keyboard for MIDI Playback: When enabled, you can use your computer keyboard to trigger MIDI notes for the currently selected Instrument. The QWERTZ/QWERTY
row of letters will play the middle octave.
Keyboard Velocity: Adjusts the velocity of notes that were triggered via your computer keyboard.
Solo Mode: This setting determines what KONTAKT will do when you attempt to activate
the Solo button on more than one Instrument. In Place will only allow one solo Instrument
at any time, so any other one will be muted; Latch will let you switch more than one Instrument into solo mode.
KONTAKT 5 - Application Reference - 48
Page 49

The KONTAKT Window
Browser: Double-click Loads Instrument: If enabled, you can add Instruments from the
Browser into the Rack by double-clicking on their names.
Browser: Show Files Before Folders: This determines the order in which files and folders will
be listed in the lower pane of the Browser.
Default Root Key for New Zones: When you create Zones out of Samples that don't have any
embedded information about the note they were sampled at, the Zones will be generated
with the root key specified here.
MIDI Channel Assignment for Loaded Patches: This drop-down menu lets you switch between
two different modes that affect in which way KONTAKT will assign MIDI channels to newly
added Instruments: Assign 1st Free is the default behavior and will assign the smallest possible MIDI port that hasn't been used yet (if available), Assign to Omni was the standard
behavior of KONTAKT 1 and will always assign loaded Instruments to Omni (thus making
them respond to all input ports). The additional Keep Channels from K1.x Patches toggle option lets you specify whether KONTAKT should use the MIDI channel embedded in KONTAKT 1 patches (later versions don't save MIDI assignments in Instrument files anymore,
only in Multi files).
External Wave Editor: This setting lets you specify your own preferred sample editor. When
you click on the Ext. Editor button in the Wave Editor, KONTAKT will start the specified
editor with the current sample, and automatically pick up the changes when you save the
Sample within that editor.
Options Dialog
KONTAKT 5 - Application Reference - 49
Page 50

5.3.4 Load / Import Tab
The KONTAKT Window
Options Dialog
Load / Import tab of the Options Dialog
Show "Replace Multi" Dialog: When enabled, KONTAKT will display a warning dialog window to check if, when you load a multi, you are sure you want to discard the current multi.
When disabled, KONTAKT will not make this check and replace the current multi instantly.
Load samples in background: When enabled, KONTAKT can load post 4.1 instruments with
background loading. This feature is useful for instruments that use a large amount of samples and take a long time to load fully. With background loading active, KONTAKT will display the instrument's interface and become playable as soon as possible, though certain
keys may not sound immediately if the samples have yet to be loaded into memory.
Convert 3rd Party Samples to WAV when Saving: If enabled, KONTAKT will always save Samples used by Instruments that came in third-party formats, such as REX, in WAV format;
otherwise, they will be saved in their native formats.
KONTAKT 5 - Application Reference - 50
Page 51

The KONTAKT Window
Unwind Automation IDs for Additionally Loaded Patches: When enabled, KONTAKT will re-as-
sign automation IDs of newly loaded Instruments if there's already an Instrument in your
Multi that uses the same IDs. As an example, suppose you'd like to add an Instrument
twice to your Multi, which uses automation IDs 0 through 9; if this option is enabled,
KONTAKT will change the assigned IDs of the second Instrument to 10-19 on load, provided that these IDs have not been used by other Instruments in your Multi yet.
Force-Load Pre-2.0 Patches in DFD Mode: Since the DFD (Direct From Disk) mode was introduced after the KONTAKT 1.0 release, older libraries don't make use of it; if this option is
enabled, KONTAKT 1.x Instruments will be loaded with their Source Modules set to DFD
mode by default, thus making larger libraries benefit from the significantly reduced memory footprint. Note, though, that the DFD mode doesn't provide all features of the Sampler
mode; if your KONTAKT 1.x Instruments use any of these features, enabling this option
might change their behavior.
Limit File Names to 31 Characters: When enabled, KONTAKT will restrict all file names to
31 characters during import runs. This can be helpful in certain cross-platform scenarios,
as some older file systems only support filenames up to this length.
Import Keyswitched Sources into Separate Instruments: If this option is enabled and KONTAKT encounters any keyswitches when importing third-party formats, it will split the
patch in question into several Instruments, each of which will contain the Groups that
were assigned to a single key in the source patch.
Write Absolute Paths Instead of Relative Paths: When enabled, KONTAKT will use absolute
Sample references for Instruments that are being converted via the Import button in the File
Browser. Absolute paths ensure that Sample references will be kept intact when you move
the Instrument file to a different location later. Note that this option only affects the operation of the Import button; when you manually save Instruments or Multis, you'll be specifically asked whether absolute or relative paths shall be used.
Browser Import: Destination File Format: When converting Sample data via the Import button
in the File Browser, KONTAKT will save Samples in the format specified here.
Options Dialog
KONTAKT 5 - Application Reference - 51
Page 52

5.3.5 Database Tab
The KONTAKT Window
Options Dialog
Database tab of the Options Dialog
The settings on this tab affect the operation of KONTAKT's Database, which is explained
in detail in section ↑12.4, Database Tab of this manual.
Automatically Add Loaded / Saved Files to Database: When enabled, KONTAKT will automatically add any files that you access to the Database if they're not already included. This
helps keeping your Database up to date without the need for manual rebuilds.
Include Samples in Database Scan: If enabled, KONTAKT will include information about individual Samples (i.e. audio files) in the Database when scanning your file system for objects. This can be useful when you're frequently creating and editing your own Instruments; otherwise, it's not advisable to enable this option, as it can massively increase the
size your Database.
Database Location List: Here you can specify locations that should be covered by the Database, such as the directory or partition that contains your sample libraries. You can add
locations to this list by clicking on the
lection dialog that appears; selecting a list entry and clicking on
Add
button and selecting a new location in the se-
Remove
will delete it from
KONTAKT 5 - Application Reference - 52
Page 53

The KONTAKT Window
the list. When you're finished, you can perform a Database rebuild with your new configuration right away. Clicking on the Update button will pick up any changes while preserving
all user settings that you've made in the Database (such as ratings or color assignments) at
the cost of increased disk space consumption, while the Reset and Scan button will erase the
entire Database and rebuild it from scratch; all user settings will be lost in this case.
5.3.6 Memory Tab
Options Dialog
Memory tab of the Options Dialog
On the Memory tab, you can optimize KONTAKT’s memory usage settings for your specific
computer configuration.
Override Instrument's Preload Size: If enabled, KONTAKT will ignore the preload buffer size
that's embedded in Instrument files since KONTAKT 2, and use the specified buffer size
instead. We recommend leaving the preload buffer size on default value. Memory improvements might be possible by moving the slider to the lowest setting possible without experiencing playback errors.
KONTAKT 5 - Application Reference - 53
Page 54

The KONTAKT Window
KONTAKT Memory Server Options (Mac OS X only)
Mac OS X 10.5 (Leopard) and all previous versions of Mac OS X cannot address more than
4 GB of RAM (up to 3.5 GB supported) per application. If you are running KONTAKT on a
32-bit Mac, you are able to access more than 4 GB RAM with KONTAKT Memory Server
(KMS).
Using KMS is only recommended when working with very large numbers of samples which
require more physical memory than one KONTAKT instance can access. You should not enable KONTAKT Memory Server if it is not absolutely necessary!
In order to use KMS on your computer, Mac OS X 10.5 (Leopard) or later needs to be installed, and at least 4 GB of physical RAM must be available. Using KMS also requires
administrator privileges, so make sure you are logged in as an administrator. KONTAKT
will detect the Mac OS X version and the amount of RAM present on your computer automatically. Subsequently, it will display an option to enable advanced memory access. After
activating KMS you need to restart KONTAKT for the changes to take effect.
Options Dialog
Check the checkbox to activate Memory Server in Options > Memory
KONTAKT 5 - Application Reference - 54
Page 55

The KONTAKT Window
KONTAKT will automatically set the size of accessible RAM to a value suitable for most
cases. You can find the amount of determined accessible RAM in the KMS Options dialog.
KONTAKT Memory Server is a separate application running in background. KONTAKT no
longer loads samples itself as long as the KMS option is enabled. All running KONTAKT
instances share the KONTAKT Memory Server and can access the samples loaded. The
KONTAKT Memory Server will boot automatically as soon as you start a KONTAKT instance.
The KMS utility appears in the Mac OS X system bar, so you can monitor the amount of
RAM used by the server process. CPU and RAM requirements of KMS utility itself are negligible. Note that there is no option to shut down the KMS utility in Manual mode.
Memory Server Modes
Options Dialog
Option for selecting Memory Server modes in Options > Memory
Automatic Mode: In Automatic mode the KMS will keep all samples currently used by KONTAKT instances stored. If an Instrument is removed from KONTAKT’s rack, samples that
are no longer needed will be also removed from the Memory Server’s sample pool. The
KMS will automatically shut down when all KONTAKT instances are closed.
KONTAKT 5 - Application Reference - 55
Page 56

The KONTAKT Window
Manual Mode: In Manual mode the KONTAKT Memory Server does not remove samples
from the server when an instrument is removed from KONTAKT’s rack or when all KONTAKT instances are closed. All samples stay in the memory as long as it is running. This
can be helpful, e.g. when re-opening a project in your host sequencer which is using KONTAKT as plug-in and when working with extensive templates of numerous instruments.
Loading times are significantly shorter, since the samples are already stored in RAM and
do not need to be loaded again.
The KMS Utility in the Mac OS X system menu bar
Managing the KONTAKT Memory Server
The KONTAKT Memory Server is managed via the KMS utility, which allows you to manually purge unused samples if you want to free memory. If you are running out of memory
when loading additional Instruments, the server will automatically start to purge samples
that are not referenced by any loaded Instrument.
Purge Menu
5.4 Purge Menu
The purge mechanism in KONTAKT keeps track of which Samples in an Instrument have
been actually triggered since the Instrument was loaded, and gives you the option of removing all other Samples from the Instrument. This way, you can reduce the number of
Samples that are being kept in memory to the subset that you have actually used in your
arrangement.
Consider this example: You're working on a large orchestra piece and have just finished
the cello part. The cello Instrument in your Multi covers the note range between C1 and
G4 in chromatic steps, with five velocity Zones per note; in other words, it's huge. Your
cello part, on the other hand, consists of alternating C2 and G1 quarter notes. Clearly,
there's a lot of memory waste going on. Using the purge facility, you can play your part
once – this will allow KONTAKT to gather which Samples are actually being used – and
KONTAKT 5 - Application Reference - 56
Page 57

The KONTAKT Window
then eliminate all unused Samples from the memory. Your Instrument will work as it did
before, but notes or velocity ranges that didn't occur during the analyzing phase won't play
anymore. If you change your mind later, you can reload all Samples with one mouse click.
Using purge functions like this can cause problems with instruments that randomly trigger
samples, or use round robin options. Check the library specification before you use these options.
You can control the purge mechanism via four functions which are available on both a
global and a local level. The global purge functions affect all Instruments in your Multi
and can be accessed via the Purge button located to the right of the Options button on the
Main Control Panel.
The entire purge mechanism can be controlled with these four functions.
The same menu is available for each Instrument; this way, you can use the purge feature
on Instruments whose parts are already finished, while keeping others that are still in active use loaded in their entirety. You can access the local purge menu of an Instrument at
the right side, just below the Instrument name, in the Instrument Header. Let's take a look
at each of the functions:
Reset Markers: Whenever KONTAKT plays a Zone in your Instrument, it will flag the respec-
tive Sample as being used. Using this function, you can delete all of these flags, thereby
resetting all data that KONTAKT has gathered about Sample usage so far. After you have
finished your work on a part, you should select this function once and then play your part;
this way, only the notes that have actually made it into the final part will be flagged as
used. Afterwards, you can proceed by choosing the Update Sample Pool function described
below.
Update Sample Pool: This function removes all Samples that are not currently flagged as be-
ing used from memory, and reloads any currently purged Samples that have been triggered
since the last purge operation. In other words, it brings the sample pool in sync with the
Sample usage flags it has gathered since the last purge operation.
Purge Menu
KONTAKT 5 - Application Reference - 57
Page 58

The KONTAKT Window
System Performance Meters
Purge All Samples: Unloads all Samples from RAM. This allows you to reverse the usual
purge process: you can play your arrangement in a “silent run”, then load only the Samples that are actually being used via the Update Sample Pool command afterwards.
Reload All Samples: Reloads all Samples, reverting any previous purge actions.
5.5 System Performance Meters
In the upper right section of the Main Control Panel, you'll find a number of system meters
that are being continually updated during operation.
Voice count, memory, CPU, and disk meters.
The value next to the notes icon indicates the total number of voices that are currently being played. Below, the total amount of allocated Sample memory is displayed; this figure
will be much smaller when you're using DFD Instruments.
The meters to the right show the current CPU and disk load as LED-style bar graphs.
These provide immediate visual feedback on whether you're close to maxing out your computer's capabilities.
5.6 Minimized View
Click the Minimized View button to collapse the KONTAKT window.
Clicking on the rightmost button in the Main Control Panel will reduce your KONTAKT window to the header of the currently selected Instrument and, if it provides one, its Performance View. This makes for a convenient way to save screen space in scenarios where you're
using KONTAKT as a sample player only.
KONTAKT 5 - Application Reference - 58
Page 59

The KONTAKT Window
Minimized View
A KONTAKT Instrument in Minimized view.
Above the Instrument Header, a reduced control panel provides two arrow buttons that will
switch between Instruments, the keyboard and quick-load buttons, the system performance meters, and the Maximize View button, which will bring you back to the normal view.
KONTAKT 5 - Application Reference - 59
Page 60

The Rack Multi Instrument Mode)
Multi Instrument Header
6 The Rack Multi Instrument Mode)
The Rack( is the place in which your mouse pointer will spend the most time when you're
working with KONTAKT. It operates in one of two modes: the Multi Instrument mode lets
you view and edit your Multi, while the Instrument Edit mode lets you edit an Instrument.
Let's take a closer look at the first one.
When you start KONTAKT, the Rack will be in Multi Instrument mode. In this mode, any
Instrument in your Multi will be shown as a horizontal Instrument Header, which contains
the Instrument name and some controls for general parameters. Your Multi can contain up
to 64 Instruments, which will be spread across 4 pages of up to 16 Instruments each.
6.1 Multi Instrument Header
At the top of the Rack section, you'll notice a header that contains a name field and some
buttons; this header is always visible as long as the Rack is in Multi Instrument mode.
The Rack header in Multi Instrument mode allows you to manage your Multi, switch between the four Multi pages, toggle the
visibility of the Multi-Script editor, show or hide Aux send controls, and resize all Instrument Headers.
At its left side, a text field contains the name of your currently loaded Multi; if you have
just started KONTAKT, this will read “New (default)”, as this is the default Multi file that
will be loaded on startup. To change the name, just click on it and enter a new one. The
left and right arrow buttons will replace your Multi with the previous or next one from the
same directory, if there are any.
Next to the Multi name field are four page buttons which allow you to switch between the
four Instrument pages.
Each Multi can contain up to 64 Instruments, arranged across four pages of 16 Instruments each.
You can use these pages for keeping your Instruments in separate categories when your
Multi is very large, or you can just switch to the next page when the 16 available Instrument slots of your current one are occupied. Another option is to assign all Instruments on
a page to channels of the same MIDI port; if you have four ports at your disposal, this
KONTAKT 5 - Application Reference - 60
Page 61

The Rack Multi Instrument Mode)
Instrument Header
method lets you easily keep track of your MIDI assignments in large Multis. Of course,
nothing keeps you from assigning several Instruments to the same MIDI channel – this is a
quick way of creating layered sounds.
KSP button.
The KSP button next to the page buttons toggles the visibility of a global Script Editor
pane; here you can create, edit and manage Multi Scripts, which operate on a higher level
than normal Instrument Scripts, but work the same otherwise. Multi scripts are explained
in chapter ↑18, The Script Editor.
At the right side of the header, you'll notice two buttons; with these, you can control which
types of information should be visible on each Instrument Header. The left button, labeled
Aux, toggles display of a row of Aux send controls that let you control the signal level at
which each Instrument is routed to the Aux Channels, which are explained in section
↑14.3, Working with Aux Channels. The right button toggles all Instrument Headers in
your multi between their minimized ad maximized size.
Toggle aux sends and minimize/maximize headers.
At their normal size, Instrument Headers contain more information, but also occupy more
screen space – if you're not planning to adjust any Instrument parameters and would like
to see an overview of all Instruments on a page, just switch all Instrument Headers to their
minimized view.
6.2
Instrument Header
Whenever you create a new Instrument or add one to your current Multi, it will appear in
the Rack as an Instrument Header.
An Instrument Header at its normal display size.
KONTAKT 5 - Application Reference - 61
Page 62

The Rack Multi Instrument Mode)
Instrument Header
Each Instrument Header can be optionally reduced in size; the header shown here is set to
its normal size. In this mode, it displays parameters that describe how the Instrument will
work in the context of the current Multi; also, it provides some controls that allow you to
adjust parameters like the Instrument's output volume, its panning position, or its mute
status. Here's a run-down of the controls:
▪ Edit button: This is the button with a wrench symbol on it. For locked instruments, this
will be replaced by a cog. If you click on this button, the Rack will switch into Instru-
ment Edit mode, and you will be able to edit the Instrument on its core level. The
same button in Instrument Edit mode will return to the Multi Instrument view.
▪ Instrument Icon: Located below the edit button. KONTAKT Instrument creators can
choose from a range of icons that indicate the general category of their creation.
Some libraries will also use custom icons.
▪ Quickload Menu: The dropdown menu to the left of the instrument name gives access
to your Quickload browser.
▪ Instrument Name: This field contains the name of your Instrument. You can edit the
name by clicking on it and entering a new one. Note that the name displayed here
will be identical to the file name (without the .nki extension) when you load and save
the Instrument.
▪ Previous / Next buttons: The left/right arrow button to the right of the instrument name
will exchange the Instrument with the previous or next one from the same directory,
respectively. The exchange will be done in place, so the new Instrument will occupy
the same slot.
▪ Output Channel: This field displays the currently selected Output Channel that will re-
ceive the output signal from this Instrument. Clicking on the channel name will open
a drop-down menu with all currently defined Output Channels; this way, you can as-
sign the Instrument to a different channel.
▪ MIDI Channel: This field indicates the currently assigned MIDI input channel that the
Instrument will respond to. Clicking on it will open a drop-down menu that allows you
to select a new MIDI channel for this Instrument. The Omni setting will make it re-
spond to MIDI data on any channel; below it, the available ports of your MIDI inter-
face will appear as sub-menus, each one containing the 16 channels of the respective
ports. Note that the maximum number of distinct MIDI channels that you can use is
64 in the stand-alone version of KONTAKT, and 16 when using KONTAKT as a plug-
in.
KONTAKT 5 - Application Reference - 62
Page 63

The Rack Multi Instrument Mode)
Instrument Header
▪ Voices: This number indicates how many voices are currently being used by the In-
strument.
▪ Max Voices: This is the maximum number of voices that the Instrument may use at
any time. You can change this value by clicking on it, then dragging your mouse up or
down. If you notice that the number of currently used voices rises to the Max Voices
value during play and you hear that voices are being cut off, try increasing this value.
▪ Purge: This button opens a drop-down menu that lets you execute the functions relat-
ed to KONTAKT's purge mechanism on a per-instrument basis. The purge facility is
explained in section ↑5.4, Purge Menu.
▪ Memory: This value indicates how much system memory is currently being used by the
Sample data of this Instrument.
▪ Solo button: When you click on this button, all other Instruments in your Multi will be
muted, so that you can hear its output signal in isolation. How KONTAKT will handle
multiple Solo selections depends on the setting of the Solo Mode option, which is ex-
plained in section ↑5.3.3, Handling Tab.
▪ Mute button: This will mute the current Instrument, thus temporarily removing its out-
put signal from the Output Channel.
▪ Tune: Moving this knob clockwise or anti-clockwise will change the pitch of this In-
strument up or down, respectively. The control covers a range of +/- 3 octaves and will
move in semitone steps unless you hold the Shift key while moving it, which lets you
make finer adjustments.
▪ Pan: This slider adjusts the panorama position of the Instrument's output signal.
▪ Level Meters: These LED-style bar graph meters indicate the current output levels
across all channels of this Instrument.
▪ Volume: This slider adjusts the output volume of this Instrument. You can choose
whether the default value of Volume sliders will be -6 dB or 0 dB in the Options Dia-
log.
▪ Remove Instrument: Clicking on the “X” button in the upper right corner of an Instru-
ment Header will remove the respective Instrument from your Multi.
▪ Minimize View: When you click on this button, this Instrument Header will be mini-
mized in size. This allows you to adjust the display sizes of headers individually.
▪ Aux: Clicking on this button will show and hide the row of Aux send sliders below this
Instrument Header.
KONTAKT 5 - Application Reference - 63
Page 64

The Rack Multi Instrument Mode)
Instrument Header (Minimized)
▪ PV: If the Instrument provides a Performance View panel, this button will toggle its
visibility. You can read all about the Performance View feature in section ↑6.4, Per-
formance View of this manual.
6.3 Instrument Header (Minimized)
If you want to save screen space, you can switch all or individual Instrument Headers to a
minimized view, which contains only the most important parameters and controls.
An Instrument Header at its minimized display size.
In this mode, the Instrument Header includes only the Edit button, the Instrument Name
field, Solo and Mute buttons, Output Volume and Pan sliders, Level Meters, and buttons for removing this Instrument from your Multi and switching the header back to its normal size. For
an explanation of what each control does, refer to the section above.
6.4 Performance View
Using KONTAKT's internal scripting language, Instruments can provide custom control
panels, called Performance Views. The idea behind this feature is that it makes Instrument-specific settings available in a user-friendly way that doesn't require the user to
switch into Instrument Edit mode. For example, a funky guitar Instrument might provide a
Performance View that lets you tweak its effects, like a wah-wah filter or a guitar amp simulation. The main advantage of this approach is that Performance Views appear below the
Instrument Header in the Rack; you don't need to switch to Instrument Edit mode to locate the respective parameters or make out to which controllers they are assigned. All Instruments included in the KONTAKT 5 library provide Performance Views.
KONTAKT 5 - Application Reference - 64
Page 65

The Rack Multi Instrument Mode)
Performance View
If an Instrument provides a Performance View, its custom panel will appear below the Instrument Header in the rack.
As you can see, this feature can be used to build highly customizable user interfaces; in
this example, the Performance View has a custom control set and a row of tabs at the bottom, which let the user switch between different control pages.
Note that Performance Views appear only below Instrument Headers at normal size, not below minimized headers. Also, you can turn control panels of Scripts in your Instrument into
Performance Views yourself; this process is explained in section ↑18.3, Editing and Saving a
Script of this manual.
KONTAKT 5 - Application Reference - 65
Page 66

The Rack Instrument Edit Mode)
7 The Rack Instrument Edit Mode)
Whenever you( edit an Instrument, the Rack will switch into Instrument Edit mode. In this
mode, all other Instrument Headers won't be visible anymore (you can still access them via
the Instrument Navigator pane of the Browser, though; read how this works in section
↑12.1.3, Instrument Navigator Pane of this manual); instead, the whole Rack space will
be dedicated to the editors, control panels, and modulation tables of your selected Instrument. To edit an Instrument, click on the wrench icon of its Instrument Header when the
Rack is in Multi Instrument mode.
At the top of the Rack pane, you'll notice that switching to Instrument Edit mode has also
changed the header.
The Rack header in Instrument Edit mode allows you to manage your Groups, Undo or Redo your most recent actions, save
the Instrument, or switch the edit view to the previous or next Instrument in your Multi.
From left to right, here's what these elements do:
▪ Exit button: Clicking on this button will “fold in” the Instrument and return to the Mul-
ti Instrument view.
▪ Edited Groups: This field indicates whether parameter adjustments on the Group level
will affect just one or multiple Groups. If it reads Group, any parameter changes will
only affect the current Group; Multi indicates that multiple Groups are currently se-
lected for editing, and All warns you that all Groups of your Instrument are currently
selected for editing.
▪ Displayed Group: This field indicates the name of the Group whose parameters are cur-
rently being displayed by the Group level modules. When you click on it, a drop-down
menu that contains all Groups in your Instrument will appear. Choosing one of these
Groups will select it for display and editing.
▪ Edit All Groups button: This button toggles the selection of all Groups for editing. It
does the same as the
▪ Undo button: When you click on the circled arrow of this button, your last action will
be undone. As KONTAKT keeps a log of your actions, you can revert more than one
action to return to a specific point in your editing history. Clicking on the small down
arrow icon at the right of this button will open your edit history in a dialog window;
selecting an action will take you back to this point in your edit history. Note that the
Edit All Groups
button in the upper left corner of the Group Editor.
KONTAKT 5 - Application Reference - 66
Page 67

The Rack Instrument Edit Mode)
Undo and Redo facilities are only available when you're working in Instrument Edit
mode. To enable the Undo function, open the Handling tab in Global Options. Select
Enable Undo.
▪
Redo button: If you reverted one or more actions via the Undo button and change your
mind, you can restore parts of your changes by clicking on the circled arrow of the
Redo button. Note that you have to do this right after using the Undo function; if you
perform any other actions after using Undo, your edit history cannot be restored. Just
like the Undo button, the Redo button will open a history list dialog when you click on
the small down arrow at its right side.
▪ Quick-Save: This button saves your Instrument in its current state; if you haven't
saved it before, a “Save” dialog will appear, otherwise KONTAKT will overwrite the
last version right away. Use this button generously when you're in the middle of com-
plex editing tasks; this way, you can always revert to the last saved version if some-
thing goes wrong.
▪ Previous / Next Instrument buttons: Clicking on these buttons will switch the Instrument
Edit view to the previous or next Instrument in your Multi, respectively.
Below its own header, the Rack displays the Instrument Header of your edited Instrument
(this is identical to the one that's being displayed in Multi Instrument mode), a row of buttons that will show and hide editors for various aspects of your Instrument, and a flexible
vertical view in which you can access all editors, modulation and routing tables, control
panels, and signal processing chains of your Instrument. The four sections at the bottom
of the Rack – labeled Buses, Insert Effects, Send Effects, and Modulation – can be optionally hidden from view by clicking the button next to their titles. When you choose to show all details, the Instrument Edit view of a full-sized, complex Instrument might look similar to
this:
KONTAKT 5 - Application Reference - 67
Page 68

The Rack Instrument Edit Mode)
Instrument Edit rack, with all editors and panels opened.
If you find this a little intimidating, don't worry; you don't have to know every panel inside
out before you can create useful Instruments or edit existing ones. Just conquer the interface one step at a time and refer to this manual and the Info Pane whenever you're not
sure what a specific knob, button or menu does; this way, you'll get the hang of how to get
the most out of KONTAKT sooner than you might think.
Let's take a quick look at what each panel does. All interface elements will be explained in
detail within the respective chapters of this manual.
KONTAKT 5 - Application Reference - 68
Page 69

The Rack Instrument Edit Mode)
▪ Instrument Header: This is the same header that is displayed when the Rack is in Multi
Instrument mode. You can switch back to the Multi Instrument mode by clicking on
the wrench icon.
▪ Editor Buttons: These buttons toggle the display of various editor panels in the Instru-
ment Edit view. The Mapping Editor and Wave Editor buttons have an arrow icon on
their right sides; clicking on this when you're running KONTAKT in stand-alone mode
will open the respective editor in a separate window. The leftmost button, labeled In-
strument Options, is special and will be explained below.
▪ Script Editor (visible if the Script Editor button is enabled): In this editor, you can load
Scripts, access their user interfaces, and edit their source code.
▪ Group Editor (visible if the Group Editor button is enabled): This is where you select,
edit, and manage the Groups in your Instrument.
▪ Mapping Editor (visible if the Mapping Editor button is enabled): This editor lets you
add Samples to your Instrument, map them to the keyboard, assign them to velocity
ranges, and manage the Zones in your Instrument.
▪ Wave Editor (visible if the Wave Editor button is enabled): This is where you work on
the Sample level to create loops, define Slice markers for rhythmic Samples, create
Zone Envelopes, and perform destructive audio editing operations.
▪ Source Module: This core module takes care of the Sample playback for a Group.
▪ Source Modulation Router: In this table, you can define modulation assignments,
which change parameters of the source module over time in a variety of different
ways.
▪ Group Insert Effects: This chain consists of 8 slots, each of which can take up a signal
processing module. Each Group has its own Insert Effects chain, which will operate
polyphonically (i.e. on the signal of each voice that originates in this Group separate-
ly).
▪ Signal Processor Controls (visible if the Edit button on the chain module above is ena-
bled): This panel contains the controls of a signal processing module in the Group In-
sert Effects chain.
▪ Amplifier Module: This module will shape the volume of the source signals in each
Group.
▪ Modulation Router (visible if the Channel Routing button on the Amplifier panel is ena-
bled): This matrix allows you to configure the signal handover between the Group and
Instrument signal flow level.
KONTAKT 5 - Application Reference - 69
Page 70

The Rack Instrument Edit Mode)
Instrument Options Dialog
▪ Instrument Bus Effects Chain: In this area you can apply different effect chains to up to
16 different buses. Buses can be used to apply effect chains to different collections
of Groups.
▪ Signal Processor Controls (visible if the Edit button on the chain module above is ena-
bled): This panel contains the controls of a signal processing module in the Instru-
ment Bus Effects chain.
▪ Instrument Insert Effects chain: This chain could be considered the master effects of
the instrument, affecting all signals that pass through the instruments main output.
▪ Signal Processor Controls (visible if the Edit button on the chain module above is ena-
bled): This panel contains the controls of a signal processing module in the Instru-
ment Insert Effects chain.
▪ Send Effects Slots: These slots take up signal processing modules which act as send
effects; they can be fed individually with signals from various points of the signal
flow.
▪ Signal Processor Controls (visible if the Edit button on the Send Effects slots module
above is enabled): This panel contains the controls of a signal processing module in
one of the Send Effects slots.
▪ Modulation Sources: This section contains a panel for each modulation source that you
have defined in your Instrument.
7.1 Instrument Options Dialog
When you click on the leftmost button below the Instrument Header while editing an Instrument, the Instrument Options dialog will appear. It allows you to adjust parameters
that affect this Instrument's playback behavior, MIDI response, and appearance in the
Rack. The Instrument Options are divided into four categories; you can access these by
clicking on the respective tabs on the left side of the dialog window.
KONTAKT 5 - Application Reference - 70
Page 71

The Rack Instrument Edit Mode)
Instrument Options Dialog
7.1.1 Instrument Tab
The Instrument tab of the Instrument Options dialog contains general options which affect the playing behavior of the respective Instrument.
Voice Stealing Mode: The default way in which KONTAKT will free up voices when the Instrument's maximum voice count has been reached. These options are explained in section ↑15.3, Voice Groups of the Group Editor chapter.
Voice Stealing Fadeout Time: When KONTAKT has to recycle a voice, it won't just cut it off
abruptly, but apply a short fade-out; this eliminates clicking noises. This parameter adjusts the length of the fadeout in milliseconds.
Key Switch Default Key: If you have defined any keyswitches for your Instrument, this value
specifies the default switch that will be active right after the Instrument has been loaded.
MIDI Transpose: This parameter allows you to apply a transposition offset to all incoming
MIDI notes. In contrast to the Tune knob in the Instrument Header, which alters the pitch
of the sample playback, this value will change the MIDI notes only; for instance, a setting
of 12 will have the same effect as playing an octave higher.
Key Range: The keyboard range to which this Instrument will respond. Setting this parameter to different ranges across multiple Instruments is a quick way to create keyboard splits.
Velocity Range: Limits the velocity range to which this Instrument will respond.
KONTAKT 5 - Application Reference - 71
Page 72

The Rack Instrument Edit Mode)
Instrument Options Dialog
Instrument Wallpaper: To give your Instruments a distinctive appearance in the Rack, you
can create your own skins. This parameter lets you choose an image file in TGA or PNG
format that will be used instead of the default panel background of the Instrument Header
at its normal size. The image needs to have a color depth of 16, 24, or 32 bits and should
be 633 pixels wide – larger widths will be cut off, smaller widths will be filled with black.
We have included some sample skins in the KONTAKT installation.
This feature is even more appealing when you use it in combination with Performance
Views; the height of a performance view can be set in the instrument scripts.
After you have added a skin to your Instrument, we recommend that you save it once with
samples; this will put the skin image file into a “wallpaper” sub-folder inside the Instrument's sample folder.
Resource Container: Now that KONTAKT libraries can contain many different types of files,
the Resource Container was designed as a tool for library developers to help them keep all
of these files in a convenient location. In this area you can
attach an nki to one via the
7.1.2 DFD Tab
Browse
button.
Create
a Resource Container, or
The DFT tab of the Instrument Options
KONTAKT 5 - Application Reference - 72
Page 73

The Rack Instrument Edit Mode)
Instrument Options Dialog
DFD Preload Buffer Size: With this slider, you can adjust the size of each Sample portion
that will be buffered in memory for instant playback. This value applies only to Samples
that belong to Groups whose Source Module is operating in DFD mode. If any Group in
DFD mode causes drop-outs which disappear when you put the respective Source Module
into Sampler mode, you might want to try increasing this parameter.
Background Loading: The Background Loading option Allow instant playback for samples which are
not loaded yet is available here. Enable this option to have KONTAKT play every triggered
note during Background Loading.
Under certain special circumstances, playing notes while loading samples in the background may cause 'flam'-like glitches or other unexpected audio artifacts. Disable this option to avoid such artifacts.
7.1.3 Controller Tab
The Controller tab of the Instrument Options
MIDI Controller #64 (Sustain Pedal): You can choose how KONTAKT should interpret and
handle incoming MIDI controller #64 messages, which are usually being sent by sustain
pedals:
▪ Pedal + CC will keep the Instrument in its sustain phase as long as the sustain pedal is
depressed, and otherwise treats the message like a normal MIDI controller (which al-
lows you to use it as a modulation source).
KONTAKT 5 - Application Reference - 73
Page 74
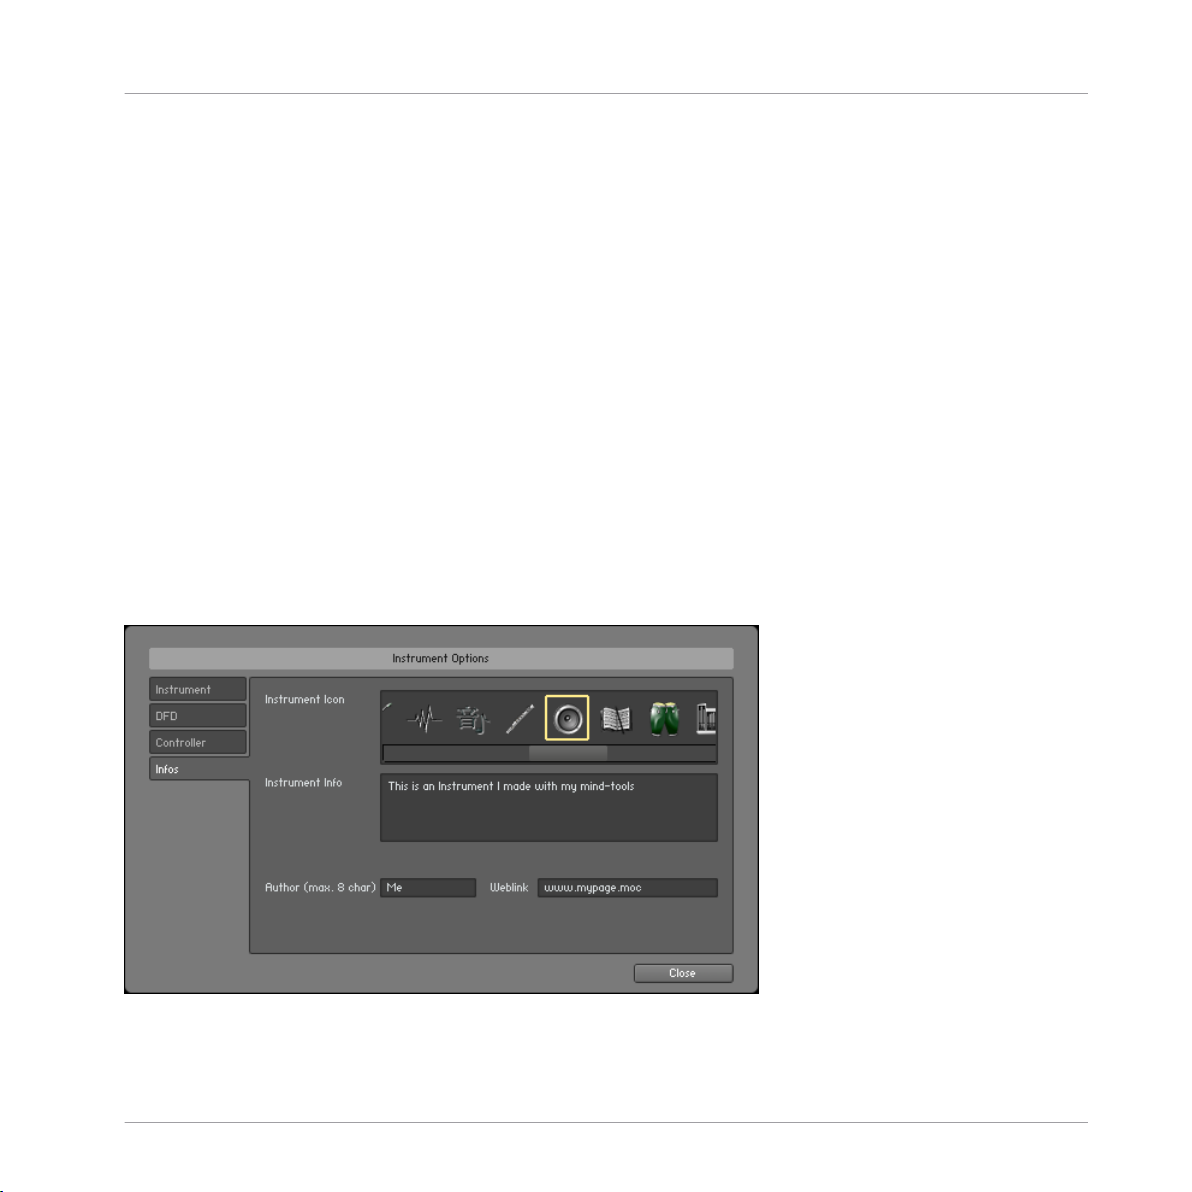
The Rack Instrument Edit Mode)
Instrument Options Dialog
▪ Sustain Pedal Without Controller will keep the Instrument in its sustain phase as long as
the sustain pedal is depressed; the message won't be available as a normal MIDI con-
troller.
▪ Controller Only: KONTAKT won't use sustain pedal messages for sustaining Instru-
ments, but you'll be able to access them as MIDI controllers for your own purposes.
Accept All Notes Off / All Sounds Off: When activated, KONTAKT will interpret and adhere to
incoming “all notes off” MIDI messages.
Accept Standard Controllers for Volume and Pan: When activated, you can change the output
volume and pan settings of an Instrument by sending MIDI CCs #7 and #10, respectively.
These are the standard controller numbers for volume and pan.
MIDI Controller #7 (Volume) Range: This drop-down menu lets you choose how the 128-step
value range of MIDI CC #7 controller messages will be mapped to the output volume slider
if the previous option is enabled. The selected range endpoints correspond to the volume
levels at MIDI values 0 (minimum) and 127 (maximum), respectively. The default setting
is negative infinity .. 0dB, which mutes the Instrument at controller value 0 and puts it at
unity gain at controller value 127.
7.1.4 Infos Tab
The Infos tab of the Instrument Options
KONTAKT 5 - Application Reference - 74
Page 75

The Rack Instrument Edit Mode)
Instrument Options Dialog
Instrument Icon: KONTAKT allows you to assign icons to your Instruments; these will be
displayed within normal-sized Instrument Headers in the Rack and provide visual hints
about the Instrument category. The rightmost icon in the list, labeled new, is the default
icon for newly created Instruments. Note that KONTAKT will assign special icons to Instruments that were imported from third-party formats; these don't appear in this list.
Instrument Info: Use this text field to enter any information, credits, or production notes
you'd like to be attached to your Instrument.
Author: When you have created an Instrument and want to distribute it, you can enter your
own or your company's name here.
Weblink: This field lets you provide a web location where people can find more information
about you and your KONTAKT creations.
KONTAKT 5 - Application Reference - 75
Page 76

Loading and Creating Instruments
8 Loading and Creating Instruments
In order to add a previously created Instrument to your Multi, either in KONTAKT format
(.nki) or in one of the supported foreign formats, locate your Instrument file within the
Browser first. You can either drag it into a blank space of the Rack (which will add it to
the Multi), or drag it onto an Instrument Header that's already in the Rack (which will replace that Instrument with the new one). Alternatively, you can choose the Load command
from the Files menu; a file selection dialog will appear that lets you locate and select any
Instrument, Multi, or Instrument Bank file on your system.
If you have enabled the “Browser: Double click loads instrument” option in the Options Dialog, you can also load Instruments by double-clicking them in the Browser.
After the Instrument has been loaded successfully, its Instrument Header will appear in
the Rack. If required, you can now change its Output and MIDI channel assignments.
Once these are correctly set, you should be able to play the Instrument via your MIDI keyboard or the virtual On-Screen Keyboard.
If you'd like to create an Instrument from scratch, you have several options. The New In-
strument command in the Files menu will add an empty Instrument that's based on the de-
fault Instrument template (you can change this template by creating a default Instrument
of your choice and saving it via the Save as Default Instrument command in the Files menu).
In most cases, you'll proceed with switching into Instrument Edit mode, opening the new
Instrument's Mapping Editor, and dragging Samples from the Browser onto the Zone grid
in order to place them on the keyboard – this process is explained in detail in chapter ↑16,
The Mapping Editor of this manual.
Alternatively, you can start out with a Sample or a set of Samples and let KONTAKT do the
work of combining them into an Instrument. Just locate and select the Sample files that
you want to use in the Browser, then drag them into an empty space in the Rack; KONTAKT will create a new Instrument (once again, based on the default Instrument template)
and spread the Samples across the keyboard. If you do this with a WAV file that contains
Slice markers or with a REX file, KONTAKT will switch the new Instrument to Beat Machine mode, so that you can play your Sample in sync to your song tempo right away.
KONTAKT 5 - Application Reference - 76
Page 77

Loading and Creating Instruments
Samples Missing Dialog
As explained in the Files menu section of the Main Control Panel chapter, KONTAKT uses
different ways to reference the Samples that are being used by an Instrument within the
Instrument file. When Instruments are being saved in a monolith, the Sample data gets
embedded in the file itself, and thus can't be accidentally separated. In a lot of cases,
though, you will encounter Instruments that reference external Sample files on your system via their respective paths and file names. It's obvious that while this method creates
small Instrument files and avoids unnecessary duplication of Sample data, it's not as bullet-proof as combining Instrument and Sample data into a monolith; whenever you move
referenced Sample files to a different location, KONTAKT won't be able to find them anymore in the location that's being specified within the respective Instrument files. Depending on whether KONTAKT used a relative path for referencing Samples, this can even happen when you move Instrument files while keeping their referenced Samples in their original locations.
Whenever you attempt to load an Instrument whose Samples cannot be found in their expected location, KONTAKT will pop up a “Samples Missing” dialog. This window offers
various options that help KONTAKT locate the missing files on your system. Once it has
found them, you can then re-save the Instrument with the corrected references in order to
make the changes permanent.
KONTAKT 5 - Application Reference - 77
Page 78

Loading and Creating Instruments
Samples Missing dialog, indicating that 10 Samples of the Instrument couldn't be found in the expected location.
In its upper half, the “Samples Missing” dialog displays a list of all Sample files that were
referenced within the Instrument file, but couldn't be found in the expected locations;
these locations are shown in the right column. Whenever you're not sure which action
might have caused the “Samples Missing” dialog to appear, study the locations displayed
in the Assumed At column carefully; you might recognize a folder that you've moved to a
different location at some point in the past.
KONTAKT 5 - Application Reference - 78
Page 79

Loading and Creating Instruments
In the lower half of the dialog, KONTAKT provides a number of commands that will either
search for the missing files automatically (left side), or allow you to specify the new location manually (right side). If you're not sure where the missing Samples could be located,
choose one of the automatic options on the left side:
Search Filesystem: This will search for the missing Samples on all file systems of your hard
disks. Depending on the size and speed of your hard disks, the scanning process might
take a considerable amount of time, but if the Sample files have not been renamed or deleted, they will eventually be found.
Search Database: This will search the Samples within KONTAKT's own Database, then use
any found records to locate them on your hard disk. The idea behind this is that the Samples might have been picked up by a Database re-build process after they have been
moved; if this is the case, their actual locations in your file system can be retrieved from
the Database. This option requires a correctly built Database that has been configured to
include Sample data.
Note that by default, all these options search for the missing Samples by their file names
only; in some cases, two or more different Samples on your hard disk might share a common name. This can cause KONTAKT to load the wrong Sample; if you notice this in your
Instrument, don't save it. Instead, remove it from your Multi, load it again, and repeat the
search process after you've enabled the
Check for Duplicates
option at the bottom of the
“Samples Missing” dialog. This will make KONTAKT examine any files with matching
names more thoroughly, which will sort out duplicates, but take more time than searching
without this option.
If you already know where the missing Samples are located on your system, there's no
need for an automatic search. Instead, choose one of the options on the right side, which
allow you to locate files manually:
Browse for Folder: When you click on this button, a folder selection dialog will appear. After
you've located and chosen a folder, KONTAKT will look for the missing Samples inside this
folder and all of its sub-folders.
Browse for Files: This option will ask you to locate each missing file manually, one at a
time, via a file selection dialog. During this process, the name of the currently searched
file will be displayed in the title bar of the selection dialog window.
If the Resolve All Possible option at the bottom of the right option field is enabled, KONTAKT will look for all missing Samples in each location that you specify via the Browse for
Folder or Browse for Files option. If it's disabled, you will be asked to provide a location
for each missing file separately.
KONTAKT 5 - Application Reference - 79
Page 80

Loading and Creating Instruments
Once you have selected the appropriate search action, KONTAKT will start the file scanning process. During this scan, the missing Sample list will shrink accordingly whenever a
Sample has been successfully located. Once all Samples have been found, the dialog will
disappear and the Instrument will be loaded into your Rack. You should now make sure
that it works correctly and then re-save it to its original location with the Save command in
the Files menu.
If you have moved a whole library, and the Samples Missing dialog appears each time you
attempt to load an Instrument from this library, you don't need to click through the Samples
Missing dialog and re-save the Instrument each time; the Batch Re-Save command in the
Files menu allows you to locate the referenced Samples of all Instruments below a folder at
once and re-save all of them automatically. This command is explained in section ↑5.3.3,
Handling Tab of this manual.
If there are still missing Samples after the scanning process, the “Samples Missing” dialog will reappear, which allows you to try another search option. If each attempt to locate
the missing Samples fails, they either don't exist on your system anymore, or have been
renamed. In such cases, you can choose to either abort loading the Instrument by clicking
the right button at the bottom of the dialog, or load the Instrument without the missing
Samples with the left button.
Allow Alternate File Types: This option allows you to ignore the audio file extension and resolve missing samples with alternative file types with the same name. For example, if you
had an instrument which referenced uncompressed WAV files, but at some point you compressed the files to NCW format, you can reference the NCW files in place of the WAV
files.
KONTAKT 5 - Application Reference - 80
Page 81

Loading and Creating Instrument Banks
9 Loading and Creating Instrument Banks
An Instrument Bank allows you to combine up to 128 KONTAKT Instruments into one slot
of your Rack. Only one of the Instruments in a Bank can be active at any time, and you
can switch between them by sending MIDI program change messages. All Instruments in a
Bank will share the same MIDI channel, Output Channel, maximum note count value, output and pan settings, and Aux send levels. You can adjust these settings in the Bank
Header, which appears in the Rack and resembles an Instrument Header in structure.
Consider this example: An orchestral sampling library provides numerous articulations and
playing techniques for each instrument; these are split up into a number of KONTAKT Instrument files. For instance, the “Solo Flute” folder might contain the four files “Flute
sustain.nki”, “Flute staccato.nki”, “Flute halftone trill.nki” and “Flute flutter tongue.nki”.
Of course, you could just add these Instruments to your Rack and assign them to different
MIDI channels; this is not efficient, though, at least not if you're planning to use only one
Solo Flute in your arrangement (and thus won't need multiple articulations at the same
time), since you're wasting three MIDI channels and three of your 64 available Instrument
slots. Instead, you could create a “Flute” bank and insert all articulations you'll need into
its slots; this allows you to switch between these articulations by sending MIDI program
change messages. This work-flow is closer to the way you'd interact with a real flutist; in
order to get him to adapt his playing style to your music, you need to add expression, dynamic and articulation marks, as well as playing directions, to your sheet music.
Some notation programs allow you to specify how different articulation, expression, dynamic,
and playing direction marks in your score will be translated when you're playing it back via
MIDI. Assigning these items to MIDI program changes that correspond to the respective Instruments in your bank allows you to create very sophisticated setups, which allow you to
create realistic mock-ups from your scores instantly without any further MIDI optimization.
Refer to the manual of your notation program to find out whether it supports this method.
Similarly, you can create MIDI program changes at specific places of your sequences in
any MIDI sequencer program.
To add a new, empty Instrument Bank to your current Multi, choose New Instrument Bank
from the Files menu. A new Bank Header will appear in the Rack; its controls are similar to
that of an Instrument Header, but apply to all contained Instruments. In its name field,
KONTAKT 5 - Application Reference - 81
Page 82
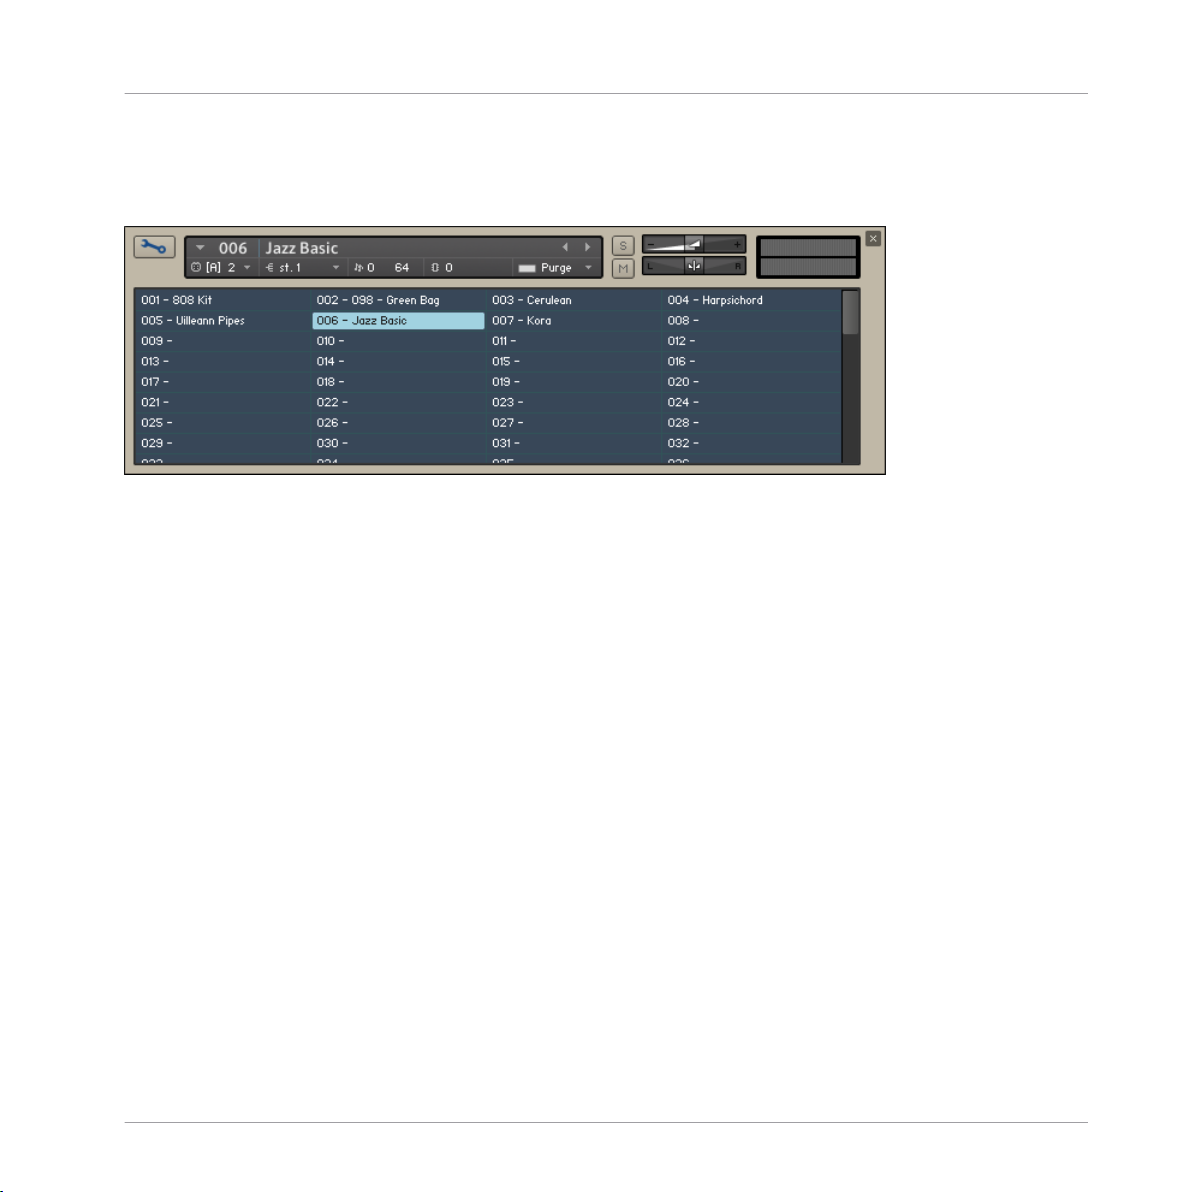
Loading and Creating Instrument Banks
the Bank Header will display the name of the currently active Instrument. In order to add
Instruments to this Bank, click on the wrench icon at the left side of its header; this will
open a list of 128 Instrument slots.
To access and assign the Instruments of your Bank, open the slot list by clicking on the wrench icon in the upper left corner
of the Bank header.
Dragging an Instrument (.nki) file from the Browser into a slot of the Instrument Bank will
load the Instrument into this slot. The number in the slot field indicates the program
change number that will switch to this Instrument; in the example shown above, incoming
notes on the Bank's MIDI channel will trigger the “plain” Jazz Guitar Instrument in slot
001 (this is being indicated in the name field of the Bank Header); sending a MIDI program change with a value of 2 will switch over to the equalized and reverberated version of
the Instrument, which will then stay active until the Bank receives a new program change
message.
You can edit an Instrument inside a Bank by double-clicking on the respective slot; this
will put your Rack into Instrument Edit mode. Once you're done with your modifications,
be sure to return to Multi Instrument mode by clicking the wrench icon in the upper left
corner of the Rack, as clicking the “X” button in the upper right corner will remove the
whole Bank from your Multi. Also, note that the modified Instrument can only be saved
within the Bank file; there's no way to save it to a separate Instrument file.
Instrument Banks and their contents will be loaded and saved along with your Multi, but
you can load and save them separately as well. KONTAKT Instrument Bank files are indicated with the extension .nkb. You can load these in the same way as you load Instruments; double-click them or drag them from the Browser into an empty space of your
Rack, or use the Load command in the Files menu.
KONTAKT 5 - Application Reference - 82
Page 83

The On-Screen Keyboard
10 The On-Screen Keyboard
KONTAKT can optionally display a virtual On-Screen Keyboard that you can “play” with
your mouse in case you don't have a MIDI keyboard connected to your computer. You can
show and hide the keyboard, which will appear at the bottom of your Rack, by clicking on
the keyboard icon at the top of your KONTAKT window.
The On-Screen Keyboard, indicating keyswitches (red) and playable range (blue).
When you click on a key, the keyboard will generate a corresponding note event that will
be received by the currently selected Instrument. Clicking and dragging the Pitch and Mod
wheels at its left side will generate pitch bend and MIDI CC #1 data, respectively. Below
the wheels, a transposition control lets you shift the displayed key range up and down.
Furthermore, the keyboard indicates used key ranges of your currently selected Instrument
with colors; by default, keys that trigger sample zones are colored blue, keyswitches (keys
that change the behaviour of the instrument) are colored red. In some libraries, however,
these colors can change in order to indicate different things (keyboard splits, different instrument types, etc.), but in the majority of cases, the keys will be blue and red, and uncolored keys are not mapped. This feature provides a quick overview in which range your
Instrument can be played, and which keys will switch between the different articulations.
KONTAKT 5 - Application Reference - 83
Page 84
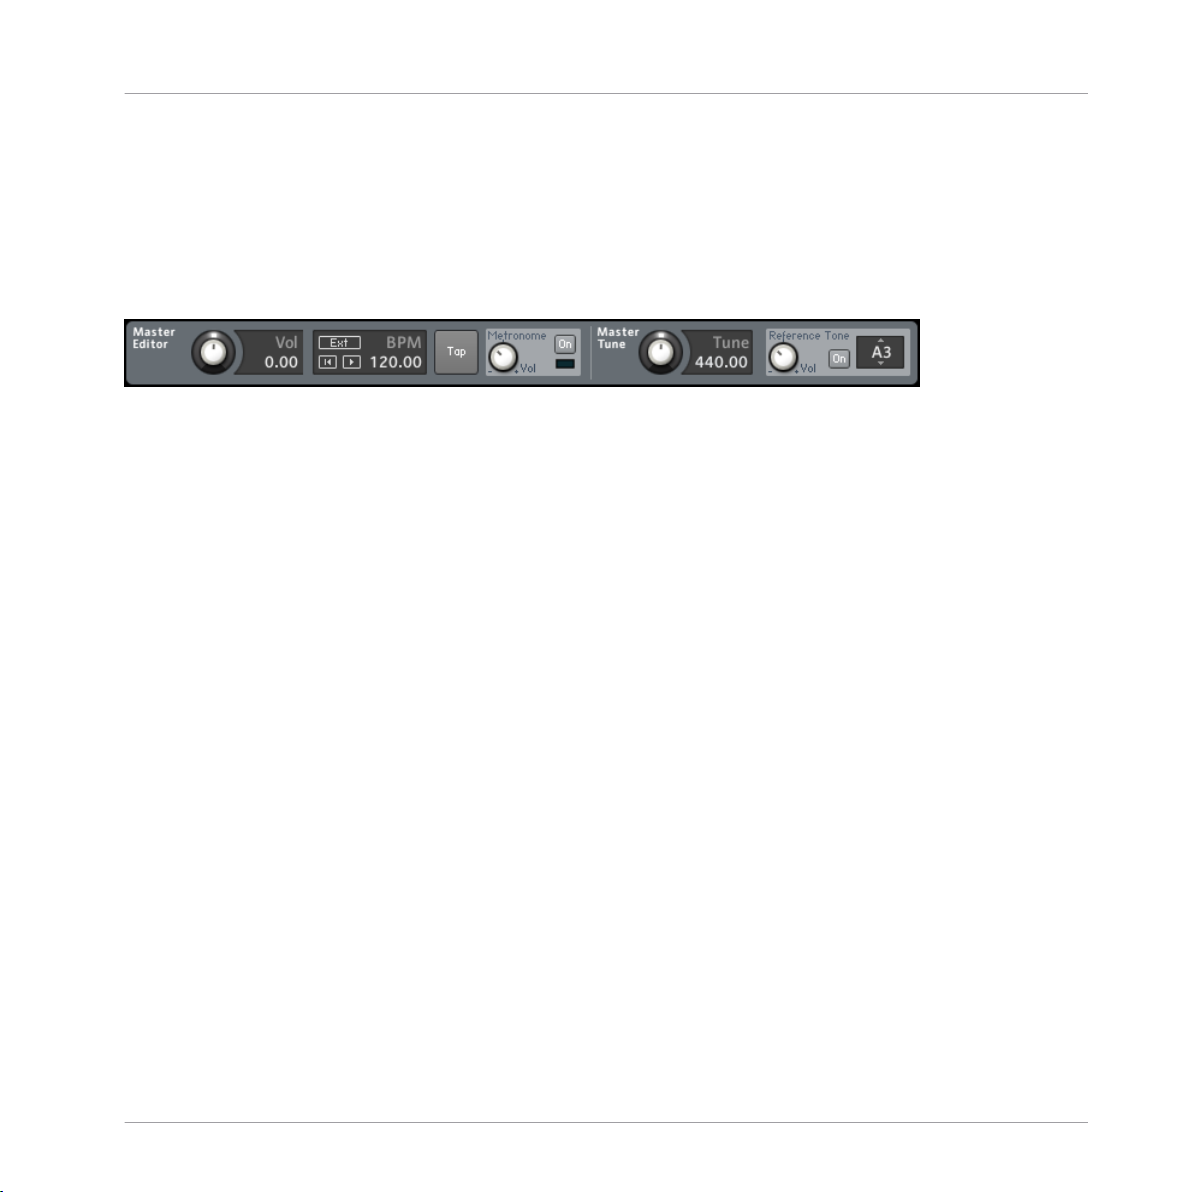
The Master Editor
11 The Master Editor
The Master Editor panel contains a number of global controls that affect the behavior of
all Instruments in your Multi, as well as some common utility functions. It can be shown
and hidden by clicking the button labeled Master at the top of the KONTAKT window, and
will appear on top of the Rack.
The Master Editor in stand-alone mode.
From left to right, here's a run-down of what you can find in the Master Editor panel:
Master Volume: This control adjusts the volume of all Output and Aux Channels – and thus
all audio signals that leave KONTAKT – at once. Its default setting is 0.0 dB, which leaves
the output levels unaffected.
Master Tempo: This field displays the current global tempo in beats per minute, as well as
sync options and song position controls. The tempo value (below the BPM label) affects the
playback speed of sliced loops and all time-related controls that can optionally be
synchronized to the tempo, such as the Speed control of LFOs. If you're running KONTAKT
in stand-alone mode, you can change the master tempo by clicking on the value and entering a new one, or by tapping a new tempo using the button described below. If running as
a plug-in in your host program, KONTAKT will use and follow your song tempo by default;
you can switch this behavior off by deactivating the button labeled
tempo value, which allows you to specify the tempo manually.
In stand-alone mode, the
Ext
button allows you to sync KONTAKT to an external MIDI
clock. The play and re-wind buttons below this control KONTAKT's internal song position,
which is necessary for some instruments that require song position information, like a
drum machine.
Tap button: This button offers a more intuitive way to adjust the Master Editor tempo. Just
tap this button rhythmically in quarter note values; KONTAKT will measure the time between taps and adjust the tempo value accordingly. If you're using KONTAKT as a plug-in
in your host program, this button only works if you've switched off the Extern Sync. parameter.
Extern Sync.
next to the
KONTAKT 5 - Application Reference - 84
Page 85

The Master Editor
Metronome: This small panel provides a simple metronome that can be handy in various
adjustment or rehearsal situations both in the studio and in live environments. The metronome can be switched on and off at any time by clicking the button labeled On. The knob
next to it allows you to adjust the volume of the metronome click. As the tempo is displayed by the flashing LED indicator as well, turning the Volume knob all the way down will
give you a purely visual metronome.
Master Tune: This knob allows you to change the master reference tuning from its default
value of A3 = 440 Hz. This might be required in situations where KONTAKT will be combined with the sound of orchestras or historical ensembles, which frequently use slightly
different reference tunings.
Reference Tone: This function provides a reference tone that allows you to tune other instruments in accordance to KONTAKT's current reference tuning. When activated with the
On
button, KONTAKT will play a sine wave at the pitch of the note that's being specified in
the rightmost selection field. You can adjust the volume of this reference tone with the
knob at the left side of the panel.
KONTAKT 5 - Application Reference - 85
Page 86

12 The Browser
The Browser allows you to organize and navigate any number of files that can be used in
KONTAKT in a quick and efficient way. Among other things, you can use it to:
▪ navigate through your file system to locate and load KONTAKT objects, such as In-
struments or Samples,
▪ import Instruments from various third-party sampler formats,
▪ manage and browse the contents of KONTAKT's Database,
▪ display a convenient overview of various aspects of the currently edited Instrument,
▪ browse and pick modules from the library of available effects, filters, and modulators,
▪ assign host and MIDI automation sources to Instrument parameters.
Wherever it makes sense, you can drag and drop items from the Browser into the Rack, so
you usually won't need to drag anything from the desktop.
The Browser can be shown and hidden by clicking on the leftmost button of the Main Control Panel. When it is active, the left side of the window consists of a section with 6 tabs,
namely Files, Libraries, Database, Monitor, Modules, and Auto. Let's see what each of these
does.
The Browser
Files Tab
12.1 Files Tab
This part of the Browser allows you to navigate your file system in a tree-based way, which
will be immediately familiar if you're accustomed to your operating system's file browsers
and selectors. It consists of two main panes and an audition toolbar at the bottom of the
section. There is an optional third pane, the Instrument Navigator, which you can toggle
via the rightmost button just below the tabs. This pane is also available on the Database
and Monitor tabs and will be explained in more detail later.
KONTAKT 5 - Application Reference - 86
Page 87

The Browser
Files Tab
The Files tab of the Browser pane provides a file system navigator.
You can click on the horizontal splitter bars that separate the panes and drag them up or
down in order to change the height of the respective panes. This works in other Browser
tabs as well.
12.1.1
Upper (Container) Pane
This pane shows all container objects on your computer in a tree structure. The term "container" encompasses all items that contain other objects, such as volumes (like hard disks,
CD-ROMs or network places), folders and monolithic sampler files that serve as "virtual
folders" (more on this later). A "+" icon next to an object indicates that there are further
KONTAKT 5 - Application Reference - 87
Page 88
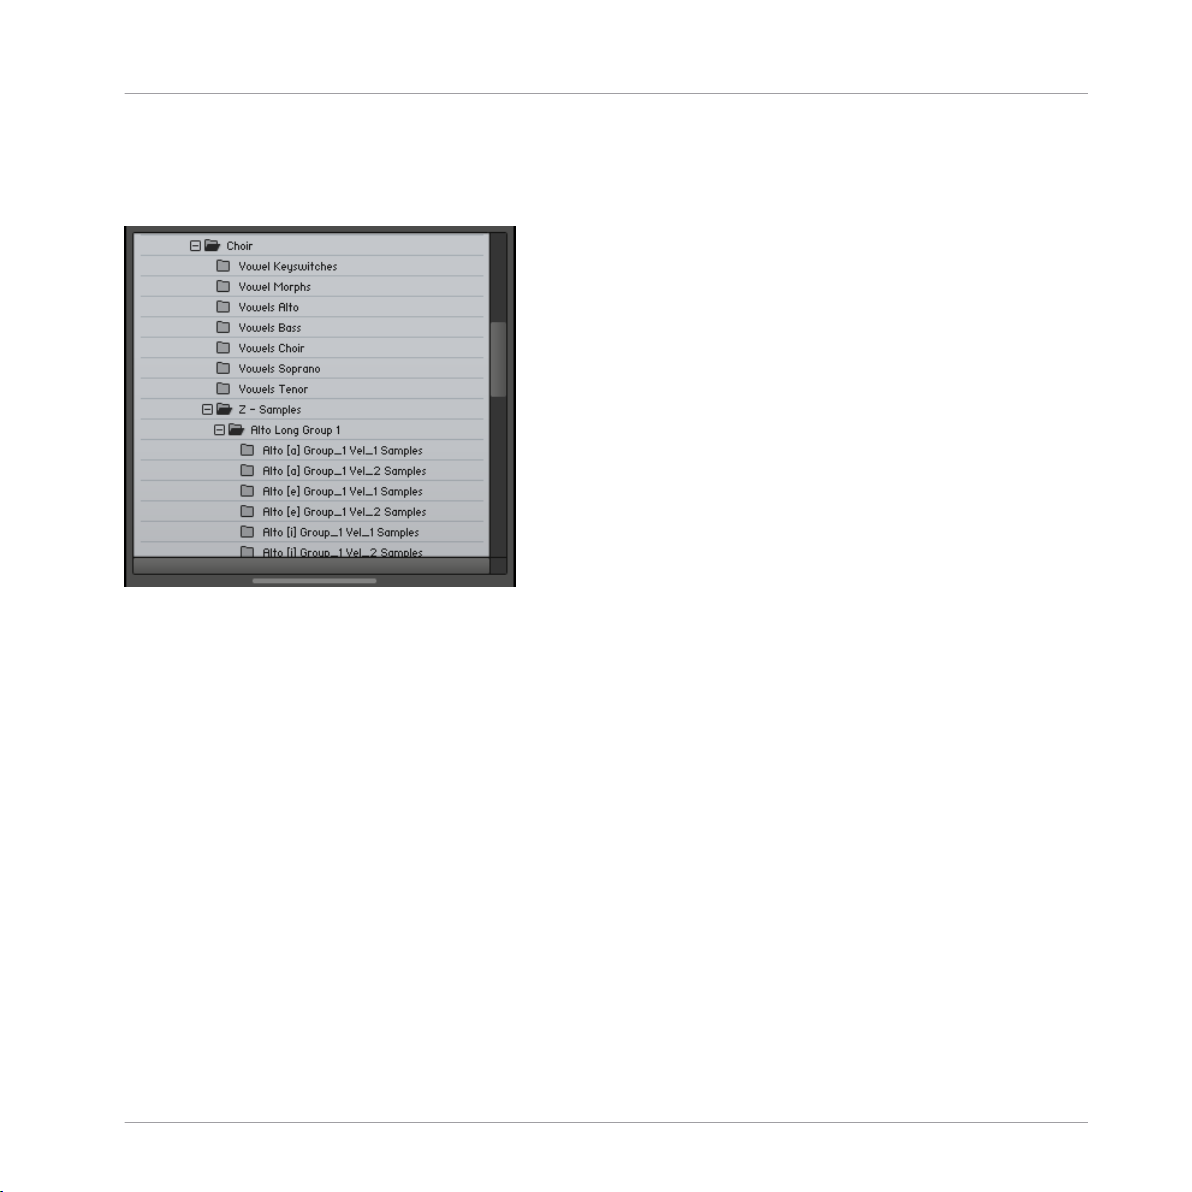
objects contained within, which are not currently being shown; you can display those by
clicking on the "+". Conversely, clicking on a "-" next to an object hides all of its contents
from the tree view.
The upper pane of the File Browser displays a navigable tree structure of your file system.
The Browser
Files Tab
12.1.2 Middle (Objects) Pane
Whenever a container object that you have selected in the upper pane contains items
which can be used in KONTAKT, these will show up in this pane. In contrast to the multidimensional tree structure of the upper pane, this list is always "flat" and does not span
multiple folders. In addition to relevant files, folders (if any) will also show up in this list
and can be navigated to via double-clicking; at the very least, the first item of the list will
usually be the parent directory (indicated with an arrow icon). This also means that you
don't necessarily need to use the upper pane for navigating through folders; however, it's
usually faster and more convenient.
KONTAKT 5 - Application Reference - 88
Page 89

The middle pane of the File Browser, displaying a number of Samples and their file sizes, native tempos, and modification
dates.
Information on the displayed items is spread across 4 columns; in addition to the filename, size and modification date, there's also a Tempo column that indicates the native
tempo of sliced loops. You can change the width of these columns by clicking and dragging the separator bars between their labels. Clicking on a column label will change the
sort order of the list according to the respective value; clicking on the same label again
will reverse the ordering direction.
Once you have found one or more items that you want to use in KONTAKT, there are several ways to load them:
▪ Double-click a Multi file (.nkm) or drag it from the Browser into the Rack to load it;
KONTAKT will ask you whether you want to replace your current Multi or merge the
one you've selected with the existing Multi.
▪ Double-click an Instrument file (.nki) or drag it from the Browser onto a free space in
the Rack to add it to your current Multi. KONTAKT will assign a MIDI channel according to the MIDI Channel Assignment for Loaded Patches setting in the Options Dialog.
This also works with multiple Instruments.
▪ Drag an Instrument onto an existing Instrument Header in your Rack to make it re-
place the respective Instrument. KONTAKT will keep the MIDI channel setting of the
previous Instrument.
The Browser
Files Tab
KONTAKT 5 - Application Reference - 89
Page 90

▪ Double-click a Sample (i.e. an audio file) or drag it onto a free space in the Rack to
create a new Instrument (based on your default Instrument) that contains a Zone with
this Sample spread across the whole keyboard range. If you do this with multiple
Samples, KONTAKT will still only create one instrument, but with a corresponding
number of adjacent Zones. Note that this does not work with 8-bit Samples, as
Groups created in this way will be set to DFD mode by default, which does not support 8-bit data.
▪ Click and drag a Sample into the Mapping Editor of an existing Instrument to create a
Zone and place it on the key or key range you're pointing at. While dragging, move the
mouse pointer up and down in the Mapping Editor to enlarge or shrink the target key
range. This also works with multiple Samples, in which case KONTAKT will create a
number of adjacent Zones. If you want to create multiple Zones above each other
(thus combining a number of samples into a velocity switch that's placed on a single
key), move the mouse pointer all the way down to the keyboard.
The sort order of the Browser's object pane determines in which order multiple Samples will
be used in KONTAKT. For instance, if you're planning to create a velocity switch from a
number of Samples, but realize after placement that the velocity assignment ended up being
upside down, just reverse the list order in the Browser and try it again.
The Browser
Files Tab
There are two ways to select multiple items in the object pane: contiguous ranges of items
in the list can be selected by clicking the first item and then, while holding your Shift key,
the last one in the range. Non-adjacent items can be selected with Ctrl-click (Cmd-click
on Macs).
12.1.3 Instrument Navigator Pane
When activated with the rightmost button of the File Browser's toolbar, the Instrument
Navigator pane appears at the bottom of the Browser. It shows a list of all Instruments in
your Rack, which is being kept up-to-date at all times. It has a lot in common with the
Multi Instrument view of the Rack in that it's divided into 4 pages of up to 16 Instruments
each, and displays the Instrument names along with Mute and Solo indicators. It provides a
good way to keep the big picture when you're editing an Instrument, in which case the
Rack does not convey any information about Instruments other than the currently edited
one.
KONTAKT 5 - Application Reference - 90
Page 91

The Instrument Navigator is not strictly specific to the Files tab, but rather a utility window
that's available in various tabs in the Browser. It's explained here for sake of consistency,
and referenced briefly in sections about other places where it's available.
The Instrument Navigator pane, displaying a number of loaded Instruments in the Multi.
The Instrument Navigator list will keep in sync with the page and Instrument selection in
the Rack and vice versa. To switch to one of the four Instrument pages, you can either use
the page buttons in the Rack header (if it's in Multi Instrument mode), or click on the
page numbers at the top of the Instrument Navigator list. Similarly, you can select an Instrument by clicking on either its header in the Rack, or its entry in the Instrument Navigator pane. If an Instrument that you select is not currently visible in the Instrument Navigator list, it will automatically scroll to its list position.
Double-clicking an Instrument in the Instrument Navigator list will open it for editing in
the Rack. When you're editing an Instrument, you can quickly switch to another Instrument by clicking on its name in the Instrument Navigator list; this is a great way to compare settings between Instruments, as KONTAKT will try to anchor both Instruments' editor views to the same vertical position.
The Browser
Files Tab
12.1.4 Audition Strip
The Audition Strip allows you to listen to audio files prior to loading them. This feature
works with audio files and sliced loops that you select in the lower pane of the Browser.
Note that when auditioning sliced loops, they will not be played in their native tempo
(which is being displayed in the Browser list), but in the current tempo of your host or, if
you're running KONTAKT in stand-alone mode, the tempo that's set in the Master Editor.
The Audition Strip is the bottom-most element of the File Browser and contains three controls.
The Audition Strip allows you to play any Sample that you select in the Browser.
KONTAKT 5 - Application Reference - 91
Page 92

Volume slider: This slider adjusts the sample playback level.
Auto button: When enabled, KONTAKT will automatically play a Sample once when you
click on it.
Speaker button: This button plays the selected Sample once or, if a Sample is currently being auditioned, stops the playback.
12.1.5 Refresh and Eject Buttons
Just below the Browser tabs, you'll see a series of function buttons and drop-down menus
that are specific to the currently visible tab. On the Files tab, this row starts on the left
side with a Refresh button, depicted by a circled arrow.
Browser refresh and eject button.
Whenever the File Browser has not yet picked up changes that recently occurred in your
file system, such as newly installed or removed sample libraries, you can force an update
of the file display by clicking this button.
The button next to the
Refresh
symbol allows you to eject your computer's CD/DVD drive(s)
from within KONTAKT. Just select the drive in the upper pane and click on this button to
eject it.
The Browser
Files Tab
12.1.6 The View Menu
This is a drop-down menu which contains options and functions that alter the way in
which information will be shown in the File Browser panes.
KONTAKT 5 - Application Reference - 92
Page 93

The view menu of the File Browser contains options that determine which items will be shown.
The first three items in this menu, labeled Show Network Drives, Show Removable Drives, and
Show Foreign Formats, are toggle options; selecting them will switch them on (indicated
with a small diamond next to their label) and off. With these, you can adjust whether the
File Browser should include mounted network volumes, removable drives, and file formats
that are not native to KONTAKT (but can be imported) in its lists.
Below the options, you'll find multiple slots labeled Quick-jump and numbered 1 to 10.
Quick-jumps are location memories that you can use to conveniently access a number of
frequently-visited places in your file system without the need to navigate there using the
container pane each time. The handling is simple: any location you navigate to in the File
Browser gets immediately saved to the currently selected Quick-jump entry. Once you
switch to another Quick-jump location, the previously selected one will keep its value.
Switching back to it will bring you to the saved location, but watch out – if you navigate
any further now, the Quick-jump memory will be changed accordingly. If you don't want
this, activate the Lock Current Quick-jump option at the bottom of the View menu to freeze
the saved location. Instead of using the pull-down menu each time, you can also use CtrlF1 through Ctrl-F10 (PC) or Alt-F1 through Alt-F10 (Mac) to access the respective Quickjump locations via your keyboard.
The Browser
Files Tab
KONTAKT 5 - Application Reference - 93
Page 94

Importing Non-Native Files Into KONTAKT
12.2 Importing Non-Native Files Into KONTAKT
In addition to its own native formats, KONTAKT can transparently load and use a multitude of third-party formats without the need for external converters or arcane import procedures. In a lot of cases, using third-party content is as easy as dragging the respective files
onto an empty space in the Rack – KONTAKT will take care of all required conversion
processes behind the scenes. In other cases, you might want to import a whole library and
save it on your hard disk in KONTAKT format. This functionality is provided by a powerful
built-in batch converter.
You'll find a complete list of foreign sampler formats that you can use in KONTAKT in the
final chapter of this document.
12.2.1 Direct Access to Foreign Formats
If you want to import one or more Instruments from a foreign library into your Multi without having to write out the library in KONTAKT format first, KONTAKT lets you do just
that. For the most part, this on-the-fly access works very similar to loading KONTAKT's
own formats; there are a few peculiarities to keep in mind, though, which stem from the
different file management approaches of other samplers:
▪ Some samplers (e.g. EXS-24) keep program data in separate files that include refer-
ences to where the actual samples can be found in the file system, while others (e.g.
GigaStudio) combine large amounts of program data and samples into big monolithic
files – just like KONTAKT's own monolithic files, these can be opened and browsed in
KONTAKT's File Browser as if they were folders. In both cases, you can drag program
files into the Rack once you've located them.
▪ The aforementioned sampler formats, along with some others, appear in the form of
common files that you can manage via your operating system. There are others (e.g.
AKAI S-1000/S-3000 or E-mu EOS) that are based on proprietary file systems, which
are usually found on CD-ROMs. KONTAKT includes facilities for reading third-party
CD formats, even if your operating system can't.
To help you get the grip on how the various supported foreign formats can be used in
KONTAKT, here are some step-by-step instructions that cover some common scenarios.
Let's start with the necessary steps for loading a single EXS24 program. Similar steps apply to HALion and most other software sampler formats.
The Browser
KONTAKT 5 - Application Reference - 94
Page 95

Importing Non-Native Files Into KONTAKT
1. In the upper pane of the File Browser, locate and select the folder that contains your
EXS24 program file.
2. Locate the EXS24 program file in the lower pane of the File Browser and drag it onto
an empty space in the Rack.
3. KONTAKT will now convert the program in memory. During this process, it tries to
find all referenced Samples in the locations specified in the program file. If it can't
find one or more required samples, it will pop up the “Samples Missing” dialog to ask
you how it should proceed; refer to chapter ↑8, Loading and Creating Instruments to
learn how this dialog works.
As mentioned above, monolithic files can be opened and browsed in the File Browser just
like folders.
Although an Instrument that has just been imported from a monolith (such as a .gig file) is
readily playable, there's actually no way to reference the samples contained in the monolith
in a permanent way. This means that if you save your Multi or your host project and recall it
later, a Samples Missing dialog will appear as KONTAKT tries to load the respective Instrument. To circumvent this, we recommend that you save your Instrument to an .nki file right
after importing; KONTAKT will save its Samples along with it.
Here's how you locate and load a GigaStudio program. Similar steps apply to Kurzweil
K2x00, SountFont2, Unity, REX I/II, and some REAKTOR map formats:
1. In the upper pane of the File Browser, locate the GigaStudio monolith (.gig) that con-
tains your program. You'll notice the file has a "+" icon next to it, indicating that it's a
container. Select this file. The lower pane will now display the contained programs
and samples.
2. In the lower pane, select the program you want to load and drag it onto an empty
space in the Rack.
Finally, here's how to import a single program from a CD-ROM in AKAI S-1000 / S-3000
format, which has a proprietary file system that can only be read through KONTAKT's File
Browser. Similar instructions apply to E-mu EOS / EIV / ESI, Ensoniq ASR-10 / EPS, and
Roland S50 / S550 / S770 formats:
While KONTAKT is running, insert the AKAI CD into your computer's CD / DVD drive. Depending on your operating system, a pop-up might appear informing you that this CD can't
be read – in such cases, choose
Ignore
.
The Browser
KONTAKT 5 - Application Reference - 95
Page 96

Importing Non-Native Files Into KONTAKT
1. After a short while, a new volume labeled Akai CD will appear in the upper pane of the
File Browser – you may have to scroll down to the end of the list to see it. Clicking the
"+" icon next to it will display the included partitions.
2. Again, click on the "+" icon next to the partition which contains your program. Below
the partition name, a list of AKAI monolithic files will show up.
3. Select the monolith you want to access. The lower pane will now show a list of includ-
ed programs and samples.
4. Select the program you want to load and drag it into the Rack.
Once the conversion has been completed successfully, the Instrument will appear in the
Rack and can be played and edited in the usual way. If you want to re-use it at a later
point without having to perform the conversion again, you should now save it in KONTAKT
format. This is done in the same way as with Instruments that came in KONTAKT's native
format from the outset.
12.2.2 Batch Import
If you're planning to incorporate a foreign sample library into your KONTAKT collection
permanently, it makes sense to convert the whole library into KONTAKT format once,
which eliminates the need for subsequent conversion steps.
The Browser
When converting formats that keep their samples in a separate location, these won't be duplicated during the conversion process. Instead, the resulting Instrument files will reference
the original Samples on your hard disk. In such cases, the "Sample Destination Folder" setting will be ignored. To keep things easily manageable, it's recommended to choose a destination folder in a location that's close to the original Samples.
Importing and saving each contained Instrument manually would be rather tiresome,
though. With KONTAKT's powerful batch import facility, you can convert whole libraries,
folders, monoliths, or volumes at once and save them to your hard disk in KONTAKT format. Here's how it works:
1. In the upper pane of the File Browser, locate and select a container object that con-
tains a number of programs to be converted. This can be a folder, a monolith (like a
GigaStudio .gig file), or a volume (like an AKAI S-1000/S-3000 CD).
2.
Click on the button labeled Import at the top of the File Browser. A pop-up dialog will
appear asking you to specify destination folders for the converted Instrument and
Sample files.
KONTAKT 5 - Application Reference - 96
Page 97

Importing Non-Native Files Into KONTAKT
3.
Specify suitable destination folders by clicking on the Choose buttons and locating
them via the file selector.
4.
Once the destination folders are set correctly, click on Convert to start the import proc-
ess. Depending on the size of the imported set, this might take a while.
5. Once the process has finished, the status window will disappear. You can now navi-
gate to the folder you've specified in the File Browser and access your library in KON-
TAKT format.
12.2.3 Importing From Other Media
If you owned a hardware sampler at some point, you might have sampler data on media
other than CD-ROMs, such as floppy disks, magneto-optical disks or hard drives, that
you'd like to use in KONTAKT. If these are formatted in your sampler's proprietary filesystem, KONTAKT won't be able to read them directly in the same way as it reads proprietary
CD-ROMs, but there's still a way to access their contents. With freely available third-party
software, you can copy the raw contents of such a medium into an image file on your hard
disk, then access this image within KONTAKT. This section describes two ways to accomplish this on Macs and PCs.
On Mac OSX, you can use Apple's own Disk Utility program to create images from media.
Disk Utility is part of the standard OS X installation. Here's how it works:
1. Start Disk Utility.
2. Insert the medium into the drive. It should appear as an icon in the volume list on the
left side, most likely with a label similar to “Untitled 0”.
3. Select this volume and choose Disk Image from (...) from the File -> New submenu,
with (...) being a disk ID similar to disk3s1.
4. A dialog will appear, which asks you for a location and filename for the image file.
5. If the process has finished successfully, you'll see a new file with a .dmg extension in
the chosen location. Copy this file into the folder
Macintosh HD/Users/[username]/Documents/Native Instruments/KONTAKT 5/images
and start KONTAKT. The volume should appear in the upper pane of the File Browser
and can be imported in the usual way via the Import button.
The Browser
KONTAKT 5 - Application Reference - 97
Page 98

Importing Non-Native Files Into KONTAKT
On Windows XP, images can be created with the Translator Free utility from ChickenSys.
Download it from http://www.chickensys.com/downloads/translator_free.php and make sure
to include the “ASPI for Windows XP” component in your installation. Here's how to create
the image:
1. Make sure that your drive is visible in the XP Explorer and, if it's a drive that uses
removable media, that your medium is inserted.
2. Start Translator Free and locate your drive in the My Computer tree. It will a have la-
bel similar to "SCSI-ATAPI" or "IOMEGA Zip 100". If you can't find it in the tree, open
the Drives tab in the Options dialog (Select Tools > Options), choose Nero ASPI Driver,
quit the program and reboot your machine, and repeat steps 1 and 2.
3. Expand and select the elements beneath the volume to check whether you can read
the contents of your drive.
4. Right-click on the volume and select Create Virtual Drive from the context menu.
Choose the first option,
Copy Entire Drive
, and click on
Write Virtual Drive
. You'll be asked
for a name and location for the image file.
5.
Click
Save
. A new image file should appear in the selected location. Put it into the
folder
C:\Documents and Settings\[username]/My Documents\Native Instruments\KONTAKT 5\images
6. Start KONTAKT. The volume should appear in the File Browser and can be converted
in the usual way via the Import button.
In the same way, you can create image files from CD-ROMs and use them. While it's cer-
tainly easier to access the CD-ROMs directly from within KONTAKT, this method is useful
for backing up your media, and also cuts your import times by a considerable amount.
The Browser
12.2.4
Format-Specific Notes
There are some peculiarities to be aware of when working with certain formats. This list
provides an overview.
▪ EXS24: All versions are supported.
▪ Apple, ACID, BeatCreator and REX loops: Loops of these types can be dragged directly
into the Rack or the Mapping Editor. If multiple loops are being imported at once,
they will be combined into one Instrument, with each loop assigned to a separate
Group.
KONTAKT 5 - Application Reference - 98
Page 99

▪ Reason NN-XT: Refill programs are encrypted and therefore cannot be imported direct-
ly. Open the NN-XT patches of your choice in Reason’s NN-XT module and save them
as SXT files, then import these into KONTAKT.
▪ GigaStudio: There is no way to have the resulting Instruments reference the samples
contained in GigaStudio monoliths in a permanent way, but when you save the patch,
you will be prompted to save out new samples. You can choose the destination sam-
ple format for imports – WAV or AIFF – on the Load / Import tab of the Options dialog.
It is important to note that .gvi files for GigaPlayer are encrypted and cannot be load-
ed.
▪ HALion: All versions up to 2 are supported; version 3 patches are encrypted and there-
fore cannot be imported.
▪ Yamaha A-3000, A-4000, A-5000: Media need to be in DOS format.
▪ VSampler: All versions up to 2.5 are supported.
▪ Battery: BATTERY 3 Cells can only be imported via the Import Group command, which
you can find in the
Edit
menu of the Group Editor.
▪ Bitheadz DS-1 Unity: Encrypted and encoded Unity libraries are not supported.
▪ Akai MPC: Supported MPC versions are MPC-60, MPC-3000, MPC-2000, and
MPC-2000XL. Nested folders are not supported; only the contents of the root folder
will be loaded.
▪ Kurzweil K2500, K2600: Only patches that don't use any Samples from the original on-
board ROM can be imported.
▪ Roland S700, S770: Sample programs in these formats can only be accessed via im-
age files. To find out how to create these, refer to section ↑12.2.3, Importing From
Other Media.
The Browser
Libraries Tab
12.3
Libraries Tab
The Libraries Tab provides direct access to all KONTAKT libraries installed on your computer.
12.3.1 Loading and saving Instruments and Multis
▪
To load an Instrument or a Multi, click on the Instruments or Multis button and navigate
through the library structure like in the lower pane of the Files tab.
KONTAKT 5 - Application Reference - 99
Page 100

▪ When using KONTAKT PLAYER libraries, you can save your own Instruments and
Multis to the original library or to any custom location. When saving your own varia-
tions to the original location of your library, these Instruments and Multis will also ap-
pear in the Libraries tab.
12.3.2 Info and Function Menu
The Info and Function menus are located at the bottom right of the Library box.
The Info and Function menus (represented by an "i" and a cog respectively) provide access
to important resources like Library readme files and manuals, support and update links
and maintenance tasks such as location of the library and removal of a library box. While
the Function menu is always present, the Info menu is only visible if any of the files mentioned above are available.
Library copyright information can now be found in the Info tab of the Instrument Options dialog.
The Browser
Libraries Tab
12.3.3 Add Library Button
In order to add a KONTAKT PLAYER library to the Libraries Tab that was not automatically
detected, e.g. a library on an external hard drive that was plugged in, click the Add Library
button on top of the Libraries Tab. You’ll be asked to manually locate the library you want
to add.
You can also use the “Add Library” function to add a library that you have previously removed to the Libraries Tab again.
KONTAKT automatically detects if an installed library has been moved; the library box will
display options to either manually locate the library or remove the library box from the Li-
braries tab.
KONTAKT 5 - Application Reference - 100
 Loading...