

Page 1

KONTAKT 2.1
Manual Addendum
Page 2

The information in this document is subject to change without notice and does not
represent a commitment on the part of NATIVE INSTRUMENTS Software Synthesis
GmbH. The software described by this document is subject to a License Agreement
and may not be copied to other media. No part of this publication may be copied,
reproduced or otherwise transmitted or recorded, for any purpose, without prior
written permission by NATIVE INSTRUMENTS Software Synthesis GmbH. All product
and company names are trademarks of their respective owners.
And also, if you’re reading this, it means you bought the software rather than stole
it. It’s because of people like you that we can continue to create great tools and
update them. So, thank you very much.
Users Guide written by Markus Krieg
Editor: Brian Smith, Martin Jann
Special thanks to the Beta Test Team, who were invaluable not just in tracking down
bugs, but in making this a better product.
© Native Instruments Software Synthesis GmbH, 2006. All rights reserved.
Germany USA
Native Instruments GmbH Native Instruments USA, Inc.
Schlesische Str. 28 5631 A Hollywood Boulevard
D-10997 Berlin Los Angeles, CA 90028
Germany USA
info@native-instruments.de info@native-instruments.com
www.native-instruments.de www.native-instruments.com
Page 3

Table Of Contents
Welcome .......................................................................................... 4
Performance View .............................................................................. 4
Assigning a script to the Performance View ........................................ 5
Setting a background skin for an instrument ....................................... 5
Minimized View ................................................................................. 7
High Quality Interpolation Mode (HQI) .................................................. 7
New Limiter / Compressor / Gainer ....................................................... 8
Limiter ........................................................................................... 8
Compressor .................................................................................... 9
Gainer ............................................................................................ 9
Akoustik Piano and Bandstand Compatibility........................................10
Akoustik Piano ...............................................................................10
Bandstand .....................................................................................11
Kontakt Player 2 Compatibility ...........................................................12
New Sample Search Dialog (“Samples Missing”)
with Spotlight Support ....................................................................13
Host Compatibility ............................................................................15
Easier Cross-Platform Management .....................................................16
Kontakt Script Processor Updates .......................................................17
New Import Features .........................................................................17
Performance Enhancements ...............................................................19
New Options Functions ..................................................................... 20
Quickjump Menus ............................................................................ 25
Flexible Outputs (2.0.2) .................................................................... 26
Other Changes and Enhancements ..................................................... 28
Other Notes..................................................................................... 30
Sound Library ...................................................................................31
Documentation ................................................................................ 32
Appendix A: Advanced Modulation ..................................................... 33
Appendix B: Full List of Supported Import File Formats ....................... 34
KONTAKT 2.1 – 3
Page 4

Welcome to this manual addendum for the Kontakt 2.1 update.
This document contains an overview of the new functions and features included
in all Kontakt updates since the initial release version 2.0.0. The descriptions
and explanations in this document complement the original printed manual.
The original manual can also be found as pdf le in the documentation folder
of the Kontakt installation folder (e.g. “Kontakt 2 Manual english.pdf”).
The Kontakt 2.1 update includes a large number of improvements, which
contain stability, performance, and compatibility improvements, as well as
new features. If you are interested in a detailed list of bug xes, please take
a look at the “readme” document in the Kontakt installation folder.
Performance View
Gone are the times when you had to dive into the complex world of the Kontakt
Edit view when you just wanted to tweak a modulator or change some FX
parameters! The new Kontakt Performance View introduces a revolutionary
concept of a dynamic GUI right inside Kontakt’s rack. The full power of
the KSP GUI controls and the new KSP access can be used with almost all
Kontakt parameters!
Just compare this to the static GUI of a typical software sampler. Kontakt is
the rst sampler that allows you to create custom GUIs for each instrument!
Several templates are provided to get you started.
In the following example you can see that you have immediate access to
typical synthesis controls (lter, envelope, LFO). With replaceable background
images, related controls can be visually grouped, greatly improving usability.
Controls can also be dynamically replaced so that you can spread them over
several pages and further simplify the GUI.
This instrument example can be downloaded from the updates section on the Native Instruments
website.
4 – KONTAKT 2.1
Page 5

Assigning a script to the Performance View
You can make use of any existing instrument script as the Performance View
source. Just add the following line of code to the script’s “on init” section:
make _ perfview
Then click Apply and close the Edit view to see your new Performance View
for the current instrument in the Kontakt rack. Make sure that the instrument
view is maximized (the “+” button at the right side of the instrument header
in the Rack). Click on the instrument icon to show / hide the Performance
View in the maximized view.
Setting a background skin for an instrument
You can assign any 16, 24, or 32 bit TGA bitmap to the current instrument (32
bit recommended). The max viewable size is 635 * 201 pixels - bigger sizes
will be cut off, smaller sizes will be lled with black. Open the bitmap via the
Skin Bitmap setting on the Instrument tab in the Instrument Options dialog
(on the top left of the Edit view). The background skin will be visible as soon
as you exit the Edit view. The skin is visible only in the rack, not in the Edit
view. We have provided some sample skins for you in the Kontakt 2
wallpaper folder.
KONTAKT 2.1 – 5
\presets\
Page 6

It is recommended to save your NKI (instrument) with samples after assigning a
skin. This way the TGA bitmap will be automatically saved inside a “Wallpaper”
subfolder in the samples folder. If you only save the NKI, the TGA will be
referred to with either a relative path or an absolute path just like with sample
les. Finally, skin TGAs will always be included in monolithic NKI les if you
chose this saving option.
Here are some examples of different performance views for instruments:
6 – KONTAKT 2.1
Page 7

Minimized View
To get the most out of the new Performance View, you can now reduce the
size of Kontakt to see only the current instrument Performance View, with
or without the keyboard. Just click on the Minimize / Maximize button to the
left of the NI icon in the Kontakt header to select the minimized view. Click
on the button again to get back to full view. While in minimized view, use the
left and right button in the header to switch to the previous or next instrument
and use the keyboard button to show / hide the keyboard.
High Quality Interpolation Mode (HQI)
The new HQI mode allows you to select among three quality options when
using the Sampler mode or the DFD mode in the Kontakt Source module.
“Standard” corresponds to the old mode, whereas “High” and “Perfect”
increase the quality. Try this with a square wave sample that you transpose
both up and down by 2 octaves! HQI mode helps you eliminate digital aliasing
sounds which become particularly audible when you transpose sounds with
signicant high frequency content upwards. Note that this quality comes with a
price in the form of additional CPU load and thus a lower total voice count.
Important: Both modes “high” and “perfect” will use more cpu if the
transposition is higher. E.g. if you transpose a sample one octave, then
2 octaves, the cpu load will double every octave. So if you transpose
your sample many octaves higher, the cpu load might be very high.
KONTAKT 2.1 – 7
Page 8

Of course, HQI can also be used in Ofine Rendering / Bounce mode. The
best news is that you can set the Bounce quality globally and independently of
the Source setting of each individual instrument! Thus you can save CPU load
during live play and get the best quality while rendering your song. This new
global setting can be found in the Audio Engine tab of the Options dialog.
New Limiter / Compressor / Gainer
The Limiter and Compressor are both available as Group Insert, Instrument
Insert, and Master effects.
Limiter
The limiter effect has the following parameters and value ranges:
Input Gain: ranges from -24 dB to 24 dB
Release Time: ranges from 10 ms to 1000 ms
Attenuation: shows the gain reduction
Output Gain: ranges from -∞ dB to 24 dB
8 – KONTAKT 2.1
Page 9

Compressor
The new “Pro” compressor offers even better sound quality than the “Classic”
and “Enhanced” versions. It has the same parameters and value ranges as
the other compressor models. Just select the compressor quality in the dropdown menu on the left side of the Compressor module.
Gainer
The new Gainer effect is available as both Instrument Insert and Instrument
Send effect and serves two purposes.
As an Instrument Insert effect, you can boost the current signal relative to the
previous stage’s output gain as well as the next stage’s input gain. In other
words, it works like an additional amplier stage.
As an Instrument Send effect, you can pick up a signal from anywhere in the
Group Insert and Instrument Insert effect chains via the Send Levels module
like with any other send effect. Plus, you can adjust the gain like above.
However, the best part is that you can click on the “I” next to the Return
value (to the right of the Return knob) and send the signal directly to any of
the four AUX master send channels!
You can now send a different signal level from each group directly to AUX1
- AUX4 and save lots of CPU load by replacing regular Instrument send effects
which might be used more than once! On the instrument level, the new Gainer
effect allows you to pick up signals earlier in the Instrument Insert effect chain
than the regular Aux Sends in the rack.
KONTAKT 2.1 – 9
Page 10

Finally, you can use the new effect output selection method with all other
existing send effects! Just think about the case where you want to use an effect
that is not part of Kontakt, e.g. a gate. Now you can send your Instrument
Send Reverb directly to an empty AUX channel and add the gate effect in
your host application. Add to this the many ways that Kontakt already lets
you route the regular outputs for each instrument and even each group and
you can really feel your head spin.
Akoustik Piano and Bandstand Compatibility
Akoustik Piano and Bandstand libraries can now be loaded in Kontakt. Note
that you have to install library updates (which will soon be available online for
registered users at www.native-instruments.com) for these two products in
order to make full use of the product features, like loading convolution reverb
impulses. If you use the Akoustik Piano 1.0 library or the Bandstand 1.0.1
library, patches will play back ne with the following restrictions:
• Convolution impulses will not load in Akoustik Piano patches
• Program change auto-load will not work in the Bandstand multi
• Convolution impulses will not load in the Bandstand multi
The libraries must be correctly installed and activated (authorized). If you
cannot load the Akoustik Piano or Bandstand libraries within their respective
applications, then Kontakt will not load them either. If you move the Bandstand
library to a different location, use the Bandstand Options dialog to change the
root path. Do not move the Akoustik Piano library since there are not options
to reect the new location.
Akoustik Piano
You can nd all the settings of the Akoustik Piano GUI in the instrument
scripts of the piano NKIs. If you are unsure of the use of these settings, please
use Akoustik Piano for editing and save your changes as a new preset. Some
settings are only provided for testing purposes (for example the “Test” tab of
the KSP module) and can be ignored.
10 – KONTAKT 2.1
Page 11

Bandstand
For Bandstand, you can also see the instrument and drum set related settings
in the NKI scripts. NKI changes for Bandstand can only be saved in Kontakt
because Bandstand does not save NKI les.
You can even change the sample mapping, add new effects / modulators,
etc. and use the changed instruments in Akoustik Piano or Bandstand. This
is, of course, done at your own risk. Keep in mind that additional effects etc.
will be audible but not editable via the GUI of the other products. If you want
to create completely new instruments for either product, please use one of
the existing instruments as a template and do not remove any of the groups,
scripts, effects, or modulators. You can remove the existing zones and replace
them with new samples. Please ensure that you own the rights to any samples
that you add before sharing your instruments with others.
If you want full Bandstand functionality in Kontakt, you need to load a
Bandstand preset as a Kontakt multi (NKM) le either from the Default or
the Preset folders. You will not be able to edit the global settings via a script
GUI but will have to directly change, say, the master effect settings in the
respective part of the Kontakt GUI. You might consider creating a new preset
KONTAKT 2.1 – 11
Page 12

via the Bandstand GUI and loading that into Kontakt. Bandstand auto-loading
(program changes) of NKIs and MIDI automation will only work if you use
MIDI port A in Kontakt.
Kontakt Player 2 Compatibility
Libraries of the newly available Kontakt Player 2 can now be loaded in
Kontakt.
The libraries must be correctly installed and activated (authorized). If Kontakt
Player 2 does not load the libraries for any reason, Kontakt will not load them
either. If you move libraries to a different location, use the Kontakt Player 2
Library Browser to change the root path.
If the libraries are locked, you cannot edit the instruments within Kontakt.
However, you can change any parameters in the Performance View and save
these changes just like in the Kontakt Player 2 GUI.
If the libraries are unlocked, you can go into the Edit mode in Kontakt, modify
the instrument to your liking (including the script for the Performance View),
and save any changes. You can then reload the altered patch into Kontakt
Player 2.
You need additional tools if you want to create new Kontakt Player 2 libraries
from within Kontakt based on an empty instrument. Please contact NI if you
are a commercial sample library developer and are interested in creating
libraries for Kontakt Player 2.
12 – KONTAKT 2.1
Page 13

New Sample Search Dialog (“Samples Missing”) with Spotlight Support
The Sample Search / Samples Missing dialog appears when sample paths
have been changed for whatever reason – for example, you have moved sample
les to a different place on your hard disk – and Kontakt asks for your advice
on how best to nd them. This has been completely redesigned for optimized
workow and control. Here is a quick run-down of the current options:
Search File System: Look for samples in the volumes / folders that you have
specied in the new Search / DB tab in the Options dialog (see below)
Search Spotlight: On OSX 10.4 (Tiger) and higher, you can now use the native
Spotlight search to nd samples in an instant!
Search Database: Look for samples in your complete database; note that you
need to do a database update / rebuild whenever you have added / renamed,
moved, or deleted any samples on any of your volumes; the scope of the
database is now the same as the one for searching the le system above; you
should also update / rebuild your database if you added / removed volumes
on the Search / DB tab above
Check for Duplicates: This new option works with any of the above actions;
just consider that you have the 16 and 24 bit version of piano samples with
the same name on your system; if you check this option, you will be presented
with a choice of either the 16 bit or the 24 bit sample folder
Browse for Folder: Look for samples in the folder of your choice (including
all subfolders)
Browse for Files: Look for a specic sample le; use the Resolve All Possible
option to look for other samples in the folder of the selected le
Skip Missing: Load the patch only with the samples found so far and ignore
any missing samples
Abort Loading: Cancel the whole loading process
KONTAKT 2.1 – 13
Page 14
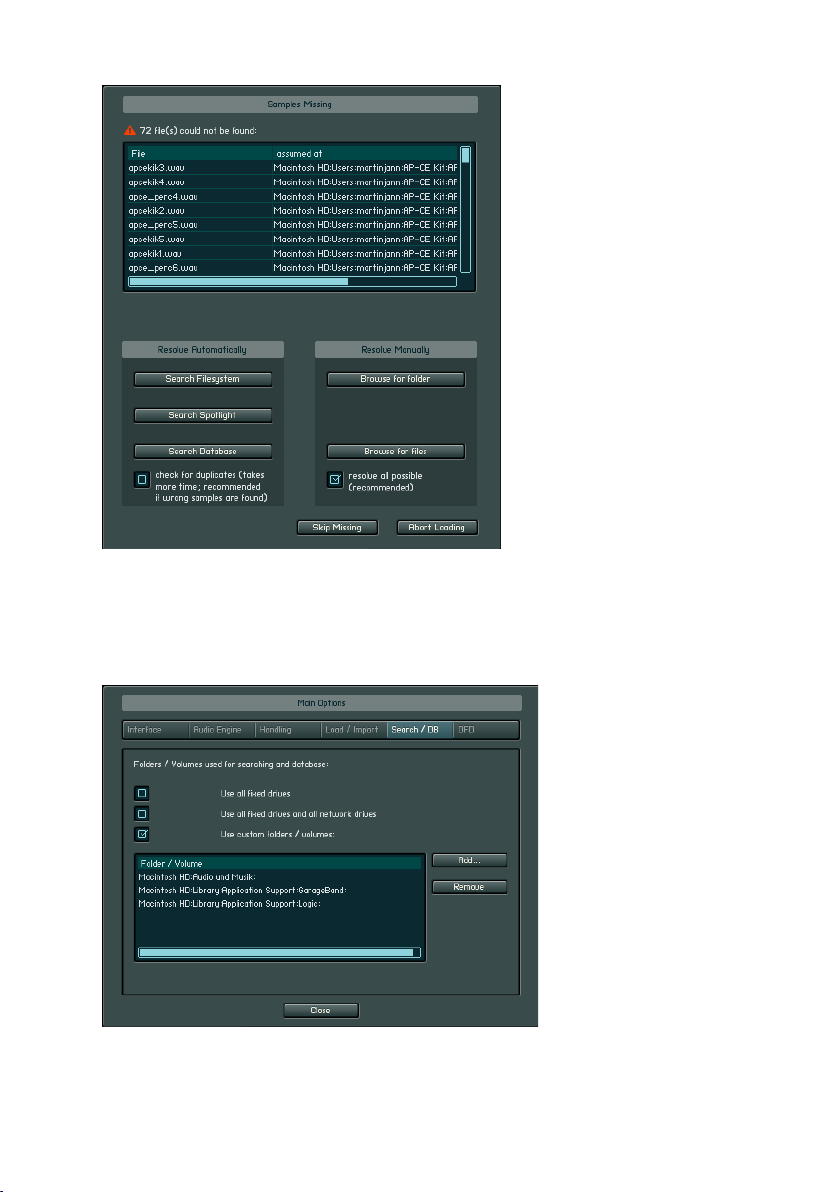
The new Search / DB tab in the Options dialog allows you to dene the scope
of the Samples Missing dialog above as well as the database rebuild / update
actions. Choices range from internal volumes, internal volumes plus network
volumes, up to your customized list of volumes or even single folders (including
subfolders). See "New Options Functions / SEARCH DATABASE".
14 – KONTAKT 2.1
Page 15

Batch Re-Save
Tired of searching for your samples every time you load a patch? Use this new
function in the File menu to go through all the NKIs, NKMs, and NKBs in the
current folder and save them with new relative sample paths. The Sample
Search dialog above will come up when needed.
It is recommended that you make a backup of your les before starting this
process as all instrument (nki) les will be overwritten!
Host Compatibility
NI has always been providing support for the latest host technologies. Kontakt
2.1 features the following host enhancements.
• Kontakt 2.1 is optimized for ProTools 7 – the performance and stability
has been increased; NI recommends to update to this ProTools
version
• Kontakt 2.1 is now cross-platform compatible (see below)
• Several stability-related host bugs have been xed in Kontakt 2.1
At the moment, the following operating system (OS) versions and host versions
are actively supported.
Operating Systems
• OSX 10.4 Tiger
Note: Mac Intel hardware will be supported via another update due in
Q2/06
• Windows XP SP2
Hosts (Playback and Editing; for extensive sound design use the stand-alone
version)
• Cubase SX 3.1 / Nuendo 3.2
Note: Surround channels are not supported
• Logic Audio 7.2
Note: Only 16 audio outputs are supported
• ProTools 7.0 / 7.1
Note: Digidesign and NI are working on further ProTools related issues
e.g. with Kontakt outputs
• Sonar 5.0
• Digital Performer 5
• Live 5.0
KONTAKT 2.1 – 15
Page 16

Hosts (Playback only)
• Finale 2006
• Garageband 3.0
• Acid Pro 6.0
Easier Cross-Platform Management
When used as a plug-in, Kontakt now saves pointers to samples with paths
relative to the library root folder instead of absolute paths (see New Options
below). The benet of this is that you can freely move host projects between
PC and Mac even if you have your sample libraries installed in different
locations on both systems!
This works only if the following requirements are met:
• The host uses the same plug-in format on both systems, e.g. Cubase
with VST or ProTools with RTAS; if you want to move your project
amongst different plug-in formats on the same or different systems,
you need to get an intermediate plug-in host like NI KORE (KORE will
then always load the Kontakt VST version but itself plug into your host
as an Audio Units, VST, RTAS, or DXi plug-in)
• You have correctly set the library root path for the Kontakt library in
the Import / Load tab of the Options dialog on both systems
• If you are loading other sample libraries in Kontakt than the Kontakt
2 factory library:
• Y o u a c t i v a t e d (a u t h o r i z e d ) t h o s e l i b r a ri e s a n d
you installed those librarie s under the Kontakt 2 library root
- o r You in s t all e d a s p ecial l i b r a r y u p d a te f o r yo u r
pro duct th at make s that libra r y Kontak t 2.1 compa tib le
- or The library in question is a new Kontakt Player 2 librar y
- or The library is a "Content only" Kontakt 2 library without direct
Kontakt Player 2 support
16 – KONTAKT 2.1
Page 17

Kontakt Script Processor Updates
Note: These features will be described in What’s new in Kontakt 2.1
– KSP and the updated version of the Kontakt Script Language Manual.
pdf. Changes to the Script presets are described in Kontakt 2 Script
Library.pdf.
Kontakt Script Processor (KSP) now supports new features that let script
authors provide better usability for their script GUIs, e.g. freely assignable
control labels, hidden controls to create less complex dynamic GUIs etc.
KSP now also offers more convenience features and technical possibilities
for authors:
• Direct access to almost all internal Kontakt parameters
• Buffering of persistent variable values when clicking Apply
New Import Features
General notes:
• Drag patches or samples from the lower browser window into an empty
place in the Kontakt rack; use the upper browser window only for
navigational purposes
• Single samples can also be directly dragged into the Mapping Editor;
8 bit samples can only be dragged directly into the Mapping Editor
because when dragging into the rack, the DFD mode is used which
does not support 8 bit samples
• See the manual for batch import of several patches and samples
KONTAKT 2.1 – 17
Page 18

• When using the batch import feature, select the le / folder / partition
to convert in the lower browser window rst and then click the Import
button in the browser header; please note that even if you select both
an Instrument Destination Folder and a Sample Destination Folder,
samples will only be created if you convert from a format that uses
embedded samples (Akai S-1000 / S-3000, EMU EOS / EIV / ESI,
Ensoniq ASR-10 / EPS, GigaStudio, Kurzweil K2x00, some Reaktor
maps, REX I / II, Roland S50 / S550 / S770, SoundFont2, and Unity);
in all other cases the original samples will be referenced – it is therefore
recommended to create the Instrument Destination Folder close to the
original sample folder and rst copy the les from CD-ROM to your
hard disk (if applicable)
• Direct import from CD-ROMs is supported even if Windows or OSX
cannot read these CD-ROMs; insert the CD-ROM and click the Reset
button in the browser (the circular arrow symbol); after a while, the
CD icon will appear at the bottom of the upper Browser window (you
might have to click the Reset button again after the CD-ROM drive
gets active); sample patches with proprietary CD-ROM format include
Akai S-1000 / S-3000, EMU EOS / EIV / ESI, Ensoniq ASR-10 / EPS,
and Roland S50 / S550 / S770; all other patches can also be copied
from CD-ROM to your hard disk in order to access external samples
(see above)
• Import from oppy disks is not supported; PC only: you can use third
party utilities to copy contents from oppy disks to your hard disk
or a CD-ROM and then import patches from there; links to some
unsupported oppy disk utilities can be found on the following page:
http://www.chickensys.com/downloads/other.php
• New since 2.0.1: In order to import from .IMG, .ISO, .NRG, or .DMG
disk images, please put those les into the following locations; the
images will appear as virtual CD drives at the bottom of the upper
browser upon restart
− PC: A folder called Images in the root of the c:\ drive or in the
KONTAKT 2 installation folder
− Mac: A folder called Images under Library/Application Support/Native
Instruments
18 – KONTAKT 2.1
Page 19

The following sample formats have been added since version 2.0:
• SampleCell (2.1)
• BeatCreator (2.1)
• GigaStudio 3 (2.0.1)
• Kurzweil K2000 (2.0.1)
• Ensoniq EPS / ASR (2.0.1)
Special notes to importing the most popular formats:
• EXS24: All versions are supported. Original EXS-instruments are always
saved with absolute sample paths so the Samples Missing dialog will
appear each time.
• Apple Loops: Apple Loops can be double-clicked to translate them
into a new instrument. They cannot be dragged to the mapping editor.
If multiple apple loops are imported together, one instrument for each
apple loop is being created. If you want to combine these apple loops
in one instrument, you need to copy the zones from one instrument to
the other.
• Reason NN-XT: Rell les cannot be imported directly because of their
encryption. Open the NN-XT patches of your choice in Reason’s NN-XT
module and save them as SXT les. Now you can import the SXT les
into Kontakt.
• GigaStudio: All versions are supported. You cannot point to the samples
in the original import le but will be prompted to save out new samples
when saving the patch. You can select the destination sample format
– WAV or AIF - in the Load/Import tab of the Options dialog.
• HALion: All versions up to 2 are supported – version 3 patches cannot
be imported since they are encrypted. Original les are always saved
with absolute sample paths so the Samples Missing dialog will appear
each time.
See a full list of supported import le formats with le extensions at the end
of this document.
Performance Enhancements
Several performance enhancements have been added in 2.1:
• Shorter Loading Times: Loading times are much shorter, especially
when using several banks with many instruments
• Less Memory Usage: RAM usage has been reduced for internal objects
KONTAKT 2.1 – 19
Page 20

(everything but samples)
• Lower Processor Load: CPU load has been dramatically reduced in idle
mode, especially when using several banks with many instruments.
• Better Multi-Processor Support: Multi-processor support has been
enhanced with better load balancing for group voices and insert effects
and additional load balancing for instrument insert and send effects
when using several instruments.
New Options Functions
Besides the new HQI ofine rendering option and the Search / DB tab
described above, there are several new options that make your life with
Kontakt easier.
• INTERFACE / Auto-refresh browser: This option activates the auto
updating of the browser. When activated, the browser automatically
detects from the system if a cd is inserted or if a folder is changed /
created.
20 – KONTAKT 2.1
Page 21
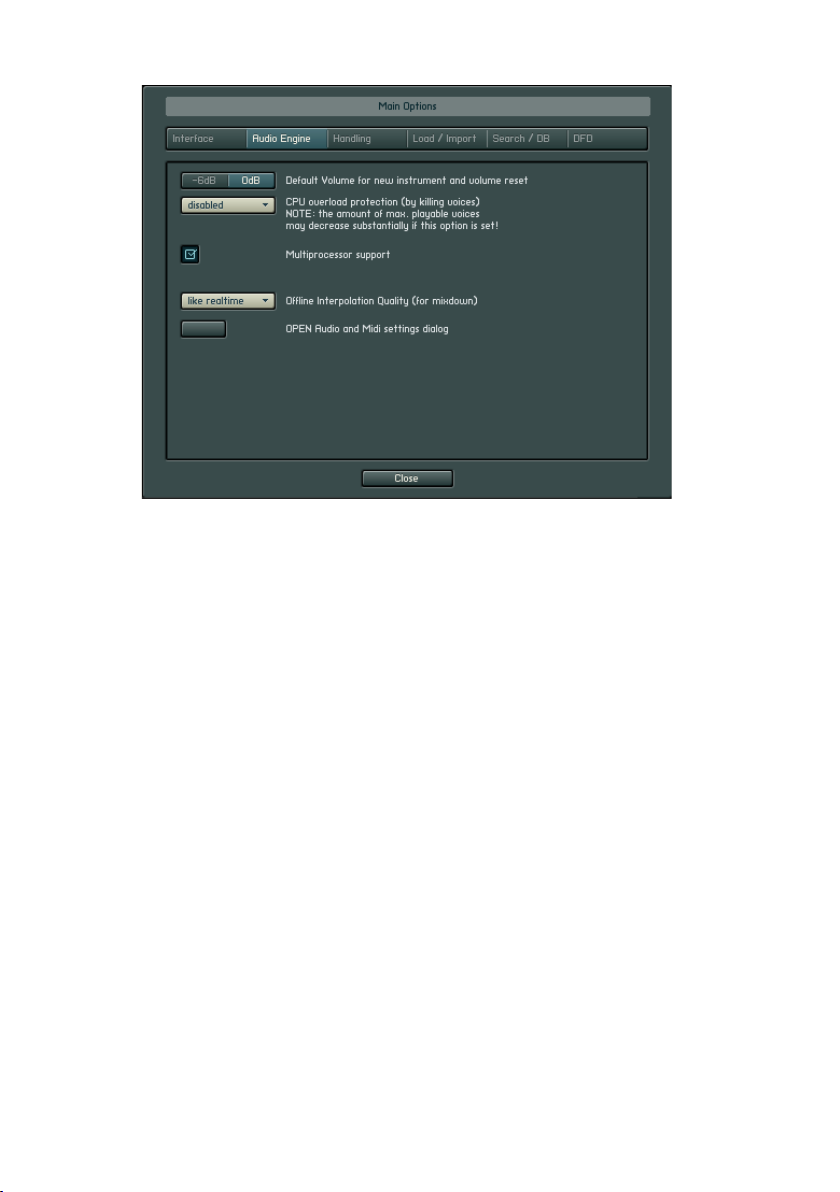
• Audio Engine / CPU Overload Protection: This option now replaces
the former CPU Throttle option and the max voice value in the header;
you can either switch off this setting or chose one of three overload
levels: Relaxed. Medium, or Strict; if you switch off this setting and
overload the CPU, you have to use the Restart Engine button in the
browser Engine tab if Kontakt cuts off the audio signal and shows
a constant CPU load of 100%; if you use any of the other settings,
Kontakt will start killing voices if the CPU load of effects and current
voices reaches a certain limit. The default setting is Relaxed which
gives you the most voices – if the total CPU load is too high with this
setting, try Medium or Strict.
KONTAKT 2.1 – 21
Page 22
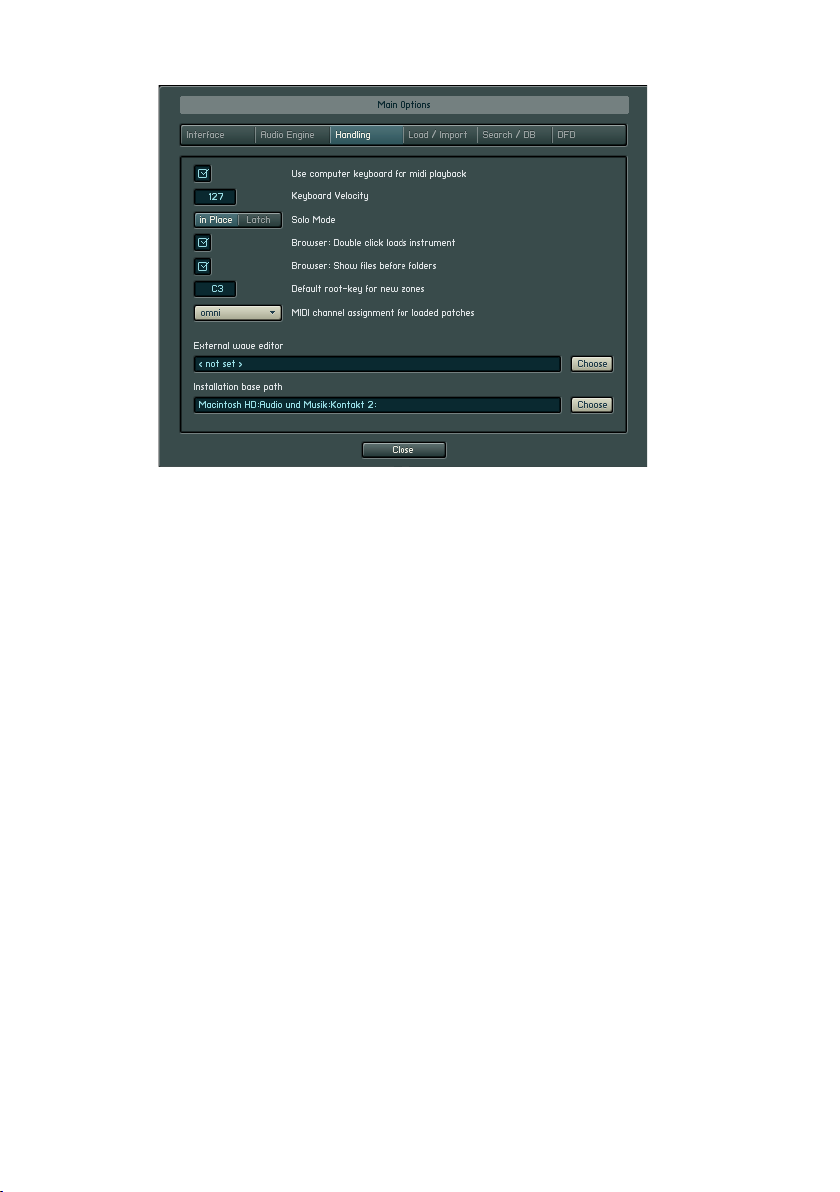
• HANDLING / Browser: show les before folders (2.0): When
enabled, this option will change the order of objects in the lower window
of the browser accordingly.
• HANDLING / MIDI channel assignment for loaded patches: This
option allows you to dene your favorite behavior from using the next
available MIDI channel (Kontakt 2 default), always using OMNI (Kontakt
1 default), and using the existing channels stored with Kontakt 1.x
patches (in Kontakt 2, MIDI channels are part of the multi and not
stored with the NKI)
22 – KONTAKT 2.1
Page 23
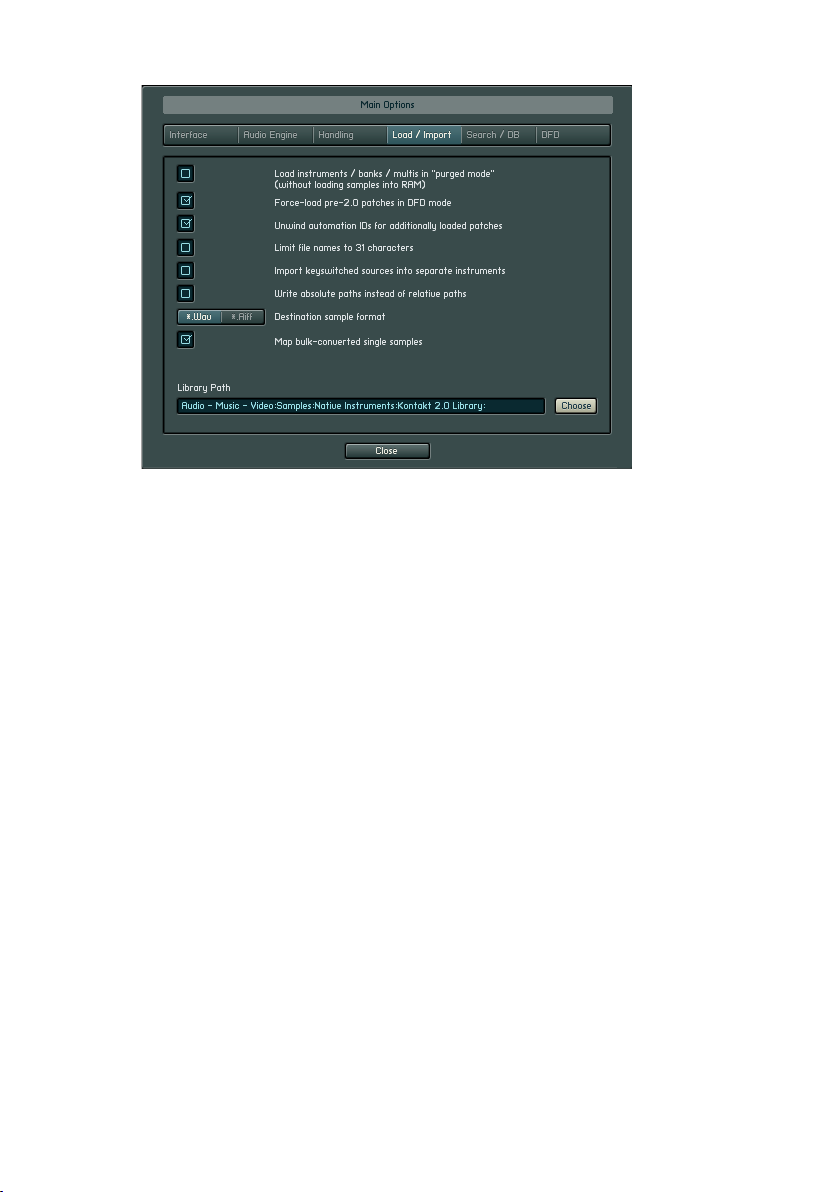
• LOAD/IMPORT / Reference internal Giga or SoundFont samples
(2.0): This option was removed – you are now always required to save
the patch with samples when importing these formats.
• LOAD/IMPORT / Library Path (2.0): The is the root path of the
Kontakt 2 library; this path is set automatically if you enter it in the
installer; afterwards, you are asked three times at Kontakt startup to
set the path manually in order to use the prepared database for factory
patches; you can set this path at any later time via this dialog – the
location is exactly one folder above the numbered folders, e.g. “03
– Grand Pianos”; if you do not set this path, library updates might not
be correctly installed, KSP scripts included in the patches might not
correctly function, and recall of host projects on different machines
might not work correctly after version 2.1
• LOAD/IMPORT / Unwind automation IDs for additional loaded
patches: This is a very useful option when assigning host automation
IDs to a patch and then loading the same patch in several slots; just
imagine that you assign host automation IDs #0 to #9 to a patch to
control typical synth features; now if you load the patch into Kontakt
rack slots 3 and 7 in your song you would want to select different LFO
settings for the two slots; this is now possible with this new feature
because the second instance of your patch now gets host IDs #10 to
#19 instead!
KONTAKT 2.1 – 23
Page 24

• LOAD/IMPORT / Force load pre 2.0 patches with DFD (2.0.2): Very
useful option when you load Kontakt 1.x libraries with lots of samples
(Kontakt 1.x default); please make sure that this option is set correctly
in the main options dialog whenever you load Kontakt 1 instruments;
you might loose Sampler mode settings if this option is activated.
• SEARCH/DB: Dene search locations for quicksearch database:
This tab is completely new and allows for more precise denition of
the database search. It replaces the selection list in the “Rebuild
Quicksearch Database” dialog. Choices range from internal volumes,
internal volumes plus network volumes, up to your customized list of
volumes or even single folders (including subfolders). In order to speed
up the Database rebuilding, please make sure to select only folders
which contain samples / instruments / multis / banks, that you want
to include in the database. To activate the Database rebuild, select
“Rebuild DB” from the Database tab in the browser.
• DFD / Overwrite Instrument’s Preload Size: Very useful option when
loading Kontakt 1.x patches that did not have this setting on a patch
basis; the Kontakt 1.x default value is 192 kB whereas the Kontakt 2.x
default value is 60 kB; try settings of 120 kB or higher if you encounter
DFD problems, e.g. on G4 systems
24 – KONTAKT 2.1
Page 25

Besides the new Skin Bitmap option mentioned below there are the following
new options in the Instrument Options dialog:
• CONTROLLER / Handle controllers #120 / #123 (All Sound off / All Notes
off): This option will support correct MIDI behavior for these controllers;
this should help you to avoid hanging notes when pushing the Stop
button on certain hosts
• CONTROLLER / Max volume for CC#7 automation: This option allows
you to chose any of the following values as the maximum value when
automating volume via CC#7 (other option in the same dialog): -12 dB,
-6 dB, 0 dB, 6 dB, 12 dB
Quickjump Menus
Kontakt 2.1 now offers quickjump menus, which allow for easier and quicker
navigation within the browser.
KONTAKT 2.1 – 25
Page 26

To set a quick jump location, select one of the
quickjump menus within the View menu of the
browser. Then navigate to the folder you want to
use as this quickjump and select another quickjump
number directly after.
You can select these quickjump menus 1-10
with the keyboard by pressing and holding down
“option” + F1-F10 on mac and “ctrl” + F1-F10
on Windows.
IMPORTANT: Once you have selected a quickjump and further navigate
in this quickjump, it will automatically update this folder, so you might
loose your previous set quickjump. To avoid this, you might start with
quickjump 2 and always use quickjump 1 for free navigation in the
browser.
Flexible Outputs (2.0.2)
Note: There are still only 16 mono outputs possible when Kontakt is used as
an Audio Unit plug-in, even though newer Logic versions support 32 outputs.
Surround channels in Cubase are not supported. In addition to the methods
mentioned below, different output congurations can also be saved as part
of a multi.
In stand-alone mode, there are 32 mono outputs possible. Therefore, the
maximum number of supported physical mono outputs is 32. If your audio
interface supports more than 32 mono outputs, you will only be able to use
the rst 32 outputs in Kontakt;outputs can not be freely mapped on the
physical level of your audio interface
26 – KONTAKT 2.1
Page 27

In plug-in mode, the maximum number of virtual mono outputs is always 32
for VST and DXi / 16 for AU and RTAS. For VST only, three default plug-in
versions are available with 8, 16, and 32 outputs respectively. For all other
plug-in formats, outputs are selected dynamically via the host (please check
the respective host documentation for details). If your host does not allow
you to remove unused channels, these channels might still use CPU. Kontakt
will automatically mute all unused channels and thus lower CPU usage within
the Kontakt engine.
Kontakt 2.1 manages outputs slightly differently than former versions: Just
like with previous 2.x versions, a default conguration is kept which is used
as soon as Kontakt is started. In contrast to how this was handled before,
2.0.2 keeps a separate default cong setting for every avor of Kontakt;
in other words, standalone, VST, AU, DXi, RTAS all have their own output
congurations. In order to change the output cong, you need to rst organize
the outputs the way you want and then click on the “make default” button
in the Output section. This ensures that at next startup the outputs are the
way you set them.
Another way to store and recall an output conguration is for plug-in use only
– it is trickier and needs careful handling. The output conguration is also
stored together with a plug-in’s total recall data, which means that a saved
song will be recalled with the output cong it was saved with. This means that
a recalled song might contain a Kontakt instance with outputs differing from
the default conguration; or it might even contain several Kontakt instances
using entirely different output congurations. This can cause a lot of potential
trouble and practically no host can effectively handle this situation.
This is why Kontakt has to declare its output requirements the rst time an
instance gets plugged in; this cannot be changed from that point on. The host
thinks Kontakt has only one output conguration, being the stored default
cong. This is why it is a good idea to stick to the default conguration and
make every change in the default itself (by clicking on “make default”). When
using Kontakt as a plug-in in a sequencer, it’s also advisable to unplug and then
replug all instances after a fundamental change and / or reloading a song.
There’s another new button labeled “Reset Out Map” (reset output mapping)
which you can use to restore the output mapping to the default settings.
Kontakt allows you to freely map each of the output channels to the available
physical outputs. The button automates this in a simple default way: all physical
outputs are assigned to Kontakt’s output channels until they are used up.
Take for example the new 8-channel VST version; if the user has Kontakt set
KONTAKT 2.1 – 27
Page 28

up to use 2 stereo and 4 mono outputs, and one presses the make default
button, then the 8 available plug-in outs will be fully assigned to the available
Kontakt output strips (1-2, 3-4, 5, 6, 7, 8). The aux channels, coming after
the “normal” output channels, will receive no assignment in this example. On
the other hand, if you set up Kontakt with just two stereo outputs, the other
four available physical outputs will be automatically assigned to the rst two
(stereo) Auxilliary Outputs.
In this case it should be noted that if you use Cubase SX or Nuendo, you will
see a message about the expected mixer conguration which differs from
the current instrument conguration when loading a project with Kontakt 2
versions from before 2.0.2. However, the project will work as expected.
Other Changes and Enhancements
• Group Edit Display: A new display has been added in the lower right
corner of the Kontakt window which shows the groups that you are
currently editing; this display is only active if you are in editing mode;
groups shown correspond to the ones selected via checkmarks in the
Group Editor; in addition, the Edit All Groups button inside this editor
now has a clearer active state
• Play During Load: You can now keep playing while loading or importing
another instrument.
• Merge Multis: Multis can now be merged with other multis; when
loading a new multi, select “No” in the Replace Multi dialog box so
that the existing multi is not replaced but merged with the new one;
note that only the instruments of the new multi will be added to the
end of your current multi, all other settings, e.g. outputs and master
effects, are left unchanged.
28 – KONTAKT 2.1
Page 29

• Stereo Modeler: This effect now contains a new Pseudo Stereo button
that should only be used with mono signals. Both this button and
Spread values greater than 0 will use create signals that are not monocompatible!
• Startup Status Dialog: This new dialog now gives you detailed status
on the tasks that are being performed when starting up Kontakt
• NKX / NKC Files: Two new le formats are now supported – NKX
les are the Kontakt Player 2 version of monolithic sample containers
(formerly called NKS les). NKC les save a content overview of
monolithic sample containers (NKS / NKX) and are stored next to the
monolith les.
• DFD 1.4: This version now supports direct from disk streaming of
encrypted samples from Kontakt Player 2 libraries.
• IRC 1.1: This version provides enhanced stability for the convolution
module.
• Convolution effect: Delay compensation can be disabled (bypassed),
so that only the convolution effect is being delays for the selected
amount, and not the full Kontakt engine. This way the original (dry)
signal is not being delayed.
• Knob Modulation (2.0.2): Right-click on knobs now allows assignment
of modulation.
• Output Selection (2.0.2): The Output Cong dialog now allows easy
switching between channels.
• External Modulator Default Value (2.0): The value between the
source and the fader sets the default value of that modulator.
• Full Sample Paths (2.0): These can be seen by hovering over the
Sample name in the Loop and Mapping editors; the same feature also
works with the IR name in the Convolution effect.
• Names of Output Effects (2.0): These are displayed as two-letter
abbreviations and can be seen in full by hovering over the respective
buttons.
• Engine Tab (2.0): An additional tab called Engine was added to the
Browser for your convenience; you can nd a quick overview of all
system resources as well as power user features; NI Support might
ask you for specic information from this page; you can also use the
Restart Engine option in case of CPU overruns (crackling and pumping
of the output LEDs).
KONTAKT 2.1 – 29
Page 30

• Ofine Bounce Mode (2.0): If you hear crackles or drop-outs when
bouncing / freezing tracks in hosts, please be aware that not all hosts
correctly announce this mode to their plug-ins; when Kontakt is used
as a plug-in, the “Ofine Bounce Mode” button in the Engine tab is
displayed; when Kontakt receives the bounce signal from the host, this
will automatically turn this button on; if the button does not turn on
automatically, this means the host does not support this feature and
you have to enable it manually (it will turn orange).
Other Notes
• Missing CD-ROM Dialog: During startup Kontakt sometimes expects
a CD-ROM in your drive that might have been present in a previous
session; please press Continue or Cancel to close this dialog
• Problems with Selecting Groups: Groups can be selected in two ways
and for two different purposes; when using the checkmarks, you select
groups for editing (see notes above); when shift-selecting group names
with the mouse, you select groups for Editing menu actions
• Problem with Selecting from Quickload Menus: Quickload menus can
get pretty big if your patches reside deep inside a folder structure; if
the lowest menu hits the right side of the Kontakt window, you cannot
select patches anymore; this is a restriction deep inside the development
libraries and cannot be easily xed; please try this workaround: make
your Kontakt windows as wide as your screen allows, click on the menu,
move your mouse all the way to the left into the Kontakt browser, and
now release you mouse
• Polyphonic Aftertouch: Polyphonic Aftertouch is not supported within
the same group; please use one group per note in order to get the
expected result
• Database Format Change (2.0.1): You will have to rebuild your database
if you built it with version 2.0 since the format has changed; we provide
you with a pre-populated database for the KONTAKT 2 library in the
new format.
• Using MIDI Ports (2.0):Kontakt supports up to 64 MIDI input channels
(4 ports with 16 channels each); only the stand-alone version supports
4 MIDI in ports; your physical MIDI in ports that are marked as active
in the Audio Setup dialog’s MIDI tab are assigned to ports A - D
automatically; in the plug-ins, only port A is active.
• Using Group Outputs (2.0): Please be aware that when you use groups
30 – KONTAKT 2.1
Page 31

with non-default outputs, the signal will bypass the instrument’s “end”
and go straight into the respective output channel; this means that you
will not be able to use instrument insert or aux effects for these groups;
this is intentional.
Sound Library
Steinway
All Steinway patches have been enhanced to use much less performance than
before. Steinway Convolution can still cause crackles on low end computers.
Updates that were posted by PMI are obsolete with these bug xes and will
not be supported by NI.
Akkord Guitar (2.0.1)
(Located in Kontakt 2 Library/02 - KSP Instruments/02 - Akkord Guitar)
The Akkord Guitar now has an additional script: Key Trigger. It lets you play
chords manually by playing a chord in the chord range and triggering a style
in the trigger range.
C4 Downstroke - normal
Db4 Upstroke - normal
D4 Downstroke - loud
Eb4 Upstroke - loud
E4 Leftoff
F4 Downstroke - muted
F#4 Upstroke - muted
G4 Leftoff release: play and hold e.g. D4, then hit G4 and
release
D4: The leftoff sample is played
G#4 - D6 Noises
Please note: if you want to trigger chords manually, the Akkord Guitar script
(i.e. the script with the pattern sequencer) must be bypassed. Vice versa, if you
want to use the pattern sequencer the Key Trigger script must be bypassed.
Squash FX + Direct (2.0.1)
(Located in Kontakt 2 Library/13 - Surround/03 - Surround Effects/)
The patch now has a prerecorded “game” stored in a KSP module: just open
the instrument and the script editor and click on “Play_the ball”.
KONTAKT 2.1 – 31
Page 32

Documentation
Note: all of these documents can be found inside the Documentation folder in
the KONTAKT 2 application folder as well as in the Start menu on PCs.
• Kontakt 2.1 Manual Addendum (this document): All new features
that are not part of the Kontakt 2 manual (English only)
• DFD Demystied: Everything you always wanted to know about
Direct-from-disk streaming in general and optimizing your settings in
particular
• What's new in Kontakt 2.1 - KSP: Overview of the new KSP features
in 2.1
• Kontakt Script Language Manual (2.0, 2.0.2, 2.1): KSP tutorial and
reference; updated with 2.1 features
• Kontakt 2 Script Library (2.0.1, 2.1): Script library reference; updated
with 2.1 script changes
• Beat Machine Tutorial (2.0.2): Everything you ever wanted to know
about this sampling mode
• Kontakt 2 Library Documentation (2.0): Sound library reference
• Kontakt 2 English, Kontakt 2 French, Kontakt 2 German, Kontakt
2 Spanish (2.0): The Kontakt 2 manual – same version as in the printed
manuals
• Welcome (2.0): The Kontakt 2 quickstart guide
32 – KONTAKT 2.1
Page 33

Appendix A: Advanced Modulation
For those of you who always wondered what the rescaler curve in the external
modulators can actually be used for, here is a nice example from the Kontakt
user community.
Let’s say you want to have a different pitch bend range for positive and for
negative values.
• Assign two pitch bend modulators to the Pitch of the Source module
• In the rst modulator, set the intensity to + 12 semitones, click the
Rescaler button, click Active, and select the preset “Fades – Linear 3
high”
• In the second modulator, set the intensity to – 2 semitones, click the
Rescaler button, click Active, and select the preset “Fades – Linear 3
low
Of course you can also draw your own curves and save them as new presets.
Remember that you can draw straight lines by clicking the right mouse button
and set values to 0 by using Ctrl+click. With the pitch bend you might also
want to set the thin out parameter (|->) to about 250 so that not each of the
16,000 pitch bend values is being evaluated and thus potentially causing
zipper noise.
KONTAKT 2.1 – 33
Page 34

Appendix B: Full List of Supported Import File Formats
Browser
Instrument Hardware Formats File Ex tension
AKAI
S-1000 CD-Rom
S-3000 / Mesa
CD-ROM; .s3p; .sp; no extension (Mac)
S-5000 / S-6000 Program .akp
Z-4 / Z-8 Program .akp
MPC Sound .snd
MPC Program .pgm
EMU
EOS IV CD-ROM
EIII CD-ROM
Esi .esi
KURZWEIL
K2000 / K2V X .krz
K2500 *
K2600 *
1)
1)
.k25
.k26
ROLAND
S-50 / S-550 .out
S-700 / S770 *
2)
.out
34 – KONTAKT 2.1
ENSONIQ
EPS .efe
ASR-10 .efa
PULSAR
Pulsar STS Program .p
Pulsar STS Sample .s
Page 35
Browser
Instrument Software Formats File Extension
GIGASTUDIO
Gigastudio 1-2.5 .gig
Gigastudio 3 .gig
EXS24
EXS24 mkI .exs
EXS24 mkII .exs
HALION
Halion 1 / 2 program *
3)
.fxp
REASON NN-XT
NN-XT Instruments .sxt
RECYCLE
REX 1 .rex
REX 2 .rx2
MACH 5
Mach 5 Bank .m5b
Mach 5 Preset .m5p
SOUNDFONT 2
Soundfont 2 .sf2
BATTERY
Battery 1 .kit
Battery 2 .kt2
KONTAKT 2.1 – 35
Page 36

REAKTOR
Reaktor .map
LM4
LM4 mk1 .txt
LM4 mk2 .fxp
BITHEADZ
DS-1 Unity *4) .uds
SAMPLECELL
SampleCell .ins; no extension / CD-ROM
BEATCREATOR
BeatCreator .zgr
*1) only supported, if patch does not reference any ROM Samples from original keyboard
*2) Only image les supported. Please put these image les into the image folder (see
manual addendum)
*3) Halion 3 is not supported
*4) Encrypted and encoded Unity libraries are not supported
36 – KONTAKT 2.1
Page 37

Browser Instrument Audiole Forma ts File Extension
APPLE LOOPS
Apple Loop .aiff
ACID
Acidized .wav
AIFF
mono / stereo .aiff / .aif
multichannel .aiff / .aif
16-24bits
SOUND DESIGNER 2
mono / stereo .sd2
16-24bits
WAV
mono / stereo .wav
multichannel .wav
16-24bits
KONTAKT 2.1 – 37
Page 38

Browser Instrument Disc Formats File Ex tension
Akai S1000 Disc proprietary
Akai S3000 Disc proprietary
E-MU Disc proprietary
Roland Disk proprietary
Ensoniq Disk proprietary
Kurzweil Disk proprietary
context context Mac HFS Disk (PC) proprietary
38 – KONTAKT 2.1
 Loading...