

Page 1

Setup Guide
Page 2

The information in this document is subject to change without notice and does not represent a
commitment on the part of Native Instruments GmbH. The software described by this document is subject to a License Agreement and may not be copied to other media. No part of this
publication may be copied, reproduced or otherwise transmitted or recorded, for any purpose,
without prior written permission by Native Instruments GmbH, hereinafter referred to as Native
Instruments.
“Native Instruments”, “NI” and associated logos are (registered) trademarks of Native Instruments GmbH.
Mac, Mac OS, GarageBand, Logic, iTunes and iPod are registered trademarks of Apple Inc.,
registered in the U.S. and other countries.
Windows 7, Windows 8, and DirectSound are registered trademarks of Microsoft Corporation in
the United States and/or other countries.
All other trade marks are the property of their respective owners and use of them does not imply any affiliation with or endorsement by them.
Document authored by: Native Instruments GmbH
Software version: 9.0 (03/2013)
Disclaimer
Special thanks to the Beta Test Team, who were invaluable not just in tracking down bugs, but
in making this a better product.
Page 3

Germany
Native Instruments GmbH
Schlesische Str. 29-30
D-10997 Berlin
Germany
www.native-instruments.de
USA
Native Instruments North America, Inc.
6725 Sunset Boulevard
5th Floor
Los Angeles, CA 90028
USA
www.native-instruments.com
Japan
Native Instruments KK
YO Building 3F
Jingumae 6-7-15, Shibuya-ku,
Tokyo 150-0001
Japan
www.native-instruments.co.jp
Contact
© Native Instruments GmbH, 2013. All rights reserved.
Page 4

Table of Contents
Table of Contents
1 Welcome to KOMPLETE 9 ULTIMATE ...........................................................................
1.1 What is Included in the Box? ...................................................................................................... 7
1.2 Products Included in KOMPLETE 9 ULTIMATE .............................................................................. 7
1.3 Setup Overview ........................................................................................................................... 10
1.2.1 Stand-alone Applications and Plug-ins ..................................................................... 7
1.2.2 Effect Plug-ins .......................................................................................................... 8
1.2.3 Instruments Powered by KONTAKT ............................................................................. 8
1.2.4 Effects Powered by GUITAR RIG ................................................................................. 10
1.2.5 Instruments and Effects Powered by REAKTOR .......................................................... 10
2 Installation ...............................................................................................................
2.1 Caution .......................................................................................................................................12
2.2 Read Before Installing ................................................................................................................ 13
2.3 Installing on Mac OS X ............................................................................................................... 14
2.4 Installing on Windows ................................................................................................................ 18
2.3.1 Connect the Hard Disk and Start the Installation ...................................................... 14
2.3.2 Select the Components to Install ............................................................................... 14
2.3.3 Set the Install Locations for Content ......................................................................... 17
2.3.4 Complete the Installation .......................................................................................... 18
2.4.1 Connect the Hard Disk and Start the Installation ...................................................... 19
2.4.2 Select the Features to Install ..................................................................................... 19
2.4.3 Define the Application's Destination Folder ............................................................... 22
2.4.4 Define VST Plug-in Destination Folders ..................................................................... 23
2.4.5 Define a Library Destination Folder ............................................................................ 24
2.4.6 Complete the Installation .......................................................................................... 26
3 Product Activation with Service Center .......................................................................
3.1 Activating Your Product Online ................................................................................................... 27
7
12
27
KOMPLETE 9 ULTIMATE - Setup Guide - 4
Page 5

Table of Contents
3.2 Updating Your Product ............................................................................................................... 31
3.3 Activating Your Product Offline .................................................................................................. 34
3.4 Further Information .................................................................................................................... 41
3.1.1 Start Service Center ................................................................................................... 27
3.1.2 Log In Into Your User Account .................................................................................... 28
3.1.3 Activate the Product .................................................................................................. 29
3.1.4 Finish the Online Activation ....................................................................................... 30
3.2.1 Select Updates .......................................................................................................... 31
3.2.2 Download the Updates ............................................................................................... 32
3.2.3 Open Your Download Folder ....................................................................................... 33
3.2.4 Install Updates .......................................................................................................... 34
3.3.1 Start the Offline Activation ........................................................................................ 35
3.3.2 Create the Activation Request File ............................................................................. 36
3.3.3 Enter the Serial Number ............................................................................................ 37
3.3.4 Transfer the Activation Request File .......................................................................... 38
3.3.5 Open the Activation Return File ................................................................................. 39
3.3.6 Finish the Offline Activation ...................................................................................... 40
4 Downloading KOMPLETE 9 ULTIMATE Products Not Present on the Hard Disk ................
5 Stand-alone Operation ...............................................................................................
5.1 Selecting an Audio Interface ....................................................................................................... 44
5.2 Optimizing Latency ..................................................................................................................... 45
5.3 Routing Audio Input and Output ................................................................................................. 46
5.4 Setting up MIDI Connections ...................................................................................................... 47
6 Plug-in Operation ......................................................................................................
7 Other Documentation and Support Resources ..............................................................
7.1 PDF Manuals .............................................................................................................................. 50
7.2 Knowledge Base/Readme/Online Support ................................................................................... 50
7.3 Forum ......................................................................................................................................... 51
42
43
49
50
KOMPLETE 9 ULTIMATE - Setup Guide - 5
Page 6

7.4 Updates ...................................................................................................................................... 51
8 Troubleshooting and FAQ ...........................................................................................
8.1 The KOMPLETE 9 ULTIMATE Hard Disk Does Not Power Up .......................................................... 52
8.2 Installation Folder Not Found by an Update Installer .................................................................. 52
8.3 Library Path Not Found by an Update Installer ........................................................................... 53
8.4 How to Convert Songs Made with an Older Plug-in Version to the Latest Plug-in Version ........... 53
8.5 Location of the VST Plug-ins Folder on Windows ......................................................................... 53
8.6 The Plug-in Does Not Appear in My Sequencer ............................................................................ 54
8.7 Sequencer Tutorials .................................................................................................................... 55
9 Product Returns ........................................................................................................
Table of Contents
52
56
KOMPLETE 9 ULTIMATE - Setup Guide - 6
Page 7

Welcome to KOMPLETE 9 ULTIMATE
What is Included in the Box?
1 Welcome to KOMPLETE 9 ULTIMATE
First of all, thank you for purchasing KOMPLETE 9 ULTIMATE. This document will guide you
through the basic steps of setting up KOMPLETE 9 ULTIMATE. After reading it, you should be
able to install and activate the applications included in KOMPLETE 9 ULTIMATE, as well as
operate them both in stand-alone mode and as a plug-in in your sequencer. We recommend
that you take the time to read this guide in its entirety.
1.1 What is Included in the Box?
The KOMPLETE 9 ULTIMATE box contains:
▪ An external USB 2.0 hard disk containing the KOMPLETE 9 ULTIMATE software installa-
tion program
▪ Your KOMPLETE 9 ULTIMATE serial number, which is found on the Setup Information flyer
▪ A ‘Y’ shaped power-sharing USB 2.0 cable that allows your KOMPLETE 9 ULTIMATE hard
disk to draw additional power off your computer, while continuing to transfer data
1.2 Products Included in KOMPLETE 9 ULTIMATE
1.2.1 Stand-alone Applications and Plug-ins
You can use the applications listed below as stand-alone programs, or you can load their plugin versions into compatible host software of your choice. In addition to being independent instruments or effects processors, GUITAR RIG PRO, KONTAKT, and REAKTOR also act as
“players” for a number of products included in KOMPLETE 9 ULTIMATE—see the subsequent
sections of this Setup Guide for more information.
▪ ABSYNTH 5
▪ BATTERY 4
▪ FM8
KOMPLETE 9 ULTIMATE - Setup Guide - 7
Page 8
Welcome to KOMPLETE 9 ULTIMATE
Products Included in KOMPLETE 9 ULTIMATE
▪ GUITAR RIG 5 PRO
▪ KONTAKT 5
▪ MASSIVE
▪ REAKTOR 5.8
1.2.2 Effect Plug-ins
You can use the products listed in this section as plug-ins within compatible host software of
your choice.
▪ DRIVER
▪ PREMIUM TUBE SERIES: ENHANCED EQ, PASSIVE EQ, and VARI COMP
▪ REVERB CLASSICS: RC 24 and RC 48
▪ SOLID MIX SERIES: SOLID BUS COMP, SOLID DYNAMICS, and SOLID EQ
▪ TRANSIENT MASTER
▪ VINTAGE COMPRESSORS: VC 160, VC 2A, and VC 76
REVERB CLASSICS RC 24 and RC 48 are not included on the KOMPLETE 9 ULTIMATE
hard disk. You can obtain these products via download after product activation. For details,
see section ↑4, Downloading KOMPLETE 9 ULTIMATE Products Not Present on the Hard
Disk.
1.2.3 Instruments Powered by KONTAKT
The products listed in this section were designed to be used within KONTAKT. Once installed,
they will be available in KONTAKTʼs Browser, from where you can load them by dragging them
onto KONTAKTʼs Rack just like any other KONTAKT Instrument.
KOMPLETE 9 ULTIMATE - Setup Guide - 8
Page 9
Products Included in KOMPLETE 9 ULTIMATE
KONTAKT Instruments are based on samples, which are essentially audio recordings. As
advanced sample-based instruments like the ones listed below consist of a large number of
high quality samples, they require considerable amounts of disk space. In addition to that,
loading large numbers of samples may put the hard disk under substantial stress. Therefore
you should consider installing your sample-based products onto a dedicated hard disk that
offers enough disk space and is sufficiently fast. You can specify the destination for the
content contained in KOMPLETE 9 ULTIMATE during the installation procedure, as described in sections ↑2.3.3, Set the Install Locations for Content and ↑2.4.5, Define a Library
Destination Folder.
▪ ABBEY ROAD DRUMMER: VINTAGE, 60S, 70S, 80S, and MODERN
▪ ACTION STRINGS
▪ ALICIA’S KEYS
▪ BALINESE GAMELAN
▪ DAMAGE
▪ EVOLVE MUTATIONS 1 and 2
▪ EVOLVE R2
▪ GEORGE DUKE SOUL TREASURES
Welcome to KOMPLETE 9 ULTIMATE
▪ MASCHINE DRUM SELECTION
▪ CLASSIC PIANO COLLECTION: BERLIN CONCERT GRAND, NEW YORK CONCERT
GRAND, UPRIGHT PIANO, and VIENNA CONCERT GRAND
▪ RETRO MACHINES MK2
▪ SCARBEE: PRE-BASS, PRE-BASS AMPED, JAY-BASS, MM-BASS, MM-BASS AMPED,
RICKENBACKER BASS, VINTAGE KEYS, and FUNK GUITARIST
▪ SESSION HORNS
▪ SESSION STRINGS PRO
▪ STUDIO DRUMMER
▪ THE GIANT
▪ VINTAGE ORGANS
▪ WEST AFRICA
KOMPLETE 9 ULTIMATE - Setup Guide - 9
Page 10

Welcome to KOMPLETE 9 ULTIMATE
Products Included in KOMPLETE 9 ULTIMATE
1.2.4 Effects Powered by GUITAR RIG
The products listed in this section were designed to be used within GUITAR RIG PRO. Once
installed, they will be available in GUITAR RIG PROʼs SideKick, from where they can be loaded just like regular Components.
▪ RAMMFIRE
▪ REFLEKTOR
▪ TRAKTOR’S 12
1.2.5 Instruments and Effects Powered by REAKTOR
The products listed in this section were designed to be used within REAKTOR. Once installed,
they will be available in REAKTORʼs Browser under the PLAYER tab, from where you can load
them just like any other REAKTOR Instrument or Ensemble.
▪ MONARK
▪ RAZOR
▪ REAKTOR PRISM
▪ REAKTOR SPARK R2
▪ SKANNER XT
▪ THE FINGER R2
▪ THE MOUTH
1.3 Setup Overview
This section provides a quick overview of the various steps necessary for getting KOMPLETE 9
ULTIMATE up and running: installation, activation, updates, and configuration, all of which will
be described in greater detail in further chapters of this guide.
KOMPLETE 9 ULTIMATE - Setup Guide - 10
Page 11

Welcome to KOMPLETE 9 ULTIMATE
Setup Overview
▪ Installation: Connect the hard disk to your computer, locate the KOMPLETE 9 ULTIMATE
setup file and double-click it in order to start the installation procedure. Carefully read
and follow the on-screen instructions, accept the License Agreements, and enter the password for your computer if prompted (Mac OS X only).
▪ Activation: Activate your product using the Service Center application. Online and Offline
activation methods are available. You can get further information on how the activation
process works in our Knowledge Base: http://www.native-instruments.com/support/activa-
tion-registration/
▪ Update: Download the latest software updates using the Service Center application. Then
browse to the download folder on your hard disk and install all downloaded updates.
▪ Configuration: Configure your new software for use with your audio and MIDI interfaces.
▪ Suggestions for further reading, troubleshooting, FAQs, and information on product returns
can be found in the subsequent chapters of this guide and within our online Knowledge
Base: http://www.native-instruments.com/knowledge/
KOMPLETE 9 ULTIMATE - Setup Guide - 11
Page 12

2 Installation
2.1 Caution
It is important you read and understand the following instructions to make sure the KOMPLETE 9 ULTIMATE hard disk or any device connected will not be damaged during usage or
maintenance:
▪ Do not unplug the KOMPLETE 9 ULTIMATE hard disk during operation. Unplugging the
hard disk while data is being transferred may destroy or damage data on your computer as
well as on the KOMPLETE 9 ULTIMATE hard disk. Under no circumstances can Native
Instruments be held liable for the recovery or restoration of data that was destroyed or
damaged due to inappropriate usage.
▪ Do not open the KOMPLETE 9 ULTIMATE hard disk or attempt to disassemble or modify
any internal parts. The KOMPLETE 9 ULTIMATE hard disk does not contain any userserviceable parts. If the device appears to be malfunctioning, discontinue use immediately and have the device inspected by qualified service personnel.
Installation
Caution
▪ Do not expose the KOMPLETE 9 ULTIMATE hard disk to rain, use it near water or in
damp or wet conditions.
▪ Make sure no objects or liquids of any kind penetrate the unit. When cleaning the KOM-
PLETE 9 ULTIMATE hard disk, use a soft, dry cloth. Never use paint thinners, solvents,
cleaning fluids, or chemical-infused wiping cloths.
▪ Never use or store the KOMPLETE 9 ULTIMATE hard disk in areas subject to extreme
temperatures (e.g., direct exposure to sunlight in an enclosed vehicle or near heat-generating equipment), or high levels of vibration.
▪ Always let the KOMPLETE 9 ULTIMATE hard disk adapt to changed room temperature af-
ter it has been stored in a cold environment.
▪ Do not use the KOMPLETE 9 ULTIMATE hard disk near electrical appliances such as tel-
evisions or radios. Doing so may cause interference which will adversely affect the operation of these appliances.
KOMPLETE 9 ULTIMATE - Setup Guide - 12
Page 13

Read Before Installing
▪ Do not place the KOMPLETE 9 ULTIMATE hard disk near sources of magnetic interfer-
ence, such as computer displays, televisions or speakers. Magnetic interference can affect
the operation and stability of your KOMPLETE 9 ULTIMATE hard disk.
▪ Do not place the KOMPLETE 9 ULTIMATE hard disk in an unstable position where it
could accidentally fall.
▪ Do not place heavy objects on top of the KOMPLETE 9 ULTIMATE hard disk or use exces-
sive force on it.
2.2 Read Before Installing
Before starting the KOMPLETE 9 ULTIMATE installation process, here are some points to be
aware of:
▪ The included USB 2.0 hard disk can only be used for installing KOMPLETE 9 ULTIMATE. It is
not possible to play content (e.g. samples) directly from this hard disk, or to run applications other than the installation program.
▪ Do not format the KOMPLETE 9 ULTIMATE hard disk! Formatting the hard disk will ultimately
erase the KOMPLETE 9 ULTIMATE installation program from the disk, thus making it impossible to install KOMPLETE 9 ULTIMATE again. Problems resulting from formatting the
KOMPLETE 9 ULTIMATE hard disk are not covered by warranty.
Installation
▪ Make sure to keep the KOMPLETE 9 ULTIMATE hard disk in a safe place for future reference,
for example in case you need to install KOMPLETE 9 ULTIMATE on a new computer.
▪ Please carefully review the installer screens and the suggested installation paths in order to
avoid any unwanted folders being created on the hard disk you are installing KOMPLETE 9 ULTIMATE onto.
▪ It is possible to define alternative locations for the sample libraries during installation. To
see the exact default installation paths of the installed components, please refer to section ↑2.3, Installing on Mac OS X (Mac OS X) or ↑2.4, Installing on Windows (Windows),
respectively.
▪ Moving any folders related to Native Instruments software after installation is not recom-
mended. Future software updates rely on the directory locations set during initial installa-
tion.
KOMPLETE 9 ULTIMATE - Setup Guide - 13
Page 14
Installing on Mac OS X
▪ Installing all features of KOMPLETE 9 ULTIMATE requires about 250 gigabytes of free hard
disk space. Most of the space is required for sample libraries.
2.3 Installing on Mac OS X
By default, this folder, including a number of subfolders, will be created during installation:
Macintosh HD/Applications/Native Instruments
We strongly recommend keeping this installation path.
2.3.1 Connect the Hard Disk and Start the Installation
Disconnect all Native Instruments hardware controllers and audio interfaces from your
computer before proceeding. Do not reconnect these devices before you have finished the
KOMPLETE 9 ULTIMATE installation procedure!
The KOMPLETE 9 ULTIMATE hard disk uses an USB 2.0 interface. You can connect it to a
USB 2.0 or USB 3.0 port, the latter of which is backwards compatible.
Installation
If the KOMPLETE 9 ULTIMATE hard disk does not power up, or does not mount as described below within a couple of seconds, the USB port on your computer is probably unable
to supply enough power to operate the hard disk. In this case, connect the unused (secondary) connector of the ‘Y’ shaped power-sharing cable to a second USB port on your computer. If this does not solve the problem, use an ‘active’ USB 2 hub that has a dedicated
power supply.
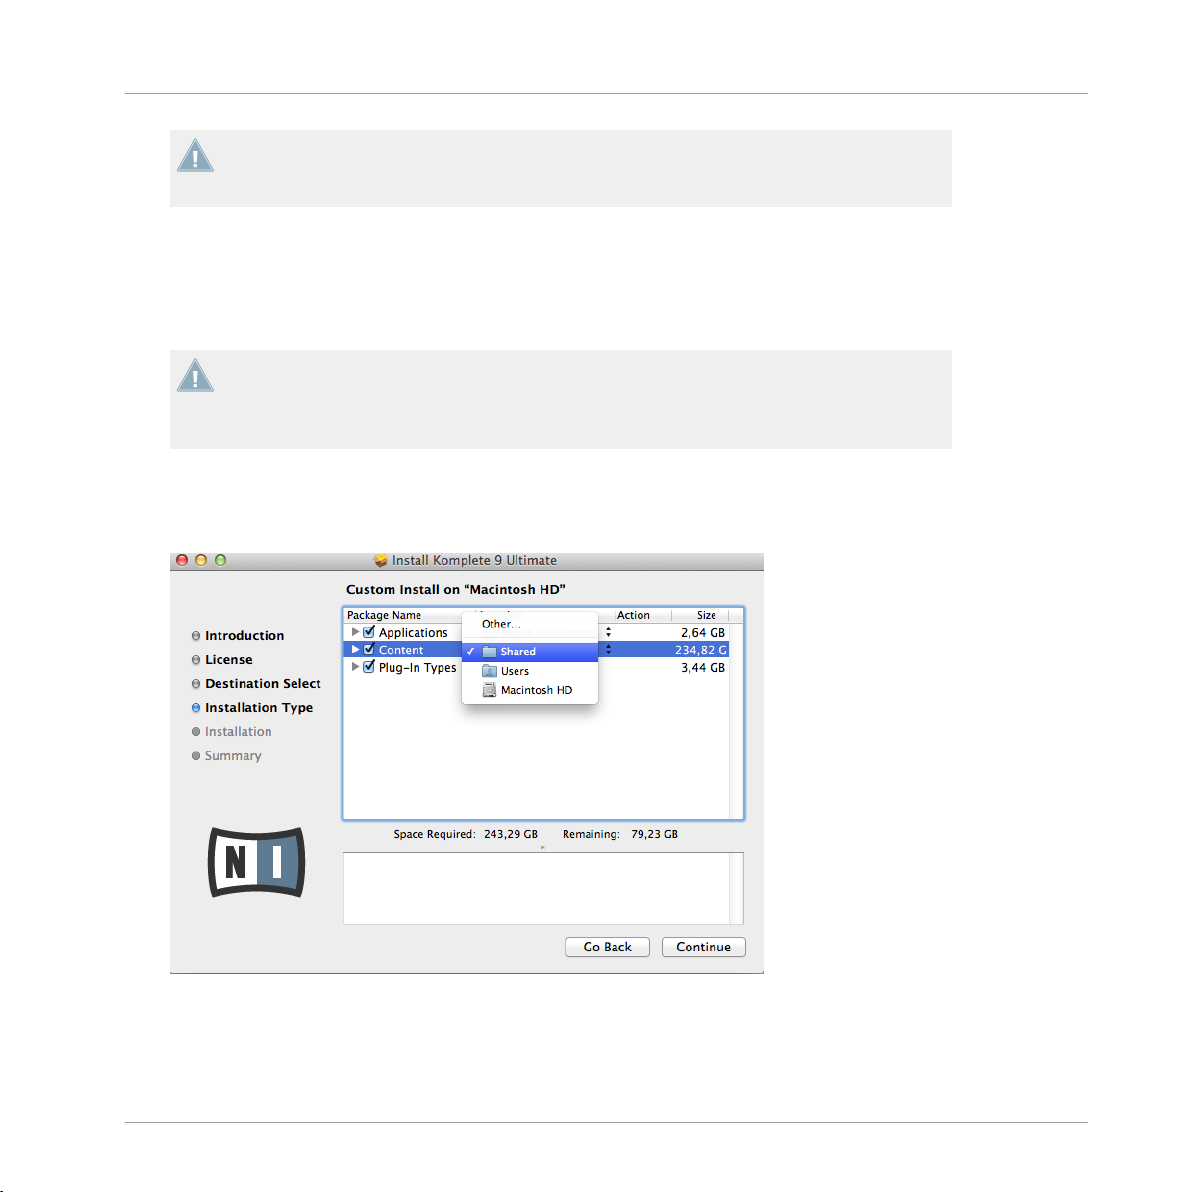
2.3.2 Select the Components to Install
The components available for installation appear grouped under the themes Applications, Con-
tent, and Plug-In Types. Click the triangles to expand the individual lists.
KOMPLETE 9 ULTIMATE - Setup Guide - 14
Page 15
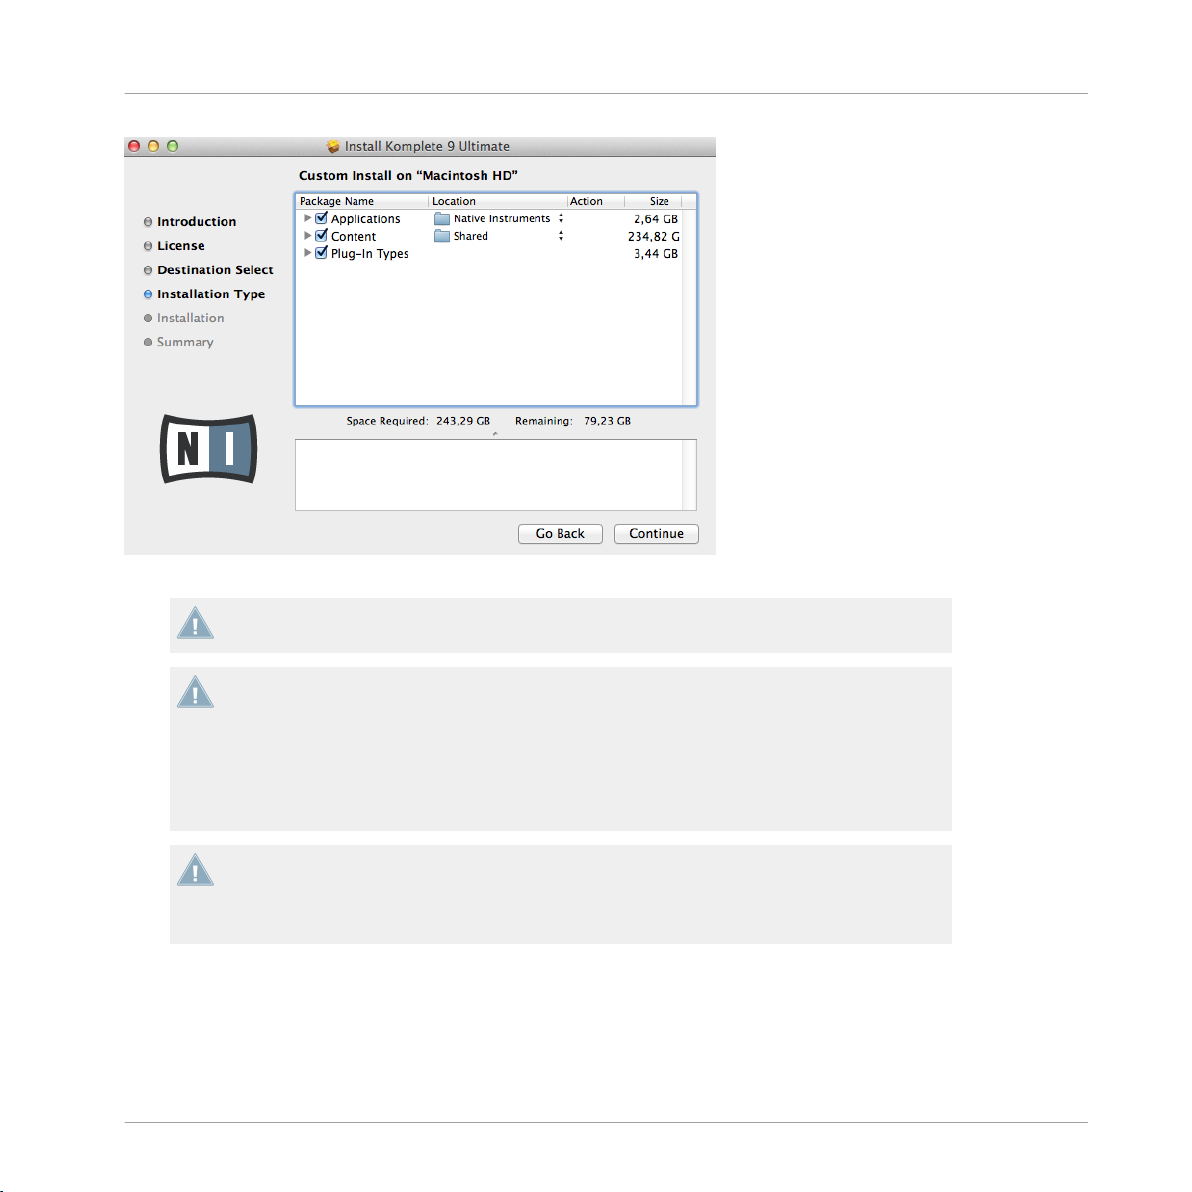
The components selection screen of the installation program.
The components listed under Content are only useful if their related applications listed under Applications are also installed. We recommend keeping all entries selected.
Installation
Installing on Mac OS X
If an application or library is already installed on your computer it is not required to install
it again with the KOMPLETE 9 installer. In case the KOMPLETE 9 ULTIMATE installer detects an application version which is newer than the version provided in KOMPLETE 9 ULTIMATE, it will bring up a warning message and deselect those applications in the component tree. This is to avoid a downgrade for those applications. We recommend keeping all
other components selected unless you have a specific reason to do otherwise. For details,
see http://www.native-instruments.com/knowledge/questions/1479/
The BATTERY 4 library is a new library, which also contains a selection of kits from the
BATTERY 3 Factory Library. If you have unfinished songs relying on BATTERY 3, it is recommended to leave this application as well as its library installed. For details, see http://
www.native-instruments.com/knowledge/questions/1481/
Applications: Specifies the applications to be installed (along with all files necessary for the
software to run on your computer).
KOMPLETE 9 ULTIMATE - Setup Guide - 15
Page 16
Installing on Mac OS X
Content: Specifies the sample-based libraries and other content, such as products powered by
GUITAR RIG or REAKTOR, to be installed.
The default installation path for content is Macintosh HD/Users/Shared/
Plug-In Types: Specifies the plug-in types (VST, Audio Unit, RTAS or AAX) to be installed. Select the plug-in type(s) depending on which type is supported by your sequencer software. Audio Unit is used by many sequencers like Logic, Live, Digital Performer or Garage Band. VST is
used by Cubase, while RTAS and AAX are the native plug-in formats for Pro Tools. Leave all
plug-in types selected if you are unsure which format is supported by your host application.
Although the KOMPLETE 9 installer allows you to select RTAS as plug-in type, at the time
of writing this guide BATTERY 4 is not available in the RTAS format. If you are using
Pro Tools 9 or older, refer to http://www.native-instruments.com/knowledge/questions/
1489/ for details on how to obtain and install BATTERY 4 in the RTAS format. For
Pro Tools 10 or higher select AAX as plug-in type.
The Service Center application, which is required for product activation, will always be installed (unless the same or a newer version already exists on your computer).
Installation
Updating from KOMPLETE 7
If you still have unfinished songs relying on samples from the KONTAKT 4 Factory Library, it is
recommended to leave this sample library installed. If you need to remove the KONTAKT 4
Factory Library in order to recover disk space, it is still possible to safely delete the library and
update it with the new KONTAKT 5. Just follow these steps:
1. Delete the folder named Kontakt 4 Library, which contains all the Instruments and samples
of KONTAKT 4 (donʼt worry, the Instruments and Multis you have in your host project are
still safe).
2. Open your project file—a Samples Missing dialog box will appear.
3. Make sure Check for Alternate file types option is checked.
4. Click the Browse for Folder button.
5. Point the browser to the Kontakt Factory Library folder and click OK.
6. To save time, you can browse for the correct subfolder within the Samples folder of the
Kontakt Factory Library.
7. Resave the project.
KOMPLETE 9 ULTIMATE - Setup Guide - 16
Page 17
Installing on Mac OS X
For information on how to convert songs made with an older version of a plug-in to the latest plug-in, see section ↑8.4, How to Convert Songs Made with an Older Plug-in Version to
the Latest Plug-in Version.
2.3.3 Set the Install Locations for Content
In the Location column you can select a target folder or hard disk for the sample-based libraries and other content listed under the Content theme.
Because the content requires a large amount of disk space, it is crucial that you select the
install location carefully. For optimum performance it is recommended to install the content on a dedicated hard disk. Note that you cannot use the KOMPLETE 9 ULTIMATE installation hard disk for this purpose.
To change the install location:
1. Click on the folder icon in the Location column. A list suggesting common target folders
and volumes will open.
Installation
2. Select a target folder or hard disk from the list, or click Other… to navigate to a volume or
folder of your choice.
KOMPLETE 9 ULTIMATE - Setup Guide - 17
Page 18

After you have customized the installation as desired, click Continue and then follow the
►
on-screen instructions.
2.3.4 Complete the Installation
Installation
Installing on Mac OS X
The final screen of the installation program.
On the last screen of the installation program, click Close to complete the installation.
►
Please activate your product using Service Center now, as explained in chapter ↑3, Prod-
►
uct Activation with Service Center of this Setup Guide.
2.4 Installing on Windows
By default, a Native Instruments folder, including a number of subfolders, will be created during installation:
C:\Program Files\Native Instruments\
KOMPLETE 9 ULTIMATE - Setup Guide - 18
Page 19

Installing on Windows
We strongly recommend keeping this installation path.
2.4.1 Connect the Hard Disk and Start the Installation
Disconnect all Native Instruments hardware controllers and audio interfaces from your
computer before proceeding. Do not reconnect these devices before you have finished the
KOMPLETE 9 ULTIMATE installation procedure!
The KOMPLETE 9 ULTIMATE hard disk uses an USB 2.0 interface. You can connect it to a
USB 2.0 or USB 3.0 port, the latter of which is backwards compatible.
If the KOMPLETE 9 ULTIMATE hard disk does not power up, or does not mount as described below within a couple of seconds, the USB port on your computer is probably unable
to supply enough power to operate the hard disk. In this case, connect the unused (secondary) connector of the ‘Y’ shaped power-sharing cable to a second USB port on your computer. If this does not solve the problem, use an ‘active’ USB 2 hub that has a dedicated
power supply.
2.4.2 Select the Features to Install
The features available for installation appear grouped under the themes Applications, Content,
and Plugin Types. Click the triangles to expand the individual lists.
Installation
KOMPLETE 9 ULTIMATE - Setup Guide - 19
Page 20

Installation
Installing on Windows
The components selection screen of the installation program.
The features listed under Content are only useful if their related Applications are also installed. We recommend keeping all features selected.
If an application or library is already installed on your computer it is not required to install
it again with the KOMPLETE 9 installer. In case the KOMPLETE 9 ULTIMATE installer detects an application version which is newer than the version provided in KOMPLETE 9 ULTIMATE, it will bring up a warning message and deselect those applications in the component tree. This is to avoid a downgrade for those applications. We recommend keeping all
other components selected unless you have a specific reason to do otherwise. For details,
see http://www.native-instruments.com/knowledge/questions/1479/
The BATTERY 4 library is a new library, which also contains a selection of kits from the
BATTERY 3 Factory Library. If you have unfinished songs relying on BATTERY 3, it is recommended to leave this application as well as its library installed. For details, see http://
www.native-instruments.com/knowledge/questions/1481/
KOMPLETE 9 ULTIMATE - Setup Guide - 20
Page 21

Installing on Windows
Applications: Specifies the applications to be installed (along with all files necessary for the
software to run on your computer).
Content: Specifies the sample-based libraries and other content, such as products powered by
GUITAR RIG or REAKTOR, to be installed.
Plugin Types: Specifies the plug-in types (VST, RTAS or AAX) to be installed. Select the plug-in
type(s) depending on which type is supported by your sequencer software. Leave all plug-in
types selected if you are not sure which format is needed by your host application
Although the KOMPLETE 9 installer allows you to select RTAS as plug-in type, at the time
of writing this guide BATTERY 4 is not available in the RTAS format. If you are using
Pro Tools 9 or older, refer to http://www.native-instruments.com/knowledge/questions/
1489/ for details on how to obtain and install BATTERY 4 in the RTAS format. For
Pro Tools 10 or higher select AAX as plug-in type.
To deselect individual features, click on the small hard disk icon next to each feature and
►
choose Entire feature will be unavailable.
Installation
You can specify which plug-in types you want to install. VST is used by many sequencers
►
like Cubase, Sonar or Live, while RTAS and AAX are the native plug-in formats for Pro
Tools.
The Service Center application, which is required for product activation, will always be installed (unless the same or a newer version already exists on your computer).
Updating from KOMPLETE 7
It is recommended to leave the sample libraries from KOMPLETE 7 installed if you still have
unfinished songs relying on them. If you need to remove the KONTAKT 4 Factory Library in
order to recover disk space, it is still possible to safely delete the library and update it with the
new KONTAKT 5. Just follow these steps:
KOMPLETE 9 ULTIMATE - Setup Guide - 21
Page 22

Installing on Windows
1. Delete the folder named Kontakt 4 Library, which contains all the Instruments and samples
of KONTAKT 4 (don't worry, the Instruments and Multis you have in your host project are
still safe).
2. Open your project file—a Samples Missing dialog box will appear.
3. Make sure Check for Alternate file types option is checked.
4. Click the Browse for Folder button.
5. Point the browser to the Kontakt Factory Library folder and click OK.
6. To save time, you can browse for the correct subfolder within the Samples folder of the
Kontakt Factory Library.
7. Resave the project.
For information on how to convert songs made with an older version of a plug-in to the latest plug-in, see section ↑8.4, How to Convert Songs Made with an Older Plug-in Version to
the Latest Plug-in Version.
2.4.3 Define the Application's Destination Folder
Here you define the installation path for all applications in KOMPLETE 9 ULTIMATE.
Installation
KOMPLETE 9 ULTIMATE - Setup Guide - 22
Page 23

Installation
Installing on Windows
The software installation path screen of the installation program.
This installation path is used for the applications and the documentation, not the content
libraries. You can specify the library path in an upcoming installer screen.
2.4.4 Define VST Plug-in Destination Folders
If you have chosen to install VST plug-ins, this screen allows defining a VST plug-in path on
your computer. You can define a single path when running a 32-bit version of Windows. If you
are running a 64-bit version of Windows, you need to define separate paths for the 32-bit and
64-bit plug-in installation locations.
Do not select the same folder for the 32-bit and 64-bit plug-ins!
KOMPLETE 9 ULTIMATE - Setup Guide - 23
Page 24

If you already have other 3rd-party plug-ins installed on your computer, make sure to select
the same installation directory for your Native Instruments plug-ins. Please also check the
default VST plug-ins path configured in your host software. The same path has to be selected there, for the host software to detect any installed plug-ins.
Installation
Installing on Windows
The plug-in folder selection screen of the installation program.
Make sure to choose the correct VST plug-ins path in this screen. You can read more about
this topic in chapter ↑8, Troubleshooting and FAQ of this Setup Guide.
2.4.5 Define a Library Destination Folder
On the next screen, you can select a target folder or hard disk for the sample-based libraries
and other content listed under the Content theme.
KOMPLETE 9 ULTIMATE - Setup Guide - 24
Page 25

Because the sound library requires a large amount of disk space, it is crucial that you select the install location carefully. For optimum performance it is recommended to install
the sound library on a dedicated hard disk. Note that you cannot use the KOMPLETE 9 ULTIMATE installation hard disk for this purpose.
To install the sound library on a separate hard disk, click on Change… and browse to the
►
destination folder.
Installation
Installing on Windows
The Library Destination Folder selection screen of the installation program.
After you have customized the installation as desired, click Next and then follow the on-
►
screen instructions.
KOMPLETE 9 ULTIMATE - Setup Guide - 25
Page 26

2.4.6 Complete the Installation
Installation
Installing on Windows
The final screen of the installation program.
On the last screen of the installation program, tick the checkbox labeled Run Service
►
Center for product activation now to start the Service Center application automatically.
Then click Finish to complete the installation.
After the installation has been completed, the Service Center application will be
►
launched. Please activate your product using Service Center now, as explained in chapter
↑3, Product Activation with Service Center of this Setup Guide.
After having successfully activated your product, you will receive a link via email in order
►
to download further applications. It may take a few hours for the email to appear.
KOMPLETE 9 ULTIMATE - Setup Guide - 26
Page 27

Product Activation with Service Center
Activating Your Product Online
3 Product Activation with Service Center
This chapter uses a placeholder name (NI Product) on all screenshots. The relevant section
on your screen will display the name of the Native Instruments product you are activating.
3.1 Activating Your Product Online
Skip to section ↑3.3, Activating Your Product Offline if your computer is not connected to
the Internet.
3.1.1 Start Service Center
1. Locate the Service Center application on your hard disk. During installation, a folder labeled Native Instruments was created in the Applications (Mac OS X) / Program Files (Windows) folder. Within this folder, a subfolder labeled Service Center holds the corresponding application.
2. Double-click the Service Center application to start the activation procedure.
It is necessary to activate your Native Instruments product in order to use its full functionality.
KOMPLETE 9 ULTIMATE - Setup Guide - 27
Page 28

3.1.2 Log In Into Your User Account
Product Activation with Service Center
Activating Your Product Online
The log-in screen of Service Center.
Log in with your email address and Native Instruments password.
►
If you do not have a Native Instruments account yet, click on Create new User Account.
►
Fill in the address form. The password will be sent to you via email.
KOMPLETE 9 ULTIMATE - Setup Guide - 28
Page 29

3.1.3 Activate the Product
Product Activation with Service Center
Activating Your Product Online
The product activation screen of Service Center.
1. Find the serial number on the Setup Information flyer and enter it in the number field.
2. Click Activate to proceed.
3. Follow the on-screen instructions.
KOMPLETE 9 ULTIMATE - Setup Guide - 29
Page 30

3.1.4 Finish the Online Activation
Product Activation with Service Center
Activating Your Product Online
Service Center confirming the product activation.
Service Center confirms that the product has been activated successfully. A search for updates
will start automatically.
▪ If updates for any of the activated products are available, the button in the bottom right
corner of the screen reads Update. To download the updates, click the Update button and
proceed with section ↑3.2, Updating Your Product.
▪ If no updates are available, the button in the bottom right corner of the screen reads Exit.
You can click it to close Service Center.
KOMPLETE 9 ULTIMATE - Setup Guide - 30
Page 31

3.2 Updating Your Product
3.2.1 Select Updates
Product Activation with Service Center
Updating Your Product
The product update screen of Service Center.
1. In Service Center, click the Update tab to view a list of available updates.
2. Select the updates you want to download by checking the checkboxes on the left. We recommend downloading all preselected updates.
3. Click Download. The download will start.
KOMPLETE 9 ULTIMATE - Setup Guide - 31
Page 32

3.2.2 Download the Updates
Product Activation with Service Center
Updating Your Product
The product update in progress.
Depending on the file size and the speed of your internet connection, downloading the files
may take a while. We strongly recommend that you always install the latest updates.
KOMPLETE 9 ULTIMATE - Setup Guide - 32
Page 33

3.2.3 Open Your Download Folder
Product Activation with Service Center
Updating Your Product
Service Center confirming all updates were downloaded, and offering to open the download folder.
After all files have been downloaded successfully, you will be asked to open the download folder.
Click Yes to open the download folder.
►
After the download folder has opened, you can quit Service Center by clicking Exit.
►
KOMPLETE 9 ULTIMATE - Setup Guide - 33
Page 34

Product Activation with Service Center
Updating Your Product
3.2.4 Install Updates
1. Launch the first installer file from the download folder.
2. Follow the instructions of the Installation Wizard.
3. Proceed until you have installed all updates.
3.3 Activating Your Product Offline
If the computer you want to use Native Instruments products on is permanently not connected
to the internet, you can activate the products utilizing the Offline activation procedure. Note
that you will need a second computer that is connected to the internet.
KOMPLETE 9 ULTIMATE - Setup Guide - 34
Page 35

3.3.1 Start the Offline Activation
Product Activation with Service Center
Activating Your Product Offline
The internet connection screen of Service Center.
1. Start Service Center. If no internet connection is detected, you will be redirected to the
Internet connection screen pictured above.
2. In the Continue without connection to the internet area at the bottom of the screen, click
Offline. You will be forwarded to the Activate screen.
KOMPLETE 9 ULTIMATE - Setup Guide - 35
Page 36

3.3.2 Create the Activation Request File
Product Activation with Service Center
Activating Your Product Offline
The offline activation screen of Service Center.
On the Activate screen, click Create. The Activate screen will display fields in which to
►
enter the serial number (see next step).
KOMPLETE 9 ULTIMATE - Setup Guide - 36
Page 37

3.3.3 Enter the Serial Number
Product Activation with Service Center
Activating Your Product Offline
The product activation screen of Service Center.
1. Enter the serial number in the number field. The serial number is located on the Setup
Information flyer.
2. Click Create to save the Activation Request File (ActivationRequestFile.html). A Save File
dialog will open and let you select a target folder.
3. Save the Activation Request File to the desired target folder.
KOMPLETE 9 ULTIMATE - Setup Guide - 37
Page 38

Product Activation with Service Center
Activating Your Product Offline
3.3.4 Transfer the Activation Request File
The offline activation procedure.
1. Copy the Activation Request file to a portable storage device and transfer it to a computer
with internet connection.
2. Open the Activation Request file by double-clicking it.
3. Follow the instructions on the Service Center product activation web page. As a new Native Instruments user you will need to create a new account before you can log in.
4. Transfer the Activation Return file back to your audio computer.
KOMPLETE 9 ULTIMATE - Setup Guide - 38
Page 39

3.3.5 Open the Activation Return File
Product Activation with Service Center
Activating Your Product Offline
The offline activation screen of Service Center.
1. On your audio computer, start Service Center again. In the Continue without connection to
the internet area at the bottom of the screen, click Offline.
2. Select the Activate page and click Open to load the Activation Return file.
KOMPLETE 9 ULTIMATE - Setup Guide - 39
Page 40

3.3.6 Finish the Offline Activation
Product Activation with Service Center
Activating Your Product Offline
Service Center confirming the product activation.
After you have opened the Activation Return File, Service Center confirms that the product has
been activated successfully. You can quit Service Center by clicking Exit.
To obtain updates for your products, log in under https://co.native-instruments.com/?
►
id=updates, using your Native Instruments user account information. Download all rele-
vant updates from the Personal Update Manager to your internet computer, transfer them
to your music computer utilizing portable storage media, and install them.
KOMPLETE 9 ULTIMATE - Setup Guide - 40
Page 41

Product Activation with Service Center
Further Information
3.4 Further Information
For details on your registered products and their serial numbers as well as information on licenses and NI user account settings, please see My Account: http://www.native-instru-
ments.com/my-account/
KOMPLETE 9 ULTIMATE - Setup Guide - 41
Page 42

Downloading KOMPLETE 9 ULTIMATE Products Not Present on the Hard Disk
4 Downloading KOMPLETE 9 ULTIMATE Products Not
Present on the Hard Disk
A number of products that are part of KOMPLETE 9 ULTIMATE are not included on the hard
disk. You will be able to download these products once you have completed the product activation. An email containing links to the Native Instruments website will be sent to the email address used to set up your NI account.
It may take up to 24 hours for the email containing the download links to arrive.
To download the additional products, follow the instructions:
1. In the email you received after you have activated KOMPLETE 9 ULTIMATE, click the
links to open the download pages in your web browser.
2. On the download pages, select the products for either Windows or OS X by clicking the
corresponding download links.
3. Save the files to a destination on your hard disk.
4. Double-click the downloaded files to start the installation.
5. Follow the on-screen instructions.
The downloaded products will be ready to use directly after installation—no additional
→
activation is required.
KOMPLETE 9 ULTIMATE - Setup Guide - 42
Page 43

Stand-alone Operation
5 Stand-alone Operation
Once the installation process has finished, you will find the installation folders of the KOMPLETE 9 ULTIMATE applications on your hard disk. Each application (e.g. KONTAKT 5, GUITAR RIG 5, etc.) has its own installation folder containing the application and the documentation resources within the Native Instruments folder in your Applications (Mac OS X) or Program
Files (Windows) folder.
When you launch one of the KOMPLETE 9 ULTIMATE applications from its installation directory, it will start as a stand-alone program with its own application menu, just like any other
application on your computer.
The Audio and MIDI Settings Dialog
When you start an application in stand-alone mode for the first time, both its audio and MIDI
settings are not yet configured. In order to make the application receive MIDI notes from your
keyboard and play sound through your audio interface, you will first have to tell it which Audio
and MIDI hardware to use. This is done via the Audio and MIDI Settings dialog, which appears
automatically upon the first start.
You can open this dialog at any time by clicking on the Audio and MIDI Settings… entry in
the File menu. In KONTAKT, this is found under Options…. In GUITAR RIG for Mac OS X,
this is located in the main application menu under Preferences….
KOMPLETE 9 ULTIMATE - Setup Guide - 43
Page 44

5.1 Selecting an Audio Interface
Stand-alone Operation
Selecting an Audio Interface
The Audio page of the Audio and MIDI Settings dialog in Windows.
On the Audio page of the Audio and MIDI Settings dialog, you can specify which audio device
the application should use for playback and adjust global playback parameters. The dialog provides the following options:
▪ Driver: With this drop-down menu, you can select which of your operating system's device
driver architectures the application should use. The following is a list of common audio
driver formats and their characteristics:
◦ Core Audio: Only audio driver format for Mac OS X. Fast performance.
◦ ASIO: Recommended audio driver format for Windows. Designed for real-time audio
applications and fast performance. This type of driver is typically installed with professional grade audio interfaces.
KOMPLETE 9 ULTIMATE - Setup Guide - 44
Page 45

Stand-alone Operation
Optimizing Latency
◦ WASAPI: Current Windows audio driver standard format for Windows 7 and Win-
dows 8. Performance depends on audio hardware and driver quality, which ranges
from fast to poor.
▪ Device: This menu lists all connected audio interfaces that match the driver architecture
chosen above. Select the audio interface that you'd like to use for playback here. On Windows, the ASIO Config button opens the control panel of the selected audio interface.
This button is not present on Mac OS X.
▪ Sample Rate: This drop-down menu allows you to set the global playback sample rate at
which the application will operate. Common values are 44100 Hz for music and
48000 Hz for film production.
▪ Latency: Displays the size of the audio playback buffer in samples. Small values will
shorten the delay between pressing a key and hearing the resulting sound (this is called
“latency”), but may cause drop-outs and stuttering when playing several voices at the
same time. Conversely, setting this to a higher value will make playback more reliable at
the cost of more latency.
5.2 Optimizing Latency
The Latency setting controls the size of the playback buffer. In order to find the optimal buffer
size for your system, we recommend that you begin by setting the latency to a healthy middle
value between 256 and 512 samples, then gradually decrease the value during your normal
work.
On Mac OS X, a dedicated Latency slider allows you to set the buffer size. On Windows, the
buffer size can be configured in the audio interface's ASIO panel if you use a low latency ASIO
driver. The ASIO panel can be opened with the ASIO Config button in the Audio and MIDI Settings dialog. Some other Windows driver standard formats do not provide any options to adjust
the latency. If so, it is recommended to upgrade your audio driver and/or audio interface.
If you are using low-latency drivers, but cannot get below a certain buffer size without getting
drop-outs, consult the documentation of your audio hardware to find out whether you can access it via an alternate driver, as some driver types allow more efficient low-level access to the
hardware than others.
KOMPLETE 9 ULTIMATE - Setup Guide - 45
Page 46

Stand-alone Operation
Routing Audio Input and Output
5.3 Routing Audio Input and Output
On the Routing page of the Audio and MIDI Settings dialog you can map the audio outputs of
the software to the physical outputs of your audio interface.
If your software shows an output level on the user interface, but you cannot hear any output from your audio interface, check on the Routing page to see if the right physical outputs have been assigned.
The Routing page of the Audio and MIDI Settings dialog in Windows.
Some KOMPLETE 9 ULTIMATE applications and products, such as GUITAR RIG, make use of
external audio signals. To feed audio coming from external sources into these applications, you
need to also configure the audio inputs of your audio interface:
To make changes to the input routing, click on the Inputs button in the upper left corner
►
of the Routing page.
KOMPLETE 9 ULTIMATE - Setup Guide - 46
Page 47

Stand-alone Operation
Setting up MIDI Connections
5.4 Setting up MIDI Connections
The MIDI page of the Audio and MIDI Settings dialog provides a list of all MIDI inputs and
outputs available on your system. These are ports of physical MIDI interfaces connected to
your computer, but also any virtual MIDI ports that may be provided by drivers or other applications to facilitate inter-application MIDI usage.
In order to make the application respond to MIDI data from the outside, you will have to enable one or more ports that appear in the inputs list of the MIDI page:
1. Make sure the Inputs button is highlighted, and identify the port(s) that you intend to use
for MIDI input in the list.
2. If the Status field on the right side of an entry reads Off, to activate the port, click directly on the word Off. This will open a drop-down menu where you can select On to change
the status.
The MIDI page of the Audio and MIDI Settings dialog in Windows.
KOMPLETE 9 ULTIMATE - Setup Guide - 47
Page 48

Setting up MIDI Connections
Some applications allow sending MIDI to external MIDI ports or to other applications:
Click on the Outputs button in the upper left corner of the MIDI page (if accessible) and
►
activate the desired ports in the same fashion as described earlier in this section.
Stand-alone Operation
KOMPLETE 9 ULTIMATE - Setup Guide - 48
Page 49

Plug-in Operation
6 Plug-in Operation
All applications contained in KOMPLETE 9 ULTIMATE are also available as VST (Virtual Studio Technology), AU (Audio Units), RTAS (Real-Time Audio Suite), and AAX (Avid Audio eXtension) plug-ins.
Although the KOMPLETE 9 installer allows you to select RTAS as plug-in type, at the time
of writing this guide BATTERY 4 is not available in the RTAS format. If you are using
Pro Tools 9 or older, refer to http://www.native-instruments.com/knowledge/questions/
1489/ for details on how to obtain and install BATTERY 4 in the RTAS format. For
Pro Tools 10 or higher select AAX as plug-in type.
Refer to the documentation of your host software to find out which plug-in formats are compatible with your particular program, and for instructions on how to load virtual instruments or effect plug-ins.
The plug-ins will be added to the plug-in menu inside your sequencer, and can be loaded following your sequencer's standard procedure. The procedure of loading virtual instruments or
effect plug-ins varies between sequencers.
The content products listed in section ↑1.2, Products Included in KOMPLETE 9 ULTIMATE
of this Setup Guide were designed to be loaded into either KONTAKT, GUITAR RIG, or REAKTOR. Therefore their names will not show up in your sequencer's plug-in list. Instead,
these products will be added to the corresponding player application's Browser (or SideKick, in case of GUITAR RIG), and can be loaded from there.
KOMPLETE 9 ULTIMATE - Setup Guide - 49
Page 50

Other Documentation and Support Resources
7 Other Documentation and Support Resources
7.1 PDF Manuals
The documentation for each component is available in PDF format and located within each application's/library's installation directory on your hard disk. When using Native Instruments applications in stand-alone mode, you can also access these documents from the application's Help
menu.
In addition to this Setup Guide, most of the applications contained in KOMPLETE 9 ULTIMATE provide the following documents:
▪ The Getting Started guide explains basic workflows, such as how to load patches and use
them in the application.
▪ The Manual is the primary information resource. It provides thorough descriptions of all
user interface elements, options, tools, editors, and sound processing modules of an application. You can use it both as a reference manual and a thorough guide for working
with the application. In some products, this document is named Operation Manual.
PDF Manuals
▪ A Readme.txt file, containing last-minute information, a version history, and more.
Additionally, some products come with a Manual Addendum that covers changes and new features introduced by the latest update(s), and with specific documents providing information about
the included libraries or modules.
Windows users may need to install the free Adobe Reader software (www.adobe.com) or any
other application capable of opening PDF files in order to view these documents.
7.2 Knowledge Base/Readme/Online Support
Open the Service Center application and click on the Support button in the upper right
►
corner. Here you will find direct links to the Native Instruments Online Knowledge Base
and the Online Support Form.
KOMPLETE 9 ULTIMATE - Setup Guide - 50
Page 51

Other Documentation and Support Resources
The support form will ask you to enter information about your hardware and software setup.
This information is essential for our support team to be able to provide you with quality assistance.
When communicating with the Native Instruments support team, keep in mind that the more
details you can provide about your hardware, your operating system, the version of the software
you are running, and the problem you are experiencing, the better they will be able to help you.
In your description, you should mention:
▪ How to reproduce the problem
▪ What you have already tried to fix the problem
▪ A description of your setup, including all hardware
▪ The brand and specifications of your computer
Always consult the Readme.txt file of a new software version. It contains important information and all last minute changes, which weren't available for the printed manual.
7.3 Forum
In the Native Instruments User Forum you can discuss product features directly with other
users and with experts moderating the forum: http://www.native-instruments.com/forum
Forum
7.4 Updates
Whenever you encounter problems, it is recommended that you first download and install any
available software updates. Updates are released regularly to fix known problems and to constantly improve the software. The version number of your software is displayed in the About dialog for any Native Instruments application. This dialog can be opened by clicking on the NI
logo in the upper right corner of the user interface. Alternatively, you can find the version numbers of all installed Native Instruments applications when showing the details for an application within the Overview page of the Service Center. Updates are available on the Update page
in Service Center or on our website under: http://www.native-instruments.com/updates
KOMPLETE 9 ULTIMATE - Setup Guide - 51
Page 52

Troubleshooting and FAQ
The KOMPLETE 9 ULTIMATE Hard Disk Does Not Power Up
8 Troubleshooting and FAQ
This chapter contains some of the most frequently asked questions and answers along with references to Knowledge Base articles for additional details. In order to find an article, please visit the Native Instruments website, navigate to the Knowledge Base in the Support section and
enter the article number in the search field.
8.1 The KOMPLETE 9 ULTIMATE Hard Disk Does Not Power Up
If the USB port on your computer does not supply enough power to the KOMPLETE 9 ULTIMATE hard disk through the primary (thicker) wire of the ‘Y’ shaped power-sharing USB cable,
the hard disk will not power up. In this case, plug in the unused connector on the secondary
(thinner and shorter) wire of the ‘Y’ cable to another USB port on your computer (or a powered
USB hub). This additional connection may be needed to provide additional power to the hard
disk and is only required if connecting the primary connector alone does not power up the
disk. The KOMPLETE 9 ULTIMATE hard disk does not have a power switch, so if your computer is powered on, the disk will begin spinning as soon as you connect it to your computer.
If the KOMPLETE 9 ULTIMATE hard disk is connected as described, but still does not power
up, get in contact with Native Instrumentsʼ Technical Support team (see section ↑7.2, Knowl-
edge Base/Readme/Online Support of this Setup Guide).
8.2 Installation Folder Not Found by an Update Installer
If you have manually moved the location of a Native Instruments application on your hard disk,
the installer, upon attempting to run an update, will display an error message and abort the
installation. You can correct the application path in Service Center from the Overview page. If
an application cannot be found, a Locate button will appear on this page. Click this button and
browse to the actual location of the application.
KOMPLETE 9 ULTIMATE - Setup Guide - 52
Page 53

Troubleshooting and FAQ
Library Path Not Found by an Update Installer
8.3 Library Path Not Found by an Update Installer
If you have manually moved the folder containing your samples and presets (library folder) or
added a new hard disk to your computer, you can set a new path to the aforementioned folder
from within the associated application. This is usually done in the Options or Preferences dialog of an application.
8.4 How to Convert Songs Made with an Older Plug-in Version to the
Latest Plug-in Version
If you have an earlier major version of an application installed (e.g. KONTAKT 4 instead of
KONTAKT 5), installing the latest major version will not replace the older one. If you want to
transfer songs made with the older version to the new version, you will need to do this manually. The following steps are required:
1. Open the song in your DAW.
2. Open all relevant Native Instruments plug-ins.
3. Export the patches or Multis from each Native Instruments plug-in instance to the hard
disk. It is recommended to save them in a dedicated song folder. Give the patches distinct names (e.g. use the track names from your song) to identify them later.
4. Replace each plug-in instance with the newer version.
5. Reload the saved patches into the appropriate plug-in instances.
6. Resave your song.
8.5 Location of the VST Plug-ins Folder on Windows
The VST plug-in versions of Native Instruments software can be installed to any location on
your hard disk. However, nearly every VST host or sequencer allows setting a default VST plugins path in its preferences. For this reason you have to make sure that you install the Native
Instruments VST plug-ins to the same folder as set within your host's preferences, otherwise
they will not appear in the application.
KOMPLETE 9 ULTIMATE - Setup Guide - 53
Page 54

Troubleshooting and FAQ
The Plug-in Does Not Appear in My Sequencer
During installation, closely study the VST Plug-Ins Destination Folder setup screen and
make sure that you select the desired path by hand if the correct path is not detected automatically (see section ↑2.4.4, Define VST Plug-in Destination Folders for more info).
To find out more about the VST plug-ins path and the handling of VST plug-ins under 64-bit
versions of Windows, look for the following article in the Native Instruments Knowledge Base:
http://www.native-instruments.com/knowledge/questions/764
8.6 The Plug-in Does Not Appear in My Sequencer
If a plug-in does not appear in your host, re-run the installer as described in chapter ↑2, Instal-
lation of this Setup Guide and make sure the appropriate plug-in is selected for installation.
The specific steps necessary for loading virtual instruments or effect plug-ins vary between sequencers. Please refer to the documentation for your host application for instructions on how
to load virtual instruments or effect plug-ins.
Some of the Instruments and Effects included in KOMPLETE 9 ULTIMATE need to be
loaded within other Native Instruments plug-ins. For details, see section ↑1.2.3, Instru-
ments Powered by KONTAKT and following.
Most host applications load Virtual Instrument plug-ins (e.g. KONTAKT) in a different place
from Effects plug-ins (e.g. GUITAR RIG). Make sure you are looking for the right type of
plug-in in the correct area for the plug-in type.
Windows: By default, Windows hides certain file types, such as plug-in files. As a result, they
will not appear when browsing to your VST plug-ins folder using Windows Explorer. In order to
be able to view plug-in files from Windows Explorer, you need to modify a Windows setting
(“Show Hidden Files”). This is necessary if you want to manually check if the plug-in files
have been installed to the correct VST plug-ins folder.
The following Knowledge Base article explains how to modify this setting: http://www.native-
instruments.com/knowledge/questions/883
KOMPLETE 9 ULTIMATE - Setup Guide - 54
Page 55

Troubleshooting and FAQ
Sequencer Tutorials
8.7 Sequencer Tutorials
The Native Instruments Knowledge Base contains several tutorials that demonstrate how to use
plug-ins within popular host sequencers: http://www.native-instruments.com/knowledge/catego-
ries/Product+Operation+and+Tutorials/Sequencer+Guides/
At the time of writing this guide, sequencer tutorials were available for Logic, Pro Tools, Cubase, Ableton Live, Sonar and Digital Performer, covering the following topics:
▪ How to insert Native Instruments plug-in software
▪ Plug-in Administration
▪ Automation
▪ Program Lists
▪ Multi Outs
▪ Troubleshooting
KOMPLETE 9 ULTIMATE - Setup Guide - 55
Page 56

Product Returns
9 Product Returns
Please contact our Technical Support team prior to returning an item. If your product needs to
be returned, they will assign you an RA (Return Authorization) number to expedite the processing of your return.
Contact Native Instruments Technical Support
http://www.native-instruments.com/support
KOMPLETE 9 ULTIMATE - Setup Guide - 56
 Loading...