


OPERATION MANUAL

The information in this document is subject to change without
notice and does not represent a commitment on the part of
NATIVE INSTRUMENTS GmbH. The software described by
this document is subject to a License Agreement and may
not be copied to other media. No part of this publication may
be copied, reproduced or otherwise transmitted or recorded,
for any purpose, without prior written permission by NATIVE
INSTRUMENTS GmbH, hereinafter referred to as NATIVE
INSTRUMENTS. All product and company names are ™ or
® trademarks of their respective owners.
Furthermore, the fact that you are reading this text means you
are the owner of legal version rather than an illegal, pirated
copy. It is only through the loyalty and honesty of people like
yourself that NATIVE INSTRUMENTS GmbH can continue to
develop and create innovative audio software. On behalf of
the entire company, thank you very much.
Users Guide written by Marc Schonbrun
Editors: Jonathan DeRouchie, André Estermann
Special thanks to the Beta Test Team, who were invaluable
not just in tracking down bugs, but in making this a better
product.

Germany
NATIVE INSTRUMENTS GmbH
Schlesische Str. 28
D-10997 Berlin
Germany
info@native-instruments.de
www.native-instruments.de
USA
NATIVE INSTRUMENTS North America, Inc.
5631 Hollywood Boulevard
Los Angeles, CA 90028
USA
sales@native-instruments.com
www.native-instruments.com
© Native Instruments GmbH, 2007. All rights reserved.

1. Introduction
1.1 Welcome
GUITAR RIG 3 will change the way you play and think about music. Say
goodbye to complex, noisy, unreliable guitar pedal setups with cables that
crackle and batteries that die in the middle of solos. GUITAR RIG 3 puts
the world’s most sophisticated, exible, and wonderful-sounding guitar
setups into any modern laptop or desktop computer (Mac OS X or Windows
XP). Take it to the studio, to the gig, or practice in your hotel room…the
possibilities are limitless.
And thanks to the included RIG KONTROL 3 foot controller/DI box/USB
2 sound card/preamp, you can take your guitar, bass, or other stringed
instrument sound to the next level with only a few guitar chords, and some
way to hear what you’re doing.
Of course, none of this would be possible without the visionaries, inventors,
and artisans whose dedication and hard work on guitar amps and effects
over the decades have dened the sound of the electric guitar as we know
it. All of the NATIVE INSTRUMENTS team would like to acknowledge their
creations as an integral source of inspiration in the design of this software.
They have both our respect and gratitude, as without them, this software
would not be possible. We are more than happy to state that imitation is
indeed the sincerest form of attery.
GUITAR RIG 3 – 4

A love of the guitar and its seemingly innite potential has driven our quest
for the ultimate guitar rig. We thank you for your support, and hope that
whether you’re looking for vintage blues timbres, modern rock grunge, or
synthetic sounds for dance music, GUITAR RIG 3 will deliver the tone,
punch, and crunch you crave.
– The NATIVE INSTRUMENTS GUITAR RIG 3 Team
1.2 How to use this manual
This manual has been designed to be as clear and concise as possible.
While GUITAR RIG has been designed to be as intuitive as any of the
hardware rigs you may be used to, its true power lies in its great exibility
– GUITAR RIG is much more diverse and exible than the hardware rigs
you’re used to. In order to make the most of your GUITAR RIG experience,
we recommend that you keep this manual handy, as it will shed light on
all the cool things GUITAR RIG can do, and with any luck, inspire you to
try things you never thought about.
The manual is divided into two main sections. The rst gives you a broad
overview of the software and hardware to get you up and running as quickly
as possible. The remainder of the manual is devoted to referencing every
Button, K
GUITAR RIG, and its sound design possibilities, you’ll want to know
everything you can about it.
nob
and switch on the interface. If you want to get deep into
GUITAR RIG 3 – 5

1.3 Software installation
If you are looking for more information about the GUITAR RIG software
installation, please consult the NATIVE INSTRUMENTS Setup Guide,
included with this package.
1.4 Hardware setup
If you are looking for more information about the RIG KONTROL hardware
installation, please consult the NATIVE INSTRUMENTS RIG CONTROL
Operation Manual, included with this package.
When you install GUITAR
When you install GUITAR
!
!
ple as e make sur e t hat yo u also
ple as e make sur e t hat yo u also
choose to install the RIG KONTROL
choose to install the RIG KONTROL
driver (KONTROL EDITION). This
driver (KONTROL EDITION). This
option has to be initiated during the
option has to be initiated during the
last step of the installation process.
last step of the installation process.
(In this step, you should also install
(In this step, you should also install
the Ser vice Center if it is not al-
the Ser vice Center if it is not al-
ready installed.)
ready installed.)
RIG 3 for the rst time,
RIG 3 for the rst time,
GUITAR RIG 3 – 6

2. Getting started
It’s time! You got the software and, you got the hardware (That new RIG
KONTROL is crying "Step on me!"), now you want to start rocking out!
Let’s get you started with an overview of GUITAR RIG 3.
2.1 What is Guitar Rig
GUITAR RIG is the future of guitar tone. Imagine having a room lled with
every boutique amplier ever crafted, endless arrays of cabinets (each with
different microphones), any effect you desire, loop machines, and other
amazing tools for crafting sounds at your immediate disposal. GUITAR
RIG takes this idea (which would cost you many hundreds of thousands of
dollars) and puts them into a single program which can run as a standalone
application, or a plug-in, on Mac OSX, or Windows XP in any DAW that
you prefer to work in. Not only can GUITAR RIG craft your favorite sounds,
you can also create new sounds you’d never even dreamed of thanks to
our unique modulation framework. GUITAR RIG is simply the best thing to
happen to your guitar playing and production since the key of E minor!
GUITAR RIG 3 – 7

2.2 New in Version 3
GUITAR RIG 3 adds to the award winning GUITAR RIG 2 design, and
implements a multitude of improvements to the software. Here’s what you
can expect to nd in GUITAR RIG 3:
A new, more polished, easier to navigate user interface.
►
The powerful L
►
stage performance.
Four brand-new, sought-after amplier models.
►
Six brand-new, sound shaping effects.
►
“Snapshots”, which allow for quick and uid changes of sounds during
►
a song.
“Matched Cabinets” feature that makes combining amp models and
►
cabinets easier than ever.
A newly designed RIG KONTROL (GUITAR RIG 3 KONTROL EDITION),
►
featuring a new A/D D/A section from the acclaimed Audio Kontrol 1,
eight freely assignable foot-switches, and one continuous controller
pedal with on/off switch.
An updated Preset browser with improved Bank and sound functional-
►
ity which makes organizing your sounds easier than ever.
Tempo, such as synced delays can now be stored within the Preset and
►
can be set to sync to host clock or ignore host clock when needed.
Assigning controllers has never been easier. Third party controllers can
►
share the common virtuaL rig KontroL graphic for a simplied interface.
ive view
for easy access to your parameters for live, on-
GUITAR RIG 3 – 8

2.3 Standalone and Plug-in Mode
You can use GUITAR RIG 3 in two different ways: run it as a stand-
alone application or plug it into your favourite sequencer. This section will
introduce you to both modes.
2.3.1 About “Standalone” Mode
GUITAR RIG 3 can function as a guitar processing setup all by itself,
without needing anything other than a computer and audio in and out.
Only a few steps are neccessary to get you started:
Turn off Direct Monitoring (please refer to Appendix A)
►
Open the GUITAR RIG 3 program, and select the computer’s audio
►
input as GUITAR RIG 3’s audio input.
Plug your guitar (using RIG KONTROL, as described later, or a preamp)
►
into the computer’s audio input.
Select the computer audio output as GUITAR RIG 3’s output.
►
Patch the computer’s audio output into your amplication system (gui-
►
tar amp, mixing console, PA system, etc.).
However, the built-in audio in most Windows machines is not studio quality,
and there will be audible latency (time delay) between the time you play a
note and when you hear it come out of the computer. Latency is frustrating,
because we’re used to hearing a sound immediately when we pluck a string.
GUITAR RIG 3 – 9

Modern Macintosh computers running OS X are better, but there may still
be sound quality issues with built-in audio.
If you a re no t us ing the RIG KONT R OL 3 audio interfac e ,
NATIVE INSTRUMENTS advises you to use an audio interface or sound
card designed specically for audio applications. These are higher quality,
and include drivers (software that transfers data from the audio interface
to the computer) optimized for minimum delay. This will ensure that you
have a much more pleasurable musical experience.
The Audio/MIDI Setup Window
In standalone mode, simply choose the appropriate inputs and outputs by
visiting the preferences screen to bring up your audio setup.
GUITAR RIG 3 – 10
2.3.2 About “Plug-in” Mode
In this mode, GUITAR RIG 3 works in conjunction with a host program,
like GarageBand, Cubase, Apple Logic, Pro Tools, Live, Sonar, Digital
Performer, Tracktion, and so on. It inserts into the program’s mixer, like a
“virtual effect”. Audio passes through the computer’s sound card into the
host program, which feeds it into GUITAR RIG 3. The host’s output then
proceeds to a hardware output, which goes to your amplication system.
As with s tandalone mode, an audio -oriented sound card is highly
recommended to avoid the latency involved in going through the host
program and computer.
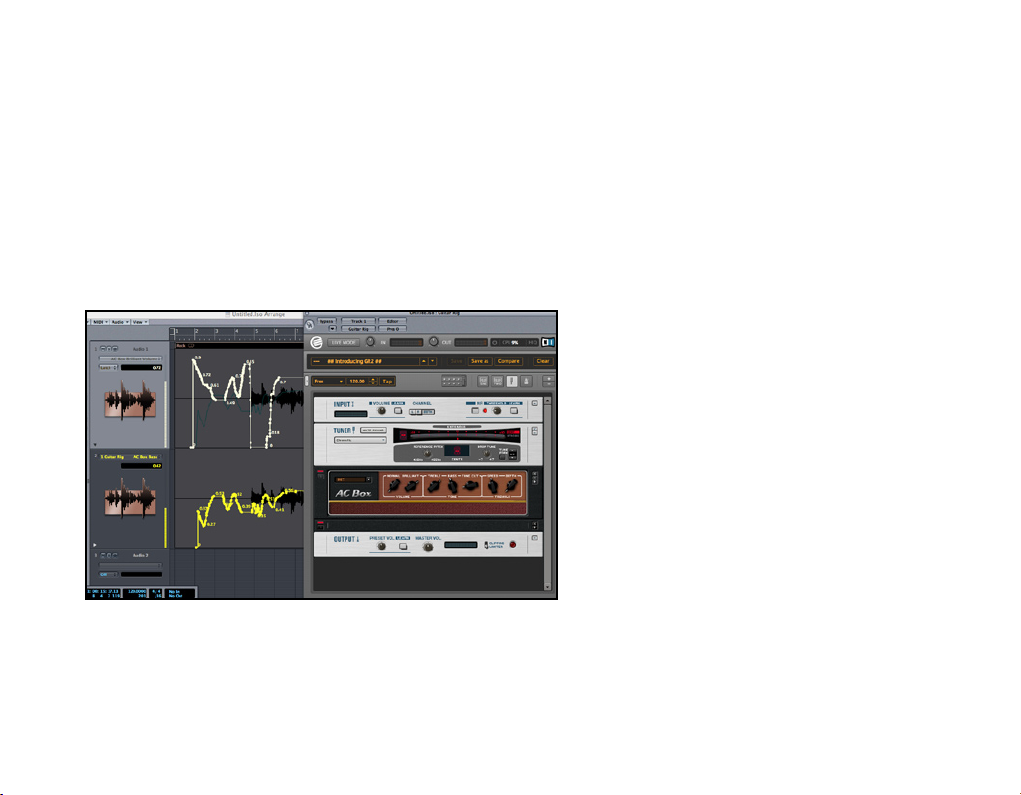
GUITAR RIG 3 is inserted in Apple Logic to process a guitar track while being automated
under host automation.
GUITAR RIG 3 – 11

2.4 The RIG KONTROL foot controller
The RIG KONTROL 3 hardware which is included in the GUITAR RIG 3
KONTROL EDITION has an expression pedal, nine footswitches, guitar
preamp/impedance converter, and USB 2 computer audio interface. The
preamp is important as it conditions the guitar signal properly for the
best tone and lowest noise when interfaced with other electronic devices,
or your computer. The footswitches and pedal are assignable to various
functions within GUITAR RIG 3 for “hands-off”, real-time control.
2.5 Caution
Guitar pickups are very susceptible to hum, light dimmer “hash”, and the
interference generated by computers and monitors. LCD monitors create
less interference than CRT types, and humbuckers are less likely to pick
up interference than single coil pickups. Piezo pickups, like those used in
the Line 6 Variax, do not pick up this interference.
As you play with GUITAR RIG 3, always position your guitar so it picks up
the least amount of interference. GUITAR RIG 3’s Noise Reduction can
help get rid of some interference, but it is not a substitute for orienting
your guitar away from sources of interference.
Also, as amazing as GUITAR RIG 3 is, it cannot compensate for problems
at the guitar. For example, if you have dead strings, the Compressor will
not magically make them sustain.
GUITAR RIG 3 – 12

2.6 Get creative!
Once GUITAR RIG 3 is open and communicating with the audio interface
and/or host, the real fun begins. Unlike a hardware rack, you aren’t limited
by a xed number of effects in particular positions. You can place the
various GUITAR RIG 3 Components in any order – even create parallel
processing paths – and then save your favorite congurations for later
recall. You can create multiple rigs for blues, hard rock, and a few more for
bass. You can even create a rig for rehearsing…there are no limits, other
than your computer’s processor speed (and your imagination).
There is one caution: The huge variety of options means it’s possible to
set up some combinations of effects and settings that don’t sound all
that great. If you’re working with a sound and aren’t satised with it, try
different cabinets, mic positions, and the like until you hit the “sweet
spot”. Also, save frequently – not necessarily because your computer might
crash, but because it’s easy to “overtweak” a sound and you’ll wish you’d
kept an earlier version. GUITAR RIG 3 makes it easy to save multiple
variations on a sound; you can then decide which one you like best, and
delete the rest.
GUITAR RIG 3 also includes two hard disk recording Components called
Tapedecks. One is optimized to load audio les to serve as backing tracks,
or you can study solos by loading them into the Tapedeck, and using the
tempo control to slow them down for easy analysis. The second Tapedeck
is optimized for recording what you’re playing, or overdubbing new parts
overtop of parts you’ve already played. A tuner and metronome keep you
in tune and on time. GUITAR RIG 3 is more than just a signal shaper – it’s
a complete system for processing, and enjoying, your guitar.
GUITAR RIG 3 – 13

3. Using Guitar Rig
GUITAR RIG was designed to be as easy to use as possible. It was also
designed to be very powerful. We have done so by designing a sleek
interface that combines all of the K
in real life, alongside the power and organization of a powerful piece of
software. This section is the broad overview of how to use GUITAR RIG.
For a more detailed look at the software in every minute detail, please
consult the reference section later in this manual.
3.1 Interface navigation
In order to get around GUITAR RIG with ease, you’ll want to know everything
you can about the visual interface to the software. The interface is broken
into ve main parts and we will detail them for you in the next sections.
3.1.1 Global Header
The g
LobaL Header
RIG 3. It contains your input and output settings, as well as controls for the
audio engine and CPU controls. It’s unique in that no matter what mode
you’re in (rig view or live view) the global Header is always visible.
is a collection of the most important controls of GUITAR
nob
s and controls you’re used to seeing
GUITAR RIG 3 – 14
The Global Header
The L
ive view button
switches the interface to the new “L
ive Mode
”, which
is detailed in section 3.1.4.
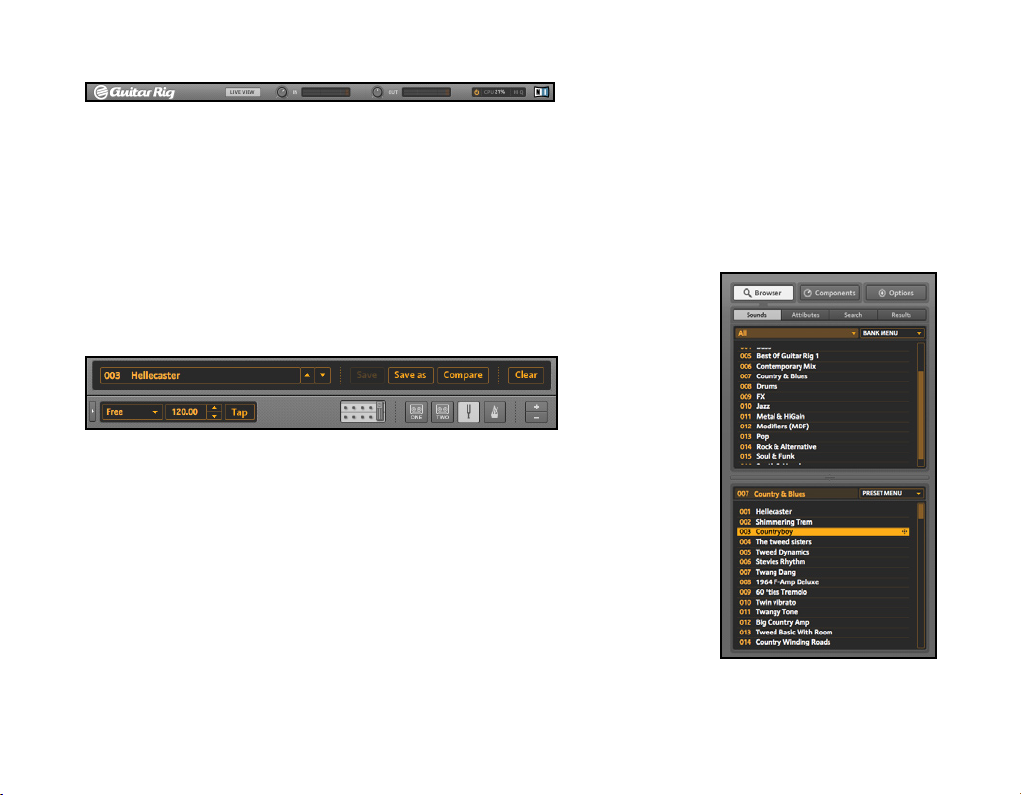
3.1.2 Toolbar
The t
ooLbar
in GUITAR RIG 3 is your one-stop-shop for controlling the
most frequently used parts of GUITAR RIG. In the tooLbar, you can view
and change Presets, Save them, as well as CoMpare various Presets while
editing and even clear your whole rack with a single click. It’s the TOOLBAR
that you will also access the newly enhanced SynC settings.
The Toolbar
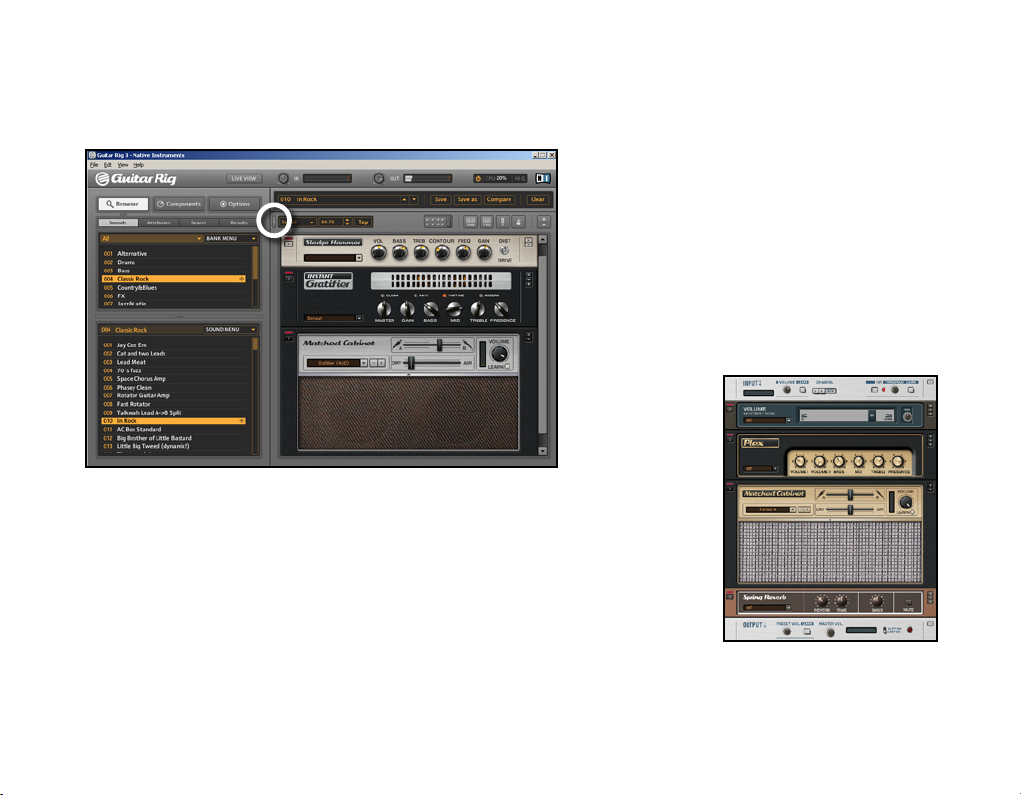
3.1.3 SideKick
The S
ideKiCK
includes the remainder of GUITAR RIG’s viewing options.
Here, you can access the S
nd, store, create, search and lter all of your sounds and Banks. The
C
oMponentS pooL
contains all of the individual rack modules in GUITAR
RIG 3. The optionS SCreen controls all of the RIG KONTROL, and external
assignments for automation, and preferenCeS for setting up GUITAR RIG,
such as window height, the location of its Bank storage and other program
details.
ound browSer/Manager
, which is where you’ll
The SideKickThe SideKick
GUITAR RIG 3 – 15
3.1.4 Hiding/Showing The SideKick
From the main GUITAR RIG screen, you can hide or show the SideKick by
clicking on the following Button:
Follow the white circle to hide/show the SideKick
Alternately, you can use the keyboard shortcut F2 to hide and show it.
3.1.5 The Rack
The rack is where you will build your custom rigs. Using your mouse,
it’s easy work to drag and drop Components from the Components pool
into the rack to make your ultimate sound. The rack also houses the four
Nice Rack!Nice Rack!
GUITAR RIG 3 – 16

xed Components: tuner, MetronoMe, tapedeCK i and tapedeCK I|. You can
remove CoMponentS from the rack by clicking the particular CoMponentS
X b
utton
. Rearrange the rack by dragging selected C
oMponentS
into any
order you choose.
3.1.6 Live View
The new Live view is perfect for taking your GUITAR RIG onstage with
your laptop computer. This view consolidates and magnies the following
elements for easy viewing across a stage:
Toolbar (Input/Output and CPU meters)
►
Sound List
►
Preset Name and Number
►
Metronome, Tuner, and Loop Machine Access
►
Large RIG KONTROL Display with Enlarged Assignment Text
►
You can toggle in and out of the live mode by clicking on the L
ive Mode
button, on the toolbar or with the key command F1.
3.2 Finding the right sound
GUITAR RIG would be useless without a sophisticated Preset manager
to help you nd, and organize all of your sounds. Intelligent categories,
Banks, and search options help you manage the hundreds of sounds that
come with GUITAR RIG.
GUITAR RIG 3 – 17

3.2.1 Categories, Banks and Sounds
The rst organization of any sound in GUITAR RIG is a Preset. A sound
contains all the Components in your rig as well as any necessary controller
assignments, and the sync settings.
The SoundS pane
GUITAR RIG 3 organizes these Presets together into Banks. Think of a Bank
as a collection of Presets that you can create to keep your sounds ‘in line’.
GUITAR RIG 3 ships with a generous amount of factory Presets and Banks,
and you can easily create more as you see t. Use Banks to save your edited
sounds together or to create set-lists for your on-stage rigs.
GUITAR RIG 3 – 18
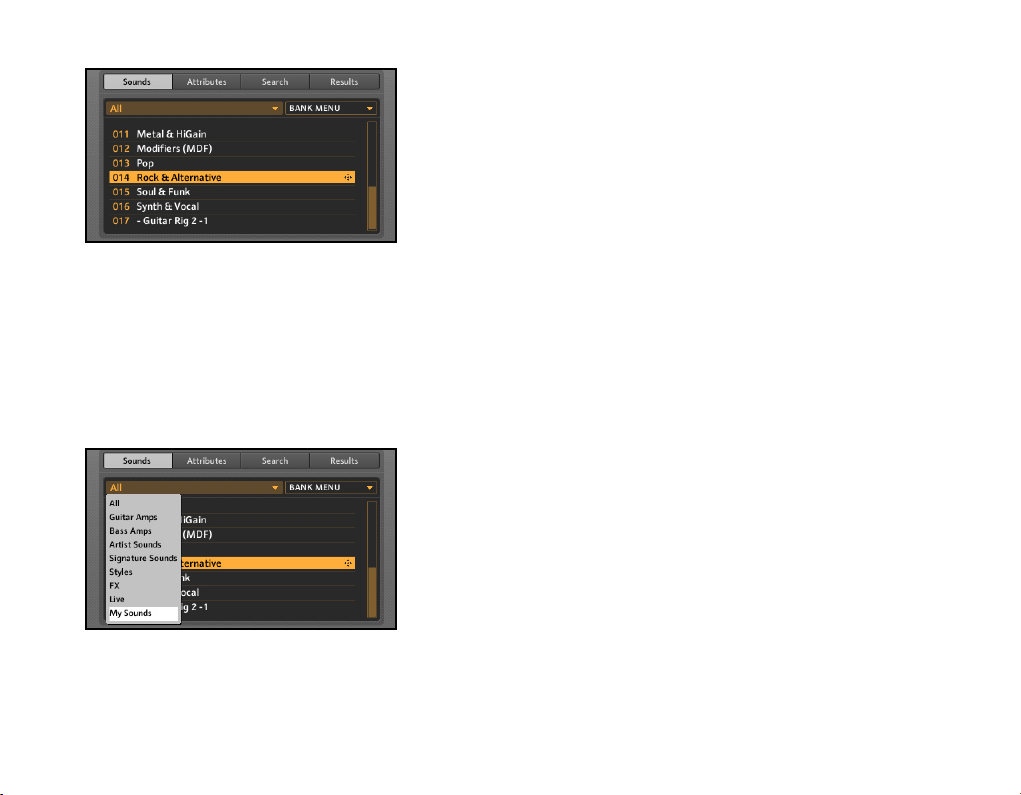
The Bank Pane
Bank categories are new in GUITAR RIG 3 and allow you to lter the Sound
Banks based on categories. For example, rather than having to look at
dozens of Banks, you can choose a lter to display your custom created
Banks inside the My Sounds category. You can tag Banks with specic
keywords (Guitar Amps, Bass Amps, Live, FX, etc…) and lter your view
on to the main Bank list. This helps to organize your sounds and avoid the
congestive difculties related to navigating a large Bank collection.
Bank Categories
GUITAR RIG 3 – 19
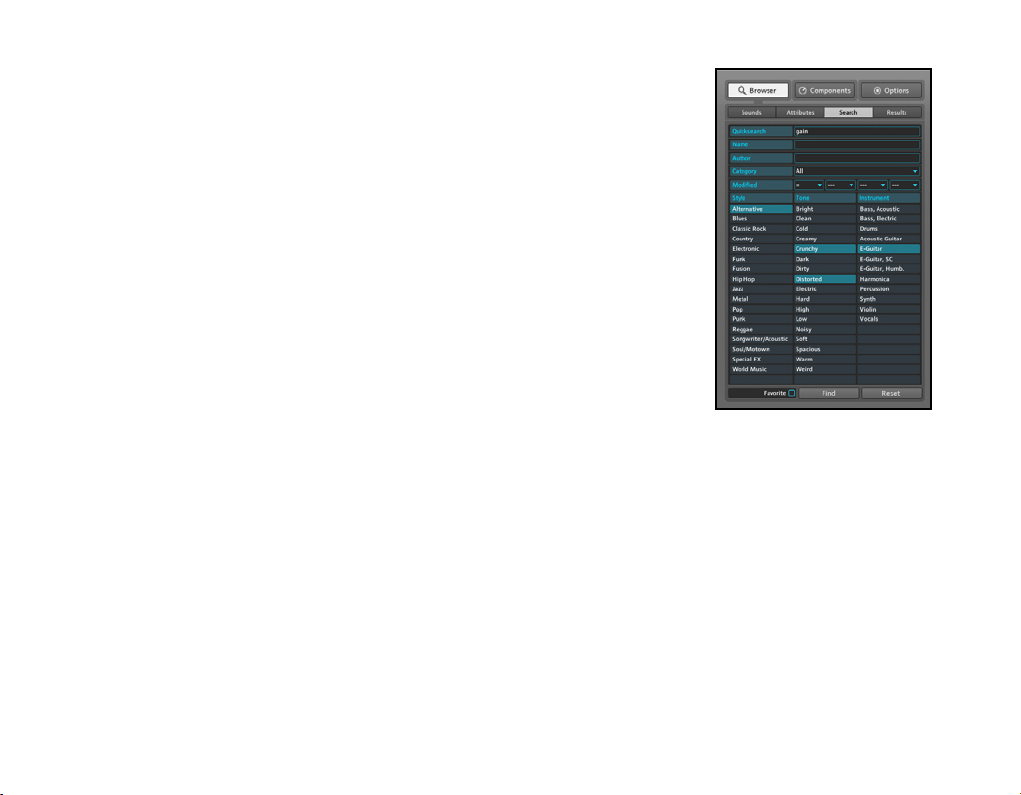
3.2.2 Search and nd
Since GUITAR RIG 3 ships with hundreds of sounds to explore and make
music with, we felt it was key to provide a tool for you to discover this
diverse sound. A library this extensive would be useless without a search
engine. Behind the S
to search for sounds based on name, author, attributes or their Bank
category.
earCH tab
you will discover a couple of handy tools
The Search PaneThe Search Pane
GUITAR RIG 3 – 20
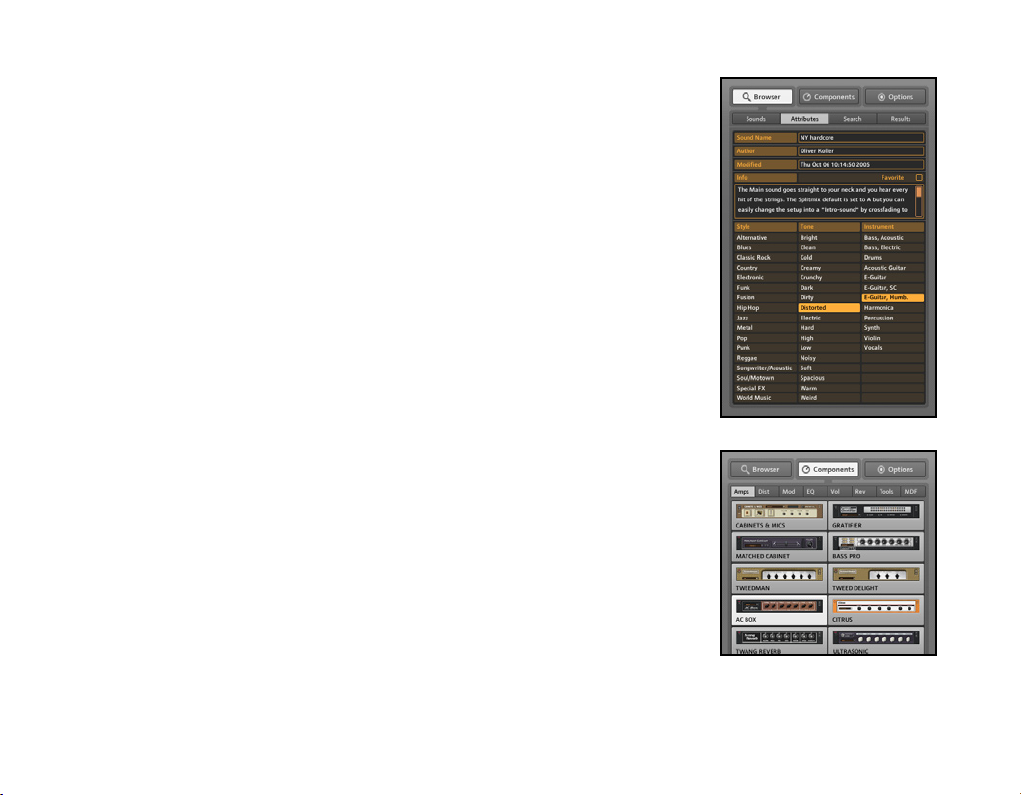
3.2.3 Manage your sounds
Managing your sounds is easier than ever in GUITAR RIG 3. You can
classify your Presets with attributes like style, tone and instrument types
to make searching more efcient. Bank categories allow you to lter large
collections of Banks by intelligent tagging. For example, you might want
to put all of your live Banks into the “Live” category, and then lter them
using the new Bank categories.
3.3 Building your own Rack
Forget about the days of oor to ceiling rack systems, sophisticated MIDI
switching systems and miles of patch cables, GUITAR RIG lets you create
your custom rig by simply dragging and dropping Components into a
virtual “rig” to make your custom sound. Crafting your rig has never been
easier.
3.3.1 The Components pool
The C
oMponentS pooL
in GUITAR RIG. The C oM pon ent S themselve s are divided into eight
categories:
Amps: The heart of guitar rig – the modeled amplifiers, and cabinets.
1.
Dist: Classic, stomp-box style distortion effects.
2.
Mod: Modulation effects such as Tremolo, Chorus, Flange, Octave shift-
3.
ers and much more.
is where you’ll nd all the sound-shaping elements
The Attributes PaneThe Attributes Pane
The Components PoolThe Components Pool
GUITAR RIG 3 – 21

EQ: Parametric EQ, Synth-style filters and Wah pedals.
4.
Vol: Volume, Compression, Limiting, Gates and Noise Suppression.
5.
Rev: Reverberant effects and Delays.
6.
Tools: Loop Machines, Splits and Crossover Mixes.
7.
MDF: A unique, synthesizer-style modulation framework; completely
8.
unique to guitar rig.
Complete, detailed explanations about each of the Components in GUITAR
RIG 3 can be found in sections 7 – 15.
3.2.1 Drop it
To add any of the C
just drag the C
your mouse to reorder your Components for a completely exible signal
routing.
oMponentS
oMponent
from the C
from the p
oMponent pooL
ooL
and drop it in the r
into your rig, you
aCK
area. Use
3.2.2 In Sync
Guitar Rig 3 now provides much greater exibility in its synchronization
options. You can now choose to sync to the host clock/external clock, store
per-sound tempo settings, or have no sync at all.
3.3 The Virtual RIG KONTROL
Virtual instruments are one thing, but hands on (or, in this case, your feet)
controls are a must. Whether you’re using one of the RIG KONTROLS
(RK1, RK2, or RK3) or using your own external MIDI control surface, the
GUITAR RIG 3 – 22
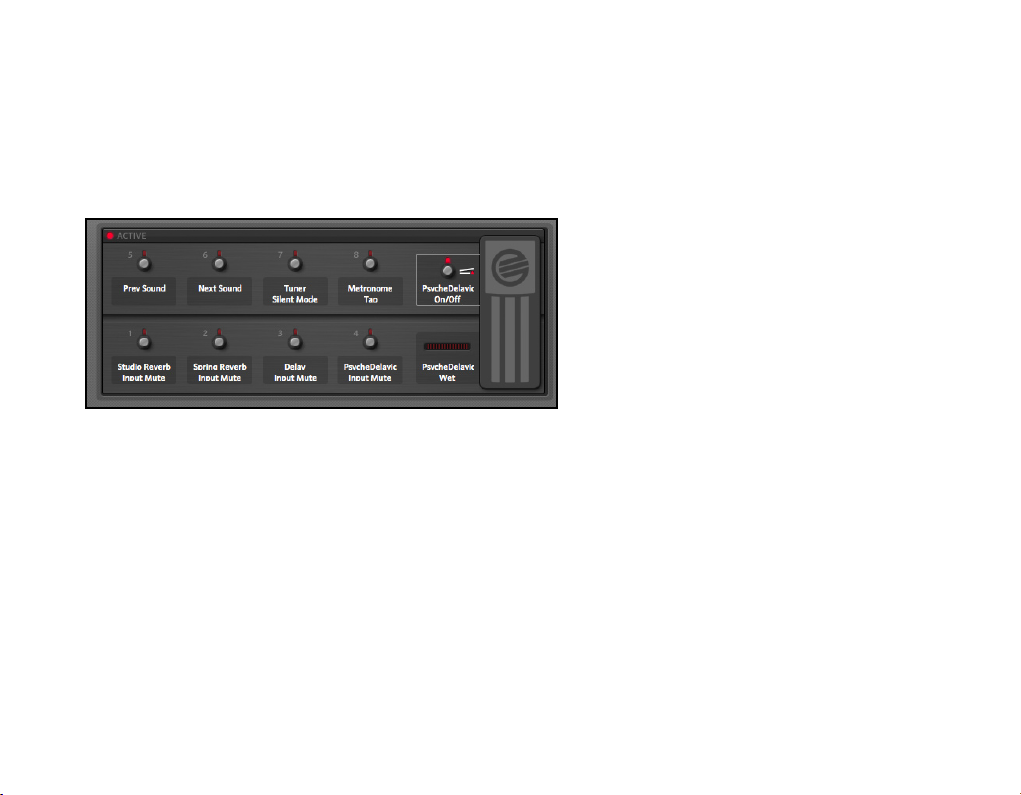
v
irtuaL rig KontroL
is your dashboard for interfacing real world controls
with your virtual rig.
The v
irtuaL rig KontroL
is a unifying theme throughout GUITAR RIG 3.
No matter what controller you use, you can map it to the virtuaL rig
K
ontroL
interface. To make your life that much easier, the Templates and
Snapshots will change the way you interface with your rig.
The virtuaL rig KontroL in all its glory!
3.3.1 In control of the Rig
You want total control of your rig? Whether you use the RIG KONTROL or a
3rd party MIDI controller, GUITAR RIG 3 allows you new ways to manage
all of your controller assignments. If you use a RIG KONTROL, you’ll nd
that it’s completely “plug-and-play” in GUITAR RIG 3. Just plug it in and
all of the controls are pre-dened and hardwired in – no need to congure
anything! You can even hot swap between RIG KONTROL 2 and RIG
KONTROL 3 without having to change a single setting!
GUITAR RIG 3 – 23

3.3.2 Making assignments
Global Assignment
Per Sound Assignment
Making assignments to your RIG KONTROL or external MIDI device is
accomplished in a few ways. You can assign controllers through simple MIDI
learn, using the virtuaL rig KontroL or through the controller assignments
window.
Assignments for the RK can be on a per-sound, or global basis. Global
assignments speed up the assignment task (providing you want to commit
a Button to a certain action, every time you use the RK.)
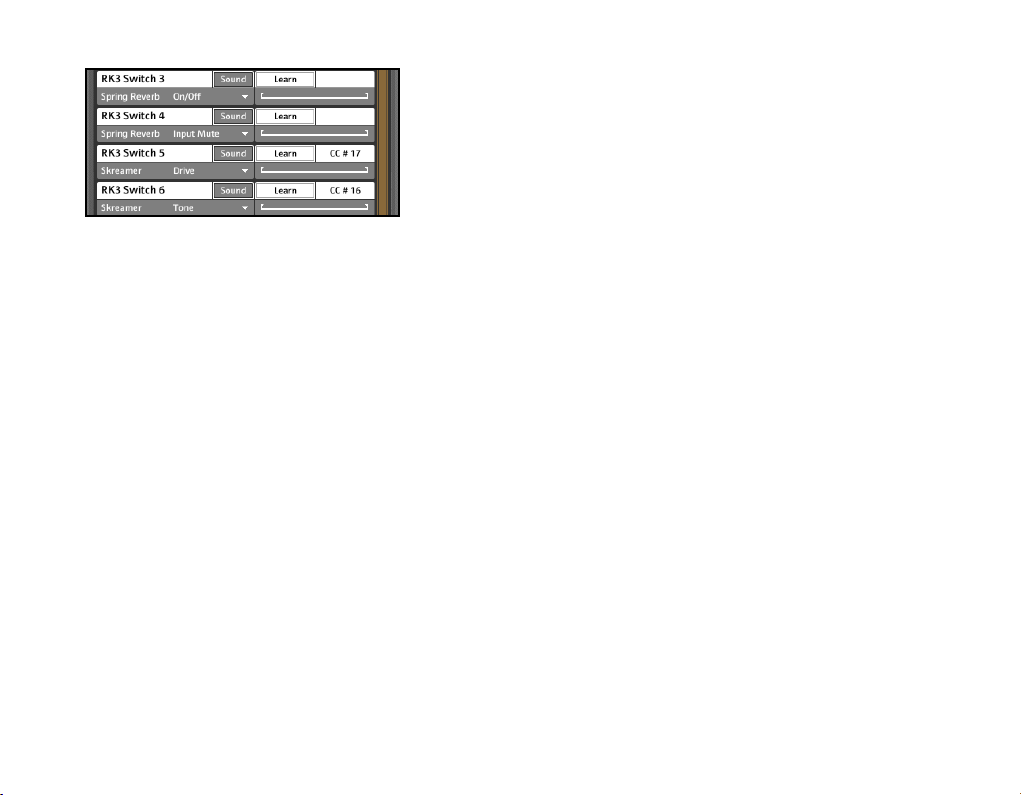
Example Controller Assignments
To make an assignment to the RIG KONTROL, the quickest way is to right
click on the Components knob, button, or switch that you wish to map,
right click (ctrl click on Mac), select Learn and then click the Button on
the virtuaL rig KontroL and your control is now mapped!
3.3.3 The snapshot concept
Have you ever wished that you could change the status of multiple
Components with a single click, all within the same sound/Preset? You
can with Snapshots! All you have to do is setup your rig the way you want
Right-Click Component LearnRight-Click Component Learn
GUITAR RIG 3 – 24
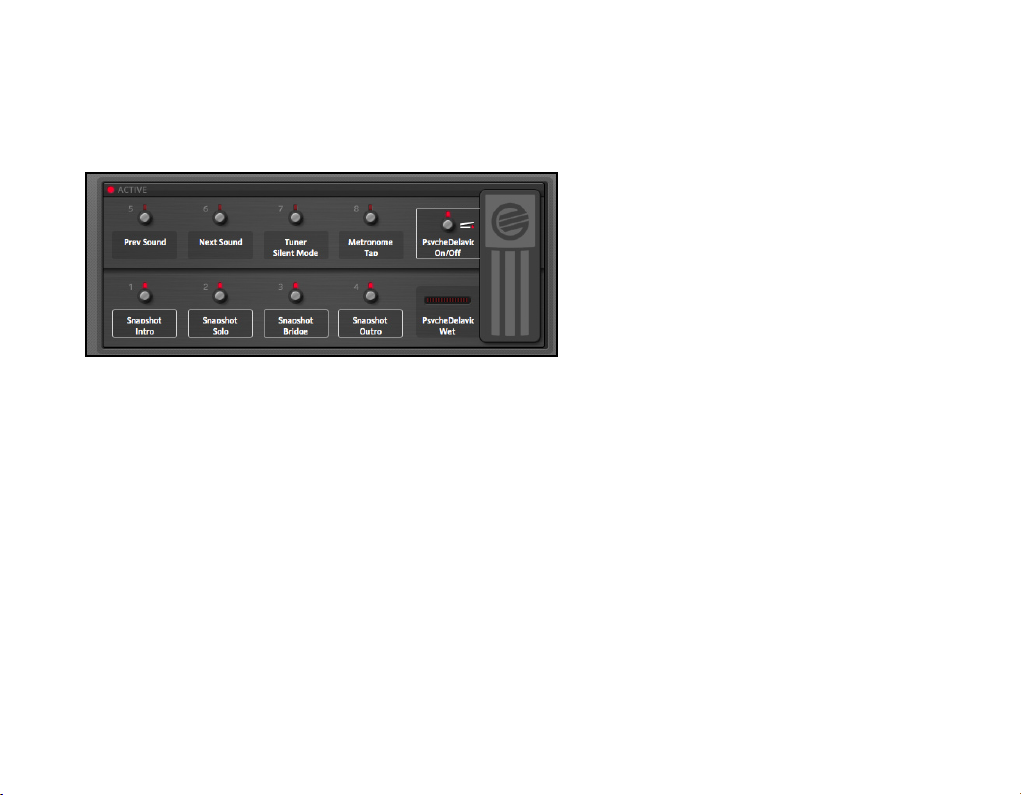
to look/sound, and map one of the buttons on the virtual RK to Snapshot
for instant recall with a single Preset. You can setup multiple Snapshots
within the same sound, making it easy to setup Snapshots for the verse,
bridge, chorus, and solo of your song, all without changing Presets.
The Virtual RIG KONTROL with Snapshots Assignments
3.3.4 Linking external controllers
You will appreciate the new virt uaL rig Kont roL, as it allows you to
seamlessly integrate and link external controllers with the virt uaL rig
KontroL. All you have to do is map your external device to the virtuaL
rig KontroL
and you’ll have permanent integration with all of the GUITAR RIG 3
sounds. From this point on, your external controller will act just like a RIG
KONTROL. In order to “learn” MIDI assignments, you just choose the
appropriate RIG KONTROL assignment, which is already mapped to your
external device. Set it, and forget it!
through the Options > Controller > Assignment Page once,
Snapshots are not Preset
Snapshots are not Preset
%
%
to alte r the st ate of the multiple
to alte r the st ate of the multiple
components within your currently
components within your currently
selected rig with a single click.
selected rig with a single click.
changes – they allow you
changes – they allow you
GUITAR RIG 3 – 25
Linked Controller Assignments
3.4 The Live View
The new L
laptop computer. Live view consolidates and “supersizes” the most essential
elements of the GUITAR RIG interface for easy viewing across a stage.
ive view
is perfect for taking your GUITAR RIG on stage with a
3.5 Interfacing Guitar Rig with other gear
The RIG KONTROL 3 is a multi-purpose device that provides:
Input impedance buffering to preserve the guitar’s sound quality
►
Gain control to match the instrument level to Guitar Rig or other host
►
software
Analog to Digital converter to convert the guitar’s analog signal to a
►
digital signal compatible with computers
GUITAR RIG 3 – 26

USB 2 interface to shuttle digital audio to and from the computer and
►
associated software running on it
Digital to Analog converter to convert digital data coming from the
►
computer into audio
Standard 1/4” (6.3mm) phone jacks for input and output connec-
►
tions
MIDI In and Out connectors
►
Volume pedal controller and footswitches
►
In terms of audio, RIG KONTROL 3 is compatible with a large number of
amplication scenarios. Here are some typical options.
Powered Monitor Speakers
The RIG KONTROL 3's outputs can drive powered monitor signals directly.
In order to prevent damage to the speakers, turn down the monitor volume
controls before connecting any cables, and turn up the volume slowly to
avoid excessively loud sounds as you optimize volume levels.
Project Studio Mixer
The RIG KONTROL 3's outputs should feed the mixer’s line, not mic,
inputs. If only mic inputs are available, you may need to switch the
mixer’s –20db pad into position. It may also be necessary to switch the
RIG KONTROL output high/low switch to –14db.
GUITAR RIG 3 – 27

Pro Studio Mixer
Same as above, except the high/low switch must be set to the high (0)
position for the best signal-to-noise ratio.
Standard Guitar Amp
With a standard guitar amp, the GUITAR RIG 3 system can be used as
a highly sophisticated pedal board. First, make sure that the rear panel
high/low switch is set to –14dB. You may also need to lower the RIG
KONTROL 3's output LeveL ControL to avoid excessive overloading of the
amp… then again, using a higher level to overload the amp may provide
that extra degree of overload you are looking for.
As the amp already has a cabinet, you will probably want to choose to
omit a cabinet. A power amp may also be redundant, unless you want to
use it as an added effect.
Standard Guitar Amp With Effects Loop
The effects loop for most amps is designed to accommodate line-level (as
opposed to guitar-level) signals. In this case, connect the loop send jacks
to the RIG KONTROL 3's inputs, and send the RIG KONTROL outputs to
the loop return (receive) jacks. As the signal coming into GUITAR RIG 3
will be fairly strong, the input gain control(s) will most likely need a minimal
amount of gain. Adjust GUITAR RIG 3’s output so that the power amp that
follows the loop return jacks is not overloaded. You may need to set the
rear panel high/low switch to low (-14dB).
GUITAR RIG 3 – 28

Keyboard Amp
These are actually ideal for use with GUITAR RIG 3, as they are designed
to give an uncolored, high-delity sound. Thus, you can use GUITAR RIG
3 to add different cabinets, power amps, and effects, and the keyboard
amp will reproduce these sounds faithfully. Keyboard amps are designed to
accept fairly high-level signals, so you will probably need to set the output
level fairly high, and the high/low switch to high (0).
Headphones
Simply plug headphones into the RIG KONTROL 3 headphone jack.
Home Stereo System
Home stereo speakers are generally not designed to handle sustained
high-level sounds, so if you do want to plug into a stereo system, keep the
volume at conservative levels. Plug the RIG KONTROL outputs into line
level inputs like those for a CD or DVD player, tuner, tape deck, etc. (not the
phono input, if present). You may need special cables or adaptors which
provide a 1/4” plug on one end and RCA phono plug on the other.
3.5.1 Using GUITAR RIG with a Host Program
You can use GUITAR RIG within a host program, like Logic, Cubase, or
Live. To do so, set up an audio track and insert GUITAR RIG as an effect.
“Record enable” the track GUITAR RIG is inserted on, and your sound will
be routed through GUITAR RIG, and out to the selected audio interface.
You can use your RIG KONTROL to control GUITAR RIG even if you haven’t
previously selected it as your audio interface.
GUITAR RIG 3 – 29

3.5.2 Installing GUITAR RIG as an Effect
Although some programs will allow you to install GUITAR RIG 3 as an
instrument (this is because your program works with both audio and MIDI)
you will denitely want to install it as a signal processing plug-in. Insert
GUITAR RIG 3 on audio tracks using VST, AU or RTAS plug-ins.
3.5.3 Avoid Zero-Latency Options!
As mentioned earlier, remember to avoid zero-latency (“direct monitoring”)
options, or you won’t hear your guitar being processed by GUITAR RIG
3.
3.5.4 Total Recall
When using GUITAR RIG 3 within a host program, it is important to keep
in mind that when you save a host’s project, it will capture whatever is in
GUITAR RIG 3’s buffer. So, if you have modied a Preset as compared to
how it is stored in the Bank, don’t worry — when you recall the project,
the Preset will be recalled exactly as you left it.
3.6 Controlling Multiple Plug-ins with a RIG KONTROL
When you use multiple instances of the GUITAR RIG plug-in within your
host sequencer, the RIG KONTROL only “binds” to the rst instance of
GUITAR RIG. It has no way of automatically switching its control from
one plug-in instance to another automatically. To switch RIG KONTROL‘s
focus to another instance of GUITAR RIG, bring up its plug-in interface
The latency in a host pro-
The latency in a host pro-
!
!
the host program, so make sure to
the host program, so make sure to
acce ss the audio settings in your
acce ss the audio settings in your
host of choice to control your la-
host of choice to control your la-
tency/buffer size.
tency/buffer size.
Rig Kontrol Active StatusRig Kontrol Active Status
gram i s de si gna ted by
gram i s de si gna ted by
GUITAR RIG 3 – 30
 Loading...