


912
GB
F
D
E
S
I
P
NA
D
912
• OWNER'S MANUAL
• MANUEL D'INSTALLATION
• BEDIENUNGSANLEITUNG
• MANUAL DEL USUARIO
• MANUAL DO PROPRIETÁRIO
• MANUALE DELLE ISTRUZIONI
• BRUKSANVISNING
REAR PANEL CONNECTIONS
WARNING:TO PREVENT FIRE OR ELECTRIC
SHOCK, DO NOT EXPOSE THIS APPLIANCE
TO RAIN OR MOISTURE
CAUTION: TO PREVENT ELECTRIC SHOCK DO
NOT USE THIS POLARISED PLUG WITH AN
EXTENSION CORD RECEPTACLE OR OTHER
OUTLET UNLESS THE BLADES CAN BE FULLY
INSERTED TO PREVENT BLADE EXPOSURE.
ATTENTION: POUR PREVENIR LES CHOCS ELECTRIQUES NE PAS UTILISER CETTE FICHE
POLARISEE AVEC UN PROLONGATEUR, UNE
PRISE DE COURANT OU UNE AUTRE SORTIE DE
COURANT, SAUF SI LES LAMES PEUVENT ETRE
INSEREES A FOND SANS EN LAISSER AUCUNE
PARTIE A DECOUVERT.
The lightning flash with arrowhead, within an equilateral tri-
angle is intended to alert the user of the presence of unin-
sulated "dangerous voltage" within the product's enclo-
sure; that may be of sufficient magnitude to constitute a
risk of electric shock to persons.
The exclamation point within an equilateral triangle is intend-
ed to alert the user of the presence of important operating
and maintenance (servicing) instructions in the literature
accompanying the appliance
Note to CATV system installer: This reminder is provided
to call the CATV installer's attention to Article 820-40 of the
NEC , which provides guidelines for proper grounding and,
in particular, specifies that the cable should be connected
to the grounding system of the building, as close to the
point of cable entry as practical.
NA
D
2
CAUTION
RISK OF ELECTRIC
SHOCK DO NOT OPEN
A TTENTION:
RISQUE DE CHOC ELECTRIQUE
NE PAS OUVRIR
CAUTION: TO REDUCE THE RISK OF ELECTRIC
SHOCK, DO NOT REMOVE COVER (OR BACK).
NO USER SEVICEABLE PARTS INSIDE.
REFER SERVICING TO QUALIFIED
SERVICE PERSONNEL.
AFIN DEVITER UN CHOC
ELECTRIQUE, ET LES
CONSEQUENCES GRAVES
QUI POURRAIENT EN
RESULTER, TENTEZ PAS
D'OUVRIR L'APPAREIL ET
DE TOUCHER AUX
COMPOSANTS INTERNES
SANS LA PRESENCE D'UNE
SERVICE PERSONNEL.
(CH1 INPUT)

NA
D
3
FRONT PANEL CONTROLS
Diagram 1.
Figure 2.

NA
D
4
GB
A NOTE ON INSTALLATION
This unit may be installed on any sturdy, level surface. Since its power transformer generates a magnetic hum field of moderate strength, a turntable
(especially one with a moving-coil pickup cartridge)
should not be located near the amplifier.
The amplifier requires ventilation. Do not obstruct
the air outlet grilles on the top or bottom covers, and
do not place the amplifier on a rug or other soft surface. Do not place the amplifier in an enclosed situation such as in a bookcase or in a cabinet.
SAFETY WARNING: Please ensure that the
Volume controls at the rear of this amplifier are set to
minimum level (i.e. COUNTER CLOCKWISE, viewed
from the back panel).
If this piece of equipment is to be used in a multiroom ouput of a NAD product, please ensure that
before turning on the system for the first time, the
Volume controls on any auxiliary amplifier ARE SET
TO THE MINIMUM LEVEL.
The multi-room output is not affected by the
Volume or Tone controls (Treble, Bass) of the main
system controls, so care must be taken to prevent
auxiliary amplifiers being driven at full output level.
WARNING TO UK USERS. If this appartus is not
fitted with a UK three-pin plug, do not attempt to
insert the attached plug into a UK mains socket.
Instead, cut the plug from the mains lead and attach
a fused UK three-pin plug using the following safety
advice on wiring.
IMPORTANT. The wires in this mains lead are
coloured BLUE and BROWN;
BLUE: NEUTRAL BROWN: LIVE
The colours of these mains lead wires may not correspond with the coloured markings identifying the
terminals in your plug. In this case the BROWN wire
must be connected to the terminal which is marked
L(ive) or coloured RED. The BLUE wire must be connected to the terminal marked N(eutral) or coloured
BLACK. No connection should be made to the terminal marked E or coloured green or green and yellow
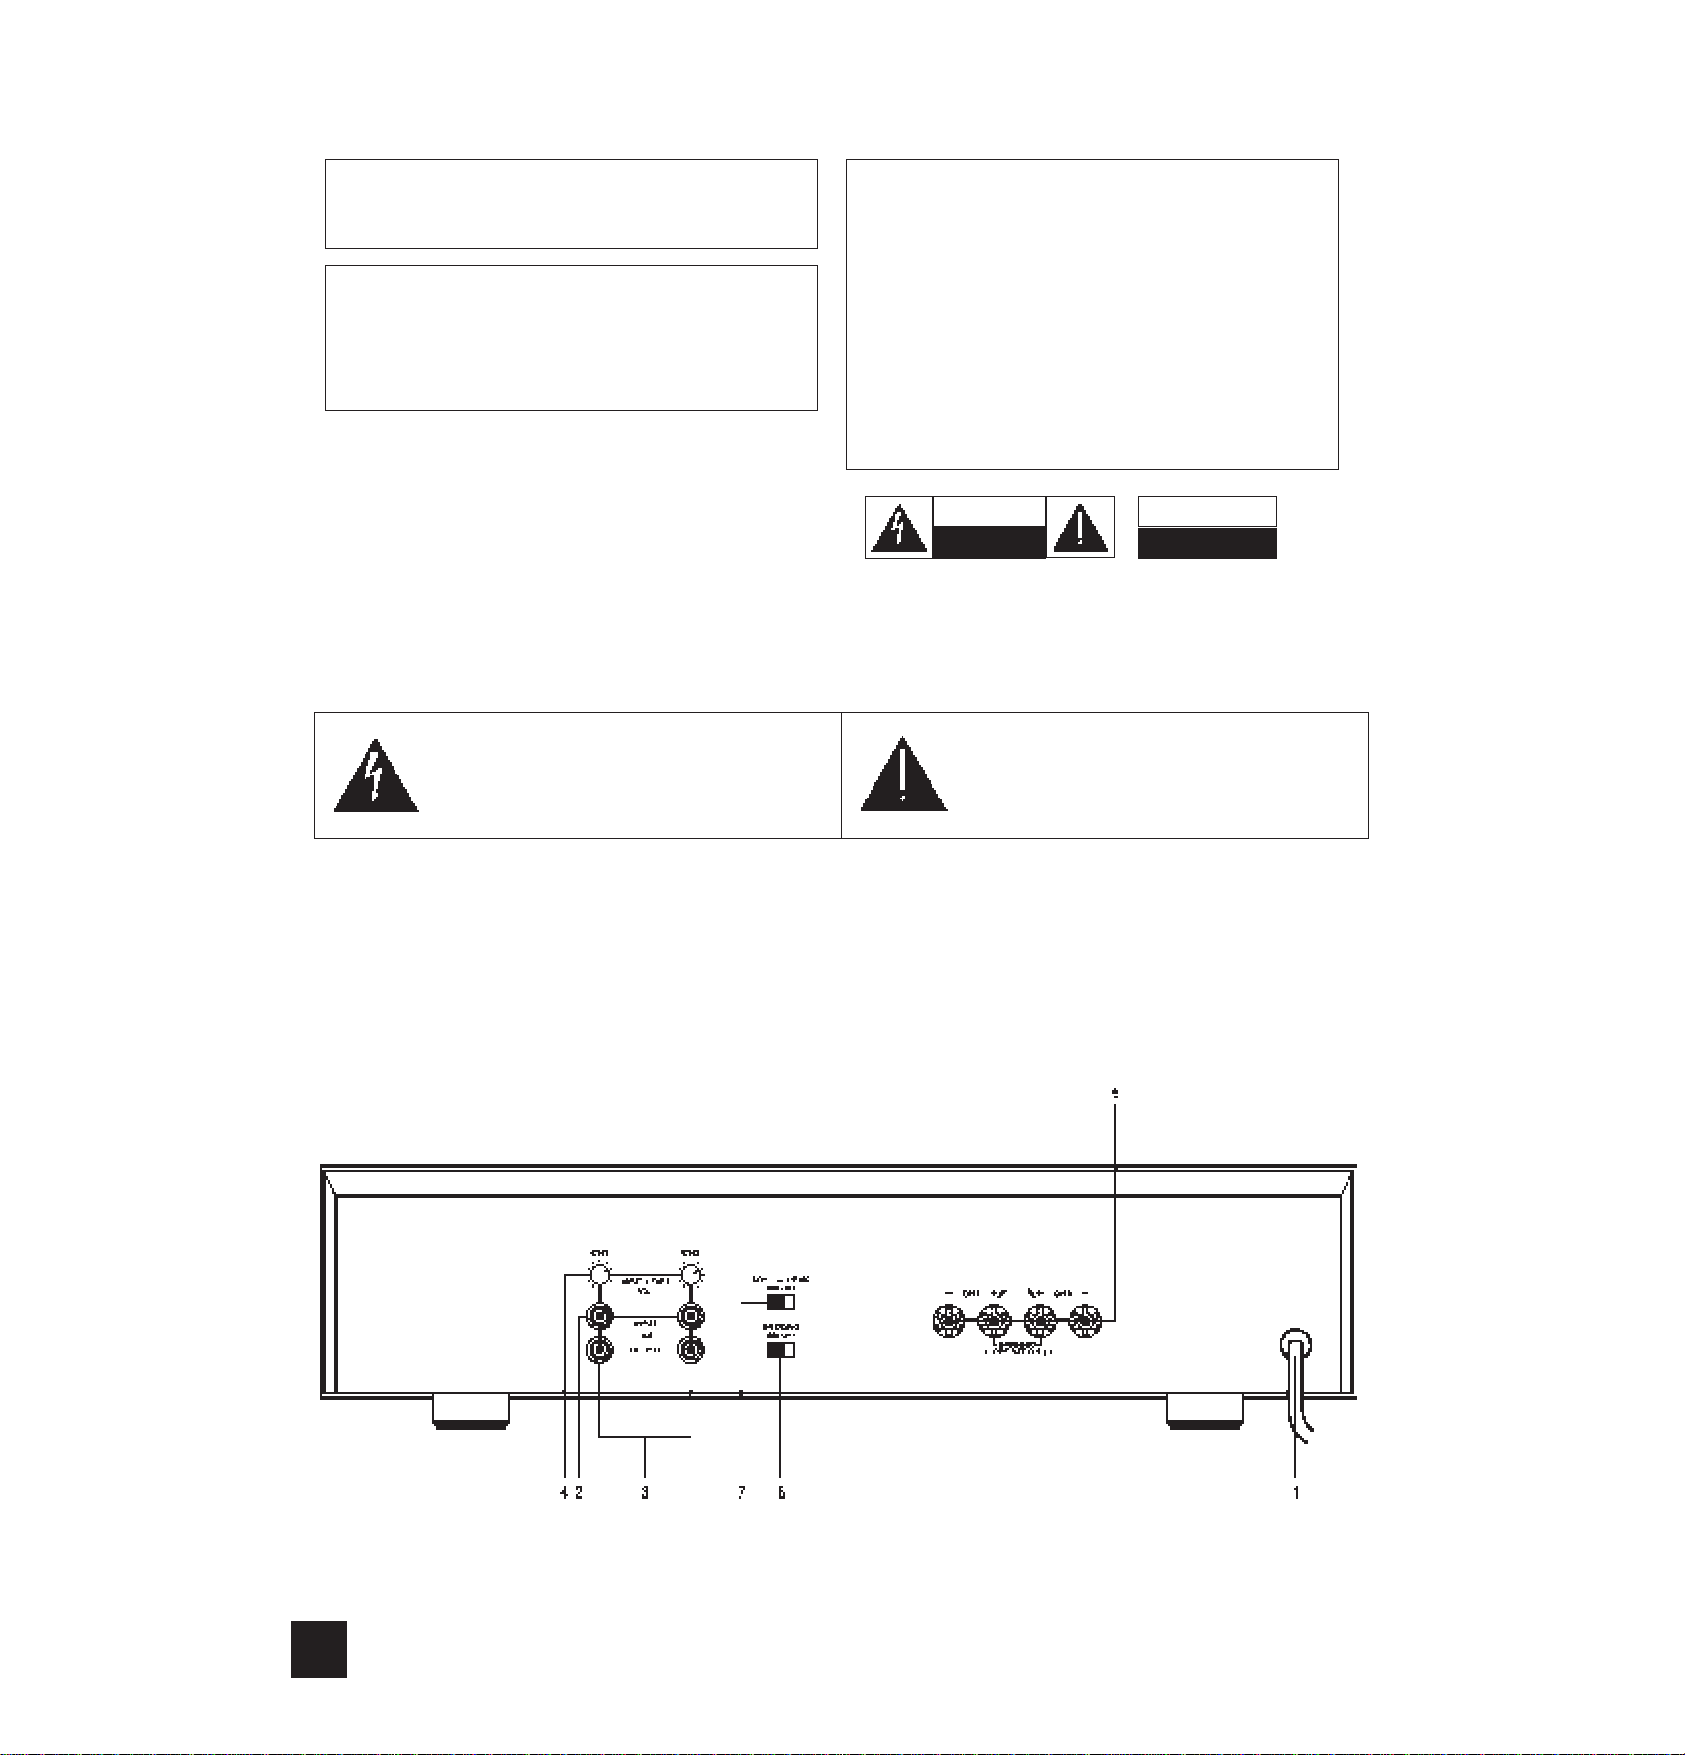
REAR PANEL CONNECTIONS
1. AC LINE CORD
Plug the AC line cord into a nearby wall outlet that
provides the correct AC power line voltage, or into a
switched convenience outlet on your preamp.
2. INPUTS
The 912 has both inputs and outputs. Before making connections to the amplifier, make sure the
POWER is switched OFF.
Connect the signal cable from the preamplifier, surround decoder or other signal source to the inputs. If
you want to use the 912 as a single 90-watt amplifier
instead of a stereo 30 W/ch amp, see BRIDGING
(Refer to item 6).
3. LINE OUTPUTS
Each input has an accompanying line output which
will pass the signal on to another amplifier input or
other line-level device. The line outputs are buffered,
so that a low impedance or short circuit placed across
it will not affect the signal at the input. If the 912 is
being used to amplify a remote pair of speakers, connect the system’s preamplifier to the 912’s inputs,
then run a pair of cables from the 912’s outputs to the
inputs of the main stereo amplifier. (See Diagram #1).
4. INPUT LEVEL
The amplifier is equipped with separate input level
controls for each channel. Before turning on the 912
for the first time, make sure all level controls are in
their normal minimum (full-clockwise) power position. Under some circumstances, other settings may
be useful for:
(1). Level-matching. In a surround-sound or other
multi-amplifier system, reduce some of the controls
as necessary to balance the system with speakers of
varying sensitivities.
(2). Extended volume-control range. Many stereo
systems have so much voltage gain that the speakers
(or your ears) are over-driven at any volume-control
setting higher than 11 or 12 o’clock. As a result you
are confined to using only the lower half of the volume control’s range, where adjustments are imprecise and where channel-balance errors tend to be
greater. If all input-level controls are reduced, you
can turn up your preamplifier’s volume control, making effective use of most of its range. (Suggestion:
adjust the input level controls so that your preferred
maximum sound levels usually occur at about 2 or 3
o’clock on the volume control.)
As an added benefit, this procedure suppresses
any noise produced by the preamp’s high-level circuitry (e.g. any residual hum or hiss that does not go
away when the Volume is turned down).
(3) Balance correction. Small errors in channel
balance can dramatically degrade the apparent
“depth” and “air” of the stereo image. Such balance
errors may be due to normal production-line differences in speaker sensitivity, differences in the
acoustic environment around the two speakers, and
slightly different distances from your chair to each
speaker. You can use the input-level controls to correct these fixed balance errors, freeing your preamplifier’s balance control to correct balance errors in
recordings.
Switch the preamp to mono and sit in your normal
listening location. Ideally the “phantom” central
image should seem to be floating in mid-air midway
between the left and right speakers. If it is located
off-center, closer to one speaker, turn down the inputlevel control for that channel slightly in order to recenter the phantom mono image. Then restore the
preamp to normal stereo operation.
5. SPEAKER CONNECTIONS
This amplifier is equipped with special high-current
binding-post speaker terminals to handle the highest
peak power levels that may occur in the “bridged”
NAD 912 POWER AMPLIFIER

NA
D
5
GB
mode or with low-impedance loudspeakers. Connect
the loudspeakers with heavy-duty (16-gauge or thicker) stranded wire.
Connections may be made in either of two ways.
[See Figure 2.]
(1) Strip off a half-inch (1 cm) of insulation from
each speaker wire. In each conductor, twist the thin
strands of wire together. Unscrew the knob, insert
the bare wire into the opening at the base of the binding post, and tighten the knob until it grasps the wire
securely. Check to be sure that no loose strand of
wire is touching the chassis or an adjacent terminal.
(2) Install banana plugs on your speaker wires,
and plug them into the end of each binding post. The
terminals are separated by 3/4 inch (19mm), so they
will accept dual-banana plugs.
Connect the wires from the left-channel speaker to
the CH 1 + and CH 1 - terminals and the wires from
the right-channel speaker to the CH 2 + and CH 2 terminals.
NOTE — Stereo speakers must operate in phase
with each other in order to produce a focused stereo
image and to reinforce rather than cancel each
other’s output at low frequencies. When connecting
speakers, take care that the red (positive) terminal on
each loudspeaker is connected to the corresponding
red (positive) terminal on the amplifier.
6. BRIDGING
The two amplifiers within the Model 912 can be
“bridged” to form a single amplifier of about three
times the power per channel.
To convert to bridged operation:
(1) Switch the POWER off.
(2) Disconnect any input and output cables.
(3) Set the bridging switch to ON.
(4) Select the cable from the speaker that is to be
driven by the 912. Connect its “positive” conductor to
the CH 1 + terminal and its “negative” conductor to
the CH 2 + terminal (i.e. to the two red terminals). DO
NOT connect any wires to the black terminals (CH 1 and CH 2 -).
CAUTION: In the bridged mode, wires must be
connected directly from the amplifier to the speakers,
not to a speaker switch, headphone adapter, or any
other device that shares a common ground between
channels.
(5) Connect the signal lead from the source chosen
to be amplified by the bridging amplifier to the input
socket of the CH 1 amplifier.
(6) Turn the POWER on.
NOTE — If you are using two pairs of speakers on
one channel, or if you are in the bridged mode, we
recommend that the speakers have a nominal impedance of 8 or more.
7. SOFT CLIPPING
When an amplifier is driven beyond its specified
power output it normally produces “hard clipping” of
the signal with harsh distortion and power-supply
buzz as the output transistors saturate. The NAD
SOFT CLIPPING circuit gently limits the output waveform and minimizes audible distortion when the
amplifier is overdriven. We recommend that it be
switched ON when playing music at levels that might
exceed the amplifier’s power capacity.
FRONT PANEL
1. POWER
Press this button to switch the amplifier on or off. A
green LED above the power button illuminates when
the power is on.

NOTE CONCERNANT L’INSTALLATION
Cet appareil peut être posé sur n’importe quelle
surface robuste, à condition qu’elle soit plane et horizontale. Son transformateur de puissance génère un
champ de ronflement magnétique de puissance
moyenne, ce qui fait que l’amplificateur ne doit pas
être placé près d’une platine tourne-disque (surtout si
elle est équipée d’une cartouche pick-up électromagnétique).
L’amplificateur a besoin de ventilation. Ne pas
obstruer les grilles de sortie d’air sur les faces
supérieure et inférieure, et ne pas poser l’amplificateur sur un tapis ou sur une quelconque surface
molle. Ne pas placer l’amplificateur dans un endroit
fermé (sur une étagère à livres ou dans un meuble,
par exemple).
AVERTISSEMENT DE SECURITE : Veiller à ce
que les commandes de volume sonore à l’arrière de
cet amplificateur soient réglées au niveau minimum
(c’est à dire en butée ANTI-HORAIRE, vues depuis la
face arrière).
Si ce matériel doit être utilisé au sein d’une sortie
multi-salles d’un produit NAD, faire bien attention,
avant de mettre la chaîne sous tension pour la première fois, à ce que les commandes de volume
sonore sur tout amplificateur auxiliaire soient
REGLEES AU NIVEAU MINIMUM.
La sortie multi-salles n’est pas affectée par les
commandes de Volume Sonore et de Tonalité (Aigus,
Graves) de la chaîne principale, et il faut donc faire
attention afin de ne pas piloter les amplificateurs auxiliaires à leur niveau de sortie maximum.
BRANCHEMENTS SUR LE PANNEAU
ARRIERE
1. CORDON D’ALIMENTATION SECTEUR
Brancher le câble d’alimentation secteur sur une
prise murale proche, dont la tension alternative de
ligne est correcte, ou sur une prise de commodité
commutée sur le préamplificateur utilisé.
2. ENTREES
Le 912 possède à la fois des entrées et des sorties.
Avant de réaliser les branchements sur l’amplificateur, vérifier que l’ALIMENTATION [POWER] est sur
ARRET [OFF].
Brancher le câble signal en provenance du préamplificateur, du décodeur de sonorisation enveloppante
ou de toute autre source de signal sur les entrées de
l’amplificateur. Si l’on souhaite utiliser le 912 comme
un seul amplificateur de 90 Watts, plutôt que comme
un amplificateur stéréophonique à 30 W par voie, se
reporter à la section PONTAGE (paragraphe 6).
3. SORTIES LIGNE
Pour chaque entrée, il y a une sortie ligne correspondante qui enverra le signal à un autre amplificateur ou à un autre appareil de niveau ligne. Les sorties ligne sont tamponnées, ce qui fait qu’une impé-
dance faible ou un court circuit sur la sortie n’aura
aucune influence sur le signal à l’entrée. Si le 912 est
utilisé pour l’amplification d’une paire de haut-parleurs satellites, brancher le préamplificateur de la
chaîne sur les entrées du 912, puis faire cheminer
une paire de câbles depuis les sorties du 912
jusqu’aux entrées de l’amplificateur stéréophonique
principal. (Cf. Schéma N° 1).
4. NIVEAU D’ENTREE
L’amplificateur est équipé de commandes de
niveau d’entrée distinctes pour chaque voie. Avant de
mettre le 912 sous tension pour la première fois, vérifier que toutes les commandes de niveau sont bien
réglées sur leur position de puissance minimum normale. Dans certains cas, il peut s’avérer utile d’utiliser
d’autres réglages pour les besoins suivants :
(1). Alignement des niveaux. S’il s’agit d’une
chaîne à sonorité enveloppante ou d’un autre type de
chaîne à amplificateurs multiples, réduire le niveau
de certaines commandes afin d’équilibrer la chaîne
en fonction des haut-parleurs de sensibilité différente.
(2). Plage de réglage étendue de la commande de
volume sonore. De nombreuses chaînes stéréo ont
un gain en tension tellement important que les hautparleurs (ou les oreilles de l’auditeur) sont surchargés
dès que la commande de volume sonore dépasse la
position onze ou douze heures. Cela veut dire que
l’on est limité à seulement la moitié de la plage effective de la commande pour effectuer les réglages,
zone dans laquelle les ajustements sont peu précis et
où les erreurs de balance entre les chaînes ont tendance à être plus importantes. En réduisant toutes
les commandes de niveau d’entrée, il est possible
d’augmenter la position de la commande de volume
sonore, ce qui permet d’utiliser sa plage de réglage
d’une manière beaucoup plus efficace. (Suggestion :
régler les commandes de niveau d’entrée de manière
à ce que les niveaux sonores maximaux auxquels on
aime écouter se trouvent à environ 2 ou 3 heures sur
la commande de volume sonore).
Cette démarche a aussi l’avantage de supprimer le
bruit éventuel généré par les circuits haut niveau du
préamplificateur (par exemple tout ronflement ou sifflement résiduels qui ne disparaissent pas lorsque
l’on baisse le Volume sonore).
(3). Correction de la balance. De petites erreurs
dans la balance entre les voies peuvent détériorer de
façon très sensible la “profondeur” et “l’aération”
apparentes de l’image stéréo. De telles erreurs de
balance peuvent être dues aux divergences de sensibilité normales entre haut-parleurs, liées aux processus de fabrication, à des différences entre l’ambiance
acoustique de chaque haut-parleur, et à des distances légèrement différentes entre le fauteuil de
l’auditeur et chaque haut-parleur. Il est bon d’utiliser
les commandes de niveau d’entrée pour corriger ces
erreurs fixes de balance, laissant ainsi à la commande de balance de votre préamplificateur la seule
fonction de correction des erreurs de balance dans
les enregistrements.
Mettre le préamplificateur en mode monophonique,
et s’asseoir à l’endroit d’audition normal. Dans l’idéal,
l’image centrale “fantôme” doit sembler flotter dans
NA
D
6
F
AMPLIFICATEUR DE PUISSANCE NAD 912
 Loading...