

Page 1

M5 Diagnostic Ultrasound System
Operation Note
Page 2

Page 3

M5 Diagnostic Ultrasound System Operation Note
Table of Contents
System Introduction..................................................................................................2
Control Panel .............................................................................................................3
Power ON / OFF the System.....................................................................................9
System Status Icons................................................................................................11
Enter or Search Patient Information......................................................................12
Select Transducer and Exam Type........................................................................13
Image Adjustment....................................................................................................14
Image Adjustment: B...............................................................................................16
Image Adjustment: M ..............................................................................................18
Image Adjustment: Color........................................................................................19
Image Adjustment: Power ......................................................................................21
Image Adjustment: PW / CW ..................................................................................23
Parameter Adjustments: Others ............................................................................25
Special Imaging Mode: Smart3D............................................................................26
Special Imaging Mode: iScape...............................................................................28
Cine Review .............................................................................................................29
Comments and Body Marks (Pictograms)............................................................30
Save, Review and Analyze Images........................................................................31
Measurements..........................................................................................................32
Setup.........................................................................................................................34
© 2007-2009 Shenzhen Mindray Bio-medical Electronics Co., Ltd. All Rights Reserved.
1
Page 4
M5 Diagnostic Ultrasound System Operation Note
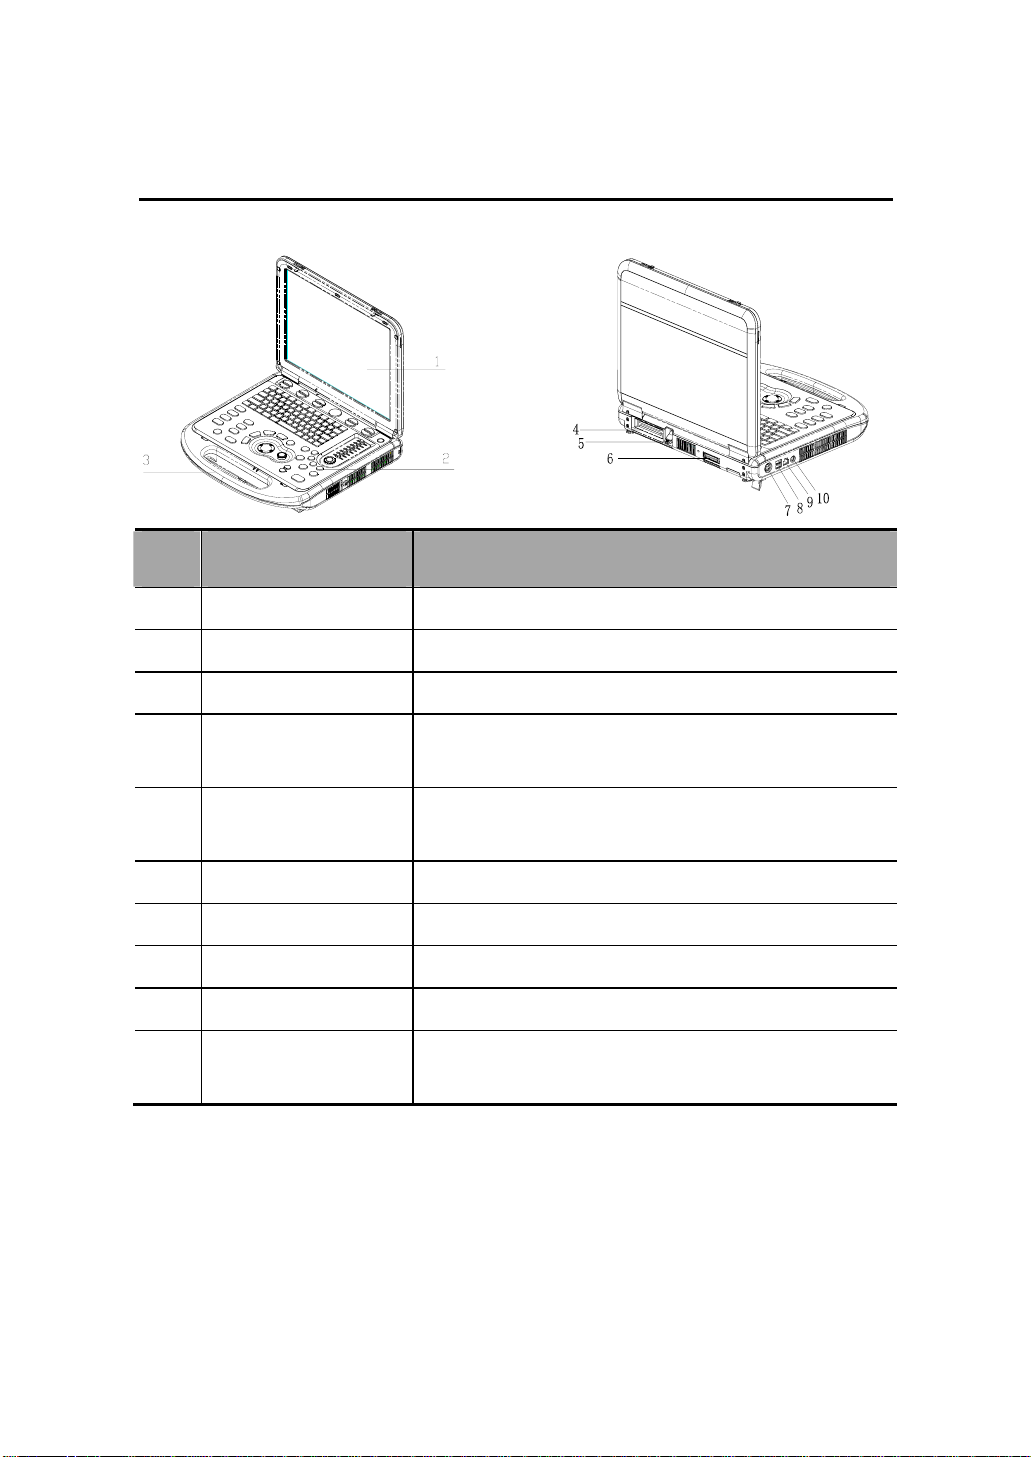
System Introduction
No Name Function
1
Monitor Displays the images and parameters during scanning
2
Control panel Operator-system interface or control
3
Handle Used for carrying the system
4
Transducer Port Connects a transducer to the main unit; or connects a
probe extend module
5
Transducer locking lever Locks or unlocks the transducer connected with the main
unit
6
IO extend port Connects the IO extend module
7
Power input port Connects the power adapter
8
USB port Connects USB devices
9
Network port Connects the network
10
S-Video separate video
output
Connects VCR recorder or video printer
© 2007-2009 Shenzhen Mindray Bio-medical Electronics Co., Ltd. All Rights Reserved.
2
Page 5
M5 Diagnostic Ultrasound System Operation Note
Control Panel
© 2007-2009 Shenzhen Mindray Bio-medical Electronics Co., Ltd. All Rights Reserved.
3
Page 6

M5 Diagnostic Ultrasound System Operation Note
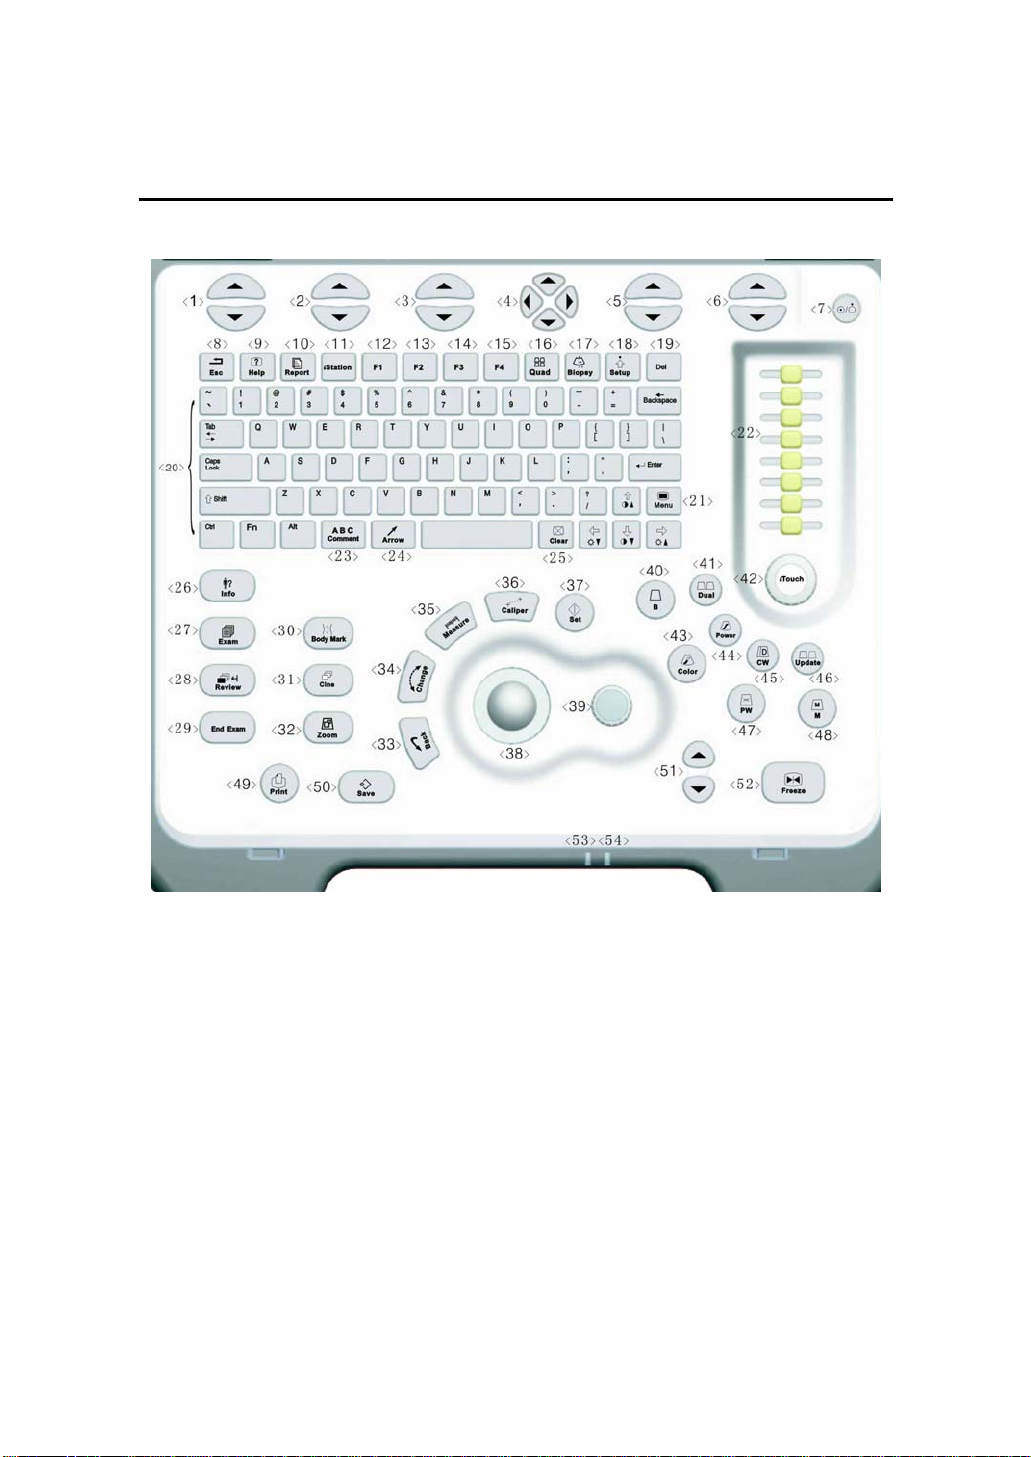
Control Panel
No English Name Name Description Function
/ soft menu controls 1 Press to select the soft menu items displayed
1
on the bottom of the screen. Refer to the
Operator’s Manual [Basic Volume] for specific
functions.
/ soft menu controls 2 Press to select the soft menu items displayed
2
on the bottom of the screen. Refer to the
Operator’s Manual [Basic Volume] for specific
functions.
/ soft menu controls 3 Press to select the soft menu items displayed
3
on the bottom of the screen. Refer to the
Operator’s Manual [Basic Volume] for specific
functions.
/ soft menu controls 4 Up/down controls are used to turn pages
4
up/down when there are more-than-one
pages for the soft menu;
Left/right controls are used to switch between
the exam types.
/ soft menu controls 5 Press to select the soft menu items displayed
5
on the bottom of the screen. Refer to the
Operator’s Manual [Basic Volume] for specific
functions.
/ soft menu controls 6 Press to select the soft menu items displayed
6
on the bottom of the screen. Refer to the
Operator’s Manual [Basic Volume] for specific
functions.
/ Power button When you press the power button to turn on
7
the system, the system enters the work status
and the indicator lights on and becomes
green. When the system enters the standby
status, the indicator turns yellow.
When you press the power button to turn off
the system, the indicator lights off.
© 2007-2009 Shenzhen Mindray Bio-medical Electronics Co., Ltd. All Rights Reserved.
4
Page 7

M5 Diagnostic Ultrasound System Operation Note
Control Panel
No English Name Name Description Function
Esc Escape Press to exit the current status to the previous
8
status.
Help Help Press to open or close the accompanying help
9
documents.
Report Report Press to open or close the diagnosis reports.
10
iStation / Press to enter or exit the patient information
11
management system.
F1 User-defined key You can assign a function to the key.
12
F2 User-defined key You can assign a function to the key.
13
F3 User-defined key You can assign a function to the key.
14
15 F4 User-defined key You can assign a function to the key.
16 Quad 4-split screen
display
17 Biopsy Biopsy Press to show or hide the biopsy guide line.
18 Setup Setup Press to show or hide the Setup menu.
19 Del Delete Press to delete the comment.
20 / Alphanumeric keys Same as those of PC.
21 Menu Menu Press to display or hide a mode-specific
22
TGC
23 Comment Comment Press to enter or exit the character comment
24 Arrow Arrow Press to enter or exit the arrow comment
25 Clear Clear Press to clear the comments or measurement
26 Info Patient information Press to enter the [Patient Info] screen.
27 Exam Exam type Press to switch between exam types.
28 Review Review Press to review the image files stored.
Time Gain
Compensation
Press to enter or exit the 4-split screen
display.
parameter menu.
Move to adjust time gain compensation.
status.
status.
calipers on the screen.
© 2007-2009 Shenzhen Mindray Bio-medical Electronics Co., Ltd. All Rights Reserved.
5
Page 8

M5 Diagnostic Ultrasound System Operation Note
Control Panel
No English Name Name Description Function
29 End Exam End exam Press to end an exam.
30 Body Mark Body mark Press to enter or exit the Body Mark status.
31 Cine Cine review Press to enter or exit the Cine Review status.
32 Zoom Zoom Press to enter or exit the Zoom status.
33
Back Return or delete
34 Change Change Press to toggle between calipers within the
35
Measure Measure
36
Caliper Caliper
37
Set Set
38 / Trackball Roll the trackball to move the cursor position.
39 / Multifunction knob Rotate to adjust image parameters or
40 B / Press to enter the B mode
41 Dual / Press to enter the Dual mode from another
42 iTouch / Rotate to increase or decrease the image
43 Color / Press to enter the Color mode.
44 Power / Press to enter the Power mode.
45 CW / Press to enter the CW mode.
Press to return to the previous operation or
delete the previous item.
same measurement.
Press to enter or exit the application
measurement mode.
Press to enter or exit the general
measurement mode.
Press to confirm an operation, same as the
left-button of the mouse.
comment arrows. Or when the cursor is
hidden, press to show the cursor.
mode;
Press to switch between the two display
windows in the Dual mode.
gain; press to optimize the image serving as a
one-key optimization.
© 2007-2009 Shenzhen Mindray Bio-medical Electronics Co., Ltd. All Rights Reserved.
6
Page 9

M5 Diagnostic Ultrasound System Operation Note
Control Panel
No English Name Name Description Function
46 Update / z Press to change the currently active
window in B+M or PW mode.
z Press to start or end image capture In
Smart3D or iScape mode.
47 PW / Press to enter the PW mode.
48 M / Press to enter the M mode.
49 Print Print
50 Save Save
51
Depth Depth
52 Freeze Freeze Press to freeze or unfreeze onscreen image.
53 / Indicator 1 Indicates if the main unit is connected to the
54 / Indicator 2 Indicates the current status of the batteries.
Press to print; user-defined key.
Press to save; user-defined key.
Press to increase or decrease the imaging
depth.
power supply.
When the main unit is not connected to the
power supply, the indicator light is off.
When the main unit is connected to the power
supply, the indicator light is on and in green
color.
When the system is supplied with power by
the batteries and the power capacity is lower
than 30%, the indicator is yellow and flashes.
When the batteries are being charged, the
indicator light is on and in yellow color.
When the battery capacity is charged to the
full capacity, the indicator color changes from
yellow to green.
In other statuses, the indicator light is off.
© 2007-2009 Shenzhen Mindray Bio-medical Electronics Co., Ltd. All Rights Reserved.
7
Page 10

M5 Diagnostic Ultrasound System Operation Note
Control Panel
There are five keys which can work with the Fn key:
Key Name Function
[Fn] +
[Fn] +
[Fn] + [S] Press the two keys to mute the speaker.
[Fn] +
[Fn] +
Press the two keys to increase the brightness of the LCD display.
Press the two keys to decrease the brightness of the LCD display.
Press the two keys to increase display contrast.
Press the two keys to decrease display contrast.
© 2007-2009 Shenzhen Mindray Bio-medical Electronics Co., Ltd. All Rights Reserved.
8
Page 11

M5 Diagnostic Ultrasound System Operation Note
Power ON / OFF the System
CAUTION:
To ensure the safe and effective operation of the system, you need to perform
daily maintenance and checks. See the section 6.1 in the Operator’s Manual
[Basic Volume] for the checklist.
CAUTION:
If the system begins to function improperly – immediately stop scanning. If the
system continues to function improperly –shut down the system and contact
Mindray Customer Service Department or sales representative. If you use the
system in a persistent improper functioning state – you may harm the patient
or damage the equipment.
Power ON
1. Connect the system to the power supply through the power adapter; or use the
batteries with sufficient capacity.
2. Press the power button to turn on the system and the power indicator is on in
green color. The power button is on the upper right corner of the system.
Power OFF
z To power off the system normally:
Gently press the power button once on the upper right corner of the control panel.
The [Shutdown Confirm] screen appears. See the figure below.
© 2007-2009 Shenzhen Mindray Bio-medical Electronics Co., Ltd. All Rights Reserved.
9
Page 12

M5 Diagnostic Ultrasound System Operation Note
Power ON / OFF the System
: To power off the system, click it. (It is recommended to select this button
after the system software is upgraded.)
: To restart quickly, click it to power off the system quickly and then press the
power button to restart quickly.
: To cancel the shutdown operation, click it to cancel the shutdown operation
and let the system return to the previous status.
z If you will not use the system for a long period of time, you shall:
1 Disconnect the power adapter;
2 Disconnect the mains power;
3 Turn off powers of all peripherals connected to the system.
z To shut down the system in a direct way if you cannot do it normally:
1 Only when you cannot shut down the system normally, you can directly shut it
down. Press and hold the power button for a long time and the system will
power off without displaying the [Shutdown Confirm] screen.
2
Shutting down the system this way may destroy the data.
NOTE: DO NOT rush shutdown of the system in a direct way. It may destroy the
data.
© 2007-2009 Shenzhen Mindray Bio-medical Electronics Co., Ltd. All Rights Reserved.
10
Page 13

M5 Diagnostic Ultrasound System Operation Note
System Status Icons
Icons Information
or
or
Region of Interest (RoI) size or position
Pulsed Wave Sample Volume size or position
Cine Review status
Measurement status
Comment status
Body Mark (Pictogram) status
Zoom status
USB device connected
Character input method indicator (English or Chinese)
X-axis rotation in 3D imaging mode
Y-axis rotation in 3D imaging mode
© 2007-2009 Shenzhen Mindray Bio-medical Electronics Co., Ltd. All Rights Reserved.
Z-axis rotation in 3D imaging mode
Sphere-center rotation in 3D imaging mode
3D cutting status
11
Page 14

M5 Diagnostic Ultrasound System Operation Note
Enter or Search Patient Information
To enter patient information,
1
Press End Exam to end the current patient scan and start a new patient exam.
2
Press Info to enter the patient information input dialog box.
3 Select an exam type.
4 Enter patient information.
5
Click OK to save the entered information and exit the dialog box. Click Cancel
to cancel the entered information and exit the dialog box.
To search for patient information,
1 To enter the patient file management screen,
1) Press iStation key directly; or
2) Click iStation button in the patient information dialog box; or
3) Click iStation button in the [Review] screen.
2 At the Data Source, select from the available file locations for patient
information or record information.
3 Set the patient conditions in the searching field.
4
Click Search to search the patients.
5 When a patient is selected, you can view images and reports in the file list
field.
6
Click New Exam to perform a new exam for the patient; Click Activate Exam
to activate the exam (within 24 hours); Click Exit to exit the iStation dialog box.
© 2007-2009 Shenzhen Mindray Bio-medical Electronics Co., Ltd. All Rights Reserved.
12
Page 15

M5 Diagnostic Ultrasound System Operation Note
Select Transducer and Exam Type
After directly connecting a transducer or connecting a transducer via the Probe
Extend Module, press Exam to open the following dialog box. Roll the trackball to
move the cursor onto an exam type in a transducer column, and click Set. The
transducer and the exam type are selected.
© 2007-2009 Shenzhen Mindray Bio-medical Electronics Co., Ltd. All Rights Reserved.
13
Page 16

M5 Diagnostic Ultrasound System Operation Note
Image Adjustment
Imaging adjustments are performed through the following methods:
1. Adjustments through image menus or soft menus
The image menus are located on the upper left corner of the screen.
To adjust,
1) Press Set or Back key; or
2) Rotate the multifunction knob.
The soft menus are located at the bottom of the screen.
To adjust,
1) Press the soft menu controls; or
2) Press Set or Back key;
3) Press the soft menu controls 4 to page up / down.
What items appear in the menu is dependent upon image mode and preset. So
what you see in your system may be different from screens and menus
exemplified in this manual.
You can preset the menu items for image menus or soft menus.
To preset menu items displayed in the image menu and soft menu in each
image mode,
(1) Press Setup key on the control panel to show the Setup menu.
(2) Click Key and Menu Preset item to open the Key and Menu Preset
screen.
(3) The Image Params page is opened by default.
(4) Select items in Available Items box on the left side.
(5) Move the selected items to the Menu page for the image menu on the right
side.
(6) Click OK button.
© 2007-2009 Shenzhen Mindray Bio-medical Electronics Co., Ltd. All Rights Reserved.
14
Page 17

M5 Diagnostic Ultrasound System Operation Note
Image Adjustment
2. Adjustments in the image parameter area through the multifunction knob
The image parameter area is located in the upper left corner of the screen. The
image parameters are displayed while the image menu is not available. Roll the
trackball to move the cursor onto a parameter,
1) A frame appears around it;
2) Press Set and the cursor disappears;
3) Rotate the multifunction knob to change the parameter;
4) Press Set again to confirm.
3. Adjustments through keys / multifunction knob / sliders
Some parameters can be adjusted through keys / multifunction knob / sliders on the
control panel, e.g. depth, gain, and TGC, etc.
© 2007-2009 Shenzhen Mindray Bio-medical Electronics Co., Ltd. All Rights Reserved.
15
Page 18

M5 Diagnostic Ultrasound System Operation Note
Image Adjustment: B
Parameter Function Description
Depth Increases or decreases B mode image depth.
TGC Manually adjust time gain compensation.
Gain Rotate the [iTouch] knob to increase or decrease the overall B
Mode gain.
iTouch Press to optimize multiple B Mode imaging parameters to
produce a uniform image.
Frequency Changes the current transducer frequency
THI (Tissue Harmonic
Imaging)
A. Power Selects the acoustic power values
Trapezoid Turns on / off the Trapezoid feature for linear transducers
L/R (Left/Right) Flip Flips an image left or right
U/D (Up/Down) Flip Flips an image up or down
Rotation Rotates an image in increments of 90°.
FOV (Field of View) Changes FOV among four selections W, M1, M2, and N.
B Steer Changes B steer angle; valid only for linear transducers
iBeam Combines multiple frames with different steer angles into one
Focus Number Increases or decreases the number of focal zones.
Focus Position Changes position of focal zones
Enhances penetration in the far field as well as resolution in the
near field; improves images of small parts.
frame; valid only for linear transducers.
© 2007-2009 Shenzhen Mindray Bio-medical Electronics Co., Ltd. All Rights Reserved.
16
Page 19

M5 Diagnostic Ultrasound System Operation Note
Image Adjustment: B
Parameter Function Description
Dynamic Range Increases / expands or decreases / compresses the image gray
scale for contrast resolution.
Gray Map Selects a combination of transform curve, gray rejection and γ
correction.
Line Density Increases or decreases the B Mode line density through selecting
High or Low.
IP (Image Processing) Selects a combination of image parameters
Colorize Turns on or off the Colorize feature.
Colorize Map Cycles through available B Mode Colorize maps
iClear Increases the B Mode image profile for greater boundary detail
Frame Average Increases or decrease B Mode image averaging for noise
reduction.
TSI (Tissue Specific
Imaging)
Noise Reject Increases or decreases the amount of Noise Rejection in the B
Post Process Gray map correction tool for transform, reject, and γ correction.
Adjusts the speed of sound against various tissue types
mode image.
© 2007-2009 Shenzhen Mindray Bio-medical Electronics Co., Ltd. All Rights Reserved.
17
Page 20

M5 Diagnostic Ultrasound System Operation Note
Image Adjustment: M
Parameter Function Description
Depth Increases or decreases image depth.
Gain Rotate the [iTouch] knob to increase or decrease the overall M
Mode gain.
Frequency Changes the current transducer frequency
Time Mark Turns on or off time line markers in the M Mode sweep display.
Speed Increases or decreases the M Mode sweep speed
A. Power Selects the acoustic power values
Gray Map Selects a combination of transform curve, gray rejection and γ
correction.
Focus Position Changes position of focal zones
Dynamic Range Increases / expands or decreases / compresses the image gray
scale for contrast resolution.
IP (Image Processing) Selects a combination of image parameters
Colorize Turns on or off the Colorize feature.
Colorize Map Cycles through available M Mode Colorize maps
Display Format Selects the display format for the B and M images
M Soften Processes the scan lines of M images to reject noise
Post Process Gray map correction tool for transform, reject, and γ correction.
© 2007-2009 Shenzhen Mindray Bio-medical Electronics Co., Ltd. All Rights Reserved.
18
Page 21

M5 Diagnostic Ultrasound System Operation Note
Image Adjustment: Color
Parameter Function Description
Gain Rotate the [iTouch] knob to increase or decrease the overall
image gain.
Doppler Frequency Selects the Doppler Frequency value
Scale Adjusts speed scale and change PRF
Invert
Baseline Adjusts the baseline position to change the range of flow
A. Power Selects the acoustic power values
B/C Wide Sets and constrains the maximum width of the B Mode image
Dual Live Turns on or off a side-by-side B Mode and B/Color Mode
Flow State Selects flow state among L, M and H.
Steer Adjusts RoI of the linear image of color flow with different
Priority Sets the flow priority to display.
Packet Size Adjusts the accuracy of color flow.
After the Auto Invert feature is selected in preset, the color
bar will automatically invert when the color flow is steered to a
certain angle, thus accommodating operator’s habit of
distinguishing flow direction.
speed
to that of the Color RoI.
display.
angles but with immobility of the transducer.
Color IP (Image Processing) Selects a combination of image parameters
Map Displays effect of color image
Filter Filters the speed signals of the low speed flow.
Line Density Selects Line Density between L and H
© 2007-2009 Shenzhen Mindray Bio-medical Electronics Co., Ltd. All Rights Reserved.
19
Page 22

M5 Diagnostic Ultrasound System Operation Note
Image Adjustment: Color
Parameter Function Description
Smooth Rejects noise and smooth the image.
Persistence Performs temporal smooth of the image.
Contrast Adjusts contrast of color maps.
Focus Position Adjusts the color focus position relative to the B focus.
Image Disp Turns on or off the B Mode image display as live Color
remains active.
© 2007-2009 Shenzhen Mindray Bio-medical Electronics Co., Ltd. All Rights Reserved.
20
Page 23

M5 Diagnostic Ultrasound System Operation Note
Image Adjustment: Power
Parameter Function Description
Gain Rotate the [iTouch] knob to increase or decrease the overall
image gain.
Doppler Frequency Selects the Doppler Frequency value
Scale Adjusts speed scale and change PRF
Invert
Dynamic Range Increases / expands or decreases / compresses the image gray
A. Power Selects the acoustic power values
B/C Wide Sets and constrains the maximum width of the B Mode image to
Dual Live Turns on or off a side-by-side B Mode and B/Color Mode display.
Flow State Selects flow state among L, M and H.
Steer Adjusts RoI of the linear image of flow with different angles but
Priority Sets the flow priority to display.
Packet Size Adjusts the accuracy of color flow.
After the Auto Invert feature is selected in preset, the color bar
will automatically invert when the color flow is steered to a certain
angle, thus accommodating operator’s habit of distinguishing flow
direction.
scale for contrast resolution.
that of the Color RoI.
with immobility of the transducer.
Color IP (Image
Processing)
Map Displays effect of color image
Filter Filters the speed signals of the low speed flow.
Line Density Selects Line Density between L and H
Selects a combination of image parameters
© 2007-2009 Shenzhen Mindray Bio-medical Electronics Co., Ltd. All Rights Reserved.
21
Page 24

M5 Diagnostic Ultrasound System Operation Note
Image Adjustment: Power
Parameter Function Description
Smooth Rejects noise and smooth the image
Persistence Performs temporal smooth of the image.
Contrast Adjusts contrast of color maps.
Focus Position Adjusts the color focus position relative to the B focus.
Image Disp Turns on or off the B Mode image display as live Color remains
active.
LVR (Low Velocity
Rejection)
Increases or decreases the LVR threshold setting
© 2007-2009 Shenzhen Mindray Bio-medical Electronics Co., Ltd. All Rights Reserved.
22
Page 25

M5 Diagnostic Ultrasound System Operation Note
Image Adjustment: PW / CW
Note:
adjustment items, such as iTouch, SV, steer, Duplex, Triplex and HPRF, are not
available in the CW mode.
Parameter Function Description
Gain Rotate the [iTouch] knob to increase or decrease the overall
image gain.
iTouch After you press the [iTouch] key on the control panel, the system
will automatically set the PW baseline and PRF value to the
optimum settings according to the current scanned tissue
characteristics.
Scale Adjusts speed scale and change PRF
Invert
PW Steer Steers the SV of PW flow with immobility of the linear transducer.
Angle Adjusts SV angle in increment of 1 degree
Quick Angle Quickly adjusts SV angle in increments of 60°.
Baseline Accommodates flow with quicker or slower speed to eliminate
SV (Sample Volume) Adjusts the width of Sample Volume.
Filter Removes signals of low speed flow.
Doppler Frequency Selects the Doppler Frequency value
Duplex / Triplex Enters or exits the Duplex or Triplex mode
Max Speed Sets the maximum speed of auto trace.
Mean Speed Sets the mean speed of auto trace.
After the Auto Invert feature is selected in preset, the spectrum
will automatically invert when it is steered to a certain angle, thus
accommodating operator’s habit of distinguishing image.
alias.
Colorize Turns on or off the Colorize feature.
© 2007-2009 Shenzhen Mindray Bio-medical Electronics Co., Ltd. All Rights Reserved.
23
Page 26

M5 Diagnostic Ultrasound System Operation Note
Image Adjustment: PW / CW
Parameter Function Description
Colorize Map Cycles through available Colorize maps
Dynamic Range Increases / expands or decreases / compresses the image gray
scale for contrast resolution.
Volume Adjusts the Doppler volume
Trace Area Sets trace area to All, Above, or Below.
Packet Size Adjusts the accuracy of color flow.
Speed Adjusts speed.
A. Power Selects the acoustic power values
Threshold Increases or decreases Doppler threshold sensitivity.
Trace Smooth Increases or decreases Doppler noise rejection.
Auto Calc (Auto
Calculation)
Auto Calc Parameter (Auto
Spectrum Calculation)
Time Mark Turns on / off Time Mark within the Doppler Spectral display.
HPRF (High Pulse
Repetition Frequency)
Display Format
Turns on or off the auto calculation.
Calculates PS, ED, RI and PI for Doppler waveform.
Turns on / off HPRF feature.
Sets Disp Format as L/R, V1:1 (vertical layout with size ratio 1:1),
V1:2 (vertical layout with size ratio 1:2) or Full.
© 2007-2009 Shenzhen Mindray Bio-medical Electronics Co., Ltd. All Rights Reserved.
24
Page 27

M5 Diagnostic Ultrasound System Operation Note
Parameter Adjustments: Others
Image Magnification
z Enter Zoom
In the real time scanning or freeze status, press Zoom key to enter the zoom status.
z Zoom Adjustment
Rotating the multifunction knob can increase or decrease the magnification factor
(maximum is 10 times). Rotating the multifunction knob to the left can decrease the
magnification factor; rotating the multifunction knob to the right can increase the
magnification factor. The magnification factor is displayed in the image parameter
and menu area. For example, Z5.0 indicates the current magnification factor is 5. In
the zoom status, rolling the trackball can move the magnified image.
z Exit Zoom
Press Zoom a second time or press Esc to exit the zoom status.
© 2007-2009 Shenzhen Mindray Bio-medical Electronics Co., Ltd. All Rights Reserved.
25
Page 28

M5 Diagnostic Ultrasound System Operation Note
Special Imaging Mode: Smart3D
The quality of images reconstructed in the Smart3D mode is closely related to fetal
image quality, angle of a B tangent plane and scanning technique. Refer to
Operator’s Manual [Basic Volume] for details.
Enter or Exit Smart3D
To enter Smart3D mode,
z Press Menu key to display the main menu.
z Navigate the cursor to the Other item and click it to display the Other menu.
z Click Smart3D item in the Other menu to enter Smart3D mode.
To exit Smart3D mode,
z If in the 3D capture status, press the Multifunction knob on the control panel to
show the cursor and click Exit in the menu; or press the Esc key.
z If in the review status, press the Esc key to exit to the 3D capture status, and
press Esc again to exit Smart3D mode.
Capture 3D Image
1. Enter the 3D capture mode.
2. Roll the trackball to change position of the Region of Interest (RoI) and press the
Set key to set the position. Switch the cursor to the status for changing the RoI
size and roll the trackball to change the size.
3. Press the Multifunction knob to show the cursor.
4. Move the cursor onto Method item in the menu and click to select between
Linear or Fan.
z If Linear is selected, you can move the cursor onto Distance (mm) item to
increase or decrease the distance range for a linear scan.
z If Fan is selected, you can move the cursor onto Angle (deg) item to
increase or decrease the angle range for a fan scan.
5. Press the Update key or use the soft menu control to click Start Capture to start
the capture.
© 2007-2009 Shenzhen Mindray Bio-medical Electronics Co., Ltd. All Rights Reserved.
26
Page 29

M5 Diagnostic Ultrasound System Operation Note
Special Imaging Mode: Smart3D
6. To end image capture,
z Press the Update key a second time; or
z Press the Freeze key; or
z Click Stop Capture in the menu; or
z Wait until the memory is full and the system automatically ends the capture.
7. To exit 3D mode from the 3D capture mode,
z Press the Esc key; or
z Click the Exit item of the 3D Capture menu; or
z Press the B key on the control panel; or
z Press the user-defined 3D key on the control panel.
Review 3D Image
In the 3D Review mode, you can
1. Press the Quad key to switch between single-window and four-window to
display 3D image.
2. Adjust VOI in the three windows.
3. Rotate 3D image.
4. Review Surface Data.
5. Adjust 3D image parameters.
6. Zoom 3D image.
7. Cut 3D image.
© 2007-2009 Shenzhen Mindray Bio-medical Electronics Co., Ltd. All Rights Reserved.
27
Page 30

M5 Diagnostic Ultrasound System Operation Note
Special Imaging Mode: iScape
You can perform the iScape panoramic imaging feature on B real time images using
all linear and convex transducers.
Enter or Exit iScape
To enter iScape mode,
• Click iScape item in the [Other] menu.
To exit iScape mode,
• If in the capture status, click Exit in the menu; or press Esc key.
• If in the review status, press Esc key to exit to the capture status, and then press
Esc key again to exit iScape mode.
Capture Images
1
Move the cursor onto the iScape item in the Other menu and press the Set key
or directly press the user-defined iScape panoramic imaging key to enter the
image capture mode.
2
Press the Update key or use the soft menu control to click Start Capture to
start the iScape image capture.
3
Press the Update key or Freeze key or use the soft menu control to click Stop
Capture to end the image capture and freeze the screen. The image splicing
starts. After the acquisition is complete, the spliced image will be displayed.
The iScape review mode is entered.
Review the Extended Image
In the iScape Review mode, you can:
1) Set the extended image parameters.
2) Rotate the extended image image.
3) Magnify the extended image image.
4) Perform measurements, add body marks or comments.
© 2007-2009 Shenzhen Mindray Bio-medical Electronics Co., Ltd. All Rights Reserved.
28
Page 31

M5 Diagnostic Ultrasound System Operation Note
Cine Review
The Cine Review is used to cycle through a series of frozen or stored images. You
can review cine images manually by the trackball or by Auto Cine.
Review Cine Images
1
Press the Freeze key to freeze an image, and the system automatically enters
the manual cine review.
2 Roll the trackball to change the direction and speed.
3
Use the soft menu control to select Auto Play to start the auto cine review and
adjust the speed.
4 Roll the trackball to change the auto review to manual review.
5
Press the Cine key or Esc key to exit the cine review.
Set an Auto Cine Review Series (Cine Clip)
You can set a segment of cine loop which can be reviewed automatically. After the
system enters the cine review status, perform the following procedures to set the
region.
1 Manually review the images until the frame which you want to set it as start
point, and use the soft menu control to select Set First Frame in the soft menu
to set the start position.
2 Manually review the images until the frame which you want to set it as end
point, and use the soft menu control to select Set End Frame in the soft menu
to set the end position.
3
Use the soft menu control to select Auto Play to set the value (except 0), the
auto cine status is entered, and adjust the review speed through this control.
© 2007-2009 Shenzhen Mindray Bio-medical Electronics Co., Ltd. All Rights Reserved.
29
Page 32

M5 Diagnostic Ultrasound System Operation Note
Comments and Body Marks (Pictograms)
Comments and Body Marks (Pictograms) can be added during ultrasound exams.
To add comments,
1
Press the ABC Comment key to enter the comment status; the cursor
changes to “|”.
2 Roll the trackball to locate the position for the comment.
3 Type the characters through the character keys on the control panel; add the
comment text through the Comment menu on the left side of the screen.
4
Press the Arrow key to add a comment arrow, and rotate the multifunction
knob to change its orientation.
5 You can change sizes of comment characters and arrows, and drag, edit or
delete the comments.
To add Body Marks,
1
Press the Body Mark key to open the Body Mark selection screen and soft
menu.
2 Use the soft menu item to select the desired body mark library.
3 Move the cursor onto the desired body mark, and a highlighted frame appears.
You can use Page Down in the soft menu to turn pages.
4
Press Set to add the selected body mark.
5 Roll the trackball to place the probe symbol and rotate the multifunction knob
to change the orientation of the probe.
6
Press Set to fix the position and orientation of the probe and exit the body
mark status.
Note: If no object is selected, pressing the Clear key will clear all comments, body
marks and general measurements from the screen.
© 2007-2009 Shenzhen Mindray Bio-medical Electronics Co., Ltd. All Rights Reserved.
30
Page 33

M5 Diagnostic Ultrasound System Operation Note
Save, Review and Analyze Images
To save images,
1
Press the Save key to save an onscreen image to the database of the system
in the format of FRM.
2
Press the Freeze key to freeze an image, use the soft menu item Save Cine to
save the Cine file to the database of the system in the format of CIN.
3 To save the stored files of the system to another memory or in another format,
click the
button below the thumbnail area.
To review images,
You can review all the images stored in an exam through the following means:
1 After the images in an exam are stored, their thumbnails will appear on the
right side of the screen; you can view the images through the thumbnails; or
2
Press the Review key to enter the [Review] screen; or
3
Select an exam of a patient in the [iStation] screen, press Review to select the
image and enter the [Review] screen.
To analyze images,
The image analysis means that you can view, magnify, perform post processing,
measurements, add comments and perform cine (multi-frame) review for a stored
image.
1 In the scanning or freeze status, double-click a thumbnail stored in this exam
to enter the image analysis status; or
2
© 2007-2009 Shenzhen Mindray Bio-medical Electronics Co., Ltd. All Rights Reserved.
In the Review status, select a thumbnail and click the Open button or directly
double-click the selected thumbnail to open the image.
31
Page 34

M5 Diagnostic Ultrasound System Operation Note
Measurements
You can perform measurements on a:
z zoomed image
z cine review image
z real-time image
z frozen image
The measurements consist of general measurements and application
measurements.
General Measurements
1
On the image, press the Caliper key to enter the general measurement
status.
2
3
4
Press the Menu key to display the menu.
Move the cursor onto the measurement tool, and press the Set key.
Move the cursor onto the desired position and press the Set key to fix the
measurement caliper, or press the Back key to cancel the operation.
Application Measurements
1
2
3 Move the cursor onto the measurement tool and method, and press the
4
5 Refer to the help information displayed below the image during a
On the image, press the Measure key to enter the application
measurement status.
Press the Menu key to display the menu.
Set key.
Move the cursor onto the desired position and press the Set key to fix the
measurement caliper, or press the Back key to cancel the operation.
measurement.
© 2007-2009 Shenzhen Mindray Bio-medical Electronics Co., Ltd. All Rights Reserved.
32
Page 35

M5 Diagnostic Ultrasound System Operation Note
Measurements
CAUTION:
1 During a measurement, if you unfreeze the image or change the
exam type, the measurement calipers will be cleared and general
measurement data will be lost (the application measurement dat a are
stored in the report).
2 During a measurement, if you turn off the system or press the End
Exam key, the data not saved will be lost.
© 2007-2009 Shenzhen Mindray Bio-medical Electronics Co., Ltd. All Rights Reserved.
33
Page 36

M5 Diagnostic Ultrasound System Operation Note
Setup
To change the factory default settings, perform setup operations.
System Configuration
1
Press the Setup key on the control panel to enter the Setup menu.
2
Select the System item to enter the system configuration dialog box.
3 Set new parameters.
4
Click OK to save the new parameters, or click Cancel to cancel them, or click
Restore Factory to restore the factory default settings.
5
Click Return item on the Setup menu to allow the new settings to take
effective.
6 In addition, you can perform other settings through Exam Preset, Image
Preset, Measure Preset, Body Mark Preset, Comment Preset, Key and Menu
Preset, Peripheral and DICOM. Refer to the Operator’s Manual [Basic Volume]
for details.
Manage Settings
1
Select the Manage Settings item in the Setup menu to display the Manage
Settings dialog box.
2
Select the desired setup data in the Export field, and click Export to export the
selected data.
3 Select the desired setup data in the Import field, and click Import to import the
selected data; or click Restore Factory to restore the factory default settings
for the selected data.
4
To export or import all setup data, click Export All or Import All at the bottom
of the screen; to restore all factory default settings, click Restore Factory at
the bottom of the screen.
© 2007-2009 Shenzhen Mindray Bio-medical Electronics Co., Ltd. All Rights Reserved.
34
Page 37

P/N:
046-000547-00 (V1.0)
 Loading...