

Page 1
Operating instructions
Washer-Extractor
WS 5243
WS 5323
To avoid the risk of accidents or damage to the machine it is en - GB
essential to read these instructions before installing,
commissioning and using it for the first time.
M.-Nr. 05 730 941
Page 2

2 M.-Nr. 05 730 941
Page 3

Contents Indice
Warning and Safety instructions . . . . . . . . . . . . . . . . . . . . . . . . . . . . . 4
Caring for the environment . . . . . . . . . . . . . . . . . . . . . . . . . . . . . . . . 7
Guide to the machine . . . . . . . . . . . . . . . . . . . . . . . . . . . . . . . . . . . 8
Control panel . . . . . . . . . . . . . . . . . . . . . . . . . . . . . . . . . . . . . . . . 9
Guide to the controls . . . . . . . . . . . . . . . . . . . . . . . . . . . . . . . . . . . 10
Operation . . . . . . . . . . . . . . . . . . . . . . . . . . . . . . . . . . . . . . . . . 13
Setting the local language . . . . . . . . . . . . . . . . . . . . . . . . . . . . . . . . 13
Setting the current time of day and date . . . . . . . . . . . . . . . . . . . . . . . . . 13
Commissioning . . . . . . . . . . . . . . . . . . . . . . . . . . . . . . . . . . . . . 14
Open the drum . . . . . . . . . . . . . . . . . . . . . . . . . . . . . . . . . . . . . . 14
Close the drum . . . . . . . . . . . . . . . . . . . . . . . . . . . . . . . . . . . . . . 14
Load weight / Adding detergent . . . . . . . . . . . . . . . . . . . . . . . . . . . . 16
Selecting a disinfection programme . . . . . . . . . . . . . . . . . . . . . . . . . . 17
Unloading the machine . . . . . . . . . . . . . . . . . . . . . . . . . . . . . . . . . 18
Selecting an “unlocked” programme . . . . . . . . . . . . . . . . . . . . . . . . . . . 19
To change the temperature and the spin speed . . . . . . . . . . . . . . . . . . . . . 19
Additional functions . . . . . . . . . . . . . . . . . . . . . . . . . . . . . . . . . . . 21
With Pre-wash / Starching / Without a spin . . . . . . . . . . . . . . . . . . . . . . . . 21
Programme interruption / Delay Start . . . . . . . . . . . . . . . . . . . . . . . . . . . 22
Notes . . . . . . . . . . . . . . . . . . . . . . . . . . . . . . . . . . . . . . . . . . . 23
Locked programmes (Disinfecting programmes) . . . . . . . . . . . . . . . . . . . . . 23
Locating the drum door to the "Clean side" . . . . . . . . . . . . . . . . . . . . . . . . 23
Hot water rinse . . . . . . . . . . . . . . . . . . . . . . . . . . . . . . . . . . . . . . 23
Connecting a printer . . . . . . . . . . . . . . . . . . . . . . . . . . . . . . . . . . . 23
Liquid dispensing . . . . . . . . . . . . . . . . . . . . . . . . . . . . . . . . . . . . 24
Problem solving guide . . . . . . . . . . . . . . . . . . . . . . . . . . . . . . . . . 26
Power cut during a wash programme . . . . . . . . . . . . . . . . . . . . . . . . . . . 26
Emergency door release . . . . . . . . . . . . . . . . . . . . . . . . . . . . . . . . . 26
Fault messages . . . . . . . . . . . . . . . . . . . . . . . . . . . . . . . . . . . . . . 27
After sales service . . . . . . . . . . . . . . . . . . . . . . . . . . . . . . . . . . . . 29
Cleaning and care . . . . . . . . . . . . . . . . . . . . . . . . . . . . . . . . . . . . 30
Explanation of the symbols on the data plate . . . . . . . . . . . . . . . . . . . . . 32
Notes for the installer . . . . . . . . . . . . . . . . . . . . . . . . . . . . . . . . . . 33
Transit bars . . . . . . . . . . . . . . . . . . . . . . . . . . . . . . . . . . . . . . . . 33
Plumbing . . . . . . . . . . . . . . . . . . . . . . . . . . . . . . . . . . . . . . . . . 34
Electrical connection / Steam connection . . . . . . . . . . . . . . . . . . . . . . . . . 35
EU Declaration of Conformity . . . . . . . . . . . . . . . . . . . . . . . . . . . . . . 36
Guarantee . . . . . . . . . . . . . . . . . . . . . . . . . . . . . . . . . . . . . . . . 37
Page
The washer-extractor must be installed by
an approved service technician or
authorised Service Dealer.
This booklet is part of a set which comprises:
- Profitronic programming instructions
- Programme surveys
- Detergent dispensing charts
The set is supplied with the machine.
M.-Nr. 05 730 941 3
Page 4

Warning and Safety instructions
Read the operating instructions through before using this machine for the first time.
This way you will avoid the risk of
accidents or damage to the machine.
Appropriate use of the machine
This washer extractor is only intended for
items of laundry which have not been impregnated with dangerous or inflammable substances.
Only machine wash articles which have
a care label stating they are suitable for
machine washing.
Temperatures, holding times, suds ratio
and disinfecting agents must meet the requirement of national Health and Safety guidelines for disinfecting procedures and the
required levels of microbiological hygiene for
infection prophylaxis.
If items being processed have to meet par-
ticular quality standards, e.g. particulate
free rinse results, the procedure must be validated and the user must make regular quality
checks to ensure appropriate standards are
being maintained.
On no account must solvents of the kind
used for dry cleaning be used in this machine. Danger of fire or explosion.
Never use or store petrol or petroleum
based substances or any easily inflammable substances near the machine. Do not
use the machine lid as a resting place.
Danger of fire or explosion.
Technical and electrical safety
The electrical safety of this appliance can
only be guaranteed when continuity is
complete between the appliance and an effective earthing system which complies with local
and national regulations.
It is most important that this basic safety requirement is regularly tested by a qualified
electrician. The manufacturer cannot be held
responsible for the consequences of an inadequate earthing system.
Do not damage, remove or bypass the
safety features and controls on the machine.
Where there is any damage to the ma-
chine or to the cable insulation the machine must not be used until it has been
repaired.
Any removable outer panels must be in
place, and all moving or electrical parts
shielded before the machine is operated.
The machine is only completely isolated
from the electricity supply either when
switched off at the wall isolator, or the mains
fuse is withdrawn from the socket.
Repairs to machines operating with elec-
tricity or steam should only be undertaken
by a suitably qualified service engineer to ensure safety. Unauthorised repairs could be
dangerous.
Faulty components should only be ex-
changed for Miele original spare parts.
Only when these parts are fitted can the
safety standards of the machine be guaranteed.
The very best materials are used in the
manufacture of this machine, and every
care is taken in its manufacture. However,
with time, deterioration of parts can occur, especially with rubber components such as
hoses. This should be borne in mind if operating the machine without supervision. Check
the inlet hoses regularly for signs of deterioration and replace in good time, to avoid leaks
and subsequent damage.
Local regulations regarding regular inspec-
tion and maintenance of this machine
must be observed.
4 M.-Nr. 05 730 941
Page 5

Warning and Safety instructions
Use of the machine
This washer extractor is not intended for
use by persons (including children) with
reduced physical, sensory or mental capabilities, or lack of experience or knowledge,
unless they have been given supervision or instruction concerning its use by a person responsible for their safety.
Never allow children to play in, on or near
the washer extractor, or to operate it themselves. Please supervise its use by the elderly or infirm.
Remember that the door porthole glass
can become hot during the operation of
the machine. Do not let children touch it .
Always make sure the drum is stationary
before reaching in to remove washing.
Reaching into a moving drum is extremely
dangerous.
It is the operator’s responsibility to ensure
that the standard of disinfection in thermal
as well as chemo thermal procedures is maintained (in accordance with § 18 IFSG) by
carrying out suitable validation tests. These
procedures should be checked on a regular
basis, either thermo-electrically using loggers,
or bacteriologically with bio indicators. The
operator must pay particular attention to maintaining the correct parameters in the procedure, including temperature and with chemo
thermal programmes the chemical concentration used. Disinfection programmes must not
be interrupted, as this can have a limiting effect on the disinfection result.
Water used for washing and rinsing must
not be used as drinking water. It must be
discharged into a proper sewerage system.
The machine should only be operated un-
supervised when there is a floor drain
(gully) in the direct vicinity of the machine.
If you are not sure about a particular agent,
contact the manufacturer of that agent for advice.
If you accidentally spill an agent containing
chlorides on the machine it should be rinsed
off with water and dried using a soft cloth.
Always follow the instructions of the
chemical manufacturer when using cleaning agents and special application chemicals.
Only use such chemicals for the purpose and
in the situation specified by the manufacturer
in order to avoid the danger of adverse
chemical reactions and material damage.
If in doubt check the suitability of the product
for use in this machine with the manufacturer
before using it.
Where a chemical cleaning agent is rec-
ommended on technical application
grounds, this does not imply that the manufacturer of the machine takes responsibility for
the effect of the chemical on the material of
the items being cleaned or on the machine.
Please be aware that changes in formulation,
storage conditions etc., which may not be publicised by the chemical producer, can have a
negative effect on the cleaning result.
Proprietary dyes, dye removers and de-
scaling agents may only be used in this
machine if the manufacturer expressly states
that they are suitable for use in a washing machine. Follow the manufacturer’s instructions
on using them.
Laundry that was soiled with biological
oils or fat should be washed using a suitable detergent and/or wash programme. It
must also be inspected after washing. If oils
or fat are not sufficiently removed they could
cause the laundry to self ignite during the
drying process.
On no account use high pressure
cleaners or hose down the machine.
Disinfecting and cleaning agents often
have compounds containing chlorides in
them. If these agents dry on to stainless steel
surfaces, the residual chlorides will attack the
steel and can cause rusting.
To protect your machine from rust damage, we
recommend only using chloride free disinfecting and cleaning agents for washing and disinfecting programmes and for cleaning stainless
steel surfaces of the machine itself.
M.-Nr. 05 730 941 5
Page 6

Warning and Safety instructions
Use of accessories
Accessory parts may only be fitted when
expressly approved by Miele. If other
parts are used, guarantee, performance and
product liability claims may be invalidated.
Chlorine and component damage
Notes on using chlorine bleach and perchlorethylene
Frequent use of chlorine increases the
risk of component damage.
The use of agents containing chlorine, such
as sodium hypochlorite and chlorine bleach in
powder form, can damage the protective surface of stainless steel and cause corrosion.
Factors affecting this are chlorine concentration levels, contact time and temperature. It is
therefore advisable to avoid the use of such agents. Oxygen based bleaching agents
should be used instead.
Disposal of old machines
When disposing of an old machine, dis-
connect it from all services and make the
door lock inoperative, so that children cannot
accidentally shut themselves in. Make appropriate arrangements for the safe disposal of
the machine.
All personnel working with this machine
must be fully trained in all aspects of its
use and safety.
Keep these instructions in a safe place.
If, however, chlorine based bleaching agents
have to be used for particular types of soiling,
then anti-chlorine measures must also be carried out. If this is not done irreparable damage can occur to components in the
machine and to laundry.
Anti-chlorine treatment
Anti-chlorine treatment has to be carried out
immediately after chlorine bleach has been
used. Hydrogen peroxide and oxygen based
cleaning and bleaching agents must only be
used in programmes specified for their use.
Any wash performance problems should be
discussed with the manufacturer of the cleaning / bleaching product in the first instance.
With thiosulfate, especially when used with
hard water, gypsum can form, which can lead
to incrustations on laundry or deposits in the
machine.
The exact quantity of additives and the treatment temperatures required must be set and
tested on site in accordance with the dosage
recommendations of the detergent and additive manufacturers. The laundry must also be
tested to make sure it contains no active chlorine residues after processing.
6 M.-Nr. 05 730 941
Page 7
Caring for the environment
Disposal of the packing material
The transport and protective packing has
been selected from materials which are environmentally friendly for disposal and can normally be recycled. Packaging e.g. cling film,
polystyrene and plastic wrappings must be
kept out of the reach of babies and young
children. Danger of suffocation. Rather than
just throwing these materials away, please ensure that they are recycled.
Disposal of your old machine
Electrical and electronic machines often contain materials which, if handled or disposed of
incorrectly, could be potentially hazardous to
human health and to the environment. They
are, however, essential for the correct functioning of your machine. Please do not therefore dispose of it with your household waste.
Please dispose of it at your local community
waste collection/recycling centre, and ensure
that it presents no danger to children while
being stored for disposal.
It should be unplugged or disconnected from
the mains electricity supply by a competent
person. See the "Warning and Safety" section
of this booklet for further details.
M.-Nr. 05 730 941 7
Page 8
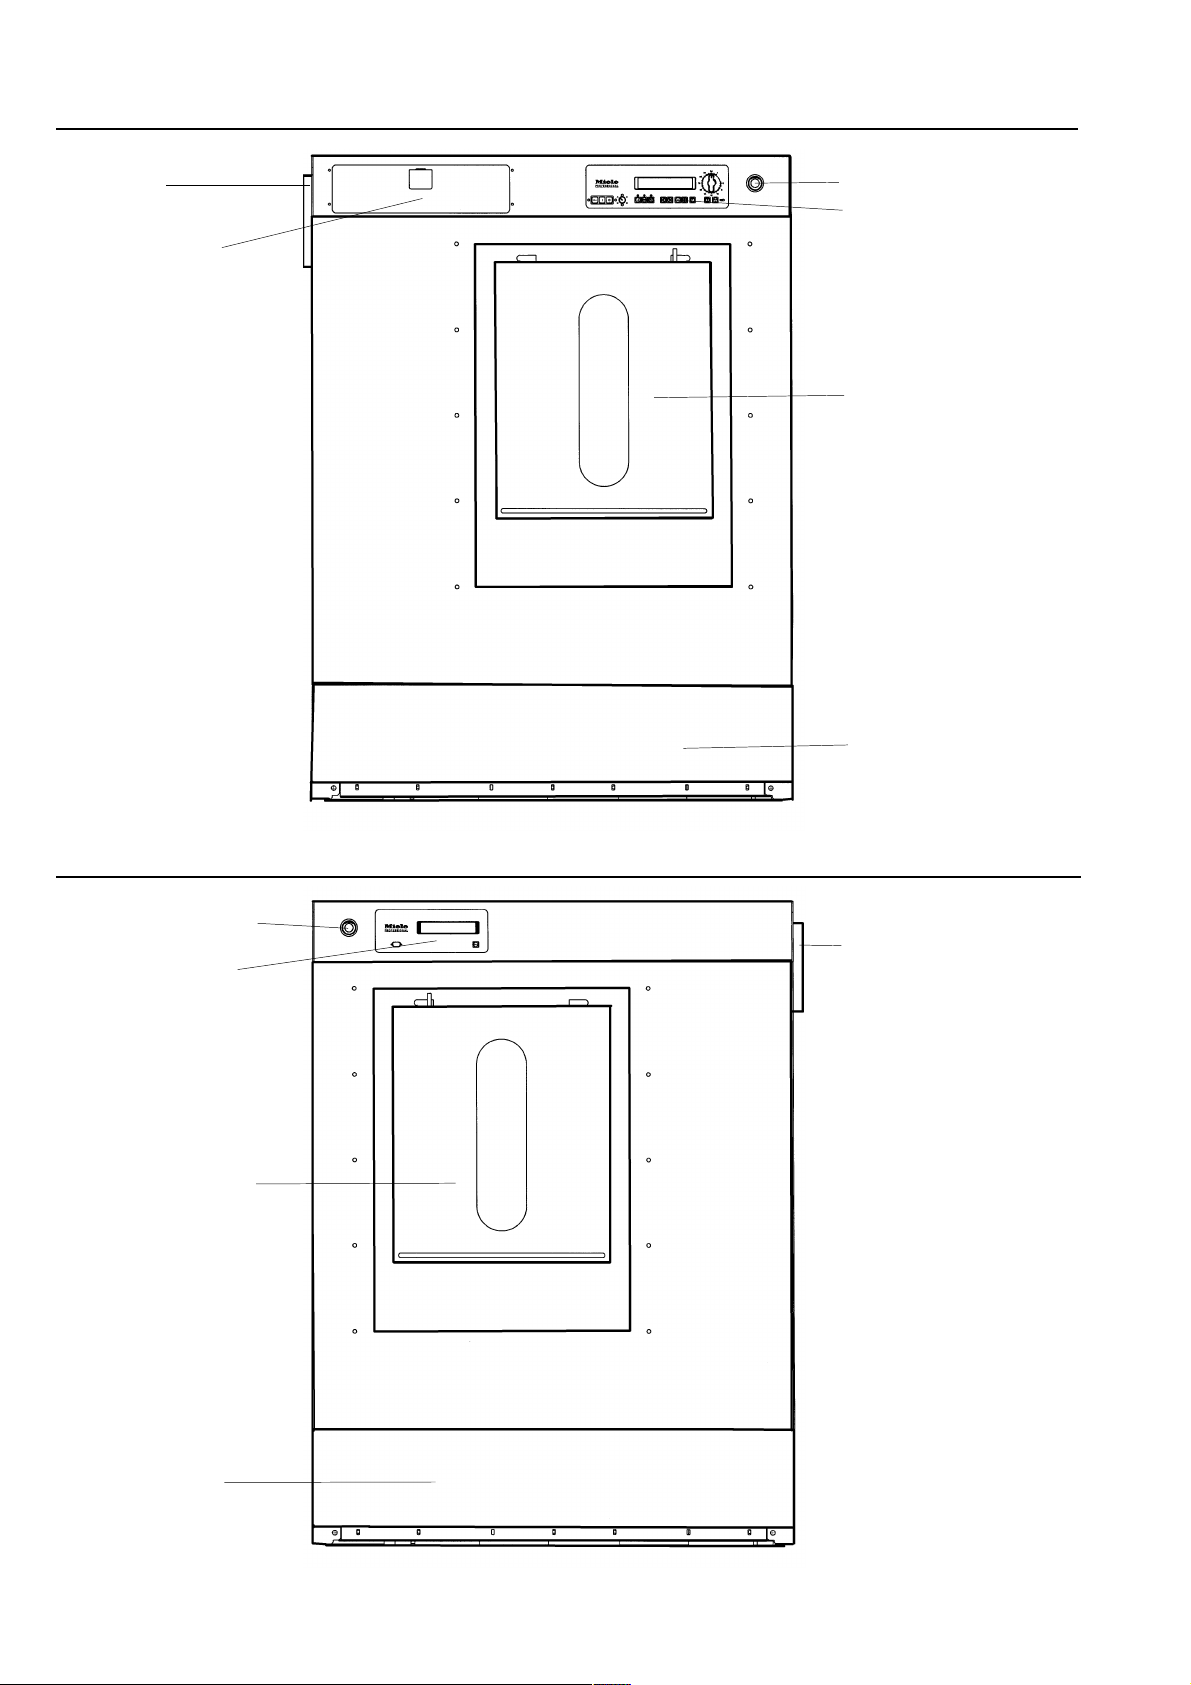
Guide to the machine
Overflow Emergency stop switch
Control panel
Detergent
dispenser drawer
Door "Unclean side"
Service panel
WS 5243/5323 "Unclean side"
Emergency stop
switch Overflow
Control panel
Door "Clean side"
Service panel
WS 5243/5323 "Clean side"
8 M.-Nr. 05 730 941
Page 9
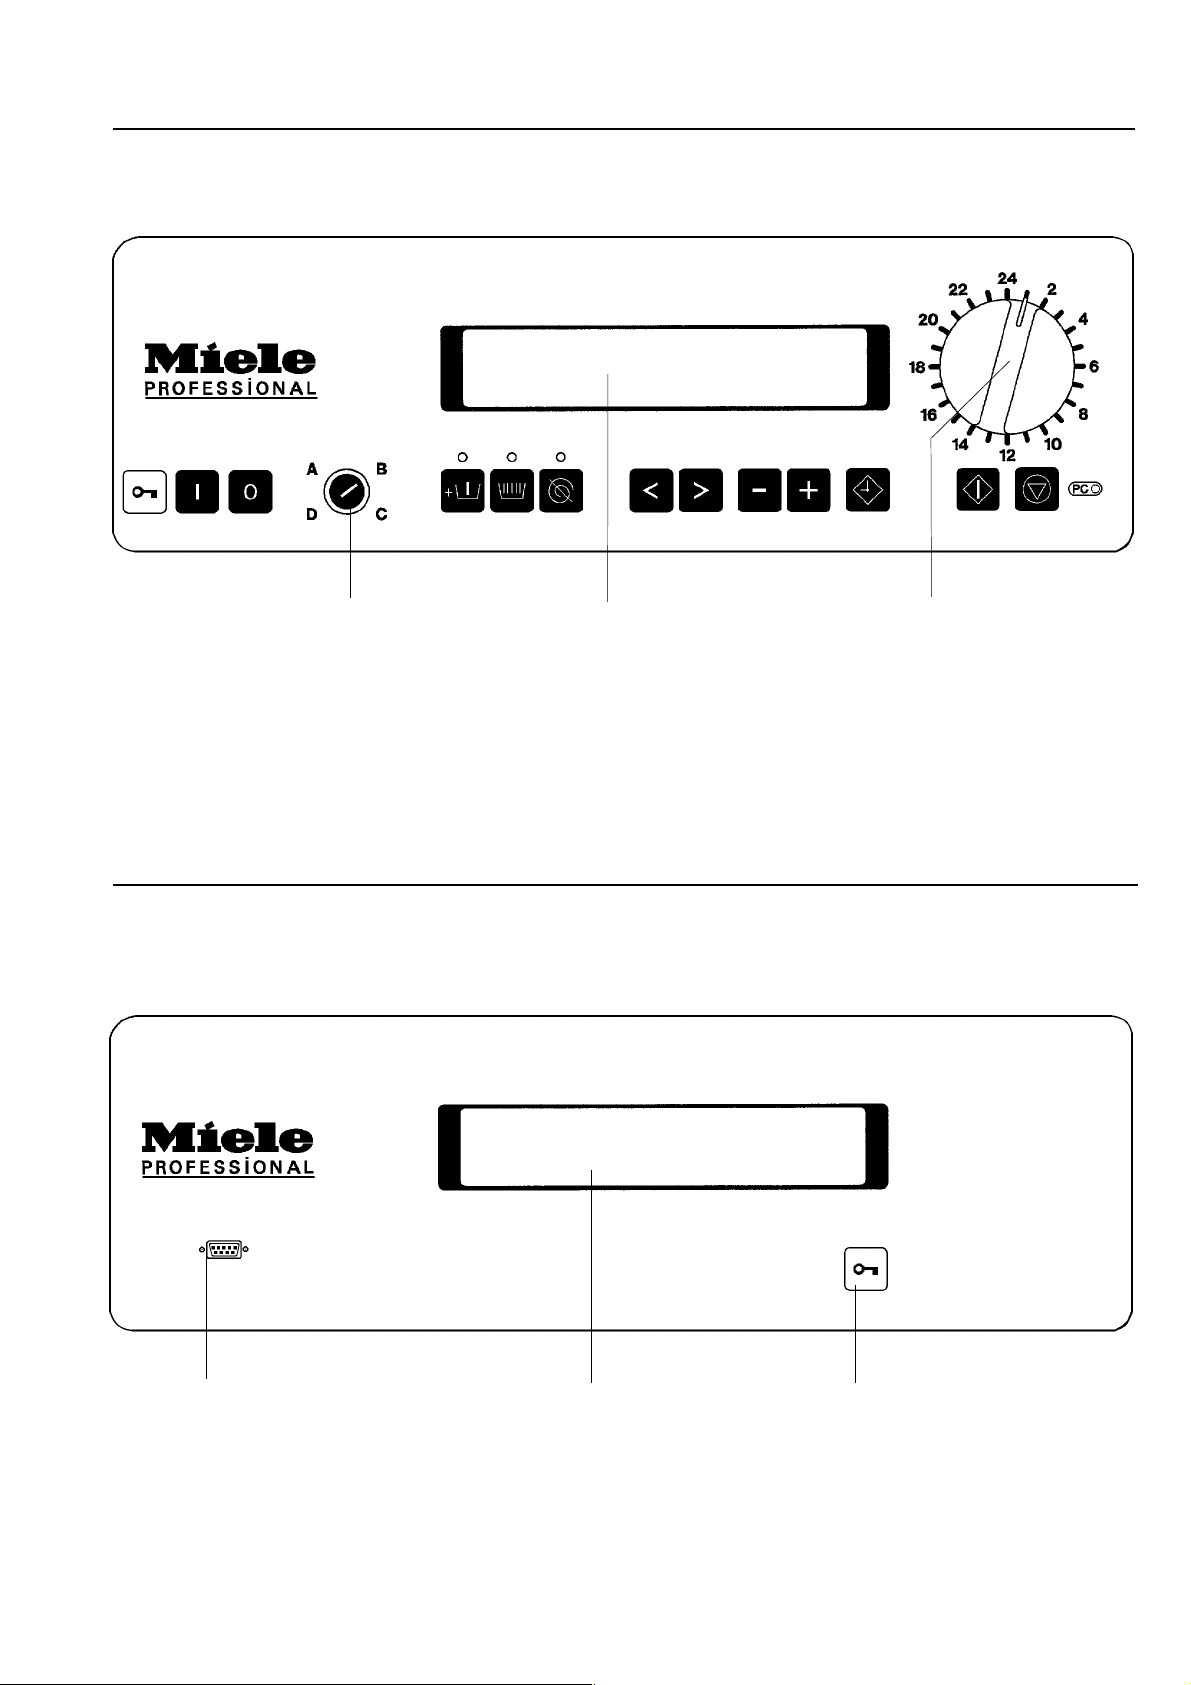
Guide to the machine
Control panel "Clean side" (loading side)
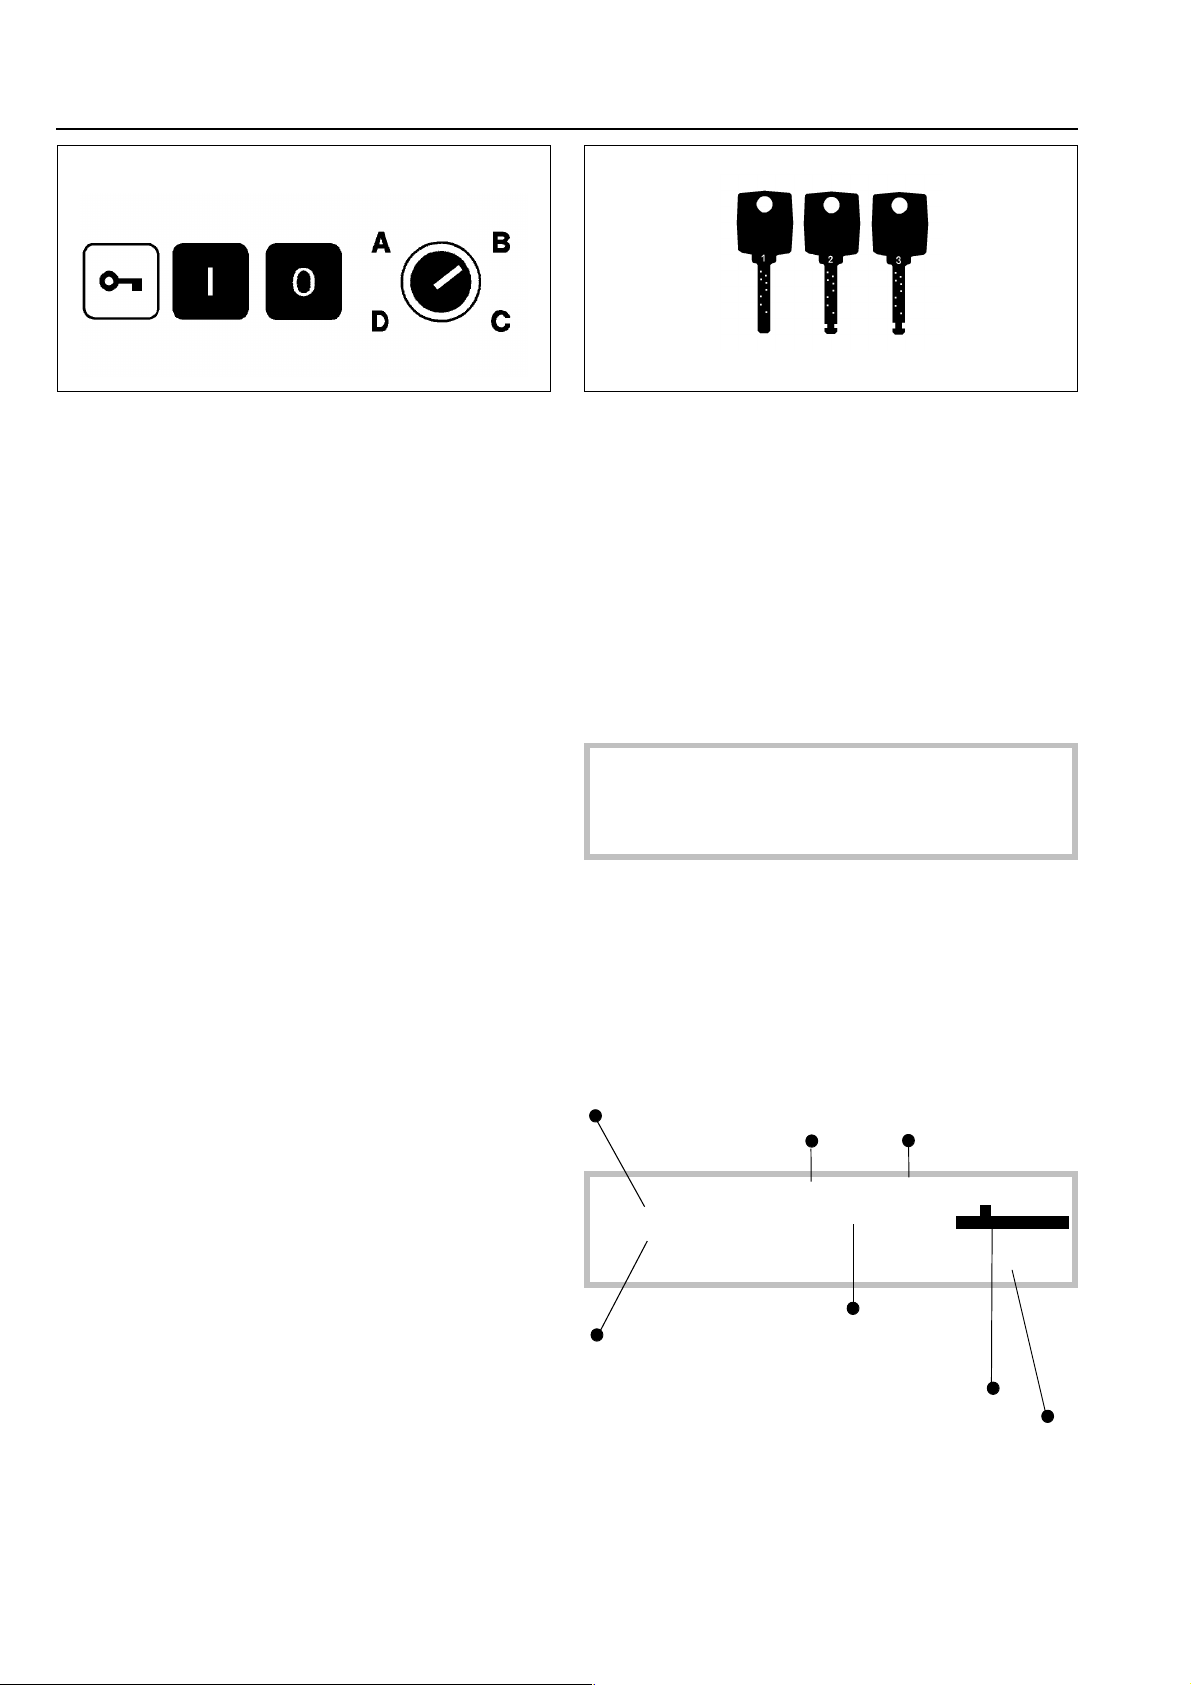
Key switch Display Programme selector
Mains on Y switch Block plus T button Cursor 1 2 buttons Start X button
Mains off Z switch Starch hold U button Plus 4 Minus 3 buttons End 7 button
Door 5 button Without spin V button Delay start W button 9 Optical
interface
Control panel "Clean side" (Side for unloading disinfected laundry)
Printer socket Display Door 5 button
A printer can be connected to the machine
for printing out programme reports.
M.-Nr. 05 730 941 9
Page 10
Guide to the machine
1 2 3
Mains on Y switch
Mains off Z switch
Door 5 button
Key switch
Position A – Free access
At this operating level only those programmes can be started which have
been allocated free access.
See Programming Instructions for
allocation of free access.
Position B - Operation
All programmes can be started at this
operating level. The display field will
show the programme which corresponds
to the setting to which the programme selector has been turned.
Keys for the key switch
Key 1 (2 supplied) for operating levels A
and B.
Key 2 for operating levels
A, B, C.
Key 3 for operating levels
A, B, C, D.
PROGRAMME 1 TH-Disinfection
>95°C< Main wash 1
Rinses 3 1000 RPM
Display
The Display content shows after the machine is switched on. It shows which programme has been selected in 4 lines
each 40 digits long.
à
Position C - Programming
In this position programming, copying,
deleting, altering, printing out, giving or
barring free access and creating new programme sequences can be carried out.
See Programming Instructions.
Position D - Unlocking
At this operating level barred programmes can be unlocked. Locked Programmes (e.g. Disinfection programmes)
can not be cancelled once they have
started.
If the key switch is turned to position D in
such a programme, the programme running is unlocked and can be cancelled.
See Programming Instructions.
After Programme start:
Required temp. and name of current prog. block
Programme number Programme name
PROGRAMME 1 TH-Disinfection
60°C Pre-wash 25°C
95°C Main wash
Actual temp.
Required temp. and name of
following prog. block
Time line for current prog. block
Points to a further display line
à
10 M.-Nr. 05 730 941
Page 11
Guide to the machine
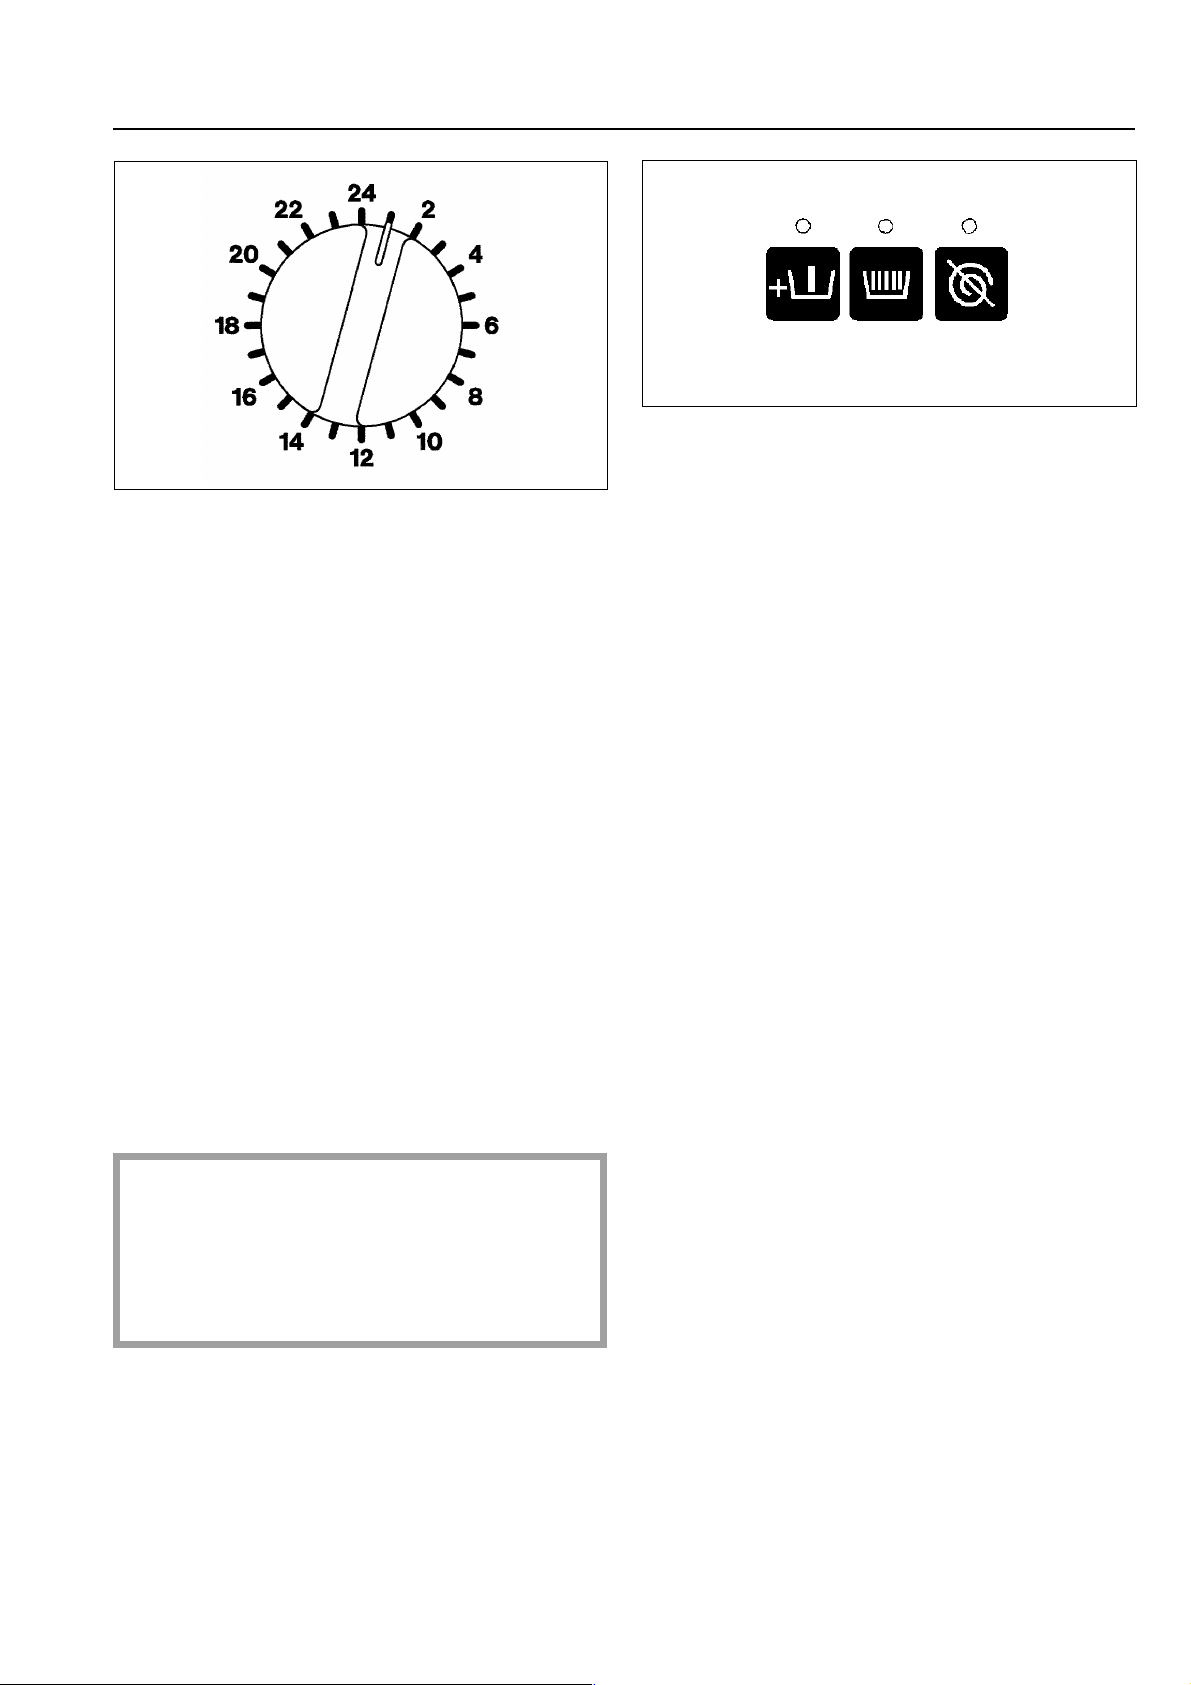
Programme selector switch
Programme numbers 1 - 24 can be selected directly. Programme numbers 25 99 can be selected using selector position 24 together with the "Plus 4 " button. The name of the selected programme and its corresponding number
appear in the display. See the Programme Survey for allocation of programme positions. Disinfection programmes are locked and cannot be
interrupted, stopped or cancelled after a
programme has been started. The programme finishes on the "Clean side".
If the programme selector switch is
turned to another position after the start
of the programme, the first line of the display flashes. The programme does not
however change.
Block+ T button with indicator light
When the button is pressed the light
above it comes on. The corresponding
programme block (e.g. Pre-wash) is
added to the programme. Pressing on
the button a second time de-selects the
function.
Starch hold U button with indicator light
Press this button if the washing is to be
starched. The light comes on.
Without spin V button with indicator light
Press this button if a final spin is not required after the final rinse. The light
comes on.
Disinfection programmes are locked 1
minute after a programme has started.
They cannot then be interrupted,
stopped or shortened.
The programme finishes on the "Clean
side".
M.-Nr. 05 730 941 11
Page 12
Guide to the machine
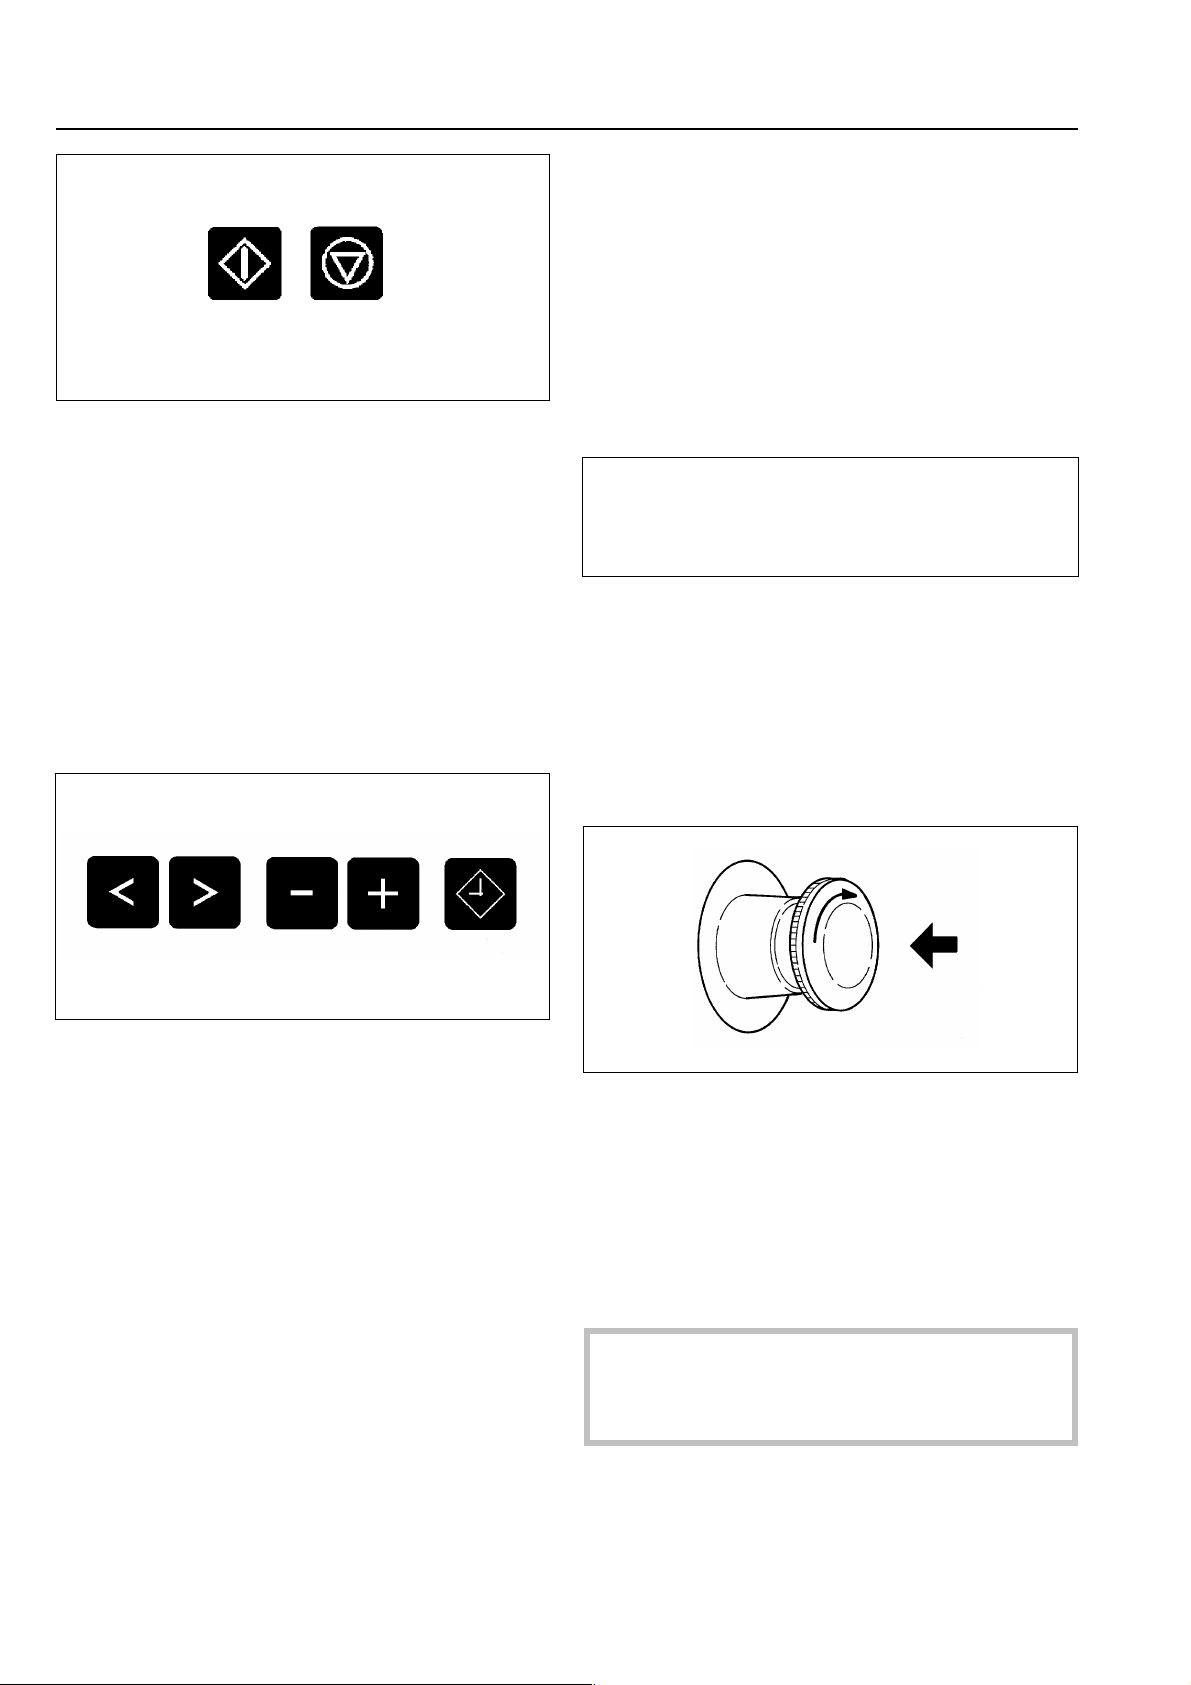
Start X button
Press to start the selected programme.
End 7 button
Pressing on this button halts a programme (Stop mode). Pressing once
again on the button immediately terminates a programme. A halted programme can be continued in the relevant
programme stage by pressing Start X
button.
Delay start W button
If this button is pressed before the start
of a programme, the display indicates
that a start time should be selected. If
the button is pressed again the Delay
start option is cancelled.
If this button is pressed after the start of
a programme the current time of day and
date are shown.
9
9 Optical interface
Data transfer to and from the machine’s
controls and a PC can take place using
the relevant software. Connection is
made via the optical interface on the control panel.
Cursor 1 2 buttons
The cursor buttons 1 2 are used to
scroll forwards or backwards into the
input fields or onto the next display (this
appears as > < flashing in the display).
After the start of the programme it is
possible in Stop mode to scroll block by
block backwards or forward in the programme. Pressing continuously on the
button scrolls quickly through the options.
4 Plus 3 Minus buttons
Once an input field has been selected it
is possible to make a modification. Pressing continuously on the button runs
quickly through the options.
Emergence Stop Switch
Only to be used in an emergency.
After removing the cause of danger this
switch can be re-set by turning the
ribbed disc in a clockwise direction.
After re-setting the following appears in the
display:
PROGRAMME 1 TH-Disinfection
PROGRAMME STOP
THROUGH POWER CUT
Please press the Start button.
The drum turns to the "Unclean side".
Press the Start X button again to continue
the interrupted programme.
12 M.-Nr. 05 730 941
Page 13

Operation
Setting the local language*
(if necessary)
To set the local language the programming
mode must be accessed by pressing simultaneously on the "Mains on” switch and the
“Start” button. Normally German and one
other language are available.
Switch on the on-site mains switch.
Turn the key switch to position B (Operation).
Switch the machine on by pressing the
Mains off Z switch.
Press the Start X button and the Mains
on Y switch at the same time and keep
pressed in until the following appears in
the display:
SETTING LOCAL LANGUAGE
>DEUTSCH< ENGLISH
After selection press Start button.
Select the required language with the Cursor 1 2 buttons.
- The display will immediately convert into
the language selected.
Setting current time and date *
Switch the machine off with the Mains off
Z switch.
Turn the key switch to position B.
Press the Delay start W button and the
Mains on Y button at the same time and
keep pressed in until the following appears in the display:
SETTING TIME AND DATE
Time of day >14< : 30 hrs
Date 23. 09. 1998
After selection press Start button.
Use the Cursor 2 button to position the
cursor on the input field for hours and set
the hours with the Plus 4 or Minus 3
buttons.
Use the Cursor 2 button to position the
cursor on the input field for minutes and
set the minutes with the Plus 4 or Minus
3 buttons.
Position the Cursor on Date and use the
4 Plus 3 Minus buttons to set the date.
Confirm your selection by pressing the
Start X button.
- The complete display contents (not
visible) are converted into the language selected.
Position the Cursor on the month and set
the month.
Position the Cursor on the year and set
the year.
Confirm your selection by pressing the
Start X button.
If the “Delay start” button is pressed during a running programme the current time
of day and date are shown.
* Pauses between programming steps must not last
longer than 25 seconds, otherwise the display returns
to the basic stage, (such as On) and the changes are
not stored in memory.
M.-Nr. 05 730 941 13
Page 14

Operation
The washer-extractor must be commissioned by an approved Customer Service
technician or authorised Service Dealer.
COMMISSIONING
Open the on-site water stopcocks, (and
the supply valves for steam, if relevant for
the version of the machine).
Switch on the electricity supply at the
mains (on site).
Turn the key switch to position B (Operation).
The functions described below refer only to
Operating level B.
Press the Mains on Y switch.
Unlock the door on the "Unclean side" by
pressing the Door 5 button.
Open the drum:
Press down on the safety lock and at the
same time push down on both sides of the
drum opening to release the locking mechanism.
Carefully allow the two sides to open and secure the top half of the drum in the retainer.
Lift the door up.
Gas pressure stays raise the door upwards.
Empty all pockets
Foreign objects, (eg nails, coins, paper
clips etc) can cause damage to textiles
and components in the machine.
Load the laundry.
Do not exceed maximum permitted loads.
See next page for details.
Close the drum:
Release the top half of the drum from its
holder.
14 M.-Nr. 05 730 941
Page 15

Operation
If any fluff has built up around the drum door it
must be removed.
The locking mechanism must also be
checked on a regular basis to ensure that it is
working correctly.
First bring down the half with the safety
lock and then bring down the other half
making sure the locking mechanism visibly engages and is secure.
When closing the drum make sure laundry
does not get trapped between the two sections.
Pull the machine door downwards and
with both hands use even pressure to lock
the door. Do not slam the door down to
shut it.
Do not pull the door towards you when
closing it as this can prevent it from engaging in the locking mechanism and prevent
the door from closing. If this does happen
you will need to contact the Customer Service Dept.
If having closed the door you want to open it
again, e.g. to add another item of laundry,
you can do so within 20 seconds of closing it
as it takes this long before the lock is activated.
To ensure that the drum door is correctly
closed. the arrow on the safety lock must
be completely visible.
If these procedures are not followed there
is a danger of the drum door opening and
causing considerable damage.
M.-Nr. 05 730 941 15
Adding detergent.
See next section.
Page 16

Operation
Load weight (dry laundry)
WS 5243 WS 5323
max. 24 kg max. 32 kg
Load weights for individual programmes
are quoted in the Programme Survey.
Adding detergent
Add detergent for the:
1 3 4 5 2
- Main wash to compartment 2
- Pre-wash to compartment 1
- Fabric conditioner to compartment 3
- Liquid bleach to compartment 4
- Liquid detergent to compartment 5
Liquid detergent must not be filled higher
than the level marker, as otherwise it will get
through the siphon and into the detergent dispenser drawer before it is needed.
Detergent dispensing
Avoid dispensing more than the required
amount as this can cause excessive foaming.
Only use low lather detergents.
Dispense according to the detergent manufacturer’s recommendations.
The amount to dispense will depend on:
– the amount of laundry
– the water hardness level in your area
– the type and amount of soiling
Bleaching agents
Only use bleaching agents on textiles which
have the symbol y on the wash care label.
Liquid bleaching agents must only be dispensed through designated dispenser compartment (4). The agent will then be
dispensed automatically during the 2nd rinse
(cold bleaching). Liquid bleaching agents
should only be used on coloured textiles
which have a wash care label stating that
they are colour fast and suitable for bleaching.
For cold bleaching the 4th rinse must be
programmed into the machine (see the
Profitronic programming manual for further
details on how to do this).
Water hardness levels
Hardness
range
I soft 0 – 1.3 0 - 7
II medium 1.3 – 2.5 7 - 14
III hard 2.5 – 3.8 14 - 21
IV very hard over 3.8 over 21
If you do not know the hardness level of the
water in your area you should contact your
local water authority for information.
Water
quality
Harness
level in
mmol/l
German
hardness
level °d
16 M.-Nr. 05 730 941
Page 17

Selecting a disinfection programme
Disinfection programmes are locked. The
wash temperature cannot be changed.
Disinfection programmes are locked 1 minute
after a programme has started. They cannot
then be interrupted, stopped or shortened.
The door on the “Clean side” cannot be opened until a programme has finished and disinfection has been sucessfully achieved.
Turn the programme selector switch to the
required programme.
The display will then show for example the following:
PROGRAMME 1 TH-Disinfection
95°C Main wash 1
Rinses 3 800 RPM
With Pre-wash
To select the “With Pre-wash” programme
block press the Block + T button. The indi-
cator light above the button will light up.
When pressing the Block + T button the following will show in the display:
PROGRAMME 1 TH-Disinfection
>60°C<Pre-wash 1
95°C Main wash 1
Rinses 3 800 RPM
The programme sequence is shown in the display after the start of the programme.
PROGRAMME 1 TH-Disinfection
60°C Pre-wash 20°C
95°C Main wash
à
The 2nd display line shows the actual suds
temperature, in this instance of the Pre-wash,
with the time line extending to the right. The
following programme block, in this instance
the Main wash, is shown underneath it.
PROGRAMME 1 TH-Disinfection
95°C Main wash 20°C
Rinse 1
à
When the Pre-wash programme block has finished, the Main wash programme block appears in the 2nd line of the display, with the
actual suds temperature, and the time line extending off to the right. The next programme
block, here Rinse 1, is shown underneath it.
If an arrow appears in the last line at the right
hand side ( à ), this indicates that there is another display line to follow.
Pressing the cursor 2 button brings up
further information relating to the PROGRAMME in the lower lines.
Programme end display
After water from the last heating phase has
To change the spin speed
drained away or after the last “Cool Down”
the programme end time is shown in hours
The following programme change can be
and minutes.
made before a programme is started:
The spin speed can be changed in 100 rpm
stages from 0 to 300 to a max. of 950 rpm. on
the WS 5243 and to 800 rpm. on the WS
5323.
Programme end 11 : 25 hrs
PROGRAMME 1 TH-Disinfection
Rinse 1
Rinse 2
à
Press the Start X button
– the programme begins.
M.-Nr. 05 730 941 17
Page 18

Unloading the machine
Open the door on the “Clean side” (unloading side) at the end of a programme
At the end of the Programme, with a stationary drum and no more water in the machine
the following display is shown (for example):
PROGRAMME 1 TH-Disinfection
PROGRAMME END
DOOR IS UNLOCKED
To open the door of the "Clean side" press
the Door 5 button and lift the door up.
If a disinfecting programme has been interrupted or if there has been a fault during
the programme it will have to be repeated
in order to ensure that the disinfection parameters have been successfully achieved.
Unlock the drum door and release both
sides of the door upwards. Secure the top
half in its retainer.
Remove all the laundry.
If this was the last wash load of the day, or for
a longer period:
Close the drum.
To ensure that the drum door is correctly
closed the arrow on the safety lock must
be completely visible.
Pull the machine door downwards and
with both hands use even pressure to lock
the door. Do not slam the door down to
shut it.
Do not pull the door towards you when
closing it as this can prevent it from engaging in the locking mechanism and prevent
the door from closing. If this does happen
you will need to contact the Customer Service Dept.
The doors on the "Clean side" (Unloading
side) must be properly closed again after
removing laundry from the machine.
After closing the door the drum opening automatically turns to the “Unclean side”.
Open the door on the "Unclean side".
Press the Mains off Z switch to switch off
the machine.
Switch off the electricity mains supply (at
the wall switch).
Turn off the stopcocks and valves on site
for water, and for steam if applicable.
18 M.-Nr. 05 730 941
Page 19

Selecting an “unlocked” programme
Turn the key switch to position B "Operation".
Press the Mains on Y switch.
Turn the programme selector switch to the
required programme.
The display will then show for example:
PROGRAMME 25 COTTONS
>95°C<Main wash 1
Rinses 3 800 RPM
With Pre-wash
To select the “With Pre-wash” programme
block press the Block + T button. The indi-
cator light above the button will light up.
When pressing the Block + T button the following will show in the display:
PROGRAMME 25 COTTONS
>60°C<Pre-wash 1
95°C Main wash 1
Rinses 3 800 RPM
To change the temperature and the spin speed
The following programme changes can be
made before a programme is started:
Position the cursor on the input field for
the spin speed and set the required spin
speed with the Plus 4 or Minus 3 buttons.
Press Start X in to start the programme.
Once the programme has started the programme sequence will show in the display.
PROGRAMME 25 COTTONS
60°C Pre-wash 20°C
95°C Main wash
à
The 2nd display line shows the actual suds
temperature, in this instance of the Pre-wash,
with the time line extending to the right. The
following programme block, in this instance
the Main wash, is shown underneath it.
PROGRAMME 25 COTTONS
95°C Main wash 20°C
Rinse 1
à
When the Pre-wash programme block has finished, the Main wash programme block appears in the 2nd line of the display, with the
actual suds temperature , and the time line extending off to the right. The next programme
block, here Rinse 1, is shown underneath it.
The temperature in 1 °C stages from cold,
15 to max. 95 °C.
The spin speed can be changed in 100 rpm
stages from 0 to 300 to a max. of 950 rpm on
the WS 5243 and to 800 rpm on the WS 5323.
PROGRAMME 25 COTTONS
>60°C<Pre-wash 1
95°C Main wash 1
Rinses 3 800 RPM
Use the Cursor 2 button to position the
cursor on the input field for the pre-wash
temperature and set the required temperature (60 °C in this example with the Plus
4 or Minus 3 buttons.
Use the Cursor 2 button to position the
cursor on the input field for the main wash
temperature and set the required temperature with the Plus 4 or Minus 3 buttons.
If an arrow appears in the last line at the right
hand side ( à ), this indicates that there is another display line to follow. Pressing the cursor 2 button brings up further information
relating to the PROGRAMME in the lower
lines.
Programme end display
After water from the last heating phase has
drained away or after the last “Cool Down”
the programme end time is shown in hours
and minutes.
PROGRAMME 25 COTTONS
Rinse 1
Rinse 2
Programme end 11 : 25 hrs
à
M.-Nr. 05 730 941 19
Page 20

Selecting an “unlocked” programme
Open the door on the “Unclean side” (loading side) at the end of a programme
At the end of the Programme the door on the
“Unclean side” can be released. If there is no
more water in the machine and the drum is
stationary the following display is shown (for
example):
PROGRAMME 25 COTTONS
PROGRAMME END
DOOR IS UNLOCKED
To open the door of the "Unclean side"
press the Door 5 button and lift the door
up.
Unlock the drum door and release both
sides of the door upwards. Secure the top
half in its retainer.
Remove all the laundry.
If this was the last wash load of the day, or for
a longer period:
Leave the drum door open.
Switch off the machine by pressing the
Mains off Z switch.
Switch off the electricity mains supply (at
the wall switch).
Turn off the stopcocks and valves on site
for water or steam.
If the programme is interrupted (e.g.) when
there is water in the machine, or during the
spin, the following display messages might
appear:
PROGRAMME 25 COTTONS
PROGRAMME END
DOOR IS LOCKED
THERE IS WATER IN THE MACHINE
or:
PROGRAMME 25 COTTONS
PROGRAMME END
DOOR IS LOCKED
DRUM IS NOT YET STATIONARY
Select SEPARATE DRAIN or SEPARATE SPIN
and start the programme. At the end of the
programme open the door.
20 M.-Nr. 05 730 941
Page 21

Additional functions
With Pre-wash
A pre-wash can be selected for heavily soiled
laundry.
The pre-wash programme block can be selected before starting a programme by pressing the Block + T button. The indicator light
above the button lights up.
Starching
Starching can be selected before starting a
programme by pressing the Starch hold U
button. The indicator light above the button
lights up.
PROGRAMME 25 COTTONS
Rinse 3
STARCH HOLD
Press the starch and starch hold button.
When the starch stage is reached in the programme, the words "Starch hold" will start
flashing in the display.
Without spin
Without spin can be selected before starting a
programme by pressing the Without spin V
button. The indicator light above the button
lights up.
PROGRAMME 25 COTTONS
Rinse 3
WITHOUT SPIN
Press the without spin or end button.
When the spin stage is reached in the programme, the words "Without spin" will start
flashing in the display. (If you want to continue the programme with a spin, press the
Without spin V button again). To finish the
programme without a spin, simply press the
End 7 button, and the programme will finish
with water still in the machine.
To open the door, select the SEPARATE
DRAIN programme and press the Start X button.
The programme is continued by pressing the
Starch hold U button (the indicator light goes
out) and the Start X button. Make up the
starch solution following the manufacturer’s instructions on the packaging, then add it to the
inflowing water via the correct dispensing
compartment. The wash time is automatically
increased by 4 minutes.
Adding the starch directly into the drum
When the starch programme stage is
reached, "Starch hold" flashes in the display.
Open the drum door on the unclean side, and
add the starch solution prepared according to
the manufacturer’s instructions. Shut the
drum door. The message "Power cut programme stop" will then appear in the display.
Press the Start X button.
The following message will appear in the display again:
PROGRAMME 25 COTTONS
Rinse 3
STARCH HOLD
Press the starch and starch hold button.
Skipping programme stages
The order of the programme in progress can
be skipped or programme blocks can be repeated.
Press the End 7 button, and the programme
will stop.
PROGRAMME 25 COTTONS
Main wash
PROGRAMME STOP
Programme stop flashes in the display.
Use the 2 cursor to skip the programme
block by block to the end.
Use the 1 cursor to skip the programme
block by block back to the beginning.
At the position required, press the Start X button to continue the programme.
Press the Starch hold U button (the indicator
light goes out); the programme continues.
M.-Nr. 05 730 941 21
Page 22

Additional functions
Interrupting a programme
To stop a programme, press the End 7 but-
ton.
To continue the programme again, press the
Start X button.
Cancelling a programme
To cancel a programme press the End 7 button twice in succession.
If the programme has been cancelled with
water in the drum or during a spin, for
example, the following message will appear in
the display:
PROGRAMME 25 COTTONS
PROGRAMME END
DOOR IS LOCKED
WATER IS IN THE MACHINE
or:
PROGRAMME 25 COTTONS
PROGRAMME END
DOOR IS LOCKED
DRUM IS NOT YET STATIONARY
To open the door, select SEPARATE DRAIN
or SEPARATE SPIN and press the Start X
button. On completion, the door can be opened.
The following (example) will appear in the display:
PROGRAMME 1 TH-Disinfection
Start time >14< : 30 hrs
After the time has been set
press the Start button.
The current time of day is always displayed
first.
The cursor points to the input field for the
"hour".
Select the Start hour using the Plus and
Minus 4 3 buttons.
Position the cursor on the input field for
the minutes, and select the minutes using
the Plus and Minus 4 3 buttons.
Press the Start X button. Delay start is
confirmed, and the following (example)
shows in the display:
PROGRAMME 1 TH-Disinfection
>95°< Main wash 1
Start time 18 : 30 hrs
When the start time is reached, the programme starts and the programme sequence
shows in the display.
Delay start
A later start time for the programme can be
selected using the Delay start button.
To set the start time
Switch on the machine, and select the required programme with the programme selector.
The following (example) will appear in the display:
PROGRAMME 1 TH-Disinfection
>95°< Main wash 1
Rinses 3 800 rpm
Press the Delay start W button.
If the Delay start W button is pressed during
the programme, the actual time of day and
date are shown.
To cancel Delay start:
Before pressing the Start button:
Press the Delay start W button.
After pressing the Start button:
Press the End 7 button.
22 M.-Nr. 05 730 941
Page 23

Notes
Locked programmes (Disinfecting programmes)
If a disinfection programme is interrupted
or if there is a fault during the disinfecting
phase (wash time 2), the whole programme must be repeated to ensure that
disinfection is achieved.
Turn the key switch to position D "Unlocking".
At this operating level barred programmes
can be unlocked.
Press the End 7 button.
Turn the key switch to position B "Operation".
The programme can now be repeated.
Locating the drum door to the "Clean side"
The DOOR LOCATING programme rotates
the drum opening to the “Clean side”. Unfinished laundry can be transported from the
“Clean side” to the “Unclean side”.
The DOOR LOCATING programme can also
be used to transport laundry in the drum to
the “Clean side”. It is the user’s responsibility
to ensure that the laundry is hygienically
clean before it is removed from the machine.
Rinsing with hot water
Rinsing with hot water is a benefit for machines connected to a hot water supply.
Standard programmes
1 Cottons 95°C and
2 Cottons 60°C
are programmed to rinse with hot water.
If a hot water supply is available it is an advantage to run the final rinse with hot water.
This reduces the residual moisture content of
the laundry after spinning and the laundry retains heat.
If the laundry is then tumble dried or ironed
straight after the wash programme savings
will be made in the time it takes to process it
and in the amount of energy required.
Connecting a printer
Printer - operation:
A report of a whole programme or a section of
a programme can be printed. See the programming instructions supplied with the
machine.
To print a wash report the machine will have
to be reprogrammed by a Miele Service technician.
To operate a printer with a parallel interface
an interface adapter is needed between the
serial interface and the parallel interface.
M.-Nr. 05 730 941 23
Page 24

Liquid dispensing
Dispenser pump Suction pipe
1 3 2
4 5
Amount to be dispensed
Follow the detergent manufacturer’s guidelines.
Always follow the instructions of the chemical
manufacturer when using cleaning agents
and special application chemicals. Only use
such chemicals for the purpose and in the
situation specified by the manufacturer in
order to avoid the danger of adverse
chemical reactions and material damage.
If in doubt check the suitability of the product for use in this machine with the manufacturer before using it.
Correct dosage also depends on the viscosity
of the liquid detergent. It should be allowed
to adapt to the normal room temperature before being used.
1 = Hose connection socket (suction side)
2 = Hose connection socket (pressure side)
3 = Leakage outlet (in case of damaged hose)
4 = Suction inlet opening
5 = Level checker for empty indicator
When a dispenser container is empty the
pump and the machine switch themselves off automatically.
PROGRAMME -- - - - - - - - -
PROGRAMME STOP
DISPENSING SYSTEM FAULT
Dispensing container 1 empty.
At the same time the machine indicates
a lack of liquid detergent.
Cleaning and care the dispensing system
Rinse the dispensing system through with hot
water every 2 weeks, or before shutting the
dispenser pumps down for any length of time,
to avoid the system getting clogged up.
Rinse out the suction pipes as well with
water.
Put the suction pipes in a container with
warm water, (40 - 50 °C) .
In the Service programme switch in each
pump, until the dispensing system is
rinsed through.
Check the connection points, hoses and
washers for leaks.
The programme will continue automatically once the container has been refilled.
24 M.-Nr. 05 730 941
Page 25

Liquid dispensing
Commissioning the dispensing pumps
Before the liquid dispensing pumps can be
used the liquid detergent must be drawn into
the system and the amount to be dispensed
set. The Service Programme is used for this.
Drawing in the liquid detergent
Feed the suction pipes into the liquid detergent containers.
Service operation:
Switch off the machine.
In operating mode B, turn the programme
selector switch to 24.
Switch on the machine, and within 4 seconds, press the Block + T button 4 times
in quick succession. This brings you into
Service operation.
The cursor will be on the Service programme.
SERVICE - OPERATION
>SERVICE PROGRAMMES< MACHINE DATA
After selection press Start button.
Press the Start X button.
à
SERVICE - OPERATION SERVICE PROGS
SERVICE PROGRAMME 2
Dispenser valve >D1< Disp. time 20 Secs.
Cancel with the End button.
Cancel with the End 7 button.
Repeat the whole process with D2 and D3.
SERVICE - OPERATION
>SERVICE PROGRAMMES< MACHINE DATA
After selection press Start button.
Press the Start X button, select SERVICE
PROGRAMME 2 and press the Start X
button.
To exit from Service operation:
Cancel with the End 7 button and switch
off the machine.
Switch the machine on and select Programme 8 SEPARATE RINSE and SPIN
to flush the liquid agent out of the machine.
To correct the amount dispensed by the
pumps
(should the dispensing times set not be long
enough)
à
SERVICE - OPERATION SERVICE PROGS
SERVICE PROGRAMME >1<
After selection press Start button.
Press the Plus 4 button to select SERVICE PROGRAMME 2 and press the Start
X button.
SERVICE - OPERATION SERVICE PROGS
SERVICE PROGRAMME 2
Dispenser valve >D1< Disp. time 0 Secs.
After selection press Start button.
Use the Plus 4 to select D1, use the 2
cursor button to move to the input field for
dispensing time and use the Plus 4 button to enter a dispensing time of approx.
20 secs. Press the Start X button and the
hoses for pump 1 will be filled.
à
The amount to be dispensed is measured out
in litres in the Service programme. The procedure is similar to the one for drawing up the
liquid detergent. The dispensing time decided
on is then set in the Operating mode C Programming in the step programming.
The maximum pump throughput is approx.
168 ml/min. for all pumps.
These figures are only intended as a guide
and will vary according to the medium.
Feed the suction pipe into a deep measuring container with sufficient liquid detergent and keep it at the full level.
Continue as for Drawing in liquid deter-
gent.
M.-Nr. 05 730 941 25
Page 26

Problem solving guide
Power cut during a wash programme
With a short power cut:
The programme remains in the last position,
and when power is restored the following
message appears in the Display:
PROGRAMME 25 COTTONS
PROGRAMME STOP
THROUGH POWER CUT
Please press the Start button.
The drum rotates to the "Unclean side".
Press the button Start X button to continue
the programme.
If a disinfection programme is interrupted
or if there has been a fault during the disinfecting phase (wash time 2), the whole programme will have to be repeated to ensure
that disinfection is achieved.
With an extended power cut:
Switch off the machine.
Switch off the electricity supply at the
mains switch (isolator).
Turn off the stopcocks and valves on site
for water or steam.
Emergency door release:
To remove the laundry the drain valve will
need to be opened manually and the drum
door unlocked manually on the “Unclean
side” and the drum turned to the correct position.
Contact the customer Service Department
for instructions on how to do this.
Cancel the disinfecting programme and repeat it
Turn the key switch to position D "Unlocking".
At this operating level barred programmes
can be unlocked.
Press the End 7 button.
Turn the key switch to position B "Oper-
ation".
Add detergent
Press the Start X button
– the programme is repeated.
After removing the laundry ensure that all
removable parts of the machine casing are
refitted correctly in position.
26 M.-Nr. 05 730 941
Page 27

Problem solving guide
Fault messages
Repairs to machines operating with electricity or steam should only be undertaken
by a suitably qualified service engineer to
ensure safety. Unauthorised repairs could
be dangerous.
If a programme has been interrupted or if
there has been a fault during the disinfecting phase (wash time 2) the whole programme will have to be repeated to ensure
that disinfection has been achieved.
Faults that occur before or after the start of a
programme are displayed flashing in the display.
PROGRAMME 25 COTTONS
PROGRAMME STOP
HEATING SYSTEM FAULT
Short circuit on heater sensor 1.
Call the Service Department.
PROGRAMME 25 COTTONS
PROGRAMME STOP
HEATING SYSTEM FAULT
Cut-out of heating sensor 1.
Call the Service Department.
PROGRAMME 25 COTTONS
PROGRAMME STOP
HEATING SYSTEM FAULT
Call the Service Department.
PROGRAMME 25 COTTONS
PROGRAMME STOP
THROUGH POWER CUT
Press the Start button.
When power is restored press the Start X
button. This fault message can also indicate
that the winding protection of the drive motor
has overheated. - Allow the motor to cool
down.
PROGRAMME 25 COTTONS
PROGRAMME STOP
WATER INLET FAULT
Open water stopcock and press "Start button".
Open water stopcock and press the Start X
button.
PROGRAMME 25 COTTONS
PROGRAMME STOP
DRAIN FAULT
Clean drain system and press Start button.
Check the drainage system on site and press
the Start X button. A defective drain valve
should only be repaired by the service department or their authorised agent.
PROGRAMME 25 COTTONS
PROGRAMME STOP
DRIVE SYSTEM FAULT
Multiplug drive variants lacking.
Call the Service Department.
PROGRAMME 25 COTTONS
95°C Main wash 20 °C
Rinses 1
DRIVE SYSTEM FAULT
Clean the ventilation slot on the side wall for
the cooling fan.
Call the Service Department, if there is still no
drum movement 30 minutes after this message appeared.
PROGRAMME 25 COTTONS
PROGRAMME STOP
PEAK LOAD CUT OUT ACTIVE
At the end of the peak load cut out function
the programme continues automatically.
M.-Nr. 05 730 941 27
Page 28

Problem solving guide
PROGRAMME 25 COTTONS
PROGRAMME STOP
IMBALANCE SWITCH
Press the On-Off switch.
Press the Mains off Z and the Mains on Y
switches.
PROGRAMME 25 COTTONS
PROGRAMME STOP
PRESSURE MONITOR FAULT
Call the Service Department.
PROGRAMME 25 COTTONS
PROGRAMME STOP
DISPENSING SYSTEM FAULT
Dispensing container 1 empty.
Change the dispensing container.
Possible reasons for increased levels of
foaming:
– detergent type
Only use detergent formulated for use in
commercial washer extractors. Domestic
laundry detergent is not suitable.
– overdosing of detergent
Dispense detergent following the detergent manufacturer’s instructions on the
packaging and in accordance with local
water hardness levels.
– detergent creates too much foam
Use a lower foaming detergent or contact
your detergent application specialist.
– very soft water
PROGRAMME 25 COTTONS
PROGRAMME STOP
HEATING SYSTEM FAULT
Dry step switch has cut out.
Call the Service Department.
Large articles of laundry stretching during
the spin cycle
Large articles of laundry (e.g. table cloths) might
stretch during the spin cycle. This can generally
be prevented by reprogramming the machine.
Procedure:
Reprogramme programmes from switch setting 14
Drain valve: programme to no
Drain with tumble: programme to no
Spintime with drain: programme to 7 mins.
In areas with hardness level 1 dispense
less detergent in accordance with the
detergent manufacturer’s instructions.
– soiling level of the laundry
For lightly soiled laundry dispense less
detergent in accordance with the detergent manufacturer’s instructions.
– residues, e.g. detergent are left on
laundry
Run an additional pre-wash without detergent and without selecting a temperature.
Laundry which has been soaked before
washing must be thoroughly
rinsed before running a wash programme.
– small loads
Reduce the amount of detergent dispensed according to the size of the load.
– drum speed too high during the wash
(Profitronic-controls)
Reduce the drum speed and wash rhythm.
28 M.-Nr. 05 730 941
Page 29

After sales service
Should a fault occur please contact the
Service Dept.
When contacting the Service Dept, please
quote the model type and machine number
(Fabr.-Nr.), and part number (M.-Nr.). These
can be found on the data plate :
at the top of the door on the "Unclean side"
or:
on the side casing of the machine above the
ventilation grille.
Only use genuine Miele spare parts. When
ordering spare parts the Spare Parts Dept will
also need to know the model type and machine number (Fabr.-Nr.) and part number (M.Nr.).
Service interval
If the following message appears in the display after switching the machine on:
PROGRAMME 1 COTTONS
PLEASE CALL THE SERVICE DEPARTMENT
(SERVICE INTERVAL 1)
à
The machine needs to be serviced.
The Service interval display will go out after 5
seconds or by pressing the Start X button.
M.-Nr. 05 730 941 29
Page 30

Cleaning and Care
The machine should be cleaned, wherever
possible, immediately after use.
On no account use high pressure cleaners or
hose down the machine.
Build-up of rust
The drum and suds container are manufactured from rust-free stainless steel. It is, however, possible that water with a high iron
content or foreign bodies in the wash, (e.g.
paper clips or metal buttons), may lead to the
formation of superficial rust spots in the drum
and/or suds container, especially if the machine is not used for a long time. Stainless
steel components should be cleaned regularly
with a proprietary cleaning agent for stainless
steel. This must be done if rust appears!
The casing, control panel and any plastic
parts such as buttons and control switches
should be cleaned with a suitable mild cleaning agent or with a damp cloth and then
wiped dry. A proprietary stainless steel cleaning agent can be used on stainless steel parts
of the casing.
Do not use abrasive cleaning agents, as
these will scratch the surface.
If you are unsure about a particular product or
need further advice please contact your nearest Miele Sales office. See back page for address.
Do not cover or block the overflow from the
machine.
Dispenser compartments and siphons
After use these should be cleaned with warm
water to remove any detergent or other
residues. The siphon tubes in the dispenser
compartments should also be cleaned.
Pull the siphon tube out and clean with hot
water before replacing.
Check the drum door regularly for a build
up of fluff and clean as necessary. Check
the door locking mechanism regularly to
ensure it is working correctly.
Cleaning the cooling fan grille
The ventilation slits in the grille cover for the
cooling fan at the side of the machine must
never be covered over or blocked. They
should be checked regularly for a build up of
fluff and cleaned as necessary.
The filters in the water inlet valves must be
checked from time to time for soiling and
cleaned if necessary.
30 M.-Nr. 05 730 941
Page 31

Cleaning and Care
Greasing
After about 1000 running hours apply Arcanol L 100 to both grease nipples of the drum.
When not in use for a longer period of
time:
If the machine is not going to be used for a
longer period of time (4 weeks or more) the
drum bearings should be lubricated and the
drum rotated several times after the last use.
The drum should be rotated every 4 weeks to
prevent damage to the bearings.
After use do not shut the door on the
“Unclean side” but leave it slightly ajar, to
allow the machine to dry out.
M.-Nr. 05 730 941 31
Page 32

Explanation of the symbols on the data plate
1 Machine type
2 Machine number / year of manufacture*
3 Voltage / Frequency
4 Control fusing
5 Drive motor
6 Plate diameter* /Plate quantity*
7 Drum data
8 Drum diameter / Drum depth
9 Spin speed
10 Drum volume / Laundry dry weight
11 Kinetic energy
12 Ex. Time to top speed
13 Braking time
14 Heating
15 Electric heating
16 Fusing (on site)
17 Steam heating indirect
18 Steam heating direct
19 Gas heating*
20 Commissioning date
21 Water registration (DVGW-Reg.-N° in
Germany)
22 Field for test certificates/CE-.....(Product-ID-
Number/Gas*
*) does not apply to WS 5243 / 5323
Noise level
Registered on the “A” scale
During wash During spin
WS 5243 60.7 dB 81.6 dB
WS 5323 63.5 dB 80.1 dB
Measured in Germany in accordance with
DIN (IEC) 45 635 machine noise regulations
3. GSGV § 1 1.a
32 M.-Nr. 05 730 941
Page 33

Installation
This machine is for use only with articles
which have not been treated with dangerous or inflammable substances.
To avoid the possibility of frost damage on no
account install the machine in a room which is
exposed to frost.
Transit fittings
2 at the rear are each secured with 3 hex
screws (SW 15) and must only be removed
once the machine has been installed in its
final position. Ensure they are removed before commissioning.
To remove them detach the lower sides from
the machine.
The red-marked fixing brackets, 2 at the side
front and 2 at the side rear for the transport
verschlag are each secured with a hex screw
(SW 15) and must be removed.
The red marked transit fittings, 2 at the front
and
Transit fittings should be stored in a safe
place for future use. They must be refitted
if the machine is moved again.
It is essential that the machine is installed
level, and is secured (see Installation diagram
supplied).
Do not install the machine on carpeted flooring if the carpet pile blocks the ventilation gap
at the base of the machine.
After installing and connecting the machine
to the services ensure that all outer panels
have been put back in place.
M.-Nr. 05 730 941 33
Page 34

Installation
Plumbing
Connection to the water supply must be carried out by a suitably qualified and competent
person in accordance with local and national
water and safety regulations (DVGW in Germany) via a stopcock, (DIN 1988 approved in
Germany).
To ensure the machine is correctly connected
to the water supply and for drainage please
observe the installation diagram and the installation instructions supplied with the machine.
Water inlet / drainage
The inlet pressure hoses supplied with the
machine must be used for connection to the
water supply.
Water connection Australia
To prevent back-syphonage, the water connection must be via an approved Dual-CheckValve.
After installing and connecting the machine
to the services ensure that all outer panels
have been put back in place.
Before connecting the inlet hoses to the machine the filters and seals supplied in the accessory pack must first be fitted.
If replacing an inlet hose only use a hose able
to withstand a burst pressure of at least 70
bar, and a water temperature of at least 90°C.
This also applies to all connection parts.
Miele "Original" spare parts meet this requirement.
A water pressure flow rate of at least 1 bar,
maximum 10 bar is essential to ensure the
smooth operation of this machine.
Water taken into the machine must not exceed a temperature of 70°C.
Connection to cold water only
See the Installation diagram supplied.
34 M.-Nr. 05 730 941
Page 35

Installation
Electrical connection
All electrical work must be carried out by a
suitably qualified and competent person in
compliance with national and local regulations.
Please take note of the Wiring diagram and
the Installation Diagram and instructions supplied. They are important for electrical connection.
The electrical safety of this machine is in accordance with EN 60204.
The machine is supplied as standard for connection to a AC 3N 50 Hz electricity supply.
The voltage, frequency are stated on the data
plate.
Variants
The electric heater rating is set ex-works to
24 kW (WS 5243),
30 kW (WS 5323).
The minimum suds level required for activating the heating given in mm column of water
is 110 mm.
:
3 N AC 380-415 V 50-60 Hz
3 AC 220-240 V 50-60 Hz
Steam connection
Steam connection must only be undertaken
by an authorised installer.
Please take note of the Installation Diagram
and instructions supplied. They are important
for steam connection.
Do not attempt to carry out any repair work
to this machine yourself. Any damage or repair work may only be carried out by a suitably qualified and competent person in accordance with local and national safety
regulations.
Please contact the Miele Service Dept. or
your Miele supplier in the event of a fault or
any damage to the machine.
After installing and connecting the machine
to the services ensure that all outer panels
have been put back in place.
The motor is fitted with an overload protection
switch.
Connection should be made via a suitable, approved isolator, with an on-off switch which is
easily accessible for servicing.
WARNING
THIS APPLIANCE MUST BE EARTHED
M.-Nr. 05 730 941 35
Page 36

EU Declaration of Conformity
Manufacturer: Miele & Cie. KG
Address: Box
33325 Gütersloh, Germany
Product designation: Automatic washer-extractor WS 5243, 5323
The products designated comply with the conditions of the following European Directives:
Text / No. EU Council directive 98/37/EC: Machinery
Electromagnetic compatibility directive (89/336/EEC)
Introduction of the CE mark: 1999
Producer: Miele & Cie. KG, Werk Lehrte
Place, Date: Lehrte, 09.01.2003
This declaration certifies compliance with the directives named above, but does not guarantee
any specific properties. The safety instructions in the product documentation provided must be
observed.
EG - Konformitätserklärung
Hersteller: Miele & Cie. KG
Anschrift: Postfach
33325 Gütersloh
Produktbezeichnung: Waschmaschine WS 5243, WS 5323
Das bezeichnete Produkt stimmt mit den Vorschriften folgender Europäischer Richtlinien
überein:
Text/Nr. EG Maschinenrichtlinie 98/37/EG
Elektromagnetische Verträglichkeit (EMV) 89/336
Anbringung der CE-Kennzeichnung: 1999
Aussteller: Miele & Cie. KG, Werk Lehrte
Ort, Datum: Lehrte, 09.01.2003
Rechtsverbindliche Unterschrift (Dr. Dyballa)
Diese Erklärung bescheinigt die Übereinstimmung mit den genannten Richtlinien, beinhaltet
jedoch keine Zusicherung von Eigenschaften. Die Sicherheitshinweise der mitgelieferten
Produktinformation sind zu beachten.
36 M.-Nr. 05 730 941
Page 37

Guarantee
Please contact your Miele Sales Office for details
concerning guarantee terms and conditions.
See the back cover for contact details.
M.-Nr. 05 730 941 37
Page 38

Alteration rights reserved/2208
M.-Nr. 05 730 941 / 00
 Loading...