


Operating instructions
Washer-Extractor
Gebrauchsanweisung
Waschschleuderautomat
WS 5240 Container
To avoid the risk of accidents
or damage to this machine
it is essential to read these
operating instructions before it
is installed, commissioned
and used for the first time.
GD
M.-Nr. 06 411 840

«M.-Nr. 06 411 840 - GB - » 2

Contents Indice
Warning and Safety instructions . . . . . . . . . . . . . . . . . . . . . . . . . . . . . 4
Guide to the machine . . . . . . . . . . . . . . . . . . . . . . . . . . . . . . . . . . . 6
- Control panel . . . . . . . . . . . . . . . . . . . . . . . . . . . . . . . . . . . . . . . 6
- Guide to the controls . . . . . . . . . . . . . . . . . . . . . . . . . . . . . . . . . . . 7
Operation . . . . . . . . . . . . . . . . . . . . . . . . . . . . . . . . . . . . . . . . 10
- Setting the current time of day and date . . . . . . . . . . . . . . . . . . . . . . . . . 10
- Operation - Key switch Position A . . . . . . . . . . . . . . . . . . . . . . . . . . . . 10
- Programm 13 Cold draindown . . . . . . . . . . . . . . . . . . . . . . . . . . . . . . 12
- Operation - Key switch position B . . . . . . . . . . . . . . . . . . . . . . . . . . . . 13
- Key switch position B, Programme 12 . . . . . . . . . . . . . . . . . . . . . . . . . . 15
- Delay start, Key switch position B only . . . . . . . . . . . . . . . . . . . . . . . . . 15
Notes . . . . . . . . . . . . . . . . . . . . . . . . . . . . . . . . . . . . . . . . . . . 16
- Starching . . . . . . . . . . . . . . . . . . . . . . . . . . . . . . . . . . . . . . . . 16
- Without spin . . . . . . . . . . . . . . . . . . . . . . . . . . . . . . . . . . . . . . . 16
- Cancelling a programme . . . . . . . . . . . . . . . . . . . . . . . . . . . . . . . . 17
After sales service . . . . . . . . . . . . . . . . . . . . . . . . . . . . . . . . . . . . 18
PC- Printer connection . . . . . . . . . . . . . . . . . . . . . . . . . . . . . . . . . 18
Problem solving guide . . . . . . . . . . . . . . . . . . . . . . . . . . . . . . . . . 19
- The door will not open . . . . . . . . . . . . . . . . . . . . . . . . . . . . . . . . . . 19
- Power cut during a wash programme, Emergency door release . . . . . . . . . . . . 19
- Fault messages . . . . . . . . . . . . . . . . . . . . . . . . . . . . . . . . . . . . . 20
Cleaning and care . . . . . . . . . . . . . . . . . . . . . . . . . . . . . . . . . . . . 22
Explanation of the symbols on the data plate . . . . . . . . . . . . . . . . . . . . . 24
Installation . . . . . . . . . . . . . . . . . . . . . . . . . . . . . . . . . . . . . . . . 25
Page
Seite
D Inhaltsverzeichnis . . . . . . . . . . . . . . . . . . . . . . . . . . . . . . . . 27
3 «M.-Nr. 06 411 840 - GB - »

Warning and Safety instructions
Read the operating instructions through
before using this machine for the first time.
This way you will avoid the risk of
accidents or damage to the machine.
Appropriate use of the machine
This washer extractor is only intended for
items of laundry which have not been
impregnated with dangerous or inflammable
substances.
Only machine wash articles which
possess a care label stating that they are
suitable for machine washing.
It is the operator’s responsibility to ensure
that the standard of disinfection in thermal
as well as chemo thermal procedures is
maintained (in accordance with § 18 IFSG) by
carrying out suitable validation tests. These
procedures should be checked on a regular
basis, either thermo-electrically using loggers,
or bacteriologically with bio indicators. The
operator must pay particular attention to
maintaining the correct parameters in the
procedure, including temperature and with
chemo thermal programmes the chemical
concentration used. Disinfection programmes
must not be interrupted, as this can have a
limiting effect on the disinfection result.
On no account must solvents of the kind
used for dry cleaning be used in this
machine. There may be the danger of fire or
explosion.
Do not damage, remove or bypass the
safety features and controls on the
machine.
Where there is any damage to the
machine or to the cable insulation the
machine must not be used until it has been
repaired.
Any removable outer panels must be in
place, and all moving or electrical parts
shielded before the machine is operated.
The machine is only completely isolated
from the electricity supply when switched
off at the wall isolator or at the mains switch.
Repairs should only be undertaken by a
suitably qualified service engineer to
ensure safety. Unauthorised repairs could
be dangerous.
Never attempt to force the machine door
open. To ensure the correct functioning of
the door lock safety mechanism the handle is
fitted with a break line.
Faulty components should only be
exchanged for original Miele spare parts.
Only when these parts are fitted can the
safety standards of the machine be
guaranteed.
Use of the machine
Remember that the door porthole glass
can become hot during the operation of
the machine.
Never use or store benzine, petrol or pe-
troleum based substances or any easily
inflammable substances near the machine.
Do not use the machine lid as a resting place.
Danger of fire or explosion.
Technical and electrical safety
The electrical safety of this machine can
only be guaranteed when continuity is
complete between it and an effective earthing
system which complies with local and national
regulations.
It is most important that this basic safety
requirement is regularly tested, and where
there is any doubt the on-site wiring should
be inspected by a qualified electrician. The
manufacturer cannot be held liable for the
consequences of an inadequate earthing
system.
«M.-Nr. 06 411 840 - GB - » 4
Always make sure the drum is stationary
before reaching in to remove laundry.
Reaching into a moving drum is extremely
dangerous.
Water used for washing and rinsing must
not be used as drinking water. It must be
discharged into a proper sewerage system.

Warning and Safety instructions
Chlorine or agents containing chlorine are
corrosive, and can under certain
conditions lead to irreperable damage to
components.
Disinfecting and cleaning agents often
have compounds containing chlorides in
them. If these agents dry on to stainless steel
surfaces, the residual chlorides will attack the
steel and can cause rusting.
If you accidentally spill an agent containing
chlorides on the machine it should be rinsed
off with water and dried using a soft cloth.
To protect your machine from rust dam-
age we recommend the use of chloridefree disinfecting and cleaning agents. If you
are unsure about a particular agent you
should contact the manufacturer for advice.
Always follow the instructions of the
chemical manufacturer when using cleaning agents and special application chemicals.
Only use such chemicals for the purpose and
in the situation specified by the manufacturer
in order to avoid the danger of adverse
chemical reactions and material damage.
If in doubt check the suitability of the product
for use in this machine with the manufacturer
before using it.
Where a chemical cleaning agent is rec-
ommended on technical application
grounds, this does not imply that the manufacturer of the machine takes responsibility for
the effect of the chemical on the material of
the items being cleaned or on the machine.
Please be aware that changes in formulation,
storage conditions etc., which may not be publicised by the chemical producer, can have a
negative effect on the cleaning result.
Proprietary dyes, dye removers and de-
scaling agents may only be used in this
machine if the manufacturer expressly states
that they are suitable for use in a washing
machine. Follow manufacturer’s usage
instructions on the packaging.
On no account use high pressure
cleaners or hose down the machine.
All personnel working with this machine
must be fully trained in all aspects of its
use and safety.
Keep these operating instructions in a safe
place.
5 «M.-Nr. 06 411 840 - GB - »
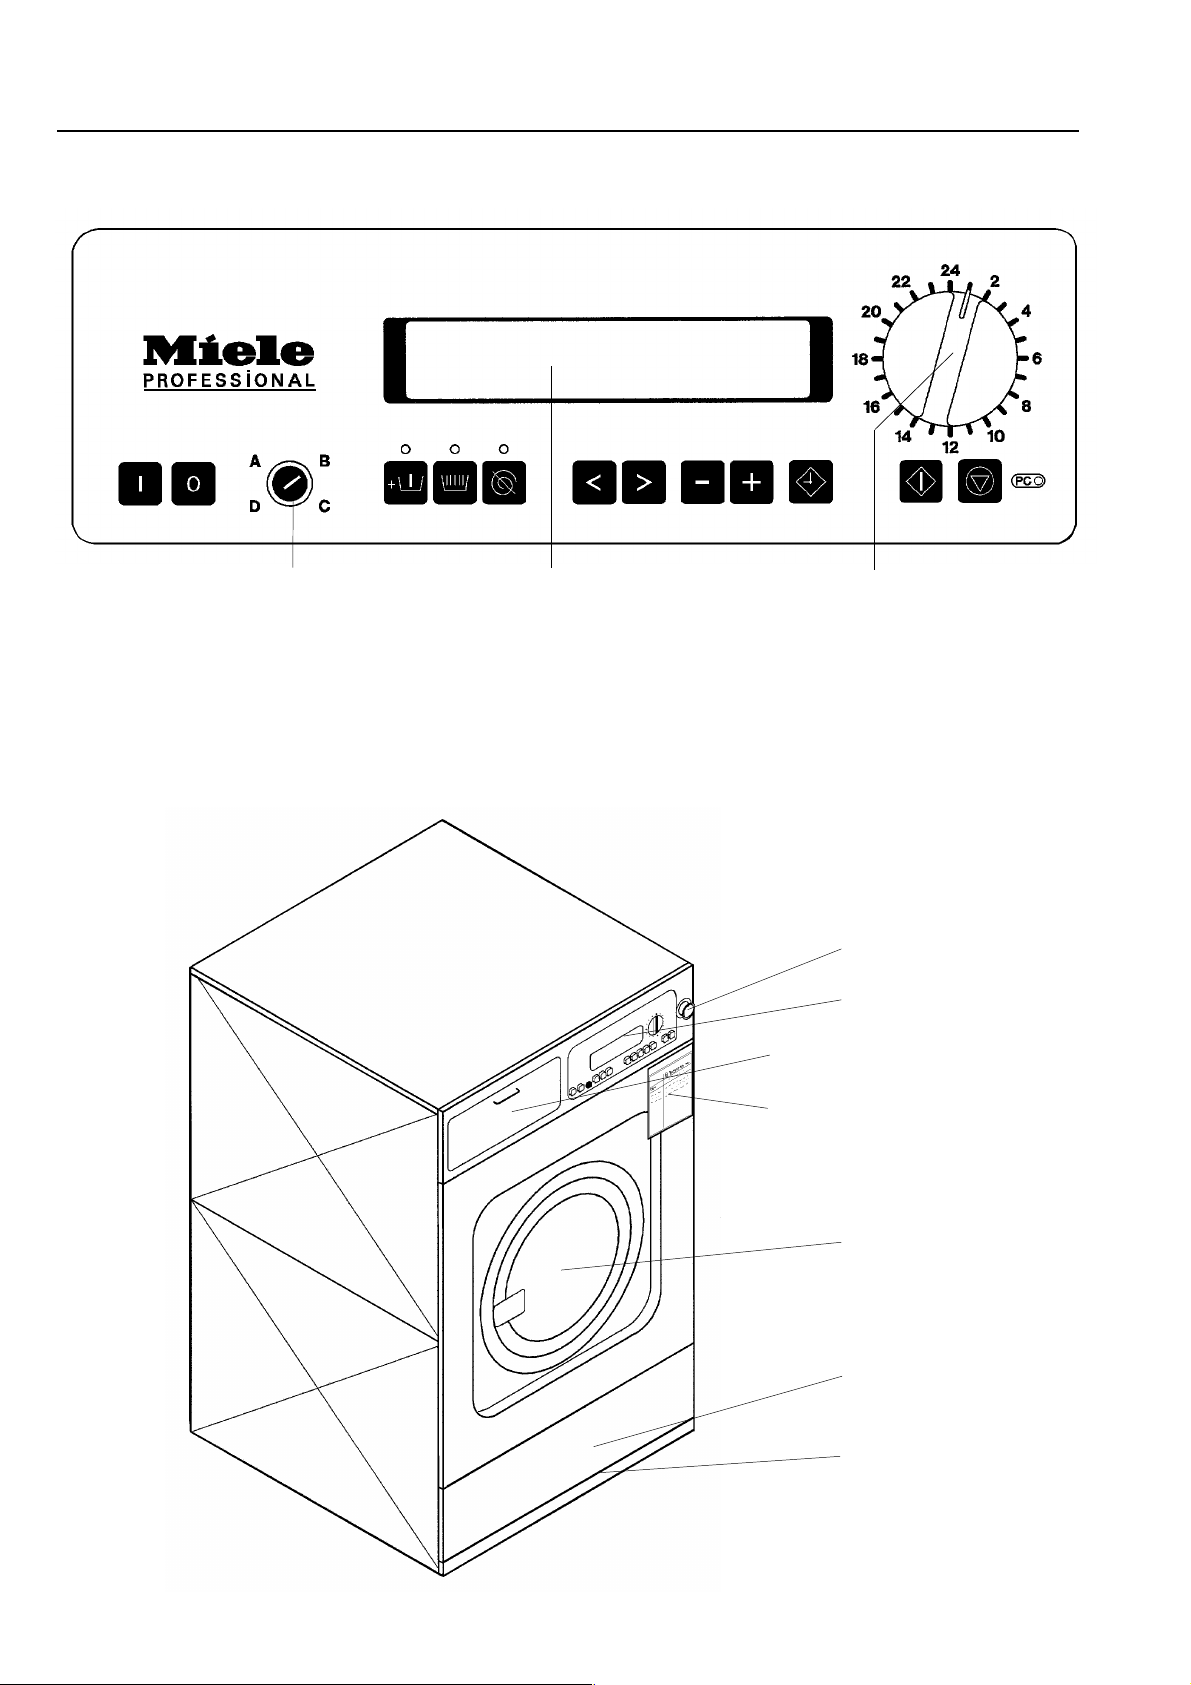
Guide to the machine
Control panel
Key switch Display Programme selector
On button Y Block + / (pre-wash button) button T Cursor buttons 1 2
Off button Z Starch hold button U Plus-/-Minus buttons 4 3 Start button X
Spin-stop button V Delay start button W End button 7
The option buttons are not available for programmes in key switch position A.
Optical interface 8
Emergency Stop switch
Control panel
Detergent dispenser box
Magnetic pocket for
detergent reminder
(with accessory pack)
Drum door
Service panel
Plinth
«M.-Nr. 06 411 840 - GB - » 6
WS 5240
Guide to the machine
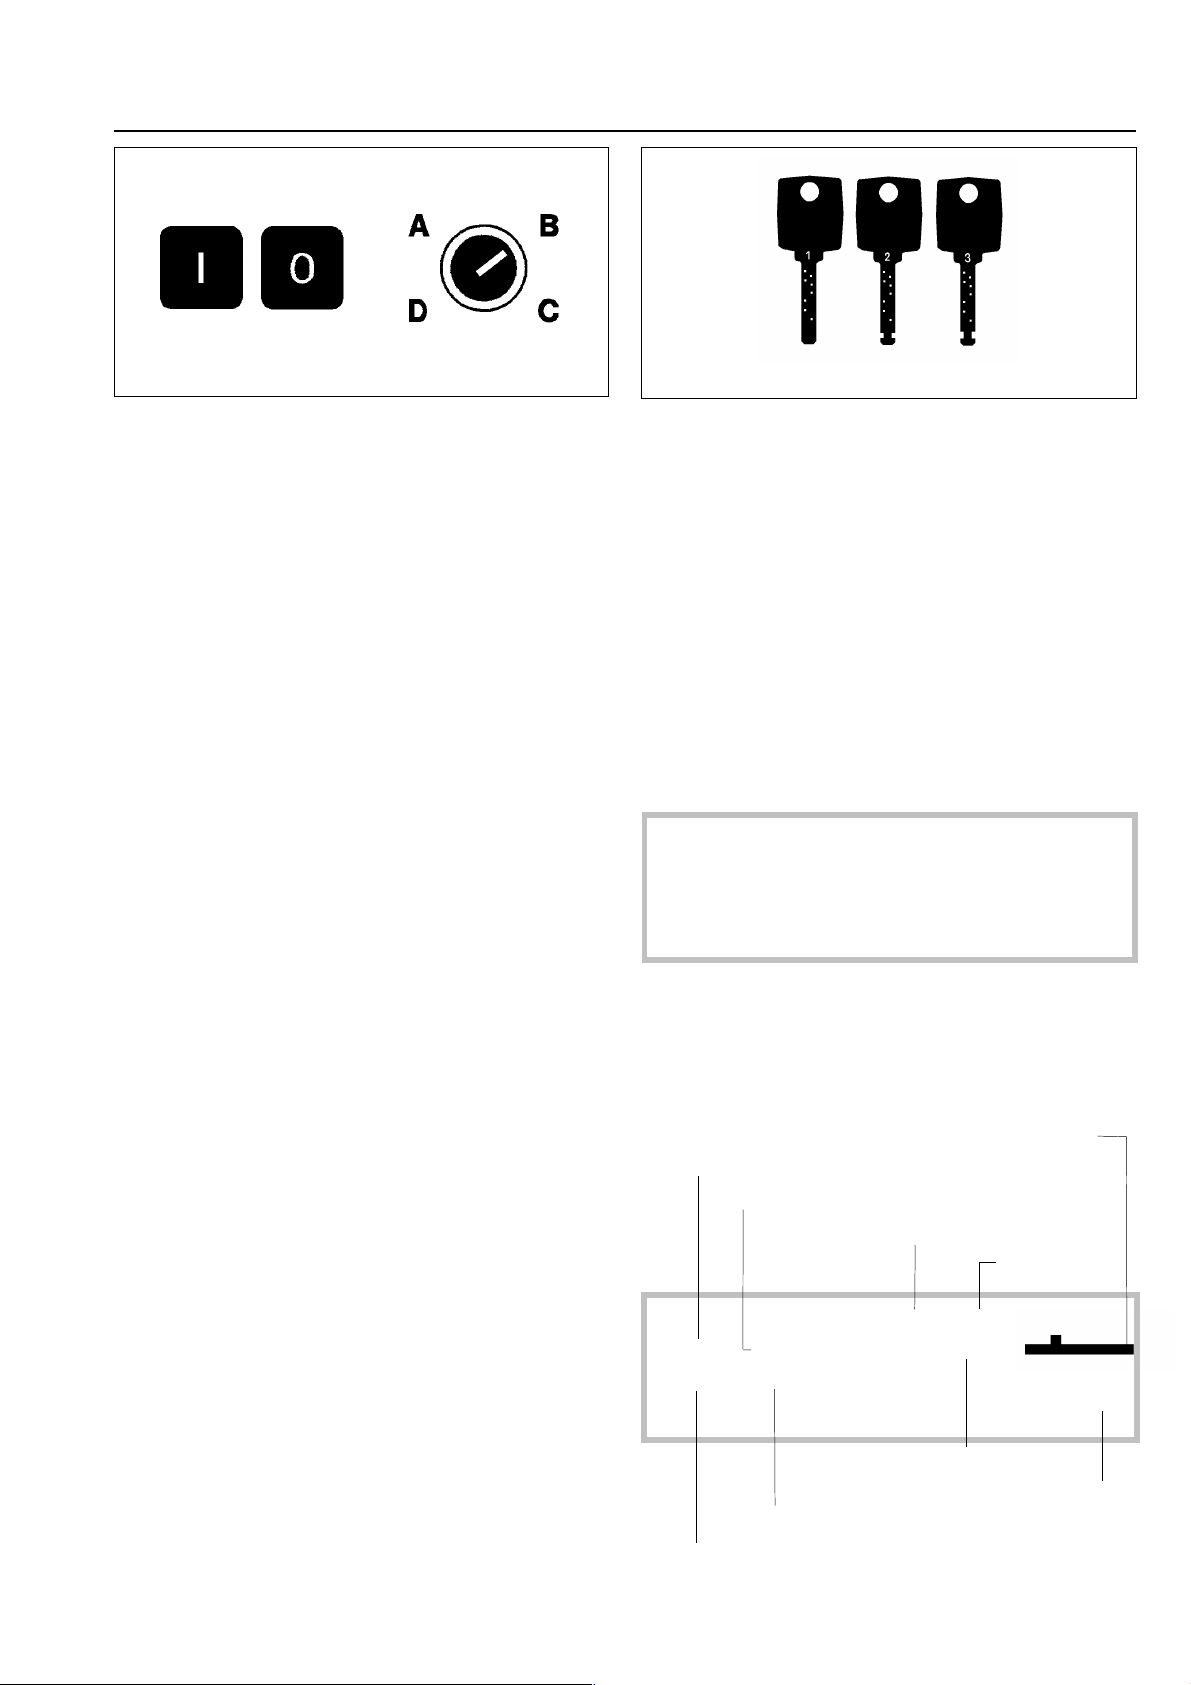
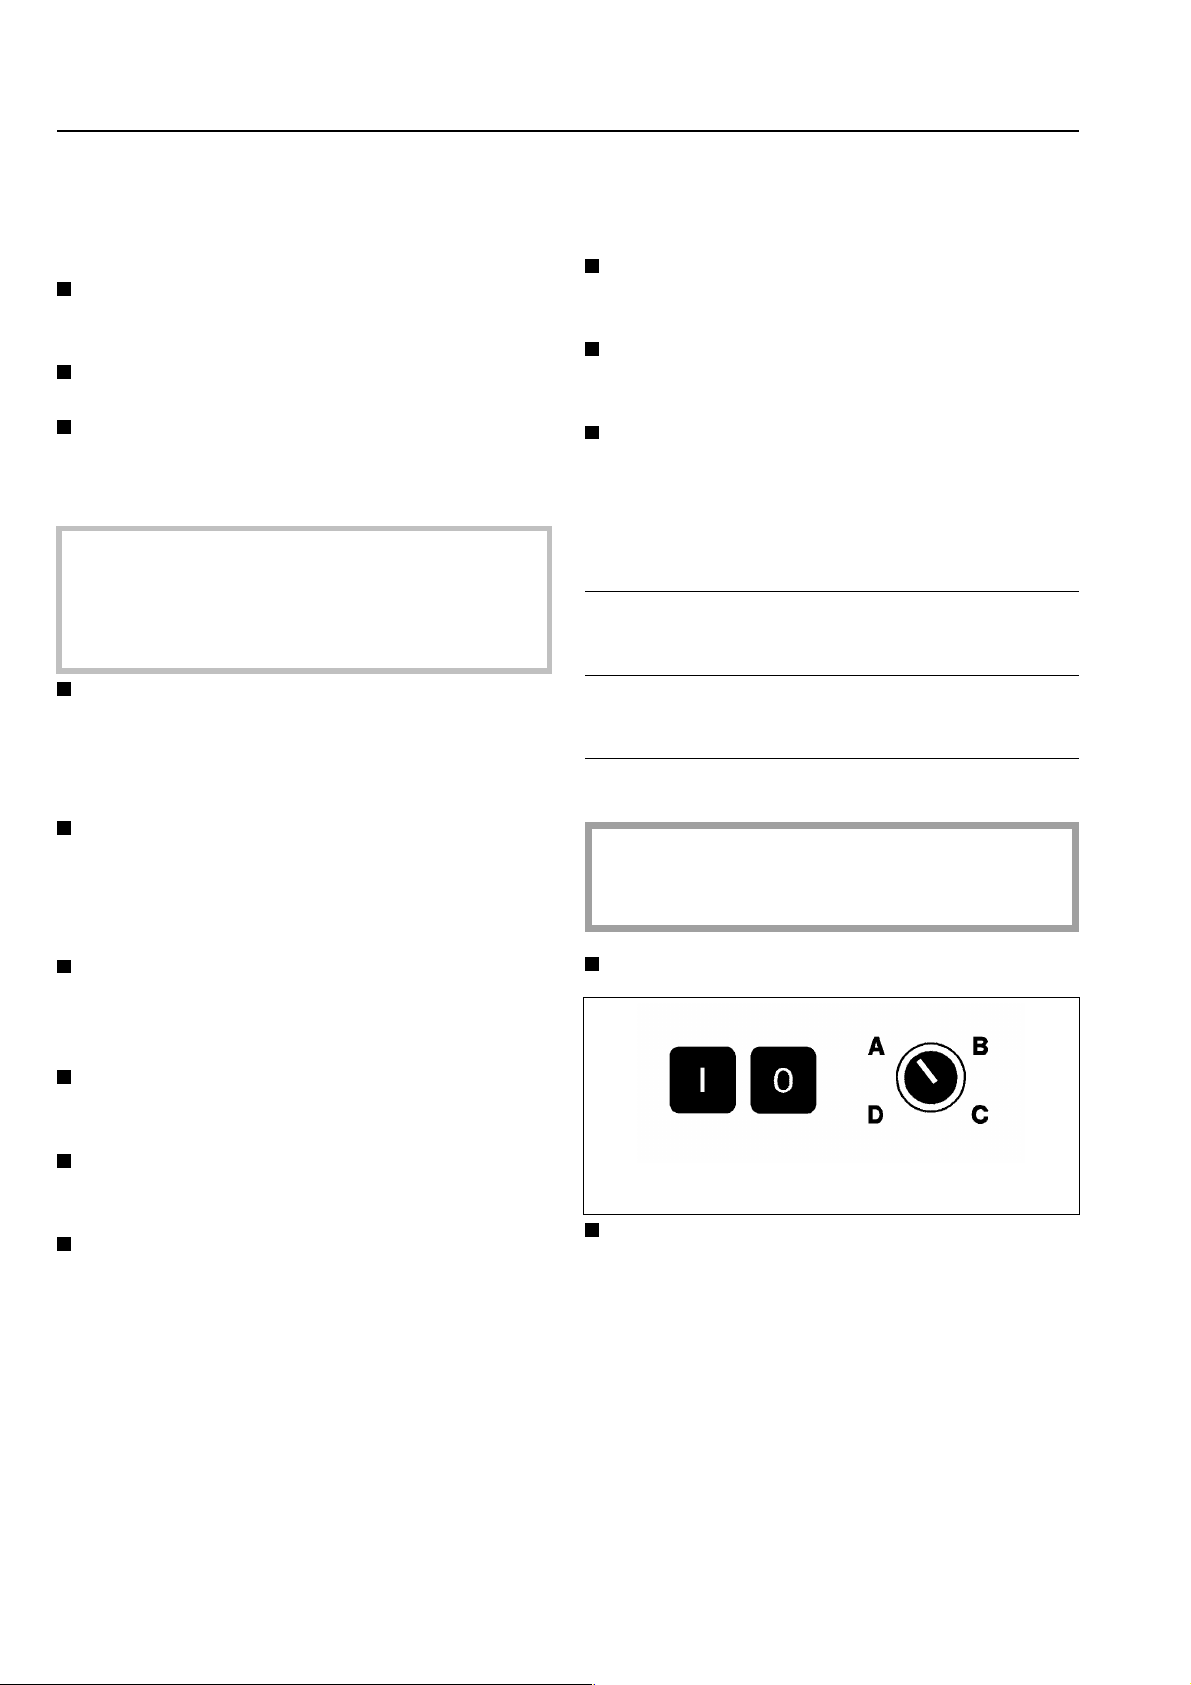
On button Y
Off button Z
1 2 3
Keys for the key switch positions
Key 1 (2 supplied) for operating levels
A and B.
Key switch
Position A - Operation
This key switch position is used for selecting programmes 1 to 13.
Position B - Supervisor
This key switch position is only accessible by the supervisor and is used
for selecting all programmes. The display
will show which programme the programme selector has been turned to.
Position C - Programming
This key switch position is only accessible by a Miele engineer for programming purposes.
Position D - Unlocking
This key switch position is only accessible by a Miele engineer for service
purposes.
Key 2 for operating levels
A, B, C.
Key 3 for operating levels
A, B, C, D.
Display
PROGRAMME 1 Universal 50°C
>50° C< Main wash 1
Rinses 3 1100 RPM
The Display content shows after the machine is switched on. It has up to four
lines, each 40 digits long, showing which
programme has been selected.
After the Programme start:
Time line for the current Prog. block
Planned temperature of the current prog. block.
Name of the current prog. block.
Programme number
Prog.name
à
PROGRAMME 14 Universal vario
60 °C Pre-wash 25 °C
95 °C Main wash
Actual temperature
Points to a further display line
Name of the following Programme block
Planned temperature of the following prog. block.
à
7 «M.-Nr. 06 411 840 - GB - »
Guide to the machine
Start button X
Press to start the selected programme.
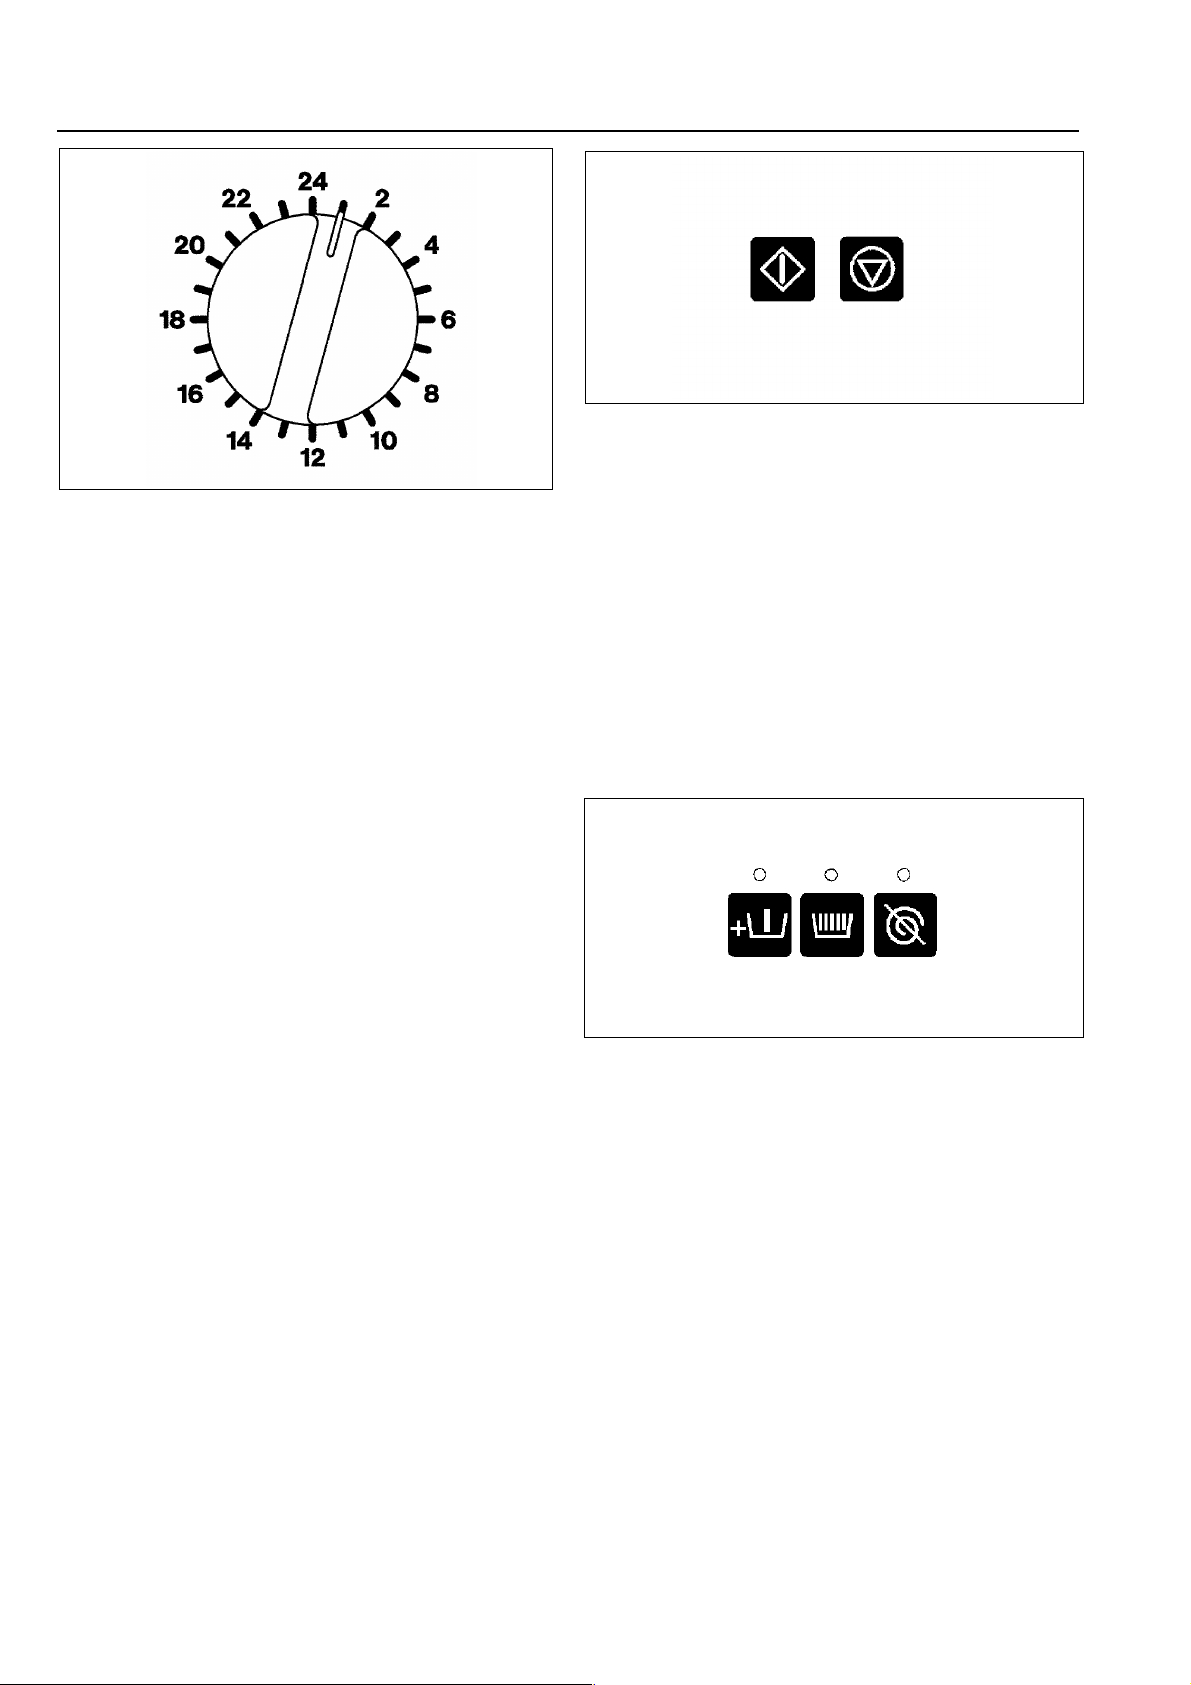
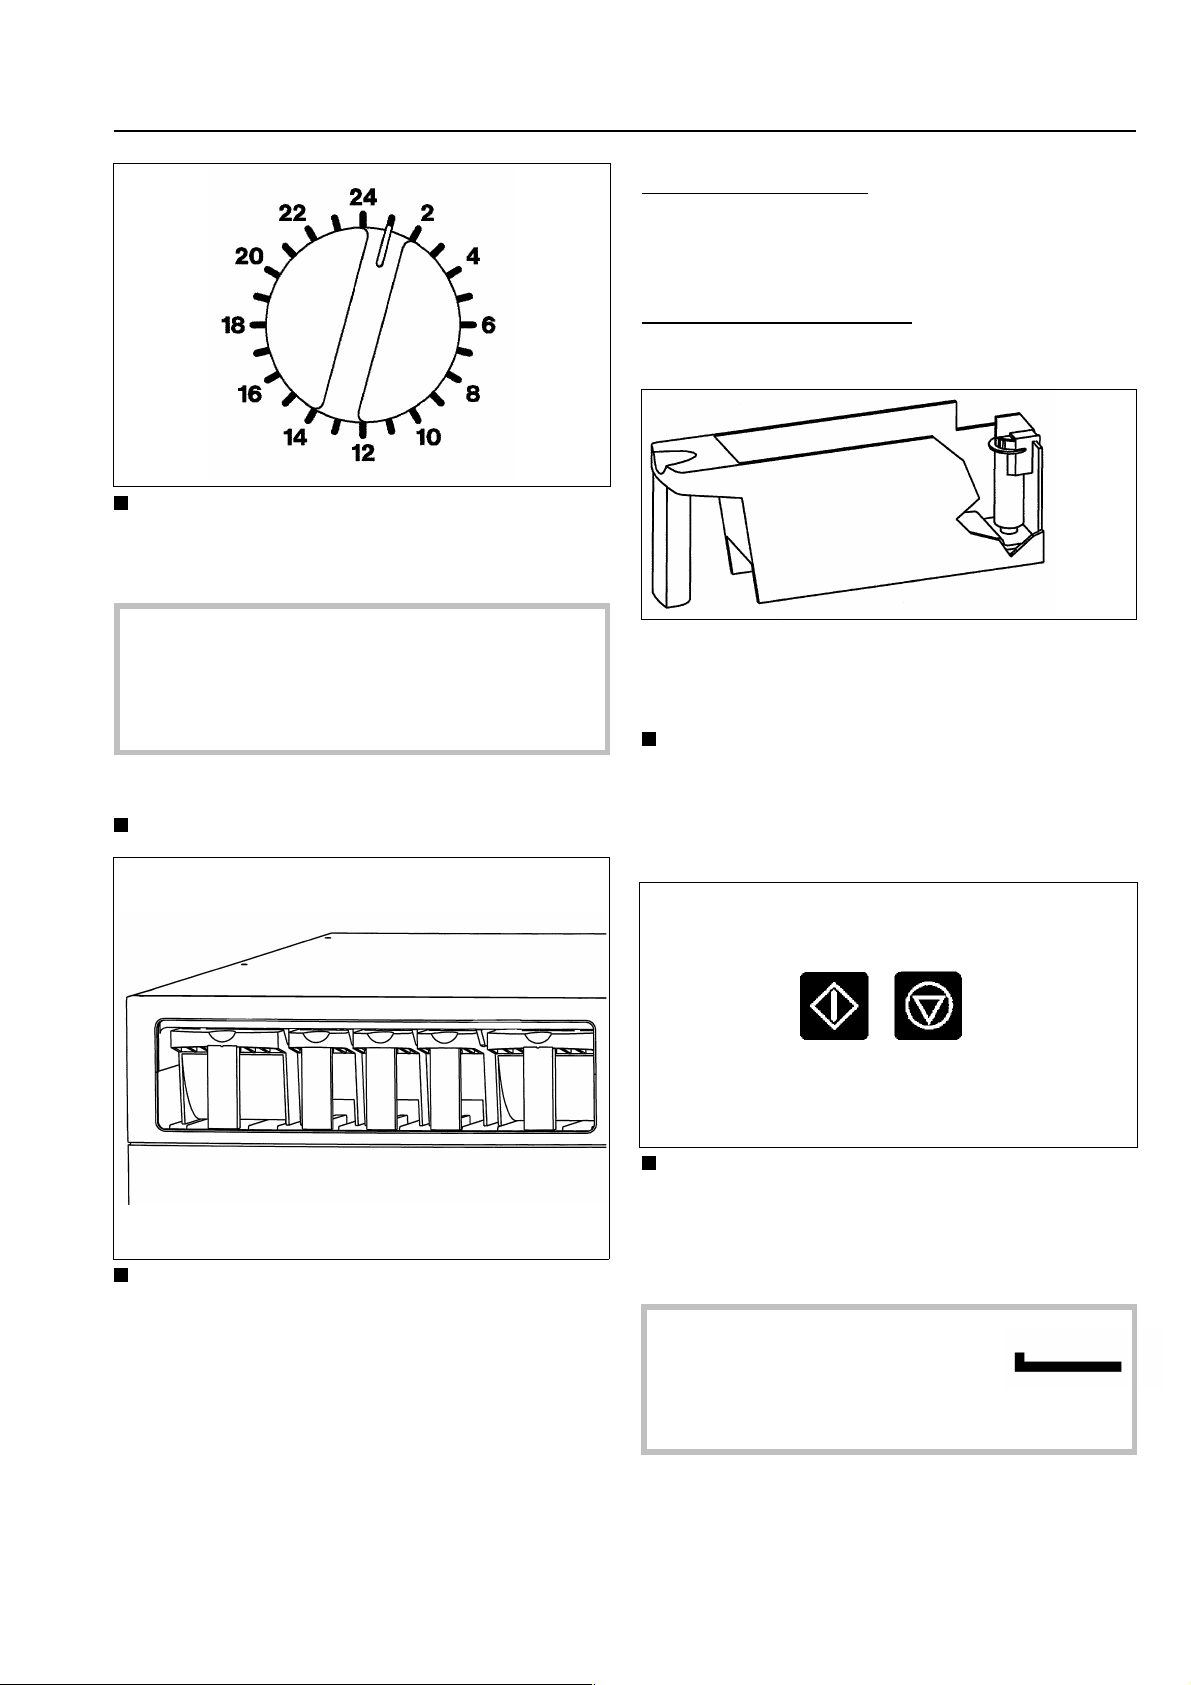
Programme selector
Programme numbers 1 to 13 can be selected directly by turning the programme selector to the appropriate number.
Programme number 14 can only be selected
via key switch position B.
The name of the selected programme and its
corresponding number appear in the display.
If the programme selector is turned to another
position after the start of the programme, the
first line of the display flashes. The programme does not however change.
Standard programmes:
Programmes in key position A
1 Universal 50°C (bagged)
2 Universal 60°C (bagged)
3 Medical cloth (sealed bag)
4 Sleeping bags
5 Overalls
6 Natural fibre covers
7 Catering cloth
8 Peripel
9 Maintenance
10 Drain and reset
11 Separate spin
12 Universal cold
End button 7
Press the End button 7 once to interrupt a programme. (Press it twice if you
want to terminate the programme).To
continue an interrupted programme
press the Start button X.
Additional options (available to Key switch
position B programmes only)
Block button T with indicator light
When the button is pressed the light
above it comes on. The corresponding
programme block (e.g. Pre-wash) is
added to the programme. Pressing the
button a second time de-selects the function. This option can be de-selected.
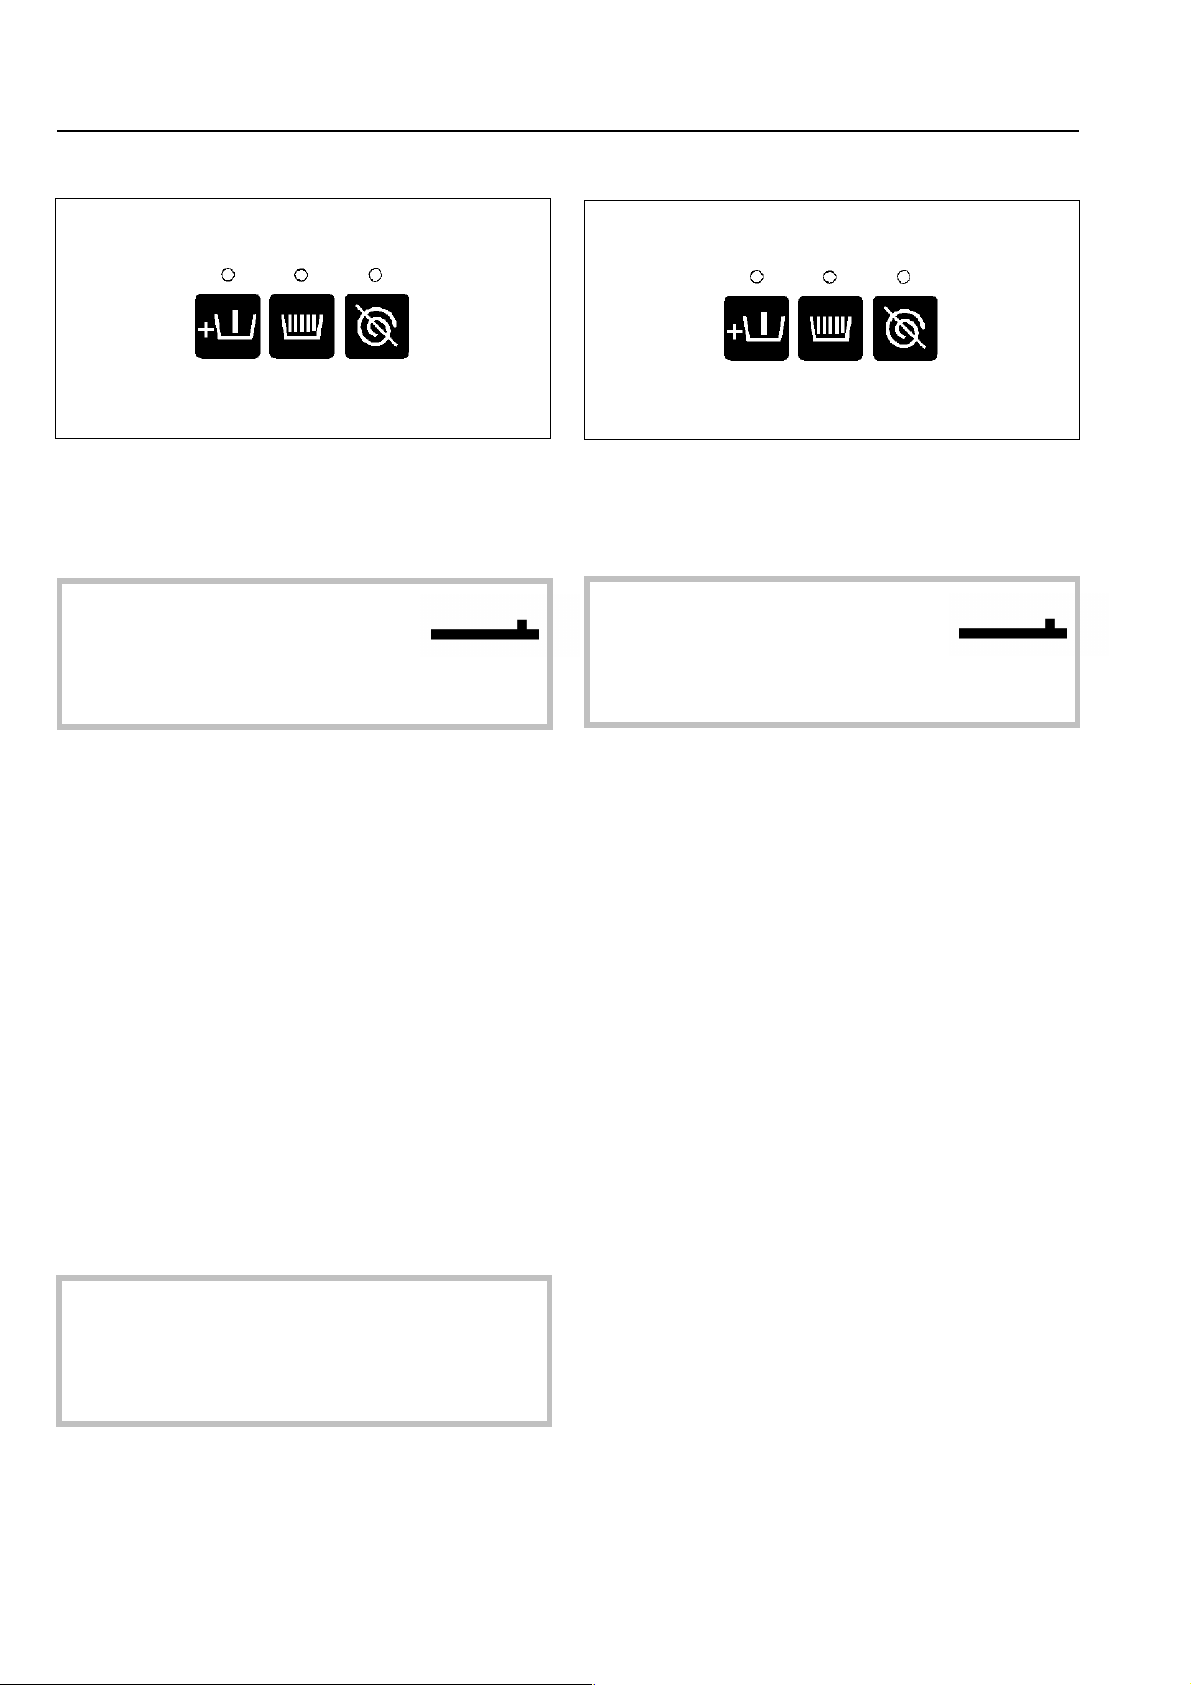
Starch-hold button U with indicator light
Press this button if the washing is to be
starched. The light comes on.
13 Cold draindown
Programme in key position B
14 Universal vario
Changes are not possible to programmes
1 to 13.
«M.-Nr. 06 411 840 - GB - » 8
Spin-stop button V with indicator light
Press this button if a final spin is not required after the final rinse. The light
comes on.
Guide to the machine
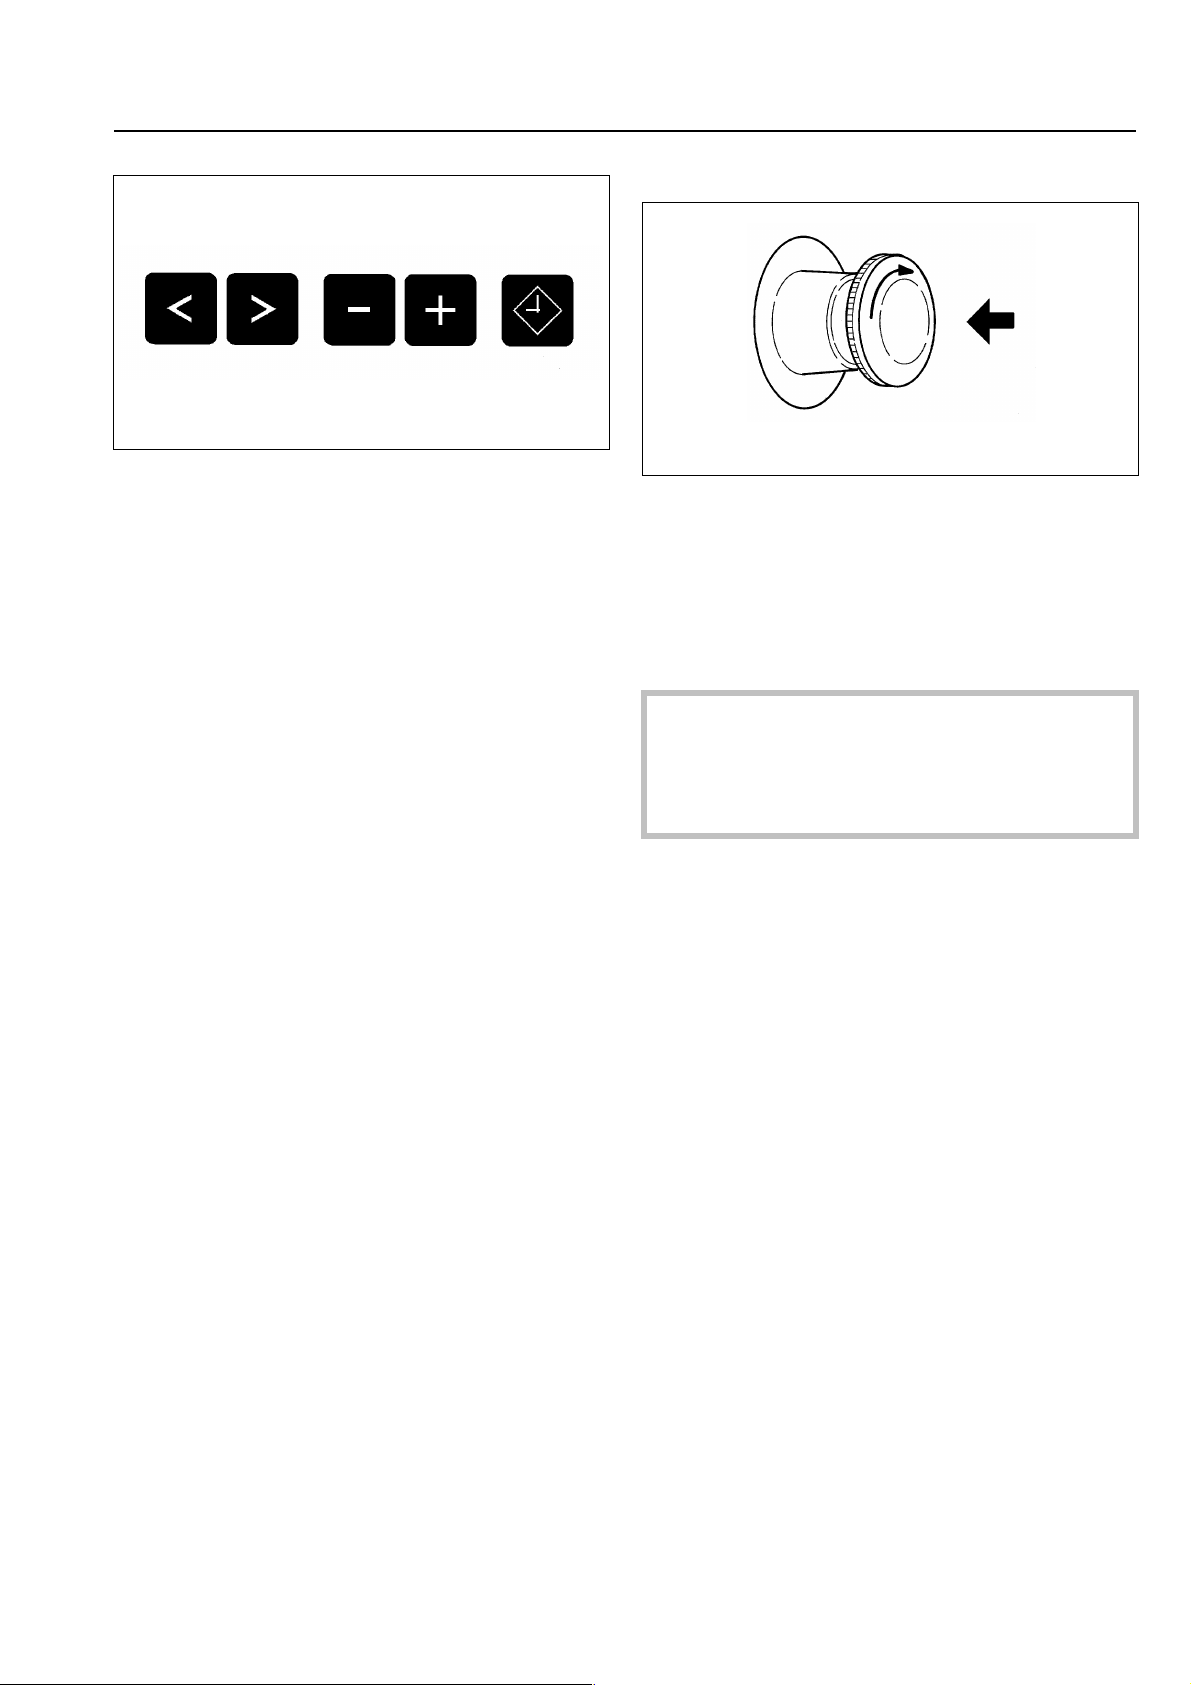
Emergency Stop Switch
Key switch position B only
Plus and Minus buttons 4 3
Once an input field has been selected it
is possible to make a modification. Pressing the button continuously advances
quickly through the options.
Delay start button W
If this button is pressed before the start
of a programme, the display indicates
that a start time should be selected. If
the button is pressed again the Delay
start option is cancelled.
If the button is pressed after the start of a
programme the current time of day and
date are shown.
Only to be used in an emergency.
After removing the cause of danger this
switch can be re-set by turning the
ribbed disc in a clockwise direction.
After re-setting the following appears in the
display:
PROGRAMME 1 Universal 50°C
PROGRAMME STOP
THROUGH POWER CUT
Please press the Start button.
Press the Start button X again to continue.
9 «M.-Nr. 06 411 840 - GB - »
Operation
Key switch position B only
Setting the current time and date*
Switch the machine off with the
Off button Z.
Turn the key switch to position B.
Press the Delay start button W and the On
button Y at the same time and hold
pressed in, until the Display shows the
following:
SETTING TIME AND DATE
Time of day >14< : 30 hrs
Date 23. 03. 1995
After selection press Start button.
Use the 2 cursor button to position the
cursor on the input field for hours and set
the hours using the Plus / Minus
buttons 4 3.
KEY SWITCH POSITION A
OPERATION
Establish the water supply to the machine
and the drain outlet.
Switch on the electricity supply at the
mains (on site) or start the generator.
Open the door and load the drum.
Load weight
WS 5240
Programmes 1, 2, 3, 8, 12
max. 25 kg bagged laundry
Programmes 4, 5, 6, 7, 8, 12
max. 25 kg unbagged laundry
Use the 2 cursor button to position the
cursor on the input field for minutes and
set the minutes using the Plus / Minus
buttons 4 3.
Position the cursor over the date and set
the date using the Plus / Minus
buttons 4 3.
Position the cursor on Month and set the
month.
Position the cursor on Year and set the
year.
Store in memory with the Start button X.
If the Delay start button is pressed during
a running programme the current time of
day and date are shown.
Foreign objects, (eg nails, coins, paper
clips etc) can cause damage to textiles
and components in the machine.
Close the drum door.
t
Press the On button Y.
*Pauses between programming steps must not last
longer than 25 seconds, otherwise the display returns
to the basic stage, (such as On) and the changes are
not stored in memory.
«M.-Nr. 06 411 840 - GB - » 10
Operation
Select a programme (e.g. Programme 1
Universal 50°C).
The display shows the following (example):
PROGRAMME 1 Universal 50°C
Detergent dispensing
Avoid dispensing more than the required
amount as this can cause excessive foaming.
Amounts to be dispensed
Take into account the water hardness, and
the detergent manufacturer’s instructions.
t
>50° C< Main wash 1
Rinses 3 1100 RPM
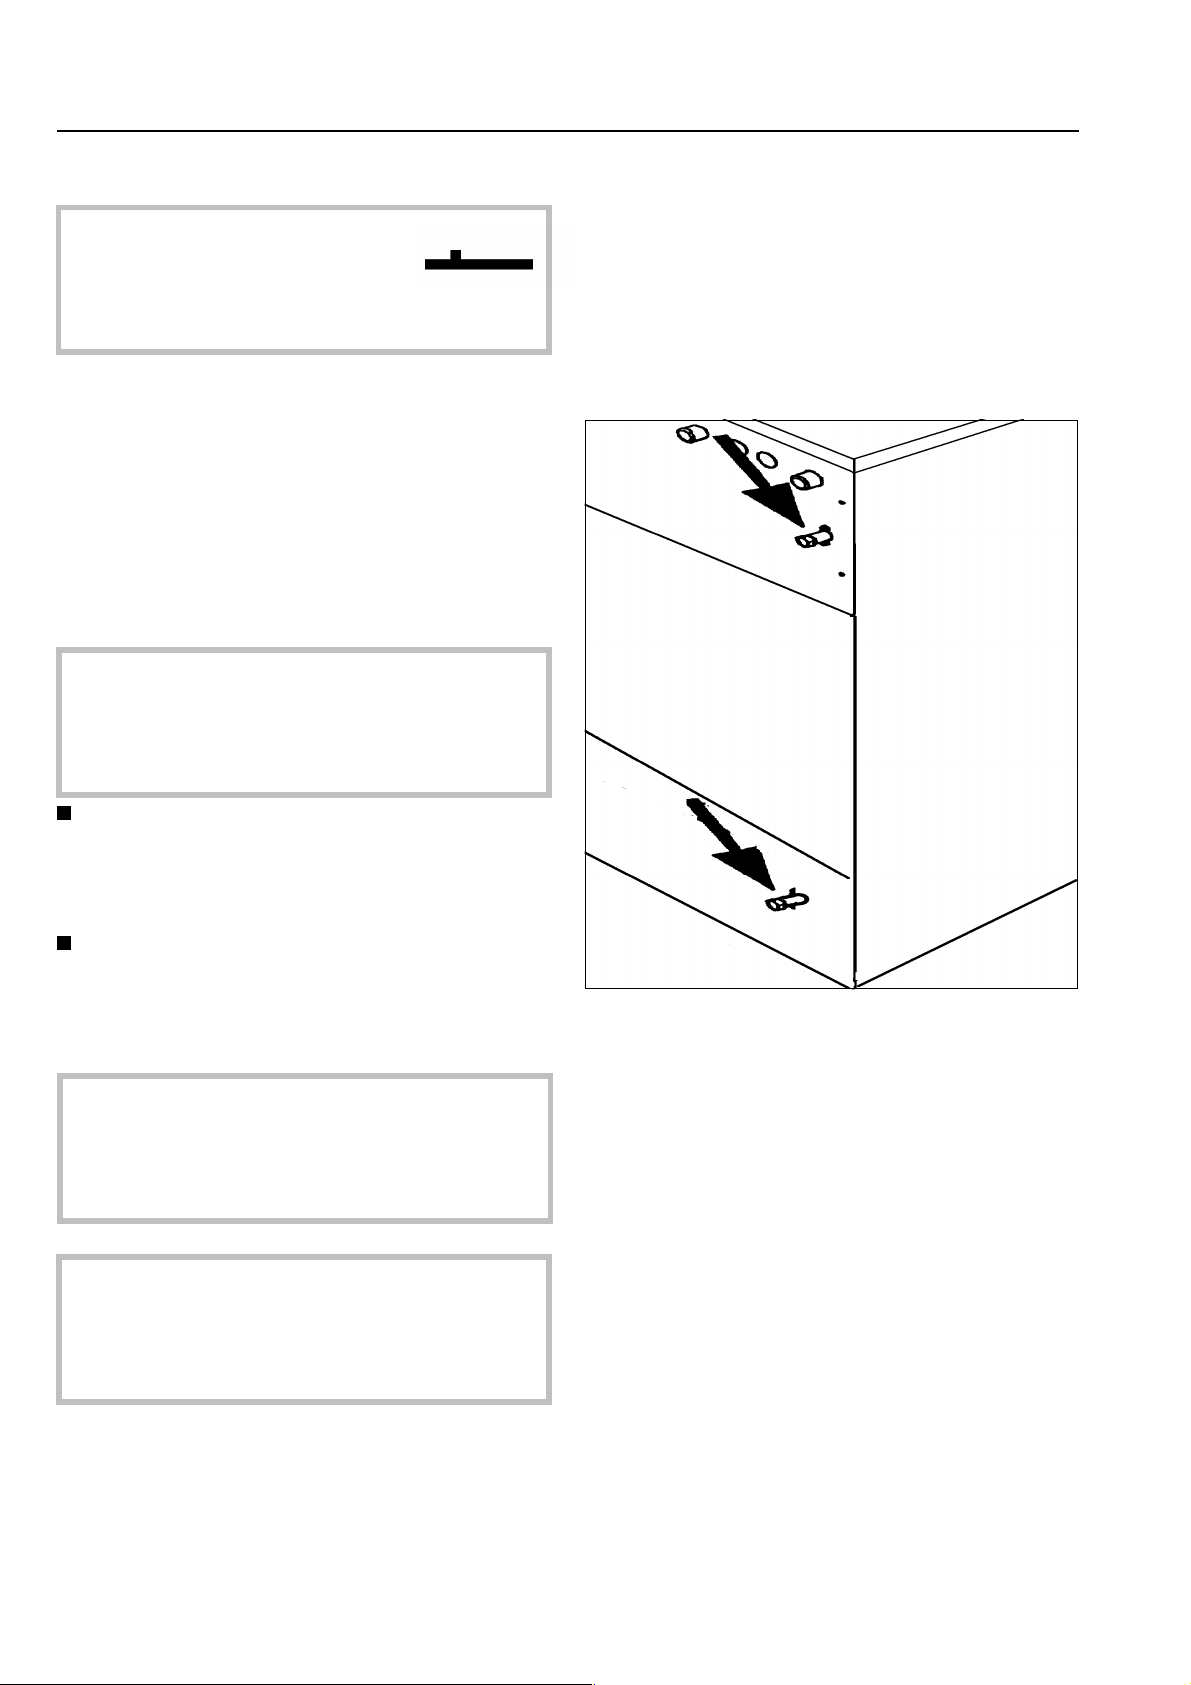
Add detergent.
Pre-Wash Peripel Main wash
1 3 4 5 2
For the standard programmes add detergent for the Main wash into dispenser compartment 2
- and as required, detergent for a Prewash into dispenser compartment 1, Peripel into compartments 3 and 4. Compartment 5 is not used.
Programme 8. PERIPEL
Do not fill compartment 3 or 4 higher than
the level marker in the relevant dispenser
compartment. Otherwise the the peripel
can run through the siphon into the suds
container.
t
Press the Start button X.
The wash programme proceeds.
The programme sequence is shown in the
display after the start of the programme.
PROGRAMME 1 Universal 50°C
20 °C
Main wash
à
The top line shows which programme has
been selected. The 2nd line shows the actual
suds temperature and the time line extending
off to the right.
11 «M.-Nr. 06 411 840 - GB - »
Operation
Programme end display
PROGRAMME 1 Universal 50°C
Rinse 1
Rinse 2
Programme end 11 : 25 hrs
à
After water from the last heating phase has
drained away, or after the last "Cool Down"
the programme end time is shown in hours
and minutes.
Programme end - to open the drum door
At the end of the Programme, with a stationary
drum and no more water in the machine
the following display is shown (for example):
PROGRAMME 1 Universal 50°C
PROGRAMME END
DOOR IS UNLOCKED
Programme 13 Cold draindown
This programme is designed for use in cold
climates when there is a danger of water
freezing during shut-down periods.
Ensure that the water supply pump system is
turned off and that the water supply is drained
down before selecting this programme.
Pull the handle to open the door.
Note: If the door cannot be opened, press
against the door, and pull on the handle
again. Never use force to open the door.
Remove the laundry.
If the programme is interrupted when there is
water in the machine, or during the spin, the
following display messages might appear:
PROGRAMME 1 Universal 50°C
PROGRAMME END
DOOR IS LOCKED
THERE IS WATER IN THE MACHINE
or:
PROGRAMME 1 Universal 50°C
PROGRAMME END
DOOR IS LOCKED
DRUM NOT YET STATIONARY
At the end of the cold draindown programme
the two plugs must be removed from the drain
off points at the rear of the machine. Place a
suitable container under the plugs to collect
the residual water.
These two plugs must be screwed back into
position again before using the machine
again. Do not overtighten them!
The door is locked. Never try to force open
the door. See "Problem solving guide".
«M.-Nr. 06 411 840 - GB - » 12
Operation
KEY SWITCH POSITION B
OPERATION
Establish the water supply to the machine
and the drain outlet.
Switch on the electricity supply at the
mains (on site) or start the generator.
Open the door and load the drum.
Load weight
WS 5240
Programmes 1, 2, 3, 8, 12, 14
max. 25 kg bagged laundry
Programmes 4, 5, 6, 7, 8, 12, 14
max. 25 kg unbagged laundry
The display shows the following (example):
PROGRAMME 1 Universal 50°C
>50 °C< Main wash 1
Rinses 3 1100 RPM
Add detergent.
Pre-Wash Peripel Main wash
Foreign objects, (eg nails, coins, paper
clips etc) can cause damage to textiles
and components in the machine.
Close the drum door.
t
Press the On button Y.
1 3 4 5 2
For the standard programmes add detergent
for the Main wash into dispenser compartment 2
- and as required, detergent for a Pre-wash
into dispenser compartment 1, Peripel into
compartments 3 and 4. Compartment 5 is not
used.
Detergent dispensing
Avoid dispensing more than the required
amount as this can cause excessive foaming.
Amounts to be dispensed
Take into account the water hardness, and
the detergent manufacturer’s instructions.
Select a programme (e.g. Programme 1
Universal 50°C).
t
13 «M.-Nr. 06 411 840 - GB - »

Operation
Do not fill compartment 3 or 4 higher than
the level marker in the relevant dispenser
compartment. Otherwise the peripel can
run through the siphon into the suds container.
t
Press the Start button X.
- The wash programme proceeds -.
The programme sequence is shown in the
display after the start of the programme.
PROGRAMME 1 Universal 50°C
20 °C
Main wash
Programme end - to open the drum door
At the end of the Programme, with a stationary
drum and no more water in the machine
the following display is shown (for example):
PROGRAMME 1 Universal 50°C
PROGRAMME END
DOOR IS UNLOCKED
Pull the handle to open the door.
Note: If the door cannot be opened, press
against the door, and pull on the handle
again. Never use force to open the door.
Remove the laundry.
If the programme is interrupted when there is
water in the machine, or during the spin, the
following display messages might appear:
PROGRAMME 1 Universal 50°C
PROGRAMME END
DOOR IS LOCKED
THERE IS WATER IN THE MACHINE
à
or:
The top line shows which programme has
been selected. The 2nd line shows the actual
suds temperature and the time line extending
off to the right.
Programme end display
PROGRAMME 1 Universal 50°C
Rinse 1
Rinse 2
Programme end 11 : 25 hrs
à
After water from the last heating phase has
drained away, or after the last "Cool Down"
the programme end time is shown in hours
and minutes.
PROGRAMME 1 Universal 50°C
PROGRAMME END
DOOR IS LOCKED
DRUM NOT YET STATIONARY
The door is locked. Never try to force open
the door. See "Problem solving guide".
«M.-Nr. 06 411 840 - GB - » 14

Operation
Key switch position B, Programme 14
The following parameters can be changed before the start of a programme if required:
The temperature in 1 °C steps from cold, 15
to max. 95 °C .
The spin speed in steps of 100 rpm from 0,
300 to max. 1100.
Use the 2 cursor button to position the
cursor on the input field for the Pre-wash
temperature, and set the temperature required with the Plus or Minus button 4 3.
Position the cursor on the input field for
the Main wash temperature, and set the
temperature required with the Plus or
Minus button 4 3.
Position the cursor on the input field for
the Spin speed, and set the spin speed required with the Plus or Minus button 4 3.
Here the display shows the following:
PROGRAMME 14 Universal vario
Start time >14>:30 hrs
After the start time has been set
press the Start button.
The current time of day is always displayed
first.
The cursor points to the input field for ’hours’.
Select the Start Hour with the Plus or
Minus button 4 3.
Position the cursor on the input field for
minutes and select the minutes with the
Plus or Minus button 4 3.
Note:
Before pressing the Start button the Start time
can be deleted by pressing the Delay start
button again, or by switching the machine off
and then on again.
Delayed Start –Key switch position B only
If a later start to a programme is required, this
can be selected using the Delay start button.
To select a delayed start time
Turn the key switch to position B.
Switch on the machine and select the required programme with the programme selector switch.
The Display shows the following:
PROGRAMME 14 Universal vario
>95 °C< Main wash 1
Rinses 3 1100 RPM
Press the Delay start button W.
Otherwise, when the Start button X is
pressed in, Delay start is confirmed, and
the following shows in the display:
PROGRAMME 14 Universal vario
95 °C Main wash 1
Start time 18 : 30 hrs
When the start time is reached the programme proceeds and the Display shows the
programme sequence. If the Delay start button W is pressed during the programme, the
actual time of day and date are shown.
If the End button 7 is pressed this cancels
the Delay start function.
15 «M.-Nr. 06 411 840 - GB - »
Notes
Starch (Key switch position B)
t
Starching can be selected additionally in all
programmes (except Separate spin and
Separate drain). The indicator light above the
button lights up.
PROGRAMME 14 Universal vario
Rinse 3
STARCH HOLD
Press the Starch and Starch hold button.
When the Starch point has been reached in
the programme sequence, "Starch hold"
flashes in the Display.
The programme is continued by pressing the
Starch hold button U, (the indicator light goes
out). Add the starch formulation, prepared according to the producers’s instructions to the
inflowing water via the correct dispenser compartment. The wash time is automatically extended by 4 minutes.
Without spin (Key switch position B)
t
Without spin can be selected additionally in
all programmes (except Separate spin). The
indicator light above the button lights up.
PROGRAMME 14 Universal vario
Rinse 3
WITHOUT SPIN
Press the without spin or End button.
When the Spin programme point is reached,
"Spin stop" flashes in the Display.
Either press the Spin-stop button V again to
continue the programme with a spin, or press
the End button 7, for the programme to finish
with water in the machine.
Filling the starch directly into the drum
When the Starch point is reached in the sequence, "Starch hold" flashes in the Display.
Open the drum door and add the starch formulation, prepared according to the producer’s instructions. Shut the drum door, the message "power cut programme stop" appears in the Display. - , and press the Start
button X . This message appears again:
PROGRAMME 14 Universal vario
Rinse 3
STARCH HOLD
Press the Starch and Starch hold button.
Press the button Starch hold button U , (the
indicator light goes out) and the programme
continues.
«M.-Nr. 06 411 840 - GB - » 16

Notes
Programme cancellation
(Key switch position B)
t
Should you wish to cancel a programme,
press the End button 7 twice in succession.
If the programme was cancelled while there
was water in the machine, or during a spin,
the following shows in the display (example):
PROGRAMME 14 Universal vario
PROGRAMME END
DOOR IS LOCKED
THERE IS WATER IN THE MACHINE
or:
PROGRAMME 14 Universal vario
PROGRAMME END
DOOR IS LOCKED
DRUM NOT YET STATIONARY
Select the programme Separate Drain or Separate Spin and start it. On completion the
door can be opened.
17 «M.-Nr. 06 411 840 - GB - »

After sales service PC- Printer connection
Should a fault occur please contact the Miele
Service Department.
When contacting the Service Department,
please quote the model type and machine
number, (Fabr.-Nr.) and Part no. (M.-Nr.).
These can be found on the data plate:
with the door open, or:
PC- Printer connection:
The machine can be connected to a PC or
printer using fitting kit SD.
PC-Operation:
Programme changes can be carried out via a
PC, or new programmes can be downloaded.
This requires a special Editor programme
which is available from the Miele Professional
Department.
Printer-Operation:
It is possible to print out whole programmes
or parts of programmes. See programming instructions.
at the rear of the machine towards the top.
Only use genuine spare parts.
When ordering spare parts please quote the
model type and machine number (Fabr.-Nr.)
and Part No. (M.-Nr.).
«M.-Nr. 06 411 840 - GB - » 18

Problem solving guide
The door will not open
Press against the door, switch the machine
off and then on again and then try and open
the door again.
If you still cannot open the door:
The door handle safety mechanism has
disengaged itself.
The door cannot be opened or closed.
Power cut during a wash programme
Emergency door release
With a short power cut:
The programme remains in position, and
when power is restored the following message appears in the Display:
PROGRAMME 1 Universal 50°C
PROGRAMME STOP
THROUGH POWER CUT
Please press the Start button.
Press the button X Start, the programme continues again.
In the event of an extended power cut:
To remove the laundry the drain valve will
need to be opened manually and the drum
door unlocked manually.
The safety mechanism is designed to protect the handle and the lock from damage,
for instance, if too much force is being
used in an attempt to open the door.
Press firmly against the door handle until you
clearly hear the safety mechanism engage.
You will now be able to open and close the
door again.
If the door remains locked, select the Drain
and Reset programme. The door will automatically unlock itself at the end of the programme.
Open the drain valve by partially opening the
venting screw, (spanner size 17 mm) at the
rear of the machine, but do not unscrew comletely. Drain off the suds.
Take care, some water will seep out of the
screw opening (approx. 100 ml). This should
be caught in a suitable container.
Tighten up the venting screw again and check
that there is no leak.
19 «M.-Nr. 06 411 840 - GB - »

Problem solving guide
First position the screwdriver in the opening,
push in and hold firm.
Press against the door handle with your right
hand, and then pull on the door handle to
open the door.
- Never use force to open the door. Take out the laundry.
Should the water inlet become blocked,
"Water inlet fault" will be displayed and the
programme terminated.
PROGRAMME 1 Universal 50°C
PROGRAMME STOP
WATER INLET FAULT
Open water stopcock and press Start button.
Open water stopcock and press the Start
button X.
PROGRAMME 1 Universal 50°C
PROGRAMME STOP
DRAIN FAULT
Clean drain system and press Start button.
Check the drainage system on site and press
the Start button X. A defective drain valve
should only be repaired by an authorised
service engineer.
PROGRAMME 1 Universal 50°C
PROGRAMME STOP
HEATING SYSTEM FAULT
Short circuit on heater sensor 1
Fault messages
Repairs to machines should only be undertaken by a suitably qualified service engineer
to ensure safety. Unauthorised repairs could
be dangerous.
Faults that occur before or after the start of a
programme are displayed in a flashing display.
PROGRAMME 1 Universal 50°C
PROGRAMME STOP
THROUGH POWER CUT
Please press the Start button.
When power is restored press the Start
button X.
This fault message can also indicate that the
winding protection of the drive motor has overheated. Allow the motor to cool down.
Call the Service department.
PROGRAMME 1 Universal 50°C
PROGRAMME STOP
HEATING SYSTEM FAULT
Cut-out of heating sensor 1.
Call the Service department.
PROGRAMME 1 Universal 50°C
PROGRAMME STOP
HEATING SYSTEM FAULT
Call the Service department.
PROGRAMME 1 Universal 50°C
PROGRAMME STOP
DRIVE SYSTEM FAULT
Multiplug drive variants lacking.
«M.-Nr. 06 411 840 - GB - » 20
Call the Service department.

Problem solving guide
PROGRAMME 1 Universal 50°C
50 °C Main wash 20 °C
Rinses 1
DRIVE SYSTEM FAULT
Clean the ventilation slot for the cooling fan,
(see page 22).
Call the Service department, if there is still no
drum movement 30 minutes after this message appeared.
PROGRAMME 1 Universal 50°C
PROGRAMME STOP
IMBALANCE SWITCH
Press the On-Off switch.
Press the Off button Z and the On button Y.
PROGRAMME 1 Universal 50°C
PROGRAMME STOP
HEATER SYSTEM FAULT
Dry step switch has cut out.
– very soft water
In areas with hardness level 1 dispense
less detergent in accordance with the
detergent manufacturer’s instructions.
– soiling level of the laundry
For lightly soiled laundry dispense less
detergent in accordance with the detergent manufacturer’s instructions.
– small loads
Reduce the amount of detergent dispensed according to the size of the load.
In "Position B" it is possible to reduce the
drum speed and the wash rhythm during
the heating-up phase in Programme 14.
Water hardness levels
Call the Service department.
Possible reasons for increased levels of
foaming:
– detergent type
Only use detergent formulated for use in
commercial washer extractors. Domestic
laundry detergent is not suitable.
– overdosing of detergent
Dispense detergent following the detergent
manufacturer’s instructions on the packaging
and in accordance with local water hardness
levels*.
– detergent creates too much foam
Hardness
range
Water
quality
Hardness
level in
mmol/l
German
hardness
level °d
I soft 0 – 1.3 0 - 7
II medium 1.3 – 2.5 7 - 14
III hard 2.5 – 3.8 14 - 21
IV very hard over 3.8 over 21
*) If you do not know the hardness level of the
water in your area you should contact your
local water authority for information.
Large articles of laundry stretching during
the spin cycle.
Large articles of laundry might stretch during
the spin cycle.
Use a lower foaming detergent or contact
your detergent application specialist.
21 «M.-Nr. 06 411 840 - GB - »

Cleaning and Care
The machine should be cleaned and any
essential maintenance carried out,
immediately after use.
On no account use high pressure cleaners or
hose down the machine.
Build-up of rust
The drum and suds container are manufactured from rust-free stainless steel. It is, however, possible that water with a high iron content or foreign bodies in the wash, (e.g. paper
clips or metal buttons), may lead to the formation of superficial rust spots in the drum
and/or suds container, especially if the machine is not used for a long time. Stainless
steel components should be cleaned regularly
with a proprietary cleaning agent for stainless
steel. This must be done if rust appears!
To protect your machine from rust damage
we recommend the use of chloride-free disinfecting and cleaning agents. If you are unsure
about a particular agent you should contact
the manufacturer for advice.
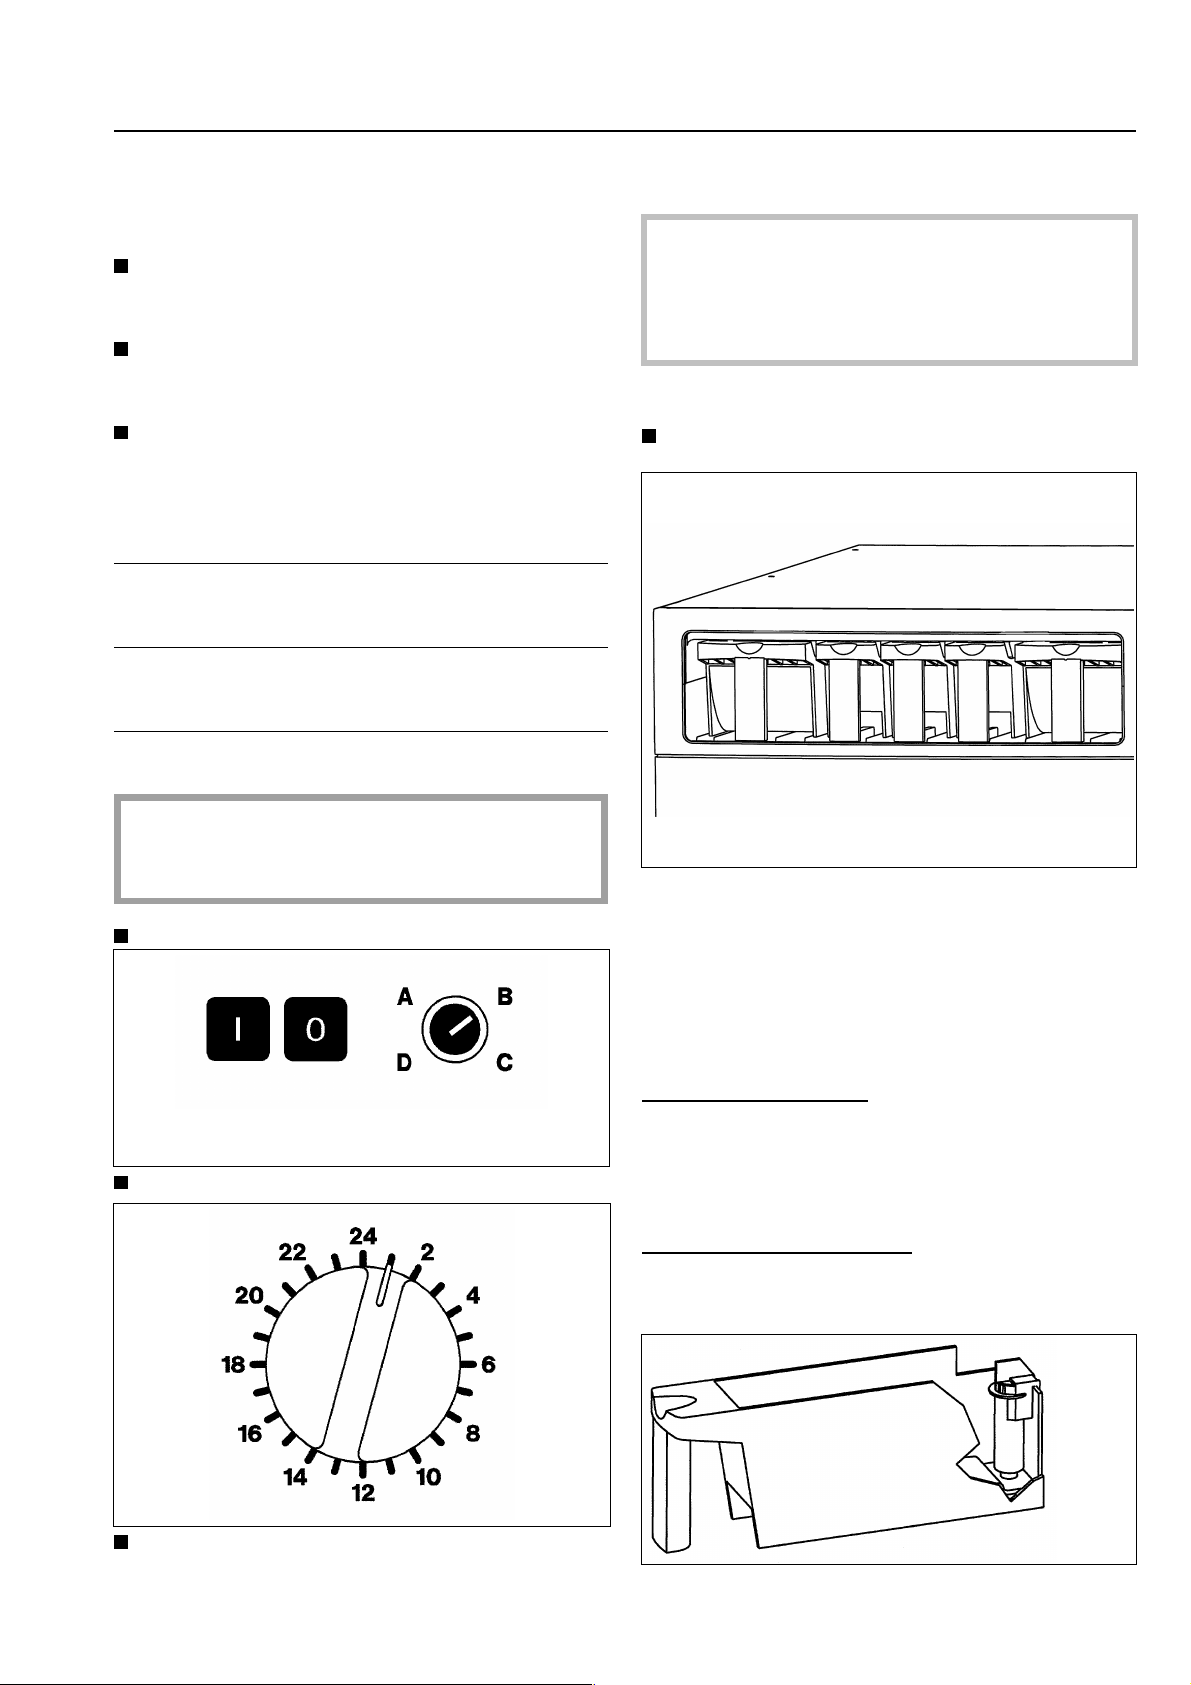
To clean the dispenser box and siphon
After use the dispenser compartment should
be cleaned with warm water to remove any
detergent or other residues.
The siphon tube in the detergent dispenser
dish should also be cleaned.
Remove the siphon tube and clean with hot
water. Put back in place.
Door seals should also be regularly checked
to make sure that nothing has got trapped in
them. Clean them regularly.
The housing and any plastic components, including control elements and the fascia panel
should be cleaned with appropriate mild
cleaners or with a damp cloth and wiped dry.
Use a proprietary stainlesss steel cleaner for
housing parts of stainless steel.
Any scouring agents will scratch the surface.
If you are unsure about a particular product or
need further advice please contact your nearest Miele Sales office. See back page for address.
Cleaning the cooling fan grille
➧
The ventilation slits in the grille cover for the
cooling fan at the rear of the machine must be
regularly checked for fluff and dirt and
cleaned whenever necessary.
«M.-Nr. 06 411 840 - GB - » 22

Cleaning and care
The filters in the water inlet valves must be
checked from time to time for soiling and
cleaned if necessary.
After about 1000 running hours apply grease
to the grease nipples on the rear service
panel.
When not in use for a longer period of
time:
If the machine is not going to be used for a
longer period of time (4 weeks or more) the
drum bearings should be lubricated and the
drum rotated several times after lubrication.
After use leave the door slightly open, to
allow the machine to dry out.
23 «M.-Nr. 06 411 840 - GB - »

Explanation of the symbols on the data plate
1 Machine type
2 Serial number
3 Voltage / Frequency
4 Control fusing
5 Drive motor
6 Plate diameter/Plate quantity *
7 Drum data
8 Drum diameter / drum depth
9 Spin speed
10 Drum volume / Laundry dry weight
11 Kinetic energy
12 Ex. time to top speed
13 Braking time
14 Heating
15 Electric heating
16 Fusing (on site)
17 Steam heating indirect
18 Steam heating direct
19 Gas heating
20 Commissioning date
21 Water registration (DVGW) test certificate
22 Field for CE test symbol...(Product ID-No./
Gas)
Noise level
registered on the "A" scale
During wash During spin
WS 5240 60.3 dB 82.2 dB
(measured in Germany in accordance with
DIN (IEC) 45 635 machine noise regulation
(3. GSGV § 1 1.a)
* does not apply to WS 5240
«M.-Nr. 06 411 840 - GB - » 24

Installation
Drum locks
Before use the drum locks must be
removed as follows:
Turn the drum locks through 90° and withdraw them.
The machine must not be transported without the drum locks in place.
To refit them please reverse the above procedure.
WARNING
THIS APPLIANCE MUST BE EARTHED
25 «M.-Nr. 06 411 840 - GB - »

«M.-Nr. 06 411 840 - GB - » 26

Inhaltsverzeichnis Indice
Sicherheitshinweise und Warnungen . . . . . . . . . . . . . . . . . . . . . . . . . 28
Gerätebeschreibung . . . . . . . . . . . . . . . . . . . . . . . . . . . . . . . . . . . 30
- Schalterblende . . . . . . . . . . . . . . . . . . . . . . . . . . . . . . . . . . . . . . 30
- Erklärung der Bedienungselemente . . . . . . . . . . . . . . . . . . . . . . . . . . . 31
Gebrauch . . . . . . . . . . . . . . . . . . . . . . . . . . . . . . . . . . . . . . . . . 34
- Einstellen der aktuellen Uhrzeit und Datum . . . . . . . . . . . . . . . . . . . . . . . 34
- Inbetriebnahme Schlüsselschalterstellung "A" . . . . . . . . . . . . . . . . . . . . . 34
- Entwässerung . . . . . . . . . . . . . . . . . . . . . . . . . . . . . . . . . . . . . . 36
- Inbetriebnahme Schlüsselschalterstellung "B" . . . . . . . . . . . . . . . . . . . . . 37
- Schlüsselschalterstellung "B", Programm 12 . . . . . . . . . . . . . . . . . . . . . . 39
- Startvorwahl / Startzeit einstellen nur in Schlüsselschalterstellung "B" . . . . . . . . . 39
Hinweise . . . . . . . . . . . . . . . . . . . . . . . . . . . . . . . . . . . . . . . . . 40
- Stärken . . . . . . . . . . . . . . . . . . . . . . . . . . . . . . . . . . . . . . . . . 40
- Ohne Schleudern . . . . . . . . . . . . . . . . . . . . . . . . . . . . . . . . . . . . 40
- Programmabbruch . . . . . . . . . . . . . . . . . . . . . . . . . . . . . . . . . . . . 41
Kundendienst . . . . . . . . . . . . . . . . . . . . . . . . . . . . . . . . . . . . . . 42
PC- Druckeranschluß . . . . . . . . . . . . . . . . . . . . . . . . . . . . . . . . . . . 42
Störungshilfen . . . . . . . . . . . . . . . . . . . . . . . . . . . . . . . . . . . . . . . 43
- Tür öffnet nicht . . . . . . . . . . . . . . . . . . . . . . . . . . . . . . . . . . . . . . 43
- Spannungsausfall während des Waschvorganges, Notentriegelung der Tür . . . . . . 43
- Fehlermeldungen . . . . . . . . . . . . . . . . . . . . . . . . . . . . . . . . . . . . 44
Reinigung und Pflege . . . . . . . . . . . . . . . . . . . . . . . . . . . . . . . . . . 46
Bedeutung der Symbole auf dem Typenschild . . . . . . . . . . . . . . . . . . . . 48
Hinweise für den Aufsteller . . . . . . . . . . . . . . . . . . . . . . . . . . . . . . . 49
Seite
27 M.-Nr. 06 411 840 - D

Sicherheitshinweise und Warnungen
Lesen Sie bitte die Gebrauchsanweisung,
bevor Sie Ihren Waschschleuderautomaten in Betrieb nehmen. Dadurch schützen
Sie sich und vermeiden Schäden an Ihrem
Waschschleuderautomaten.
Bestimmungsgemäße Verwendung des
Waschschleuderautomaten
Dieser Waschschleuderautomat ist nur
zur Anwendung für Wäsche, die nicht mit
gefährlichen oder entzündlichen Arbeitsstoffen durchsetzt ist, bestimmt.
Waschen Sie in diesem Waschschleuder-
automaten ausschließlich Textilien, die
vom Hersteller im Pflegeetikett als maschinenwaschbar deklariert sind.
Den Desinfektionsstandard, thermischer
sowie chemothermischer Verfahren (aus
der Liste, gemäß § 18 IFSG) hat der Betreiber in der Routine durch entsprechende Prüfungen sicherzustellen. Die Verfahren sollten
periodisch, thermoelektrisch mittels Loggern
oder bakteriologisch mittels Bioindikatoren
überprüft werden. Auf die Einhaltung des Verfahrensparameter, Temperatur und bei chemisch thermischen Programmen auch der
Konzentration hat der Betreiber insbesondere
zu achten. Desinfektionsprogramme dürfen
nicht unterbrochen werden, da sonst das Desinfektionsergebnis eingeschränkt sein kann.
Auf keinen Fall in diesem Waschschleu-
derautomaten chemisch reinigen! Bei den
meisten Reinigungsmitteln - z.B. Benzin - besteht Brand-/ Explosionsgefahr!
Technisch elektrische Sicherheit
Die elektrische Sicherheit dieser Maschi-
ne ist nur dann gewährleistet, wenn sie an
ein Schutzleitersystem angeschlossen wird.
Es ist sehr wichtig, daß diese grundlegende
Sicherheitsvorkehrung vorhanden ist. Im Zweifelsfall die Installation durch einen Fachmann
überprüfen lassen.
Der Hersteller kann nicht verantwortlich gemacht werden für Schäden, die durch eine
fehlende oder unterbrochene Schutzleitung
verursacht werden.
Beschädigen, entfernen oder umgehen
Sie nicht die Sicherheitseinrichtungen und
Bedienungselemente des Waschschleuderautomaten.
Maschinen bei denen Bedienungselemen-
te oder die Isolierung von Leitungen beschädigt sind, dürfen vor einer Reparatur
nicht mehr betrieben werden.
Benutzen Sie den Waschschleuderauto-
maten nur, wenn alle abnehmbaren
Außenverkleidungsteile montiert sind und
somit kein Zugriff zu stromführenden oder
sich drehenden Maschinenteilen besteht.
Der Waschschleuderautomat ist nur dann
elektrisch vom Netz getrennt, wenn der
Hauptschalter oder die Sicherung ausgeschaltet ist.
Reparaturen an den Maschinen dürfen
nur von Fachkräften durchgeführt werden.
Durch unsachgemäße Reparaturen können
erhebliche Gefahren für den Benutzer entstehen.
Lagern oder verwenden Sie in der Nähe
des Waschschleuderautomaten kein Benzin, Petroleum oder sonstige leicht entzündliche Stoffe. Benutzen Sie den Maschinendeckel nicht als Ablagefläche.
Brand- und Explosionsgefahr!
M.-Nr. 06 411 840 - D 28
Versuchen Sie nie, die Fülltür des Wasch-
schleuderautomaten gewaltsam zu öffnen.
Um die Sicherheitsfunktion des Türschlosses
zu gewährleisten, ist der Türgriff mit einer
Überreißsicherung versehen.
Defekte Bauteile dürfen nur gegen Miele
Original-Ersatzteile ausgetauscht werden.
Nur bei diesen Teilen gewährleisten wir, daß
sie im vollen Umfang die Sicherheitsanforderungen erfüllen, die wir an unsere Maschinen
stellen.

Sicherheitshinweise und Warnungen
Gerätebenutzung
Wenn Sie mit hohen Temperaturen waschen, denken Sie daran, daß das
Schauglas heiß wird.
Überzeugen Sie sich vor der Wäscheent-
nahme stets davon, daß die Trommel stillsteht. Beim Hineingreifen in eine noch drehende Trommel besteht erhebliche Verletzungsgefahr.
Das beim Waschen anfallende Wasser ist
Lauge und kein Trinkwasser!
Leiten Sie diese Lauge in ein entsprechend
dafür ausgelegtes Abwassersystem.
Der Einsatz von Chlor oder chlorhaltigen
Mitteln führt zu Korrosion und kann unter
bestimmten Bedingungen zum Ausfall von
Bauteilen führen.
Desinfektions- und Reinigungsmittel ent-
halten häufig chlorhaltige Verbindungen.
Trocknen solche Mittel auf Edelstahl-Oberflächen an, können die entstehenden Chloride
den Edelstahl angreifen und Rost erzeugen.
Versehentlich auf die Edelstahl-Oberfläche
geratene chlorhaltige Mittel mit Wasser abwaschen, danach die Oberfläche mit einem
Tuch trockenreiben.
Am sichersten schützen Sie den Edelstahl Ihres Gerätes vor Rostschäden, wenn Sie nur
chloridfreie Mittel zum Waschen/Desinfizieren
und zum Reinigen aller Edelstahlflächen verwenden. Lassen Sie sich im Zweifelsfall die
Unbedenklichkeit des Mittels durch den Hersteller bestätigen.
Die anwendungstechnische Empfehlung
chemischer Waschhilfsmittel bedeutet
nicht, dass der Gerätehersteller die Einflüsse
dieser Hilfsmittel auf das Waschgut und die
Waschmaschine verantwortet.
Beachten Sie, dass Produktveränderungen
die vom Hersteller dieser Hilfsmittel nicht bekanntgegeben wurden, die Qualität des Waschergebnisses beeinträchtigen können.
Färbe- / Entfärbemittel sowie Entkalkungs-
mittel müssen für den Einsatz in Waschschleuderautomaten geeignet sein. Beachten
Sie unbedingt die Verwendungshinweise des
Herstellers.
Zur Reinigung des Waschschleuderauto-
maten darf kein Hochdruckreiniger und
kein Wasserstrahl benutzt werden.
Werden weitere Personen in die Handha-
bung des Waschschleuderautomaten eingewiesen, so sind ihnen diese wichtigen Sicherheitshinweise zugängig zu machen
und/oder vorzutragen.
Bewahren Sie diese Gebrauchsanweisung
auf!
Achten Sie bei der Anwendung und Kom-
bination von Waschhilfsmitteln und Spezialprodukten unbedingt auf die Verwendungshinweise der Hersteller. Setzen Sie das
jeweilige Mittel nur für den vom Hersteller vorgesehenen Anwendungsfall ein um Materialschäden und heftigste chemische Reaktionen
zu vermeiden.
Lassen Sie sich die Unbedenklichkeit des
Einsatzes dieser Mittel in Waschmaschinen
durch den Waschmittelhersteller bestätigen.
29 M.-Nr. 06 411 840 - D

Gerätebeschreibung
Schalterblende
Schlüsselschalter Display (Anzeigefeld) Programmwahlschalter
Schalter "YNetzein" Taste "T Blockplus" Tasten "1 2 Cursor" Taste "X Start"
Schalter "Z Netzaus" Taste "U Stärkestop" Tasten "4 Plus 3 Minus" Taste "7 Ende"
Taste "V Schleuderstop" Taste "W Startvorwahl"
Zusatzfunktionstasten in Schlüsselschalterstellung "A" ohne Funktion
"9 Optische Schnittstelle"
Not-Aus-Schalter
Schalterblende
Waschmitteleinspülkasten
Magnettasche für
Waschmittelzugabeübersicht
(im Beipack)
Fülltür
Montageklappe
Sockelblende
M.-Nr. 06 411 840 - D 30

Gerätebeschreibung
1 2 3
Schalter "Y Netzein"
Schalter "Z Netzaus"
Schlüsselschalter
Stellung A - Bedienung
In diesem Betriebszustand können nur
die Programme 1 -13 gestartet werden.
Stellung B - Supervisor
Diese Schlüsselschalterstellung darf nur
durch den Supervisor genutzen werden.
In diesem Betriebszustand können alle
Programme gestartet werden. Im Display
erscheint immer das am Programmwahlschalter eingestellte Programm.
Stellung C - Programmierung
Wird benötigt um Programmabläufe neu
zu erstellen, zu kopieren, zu löschen, zu
verändern, auszudrucken, freizugeben
oder sie zu verriegeln.
Diese Schlüsselschalterstellung darf nur
vom Kundendiensttechniker genutzt werden.
Stellung D - Entriegeln
In diesem Betriebszustand können verriegelte Programme entriegelt werden.
Diese Schlüsselschalterstellung darf nur
vom Kundendiensttechniker genutzt werden.
Schlüssel für Schlüsselschalter
Schlüssel 1 (2 mal vorhanden) für den
Betriebszustand A und B.
Schlüssel 2 für den Betriebszustand
A, B, C.
Schlüssel 3 für den Betriebszustand
A, B, C, D.
Display (Anzeigefeld)
PROGRAMM 1 Universal 50°C
>50° C< Hauptwäsche 1
Spülgänge 3 1100 U/Min
à
Der Displayinhalt erscheint nach "Netzein". Es zeigt in 4 Zeilen mit je 40 Stellen
das am Programmwahlschalter eingestellte Programm an.
Nach Programmstart:
Zeitstrahl für den aktuellen Programmblock
Solltemperatur des aktuellen Programmblockes
Name des aktuellen Programmblockes
Programmnummer
Programmname
PROGRAMM 14 Universal Vario
60 °C Vorwäsche 25 °C
95 °C Hauptwäsche
à
Isttemperatur
Hinweis auf eine weitere Displayzeile
Name des nachfolgenden Programmblockes
Solltemperatur des nachfolgenden Programmblockes
31 M.-Nr. 06 411 840 - D

Gerätebeschreibung
Taste "X Start"
Das angewählte Programm wird gestartet.
Programmwahlschalter
Die Programmnummern 1 - 13 können direkt angewählt werden.
Die Programmnummer 14 kann nur angewählt werden, wenn der Schlüsselschalter in Stellung B steht.
Das angewählte Programm erscheint mit
Nummer und Namen im Display.
Wird der Programmwahlschalter nach Programmstart auf eine andere Position gedreht,
blinkt die erste Displayzeile. Es tritt jedoch keine Programmänderung ein.
Standardprogramme:
Programme in Schlüsselschalterstellung A
1 Universal 50°C
2 Universal 60°C
3 Medizinische Kleidung
4 Schlafsäcke
5 Kittel / Overalls
6 Natur Decken
7 Küchen Kleidung
8 Peripel
Taste "7 Ende"
Durch Betätigung wird ein Programm gestoppt (Stoppbetrieb). Bei nochmaliger
Betätigung sofort beendet. Ein gestopptes Programm kann durch Betätigung
der Taste "X Start" im entsprechenden
Programmschritt weiter geführt werden.
Zusatzfunktionen Schlüsselschalterstellung B
Taste "T Blockplus" mit Anzeigeleuchte
Mit der Tastenbetätigung leuchtet die Anzeigeleuchte über der Taste. Der entsprechende Programmblock (z.B.Vorwäsche)
wird dem Programm hinzugefügt. Bei
nochmaliger Betätigung der Taste wird
die Funktion wieder abgewählt.
9 Wartung
10 Extra Ablauf / Reset
11 Extra Schleudern
12 Universal kalt
13 Entwässerung
Programme in Schlüsselschalterstellung B
14 Universal Vario
Änderungen in den Programmen 1 - 13 sind
nicht möglich.
M.-Nr. 06 411 840 - D 32
Taste "U Stärkestopp" mit Anzeigeleuchte
Soll die Wäsche gestärkt werden, so ist
die Taste zu betätigen.
Die Anzeigeleuchte leuchtet auf.
Taste "V Schleuderstopp" mit Anzeige-
leuchte
Soll im Anschluß an das Spülen nicht geschleudert werden, so ist die Taste zu betätigen. Die Anzeigeleuchte leuchtet auf.

Gerätebeschreibung
Not-Aus-Schalter
Funkton nur in Schlüsselschalterstellung B:
Tasten "4 Plus 3 Minus"
Im ausgewählten Eingabefeld können
Veränderungen vorgenommen werden.
Eine Dauerbetätigung der Taste löst einen Schnelldurchlauf aus.
Taste "W Startvorwahl"
Mit Betätigung der Taste vor Programmstart erscheint im Display der Hinweis,
daß eine Startzeit gewählt werden kann.
Mit erneuter Betätigung wird die Startvorwahl wieder gelöscht.
Nach Programmstart wird mit Betätigung
der Taste die aktuelle Uhrzeit und Datum
angezeigt.
Betätigung nur bei Gefahr.
Nach Gefahrenbeseitigung wird der
Schalter durch Rechtsdrehung der gerändelten Scheibe entriegelt.
Nach der Entriegelung wird folgendes im Display angezeigt:
PROGRAMM 1 Universal 50°C
PROGRAMMSTOP
DURCH NETZ AUS !
Bitte die Starttaste drücken.
Es ist erneut die Taste "X Start" einzudrücken, damit das unterbrochene Programm
fortgesetzt wird.
33 M.-Nr. 06 411 840 - D

Gebrauch
Nur in Schlüsselschalterstellung B
Einstellen der aktuellen Uhrzeit u. Datum*
Maschine mit Schalter "Z Netzaus" ausschalten.
Schlüsselschalter in Stellung B bringen.
Taste "W Startvorwahl" und Schalter "Y
Netzein" zusammen betätigen und gedrückt halten, bis im Display folgendes angezeigt wird:
EINSTELLUNG VON UHRZEIT UND DATUM
Uhrzeit >14< : 30 Uhr
Datum 23. 03. 1995
Nach Einstellung Starttaste drücken.
Den Cursor mit der Taste "2 Cursor" auf
das Eingabefeld für Stunden stellen und
mit den Tasten "4 Plus 3 Minus" die
Stunde einstellen.
Den Cursor mit der Taste "2 Cursor" auf
das Eingabefeld für Minuten stellen und
mit den Tasten "4 Plus 3 Minus" die Minuten einstellen.
Schlüsselschalterstellung A
INBETRIEBNAHME
Bauseitige Wasserversorgung und Ablaufsystem in Betrieb nehmen.
Hauptschalter (bauseitig) einschalten.
Fülltür öffnen und Wäsche einfüllen.
Füllgewichte
WS 5240
Programm 1, 2, 3, 8, 12
max. 25 kg Wäschesäcke
Programm 4, 5, 6, 7, 8, 12
max. 25 kg einzelne Wäschestücke
Fremdkörper (z.B. Nägel, Münzen, Büroklammern) können Textilien und Bauteile
beschädigen.
Fülltür schließen.
Den Cursor auf Tag stellen und mit den
Tasten "4 Plus 3 Minus" den Tag einstellen.
Den Cursor auf Monat stellen und den Monat einstellen.
Den Cursor auf die Jahreszahl stellen und
einstellen.
Mit der Taste "X Start" speichern.
Wird die Startvorwahltaste während des
laufenden Programms betätigt, werden aktuelle Uhrzeit und Datum angezeigt.
*Die Pause zwischen den Programmierschritten darf
nicht länger als 25 Sekunden dauern, sonst springt das
Display wieder in den Grundzustand (wie Netzein) und
die Änderungen werden nicht übernommen.
t
Schalter "Y Netzein" betätigen.
M.-Nr. 06 411 840 - D 34

Gebrauch
Programm wählen (z.B. Programm 1
Universal 50°C).
Im Display wird (z.B.) folgendes angezeigt:
Waschmitteldosierung
Eine Überdosierung ist grundsätzlich zu vermeiden, da sie zur erhöhten Schaumbildung
führt.
Dosiermenge
Wasserhärte und die Angaben des Waschmittelherstellers berücksichtigen.
t
PROGRAMM 1 Universal 50°C
>50° C< Hauptwäsche 1
Spülgänge 3 1100 U/Min
Waschmittel hinzugeben.
Pre-Wash Peripel Main wash
1 3 4 5 2
Für Programmnummer 8: PERIPEL
Einspülschale 3 oder 4 dürfen nicht über
die Markierung hinaus gefüllt werden, da
sonst durch den Saugheber Peripel in die
Trommel laufen kann.
t
Taste "X Start" eindrücken
- das Waschprogramm läuft ab -.
Nach dem Programmstart wird der Programmablauf im Display angezeigt.
Für die Standardprogramme Waschmittel für
das Hauptwaschen in Einspülschale 2
- und falls gewünscht - Waschmittel für die
Vorwäsche in Einspülschale 1, Peripel in Einspülschale 3 und 4 eingeben. Einspülschale 5
wird nicht genutzt.
PROGRAMM 1 Universal 50°C
20 °C
Hauptwäsche
à
In der 1. Displayzeile wird der Name des gewählten Programmes angezeigt. In der 2. Displayzeile erscheint die aktuelle Laugentemperatur und der nach rechts wandernde
Zeitstrahl.
35 M.-Nr. 06 411 840 - D

Gebrauch
Programmendeanzeige
PROGRAMM 1 Universal 50°C
Spülgang 1
Spülgang 2
Programmende 11 : 25 Uhr
à
Nach Wasserablauf der letzten Heizphase
bzw. nach dem letzten Cool Down wird die
Stunde und Minute des Programmendes angezeigt.
Öffnen der Fülltür nach Programmende
Am Programmende bei Trommelstillstand und
kein Wasser in der Maschine wird (z.B.) folgendes im Display angezeigt:
PROGRAMM 1 Universal 50°C
PROGRAMMENDE
TÜR IST ENTRIEGELT!
Programm 13 "Entwässerung"
Dieses Programm dient zur Entwässerung
der Maschine bei Frostgefahr während längerer Betriebspausen.
Bevor das Programm gestartet wird, muß die
bauseitige Wasserversorgung geschloßen
und entleert sein.
Die Tür durch ziehen des Türgriffes öffnen.
Hinweis: Läßt sich die Tür nicht öffnen, ist
gegen die Tür zu drücken und anschließend nochmals der Türgriff zu ziehen. - Die Fülltür nie mit Gewalt öffnen! -
Waschgut entnehmen.
Ist das Programm mit Wasser in der Maschine oder im Schleudern abgebrochen worden
wird folgendes im Display angezeigt:
PROGRAMM 1 Universal 50°C
PROGRAMMENDE
TÜR IST VERRIEGELT
WASSER IST IN DER MASCHINE!
oder:
PROGRAMM 1 Universal 50°C
PROGRAMMENDE
TÜR IST VERRIEGELT
KEIN TROMMELSTILLSTAND!
Am Ende des Programmes müssen die zwei
Verschlußschrauben aus den Entlüftungsstutzen an der Rückseite der Maschine entfernt
werden. Aus den Öffnungen tritt Wasser aus,
das mit geeigneten Behältnissen aufgefangen
werden sollte.
Vor einer erneuten Inbetriebnahme die Entlüftungsschrauben wieder festschrauben und
auf Dichtigkeit überprüfen.
Die Tür ist veriegelt. Versuchen Sie nicht die
Tür gewaltsam zu öffnen.
Siehe "Störungshilfen".
M.-Nr. 06 411 840 - D 36

Gebrauch
Schlüsselschalterstellung B
INBETRIEBNAHME
Bauseitige Wasserversorgung und Ablaufsystem in Betrieb nehmen.
Hauptschalter (bauseitig) einschalten.
Fülltür öffnen und Wäsche einfüllen.
Füllgewichte
WS 5240
Programm 1, 2, 3, 8, 12, 14
max. 25 kg Wäschesäcke
Programm 4, 5, 6, 7, 8, 12, 14
max. 25 kg einzelne Wäschestücke
Fremdkörper (z.B. Nägel, Münzen, Büroklammern) können Textilien und Bauteile
beschädigen.
Fülltür schließen.
Im Display wird (z.B.) folgendes angezeigt:
PROGRAMM 1 Universal 50°C
>50° C< Hauptwäsche 1
Spülgänge 3 1100 U/Min
Waschmittel hinzugeben.
Pre-Wash Peripel Main wash
1 3 4 5 2
Für die Standardprogramme Waschmittel für
das Hauptwaschen in Einspülschale 2
- und falls gewünscht - Waschmittel für die
Vorwäsche in Einspülschale 1, Schönungsmittel in Einspülschale 3 und 4 eingeben. Einspülschale 5 wird nicht genutzt.
t
Schalter "Y Netzein" betätigen.
Programm wählen (z.B. Programm 1
Universal 50°C).
Waschmitteldosierung
Eine Überdosierung ist grundsätzlich zu vermeiden, da sie zur erhöhten Schaumbildung
führt.
Dosiermenge
Wasserhärte und die Angaben des Waschmittelherstellers berücksichtigen.
t
37 M.-Nr. 06 411 840 - D

Gebrauch
Einspülschale 3 oder 4 dürfen nicht über
die Markierung hinaus gefüllt werden, da
sonst durch den Saugheber Peripel in die
Trommel laufen kann.
t
Taste "X Start" eindrücken
- das Waschprogramm läuft ab -.
Nach dem Programmstart wird der Programmablauf im Display angezeigt.
PROGRAMM 1 Universal 50°C
20 °C
Hauptwäsche
à
In der 1. Displayzeile wird der Name des gewählten Programmes angezeigt. In der 2. Displayzeile erscheint die aktuelle Laugentemperatur und der nach rechts wandernde
Zeitstrahl.
Programmendeanzeige
PROGRAMM 1 Universal 50°C
Spülgang 1
Spülgang 2
Programmende 11 : 25 Uhr
à
Öffnen der Fülltür nach Programmende
Am Programmende bei Trommelstillstand und
kein Wasser in der Maschine wird (z.B.) folgendes im Display angezeigt:
PROGRAMM 1 Universal 50°C
PROGRAMMENDE
TÜR IST ENTRIEGELT!
Die Tür durch ziehen des Türgriffes öffnen.
Hinweis: Läßt sich die Tür nicht öffnen, ist
gegen die Tür zu drücken und anschließend nochmals der Türgriff zu ziehen. - Die Fülltür nie mit Gewalt öffnen! -
Waschgut entnehmen.
Ist das Programm mit Wasser in der Maschine oder im Schleudern abgebrochen worden
wird folgendes im Display angezeigt:
PROGRAMM 1 Universal 50°C
PROGRAMMENDE
TÜR IST VERRIEGELT
WASSER IST IN DER MASCHINE!
oder:
PROGRAMM 1 Universal 50°C
PROGRAMMENDE
TÜR IST VERRIEGELT
KEIN TROMMELSTILLSTAND!
Die Tür ist veriegelt. Versuchen Sie nicht die
Tür gewaltsam zu öffnen.
Siehe "Störungshilfen".
Nach Wasserablauf der letzten Heizphase
bzw. nach dem letzten Cool Down wird die
Stunde und Minute des Programmendes angezeigt.
M.-Nr. 06 411 840 - D 38

Gebrauch
Schlüsselschalterstellung B, Programm 14
Folgende Parameter können vor Programmstart nach Bedarf verändert werden:
Die Temperatur in 1 °C-Stufen von kalt, 15
bis max. 95 °C .
Die Schleuderdrehzahl in 100 U/Min-Stufen
von 0, 300 bis max. 1100.
Den Cursor mit der Taste "2 Cursor" auf
das Eingabefeld für die Temperatur der
Vorwäsche stellen und mit den Tasten
"4 Plus 3 Minus" die gewünschte Temperatur einstellen.
Den Cursor auf das Eingabefeld für die
Temperatur der Hauptwäsche stellen und
mit den Tasten "4 Plus 3 Minus" die gewünschte Temperatur einstellen.
Den Cursor auf das Eingabefeld für die
Schleuderdrehzahl stellen und mit den Tasten "4 Plus 3 Minus" die gewünschte
Drehzahl einstellen.
Im Display wird (hier) folgendes angezeigt:
PROGRAMM 14 Universal vario
Startzeit >14< : 30 Uhr
Nach Einstellung der Startzeit ist die
Starttaste zu drücken.
Es erscheint immer zuerst die aktuelle Uhrzeit.
Der Cursor steht auf dem Eingabefeld für
Stunden.
Mit Tasten "4 Plus 3 Minus" die Startstunde anwählen.
Den Cursor auf das Eingabefeld für Minuten stellen und mit den Tasten "4 Plus 3
Minus" die Minuten anwählen.
Hinweis:
Vor Betätigung der Starttaste ist das Löschen
der Startzeit durch erneute Betätigung der
Startvorwahltaste oder Aus- und Einschalten
der Maschine möglich.
Startvorwahl
Nur in Schlüsselschalterstellung B
Soll einem Programm eine Startzeit zugeordnet werden, so kann über die "Startvorwahltaste" ein späterer Zeitpunkt zum Waschen gewählt werden.
Startzeit einstellen
Schlüsselschalter in Stellung B (Betrieb)
stellen.
Maschine einschalten, und über den Programmwahlschalter gewünschtes Programm einstellen.
Im Display wird folgendes angezeigt:
PROGRAMM 14 Universal vario
>95 °C< Hauptwäsche 1
Spülgänge 3 1100 U/Min
Taste "X Start" betätigen, die Startvorwahl ist abgeschlossen und
im Display wird folgendes angezeigt:
PROGRAMM 14 Universal vario
95 °C Hauptwäsche 1
Startzeit 18 : 30 Uhr
Mit Erreichen der Startzeit startet das Programm und das Display zeigt den Programmablauf an. Wird die Taste "W Startvorwahl"
während des laufenden Programms betätigt,
werden aktuelle Uhrzeit und Datum angezeigt.
Abbruch der Startvorwahl mit der Taste
"7 Ende".
Taste "W Startvorwahl" betätigen.
39 M.-Nr. 06 411 840 - D

Hinweise
Stärken (Schlüsselschalterstellung "B")
t
Stärken kann in allen Programmen (außer Extra Schleudern und Extra Ablauf) hinzugewählt werden, die Anzeigeleuchte über der
Taste leuchtet auf.
PROGRAMM 14 Universal vario
Spülgang 3
STÄRKESTOP!
Stärken u. Stärkestoptaste drücken.
Wird der Programmpunkt "Stärken" erreicht,
blinkt im Display "Stärkestop".
Das Programm wird durch Betätigen der Taste "U Stärkestop" fortgesetzt (die Anzeigeleuchte erlischt). Die nach Herstellerangaben
aufbereitete Stärke dem einfließenden Wasser über die betreffende Einspülschale zugeben. Die Waschzeit wird automatisch um 4 Minuten verlängert.
Ohne Schleudern
(Schlüsselschalterstellung "B")
t
Schleuderstop kann in allen Programmen
(außer Extra Schleudern) hinzugewählt werden, die Anzeigeleuchte über der Taste leuchtet auf.
PROGRAMM 14 Universal vario
Spülgang 3
SCHLEUDERSTOP!
Schleuderstop- oder Endetaste drücken.
Wird der Programmpunkt "Schleudern" erreicht, blinkt im Display "Schleuderstop".
Durch erneute Betätigung der Taste "V
Schleuderstop" kann das Programm mit
Schleudern fortgesetzt werden.
Taste "7 Ende" betätigen und das Programm
wird mit Wasser in der Maschine beendet.
Einfüllen der Stärke direkt in die Trommel
Wird der Programmpunkt "Stärken" erreicht,
blinkt im Display "Stärkestop".
Die Fülltür öffnen und die nach Herstellerangaben aufbereitete Stärke zugeben. Fülltür
schließen -im Display erscheint "Programmstop durch Netzaus"- und Taste "X Start" betätigen. Im Display erscheint wieder folgende
Meldung:
PROGRAMM 14 Universal vario
Spülgang 3
STÄRKESTOP!
Stärken u. Stärkestoptaste drücken.
Taste "U Stärkestop" betätigen (die Anzeigeleuchte erlischt) und das Programm läuft weiter.
M.-Nr. 06 411 840 - D 40

Hinweise
Programmabbruch
(Schlüsselschalterstellung "B")
t
Soll das Programm abgebrochen werden, so
ist die Taste "7 Ende" zwei mal hintereinander zu betätigen.
Ist das Programm mit Wasser in der Maschine oder im Schleudern abgebrochen worden
wird (z.B.) folgendes im Display angezeigt:
PROGRAMM 14 Universal vario
PROGRAMMENDE
TÜR IST VERRIEGELT
WASSER IST IN DER MASCHINE!
oder:
PROGRAMM 14 Universal vario
PROGRAMMENDE
TÜR IST VERRIEGELT
KEIN TROMMELSTILLSTAND!
Programm Extra Ablauf oder Extra Schleudern wählen und starten um die Tür öffnen zu
können.
41 M.-Nr. 06 411 840 - D

Kundendienst PC- Druckeranschluß
Bei Störungen benachrichtigen Sie bitte den
Werks-Kundendienst.
Der Kundendienst benötigt Typ, Maschinennummer (Fabr.-Nr.) und Material-Nummer
(M.-Nr.). Diese Angaben finden Sie auf den
Typenschildern:
Bei geöffneter Tür, oder:
PC- Druckeranschluß
Der Anschluß eines PC’s (Personal Computers) oder Druckers an die Maschine ist durch
Einbau des Montagesatzes SD möglich.
PC-Betrieb:
Über den PC können Programmveränderungen vorgenommen werden, oder neue Programme aufgespielt werden.
Ein entsprechendes Editorprogramm erhalten
Sie über Ihr Vertriebszentrum oder
Miele-Fachhändler.
Drucker-Betrieb:
Es können ganze Programme oder Programmbereiche ausgedruckt werden. Siehe
Programmieranweisung.
oben an der Maschinenrückseite.
Im Ersatzfall dürfen ausschließlich Original-Ersatzteile verwendet werden (auch in
diesem Fall benötigt der Kundendienst Typ,
Maschinennummer (Fabr.-Nr.) und MaterialNummer (M.-Nr.).
M.-Nr. 06 411 840 - D 42

Störungshilfen
Die Tür läßt sich nicht öffnen
Gegen den Türgriff drücken, die Maschine
aus- und einschalten und anschließend nochmals den Türgriff ziehen.
Die Sicherung des Türgriffes ist ausgerastet.
Der Türgriff hat seine Funktion verloren. Die
Tür kann jetzt weder geöffnet noch geschlossen werden.
Das Ausrasten der Sicherung soll eine Beschädigung des Türgriffes und Schlosses
bei gewaltsamer Öffnung der Tür verhindern.
Spannungsausfall während des Waschvorganges, Notentriegelung der Tür
Bei kurzzeitigem Spannungsausfall:
Das Programm bleibt in der zuletzt eingenommenen Position stehen und im Display erscheint nach Spannungswiederkehr folgende
Meldung:
PROGRAMM 1 Universal 50°C
PROGRAMMSTOP
DURCH NETZAUS!
Bitte die Starttaste drücken.
Taste "X Start" betätigen, das Programm
wird fortgesetzt.
Bei längerem Spannungsausfall:
Zum Entnehmen der Wäsche muß zuerst das
Ablaufventil manuell geöffnet und danach die
Fülltür manuell entriegelt werden.
Kräftig gegen den Türgriff drücken, bis die Sicherung deutlich hörbar wieder einrastet.
- Die Tür kann wieder geöffnet oder geschlossen werden.
Läßt sich die Tür dann noch nicht öffnen, das
Programm Nr. 10 "Extra Ablauf / Reset" starten. Nach dem Ende des Programmes läßt
sich die Tür öffnen.
Das Ablaufventil durch Lösen der Entlüftungsschraube (Schlüsselweite 17) an der Maschinenrückseite öffnen, aber nicht ganz herausdrehen. Die Lauge ablaufen lassen.
Achtung! Aus der Schraubenöffnung tritt geringfügig Wasser aus (ca. 100 ccm), das mit
einem geeigneten Behältnis aufgefangen werden sollte. Entlüftungsschraube anschließend
wieder festschrauben und auf Dichtigkeit überprüfen.
43 M.-Nr. 06 411 840 - D

Störungshilfen
Den Schraubendreher zuerst in die Öffnung
stecken, hineindrücken und festhalten.
Mit der rechten Hand gegen den Türgriff
drücken, und anschließend durch Ziehen des
Türgriffes die Fülltür öffnen.
- Die Fülltür nie mit Gewalt öffnen! -
Wäsche entnehmen.
Ist der Wassereinlauf blockiert, erscheint im
Display die Fehlermeldung "WasserzulaufFehler" und das Programm wird unterbrochen.
PROGRAMM 1 Universal 50°C
PROGRAMMSTOP
WASSERZULAUF-FEHLER!
Wasserhahn öffnen und "Starttaste" drücken.
Wasserhahn öffnen und Taste "X Start" betä-
tigen.
PROGRAMM 1 Universal 50°C
PROGRAMMSTOP
WASSERABLAUF-FEHLER!
Ablauf reinigen u. Starttaste drücken.
Bauseitiges Ablaufsystem überprüfen und Taste "X Start" betätigen. Ein defektes Ablaufventil darf nur durch den Kundendienst repariert werden.
PROGRAMM 1 Universal 50°C
PROGRAMMSTOP
HEIZSYSTEM-FEHLER!
Kurzschluß am Heizungsfühler 1.
Fehlermeldungen
Reparaturen an den Maschinen dürfen nur
von Fachkräften durchgeführt werden. Durch
unsachgemäße Reparaturen können erhebliche Gefahren für den Benutzer entstehen.
Treten vor oder nach Programmstart Fehlfunktionen auf, so werden diese blinkend im Display angezeigt.
PROGRAMM 1 Universal 50°C
PROGRAMMSTOP
DURCH NETZAUS!
Bitte die Starttaste drücken.
Bei Netzwiederkehr Taste "X Start" betätigen.
Diese Fehlermeldung kann auch bedeuten:
Der Wicklungsschutz des Antriebsmotors hat
ausgelöst. - Motor abkühlen lassen.
Rufen Sie den Kundendienst.
PROGRAMM 1 Universal 50°C
PROGRAMMSTOP
HEIZSYSTEM-FEHLER!
Unterbrechung am Heizungsfühler 1.
Rufen Sie den Kundendienst.
PROGRAMM 1 Universal 50°C
PROGRAMMSTOP
HEIZSYSTEM-FEHLER!
Rufen Sie den Kundendienst.
PROGRAMM 1 Universal 50°C
PROGRAMMSTOP
ANTRIEBSSYSTEM-FEHLER!
Codierstecker-Antriebsvariante fehlt.
M.-Nr. 06 411 840 - D 44
Rufen Sie den Kundendienst.

Störungshilfen
PROGRAMM 1 Universal 50°C
50 °C Hauptwäsche 20 °C
Spülen 1
ANTRIEBSSYSTEM-FEHLER!
Luftschlitze des Kühlgebläses reinigen (siehe
Seite 46).
Rufen Sie den Kundendienst, wenn 30 Minuten nach dieser Meldung keine Waschbewegung mehr stattfindet.
PROGRAMM 1 Universal 50°C
PROGRAMMSTOP
UNWUCHTSCHALTER!
Ein-/Ausschalter drücken.
Schalter "Z Netzaus"und "Y Netzein"
drücken.
PROGRAMM 1 Universal 50°C
PROGRAMMSTOP
HEIZSYSTEM-FEHLER!
Der Trockengehschutz hat ausgelöst.
Rufen Sie den Kundendienst.
– sehr weiches Wasser
Bei Wasser im Härtebereich 1 entsprechend den Angaben des Waschmittelherstellers weniger dosieren.
– Verschmutzungsgrad des Waschgutes
Bei leicht verschmutztem Waschgut entsprechend den Angaben des Waschmittelherstellers weniger dosieren.
– geringe Beladungsmenge
Die Waschmitteldosierung entsprechend
verringern.
Bei den Maschinen ist es möglich in
Schlüsselschalterstellung "B" und Programmnummer 14 die Trommeldrehzahl
und den Waschrhythmus während der Aufheizphase zu verringern.
Wasserhärten
Härte-
bereich
Wasser-
eigen-
schaften
Gesamt-
härte in
mmol/l
deutsche
Härte
°d
Mögliche Ursachen der erhöhten Schaumbildung:
– Waschmittelsorte
Verwenden Sie Waschmittel, die für gewerbliche Waschmaschinen geeignet sind.
Haushaltswaschmittel sind nicht geeignet.
– Überdosierung des Waschmittels
Beachten Sie die Dosierangaben des
Waschmittelherstellers und dosieren Sie
entsprechend der örtlichen Wasserhärte*.
– stark schäumendes Waschmittel
Setzen Sie ein weniger stark schäumendes
Waschmittel ein oder ziehen Sie einen
Waschmittelanwendungstechniker hinzu.
I weich 0 - 1,3 0 - 7
II mittel 1,3 - 2,5 7 - 14
III hart 2,5 - 3,8 14 - 21
IV sehr hart über 3,8 über 21
*) Wenn Sie den Härtebereich nicht kennen,
informieren Sie sich bei Ihrem Wasserversorgungsunternehmen.
Aufspannen von großen Wäschestücken
während des Schleuderns
Es kann vorkommen, daß sich große Wäschestücke (z.B. Tischdecken) während des Schleuderns aufspannen.
45 M.-Nr. 06 411 840 - D

Reinigung und Pflege
Reinigung und Pflege möglichst nach Gebrauch des Waschschleuderautomaten vornehmen.
Zur Reinigung des Waschschleuderautomaten darf kein Hochdruckreiniger und kein Wasserstrahl benutzt werden.
Fremdrostbildung
Desinfektions- und Reinigungsmittel enthalten
häufig chlorhaltige Verbindungen. Trocknen
solche Mittel auf Edelstahl-Oberflächen an,
können die entstehenden Chloride den Edelstahl angreifen und Rost erzeugen. Versehentlich auf die Edelstahl-Oberfläche geratene chlorhaltige Mittel mit Wasser abwaschen,
danach die Oberfläche mit einem Tuch
trockenreiben.
Am sichersten schützen Sie den Edelstahl Ihres Gerätes vor Rostschäden, wenn Sie nur
chloridfreie Mittel zum Waschen/Desinfizieren
und zum Reinigen aller Edelstahlflächen verwenden. Lassen Sie sich im Zweifelsfall die
Unbedenklichkeit des Mittels durch den Hersteller bestätigen.
Wassereinspülkasten, Einspülschalen und
Saugheber reinigen
Der Waschmitteleinspülkasten und die Einspülschalen sind nach Gebrauch mit warmem
Wasser gründlich von Waschmittelrückständen und Verkrustungen zu säubern.
Reinigen Sie ebenfalls die Saugheber der Einspülschalen für Waschhilfsmittel.
Saugheber herausziehen, mit warmem
Wasser reinigen und anschließend wieder einsetzen.
Die Trommel und der Laugenbehälter sind
aus rostfreiem Edelstahl hergestellt. Eisenhaltiges Wasser oder eisenhaltige Fremdkörper
(z.B. Büroklammern, Eisenknöpfe oder Eisenspäne) die mit dem Waschgut eingebracht
werden, können zu Fremdrostbildung in der
Trommel bzw. dem Laugenbehälter führen.
Reinigen Sie in diesem Fall die Trommel bzw.
den Laugenbehälter regelmäßig und unmittelbar nach Auftreten des Fremdrostes mit handelsüblichen Edelstahlpflegemittel.
Die Türdichtungen sind auf eisenhaltige Rückstände zu kontrollieren und mit oben genannten Mitteln gründlich zu reinigen. Diese
Maßnahmen sind Vorbeugend regelmäßig
durchzuführen.
Waschmaschinengehäuse, Schalterblende
und Kunststoffteile nur mit einem milden Reinigungsmittel oder einem weichen, feuchten
Tuch reinigen und anschließend trockenreiben.
Zur Reinigung der Gehäuseteile aus Edelstahl ist ein handelsüblicher Edelstahlreiniger
zu verwenden.
Scheuermittel zerkratzen die Oberfläche.
Luftschlitze des Kühlgebläses reinigen
➧
Die Luftschlitze der Abdeckung des Kühlgebläses an der Rückseite des Waschschleuderautomaten sind regelmäßig auf Verflusung zu
kontrollieren und gegebenenfalls zu reinigen.
M.-Nr. 06 411 840 - D 46

Reinigung und Pflege
Die Siebe in den Wasserzulaufventilen sind
von Zeit zu Zeit auf Verschmutzung zu kontrollieren und gegebenenfalls zu reinigen.
Trommelwellenlager nach ca. 1000 Betriebsstunden über Schmiernippel an der Verbindungsleiste abschmieren.
Stillstandzeiten
Bei einer längeren Stillstandzeit der Maschine
(ab 4 Wochen) ist die Trommellagerung entsprechend dem Wartungshinweis vor dem
Stillstand zu fetten und die Trommel einige
Umdrehungen zu drehen.
Damit der Waschschleuderautomat nach
Gebrauch austrocknen kann, ist die Fülltür
nicht zu schließen, sondern nur anzulehnen.
47 M.-Nr. 06 411 840 - D

Bedeutung der Symbole auf dem Typenschild
1 Maschinentyp
2 Maschinennummer/Baujahr*
3 Spannung/Frequenz
4 Steuersicherung
5 Antriebsmotor
6 Tellerdurchmesser* /Telleranzahl*
7 Trommeldaten
8 Trommeldurchmesser/Trommeltiefe
9 Schleuderdrehzahl
10 Trommelinhalt/Wäschetrockengewicht
11 Kinetische Energie
12 Hochlaufzeit
13 Bremszeit
14 Heizung
15 Elektroheizung
16 Sicherung (bauseitig)
17 Dampfheizung indirekt
18 Dampfheizung direkt
19 Gasheizung
20 Inbetriebnahmedatum
21 DVGW-Reg.-N° (Wasser)
22 Feld für Prüfzeichen/CE-.....(Produkt-ID-
Nummer/Gas
*)gilt nicht für WS 5240
Geräuschemission
A-bewerteter Schalleistungspegel
Waschen Schleudern
WS 5240 EL 60,3 dB 82,2 dB
gemessen nach DIN (IEC) 45 635 Kennzeichnung nach Maschinen-Lärmverordnung
3. GSGV § 1 1.a
M.-Nr. 06 411 840 - D 48

Hinweise für den Aufsteller
Transportsicherung
Die Transportsicherung um 90 Grad drehen
und herausziehen.
Bewahren Sie die Transportsicherung auf.
Sie muß vor dem Transport der Maschine
wieder montiert werden.
Zur Montage in umgekehrter Reihenfolge
wie oben beschrieben verfahren.
Achtung!
Die elektrische Sicherheit dieser Maschine ist
nur dann gewährleistet, wenn sie an ein
Schutzleitersystem angeschlossen wird.
Es ist sehr wichtig, daß diese grundlegende
Sicherheitsvorkehrung vorhanden ist.
49 M.-Nr. 06 411 840 - D

M.-Nr. 06 411 840 - D 50

51 M.-Nr. 06 411 840 - D

Alteration rights reserved 43.04
Änderungen vorbehalten
This paper is made from 100% chlorine free bleached cellulose.
Dieses Papier besteht aus 100% chlorfrei gebleichtem Zellstoff und ist somit umweltschonend.
 Loading...