


Metz MF 72TK80, MF 72TK81, MF 72TK86, MF 82TK96, MF 82TK97 User Manual
...Operating instruction
Spectral-72 MF 72TK80
Astral-72 MF 72TK81
Corum-72 MF 72TK86
Spectral-82 MF 82TK96
Astral-82 MF 82TK97
Spectral-84 MF 84TK89
04/13/22
603 47 2021.A2

Foreword |
Contents |
Dear customer,
thank you for purchasing this Metz product.
We have equipped this TV set with a menu system which uses "file cards" and believe that this will provide you with a user interface that is easy to understand.
If you have any problems, you can press the "INFO" key to display a help function that will assist you in setting up your TV set.
However, you should read at least sections 1 to 7 of the Operating Instructions before putting your new TV set into service.
Your METZ-WERKE
1. Installation . . . . . . . . . . . . . . . . . . . . . . . . . . . 3 2. Safety Notes . . . . . . . . . . . . . . . . . . . . . . . . . . 4 3. Remote Control Unit . . . . . . . . . . . . . . . . . . . . 6 4. General Operating Notes . . . . . . . . . . . . . . . 12 5. Daily Operation . . . . . . . . . . . . . . . . . . . . . . 14 5.1 Setting the operating mode . . . . . . . . . . . . . 15 5.2 Operating scope . . . . . . . . . . . . . . . . . . . . . 15 6. Setting language and country . . . . . . . . . . . . 17 7. Programming Stations . . . . . . . . . . . . . . . . . . 18 8. Station logo . . . . . . . . . . . . . . . . . . . . . . . . . 21 9. Sorting Stations. . . . . . . . . . . . . . . . . . . . . . . 22 10. Selecting stations. . . . . . . . . . . . . . . . . . . . . 23 11. Picture settings, general . . . . . . . . . . . . . . . . 24 11.1 Picture settings for a specific prog. position . . . . 26 12. Sound settings, general . . . . . . . . . . . . . . . . 27 12.1 Sound settings for a specific prog.e position . . . 29 12.2 HiFi output . . . . . . . . . . . . . . . . . . . . . . . . 30 12.3 Two-stage muting . . . . . . . . . . . . . . . . . . . 31 12.4 Centre loudspeaker . . . . . . . . . . . . . . . . . . 32 13. Colour standard . . . . . . . . . . . . . . . . . . . . . 33 14. Display configuration . . . . . . . . . . . . . . . . . 34 15. Chlidlock . . . . . . . . . . . . . . . . . . . . . . . . . . 35 16. Reminder . . . . . . . . . . . . . . . . . . . . . . . . . . 37 17. Timer control. . . . . . . . . . . . . . . . . . . . . . . . 38 18. Setting the time . . . . . . . . . . . . . . . . . . . . . . 39 19. Function keys . . . . . . . . . . . . . . . . . . . . . . . 40 20. Special functions . . . . . . . . . . . . . . . . . . . . . 41 21. Teletext . . . . . . . . . . . . . . . . . . . . . . . . . . . . 44 22. AV devices . . . . . . . . . . . . . . . . . . . . . . . . . 47 22.1 AV playback . . . . . . . . . . . . . . . . . . . . . . . 49 22.2 Copying recordings between AV devices . . . 51 23. EPG - NexTView . . . . . . . . . . . . . . . . . . . . . 52 23.1 EPG - Activating NexTView . . . . . . . . . . . . 53 23.2 Collecting NexTView Data . . . . . . . . . . . . . 54 23.3 Using NexTView.. . . . . . . . . . . . . . . . . . . . 55 24. Satellite system (only if fitted) . . . . . . . . . . . . 58 25. Automatic SAT station search . . . . . . . . . . . . 62 26. Specific SAT station search. . . . . . . . . . . . . . 63 27. One-touch SAT recording. . . . . . . . . . . . . . . 64 28. SAT timer recording . . . . . . . . . . . . . . . . . . 65 29. Initial programme position . . . . . . . . . . . . . . 66 30. Operation without the remote control unit . . . 67 31. Technical Data . . . . . . . . . . . . . . . . . . . . . . 68 32. Options . . . . . . . . . . . . . . . . . . . . . . . . . . . 69 33. Connecting headphones . . . . . . . . . . . . . . . 70 34. Cleaning the TV set . . . . . . . . . . . . . . . . . . . 70 35. Glossary. . . . . . . . . . . . . . . . . . . . . . . . . . . 71
Troubleshooting . . . . . . . . . . . . . . . . . . . . . 74 Connecting facilities at back-panal of TV-sets . . . 76 Index. . . . . . . . . . . . . . . . . . . . . . . . . . . . . 77 Codetabel . . . . . . . . . . . . . . . . . . . . . . . . . 80
2

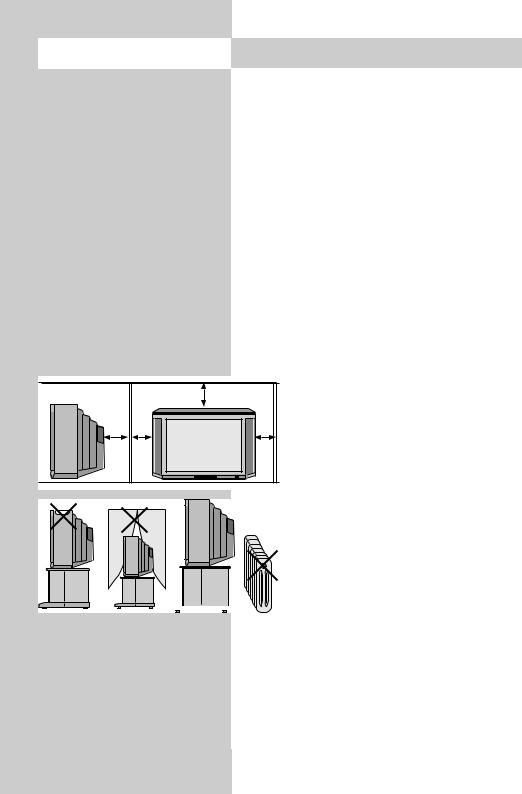
1.Installation
•Take care that no bright artificial light or sunshine falls directly on the screen. This could cause reflections which have a negative effect on the brilliance of the picture.
 5x cm
5x cm
• The optimum viewing distance is about
five times the screen diagonal dimension. For TV sets with a 70 cm screen, it
is thus about 3.5 metres.
•The antenna cable and any other components (such as a video recorder) connected between the antenna socket in the wall and the TV set must comply with the European standard EN 60966-2-4.
•There may be no magnetic fields in the immediate vicinity of the TV set. Keep loudspeaker boxes well away from the set.
•The antenna cable used for connecting the TV set must have a screening attenuation of at least 75 dB.
•The use of non-approved cables will invalidate the operating permission for the TV set.
•For details of how to connect peripheral devices such as video recorders, DVD players, etc. press the „INFO“ key to call the help function, select „Connecting AV devices“ with the cursor and press „OK“ to display the information.
cm |
|
3
2. Safety notes
•Always place the monitor on a solid, stable surface.
•If a cold TV set is moved to a warm room, always allow any condensation on the screen to evaporate before switching it on.
•The TV set is intended for use in a dry room. If, in exceptional circumstances, you use it outdoors, take care that is protected against moisture (rain, splashed water, dew).
•TV sets need adequate ventilation. Never cover the openings on the rear of the set with curtains, doilies, newspapers, etc. Also take care that the slits in the bottom of the case are freely accessible so that the intake of the cooling air is not hindered.
|
•If you place the TV set in a wall unit, leave sufficient space on all sides for the circulation of cooling air.
•Do not place the TV set close to a radiator, since this would effect adequate cooling.
• Do not place
burning candles or

 vessels containing liquids (vases, etc.) on top of the TV set, since any hot wax or water dripping into the set could cause serious damage to the electronic components and could also jeopardize the electrical safety of the set.
•Lightning can damage electrical equipment. A lightning flash entering the power cable or the aerial cable can damage the TV set even if it is
4

2. Safety notes
switched off. You should therefore disconnect the power cable and aerial cable from their outlets or from the TV set in the case of a thunderstorm.
•The monitor may be opened and repaired only by a qualified person.
CAUTION! HIGH VOLTAGES CAN KILL! If repairs should be necessary, consult your local dealer.
•Always switch off the TV set before cleaning it.
•Do not hold the remote control directly in front of your eyes and press a button. The remote control emits infrared radiation!
•Do not place rechargeable batteries in the battery compartment of the remote control.
Use only two 1.5 V dry batteries of the type LR03/AM4/AAA (Micro).
•The TV set is intended only for the reception and reproduction of picture and sound signals.
•The TV set may be operated only from a mains voltage of 230 VAC, 50/60 Hz.
240 VAC in Australia only
•Lay the power cable so that nothing stands on it and no-one can trip over it.
5

3. Remote control unit
21


The Metz remote control unit RG 12 can be used to remotely control all Metz TV sets with the type designation "TH" (see
the Operating Instructions of the TV set or look at the label on the back of the set) or later models (such as TK, TL, ...)
as well as video recorders VCR1 and VCR 2, DVD players and HiFi equip-
|
|
ment (such as radios, cassette players, |
|
||
|
|
CD players, amplifiers, etc.) made by |
|
||
|
|
Metz or various other manufacturers. |
|
|
The remote control unit transmits com- |
|
|
mands to the TV set with the aid of infra- |
|
|
|
|
|
red light. You should always point the |
|
|
remote control unit directly at the TV set. |
|
|
The remote control unit may possibly inter- |
|
|
fere with other infrared devices (such as |
|
|
infrared headphones) within its range. |
|
|
|
|
Sunlight falling directly on the TV |
|
|
|
|
|
|
set may interfere with the operation |
|
|
|
|
|
of the remote control unit, because |
|
|
the TV set cannot detect the infra- |
|
|
|
|
|
|
|
red signals from it. The TV set must |
|
|
|
first be switched on with the main |
|
|
switch before the remote control unit can be used.
The remote control unit is programmed as follows before it leaves the factory:
|
|
|
|
|
22 |
•TV Metz TV sets with the type designation "TH"
•VCR1 Metz video recorders with remote
control unit RH51
•VCR2 Metz video recorders with remote control unit RF52
•DVD Metz DVD players with remote control unit RG/RH374
•HiFi Metz HiFi CD receiver HE 11 with remote control unit F11
Never load rechargeable batteries into the battery compartment of the remote control unit!
Only use two 1.5V LR03/AM4 batteries, size AAA.
6

3. Remote control unit
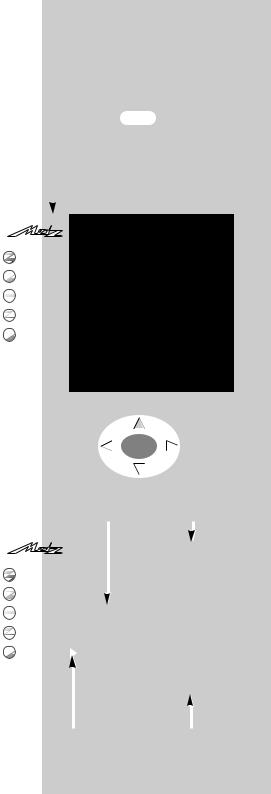
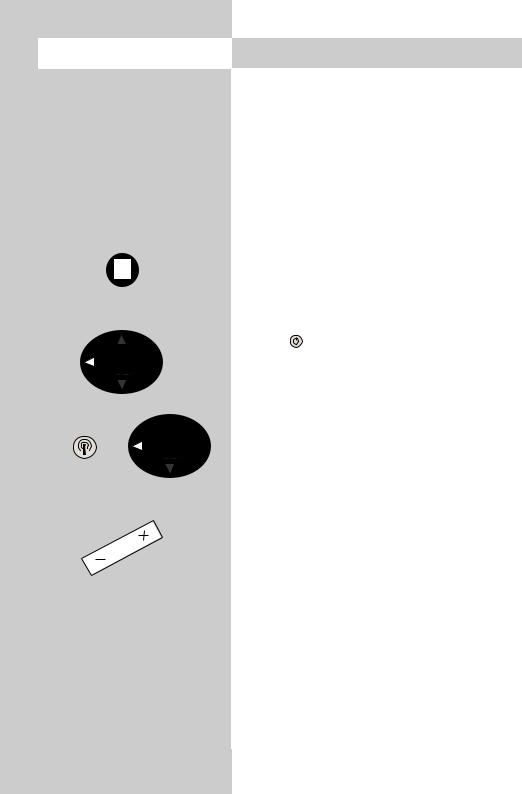
The most important keys in normal use
ON:
the last station watched before the set was switched off is selected.
OFF (standby)
Numeric keys (direct station selection)
P+ / P-: next/previous programme position
Volume control
Also used to change settings in the menu
Return to previously selected programme position
Display the station table
Overview of key functions
Switch to satellite radio mode Switch on from standby mode to satellite radio mode 1)
(1) only if a SAT upgrade module is fitted)
Function keys F1 ... F3
Cursor control key in the "Information" and in the menus
OK - confirmation key
Change settings in the TV menu
Sound mute
Call the TV menu
In the menu: return to the previous main menu item
Call Teletext
Call the „Information“
In the „Information“: return to the contents
Frame freeze
Delete key in the menus
Return to previously selected programme position
In the TV menu: call „Configuration“
Display date and time
In the TV menu: call „Timer“
In the TV menu: call the „Station table“ or display station attributes
Call the sound settings
In the TV menu: call „AV devices“
Call the picture settings
In the TV menu: call „Picture and sound“
Return to the TV picture
Switch from satellite radio mode1) to TV mode Switch on from
standby mode to TV mode (1) only if a SAT upgrade module is fitted)
Call the AV menu for playback and recording
Switch on from standby mode to AV mode
21 used for switching the operating level to AV devices
22 EPG (Electronic Program Guide)
= open NexTView
7

3. Remote control unit
1.Programming the remote control unit for control of your
equipment
In order to remotely control your consumer electronics equipment, you must programme each of the various levels of the remote control unit with a 3-digit code.
•TV (TV-Gerät)
The TV level is already programmed for Metz TV sets with the type designation "TH". This programming cannot be changed.
•VCR 1 (Video recorder 1) VCR 2 (Video recorder 2) DVD-Player
HiFi (e.g. amplifier, tuner, tape, etc.) The remote control unit must be programmed with a code from the code list for each level you want to use.
Note the factory settings (Page 6) and the list of available codes at the end of these Operating Instructions.
1.1Programming the codes for VCR and DVD
When you select the steps a)...c) ,you have about 15 seconds to continue with the next step. If you do not do so within this time, the unit automatically returns to the TV level
a)Use the Select key to select the desired level. The coloured LED for the currently selected level lights.
b)Press the keys  and F1 together and hold them until the LED blinks twice.
c)Enter the desired code (see the code list) with the numeric keys. If this code is accepted, the LED again blinks twi-
ce. If the code does not exist in the table, the LED lights for about two seconds.
1.2Programming the codes for CD Player, Tuner and Tape
When you select the steps a)...c) ,you have about 15 seconds to continue with the next step. If you do not do so within this time, the unit automatically returns to the TV level.
a)Use the Select key to select the HiFi level. The coloured LED HiFi lights.
b)Press the key  , release it and then press the key: ...
...F1 for CD player
...F2 for Tuner (radio)
...F3 for Tape (cassette recorders) der Fernbedienung drücken, bis die until the LED blinks once.
c)Enter the desired code (see the code list) with the numeric keys. If this code is accepted, the LED again blinks twice. If the code does not exist in the table, the LED lights for about two seconds.
1.3 Programming the code for HiFi amplifier
When you select the steps a)...d) ,you have about 15 seconds to continue with the next step. If you do not do so within this time, the unit automatically returns to the TV level.
a)Use the Select key to select the HiFi level. The coloured LED HiFi lights.
b)Press the key  , release it and then press and hold the F3 key until the LED blinks twice.
8

3. Remote control unit
c)Press the F1 key: the LED blinks once.
d)Enter the desired code (see the code list) with the numeric keys. If this code is accepted, the LED again blinks twice. If the code does not exist in the table, the LED lights for about two seconds.
1.4 Station search
Follow the instructions for programming the code for VCR, DVD, CD, tuner, tape as far as the step where the code number is entered. Then enter the three-digit code number "001" for the station search. The LED blinks twice to acknowledge the input. Then press and hold the "Station-search" key (which depends on the operating level; see the table on pages 10 and 11) until the device stops or is switched off (a STOP or OFF command is issued automatically every 1.5 seconds).
Release the "Station search" key and press the "Select" key to confirm that you want to execute a station search (the code which was found is saved).
After completion of the station search, or when all code numbers have been interrogated, the corresponding LED blinks five times.
2.Determining which code is already programmed (readout mode)
When you select the steps a)...e) ,you have about 15 seconds to continue with the next step. If you do not do so within this time, the unit automatically returns to the TV level.
a) In order to determine which code is
programmed for a level, first select the level as described in section 1.1, steps
a)and b).
b)Enter on the numeric keys. The LED blinks twice to acknowledge your input.
c)Press numeric key (for the first digit of the code). The LED now blinks the number of times corresponding to the programmed digit (if, for example, the LED blinks three times, the digit 3 is programmed).
d)Press numeric key (for the second digit of the code). The LED now blinks the number of times corresponding to the programmed digit (if, for example, the LED does not blink, the digit 0 is programmed).
e)Press numeric key (for the third digit of the code). The LED now blinks the number of times corresponding to the programmed digit (if, for example, the LED blinks seven times, the digit 7 is programmed).
In this example, the currently programmed code is thus
If you lose count while reading out the code, simply start again at step 2c).
9

3. Remote control unit
|
|
K e y |
V C R 1 / 2 |
21 |
|
On |
On / Standby |
|


|
|
|
|
|
|
|
||
|
||
|
|
|
R |
Record |
|
|
|
a |
F 1 |
Time in display |
b |
F 2 |
|
c |
F 3 |
|
|
0...9 |
Numeric keys:programme selection |
|
|
|
P +/– |
Programme +/– |
|
|
|
|
|
< > |
Fast forward/Rewind |
|
|
|
|
OK |
OK |
|
|
|
Vol.+/– |
TV volume +/– |
|
|
|
|
|
Mute |
Mute TV |
|
|
|
Menu |
MENU |
|
Text
|
Info |
TV-set INFO* |
|
|
|
|
|
|
I I |
Pause |
|
|
|
|
|
|
red |
STOP / Statiom search |
|
|
|
|
|
green |
PLAY |
||
|
|
|
|
|
white |
Slow-motion |
|
|
|
||
yellow |
|
||
|
|
|
|
|
blue |
|
|
|
|
|
|
|
TV |
|
|
|
|
|
|
|
AV |
AV input |
|
|
|
|
|
21 |
Select |
Select operating |
|
|
|
|
|
22 |
EPG |
Switching voltage on/off** |
|
|
|
|
|
|
* |
In preparation: If the TV set is switched on, |
|
|
the current operating level is indicated. |
|
** |
AV-Link with Panasonic VCR |
Note:
22The assignments of the operating levels to the device functions apply only for the AV devices preset in the factory. If other AV devices in accordance with the code table are used, some of these assignments may differ or be restricted.
Station search:
Programme the code for VCR, DVD, CD, tuner or tape and execute the steps up to the input of the code number. Then enter "001" as the 3-digit code for station search. The LED blinks twice to acknowledge this input. Then press and hold the
10
3. Remote control unit
K e y |
D V D |
|
H i F i |
|
||
|
|
|
||||
C D ( F 1 ) |
T U N E R ( F 2 ) |
T A P E ( F 3 ) |
||||
|
|
|
||||
|
|
|
|
|
|
|
|
On |
On / Standby |
ON: display time/track |
ON: radiotext on/off |
|
|
ON + AV, ON: on/standby |
ON + AV, ON: on/standby |
|
||||
|
|
|
|
|||
|
|
|
|
|
|
|
|
R |
Return |
|
|
|
|
|
|
|
|
|
|
|
a |
F 1 |
Angle |
|
F1 & ON: CD |
F1 & ON: CD |
|
b |
F 2 |
Audio |
F2 & ON: tuner |
|
F2 & ON: Tuner |
|
c |
F 3 |
Subtitle |
F3 & ON: tape-input |
F3 & ON: tape input |
|
|
|
0...9 |
Numeric keys: title selection |
Num.Keys: title selection |
N.Keys: programme selection |
|
|
|
|
|
|
|
|
|
|
P +/– |
Cursor up / down |
Titel +/– |
Programme +/– |
|
|
|
|
|
|
|
|
|
|
< > |
Cursor left/right |
|
Frequency +/– |
|
|
|
|
|
|
|
|
|
|
OK |
OK / Enter |
|
|
|
|
|
|
|
|
|
|
|
|
Vol.+/– |
TV volume +/– |
AMP volume +/– |
AMP volume +/– |
AMP volume +/– |
|
|
|
|
|
|
|
|
|
Mute |
Mute TV |
|
|
|
|
|
|
|
|
|
|
|
|
Menu |
MENU |
|
|
|
|
|
|
|
|
|
|
|
|
Text |
Display |
|
|
|
|
|
|
|
|
|
|
|
|
Info |
TV set INFO* |
TV set INFO* |
TV set INFO* |
TV set INFO* |
|
|
|
|
|
|
|
|
|
I I |
Pause |
PAUSE |
|
|
|
|
|
|
|
|
|
|
|
red |
STOP / Station search |
STOP / OPEN-CLOSE / Station search |
num. key =Station search |
Station search |
|
|
|
|
|
|
|
|
|
green |
PLAY |
PLAY |
|
|
|
|
|
|
|
|
|
|
|
white |
EJECT |
|
|
|
|
|
|
|
|
|
|
|
|
yellow |
Skip + |
|
|
|
|
|
|
|
|
|
|
|
|
blue |
Skip – |
|
|
|
|
|
|
|
|
|
|
|
|
TV |
|
|
|
|
|
|
|
|
|
|
|
|
|
AV |
Repeat |
AUX Input |
AUX input |
AUX input |
|
|
|
|
|
|
|
|
21 |
Select |
Select operating level |
Select operating level |
Select operating level |
Select operating level |
|
|
|
|
|
|
|
|
22 |
EPG |
Title |
|
|
|
|
|
|
|
|
|
|
|
"Station search" key (depending on the operating level: see the table) until the device stops running or switches off (an OFF or STOP command is automatically transmitted every 1.5 seconds). Release the "Station search" key and start the search with the "Select" key (the code you entered is saved). When the station search has been completed or all code numbers have been interrogated, the corresponding LED blinks five times.
Reset:
Programme the code for VCR, DVD, CD, tuner or tape and execute the steps up to the input of the code number. Then enter "000" as the 3-digit code for "Reset". The LED blinks twice to acknowledge this input. This resets all codes to the factory settings.
The reset is executed for all operating levels, regardless of the operating level from which it is executed.
11

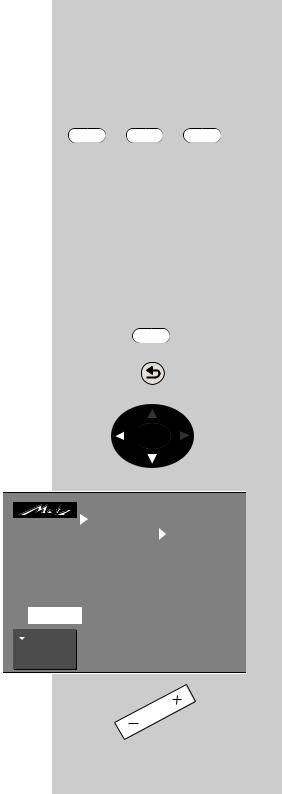
Call the menu |
|
|
4. General operating notes |
||||||||||||||||
|
|
|
|
|
|
|
|
|
|
|
|
|
|
|
|
|
|
When designing this TV set, we have tried to |
|
|
|
|
|
|
|
|
|
|
|
|
|
|
|
|
|
|
|
make its operation as easy as possible so that |
|
|
|
|
|
|
|
|
|
|
|
|
|
|
|
|
|
|
|
you will enjoy learning how to use it. |
|
|
|
|
|
|
|
|
|
|
|
|
|
|
|
|
|
|
|
The TV set itself can provide the answers, with the |
|
|
|
|
|
|
|
|
|
|
|
|
|
|
|
|
|
|
|
menu „Information“, to any questions you may |
|
|
|
|
|
|
|
|
|
|
|
|
|
|
|
|
|
|
|
have during installation and switching on. |
|
|
|
|
|
|
|
|
|
|
|
|
|
|
|
|
|
|
|
To use this function, simply press the „INFO“ key |
|
|
|
INFO |
|
|
to display the table of contents of the |
||||||||||||||
|
|
|
|
„Information“ on the screen. |
|||||||||||||||
|
|
|
|
|
|
|
|
|
|
|
|
|
|
|
|
|
|
||
|
|
|
|
|
|
|
|
|
|
|
|
|
|
|
|
|
|
The menu „Information“ (help function) |
|
|
|
|
|
|
|
|
|
|
|
|
|
|
|
|
|
|
|
||
|
|
|
|
|
|
|
|
|
|
|
|
|
|
|
|
|
|
|
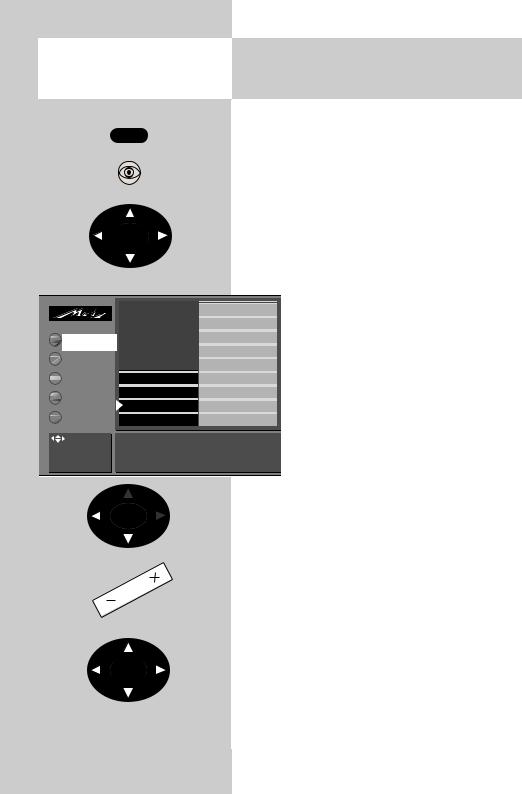
In the table of contents, or in the index, you |
|
Information |
|
|
|
|||||||||||||||
|
|
|
|
can then select the information you need |
|||||||||||||||
|
|
Contents (1/2) |
|
|
|
with the cursor control key. |
|||||||||||||
|
|
|
|
|
|
|
|
|
|
|
|
|
|
|
|
|
|
|
|
Index |
|
|
|
|
|
|
|
|
|
|
|
|
|
|
|
|
|
|
„Cursor right“ : move to next page of the |
Programme selection |
|
|
|
index. |
|||||||||||||||
Picture settings |
|
|
|
„Cursor left“ : scroll backwards through |
|||||||||||||||
Sound settings |
|
|
|
the index. |
|||||||||||||||
AV playback / recording / satellite recording |
|||||||||||||||||||
Teletext |
|
|
|
„Cursor up“ : select the previous underli- |
|||||||||||||||
Function key |
|
|
|
||||||||||||||||
Satellite radio mode |
--> |
ned text or the arrow -->. |
|||||||||||||||||
Use the cursor to select an underlined text. |
„Cursor down“ : select a line in the list. |
||||||||||||||||||
OK: further information INFO: help index |
Then press the „OK“ key to display this |
||||||||||||||||||
Previously visited pages: backwards |
forwards |
||||||||||||||||||
|
|
|
|
|
|
|
|
|
|
|
|
|
|
|
|
|
|
|
information. |
|
|
|
|
|
|
|
|
|
|
|
|
|
|
|
|
|
|
|
|
|
|
|
|
|
|
|
|
|
|
|
|
|
|
|
|
|
|
You can select any underlined words in the table |
|
|
|
|
|
|
|
|
|
|
|
|
|
|
|
|
|
|
|
of contents, the index or the explanatory text with |
|
|
|
|
|
|
|
|
|
|
|
|
|
|
|
|
|
|
|
|
|
|
|
OK |
|
|
|
|
|
|
|
|
|
|
|
|
|||||
|
|
|
|
|
|
|
|
|
|
|
|
|
|
|
|
|
|
|
|
selected help pages with the aid of the red and green keys.
12
4. General operating notes |
|
|
|
|
Call the menu |
|
||||||||||||||||
Using the menus |
|
|
|
|
|
|
|
|
|
|
|
|
|
|
|
|
|
|
|
|
|
|
With the „TV menu“, we help you to find your |
|
|
|
|
|
MENU |
|
|||||||||||||||
way through the many operating functions of |
|
|
|
|
|
|
|
|
|
|
|
|
|
|
|
|||||||
|
|
|
|
|
|
|
|
|
|
|
|
|
|
|
||||||||
your TV set. |
|
|
|
|
|
|
|
|
|
|
|
|
|
|
|
|
|
|
|
|
|
|
|
|
|
|
|
|
|
|
|
|
|
|
|
|
|
|
|
|
|
|
|
|
|
Do not hesitate to try out the options in the |
|
|
|
|
|
|
|
|
|
|
|
|
|
|
|
|
|
|
|
|
|
|
various menus. Any changes you make become |
|
|
|
|
|
|
|
|
|
|
|
|
|
|
|
|||||||
permanently effective only if you save them by |
|
|
|
|
|
|
|
|
|
|
|
|
|
|
|
|||||||
|
Main menu items |
|
|
|
||||||||||||||||||
pressing the „OK“ key. If you are not sure that |
|
|
|
|
|
|
||||||||||||||||
|
|
|
|
|
|
|
|
|
|
|
|
|
|
|
|
|
||||||
|
|
|
|
|
|
|
|
|
|
|
|
|
|
|
||||||||
|
|
|
|
|
|
|
|
|
|
|
|
|
|
|
|
|||||||
you want to retain a new setting, you |
|
|
|
|
|
|
|
|
|
|
|
|
|
|
|
|
|
|
|
|
|
|
|
|
|
|
|
|
|
|
|
|
|
|
|
|
|
|
|
|
|
|
|
|
|
can simply exit from the menu by pres- |
|
|
|
|
|
|
|
|
|
|
|
|
|
|
|
|
|
|
|
|
|
|
|
|
|
|
|
|
|
|
|
|
|
|
|
|
|
|
|
|
|
||||
sing the „TV“ key. The new setting is |
|
|
|
|
|
|
|
|
|
|
|
|
|
|
|
|
|
|||||
|
|
Picture-Volume |
|
|
|
|
|
|
|
|
|
|
|
|
|
|
|
|||||
then discarded. |
|
|
|
|
|
|
|
|
|
|
|
|
|
|
|
|
|
|
|
|
|
|
|
|
AV devices |
|
|
|
|
|
|
|
|
|
|
|
|
|
|
|
|||||
While you are in the TV menu, you can |
|
|
|
|
|
|
|
|
|
|
|
|
|
|
|
|
|
|||||
|
|
Station table |
|
|
|
|
|
|
|
|
|
|
|
|
|
|
|
|||||
return to the main menu item at any time |
|
|
|
|
|
|
|
|
|
|
|
|
|
|
|
|
|
|||||
|
|
Timer |
|
|
|
|
|
|
|
|
|
|
|
|
|
|
|
|||||
by pressing the „MENU“ key. If you do |
|
|
|
|
|
|
|
|
|
|
|
|
|
|
|
|
|
|||||
TV-Menü |
|
Configuration |
|
|
|
|
|
|
|
|
|
|
|
|
|
|
|
|||||
not understand a menu item, press the |
|
|
|
|
|
|
|
|
|
|
|
|
|
|
|
|
||||||
|
|
|
|
|
|
|
|
|
|
|
|
|
|
|
|
|
|
|
|
|
||
„INFO“ key for more information. |
Coloured keys: |
|
|
|
|
|
|
|
|
|
|
|
|
|
|
|
||||||
To return to the menu, press the „INFO“ |
call menü |
|
|
|
|
|
|
|
|
|
|
|
|
|
|
|
||||||
TV: return to TV |
|
|
|
|
|
|
|
|
|
|
|
|
|
|
|
|||||||
picture |
|
|
|
|
|
|
|
|
|
|
|
|
|
|
|
|||||||
key twice. |
|
|
|
|
|
|
|
|
|
|
|
|
|
|
|
|
|
|
|
|
|
|
|
|
|
|
|
|
|
|
|
|
|
|
|
|
|
|
|
|
|
|
|
|
|
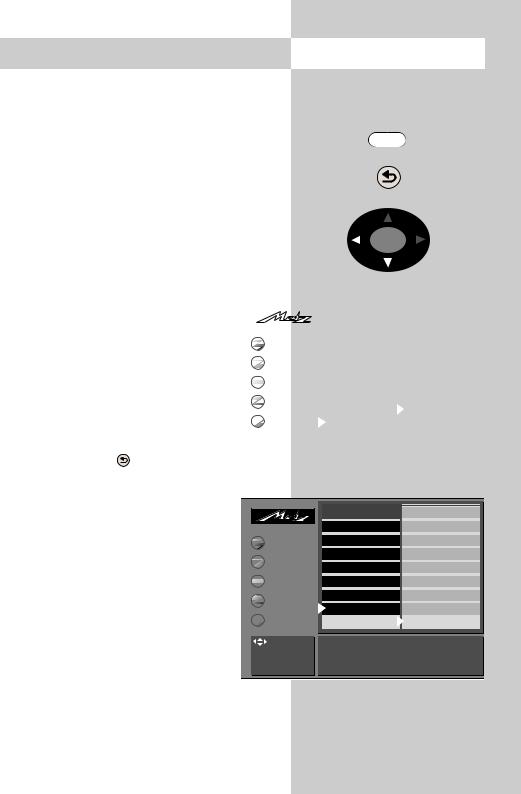
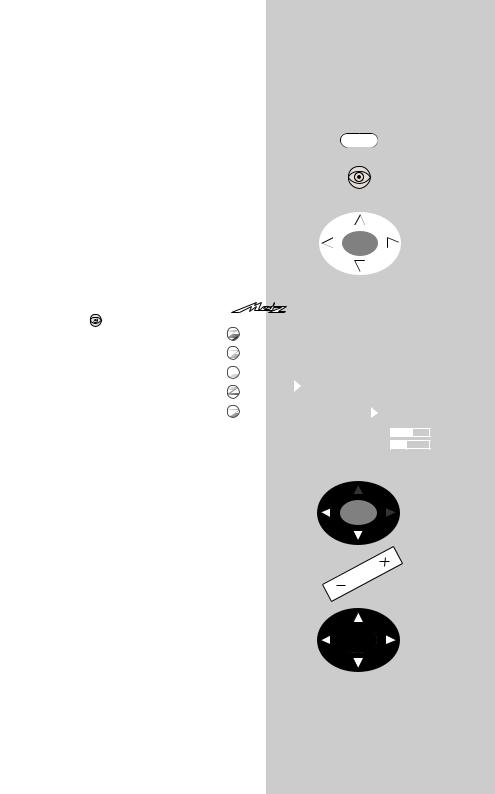
The five main sections of the menu can be opened |
|
|
|
|
|
|
|
|
|
|
|
|
|
|
|
|||||||
with the coloured keys. The help information is |
|
|
|
|
|
|
|
|
|
|
|
|
|
|
|
|||||||
shown in the form of two card files containing the |
|
|
|
|
|
OK |
|
|
|
|
|
|
|
|
||||||||
subjects (blue) and the sections of the selected |
|
|
|
|
|
|
|
|
|
|
|
|
|
|
|
|||||||
subject (yellow). You can select the subjects and |
|
|
|
|
|
|
|
|
|
|
|
|
|
|
|
|||||||
|
|
|
|
|
|
|
|
|
|
|
|
|
|
|
||||||||
sections with the aid of the red triangular cursor, |
|
|
|
|
|
|
|
|
|
|
|
|
|
|
|
|||||||
which is moved with the oval key. |
|
|
|
|
|
|
|
|
Subjects* |
|
|
|
Sections* |
|
|
|||||||
Pressing the „OK“ key then moves you to |
|
|
|
|
|
|
|
|
|
|
|
|
|
|
|
|
|
|
|
|
|
|
|
|
|
|
|
|
|
|
|
|
|
|
|
|
|
|
|
|
|
|
|
|
|
the setting window below the file boxes. |
|
|
|
|
|
|
|
|
|
|
|
|
|
|
|
|
|
|
|
|
||
|
|
|
|
|
|
|
|
|
|
|
|
|
|
|
Factory |
|
||||||
The current setting is displayed here and |
|
|
|
|
|
|
|
|
|
|
|
Rotation* |
|
|||||||||
|
|
Picture-Volume |
|
|
|
|
|
|
|
|
Panorama* |
|
||||||||||
you can change it with the - + key. |
|
|
|
|
|
|
|
|
|
|
|
|||||||||||
|
|
AV devices |
|
|
|
|
|
|
|
|
CTI |
|
||||||||||
To save the new setting, press the „OK“ |
|
|
|
|
|
|
|
|
|
|
Noise reduction |
|
||||||||||
|
|
|
Station table |
|
|
|
|
|
|
|
|
|
|
|
|
|
||||||
|
|
|
|
Sound set.prog.po |
|
|
||||||||||||||||
key. This also returns you to the file of |
|
|
|
Picture sharpness |
|
|||||||||||||||||
yellow section cards. If you do not want |
|
|
Timer |
|
Sound settings, gen. |
|
Colour intensity |
|
||||||||||||||
|
|
|
Pict. set.,prog. posn. |
|
Contrast |
|
||||||||||||||||
to save the new setting, press the |
TV-Menü |
|
Configuration |
|
Pict. settings, gen. |
|
|
|
|
|
|
|||||||||||
|
|
Luminance |
|
|||||||||||||||||||
„MENU“ key to return to the related |
|
|
|
|
|
|
|
|
|
|
|
|
|
|
|
|
|
|
|
|
|
|
|
select, |
|
These settings apply to all programme position |
|
||||||||||||||||||
main menu item or press the „TV“ key to |
|
go to |
|
|
|
|
|
|
|
|
|
|
|
|
|
|
|
|||||
settings. |
|
|
|
|
|
|
|
|
|
|
|
|
|
|
|
|||||||
exit from the menu. |
|
|
|
|
|
|
|
|
|
|
|
|
|
|
|
|||||||
|
|
|
|
|
|
|
|
|
|
|
|
|
|
|
|
|
|
|
|
|
||
|
|
|
|
|
|
|
|
|
|
|
|
|
|
|
|
|
|
|
|
|
|
|
You can delete your input by pressing the ll key. |
|
|
|
|
|
|
|
|
|
|
|
|
|
|
|
|
||||||
Cursor |
|
|
|
|
Setting window |
|
||||||||||||||||
|
|
|
|
|
|
|
|
|
||||||||||||||
|
|
|
|
|
|
|
|
|
|
|
|
|
|
|
|
|
|
|
|
|
|
|
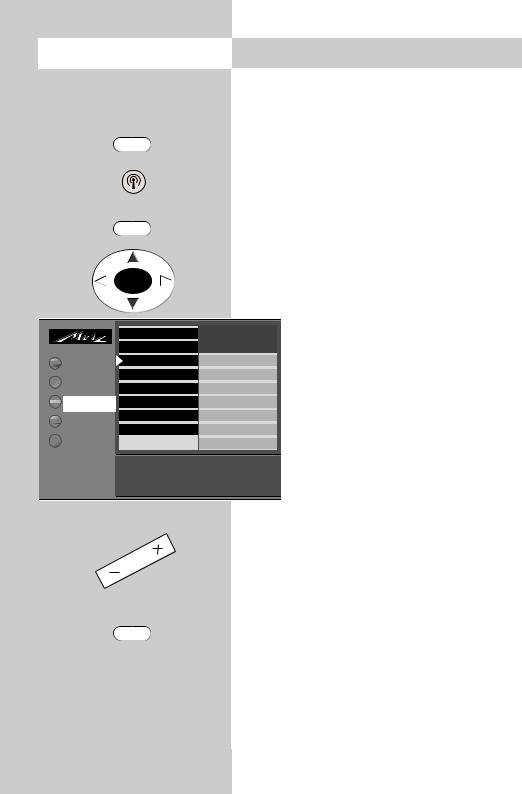
13
OK
5. Daily operation
Switching on
Switch on the TV set with the main switch. The red standby indicator lights.
Then enter the desired programme position on the numeric keys of the remote control unit. Alternatively, simply press the  key with the TV set in standby mode to select the programme position you were watching before the set was switched off.
If you have defined an initial programme position (see page 66), pressing the  key with the TV set in standby mode will select this programme position.
Switching off
standby TV set to
Station selection
 You can select a station (programme position) with OK
  the numeric keys, with the rocker key „P+/P-“ or from
the station table.
To call the station table, press the white key  . Use the cursor control key to select the desired station and then press the „OK“ key to confirm your selection.
Adjusting the volume
You can adjust the volume with the - + key.
Adjusting picture and sound settings
Call the picture settings with the blue key  or the sound settings with the yellow key
  .
.
At the bottom left of the screen, you will then see the setting box with the various functions. Select the desired function with the rocker key „P+/P-“ and adjust the setting with the - + key.
14
5.1 Setting the operating mode |
Call the menu |
||
|
|
|
|
The TV set can be switched on at the desired ope- |
|
|
|
rating level with the keys "TV", "AV" and "R". |
|
|
|
These keys can also be used to switch between the |
TV |
AV |
R |
operating levels. |
|
|
|
When the TV set is switched on with one of these |
|
|
|
keys, the station which was last selected at this |
|
|
|
operating level is again set. |
|
|
|
TV = television mode |
|
|
|
AV = audio-visual mode for use with AV devices |
|
|
|
R = radio mode 1) |
|
|
|
(1) available only if a SAT receiver is installed) |
|
|
|
|
|
|
|
5.2 Operating scope |
|
menu |
|
Until we introduce Version 2.1 of the software, this |
|
MENU |
|
menu item is available only in the service menu. If |
|
|
|
you wish to reduce the operating scope of your TV |
|
|
|
set, please consult your local Metz dealer. |
|
|
|
The operating scope of the TV set is indicated by |
|
|
|
asterisks in the menus and can be reduced in two |
|
|
|
stages in order to prevent inadvertent changing of |
|
|
|
certain settings. |
|
OK |
|
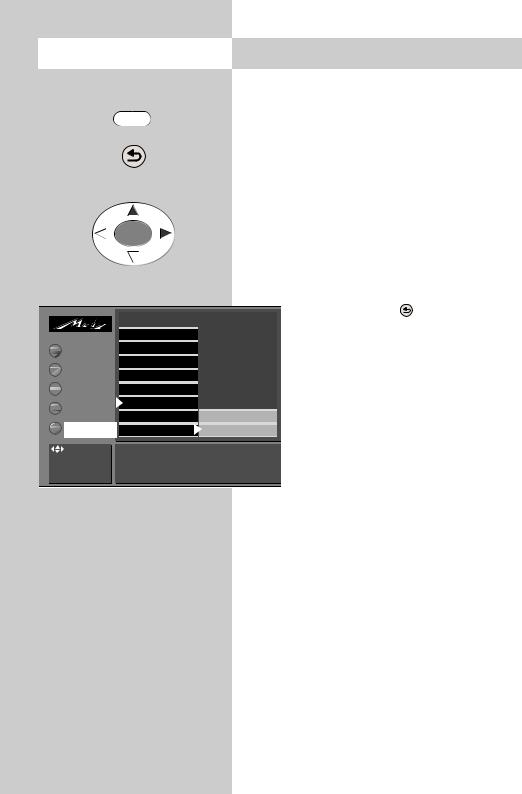
Programming the operating scope
(Software version V2.1 or higher)
•Press the "MENU" key to open the TV menu.
•Press the red key  to open the menu "Configuration".
•Use the cursor control key to select "Operation".
•Press the "OK" key and then use the cursor control key to select "Operating".
•Press the "OK" key and then, in the setting
window, select the desired operating scope with the - + key.
TV-Menü
|
 Picture-Volume
 AV devices
 Station table
 Timer
Timer  Configuration

 : select, OK: go to settings.
|
|
|
|
Operation |
|
|
Function for AV* |
Scope of operation |
|
Function for F3* |
EPG settings |
|
Function for F1* |
Automatic zoom |
|
EURO sockets* |
Sound settings |
|
Station search |
HiFi output |
|
Country* |
Init. prog. position |
|
Language* |
Display configuration |
|
|
|
|
|
|
|
Scope of operation |
full |
|
|
|
15

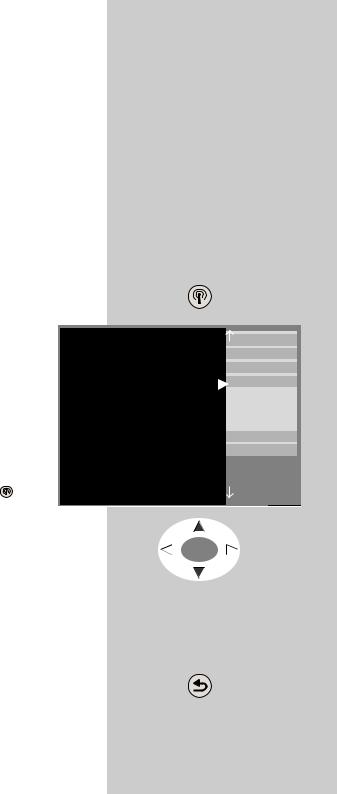
5.2Operating scope
The full TV menu is displayed
A reduced TV menu is displayed. The following functions are no longer available:
-Special picture settings such as panorama, CTI, noise reduction, picture sharpness, etc.
-Special sound settings such as stereo wide, spatial sound, balance, tone settings, etc.
-Picture and sound settings for individual programme positions.
-Programming of the function keys.
-Settings for the EURO sockets.
-Special functions in the menu "Operation".
The TV menu cannot be opened, Only the standard functions of the remote control are available.
•Save the changed setting by pressing the "OK" key.
If you want to open a menu although only the operating scope with one asterisk is active, then:
•Press and hold the "MENU" key for at least five seconds to open the TV menu.
•The menu item "Operation" is automatically selected.
•Use the - + key to select the desired operating scope and press the "OK" key to save the changed setting.
16
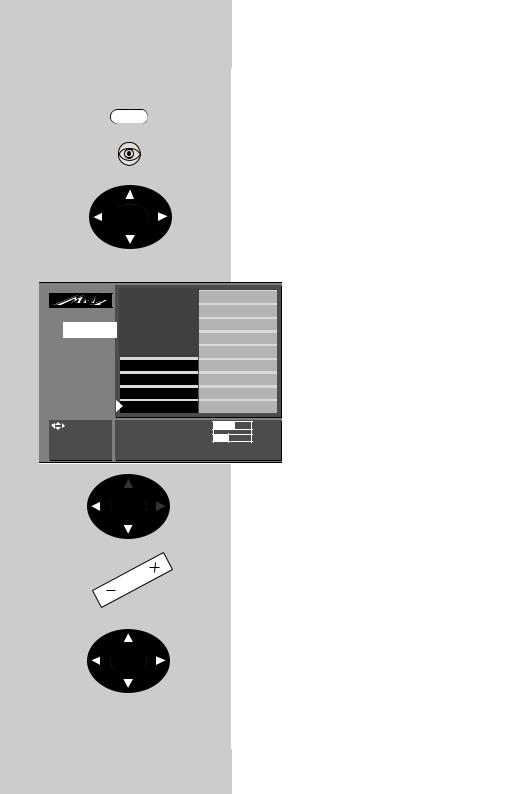
6.Setting the language and country
In a menu with two asterisks (**), the settings for the menu items "Language" and "Country" cannot be changed.
Setting the language for the TV menu
You can select one of the available languages for the display of the TV menu. The text in the menu and in the help function (Information) is then displayed in the selected language.
Call the menu
MENU
Setting the country |
|
|
|
|
|
OK |
|
|
|
|
|
|
|
|
|
|
|
|
|
|
|
|
|
|
|
|
After installing the TV set, you must select the |
|
|
|
|
||||
country where it is installed. This infor- |
|
|
|
|
|
|
|
|
mation is used by the TV set to make |
|
|
|
|
|
|
|
|
|
|
|
|
|
|
|
||
|
|
|
|
|
|
|
||
certain basic settings (such as the chan- |
|
|
Operation |
|
|
|||
nel spacing, the sorting sequence for the |
|
Picture-Volume |
Function for AV* |
|
|
|||
|
Function for F3* |
Nederlands |
||||||
stations, etc.). |
|
|
AV devices |
|||||
|
|
Function for F1* |
Français |
|||||
|
|
|
Station table |
EURO sockets* |
Español |
|||
Setting the language and country: |
|
Timer |
Station search |
Italiano |
||||
|
Country* |
English |
||||||
• Press the „MENU“ key to open the TV |
|
|
|
|||||
Menü-TV |
|
Configuration |
Language* |
Deutsch |
||||
menu. |
|
|
|
|
|
|
|
|
|
|
|
: select, |
|
|
|
|
|
• Press the red key |
to open the menu |
|
OK: go to |
Selected language English |
||||
|
settings. |
|||||||
|
|
|
|
|
||||
„Configuration“. |
|
|
|
|
|
|
|
|
|
|
|
|
|
|
|
|
|
• Press the „OK“ key and use the cursor |
|
|
Italien |
|
control key to set the desired language |
|
|
||
|
Operation |
Großbritanien |
||
or country. |
||||
Picture-Volume |
Function for AV* |
Frankreich |
||
• Press the „OK“ key to save the set- |
||||
AV devices |
Function for F3* |
Finnland |
||
tings. |
Function for F1* |
Deutschland |
||
|
||||
Station table |
EURO sockets* |
Dänemark |
||
• Press the „TV“ key to close the menu. |
||||
Timer |
Station search |
Belgien |
||
|
||||
|
Country* |
Baltikum |
||
|
|
|
|
|
Configuration |
|
|
|
|
|
The menu language can also be set |
TV-Menü |
Language* |
|
|
Australien |
|||
|
|
|
|
|
|
|
||
|
: select, |
|
|
|
||||
in the help function (Information) |
|
|
|
|
||||
OK: go to |
Selected country Australia |
|||||||
by selecting the appropriate natio- |
settings. |
|
|
|
||||
|
|
|
|
|
|
|
||
nal flag.
* The number of subjects and sections displayed here depends on the operating scope setting.
17
Call the menu
MENU
OK
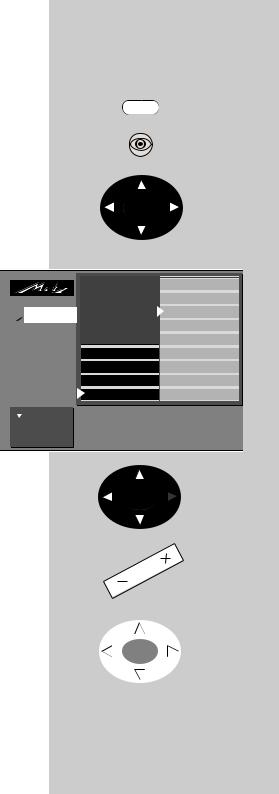
7. Programming stations
You can programme the TV stations in three different ways.
a) Automatic station search
The automatic station search function searches the entire range of reception frequencies for TV stations. All stations which are found are placed in the station table, which is displayed at the end of the search operation. If you are not satisfied with the order in which the stations are stored, you can shift or delete stations as described in the next section.
TV-Menü
|
|
Executing an automatic station search |
|||
|
|
|
• Press the „MENU“ key to call the TV |
||
|
|
|
menu |
|
|
|
|
|
• Press the red key |
to open the |
|
|
Operation |
|
„Configuration“ menu. |
||
|
• Move the cursor to „Automatic station |
||||
Picture-Volume |
Function for AV* |
|
|||
AV devices |
Function for F3* |
|
search“. |
|
|
Function for F1* |
|
• Press the „OK“ key several times until |
|||
|
|
||||
Station table |
EURO sockets* |
|
|||
|
the message „Searching for stations“ |
||||
Timer |
Station search |
|
|||
Country* |
DataLogic |
is displayed. |
|
||
Configuration |
|
||||
Language* |
Terr. station search |
• A station table containing all stations |
|||
: select, |
|
|
which are found is displayed on the |
||
OK: go to |
Station search (START) |
left side of the screen. |
|||
settings. |
|||||
|
|
||||
|
|
|
• At the end of the search, all stations |
||
|
|
|
which were found are sorted and |
||
|
|
|
displayed. |
|
|
•To delete any unwanted stations, select them with the cursor and press the „II“ key.
•To save the stations, press the „OK“ key and enter, with the numeric keys, the number of the programme position where the first station is to be saved. The remaining stations are saved in the following programme positions.
*The number of subjects and sections displayed here depends on the operating scope setting.
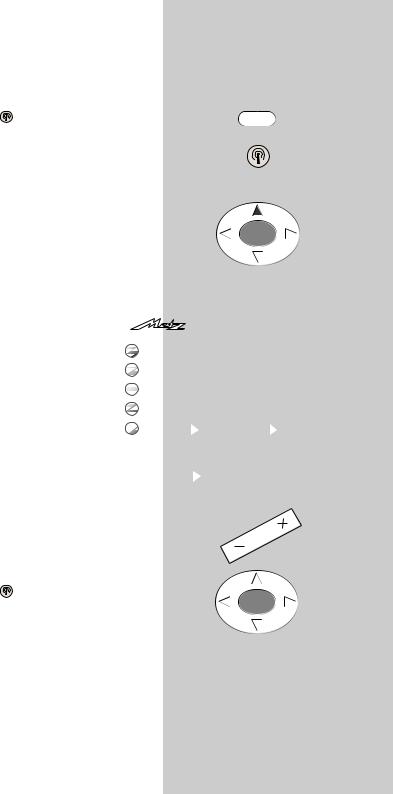
b) Station search
The station search function permits you to search for specific stations if you do not know their channel number or frequency.
18
7. Programming stations |
Call the menu |
|
Executing a station search |
|
|
• Press the „MENU“ key to display the TV menu. |
MENU |
|
• Press the white key to display the station |
|
|
table. |
|
|
• Move the cursor to en empty programme posi- |
|
|
tion (or to a position containing a station you |
|
|
wish to replace with the new station). |
|
|
• Move the cursor to „Frequency/Channel“. |
|
|
• Press the „OK“ key. |
OK |
|
• In the setting window which is then displayed, |
||
|
||
move the cursor to „Search“. |
|
|
• Press the - + key to start the search. |
|
|
• The search stops when the first station |
|
is found. |
|
|
|
|
|
|
|
|
|
|
|
|
009 |
|
|
|
|
• If you want to save this station, press |
|
|
008 |
|
|
|
||
the „OK“ key. |
|
|
|
Picture-Volume |
007 |
correction |
|
|
|
|
006 |
standard* |
|
|
|||
• If you do not want to save this station, |
|
|
AV devices |
|
|
|||
|
|
005 |
corrections* |
|
||||
press the - + key again to continue the |
|
|
Station table |
004 |
quality* |
|
|
|
search. |
|
|
|
|
003 |
Logo |
|
|
|
|
|
Timer |
|
|
|||
|
|
|
002 |
Frequency/channel |
|
|||
|
|
|
|
|
|
|||
c) Direct channel input |
|
TV-Menü |
|
Configuration |
001 |
standard 2) |
|
|
|
|
|
|
|
|
|
||
|
|
: select, |
Channel |
channel |
-- |
|
||
You can programme a station directly by |
OK: go to |
Frequency |
|
|
|
|||
settings. |
|
|
|
|||||
Scan |
ARD |
|
||||||
entering its channel number with the |
|
|
|
|||||
|
|
|
|
|
|
|
|
|
numeric keys (you must, of course, know the |
|
|
|
|
|
|
||
channel number of the desired station). |
|
|
|
|
|
|
|
|
Executing direct channel input |
|
|
|
|
|
|
|
|
• Press the „MENU“ key to display the TV menu. |
|
|
|
|
||||
• Press the white key |
to display the station |
|
|
|
|
|||
table. |
OK |
|
|
||
• Move the cursor to en empty programme posi- |
|
|
tion (or to a position containing a station you |
2) Available only on TV sets |
|
wish to replace with the new station). |
||
which are equipped with this |
||
• Move the cursor to „Frequency/Channel“. |
||
option. |
||
• Press the „OK“ key. |
||
* The number of subjects and sections |
||
|
||
|
displayed here depends on the opera- |
|
|
ting scope setting. |
19
TV-Menü
Call the menu
MENU
7.Programming stations
•In the setting window which is then displayed, move the cursor to „Channel“ or „Special channel“.
•Enter the number of the channel or special channel with the numeric keys.
•Press the „OK“ key to save the station.
•Press the „TV“ key to close the menu.
Fine tuning
When you programme stations, each channel is
|
|
|
|
OK |
|
automatically tuned to the centre frequency. This |
|||||
|
|
|
|
|
|
||||||
|
|
|
|
|
|
is normally sufficient. If this automatic function |
|||||
|
|
|
|
|
|
does not produce satisfactory results, you can |
|||||
|
|
|
|
|
|
carry out fine tuning. |
|
||||
|
|
|
|
|
|
|
|
|
|
Executing fine tuning |
|
|
|
|
|
|
|
|
|
|
|
|
|
|
|
|
|
|
|
|
|
|
|
• Select the desired programme position. |
|
|
|
|
|
|
|
|
|
|
|
||
|
|
|
|
|
|
|
|
|
• Press the „MENU“ key. |
|
|
|
Picture- |
|
|
|
|
|
|
|
|
|
|
|
|
|
|
|
|
|
|
|
• Press the white key |
to open the sta- |
|
|
AV |
|
|
|
|
|
|
|
|
||
|
|
|
|
|
|
|
|
|
|
tion table. |
|
|
Station |
|
|
|
|
|
|
|
|
|
|
|
|
|
|
|
|
|
|
|
• Move the cursor to the subject card |
||
|
|
|
|
|
|
|
|
|
|
||
|
Timer |
|
|
|
|
|
|
|
|
||
|
|
|
|
|
|
|
|
|
„Frequency/Channel“. |
|
|
|
|
|
|
|
|
|
|
|
|
|
|
|
|
|
|
|
|
|
|
|
|
• Press the „OK“ key to confirm your |
|
Change value |
|
|
6 Cable channel |
-- |
|
|
|||||
|
|
|
|
selection. |
|
||||||
+ and - |
|
|
MHz |
|
|
|
|
||||
|
|
ARD • In the setting window, select „Frequen- |
|||||||||
Confirm with |
|
|
|||||||||
|
|
|
|
||||||||
cy“ and use the - + key to change the frequency value until the picture is as clear as possible.
•Save the new setting by pressing the „OK“ key.
•Press the „TV“ key to close the menu.
OK
20
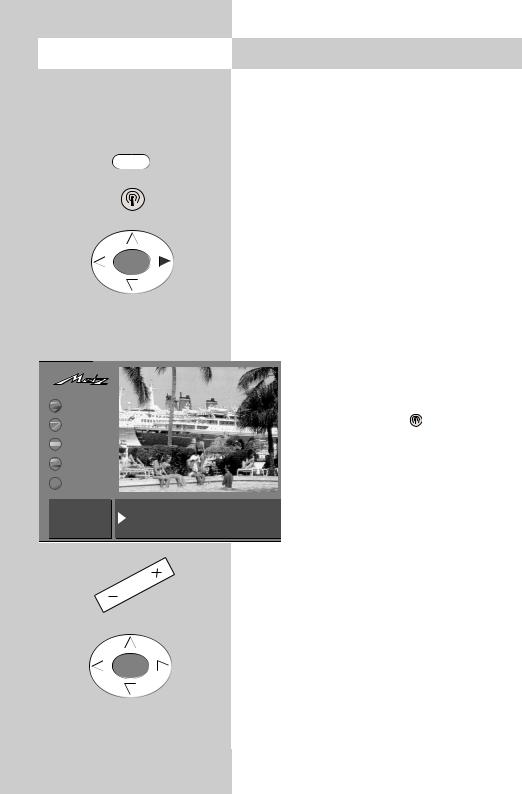
8. Station logo Call the menu
Each station which transmits VPS signals also |
|
|
sends a station logo with up to eight characters, |
|
|
which is automatically assigned to this station in |
|
|
the station list. If this automatic function does not |
MENU |
|
work correctly, or if you want a different station |
||
|
||
logo, you can overwrite the logo manually. |
|
Setting the station logo
•Select the desired programme position.
•Press the „MENU“ key.
• Press the white key |
to open the station table. |
OK |
|
• Move the cursor to the subject card „Logo“.
•Press the „OK“ key to confirm your selection. In the setting window, you can now enter
the desired logo with the aid of the |
|
|
|
|
|
009 MDR |
|
|
||
numeric keys. |
|
|
|
|
008 SW 3 |
|
|
|||
|
|
Picture-Volume |
|
007 |
N24 |
|
Decoder |
|||
As long as the red cursor is selected, |
|
|
|
|
||||||
|
|
|
|
|
006 |
PRO 7 |
|
Sound correction |
||
you can enter the desired letters and |
|
|
AV devices |
|
|
|||||
|
|
|
005 |
RTL |
|
|
Colour standard* |
|||
digits by pressing the numeric keys |
|
|
Station table |
|
004 |
SAT 1 |
|
Picture corrections* |
||
(e.g. key : J-K-L-5). If you make a |
|
|
|
|
|
003 |
Bayern 3 |
|
Picture quality* |
|
|
|
Timer |
|
|
||||||
mistake, you can delete the characters |
|
|
|
002 |
ZDF |
|
Enter Logo |
|||
|
|
Configuration |
|
|
||||||
before the red cursor, one at a time, |
TV-Menü |
|
|
001 |
ARD |
|
Frequency/channel |
|||
|
|
|
|
|
|
|
|
|
||
with the red key. To delete the entire |
|
: select, |
. , |
ABC DEF |
||||||
logo, press the ll key. |
OK: go to |
GHI |
JKL |
|
MNO ARD |
|||||
settings. |
! PQRS TUV " WXYZ |
|||||||||
|
|
|
|
|
|
|
|
|
|
|
• When you are finished, press the „OK“ key to save the new logo.
• Press the „TV“ key to close the menu.
OK
* The number of subjects and sections displayed here depends on the operating scope setting.
21
Call the menu
MENU
F1
|
MDR |
|
3 |
Picture-Volume |
N24 |
Decoder |
AV devices |
PRO 7 |
|
|
|
|
Station table |
1 |
|
Bayern 3
Timer
Menü-TV |
Configuration |
ARD |
|
|
|
|
|
|
F1: End |
|
|
|
White: Clear all |
|
|
|
marks |
|
|
|
|
|
|
*The number of subjects and sections displayed here depends on the opera-
ting scope setting.
9. Sorting stations
In the station table, you can shift or copy one or more stations to other programme positions. You can also delete any unwanted stations.
Copying, shifting and deleting stations
•Press the „MENU“ key to call the TV menu.
•Press the white key  to call the station table.
•Press the „F1“ key to enable editing of the station table.
•Use the cursor control key to select the programme position you want to copy, shift or delete.
•Press the „OK“ key to mark this programme position: the text colour changes to orange and an asterisk is displayed after the last digit of the programme position number (in the example on the left: position 007).
•To shift or copy this station, move the cursor to the programme position before or after which the selected station(s) is/are to be inserted. If these stations originally had a lower position number than this position, it/they will be inserted before this programme position. Stations which originally had a higher number will be inserted after this programme position.
•Press the - + key to copy (+) or shift (-) the selected station(s).
•To delete a station, press the ll key.
•Press the „F1“ key to save the new settings
22
10. Selecting stations |
Call the menu |
|||||
Station selection and programme posi- |
|
|
|
|
||
tion management |
|
|
|
|
||
Your TV set can manage up to 999 programme |
|
|
|
|
||
positions in the station table. You can select these |
|
|
|
|
||
programme positions with the numeric keys, with |
|
|
|
|
||
the oval „P+/P-“ rocker key or via the station |
|
|
|
|
||
table. |
|
|
|
|
||
When you enter a position number on the nume- |
|
|
|
|
||
ric keys, the first digit you enter is the „hundreds“ |
|
|
|
|
||
digit. If there are less than 100 programme posi- |
|
|
|
|
||
tions defined, this digit automatically moves to the |
|
|
|
|
||
„tens“ position. If less than 10 programme posi- |
|
|
|
|
||
tions exist, it automatically moves to the |
|
|
|
|
||
„ones“ position. |
|
|
|
|
|
|
|
|
|
14 |
MDR |
|
|
After pressing any numeric key, you |
|
|
13 |
Nord 3 |
|
|
|
|
12 |
RTL |
|
||
have three seconds to enter further |
|
|
11 |
SAT 1 |
|
|
|
10 |
Nord 3 |
|
|||
digits. |
|
|
|
|||
|
|
9 |
SuperRTL |
|
||
|
|
|
|
8 |
Kabel 1 |
|
Selecting programmes from the |
|
|
7 |
PRO 7 |
|
|
|
|
6 |
West 3 |
|
||
station table |
|
|
5 |
Hessen 3 |
|
|
|
|
4 |
SW-BW |
|
||
In normal TV mode, you can open the |
|
|
3 |
Bayern 3 |
|
|
|
|
|
||||
|
|
2 |
ZDF |
|
||
station table with the white key . In |
|
|
|
|||
|
|
1 |
ARD |
|
||
|
|
|
|
|
|
|
the table which is then displayed, you |
|
can select a station with the oval „P+/P-“ rocker |
|
key. Then press the „OK“ key to switch to this sta- |
OK |
tion. |
|
If more than 20 stations are stored in the station |
|
|
|
table, you can display the next 10 stations by |
|
pressing the oval cursor control key. |
|
Return to previous station
With the red key  , you can switch back and forth between the last two stations you selected.
23
Call the menu |
11. Picture settings, general |
TV-Menü
In a menu with two asterisks (**), the set- MENU tings for certain menu items cannot be
changed.
You can adjust the picture settings (brightness, contrast, chrominance, etc.) for all programme positions and save these settings as the standard values. These standard values can be recalled at any time by pressing the „OK“ key.
OK |
Defining the picture settings: |
|
• Press the „MENU“ key to open the TV menu.
• Press the „OK“ key to open the menu „Picture and sound“.
|
Picture pos.,vertic* |
|
Film mode*2) |
 Picture-Volume
 AV devices
 Station table
 Timer
Timer  Configuration
 CTI*
CTI*
 Comb filter
 Noise reduction Sound set.prog.po Picture sharpness
Sound settings, gen. Colour intensity Pict. set.,prog. posn.* Contrast
Pict. settings, gen.  Brightness
: select, |
Brightness |
61 |
|
OK: go to |
Standard value |
50 |
|
settings. |
|||
|
|
Accept 61 as the standard value:
•Use the cursor control key to select the individual picture settings.
•Press the „OK“ key and then use the
- + key to change the setting in the setting window.
•Use the cursor control key to select the 3rd line in the setting window "...
accept as a standard value: OK".
•Save the new setting as the standard value by pressing the „OK“ key.
OK
*The number of subjects and sections displayed here depends on the operating scope setting.
•Press the „TV“ key to close the menu
If these standard settings are unsatisfactory for some programme positions, you can define special individual settings for these positions as described on the next page.
2) Rotation
This function can be used to compensate for any tilting of the picture caused by the earth’s magnetic field. The function should be executed when the set is first installed and if the set is subsequently moved to a different position.
3) Film mode – see glossary.
2)Available only on TV sets which are equipped with this option.
24
11. Picture settings, general |
Call the menu |
In a menu with two asterisks (**), the settings for certain menu items cannot be changed.
Panorama function 2)
This setting can be made only on 16:9 TV sets.
The panorama function can be used to expand "normal" programmes in 4:3 format to the 16:9 format. This is done by increasing the width of the picture to fill the complete width of the screen.
MENU
OK
Setting Panorama2) mode:
•Press the "MENU" key to open the TV menu.
•Press the "OK" key to open the menu "Picture and sound".
•Use the cursor control key to select "Panorama".
•Press the "OK" key and then, in the setting window, use the - + key to change the setting for "Panorama".
TV-Menü
|
 Picture-Volume
 AV devices
 Station table
 Timer
Timer  Configuration

 : select, OK: go to settings.
 Rotation2)*
 Picture pos., vertica
 Panorama2)*
CTI*
Comb filter*
Sound set.prog.po Noise reduction*
Sound settings, gen. Picture sharpness* Pict. set.,prog. posn.* Colour intensity
Pict. settings, gen. Contrast
Panorama |
On, zoom 1 Mode |
Non-linear |
|
|
|
•Use the cursor control key to select the menu item "Mode" and use the - + key to select either "linear" or "non-linear".
•Press the "OK" key to save your changes. The picture shows the factory setting.
•Press the "TV" key to close the TV menu.
The functions "Panorama2)" and "Zoom" can also be used together.
2)Available only on TV sets which are equipped with this option.
OK
|
|
|
|
* The number of |
and sections |
||
displayed here |
on the opera- |
||
ting scope |
|
|
|
25
TV-Menü
Call the menu
MENU
OK
11.1 Picture settings for a specific
programme position ...
In a menu with two asterisks (**), the picture settings for a specific programme position cannot be changed.
If the standard settings are not satisfactory for certain programme positions, you can define different settings for these positions with the menu item „Picture settings for Pr ...“. These settings apply only to the selected programme position and cannot be overwritten by the standard settings.
|
|
VCR |
Defining different picture settings for Pr. |
|
|
|
Colour standard |
||
|
xy: |
|||
Picture-Volume |
|
Colour offset |
||
|
CTI |
• Select the programme position for |
||
AV devices |
|
|||
|
Comb filter |
which you want to define different pic- |
||
|
|
|||
Station table |
Sound set.prog.po |
Noice reduction |
||
ture settings. |
||||
Timer |
Sound settings, gen. Picture sharpness |
|||
Pict. set.,prog. posn.* Colour intensity |
• Press the „MENU“ key to open the TV |
|||
Configuration |
||||
Pict. settings, gen. |
Contrast |
menu. |
||
: select, |
These settings apply to the currently selected programme |
|||
• Press the „OK“ key to open the menu |
||||
OK: go to |
position. |
|
||
settings. |
|
|
„Picture and sound“. |
|
|
|
|
||
|
|
|
• Use the cursor control key to select the |
|
|
|
|
item „Picture settings for Pr. xy“. |
|
|
OK |
• Press the „OK“ key and then select the setting |
||
|
|
you want to change. |
||
•Press the „OK“ key to confirm your selection and then, in the setting window, use the - + key to change the setting.
•Press the „OK“ key to save the new setting.
•Press the „TV“ key to close the menu.
You can also define and recall the individual picture settings in the station table.
26
12. Sound settings, general |
|
Call the menu |
||||||||
In a menu with two asterisks (**), the set- |
|
|
|
|
|
|||||
tings for certain menu items cannot be |
|
|
|
|
|
|||||
changed. |
|
|
|
|
|
|
|
MENU |
|
|
|
|
|
|
|
|
|
|
|
|
|
You |
|
|
|
|
|
|
|
|
|
|
bass, etc.) for all programme positions and save |
|
|
|
|
|
|||||
these settings as the standard values. These stan- |
|
|
|
|
|
|||||
dard values can be recalled at any time by pres- |
|
|
|
|
|
|||||
sing the „OK“ key. |
|
|
|
|
|
|
|
|
|
|
|
|
|
|
|
|
|
|
OK |
|
|
Defining the sound settings: |
|
|
|
|
|
|
|
|
|
|
• Press the „MENU“ key to open the TV |
|
|
|
|
|
|
|
|
|
|
|
|
|
|
|
|
|
|
|
||
menu. |
|
|
|
|
|
|
|
|
|
|
|
|
|
|
|
|
|
|
Stereo wide* |
||
• Use the blue key |
to select the menu |
|
|
|
|
|
Spatial sound* |
|||
„Picture and sound“ and press the |
|
|
Picture-Volume |
|
|
|
Balance* |
|||
|
|
AV devices |
|
|
|
Tone settings |
||||
„OK“ key to open it. |
|
|
|
|
|
|
Volume headphones |
|||
|
|
|
Station table |
|
|
|
|
|||
• Use the cursor control key to select the |
|
|
Sound set.prog.po |
Bass |
||||||
|
|
Timer |
Sound settings, gen. |
Treble |
||||||
item „Sound settings, general“. |
|
|
Pict. set.,prog. posn.* |
Volume control |
||||||
|
|
|
|
|||||||
• Press the „OK“ key and then select the |
TV-Menü |
|
Configuration |
Pict. settings, gen. |
Volume |
|||||
|
|
|
|
|
|
|
|
|||
setting you want to change. |
|
: select, |
Volume |
55 |
|
|||||
OK: go to |
Satandard value |
46 |
|
|||||||
• Press the „OK“ key to confirm your |
settings. |
Accept 55 as the standard value: OK |
||||||||
|
|
|
||||||||
|
|
|
|
|
|
|
|
|
|
|
selection and then, in the setting window, use
the - + key to change the setting. |
|
|
OK |
||
• Press the „OK“ key to save the new setting as |
||
|
||
the standard value. |
|
•Press the „TV“ key to close the menu.
If these standard settings are unsatisfactory for some programme positions, you can define special individual settings for these positions as described on the next page.
* The number of subjects and sections displayed here depends on the operating scope setting.
27
 Loading...