


TV. VIDEO. AUDIO. MECABLITZ |
MECABLITZ 45CL-1
Operating instructions

|
Contents |
|
Foreword . . . . . . . . . . . . . . . . . . . . . . . . . . . . . . . . . . . . . . . . . . . . . . . . . . . . . . |
. .2 |
|
Points worth knowing . . . . . . . . . . . . . . . . . . . . . . . . . . . . . . . . . . . . . . . . . . . . . |
. .3 |
|
1. |
Safety instructions . . . . . . . . . . . . . . . . . . . . . . . . . . . . . . . . . . . . . . . . . |
.4 |
2. |
Preparing the flashgun for use . . . . . . . . . . . . . . . . . . . . . . . . . . . . . . . |
.5 |
2.1 |
Attaching the flashgun to a camera . . . . . . . . . . . . . . . . . . . . . . . . . . . . . . |
.5 |
2.2 |
Power supply . . . . . . . . . . . . . . . . . . . . . . . . . . . . . . . . . . . . . . . . . . . . . . |
.6 |
2.3 |
Battery replacement . . . . . . . . . . . . . . . . . . . . . . . . . . . . . . . . . . . . . . . . . |
.6 |
2.3.1 |
Exchanging the batteries . . . . . . . . . . . . . . . . . . . . . . . . . . . . . . . . . . . . . . |
.6 |
2.3.2 |
Operation with the battery pack . . . . . . . . . . . . . . . . . . . . . . . . . . . . . . . . |
.7 |
2.3.3 |
Operation with the mains unit . . . . . . . . . . . . . . . . . . . . . . . . . . . . . . . . . . |
.8 |
2.4 |
Switching the flashgun on and off . . . . . . . . . . . . . . . . . . . . . . . . . . . . . . . |
.8 |
3. |
Automatic flash mode . . . . . . . . . . . . . . . . . . . . . . . . . . . . . . . . . . . . . . |
10 |
4. |
Manual flash mode . . . . . . . . . . . . . . . . . . . . . . . . . . . . . . . . . . . . . . . . . |
11 |
5. |
Bounced flash . . . . . . . . . . . . . . . . . . . . . . . . . . . . . . . . . . . . . . . . . . . . . |
12 |
5.1 |
Bounced flash in automatic and TTL flash modes . . . . . . . . . . . . . . . . . . . |
13 |
5.2 |
Bounced flash in manual flash mode . . . . . . . . . . . . . . . . . . . . . . . . . . . . . |
13 |
6. |
Fill-in flash in daylight . . . . . . . . . . . . . . . . . . . . . . . . . . . . . . . . . . . . . . |
14 |
|
Fill-in flash in automatic mode . . . . . . . . . . . . . . . . . . . . . . . . . . . . . . . . . |
14 |
7. |
Auto-check display . . . . . . . . . . . . . . . . . . . . . . . . . . . . . . . . . . . . . . . . . |
15 |
8. |
Illumination and wide-angle diffuser . . . . . . . . . . . . . . . . . . . . . . . . . . |
16 |
9. |
Exposure corrections . . . . . . . . . . . . . . . . . . . . . . . . . . . . . . . . . . . . . . . |
17 |
9.1 |
Exposure correction in automatic flash mode . . . . . . . . . . . . . . . . . . . . . . |
17 |
10. |
Care and maintenance . . . . . . . . . . . . . . . . . . . . . . . . . . . . . . . . . . . . . . |
17 |
11. |
Technical data . . . . . . . . . . . . . . . . . . . . . . . . . . . . . . . . . . . . . . . . . . . . |
18 |
12. |
Optional accessories . . . . . . . . . . . . . . . . . . . . . . . . . . . . . . . . . . . . . . . |
20 |
|
Index . . . . . . . . . . . . . . . . . . . . . . . . . . . . . . . . . . . . . . . . . . . . . . . . . . . . |
22 |
Foreword
Congratulations on purchasing this METZ flashgun, and thank you for your confidence in METZ equipment.
It is only natural that you should want to use your flashgun straight away. However, it will be well worth your while to study these Operating Instructions carefully beforehand to ensure that you can operate the flashgun effectively and without any problems.
2

Points worth knowing
This flashgun can be used with:
•All cameras with a hot shoe in conjunction with the synch cable 45-54 (optional accessory)
•All cameras with synch connection in conjunction with the supplied synch cable
•System cameras
Brief survey of the operating functions:
Configuration
• 45 CL-1 with synch cable:
Operating modes possible Automatic flash mode, Ch. 3, p. 30 Manual flash mode, Ch. 4, p. 32
The mecablitz 45 CL-1 is available in two versions:
•The mecablitz 45 CL-1-NC with NiCad battery and battery charger.
The NC version can be expanded to alkaline manganese battery operation by way of the battery holder 45-39 (available as an optional extra).
•The mecablitz 45 CL-1-BAT (for operation with alkaline manganese batteries; (batteries are not included).
The battery version can be upgraded to rechargeable NiCad battery operation by adding the B 45 charger set (= NiCad battery and battery charger).
The mecablitz 45 CL-1 is a powerful flashgun based on the most modern technology.
Outstanding features:
•Universal, swivelling quadrolight reflector for bounced flash without having to forgo the benefits of automatic exposure control.
•Wide-angle diffuser.
•Automatic exposure control with a selection of 5 working apertures to easily resolve the problems associated with depth-of-field and to offer greater creative scope regarding camera settings.
•Power-saving thyristor light output control, particularly in the close-up range, for shorter recycle times and a higher number of flashes from just one battery charge.
•Correct exposure confirmation (auto check).
•Convenient calculator dial for all settings.
•Manual mode.
3

1.Safety Instructions
•Never fire a flash in the immediate vicinity of the eyes!
Flash fired directly in front of the eyes of a person or animal can damage the retina and lead to severe visual disorders, even blindness!
•Do not open or short-circuit rechargeable batteries!
•Alkaline manganese and rechargeable batteries should not be exposed to excessive heat, for instance sunshine, fire and the like!
•Never throw spent batteries in a fire! Danger of explosion!
•Lye can leak out of spent batteries and damage the contacts. Consequently, spent batteries must always be immediately taken out of the battery housing.
•NEVER recharge dry-cell batteries.
•Do not expose the flashgun to dripping or splashing water!
•Protect the flashgun against excessive heat and high humidity levels! Do not store the flashgun in the glove compartment of a car!
•Do not place any light-impermeable material on, or directly in front of, the diffuser. Ensure that the diffuser is always clean. The high light output of the flash will burn the material or the diffuser if this is not observed.
•Never take the flashgun apart! DANGER - HIGH VOLTAGE!
There are no parts inside the flashgun that can be repaired by a layperson!
4
2. Preparing the Flashgun for Use
|
|
|
|
|
|
|
|
|
|
|
holder block |
|
|
|
|
|
|
|
||
|
|
|
rapid-action catch |
|||
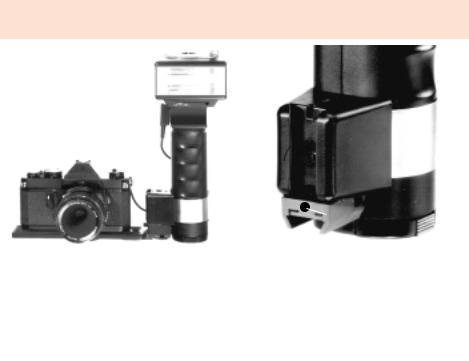
Fig. 1a: Mounting the components |
|
Fig.1b: Inserting the camera bracket |
||||
|
||||||
2.1 Attaching the flashgun to a camera
The macablitz must always be connected to the X contact the camera or the synchronization selector must be set to X.
Always switch off the camera and the flashgun before mounting or removing the flashgun.
Mounting the flashgun:
•Fasten the camera bracket with the bracket screw to the camera’s tripod bush. For mediumand large-format cameras we recommend the use of the 202/4 bracket (optional accessory).
•Insert the camera bracket into the rapid-action catch of the holder block until it is audibly engaged (fig. 1b).
•Secure the camera bracket with the locking screw.
•Connect the synch cable to the flashgun and camera.
5
2. Preparing the Flashgun for Use
|
|
|
|
|
|
|
|
|
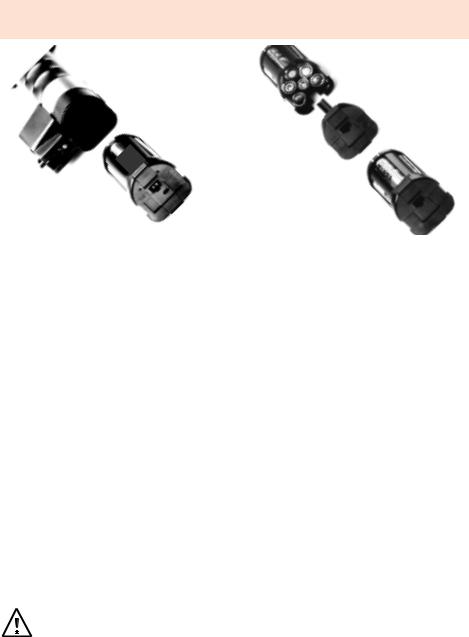
Fig.2a: Battery changing |
|
Fig.2b: Opening the battery housing |
|
||
|
|
(only with BAT-version, otherwise optional extra) |
2.2 Power supply
The flashgun can be operated with:
•Alkaline manganese batteries, size IEC LR 6 (AA-type) (only with BAT-version, otherwise optional extra)
•Metz NiCad battery pack 45-40 (only if NiCad is featured; otherwise available as an optional accessory). A charger (see table 2, page 25) is included with the flashgun if NiCad is featured).
•Power Pack P 50 (optional accessory)
•Mains unit N 22 or N 23 (optional accessories)
2.3 Battery replacement
Press the two locking keys of the battery housing, and pull out of the flashgun (fig. 2a). To return the battery housing press the two locking keys together and press into the handlemount grip of the flashgun until it audibly engages.
2.3.1 Exchanging the batteries
Press together the smooth locking keys of the dismantled battery housing (only with BAT-ver- sion, otherwise optional extra) and remove the lid (fig. 2b). Insert new batteries in conformity with the polarity symbols indicated in the base of the housing. Return the lid and lock in again.
Spent batteries must not be thrown into the domestic waste! Help keep the environment clean and discard spent batteries at corresponding collecting points!
The battery housing must not be fitted with NiCad batteries! The contacts of the battery housing are only intended for alkaline manganese batteries.
The lower resistance of NiCad batteries means that more current can flow, and this can damage the flashgun. The NiCad Battery Pack 45-40 has special contacts which do not allow the flow of high currents.
6
2. Preparing the Flashgun for Use
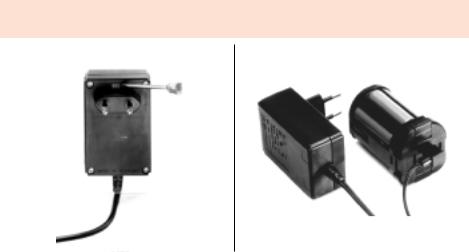
Fig. 3a: Voltage selector |
Fig.3b: Charging the battery |
2.3.2 Operation with the battery pack (only with NC-version, otherwise optional extra)
The NiCad battery should be charged for 5 hours before it is used for the first time. The NiCad battery can be charged within the flashgun or externally.
Warning: The flashgun must NOT be switched on while the battery is being charged within the flashgun!
The NiCad battery is discharged if the recycle time after a flash exceeds 60 seconds.
Adjust the correct mains voltage on the charger prior to charging. The voltage selector (fig. 3a) is located next to the plug and can be adjusted with a small screwdriver.
The connection for the charger (fig. 3b) is in the base of the NiCad battery. The adjoining pilot lamp lights up while charging is in progress.
The charging time for a completely exhausted NiCad battery is 5 hours. A partly discharged NiCad battery requires a correspondingly diminished charging time.
To identify an exhausted battery: Push the knurled slide in the battery lid to the black mark. To identify a charged battery: Push the knurled slide in the battery lid to the white mark. The Nicad battery can also be charged with the in-car charger A 16 (optional accessory).
7
 Loading...