

Page 1

Logitech® QuickCam® Pro 9000
and
Logitech®
QuickCam® Pro for Notebooks
Reviewer’s Guide
Page 2

Logitech Reviewer’s Guide: QuickCam Pro 9000 and QuickCam Pro for Notebooks –
Page ii
Logitech Reviewer’s Guide
Table of Contents
Additional Resources ...................................................................... 1
Part 1: Product Overview................................................................. 2
1.1 Introduction: A New World of Communications.......................................................2
1.2 Brief Market Summary.............................................................................................2
1.3 Key Features: Carl Zeiss optics, Autofocus, Two-megapixel sensor ......................2
1.4 Other Features ........................................................................................................3
1.5 Product Specifications.............................................................................................6
Part 2: Image Quality........................................................................ 7
2.1 Carl Zeiss ................................................................................................................7
2.2 Autofocus.................................................................................................................7
2.3 True Two-Megapixel Sensor ...................................................................................8
Part 3: Installation and Use ............................................................. 9
3.1 Installation/Setup.....................................................................................................9
3.2 Common Usage Scenarios/Examples.....................................................................9
3.3 Exploring QuickCapture.........................................................................................10
3.4 Testing Considerations..........................................................................................17
Part 4: Video Calling Applications................................................ 19
4.1 Using a Webcam with Instant Messenger Applications.........................................19
4.2 Sharing Videos Online...........................................................................................20
Page 3

Logitech Reviewer’s Guide: QuickCam Pro 9000 and QuickCam Pro for Notebooks –
Additional Resources
Supporting Documents
- Press Release
- Product Fact Sheets
- Expert’s Guide to Webcams (article)
- Innovation Brief: Image Quality
- How to Choose and Use a Webcam (article)
- Logitech QuickCam family line-up
- Background on Carl Zeiss Tessar® lens
Images and additional resources are available online at
http://www.logitech.com/pressroom, or from the Logitech contact listed below.
Page 1
Press Relations Contact (not for publication)
Ha Thai
Logitech Sr. Public Relations Specialist
Entertainment and Communications Business Unit
Video and Voice Access Devices
Phone: 510.713.4982
E-mail:
ha_thai@logitech.com
Pamela McCracken
Logitech Public Relations Manager
Entertainment and Communications Business Unit
Gaming, Audio, Video and Voice Access Devices
Phone: 510.713.4003
E-mail:
pamela_mccracken@logitech.com
Copyright declarations:
Logitech and the Logitech logo are trademarks or registered trademarks of Logitech Inc.
Carl Zeiss and Tessar are trademarks or registered trademarks of Carl Zeiss AG.
Windows Vista and Windows XP are trademarks or registered trademarks of Microsoft Corporation.
Macintosh is a registered trademark of Apple Inc.
Page 4

Logitech Reviewer’s Guide: QuickCam Pro 9000 and QuickCam Pro for Notebooks –
Page 2
Part 1: Product Overview
1.1 Introduction: A New World of Communications
As of 2007, more than 250 million people worldwide were enjoying a broadband
connection, according to research firm Parks Associates. Broadband penetration is
driving the adoption of new technologies for new applications.
One such development is innovative webcams for video calling and sharing. With more
bandwidth, people are increasingly able to send and receive larger amounts of data.
Because of video communications, now friends and colleagues can connect with each
other from all around the world – while enjoying conversations as if they were in the
same room.
1.2 Brief Market Summary
Logitech has been a driving force in the webcam market for more than 10 years. Way
back in 1995, Logitech marketed its first webcam, the VideoMan. In 1998, the company
introduced the first webcam with an integrated microphone.
Logitech has provided audio and video technology for Windows Live® Messenger since
March 2003. And as of January 2007, Logitech has supported over 11.3 billion Windows
Live Messenger sessions.
In May 2007, Logitech shipped its 50 millionth webcam. The world’s leading
manufacturer of webcams, Logitech’s success is a result of the company’s ability to
bring innovative, user-friendly webcams to market, while driving innovative applications
that allow webcam users to make the most of their investment.
1.3 Key Features: Carl Zeiss optics, Autofocus, Two-megapixel sensor
Logitech thoroughly evaluates each webcam’s individual components, always delivering
compelling new technologies with the best-possible value for the consumer. The
company is scrupulous when testing new sensor technology and the latest optics,
ensuring premium performance.
The new Logitech QuickCam Pro-series webcams set a new standard in webcam image
quality by bringing together Carl Zeiss® optics and a premium autofocus system.
Carl Zeiss Optics
The Logitech® QuickCam® Pro 9000 and Logitech® QuickCam® Pro for Notebooks
webcams are the first webcams to incorporate Carl Zeiss optics.
Carl Zeiss is a global leader in optics with a 160 year history driving lens innovation.
Working with Carl Zeiss, Logitech can ensure that the new QuickCam Pro-series
webcams meet Zeiss’s high standards for lens design and manufacturing.
Page 5

Logitech Reviewer’s Guide: QuickCam Pro 9000 and QuickCam Pro for Notebooks –
Page 3
Autofocus
Logitech incorporated a premium autofocus system, which allows people to get razorsharp images – even in extreme close-ups (up to 10 cm from the webcam lens).
Logitech used a premium voice coil motor (VCM) system to create a webcam that
refocuses quickly and quietly. Unlike a stepper motor, which uses a gear system, the
VCM is gearless and can refocus on extreme close-ups usually within three seconds.
Two- Megapixel Sensor
The QuickCam Pro-series webcams comes with a true two-megapixel sensor, which
helps create images with better
resolution. For quick snapshots, the webcams have the
ability to capture true two-megapixel images that, with Logitech software, can be
enhanced to eight megapixels.
Images taken using Logitech QuickCam Pro 9000 and Logitech QuickCapture (96 0 by 720 pixels).
1.4 Other Features
HD Video
The Logitech QuickCam Pro-series webcams allow people to call and share HD-quality
video. At 960 by 720 pixels, images have never been so clear. And the webcams can
record to disc at up to 1600 by 1200 pixels (at five frames per second), which means it’s
possible to record and e-mail HD video messages to friends and colleagues, or even
upload video clips to Web sites such as YouTube.
Logitech RightLight 2 Technology
Logitech RightLight® 2 technology is a system of hardware and software technologies
that improves a webcam’s image quality under a wide variety of lighting conditions,
particularly in low light. Logitech RightLight technology consists of premium sensors,
– Better Low-Light and Backlight Performance
Page 6

Logitech Reviewer’s Guide: QuickCam Pro 9000 and QuickCam Pro for Notebooks –
Page 4
advanced firmware and the very best lenses that work together to deliver great video
performance.
Webcams with RightLight technology feature next-generation, higher-performance
CMOS sensors that, when combined with Logitech firmware, maximize the amount of
light a webcam can capture in any situation. The Logitech RightLight system is able to
capture and process additional light; as a result, areas that are not well-lighted – whether
it’s a shadowed face or an entirely dark image – will appear brighter and more detailed.
Logitech RightLight technology also optimizes color performance to produce naturallooking skin tones. During the development process, Logitech webcams are thoroughly
tested to ensure they reproduce a spectrum of colors, with an emphasis on skin tones.
Adjustments to color hues and saturation are made within camera firmware before mass
production to ensure skin tones appear as natural as possible. Other webcams on the
market prioritize brighter colors, which can make facial colors overly saturated –
sometimes even awkwardly tinted. For those who would like to increase the saturation of
colors, Logitech QuickCam software includes a color-boost option within the camera
settings panel. This gives colorful items, such as shirts or background, a deeper color –
though it may negatively impact the color of a face.
Logitech RightSound Technology
Many webcams include an integrated
microphone. However, because of the
microphone’s sensitivity and close proximity
to computer speakers, people using live video
calling applications commonly experience an
echo that can disrupt conversations.
Logitech RightSound® technology features
advanced acoustic echo cancellation (AEC)
software, part of the Logitech webcam
drivers, that eliminates echo. The RightSound
technology AEC algorithm analyzes sound
waves and identifies repeated noises/voices, then filters out the redundant sound so that
people can experience clear conversations without echo. Naturally, because echo is
caused by circumstances on both ends of a video call, both parties need to use either a
webcam with AEC or a headset to eliminate any chance of echo. When someone
doesn’t use a headset or a webcam with AEC, it is the person on the other end of a
video call who will actually hear the echo.
Because of echo, using a webcam with a live video-calling application required wearing
a headset – until now. With Logitech RightSound technology, people can communicate
freely without a headset – a more natural way of interacting – just as if they were in the
same room with a friend or family member. RightSound technology allows the whole
family to join the conversation without creating echo for the person on the other end of
the video call, or without having to pass a headset from person to person.
In addition to eliminating echo, Logitech RightSound technology in the QuickCam Pro
9000 and QuickCam Pro for Notebooks also suppresses unwanted background noise to
further ensure crystal clear video calls. For example, noise from an air conditioner
running constantly in the background can be reduced and, in many cases, eliminated by
the noise suppression technology.
Page 7
Logitech Reviewer’s Guide: QuickCam Pro 9000 and QuickCam Pro for Notebooks –
Page 5
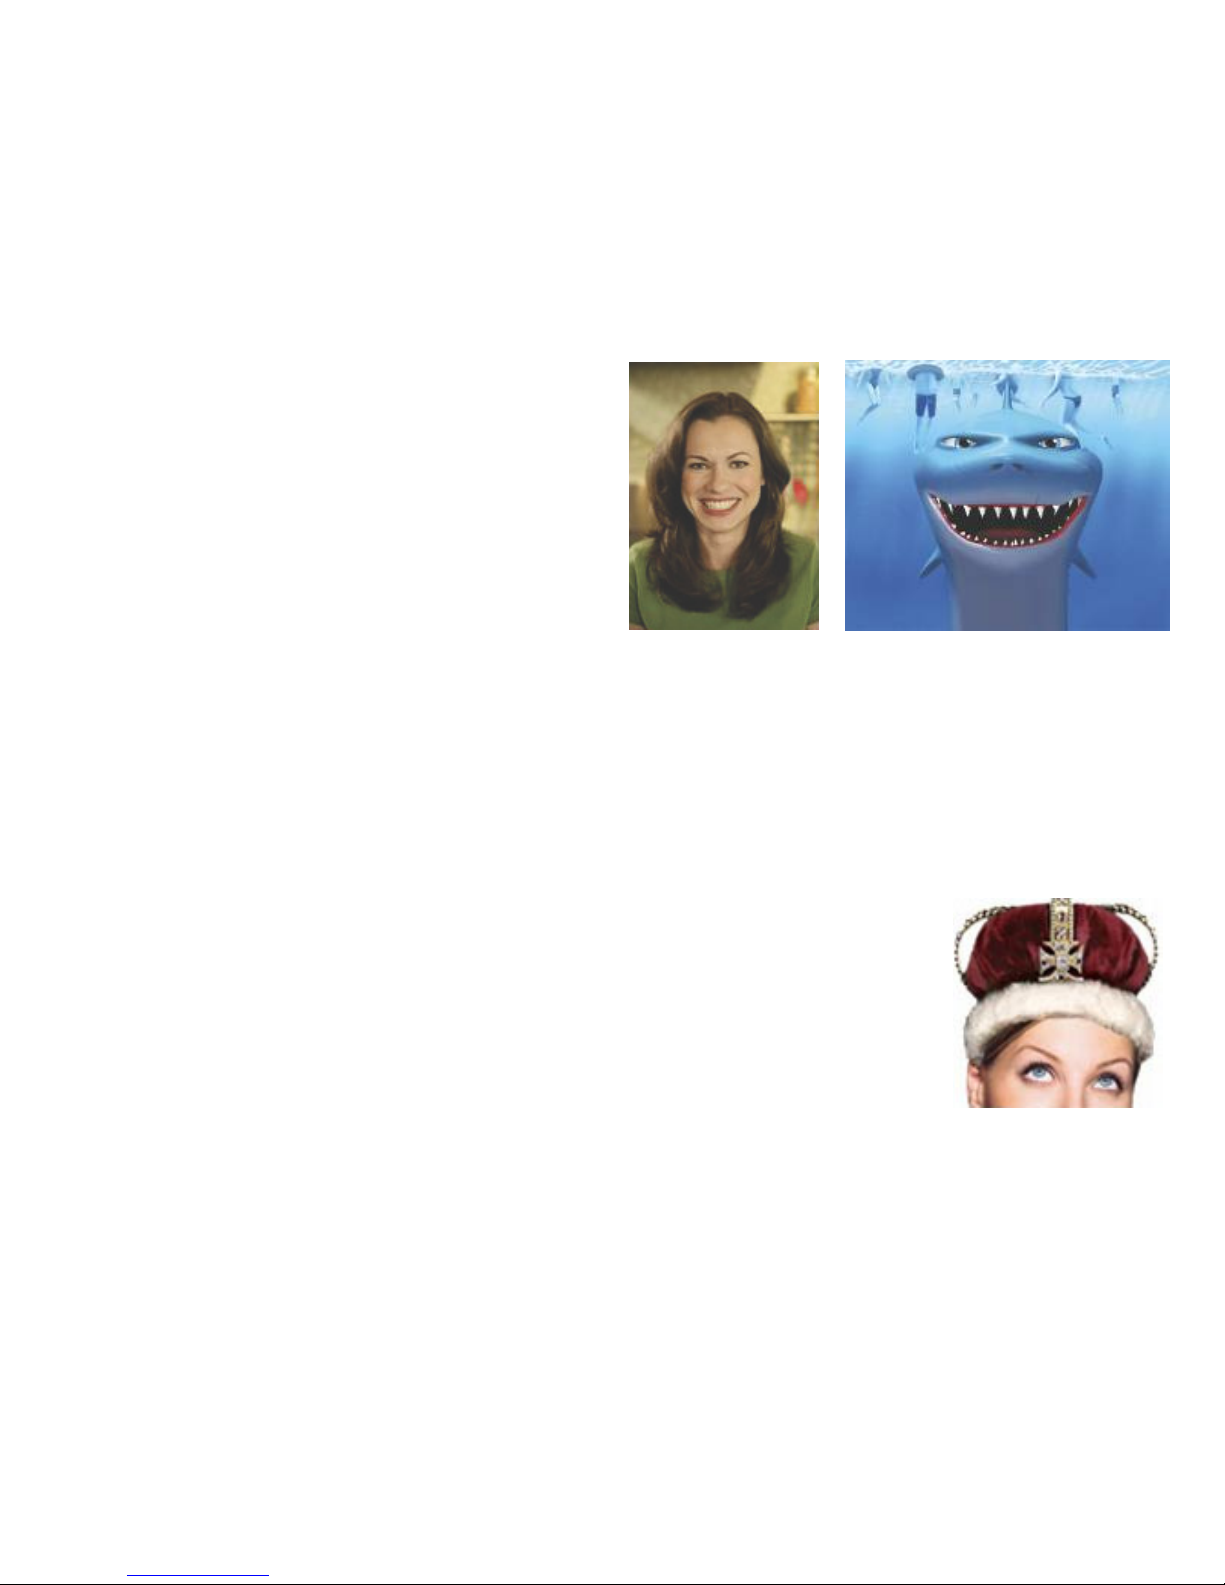
Logitech Video Effects: Avatars, Face Accessories and Fun Filters
The innovative Logitech Video Effects software allows people to completely transform
themselves. And Logitech Video Effects software works with all popular webcam
applications, including MSN® Messenger Video Conversation, AOL® Instant
Messenger™ (AIM®) and Yahoo!® Messenger.
Logitech Avatars
Avatars have become popular in some
instant messaging applications, allowing
people to build characters that become their
online identity. These characters can be
commanded to make certain expressions,
such as smiling or frowning, with keystrokes
on the computer. Video Effects avatars are
different – Logitech’s avatars mimic the
physical movement of the webcam user
during a live video communications session.
The innovation behind Video Effects avatars starts with Logitech’s advanced face
tracking software. The software identifies 22 points on a face based on algorithms that
spot various shapes, colors and movements. Those 22 points – around the eyebrows,
eyes, nose and mouth – are then translated into coordinates that become instructions for
the animated avatars. The actual video of the webcam user is then replaced with the
output of a three-dimensional avatar. The entire process takes place in a matter of
milliseconds.
Logitech Face Accessories
Video Effects face accessories use the same fundamental technology as the
avatars – with a few variations. Instead of using 22 points to identify
expressions, the software tracks 14 or 8 points on a face. Those points
become anchors for the various animated accessories – a hat, for example,
would use anchor points around the eyebrows to define its location, whereas
a mustache would use anchor points around the mouth. The animated
accessories are then scaled and rotated, depending on the position of the
anchor points. Unlike the avatars, the original source video is kept intact and
the animated accessory is overlaid on top of the image. The combination is
then sent to the video application.
Logitech Fun Filters
Logitech Fun Filters create an outline around any object visible in the image, such as the
caller’s face, chair or office furniture. With the simple click of a button, people can
change their image to one of twelve fun filters, giving their image a fish eye, neon light or
chalkboard-looking effect.
Page 8

Logitech Reviewer’s Guide: QuickCam Pro 9000 and QuickCam Pro for Notebooks –
1.5 Product Specifications
Price
The suggested retail price of both webcams is $99.99 (U.S.).
Warranty
Two-year limited hardware warranty.
System Requirements
Windows® XP
• Pentium® P4 (or compatible) processor 1.4 GHz (2.4 GHz recommended)
• 128 MB RAM (256 MB recommended)
• 200 MB available hard disk space
• 16-bit color display adapter
• Windows®-compatible sound card and speakers (full-duplex sound card
recommended)
• USB port
• CD-ROM drive
Page 6
Windows Vista™
• Pentium® P4 (or compatible) processor, 2.4 GHz (2.8 GHz recommended)
• 512 MB RAM (1 GB recommended)
• 200 MB available hard disk space
• 16-bit color display adapter
• Windows®-compatible sound card and speakers (full-duplex sound card
recommended)
• USB port
• CD-ROM drive
Note: System requirements apply to the use of Logitech® RightLight™ 2, RightSound™,
or Video Effects.
Technical Specifications
• Carl Zeiss Tessar® lens
• Autofocus system
• True two-megapixel sensor
• Color depth: 24-bit true color
• Video capture: Up to 1680 by 1200 pixels (960 by 720 pixels at HD quality)
• Frame rate: Up to 30 frames per second
• Still image capture: 8 million pixels (with software enhancement)
Page 9

Logitech Reviewer’s Guide: QuickCam Pro 9000 and QuickCam Pro for Notebooks –
Page 7
Part 2: Image Quality
A good image reproduces its subject as close to reality as possible. Qualities of a good
image include clarity, detail, sharpness, color accuracy and tonal range. Usually, the
higher the resolution, the better the image. But if the lens doesn’t capture the light
accurately, the image may still be speckled or washed-out or have any number of other
aberrations.
For webcams, good image quality is a product of several systems working in concert to
deliver a crystal clear image to your monitor. The major elements of the image system
include the lens and the sensor.
Logitech’s new QuickCam Pro-series webcams use Carl Zeiss optics and a premium
autofocus system to deliver unparalleled image quality.
2.1 Carl Zeiss
The new Logitech QuickCam Pro-series webcams are the first to incorporate Carl Zeiss
optics. These webcams meet the specification of the Carl Zeiss Tessar® lens system, a
design renowned for image sharpness.
Elegant and precision-engineered, the
Carl Zeiss® family of companies has a
storied history of producing lens designs
that are used for a variety of
applications, including high-end and
consumer cameras, electron
microscopes and space photography.
Though the original Tessar lens had a
four-element design, the Tessar lens
used in the Logitech webcams is a
further technological development.
The Logitech webcams use a five-element
lens arranged into four optical elements.
1. Aspheric lens
2. Aspheric lens
3 & 4. Doublet lens
5. Aspheric lens
That is, two of the lenses (Number 3 and 4)
in the lens stack are cemented together. As a result, the lens focuses the light onto the
sensor with maximum detail and minimal aberrations.
Elegant and simple, the compact and lightweight Tessar design makes it the perfect
choice for Logitech webcams, which must conserve on weight and bulk.
2.2 Autofocus
Current webcams often have a tough time automatically focusing on moving or close-up
subjects. The resulting image usually looks hazy and out-of-focus.
Logitech addressed this problem by building an autofocus system into its newest
webcams: Logitech® QuickCam® Pro 9000 and Logitech® QuickCam® Pro for
Notebooks.
Logitech's autofocus system zeroes in on the subject—such as a person's face or even
a business card—in the center of the frame. When the subject moves, the webcam
Page 10
Logitech Reviewer’s Guide: QuickCam Pro 9000 and QuickCam Pro for Notebooks –
Page 8
automatically tracks the motion and refocuses the image in less than three seconds.
Even if the subject is only 10 centimeters from the camera, the webcam focuses in and
out automatically with precision and speed. The result: Transitions are fluid, and the
image is clear and sharp.
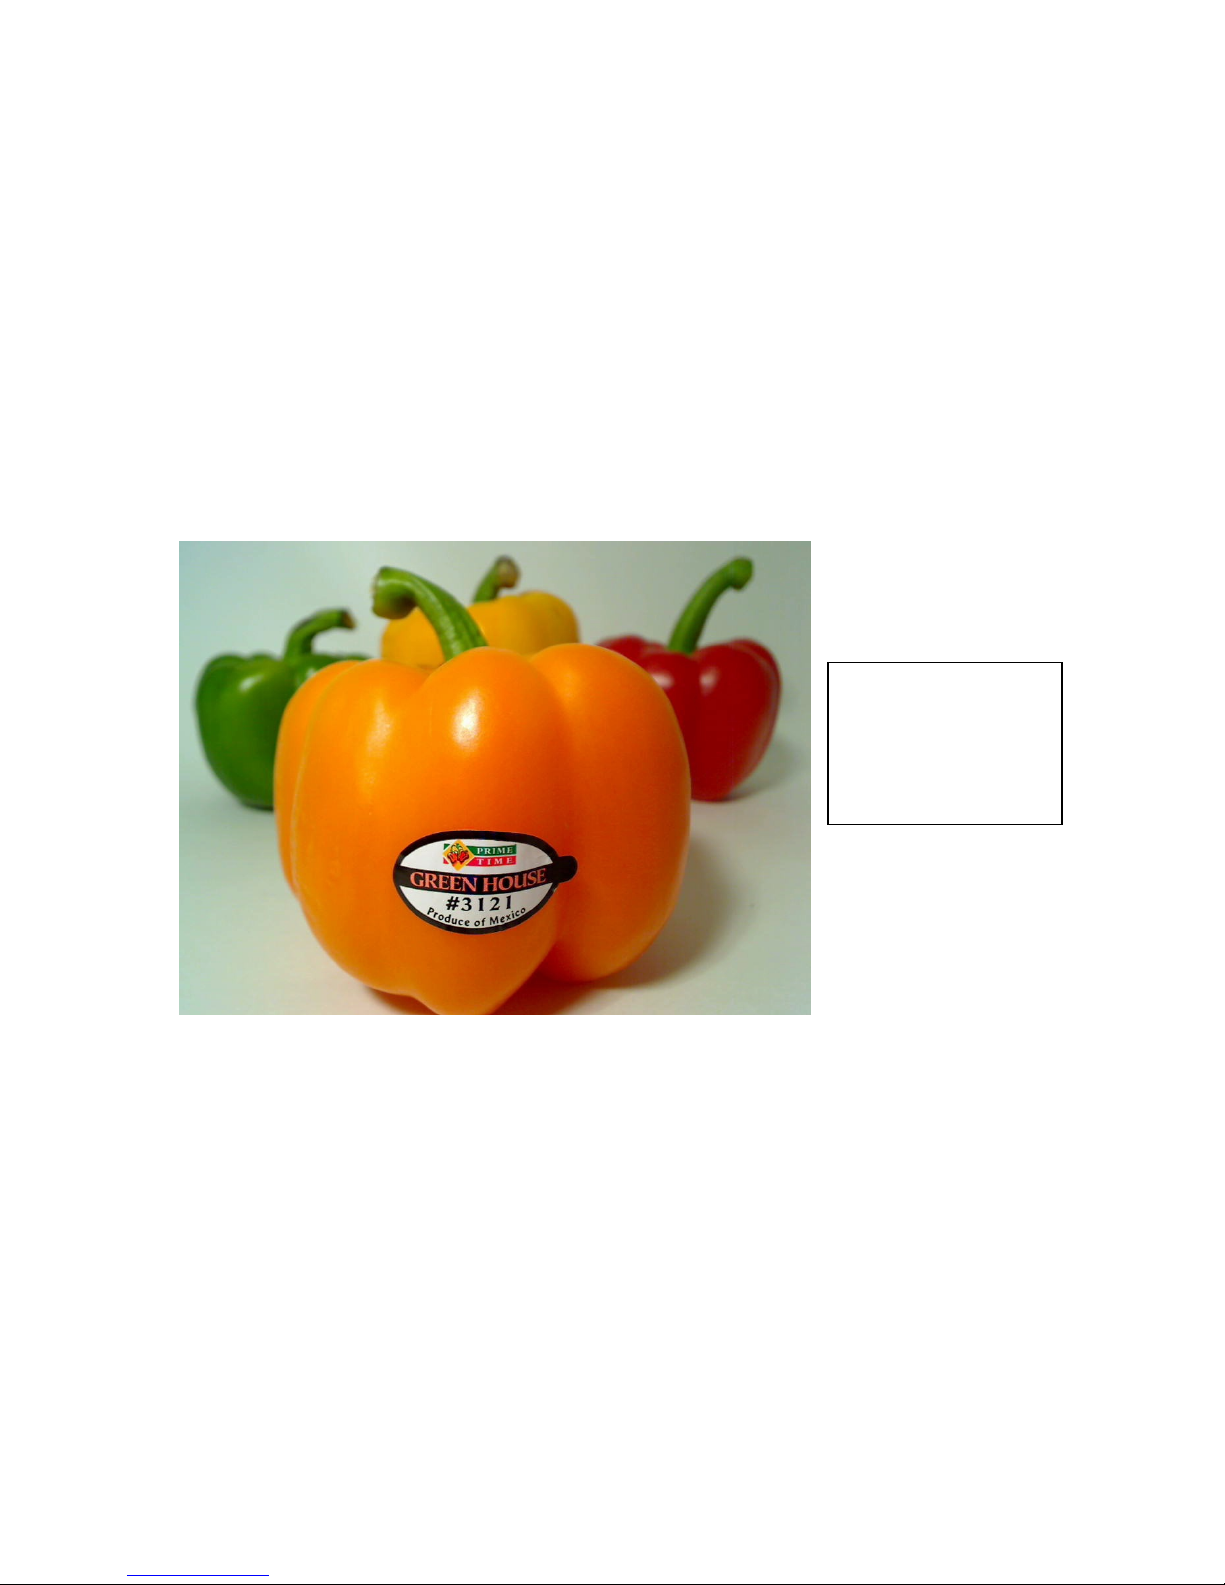
2.3 True Two-Megapixel Sensor
Once light is captured by a webcam lens, the webcam’s sensor needs to transform the
physical qualities of the light into digital information. While higher-megapixel sensors can
produce pictures and videos of higher resolution, multi-megapixel sensors do not always
equal high-quality images.
Logitech’s combination of a high-quality Carl Zeiss Tessar lens, a premium autofocus
system and a two-megapixel sensor ensures that people will be able to capture twomegapixel images, and greater, with amazing clarity and detail.
Image taken using
Logitech QuickCam Pro
9000 and Logitech
QuickCapture software
at 960 by 720 resolution.
With the introduction of the QuickCam Pro 9000 and QuickCam Pro for Notebooks
webcams, Logitech utilized a premium two-megapixel sensor. For photos and video
clips, this high-resolution sensor can capture video at 960 by 720 pixels. That’s
equivalent to HDTV-quality video. With software interpolation, a method of adding pixels
to an existing image, people can capture and print up to eight-megapixel photos.
(For more information on Carl Zeiss and the Logitech autofocus system, please read the
“Innovation Brief: Image Quality.”)
Page 11

Logitech Reviewer’s Guide: QuickCam Pro 9000 and QuickCam Pro for Notebooks –
Page 9
Part 3: Installation and Use
3.1 Installation/Setup
Installation of the QuickCam Pro 9000 and QuickCam Pro for Notebooks webcams is a
simple process, and takes just a few minutes. The user’s guide included in the product
provides clear step-by-step instructions. Here are a few additional suggestions for
reviewers:
• Position the QuickCam Pro 9000 or QuickCam Pro for Notebooks webcam at the
top-center of your monitor so that the camera lens is close to the video screen,
improving eye contact.
• For optimal performance, the built-in microphone should be approximately three
feet away from you.
• Bend the flexible monitor clip to secure the QuickCam Pro 9000 and QuickCam
Pro for Notebooks webcam to your monitor.
• Insert the supplied CD into an available drive and follow the on-screen
instructions.
• Do not connect the cameras until prompted to do so by the installation software.
• If the software installation process doesn’t start automatically, from the Windows
Start menu, select Run and type in D:\setup.exe. (Where D: is the drive letter of
your optical drive. If your optical drive is assigned to a different letter, substitute
that letter in the run command.)
• Be sure to complete the audio-tuning wizard that runs the first time you launch
the QuickCam software. This wizard helps you to adjust your speakers and
microphone for optimal audio performance.
3.2 Common Usage Scenarios/Examples
To fully appreciate the amazing image quality of the Logitech QuickCam Pro-series
webcams, please try these simple scenarios.
• Record a video clip or take a photo. Open QuickCapture and click Take Photo
or Record Video. Notice how clear and detailed the images are. Notice how rich
the colors are.
• E-mail a photo or a video clip. After you’ve recorded something, right-click on
an image in your gallery and send it to a friend or colleague. People can even
upload a clip to YouTube.
• Adjust the image size. With QuickCapture open, click the drop-down menu just
to the bottom right of the image. You can take up to eight-megapixel still photos
and HD video (at 960 by 720 pixels).
• To get the camera to perform at its best, your monitor resolution should be
at a minimum of 1280 by 1024 pixels. If you don’t do this, when you set
QuickCapture to use HD resolution or higher, you may see some image artifacts
on your screen.
To explore the many features of the Logitech QuickCam Pro 9000 and QuickCam Pro
for Notebooks webcam, launch the QuickCam software by clicking on the QuickCam
shortcut on the desktop (or in the system tray).
Page 12

Logitech Reviewer’s Guide: QuickCam Pro 9000 and QuickCam Pro for Notebooks –
The QuickCam Control Panel will appear:
Launch QuickCapture to take pictures or make movies.
Video Effects (avatars and video accessories)
Privacy shade
Change settings
Select video communications application
Page 10
Audio mute and video privacy shade buttons
3.3 Exploring QuickCapture
The first time you launch QuickCapture interface, the QuickCam Pro 9000 or QuickCam
Pro for Notebooks webcams will evaluate the lighting conditions. If you have a lighting
environment that will benefit from Logitech’s RightLight 2 Technology, a dialog box pops
up and recommends that you enable RightLight.
Accept the recommended selection and click on Continue.
3.3.1 Explore RightLight 2 Technology
Logitech’s RightLight 2 Technology is a system of hardware and software that delivers
superior image quality in challenging lighting situations such as a dimly lighted or harshly
backlighted room.
Page 13

Logitech Reviewer’s Guide: QuickCam Pro 9000 and QuickCam Pro for Notebooks –
Page 11
Example 1 – Using RightLight 2 Technology with Backlighting
To better illustrate how RightLight 2 Technology works, the next two examples guide you
through disabling RightLight 2, so that you can see how much the image improves when
you allow the wizard to re-enable it.
• Position yourself so that there is a light source behind you.
• Click the QuickCapture icon to activate your camera.
• Click the Change Settings icon on the QuickCam Control Panel.
• Click the RightLight 2 icon to access the RightLight 2 settings.
• Uncheck Use RightLight 2 Settings to disable RightLight 2.
• Click Return to Default Settings. You’ll see your face in shadows. The camera
detects that you can benefit from RightLight 2 Technology and prompts you to
enable it.
• Accept the default and click Continue.
The result will look something like this:
Page 14

Logitech Reviewer’s Guide: QuickCam Pro 9000 and QuickCam Pro for Notebooks –
Example 2 – Using RightLight 2 in Low Lighting
• Darken your room to a low lighting level.
• Click the QuickCapture icon to activate your camera.
• Click the Change Settings icon on the QuickCam Control Panel.
• Click the RightLight 2 icon to access the RightLight 2 settings.
• Uncheck Use RightLight 2 Settings to disable RightLight 2.
• Click Return to Default Settings. You’ll see your face in shadow. Immediately
the camera detects that you can benefit from RightLight 2 Technology and
prompts you to enable it.
• Accept the default and click Continue. RightLight 2 Technology automatically
adjusts the settings to improve the lighting on your face.
The results will look something like this:
Page 12
Note how RightLight 2 adjusted the settings for low-light saturation, low-light boost and
video noise.
Page 15
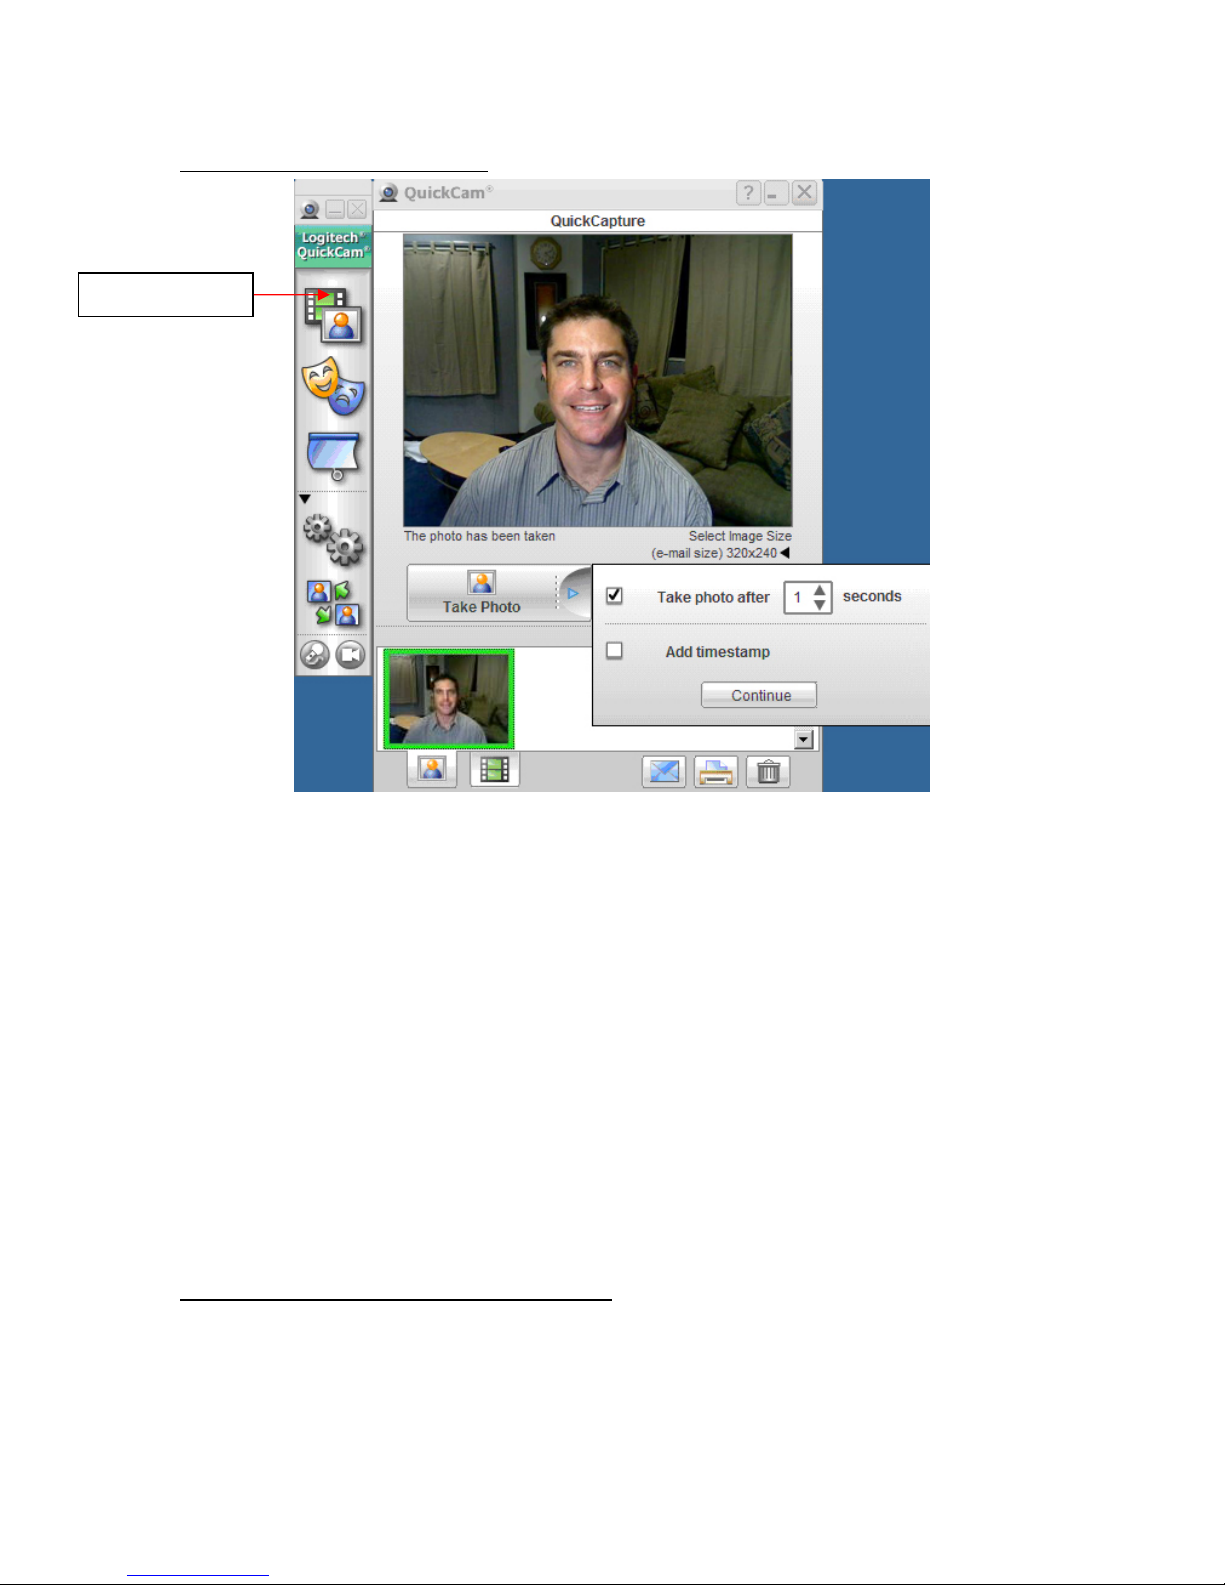
Example 3 – Taking a snapshot
QuickCapture
Logitech Reviewer’s Guide: QuickCam Pro 9000 and QuickCam Pro for Notebooks –
Page 13
• Click the QuickCapture icon in the Logitech QuickCam Control Panel.
• If prompted, allow the QuickCam Pro 9000 and QuickCam Pro for Notebooks
webcam to use RightLight Technology and click Continue.
• Click the arrow on the right of the Take Photo button to select your photo
options, including the photo timer. The default photo timer is set to zero. Note
that if you adjust the timer, the activity light blinks as the timer counts down
before taking your picture. You’ll hear a shutter click when the picture has been
taken, and a thumbnail of your picture will appear in your photo gallery.
• Similarly, you can make your first video by clicking the Record Video button.
The icons across the bottom of the screen let you toggle between your photo and video
gallery, send e-mail, print photos from your gallery, or delete photos or movies.
Tip: You can also take a snapshot by pushing the button on the right end of the camera.
Taking a picture with the snapshot button is equivalent to clicking on the Take Photo
button. As noted above, if you have configured the QuickCam Pro 9000 or QuickCam
Pro for Notebooks to delay taking the snapshot, you will experience the same delay
when you push the snapshot button.
Example 4 – Changing the Video Resolution
Logitech’s QuickCam Pro 9000 and QuickCam Pro for Notebooks webcam defaults to a
video resolution of 640 by 480 pixels. However, with its true two-megapixel sensor, the
QuickCam Pro 9000 and QuickCam Pro for Notebooks webcams are capable of much
higher resolutions. To really see the high resolution and fine detail provided by the
precision-engineered glass lens, increase the resolution to 640 by 480 pixels or higher.
Page 16

Logitech Reviewer’s Guide: QuickCam Pro 9000 and QuickCam Pro for Notebooks –
Page 14
In addition, the QuickCam software enables you to write to a disk at a high-definition
resolution of 960 by 720 pixels.
Change
Resolution
• In the lower-right-hand corner of the video frame, click Select Image Size. A
dropdown box appears. Choose a resolution of at least 640 by 480 pixels.
• Examine the larger image and look for fine details such as strands of hair and
details in the background of the image.
Tip: Be sure your computer’s screen resolution is set to 1280 by 1024 pixels or higher in
order to see the best sharpness from the web cameras.
3.3.2 Fun with Video Effects
Logitech Video Effects software, included with the QuickCam Pro 9000 and QuickCam
Pro for Notebooks webcams, provides fun and entertaining enhancements to the user’s
video experience. When activated, it alters the video stream created by the camera
independently of the webcam application, thus ensuring that the Video Effects work with
any application that supports live video.
There are three types of video effects:
• Avatars: Avatars are models that completely replace the video image.
Based on Logitech’s face-tracking software that tracks 22 points on the
face, avatars can assume the movements of the person in the video.
The avatar’s eyes blink, and its mouth and head move to reflect the
movement of the person in the video.
Page 17

Logitech Reviewer’s Guide: QuickCam Pro 9000 and QuickCam Pro for Notebooks –
• Face Accessories: These are video accessories are two-dimensional
video effects that are applied on top of the live video stream. These
accessories include hats, a poker visor, a moustache/goatee, and more.
As the subject in the video moves, face-tracking software ensures that
the selected video accessory stays attached to the subject.
• Fun Filters: Fun Filters apply photographic filters or manipulate the
images you capture with your Logitech QuickCam. Don’t just take
pictures using fun filters; use them with your favorite video messenger, or
make a movie to share. Neonize or polarize your appearance, make your
image seem drawn with chalk or colored pencils, go retro with the 50’s
Movie Reel, or make yourself appear ghostly.
Example 5 – Turn Yourself into an Avatar
Toggle between live video and video effects.
Page 15
Video Effects
Button
• Click the QuickCapture icon to activate your camera.
• Click the Video Effects icon on the QuickCam Control Panel.
• Select the avatar you want to become.
• The first time you choose an avatar, a calibration wizard pops up
• After completing the wizard, click the green Start button next to
• Nod your head, blink your eyes and open your mouth to see how
• With the avatar active, you can take a photo or record a movie.
Download more Video Effects from Logitech
(pictured right). Click the Start button and position your face within
the red square so that the software can calibrate the avatar to your
face.
your selected avatar to toggle live video to the avatar.
the avatar mimics your actions.
Page 18
Logitech Reviewer’s Guide: QuickCam Pro 9000 and QuickCam Pro for Notebooks –
Page 16
Tip: Leave the Video Effects window open so that you can easily change to an avatar or
apply a video accessory during a video call or video chat session.
During use, if you notice problems with models or accessories tracking your facial
features, try increasing the amount of light in the room, or try recalibrating the
camera by clicking on the Video Effect Options button, then selecting Calibrate
Avatars.
Logitech frequently adds new avatars, face accessories and fun filters, available free for
download at
www.logitech.com/videoeffects.
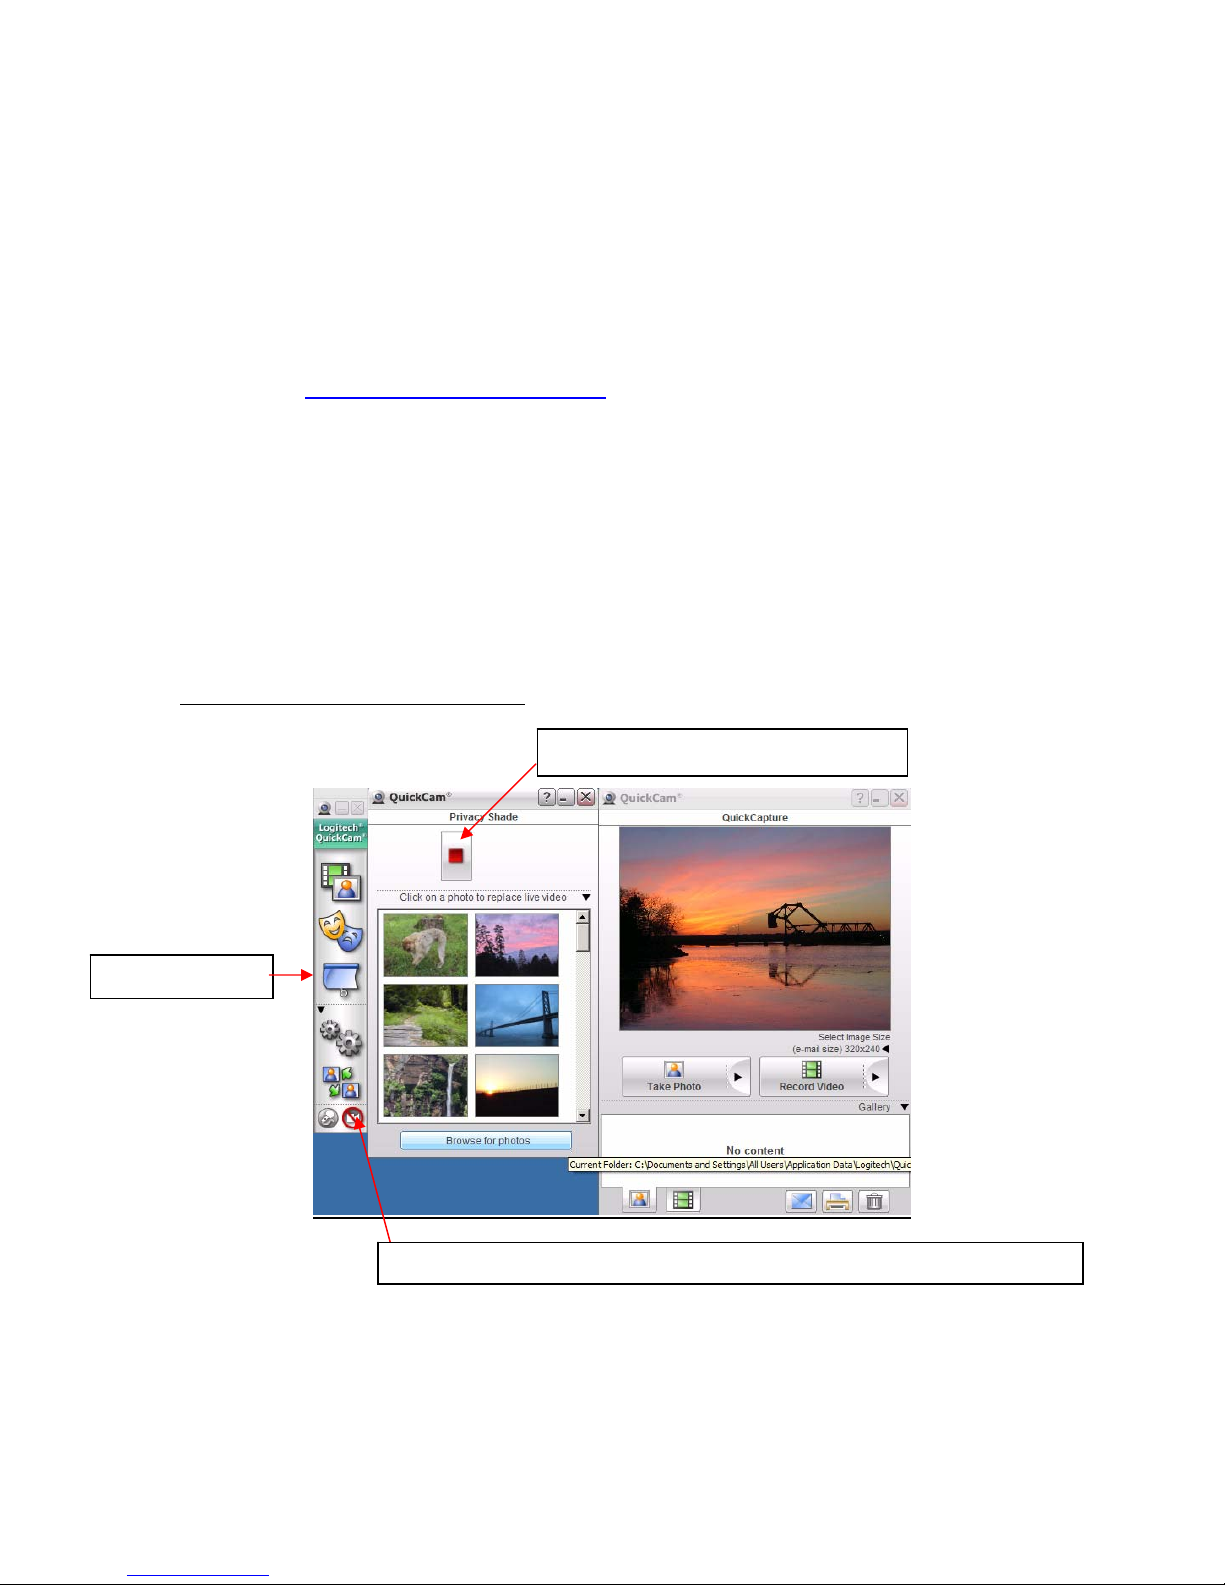
3.3.3 Privacy Shade
There are times when you might prefer not to send live video. Unlike some cameras that
merely block the camera lens with a piece of plastic, thereby sending a black video
frame, the QuickCam Pro 9000 and QuickCam Pro for Notebooks webcams are
equipped with a software-enabled privacy shade. If you want privacy, the privacy shade
substitutes a still image for the live video stream. You can choose photos from the photo
gallery supplied by Logitech, or use one of your own favorite pictures.
Example 6 – Enable Privacy Shade
Privacy Shade
• Click the QuickCapture icon to activate your camera and preview your privacy
• Click the Privacy Shade icon on the QuickCam Control Panel.
• Select a photo from the supplied photo gallery, or click Browse for Photos to
Mute microphone and control privacy shade from the control panel
shade.
select one of your own.
Enable or disable Privacy Shade
Page 19

Logitech Reviewer’s Guide: QuickCam Pro 9000 and QuickCam Pro for Notebooks –
Page 17
• Click the green Start button to replace live video with your selected photo. The
icon becomes a red Stop button. To return to live video, click the Stop button.
3.3.4 Change Settings
The Change Settings menu lets you control virtually all of the settings on your
QuickCam Pro 9000 or QuickCam Pro for Notebooks webcam. Many settings, such as
exposure control, brightness, contrast and white balance have been optimized for you
through RightLight 2 Technology, and overriding the default settings is rarely required.
There are some settings that you may wish to adjust, such as automatic face tracking to
match your personal preferences.
3.4 Testing Considerations
• The Logitech QuickCam Pro 9000 and QuickCam Pro for Notebooks webcams
have been optimized to work in incandescent or halogen-illuminated
environments. This is the type of lighting most frequently found in the home.
• The first time you launch
QuickCam, you will see the
audio tuning wizard. You must
complete this process or your
audio will not be configured
properly. If you are experiencing
audio problems or need to rerun
this wizard (for example, if you
chose to cancel it at first launch),
you can access it in the Audio
Settings tab.
• Logitech Video Effects use a
sophisticated face-tracking
technology that tracks 22 points
on your face. The tracking
engine is more accurate with better lighting conditions. If the face-tracking engine
determines that it is having problems tracking your face, a dialog box appears,
prompting you to increase lighting, and to position lights to uniformly illuminate
your face.
• The Logitech QuickCam Pro 9000 a
QuickCam Pro for Notebooks webc
nd
am
is designed to work with all of the
popular video calling applica
Video Calling Applications tab
tions. The
on
the QuickCam Control Panel
provides instant access to the fiv
e
most popular video calling
applications. From this control panel,
you can download any of the video
Improper audio
devise selected.
Rerun the Audio
tuning wizard to
fix.
Page 20

Logitech Reviewer’s Guide: QuickCam Pro 9000 and QuickCam Pro for Notebooks –
calling applications, or, if you already have them installed, launch the applica
• RightLight Technology will reduce the
video frame rate in dim light to ensure
proper exposure on your face. If you
prefer to maximize frame rate instead
,
either disable RightLight completely or
move the “low light boost” slider to the
left after un-checking “Use Automatic
RightLight Settings”
Logitech’s RightSound Technology is
•
not compatible with 7.1 channel or
SPDIF audio. If your system has thi
s
audio setup, you must disable both
Echo Cancellation and Noise
Suppression in RightSound se
ttings for
your audio to work properly.
Page 18
tion.
Page 21

Logitech Reviewer’s Guide: QuickCam Pro 9000 and QuickCam Pro for Notebooks –
Page 19
Part 4: Using Video Calling Applications
4.1 Using a Webcam with Instant Messenger Applications
It is simple to get up close and personal with instant messaging (IM). Now you can add
video to your IM and be seen and heard with a video call. All you and your friends and
family need is a webcam and speakers (or a headset for privacy) and a broadband
connection.
Here's how you can get started with the four most popular IM applications.
Skype®
Use your computer to call other Skype users for free — anywhere in the world. Skype
offers free unlimited computer calls using just your Internet connection and the power of
free Skype software. And now you can also add video to those free calls and see your
friends face-to-face! Here's how:
1. Visit
www.skype.com to download the latest Skype software.
2. Once you've downloaded the software, simply click the Add Contact button to
enter your friends' Skype Names in your personal phone book.
a. You can search for friends by name, email address or Skype ID.
b. Once you find the person you are looking for, click their name to add
them to your contact list.
3. Select the Skype name of the person you want to call from your contact list.
4. Press the Green Phone button at the bottom of the Skype contact list screen.
5. Once they answer your call, if your friend has the latest Skype application (plus a
properly configured webcam and microphone), they will see and hear you in
seconds.
Windows Live™ Messenger
Getting started with Windows Live Messenger takes just minutes with the following
steps:
1. Download Windows Live Messenger at www.get.live.com/messenger.
2. Launch Windows Live Messenger.
a. If you need an account you can sign up for one free when you launch
the application – all you need is an email address.
3. To make a call, click the Video Call icon (up top) or right-click a contact in
your list.
4. Click Video as the communication option.
5. Select Start a Video Call.
Page 22

Logitech Reviewer’s Guide: QuickCam Pro 9000 and QuickCam Pro for Notebooks –
6. A window will appear while you wait for your friend to connect on the other
end.
7. Once your contact accepts your invitation, the video conversation will begin.
a. If the person you are calling has a webcam, you will be able to see
them.
b. If the person you are calling does not have a webcam, they will be
able to see you but you will not be able to see them.
Yahoo!® Messenger
Yahoo! Messenger also supports video calling. Here’s how to get started.
1. Download Yahoo! Messenger at
http://messenger.yahoo.com.
2. Install Yahoo! Messenger by following the prompts.
3. Launch Yahoo! Messenger from your desktop.
4. To make a video call, click the Messenger menu in Yahoo! Messenger and
select the Start My Webcam option.
5. Select the person you want to call from you list of buddies.
6. Other ways to start a video call (depending on which version of Yahoo!
Messenger you are using) include:
a. Click the camera icon located on the IM window toolbar.
b. Click the contact menu located on the IM window and select Invite to
View.
Page 20
AOL Instant Messenger (AIM®)
AIM Video is growing and it’s easy to get started.
1. Download AOL Instant Messenger (AIM) at
www.aim.com.
2. Launch the AIM application on your desktop.
3. Double-click your buddy's name from your buddy list.
a. To add or find a buddy, select the Find a Friend option from the pull
down menu.
b. You can find friends by name or email.
4. To make a Video Call, in the AIM window click Video.
5. Then select a friend to call.
6. Once they accept your request, your webcams will connect. Simply start
talking and you can see and hear each other.
7. To use AIM Video, both you and your buddy will need a microphone,
speakers and a webcam.
a. If you hover your mouse pointer over your buddy's Screen Name on your
buddy list, you can check your buddy's Capabilities and see if your buddy
can Video IM with you.
Page 23

Logitech Reviewer’s Guide: QuickCam Pro 9000 and QuickCam Pro for Notebooks –
Page 21
4.2 Sharing Videos Online
Making and sharing videos online is the cool, new thing to do. And fun sites like
YouTube and Grouper are fueling the video-sharing craze. If you haven't tried this yet,
here's how to get started:
YouTube.com
1. Shoot your video using your webcam and QuickCam® software.
2. Go to
3. Click Upload Videos in the upper-right-hand corner of any YouTube page.
4. Enter as much information about your video as possible, including Title,
5. Click the Continue Uploading button.
6. In the next window, click the Browse button to search for the video file. Select
7. Set your video to Public or Private and click the Upload Video button.
TIP: Make sure your edited video is less than 10 minutes, smaller than 100MB and in a
YouTube-acceptable format.
www.youtube.com to sign up for an account (if you don't already have
one).
Description, Tags and Category. The more information you include, the easier it
is for people to find your video.
the file you want to upload.
Grouper.com
1. Shoot your video using your webcam and QuickCam® software.
2. Go to
www.grouper.com and sign up for an account (if you don't already have
one).
3. Click Upload at the top pf the Grouper.com home page.
4. Login to your account.
5. Pick a video to upload from your computer.
6. Click the Upload button.
7. Set your video to Public or Private and click the Upload Video button.
Note: Grouper.com also offers one-click posting to MySpace, Friendster, Blogger,
WordPress, and many more.
 Loading...