


 Loading...
Operating Manual
Equipment
– Viewvision
233–33148.024
Brief instructions for ViewVision
Preparation |
|
|
Remote control TV mode |
|
|
Remote control recorder mode |
|
|
Switch unit on/off |
|
|
Insert disk |
Button on the unit |
– Insert disk – |
Operating modes |
|
|
MOVIE |
– 34MOVIE – |
|
MUSIC |
– 34MUSIC – |
|
|
56DISC/USB – |
|
PHOTO |
– 34PHOTO – |
|
|
56DISC/USB – |
|
Disk menu |
|
|
Select title |
3456– |
|
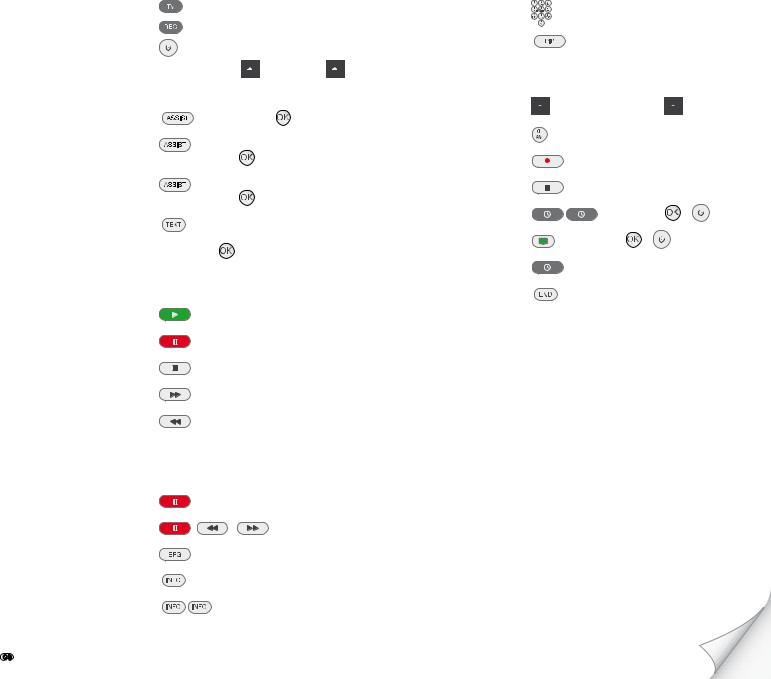
Playback
Playback
Pause
Stop
Forwards (press several times)
Backwards (press several times)
Next/previous section |
P+/- |
|
Volume |
V+/- |
|
Individual frame |
3/4 |
|
Slow motion |
/ |
(press several times) |
Jump forwards 30 sec. |
|
|
Detailed information |
|
|
Title menu |
|
|
Recorder/TV operation |
|
|
|
Select channel |
or P+/- |
|
|
Picture-in-picture during playback |
|
|
|
Recording |
|
|
|
Insert disk |
– Insert recordable disk – |
|
|
Select signal source |
or P+/- |
|
|
Start recording manually |
|
|
|
Stop recording manually |
|
|
|
Programme timed recording |
– Enter data – |
– |
|
ShowView |
– Enter data – |
– |
|
Timer overview |
|
|
|
Terminate menu |
|
|
|
Recording of Loewe SAT-TV |
See operating instructions for Loewe TV |
||
-
Please fold out this page.
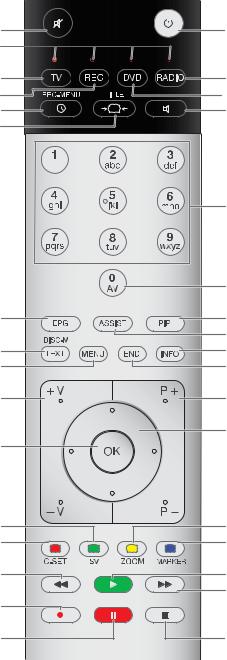
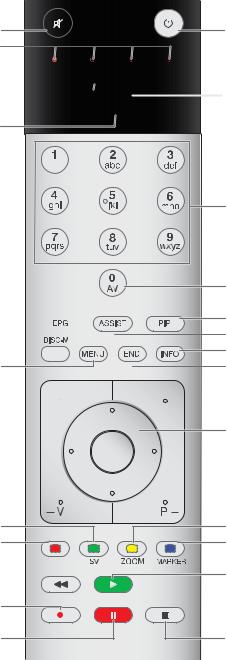
Remote control Assist – recorder operation
|
Loewe TV: Sound off/on |
Switch on/off - on stand by............................... |
(Page 20) |
|
LED indicator for current operating mode |
|
|
|
Switch over to operate TV set |
Loewe TV: Radio Digital/Auro FM-Radio |
|
(Page 20) |
....................... Switch over to operate Recorder |
Switch over to operate DVD-Player/Auro |
|
Timer recording menu; timer recording list menu |
Loewe TV: Sound menu |
|
|
(Page 40) |
................................................. Title List menu |
|
|
STOP: Select station directly............................... |
(Page 47) |
MENU: enter numbers or letters |
|
|
|
STOP: Call AV selection...................................... |
(Page 47) |
|
|
MENU: enter numbers or letters |
|
(Page 37) |
............................................. PLAY: skip 30 sec. |
PIP (picture in picture)....................................... |
(Page 40) |
(Page 39)............................ |
User interface of loaded DVD |
“Home” menu................................................... |
(Page 23) |
|
MENU: switch between original and playlist |
Info; PLAY: menu bar......................................... |
(Page 35) |
(Page 23)................................................... |
“Setup” menu |
MENU: hide menu |
|
|
Loewe TV: Volume |
PLAY: Next chapter; ........................................ |
(Pages 37) |
|
|
STOP: Select station up/down |
|
|
|
MENU: select/set............................................... |
(Page 23) |
(Page 35).................................... |
Status display (TV, DVD) |
|
|
|
MENU: confirm the menu selection |
|
|
(Page 48)............................................... |
ShowView menu |
Zoom................................................................. |
(Page 38) |
(Page 52)......................................... |
New chapter marker |
short: Set marker; long: Marker search.............. |
(Page 38) |
(Page 38).................................. |
PAUSE: slow motion back |
|
|
(Page 37)..................................... |
PLAY: search backward |
Playback............................................................ |
(Page 37) |
|
|
PAUSE: slow motion forward............................. |
(Page 38) |
(Page 47).............................................................. |
Record |
PLAY: search forward......................................... |
(Page 37) |
(Pages 37, 38).................................... |
Pause; single frame |
Stop.................................................................. |
(Page 37) |
-
Index
A
Area Code 31 Auto Chapter 32
Automatic programming 24
B
Basic Settings 20 Brief instructions 2
C
Card-Reader 45
Chapter List 51 Clock set 27
COMPONENT VIDEO OUT 7 Connections 16
Accessories 19 Aerial 16
Amplifier 19
Camcorder 20 Decoder 18 General 16
Satellite Receiver 18 Set-top box 18 Television 16
Copy protection system 14 Copyright 14
CPRM 14
D
Delete Station 26
Digital Link 11,20 Digital Link Plus 11,24 DIGITAL OUT 7
Digital Video 49 Disc-related Terms 15 Disc Format 32
Disc Label 33
Disc Protect 34 Display 7 Disposal 11
DivX registration code 31 Dolby Digital 29
DTS 29
DV IN 6
E
Edit recordings 51
Add chapter markers 52 Combine chapters 56 Create new Playlist 52 Delete part 54
Divide title 56,58 Edit thumbnail 52
Move Playlists Chapters 57 Protect title 57
Title Name 55
F
Finalisation 33
Front Panel 6
G
Glossary 65
H
HDMI 7,36
I
IN from ANT. 16 Initialisation 28 Inserting/removing memory
cards 45
M
Main menu 21 Mains cable 7 Masthead 61 Moving stations 26 MPEG 29
O
Operating additional devices 8
OPTICAL 7 OUT (TO TV) 16
P
Photo mode 44
Picture in Picture (PIP) 40 Playable Discs 14 Playback 37
3D-Surround 39 Audio CD 42 Camera positions 39 CHAPTER 37 Compatibility 43 Disc menu 39 Freeze frame 38 Markers 38 MP3/WMA media 42 Random play 43 Repeat 38
Search 37 Skip 37
Slow Motion 38 Subtitles 40 Time 38
TITLE 37 Playiback
DivX fles 41
Playing on other devices 58 Playlist 52
Program Edit 25 Progressive Scan 16
R
Rating 30 Rear Panel 7 Recording 47
Digital Video 49
Manual Record 47 Record from external
sources 49 ShowView 48 Simultaneous record and
display 47 Timer Recording 47 Timer Record List 48
Regional code 15 Remote Control 16 Resetting 16 Rewritable discs 13
S
S-VIDEO OUT 7 Safety 12
Scope of delivery 10 Screen Menus 35 Service 64
Set Password 29 Delete 30 Switching off 30
Set up 10 Setup menu 23
Audio Menu 29
Disc Menu 32 General Menu 24 Language Menu 28 Lock Menu 29 Recording Menu 31
Slide Show 44 Station Rename 26 Symbols 15
T
Technical Specifcations 61 Title List 51
Trademark rights 10 Troubleshooting 59–60
V
VIDEO OUT 7
 -
-
Contents |
|
Brief instructions for ViewVision..................................... |
2 |
Remote control Assist – recorder operation..................... |
3 |
Index................................................................................ |
4 |
Front Panel....................................................................... |
6 |
Rear Panel & Display........................................................ |
7 |
Operating additional devices............................................ |
8 |
Setting the remote control............................................................................. |
8 |
Operating Loewe equipment.......................................................................... |
8 |
Remote control Assist – TV operation.............................. |
9 |
Welcome......................................................................... |
10 |
Scope of delivery......................................................................................... |
10 |
Set up.......................................................................................................... |
10 |
Shipping the Unit........................................................................................ |
11 |
Disposal...................................................................................................... |
11 |
Advantages of connection to a Loewe TV set............................................... |
11 |
For your safety............................................................... |
12 |
Essential Information..................................................... |
13 |
Recordable discs.......................................................................................... |
13 |
Playable Discs.............................................................................................. |
14 |
Notes on Discs............................................................................................. |
15 |
Disc-related Terms....................................................................................... |
15 |
Symbols....................................................................................................... |
15 |
Initial Installation........................................................... |
16 |
Initial Remote Control Setup ....................................................................... |
16 |
Switching over to Progressive Scan.............................................................. |
16 |
Connections - General................................................................................. |
16 |
Connecting to the Aerial.............................................................................. |
16 |
Connecting to the Television........................................................................ |
16 |
Alternative connections............................................................................... |
16 |
Connecting to a Loewe TV System................................................................ |
17 |
Connecting to a set-top box / Satellite Receiver........................................... |
18 |
Connecting to an External Decoder Box....................................................... |
18 |
Connecting to an Amplifier.......................................................................... |
19 |
Connecting Audio/Video (A/V) Accessories................................................... |
19 |
Connect to the mains.................................................................................. |
20 |
Basic Settings.............................................................................................. |
20 |
Activating Digital Link.................................................................................. |
20 |
Resetting the DVD Recorder........................................................................ |
20 |
Auto Setup.................................................................................................. |
21 |
Menu overview............................................................................................ |
22 |
Main menu (HOME)..................................................................................... |
23 |
Setup menu................................................................................................. |
23 |
The General Menu....................................................................................... |
24 |
Language Menu.......................................................................................... |
28 |
Audio Menu................................................................................................ |
29 |
Lock Menu................................................................................................... |
29 |
Recording Menu.......................................................................................... |
31 |
Disc Menu................................................................................................... |
32 |
Operating convenience................................................... |
35 |
Additional Screen Menus............................................................................. |
35 |
HDMI mode.................................................................... |
36 |
Video mode.................................................................... |
37 |
Playing back a DVD..................................................................................... |
37 |
Playing discs or USB devices with mixed contents........................................ |
40 |
PIP (Picture In Picture)................................................................................. |
40 |
DivX mode...................................................................... |
41 |
Audio mode.................................................................... |
42 |
Photo mode.................................................................... |
44 |
USB mode....................................................................... |
45 |
Recording....................................................................... |
47 |
Manual Record............................................................................................ |
47 |
Timer Recording........................................................................................... |
47 |
Timer recordings with the ShowView® system............................................ |
48 |
Timer Record List......................................................................................... |
48 |
Record from external sources....................................................................... |
49 |
Digital Video................................................................................................ |
49 |
Edit recordings............................................................... |
51 |
Menu Title List and Chapter List................................................................... |
51 |
Edit Original and Playlist............................................................................. |
52 |
Add chapter markers................................................................................... |
52 |
Create new Playlist...................................................................................... |
52 |
Add title/chapter to the Playlist.................................................................... |
53 |
Delete title/chapter from Original/Playlist..................................................... |
54 |
Delete part.................................................................................................. |
54 |
Title Name................................................................................................... |
55 |
Select title start point.................................................................................. |
55 |
Select chapter.............................................................................................. |
55 |
Divide title................................................................................................... |
56 |
Combine chapters........................................................................................ |
56 |
Move Playlists Chapters............................................................................... |
57 |
Hide title/chapter......................................................................................... |
57 |
Protect title.................................................................................................. |
57 |
Overwrite recordings................................................................................... |
58 |
Title List menus on other devices................................................................. |
58 |
Playing on other devices.............................................................................. |
58 |
Troubleshooting............................................................. |
59 |
Technical Specifications.................................................. |
61 |
Masthead.................................................................................................... |
61 |
Language Code List........................................................ |
62 |
List of country codes...................................................... |
63 |
Service............................................................................ |
64 |
Glossary.......................................................................... |
65 |
- 
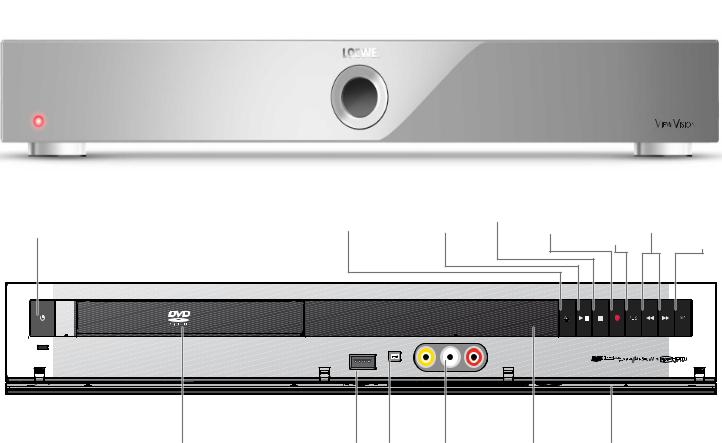
Front Panel
Operation |
|
|
|
indicator |
Front flap |
||
|
|
|
(closed) |
|
|
|
|
|
|
|
|
|
Disk tray |
Playback |
|
Start |
RES |
Program/ |
|
Switch on |
Stop |
Chapter |
|
||||
Switch off to standby |
open/close |
/ Pause |
|
recording |
(screen |
up / down |
Signal source |
|
|
|
|
|
resolution) |
|
A/V |
|
|
|
|
|
V I D E O D I G I T A L |
|
|
Disk tray |
USB DV IN AV3 VIDEO IN / |
Display |
Front flap |
|
AUDIO IN L/R |
|
(open) |
 -
-
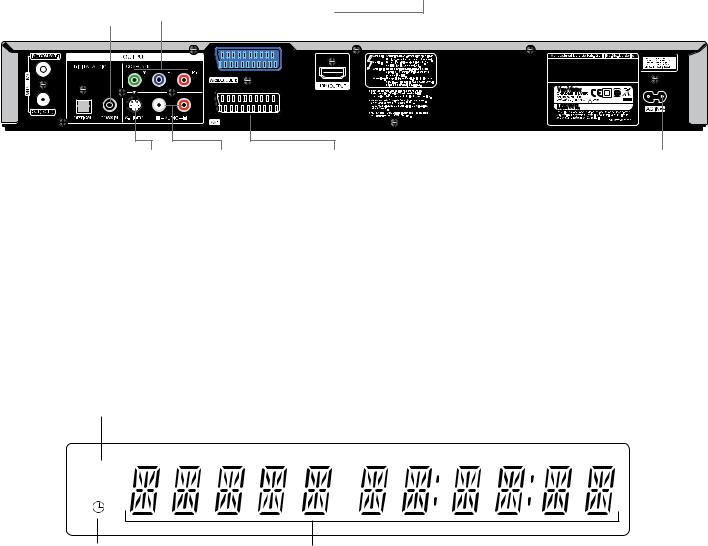
Rear Panel & Display
|
|
|
DIGITAL |
|
|
|
|
|
|||
IN (from ANT.) |
AUDIO |
COMPONENT VIDEO |
AV 2 DECODER |
||||||||
Aerial |
COAXIAL |
||||||||||
Euro AV (SCART) connection for an |
|||||||||||
connection |
Digital, coaxial |
OUT (Y Pb Pr) |
external source (Decoder, Set-Top- |
||||||||
|
|
|
audio output |
Connection for a TV |
Box, Video Recorder etc.). |
||||||
|
|
|
|
|
|
with component inputs |
|||||
|
|
|
|
|
|
|
|
|
|
||
|
|
|
|
|
|
(Cinch) |
|
|
|
|
|
|
|
|
|
|
|
|
|
|
|
||
|
|
|
|
|
|
|
|
|
|
||
|
|
|
|
|
|
|
|
|
|
|
|
|
|
|
|
|
|
|
|
|
|
|
|
|
|
|
|
|
|
|
|
|
|
|
|
|
|
|
|
|
|
|
|
|
|
|
|
|
|
|
|
|
|
|
|
|
|
|
|
HDMI OUTPUT connection of a TV with HDMI input
|
|
|
|
|
|
|
|
|
|
|
|
|
|
|
|
|
|
|
|
|
|
|
|
|
|
|
|
OUT (TO TV) |
DIGITAL |
|||||
Passes the |
AUDIO |
|||||
aerial signal |
OPTICAL |
|||||
to the TV |
Digital, optical |
|||||
|
|
|
audio output |
|||
S-VIDEO |
AUDIO L/R |
AV 1 |
Connection for a |
Connection for a TV with |
Euro AV (SCART) con- |
TV with S-Video |
audio inputs (Cinch) |
nection for TV set |
input. |
|
|
Mains cable |
Caution: Do not touch the inner pins of connection sockets on the rear panel. Electrostatic discharge may cause permanent damage to the unit.
Record symbol
Display for currently running recording
REC
Timer symbol
Display for programmed timer recording(s)
Character specifications
time, total playing time, time elapsed, title, chapter / track number, station, status etc.
-

Operating additional devices
Setting the remote control
The different Loewe sets can be set as follows on the Assist remote control:
Device |
Button combination |
|
|
Loewe TV (Chassis L2650 ≥ V4.4) |
+ |
|
|
Loewe TV (Chassis L2600) |
+ |
|
|
Loewe TV (Chassis Q25x0) |
+ |
|
|
Loewe Centros 11x2 |
+ |
|
|
Loewe ViewVision, Centros 21x2 |
+ |
|
|
Loewe ViewVision DR+ / DVB-T |
+ |
|
|
Loewe ViewVision 8106 H |
+ |
|
|
Loewe Auro 2216 PS/8116 DT |
+ |
|
|
Loewe Xemix 6222 PS |
+ |
|
|
Factory setting
The specified key combination must be pressed (approx. 5 s) until one of the LEDs flashes twice.
Operating Loewe equipment
Using the remote control for a DVD player
Press the DVD button, the indicator above it lights for about 5 seconds.
Using the remote control for a recorder
Press the REC button, the indicator above it lights for about 5 seconds.
Using the remote control for a TV set
Press the TV button, the indicator above it lights for about 5 seconds.
Every time you press the button, the indicator of the selected operating mode (TV
– REC – DVD – RADIO) lights up.
 -
-
Remote control Assist – TV operation
Sound off/on |
Switch on/off - on stand by |
LED indicator for current operating mode |
|
Switch over to operate TV set


 Switch over to operate Recorder


 Call timer list


Set picture format
Radio Digital on/off
Switch over to operate Auro Sound menu on/off
Electronic Programme Guide (EPG) on/off
Teletext on/off
Show/hide menu
Select station directly
MENU: enter numbers or letters
Call AV selection
PIP on/off (picture in picture)
 Menu “Other functions“ on/off Open index; MENU: info texts on/off
 Status display on/off; MENU: hide menu
Volume down/up

Station list on; MENU: confirm/call

Green button: Standard settings for picture/sound Red button: Freeze picture on/off; DR+: Call the DR+ archive 
Select station down; DR+: Jump back/Rewind/Replay
DR+: Record

 Select station up/down
PIP: Position of the PIP picture; MENU: select/set
Yellow button: previous station
Blue button: programme info on/off
Freeze picture off; DR+: Playback/Set bookmark  Select station up; DR+: Jump forward/Fast forward
Freeze picture on/off; |
Freeze picture on; DR+: Stop |
DR+: Pause (Start viewing with time shift)
-
Welcome
Thank you
for choosing a Loewe product. We are happy to welcome you as our customer. At Loewe we combine the highest standards of technology, design and user friendliness. This is equally true of TV, DVD, video, audio and accessories.
Neither technology nor design is an end in itself, but both are intended to provide our customers with the best possible audio and visual experience. Our design is not influenced by short-term, fashionable trends. You have, after all, purchased a high-quality piece of equipment which you do not want to get tired of looking at tomorrow or the day after.
You can control three devices with the Assist remote control. In addition to this recorder also a Loewe TV set and a Loewe DVD player or a Loewe Audio System (page 8).
Scope of delivery
•Recorder Loewe ViewVision
•Assist remote control with 2 batteries
•AV cable (Scart cable)
•Antenna cable
•HDMI cable
•1x DVD-RW disk
•this operating manual
Trademark rights
Manufactured under license from Dolby Laboratories. Dolby, ProLogic and the double-D symbol are trademarks of Dolby Laboratories.
“DTS“ and “DTS Digital Out” are trademarks of Digital Theater Systems, Inc. ShowView is a registered trademark of Gemstar Development Corporation.
The ShowView System is manufactured under license from Gemstar Development Corporation.
HDMI, the HDMI Logo and High-Definition Multimedia Interface are trademarks or registered trademarks of HDMI licensing LLC.
Set up
•Place the recorder on a firm, level base.
•Do not place the recorder in the vicinity of sources of intense heat or in direct sunlight.
•When installing in a cabinet or enclosed shelf: Leave at least 2.5 cm free around the recorder to allow unhindered circulation of air and avoid build-up of heat. Do not cover up fan and openings on the rear.
•There can be interference to the images and sound of any nearby television, video recorder or radio. If this is the case, do not position the unit in the direct vicinity of a TV set, video recorder or radio, or switch the unit off after removing the disk.
•Position the recorder so that the infrared signal of the remote control can reach the display of the recorder unobstructed (or if this is not possible, see “Advantages of connection to a Loewe TV set”, page 11).
•Do not place strong artificial light sources in front of the device. This may affect infrared reception.
•Incorrect voltages can damage the device. This device may only be connected to a power supply with the voltage and frequency specified on the rating plate, using the power cable provided.
•If there is an electrical storm, disconnect the antenna and mains plug. Power surges caused by lightning strikes can damage the unit through the antenna system or the mains.
•The antenna and mains should also be disconnected if the unit is to remain unsupervised for a long period of time.
•The mains plug must be easily accessible so that the unit can be disconnected at any time.
•Lay the cable in such a way that it cannot get damaged. The power cable should not be kinked or laid over sharp edges, not stood upon or exposed to chemicals - the latter also applies to the device as a whole. A mains cable with damaged insulation can cause electric shocks and is a fire hazard.
•Do not tug the cable when you remove the mains plug but hold the plug by the housing. The wires in the mains plug may be damaged and cause a short-circuit when you plug it back in.
You should also read and follow the safety advice on the following pages.
 - 10
- 10
Welcome
Shipping the Unit
The original shipping box and packaging materials should be used to ship the unit. To give the unit the best possible protection, repack it as it was originally packed by the manufacturer.
Disposal
Cardboard box and packaging
In line with national regulations regarding the disposal of packaging materials, we pay a fee to authorised recyclers who collect packaging from dealers. However, we recommend that you keep the original cardboard box and the rest of the packaging materials so that the unit can, if necessary, be transported in the safest possible conditions.
The unit
Important: The EU Directive 2002/96/EG governs the proper
re-acceptance, handling and recycling of used electronic appli-
ances. Old electronic appliances must therefore be disposed of separately. Never throw this set in the normal domestic waste.
Youcanhandinyouroldsetfreeofchargeatidentifiedcollection points or at your dealer if you buy a similar new set. Other details about re-acceptance (also for non-EU countries) are available from your local administration.
Remote control batteries
The batteries provided contain no harmful materials such as cadmium, lead or mercury. Regulations concerning used batteries mean that batteries may no longer be thrown out with the household rubbish. You can dispose of used batteries free of charge at the collection points in commercial outlets. Your dealer will also have a collection point for used batteries.
Advantages of connection to a Loewe TV set
With Digital Link you can install the recorder for example in a closed rack or a cupboard without direct visual contact with the recorder. With the DVD remote control, you operate the recorder via the Loewe TV set. Digital Link must be switched on on the recorder (page 20).
If you use the HDMI connection, the TV set is automatically switched over to this input if your TV set supports this function.
If you want to make timer recordings from the TV satellite tuner, Digital Link Plus controls the recording. With Digital Link Plus the station data of the aerial and cable stations of the TV set are transferred to the recorder so that the same stations are saved in the same order in both devices. This enables timer recordings of aerial and cable stations to be made comfortably on the TV set with the EPG (Electronic Program Guide). The timer data are transferred to the recorder which then makes the timer recording independently of the TV set. For timer data for satellite stations, the TV set starts and stops the recorder and sets it to the Euro AV 1 input. When play is started, this is shown immediately on the TV set regardless of which TV station you are currently watching (if the TV is switched off, it will be switched back on automatically first).
11 -
For your safety
For your own safety and to avoid unnecessary damage to your unit, please read and follow the safety advice below:
Use for the intended purpose and ambient conditions
This recorder is intended exclusively for the reception, recording and playing of video and audio signals and is designed for the home and office and may not be operated in rooms with a high humidity (e.g. bathroom, sauna) or high concentration of dust (e.g. workshops).
The terms of the warranty only cover normal use of the recorder.
If the device is used outdoors, make sure that it is protected against moisture (rain, drips and splashes or dew). High humidity and dust concentrations lead to leak currents in the device which may lead to electric shocks or fires.
If you have moved the device out of the cold into a warm environment, leave it switched off for about an hour to avoid formation of condensation.
Always switch off your system (Viewvision, TV set and any other audio components which may be connected) before connecting or disconnecting other devices or loudspeakers.
Do not open up the housing, or you could be directly exposed to the laser beam. The laser beam will be visible if the unit is open.
DO NOT LOOK INTO THE LASER BEAM.
Protect your recorder from:
•liquids and damp
•shock and mechanical stress
•magnetic and electrical fields
•cold, heat, direct sunlight and extreme fluctuations in temperature
•dust
•anything which obstructs ventilation
•manual interference with the unit‘s interior
PLEASE NOTE: TO AVOID RISK OF ELECTRICAL SHOCK, DO NOT REMOVE THE
COVER (OR THE REAR OF THE UNIT). THERE ARE NO PARTS INSIDE THE UNIT THAT CAN BE REPAIRED BY THE USER. REPAIRS SHOULD ONLY BE CARRIED OUT BY A LOEWE DEALER.
Only use original accessories such as Loewe installation systems if possible.
Supervision
Do not allow children to use the recorder/TV set unsupervised. Do not allow children to play in the immediate vicinity of the recorder/TV set. They could knock, push or pull the equipment over and cause injury.
Cleaning
Only clean your recorder with a slightly damp, soft, clean cloth (without any aggressive cleaning agents).
If the recorder does not read a disk correctly, the reading unit in the device may be soiled. Use a commercially available cleaning disk.
Keep the disk drawer closed to prevent dust from the drawer getting onto the lens.
About this user guide
The information in this guide refers to the Loewe product Viewvision and Viewvision Secam - (version for France).
Unless stated otherwise, the instructions refer to the operating elements on the Assist remote control.
The explanations for DVDs in this guide refer to the DVDs recorded with this recorder. They do not apply for DVDs recorded on other recorders and played on this recorder.
Paragraphs beginning with the symbol indicate important hints, tips or conditions for perfect operation.
Terms which you will find in the menu or printed on the recorder are printed in bold type.
In the functional descriptions, the necessary operating elements are arranged to the left of the text which contains the handling instructions.
Please read this operating manual to understand this device and its possibilities. The individual chapters are inter-related.
The index/glossary at the end of this manual explains certain terms which are used in the user interface of the device and in the operating manual.
 - 12
- 12

Essential Information
Recordable discs
DVD-RW (Digital Versatile Disc - ReWritable)
DVD-RW discs can be formatted for recording in the VR mode or in the video mode. These discs can be rewritten several times.

 Recordings can be deleted and the disc can then be rewritten. VR mode Recordings can be extensively edited.
They can only be played on VR mode compatible players (after finalisation).
Video mode Limited editing possible.
Play on normal DVD players (after finalisation).
DVD-R (Digital Versatile Disc - Recordable)
These discs can be recorded once. A DVD-R disc cannot be rewritten or edited after finalisation. DVD-R discs can only be formatted for recording in video mode. Play on normal DVD players (after finalisation). Limited editing possible.
DVD+RW (Digital Versatile Disc + ReWritable)
These discs can be rewritten several times. Recordings can be deleted and the disc can then be rewritten. Play only on DVD+RWcompatible players (automatic finalisation). Edited contents can only be played after finalisation on DVD+RW-compatible players. Titles/chapters of recordings can be edited.
DVD+R (Digital Versatile Disc + Recordable)
These discs can be recorded once. A DVD+R disc cannot be rewritten or edited after finalisation. Play only on DVD+R-compatible players (after finalisation). Edited contents can only be played after finalisation on DVD+R-compatible players. Title/chapters can be edited conditionally.
This recorder cannot write to CD-R or CD-RW discs.
This recorder cannot write data discs (e.g. no MP3 or JPEG files).
The displayed recording time is not exact because the recorder uses a variable bit rate video compression. This means that the exact recording time depends on the contents being recorded.
When recording a television broadcast the remaining recording time may be shorter if the reception is poor or the picture contains interference.
If you record only still pictures or audio, the recording time may be longer.
The displayed recording time and remaining time may not always add up to the total length of the disc.
The available recording time may be shorter following intensive editing of the disc.
If you use a DVD-R disc you can continue recording until the disc is full or until you finalize it. Before you start recording check how much recording time is available on the disc.
If you use a DVD-RW disc in video mode, the available recording time is extended again when you delete the last title recorded on the disc.
The Delete Parts function (page 54) only hides the title but does not delete it from the disc and does not extend the recording time (except for the last recorded title on a DVD-RW disc in video mode).
Overwrite recording is only possible on DVD+RW discs (page 58).
13 - 

Essential Information
Recording TV-Audio Channels
This recorder can also record NICAM audio. If the NICAM setting (page 27) is set to “Auto“, NICAM audio will be recorded in the case of a NICAM transmission.
Restrictions on Video Recording
•You cannot record movie material with copy protection with this recorder. If a copy protection is encountered during recording, the recording stops or is interrupted automatically and a message is displayed on the screen.
•A video that can only be copied once can only be recorded using a DVD-RW disc in VR mode with CPRM (see below).
•NTSC format signals from analog or DV inputs cannot be recorded correctly with this recorder.
•SECAM format video signals (from an integrated TV tuner or from analog inputs) are recorded in PAL format.
CPRM
CPRM is a copy protection system (with scramble system) that only allows the recording of “copy once“ broadcasts. CPRM is the abbreviation for “Content Protection for Recordable Media”.
This recorder is CPRM compatible. You can therefore record copy-once broadcasts but cannot make copies of these recordings. CPRM recordings are only possible with VR mode formatted DVD-RW discs and can only be played on players with CPRM compatibility.
Copyright
•The recording equipment should only be used for lawful copying. You should find out what constitutes lawful copying in the country in which you are making a copy. Copying of copyrighted material e.g. films or music is only lawful if permitted by a legal exception or consented to by the rights owner.
•The product contains copyright protection technology through certain US patents and other intellectual property rights and is the property of the Macrovision Corporation and other companies. Use of this protection technology must be authorized by the Macrovision Corporation. It is only intended for private or other limited use unless otherwise authorized by the Macrovision Corporation. Reverse engineering and disassembly are prohibited.
Playable Discs
Video-DVD (8 cm- / 12 cm disc)
Audio-CD
(8 cm- / 12 cm disc)
CD-R/RW
DIGITAL AUDIO
Recordable
ReWritable
DVD-R/DVD-RW discs, DVD+R/DVD+RW discs, CDR/CD-RW discs with audio titles, DivX, MP3/WMA or JPEG files and Kodak Picture-CDs (JPEG) can also be played on this unit.
including MP3 discs with ID3-Tag.
DVD-R/RW, DVD+R/RW and CD-R/RW discs written to using a PC or a DVD or CD recorder cannot be played if the disc is damaged or dirty or if there is condensation on the recorder‘s lens.
If you record a disc using a PC, even if it is in a compatible format, the disc may not play depending on the settings of the application software used to create the disc. (Further information can be obtained from the software provider).
Depending on the recording unit or the CD-R/RW (or DVD±R/±RW) disc itself, some CD-R/RW (or DVD±R/±RW) discs cannot be played with this unit.
Do not attach any labels to either side (the labeled side or the written side) of a disc.
Do not use any irregularly shaped CDs (e.g. heart-shaped or octagonal). If you use these discs malfunctions may occur.
Fingerprints and scratches on the disc can affect playback and/or recording. Take proper care of your discs.
 - 14
- 14
Essential Information
Regional code of the Recorder and DVDs
2 |
This Recorder can only play Region “2“ or “all“ coded DVDs. |
|
The region code on the label of some DVDs shows which type of DVD recorder can play those discs. If you play other discs the error message “Incorrect region code. Playback not possible.“ will be displayed on the TV screen.
Some discs may not have the label with the region code even though they cannot be played in all regions.
Notes on Discs
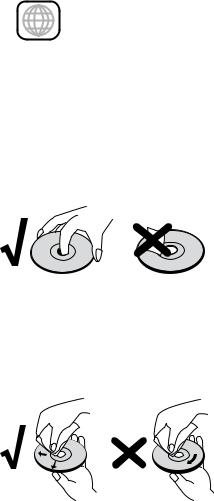
Handling Discs
Do not touch the prerecorded side of the disc. Hold the disc at the edges so as not to touch the surface with your fingers. Do not stick paper or tape to either side of the disc.
Storing Discs
After playing, store the disc in its case. Do not expose the disc to direct sunlight or a source of heat and never leave it in a parked car exposed to direct sunlight as there may be a considerable increase in temperature inside the car.
Cleaning Discs
Fingerprints and dust on the disc can affect the picture and sound quality. Clean the disc before playing it with a clean cloth. Wipe the disc from the center outwards.
Do not use any strong solvents such as alcohol, benzine, thinner, commercially available cleaners or anti-static sprays intended for vinyl records.
Disc-related Terms
Title
A title is the main movie content or the music album. You have easy access by the title number.
Chapter (DVD)
Chapters are movie sequences or a piece of music which are parts of a title. You have easy access by the assigned chapter number.
Track (only Audio-CD)
A piece of music on an Audio-CD. You have easy access by the assigned track number.
Symbols
The  symbol on the screen
During operation,  may appear on the screen. This symbol means that the desired function is not available at the moment.
Disc symbols in the operating instructions
If part of the operating instructions contains one of the symbols listed below, the section is only applicable to the disc shown on the symbol.
Many functions of this recorder are dependent on the selected recording quality. One or more of the symbols are displayed for each function described in the manual so that you can immediately see whether the disc supports this function.
DVD ALL All DVDs listed below
-RW Video DVD-RW Disc with video mode -RW VR DVD-RW Disc with VR mode
-R DVD-R disc +R DVD+R disc +RW DVD+RW disc
DVD-V DVD-Video disc CD Audio CD
DivX DivX/Xvid files MP3 MP3 files WMA WMA files JPEG JPEG files
15 - 
Initial Installation
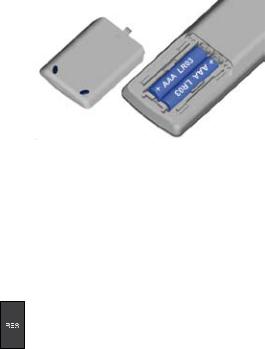
Initial Remote Control Setup
To insert or change the batteries, press on the imprinted arrow. Sldie off and remove the battery compartment cover. Insert alkaline-manganese LR 03 (AAA) type batteries and make sure the + and – poles are aligned correctly. Then, replace the cover.
Switching over to Progressive Scan
With the “Progressive Scan” mode you get the best possible picture quality without flicker in the “Component Video” mode in display units which support this operating mode.
Your recorder must be switched on. An HDMI cable is not plugged.
Button on the recorder.
On: 576 P appears briefly in the recorder display. Off: 576 I appears briefly in the recorder display.
Connections - General
Depending on your television set and the other units you want to connect, there are several ways of connecting your recorder to your TV set. Only use the connection methods described below.
Refer as necessary to the manuals for your television, recorder, stereo system and other units in order to make the best possible connections.
The recorder must be connected directly to the TV set. Use the “connection wizard” for this in Loewe TV sets.
Do not connect the Recorder AUDIO OUT socket to the audio system Phono In socket.
Connecting to the Aerial
Remove the existing aerial cable plug (R) (for analog, terrestrial or cable TV) from the TV and plug it into the aerial socket on the back of the recorder (IN from ANT.) socket). Then plug one end of the aerial cable provided into the TV socket on the recorder (OUT (TO TV)) and the other end into the aerial socket on the TV.
Connecting to the Television
Make the following connections depending on the scope of functions of your existing equipment (page 17)
When connecting to a LOEWE TV set, the recorder must be logged in to the connection wizard of the TV set at the appropriate connection first.
Euro AV1 connection
Connect the AV1 scart socket of the recorders to the appropriate input socket on the TV with the scart cable.
HDMI connection
Connect the HDMI OUT socket of the recorder to the HDMI input socket on the TV set with the HDMI cable provided (HDMI socket 1 in Loewe). Make the settings as described on page 36. The SCART connection is required additionally for recording from the TV set.
Alternative connections
S-Video connection
Connect the S-VIDEO OUT socket of the recorder to the S-Video input socket of the TV set with the S-Video cable.
Component Video connection
Connect the COMPONENT VIDEO OUT sockets on the recorder to the appropriate input sockets on the TV set with a Y Pb Pr cable (available from your dealer).
Audio connection (left/right)
Connect the left and right AUDIO OUT socket of the recorder to the left and right AUDIO IN sockets on the TV set with the audio cables.
Digital Audio output
Connect the DIGITAL-OUT socket of the recorder to the DIGITAL-IN socket of the surround amplifier.
 - 16
- 16

Initial Installation
Connecting to a Loewe TV System
Make the connections as shown here:
Audio-Link
Loewe Individual Sound-System (Subwoofer)

 Aerial cable
Back of the television
Euro-AV cable |
HDMI cable |
|
Aerial cable
Back of the recorder
Mains cable
17 - 

Initial Installation
Connecting to a set-top box / Satellite Receiver
If you use a cable or satellite receiver with integrated decoder, connect it to your recorder and television set as described below. If you use a separate decoder box for your cable/satellite television, follow the instructions in the next section “Connecting to an External Decoder Box“.
1.Connect the aerial cable as shown. This enables you to watch and record TV channels.
. Connect the AV1 connection to an AV socket on your TV set with the Scart cable. This enables you to view discs.
3.Connect the AV2 DECODER connection to an AV socket on your set-top box / your satellite receiver. This enables you to watch its TV channels.
This recorder is equipped with a “Loop-Through“ function. The function enables you to record a TV program from the integrated analog terrestrial TV tuner of this recorder while watching a satellite or set-top box channel. Do not connect the recorder “via“ your video recorder, satellite receiver or set-top box.
Antenna/ |
INPUT |
OUTPUT |
|
|
|
AERIAL |
AERIAL |
SCART AV1 |
SCART AV2 |
cable television |
|
|
|
|
wall socket |
|
|
|
Set-top box or |
|
|
|
|
|
|
|
|
|
satellite receiver |
Back of the recorder
Connecting to an External Decoder Box
If you use an external decoder box for your satellite or cable TV system, follow the connection procedure described below.
1.Connect your aerial socket in the wall to the aerial input socket on your set-top box / satellite receiver using an aerial cable.
. Connect the decoder to the AV DECODER socket on the set-top box /satellite receiver using a SCART cable. Further instructions can be found in the manual for your decoder box.
3.Connect the AV2 socket on the DVD recorder to an AV 2 socket on your set-top box / satellite receiver using a SCART cable.
4.Connect the AV1 socket on the DVD recorder to a AV 1 socket on your television using the SCART cable.
Do not connect the Decoder-Box directly to the recorder but as shown in the figure below to the satellite/set-top box.
Stations from the decoder (e.g. via Pay-TV services) can only be viewed when the recorder is switched off (standby mode).
For timer recordings to work properly on this recorder, the satellite / set-top box must also be switched on during recording.
With this configuration you cannot watch one television broadcast and record another at the same time.
Antenna/ |
Set-top box or satellite receiver |
Decoder |
||||
AERIAL |
AERIAL |
SCART AV1 |
SCART AV2 |
SCART AV |
||
|
||||||
cable television |
INPUT |
OUTPUT |
|
|
|
|
|
|
|
|
|
||
wall socket |
|
|
|
|
|
|
SCART INPUT
S-VIDEO |
COMPONENT VIDEO INPUT |
AUDIO INPUT |
VIDEO |
HDMI |
INPUT |
|
INPUT |
INPUT |
Y |
Pb Pr |
L R |
|
|
Back of the recorder |
|
Back of the television |
|
|
|
|
||
|
|
SCART INPUT |
|
|
|
|
|
|
S-VIDEO |
COMPONENT VIDEO INPUT |
AUDIO INPUT |
VIDEO |
HDMI |
|
|
INPUT |
|
INPUT |
INPUT |
|
|
|
|
Y Pb Pr |
L R |
|
|
Back of the television
 - 18
- 18

Initial Installation
Connecting to an Amplifiier
Connecting to an analog amplifier with analog 2-channel stereo or Dolby Pro Logic II / Pro Logic
Connect the left and right AUDIO OUT socket of the recorder to the left and right AUDIO IN sockets of the amplifier, receiver or stereo system with the audio cables (A).
Connecting to a digital amplifier with two-channel digital stereo (PCM) or to an audio/video receiver with a multichannel decoder (Dolby Digital™, MPEG 2 or DTS)
1.Connect one of the DIGITAL AUDIO OUT sockets (OPTICAL O or COAXIAL X) of the recorder to the appropriate input socket on your amplifier. Use an appropriate digital audio cable (optical O or coaxial X - available from your dealer).
. You must configure the digital output of the recorder (page 29).
Back of the recorder
O X A
A
OPTICAL |
COAXIAL |
L |
R |
Amplifier (Receiver) |
DIGITAL INPUT |
DIGITAL INPUT |
AUDIO INPUT |
|
|
Digital multi-channel sound
A digital multi-channel connection offers the best sound quality. You will need a multi-channel audio/video receiver which supports one or more audio formats, e.g. MPEG 2, Dolby Digital and DTS. You will find information in the documentation enclosed with the receiver.
Due to the DTS licensing agreement the digital output will be to DTS DIGITALOUT when a DTS audio stream is selected.
This recorder does not perform a (2-channel) decoding (downmix) of a DTS sound track internally. In order to enjoy DTS multi-channel surround sound, you have to connect this recorder to a DTS-compatible receiver via one of the recorder’s digital audio outputs.
If the audio format of the digital output does not correspond to the capabilities of your receiver, the receiver will emit a strong distorted sound or no sound at all.
5.1 Digital surround sound via the digital connection can only be obtained if your receiver is equipped with a digital multi-channel decoder.
You can obtain information about the audio format of the current DVD via the “Disc Info“ menu (page 35).
Connecting Audio/Video (A/V) Accessories
Connect the input sockets (AV2 on the back of the device or AV3 = input on the front of the device (page 6)) of the recorder to the audio/video out sockets of the accessory components with the audio/video cables.
If you have connected a device to AV2 and switched off its power supply, the Digital Link Plus function to the recorder is not possible.
AUDIO
OUTPUT
Connector block for an |
R |
|
accessory component |
||
|
||
(VCR, Camcorder, etc.) |
L |
|
|
VIDEO |
|
|
OUTPUT |
Video L-Audio-R
Front of the recorder
19 - 
Initial Installation
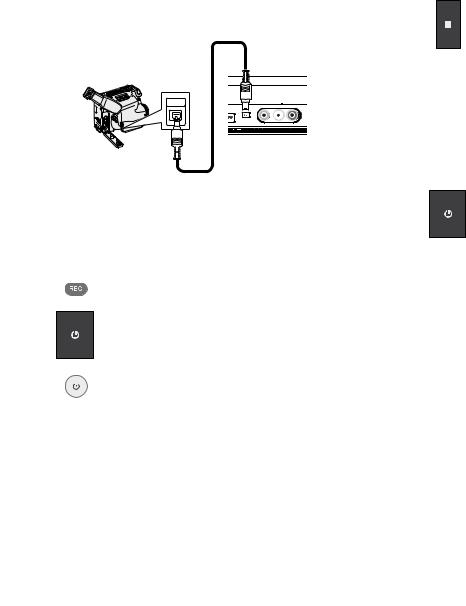
Connecting a digital camcorder
You can connect a digital camcorder (DV) or a digital DVD-R/RW recorder to the DV IN socket and transfer contents of DV tapes or DVDs digitally.
Use a DV cable (not included in delivery) to connect the DV IN-/OUT socket of your DV-camcorder/video deck to the DV IN socket on the front control panel of this recorder.
Only DV units can be connected to this socket (the source signal must be in the DV-25 format; see page 49). It is not compatible with digital satellite tuners or S-VHS video decks.
DV Digital Camcorder
DV
IN/OUT
Front of the recorder
Connect to the mains
First plug the small plug on the power cable into the mains connection on the back of the recorder then plug the large mains plug into a 110-240V/50-60Hz mains socket.
Basic Settings
Set the remote control for recorder operation.
Push the On/Off button on the DVD recorder or
the On/Off switch on the remote control.
If you aim the remote control at the recorder when switching over to Recorder mode, the recorder will be switched on.
Activating Digital Link
With Digital Link, Loewe TV sets pass on the signals from the remote control through the Euro-AV connection on the recorder. Digital Link is useful when you want to put the recorder in a concealed place, e.g. in a closed rack.
Your recorder must be switched on. Button on the recorder for > 3 s
Digital Link on: LINK appears in the recorder display. Digital Link off: FRONT appears in the recorder display.
Resetting the DVD Recorder
If any of the following problems occur.
•The unit is plugged in but will not turn on or off.
•The display panel does not work.
•The recorder is not working properly, no picture is displayed, the Recorder can be reset in the following way:
Hold down the button on the device for at least 10 seconds. The device switches off or pull out the power cable, wait at least 20 seconds and reconnect the cable.
Press the button again to switch the device back on.
 - 20
- 20
Loading...