


Art 40
Art
TV
Art 60
Art 50
Art 40
Quick guide

Connect ID 40-55 - 2 -
Quick guide
Table of contents
Welcome! .......................................................................................3
Scope of delivery .......................................................................................... 3
About this quick guide ................................................................................. 3
Imprint ............................................................................................................ 3
For your safety ..............................................................................4
Technical information .................................................................................. 5
Basic functions .............................................................................6
english
Remote control ............................................................................. 7
Functions of the operating controls ..........................................8
Preparing the TV set ....................................................................8
Preparing the remote control unit .............................................................. 8
Switching the TV set ON/OFF ....................................................................9
General information on the operation .......................................9
Info display ....................................................................................................12
Operation without remote control.............................................................12
Photo ...........................................................................................32
Photo display ...............................................................................................33
Web ............................................................................................. 34
Web ...............................................................................................................34
MediaNet .....................................................................................................34
Browser ........................................................................................................ 35
Extras.......................................................................................... 36
Extras ...........................................................................................................36
Timer ............................................................................................................36
Conditional Access module (CA module) ...............................................37
Connections rear side of the device ........................................38
Function of the connections .....................................................................39
Technical data ........................................................................... 40
Environment ...............................................................................41
Legal information .......................................................................41
Home view / Home - Favourites ............................................... 13
Home view ....................................................................................................13
Home - Favourites .......................................................................................13
TV ................................................................................................. 14
Setting the volume ......................................................................................14
Select station ...............................................................................................14
Status display ...............................................................................................16
Function list ..................................................................................................17
AV selection ..................................................................................................17
Electronic Programme Guide – EPG.........................................................18
Teletext .........................................................................................................20
HbbTV / MediaText .....................................................................................21
Digital Recorder ......................................................................................... 22
Archive recording .....................................................................................22
DR+ archive .............................................................................................. 23
Media+ ....................................................................................... 24
General information on media reproduction ..........................................24
Accessing your media ................................................................................ 24
Video ............................................................................................25
Video playback ............................................................................................26
Additional functions for DR+ archive playback ...................................27
Miscellaneous ............................................................................ 42
Integrated features .....................................................................................42
Conformity / Manufacturer’s declaration ............................................... 42
Software / User guides ..............................................................................42
Index ........................................................................................... 43
Service ........................................................................................ 44
Audio/Radio ...............................................................................28
Audio playback ...........................................................................................29
Radio mode (DVB radio) ...........................................................................30
Radio mode (Internet radio) ......................................................................31

Connect ID 40-55 - 3 -
Quick guide
Welcome!
Thank you,
for choosing a Loewe TV set!
Loewe stands for the highest standards of technology, design and user
friendliness. This applies equally for TV, video and accessories.
In addition to sleek design and a varied combination of colour and
mounting choices, your Loewe TV set offers a host of technological
options.
Loewe Image
Image+ and state-of-the-art full HD LCD displays with LED backlit TV
technology guarantee the best image quality and high contrast values
and all this at lowest possible energy consumption.
Loewe Digital
The integrated Triple Tuner for DVB-T/C/S allows you to receive standard
as well as high-definition content and thanks to CI Plus interface even
pay TV.
Loewe Assist
The intuitive Loewe user interface Assist Media offers a simple access
to all device functions; by means of the HOME key on the remote control you can access all your favourite content as well as all multimedia
functions of your TV set.
Loewe Media
The Loewe Multimedia functions offer you a multitude of options: via
MediaHome you have access to your photos, videos and music in your
home network or on the USB stick.
Loewe MediaNet and MediaText help you to access numerous worldwide web-applications and contents from HbbTV services.
Loewe Connectivity
Network your TV set by means of numerous interconnection options.
Be it HDMI, USB, CI Plus or LAN/WLAN, discover the world of the
Loewe networking possibilities.
+
+
+
+
+
Scope of delivery
About this quick guide
This quick guide gives you only a short overview of the most important
functions of your TV set.
You can download detailed user guides in your language in elec-
tronic form in the latest version via the support portal of the Loewe
Homepage (see section Miscellaneous – Software / User guides).
In the detailed user guide, you will find i.a. a detailed description of the
menu items of the system settings, the complete functionality of the
digital recorder and the connection and installation of external devices.
The operating instructions for your TV set are updated at irregular
intervals. We recommend checking them now and then, especially
after a software update.
For best results regarding safety and the longevity of the set, we
recommend you read the chapter For your safety before switching
it on for the first time.
Paragraphs which begin with the symbol
tions, tips or conditions for the following settings.
Terms which you will find in the menus or printed on the remote control
or TV set are written in bold type.
The necessary control elements are shown in the descriptions to the
left of the text containing the instructions for action.
In addition to the remote control, a PC keyboard can be connected to
one of the USB ports on your TV and then used to control your TV set.
In the user guide, this symbol indicates places in which
the use of a keyboard is particularly advantageous.
Depending on the connected accessory equipment the menus in the
TV set can differ from those described here.
All the station names, programme contents, the illustrated photos,
titles, albums and album covers in this quick guide are examples.
indicate important instruc-
General information on the operation of the
TV set
For further information on the user interface and the general operation
of your TV set see chapter General information on the operation.
english
• LCD TV set
• Mains cable
• Antenna cable
• Remote control Assist with two batteries
• Table stand
• Installation instructions for table stand
• Screws for table stand
• Wrench
• Adhesive cable tie
• Quick guide
Interactive data services
In some countries the stations also broadcast interactive data services
with their programmes, leading to the functions of individual keys not
being available or only so to a limited extent. You can find out more
about this in section HbbTV / MediaText.
Imprint
Loewe Opta GmbH
Industriestraße 11
D-96317 Kronach
www.loewe.de
All rights including translation, technical modifications and errors
reserved.
Editorial date 10/13-3.0 TB/FP
© Loewe Opta GmbH, Kronach
35747000 / ID: 2.0.38

Connect ID 40-55 - 4 -
Quick guide
For your safety
For your safety, and to avoid unnecessary damage to your unit,
please read and follow the safety instructions below:
Intended use and ambient conditions
This TV set is intended exclusively for receiving and playing visual and
audio signals. It must not be used in rooms with a high level of humi-
dity (e.g. bathroom, sauna) or a high dust concentration. The
manufacturer‘s warranty is only valid for use in the specified permissible environment.
If the unit is used outdoors, make sure that it is protected from moisture
english
(rain, dripping water and splashing water or dew). High humidity and
dust concentrations lead to leakage currents in the device. This can
result in a shock hazard when touching it or even fire.
If you have moved the unit out of
the cold into a warm environment,
leave it switched off for about an
hour to avoid the formation of
condensation.
Do not place objects containing
liquids on top of the unit. Protect
the appliance against dripping and
splashing water.
Candles or naked flames must be
kept away from the TV set at all
times to prevent it from catching
fire.
Never place the TV set in a location where it is exposed to vibrations.
This may lead to damage.
Transporting
Move the device in vertical position only. Get hold of the device on
the upper and lower edges of the housing.
If the set has to be put down during packing/unpacking, place the TV
set with its entire front surface lying flat on soft material. Use a blanket
or the fleece from the packing material as an underlay.
The LCD screen is made of glass or plastic and can break if not handled
properly.
Always wear rubber gloves to carry the TV set if the LCD screen is
damaged and liquid crystal might be leaking out. In the case of skin
contact immediately rinse thoroughly with water.
Air circulation and high temperatures
The vent slots on the rear panel of the set must always be kept
unobstructed. Please do not place newspapers or cloths on/over the
TV set.
Make sure that there is at
least 10 cm free space on the
sides and above the set for
air circulation, if the set is
placed in a cabinet or on a
shelf.
Like any electronic device,
your TV set requires air for
cooling. Obstruction of the
air circulation can cause fires.
Prevent metal items, needles, paper clips, liquids, wax, or similar
items, from getting into the interior of the device through the vent
slots in the rear panel. Such objects can cause short circuits in the
set, which could possibly cause a fire.
If something should get into the interior of the set then immedi-
ately unplug the mains plug of the device and contact the field service
for more information.
Set-up
The set is suitable for mounting in many different ways. Note the assembly instructions regarding the different possible mounting options.
Before setting up the device, please check that the final location is
suitable to bear the load of the device in terms of surface (sensitivity
to pressure) and stability (statics).
This is particularly the case for the high-gloss painted surfaces and
surfaces that are made from real wood/real wood veneer.
Place the TV set with the table or floor stand only on a level, sturdy,
horizontal base. Particularly make sure that the set does not protrude
to the front when placed in or on pieces of furniture.
Place the TV set in a normal position for use. The TV set may only be
used in an upright horizontal position. It may not be tilted by more
than 10 degrees. The TV set must never be operated in portrait position, lying flat or hanging overhead from the ceiling.
10 cm
10 cm
10 cm
±10°
D
Power supply
Incorrect voltages can damage the unit. This device may only be con-
nected to a power supply with the voltage and frequency indicated on the
type plate using the supplied mains cable. The mains plug of the TV set
must be easily accessible so that the device can be disconnected from
the mains at any time. When unplugging the unit from the mains, pull at
the connector body and not at the cable. The cables in the mains plug
could otherwise be damaged and could cause a short-circuit when
plugged in again.
Lay the mains cable so that it cannot be damaged. Do not step on
the mains cable. The mains cable may not be kinked or laid over sharp
edges nor be exposed to chemicals; the latter also applies to the unit
as a whole. A mains cable with damaged insulation can cause electric
shocks and poses a fire risk.
Set up the device where it is not exposed to direct insolation and
where it is not exposed to additional heating by radiators.
About the LCD screen
The TV set with LCD screen you have purchased satisfies the most
rigorous quality requirements and has been inspected with respect
to pixel errors. Despite of thorough care when manufacturing the
display, it cannot be 100% guaranteed that no subpixel defects will
occur due to technical reasons. Please understand that these types
of effects, as long as they are within the limits specified in the standard,
cannot be considered as a device defect in terms of the guarantee.
Avoid displaying still images for long periods of time. It is possible that
a copy of the image may remain visible.

Connect ID 40-55 - 5 -
Quick guide
For your safety
TV sets with 3D function
Read the following safety instructions before using the 3D function
of your TV set.
Please use the Loewe 3D TV sets only with the Loewe 3D glasses which
can be purchased as an accessory from your Loewe dealer.
People with a visual disorder may not be able to perceive 3D effects
or may only be able to perceive them to a limited extent. People who
are sensitive to flickering images (e.g. those with epilepsy) should only
use the 3D function after having consulted their doctor.
It might take some time for you to get used to the 3D glasses and
before you can perceive the 3D effects properly.
Stop using the 3D function immediately if you experience any feelings
of nausea, dizziness or malaise when viewing 3D content.
Supervise children whilst they are viewing 3D content, as they can be
particularly sensitive to it.
Allow more time for a break after having watched 3D movies, so that
you are able to relax. Failure to do so could result in headaches, fatigue,
dizziness or malaise.
Position yourself comfortably in front of the 3D TV set and ensure that
you are seated firmly. By doing this, you will avoid any injuries that may
occur due to reacting to extreme 3D content.
Switch off any artificial light sources (e.g., energy saving lamp) between
the TV set and the 3D glasses. These could impair the infrared reception or the TV picture may flicker as a result.
Supervision
Do not let children operate the TV set unsupervised and do not let
them loiter and play close to the set. The set could tip over, be pushed
off or pulled down from the stand surface and injure someone.
Do not allow the switched-on TV set to run unattended.
Cleaning and care
Switch off the TV set with the main switch prior to cleaning.
Clean the TV set, the screen, and the remote control unit with a soft,
moist, clean and colour-neutral cloth only, without any aggressive
or scouring cleaning agents.
Repairs and accessories
Never remove the back of the TV set yourself. Have your TV set repaired or serviced by authorised television technicians only.
Only use original accessories such as Loewe stands, if possible.
Technical information
Switching off the TV set with the mains switch during operation or an
inadvertent disruption to the power supply (e.g., power failure) can
cause damage to the USB hard disk file system and hence loss of
the recorded broadcasts. Always return the TV set to Standby mode
before switching it off with the mains switch.
However, if unexpected problems occur when operating the hard disk,
formatting the hard disk may rectify this. You can find the corresponding menu items under System settings ט Control ט more ... ט
Hard disks.
Loewe is not liable for data being lost from USB hard disks.
english
Volume
Loud music can lead to ear damage. Avoid extreme volume especially over long periods and when using headphones.
Thunder storms
Pull out the mains plug and all connected antenna cables from the
TV set in a thunderstorm. Overvoltage caused by lightning strokes
can damage the set via the antenna system, as well as via the mains.
The mains plug and all connected antenna cables should also be pulled
out during long periods of absence.
Automatic shutdown
If the TV is not operated for 4 hours (adjustment of volume, programme change, etc.) the TV will automatically switch to stand-by
mode to save energy. A prompt to terminate this shutdown process
appears one minute before expiry of the 4 hours.
The automatic shutdown is generally active for the TV mode as soon
as the energy efficiency mode Home Mode is enabled for at least one
of the signal input groups. This also applies if another energy efficiency
mode is selected during initial installation, but one of the signal input
groups is subsequently set to Home Mode.
Automatic shutdown does not occur when using the radio without
screen display (screen off).
Connect ID 40-55 - 6 -
Quick guide
Basic functions
On/Off of the TV set
General navigation
english
Select station
Switching the TV set ON / switching it OFF in Standby
mode (Mains switch must be switched ON)
With the TV set being switched on:
Press key long: TV set and all CEC-enabled devices
connected to the HDMI ports will be switched off to
standby (system standby).
Navigation on the user interface, select
objects
OK short: Call station list. Or:
OK long: Call expanded station list.
Mark station,
OK switch over to station.
Or:
P+/P– Next/previous channel
Key functions
TV operation
Call radio mode (standard assignment)
(1
Call Home view,
Select the operating mode or the function
short, during screen fade-in function:
Info display,
Info text appropriate to the content that can assist you
further, should you have any questions about your TV
set;
short, without on-screen display: call status display.
with status display opened and repeatedly pressing
the key call / close the detailed information on the
broadcast
long: Show key explanation window
short: Open the DR+ archive
long: Call timer list
Add current object to Home favourites
Or:
Select station with numerical keys
Sound
V+/V– Increase/reduce volume
Sound on/off
Function of the coloured keys during TV operation
Red key: Start HbbTV or value-added network
service
Yellow key: Last selected station
Blue key: Call function list
(selection of language/sound,
subtitles or channel/video track)
Function of the coloured keys in audio mode
Green key: Switch screen ON/OFF
Yellow key: Last selected station in DVB radio
mode
Call MediaNet
EPG (Electronic Programme Guide) On/Off
Turn Teletext/MediaText on/off
Call function list for the active operating mode
short: step / level back
long: close all displays
(1
The assignment of these keys can be changed. The description refers to the standard setting.
Connect ID 40-55 - 7 -
Quick guide
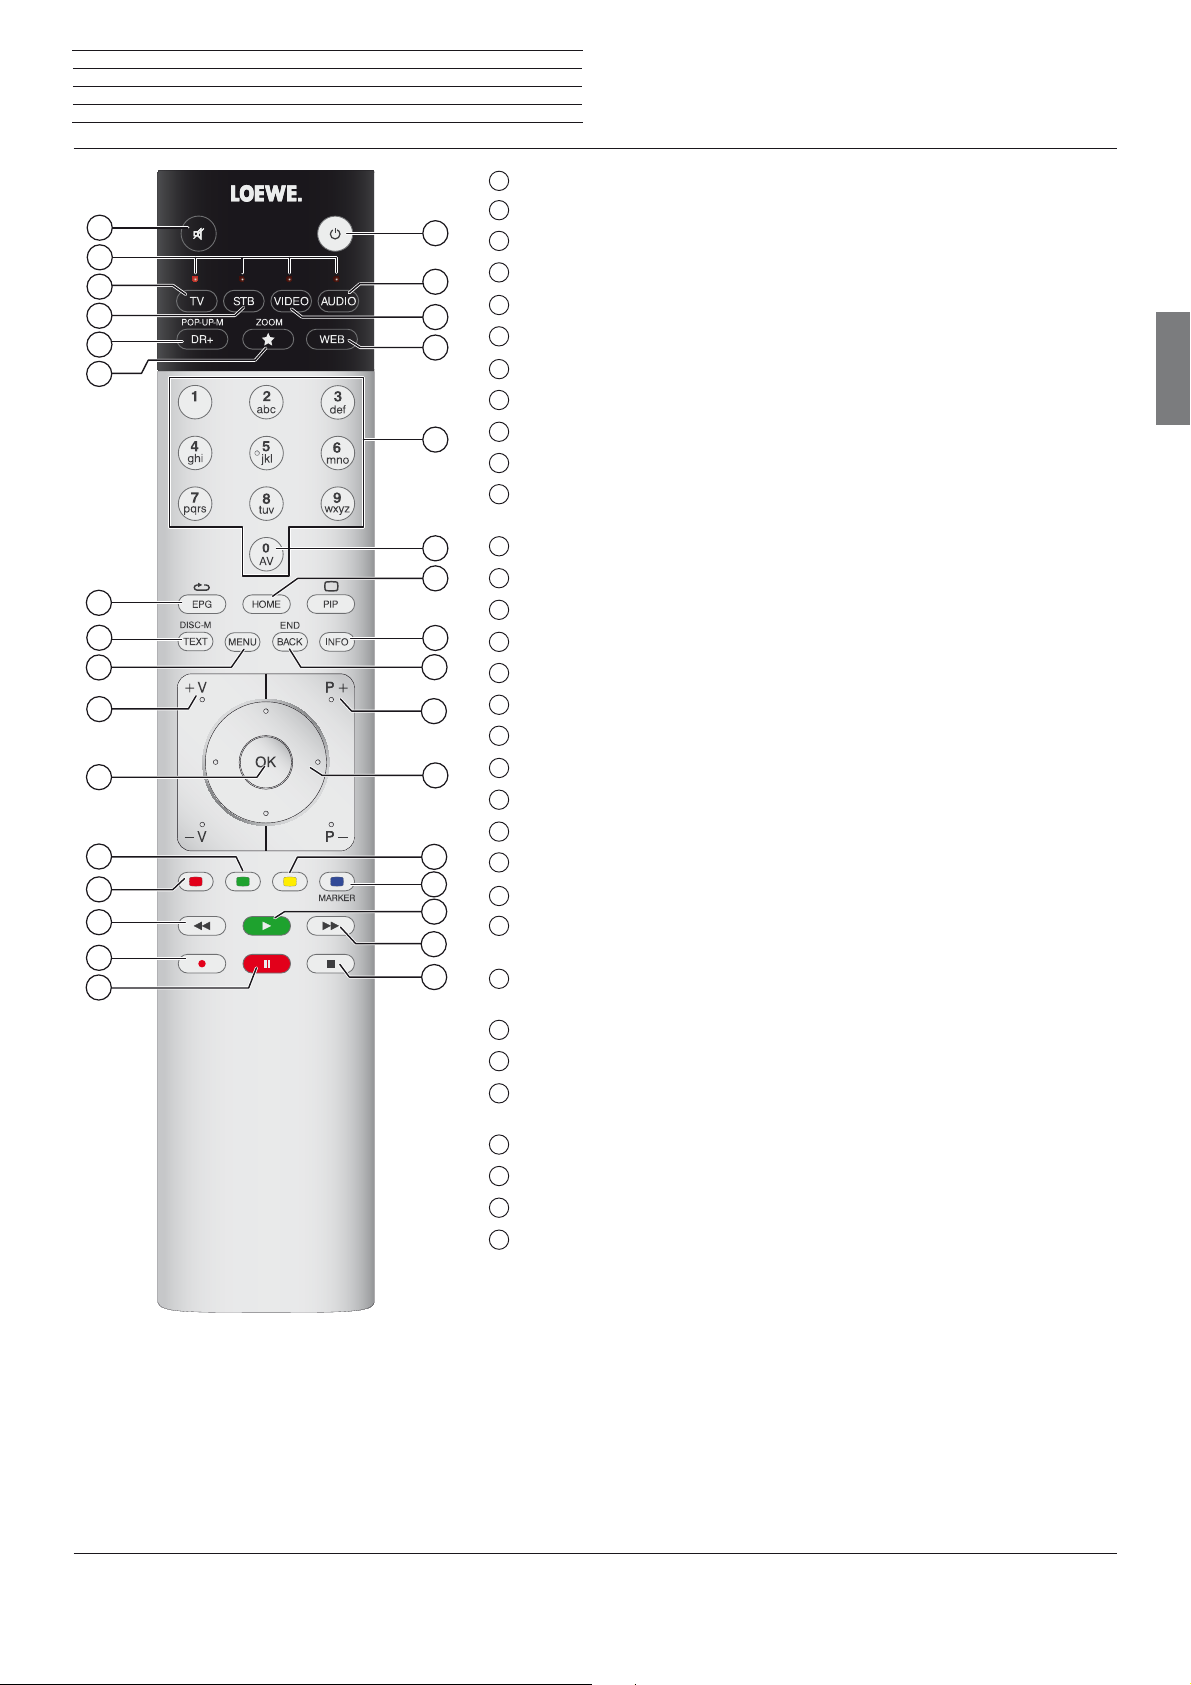
Remote control
1
2
3
4
5
6
7
8
9
10
11
in the menu: confirm/call up
12
13
14
15
16
17
18
19
20
21
22
23
24
press long: close all displays
25
In menu: context-relevant Info on/ off
26
27
28
in the menu: enter numbers or letters
29
30
31
32
System standby
10
11
12
13
14
15
16
1
32
2
3
4
5
31
30
29
6
28
27
26
7
8
9
25
24
23
22
21
20
19
18
17
Sound mute/on
LED display for currently operated device
Switching to TV mode
Reassign remote control to SetTop-Box (PACE DS440N)
DR+ archive on/off
Define active object as favourite
Electronic Programme Guide on/off
Teletext/MediaText
Call function list
V+/V- increase/reduce volume
Call station list / expanded station list
Green coloured key: screen on/off
Red coloured key: call preferred value-added network service
Jump / Wind
One Touch Recording
Start / interrupt timeshift television
Finish timeshift
Jump / wind
Start / continue timeshift television
Blue coloured key: call station function list with subfunctions
Yellow coloured key: switching to previously received station
In menu / in lists: selecting/setting
P+/P– select stations up/down
Press briefly: back to previous window (step back)
Status display on/off
Open/close Home view
AV selection
Select station directly
Call MediaNet
Reassign remote control to BluTech Vision 3D
Switch to radio mode
Switch ON/OFF to standby mode
(2
on/off
(1
(1
(1
english
(
2
The key assignment displayed here is valid for the main level of the TV set. The key assignment may vary in certain operating modes (see the corresponding chapter in this quick guide).
(1
The assignment of these keys can be changed. The description refers to the standard setting.
(2
Depending on the corresponding settings.
Connect ID 40-55 - 8 -
Quick guide
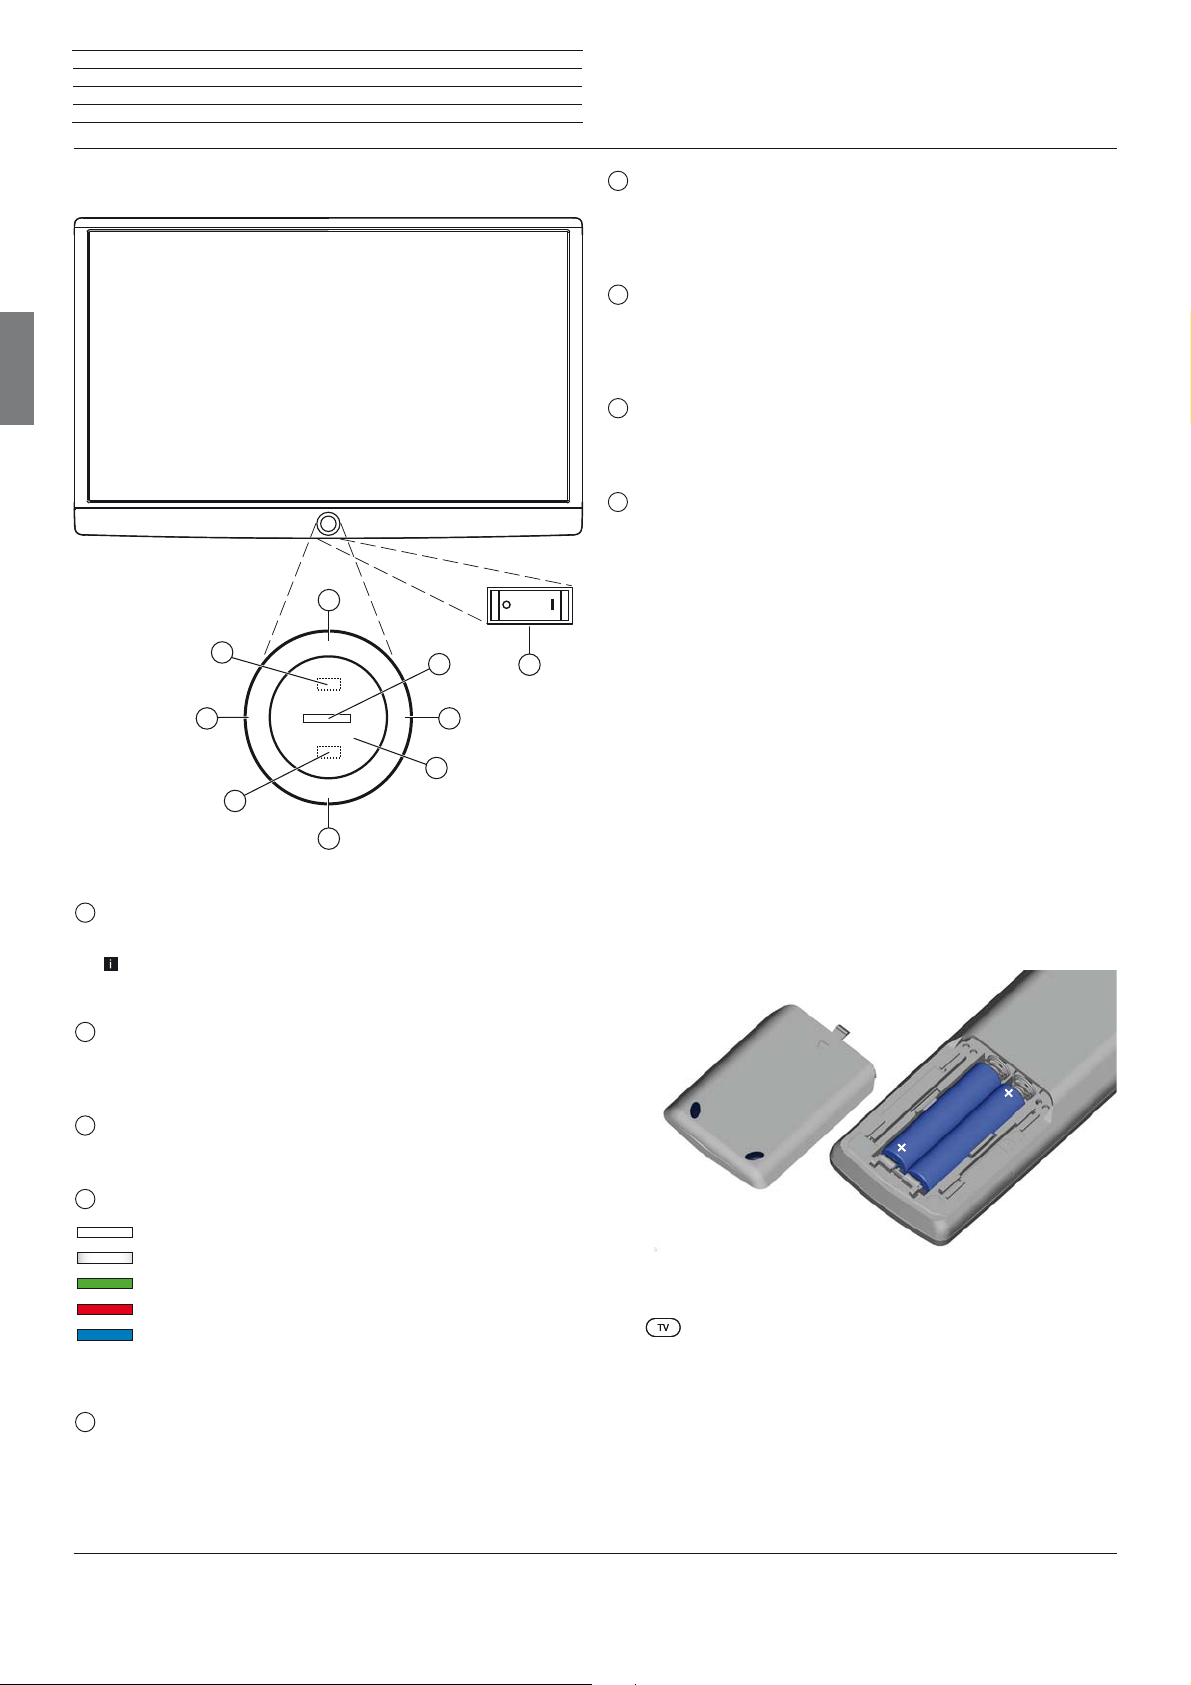
Operating controls on the TV set / Preparing the TV set
Functions of the operating controls
english
6
5
-
9
3
1
Mains switch:
The mains switch is located on the bottom of the set.
The TV set will be completely separated from mains only when
you unplug the mains cable.
M
4
+
8
2
R
7
6
Key M:
TV set in standby mode: switch TV set on in TV mode
TV set switched on: call direct control on TV set
in direct control on TV set: up
7
Key R:
TV set in standby mode: switch TV set on in radio mode
TV set switched on: toggle TV mode and radio mode
Direct control on TV set: down
8
Key +:
increase volume
Direct control on TV set: to the right
9
Key – :
reduce volume
Direct control on TV set: to the left
Preparing the remote control unit
1
Inserting or replacing batteries
Press on the embossed arrow whilst pushing the battery cover down.
Only use leak-proof micro-cells of the LR 03 (AAA) Alkali-Manganese
type. Do not use different types of batteries and old and new batteries together.
The batteries used must not be exposed to excessive heat such as
sunlight, fire or similar!
Pay attention to the correct polarity of + and – when inserting the
batteries.
If the batteries are too weak after longer use, the TV set prompts you
to change the batteries. Dispose of used batteries in an environmentally friendly way (see chapter Environment / Legal information).
Push the cover back on from below after having inserted the batteries.
2
On/Off key:
Switching on in standby mode
Switching off to the standby mode
3
IR receiver:
Infrared receiver for receiving the remote control commands.
4
Display:
white: Standby
white, intermittent: TV set starts
green: TV set switched on
red: timer recording active
blue: TV set in standby, background operation
active (EPG data updating or software
update)
5
Infrared transmitter:
When showing 3D content, the 3D glasses Loewe Active
Glasses 3D are controlled via the infrared sensor.
AAA LR03
AAA LR03
Adjusting the remote control unit for operating the TV set
Press the TV key.

Connect ID 40-55 - 9 -
Quick guide
Switching TV set on/off / General information on the operation
Switching the TV set ON/OFF
Switching TV set to the standby mode
Press the mains switch at the bottom of the set.
The indicator in the control panel on the front side lights up white. The
set is now in standby mode.
Switching the TV set on/off via the local operating panel
To switch the TV set into Operating mode or switch it off to Standby
mode, press the button on top of the TV set for about 2 seconds.
Display
After switching on the TV set, it takes a few seconds for further ope-
rating commands to be processed. Your TV set is ready to operate
as soon as the status indicator in the control panel lights up in green.
Switching the TV set on by means of the Remote control
Press the on/off key.
Or:
Press the TV key.
The previously watched station will be called.
Or:
Press numerical keys 1-9.
The corresponding station will be called.
General information on the operation
Some keys of the remote control for operating the TV set you will use
more often than others. The most important keys for navigation will
be explained in general. The numbers in the text refer to the figure
showing the remote control in chapter Remote control.
22
The arrow keys
TV set and for selecting menu items. They are arranged in the middle
of the remote control in a circle around the OK key
quick guide they will be represented as follows:
The OK key
menu item and for opening the station list. In this quick guide, an
instruction for this key looks like the following:
Using the numerical keys of your remote control
gramme channels and teletext pages directly. With key 0 you open
the AV options. In this user guide, entering numbers with numerical
keys is shown as follows:
The numerical keys are also used to enter text (see section Entry of
characters by remote control).
The Home view is the central overview page for all of your TV set‘s
operating modes. You reach Home view with the HOME key
help you to navigate in the menus and lists of the
11
. Later in this
Select the desired item.
11
is used to confirm a selection, for calling the highlighted
OKconfirm.
you enter pro-
28
Entering programme channel directly.
26
.
english
After switching on the TV set, it takes a few seconds for further ope-
rating commands to be processed. Your TV set is ready to operate
as soon as the status indicator in the control panel lights up in green.
Switching the set off with the remote control (Standby)
Press the on/off key.
Before switching off the set with the mains switch,
we recommend you to switch it to standby mode.
Switching TV set and connected additional devices off
(System Standby)
Press the On/Off key longer:
TV set and all CEC-enabled devices connected to the
HDMI ports will be switched off to standby (System
Standby).
HOME: Calling the Home view.
24
Pressing the BACK key
Pressing the BACK key longer closes all opened fade-ins. An example
for the BACK key in this quick guide:
BACK: Stop text entry and exit entry box.
Prolonged pressure on the INFO key
gives you information on the currently most important key functions.
If the function for a key is not available, this will be indicated by an
inserted symbol
briefly brings you one level up in the wizard.
25
shows a key guide window that
on the right above.
continued on the next page ט
Connect ID 40-55 - 10 -
Quick guide
General information on the operation
Structure of the Menu screen
Basically, the structure of the different menu screens is similar, regardless of whether it is e.g. a wizard, rendering media content or a setup
menu. The structure is explained by means of three different screens.
The functions of these menu screens are explained more detailed in
the respective chapters.
Screen structure: Wizard
english
INITIAL INSTALLATION - Menu language
Which menu language do you want to use for operation?
Deutsch (de) Ελληνικά (el) Svenska (sv) Čeština (cs)
English (en) Polski (pl) Dansk (da)
Français (fr) Magyar (hu) Português (pt)
Italiano (it) Suomi (fi) Русский (ru)
Español (es) Slovenščina (sl) Norsk (no)
Nederlands (nl) Slovenčina (sk) Türkçe (tr)
Proceed with
Back with Cancel with
(A) Title bar with name of the wizard and the current operating step.
(B) Selected items, whose number can be different according to the
operating step.
(C) Bottom line showing the available operating controls. If required,
instructions and information are inserted.
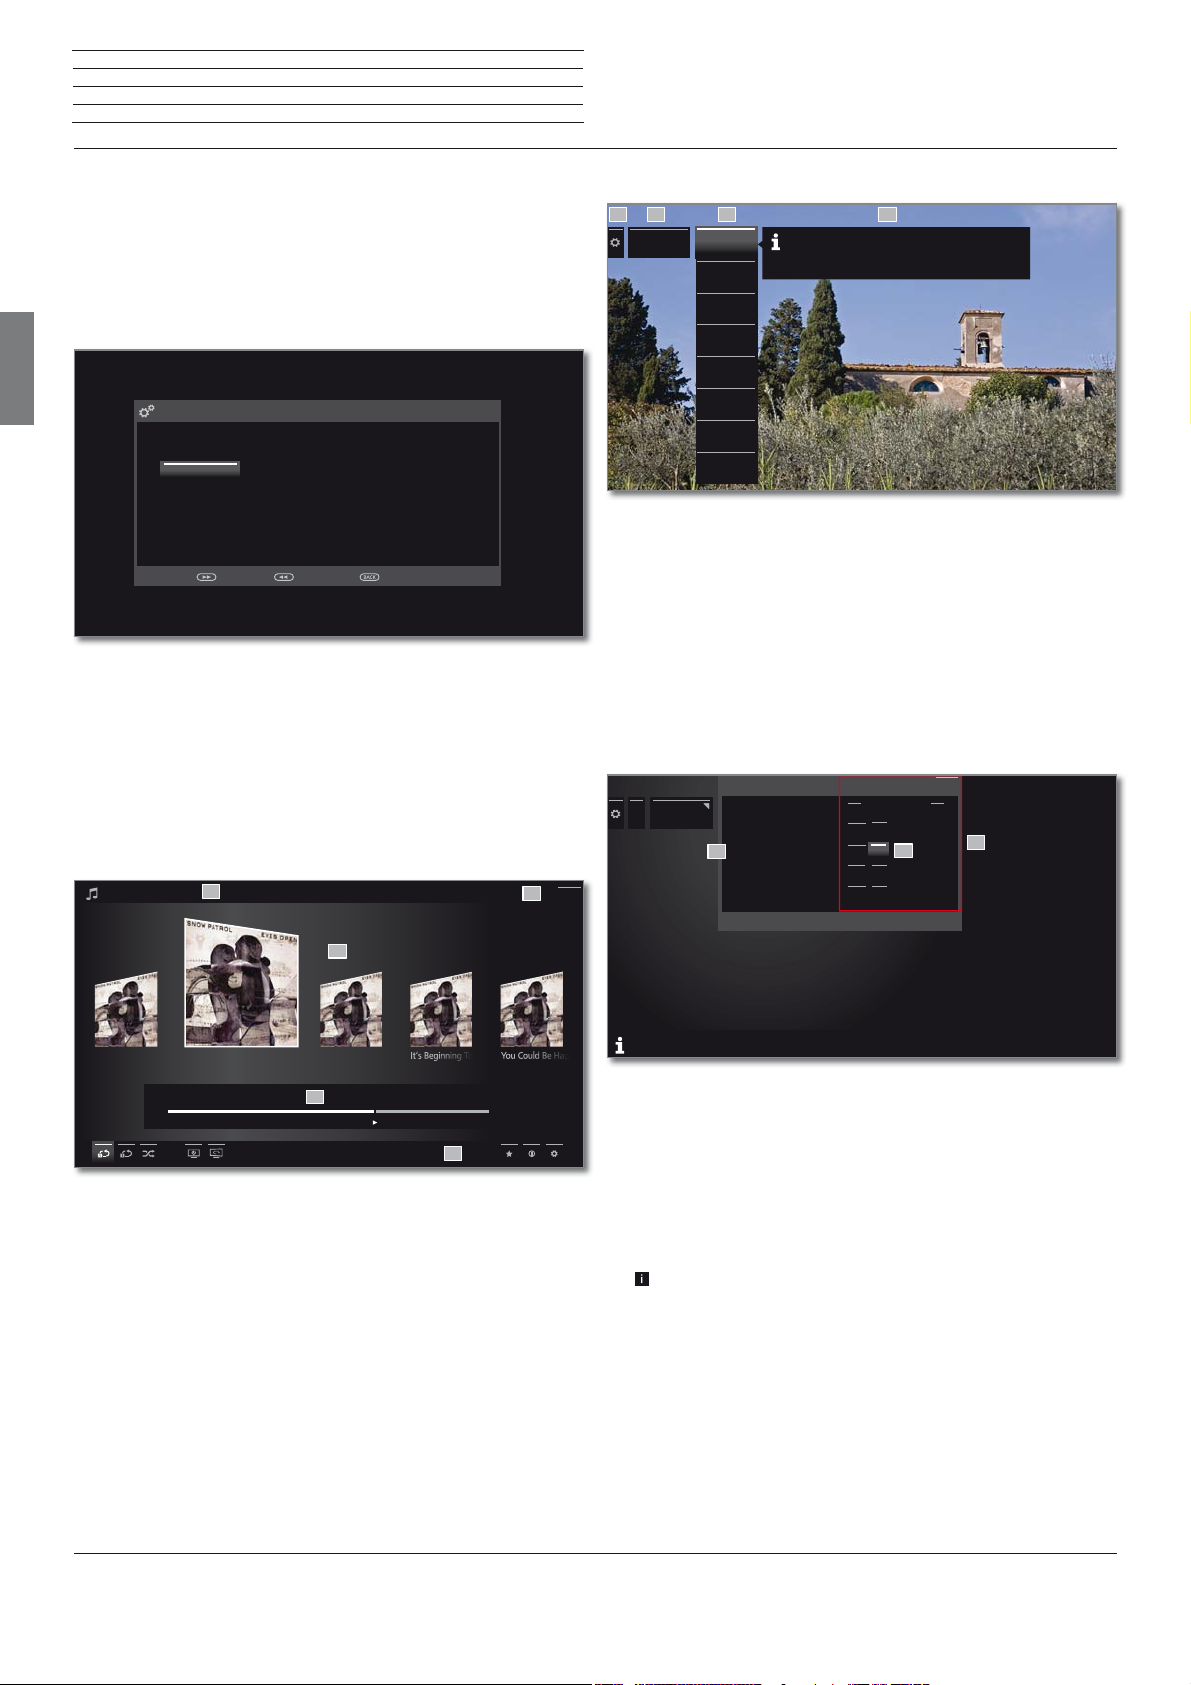
Screen structure: Rendering of media content (example: Audio
player)
Snow Patrol / Eyes Open
A
Screen structure: Setup (example: picture)
A
Picture
CB D
3D
Picture adjustment
Contrast
Brightness
Colour intensity
Image+
Active
Picture format
more ...
If your desired display format has not been automatically
selected then you can choose it in the 3D settings menu. You
may display the 3D image in 2D or vice versa.
(A) Selected function in the Home overview (here: system settings)
(B) Home Menu System settings, with selected menu item Picture.
(C) Menu items Picture focusing on 3D
(D) Help text for the selected menu item Picture > 3D
Navigation: Selection of elements (example: On-screen displays)
Highlighting and thus selecting the symbols/elements or menu items
on the screen can be effected by the arrow keys on the remote control.
So you can see all the time where you are. As soon as there is a bar
above a symbol or text, this is a selected element.
On-screen displays
......
On-screen
displays
Back
B
Display time
Volume display
Automatic info
B
Permanent clock display
Automatic HDMI hint
< 7s >
< 7s >
yes no
yes no
on
off on
off on
off on
yes no
yes no
Back
C
A
C
Chasing Cars Shut Your EyesHands Open
00:00
02:56
D
04:27
E
(A) Title bar with selected album / subdirectory.
(B) Menu item Back to exit the menu or to go back to the previous
menu item.
(C) Selection of album or title
(D) Time bar
(E) Bottom line with the different symbols for controlling the playback
function.
With this you activate/deactivate the info text overlay for the menu item just selected.
(A) Selectable elements / menu items.
(B) The text in the line where the marker is currently located is white.
(C) Move the selection marking by means of the arrow keys
to the menu item to be set.
In most cases, the marked menu item will be automatically
adopted. The font colour of the previously active item will change
to grey, that of the newly selected item to white.
In a few menus, to confirm a selected menu item is required by
pressing OK.
continued on the next page ט
Connect ID 40-55 - 11 -
Quick guide
General information on the operation
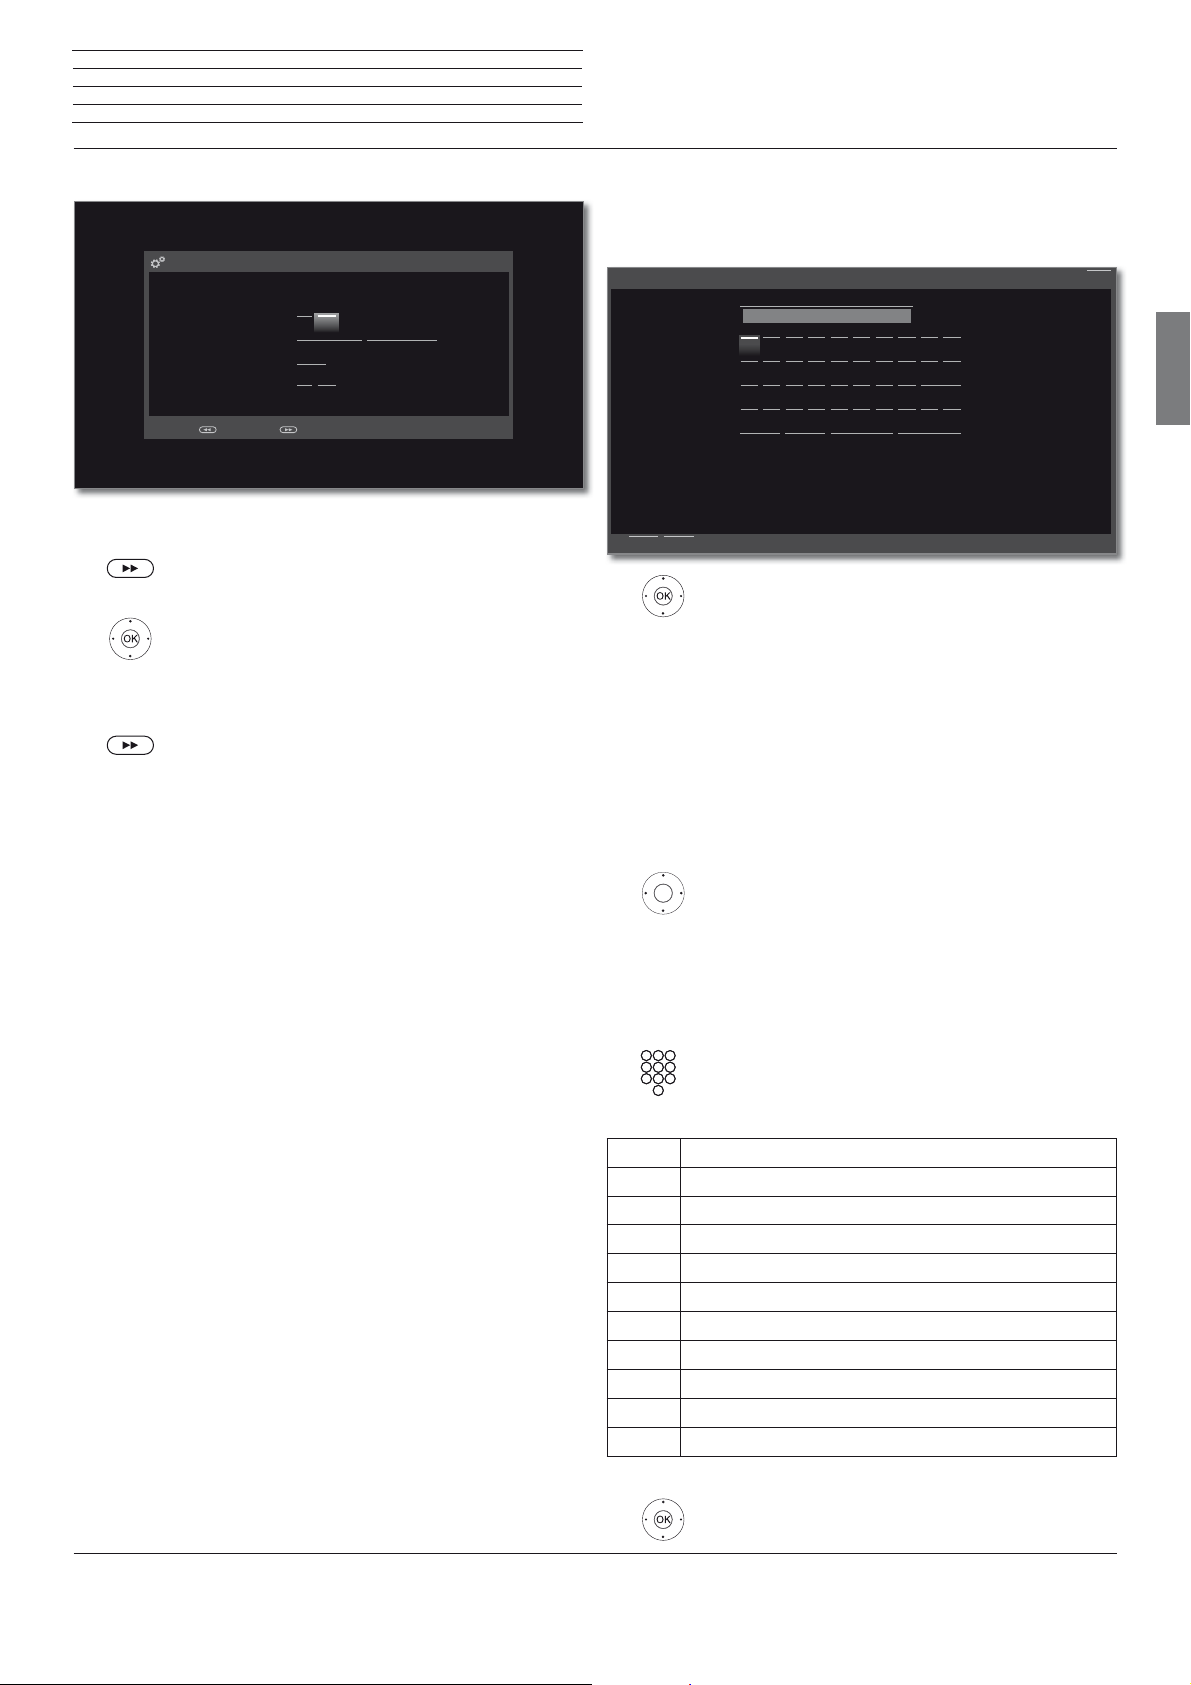
Navigation: Wizards
DVB-S settings (ASTRA1 19,2°E)
Please specify whether you want to search for scrambled stations too.
Note: Scrambled stations can only be received with an integrated CA module and additional
card.
Scrambled stations
Search method
Symbol rate
Accept Logical Channel Number
Back with Proceed with
If the menu item(s) (marked white) is/are already
correctly preset:
Go to next step.
Otherwise:
Mark the menu items to be changed. The
OK confirm the selection.
Go to next step.
yes
no
Network search
22000
no
Frequency search
yes
update will be adopted automatically. The
fount colour of the previously active item will
change to grey. If not,
Entering characters with on-screen keyboard
For certain functions, entering letters or characters is required, e.g., for
Web addresses (URLs) in the browser or for renaming archive entries.
An on-screen keyboard appears for entering text.
Enter/change internet address
CancelAdopt
http://www.loewe.de
E
W
Q
D
S
A
C
X
Y
3
2
1
Delete Cancel AdoptSpace
P
O
I
U
Z
T
R
I
L
K
F
V
4
J
H
G
.-/
M
N
B
6
5
abc
7
0
9
8
Back
highlight character / on-screen button,
OK Accept character.
For the selection of special characters select field
.-/ several times briefly in rapid succession.
To conclude the entry:
Mark Adopt,
confirm with OK.
english
Entry of characters by remote control
Alternatively to the on-screen keyboard you can also enter the desired
characters by means of the remote control (as with the keypad of a
mobile phone).
Mark text entry field.
Under the first letter of the name you will see a line
indicating the current input position.
Input position one character to the right (also for
blanks).
Input position one character to the left.
Enter the letters one after another. When using the
remote control, press the numerical keys just as on
a mobile phone keypad (0-9) until the desired symbol
is displayed.
Key Characters (uppercase - lowercase)
1
2
3
4
5
6
7
8
9
0
[space] 1
A B C 2 Ä Æ Ã Å Ā À Á Ć Ç Č - a b c 2 ä æ ã å ā â à á ć ç č
D E F 3 Ė Ë Ē Ę Ê È É - d e f 3 ė ë ē ę ê è é
G H I 4 Ï Ī Į Î Ì Í - g h i 4 ï ī į î î ì í
J K L 5 - j k l 5
M N O 6 Ö O E Õ Ō Ô Ò Ó Ø - m n o 6 ń ñ ö o e õ ō ô ò ó ø
P Q R S 7 - p q r s 7
T U V 8 Ü Ū Û Ù Ú - t u v 8 ü ū û ù ú
W X Y Z 9 - w x y z 9
. 0 - / _ : + , ; ? ! = & # % ~ @ $ * ’ ( ) ” § \ { } [ ] < > ´ ` ^ |
To conclude the entry:
Mark Accept,
confirm with OK.
Connect ID 40-55 - 12 -
Quick guide
Info display / Operation without remote control
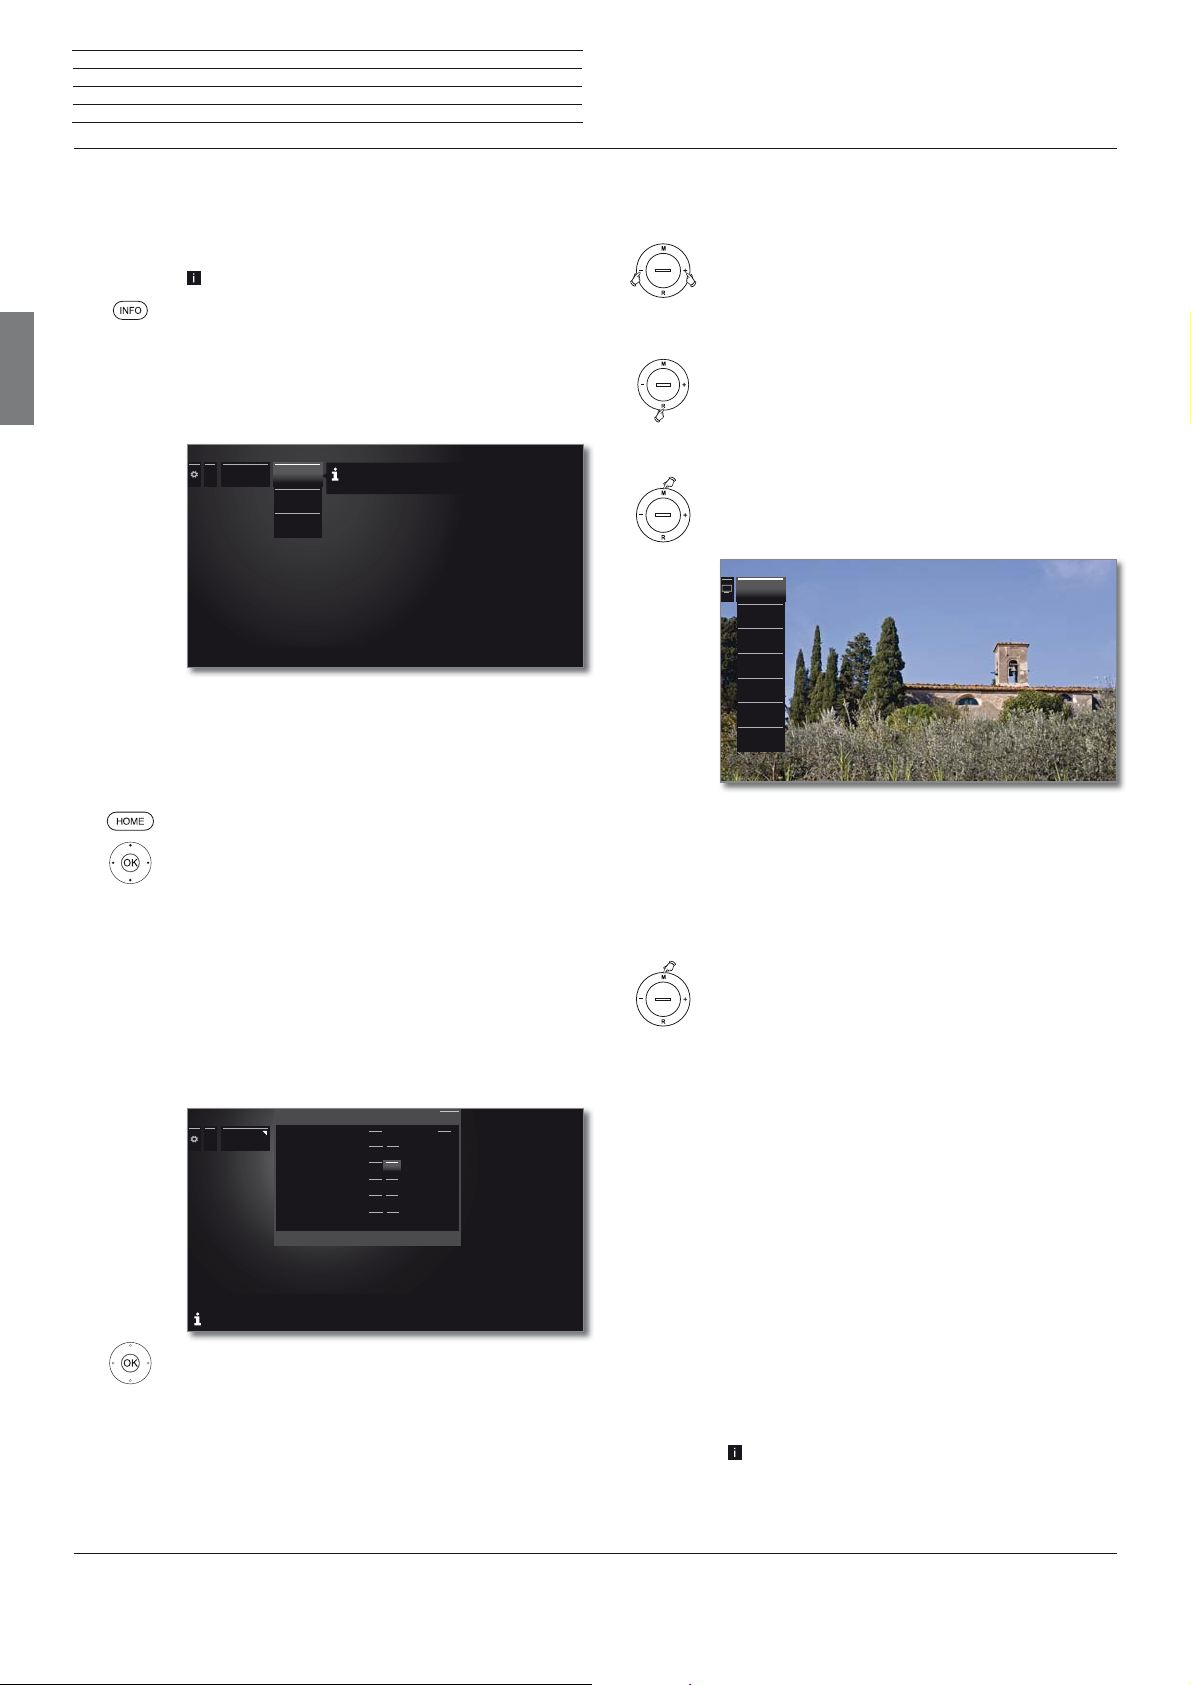
Info display
The info display provides an info text appropriate to the on-screen
display that can assist you further with the operation of your TV set.
An on-screen display is faded in.
The factory setting is that the info display is shown
automatically for each menu item. In this case you can
temporarily hide the info texts with the INFO key.
english
Permanently display or hide the automatic info display
Once you have become familiar with how to operate the TV set, you
can switch off the automatic info display.
The automatic info display can be hidden permanently via a menu setting. Then it can be displayed
temporarily by pressing the INFO key.
...
Energy efficiency
The priority here is low energy consumption in home use. In this
Home Mode
case, the TV switches off automatically for the sake of saving
energy, after it has been out of operation for four hours.
Premium
Mode
Shop Mode
Operation without remote control
Changing Volume
+ / – Increase/reduce volume.
Switching radio on or off or switching to radio
R Radio on or switch between TV and Radio.
Calling direct control on TV set
M Call direct control on TV set.
Operating
mode
Station selection
AV selection
3D
Contrast
Picture format
Service
HOME: Calling the Home view.
Mark System settings,
OK call system settings.
Mark Control,
go to next column.
Mark more ... ,
move to next column.
Mark On-screen displays,
call On-screen displays.
Select Automatic menu info,
select off / on.
On-screen
displays
On-screen displays
Display time
Volume display
Automatic menu info
Key explanation
Permanent clock display
Automatic HDMI hint
Tilbage
<>7 s
yes no
off on
off on
off on
yes no
...
If you select "on" here, the informational text belonging to each selected menu item will always appear
simultaneously.
Back
OK Accept settings.
R Scroll down.
M Scroll up.
– Scroll left.
+ Scroll right, adopt settings, confirm.
Close all displays
Press M longer.
Explanations of the settings:
Operating
Switch between TV and radio operation.
mode
Stations
Call Station selection.
selection
AV selection Select AV interface.
3D Calling 3D settings.
Contrast Set contrast.
The power consumption of the TV set depends
directly on the value set here.
Picture
Selecting the picture format.
format
Service
The Service menu item is provided for service
purposes by dealers only.
Connect ID 40-55 - 13 -
Quick guide
Home view / Home - Favourites
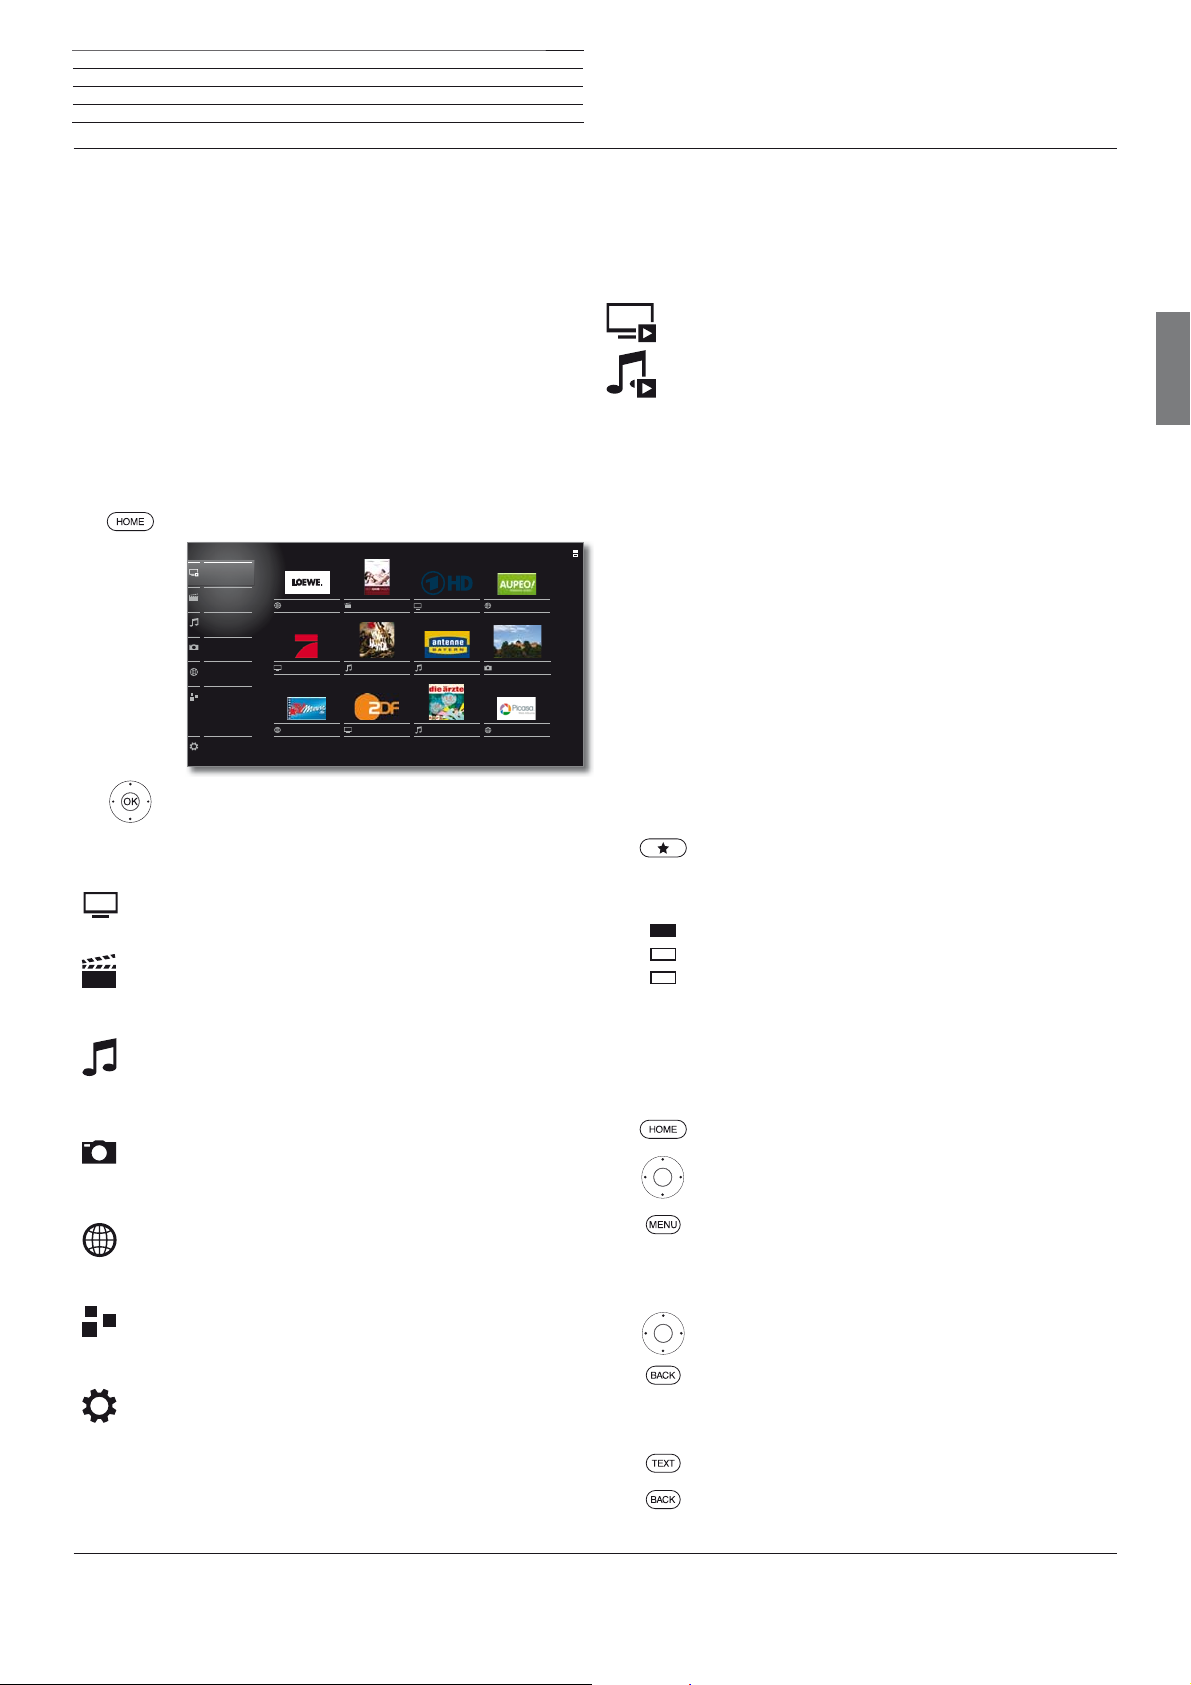
Home view
The Home view is the central overview page for all of your TV set‘s
operating modes.
The list of options on the left of Home view gives you access to TV,
Video, Audio/Radio, Photo and Web.
By means of Extras and System settings you have access to more
functions and you can configure your TV set.
On the right side of the screen you find all your favourites (bookmarks)
created in the different operating modes.
The number of selectable items varies depending on the TV equipment, network connection, available media/media servers and connected gadgets.
Call Home view
HOME: Calling the Home view.
TV
Video
Audio/Radio
Photo
Web
Extras
System settings
Select menu item / favourite,
OK call.
Loewe
ProSieben
TVMovie.de
KeinOhrHasen
Coldplay/Viva
ZDF
DasErste HD
Antenne
die ärzte/auch
Aupeo
Franken
Picasa
Activated operating mode
The respective activated operating mode will be indicated in the list
of options by a small playback symbol in the lower right-hand corner
of the Home symbol.
Examples:
TV mode activated.
Audio player (Audio mode) activated.
In the opened Home view, pressing again on the Home key brings you
back to the respective active operating mode.
Home - Favourites
You will find your favourites on the right of the individual operating
modes.
You can create favourites in the operating modes of the TV set. In this
way you get a collection of your favourite music titles, your preferred
stations and often visited Internet sites on a single overview page.
After an initial installation, TV stations, online links and radio stations
will already be automatically created as favourites independent of the
installation site of the TV set and of existing Internet links.
Creating favourites
In the operating modes of the TV set you can define the current object (station, music title, photo, etc.) as favourite by means of your
remote control. The favourite will be added to Home view and placed
at the end.
english
Description of the individual sections/functions:
TV: Here you call the TV mode of your TV set.
See chapter TV for further information.
Video: The item Video gives you access to videos from
local (USB, home network) and online sources.
See chapter Video for further information.
Audio/Radio: With item Audio/Radio you find music files
from your local server(s) and USB storage media as well
as from DVB and Internet radio.
See chapter Audio/Radio for further information.
Photo: Via menu item Photo you can view photos from
your local media on your TV screen.
See chapter Photo for further information.
Web: Here you have access to multimedia content in the
Internet (MediaNet) as well as a high-quality web browser.
See chapter Web for further information.
Extras: Extras contains additional functions and settings
(e.g., Timer list, CA module).
See chapter Extras for further information.
System settings: In menu item System settings you find
the configuration menu of the TV set e.g., with settings for
picture, sound, connections or sound components. For the
description of the system settings, refer to the detailed user
guide (see section Software / User guides).
Create favourite.
If there are more favourites than can be shown on one
page, this will be indicated by rectangular symbols in
the upper right corner of Home view. Example:
Three pages with favourites exist. The first page of
them is indicated.
Editing favourites
You can edit the existing favourites in Home view. Change the sequence of your favourites as you wish or delete favourites you do not
need any more.
HOME: Calling the Home view.
Mark the favourite to be changed.
MENU: change favourite.
Move favourite or delete it (see below).
Moving favourites
move favourite to new position.
BACK: finish procedure.
Deleting favourites
TEXT: Delete selected favourite.
BACK: Finish procedure.

Connect ID 40-55 - 14 -
20
30
20
30
Quick guide
TV
Volume / Station
TV
In TV mode that can be selected via the Home overview, you can
use the basic TV functions of your TV set. In TV mode you will have
numerous functionalities at your disposal as, for instance, EPG and, if
offered by the station, HbbTV (hybrid broadcast broadband television).
By means of the function list you may call additional options and settings all around TV operation.
Setting the volume
english
Switching sound off/on
Sound off.
Sound on: Press key again or increase the volume
using V+.
Setting the volume
V+/V– Volume up/down.
The volume control bar will be displayed in the upper
right corner.
The volume control bar can be deactivated in the
menu System settings ט Control טmore ... ט
On-screen displays.
Select station
Select station with P+ / P–
P+/P– Station up/down.
The number and the name of the station along with
the title of the programme and that of the next
programme will be briefly shown. Also, the status
display with time and programme-dependent symbols
appears.
The symbols of the status display are described in
section Status display.
Selecting a station out of the station list
In normal TV mode, without other displays:
OK Call station list.
:15 - 23:
ASTRA LCN
9 ZDF HD
20:15 - 21:45
Toskana
10 BR Nord HD
21:15 - 21:45
11 SAT.1
20:14 - 22:19
12 RTL Television
21:15 - 22:15
Dr. House
13 n-tv
21:10 - 22:00
14 ProSieben
Mark stations.
OK The marked station will be called.
Length of the station list
There is a possibility to influence the amount of stations by using different station lists.
In normal TV mode, without other displays:
OK Call station list,
call overview of station lists.
:15 - 23:
ASTRA LCN
9 ZDF HD
20:15 - 21:45
Analogue
Toskana
10 BR Nord HD
DVB-C
21:15 - 21:45
DVB-T
11 SAT.1
20:14 - 22:19
Personal list 1
12 RTL Television
AV
21:15 - 22:15
Dr. House
13 n-tv
Manage list
21:10 - 22:00
14 ProSieben
Select station using the numerical keys
1-digit stations
Press the numerical key a little bit longer: The chan-
long
nel will change immediately.
Or:
Press the numerical key briefly, the station changes
after 2 seconds (changes immediately if up to 9
stations are stored).
2-digit and 3-digit stations
Press first (and second) numerical key briefly.
short short long
Keep the last numerical key depressed a little bit
longer: The channel will change immediately.
Or:
Press all the numerical keys briefly, the channel
changes two seconds after the last number has been
entered (with up to 99 or 999 saved channels it will
change immediately).
4-digit stations
all short
Press all four numerical keys briefly, the station
changes immediately.
If you select an unoccupied station position, the next
available station is selected.
Mark the desired list.
The station list will be changed according to the
selection. The list will be adopted automatically.
Move to the newly selected list.
Explanations of the station lists:
The number and the names of the possible station lists depend on
the available signal sources (antennas, TV reception networks, etc.).
ASTRA LCN
Analogue
Only stations from the selected source / reception
network are indicated in the station list.
DVB-C
DVB-T
AV
Exclusively AV inputs are shown in the station list.
Personal list
Only stations of the selected personal list are indicated
in the station list. The name of the list may be changed.
Manage list
Call up the station list editing menu (System set-
tings ט Stations ט Station lists TV).
continued on the next page ט
 Loading...