


User Guide
BluRay Player
 BluTechVision Interactive
233–33997.020

Getting Started
Preparation |
|
|
TV operation |
|
|
Press BluTechVision Interactive Mode |
briefly |
|
Switching device on/off |
|
|
Insert disc |
Button on device |
– Insert Disc – |
Operating modes |
|
|
Select operating mode |
Movie - Photo - Music OK |
|
If applicable select medium |
Disc - USB OK |
|
Playback |
|
|
Playback |
|
|
Pause |
|
|
Stop (Continue) |
|
|
Stop |
|
|
Press Search forwards |
extended, then press several times |
|
Press Search backwards |
extended, then press several times |
|
Next/Previous Chapter |
P+/- |
|
Volume |
V+/- |
|
Individual frame |
(press several times) |
|
Slow motion |
/ |
|
|
press for a long period, then press several |
|
|
times |
|
Other Functions |
|
Call up the menu. |
|
Close menu. |
|
Tittle menu |
|
Disc Menu (BD/DVD) |
|
Pop-UP Menu (BD) |
|
Picture Mode Menu (BD) |
|
Repeat |
(press several times) |
Zoom Menu |
|
zoom out |
|
zoom in |
|
Screen off/on |
|
Sets a marker |
|
Marker extended press |
extended OK |
HDMI Format |
|
BD-LIVE |
|
Pop-Up menu (BD) |
BD-LIVE submenu/menu |
|
OK |
- 2
Please unfold this page.
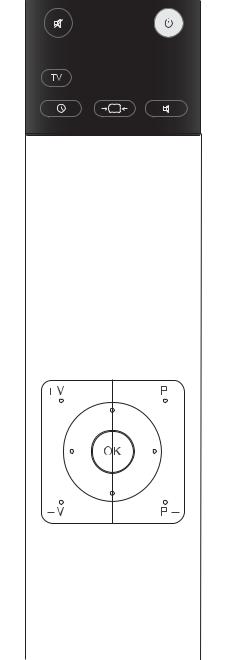
Remote Control Assist – BluTechVision Interactive Operation
|
Audio off/on (Loewe TV set) |
Switch on/off in standby mode ........................ |
(page 13) |
|
LED display for current operating mode |
|
|
|
|
Device set, e.g. Operate AudioVision |
|
|
Switch over to operate TV |
AudioVision short: CD/DVD/USB/iPod; Long: FM Radio |
|
|
Device set, e.g. Operate DVD Recorder |
Device set, e.g. Operate BluTechVision |
|
(page 27) |
............................................ Pop - Up/Disc menu |
Sound adjustment/sound via Loewe TV set) |
|
(page 26) |
...................................................... Zoom menu |
|
|
MENU: Enter numbers or letters
|
|
MENU: Enter numbers or letters |
|
(page 24) |
........................................................... Playback |
Menu Picture Mode (BD).................................. |
(page 27) |
|
|
Home Menu..................................................... |
(page 14) |
(page 26)............................... |
Disc Menu of DVD inserted |
Title Menu ....................................................... |
(page 24) |
(page 14)...................................................... |
Setup menu |
Close menu...................................................... |
(page 14) |
|
Volume (Loewe TV set) |
DISC: Select Title up/down ............................... |
(page 25) |
|
|
FILE: Browse list forwards/backwards .............. |
(page 29) |
|
|
Select Setup menu ........................................... |
(page 14) |
(page 14)................................................... |
Confirm/Open |
|
|
(page 26) |
......................... Green button: Zoom: zoom out |
Yellow button: Zoom: Zoom in ......................... |
(page 26) |
(page 31)...................... |
Red button: Music: Screen off/on |
Blue colour button: Short: Set Marker.............. |
(page 26) |
|
|
Long: Show Open Markers............................... |
(page 26) |
(page 24).................................... |
Short: previous chapter. |
Playback.......................................................... |
(page 24) |
(page 24)................................... |
Long: Search backwards |
Short: next chapter .......................................... |
(page 24) |
|
HDMI resolution |
Long: Search forwards ..................................... |
(page 24) |
(page 24)................................................................ |
Pause |
Stop................................................................. |
(page 24) |
3 -
Index of key words
A
Area Code 19
Area Code List 37
Audio 17
Audio channels 25
B
BD-LIVE 21, 28
BD-Storage 22
Blu-ray 7
C
Cabling 10
Cabling AudioVision (other TV sets) 11 Chapter 25
Cleaning 9
Company and editorial details 36 Concealed Set-up 8
Conditions 23 Connecting 10, 11, 23 Connection options 7
D
Device buttons 12
Digital Link HD (HDMI CEC) 13
Digital Sound Formats 25
Disc Languages 15
Disc Menu 26, 27
Disc Playback 25
Display 16
Disposal 33
DivX Registration Code 19, 22
DivX Subtitle 29, 30, 31, 32
DRC 17
DVD button 12
E
Ejecting the Disc 23
Electrical Data 36
Environment 33
F
Factory Set 12, 22
Fast forward 24
File formats supported 36
Film language 25
FM Radio 33
Frame by Frame 24
Freeze Frame 24
Front / Rear View 6
G
Getting Started 2
Glossary 35
H
Handling Discs 23
HDMI CEC 13
HDMI Colour Adjustment 16
HDMI Format 33
Home Menu 14, 15, 29
I
Inserting Discs 23
Intended Use 9
L
Language 15
Language code list 37
M
Mains supply 13
Markers 26
Menu Display 16
Menu Language 14
Music Files 31
N
Navigation in the Menu 15
Network 20
O
Operating Loewe Equipment 12
P
Password 18
Performance 7
Photo Files 32
Picture Mode 27
Playable Discs 23
Playback 24
R
Rating 18, 19
REC button 12
Regional Code 23
Remote Control 3, 12
Repeat 24, 26
Resolution 16, 33
S
Safety 9 Sampling freq. 17
Saving the last disc settings 26 Scope of delivery 8
Search 24 Selecting a Title 25 Service 38
Setting up 8
Setting up the Assist Remote Control 12 Setup Menu 14
Slide show 32 Slow motion 24
Software Updating 33
Sort List of Radio Channels 33 Sound functions 12
Start-up 12, 13 Subtitles 25
Switching on/off 12, 13 Symbols 23
T
Technical speci cations 36
Time 25
Trademark rights 36
TV Aspect Ratio 16
TV button 12
TV input 17
U
USB Operation 30
User Guide 9
V
Video Files 29
Z
Zoom 26
 - 4
- 4
Contents |
|
Getting Started ................................................................ |
2 |
Remote Control Assist – BluTechVision Interactive |
|
Operation......................................................................... |
3 |
Front/Rear View............................................................... |
6 |
Performance .................................................................... |
7 |
Welcome .......................................................................... |
8 |
Scope of delivery........................................................................................... |
8 |
Setting Up..................................................................................................... |
8 |
For your Safety ................................................................ |
9 |
About these operating instructions ............................................................... |
9 |
Connecting up................................................................ |
10 |
Cabling BluTechVision Interactive (from mainframe L271x onwards) ........... |
10 |
Cabling BluTechVision Interactive (other TV/Audio Equipment).................... |
11 |
Start-up.......................................................................... |
12 |
Setting up the Assist Remote Control .......................................................... |
12 |
Setting up the Assist Remote Control .......................................................... |
12 |
Operating Loewe Equipment....................................................................... |
12 |
Connecting to the Mains Supply.................................................................. |
13 |
Switching On/Off......................................................................................... |
13 |
Digital Link HD............................................................................................ |
13 |
Digital Link HD (HDMI CEC)......................................................................... |
13 |
Navigation in the Menu .............................................................................. |
14 |
Home Menu................................................................................................ |
14 |
Setup Menu ................................................................................................ |
14 |
Language Menu.......................................................................................... |
15 |
Menu Display.............................................................................................. |
16 |
Menu Audio................................................................................................ |
17 |
Menu Lock.................................................................................................. |
18 |
Network Menu............................................................................................ |
20 |
Other Menu ................................................................................................ |
22 |
DivX Registration Code ............................................................................... |
22 |
Factory Set.................................................................................................. |
22 |
Playback of Discs........................................................... |
23 |
Conditions .................................................................................................. |
23 |
Playback in General .................................................................................... |
24 |
Disc Playback.............................................................................................. |
25 |
Saving the last disc settings ........................................................................ |
26 |
Disc Menu................................................................................................... |
27 |
Picture Mode .............................................................................................. |
27 |
BD-LIVE ...................................................................................................... |
28 |
Playback of Media Files................................................. |
29 |
Home Menu................................................................................................ |
29 |
Video Files .................................................................................................. |
29 |
USB Operation ............................................................................................ |
30 |
Music Files.................................................................................................. |
31 |
Photo Files.................................................................................................. |
32 |
Other Functions ............................................................. |
33 |
HDMI Format Setup .................................................................................... |
33 |
Software Updating...................................................................................... |
33 |
Environment .................................................................. |
33 |
Environmental Protection............................................................................ |
33 |
Troubleshooting............................................................. |
34 |
Glossary ......................................................................... |
35 |
Technical specifications ................................................. |
36 |
Language code list......................................................... |
37 |
Area Code List ............................................................... |
37 |
Service ........................................................................... |
38 |
5 - 

Front/Rear View
On |
CD/DVD Drive |
Open/Close Disc Drawer |
Display |
Playback / |
Screen Resolution |
Switching Off in Standby |
Disc drawer |
|
Pause Stop |
USB socket |
|
|
|
Operating |
Front ap |
Rewind Fast forward |
display |
(opened) |
IR Receiver |
DIGITAL AUDIO OUT COAXIAL |
HDMI Output |
(digital sound output) |
(HDMI output) |
OUTPUT COMPONENT |
LAN |
(Component TV Output Select) |
(RJ-45 Network Connection) |
|
VIDEO OUT |
|
(TV Output Select) |
|
|
Mains Socket |
2CH AUDIO OUT |
DIGITAL AUDIO OUT |
|
(analogue sound |
OPTICAL |
|
output stereo L/R) |
(optical digital |
|
|
sound output) |
 - 6
- 6
Performance
Your Loewe BluTechVision Interactive offers you comfortable access to your media collection. It plays Blu-ray Discs, Audio CDs and Video DVDs. Digital Video, Photo and Music Files can also be played from USB Sticks and from Data Discs.
Connection options
USB 2.0
HDMI OUT (HDMI output) VIDEO OUT (Video output)
OUTPUT COMPONENT (Components TV Output Select) 2CH AUDIO OUT L/R (analogue sound output stereo L/R) DIGITAL AUDIO OUT - COAXIAL (digital sound output)
DIGITAL AUDIO OUT - OPTICAL (optical digital sound output) LAN (network connection)
Blu-ray/CD/DVD-Player
Playback of Blu-ray discs
Playback from Audio CDs, CD-R and CD-RW Discs Playback from DVD-Video, DVD-ROM and DVD-RW Discs DVD Upscaling (720p/1080p)
Operation using drive buttons on the device and Assist remote control
Media management
Display of album graphics
Music Playback
Playback of MP3, WMA Audio files
Repeating Titles, Tracks or Directories
Random Playback
Video Playback
Playback of DivX(HD) Video Files
Playback of Subtitles
Photo Playback
Playback of JPEG photo files
Slideshow with music
Use with other Loewe system components
Connection of Loewe flat TV sets via Digital Link HD (HDMI CEC) (from mainframe L271x - if necessary, a software update of the TV set must be carried out) and operation only with one Assist remote control - also with the concealed setup of
BluTechVision Interactive.
7 - 
Welcome
Thank you
for choosing a Loewe product. We are happy to welcome you as our customer. At Loewe we combine the highest standards of technology, design and user friendliness. This is equally true of TV, DVD, video, audio and accessories. Neither technology nor design is an end in itself, but both are intended to provide our customers with the best possible audio and visual experience. Our design is not influenced by short-term, fashionable trends. You have, after all, purchased a high-quality piece of equipment which you do not want to tire of tomorrow or the day after.
Scope of delivery
•BluTechVision Interactive
•Assist Remote Control with 2 batteries
•HDMI cable
•Mains cable
•These operating instructions
Setting Up
•Place the device on a stable, level surface.
•Do not set up the unit near strong heat sources or in direct sunlight.
•When setting up in a cupboard or enclosed shelving: Leave at least 2.5 cm of free space around the unit to allow air to circulate freely and to prevent heat accumulation.
•The picture and sound of a TV set, a player or a radio nearby could have their transmissions distorted. If this is the case, do not place the device in the immediate proximity of these devices.
•Set the device up so that the infrared signal of the remote control can directly reach the display of the Player (or, if this is not possible, refer to "Digital Link HD (HDMI CEC)" page 13).
•Do not place any strong artificial light source in front of the unit. This could have a detrimental effect on the infrared reception.
•Incorrect voltages can damage the unit. This unit may only be connected up to an electricity supply with the voltage and frequency stated on the rating plate.
•During thunderstorms, disconnect the mains plug. A voltage surge caused by lightning conducted through the mains could damage the unit.
•If the unit is not to be used for an extended period, the plug should also be disconnected from the mains.
•The mains plug must be easy to reach to ensure that the unit can be disconnected from the mains at any time.
•Position the mains cable in such a way that it can not be damaged. The mains cable may not be bent or laid across sharp edges, walked on or exposed to any chemicals; the latter applies to the whole unit. A mains cable with damaged insulation can cause electric shocks and represents a fire hazard.
•When you want to unplug from the mains, pull on the plug housing rather than on the cable. The cables in the mains plug could otherwise be damaged and could cause a short-circuit when being plugged in again.
Please also read and follow the safety advice on the following pages.
 - 8
- 8

For your Safety
For your safety, and to avoid unnecessary damage to your unit, please read and follow the safety advice below.
Please keep the safety information in a safe place.
Use for the intended purpose and ambient conditions
This unit is intended exclusively for playback of video and audio signals. It is designed for living or office rooms and may not be used in rooms with a high level of humidity (e.g. bathroom, sauna) or a high dust concentration (e.g. workshops).
The terms of the warranty only cover the intended use of the unit.
If the unit is used outdoors, make sure that it is protected from moisture (rain, drips, spray or dew).
High concentrations of moisture and dust lead to creepage current in the unit which can make it dangerous if a live wire is touched or it may cause a fire.
If you have moved the unit out of the cold into a warm environment, leave it switched off for about an hour to avoid the formation of condensation.
Always switch off your system (BluTechVision Interactive, TV set and any other components which may be connected) before connecting or disconnecting other devices or speakers.
Protect your device from:
•Water, dampness, dripping or sprayed water, steam.
•Drips of water and spray
•Knocks and mechanical stress
•Magnetic and electric fields
•Cold, heat, direct sunlight and high temperature fluctuations
•Dust
•Covers that inhibit ventilation
•Interference with the internal workings of the unit
Do not place any burning candles or anything filled with a liquid (such as vases) on the unit.
Do not cover ventilation slits with magazines or blankets. Pay attention for example to curtains etc.
IMPORTANT: TO PREVENT AN ELECTRIC SHOCK, DO NOT REMOVE COVER. THERE ARE NO PARTS INSIDE THE UNIT THAT CAN BE REPAIRED BY THE USER. REPAIRS SHOULD ONLY BE CARRIED OUT BY A LOEWE DEALER.
Only use Original accessories and spare parts from
Loewe.
Supervision
Do not allow children to use the unit/TV set unsupervised. Do not allow children to play in the immediate vicinity of the unit/TV set. Do not operate your BluTechVision Interactive without supervision. Please disconnect from the mains if you are going to be away for a long time.
Cleaning
Only clean your unit with a slightly damp, soft, clean cloth (without any aggressive or scouring cleaning agents).
About these operating instructions
The information in this guide refers to the Loewe product BluTechVision Interactive.
Unless stated otherwise, the instructions refer to the operating elements on the Assist remote control.
Paragraphs beginning with the symbol indicate important hints, tips or conditions for perfect operation.
Terms which you will find in the menu or printed on the unit are printed in bold type.
In the functional descriptions, the necessary operating elements are arranged to the left of the text containing the handling instructions.
The diagrams in these operating instructions are only by way of example. This may vary from the actual display you see.
9 - 
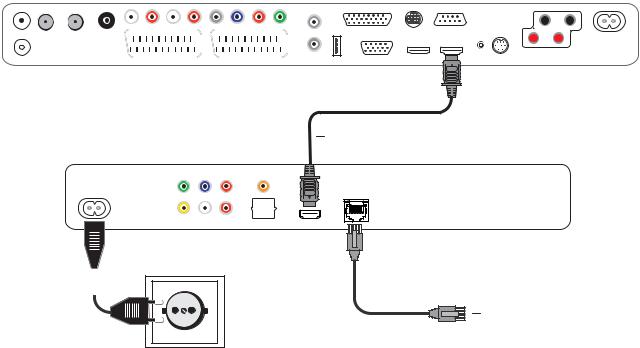
Connecting up
Cabling BluTechVision Interactive (from mainframe L271x onwards)
Use the HDMI cable supplied to connect the socket HDMI OUT on the BluTechVision Interactive with the socket HDMI IN on your TV set.
Using an optional RJ-45 network cable of the BluTechVision Interactive to a network connection (e.g. Switch or DSL Router) with a connection to the internet. Plug the small connector of the mains cable into the socket behind the unit (page 6) and then plug in the large connector of the mains cable into a 220-240 V 50/60 Hz mains socket.
It is possible that your Loewe TV set may need a software update. Please contact your specialist retailer.
Loewe Flat TV set (from L271x)
HDMI cable
BluTechVision Interactive
Mains cable 

Network Cable
 - 10
- 10
Connecting up
Cabling BluTechVision Interactive
(other TV/Audio Equipment)
Use the HDMI cable supplied to connect the socket HDMI OUT on the BluTechVision Interactive with the socket HDMI IN on your TV set.
If your TV set does not have an HDMI IN socket, then connect the three OUTPUT COMPONENT sockets on the BluTechVision Interactive using three videocompatible cinch cables to the sockets COMPONENT IN on your TV set.
You can also make a connection to a TV set using a video-compatible cinch cable via the VIDEO OUT socket.
Using an optional RJ-45 network cable of the BluTechVision Interactive to a network connection (e.g. Switch or DSL Router) with a connection to the internet.
TV set
Component Video Cable
BluTechVision Interactive
In order to play the audio of the BluTechVision Interactive using your TV set (without HDMI) or your audio equipment, you need to make an audio connection between the audio equipment and the BluTechVision Interactive. It is preferable to use an optional, digitally compatible audio cinch cable and to connect it to the DIGITAL AUDIO OUT COAXIAL socket.If your audio equipment has an optical digital input (TOSLINK), you can also make the connection with an optional fibreoptic cable using the socket DIGITAL AUDIO OUT OPTICAL.
Alternatively, you can feed your audio equipment with the stereo audio signal from the BluTechVision Interactive using an optional stereo cinch cable with the sockets 2CH AUDIO OUT on your BluTechVision Interactive.
Plug the small connector of the mains cable into the socket behind the unit (page 6) and then plug in the large connector of the mains cable into a 220-240 V 50/60 Hz mains socket.

 Digital Audio
HDMI cable
Mains cable 

Network Cable
11 - 
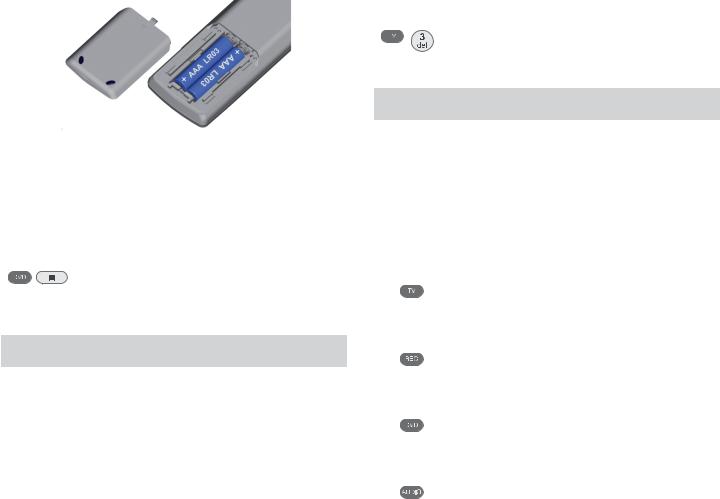
Start-up
Setting up the Assist Remote Control
To insert or change the batteries, press on the arrow. While doing so, simply slide the battery compartment lid down and remove it. Insert alkali manganese batteries LR 03 (AAA) and ensure the correct position of + and –. Slide the cover on again from the bottom.
Setting up the Assist Remote Control
Other Devices
You can operate various Loewe devices using the Assist Remote Control. The device buttons REC - DVD - AUDIO can be set up for this.
Press the required device buttons and the Stop button simultaneously for 5 sec. until the corresponding LED display flashes twice.
Then select the two-digit device code from the table:
Unit |
Code |
Factory Set |
|
|
|
Loewe ViewVision 8106 H |
10 |
|
|
|
|
Loewe ViewVision, Centros 21x2 |
12 |
|
|
|
|
Loewe ViewVision DR+ DVB-T |
13 |
REC |
|
|
|
Loewe Auro 2216 PS/8116 DT |
14 |
|
|
|
|
Loewe BlutechVision |
15 |
|
|
|
|
Loewe Sound Projector |
17 |
|
|
|
|
Loewe TV Radio digital |
19 |
AUDIO |
|
|
|
Loewe Mediacenter |
20 |
|
|
|
|
Loewe BlutechVision Interactive |
21 |
DVD |
|
|
|
HDMI CEC Mode |
22 |
|
|
|
|
Loewe Sound Projector 2 |
23 |
|
|
|
|
Loewe AudioVision |
24 |
|
|
|
|
Reset to Factory Set |
99 |
|
|
|
|
The corresponding LED Display flashes twice.
Sound functions
It can be set on which devices the buttons with the sound functions (V+/-, sound off and sound mode) should work.
Press the device button TV and at the same time the button with the single digit function code from the list for 5 sec. until the LED Display flashes twice.
Function |
Code |
Figure |
|
|
|
Loewe AudioVision |
3 |
Page 11 |
|
|
|
Loewe Mediacenter |
4 |
|
|
|
|
Loewe TV |
5 |
Page 10 |
|
|
|
Loewe Sound Projector |
6 |
|
|
|
|
Factory Set |
|
|
from mainframe L271x, Software V9.2
Operating Loewe Equipment
Using the remote control for a Loewe TV set
Press TV button; the LED Display above it lights up for approx. 5 seconds
Using the remote control for a Loewe recorder
Press the REC button; the LED Display above it lights up for approx. 5 seconds
Using the remote control for BluTechVision Interactive
Press the DVD button; the LED Display above it lights up for approx. 5 seconds
Using the remote control for AudioVision
Press the AUDIO button; the LED Display above it lights up for approx. 5 seconds
Every time a button is pressed, the LED display lights up for the selected operating mode for checking purposes (TV – REC – DVD – AUDIO).
Please refer to the respective operating conditions on how to operate the individual devices.
 - 12
- 12
 Loading...