


Model |
V-CP943**/V-CP953**/V-CP963** /V-CP973** |
|
|
Language |
English / Hungarian/ Bulgaria/ Romanian/ Czech / Polish |
||
Page |
25 |
Color(cover/body) |
1/1 |
Material |
Weight 100g |
Size(W*H) |
150×220(mm) |
Date |
2006.04.12 |
Designer |
geyang |
Part No |
38288I2001N |
Description |
Owners Manual |
Chage Record
No. |
Change content |
ECO No. |
Date Designer Confirm |
1 . |
|
|
|
2 |
|
|
|
3
4
5
6
7
8
9

V-CP943N***/S*** V-CP953N***/S*** V-CP963N***/S*** V-CP973N***/S*** VTCP943N***/S*** VTCP953N***/S*** VTCP963N***/S*** VTCP973N***/S***

- 2 -
2
1
3 |
7 |
8 |
 9
9
4 |
15 |
|
16 |
|
26 |
|
12 |
6 |
5 |
9 |
|
10 |
11 |
14 |
13 |
|
17 |
18 |
|
19
20 |
22 |
|
21
24 |
25 |
|
23
27 |
29 |
28 |
|
|
- 3 - |

32 31
30
33 |
33 |
34 32
35 |
32 |
32
35
32 21
35
- 4 -

 E
E
- 5 -
E 
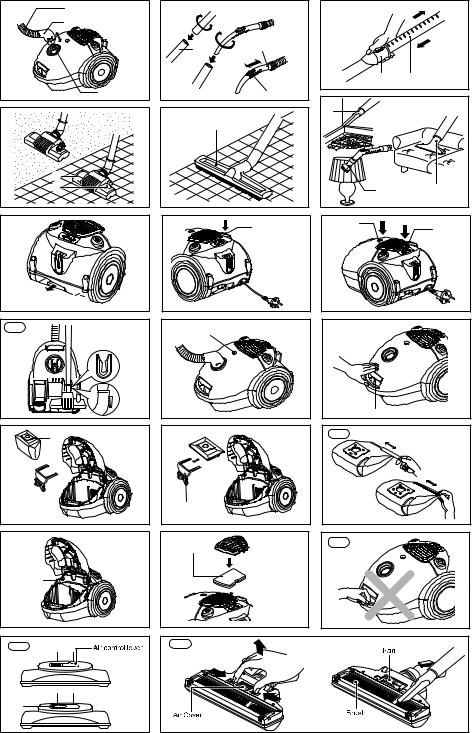
 Hard floor Nozzle(26)
Efficient cleaning of hard floors (wood, linoleum,etc.)
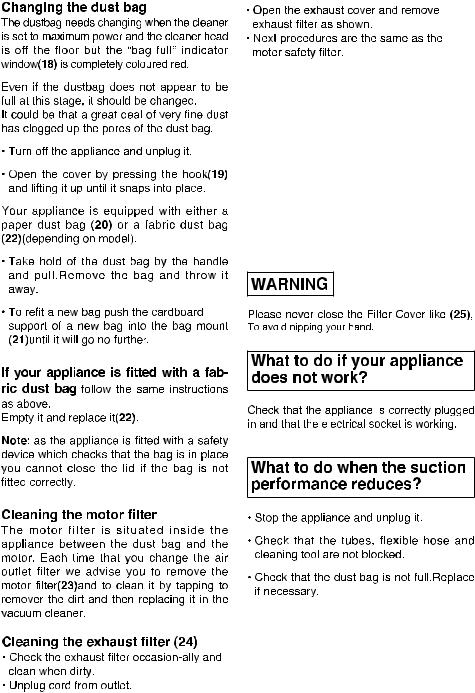
• Turbine brush nozzle (27)
- Air adjustment (28)
Slide the air control lever to the right for long pile carpet and to the left for short pile carpet.
- Cleaning turbine brush nozzle (29)
Press the button on the rear side of the nozzle to separate the air cover.
Use the dusting brush & crevice tool to vacuum clean the brush and fan.
- 6 -

 E
E
CLEANING THE DUST TANK AND FILTER ASSEMBLY
For best cleaning results, the dust tank should be cleaned often.
1.Unplug cord from wall outlet.
2.Pull lid release out and up, then lift filter cover.
3.Pull the dust tank assembly (30) up.
4.Push the release lever (31) of the filter assembly (32) and pull it out of the dust tank (33).
5.Wash the dust tank with sponge or soft cloth under cold running water.
6.Brush (34) is for cleaning the filter assembly(32). It is on the back of the filter assembly.
7.Pull the filter supporter (35) down from the filter assembly (32).
8.Clean the filter assembly (32) and the filter supporter (35) with the brush under cold running water.
Do not use detergent or wash in washing machine or dishwasher.
9.Allow the filter assembly (32) and filter supporter (35)to dry in shaded location for
a day.
Do not tumble or spin dry, nor microwave or place in oven or in path of direct heat. Ensure both the filter and filter supporter are completely dry before placing it back into the vacuum.
HOW TO FIT THE BAG MOUNT AND THE DUST BAG
If you want to use a dust bag instead of the dust tank, please:
1.Unplug cord from wall outlet.
2.Pull the cover release out and up, then lift canister hood.
3.Pull the dust tank assembly (30) up. 4.Fit the bag mount (21) with the spring, ensure the bosses on both sides of the bag mount into the slots near the handle
on the base.
5.To fit a bag push the cardboard support of a new bag into the bag mount until it will go no further
- 7 -
 Loading...