


 Loading...
ENGLISH
USER GUIDE
Copyright ©2019 LG Electronics Inc. All rights reserved.
MFL71461601 (1.0) |
www.lg.com |

Important Customer Information 1
Before you begin using your new phone
Included in the box with your phone are separate information leaflets. These leaflets provide you with important information regarding your new device. Please read all of the information provided. This information will help you to get the most out of your phone, reduce the risk of injury, avoid damage to your device, and make you aware of legal regulations regarding the use of this device.
It’s important to review the Product Safety and Warranty Information guide before you begin using your new phone. Please follow all of the product safety and operating instructions and retain them for future reference. Observe all warnings to reduce the risk of injury, damage, and legal liabilities.

2 Table of Contents
Important Customer Information............................................... |
1 |
Table of Contents........................................................................ |
2 |
Feature Highlight......................................................................... |
5 |
Camera features................................................................................................... |
5 |
Sound quality and effects................................................................................... |
19 |
Floating Bar......................................................................................................... |
20 |
Google Assistant.................................................................................................. |
21 |
Face Recognition................................................................................................ |
22 |
Fingerprint recognition....................................................................................... |
24 |
Always-on display............................................................................................... |
27 |
Notes on Water Resistant Properties................................................................ |
28 |
The Basics................................................................................ |
30 |
Phone Overview.................................................................................................. |
30 |
Installing the SIM card and memory card........................................................ |
34 |
Removing the memory card.............................................................................. |
35 |
Charging Your Phone.......................................................................................... |
36 |
Turning Your Phone On and Off........................................................................ |
39 |
Touch Screen....................................................................................................... |
40 |
Getting to Know the Home Screen................................................................... |
43 |
Setting Your Lock Screen................................................................................... |
52 |
Memory card encryption.................................................................................... |
55 |
Entering text........................................................................................................ |
56 |
Capturing a Screenshot...................................................................................... |
61 |
Content sharing................................................................................................... |
61 |

Table of Contents 3
Useful App................................................................................ |
63 |
App Shortcuts..................................................................................................... |
63 |
Audio recording features................................................................................... |
64 |
Calculator............................................................................................................ |
65 |
Calendar.............................................................................................................. |
65 |
Camera................................................................................................................ |
67 |
Clock.................................................................................................................... |
89 |
Contacts................................................................................................................ |
91 |
File Manager........................................................................................................ |
96 |
Gallery.................................................................................................................. |
97 |
Game Launcher................................................................................................. |
100 |
LG Health........................................................................................................... |
100 |
Messaging......................................................................................................... |
102 |
Music.................................................................................................................. |
105 |
Multi-tasking feature......................................................................................... |
107 |
Phone................................................................................................................. |
109 |
QuickMemo+...................................................................................................... |
115 |
Voicemail............................................................................................................. |
117 |
Google Apps....................................................................................................... |
118 |
Settings.................................................................................... |
120 |
Settings.............................................................................................................. |
120 |
Network & internet........................................................................................... |
120 |
Connected devices........................................................................................... |
126 |
Sound................................................................................................................. |
130 |
Display................................................................................................................ |
131 |
Lock screen & security..................................................................................... |
134 |
Extensions......................................................................................................... |
138 |
Apps & notifications......................................................................................... |
140 |
Battery............................................................................................................... |
140 |
Storage............................................................................................................... |
141 |
Accounts............................................................................................................. |
141 |
Accessibility....................................................................................................... |
142 |
Google................................................................................................................ |
145 |
System............................................................................................................... |
145 |
System updates................................................................................................. |
147 |

4 Table of Contents
Appendix.................................................................................. |
148 |
Phone software update.................................................................................... |
148 |
Anti-Theft Guide............................................................................................... |
149 |
Open Source Software Notice Information.................................................... |
149 |
Regulatory Information (FCC ID number, etc.).............................................. |
150 |
Trademarks........................................................................................................ |
150 |
Laser Safety Statement.................................................................................... |
151 |
More information............................................................................................... |
151 |
Safety....................................................................................... |
153 |
Safety Information............................................................................................ |
153 |
Consumer Information about Radio Frequency Emissions.......................... |
154 |
Consumer Information on SAR........................................................................ |
157 |
FCC Hearing-Aid Compatibility (HAC) Regulations for Wireless Devices. 159 |
|
Caution! Avoid Potential Hearing Loss............................................................ |
161 |
TIA Safety Information.................................................................................... |
162 |
Part 15.19 Statement........................................................................................ |
165 |
Part 15.21 Statement........................................................................................ |
165 |
Part 15.105 Statement..................................................................................... |
165 |
Safety Information............................................................................................ |
166 |
FDA Consumer Update..................................................................................... |
171 |
LIMITED WARRANTY - USA ............................................... |
183 |

Feature Highlight 5
Camera features
Studio
You can create studio level photos by using Spotlight and Backdrop features in the camera.
Spotlight
You can apply various lighting effects while taking photos.
1.Tap  Home >
  Camera, then tap Studio.
2.Tap 
 Spotlight to select a lighting effect.
Spotlight icon
Spotlight options
3.Tap the desired lighting effect icon.
4.When Studio effect is available. appears on the screen, tap  Capture to take a photo.
The Studio feature may not work if the camera cannot recognize the subject.
6Feature Highlight
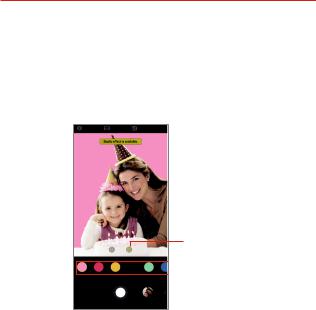
Backdrop
You can apply various effects for background while taking portrait photos.
1.Tap  Home >
  Camera, then tap Studio.
2.Tap  Backdrop to select a backdrop effect.
3.Select a background color you want to apply.
Backdrop icon
 Background colors
Feature Highlight 7
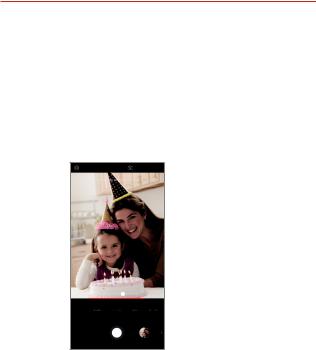
Portrait
You can create an artistic portrait photo, whereby the subject is in focus and the background is blurred. You can also edit the image by applying lighting or color effect to the background.
NOTES • While taking a photo, keep the distance to your subject to 1.3 ~ 5 feet.
•This feature is not available if the surroundings are too dark.
1.Tap  Home >
  Camera, and tap Portrait.
2.Drag the slide bar to the left or right to adjust the blur strength.

 Adjust blur strength.
3.When Portrait is available. appears on the screen, tap  Capture to take a photo.
The Portrait feature may not work if the camera cannot recognize the subject.
8Feature Highlight
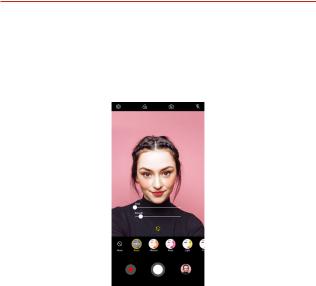
Makeup Pro
While taking selfies, you can apply various makeup techniques.
When using the front camera, adjust the skin tone and apply eye and lip makeups.
1.Tap  Home >
  Camera, switch to the front camera, then tap
Makeup Pro.
2.Select a desired makeup option, then drag the slide bar to the left or right to adjust the effect.
When you select None, the slide bar disappears.
3.Tap  Capture to take a photo.
Feature Highlight 9
Triple cameras
The triple cameras, which are located on the back of the device, allow you to take photos or record videos with three different angles of view.
Tap  Home >
  Camera, and select
 Telephoto /
 Standard-Angle
/ Super Wide-Angle while taking photos or recording videos with the rear camera.
Standard-Angle
Telephoto |
Super Wide-Angle |
Rear Camera
10Feature Highlight
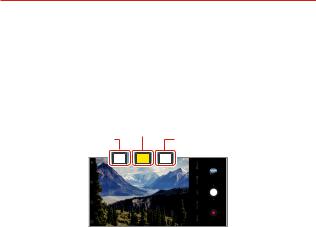
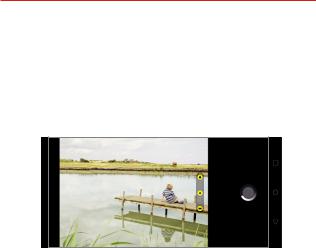
Triple Preview
You can preview images of different angles taken by the triple cameras and select a desired angle to take a photo or record a video.
1.Before taking a photo, touch and hold a camera view icon to display preview icons of the three angles on the right.
The screen displays the preview image of the selected angle of view.
2.After selecting a desired angle, tap  Capture or
  Record to take a photo or record a video.
Select preview
icon.
Telephoto view |
Standard-Angle view |
Super Wide-Angle view |
NOTE This feature is available only in the Auto mode and AI Cam.
Feature Highlight 11
Triple shot
This feature allows you to take a series of photos with different angles of view and save them as a video with slide effect.
1.Tap  Home >
  Camera, then tap More >
  Triple shot.
2.Tap  Capture to take a photo.
The triple cameras take photos automatically in sequence.
The triple shot video is automatically saved in Gallery. Tap  Effect and select a desired effect to save as a video.
NOTE While taking a photo, hold the device steady until all 3 photos have been taken.
12Feature Highlight
AR features
You can use various AR (Augmented Reality) features with the Camera app.
You can create your own My Avatar, AR Emoji, or AR Sticker for rich content. My Avatar helps you create a cartoon version of yourself and customize it. AR Emoji help you create 3D animated animal emojis that mimic facial expression. AR Sticker allows you to choose from several different stickers to use on a photo or video while facing your camera.
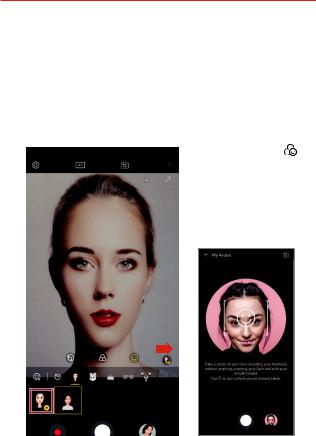
Creating My Avatar
1.Tap  Home >
  Camera, switch to the front camera, then tap
Camera effect >  AR features.
2.Tap  My Avatar >
  Create your own avatar to take a photo.
Follow the on-screen instructions to align your face on the screen.
To make My Avatar by using one of the saved photos from Gallery, tap
 Gallery.
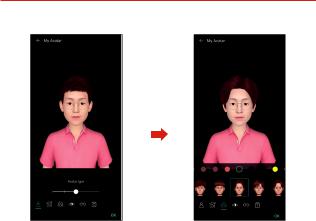
3.Select My Avatar's gender and select details including avatar type, skin tone, hairstyle, and clothes, then tap OK.
Feature Highlight 13
Taken photos are saved in Gallery.

14 Feature Highlight
Creating My Avatar, AR Emoji, AR Sticker
1.Tap  Home >
  Camera, switch to the front camera, then tap
Camera effect >  AR features.
2.Select an option you want to record.
My Avatar |
AR Emoji |
AR Sticker |
3.To take a photo, tap  Capture. To record a video, tap
  Record.Taken photos are saved in Gallery.
Feature Highlight 15
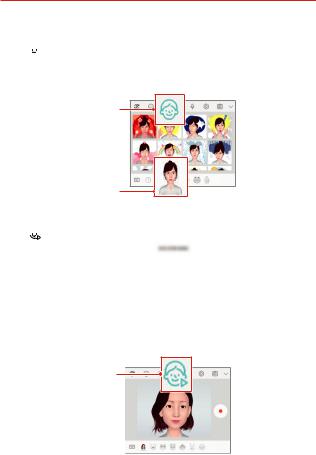
Using Avatar Stickers
1.Tap  Avatar Sticker on the LG Keyboard.
2.Select the desired Avatar Sticker.
Avatar
Sticker icon.
Select My
Avatar.
Using Ani Sticker
1.Tap 
 Ani Sticker on the LG Keyboard.
2.Select the desired My Avatar.
3.Tap  Record to record voice and video, and then tap
  Stop to save.
Ani Stickers with various facial expressions, motions, and voices are created.
4.Tap  Upload to upload Ani Sticker.
Tap  Play to preview the created Ani Sticker.
Select an
Ani Sticker.

16Feature Highlight
AI CAM
You can use the AI Cam feature to automatically recognize the object when taking a photo or recording a video for an optimal quality.
1.Tap  Home >
  Camera, then tap AI CAM.
2.When the object is recognized, the best effect for the scene is applied.
To apply other effects, tap the scene icon.
A wide range of categories, such as portrait, animals, food, sunrise, sunset, landscape, sky, beach, babies, flowers and text, can be recognized automatically.
NOTE The result of the scene recognition may differ depending on the illumination or the location of the subject while taking photos. Keywords do not appear on the actual photos or videos.
Feature Highlight 17
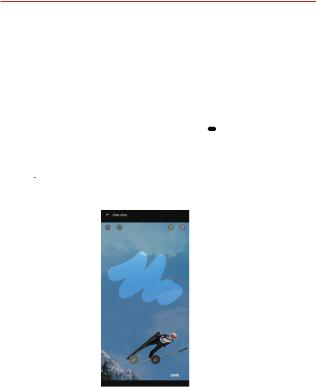
Cine shot
You can record a moment and make a video with only a part of the scene in motion.
While recording a video, hold the device steady. After recorded, rub the area in the video you want in motion. The selected area starts moving and the rest of the video remains still.
1.Tap  Home >
  Camera, then tap More >
  Cine shot.
2.Tap  Record to record a 3 second video.
Hold the device steady while recording the video.
3.Tap  Edit and rub the area you want in motion with the cine shot effect.
Undo |
|
|
|
|
Play forward and |
||
|
|
||||||
Redo |
|
|
|
|
|
|
backward repeatedly. |
|
|
|
|
Play forward |
|||
|
|
|
|
|
|
|
|
|
|
|
|
|
|
|
|
|
|
|
|
|
|
|
repeatedly. |
Select the area to |
|
|
|
Erase the selected area. |
|
|
|||
move. |
|
|
||
Tap  Erase to erase the selected area.
Tap  Loops forward to play the selected area in motion forward repeatedly.
Tap  Loops back and forth to play the selected area in motion forward and backward repeatedly.
4.Tap SAVE.
The selected area will be in motion.

18Feature Highlight
Cine Video
You can record a movie-like video.
1.Tap  Home >
  Camera.
2.Tap More >  Cine Video.
3.Tap  Record to record a video.

 Point Zoom: Record a video by selecting the point zoom feature to zoom in/out around a specific area.

 Filter: Select an effect to apply to the recording. You can also adjust the vignette and strength for each Cine effect. This feature cannot be changed after you have started recording.
NOTES • The Point Zoom feature supports a zoom speed of up to 3x.
• This feature only supports video recordings in standard angle.

Feature Highlight 19
Graphy
You can adjust the white balance, ISO and shutter speed referring to the recommended images.
1.Tap  Home >
  Camera.
2.Tap Manual Camera.
3.Tap  Settings and then tap
  Graphy photos to activate the feature.
4.Tap  Graphy and select the desired scene from the recommended images.
5.Tap  Capture to take a photo.
NOTES • This feature is available only in the Manual camera mode.
•You can add more scenes by tapping  Add and downloading the Graphy app from Play Store. You may be charged for data usage, depending on your pricing plan.
Sound quality and effects
DTS:X 3D Surround
You can play a song or video in three-dimensional, immersive and vivid sound. Connect to an earphone, speaker or other external audio devices to use this feature.
Tap  Home >
  Settings > Sound > Sound quality and effects, then tap DTS:X 3D Surround,
  ON/OFF to activate this feature.
Adjusting the sound direction
You can adjust the sound direction as desired.
1.Tap  Home >
  Settings > Sound > Sound quality and effects > DTS:X 3D Surround.
2.Select the desired sound direction.
20 Feature Highlight
Floating Bar
Floating Bar overview
You can access frequently used features, including Shortcuts, Screen capture, Music player, and Quick contacts by touching and swiping the floating bar on the screen.
To enable the floating bar, tap  Home >
  Settings > Extensions > Floating Bar and then tap
  ON/OFF on the top of the screen.
Opening and closing the floating bar
To open the floating bar: Tap  View all or
  View all.
To close the floating bar: Tap  Fold or
  Fold.
Fold.

 Floating Bar
Tobar.access the rest of the bar options, swipe left or right on the floating
Moving the floating bar position
You can set the area in which the floating bar can move or be pinned. In the
Floating Bar menu, tap Position, then select from Right and left edges, Right edge, Left edge and Pin current position.

Feature Highlight 21
Google Assistant
Google Assistant overview
You can launch or use desired apps with your voice.
NOTE |
To use this feature, first connect to the network and sign in to your Google Account. |
Sign in
1.Press and hold  Home from the Home screen to launch Google Assistant.
2.Tap GET STARTED.
3.Follow the on-screen instructions and say “Ok Google”.
The device saves your voice data for recognition.
4.Select whether to use voice recognition unlock feature.
When this feature is activated, you can unlock the screen by saying “Ok Google” while the screen is turned off or unlocked.
NOTES • This feature may be more vulnerable to security than the other screen locks, such as Knock Code, Pattern, PIN, and Password. When a similar voice or your recorded voice is used, the screen may be unlocked.
•To use this feature, tap  Home >
  Settings > Lock screen & security > Secure lock settings > Smart Lock, and then use the screen lock method you set to unlock the
device. Tap Voice Match > Unlock with Voice Match, and tap  ON/OFF, then enter the currently used unlock method again. Note that Swipe is excluded.
•You need to unlock the device by using the specified method after failing to unlock the device with voice recognition. See Setting a Screen Lock for details.
5.Tap Save.
Launching Google Assistant
1.Touch and hold  Home on the Home screen. or
Press the Google Assistant key on the left side of the device. or
Say “Ok Google” when the screen is turned off or locked.
2.Say a command or question when you see 
 on the bottom of the screen.
NOTE |
Voice recognition accuracy may decrease if you speak with an unclear voice or in a |
|
noisy place. When you use the voice recognition feature, increase its accuracy by |
|
speaking with a clear voice in a quiet place. |

22 Feature Highlight
Face Recognition
Face Recognition overview
You can unlock the screen with your face by using the Face Recognition feature.
NOTES • This feature may be more vulnerable to security than the other screen locks, such as Knock Code, Pattern, PIN, and Password.
•When a similar face such as a twin is used, the device may recognize it as the registered user and may be unlocked.
•The recognized facial data is securely stored in your device.
•If the device cannot detect your face, or you forget the screen lock set for your device, visit the nearest LG Customer Service Center with your device and ID card.
Precautions for Face Recognition
Face recognition accuracy may decrease in the following cases. To increase its accuracy, check the following before using the device.
When your face is covered with a hat, eyeglasses, sunglasses, or mask, or your face is significantly different due to heavy makeup or beard.
When there are fingerprints or foreign substances on the front of the camera lens, or your device cannot detect your face due to an exceedingly bright or dark condition.
Registering facial data
Before using the Face Recognition feature, register your facial data on your device.
1.Tap  Home >
  Settings > Lock screen & security > Face Recognition.
NOTES • To use this feature, the screen lock must be set with a Knock Code, Pattern, PIN, or Password.
•When the screen lock is not set, register the data by following the on-screen instructions. See Setting a Screen Lock for details.
2.Tap NEXT and unlock the device according to the specified method.
3.Tap START and raise your device in the front of your eyes.
Register your face in a room that is not too bright or dark.
Hold the device in the distance of 10-20 inches from your face.

Feature Highlight 23
Position your entire face inside the guideline on the screen, and then move your head slowly in a circle while looking at the screen.
Keep still while registering your face. You can improve recognition rate by taking steady photos multiple times.
NOTE |
Only one face can be registered at a time. |
4. When the face registration is done, tap OK.
Unlocking the screen with your face
You can unlock the screen with your face instead of a Knock Code, Pattern, PIN, or Password.
1.Tap  Home >
  Settings > Lock screen & security > Select screen lock.
2.Unlock the screen according to the specified method.
3.Tap Allow Face recognition >  On/Off to unlock the screen with your face.
Face Recognition options
You can customize Face Recognition options.
1.Tap  Home >
  Settings > Lock screen & security > Face Recognition.
2.Customize the following settings:
Improve face recognition: You can add facial data in various conditions to improve face recognition.
Delete face: You can delete the registered facial data and register it again if the face recognition does not work properly.
Allow when screen is off: You can wake your phone and then use
Face Recognition by raising the phone when the screen is off.
Swipe to unlock after face recognized: After your device recognizes your face, you must swipe the screen to unlock it.
Advanced face recognition: Allows you to unlock only when the eyes are open.

24 Feature Highlight
Fingerprint recognition
Fingerprint recognition overview
You must register your fingerprint on your device first before using the fingerprint recognition function.
You can use the fingerprint recognition function in the following cases:
To unlock the screen.
To view locked contents in Gallery or QuickMemo+.
Confirm a purchase by signing in to an app or identifying yourself with your fingerprint.
NOTE Your fingerprint can be used by the device for user identification. Very similar fingerprints from different users may be recognized by the fingerprint sensor as the same fingerprint.
Precautions for fingerprint recognition
Fingerprint recognition accuracy may decrease due to a number of reasons. To maximize the recognition accuracy, check the following before using the device.
Ensure that the fingerprint sensor is not damaged by a metallic object, such as coin or key.
When water, dust or other foreign substance is on the fingerprint sensor or your finger, the fingerprint registration or recognition may not work. Clean and dry your finger before having the fingerprint recognized.
A fingerprint may not be recognized properly if the surface of your finger has a scar or is not smooth due to being soaked in water.
If you bend your finger or use the fingertip only, your fingerprint may not be recognized. Make sure that your finger covers the entire surface of the fingerprint sensor.
Scan only one finger for each registration. Scanning more than one finger may affect fingerprint registration and recognition.
The device may generate static electricity if the surrounding air is dry. If the surrounding air is dry, avoid scanning fingerprints, or touch a metallic object such as coin or key before scanning fingerprints to remove static electricity.

Feature Highlight 25
Registering fingerprints
You can register and save your fingerprint on the device to use fingerprint identification.
1. Tap  Home >
  Settings > Lock screen & security > Fingerprints.
NOTES • This feature is available only when the screen lock is set.
- Lock the device with a Knock Code, Pattern, PIN or Password.
•If the screen lock is not set, enable it by following the on-screen instructions. See
Setting a Screen Lock for details.
2.Locate the fingerprint sensor on the back of the device and gently put your finger on it to register the fingerprint.
NOTES • Gently press the fingerprint sensor so that the sensor can recognize your fingerprint.
• Ensure that your fingertip covers the entire surface of the sensor.
3.Follow the on-screen instructions.
Repeat scanning the fingerprint by moving your finger little by little until the fingerprint is registered.
4.When the fingerprint registration is done, tap OK.
Tap ADD MORE to register another fingerprint. If you register only one fingerprint and the corresponding finger is not in a good condition, the fingerprint recognition may not work well. As a preventative measure, register multiple fingerprints.

26Feature Highlight
Managing fingerprints
You can edit or delete registered fingerprints.
1.Tap  Home >
  Settings > Lock screen & security > Fingerprints.
2.Unlock according to the specified lock method.
3.From the fingerprint list, tap a fingerprint to rename it. To delete it, tap  Delete.
Unlocking the screen with a fingerprint
You can unlock the screen or view locked content by using your fingerprint. Activate the desired function:
1.Tap  Home >
  Settings > Lock screen & security > Fingerprints.
2.Unlock according to the specified lock method.
3.On the fingerprint settings screen, activate the desired function:
Screen lock: Unlock the screen with a fingerprint.
Content lock: Access locked contents in Gallery and QuickMemo+ with a fingerprint.

Feature Highlight 27
Always-on display
You can view the date, time or signature when the main screen is turned off.
Swipe the bottom of the Always-on display screen to access features including Camera, Capture+, Wi-Fi, sound settings, Bluetooth®, Flash, Music and more.
1.Tap  Home >
  Settings > Display > Always-on display.
2.Select the image you want to display and tap SAVE.
Tap the desired image among Digital clock, Analog clock, Dual clock,
Signature, Calendar, and Image.
Tap Quick tools & music player  ON/OFF to swipe over the status icons for Quick tools and the music player.
Tap AI Pick  ON/OFF to see useful information provided based on
Context Awareness.
To set the time period not to activate Always-on display feature, tap
Daily timeout.
To enhance brightness for the Always-on display feature, tap Brighter display.
NOTES • The battery may drain faster when you use Always-on display. Turn this feature off to save battery power.
•To deactivate Always-on display feature, tap  Home > Settings > Display >
Always-on display, and then tap  .
.

28 Feature Highlight
Notes on Water Resistant Properties
This product is water and dust resistant in compliance with the Ingress Protection rating IP68.
Your product has undergone testing in a controlled environment and is proven to be water and dust resistant in certain circumstances (meets the requirements of classification IP68 as described by the international standard IEC 60529 - Degrees of Protection provided by Enclosures [IP Code]; test conditions: 15-35 °C/59-95 °F, 86-106 kPa, 1.5 meters, for 30 minutes).
Do not expose the device in conditions that are different from the test conditions. Results may vary in actual use.
 WARNING
Despite a rating of IP68, your device is not impervious to conditions not tested in LG’s controlled environment. Please note that any damages that occur due to such causes changes the color of the LDI (Liquid Damage
Indicator). If the color of LDI located inside the product changes, the product may be considered ineligible for any free-of-charge repair services provided under the product’s limited warranty.
Avoid excessive dust or moisture as it may cause damages to the LDI or other internally sealed components and therefore may render your product ineligible for repair services provided under the product’s limited warranty. Do not use the product in the following environments.
Do not immerse the product in any liquid chemicals (soap, etc.).
Do not immerse the product in salt water, including seawater.
Do not immerse the product in a hot spring.
Do not swim with this product.

Feature Highlight 29
Do not place the product directly on sand (e.g. beach) or mud.
Do not immerse your product in water deeper than 1.5 meters for longer than 30 minutes.
•If your product becomes wet, be sure to wipe the microphone, speaker, and stereo jack with a dry cloth before use.
•Should your product or your hands become wet, dry them before handling the product.
•Do not use the product in places where it may be sprayed with high pressure water (e.g. near a faucet or shower head) or submerge it in water for extended periods of time, as the product is not designed to withstand high water pressure.
•The product’s water and dust resistant features may be damaged by dropping or receiving an impact.
•If the product gets wet, use a clean, soft cloth to dry it thoroughly.
•The touch screen and other features may not work properly if the device is used while wet.
•Your product is water resistant only when the SIM/Memory card tray is properly inserted into the product.
•Do not open or close the SIM/Memory card tray while the product is wet or immersed in water. Exposing the open tray to water or moisture may damage the product.
•The SIM/Memory card tray contains rubber [packing] to help prevent dust, water, or moisture from entering the product. Do not damage the rubber [packing] as this may allow dust, water, or moisture to enter your product and cause damage.
NOTE Failure to follow the provided instructions may invalidate your device’s limited warranty.
Loading...