


(Option)
(Option)
- 2 -

12 |
17 |
14 |
13 |
|
|
|
18 |
15
16
19
20 |
23 |
21 |
24 |
- 3 -
22
25 |
E 
Information for your safety
Please read all the following information, which contains important instructions for the safety, the use and the maintenance of the appliance.
This appliance complies with the following EC Directives: -73/23/EEC, 93/68/EEC-Low Voltage Directive-89/336EEC -EMC Directive.
 Never allow children to use the appliance unsupervised.
 Do not use the appliance If the supply cord is damaged or faulty.
 If the mains lead is damaged, it must be replaced by an approved LG Electronics Service Agent in order to avoid a hazard.
 Always switch the vaccum cleaner off before :
•changing the dust bag.
•changing or cleaning the filters.
 If no dustbag is inserted, the cover cannot be closed. Please do not use force!
 Do not vacuum flammable or explosive substances(liquids or gases).
 Do not vacuum hot ash, embers etc. nor sharp objects.
 Do not vacuum water or other liquids.
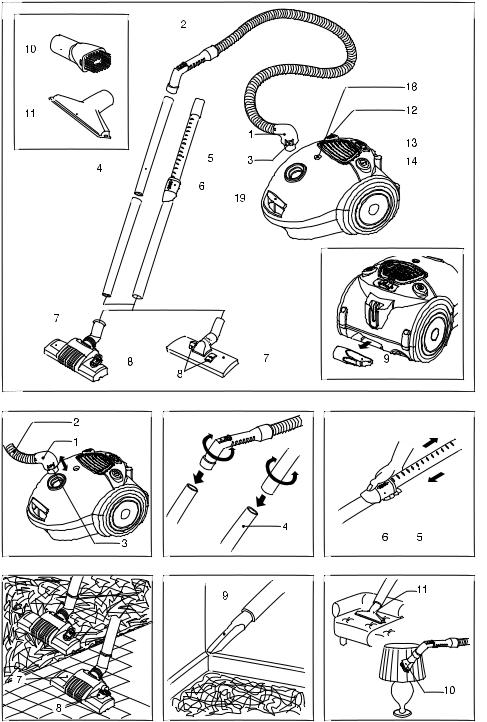
How to Use
Connecting the flexible hose
Push the end of the head (1) on the flexible hose(2) into the attachment point on the vacuum cleaner.
To remove the flexible hose from the vacuum cleaner, press on the button (3) situated on the head, then pull upwards.
Assembling the tubes
(depending on model)
•Metal(or Plastic) Pipe(4)
-Fit together the two tubes by twisting
slightly.
•Telescopic tube(5)
-Push spring latch(6) forward.
-Pull out tube to required length.
-Release spring latch to lock.
Using the cleaning head and Accessory Nozzles (depending on model)
Fit the large cleaning head onto the end of the tube.
•The 2 position head(7) is equipped with a pedal(8) which allows you to alter its position according to the type of floor to be cleaned.
Hard floor position (tiles, parquet floors...). Press on the pedal to lower the brush.
Carpet or rug position. Press on the pedal to lift the brush up.
•Crevice Tool(9)
For vacuuming in those normally inaccessible places i.e. reaching cobwebs, or down the side of a sofa!
•Dusting brush(10)
For vacuuming picture frames furniture outlines, books and other uneven objects.
•Upholstery Nozzle(11)
For vacuuming uphostery, mattresses, etc. The thread collectors help to pick up the threads and fluff.
How to plug in and use
Pull out the supply cord to the desired
length and plug into the socket.
Press button (14) to start the vacuum cleaner. To stop it press the button (14) again.
Adjusting the power level
•If your appliance is equipped with an electronic variable power control (13), you can choose the power appropriated for the task. The more you slide the button towards the right, the greater the suction power.
• The flexible hose handle (15) has a manual air flow regulator(16) which allows you to briefly reduce the suction level.
Storage(17)
When you have switched off and unplugged the appliance, press on the button (12) to automatically rewind the cord.
You can move or store your appliance in a vertical position by sliding the hook on the large cleaning head into the clip on the underside of the appliance.
- 4 -

Changing the dust bag
The dustbag needs changing when the cleaner is set to maximum power and the cleaner head is off the floor but the “bag full” indicator window(18) is completely coloured red.
Even if the dustbag does not appear to be full at this stage, it should be changed.
It could be that a great deal of very fine dust has clogged up the pores of the dust bag.
•Turn off the appliance and unplug it.
•Open the cover by pressing the hook (19) and lifting it up until it snaps into place.
Your appliance is equipped with either a paper dust bag (20) or a fabric dust bag (22)(depending on model).
•Take hold of the dust bag by the handle and pull.Remove the bag and throw it away.
•To refit a new bag push the cardboard support of a new bag into the bag mount (21)until it will go no further.
If your appliance is fitted with a fabric dust bag follow the same instructions as above.
Empty it and replace it(22).
Note: as the appliance is fitted with a safety device which checks that the bag is in place you cannot close the lid if the bag is not fitted correctly.
Cleaning the motor filter
The motor filter is situated inside the appliance between the dust bag and the motor. Each time that you change the air outlet filter we advise you to remove the motor filter(23)and to clean it by tapping to remover the dirt and then replacing it in the vacuum cleaner.
 E
E
Cleaning the exhaust filter (24)
•Check the exhaust filter occasion-ally and clean when dirty.
•Unplug cord from outlet.
•Open the exhaust cover and remove exhaust filter as shown.
•Next procedures are the same as the moter safety filter.
WARNING
Please never close the Filter Cover like (25), To avoid nipping your hand.
What to do if your appliance does not work?
Check that the appliance is correctly plugged in and that the electrical socket is working.
What to do when the suction performance reduces?
•Stop the appliance and unplug it.
•Check that the tubes, flexible hose and cleaning tool are not blocked.
•Check that the dust bag is not full.Replace if necessary.
- 5 -

M
Biztonsági információ
Kérjük, hogy gondosan olvassa el a készülék biztonságos használatára és karbantartására vonatkozó alábbi információkat.
Ez a készülék az alábbi Európai Uniós Irányelveknek felel meg: 73/23/EEC, 93/68EEC-Alacsony Feszültségi Irányelv, 89/336EEC –EMC.
 A készüléket gyermek kizárólag felügyelet mellett használhatja.
 Ne használja a készüléket, ha a csatlakozózsinór sérült vagy hibás.
 A kockázatok elkerülése érdekében a sérült csatlakozózsinórt kizárólag az LG Electronics hivatalos márkaszervizének képviselője cserélheti ki.
 Mindig kapcsolja ki a készüléket, mielőtt:
-porzsákcsere esetén;
-tisztítja vagy cseréli a szűrőket.
 Ha a készülékben nincs porzsák, a fedelet nem lehet lecsukni. Kérjük, ne próbálja erővel lezárni a fedelet!
 Ne használja a készüléket gyúlékony vagy robbanásveszélyes anyagok felszívására (folyadékok vagy gázok).
 Ne használja a készüléket forró hamu, parázs, stb. továbbá éles tárgyak felszívására.
 Ne használja a készüléket víz vagy egyéb folyadék felszívására.
A készülék használata
A flexibilis cső csatlakoztatása
Nyomja a flexibilis cső (2) fejének végét (1) a készüléken található csatlakoztatási pontba. A flexibilis cső eltávolításához nyomja meg a fej oldalán található gombot (3), majd húzza felfelé a fejet.
Csövek összeszerelése
(típustól függően)
•Fém (vagy műanyag) cső (4)
Enyhe csavarással illessze össze a két csövet.
•Teleszkópos cső (5)
–Nyomja a rugós reteszt előre (6).
–Húzza ki a csövet a kívánt hosszúságúra.
–Engedje vissza a rugós reteszt.
A tisztítófej és kiegészítő szívófejek használata(típustól függően)
Illessze a nagy szívófejet a cső végére.
•A 2-állású tisztítófejen (7) egy pedál (8) helyezkedik el, melynek segítségével Ön a porszívózni kívánt felületnek megfelelően állíthatja be a szívófejet.
Kemény burkolat-állás (kőburkolat, parketta stb.) Akefe leeresztéséhez nyomja meg a pedált.
Szőnyeg vagy szőnyegpadló-állás Nyomja a pedált a másik állásba, ekkor a kefe felemelkedik.
•Résszívó fej (9)
Az olyan nehezen megközelíthető helyek tisztítására alkalmas, mint pl. az ülőgarnitúra oldala vagy a szűk sarkokban található pókhálók.
•Portalanító kefe (10)
A portalanító kefe képkeretek, bútorvázak, könyvek és egyéb egyenetlen felületek porszívózására alkalmas.
•Kárpittisztító fej (11)
Bútorkárpitok, matracok stb. porszívózásához. A szöszgyűjtők segítségével könnyedén összeszedhetők a szöszök, pihék.
Csatlakoztatás a hálózati áramforrásba és használat
Húzza ki a csatlakozózsinórt a kívánt hosszúságra, és dugja be a csatlakozódugót a hálózati áramforrásba.
Nyomja meg a bekapcsológombot (14). A készülék kikapcsolásához ugyanezt a gombot (14) kell megnyomni.
Szíváserősség beállítása
•Amennyiben készüléke rendelkezik elektromos szíváserősség-állító gombbal (13), Ön az adott felületnek vagy feladatnak megfelelően állíthatja be a szíváserősséget. A gomb jobbra tolásával a szívóerő fokozatosan növekszik.
•A flexibilis cső fogóján (15) található manuális szíváserősség-állító szeleppel (16) lehet rövid ideig csökkenteni a szíváserősséget.
Tárolás (17)
A használat befejezése után kapcsolja ki a készüléket, húzza ki a csatlakozódugót, majd nyomja meg a vezetékfeltekerő gombot (12), ekkor a vezeték magától feltekeredik.
A készülék függőleges helyzetben történő tárolásához csúsztassa a nagy szívófejen lévő kampót a készülék alján található nyílásba.
- 6 -
 Loading...