


Introduction
Installation
Operation
Suggestion on food storage
Care and maintenance
Table of contents
|
3 |
Important safety instruction |
3 |
Identification of parts |
4 |
Where to install |
5 |
Door removal |
6 |
Door replacement |
7 |
Height adjustment |
7 |
Starting |
8 |
Adjusting the temperatures and functions |
8 |
Ice making
Wine holder
Egg box (Applicable to some models only)
Humidity control in the vegetable compartment
Deodoriser
Location of foods
Storing foods
How to dismantle parts
General information
Cleaning
Trouble shooting
2
Introduction
Entry |
|
|
|
The model and serial numbers are found on the inner case or back of refrigerator |
|||
compartment of this unit. These numbers are unique to this unit and not |
|||
available to others. You should record requested information here and retain |
|||
this guide as a permanent record of your purchase. Staple your receipt here. |
|||
Date of purchase |
: |
|
|
Dealer purchased from |
: |
|
|
Dealer address |
: |
|
|
Dealer phone no. |
: |
|
|
Model no. |
: |
|
|
Serial no. |
: |
|
|
|
Important safety instruction |
||||
|
Before use, this refrigerator must be properly installed and located in accordance with |
||||
|
the installation instructions in this document. |
||||
|
Never unplug your refrigerator by pulling on the power cord. Always grip plug firmly and |
||||
|
pull it straight out from the outlet. |
||||
|
When moving your appliance away from the wall, be careful not to roll over the power |
||||
|
cord or to damage it in any way. |
||||
|
After your refrigerator is in operation, do not touch the cold surfaces in the freezer |
||||
|
compartment, particularly when your hands are damp or wet. Skin could adhere to |
||||
|
these extremely cold surfaces. |
||||
|
Unplug the power cord from the power outlet for cleaning or other requirements. Never |
||||
|
touch it with wet hands because you can get an electric shock or be hurt. |
||||
|
Never damage, process, severely bend, pull out, or twist the power cord because |
||||
|
damage to the power cord may cause a fire or electric shock. Should you have doubts |
||||
|
on whether the appliance is properly grounded, please contact an electrician. |
||||
|
Never place glass products in the freezer as they may break due to expansion when their |
||||
|
contents are frozen. |
||||
|
Never put your hands within the ice storage bin of the automatic ice maker. You could |
||||
|
be hurt by the operation of the automatic ice maker. |
||||
|
The appliance is not intended for use by young children or infirm persons without |
||||
|
supervision. |
||||
|
Young childeren should be supervised to ensure that they do not play with the |
||||
|
appliance. |
||||
|
Never climb, sit, stand or hang on the refreshment center door. These actions may |
||||
|
damage the refrigerator and even tip it over, causing severe personal injury. |
||||
Don’t use an |
If possible, connect the refrigerator to its own individual electrical outlet to prevent it and |
||||
extension cord |
other appliances or household lights from causing an overload that could cause a power |
||||
|
outage. |
||||
Accessibility of |
The refrigerator-freezer should be so positioned that the supply plug is accessible for |
||||
Supply Plug |
quick disconnection when accident happens. |
||||
Supply Cord |
If the supply cord is damaged, it must be replaced by the manufacturer or its service |
||||
Replacement |
agent or a similarly qualified person in order to avoid a hazard. |
||||
Warning |
Do not modify or extend the Power Cord length. |
|
|
|
|
|
|
|
|||
|
It will cause electric shock or fire. |
|
|
||
|
|
||||
3

|
Introduction |
|
|
Child entrapment |
DANGER : Risk of child entrapment. |
warning |
Before you throw away your old refrigerator or freezer : |
|
Take off the doors |
|
Leave the shelves in place so that children may not easily climb inside. |
|
The appliance is not intended for use by young children or disadvantaged persons |
|
without supervision. |
|
Young children should be supervised to ensure that they do not play with the appliance. |
Don’t store Don’t store or use gasoline or other flammable vapor and liquids in the vicinity of this or any other appliance.
Grounding (Earthing) In the event of an electric short circuit, grounding (earthing) reduces the risk of electric shock by providing an escape wire for the electric current.
In order to prevent possible electric shock, this appliance must be grounded improper use of the grounding plug can result in an electric shock. Consult a qualified electrician or service person if the grounding instructions are not completely understood, or if you have doubts on whether the appliance is properly grounded.
Identification of parts
Freezer |
Refrigerator |
|
compartment |
compartment |
Milk product corner |
|
|
|
|
|
Lamp |
Ice separation |
|
Shelf |
|
Door rack |
|
handle |
|
|
|
|
|
Ice making |
|
|
compartment |
|
Wine holder (Plastic or wire) |
Ice box |
|
|
|
|
|
|
|
Shelf |
|
|
Egg box |
Drawer |
|
Lamp |
|
|
|
|
|
Vegetable drawer |
|
|
Door rack |
Drawer |
|
Vegetable |
|
|
|
|
|
drawer/Meat drawer |
|
|
Humidity switch |
|
|
Lower cover |
NOTE
•If you find some parts missing from your unit, they may be parts only used in other models.
4
Installation
|
Where to install |
|
|
|
|
|
|
|
Select a good |
1. Place your appliance where it is easy to |
|
|
|
|
|
|
|
location |
use. |
|
|
|
|
|
|
|
|
2. Avoid placing the unit near heat sources, |
|
|
|
|
|
|
|
|
direct sunlight or moisture. |
|
|
|
|
|
|
|
|
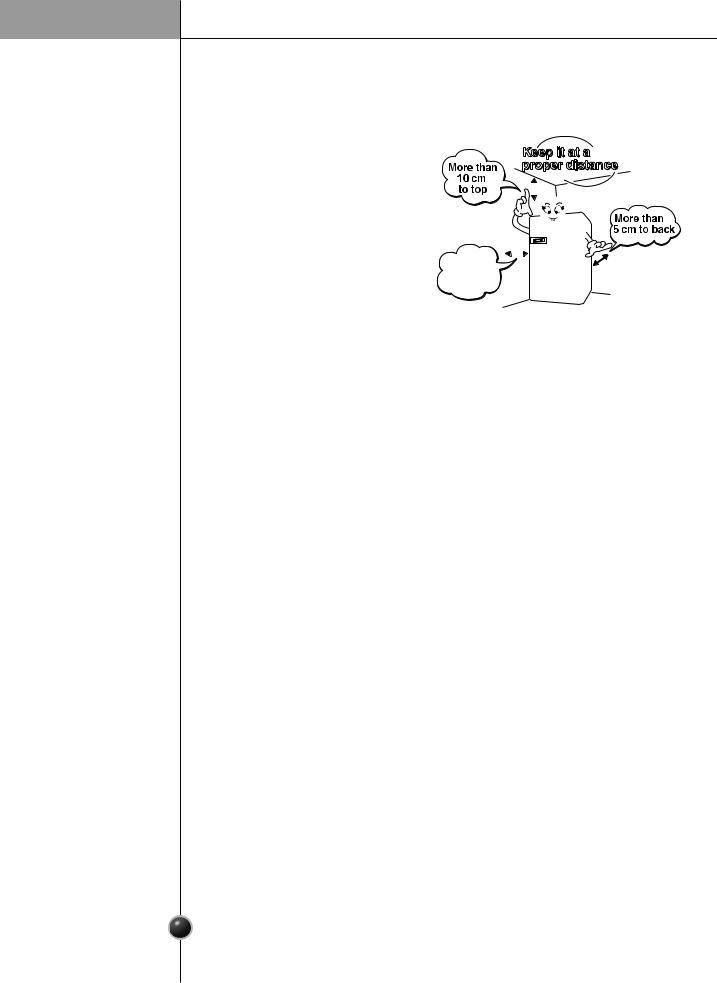
3. Air must circulate properly around your |
|
|
|
|
|
|
|
|
|
|
|
|
|
|
|
|
|
appliance to ensure efficient operation. If |
|
|
|
|
|
|
|
|
|
|
|
|
|
|
|
|
|
your appliance is placed in a recessed |
|
|
|
|
|
|
|
|
|
|
|
|
|
|
|
|
|
area in the wall, allow at least a 4 inches |
|
|
|
|
|
|
|
|
(10cm) or greater clearance above the |
More than |
|
|
|
|||
|
appliance, 2 inches (5cm) or more to each |
5 cm |
|
|
|
|||
|
side and 2 inches (5cm) or more to back. |
to side |
|
|
|
|||
|
|
|
|
|
|
|
|
|
|
The appliance should be elevated 1 inch |
|
|
|
|
|
|
|
|
(2.5 cm) from the floor, especially if it is |
|
|
|
|
|
|
|
|
|
|
|
|
|
|
|
|
|
carpeted. |
|
|
|
|
|
|
|
4.To avoid vibrations, the appliance must be leveled.
5.Don't install the appliance below 5∞C. It may cause affect the performance.
Disposal of the This appliance contains fluid (refrigerant, lubricant)and is made of parts and old appliance materials which are reusable and/or recyclable.
All the important materials should be sent to the collection center of waste material and can be reused after rework (recycling). For take back, please contact with the local agency.
5
Installation
|
Door removal |
|
|
Warning |
Electric Shock Hazard |
|
|
|
Disconnect electrical supply to refrigerator before installing. |
|
|
|
Failure to do so could result in death or serious |
|
|
|
injury. |
|
|
|
If your access door is too narrow for the |
|
|
|
refrigerator remove the refrigerator door and |
|
Lower |
|
pass the refrigerator laterally. |
|
cover |
|
|
|
|
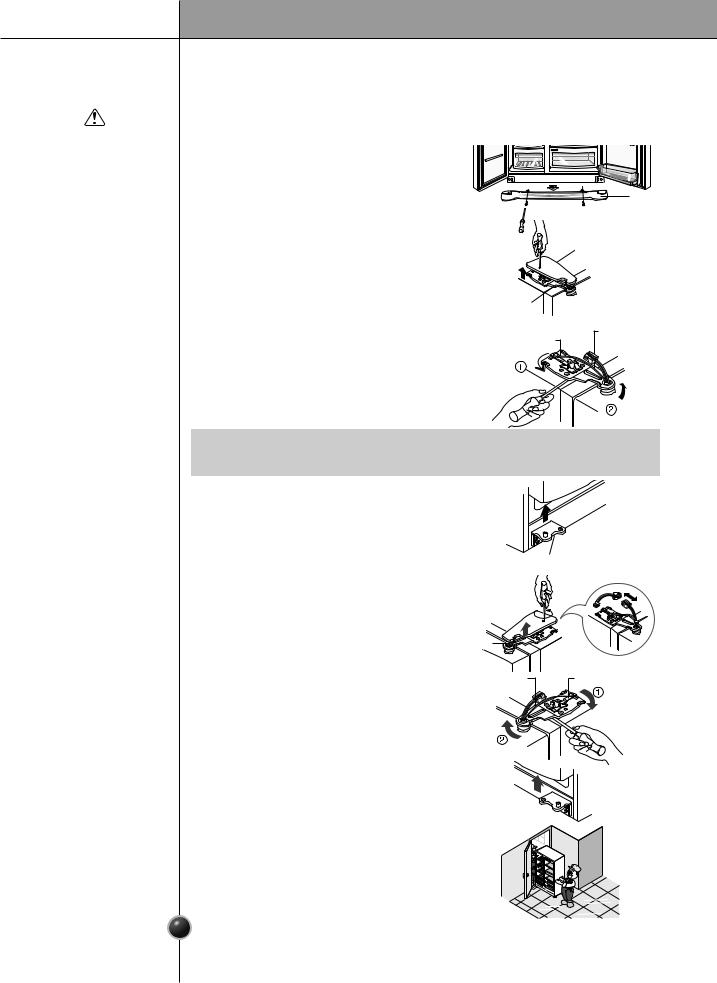
Remove lower |
Remove the lower cover by lifting upward. |
|
Hinge |
cover |
|
|
cover |
Remove the |
1) Removing the hinge cover by loosening the |
|
|
freezer |
screws. Separate all connection wires except |
|
|
compartment |
for the earth line after. |
Upper hinge |
|
door |
|
|
Upper |
|
|
Keeper |
hinge |
2) Remove the keeper by rotating it to counter clockwise ( ) and then lifting the upper hinge up ( ).
NOTE
•When removing the upper hinge, be careful that the door does not fall forwards.
3)Remove the freezer compartment door by
|
lifting it upward. |
|
|
|
|
|
Lower hinge |
Remove the |
1) Loosen the hinge cover screws and remove |
|
|
refrigerator |
the cover. Removeconnection wire if any, |
|
|
door |
except for the earth line. |
|
|
|
|
Connection |
|
|
|
wires |
|
|
2) Remove keeper by rotating it clockwise ( ) |
Upper hinge |
Keeper |
|
and then remove upper hinge by lifting it up |
|
|
|
( ). |
|
|
|
3) Remove refrigerator compartment door by |
|
lifting up. |
Pass the |
Pass the refrigerator laterally through access |
refrigerator |
door as shown in the right figure. |
|
6 |
Installation
|
Door replacement |
|||||||||||||||
|
Mount them in the reverse sequence of removal after they pass through the access door. |
|||||||||||||||
|
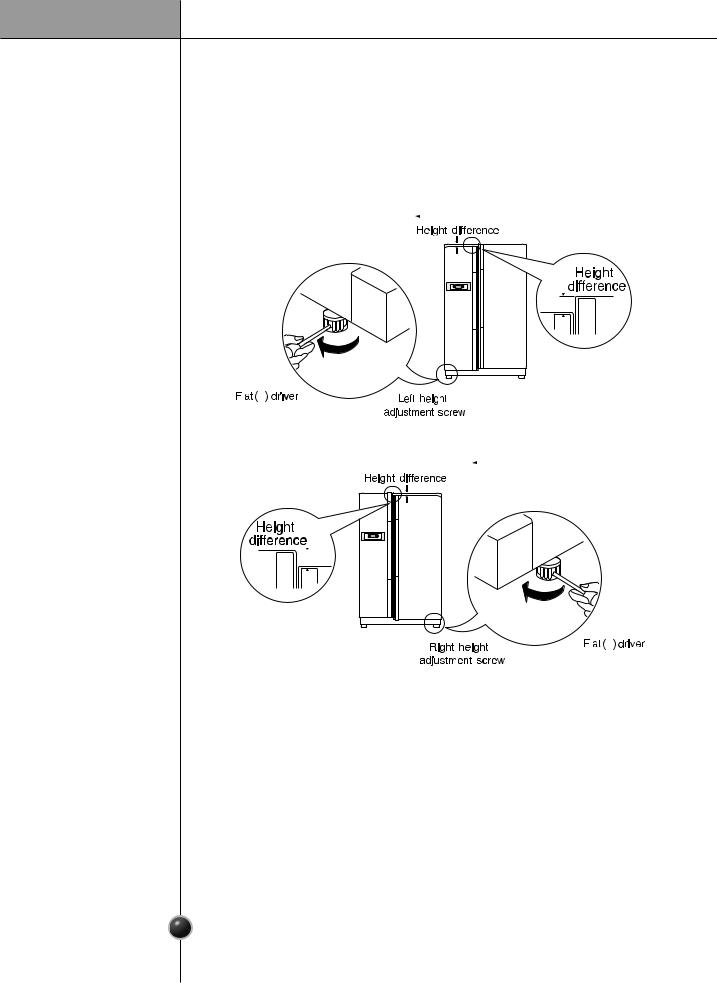
Height adjustment |
|||||||||||||||
If the freezer |
Level the door by inserting flat ( - type) driver into the groove of the left height adjusting |
|||||||||||||||
compartment door |
screw and rotate it to the arrow direction ( |
|
). |
|||||||||||||
|
|
|||||||||||||||
is lower than the |
|
|
|
|
|
|
|
|
|
|
|
|
|
|
|
|
refrigerator |
|
|
|
|
|
|
|
|
|
|
|
|
|
|
|
|
|
|
|
|
|
|
|
|
|
|
|
|
|
|
|
|
|
|
|
|
|
|
|
|
|
|
|
|
|
|
|
|
|
|
compartment door |
|
|
|
|
|
|
|
|
|
|
|
|
|
|
|
|
|
|
|
|
|
|
|
|
|
|
|
|
|
|
|
|
|
|
|
|
|
|
|
|
|
|
|
|
|
|
|
|
|
|
|
|
|
|
|
|
|
|
|
|
|
|
|
|
|
|
|
|
|
|
|
|
|
|
|
|
|
|
|
|
|
|
|
|
|
|
|
|
|
|
|
|
|
|
|
|
|
|
|
|
|
|
|
|
|
|
|
|
|
|
|
|
|
|
|
|
|
|
|
|
|
|
|
|
|
|
|
|
|
|
|
|
|
|
|
|
|
|
|
|
|
|
|
|
|
|
|
|
|
|
|
|
|
|
|
|
|
|
|
|
|
|
|
|
|
|
|
|
|
If the freezer |
Level the door by inserting flat ( - type) driver into the groove of the right height |
|||||||||||||||||
compartment door |
adjusting screw and rotate it to the arrow direction ( |
|
). |
|||||||||||||||
|
||||||||||||||||||
|
||||||||||||||||||
is higher than the |
|
|
|
|
|
|
|
|
|
|
|
|
|
|
|
|
|
|
refrigerator |
|
|
|
|
|
|
|
|
|
|
|
|
|
|
|
|
|
|
|
|
|
|
|
|
|
|
|
|
|
|
|
|
|
|
|
|
|
|
|
|
|
|
|
|
|
|
|
|
|
|
|
|
|
|
|
|
compartment door |
|
|
|
|
|
|
|
|
|
|
|
|
|
|
|
|
|
|
|
|
|
|
|
|
|
|
|
|
|
|
|
|
|
|
|
|
|
|
|
|
|
|
|
|
|
|
|
|
|
|
|
|
|
|
|
|
|
|
|
|
|
|
|
|
|
|
|
|
|
|
|
|
|
|
|
|
|
|
|
|
|
|
|
|
|
|
|
|
|
|
|
|
|
|
|
|
|
|
|
|
|
|
|
|
|
|
|
|
|
|
|
|
|
|
|
|
|
|
|
|
|
|
|
|
|
|
|
|
|
|
|
|
|
|
|
|
|
|
|
|
|
|
|
|
|
|
|
|
|
|
|
|
|
|
|
|
|
|
|
|
|
|
|
|
|
|
|
|
|
|
After leveling the |
The refrigerator doors will close smoothly by heightening the front side by adjusting |
door height |
the height adjusting screw. If the doors do not close correctly, performance may be |
|
affected. |
Next 1. Wipe off all dust accumulated during shipping and clean your appliance thoroughly.
2.Install accessories such as the wine corner, cover evaporating tray, etc., in their proper places. They are packed together to prevent possible damage during shipping.
3.Connect the power supply cord (or plug) to the outlet. Don't double up with other appliances on the same outlet.
4.Prior to use, let the appliance run for 2-3 hours. Check the flow of cold air in the freezer compartment to ensure proper cooling has taken place. Your appliance is now ready for use.
7
 Loading...