


WUA-1610, WUA-1610H
300Mbps Wireless USB Adapter
User Manual
V1.0
Table of Contents |
|
Chapter 1 Introduction ...................... |
1 |
1.1 PACKAGE CONTENTS ......................................................... |
1 |
1.2 PRODUCT FEATURES.......................................................... |
1 |
1.3 LED INDICATOR DESCRIPTION.............................................. |
2 |
1.4 PRODUCT USAGE ............................................................. |
2 |
1.5 BEFORE INSTALLATION ....................................................... |
2 |
1.6 DISABLE OTHER MANUFACTURERS’ WIRELESS NETWORK ADAPTERS . 3 |
|
1.7 PRODUCT MAINTENANCE ................................................... |
4 |
1.8 WORKING ENVIRONMENT .................................................. |
5 |
1.9 SYSTEM REQUIREMENTS..................................................... |
5 |
Chapter 2 Installation Guide .............. |
5 |
2.1 HARDWARE INSTALLATION................................................ |
6 |
2.2 DRIVER AND SOFTWARE INSTALLATION.................................... |
6 |
Chapter 3 System configuration....... |
12 |
3.1 GENERAL ..................................................................... |
13 |
3.2 PROFILE....................................................................... |
13 |
3.3 LINK INFORMATION......................................................... |
23 |
3.4 ADVANCED ................................................................... |
25 |
Appendix 1: FAQ .............................. |
27 |
Chapter 1 Introduction
Thank you for choosing this LevelOne wireless adapter!
The LevelOne WUA-1610 / WUA-1610H 300Mbps Wireless USB Adapter complies with the most advanced IEEE802.11n standards, and is also compatible with IEEE802.11 b/g/n wireless devices. The WUA-1610 / WUA-1610H 300Mbps Wireless USB Adapter includes an easy-to-use configuration that discovers available wireless networks wherever you go.
1.1 Package Contents
WUA-1610 / WUA-1610H
2dBi Antenna x 2 ( WUA-1610 )
5dBi Antenna x 2 ( WUA-1610H )
USB Cable
Quick Installation Guide
CD Manual / QIG / Utility
1.2 Product Features
Upgrades your wireless network up to 300Mbps
Provides 2dBi detachable antenna (WUA-1610)
Provides 5dBi detachable antenna (WUA-1610H)
Provides Wi-Fi protected setup (WPS) configuration
Quick and easy installation
Compatible with IEEE802.11b/g/n wireless standards
Supports WEP, WPA and WPA2 encryption with IEEE 802.1X for high level security
USB 2.0 interface
Supports Window XP/Vista/7
-1-
1.3 LED Indicator Description
There is one status LED indicator on the side of the wireless network adapter. It lights up and stays ON when working correctly, and flashes when transferring data.
1.4 Product Usage
The WUA-1610 / WUA-1610H Wireless USB Adapter offers a fast, reliable and extendable solution for wireless access.
It is mostly used in the following circumstances:
1.Enables staff members who require greater mobility in the office to have access to wireless networks anywhere inside their company.
2.Enables wireless communication for companies or places which are not suitable for wired LAN installation because of budget or building environment restrictions, such as historical buildings, rentals, or places for short-term usage.
3.Suits businesses or individual who often changes network topology.
4.Suits company or individual who would like to avoid using expensive cables or renting lines etc.
1.5 Before Installation
1.Please peruse this user manual before you install and use the product.
2.Please close or uninstall the configuration programs of other
manufacturers’ before you install the configuration programs of WUA-1610 / WUA-1610H Mato avoid possible UI collision.
3. In order to avoid possible network collision between this LevelOne network adapter and those of other manufactures, we recommend you to first disable the network of other manufacturer when installaing drive.
-2-

1.6 Disable other manufacturers’ wireless network adapters
1. Right click “My Computer” and select “Manage”
2. On the Computer Management screen ,select“Device Manager” “Network adapters”, and right click the network adapter you want to disable and click “Disable”
-3-
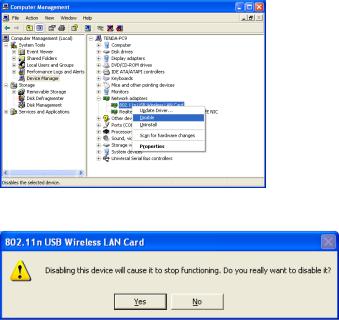
3. Click the “Yes” button on the dialogue box to disable the network adapter.
1.7 Product Maintenance
1.Please keep the product away from water and humid environment to guarantee its normal performance
2.Protect it against hazardous substances (such as acids, alkalis etc).
3.Please don’t directly expose the adapter to the sunlight or excessive heat.
4.Please contact LevelOne tech support if any problems occur.
-4-
1.8 Working Environment
Temperature :
Operating Temperature 0 ~40
Storage temperature -20 ~70
Humidity :
Operating Humidity 10% ~ 90% RH (non-condensing)
Storage Humidity 5% ~ 95% RH (non-condensing)
1.9 System Requirements
►Available USB 2.0 slot
►300 MHz processor and 32 MB of memory
►CD-ROM drive
►An 802.11 b/g/n access point (for Infrastructure Mode) or another 802.11 b/g/n wireless adapter (for Ad Hoc; Peer-to-Peer networking mode.)
►Microsoft® Windows® 7, Vista™, XP
Chapter 2 Installation Guide
This chapter will guide you through the process of installing the network adapter software package, with the included software CD. The package integrates driver and configuration software. Thus, when you are installing the driver, the configuration software will be installed automatically as well.
The software installation steps and operating guide in this user guide are explained under Windows XP, Installation steps for other operating systems
-5-
are similar.
2.1 Hardware Installation
Plug the USB Wireless Adapter into an available USB port on your computer, and the Found New Hardware Wizard (windows 7) screen will appear; Close the wizard, then clicks the following steps to install
2.2 Driver and Software Installation
Installation
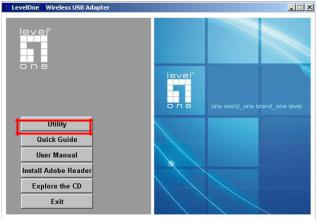
1.Insert the CD into the CD-ROM drive on your PC. The autorun program should start automatically. If it does not, please run autorun.exe under your CD-ROM drive. In the autorun screen, click Utility to begin the software installation.
2.Click “Next” to continue.
-6-

3.Click “Next” to continue.
-7-
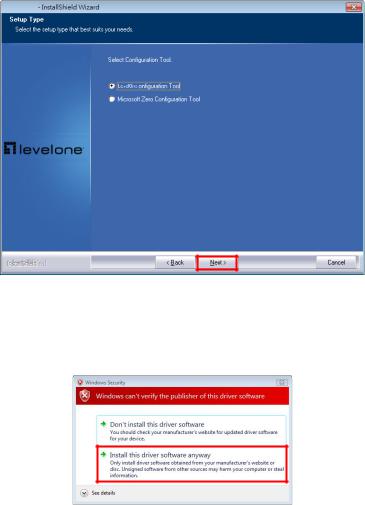
4.Click “Next” to continue.
5.In Windows Vista / 7, the follow message may appear. Please click “Install this driver software anyway.”
6.Please click “Finish” and restart your computer.
-8-
 Loading...