


Table of Contents |
|
■ Introduction |
|
Overview |
1 |
Features |
1 |
Configurations |
2 |
Installation |
|
Cables |
5 |
Device Connection |
6 |
Initial Power-up |
7 |
■ Operation |
|
Pushuttons |
9 |
LEDs |
9 |
OSD (On-Screen Display) Operation |
10 |
Hotkey Commands |
16 |
■ Cascade Configuration |
|
Connection |
19 |
Change Configuration while Running |
21 |
■ Sun/Mac Keyboard Mapping |
23 |
■ Appendices |
|
Specifications |
25 |
Troubleshooting |
27 |
Please read this manual thoroughly and follow the Installation procedures to prevent any
damage to the KVM switch or any connecting device.

LevelOne
------------------------ Introduction
Overview
The slim LevelOne KVM Switches offer the most reliable and efficient way of managing multiple computers in server rooms where space is at a premium. On Screen Display (OSD) features computer naming, computer selection, status indication, auto scan and much more. Up to 136 servers can be easily managed by cascading multiple KVM switches to expand the capacity. Revolutionized video enhancement technology ensures superb quality up to 1920 x 1440. For secured connection and space saving, all LevelOne KVM switches require just one HDB15 connector for each computer connection
Two major models are available:
-PS/2-only models One HDB15 connector for each PS/2 computer connection: (fit cable : ACC-2001 1.8m cable for PS2, ACC-2002 3m cable for PS/2)
-USB-PS/2 Combo models One HDB15 connector for each
PS/2 or USB computer connection: (fit cable : ACC-2001 1.8m cable for PS2, ACC-2002 3m cable for PS/2), (fit cable : ACC-2003 1.8m cable for USB, ACC-2004 3m cable for USB)
Model |
|
Product |
|
For computer |
|
Suitable for |
|
|
|
with Interface |
|
|
|
||
|
|
|
|
|
|
|
|
PS/2-only |
|
KVM-0410 |
|
PS/2 |
|
PS/2-server |
|
|
|
KVM-0810 |
|
|
|
|
|
|
|
KVM-1610 |
|
|
|
|
|
USB-PS/2 |
|
KVM-0420 |
|
PS/2 or USB |
|
PS/2-server |
|
Combo |
|
KVM-0820 |
|
|
|
USB-Sun |
|
|
|
KVM-1620 |
|
|
|
USB-Mac |
|
Features
!Cascade configuration expands system capability
!1U-height form factor saves rack spaces
LevelOne
!Unique cables for secured connection
!Auto-scan function automatically selects computer sequentially
!Supports Microsoft IntelliMouse (Pro)
!Assigns computers with unique and meaningful names
!Identifies and selects computers by the names
!Programmable scan filters unused computers
!Store system settings and name entries to non-volatile memory
!Password security locks computer from unauthorized access
!Gains complete control with easy-to-use OSD interface
!Hotkey functions allow easily computer access
!Keyboard states automatically saved and restored when switching computers
!Operating system is independent, transparent to all applications
!Plug-and-play system configuration
!Keyboard and mouse can be hot plugged at any time
!DDC2B compatible
!Optional multimedia module supports microphones and stereo speakers
Configurations
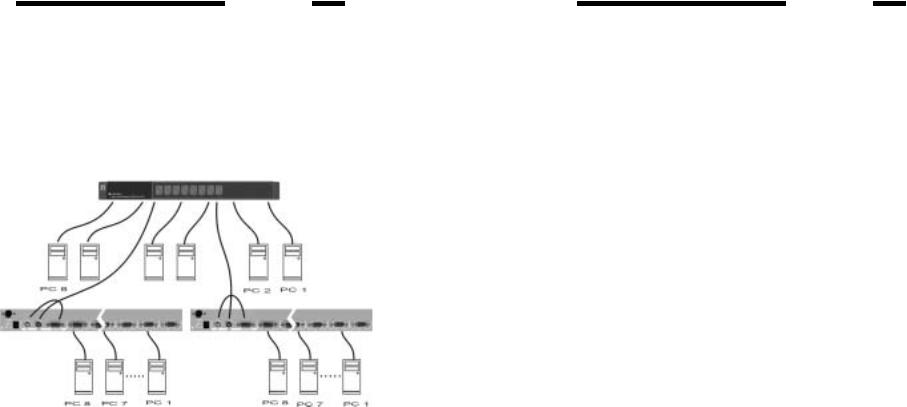
Single KVM Switch Configuration
Use one PS/2 keyboard, mouse and monitor to manage 4, 8 or 16 computers in figure 1.
Figure 1: Single KVM Switch configuration
1 |
2 |
LevelOne |
LevelOne |
Cascaded KVM Switch (Master/Slave) Configuration
A second level of Slave KVM Switches may connect to the Master unit to expand system capacity allowing you to manage computers. There is only one Master that connects to the PS/2 keyboard, mouse and monitor directly operated by a user. Once connected, LevelOne KVM Switches automatically configure themselves to either Master or Slave. Slaves of different LevelOne KVM Switch models can be mixed in cascade configuration as shown in figure 2.
Figure 2: A cascade configuration
Throughout this manual, Master is the KVM Switch that connects directly to a PS/2 keyboard, mouse and monitor. Slave is a KVM Switch that has its CONSOLE port connected to the Master's “PC x” port. Slave only exists in cascade configuration.
3 |
4 |
LevelOne
------------------------ Installation
Make sure all computers and LevelOne KVM Switches are powered down during installation.
Cables
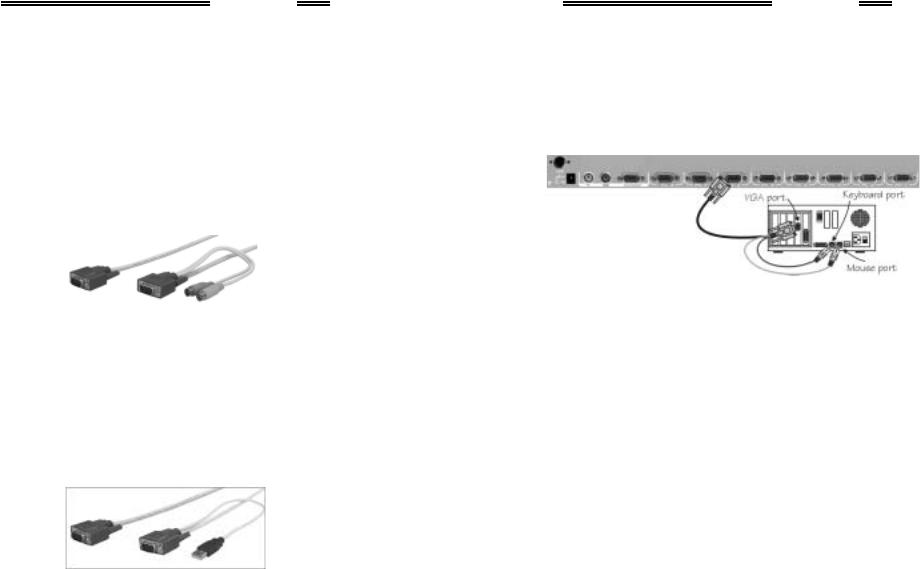
Use only the following cables for connection to computers with PS/2 interface, as shown in figure 3.
Model Name |
ACC-2001 |
ACC-2002 |
||
Length |
1.8m |
|
3m |
|
|
|
|
|
|
|
|
|
|
|
Figure 3: 1-to-3 cable for PS/2 computer
Use only the following cables for connection to computers with USB interface, as shown in figure 4.
Model Name |
ACC-2003 |
ACC-2004 |
Length |
1.8m |
3m |
Figure 4: 1-to-2 cable for USB computer
LevelOne
Device Connection
PS/2-only Model
(KVM-0410, KVM-0810, KVM-1610)
Use a 1-to-3 cable to connect from one of the PC ports to the PS/2 keyboard, mouse and monitor ports of computer, as shown in figure 5.
Figure 5: PS/2 computer connection
USB-PS/2 Combo Model
(KVM-0420, KVM-0820, KVM-1620)
To a USB computer: Use a 1-to-2 cable to connect from one of the PC ports to the USB port and VGA port of a computer, as shown in figure 6. The computer can be a USB-ready PC, Sun, HP server or a Mac.
To a PS/2 computer: Use a 1-to-3 cable to connect from one of the PC ports to the PS/2 keyboard, mouse and monitor ports of a computer, as shown in figure 5.
To a notebook computer: In most cases, all you need is a piece of PS/2 Y-adapter at the notebook PS/2 port. However, some Notebook computers do not follow industry standard, please check your Notebook user's manual for detail.
5 |
6 |

LevelOne |
LevelOne |
Figure 6: Computer USB Port Connection
Initial Power-Up
You must power up the Master KVM switch that has a PS/2 keyboard, mouse and monitor connected to it before turning on any other devices.
!For single KVM Switch:
1)Apply a power adapter (O/P = 9V DC) to the Master.
2)Turn on computers.
!For cascaded KVM Switches:
1)Apply a power adapter (O/P = 9V DC) to the Master.
2)Apply power adapters to all Slaves.
3)Turn on computers.
Note: You may hot plug additional powered-down computers or a slave Switches without turning any existing KVM switch or computer off after initial power up.
7 |
8 |

LevelOne
------------------------ Operation
Figure 7: Front pushbuttons and LEDs
Pushbuttons
A computer may be selected by pressing the pushbutton directly, by issuing hotkey commands or by activating the OSD window.
Note: For 16-port models: 1 ~ 8 represent the lower 8 ports and A ~ H for the higher 8 ports. To select computer A, press and hold pushbutton 1 for 2 seconds; for computer B, press and hold pushbutton 2, etc.
!K/M RESET
K/M RESET solves most problems developed by keyboard, mouse, device replacement or change of configuration. Press down both the front-panel number 1 and 2 pushbuttons for 2 seconds to re-configure the whole system without turning either the KVM Switch or any computer off.
!AUTO SCAN
LevelOne KVM Switch provides an easy-to-use feature to start Auto Scanning. For 8 and 16-port, you can press down both the front-panel number 7 and 8 pushbuttons for 2 seconds to start Auto Scanning.
And for 4-port KVM, you can press down both number 3 and 4 to start Auto Scanning.
LEDs
The lighting red LED indicates the port that is selected. The port is
LevelOne
either Auto Scan or Manual Scan mode if the red LED flashes. Green LED is lighting when the port connects a power-on computer. There are 2 rows of LEDs for 16-port switches, the lower row is for numerical ports (“1” ~ “8”) and the upper row is for alphabetical ports (“A” ~ “B”).
OSD (On-Screen-Display) Operation
Figure 8: OSD screen illustration
USB-PS/2 Combo models offer F5, see Function key <F5>
By hitting the left <CTRL> key twice within two seconds, you may see the 'Hotkey Menu' if it is enabled (an OSD option). Or, by hitting the left <CTRL> key three times within two seconds, you will see a 'KVM MENU' screen showing a list of the computers with corresponding
9 |
10 |
 Loading...