


Lenovo ThinkStation P920, ThinkStation P720, ThinkStation P520, ThinkStation P520C Windows 10 Installation Guide [en, ar, bg, cs, da, de, el, es, es, fi, fr, he, hr, hu, id, it, ja, ko, nb, nl, pl, pt, pt, ro, ru, sh, sk, sl, sv, th, tr, uk, zc, zh]

LENOVO THINKSTATION P520C, P520, P720, & P920
WINDOWS 10 INSTALLATION

Contents
OVERVIEW
SECTION 1 – BIOS & PRE-INSTALLATION STEPS
SECTION 2 – WINDOWS 10 INSTALLATION
SECTION 3 – WINDOWS 10 UPGRADE USING MEDIA CREATION TOOL SECTION 4 – DOCUMENT REVISION HISTORY
Overview
The purpose of this document is to provide guidance for users on how to install a Windows 10 retail operating system on their ThinkStation P520c, P520, P720, and P920 systems.
Section 1 – BIOS & Pre-Installation Steps
The first step before installing Windows is to make sure BIOS is setup correctly. It is important to note which type of partitioning method (GPT or MBR) before attempting to install any operating system on their system.
For UEFI/GPT installations (recommended):
oBoot into BIOS by pressing the F1 key at the “Lenovo” splash screen.

o Select “Setup” from the screen indicated below.
oSelect the “Exit” menu option along the left column and set “OS Optimized Defaults” along the right column to “Enabled”.
o Select “Yes” at the confirmation screen indicated below.
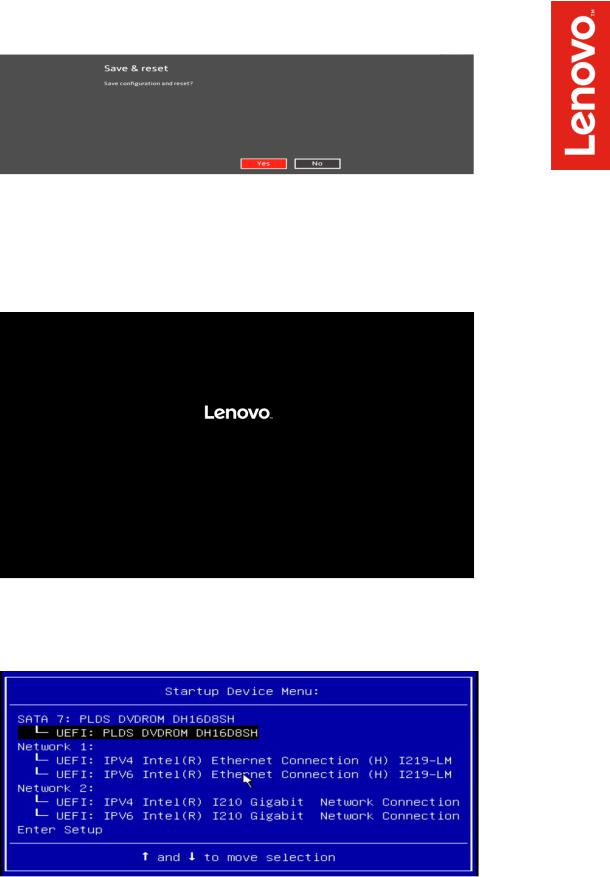
o Select F10 to “Save and Exit” BIOS.
oInsert the Windows 10 install media (either through USB or CD/DVD).
oPower on the system and press the F12 key whenever the following Lenovo splash screen appears.
oSelect the Windows bootable installation media “UEFI” option from the F12 boot menu.

For Legacy/MBR installations:
oBoot into BIOS by pressing the F1 key at the “Lenovo” splash screen.
o Select “Setup” from the screen indicated below.

oSelect the “Exit” menu option along the left column and set “OS Optimized Defaults” along the right column to “Disabled”.
oSelect “Startup” menu option along the left column and select the
“CSM Configuration” option along the right column.
 Loading...