


ThinkVision T24d-10
User Guide
Machine Types: 61B4
Product numbers
61B4-MAR1-WW
First Edition (February 2017)
© Copyright Lenovo 2017.
LENOVO products, data, computer software, and services have been developed exclusively at private expense and are sold to governmental entities as commercial items as defined by 48 C.F.R. 2.101 with limited and restricted rights to use, reproduction and disclosure.
LIMITED AND RESTRICTED RIGHTS NOTICE: If products, data, computer software, or services are delivered pursuant a General Services Administration "GSA" contract, use, reproduction, or disclosure is subject to restrictions set forth in Contract No. GS-35F-05925.

Contents
Safety information . . . . . . . . . . . . . . . . . . . . . . . . . . . . . . . . . . . . . . . . . . . . . . . . . . . . . . . . . . . . . |
iii |
General Safety guidelines. . . . . . . . . . . . . . . . . . . . . . . . . . . . . . . . . . . . . . . . . . . . . . . . . . . . . . . . . . . . . . . . . . . . . . . . . . . . . . . . . . . . iii
Chapter 1. Getting started . . . . . . . . . . . . . . . . . . . . . . . . . . . . . . . . . . . . . . . . . . . . . . . . . . . . . . . 1-1
Shipping contents. . . . . . . . . . . . . . . . . . . . . . . . . . . . . . . . . . . . . . . . . . . . . . . . . . . . . . . . . . . . . . . . . . . . . . . . . . . . . . . . . . . . . . . . . 1-1 Notice for use . . . . . . . . . . . . . . . . . . . . . . . . . . . . . . . . . . . . . . . . . . . . . . . . . . . . . . . . . . . . . . . . . . . . . . . . . . . . . . . . . . . . . . . . . . . . 1-2 Product overview . . . . . . . . . . . . . . . . . . . . . . . . . . . . . . . . . . . . . . . . . . . . . . . . . . . . . . . . . . . . . . . . . . . . . . . . . . . . . . . . . . . . . . . . . 1-3 Types of adjustments. . . . . . . . . . . . . . . . . . . . . . . . . . . . . . . . . . . . . . . . . . . . . . . . . . . . . . . . . . . . . . . . . . . . . . . . . . . . . . . . . . . . 1-3 Tilt. . . . . . . . . . . . . . . . . . . . . . . . . . . . . . . . . . . . . . . . . . . . . . . . . . . . . . . . . . . . . . . . . . . . . . . . . . . . . . . . . . . . . . . . . . . . . . . . . . 1-3 Swivel . . . . . . . . . . . . . . . . . . . . . . . . . . . . . . . . . . . . . . . . . . . . . . . . . . . . . . . . . . . . . . . . . . . . . . . . . . . . . . . . . . . . . . . . . . . . . . . 1-3 Monitor controls . . . . . . . . . . . . . . . . . . . . . . . . . . . . . . . . . . . . . . . . . . . . . . . . . . . . . . . . . . . . . . . . . . . . . . . . . . . . . . . . . . . . . . . 1-4 Cable lock slot . . . . . . . . . . . . . . . . . . . . . . . . . . . . . . . . . . . . . . . . . . . . . . . . . . . . . . . . . . . . . . . . . . . . . . . . . . . . . . . . . . . . . . . . 1-4 Setting up your monitor . . . . . . . . . . . . . . . . . . . . . . . . . . . . . . . . . . . . . . . . . . . . . . . . . . . . . . . . . . . . . . . . . . . . . . . . . . . . . . . . . . . . 1-5 Connecting and turning on your monitor . . . . . . . . . . . . . . . . . . . . . . . . . . . . . . . . . . . . . . . . . . . . . . . . . . . . . . . . . . . . . . . . . . . . 1-5 Registering your option . . . . . . . . . . . . . . . . . . . . . . . . . . . . . . . . . . . . . . . . . . . . . . . . . . . . . . . . . . . . . . . . . . . . . . . . . . . . . . . . . . . 1-10
Chapter 2. Adjusting and using your monitor . . . . . . . . . . . . . . . . . . . . . . . . . . . . . . . . . . . . . . . . . 2-1
Comfort and accessibility. . . . . . . . . . . . . . . . . . . . . . . . . . . . . . . . . . . . . . . . . . . . . . . . . . . . . . . . . . . . . . . . . . . . . . . . . . . . . . . . . . . 2-1 Arranging your work area. . . . . . . . . . . . . . . . . . . . . . . . . . . . . . . . . . . . . . . . . . . . . . . . . . . . . . . . . . . . . . . . . . . . . . . . . . . . . . . . 2-1 Positioning your monitor . . . . . . . . . . . . . . . . . . . . . . . . . . . . . . . . . . . . . . . . . . . . . . . . . . . . . . . . . . . . . . . . . . . . . . . . . . . . . . . . 2-1 Quick tips for healthy work habits . . . . . . . . . . . . . . . . . . . . . . . . . . . . . . . . . . . . . . . . . . . . . . . . . . . . . . . . . . . . . . . . . . . . . . . . . 2-2 Accessibility information . . . . . . . . . . . . . . . . . . . . . . . . . . . . . . . . . . . . . . . . . . . . . . . . . . . . . . . . . . . . . . . . . . . . . . . . . . . . . . . . 2-2
Adjusting your monitor image . . . . . . . . . . . . . . . . . . . . . . . . . . . . . . . . . . . . . . . . . . . . . . . . . . . . . . . . . . . . . . . . . . . . 2-3
Using the direct access controls . . . . . . . . . . . . . . . . . . . . . . . . . . . . . . . . . . . . . . . . . . . . . . . . . . . . . . . . . . . . . . . . . . . . . . . . . . . 2-3 Using the On-Screen Display (OSD) controls . . . . . . . . . . . . . . . . . . . . . . . . . . . . . . . . . . . . . . . . . . . . . . . . . . . . . . . . . . . . . . . . 2-4 Selecting a supported display mode . . . . . . . . . . . . . . . . . . . . . . . . . . . . . . . . . . . . . . . . . . . . . . . . . . . . . . . . . . . . . . . . . . . . . . . . 2-8
Understanding power management . . . . . . . . . . . . . . . . . . . . . . . . . . . . . . . . . . . . . . . . . . . . . . . . . . . . . . . . . . . . . . . . 2-9 Caring for your monitor . . . . . . . . . . . . . . . . . . . . . . . . . . . . . . . . . . . . . . . . . . . . . . . . . . . . . . . . . . . . . . . . . . . . . . . . 2-10
Detaching the monitor base and stand . . . . . . . . . . . . . . . . . . . . . . . . . . . . . . . . . . . . . . . . . . . . . . . . . . . . . . . . . . . . . . . . . . . . . . . . 2-10 Wall Mounting (Optional) . . . . . . . . . . . . . . . . . . . . . . . . . . . . . . . . . . . . . . . . . . . . . . . . . . . . . . . . . . . . . . . . . . . . . . . . . . . . . . . . . 2-10
Chapter 3. Reference information. . . . . . . . . . . . . . . . . . . . . . . . . . . . . . . . . . . . . . . . . . . . . . . . . . 3-1
Monitor specifications . . . . . . . . . . . . . . . . . . . . . . . . . . . . . . . . . . . . . . . . . . . . . . . . . . . . . . . . . . . . . . . . . . . . . . . . . . . . . . . . . . . . . 3-1 Troubleshooting . . . . . . . . . . . . . . . . . . . . . . . . . . . . . . . . . . . . . . . . . . . . . . . . . . . . . . . . . . . . . . . . . . . . . . . . . . . . . . . . . . . . . . . . . . 3-3 Manual image setup . . . . . . . . . . . . . . . . . . . . . . . . . . . . . . . . . . . . . . . . . . . . . . . . . . . . . . . . . . . . . . . . . . . . . . . . . . . . . . . . . . . . 3-4 Manually installing the monitor driver . . . . . . . . . . . . . . . . . . . . . . . . . . . . . . . . . . . . . . . . . . . . . . . . . . . . . . . . . . . . . . . . . . . . . . 3-5 Installing the monitor driver in Windows 7. . . . . . . . . . . . . . . . . . . . . . . . . . . . . . . . . . . . . . . . . . . . . . . . . . . . . . . . . . . . . . . . 3-5 Installing the monitor driver in Windows 10. . . . . . . . . . . . . . . . . . . . . . . . . . . . . . . . . . . . . . . . . . . . . . . . . . . . . . . . . . . . . . . 3-6 Getting further help . . . . . . . . . . . . . . . . . . . . . . . . . . . . . . . . . . . . . . . . . . . . . . . . . . . . . . . . . . . . . . . . . . . . . . . . . . . . . . . . . . 3-6
Service information . . . . . . . . . . . . . . . . . . . . . . . . . . . . . . . . . . . . . . . . . . . . . . . . . . . . . . . . . . . . . . . . . . . . . . . . . . . . 3-7
Customer responsibilities . . . . . . . . . . . . . . . . . . . . . . . . . . . . . . . . . . . . . . . . . . . . . . . . . . . . . . . . . . . . . . . . . . . . . . . . . . . . . . . . 3-7 Service parts . . . . . . . . . . . . . . . . . . . . . . . . . . . . . . . . . . . . . . . . . . . . . . . . . . . . . . . . . . . . . . . . . . . . . . . . . . . . . . . . . . . . . . . . . . 3-7
Appendix A. Service and Support . . . . . . . . . . . . . . . . . . . . . . . . . . . . . . . . . . . . . . . . . . . . . . . . . |
A-1 |
Registering your option . . . . . . . . . . . . . . . . . . . . . . . . . . . . . . . . . . . . . . . . . . . . . . . . . . . . . . . . . . . . . . . . . . . . . . . . . . . . . . . . . . . . A-1 Online technical support. . . . . . . . . . . . . . . . . . . . . . . . . . . . . . . . . . . . . . . . . . . . . . . . . . . . . . . . . . . . . . . . . . . . . . . . . . . . . . . . . . . . A-1 Telephone technical support. . . . . . . . . . . . . . . . . . . . . . . . . . . . . . . . . . . . . . . . . . . . . . . . . . . . . . . . . . . . . . . . . . . . . . . . . . . . . . . . . A-1
Appendix B. Notices . . . . . . . . . . . . . . . . . . . . . . . . . . . . . . . . . . . . . . . . . . . . . . . . . . . . . . . . . . . |
B-1 |
Recycling information . . . . . . . . . . . . . . . . . . . . . . . . . . . . . . . . . . . . . . . . . . . . . . . . . . . . . . . . . . . . . . . . . . . . . . . . . . . . . . . . . . . . . B-2 Trademarks. . . . . . . . . . . . . . . . . . . . . . . . . . . . . . . . . . . . . . . . . . . . . . . . . . . . . . . . . . . . . . . . . . . . . . . . . . . . . . . . . . . . . . . . . . . . . . B-2
Contents ii

Safety information
General Safety guidelines
For tips to help you use your computer safely, go to:
http://www.lenovo.com/safety
Before installing this product, read the Safety Information.


 í
í


 í
í 


 í
í
iii

Chapter 1. Getting started
This User’s Guide provides detailed operation instructions for the user. For quick instruction overview, please see the Setup Poster for brief information.
Shipping contents
The product package should include the following items:
•Information Flyer
•Flat Panel Monitor
•Power Cord
•HDMI Cable (NA)
•USB 3.0 Cable
•DP Cable
•Analog Cable (for VGA use)
•Base
•Stand
HDMI 

 HDMI
HDMI
(NA) (WW)
Chapter 1. 1-1

Notice for use
To set up your monitor, please see the illustrations below.
Note: Do not touch the monitor within the screen area. The screen area is glass and can be damaged by rough handling or excessive pressure.
1.Place your monitor with the screen face down on a soft flat surface.
2.Align the stand assembly bracket to the monitor.
3.Insert the bracket towards monitor until it locks in place.
Note: To install a VESA mount, please see "Wall Mounting (Optional)"on page 2-10"on page 2-10.
Chapter 1. 1-2
Product overview
This section will provide information on adjusting monitor positions, setting user controls, and using the cable lock slot.
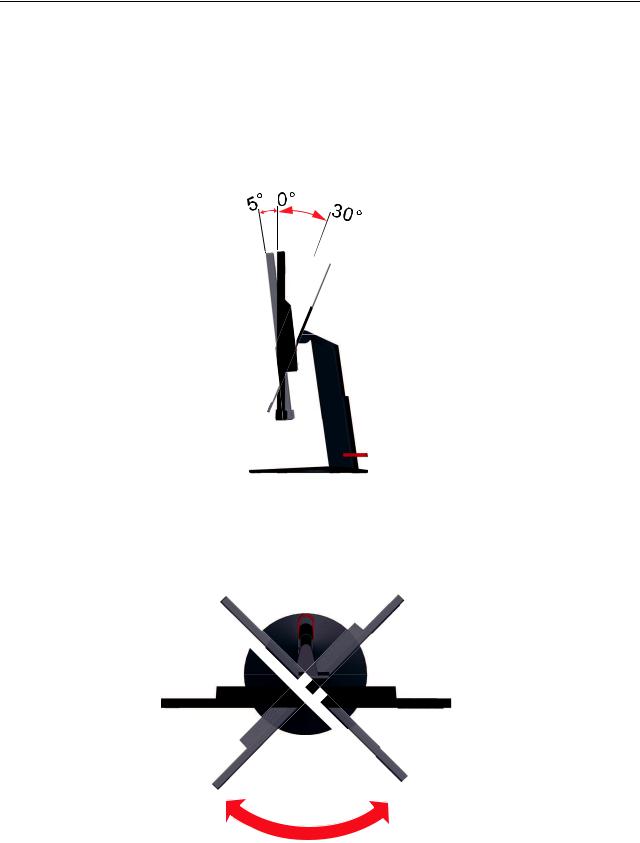
Types of adjustments
Tilt
Please see the illustration below for an example of the tilt range.
Swivel
With the built-in pedestal, you can tilt and swivel the monitor for the most comfortable viewing angle.
|
|
Chapter 1. 1-3

-Adjust the screen position before rotating the monitor screen. (Make sure that the monitor screen ascent to its highest point, and it inclines backward at 30°.)
-then rotate clockwise until the monitor stops at -90°~90°.
PP
5°
0°
 30°
30°
° |
° |
Monitor controls
The keypad controls on the panel frame are accesses to various functions.
For information on how to utilize these keypad controls, please see "Adjusting your monitor image"on page 2-3.
Cable lock slot
Your monitor is equipped with a cable lock slot located on the rear of your monitor.
Chapter 1. 1-4

Setting up your monitor
This section provides information on how to set up your monitor.
Connecting and turning on your monitor
Note: Be sure to read the Safety information on page iii before carrying out this procedure.
1.Power off your computer and all attached devices, then unplug the computer power cord.
2.Connect the cables according to below icon indication.
3.For computer in HDMI connecting.
Note 1: Monitors sold in NA include an HDMI cable.
Note 2: For other regions Lenovo recommends that customers who require to use the HDMI input on their monitor purchase the "Lenovo HDMI to HDMI cable OB47070" www.lenovo.com/support/monitor accessories
Chapter 1. 1-5

4.Connect one end of the DP cable to the DP connector on the back of the computer, and the other end to the DP connector on the monitor.
5.Connect one end of the analog signal cable to the monitor VGA (Analog) connector and the other end to the computer.
6.Connect the speaker’s audio cable and audio jack of monitor to transfer audio source from Display Port, or HDMI.
Note: The audio output in HDMI/DP modes.
Chapter 1. 1-6
7.For computer in USB 3.0 connecting.
Note: In some circumstances when using USB 3.0 devices (hard drives or flash drives) and 2.4GHz USB wireless devices (for example wireless mouse, keyboard, or headphone) at the same time, USB 3.0 devices radio frequency interference may impact on 2.4GHz USB wireless devices, result in a drop in throughput on the wireless transmission. User may feel delayed response to mouse or keyboard inputs, missing keyboard characters or mouse commands, decreased operating distance between the 2.4 GHz USB wireless device and its receiver. Please refer to the following ways which helps to reduce this radio frequency interference.
1). Wireless dongle was moved away from the USB 3.0 device as possible as you can.
2). If the USB wireless receiver and USB 3.0 device have to be connected at the same side, Position your USB wireless receiver as close as possible to your wireless peripheral device (mouse, keyboard, headphones, etc.) Or use a standard USB-extender cable or Hub to position your USB wireless receiver as far away as possible from your USB 3.0 port.
Chapter 1. 1-7

8.Connect one end of the USB cable to the USB downstream terminal of the monitor, and connect the other end of the USB cable to an appropriate USB port on your device.
Note: The USB downstream port does not provide power while the monitor switch is off.
9.Insert the power cord into the monitor, then plug the monitor power cord and the computer cord into grounded electrical outlets.
Note: A certified power supply cord has to be used with this equipment. The relevant national installation and or equipment regulations shall be considered. A certified power supply cord not lighter than ordinary polyvinyl chloride flexible cord according to IEC 60227 (designation H05VV-F 3G 0.75mm2 or H05VVH2-F2 3G 0.75mm2 ) shall be used. Alternative a flexible cord be of synthetic rubber according to IEC 60245 (designation H05RR-F 3G 0.75mm2 ) shall be used.
Chapter 1. 1-8
 Loading...