


The car is fitted with the infotelematic CONNECT Nav+ system designed in accordance with the specific features of the passenger compartment and with a personalised design that blends with the styling of the dashboard.
The system is installed in a user-friendly position for the driver and the graphics on the front panel make it easy to quickly locate the controls which facilitates the use of them.
To increase safety against theft, the set is fitted with a protection system that allows the use of it only on the car on which it was fitted originally.
The pages that follow contain the instructions for use, which we advise you to read carefully and always keep within reach (e.g. in the glove compartment).
So, enjoy your reading and have a good journey.
IMPORTANT For the navigation system only use the original CD provided with the car or in any case other CDs of the same brand.


CONNECT Nav+
ADVICE, CONTROLS AND GENERAL INFORMATION ... |
5 |
ADVICE ............................................................................. |
5 |
CONTROLS ........................................................................ |
10 |
Front panel controls ............................................................ |
10 |
Steering wheel controls ........................................................ |
14 |
GENERAL INFORMATION ................................................ |
15 |
System power on ................................................................. |
16 |
System power off ................................................................. |
17 |
Main mode .......................................................................... |
18 |
Protection against theft ....................................................... |
19 |
AUDIO ............................................................................... |
21 |
SCREEN OPTIONS AND FUNCTIONS .............................. |
21 |
RADIO MODE .................................................................... |
22 |
Traffic information .............................................................. |
24 |
Seeking alternative frequencies ............................................ |
26 |
“Frequency” function .......................................................... |
26 |
Autostore function ............................................................... |
27 |
Band Scan function ............................................................. |
28 |
Preset Scan function ............................................................ |
28 |
Radio setup function ........................................................... |
29 |
LOC/DX function ............................................................... |
29 |
Mono/Stereo function .......................................................... |
29 |
PTY-Prog. Type function ..................................................... |
30 |
RDS function ...................................................................... |
31 |
Regional function ................................................................ |
31 |
Audio setup function ........................................................... |
32 |
Bass .................................................................................... |
33 |
Treble ................................................................................. |
33 |
Balance/Fader function ....................................................... |
33 |
Loudness ............................................................................ |
33 |
Equalizer ............................................................................ |
34 |
Auto Vol. Cont. function ...................................................... |
35 |
CD MODE .......................................................................... |
37 |
Shuffle function .................................................................. |
38 |
Scan function ...................................................................... |
39 |
Compression function .......................................................... |
39 |
CD setup function ............................................................... |
39 |
Audio setup function ........................................................... |
42 |
CD-CHANGER MODE ........................................................ |
42 |
Shuffle function .................................................................. |
44 |
Prog function ...................................................................... |
45 |
Scan function ...................................................................... |
45 |
Compression function .......................................................... |
45 |
CDC setup function ............................................................. |
45 |
Audio setup function ........................................................... |
47 |
MP3 MODE ........................................................................ |
47 |
Main screen options and functions ........................................ |
49 |
Audio setup function ........................................................... |
50 |
Direct selection function ...................................................... |
50 |
Define Playlist function ....................................................... |
50 |
Playlist function .................................................................. |
50 |
Compression function .......................................................... |
51 |
Scan function ...................................................................... |
51 |
Shuffle function .................................................................. |
51 |
Playing the Playlist ............................................................. |
52 |
Playing MP3 CD ................................................................. |
53 |
Define Playlist function ....................................................... |
54 |
CELLULAR TELEPHONE WITH VOICE COMMANDS ... |
60 |
GENERAL INFORMATION ................................................ |
60 |
PRELIMINARY OPERATIONS ........................................... |
61 |
Entering and exiting the telephone mode ............................. |
61 |
Inserting the telephone card ................................................ |
63 |
Entering the PIN code ......................................................... |
64 |
INCOMING CALLS ............................................................ |
65 |
OUTGOING CALLS ........................................................... |
65 |
DIALLING A SERVICE NUMBER ...................................... |
66 |
Frequent Numbers function ................................................. |
67 |
Ph/Book function ................................................................ |
68 |
Message function.................................................................. |
75 |
LAST CALL function .......................................................... |
79 |
3

Incoming calls function ........................................................ |
79 |
Outgoing calls function ........................................................ |
80 |
Memo function .................................................................... |
81 |
WAP function ...................................................................... |
82 |
Settings function ................................................................. |
87 |
Options function ................................................................. |
88 |
NAVIGATOR ...................................................................... |
92 |
GENERAL INFORMATION ................................................ |
92 |
SCREEN OPTIONS AND FUNCTIONS .............................. |
93 |
GRAPHIC INSTRUCTIONS ................................................ |
94 |
VOICE INSTRUCTIONS ..................................................... |
94 |
NAVIGATION CD-ROM PLAYER ....................................... |
95 |
MAIN SCREEN ................................................................... |
96 |
OTHER MENUS ................................................................. |
99 |
SELECT ADDRESS ............................................................ |
99 |
Address ............................................................................... |
100 |
Points of interest ................................................................. |
103 |
Last destinations ................................................................. |
105 |
Bookmarks........................................................................... |
105 |
RDS-TMC ........................................................................... |
106 |
Dest 1 – Dest 2 .................................................................... |
108 |
VISUALIZATION ............................................................... |
109 |
DELETE DESTINATION .................................................... |
109 |
VOICE BOOKMARKS ......................................................... |
111 |
MAP PREFERENCES ........................................................ |
113 |
ROUTE OPTIONS .............................................................. |
115 |
ON-BOARD COMPUTER (TRIP) ...................................... |
116 |
GENERAL INFORMATION ................................................ |
116 |
GENERAL TRIP and TRIP B function ................................ |
116 |
ETA (Estimated Time of Arrival) ........................................ |
117 |
Distance to destination ........................................................ |
117 |
Speed limit .......................................................................... |
117 |
Km/miles to empty .............................................................. |
117 |
Instant consumption ............................................................ |
118 |
Trip time ............................................................................. |
118 |
Distance traveled ................................................................. |
118 |
Average speed ..................................................................... |
118 |
Average consumption .......................................................... |
118 |
Trip: speed .......................................................................... |
118 |
Trip: MY CAR ..................................................................... |
119 |
Trip: info ............................................................................. |
121 |
Trip: reset ........................................................................... |
123 |
VOICE RECOGNITION ..................................................... |
124 |
GENERAL INFORMATION ................................................ |
124 |
VOICE COMMANDS .......................................................... |
125 |
Keywords ............................................................................ |
125 |
Examples (voice commands) ............................................... |
132 |
INFORMATION AND ASSISTANCE SERVICES (SOS) .... |
141 |
Medical advice function ....................................................... |
141 |
Roadside assist. function ..................................................... |
142 |
Personal number function ................................................... |
142 |
Emergency 112 function ..................................................... |
142 |
Phone settings function ....................................................... |
143 |
Calls for medical advice or roadside assistance ..................... |
144 |
bCONNECT Infomobility services ....................................... |
145 |
MY CAR ............................................................................. |
148 |
LANGUAGE ....................................................................... |
149 |
DATE & TIME .................................................................... |
150 |
VEHICLE ........................................................................... |
152 |
SYSTEM (programming) .................................................... |
156 |
Instrument panel ................................................................. |
156 |
Video .................................................................................. |
157 |
Power OFF ......................................................................... |
157 |
FAULTS ............................................................................. |
159 |
Internal faults ..................................................................... |
159 |
Overtemperature faults ........................................................ |
159 |
4

ADVICE, CONTROLS
AND GENERAL INFORMATION
ADVICE |
RECEPTION CONDITIONS |
CARE AND MAINTENANCE |
ROAD SAFETY
You are recommended to learn how to use the different functions of the CONNECT Nav+ and in particular of the radio (e.g. storing stations) before starting to drive.
Reception conditions change constantly when driving. Reception can be disturbed by the presence of mountains, buildings, bridges particularly when far away from the broadcaster received.
IMPORTANT When receiving traffic information the volume might be higher than normal.
The structure of the CONNECT Nav+ ensures long years of operation with no need for particular maintenance. In the event of a fault, contact
Lancia Dealership.
Some care must however be taken to ensure the complete efficiency of the CONNECT Nav+:
– the monitor is sensitive to scratching, liquid detergents and UV rays;
WARNING
Too high a volume when driving can put the driver’s life at risk and that of other peo-
ple. Therefore the volume should always be adjusted in such a way that it is always possible to hear the noises of the surrounding environment (e.g. horns, ambulance, police sirens, etc.).
– liquids that penetrate inside may damage the device irreparably.
Clean the front panel and display only using a soft, dry antistatic cloth. Cleaning and polishing products may damage the surface.
CONNECT Nav+
5

Be careful not to knock the display with pointed or hard objects and avoid
touching with the hands. Do not press on the display when cleaning.
CONNECT Nav+
IMPORTANT NOTES
–In the event of a fault the CONNECT Nav+ should be checked and repaired only at Lancia Dealership.
–In case of particularly low temperatures the display might take a certain time to reach the optimum brightness.
–In the case of prolonged parking with high outside temperature, the automatic thermal protection of the system may come into action suspending operation until the passenger compartment temperature falls to acceptable levels.
COMPACT DISC
If a Compact Disc is used on the sound system, remember that the presence of dirt or marks on Compact Discs may cause skipping when playing and poor sound quality. The same happens if Compact Discs are bent by accident.
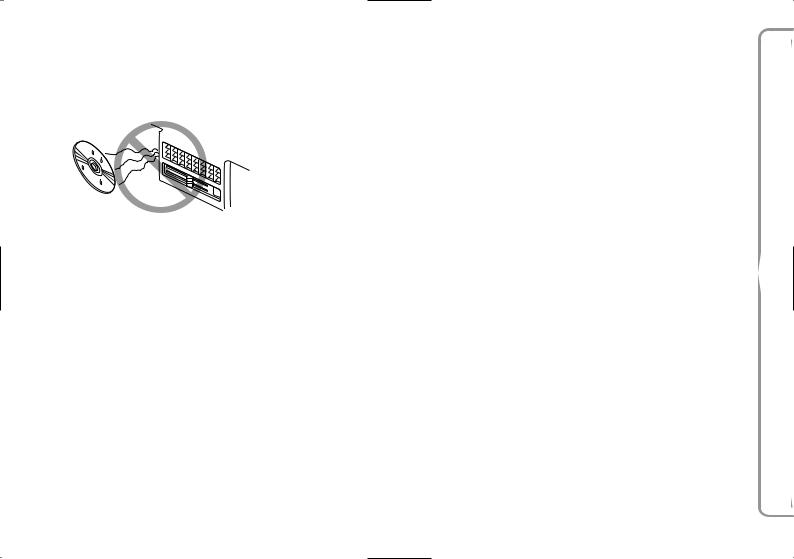
IMPORTANT Never use 8 cm audio or MP3 CDs, even with the special adapter, since this format damages the system.
To obtain optimum playing conditions we give the following advice:
– Only use Audio Compact Discs with the brand:
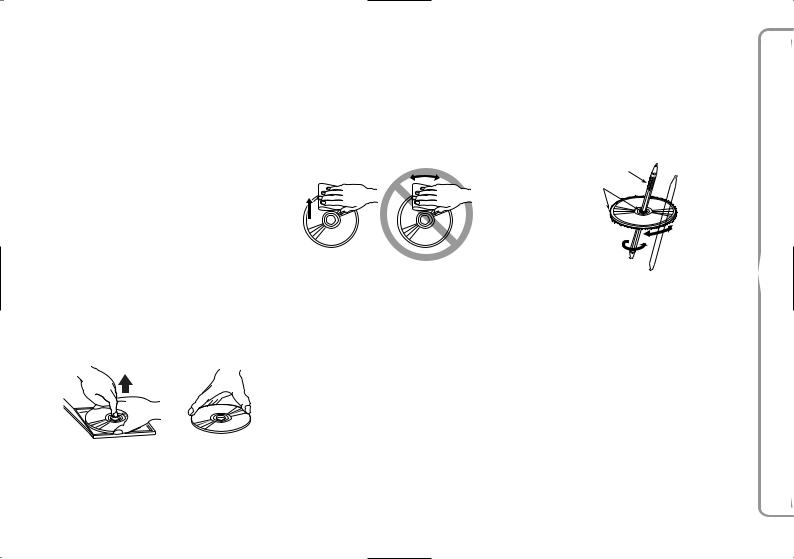
– Carefully clean all Compact Discs of any fingerprints and dust using a soft cloth. Support Compact Discs on the edges and clean from the centre outwards.
6
–Never use chemical products for cleaning (e.g. spray cans, antistatics or thinners) as they might damage the surface of Compact Discs.
–After listening to them put Compact Discs back in their boxes to avoid marking or scoring which could cause skipping when playing.
–Do not expose Compact Discs to direct sunlight, high temperatures or damp for prolonged lengths of time to prevent them from bending.
–Do not stick labels or write on the recorded surface of Compact Discs.
To remove a Compact Disc from its container, press on the centre and raise the disc holding carefully from the edges.
Removing the disc |
Proper way to hold |
|
the compact disc |
Always hold a Compact Disc by the edge. Never touch the surface.
To remove fingerprints and dust, use a soft cloth starting from the centre of the Compact Disc towards the circumference.
No
New discs may be rough around the edges. When using these discs the player might not work or the sound might skip. To remove roughness from the edge of a disc use a ballpoint pen, etc.
Ball-point pen
Roughness
IMPORTANT Do not use the protec- |
CONNECT Nav+ |
|
|
tive sheets for CDs in commerce or |
|
discs with stabilisers, etc. as they |
|
might get stuck in the internal mech- |
|
anism and damage the disc. |
|
7

CONNECT Nav+
IMPORTANT Should copy-protected CDs be used, then, few seconds may be required before the system starts to play them. Moreover, due to the proliferation of always new and different protection methods, it is not guaranteed that the CD player can play whatever protected disc. Copy protection is often indicated on the CD cover in small letters or hard to read characters. Usually it is indicated by writings like: “COPY CONTROL”, “COPY PROTECTED”, “THIS CD CANNOT BE PLAYED ON A PC/MAC”, or it is identified by symbols like:
Protected discs (and their cover) very often are not marked with the audio CD identification symbol:
Notes about Compact Discs
Do not stick labels on the surfaces of a Compact Disc or write on the surface with pens or pencils.
No
Do not use solvents such as stain removers, antistatic sprays or thinners in commerce for cleaning Compact Discs.
No
Do not use highly scratched, cracked or distorted Compact Discs. This could damage the player or prevent it from working properly.
No
8
Do not expose Compact Discs to direct sunlight or any other source of heat.
No
GENERAL INFORMATION
The CONNECT Nav+ controls and provides information for the following systems and functions:
–GPS (Global Positioning System) based navigation;
–Sound system with RDS (Radio Data System) radio, MP3, CD and CD Changer;
–GSM (Global System for Mobile Communication) based telephone with WAP and SOS-call (emergency call) functions;
–Voice recognition (VR module) with voice synthesis and voice memo.
The CONNECT Nav+ system mainly consists of the following:
–a keypad consisting of 28 push-but- tons and 2 knobs;
–controls on steering wheel (8 pushbuttons)
–electronics boxed in a properly housing located inside the dashboard.
The interface is the multifunction information display for all the integrated components.
Multifunction information display
The system uses a graphic 6,5” 16/9 LCD 256-colour TFT display with a resolution of 400 x 240 pixels.
The display brightness can be changed depending on the environment conditions and the driver’s requirements, storing two settings, day and night, which are automatically set to correspond with the turning on/off of the external lights, if this has been set in MY CAR menu.
CONNECT Nav+
9

FRONT PANEL CONTROLS
L0C0284m
CONNECT Nav+
fig. 1
The reference numbers identifying each key, as shown in the figure, are used in the manual to describe the relevant functions. You are therefore recommended to keep this figure within reach when learning how to use the different functions of the Connect Nav+ system.
10

As shown in fig. 1, the CONNECT Nav+ front panel features 28 buttons and two knobs, acting also as buttons.
Certain controls have multiple functions which depend on the system operating conditions active.
Turning on the function chosen is in some cases controlled by the push duration (short or long), as shown in the following table:
Legend |
|
Short push function |
|
Prolonged pressure of the key |
|
|
|
|
(less than 1 second) |
|
(more than 2 seconds) |
1 |
- } |
|
“Voice Recognition” function on/off. |
|
“Voice Memo” function on. This function can |
|
|
|
|
|
be stopped by a further short or long push. |
2 |
- SRC |
|
Audio source selection: FM1/2/3/FMAST – LW/ |
|
|
|
|
|
MW/AMAST – CD – CDC |
|
– |
3 |
- £ |
|
- Forward the phone call set. |
|
- Refuse the incoming call. |
|
|
|
- Re-dial last called number and start call by |
|
- Stop current conversation. |
|
|
|
pressing the button within 5 seconds. |
|
|
|
|
|
- Accept the incoming call |
|
|
4 - TRIP |
|
TRIP computer mode on. |
|
– |
|
5 |
- ÷ |
|
Radio mode: searching the first tunable radio station |
|
Radio mode: activation of the scan function |
|
|
|
with frequency lower than the initial station. CD |
|
with frequency lower than the initial one. |
|
|
|
mode: select previous track. |
|
Station scanning will stop to the first |
|
|
|
MP3 mode: select previous track. |
|
audible station. |
|
|
|
|
CD mode: select previous track. |
|
|
|
|
|
|
|
|
|
|
|
|
MP3 mode: skip to previous 10 tracks |
|
|
|
|
|
or previous folder. |
|
|
|
|
|
|
CONNECT Nav+
11

CONNECT Nav+
Legend |
|
Short push function |
|
Prolonged pressure of the key |
|
|
|
|
(less than 1 second) |
|
(more than 2 seconds) |
6 - ˜ |
|
Radio mode: searching the first tunable radio station |
|
Radio mode: activation of the scan function |
|
|
|
|
with frequency higher than the initial station. |
|
with frequency higher than the initial one. |
|
|
|
CD mode: select next track |
|
Station scanning will stop to the first audible |
|
|
|
MP3 mode: select next track. |
|
station. |
|
|
|
|
|
CD mode: select next track. |
|
|
|
|
|
MP3 mode: skip to next 10 tracks |
|
|
|
|
|
or next folder. |
7 |
|
|
Slot for CD. |
|
– |
8 - ˚ |
|
Eject navigation CD–ROM or audio CD. |
|
– |
|
9 - ˙/II |
|
Play/pause for CD/CDC. |
|
Pause for CD/CDC |
|
10 |
|
|
SIM CARD slot ejection key. |
|
– |
11 |
|
|
Slot for SIM CARD. |
|
– |
12 |
- SOS |
|
SOS mode on |
|
|
|
|
|
(assistance services and functions). |
|
– |
13 |
- • |
|
Infomobility bCONNECT mode on. |
|
– |
14 |
- ESC |
|
This button lets the user get out from a selection list |
|
|
|
|
|
or jump from a submenu to an upper menu. |
|
– |
15 |
|
|
Knob for selecting the required option, press the |
|
|
|
|
|
knob to confirm the option selected. In MAIN |
|
– |
|
|
|
mode it is possible to alternate between day and |
|
|
|
|
|
night luminosity settings. |
|
|
|
|
|
|
|
|
12

Legend |
|
Short push function |
|
Prolonged pressure of the key |
|
|
(less than 1 second) |
|
(more than 2 seconds) |
16 - KEYPAD |
|
Multiple function buttons whose function depends |
|
|
|
|
on the active mode. Their function is always identi- |
|
|
|
|
fied by the buttons displayed on the screen. |
|
|
|
|
In some case the button area covers some adjacent |
|
– |
|
|
buttons: the function of all these buttons will be |
|
|
|
|
the same. |
|
|
17 |
|
Knob for adjusting the volume level and for turn- |
|
|
|
|
ing the system on/off (by pressing it). In MAIN |
|
– |
|
|
mode it is possible to alternate between day and |
|
|
|
|
|
|
|
|
|
night luminosity settings. |
|
|
18 - NAV/RPT |
|
Navigator mode on |
|
RPT function for navigation |
|
|
|
information on/off. |
|
|
|
|
|
|
19 - TEL/OFF |
|
Telephone mode on. |
|
Telephone on/off. |
|
|
|
|
|
20 AUDIO/MUTE |
|
Audio mode on. |
|
MUTE function for audio |
|
|
|
sources on/off. |
|
|
|
|
|
|
21 - MAIN/DARK |
|
Main mode on. |
|
Dark Mode: the display will be fully blacked |
|
|
|
out. It will be lit again by pressing the MAIN, |
|
|
|
|
|
|
|
|
|
|
TEL, SOS, NAV, £, TRIP, and • keys, or |
|
|
|
|
when a telephone call is received. |
|
|
|
|
|
CONNECT Nav+
13
CONNECT Nav+
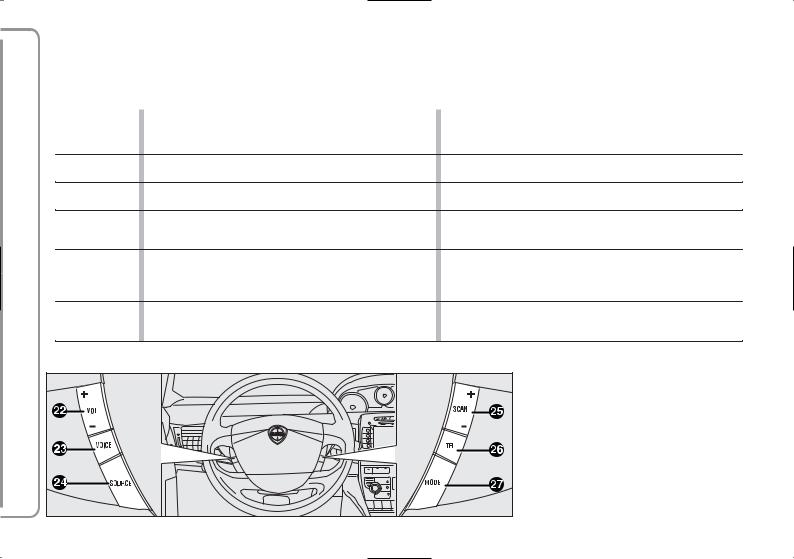
STEERING WHEEL CONTROLS
The main functions of the CONNECT Nav+ are repeated on the steering wheel, which facilitates control. As shown in fig. 2, there are 8 buttons and one encoder. Turning on the function chosen is in some cases controlled by the push duration (short or long), as shown in the following table:
Legend |
Short push function |
Long push function |
|
|
|
(less than 2 seconds) |
(more than 2 seconds) |
22 |
– VOL +/- |
Volume level turning up/down. |
Continuous volume increase or decrease. |
23 |
- VOICE |
“Voice Recognition” function on/off. |
“Voice Memo” function on. This function can be stopped by a further |
|
|
|
short or long push. |
24 |
- SOURCE |
Operating mode choice: FM1/2/3/AST –MW/LW/AMAST – |
|
|
|
CD – CDC. |
– |
25 |
– SCAN +/- |
“SCAN +/–” buttons enable: in Radio mode: |
|
|
|
to tune to the previous or next station; |
– |
|
|
in CD/MP3/CDC mode: playing the previous or next track. |
|
26 |
- TEL |
- Forward the phone call set. |
- Refuse the incoming call. |
|
|
- Re-dial last called number and start call by pressing the button |
- Stop dialling a new phone number. |
|
|
within 5 seconds. |
- Stop current conversation. |
|
|
- Accept the incoming call. |
|
27 – MODE Button “MODE” allows switching through the various
CONNECT Nav+ modes: MAIN, AUDIO, TEL, NAV, MAP, – TRIP, MY CAR, starting from the mode which is currently active.
L0C0281m |
14 fig. 2

GENERAL
INFORMATION
IMPORTANT NOTES FOR USE AND ROAD SAFETY
The CONNECT Nav+ with Radio/ Telephone/Navigator/On-board computer makes it possible to easily control the main functions of the car.
To avoid creating dangerous situations for yourself and others in use of the system, please pay attention to the following points:
–the CONNECT Nav+ must be used keeping full control of the car; in the case of doubt in the use of the functions, it is necessary to stop before performing the various operations;
–use of the cell phone is prohibited near explosive substances.
The navigation system allows you to reach your destination, indicating each route change stored on the navigation CD-ROM. In fact, in calculating the route, the system takes into account of all the information stored concerning the roads, advising the best route. However it cannot take account of the traffic, sudden interruptions or any other inconvenience.
CONNECT Nav+
15

CONNECT Nav+
WARNING
The navigation system helps the driver while driving by suggesting, vocally and graphically, the best route to be followed to reach the preset destination. The suggestions given by the navigation system do not exempt the driver from full responsibility due to driving behaviour and compliance with road and other traffic regulations. The responsibility for road safety always and anyway lies with
the car’s driver.
In carrying out any manoeuvre it is always necessary to follow the rules of the road, regardless of the advice given by the navigation system. If you leave the suggested route, the navigation system will calculate a new one and suggest it to you.
SYSTEM POWER ON
The CONNECT Nav+ can be switched on according to two different methods:
automatic switching on with ignition key to ON;
manual switching on:
– by button 17-fig. 1;
16

Automatic switching on
Turning the ignition key to ON, will turn the CONNECT Nav+ system on automatically, thus activating or making available all the functions described in this manual.
Manual switching on
With the ignition key OFF press key 17-fig. 1 to turn on the CONNECT Nav+ system in MAIN mode and make available the following option modules:
–AUDIO
–PHONE
–NAVIGATION
–MAP
–TRIP
–MY CAR
IMPORTANT With manual switchon, the TRIP and MY CAR functional modules can be accessed with a few restrictions. These limitations are normal when switching the system on manually by button 17fig. 1, since with engine off (key at OFF), the car data transmission devices are not operating.
Turning the ignition key to ON will make all system functions active (See TRIP computer and SETUP sections).
SYSTEM POWER OFF
The CONNECT Nav+ system can be switched off according to two different modes:
–deactivation dependent on ignition key
–deactivation independent of ignition key
The power-off mode can be chosen in the SETUP module (see section SETUP/ Power OFF).
CONNECT Nav+
17

CONNECT Nav+
Deactivation dependent on ignition key (Key-dependent auto-off)
With this mode active, CONNECT Nav+ can be switched off by turning the ignition key to OFF or by pressing button 17-fig. 1.
The display will show the message “PLEASE WAIT WHILE SYSTEM TURNS OFF”.
IMPORTANT Deactivation with ignition key to OFF is delayed and will take place after 20 minutes if the system has a destination set or a phone call is in progress.
Deactivation independent of ignition key (Key-independ. auto-off)
With this mode active, the radio-nav- igation system can be switched off by pressing button 1-fig. 1 or automatically after 20 minutes.
MAIN MODE
Activate MAIN by pressing the MAIN key 21-fig. 1 located on the front panel. This mode displays information on the main system modules fig. 3-4:
–AUDIO
–PHONE
–NAVIGATION
–MAP
–TRIP
–MY CAR
L0C5000g |
18 |
fig. 3 |
|

The upper status bar displays the current time, GPS and GSM field strength, date (day, month, year), outside temperature and the current operating mode.
Turn the right hand knob 15-fig 1 to select the required mode and press the knob to call up the menu.
When the system is turned off, the last active module is saved. When the system is turned back on, the MAIN screen is displayed with the last active module selected.
The lower status bar displays the symbol for switching the display between day/night lighting. When key 16-fig. 1 next to the symbol is pressed, screen brightness may be switched between day and night settings.
For other display setting options, refer to the VIDEO paragraph in the MY CAR chapter.
L0C5001g |
PROTECTION AGAINST THEFT
Power-on authentication procedure
CONNECT Nav+ is protected against theft and unauthorised installation by means of an “authentication procedure”.
This kind of verification involves Body Computer Node (by means of messages exchanged on car network) and is performed at every power-on.
The process will not be actuated if the radio navigation system is turned on by means of key 17-fig. 1. In this case, the radio navigation system will operate normally, without carrying out the authentication procedure.
CONNECT Nav+
fig. 4 |
19 |
|
With ignition key at ON, if authentication fails, system starts working as usual, but the user is asked to enter the 4-digit “Master Code” to allow access to the standard functions.
Master code is unique for each CONNECT Nav+, and is stored in its memory and can not be reset.
To enter the code, access is made possible to a screen fig. 5 which acts in the same way as the screen for the telephone PIN entry request.
Only the code entry numeric keys, key 17-fig. 1 and a few audio control keys will be active.
After the code is entered, a second panel notices the user that the authentication procedure is in progress, fig. 6.
In case the correct code is provided, the system is fully enabled. On the contrary, if a wrong code is entered, screen is cleared and previous box is shown again with the following string:
“Incorrect code entered. Enter master code or turn off system with pushbutton 17-fig. 1.
There is no upper limit to the number of wrong codes that can be entered.
CONNECT Nav+
L0C5002g |
L0C5003g |
20 fig. 5 |
fig. 6 |

The audio system is turned on by pressing briefly the “AUDIO” key 20fig. 1 which displays the main functions of the radio fig. 7.
Keeping button 20-fig. 1 pressed longer, with the audio system on and any operating mode active, the “MUTE” mode is switched on: this way the audio source is muted and the display will show “MUTE”. The “MUTE” function can be switched off either by pressing key 20-fig. 1 for more than 2 seconds or changing the sound volume.
Through the audio system of the CONNECT Nav+ it is possible to control:
–RDS radio with FM/AM reception;
–Compact Disc player;
–CD-Changer (if installed);
–equalizer;
–MP3 player.
AUDIO
SCREEN OPTIONS AND FUNCTIONS
Pressing repeatedly the “SRC” key 2- fig. 1 the available audio sources are displayed cyclically:
–Radio (FM1, FM2, FM3, FMAST, LW, MW, AMAST)
–CD (if the CD is inserted)
–CD-Changer (if installed).
L0C5004g |
6 |
The audio source is automatically changed in one of the following cases:
–broadcasting of traffic information, if the TA function is on and an enabled station is tuned (TP)
–forwarding a phone call
–receiving a phone call
–voice recognition function activation.
CONNECT Nav+
fig. 7 |
21 |
|

CONNECT Nav+
RADIO MODE
Choosing the radio source will display the following functions fig. 8:
–Frequency
–Autostore (active only on the FMAST and AMAST bands)
–Preset scan
–Band scan
–Loc/DX
–Radio setup
–Audio setup.
The radio is always set to receive stations in the RDS (Radio Data System) mode.
The main screen is as follows fig. 8:
–the top section on the left of the screen describes the radio status:
–active frequency band (e.g. FM1);
–tuned station frequency (e.g. 102.50);
L0C5004g |
6 |
–frequency measure unit (MHz for FM band and kHz for AM band);
–RDS channel name (if available) or current station frequency;
–channel information (stereo signal, TP, EON, etc..).
At the screen bottom is given the list of stored stations (in the current band) and the numbers corresponding to storage keys.
There are 6 available memories for each band.
22 fig. 8

At the screen bottom there are the functions that can be activated by pressing the corresponding multifunction keys 16-fig. 1, on the front panel:
–FM activates, on successive pushes FM1, FM2, FM3, FMAST, FM1… radio bands in a loop.
–AM activates, on successive pushes MW, LW, AMAST, MW… radio bands in a loop
–CD activates CD
–CDC activates CD Changer
–1-6 buttons (short push), select a pre-stored station
–1-6 buttons (long push), store the currently active station at the selected button
–AF alternative frequency search on/off
–TA traffic information on/off.
Tuning
This function seeks stations in the chosen band.
Proceed as follows:
–select the frequency band (FM1, FM2, FM3, MW, LW) pressing the “SRC” key repeatedly 2-fig. 1;
–press key “¯¯” 5-fig. 1 or “˙˙” 6- fig. 1 to start the search for tuning the
next or previous station that can be received.
If the “TA” function is on (traffic information), the tuner only seeks stations that broadcast traffic bulletins.
If the “PTY” function is on, the tuner only seeks stations with the selected PTY program (see paragraph "PTYPROG TYPE function”).
Manual station storage
The station being heard can be stored in the range chosen with keypad buttons 16-fig. 1 numbered from “1” to “6” at the bottom of the main screen.
Keep one of these keys pressed until the display shows the number of the key with which the station has been stored; a confirmation beep will indicate that the station has been stored.
CONNECT Nav+
23

CONNECT Nav+
Listening to stored stations
Proceed as follows:
–choose the required frequency band (FM1, FM2, FM3, FMAST, LW, MW or AMAST) pressing repeatedly the “SRC” key 2-fig. 1;
–press briefly one of the station storage keys on the keypad 16-fig. 1 numbered from “1” to “6” at the bottom of the main screen.
In the FM1, FM2, FM3 and FMAST bands, if reception is poor and the “AF-Alt. Freq.” alternative frequency seek function is on, a station with the strongest signal that is broadcasting the same programme is automatically sought.
TA - TRAFFIC INFORMATION
Certain stations in the FM band (FM1, FM2, FM3 and FMAST) are also enabled to broadcast information about the conditions of the traffic. In this case the displays shows the abbreviation “TP”.
To turn on/off the TA function (Traffic Announcement) for traffic bulletins, press briefly one of the keypad keys 16-fig. 1 set near the icon key TA.
When the TA function is on, the display shows “TA” and the wording on the icon key is darkened.
The listening conditions and information shown on the display may be the following:
–TA and TP: you are tuned to a station that broadcasts traffic information and the traffic information function is on
–TP: you are tuned to a station that broadcasts traffic information but the traffic information function is off
–TA: the traffic information function is on but you are tuned to a station that does not broadcast traffic information
–TA and TP not shown on the display: you are tuned to a station that does not broadcast traffic information and the traffic information function is off.
With the TA function on it is possible:
1) to receive traffic information also if the CD/CDC/MP3 player is working;
2) to receive traffic information at a preset minimum level also with the radio volume down completely.
24

The operations to be carried out for each of the above two conditions are listed below.
1) If you wish to receive traffic information while listening to a CD, before inserting the CD, tune to a station enabled to broadcast traffic information (TP) and turn the TA function on. If, while playing the CD, this station broadcasts traffic information, CD playing will be temporarily stopped and resumed automatically at the end of the message.
If the CD player is already operating and, at the same time, you wish to receive traffic information, actuating the TA function will cause the radio to tune to the latest station listened to on the FM band (if the station controls the “TP”); otherwise, automatic search will be started to find a station that controls the “TP”.
2) To receive traffic information though not listening to the radio:
–turn on the TA function, so that the display shows the abbreviation “TA”;
–tune to a station enabled to broadcast traffic information so that “TP” is shown on the display;
This way, if that station broadcasts traffic information, this will be heard at a minimum predefined volume.
A telephone call has higher priority than traffic message.
IMPORTANT In certain countries, radio stations exist which though the TP function is active (the display shows “TP”), do not broadcast traffic information.
If the radio is operating on the AM band, selecting the FM band will cause the latest listened station to be tuned. If the selected station does not send traffic information (the “TP” writing does not appear on the display), automatic search will be started to seek an enabled station to which the radio will tune.
If the volume is changed during a traffic bulletin the value is not shown on the display and the new value is kept only for the bulletin in progress.
CONNECT Nav+
25

CONNECT Nav+
AF - SEEKING ALTERNATIVE FREQUENCIES
Within the RDS system the radio can work in two different modes:
–AF ON: alternative frequency search on;
–AF OFF: alternative frequency search off.
When the signal of the RDS station tuned weakens, the following two cases may occur:
–With AF ON the RDS system activates automatic tuning of the optimum frequency of the station chosen, with the stations enabled, therefore the radio is automatically tuned to the station with the strongest signal that is broadcasting the same programme. During the journey it will thus be possible to continue listening to the station chosen without having to change the frequency when changing area. Of course, the station being listened to must be receivable in the area the car is crossing.
–With AF OFF the radio will not tune the strongest station automatically and it will have to be found manually using the tuner buttons.
To turn on/off this function, press briefly one of the keypad keys 16fig. 1 set near the icon key AF.
When the AF function is on, the display shows “AF” and the wording on the icon key is darkened.
The RDS channel name (if available) is still shown on the display.
“FREQUENCY” FUNCTION
The “Frequency” function enables to tune the required radio station by turning knob 15-fig. 1 clockwise or counter-clockwise.
To turn the “Frequency” function on, turn knob 15-fig. 1 to select the corresponding icon key and then press it.
To turn this function off, press again knob 15-fig. 1.
26

“Autostore” FUNCTION (AUTOMATIC STATION STORAGE)
After selecting the AMAST or FMAST band, to turn on the Autostore function (automatic station storage), select the “AUTOSTORE” icon with the knob 15-fig. 1 then press it to confirm.
When this function is on, the radio automatically stores the stations with the strongest signal:
–6 FM stations in the FMAST band or
–6 AM stations in the AMAST band.
During automatic storage the display shows “Autostore”.
Stations will be stored automatically on the preset keys from “1” to “6” of the keypad 16-fig. 1. After storage, the radio tunes automatically to the first station of the FMAST band, corresponding to the frequency stored on the preset key “1” of the keypad 16fig. 1.
Every station is stored only once, except in the case of regional programmes, which in certain cases might be stored twice.
The behaviour of the set during Autostore is as follows:
–pressing one of the preset keys from “1” to “6” the automatic storage process is interrupted and the station stored with that key is tuned
–changing the audio source (Radio, CD, CD-Changer) during the automatic storage process, the Autostore function is interrupted.
CONNECT Nav+
27

IMPORTANT It may occur that the Autostore function is unable to find 6 stations with a strong signal; in this case only the stations found are stored.
IMPORTANT Activating the “Autostore” function cancels the stations stored previously in the FMAST or AMAST band.
CONNECT Nav+
“Preset Scan” FUNCTION
The “Preset scan” function activates stored station scanning in the chosen frequency band. Each stored station will be played for about 10 seconds.
To turn on the “Preset scan” function, select the “Preset scan” icon with the knob 15-fig. 1 and then press it to confirm.
During stations scan, the scanned one is highlighted in the stored stations window and corresponding low-bar button too. During operations the string “Preset Scan” is displayed in the main window.
Scanning will be interrupted by pressing knob 15-fig. 1 again (by taking care to be positioned onto the “Preset Scan” graphic key), or by selecting a station previously memorized.
“Band Scan” FUNCTION
The “Band scan” function activates station scanning in the chosen frequency band. Each station frequency will be displayed for about 10 seconds.
To turn the “Band scan” function on, select the “Band scan” icon with the knob 15-fig. 1 then press it to confirm.
During scanning, the display will show “Band Scan”.
Scanning will be interrupted by pressing knob 15-fig. 1 again (by taking care to be positioned onto the “Preset
Scan” graphic key), or by selecting a station previously memorized.
28

LOC/DX function
(tuner sensitivity adjustment)
With this function it is possible to change the sensitivity of automatic radio station searching. When low sensitivity “LOC” is set, only stations with excellent reception are sought; when high sensitivity “DX” is set, all the stations are sought. If you are in an area with a large number of broadcasters and you want the ones with the strongest signal, choose low sensitivity “LOC”.
To choose between low or high tuner sensitivity, select the “LOC/DX” function with the knob 15-fig. 1 and then press it repeatedly. The abbreviation of the sensitivity chosen will be shown on the display:
–LOC = low sensitivity;
–DX = high sensitivity.
“Radio setup” FUNCTION
To turn on the “Radio Setup” function, select the “Radio Setup” icon with the knob 15-fig. 1 and press it to confirm. This function enables to go to next window to adjust radio settings. When in this window it is not possible to change the audio source. The following functions are displayed fig. 9:
–Mono/Stereo
–PTY-Prg. Type
–RDS
–Regional.
Choosing and confirming “OK”, goes back to the previous screen storing the adjustments set. Pressing “ESC” 14fig. 1 goes back to the previous screen resuming the settings stored previously.
L0C5006g |
Mono/Stereo function
To pass from “Mono” to “Stereo” or vice versa, select “Mono/Stereo” by turning the knob 15-fig. 1 and press it to confirm. This function is only available on FM band.
When stereo reception is on the display shows “STEREO”, when it is off the display shows “MONO”.
When the signal of the station tuned is weak, to improve the sound quality, it is advisable to switch to “MONO”.
CONNECT Nav+
fig. 9 |
29 |
|
 Loading...