Konica Minolta DI351, DI200, DI200F, DI251, DI251F Manual
...
7664-4668-23
Network Interface Card
for Pi3502
Operator´s Manual

Foreword
Software License Agreement and Warranty
(i)For the US and Canada
Software License Agreement
Important:
Before installing the software please carefully read this License Agreement. The installation of this software indicates your acceptance of the terms and conditions of this License. If you do not agree with the terms and conditions, you should return the software to Minolta Corporation for a full refund.
Ownership:
The software is owned and copyrighted by Minolta Corporation and its third party suppliers. Your license confers no title or ownership in the Software and should not be construed as a sales of any right in the Software. Minolta’s third party suppliers may protect their rights in the event of any violation of these terms.
The License permits you to:
1.Use this software in the conduct of business without limit when the software is used with the intended Minolta Product.
2.SOFTWARE: You may install and use the SOFTWARE on a computer to which the Minolta Printer is attached.
OR
NETWORK: If the software is installed on a computer acting as a network server, any number of computers or workstations may access or utilize the printer services of that server. The printer services are described in the printed materials accompanying the Printer Network Card.
i

Foreword
The following are not permitted:
1.The making of alternations to the software.
2.The right to grant sub-license, leases or other rights to others.
3.The merging of this software product or any portion of it into another product or program.
4.The reverse engineering, decompilation or disassembly of the software.
Export Requirements:
You may not export or re-export the software or any copy or adaptation in violation of any applicable laws or regulations.
Notes:
By installing this software, you acknowledge that you have read this agreement, understand it and agree to be bound by its terms and conditions. You further agree that this is the complete and exclusive statement of the agreement between us and supersedes any proposal or prior agreement either oral or written, and any other communication between us relating to the subject matter of this agreement. You further agree that if Minolta Corporation is required to engage in any proceeding, legal or otherwise to enforce its rights under this agreement, Minolta Corporation shall be entitled to recover from License, in addition to any other sums due, reasonable Attorney fees, cost and disbursements.
ii

Foreword
Limited Software Warranty
Limited Warranty
Minolta warrants that the software will perform in accordance with the accompanying written materials for a period of (90) ninety days from the date of purchase. Minolta does not warrant that the operation of the program will meet your requirements. This limited warranty gives you specific legal rights. You may have others, which vary from state/jurisdiction to state/jurisdiction.
Purchase Remedies
Minolta’s entire liability and your exclusive remedy with respect to the software shall be at Minolta’s option either, repair or replacement of the software. The software must be returned to Minolta with a copy of your proof of purchase. The Limited Warranty is void if failure of the software has resulted from accident, abuse, or misapplication. Any replacement software will be warranted for the remainder of the original warranty period or (30) thirty days, whichever is longer.
The remedies provided herein are customer’s sole and exclusive remedies. In no event shall Minolta Corporation be liable for any lost profits, direct, indirect, special, incidental, or consequential damages, whether based on contract, tort, or any other legal theory.
Minolta Network Card Warranty
Warranty Term
Minolta Network Cards have a (1) One Year Warranty. The Network Card must be returned to Minolta for repair or replacement at Minolta’s discretion.
Warranty Coverage
Minolta Corporation warrants this product to be free from defects in workmanship and materials for a period of one year from the date of receipt of the unit. If the unit fails to function as written in the User’s manual, Minolta will repair or replace the unit at no charge. Minolta will ship at their expense an exchange unit overnight to replace the defective unit.
The remedies provided herein are the customer’s sole and exclusive remedies. In no event shall Minolta Corporation be liable for any lost profits, direct or indirect, special, incidental, or consequential damages, whether based on contract, tort, or other legal history.
iii

Foreword
Software License Agreement and Warranty
(ii)For all other countries including Europe
Software License Agreement
Important:
Before installing the software please carefully read this License Agreement. The installation of this software indicates your acceptance of the terms and conditions of this License. If you do not agree with the terms and conditions, you should return the software to Minolta Co., Ltd. for a full refund.
1.SOFTWARE
Software means the computer program contained in this package (which may include digitally encoded, machine readable, scalable outline font data as encoded in a special format), together with all codes, techniques, software tools, format, design, concepts, methods and ideas associated with the computer program and all documentation related thereto.
2.LICENSE AGREEMENT
This is a license agreement and not an agreement for sale. Minolta owns, or has been licensed from other owners, copyrights in the Software. Except as stated in this Agreement, you are not granted any rights to patents, copyrights, trade names, trademarks (whether registered or unregistered), or any other rights, franchises or license in respect of the Software. Title to the Software and any copy made from it is retained by Minolta or such other owners.
3.LICENSE
Minolta, hereby grants to you, and you agree to accept a non-exclusive, non transferable and limited license and you may:
(1)install and use the Software on a single computer and one associated printer.
(2)use the Software only for your own customary business or personal purpose.
(3)make a copy of the Software for backup or installation purposes only in support of the normal and intended use of the Software.
iv

Foreword
(4)transfer possession of copies of the Software to another party by transferring a copy of this Agreement and all other documentation along with at least one complete unaltered copy of the Software, provided that
(i) you either transfer Software to such other party or destroy all your other copies of the Software (ii) such transfer of procession terminates your license from Minolta, and (iii) such other party shall accept and be bound by these license terms by its initial use of the Software.
4.RESTRICTIONS
(1)You shall not without the written consent of Minolta:
(i)use, copy, modify, merge or transfer copies of the Software except as provided herein.
(ii)reverse assemble or reverse compile the Software except as permitted by law; or
(iii)Sublicense, rent, lease or distribute the Software or any copy thereof.
(2)You shall not export or re-export the Software in any form under violation of export restrictions by the government of your country.
5.LIMITED WARRANTY
Minolta warrants the media on which the Software is recorded to be free from defects in materials and workmanship under normal use. Warranty details and limitations for the Software are described in the Statement of Limited Warranty which was supplied with the hardware. With the exception of the foregoing express warranties applicable to hardware and media only, the Software is not warranted but provided.
SUCH WARRANTIES ARE IN LIEU OF ALL OTHER WARRANTIES, EXPRESSED OR IMPLIED, INCLUDING, BUT NOT LIMITED TO, THE IMPLIED WARRANTIES OF MERCHANTABILITY AND FITNESS FOR A PARTICULAR PURPOSE.
6.LIMITATION OF REMEDIES
IN NO EVENT WILL MINOLTA BE LIABLE FOR ANY LOST PROFITS, LOST DATA, OR ANY OTHER INCIDENTAL OR CONSEQUENTIAL DAMAGES THAT RESULT FROM USE OR INABILITY TO USE THE SOFTWARE, EVEN IF MINOLTA OR ITS AUTHORIZED REMARKETERS HAVE BEEN ADVISED TO THE POSSIBILITY OF SUCH DAMAGES OR FOR ANY CLAIM BY YOU BASED ON A THIRD PARTY CLAIM.
v

Foreword
7.TERMINATION
You may terminate your license at any time by destroying the Software and all your copies of it or as otherwise described in these terms. Minolta may terminate your license if you fail to comply with these terms. Upon such termination, you agree to destroy all copies of the Software in your possession.
8.GOVERNING LAW
This Agreement shall be governed by the laws of the country where the delivery is made to the original customer.
9.GOVERNMENT END USERS
If you are acquiring the Software on behalf of any unit or agency of the United States Government, the following provisions apply. Use, duplication or disclosure by the Government is subject to restrictions as set forth in the Rights in Technical Data and Computer Software clause at FAR 252.227-7013, subdivision(b)(3)(ii) or subparagraph (c)(1)(ii), as appropriate. Further use, duplication or disclosure is subject to restrictions applicable to restricted rights software as set forth in FAR 52.227-19(c)(2).
YOU ACKNOWLEDGE THAT YOU HAVE READ THIS AGREEMENT, UNDERSTAND IT, AND AGREE TO BE BOUND BY ITS TERMS AND CONDITIONS. NEITHER PARTY SHALL BE BOUND BY ANY STATEMENT OR REPRESENTATION NOT CONTAINED IN THIS AGREEMENT. NO CHANGE IN THIS AGREEMENT IS EFFECTIVE UNLESS WRITTEN AND SIGNED BY PROPERLY AUTHORIZED REPRESENTATIVES OF EACH PARTY. BY INSTALLING THIS SOFTWARE, YOU AGREE TO ACCEPT THE TERMS OF THIS AGREEMENT.
vi

Foreword
User Instructions
For the U.S.A. Users
FCC Part 15-Radio Frequency Devices
This device complies with Part 15 of the FCC Rules. Operation is subject to the following two conditions: (1) This device may not cause harmful interference, and (2) this device must accept any interference received, including interference that may cause undesired operation.
NOTE
This equipment has been tested and found to comply with the limits for a Class A digital device, pursuant to Part 15 of the FCC Rules. These limits are designed to provide reasonable protection against harmful interference when the equipment is operated in a commercial environment. This equipment generates, uses, and radiate radio frequency energy and if not installed and used in accordance with the instruction manual, may cause harmful interference to radio communications.
Operation of this equipment in a residential area is likely to cause harmful interference in which case the user will be required to correct the interference at his own expense.
WARNING
The design and production of this unit conform to FCC Regulations, and any changes or modifications must be registered with the FCC and are subject to FCC control. Any changes made by purchaser or user without first contacting the manufacturer will be subject to penalty under FCC regulations.
FCC-F02
This device must be used with shielded interface cables. The use of nonshielded cables is likely to result in interference with radio communications and is prohibited under FCC rules.
vii

Foreword
For Canada Users
Interference-Causing Equipment Standard (ICES-003 Issue 3)
This Class A digital apparatus complied with Canadian ICES-003
Cet appareil numérique de la classe A est conforme à la norme NMB-003 du Canada.
IC-F03
For European Users
CE Marking (Declaration of Conformity)
This product complies with the following EU directives: 89/336/EEC, 73/23/EEC and 93/68/EEC directives.
This declaration is valid for the area of the European Union.
This device must be used with shielded interface cables. The use of nonshielded cables is likely to result in interference with radio communications and is prohibited under EU directives.
For Users of the Class B regulation’s countries
This device must be used with shielded interface cables. The use of nonshielded cables is likely to result in interference with radio communications and is prohibited under CISPR 22 rules and local rules.
For Users except the Class B regulation’s countries
WARNING
This is a Class A product. In a domestic environment this product may cause radio interference in which case the user may be required to take adequate measures.
This device must be used with shielded interface cables. The use of nonshielded cables is likely to result in interference with radio communications and is prohibited under CISPR 22 rules and local rules.
viii

Foreword
Welcome
Congratulations on your selection of this Minolta Network Interface Card for Pi3502.
This Operator’s Manual provides information about how to set up the Network Interface Card and operate the Digital Copier in a network environment.
Trademark Acknowledgements
Minolta is a registered trademark of MINOLTA CO., LTD. Page Scope is a trademark of MINOLTA CO., LTD.
Apple, AppleTalk, and Macintosh are registered trademarks of Apple Computer, Inc.
Ethernet is a registered trademark of Xerox Corporation.
HP LaserJet III, HP LaserJet IIISi, HP LaserJet 4Si, are registered trademarks of Hewlett-Packard Company. HP UNIX is a trademark of Hewlett-Packard Company.
Linux is a registered trademark of Linus Torvalds.
Microsoft, Windows, and Windows NT are registered trademarks of Microsoft Corporation.
Netscape Communications, the Netscape Communications logo, Netscape Navigator, Netscape Communicator, and Netscape are trademarks of Netscape Communications Corporation.
Novell and NetWare are registered trademarks of Novell, Inc. PostScript is a registered trademark of Adobe Systems, Inc. Red Hat is a registered trademark of Red Hat, Inc.
SCO UNIX is a trademark of The Santa Cruz Operation, Inc. Sun and Solaris are trademarks of Sun Microsystems, Inc. ULTRIX is a trademark of Digital Equipment Corporation. UNIX is a registered trademark of The Open Group.
All other product names are trademarks or registered trademarks of their respective holders.
Copyright 2001 MINOLTA CO., LTD
The information contained in this manual is subject to change without notice.
ix
Foreword
About This Manual
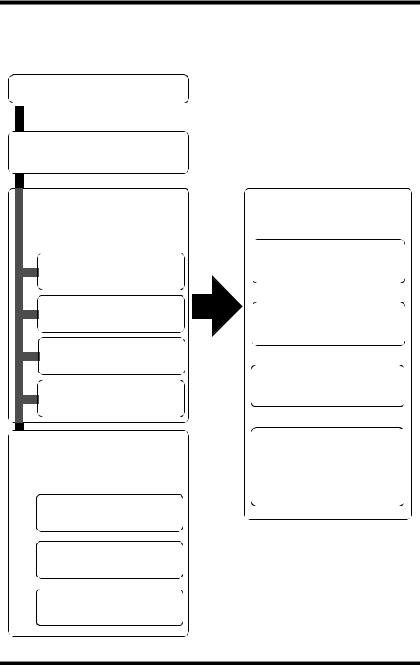
The following shows the general outline of this manual.
Chapter 1 - Getting Ready
Chapter 2 - Installing the
Network Card
Read the section that covers your particular network environment.
Chapter 3 - Windows
Configuration
Chapter 4 - NetWare
Configuration
Chapter 5 - Macintosh
Configuration
Chapter 6 - UNIX
Configuration
Read the following chapters when necessary.
Chapter 10 - Troubleshooting
Chapter 11 - Jumper
Switch Settings
Chapter 12 - Specifications
Reference these chapters as required.
Chapter 7 - Setting Up IP
Parameters
Chapter 8 - Using the
Utility Software
Chapter 9 - Using Telnet to Make Settings
Appendix A - Installing and Setting Up Network Protocol (Windows)
x

|
|
Contents |
|
|
|
|
|
|
|
CONTENTS |
|
Chapter 1: Getting Ready |
|
|
1-1 Bundled Items .................................................. |
1-2 |
|
1-2 System Requirements ..................................... |
1-3 |
|
Chapter 2: Installing the Network Card |
|
|
2-1 Preparing the Digital Copier ........................... |
2-1 |
|
2-2 Connecting a Network Cable .......................... |
2-2 |
|
2-3 Setting Up the Network Card .......................... |
2-3 |
|
Chapter 3: Windows Configuration |
|
|
3-1 Windows 95/98 ................................................. |
3-2 |
|
3-1-1 Peer-to-Peer Printing with TCP/IP ........... |
3-2 |
|
3-1-2 Peer-to-Peer Printing with IPX/SPX......... |
3-4 |
|
3-2 Windows NT ..................................................... |
3-5 |
|
3-2-1 Peer-to-Peer Printing with TCP/IP ........... |
3-5 |
|
3-2-2 |
LPR Printing ............................................ |
3-7 |
3-3 Windows 2000 .................................................. |
3-9 |
|
3-3-1 Peer-to-Peer Printing with TCP/IP ........... |
3-9 |
|
3-3-2 |
LPR Printing .......................................... |
3-11 |
3-3-3 |
IPP Printing............................................ |
3-13 |
Chapter 4: NetWare Configuration |
|
|
4-1 NetWare 3.x Configuration .............................. |
4-2 |
|
4-1-1 Starting up PCONSOLE and Selecting the |
||
|
File Server ............................................... |
4-3 |
4-1-2 Creating a Print Queue............................ |
4-4 |
|
4-1-3 Specifying the Print Server Name ........... |
4-4 |
|
xi

Contents
4-1-4 Configuring the Print Server .................... |
4-5 |
|
4-1-5 Assigning Print Queues to the Printer ..... |
4-6 |
|
4-1-6 Setting Up the Printer NOTIFY Options |
|
|
|
(Optional) ................................................. |
4-7 |
4-1-7 Installing the Print Server on Multiple File |
||
|
Servers .................................................... |
4-8 |
4-1-8 |
Primary File Server.................................. |
4-9 |
4-1-9 |
Preferred File Server ............................... |
4-9 |
4-2 NetWare 4.x Configuration Using Bindery |
|
|
Emulation........................................................ |
4-10 |
|
4-2-1 Confirming the Bindery Context............. |
4-10 |
|
4-2-2 Configuring in the Bindery Mode ........... |
4-11 |
|
4-3 Configuration Using Novell Directory |
|
|
Services .......................................................... |
4-13 |
|
4-3-1 Creating a Printer Object ....................... |
4-15 |
|
4-3-2 Creating a Print Server Object............... |
4-16 |
|
4-3-3 Creating a Print Queue Object .............. |
4-16 |
|
4-3-4 Assigning a Printer Object ..................... |
4-18 |
|
4-3-5 Assigning a Print Server Object............. |
4-19 |
|
4-3-6 |
Checking Assignments .......................... |
4-20 |
4-3-7 |
Printer Configuration and Reset ............ |
4-21 |
4-4 Configuring NetWare Enterprise Print Services |
||
(NDPS)............................................................. |
4-21 |
|
4-4-1 |
Creating NDPS Manager ....................... |
4-22 |
4-4-2 Configuring an NDPS Gateway for IPX .. |
4-22 |
|
4-4-2-1 Prerequisites ................................... |
4-23 |
|
4-4-2-2 Configuring Queue-Based Printers .. |
4-23 |
|
4-4-3 |
Bindery Reference Queues ................... |
4-24 |
4-4-3-1 Prerequisites ................................... |
4-25 |
|
4-4-3-2 Configuring Bindery Reference |
|
|
|
Queues............................................ |
4-25 |
4-4-3-3 Configuring the Queue-Based Printer |
||
|
Option at the Server Console .......... |
4-26 |
xii

Contents
4-4-4 Configuring an NDPS Gateway for IP.... |
4-27 |
|
4-4-4-1 Configuring Remote Printers Running |
||
|
in lpr Mode....................................... |
4-27 |
4-4-4-2 Using the Remote Printer LPR/TCPIP |
||
|
Option at the Server Console .......... |
4-28 |
4-4-5 Public-Access Printers and Controlled- |
|
|
|
Access Printers...................................... |
4-29 |
4-4-5-1 Creating Public-Access Printers in |
|
|
|
NetWare Administrator .................... |
4-29 |
4-4-5-2 Converting Public-Access Printers to |
||
|
Controlled-Access Printers.............. |
4-30 |
4-4-6 Adding NDPS Printers from Windows |
|
|
|
Clients.................................................... |
4-31 |
Chapter 5: Macintosh Configuration |
|
|
5-1 Setting Up AppleTalk ....................................... |
5-1 |
|
5-2 Selecting and Setting Up the Printer.............. |
5-1 |
|
5-3 Network Card Configuration ........................... |
5-2 |
|
Chapter 6: UNIX Configuration |
|
|
6-1 Printer-based lpd Configuration..................... |
6-3 |
|
6-1-1 |
BSD System ............................................ |
6-4 |
6-1-2 |
AIX Version 2.5 ........................................ |
6-5 |
6-1-3 |
AIX 4.0 ..................................................... |
6-6 |
6-1-4 HP-UX...................................................... |
6-6 |
|
6-1-5 AS/400 ..................................................... |
6-7 |
|
6-1-6 DEC ULTRIX 4.3 RISC, OSF1/ALPHA .... |
6-8 |
|
6-1-7 |
SCO UNIX ............................................... |
6-9 |
6-1-8 System V Release 4, Solaris 2.x ........... |
6-10 |
|
xiii

Contents
6-1-9 Linux ...................................................... |
6-11 |
|
6-1-9-1 Configuring the Printer Using the |
|
|
|
printtool Command .......................... |
6-11 |
6-1-9-2 Configuring the Printer by Editing the |
||
|
printcap File..................................... |
6-12 |
6-2 Host-based lpd Configuration ...................... |
6-13 |
|
6-2-1 |
Loading the Program ............................. |
6-14 |
6-2-2 |
Selecting Filters ..................................... |
6-14 |
6-2-2-1 Selecting a Filter Manually .............. |
6-15 |
|
6-2-3 Solaris Version 1, OSF1 ........................ |
6-15 |
|
6-2-4 |
DEC ULTRIX 4.3.................................... |
6-17 |
6-2-5 |
HP-UX System....................................... |
6-18 |
6-2-6 System V (Solaris Version 2), System V |
|
|
|
Release 4/386 Base Machine................ |
6-20 |
6-2-7 |
SCO UNIX ............................................. |
6-22 |
6-2-8 |
AIX RISC System/6000 ......................... |
6-24 |
6-2-8-1 Virtual Printer Commands ............... |
6-26 |
|
6-2-8-2 AIX Print Command......................... |
6-26 |
|
Chapter 7: Setting Up IP Parameters |
|
|
7-1 Assigning IP Addresses Using ARP |
|
|
(For Windows) .................................................. |
7-2 |
|
7-2 Assigning IP Addresses Using ARP |
|
|
(For UNIX) ......................................................... |
7-4 |
|
7-3 Assigning IP Addresses Using the BOOTP |
|
|
Daemon (For UNIX) .......................................... |
7-6 |
|
7-4 Assigning IP Addresses Using the RARP |
|
|
Daemon (For UNIX) .......................................... |
7-7 |
|
7-5 Using the DHCP Daemon (For UNIX) ............. |
7-9 |
|
xiv

Contents
Chapter 8: Using the Utility Software |
|
|
8-1 Management Access Program (Windows) |
.... 8-1 |
|
8-1-1 |
Installing MAP.......................................... |
8-2 |
8-1-2 |
Using MAP............................................... |
8-2 |
8-2 Peer-to-Peer Printing Program (Windows) .... |
8-5 |
|
8-2-1 IP Peer-to-Peer Printing Program |
|
|
|
(Windows)................................................ |
8-5 |
8-2-1-1 Installing the IP Peer-to-Peer Printing |
||
|
Program............................................. |
8-5 |
8-2-1-2 Using the IP Peer-to-Peer Printing |
|
|
|
Program............................................. |
8-6 |
8-2-2 IPX Peer-to-Peer Printing Program |
|
|
|
(Windows)................................................ |
8-9 |
8-2-2-1 Installing the IPX Peer-to-Peer Printing |
||
|
Program............................................. |
8-9 |
8-3 BOOTP (Windows) ......................................... |
8-12 |
|
8-3-1 |
Using BOOTP ........................................ |
8-13 |
8-4 NIManage for AppleTalk (Macintosh) ........... |
8-14 |
|
8-4-1 |
Using NIManage .................................... |
8-14 |
8-4-1-1 Configuration ................................... |
8-16 |
|
8-4-1-2 Error Log ......................................... |
8-17 |
|
8-4-1-3 Setting Up the Protocol ................... |
8-17 |
|
8-4-1-4 Setting Up the Status Page ............. |
8-18 |
|
8-5 NWSetup (Windows)...................................... |
8-19 |
|
8-5-1 |
Installing NWSetup ................................ |
8-19 |
8-5-2 |
Using NWSetup ..................................... |
8-20 |
8-5-2-1 Selecting a Print Server................... |
8-20 |
|
8-5-2-2 Novell NetWare Settings ................. |
8-21 |
|
8-5-2-3 Print Server Settings ....................... |
8-23 |
|
8-5-2-4 Setting Up Notification..................... |
8-26 |
|
xv

Contents
Chapter 9: Using Telnet to Make Settings |
|
|
9-1 Establishing a Telnet Connection .................. |
9-2 |
|
9-2 Menu Items ....................................................... |
9-3 |
|
9-2-1 |
IP Parameters .......................................... |
9-3 |
9-2-2 |
LPD Printers ............................................ |
9-3 |
9-2-3 Protocols.................................................. |
9-3 |
|
9-2-4 |
Reset Unit ................................................ |
9-3 |
9-2-5 |
Restore Factory Defaults ......................... |
9-4 |
9-2-6 |
Change Password.................................... |
9-4 |
9-2-7 |
Exiting Telnet (Exit) .................................. |
9-5 |
Chapter 10: Troubleshooting |
|
|
10-1 LED Status Indicators.................................. |
10-1 |
|
10-2 Troubleshooting ........................................... |
10-3 |
|
10-2-1 General Troubleshooting Checklist ........ |
10-3 |
|
10-2-2 NetWare Troubleshooting Checklist....... |
10-4 |
|
10-3 Resetting to Factory Defaults ..................... |
10-6 |
|
Chapter 11: Jumper Switch Settings |
|
|
11-1 Network Card and Jumper Pin Positions ... |
11-2 |
|
11-2 Resetting to Factory Defaults ..................... |
11-2 |
|
11-3 Address Selection........................................ |
11-3 |
|
11-4 Bus Handshaking......................................... |
11-3 |
|
Chapter 12: Specifications |
|
|
12-1 Network Card ................................................ |
12-1 |
|
12-2 10/100BaseT Cable....................................... |
12-1 |
|
xvi

Contents
Appendix A: Installing and Setting Up Network |
|
Protocol (Windows) |
|
A-1 Installing and Setting Up TCP/IP |
|
(Windows 95/98/Me)......................................... |
A-1 |
A-2 Installing and Setting Up IPX/SPX-compatible |
|
Protocol (Windows 95/98/Me) ......................... |
A-2 |
A-3 Installing and Setting Up TCP/IP and TCP/IP |
|
Printing (Windows NT 4.0) .............................. |
A-3 |
A-3-1 Installing and Setting Up TCP/IP ............. |
A-3 |
A-3-2 Installing and Setting Up the Microsoft |
|
TCP/IP Printing Service........................... |
A-4 |
A-4 Installing and Setting Up TCP/IP |
|
(Windows 2000)................................................ |
A-5 |
Appendix B: FTP Printing |
|
B-1 FTP Printing...................................................... |
B-1 |
Appendix C: Index
xvii

MEMO

Getting Ready Chapter 1
Chapter 1
Getting Ready
Getting Ready |
Chapter 1 |
|
|

Introduction
This Network Interface Card is a multi-protocol network card that provides Ethernet connection for the Minolta Pi3502 printer controller and offers the following features.
•Automatic Ethernet type detection (10BaseT, 100BaseT)
•Fully transparent AppleTalk printing support for the Macintosh, including support for binary PostScript printing.
•Peer-to-peer printing program allows printing on a network without going through a server
-Peer-to-Peer Printing with TCP/IP (Windows 95/98/2000/NT 4.0)
-Peer-to-Peer Printing with IPX/SPX (Windows 95/98)
•Novell NetWare PSERVER support under bindery base or Novell Directory Services (NDS)
•lpr/lpd functions under TCP/IP
•SNMP control using MIB-II and private MIB
SNMP support using standard MIB on a compatible printer or printer-specific MIB
•Onboard HTTP server allowing configuration of network function settings using a Web browser
•Direct printing from a Web browser or other FTP client
•Direct printing from an IPP client
•SLP (Service Location Protocol) support
Getting Ready Chapter 1
1-1

Getting Ready Chapter 1
1-1 Bundled Items
1-1 Bundled Items
This Network Card comes with the following items.
•Network Card
•Quick Install Guide
•Setup Instructions
•Parts for Installation
–Screws (2)
–Spacers (2)
–Flat cable (1)
Utility software (on the CD-ROM)
The following items are contained in the nicutlty folder on the CD-ROM that comes with the printer controller.
Network Interface Card Operator’s Manual (this manual)
Discovery Program
–IPX/IP Management Access Program (MAP) Peer-to-Peer Printing Programs
–IP Peer-to-Peer Printing Program
–IPX Peer-to-Peer Printing Program
BOOTP Program
–BootPL32.exe NetWare Setup Utility Program
–NWSetup
Macintosh Utility Program
– NIManage (AppleTalk Utility)
UNIX TCP/IP Utility Programs
MIB Setting File
1-2

1-2 System Requirements
The ReadMe file on the CD-ROM contains the latest information about each of the network software applications. Be sure to read the ReadMe file before using the network software.
1-2 System Requirements
The following table describes the system requirements for using the Network Interface Card hardware and software.
Version of Protocol or NOS
Novell NetWare Version 3.x, 4.x or 5.x
Macintosh System 7.x, 8.x, or 9.x
UNIX, Windows, or LAN Server systems supporting lpr over TCP/IP
DEC ULTRIX 4.3 or 4.4, DEC OSF/1 2.0 or 3.0, Solaris 1.1.3 or 2.3, (SUN OS 4.1.3 or 5.3), System V Release 4, HP-UX 9.01, IBM AIX 3.2.5, or SCO UNIX 2 for DPI TCP/IP port 10001
Red Hat Linux 6.1 or later, SuSE Linux 6.3 or later, OpenLinux 2.3 or later, Turbolinux 4.0 or later.
Getting Ready Chapter 1
1-3

Getting Ready Chapter 1
1-2 System Requirements
|
Novell NetWare printing requires NetWare |
|
|
Capture, NPRINT and PCONSOLE (later |
|
|
than 1.0) utilities. |
|
|
NWSetup requires Windows 95/98/Me/2000 or |
|
|
Windows NT 4.0, and the Novell 32-bit client. |
|
|
|
|
|
The IP Peer-to-Peer utility requires Windows |
|
|
NT 4.0; Windows 95/98/Me/2000. |
|
|
|
|
|
The IPX Peer-to-Peer utility requires Windows |
|
|
95/98/Me. |
|
|
|
|
Software |
The MAP utility requires Windows NT 4.0; |
|
Windows 95/98/Me/2000. MAP also requires a |
||
|
||
|
browser such as Microsoft Internet Explorer or |
|
|
Netscape. |
|
|
|
|
|
TCP/IP setup and maintenance may be done |
|
|
with Telnet. Monitoring and maintenance with |
|
|
HTTP requires a suitable Internet Web |
|
|
browser program supporting HTML. |
|
|
|
|
|
AppleTalk printing requires printer PPD |
|
|
appropriate to the Digital Copier. AppleTalk |
|
|
NIManage Utility Program is provided for |
|
|
setup and maintenance. |
|
|
|
|
|
Support for 10 or 100 megabit Ethernet |
|
Hardware |
networks: 10/100BaseT (twisted pair cables) |
|
and hardware |
||
|
||
|
|
|
|
CD-ROM drive |
|
|
|
1-4

Chapter 2
Installing the Network
Card
Installing the Network Card Chapter 2
Installing the Network Card |
Chapter 2 |
|
|
2-1 Preparing the Digital Copier
2-1 Preparing the Digital Copier
1.Confirm that the Digital Copier is operating normally.
2.Power down the Digital Copier and unplug its power cord from the power outlet.
3.Install the Network Card into the interface connector of the Digital Copier controller board.
See the Setup Instructions that comes with the Network Card for full details about installation.
Important!
•The Network Card MAC address (network address) and serial number are marked on the back on the Network Card. These numbers are required when making Network Card settings, so be sure to write them down somewhere before installing the card.
Important!
•Special care is required when handling the Network Card. The Network Card is designed to protect components from electrostatic discharge during normal operation. Be sure to take proper electrostatic protection measures whenever handling the Network Card.
Installing the Network Card Chapter 2
2-1
Installing the Network Card Chapter 2
2-2 Connecting a Network Cable
2-2 Connecting a Network Cable
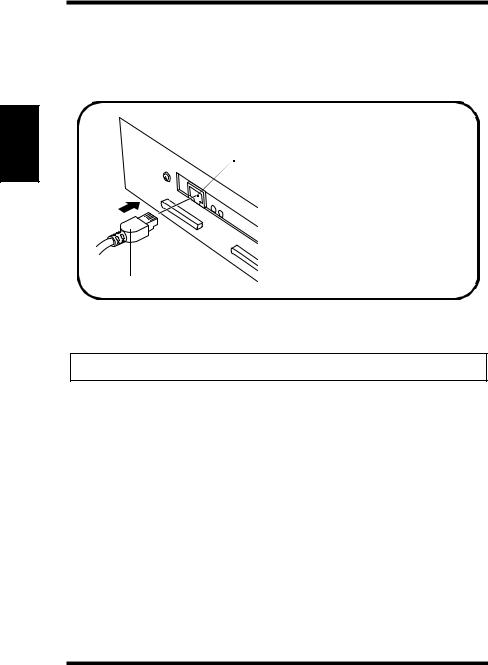
1.Make sure that Digital Copier power is turned off.
2.Connect the network cable to the Network Card.
|
10/100BaseT Port |
|
Insert the plug into the 10/ |
|
100BaseT port on the rear |
|
panel of the Network Card |
|
and press it in until you hear |
Network Cable |
it click securely into place. |
3.Power up the Digital Copier and check for abnormalities.
Important!
• Use only Category 5 shielded 10/100BaseT cable.
2-2

2-3 Setting Up the Network Card
2-3 Setting Up the Network Card
You must first configure the Network Card and your computer before you can print using the Network Card. The settings you need to make depend on the configuration of your network environment. Chapters 3 through 6 of this manual describe configurations for the environments listed below. Follow the configurations procedure for the operating system you are using.
Chapter 3 - Windows Configuration
Network printing in a Windows 95/98/2000/NT environment
Chapter 4 - NetWare Configuration
Network printing in a NetWare environment
Chapter 5 - Macintosh Configuration
Network printing in a Macintosh environment
Chapter 6 - UNIX Configuration
Network printing in a UNIX environment
Installing the Network Card Chapter 2
2-3
 Loading...