

Konica Minolta bizhub 222 User Manual

User’s Guide [Facsimile Operations]

Introduction
Introduction
Thank you for your purchase of this Konica Minolta digital electronic photocopying machine.
This User’s Guide describes operating procedures and precautions for the
use of the Fax functions. Be sure to read this User’s Guide before starting
any machine operations.
For correct operation, also read this User’s Guide before starting any machine operations.
In order to ensure that this machine is used correctly and safely, carefully
read the “Installation and operation precautions” in the User’s Guide [Copy
Operations] before using the machine.
Trademark Acknowledgements
KONICA MINOLTA, the KONICA MINOLTA logo, and “The essentials of imaging” are registered trademarks of Konica Minolta Holdings, Inc.
PageScope and bizhub are registered trademarks of Konica Minolta Business Technologies, Inc.
Adobe, the Adobe logo, the Acrobat logo, and the PostScript logo are either
registered trademarks or trademarks of Adobe Systems Incorporated.
All other company names and product names mentioned in this manual are
registered trademarks of their respective companies.
Copyright
©2005 KONICA MINOLTA BUSINESS TECHNOLOGIES, INC. All Rights Reserved.
Restrictions
Unauthorized use or reproduction of this document, whether in its entirety or
in part, is strictly prohibited.
Konica Minolta Business Technologies, Inc. assumes no responsibility for
consequences arising from the use of this manual.
The information contained in this User’s Guide is subject to change without
notice.
362/350/282/250/222/200 x-1

Special Notice to User
For Canada
NOTICE:
This product meets the applicable Industry Canada technical specifications.
The Ringer Equivalence Number is an indication of the maximum number of
devices allowed to be connected to a telephone interface. The termination
on an interface may consist of any combination of devices subject only to the
requirement that the sum of the RENs of all the devices does not exceed five.
AVIS:
Le present materiel est conforme aux specifications techniques applicables
d’Industrie Canada.
L’indice d’equivalence de la sonnerie (IES) sert a indiquer le nombre maximal
de terminaux qui peuvent etre raccordes a une interface telephonique. La
terminaison d’une interface peut consister en une combinaison quelconque
de dispositifs, a la seule condition que la somme d’indices d’equivalence de
la sonnerie de tous les dispositifs n’excede pas 5.
For U.S.A.
Introduction
FCC PART 68 REQUIREMENTS:
This equipment complies with Part 68 of the FCC rules and the requirements
adopted by the ACTA. On the cover of this equipment is a label that contains,
among other information, a product identifier in the format
US:AAAEQ##TXXXX. If required, this information must be provided to the telephone company.
This equipment uses certification jack USOC RJ11C.
A plug and jack used to connect this equipment to the premises wiring and
telephone network must comply with the applicable FCC Part 68 rules and
requirements adopted by the ACTA.
A compliant telephone cord and modular plug is provided with this product.
It is designed to be connected to a compatible modular jack that is also compliant. See installation instructions for details.
x-2 362/350/282/250/222/200

Introduction
The REN is used to determine the number of devices that may be connected
to a telephone line. Excessive RENs on a telephone line may result in the devices not ringing in response to an incoming call. In most but not all areas,
the sum of RENs should not exceed five (5.0).
To be certain of the number of devices that may be connected to a line, as
determined by the total RENs, contact the local telephone company For
products approved after July 23, 2001, the REN for this product is part of the
product identifier that has the format US: US:AAAEQ##TXXXX.. The digits
represented by ## are the REN without a decimal point (e.g., 03 is a REN of
0.3). For earlier products, the REN is separately shown on the label.
If this equipment FK-503, ML-502 causes harm to the telephone network, the
telephone company will notify you in advance that temporary discontinuance
of service may be required. But if advance notice isn’t practical, the telephone company will notify the customer as soon as possible. Also, you will
be advised of your right to file a complaint with the FCC if you believe it is
necessary.
The telephone company may make changes in its facilities, equipment, operations or procedures that could affect the operation of the equipment. If
this happens the telephone company will provide advance notice in order for
you to make necessary modifications to maintain uninterrupted service.
If trouble is experienced with this equipment FK-503, ML-502, for repair or
warranty information, please contact the Konica Minolta dealer location
where you purchased this equipment. If the equipment is causing harm to the
telephone network, the telephone company may request that you disconnect
the equipment until the problem is resolved.
Connection to party line service is subject to state tariffs. Contact the state
public utility commission, public service commission or corporation commission for information. If you home has specially wired alarm equipment connected to the telephone line, ensure the installation of FK-503, ML-502 does
not disable you alarm equipment. If you have questions about what will disable alarm equipment, consult your telephone company or a qualified installer.
362/350/282/250/222/200 x-3

Introduction
The Telephone Consumer Protection Act of 1991 makes it unlawful for any
person to use a computer or other electronic device, including FAX machines, to send any message unless such message clearly contains in a margin at the top or bottom of each transmitted page or on the first page of the
transmission, the date and time it is sent and an identification of the business
or other entity, or other individual sending the message and the telephone
number of the sending machine or such business, other entity, or individual.
(The telephone number provided may not be a 900 number or any other
number for which charges exceed local or long-distance transmission charges.)
In order to program this information into your FAX machine, you should complete the following steps: See “Programming a name (TSI Registration)” on
page 10-25.
WARNING/CAUTION Explained
WARNING
The exclamation point within an equilateral triangle followed by the word “Warning” is intended
to alert the user to the possibility that a disregard for the warning may result in fatal hazards or
critical injuries. Be sure to focus your attention on the Warning headings when reading the Copier User’s Guide.
CAUTION
The exclamation point within an equilateral triangle followed by the word “Caution” is intended
to alert the user to the possibility that a disregard for the caution may result in minor injuries or
in physical damage. Be sure to focus your attention on the Caution headings when reading the
Copier User’s Guide.
For New Zealand
This device is equipped with pulse dialing while the Telecom standard is
DTMF tone dialing. There is no guarantee that Telecom lines will always continue to support pulse dialing.
This equipment does not fully meet Telecom’s impedance requirements.
Performance limitations may occur when used in conjunction with some
parts of the network. Telecom will accept no responsibility should difficulties
arise in such circumstances.
The grant of a Telepermit for any item of terminal equipment indicates only
that Telecom has accepted that the item complies with minimum conditions
for connection to its network. It indicates no endorsement of the product by
Telecom, nor does it provide any sort of warranty. Above all, it provides no
assurance that any item will work correctly in all respects with another item
of Telepermitted equipment of a different make or model, nor does it imply
that any product is compatible with all of Telecom’s network services.
x-4 362/350/282/250/222/200

Introduction
The automatic calling functions of this equipment must not be used to cause
a nuisance to other customers.
Telepermitted equipment only may be connected to the auxiliary telephone
port. The auxiliary port is not specifically designed for 3-wire connected
equipment. 3-wire might not respond to incoming ringing when connected to
this port.
For Europe
The Facsimile has been approved in accordance with Council Decision 1999/
5/ EC for pan-European single terminal connection to the public switched telephone network (PSTN). However, due to differences between the individual
PSTNs provided in different countries, the approval does not, of itself, give
an unconditional assurance of successful operation on every PSTN network
terminal point.
In the event of problems, you should contact your equipment supplier in the
first instance.
The CE marking must be affixed to the
product or to its data plate. Additionally it
must be affixed to the packaging, if any,
and to the accompanying documents.
362/350/282/250/222/200 x-5

Contents
Introduction
Introduction
Special Notice to User ......................................................................x-2
For Canada .....................................................................................x-2
For U.S.A. .......................................................................................x-2
For New Zealand .............................................................................x-4
For Europe ......................................................................................x-5
Contents .............................................................................................x-6
Getting Started ................................................................................x-17
Sending a fax ................................................................................x-17
Available features ............................................................................x-19
Printing transmission information .................................................x-19
Sending a fax at a specified time ..................................................x-19
Sending one scanned page at a time (Quick Scan TX) ................x-19
Overseas faxing ............................................................................x-19
Sending a fax printed with the recipient’s name ..........................x-20
Sending a fax with the document scanning area specified ..........x-20
Specifying the binding position of double-sided documents .......x-21
Sending a fax with a command sent from the recipient ...............x-21
Storing a document for polling .....................................................x-22
Using a confidential box ...............................................................x-22
Sending a fax protected with a password ....................................x-22
Advanced scanning features ........................................................x-23
User’s Guides ...................................................................................x-24
User’s Guide [Copy Operations] ...................................................x-24
User’s Guide [Network Scanner Operations] ................................x-24
User’s Guide [Box Operations] .....................................................x-24
User’s Guide [Print Operations] .................................................... x-24
Quick Guide [Print Operations] .....................................................x-24
User’s Guide [Advanced Scan Operations] ..................................x-24
User’s Guide [Facsimile Operations] (this manual) .......................x-25
User's Guide [Fax Driver Operations] ...........................................x-25
Explanation of manual conventions ...............................................x-26
Descriptions and symbols of documents and paper ...................x-28
“Width” and “Length” ...................................................................x-28
w and v ........................................................................................ x-28
x-6 362/350/282/250/222/200

Introduction
1 Before use
1.1 Precautions ....................................................................................... 1-2
1.2 Part names and their functions ....................................................... 1-3
Back of main unit (Fax Kit FK-503) ................................................ 1-3
Stamp Unit SP-501 ........................................................................ 1-4
1.3 Using the control panel .................................................................... 1-5
Control panel .................................................................................. 1-5
1.4 Initial settings .................................................................................... 1-7
Required settings ........................................................................... 1-7
Useful functions ............................................................................. 1-9
1.5 Fax settings screen ........................................................................ 1-10
Fax mode screen ......................................................................... 1-10
FAX/Copy screen ......................................................................... 1-11
Icons that appear in the screen ................................................... 1-12
1.6 User authentication and account track ........................................ 1-14
2 Transmission
2.1 General fax operation ....................................................................... 2-2
To send a fax ................................................................................. 2-2
2.2 Feeding the document ..................................................................... 2-4
Loading the document into the ADF .............................................. 2-4
Placing the document on the original glass ................................... 2-5
2.3 Faxing a multi-page document from the original glass ................ 2-7
Faxing using the original glass ....................................................... 2-7
2.4 Specifying the transmission settings .............................................. 2-9
To specify the transmission settings .............................................. 2-9
Quality .......................................................................................... 2-10
Density ......................................................................................... 2-11
Reduction/Area ............................................................................ 2-12
Checking the settings .................................................................. 2-14
2.5 Specifying a recipient ..................................................................... 2-17
Using the Direct Input screen ...................................................... 2-17
Using a one-touch dial button ..................................................... 2-19
Using a program .......................................................................... 2-20
Using the Search screen .............................................................. 2-22
Specifying multiple recipients (broadcast transmission) .............. 2-24
Checking/deleting recipients ....................................................... 2-26
2.6 Check the recipient before sending .............................................. 2-28
To perform a check receiver transmission ................................... 2-29
362/350/282/250/222/200 x-7

2.7 Faxing after using the telephone (manual faxing) ........................2-31
To send a fax manually .................................................................2-31
2.8 Combining one-touch dialing and direct dialing
(chain dialing) ...................................................................................2-32
To send a fax using chain dialing .................................................2-32
2.9 Operations while scanning .............................................................2-34
If document size cannot be detected ...........................................2-34
If memory became full ..................................................................2-34
2.10 When unable to send .......................................................................2-35
To send the fax again ...................................................................2-35
2.11 Stopping the transmission ..............................................................2-36
To stop sending a fax ...................................................................2-36
2.12 Checking transmission results (Job List) ......................................2-37
Jobs ..............................................................................................2-37
Checking a job ..............................................................................2-38
3 Reception
3.1 Reception modes ..............................................................................3-2
3.2 Reception ...........................................................................................3-5
Printing received faxes ...................................................................3-5
When unable to receive ..................................................................3-6
Reception information .....................................................................3-7
3.3 Receiving a telephone call ................................................................3-8
To receive a telephone call .............................................................3-8
Introduction
4 Troubleshooting
4.1 Problems when sending faxes .........................................................4-2
4.2 Problems when receiving faxes .......................................................4-4
4.3 Error messages .................................................................................4-6
5 Specifications
5.1 Specifications ....................................................................................5-2
6 Useful transmission functions
6.1 FAX Menu ...........................................................................................6-2
Displaying the Fax Menu screen .....................................................6-2
FAX Menu screens ..........................................................................6-3
x-8 362/350/282/250/222/200

Introduction
6.2 Sending faxes printed with transmission information .................. 6-6
To send faxes printed with transmission information .................... 6-6
6.3 Checking a report for the transmission result
(“TX Report” function) .................................................................... 6-10
To print the transmission report ................................................... 6-10
6.4 Sending two document pages as one (“2in1” function) .............. 6-12
To send a 2in1 fax ........................................................................ 6-12
6.5 Sending double-sided documents (“2-Sided TX” function) ........ 6-13
To fax double-sided document pages ......................................... 6-13
6.6 Sending an Letter-size document with a landscape orientation
(“Rotation TX” function) ................................................................. 6-15
To send a rotated transmission ................................................... 6-15
6.7 Giving a fax priority (“Priority TX” function) ................................. 6-16
To send a priority transmission .................................................... 6-16
6.8 To send a fax at a specified time
(“Timer TX Setting” function) ......................................................... 6-17
To send a timer transmission ....................................................... 6-17
6.9 Stamping faxed documents (“Stamp” function) .......................... 6-19
To stamp faxed documents ......................................................... 6-19
6.10 Sending a document one page at a time
(“Quick Scan TX” function) ............................................................ 6-21
To send a document one page at a time ..................................... 6-21
6.11 Sending a fax with a password applied
(“Password TX” function) ............................................................... 6-22
To send faxes with a password applied ...................................... 6-22
6.12 Specifying the number of fax copies
(“Remote Copy” function) .............................................................. 6-23
To specify the number of fax copies to be printed ...................... 6-23
6.13 F-codes ............................................................................................ 6-25
F-codes ........................................................................................ 6-25
F-code confidential transmissions ............................................... 6-25
Bulletin boards ............................................................................. 6-26
Remote copying ........................................................................... 6-26
Precautions for specifying F-codes ............................................. 6-26
6.14 Using a confidential box (confidential transmission) .................. 6-27
To use a confidential box ............................................................. 6-27
Retrieving F-code confidential documents .................................. 6-29
6.15 Registering a document on a bulletin board ................................ 6-30
To register a document on a bulletin board ................................. 6-30
362/350/282/250/222/200 x-9

Registering a document on a bulletin board from another fax
machine ........................................................................................6-32
6.16 Faxing from a computer (PC-FAX) .................................................6-34
7 Useful reception functions
7.1 Receiving a fax with a password applied
(“Password RX” function) .................................................................7-2
7.2 Retrieving documents from bulletin boards
(“Retrieve” function) ..........................................................................7-3
To retrieve a document from a bulletin board ................................7-3
7.3 Using a confidential box (confidential reception) ...........................7-6
To receive a confidential document ................................................7-6
8 Polling
8.1 Preparing a polling document (“Polling TX” function) ...................8-2
To perform a polling transmission ..................................................8-2
8.2 Receiving a polling document (“Polling RX” function) ...................8-5
To perform polling reception ..........................................................8-5
9 Registering/specifying settings
Introduction
9.1 Displaying the FAX Registration screen ..........................................9-2
To display the FAX Registration screen ..........................................9-2
9.2 Programming a one-touch dial button ............................................9-4
Programming a one-touch dial button with a fax number ..............9-4
Registering an F-code ....................................................................9-8
Specifying the transmission speed ...............................................9-10
Changing/deleting a one-touch dial button ..................................9-11
Copying a one-touch dial button ..................................................9-12
Registering/deleting a secondary destination ..............................9-13
9.3 Registering indexes for one-touch dial buttons ...........................9-15
To register an index ......................................................................9-15
Changing/deleting an index ..........................................................9-17
9.4 Registering a transmission program .............................................9-18
Registering a transmission program .............................................9-18
Registering a batch transmission program ...................................9-22
Registering a polling reception program .......................................9-24
Changing/deleting a program .......................................................9-26
9.5 Setting up a bulletin board .............................................................9-27
To set up a bulletin board .............................................................9-27
x-10 362/350/282/250/222/200

Introduction
9.6 Registering confidential boxes ...................................................... 9-32
To register a confidential box ...................................................... 9-32
10 Utility mode
10.1 Overview of Utility mode parameters ........................................... 10-2
List of registration information and parameters ........................... 10-2
10.2 Specifying User’s Choice settings ................................................ 10-9
To specify User’s Choice settings ............................................... 10-9
Output Tray Settings .................................................................. 10-10
Default Screen ............................................................................ 10-11
10.3 Specifying FAX Registration settings ......................................... 10-12
10.4 Specifying User Management settings ....................................... 10-13
To specify User Management settings ...................................... 10-13
Tone volume parameters ........................................................... 10-14
Memory RX ON/OFF .................................................................. 10-14
10.5 Displaying the Administrator Management screen ................... 10-15
To display the Administrator Management screen .................... 10-15
10.6 Available parameters .................................................................... 10-17
Administrator Management 1 screen ......................................... 10-17
Administrator Management 2 screen ......................................... 10-18
10.7 Specifying the language for reports and the transmission
source name (“Language for Communication” parameter) ..... 10-19
To specify the language for reports and the transmission
source name .............................................................................. 10-19
10.8 Programming the telephone number
(“Self-telephone # Information” parameter) ............................... 10-21
To register the telephone number .............................................. 10-21
10.9 Programming a name (TSI Registration) .................................... 10-25
To register a transmission source name .................................... 10-25
10.10 Registering the ID displayed on the recipient’s machine
(“Self-ID” parameter) .................................................................... 10-27
To register the machine’s ID ...................................................... 10-27
10.11 Preventing changes to one-touch dial buttons ......................... 10-29
To prevent changes to one-touch dial buttons .......................... 10-29
10.12 Specifying transmission settings (TX Settings) ......................... 10-31
To specify Quality/Mode settings .............................................. 10-32
To specify Communication Menu settings ................................ 10-34
362/350/282/250/222/200 x-11

Introduction
10.13 Specifying the printing period for received documents
(RX Settings) ..................................................................................10-37
Specifying the “Memory Lock Time” parameter .........................10-37
Specifying the “Memory Lock Password” parameter .................10-39
Printing manually ........................................................................10-40
10.14 Deleting confidential boxes ..........................................................10-42
To delete a confidential box .......................................................10-42
10.15 Specifying the reception mode and the number of rings
(RX Functions) ................................................................................10-44
To specify RX Functions settings ...............................................10-44
To specify the reception method (Reception Mode) ..................10-45
To specify the number of rings (Numbers of RX Call Rings) ......10-45
10.16 Registering communication passwords .....................................10-46
To register a communication password .....................................10-46
10.17 Specifying report output settings (Report Settings) ..................10-48
To specify the result report printing conditions (TX Report) .......10-48
To specify the activity report printing conditions
(Activity Report) ...........................................................................10-49
10.18 Forwarding sent documents to the specified recipient
(TX Forwarding) .............................................................................10-51
To specify document forwarding ................................................10-51
10.19 Specifying the procedure for received documents
(Document Management) .............................................................10-53
To specify the procedure performed with documents received
on each line .................................................................................10-53
To specify the procedure performed with documents received
on each line .................................................................................10-54
To specify the procedure performed with documents received
with an F-code ............................................................................10-56
To specify the procedure performed with documents received
with an F-code ............................................................................10-57
Specifying the procedure performed with other received
documents ..................................................................................10-60
To specify the procedure performed with other received
documents ..................................................................................10-61
10.20 Specifying the self-registered domain name ..............................10-63
To specify the self-registered domain name ..............................10-63
10.21 Specifying the gateway transmission setting .............................10-65
To specify the gateway transmission setting ..............................10-65
10.22 Specifying software switch settings (machine functions) .........10-67
Software SW settings .................................................................10-67
To specify a software switch setting ..........................................10-68
x-12 362/350/282/250/222/200

Introduction
Specifying settings for the stamp and password comparison
(mode 000) ................................................................................. 10-71
Specifying settings for inserting the recipient’s name in the
document (mode 001) ................................................................ 10-72
Specifying printing of the memory clear report and the report
for a broadcast transmission (mode 002) .................................. 10-73
Specifying the storage time for failed transmission documents
(mode 004) ................................................................................. 10-74
Specifying settings for general subscriber lines (mode 006) ..... 10-75
Specifying settings for receiving long documents
(mode 007) ................................................................................. 10-76
Specifying the setting for selecting paper when printing
received documents (mode 008) ............................................... 10-78
Specifying settings for the confirmation screen for broadcast
transmissions (mode 014) .......................................................... 10-79
Specifying whether or not a telephone is connected and
whether or not a received date report is added and its format
(mode 016) ................................................................................. 10-80
Specifying settings to limit dialing and broadcast transmissions
(mode 018) ................................................................................. 10-81
Specifying settings for the image in the results report
(Mode 023) ................................................................................. 10-82
Specifying the copy limitation with remote copying
(mode 028) ................................................................................. 10-83
Specifying settings for fax reception functions (mode 030) ....... 10-84
Specifying the setting for tray selection of received faxes
(mode 037) ................................................................................. 10-85
Specifying administrator forwarding settings (mode 198) ......... 10-86
Specifying settings for checked receiver transmissions
(mode 200) ................................................................................. 10-87
Specifying settings for the number of rings until automatic
reception (port 2) (mode 249) ..................................................... 10-88
Blocking calls from callers that are not specified (mode 306) ... 10-90
Specifying the Internet fax settings (mode 350) ........................ 10-90
Specifying whether transmission source information is added
when performing an IP relay operation or forwarding received
documents (mode 352) .............................................................. 10-91
Specifying settings for the information indicated in the report
for IP relay transmissions (mode 368) ........................................ 10-92
Specifying settings for when copying is finished using the ADF
(mode 429) ................................................................................. 10-93
Specifying settings to limit the use of communication modes-1
(mode 475) ................................................................................. 10-94
Specifying settings to limit the use of communication modes-2
(mode 476) ................................................................................. 10-95
362/350/282/250/222/200 x-13

Introduction
Specifying settings to limit the use of communication modes-3/
Specifying restrictions for registering fax addresses and printing
reports and specifying how one-touch dial recipients
are displayed (mode 477) ...........................................................10-97
Specifying the deleting method for [Del.] in input screens
(mode 478) ..................................................................................10-99
Specifying settings for limiting user authentication to only
Scan functions (mode 479) .......................................................10-100
11 Specifying settings using PageScope Web Connection
11.1 Items that can be specified using PageScope Web
Connection .......................................................................................11-2
Fax/Scan (User mode) ..................................................................11-2
System (Administrator mode) .......................................................11-2
Fax/Scan (Administrator mode) ....................................................11-3
Network (Administrator mode) ......................................................11-3
11.2 Using PageScope Web Connection ...............................................11-4
Operating environment .................................................................11-4
Accessing PageScope Web Connection ......................................11-5
When performing user authentication ...........................................11-6
Page Structure ..............................................................................11-7
Logging on to Administrator mode ...............................................11-8
Web browser cache ....................................................................11-10
For Internet Explorer ...................................................................11-10
For Netscape ..............................................................................11-10
11.3 One-touch key registration (User mode) .....................................11-11
To name an index .......................................................................11-13
To register with one-touch registration .......................................11-14
Registering sub-destinations ......................................................11-16
11.4 FAX Program Registration (User mode) ......................................11-18
Registering fax programs ............................................................11-20
11.5 System (Administrator mode) .......................................................11-22
To change settings .....................................................................11-22
11.6 Export/Import (Administrator mode) ...........................................11-23
To export files .............................................................................11-23
To import files .............................................................................11-25
11.7 Line Settings (Administrator mode) .............................................11-28
To specify the machine telephone number ................................11-28
11.8 Transmission source registration ................................................11-29
To register transmission sources ................................................11-29
x-14 362/350/282/250/222/200

Introduction
11.9 TX Settings (Administrator mode) ............................................... 11-30
Transmission settings ................................................................ 11-30
To specify the TX settings .......................................................... 11-31
Communication mode ................................................................ 11-32
To specify settings for communication modes .......................... 11-32
11.10 RX Settings (Administrator mode) .............................................. 11-33
To specify the RX settings ......................................................... 11-34
11.11 Fax Setting (Administrator mode) ............................................... 11-35
RX Functions .............................................................................. 11-35
To specify the reception function settings ................................. 11-35
Password Communication ......................................................... 11-36
To specify password communication settings .......................... 11-37
11.12 RX Document (Administrator mode) ........................................... 11-38
To specify F-code settings ........................................................ 11-39
To specify the processing of received documents per line ....... 11-41
To specify the processing of other received documents ........... 11-43
11.13 Report Output Settings (Administrator mode) ........................... 11-44
To specify the report output settings ......................................... 11-44
11.14 TCP/IP (Administrator mode) ...................................................... 11-46
To specify the TCP/IP settings .................................................. 11-47
11.15 Mail/Internet FAX (Administrator mode) ..................................... 11-49
To specify other settings ............................................................ 11-50
12 Reports and lists
12.1 Checking the transmission status (TX Report) ............................ 12-2
Printing the transmission activity report ...................................... 12-2
Contents of the report .................................................................. 12-4
12.2 Checking the reception status (RX Report) ................................. 12-6
Printing the reception activity report ............................................ 12-6
Contents of the report .................................................................. 12-7
12.3 Checking the list of the registered one-touch dial buttons
(One-Touch List) ............................................................................. 12-9
Printing the list of one-touch dial buttons .................................... 12-9
Contents of the list ..................................................................... 12-10
12.4 Checking the list of fax programs (Program List) ..................... 12-11
Printing the fax program list ....................................................... 12-11
Contents of the list ..................................................................... 12-12
12.5 Checking the bulletin board documents (Bulletin List) ............. 12-13
Printing the bulletin board list .................................................... 12-13
362/350/282/250/222/200 x-15

12.6 Checking the contents of confidential boxes
(Confidential List) ...........................................................................12-15
Printing the confidential box list .................................................12-15
12.7 Checking the settings for each function (Setting List) ..............12-17
Printing the settings list ..............................................................12-17
Contents of the list ......................................................................12-18
13 Appendix
13.1 Entering text .....................................................................................13-2
To type text ...................................................................................13-2
List of available characters ...........................................................13-3
13.2 Replacing the stamp .......................................................................13-4
To replace the stamp ....................................................................13-4
13.3 Glossary ............................................................................................13-6
13.4 Index .................................................................................................13-9
Introduction
x-16 362/350/282/250/222/200
Introduction
Getting Started
Sending a fax
The basic procedure for sending a fax is described below.
In order to use the Fax functions, the optional fax kit must be installed.
1 Press the [Fax/Scan] key in the control panel to enter Fax mode.
– If the machine is set to display the FAX/Copy screen when it is in
standby, a fax can be sent simply by specifying the recipient’s fax
number or by entering “#” and a one-touch number. For details, refer to “Default Screen” on page 10-11.
2 Position the document to be faxed.
– For details on positioning the document, refer to “Feeding the doc-
ument” on page 2-4.
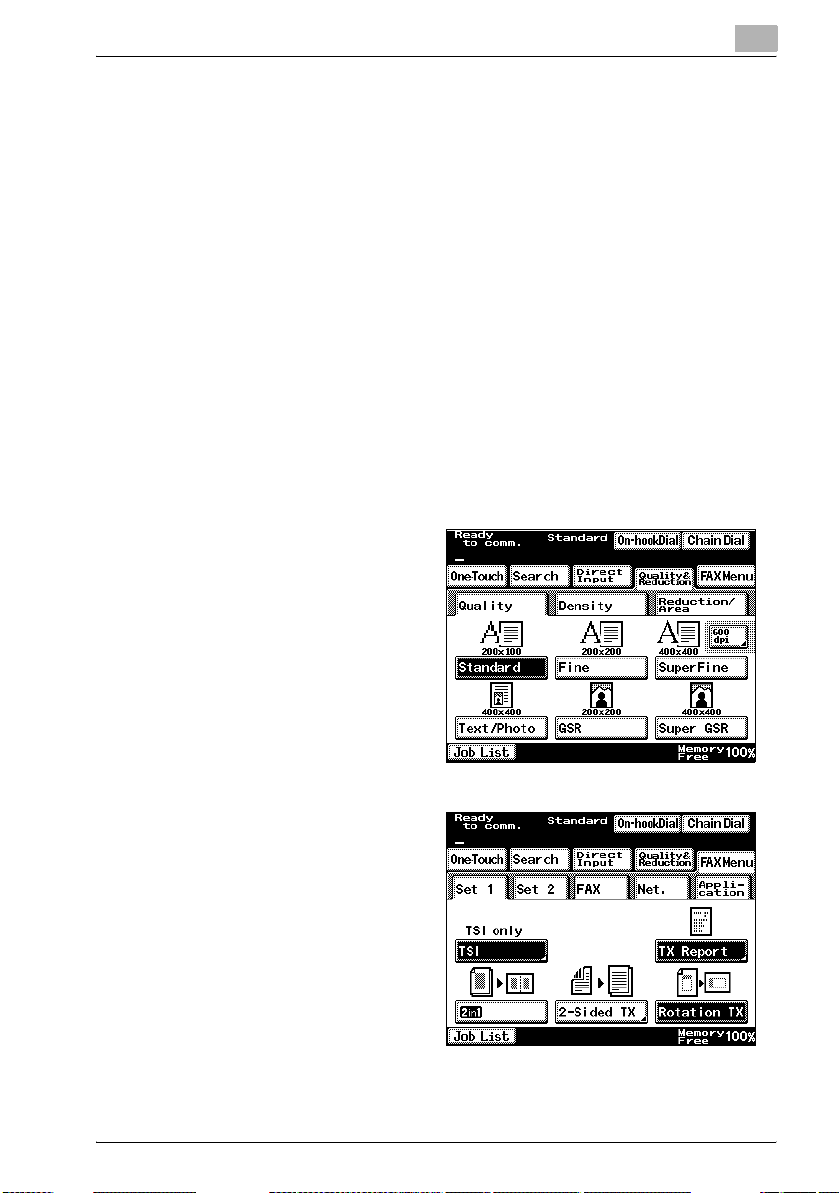
3 Specify the desired set-
tings.
Quality & Reduction screen
FAX Menu screen
362/350/282/250/222/200 x-17
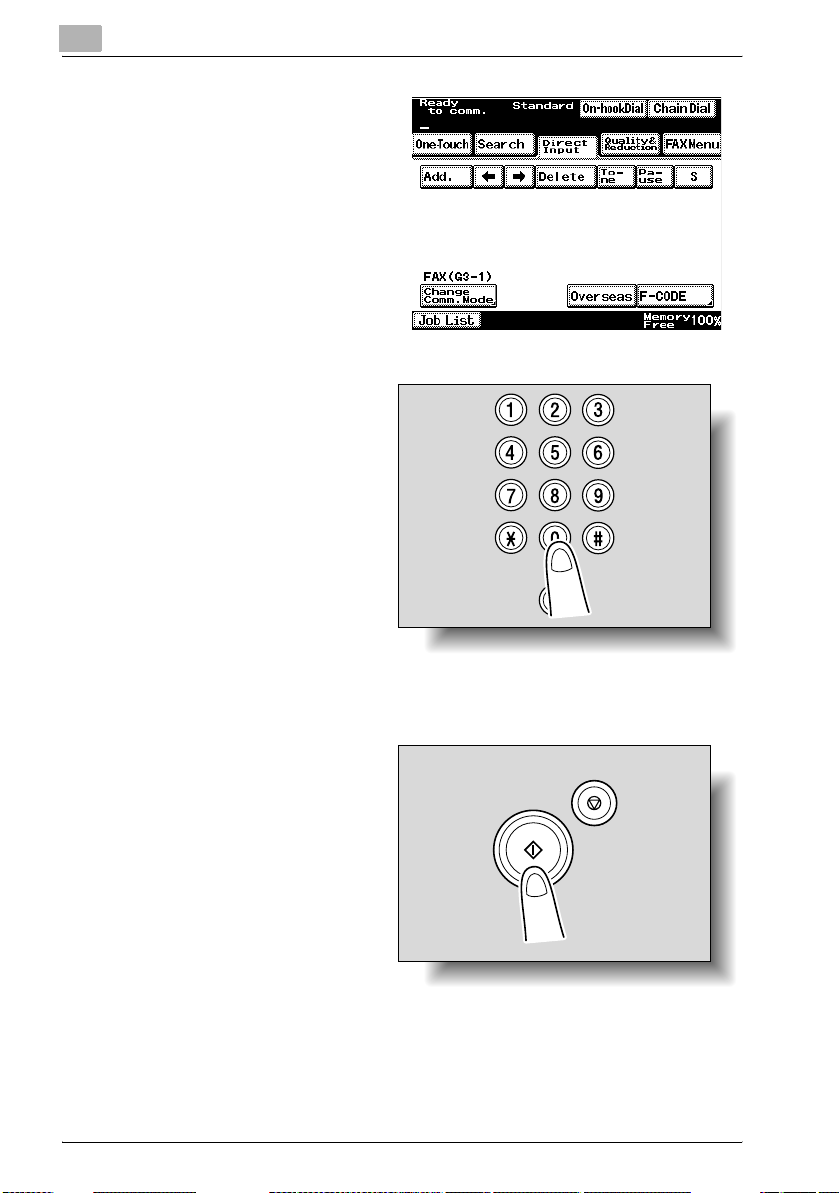
4 Touch [Direct Input].
Stop
Start
5 Using the keypad, type
in the fax number of the
recipient.
– If an incorrect fax
number was entered,
touch [Delete] to correct the number.
– To erase the entered
number, press the
[C] (clear) key.
Introduction
6 Press the [Start] key in the control panel.
– If the fax could not be
sent, refer to “When
unable to send” on
page 2-35.
x-18 362/350/282/250/222/200
Introduction
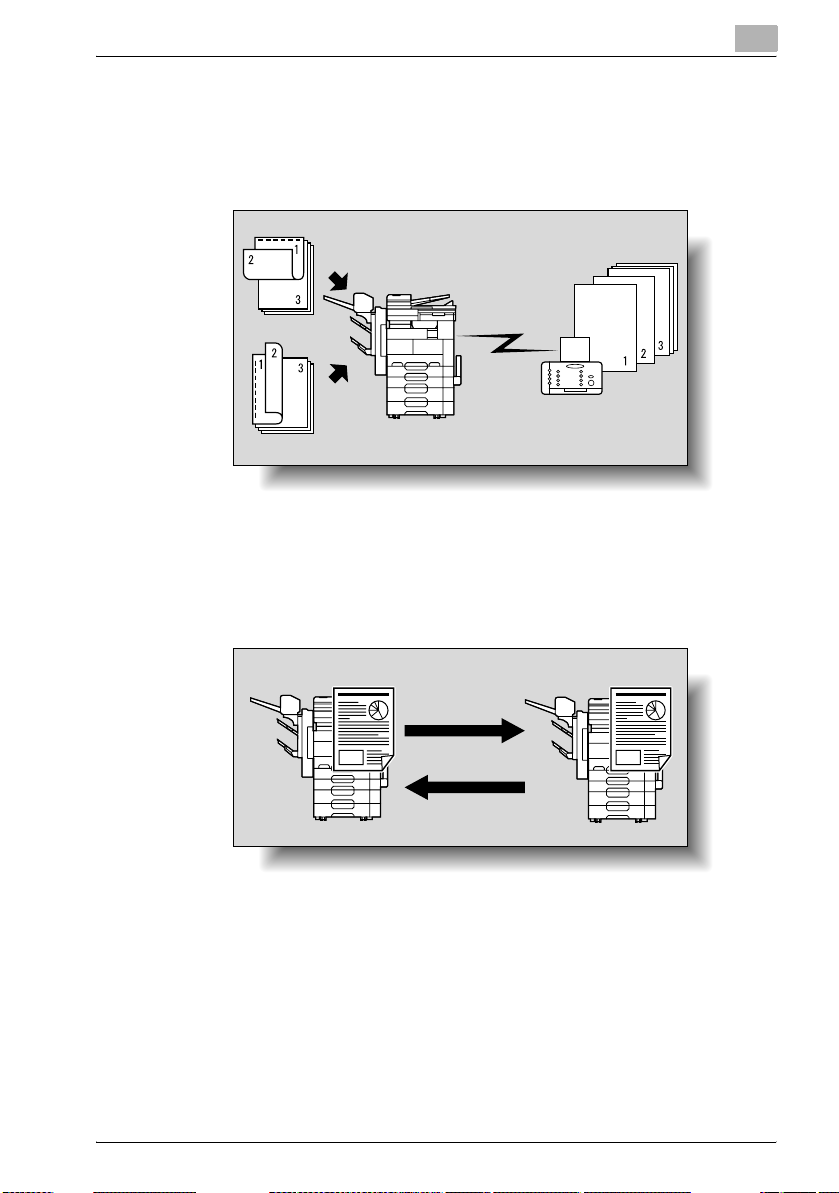
Available features
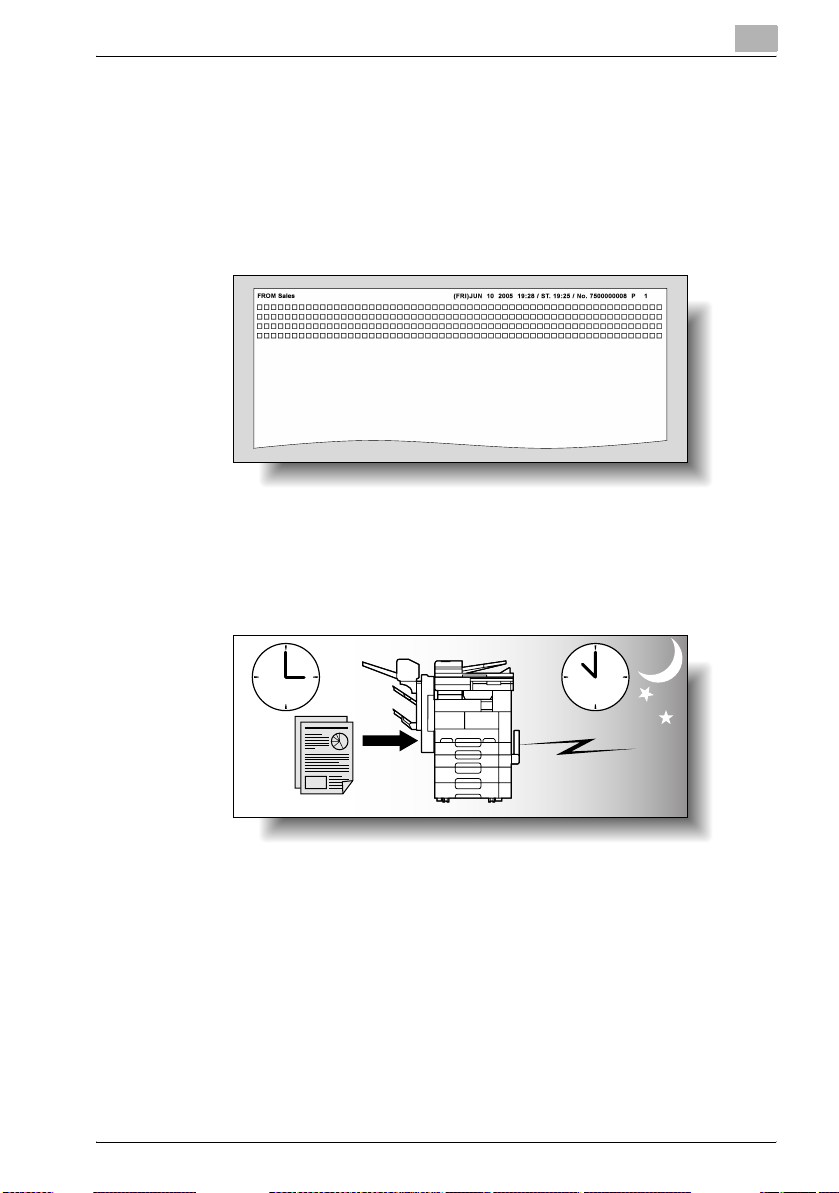
Printing transmission information
A fax can be sent printed with information such as the sender’s name, the
transmission date and time, document number, and number of pages. This
is useful for informing the recipient of the sender’s information.
For details, refer to page 6-6.
Sending a fax at a specified time
A fax can be sent at a specified time. Sending faxes at discounted calling
times, such as at night or early in the morning, can help reduce costs.
For details, refer to page 6-17.
Begin the transmission.
Specify a time.
Sending one scanned page at a time (Quick Scan TX)
With this feature, faxing begins at the same time that the document page is
scanned.
For details, refer to page 6-21.
Overseas faxing
When faxing to a location where transmission conditions are poor, a slower
transmission speed can be set to ensure that the fax can be sent.
For details, refer to page 2-17.
362/350/282/250/222/200 x-19
Introduction
JAPAN
CHINA
AUSTRALIA
Indian Ocean
PAPUA
NEW GUINEA
INDONESIA
PHILIPPINES
MONGOLIA
THAILAND
VIETNAM
MALAYSIA
SINGAPORE
BRUNEI
Taiwan
NORTH KOREA
SOUTH KOREA
CAMBODIA
LAOS
NMAR
BHUTAN
LADESH
RUSSIA
A
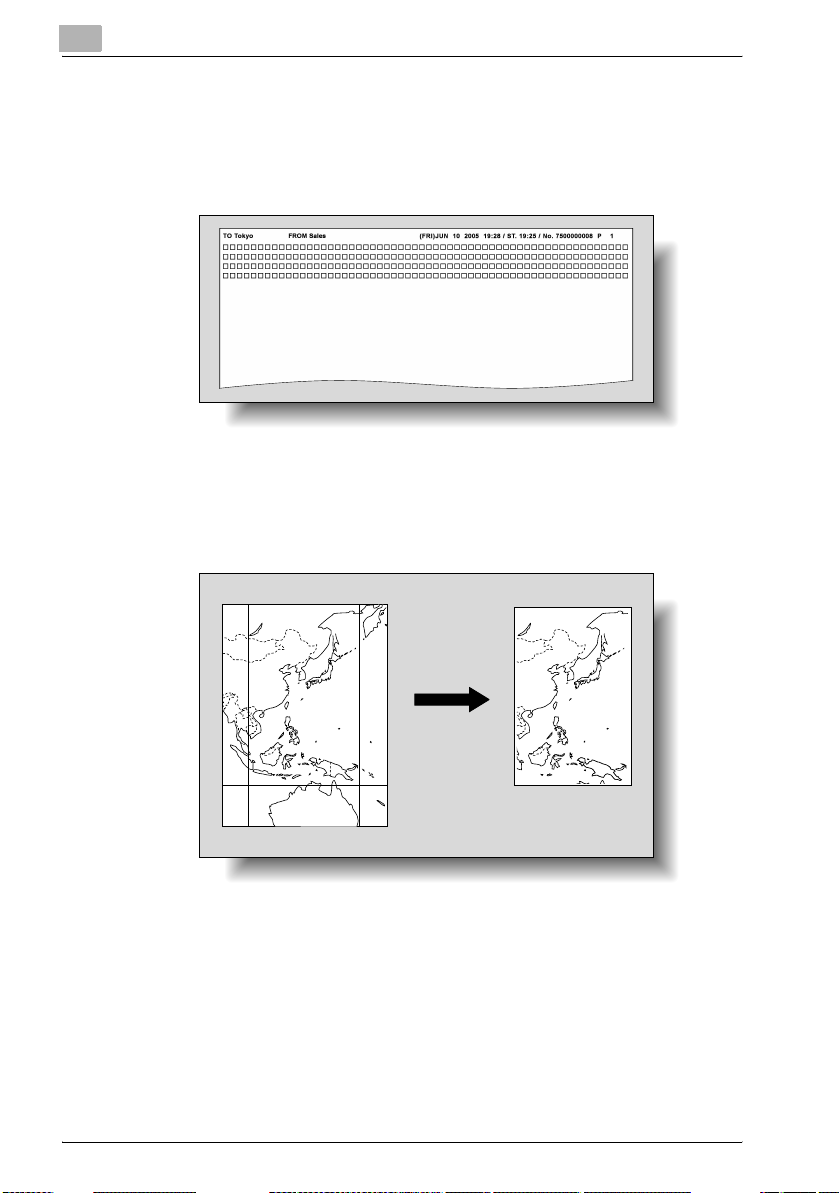
Sending a fax printed with the recipient’s name
The recipient’s name can be printed on the fax that is sent.
This allows the fax to be delivered to the correct person on the receiving end.
For details, refer to page 6-6.
Sending a fax with the document scanning area specified
The fax can be sent after the size of the area to be sca nned is specified. This
is useful when you want to fax only a portion of the document.
For details, refer to page 2-12.
RUSSIA
OLIA
NORTH KOREA
SOUTH KOREA
CHINA
S
AND
MBODIA
VIETNAM
BRUNEI
LAYSIA
INGAPORE
x-20 362/350/282/250/222/200
JAPAN
Taiwan
PHILIPPINES
P
Introduction
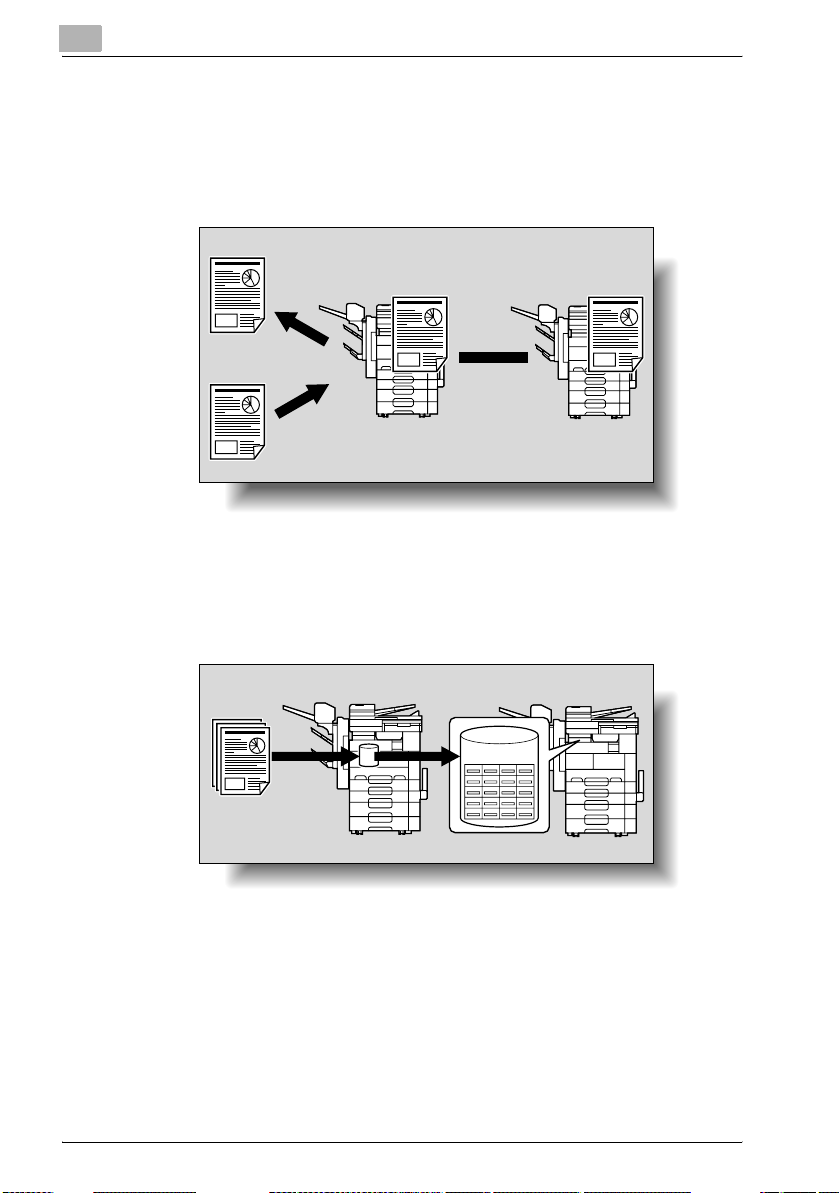
Specifying the binding position of double-sided documents
The fax can be sent after the binding position is specified so that the position
of the back of the document page can be adjusted.
For details, refer to page 6-13.
Sending a fax with a command sent from the recipient
A document loaded to be scanned or stored on the machine can be sent
when a command is sent from the recipient.
For details, refer to page 8-5.
Top binding
Send
Received fax
Left binding
Receive
Send
362/350/282/250/222/200 x-21
Introduction
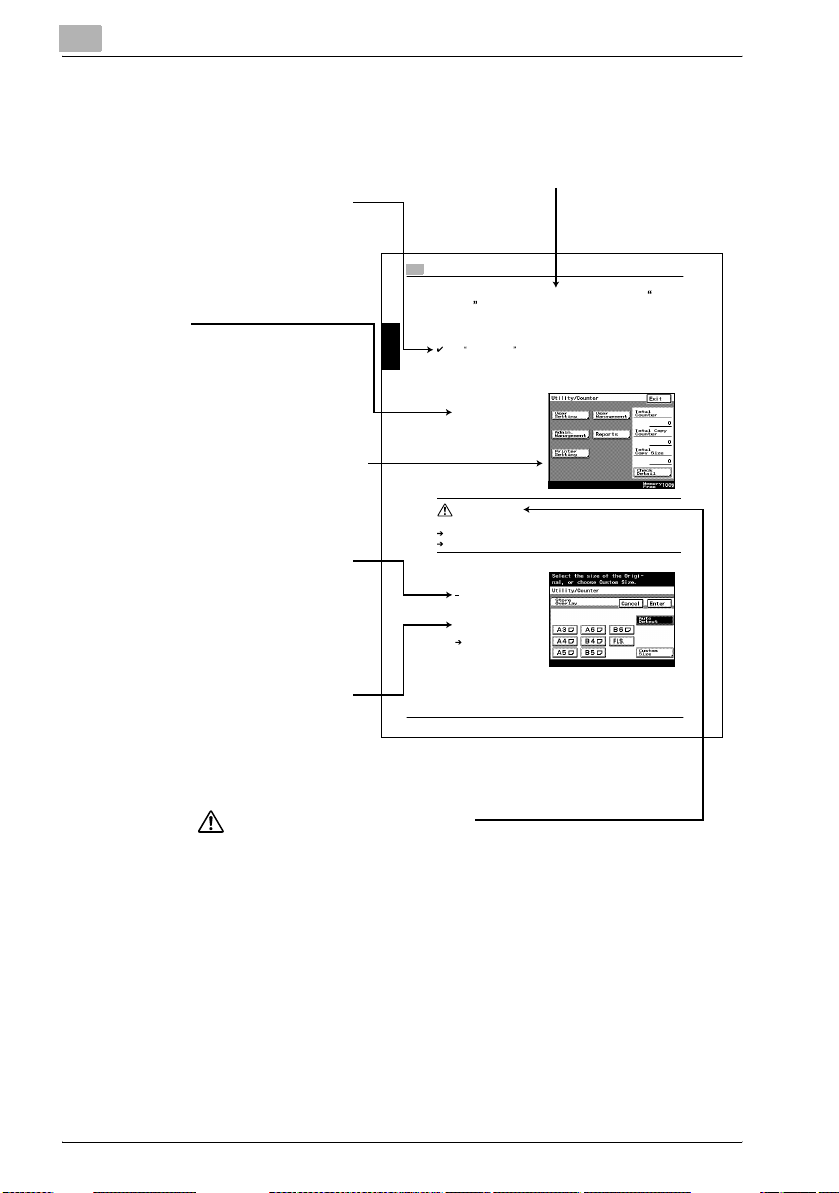
Storing a document for polling
A document that you want viewed can be stored on the bulletin board to be
sent through polling. In addition, a document can be received through polling
from a different bulletin board.
For details, refer to page 8-2.
Read
Store
Bulletin board
Polling
Using a confidential box
A document to be sent to or received by a specific person can be transmitted
using a confidential box.
For details, refer to page 6-27.
Send Receive
Confidential box
Sending a fax protected with a password
If the recipient is set up for the closed communication, a fax can be sent protected with a password.
For details, refer to page 6-22.
x-22 362/350/282/250/222/200

Introduction
Advanced scanning features
The following features are available if scanner unit is installed.
- IP Scanner
- IP address fax
- Scan to PC
- IP Relay
For more details, refer to the User’s Guide [Advanced Scan Operations] on
the enclosed CD-ROM.
With the advanced scanning features, a document can be scanned with
the touch of a button, and the scan data can be set to the computer with
the specified IP address. (If “Enhance Security” is set to “ON”, IP Scanner
cannot be used.)
By specifying an IP address, a fax can be sent via the LAN to a fax machine connected to the network. Since the telephone line is not used,
communication costs can be reduced.
A document can easily be scanned with a one-touch dial button, and the
scan data can be sent to the computer with the specified IP address.
A fax can be sent through a relay machine connected to the LAN.
362/350/282/250/222/200 x-23

User’s Guides
The following User’s Guides have been prepared for this machine.
User’s Guide [Copy Operations]
This manual contains details on basic operations and the operating procedures for the various copy functions.
- Refer to this User’s Guide for details on operating procedures for copy
functions, including precautions on installation/use, turning the machine
on/off, loading paper, and troubleshooting operations such as clearing
paper misfeeds.
User’s Guide [Network Scanner Operations]
This manual contains details on specifying network functions for standard
equipment and on operations for scanning functions.
- Refer to this User’s Guide for details on operating procedures for network
functions and for using the Scan to E-Mail, Scan to FTP, Scan to SMB
and Internet fax operations.
User’s Guide [Box Operations]
This manual contains details on operating procedures for using the Box functions.
- Refer to this User’s Guide for details on printing a proof copy or a locked
job and on functions that use the optional hard disk drive, such as routing
and saving documents in boxes.
Introduction
User’s Guide [Print Operations]
This manual contains details on operating procedures using the standard
built-in printer controller.
- For details on the printing functions, refer to the User’s Guide (PDF file)
on the Driver CD-ROM.
Quick Guide [Print Operations]
This manual contains details on operating procedures using the standard
built-in printer controller.
- Refer to this Quick Guide for basic operating procedures on the printing
functions.
User’s Guide [Advanced Scan Operations]
This manual contains details on the operating procedures for the functions
that can be used when the optional scanner unit is installed.
- Refer to this User’s Guide for details on using the IP address faxing, IP
Relay and Scan to PC operations and on using IP Scanner.
x-24 362/350/282/250/222/200

Introduction
User’s Guide [Facsimile Operations] (this manual)
This manual contains details on operating procedures for using the Fax functions.
- Refer to this User’s Guide for details on operating procedures for the Fax
User’s Guide [Fax Driver Operations]
This manual contains function details on the fax driver, which is used to send
faxes directly from a computer.
- Refer to the User’s Guide (PDF file) on the Driver CD-ROM for details on
functions when the fax kit is installed.
procedures for performing PC-FAX operations.
362/350/282/250/222/200 x-25
Explanation of manual conventions
Text that appears in this manner
describes the function limitations
and options required to use certain
functions.
8
8.10 Printing copies overlapping a different image ( Image
Overlay function)
[]
Names highlighted as shown above
indicate keys on the control panel,
buttons in the touch panel, and the
power switches.
Touch panel screens are shown to
check the actual display.
Text that appears in this manner
describes supplemental information,
such as precautions, references and
actions, relating to steps.
Text that appears in this manner
provides answers to problems and
questions that may occur during
operation.
Images previously stored on the hard disk can be printed overlapping copies.
To store an overlay image (Store Overlay)
1 Position the overlay document to be stored on the hard disk.
2 Press the [Utility/Coun-
Auxiliary functions Chapter 8
Handling toner and toner bottles
3 Select the size of the
4 Touch [Enter].
8-30
Introduction
Titles indicate the contents of the section.
Auxiliary functions
The Image Overlay function is available only if optional hard disk HD504 is installed.
ter] key, and then touch
[User Setting].
The User Setting screen
appears.
CAUTION
Do not throw toner or the toner bottle into a fire.
Toner expelled from the fire may cause burns.
area to be scanned.
To cancel changes to
the settings, touch
[Cancel].
What do the Book
?
Erase settings do?
If a Book Erase setting is selected, the
dark shadows
around the document or along the center of the document can be erased.
WARNING , CAUTION
Text highlighted in this manner indicates precautions to ensure safe use of this machine.
“Warning” indicates instructions that, when not observed, may result in fatal or critical injuries.
“Caution” indicates instructions that, when not observed, may result in serious injuries or
property damage.
(The page shown above is an example only.)
x-26 362/350/282/250/222/200

Introduction
Auxiliary functions
5 Select the document ori-
entation.
To cancel changes to
the settings, touch
[Cancel].
6 Press the [Start] key.
The document is scanned, and the overlay image is stored.
Reminder
Be sure to use toner bottles of the specified model, otherwise the machine may be damaged.
Note
The size of the scanned area appears on the button where the image is
stored.
Detail
For details on replacing the toner bottle, refer to To replace the toner
bottle on page 9-4.
Detail
Text highlighted in this manner provides
more detailed information concerning
operating procedures or references to
sections containing additional information.
If necessary, refer to the indicated sections.
8
Reminder
Text highlighted in this manner
indicates operation precautions.
Carefully read and observe this
type of information.
Auxiliary functions Chapter 8
8-31
Note
Text highlighted in this manner
contains references and supplemental
information concerning operating
procedures and other descriptions.
We recommend that this information
be read carefully.
(The page shown above is an example only.)
362/350/282/250/222/200 x-27
Descriptions and symbols of documents and paper
The descriptions and symbols used in this manual for documents and paper
are explained below.
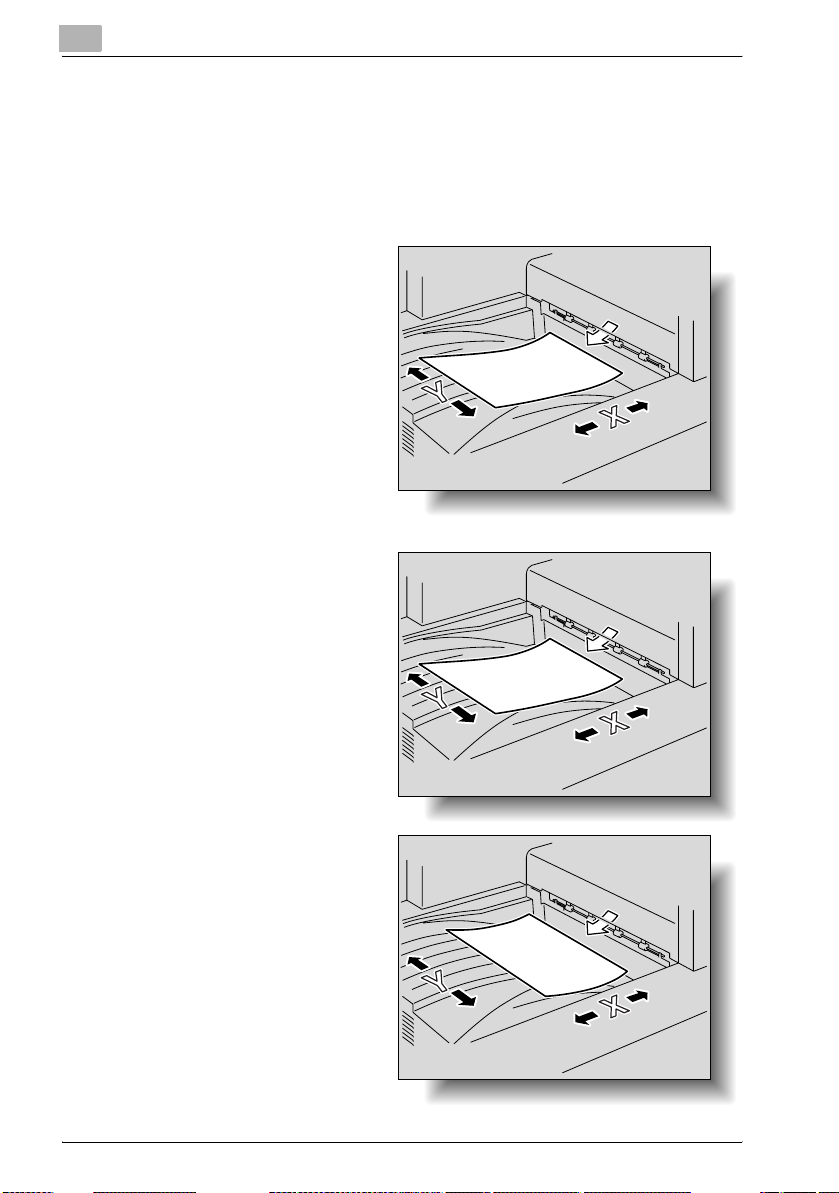
“Width” and “Length”
Whenever paper dimensions
are mentioned in this manual,
the first value always refers to
the width of the paper (shown
as “Y” in the illustration), and
the second value refers to the
length (shown as “X”).
w and v
If the length (X) is longer than
the width (Y), the paper orientation is indicated by w.
Introduction
If the length (X) is shorter than
the width (Y), the paper orientation is indicated by v.
x-28 362/350/282/250/222/200

Before use Chapter 1
1
Before use
 Loading...