

Page 1

NC-503
User Manual
Page 2

Page 3

Contents
1 Introduction
1.1 Software end user license agreement.......................................... 1-11
1.2 Explanation of manual conventions.............................................. 1-14
Safety advices.............................................................................. 1-14
Sequence of action ...................................................................... 1-14
Tips .............................................................................................. 1-15
Special text markings................................................................... 1-15
2 Getting ready
2.1 Overview............................................................................................ 2-3
2.2 Names of control panel parts and their functions......................... 2-4
2.3 Entering text...................................................................................... 2-9
Changing the input mode .............................................................. 2-9
Key operation................................................................................. 2-9
Text input example....................................................................... 2-11
To delete a part of the entered text ............................................. 2-15
To change entered characters..................................................... 2-15
Entering text with the keypad keys.............................................. 2-15
To enter a space .......................................................................... 2-15
To stop entering text.................................................................... 2-15
2.4 Connecting to a local area network (LAN) ................................... 2-16
Connecting the network cable..................................................... 2-16
Network port LEDs....................................................................... 2-16
3 Network printing
3.1 Selecting the network printing method .......................................... 3-3
When using a Windows operating system..................................... 3-4
When using a NetWare environment
(NetWare server and Windows client)............................................ 3-7
3.2 Checking the setup .......................................................................... 3-9
Peer-to-peer printing...................................................................... 3-9
LPR/PORT9100 printing............................................................... 3-10
IPP printing................................................................................... 3-11
NetWare server/client (except NDPS).......................................... 3-11
NetWare server/client (NDPS)...................................................... 3-12
NC-503 Contents-1
Page 4

3.3 Specifying an IP address ................................................................ 3-13
3.4 Printing the settings information ................................................... 3-18
3.5 Connecting the computer and this machine
over a network................................................................................. 3-19
Peer-to-peer printing .................................................................... 3-20
LPR printing .................................................................................. 3-21
PORT9100 printing ....................................................................... 3-23
IPP printing ................................................................................... 3-25
Checking IPP-related settings from
PageScope Web Connection ....................................................... 3-25
IPP printing connections............................................................... 3-26
Connecting the IPP printing NetWare server
and this machine........................................................................... 3-27
4 Network scanning
Scan to E-mail ................................................................................ 4-4
Scan to Server (FTP)....................................................................... 4-5
Environments for network scan transmissions............................... 4-6
5 Network settings
5.1 Network settings ............................................................................... 5-3
List of network settings................................................................... 5-3
List of LDAP settings ...................................................................... 5-8
5.2 Specifying settings from the control panel................................... 5-10
5.3 NETWORK SETTING ....................................................................... 5-12
Specifying the IP address, subnet mask and
default gateway............................................................................. 5-13
Specifying the DNS settings ......................................................... 5-18
Specifying the gateway transmission setting ............................... 5-20
Specifying the WEB setting .......................................................... 5-21
Specifying the LPD setting ........................................................... 5-22
Specifying the SLP setting............................................................ 5-23
Specifying the SNMP setting........................................................ 5-24
5.4 E-MAIL SETTING 1 .......................................................................... 5-25
Programming the sender’s name ................................................. 5-26
Specifying the e-mail address of the sender ................................ 5-29
Specifying the SMTP server address............................................ 5-30
Specifying the SMTP port number ............................................... 5-31
Specifying the SMTP server connection timeout ......................... 5-32
Contents-2 NC-503
Page 5

Specifying the text input setting .................................................. 5-33
Specifying the subject of e-mail messages ................................. 5-34
Specifying the POP before SMTP setting.................................... 5-35
Specifying the E-MAIL MODE settings........................................ 5-36
5.5 E-MAIL SETTING 2.......................................................................... 5-37
Specifying the POP3 server address ........................................... 5-37
Specifying the POP3 port number............................................... 5-40
Specifying the POP3 server connection timeout ......................... 5-41
Specifying the POP3 account...................................................... 5-42
Specifying the POP3 password ................................................... 5-43
5.6 LDAP SETTING................................................................................ 5-44
Specifying the LDAP server address ........................................... 5-45
Specifying the LDAP port number ............................................... 5-48
Selecting the SSL setting............................................................. 5-49
Specifying the search base.......................................................... 5-50
Specifying the attribute setting .................................................... 5-51
Selecting the search method ....................................................... 5-52
Specifying the LDAP search timeout ........................................... 5-53
Specifying the maximum number of search items....................... 5-54
Selecting the authentication method ........................................... 5-55
Specifying the LDAP account name ............................................ 5-56
Specifying the LDAP password ................................................... 5-57
Specifying the domain name ....................................................... 5-58
5.7 USER SETTING ............................................................................... 5-59
Specifying the NTP server ........................................................... 5-59
Specifying the time zone.............................................................. 5-62
6 Registering destinations
6.1 Registering destinations.................................................................. 6-3
Registering one-touch dial destinations ........................................ 6-5
Registering speed dial destinations............................................. 6-12
Registering speed dial destinations (FTP servers)....................... 6-19
Registering group dial destinations ............................................. 6-19
6.2 Editing or deleting registered information ................................... 6-23
Editing or deleting a one-touch dial destination .......................... 6-23
Editing or deleting a speed dial destination................................. 6-26
Editing or deleting a group dial destination ................................. 6-29
NC-503 Contents-3
Page 6

7 Performing a scan to e-mail operation
7.1 Basic transmission............................................................................ 7-3
Using the automatic document feeder ........................................... 7-4
Positioning documents on the original glass .................................. 7-6
7.2 Changing the transmission settings.............................................. 7-13
Specifying the subject .................................................................. 7-13
Specifying a cc address ............................................................... 7-15
Selecting the file format ................................................................ 7-20
Selecting the compression encoding method.............................. 7-22
7.3 Changing the scanning quality settings ........................................ 7-24
Selecting the resolution ................................................................ 7-24
Selecting the document quality .................................................... 7-26
7.4 Changing the document scanning density ................................... 7-28
When "TEXT/PHOTO" or "TEXT" was selected............................ 7-28
When "PHOTO" was selected ...................................................... 7-31
7.5 Specifying the default scanning settings ...................................... 7-33
Selecting the resolution ................................................................ 7-33
Selecting the file format ................................................................ 7-35
Selecting the compression encoding method.............................. 7-37
7.6 If the memory becomes full while
scanning documents....................................................................... 7-39
7.7 Specifying a one-touch dial destination........................................ 7-41
7.8 Specifying a speed dial destination............................................... 7-42
7.9 Specifying a recipient from a group dial destination ................... 7-43
7.10 Selecting a destination from the phone book............................... 7-44
Searching the phone book............................................................ 7-46
Searching the LDAP server........................................................... 7-48
7.11 Checking the communication results............................................ 7-52
8 Performing a scan to server (FTP) operation
8.1 Basic transmission............................................................................ 8-3
Using the automatic document feeder ........................................... 8-4
Positioning documents on the original glass .................................. 8-7
8.2 If the memory becomes full while
scanning documents....................................................................... 8-13
Contents-4 NC-503
Page 7

9 Using PageScope Web Connection
9.1 When using PageScope Web Connection...................................... 9-3
9.2 About PageScope Web Connection ............................................... 9-3
9.3 System requirements ....................................................................... 9-5
9.4 Accessing PageScope Web Connection........................................ 9-6
9.5 Structure of pages............................................................................ 9-7
Description of the pages................................................................ 9-7
Operation ....................................................................................... 9-8
Web browser cache ....................................................................... 9-9
With Internet Explorer .................................................................... 9-9
With Netscape Navigator ............................................................... 9-9
9.6 Logging on to Administrator mode............................................... 9-10
To log on to Administrator mode ................................................. 9-10
9.7 User mode....................................................................................... 9-12
User mode tabs............................................................................ 9-12
System tab — Summary.............................................................. 9-13
System tab — Details — Input Tray............................................. 9-14
System tab — Details — Output Tray.......................................... 9-15
System tab — Details — ROM Version........................................ 9-16
System tab — Details — Interface Information............................ 9-17
System tab — Details — Consumable......................................... 9-18
System tab — Maintenance — Counter ...................................... 9-19
System tab — Online Assistance................................................. 9-20
Job tab — Print Job Management............................................... 9-21
Job tab — File Download............................................................. 9-22
Print tab — Settings — Paper Handling ...................................... 9-23
Print tab — Settings — Page Layout........................................... 9-24
Print tab — Settings — Printer Setting ........................................ 9-25
Print tab — Test Print................................................................... 9-26
Print tab — Font Information ....................................................... 9-27
Scan tab — One-Touch Dial Setting............................................ 9-28
Scan tab — Speed Dial Setting ................................................... 9-29
Scan tab — Group Dial Setting.................................................... 9-30
Network tab — Summary............................................................. 9-31
9.8 Administrator mode........................................................................ 9-32
Administrator mode tabs ............................................................. 9-32
System tab — Summary.............................................................. 9-33
System tab — Details .................................................................. 9-34
System tab — Preference............................................................ 9-35
System tab — Save Setting......................................................... 9-37
NC-503 Contents-5
Page 8

Save Setting.................................................................................. 9-38
Restore Setting ............................................................................. 9-38
System tab — Maintenance
— NIC and Printer Controller Reset.............................................. 9-39
System tab — Maintenance — Initialize....................................... 9-40
Firmware Update .......................................................................... 9-40
Restore Factory Defaults .............................................................. 9-41
System tab — Maintenance — Counter....................................... 9-42
System tab — Online Assistance ................................................. 9-43
Job tab — Print Job Management................................................ 9-44
Deleting jobs ................................................................................. 9-44
Print tab — Settings — Paper Handling ....................................... 9-45
Print tab — Settings — Page Layout............................................ 9-46
Print tab — Settings — Printer Setting......................................... 9-47
Print tab — Test Print ................................................................... 9-48
Print tab — Font Information ........................................................ 9-49
Scan tab — One-Touch Dial Setting ............................................ 9-50
Registering one-touch dial settings.............................................. 9-51
Sample page for a fax destination................................................ 9-54
When "Fax" is selected................................................................. 9-55
When "E-Mail" or "LDAP Search" is selected .............................. 9-55
When "Group Dial" is selected ..................................................... 9-55
Scan tab — Speed Dial Setting .................................................... 9-56
Registering speed dial settings..................................................... 9-57
Sample page for an e-mail destination......................................... 9-60
When "Fax" is selected................................................................. 9-61
When "E-Mail" or "LDAP Search" is selected .............................. 9-61
When "FTP Server Address" is selected ...................................... 9-62
Scan tab — Group Dial Setting .................................................... 9-63
Registering group dial settings ..................................................... 9-64
Scan tab — Fax Configuration ..................................................... 9-66
Scan tab — Downloading/Uploading Destination List ................. 9-69
Download...................................................................................... 9-69
Upload .......................................................................................... 9-70
Network tab — Summary ............................................................. 9-71
Network tab — TCP/IP Configuration........................................... 9-72
Network tab — NetWare Configuration
— NetWare Setting ....................................................................... 9-74
Network tab — NetWare Configuration
— NetWare Status ........................................................................ 9-77
Network tab — IPP Configuration ................................................ 9-78
Network tab — SMTP & POP3 Configuration............................... 9-80
Network tab — FTP & DNS Configuration.................................... 9-83
Network tab - LDAP Configuration ............................................... 9-84
Contents-6 NC-503
Page 9

10 Troubleshooting
10.1 Main error messages and their remedies .................................... 10-3
10.2 Troubleshooting.............................................................................. 10-4
Network printing........................................................................... 10-4
Scan to E-mail.............................................................................. 10-4
PageScope Web Connection....................................................... 10-5
11 Appendix
11.1 Main product specifications.......................................................... 11-3
Network printing........................................................................... 11-3
Scan to E-mail/Scan to Server (FTP) ........................................... 11-4
NC-503 Contents-7
Page 10

Contents-8 NC-503
Page 11

1
Introduction
Page 12

Page 13

Introduction
1 Introduction
Thank you for purchasing this machine.
This manual provides descriptions on the use of network printing and
network scanning functions used with the Internet or on an intranet.
Be sure to read this manual before performing any operations.
For precautions concerning the use and safety of the machine, refer to the
user manual provided with the machine.
Store the CD-ROM and user manuals provided with the machine in a safe
place.
Trademarks and copyright
- KONICA MINOLTA, the KONICA MINOLTA logo, and The essentials of
imaging are registered trademarks of KONICA MINOLTA HOLDINGS,
INC.
- PageScope and bizhub are registered trademarks or trademarks of
KONICA MINOLTA BUSINESS TECHNOLOGIES INC.
- Netscape is a registered trademark of Netscape Communications
Corporation in the United States and other countries.
- Novell and Novell NetWare are registered trademarks of Novell, Inc. in the
United States and other countries.
- Microsoft, Windows, and Windows NT are either registered trademarks
or trademarks of Microsoft Corporation in the United States and/or other
countries.
- Adobe, the Adobe logo, Acrobat and PostScript are either registered
trademarks or trademarks of Adobe Systems Incorporated in the United
States and/or other countries.
- Ethernet is a registered trademark of Xerox Corporation.
- PCL is a registered trademark of Hewlett-Packard Company Limited.
- All other product and brand names are trademarks or registered
trademarks of their respective companies or organizations.
1
NC-503 1-3
Page 14

1
Introduction
Kerberos
Copyright and Other Legal Notices
Copyright © 1985-2007 by the Massachusetts Institute of Technology.
All rights reserved.
Export of this software from the United States of America may require a
specific license from the United States Government. It is the responsibility of
any person or organization contemplating export to obtain such a license
before exporting.
WITHIN THAT CONSTRAINT, permission to use, copy, modify, and
distribute this software and its documentation for any purpose and without
fee is hereby granted, provided that the above copyright notice appear in all
copies and that both that copyright notice and this permission notice appear
in supporting documentation, and that the name of M.I.T. not be used in
advertising or publicity pertaining to distribution of the software without
specific, written prior permission. Furthermore if you modify this software
you must label your software as modified software and not distribute it in
such a fashion that it might be confused with the original MIT software.
M.I.T. makes no representations about the suitability of this software for any
purpose. It is provided "as is" without express or implied warranty.
THIS SOFTWARE IS PROVIDED "AS IS" AND WITHOUT ANY EXPRESS OR
IMPLIED WARRANTIES, INCLUDING, WITHOUT LIMITATION, THE IMPLIED
WARRANTIES OF MERCHANTIBILITY AND FITNESS FOR A PARTICULAR
PURPOSE.
Individual source code files are copyright MIT, Cygnus Support, Novell,
OpenVision Technologies, Oracle, Red Hat, Sun Microsystems,
FundsXpress, and others.
Project Athena, Athena, Athena MUSE, Discuss, Hesiod, Kerberos, Moira,
and Zephyr are trademarks of the Massachusetts Institute of
Technology(MIT). No commercial use of these trademarks may be made
without prior written permission of MIT.
"Commercial use" means use of a name in a product or other for-profit
manner. It does NOT prevent a commercial firm from referring to the MIT
trademarks in order to convey information (although in doing so, recognition
of their trademark status should be given).
Portions of src/lib/crypto have the following copyright:
Copyright © 1998 by the FundsXpress, INC.
All rights reserved.
1-4 NC-503
Page 15

Introduction
Export of this software from the United States of America may require a
specific license from the United States Government. It is the responsibility
of any person or organization contemplating export to obtain such a license
before exporting.
WITHIN THAT CONSTRAINT, permission to use, copy, modify, and
distribute this software and its documentation for any purpose and without
fee is hereby granted, provided that the above copyright notice appear in all
copies and that both that copyright notice and this permission notice appear
in supporting documentation, and that the name of FundsXpress. not be
used in advertising or publicity pertaining to distribution of the software
without specific, written prior permission. FundsXpress makes no
representations about the suitability of this software for any purpose. It is
provided "as is" without express or implied warranty.
THIS SOFTWARE IS PROVIDED "AS IS" AND WITHOUT ANY EXPRESS OR
IMPLIED WARRANTIES, INCLUDING, WITHOUT LIMITATION, THE IMPLIED
WARRANTIES OF MERCHANTIBILITY AND FITNESS FOR A PARTICULAR
PURPOSE
OpenLDAP Public License
The OpenLDAP Public License
Version 2.8, 17 August 2003
Redistribution and use of this software and associated documentation
("Software"), with or without modification, are permitted provided that the
following conditions are met:
1. Redistributions in source form must retain copyright statements and
2. Redistributions in binary form must reproduce applicable copyright
3. Redistributions must contain a verbatim copy of this document.
The OpenLDAP Foundation may revise this license from time to time. Each
revision is distinguished by a version number. You may use this Software
under terms of this license revision or under the terms of any subsequent
revision of the license.
THIS SOFTWARE IS PROVIDED BY THE OPENLDAP FOUNDATION AND
ITS CONTRIBUTORS "AS IS" AND ANY EXPRESSED OR IMPLIED
WARRANTIES, INCLUDING, BUT NOT LIMITED TO, THE IMPLIED
WARRANTIES OF MERCHANTABILITY AND FITNESS FOR A PARTICULAR
PURPOSE ARE DISCLAIMED. IN NO EVENT SHALL THE OPENLDAP
FOUNDATION, ITS CONTRIBUTORS, OR THE AUTHOR(S) OR OWNER(S)
OF THE SOFTWARE BE LIABLE FOR ANY DIRECT, INDIRECT,
INCIDENTAL, SPECIAL, EXEMPLARY, OR CONSEQUENTIAL DAMAGES
1
notices,
statements and notices, this list of conditions, and the following
disclaimer in the documentation and/or other materials provided with the
distribution, and
NC-503 1-5
Page 16

1
Introduction
(INCLUDING, BUT NOT LIMITED TO, PROCUREMENT OF SUBSTITUTE
GOODS OR SERVICES; LOSS OF USE, DATA, OR PROFITS; OR BUSINESS
INTERRUPTION) HOWEVER CAUSED AND ON ANY THEORY OF
LIABILITY, WHETHER IN CONTRACT, STRICT LIABILITY, OR TORT
(INCLUDING NEGLIGENCE OR OTHERWISE) ARISING IN ANY WAY OUT
OF THE USE OF THIS SOFTWARE, EVEN IF ADVISED OF THE POSSIBILITY
OF SUCH DAMAGE.
The names of the authors and copyright holders must not be used in
advertising or otherwise to promote the sale, use or other dealing in this
Software without specific, written prior permission. Title to copyright in this
Software shall at all times remain with copyright holders.
OpenLDAP is a registered trademark of the OpenLDAP Foundation.
Copyright 1999-2003 The OpenLDAP Foundation, Redwood City, California,
USA. All Rights Reserved. Permission to copy and distribute verbatim
copies of this document is granted.
Cyrus SASL
Copyright © 2001 Carnegie Mellon University. All rights reserved.
Redistribution and use in source and binary forms, with or without
modification, are permitted provided that the following conditions are met:
1. Redistributions of source code must retain the above copyright notice,
this list of conditions and the following disclaimer.
2. Redistributions in binary form must reproduce the above copyright
notice, this list of conditions and the following disclaimer in the
documentation and/or other materials provided with the distribution.
3. The name "Carnegie Mellon University" must not be used to endorse or
promote products derived from this software without prior written
permission. For permission or any other legal details, please contact
Office of Technology Transfer
Carnegie Mellon University
5000 Forbes Avenue
Pittsburgh, PA 15213-3890
(412) 268-4387, fax: (412) 268-7395
[email protected]
4. Redistributions of any form whatsoever must retain the following
acknowledgment:
"This product includes software developed by Computing Services at
Carnegie Mellon University (http://www.cmu.edu/computing/)."
1-6 NC-503
Page 17

Introduction
CARNEGIE MELLON UNIVERSITY DISCLAIMS ALL WARRANTIES WITH
REGARD TO THIS SOFTWARE, INCLUDING ALL IMPLIED WARRANTIES
OF MERCHANTABILITY AND FITNESS, IN NO EVENT SHALL CARNEGIE
MELLON UNIVERSITY BE LIABLE FOR ANY SPECIAL, INDIRECT OR
CONSEQUENTIAL DAMAGES OR ANY DAMAGES WHATSOEVER
RESULTING FROM LOSS OF USE, DATA OR PROFITS, WHETHER IN AN
ACTION OF CONTRACT, NEGLIGENCE OR OTHER TORTIOUS ACTION,
ARISING OUT OF OR IN CONNECTION WITH THE USE OR
PERFORMANCE OF THIS SOFTWARE.
OpenSLP License
Copyright © 2000 Caldera Systems, Inc
All rights reserved.
Redistribution and use in source and binary forms, with or without
modification, are permitted provided that the following conditions are met:
1. Redistributions of source code must retain the above copyright notice,
2. Redistributions in binary form must reproduce the above copyright
3. Neither the name of Caldera Systems nor the names of its contributors
THIS SOFTWARE IS PROVIDED BY THE COPYRIGHT HOLDERS AND
CONTRIBUTORS "AS IS" AND ANY EXPRESS OR IMPLIED WARRANTIES,
INCLUDING, BUT NOT LIMITED TO, THE IMPLIED WARRANTIES OF
MERCHANTABILITY AND FITNESS FOR A PARTICULAR PURPOSE ARE
DISCLAIMED. IN NO EVENT SHALL THE CALDERA SYSTEMS OR
CONTRIBUTORS BE LIABLE FOR ANY DIRECT, INDIRECT, INCIDENTAL,
SPECIAL, EXEMPLARY, OR CONSEQUENTIAL DAMAGES (INCLUDING,
BUT NOT LIMITED TO, PROCUREMENT OF SUBSTITUTE GOODS OR
SERVICES; LOSS OF USE, DATA, OR PROFITS; OR BUSINESS
INTERRUPTION) HOWEVER CAUSED AND ON ANY THEORY OF
LIABILITY, WHETHER IN CONTRACT, STRICT LIABILITY, OR TORT
(INCLUDING NEGLIGENCE OR OTHERWISE) ARISING IN ANY WAY OUT
OF THE USE OF THIS SOFTWARE, EVEN IF ADVISED OF THE POSSIBILITY
OF SUCH DAMAGE.
1
this list of conditions and the following disclaimer.
notice, this list of conditions and the following disclaimer in the
documentation and/or other materials provided with the distribution.
may be used to endorse or promote products derived from this software
without specific prior written permission.
NC-503 1-7
Page 18

1
Introduction
OpenSSL License
Copyright © 1998-2007 The OpenSSL Project. All rights reserved.
Redistribution and use in source and binary forms, with or without
modification, are permitted provided that the following conditions are met:
1. Redistributions of source code must retain the above copyright notice,
this list of conditions and the following disclaimer.
2. Redistributions in binary form must reproduce the above copyrightnotice,
this list of conditions and the following disclaimer in the documentation
and/or other materials provided with the distribution.
3. All advertising materials mentioning features or use of this software must
display the following acknowledgment:
"This product includes software developed by the OpenSSL Project for
use in the OpenSSL Toolkit. (http://www.openssl.org/)"
4. The names "OpenSSL Toolkit" and "OpenSSL Project" must not be used
to endorse or promote products derived from this software without prior
written permission. For written permission, please contact openssl[email protected].
5. Products derived from this software may not be called "OpenSSL" nor
may "OpenSSL" appear in their names without prior written permission
of the OpenSSL Project.
6. Redistributions of any form whatsoever must retain the following
acknowledgment:
"This product includes software developed by the OpenSSL Project for
use in the OpenSSL Toolkit (http://www.openssl.org/)"
THIS SOFTWARE IS PROVIDED BY THE OpenSSL PROJECT "AS IS" AND
ANY EXPRESSED OR IMPLIED WARRANTIES, INCLUDING, BUT NOT
LIMITED TO, THE IMPLIED WARRANTIES OF MERCHANTABILITY AND
FITNESS FOR A PARTICULAR PURPOSE ARE DISCLAIMED. IN NO EVENT
SHALL THE OpenSSL PROJECT OR ITS CONTRIBUTORS BE LIABLE FOR
ANY DIRECT, INDIRECT, INCIDENTAL, SPECIAL, EXEMPLARY, OR
CONSEQUENTIAL DAMAGES (INCLUDING, BUT NOT LIMITED TO,
PROCUREMENT OF SUBSTITUTE GOODS OR SERVICES;
LOSS OF USE, DATA, OR PROFITS; OR BUSINESS INTERRUPTION)
HOWEVER CAUSED AND ON ANY THEORY OF LIABILITY, WHETHER IN
CONTRACT, STRICT LIABILITY, OR TORT (INCLUDING NEGLIGENCE OR
OTHERWISE) ARISING IN ANY WAY OUT OF THE USE OF THIS
SOFTWARE, EVEN IF ADVISED OF THE POSSIBILITY OF SUCH DAMAGE.
This product includes cryptographic software written by Eric Young
([email protected]). This product includes software written by Tim Hudson
([email protected]).
1-8 NC-503
Page 19

Introduction
Original SSLeay License
Copyright © 1995-1998 Eric Young ([email protected]) All rights reserved.
This package is an SSL implementation written by Eric Young
([email protected]).
The implementation was written so as to conform with Netscapes SSL.
This library is free for commercial and non-commercial use as long as the
following conditions are aheared to. The following conditions apply to all
code found in this distribution, be it the RC4, RSA, lhash, DES, etc., code;
not just the SSL code. The SSL documentation included with this
distribution is covered by the same copyright terms except that the holder is
Tim Hudson ([email protected]).
Copyright remains Eric Young’s, and as such any Copyright notices in the
code are not to be removed.
If this package is used in a product, Eric Young should be given tribution as
the author of the parts of the library used.
This can be in the form of a textual message at program startup or in
documentation (online or textual) provided with the package.
Redistribution and use in source and binary forms, with or without
modification, are permitted provided that the following conditions are met:
1. Redistributions of source code must retain the copyright notice, this list
2. Redistributions in binary form must reproduce the above copyright
3. All advertising materials mentioning features or use of this software must
4. If you include any Windows specific code (or a derivative thereof) from
THIS SOFTWARE IS PROVIDED BY ERIC YOUNG "AS IS" AND ANY
EXPRESS OR IMPLIED WARRANTIES, INCLUDING, BUT NOT LIMITED TO,
THE IMPLIED WARRANTIES OF MERCHANTABILITY AND FITNESS FOR A
PARTICULAR PURPOSE ARE DISCLAIMED. IN NO EVENT SHALL THE
AUTHOR OR CONTRIBUTORS BE LIABLE FOR ANY DIRECT, INDIRECT,
INCIDENTAL, SPECIAL, EXEMPLARY, OR CONSEQUENTIAL DAMAGES
(INCLUDING, BUT NOT LIMITED TO, PROCUREMENT OF SUBSTITUTE
GOODS OR SERVICES; LOSS OF USE, DATA, OR PROFITS; OR BUSINESS
1
of conditions and the following disclaimer.
notice, this list of conditions and the following disclaimer in the
documentation and/or other materials provided with the distribution.
display the following acknowledgement:
"This product includes cryptographic software written by Eric Young
([email protected])"The word "cryptographic" can be left out if the
rouines from the library being used are not cryptographic related :-).
the apps directory (application code) you must include an
acknowledgement:
"This product includes software written by Tim Hudson
([email protected])"
NC-503 1-9
Page 20

1
Introduction
INTERRUPTION) HOWEVER CAUSED AND ON ANY THEORY OF
LIABILITY, WHETHER IN CONTRACT, STRICT LIABILITY, OR TORT
(INCLUDING NEGLIGENCE OR OTHERWISE) ARISING IN ANY WAY OUT
OF THE USE OF THIS SOFTWARE, EVEN IF ADVISED OF THE POSSIBILITY
OF SUCH DAMAGE.
The licence and distribution terms for any publically available version or
derivative of this code cannot be changed. i.e. this code cannot simply be
copied and put under another distribution licence (including the GNU Public
Licence).
About PageScope Web Connection
Network utility PageScope Web Connection can be used when a network
interface card is installed. PageScope Web Connection is an extremely
useful network utility for specifying network and other settings over the
network.
PageScope Web Connection can be used simply with the Web browser
(Internet Explorer or Netscape Navigator) installed on the computer; no
special software is required. For details on using PageScope Web
Connection, refer to "Using PageScope Web Connection" on page 9-3.
Copyright
© 2007 Konica Minolta Business Technologies, Inc. All Rights Reserved.
Note
- This user manual may not be reproduced in part or in full without
permission.
- Konica Minolta Business Technologies, Inc. will not be held liable for any
incidents caused by using this user manual.
- Information included in this user manual is subject to change without
notice.
- Views of the actual equipment may be slightly different from the
illustrations used in this user manual.
1-10 NC-503
Page 21

Introduction
1.1 Software end user license agreement
PLEASE READ CAREFULLY THE LICENSE AGREEMENT BELOW BEFORE
OPENING THE PACKAGE OF THIS SOFTWARE ("SOFTWARE"),
DOWNLOADING, INSTALLING OR USING THE SOFTWARE. OPENING THE
PACKAGE, OR DOWNLOADING, INSTALLING OR USING THE SOFTWARE
SHALL BE DEEMED YOUR LAWFUL ACCEPTANCE OF THE TERMS AND
CONDITIONS BELOW. IF YOU DO NOT AGREE TO THEM, DO NOT
DOWNLOAD, INSTALL, USE THE SOFTWARE, NOR OPEN THE PACKAGE.
1. COPYRIGHT AND INTELLECTUAL PROPERTY RIGHTS
This is a license agreement and not an agreement for sale. Konica Minolta
Business Technologies, Inc.("Konica Minolta") owns, or has been licensed
from other owners ("Konica Minolta Licensor"), copyrights and other
intellectual property rights of the Software, and any and all rights and title to
the Software and any copy made from it are retained by Konica Minolta or
Konica Minolta Licensor. In no event, this Agreement shall be deemed to
assign any copyright and/or any intellectual property rights of the Software
from Konica Minolta or Konica Minolta Licensor to you. The Software is
protected by copyright laws and international treaty provisions.
2. LICENSE
Konica Minolta hereby grant to you a non-exclusive and limited license, and
you may:
(i) install and use the Software only on your computer(s) connected with
Konica Minolta product for which this Software is designed;
(ii) allow users of the computers described above to use the Software,
provided that you assure that all such users comply with the terms of this
Agreement;
(iii) use the Software only for your own customary business or personal
purpose;
(iv) make one copy of the Software only for backup purpose in the support
of the normal and intended use of the Software.
(v) transfer the Software to other party by transferring a copy of this
Agreement and all documentation along with the Software, provided that (a)
you must, at the same time, either transfer to such other party or destroy all
your other copies of the Software, (b) such transfer of possession terminates
your license from Konica Minolta, and (c) you must assure that such other
party has agreed to accept the terms and conditions of this Agreement. If
such other party does not accept such terms and conditions then you shall
not transfer any copy of the Software.
1
NC-503 1-11
Page 22

1
Introduction
3. RESTRICTIONS
(1) You shall not without the written consent of Konica Minolta:
(i) use, copy, modify, merge or transfer copies of the Software except as
provided herein;
(ii) reverse engineer, reverse assemble, reverse compile or any other way
analyze the Software; or
(iii) sublicense, rent, lease or distribute the Software or any copy thereof.
(iv) remove, use, or alter any trademark, logo, copyright or other proprietary
notices, legends, symbols or labels in the Software.
(2) You agree that you will not export the Software in any form in violation of
any applicable laws and regulations regarding export control of any country.
4. DISCLAIMER OF WARRANTIES
(1) If the Software is furnished on CD-ROM(s) or other tangible object that is
used for storage of digital data (hereinafter collectively "Storage Medium"),
Konica Minolta warrants the Storage Medium to be free from the defects in
material and workmanship under normal use, for a period of ninety (90) days
from the date of delivery to you. WITH THE EXCEPTION OF THE
FOREGOING EXPRESS WARRANTIES APPLICABLE TO STORAGE
MEDIUM ONLY, THE SOFTWARE IS PROVIDED TO YOU "AS IS" WITHOUT
ANY WARRANTIES WHATSOEVER. KONICA MINOLTA, ITS AFFILIATE
COMPANIES AND KONICA MINOLTA LICENSOR DISCLAIM ALL
WARRANTIES WITH REGARD TO THE SOFTWARE, EXPRESS OR IMPLIED,
INCLUDING, WITHOUT LIMITATION, IMPLIED WARRANTIES OF
MERCHANTABILITY, FITNESS FOR A PARTICULAR PURPOSE AND NONINFRINGEMENT OF THIRD PARTY RIGHTS.
(2) IN NO EVENT WILL KONICA MINOLTA, ITS AFFILIATE COMPANIES NOR
KONICA MINOLTA LICENSOR BE LIABLE FOR ANY LOST PROFITS, LOST
DATA, OR ANY OTHER INDIRECT, SPECIAL, PUNITIVE, INCIDENTAL OR
CONSEQUENTIAL DAMAGES THAT RESULT FROM USE OR INABILITY TO
USE THE SOFTWARE INCLUDING WITHOUT LIMITATION, DAMAGES FOR
LOSS OF GOODWILL, COMPUTER FAILURE OR MALFUNCTION OR ANY
AND ALL OTHER COMMERCIAL OR OTHER DAMAGES OR LOSSES, EVEN
IF KONICA MINOLTA, ITS AFFILIATE COMPANIES OR KONICA MINOLTA
LICENSOR HAS BEEN ADVISED OF THE POSSIBILITY OF SUCH
DAMAGES OR FOR ANY CLAIM BY YOU BASED ON A THIRD PARTY
CLAIM.
(3) The disclaimer of warranty hereunder does not affect your statutory rights.
In case of the disclaimer is not allowed by applicable law, the disclaimer shall
only apply to you to the maximum extent permitted by the law.
1-12 NC-503
Page 23

Introduction
5. TERMINATION
You may terminate this license at any time by destroying the Software and
all your copies of it. This Agreement shall also terminate if you fail to comply
with any terms hereof. Upon such termination, you must immediately destroy
all copies of the Software in your possession.
6. GOVERNING LAW
This Agreement shall be governed by the laws of Japan.
7. SEVERABILITY
In the event that any part or parts of this agreement shall be held illegal or
null and void by any court or administrative body of competent jurisdiction,
such determination shall not effect the remaining parts of this agreement and
they shall remain in full force and effect as if such part or parts determined
illegal or void had not been included.
8. NOTICE TO US GOVERNMENT END USERS
The Software is a "commercial item," as that term is defined at 48 C.F.R.
2.101 (October 1995), consisting of "commercial computer software" and
"commercial computer software documentation," as such terms are used in
48 C.F.R. 12.212 (September 1995). Consistent with 48 C.F.R. 12.212 and
48 C.F.R. 227.7202-1 through 227.7202-4 (June 1995), all U.S. Government
End Users shall acquire the Software with only those rights set forth herein.
YOU ACKNOWLEDGE THAT YOU HAVE READ THIS AGREEMENT,
UNDERSTAND IT, AND AGREE TO BE BOUND BY ITS TERMS AND
CONDITIONS. NEITHER PARTY SHALL BE BOUND BY ANY OTHER
STATEMENTS OR REPRESENTATIONS THAT ARE INCONSISTENT WITH
THE TERMS AND CONDITIONS OF THIS AGREEMENT. NO AMENDMENT
TO THIS AGREEMENT IS EFFECTIVE UNLESS WRITTEN AND SIGNED BY
PROPERLY AUTHORIZED REPRESENTATIVES OF EACH PARTY. BY
OPENING THE PACKAGE, DOWNLOADING, INSTALLING OR USING THE
SOFTWARE YOU AGREE TO ACCEPT THE TERMS OF THIS AGREEMENT.
1
NC-503 1-13
Page 24

1
1.2 Explanation of manual conventions
The marks and text formats used in this manual are described below.
Safety advices
6 DANGER
Failure to observe instructions highlighted in this manner may result in
fatal or critical injuries in fact of electrical power.
% Observe all dangers in order to prevent injuries.
7 WARNING
Failure to observe instructions highlighted in this manner may result in
serious injuries or property damage.
% Observe all warnings in order to prevent injuries and to ensure safe use
of the machine.
7 CAUTION
Failure to observe instructions highlighted in this manner may result in
slight injuries or property damage.
% Observe all cautions in order to prevent injuries and to ensure safe use
of the machine.
Introduction
Sequence of action
1 The number 1 as formatted here indicates the first step of a sequence
of actions.
2 Subsequent numbers as formatted here indicate subsequent steps of
a sequence of actions.
Text formatted in this style provides additional assistance.
?
% Text formatted in this style describes the action that will ensure the
desired results are achieved.
1-14 NC-503
Page 25

Introduction
Tips
2
2
!
Special text markings
[Stop] key
The names of keys on the control panel are written as shown above.
MACHINE SETTING
Display texts are written as shown above.
1
Note
Text highlighted in this manner contains useful information and tips to
ensure safe use of the machine.
Reminder
Text highlighted in this manner contains information that should be
reminded.
Detail
Text highlighted in this manner contains references for more detailed
information.
NC-503 1-15
Page 26

1
Introduction
1-16 NC-503
Page 27

2
Getting ready
Page 28

Page 29

Getting ready
2 Getting ready
This chapter provides information that is important to know before this
device is used.
2.1 Overview
By installing the network interface card, this machine can be used as a
network printer. In addition, since the machine is preprogrammed with
scanning functions, paper documents can easily be converted to electronic
data and used, for example, with electronic filing allowing easy access to the
information. Scanned image data (scan data) can be saved as TIFF or PDF
files and sent to other computers through a network.
2
NC-503 2-3
Page 30

2
Getting ready
2.2 Names of control panel parts and their functions
123 4 56
21
20
19
101112131415161718
No. Part name Description
1 [Power Save] key Press to enter Power Save mode.
2 [Mixed Original] key/indicator Press to select the "Mixed Original" setting.
3 [Simplex/Duplex] key/indicator Press to select double-sided copying. Select
4 Display Displays the number of copies, zoom ratio, fax
5[+], [,], [*], and [)] keys
[OK] key
6 [Printer] key/indicator This indicator lights up while data is being
7 [Access] key Press when account track settings have been
8 [Speed Dial] key Press to register frequently used fax numbers
9 [Phone Book] key/indicator Press to display the information programmed
10 [Back] key Press to return to the previous screen.
"1-SIDE->1-SIDE", "1-SIDE->2-SIDE", "2SIDE->1-SIDE" or "2-SIDE->2-SIDE". If any
setting other than "1-SIDE->1-SIDE" is selected, the indicator lights up.
mode, setting menus and error messages.
Press the [+], [,], [*], and [)] keys to select
menu items in the display and change their
settings.
Press the [OK] key to apply the current setting.
printed from the computer and flashes while
data is being sent.
For details, refer to the user manual for the
printer driver.
applied.
and addresses, and to recall them during
transmissions.
for one-touch dialing, group dialing and speed
dialing.
7
8
9
2-4 NC-503
Page 31

Getting ready
No. Part name Description
11 "Caution" indicator This indicator lights up or flashes if an error
12 [Density] key Press to select the scanning density of copies
13 [Quality] key Press to select "TEXT", "PHOTO" or
14 [Zoom] key Press to specify whether to enlarge or reduce
15 [Paper] key Press to select the paper drawer that is to be
16 [Function] key/indicator Press to specify settings for advanced copy
17 [Finishing] key/indicator Press to select a copy Finishing function.
18 [Combine Original] key/indicator Press to specify 2in1 or 4in1 copy settings.
19 [Confirm] key Press to view the counters or transmission re-
20 [Utility] key Press to specify settings in Utility mode.
21 [Mode Memory] key Press to register specified copy programs and
has occurred.
and fax documents.
"TEXT/PHOTO" as the document quality.
the image when copying.
used.
operations and useful fax transmission/reception functions, such as copying with a binding
margin added and sending/receiving confidential documents.
sults, or to print a transmission result report.
MACHINE SETTING, PAPER SOURCE SETUP, CUSTOM SIZE MEMORY, USER MANAGEMENT, ADMIN. MANAGEMENT, COPY
SETTING 1, COPY SETTING 2, DIAL REGISTRATION, FAX REGISTRATION, FAX TX OPERATION, FAX RX OPERATION,
REPORTING, SCAN SETTING
recall them.
2
NC-503 2-5
Page 32
2
Getting ready
22 23 24 25 26
27
28
2930
No. Part name Description
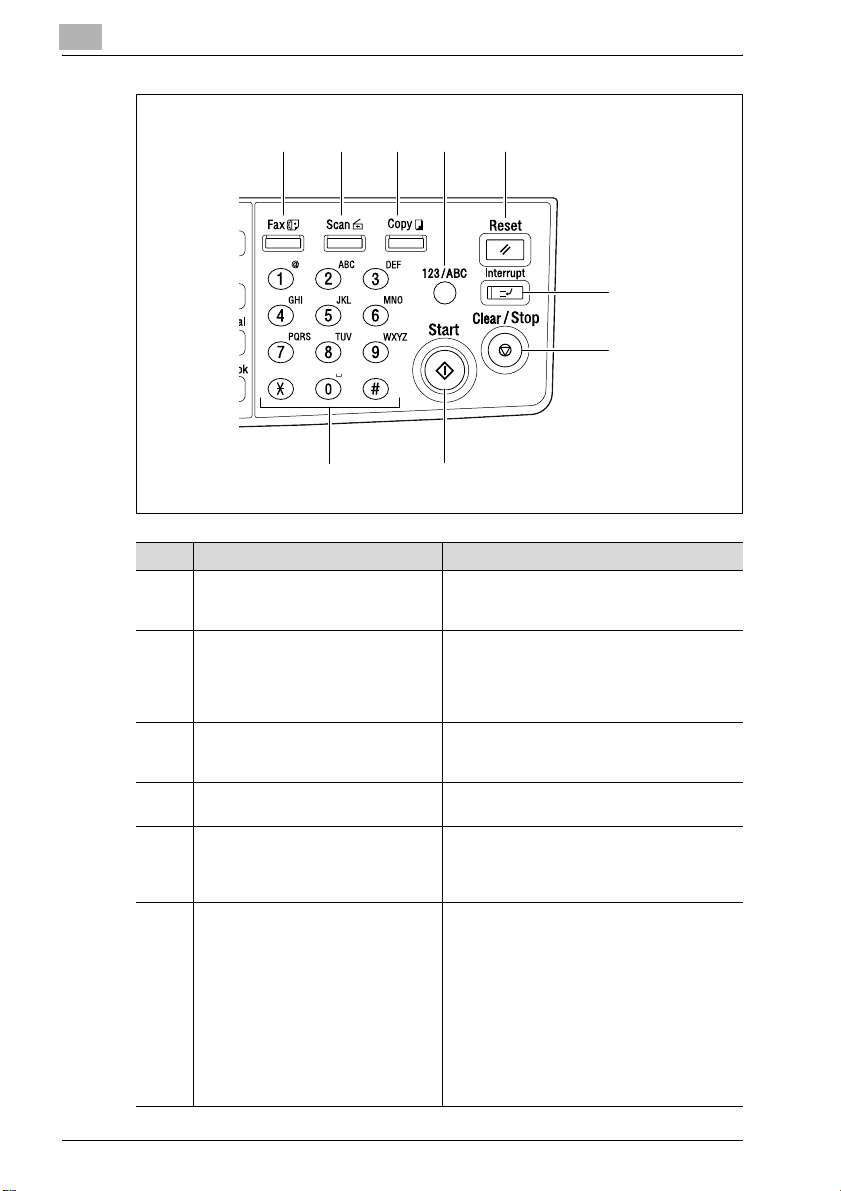
22 [Fax] key/indicator Press to enter Fax mode. The indicator on the
23 [Scan] key/indicator Press to enter Scan mode. The indicator on
24 [Copy] key/indicator Press to enter Copy mode. The indicator on
25 [123/ABC] key Press to switch between number input mode
26 [Reset] key • Press to cancel all settings.
27 [Interrupt] key/indicator Press to enter Interrupt mode. The indicator
key lights up in green to indicate that the machine is in Fax mode.
the key lights up in green to indicate that the
machine is in Scan mode. (Available only
when network interface card NC-503 and image controller IC-206 are installed)
the key lights up in green to indicate that the
machine is in Copy mode.
and letter input mode.
• The currently specified job is canceled.
(Pressing this key does not switch the machine to Copy or Fax mode.)
on the key lights up in green to indicate that
the machine is in Interrupt mode.
Press the key again to cancel Interrupt mode
and return to the mode before Interrupt mode
was entered.
If this key is pressed while a received fax or
computer document is being printed, printing
stops so that the interrupting copy job can be
performed. Press this key again to continue
printing the received fax or computer document.
2-6 NC-503
Page 33

Getting ready
No. Part name Description
28 [Clear/Stop] key • Press to clear the entered number.
29 [Start] key/indicator • Press to start a copy operation.
30 Keypad • Use to type in the number of copies to be
• Press to stop a continuous copy operation.
• Press to stop the transmission/reception of
the fax.
• Press to stop the print job from the computer.
• Press to start sending a fax.
• Press to start a scanning operation (with
push scanning).
• If this key is pressed while this machine is
warming up, the next copy job is queued.
• The key lights up in green to indicate that
jobs can be queued, and the key lights up
in orange to indicate that the machine is not
ready to begin copy operations.
produced.
• Use to type in the various settings.
• Use to specify the fax/scan destination.
• Used to type in speed dial numbers and
text.
• In Fax mode, the key is used for tone
transmissions (pulse dialing), and the # key
is used for accessing an outside line.
2
NC-503 2-7
Page 34
2
Getting ready
31 32 33 34
35
36
No. Part name Description
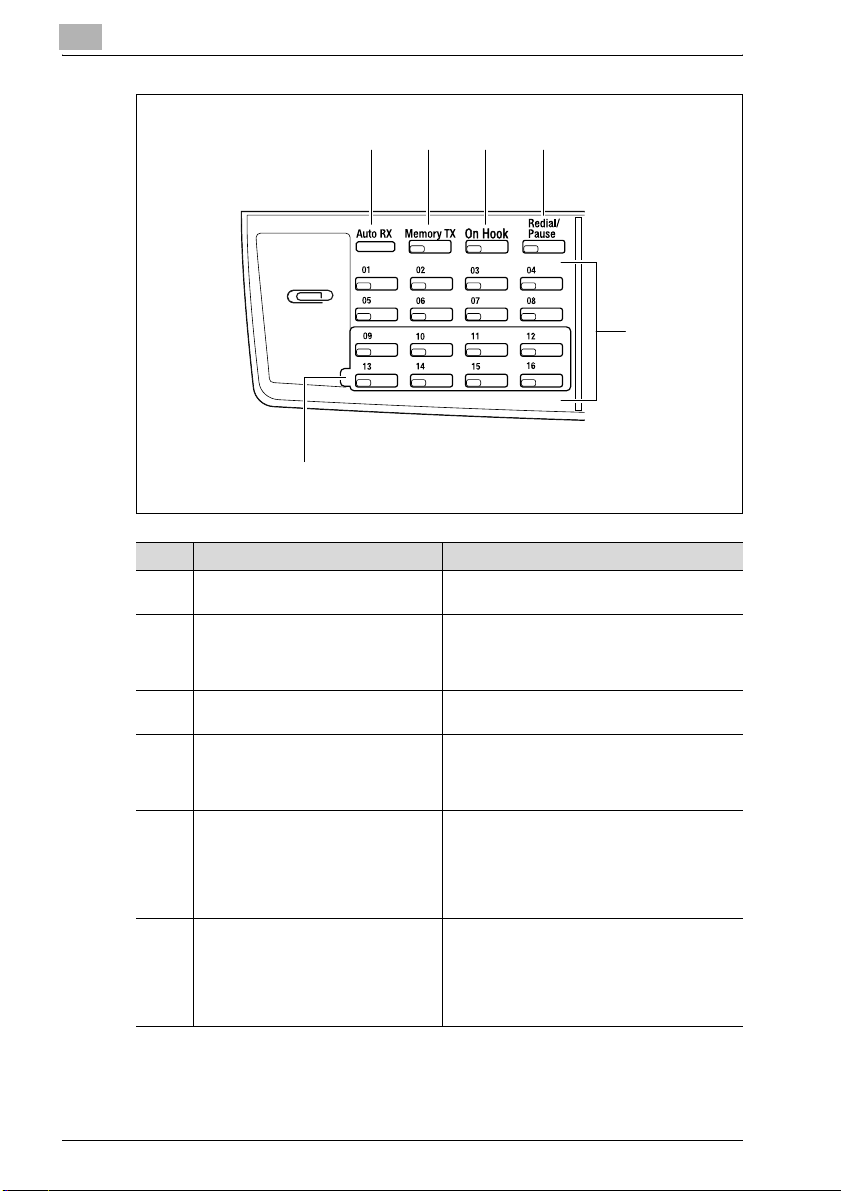
31 Auto RX indicator This indicator lights up when the automatic re-
32 [Memory TX] key/indicator Press this key to select the memory transmis-
33 [On Hook] key Press to answer the call. Press this key again
34 [Redial/Pause] key Press to redial the last recipient called.
35 One-touch dial keys Used to dial previously registered fax num-
36 Switching plate Switches the numbers assigned to the one-
ception function is selected.
sion function. This indicator lights up in green
when the memory transmission function is selected.
to hang up.
While dialing, this key is used to generate a
pause when transferring from an internal to an
external line or receiving information services.
bers.
Use keys [01] through [32] for specifying onetouch dialing and group dialing settings. Use
keys [29] through [32] for specifying program
dialing settings.
touch dial keys. When the switching plate is in
the lower position, the keys are numbered [01]
through [16]. When the switching plate is in the
upper position, the keys are numbered [17]
through [32].
2-8 NC-503
Page 35

Getting ready
2.3 Entering text
Follow the procedure described below to enter text when specifying the user
name or programming one-touch dial keys with the recipient name.
Changing the input mode
Each press of the [123/ABC] key switches between number input mode and
letter input mode.
[1…]: Numbers can be entered.
[A…]: Letters and symbols can be entered.
Key operation
Using the keypad, type in numbers, letters and symbols.
Switch between numbers and letter/symbols by pressing the [123/ABC] key.
When [1…] appears in the display, numbers will be entered.
When [A…] appears in the display, letters/symbols will be entered.
"%" is treated as a tilde (
The following characters can be entered by each key in the keypad.
2
~
).
NC-503 2-9
Page 36

2
Getting ready
Characters that can be entered with keypad keys
2
Note
Repeatedly press the keypad key to scroll through the corresponding
characters and symbols listed until the desired character appears in the
display.
Keypad key Available characters
[1…] [A…]
1 1 . (period) @ _ (underscore) - (hyphen) 1
22A B C 2 a b c
33D E F 3 d e f
44G H I 4 g h i
5 5 J K L 5 j k l
6 6 M N O 6 m n o
7 7 P Q R S 7 p q r s
88T U V 8 t u v
9 9 W X Y Z 9 w x y z
0 0 (space) 0
* + & / * = ! ? ( ) %
###
[ ] ^ ‘ ’ { } | ~ $ , : ; < > “
2-10 NC-503
Page 37
Getting ready
Text input example
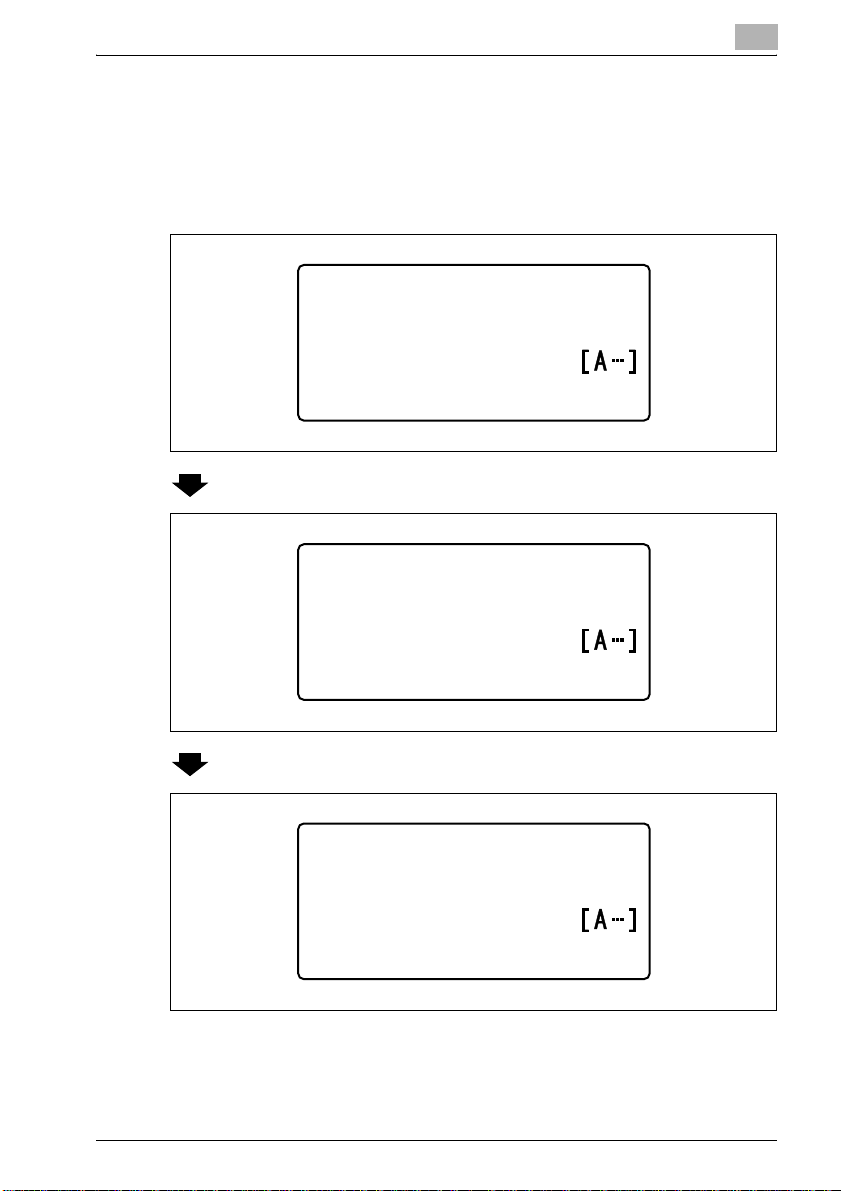
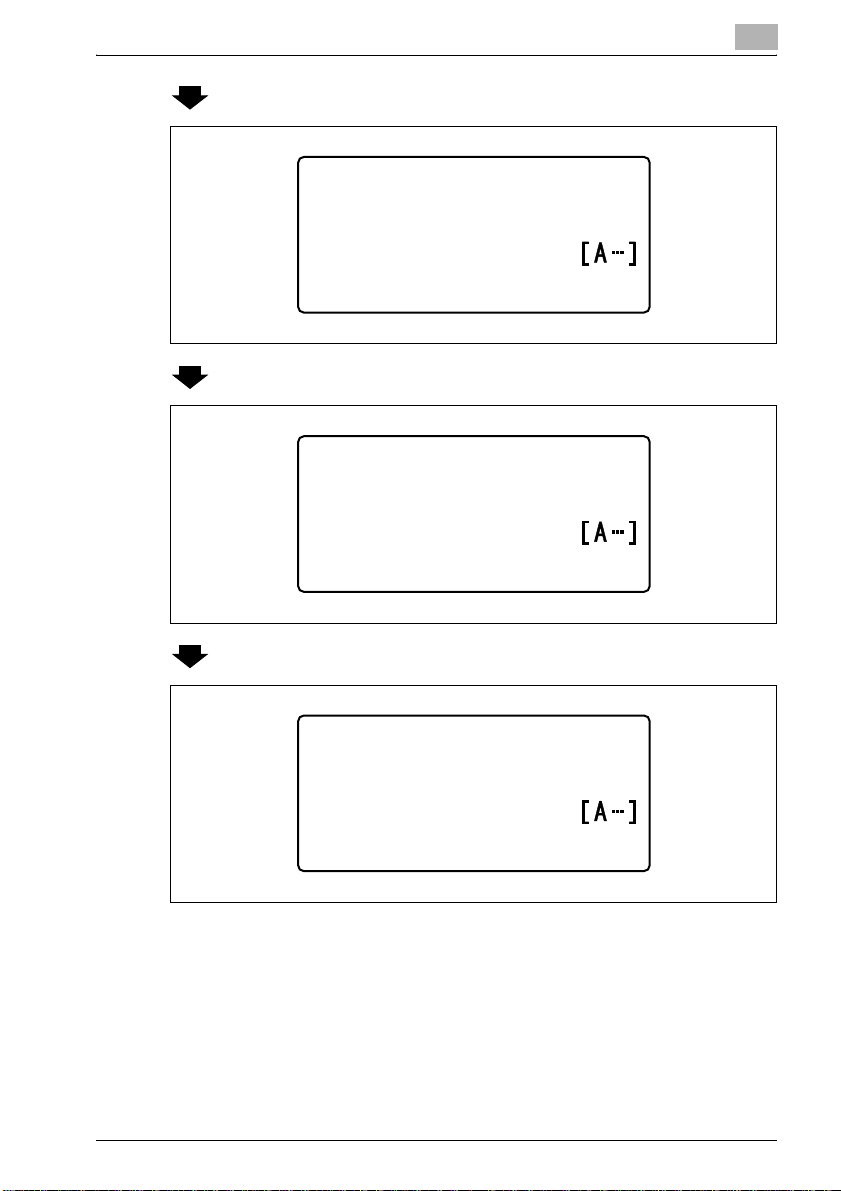
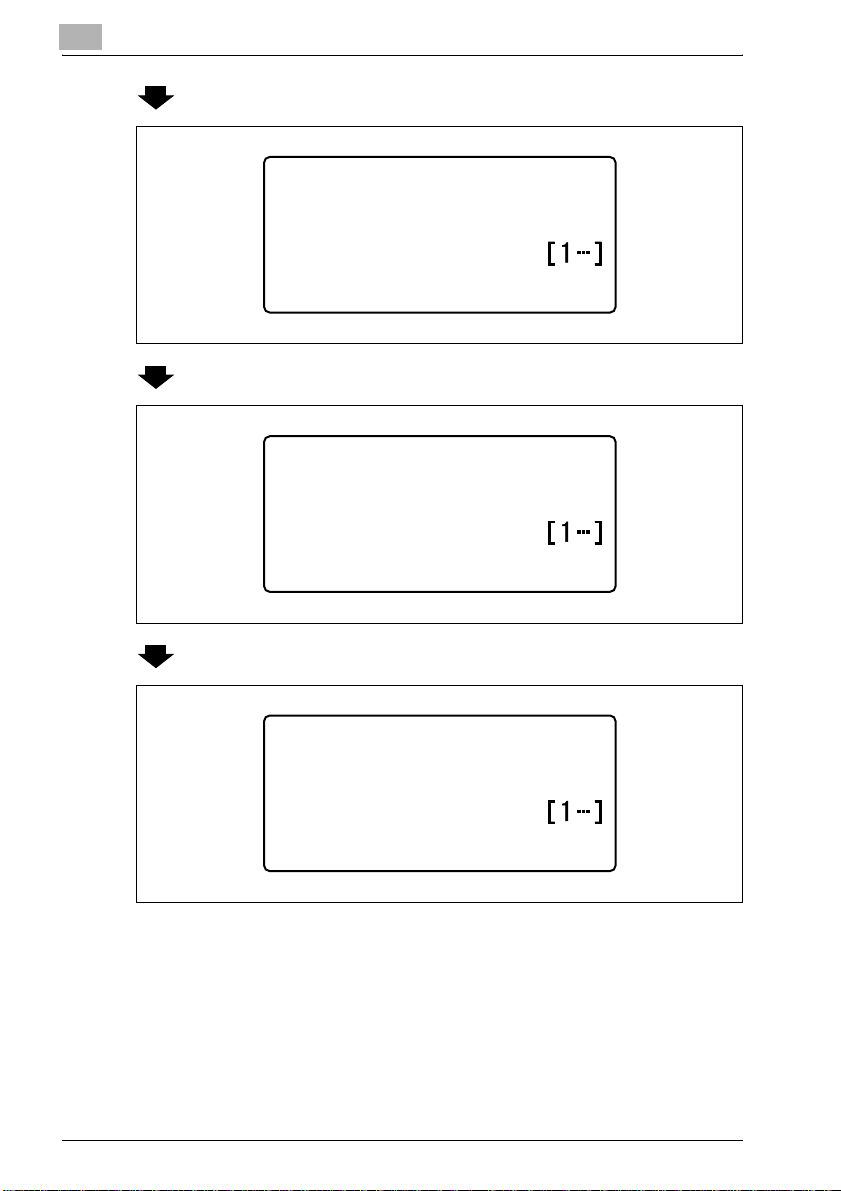
To enter the name "Office 01":
% Press the [123/ABC] key until input mode [A…] is selected.
2
– The cursor (_) flashes alternately in the display with the character at
its current location.
ONE-TOUCH DIAL
NAME
:_
Press the [6] key 3 times.
ONE-TOUCH DIAL
NAME
:O
Press the [3] key 7 times.
ONE-TOUCH DIAL
NAME
:Of
NC-503 2-11
Page 38
2
Getting ready
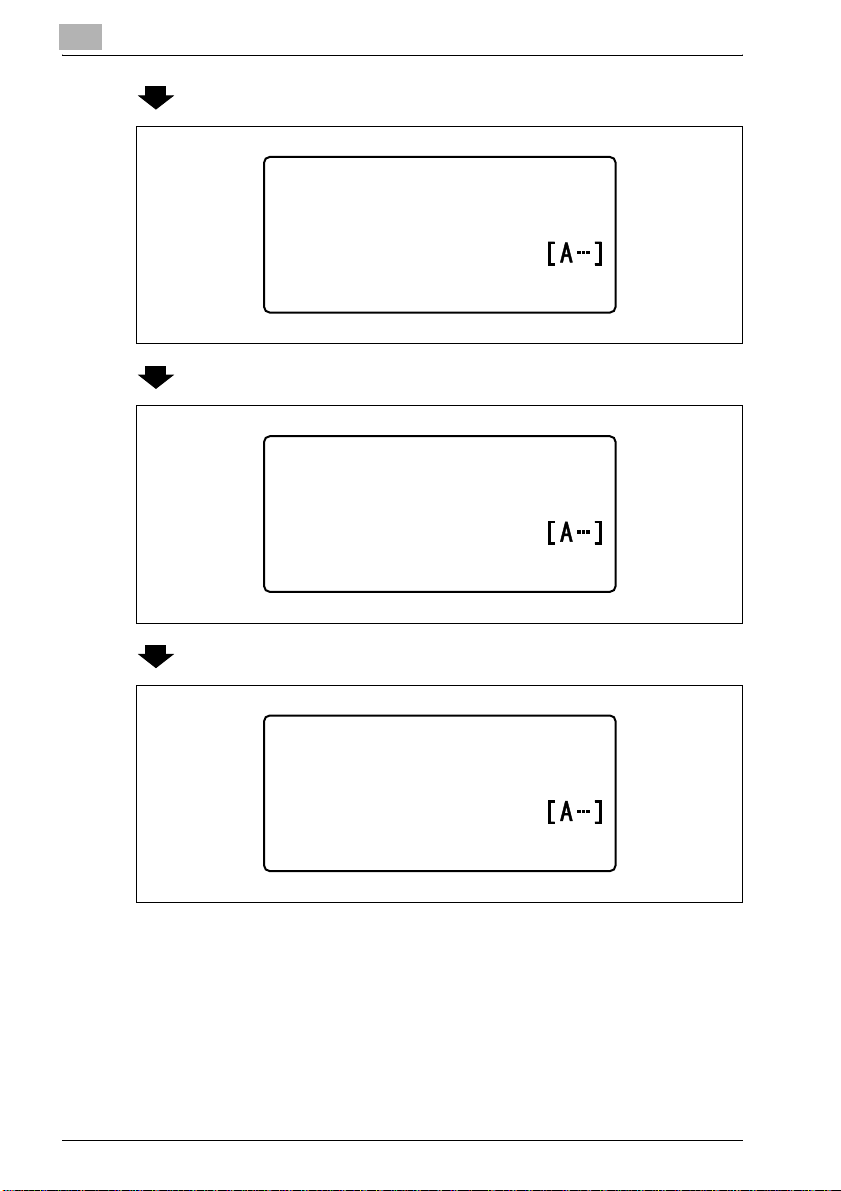
Press the [)] key.
ONE-TOUCH DIAL
NAME
:Of_
Press the [3] key 7 times.
ONE-TOUCH DIAL
NAME
:Off
Press the [4] key 7 times.
ONE-TOUCH DIAL
NAME
:Offi
2-12 NC-503
Page 39
Getting ready
2
Press the [2] key 7 times.
ONE-TOUCH DIAL
NAME
:Offic
Press the [3] key 6 times.
ONE-TOUCH DIAL
NAME
:Office
Press the [0] key.
ONE-TOUCH DIAL
NAME
:Office_
NC-503 2-13
Page 40
2
Getting ready
Press the [123/ABC] key.
ONE-TOUCH DIAL
NAME
:Office _
Press the [0] key.
ONE-TOUCH DIAL
NAME
:Office 0
Press the [1] key.
ONE-TOUCH DIAL
NAME
:Office 01
2-14 NC-503
Page 41

Getting ready
To delete a part of the entered text
% Press the [*] or [)] key to move the cursor (_) below the character to
To change entered characters
% Press the [*] or [)] key to move the cursor (_) below the character that
Entering text with the keypad keys
% To enter a character with the same key used to enter the previously
To enter a space
% Press the [0] key in the keypad.
To stop entering text
% Press the [Reset] key.
2
be deleted, and then press the [Clear/Stop] key.
you wish to change, and then enter the new character.
The entered character is inserted at the cursor’s position.
entered character, press the [)] key before entering the next character.
(Refer to the example on the previous page.)
NC-503 2-15
Page 42
2
2.4 Connecting to a local area network (LAN)
This machine can transmit with the TCP/IP protocol on a LAN. Therefore, this
machine must be connected to the LAN with a network cable.
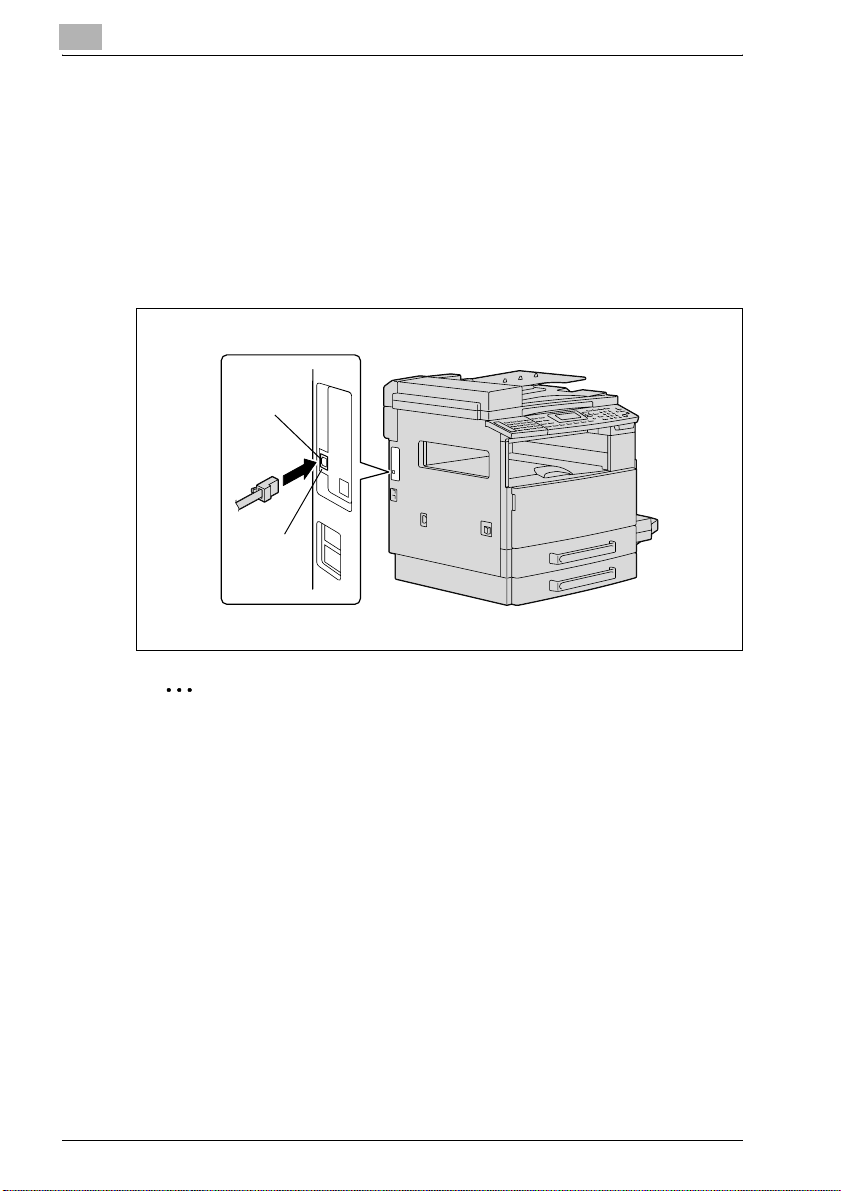
Connecting the network cable
% Insert one plug on the network cable into the network port (LAN) on the
left side of the machine, and then insert the other plug into an available
port on the network hub.
LED1
LED2
Getting ready
2
Reminder
The network cable is not included with this machine; therefore, use
Category 5 or 5e cable for the network cable.
Network port LEDs
LED1 (LINK): This indicator lights up when the network cable is correctly
connected. If this indicator does not light up, even if it is assumed that the
cable is correctly connected, check the connection again. If this indicator still
does not light up, even though both ends are correctly connected, the
network cable may damaged.
LED2 (ACT): This indicator flashes while data is being sent or received.
2-16 NC-503
Page 43

3
Network printing
Page 44

Page 45

Network printing
3 Network printing
This chapter provides descriptions of the procedures for installing the
network interface card and using this machine as a network printer.
3.1 Selecting the network printing method
When the network interface card is installed, various network printing
methods are possible. The following procedure describes how to connect a
computer to this machine over a network. Select an available network
printing method according to the operating system being used.
3
NC-503 3-3
Page 46
3
Network printing
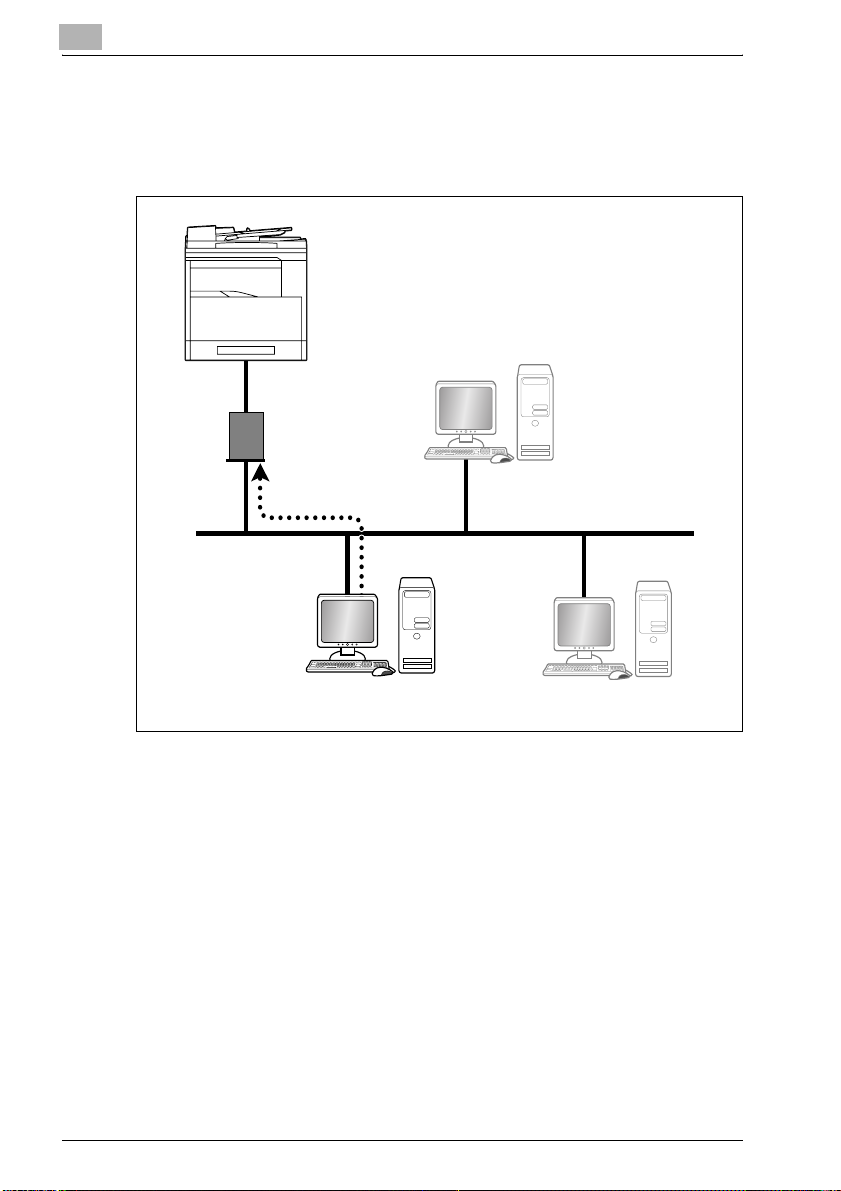
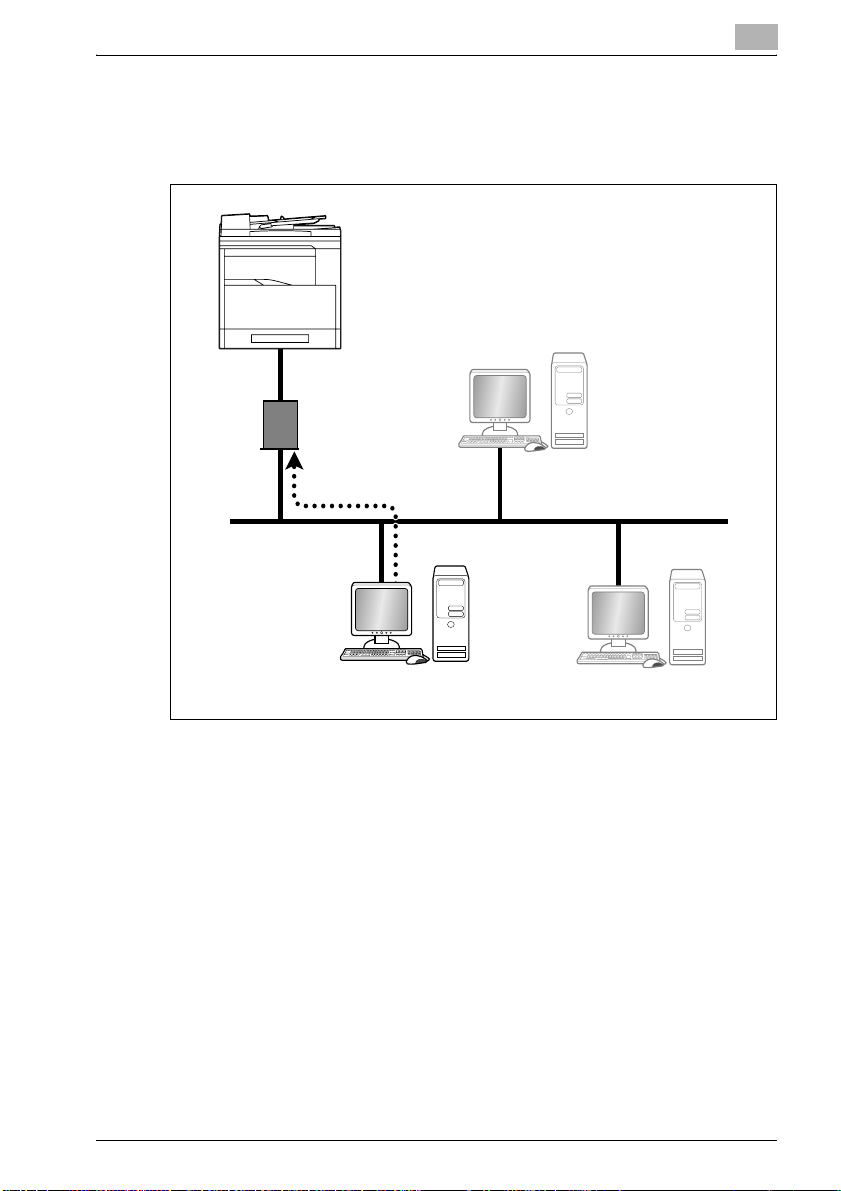
When using a Windows operating system
Peer-to-peer printing
Compatible operating systems: Windows 98 SE/Windows Me
Network interface
card NC-503
TCP/IP protocol
Computer
Peer-to-peer printing
- Using the Peer-to-Peer Utility, the computer and this machine are
connected over a network. Since there is no differentiation between client
and server computers, this method is appropriate for network
connections on a small-scale LAN. The Peer-to-Peer Utility is installed on
the computer when the printer driver is installed.
3-4 NC-503
Page 47
Network printing
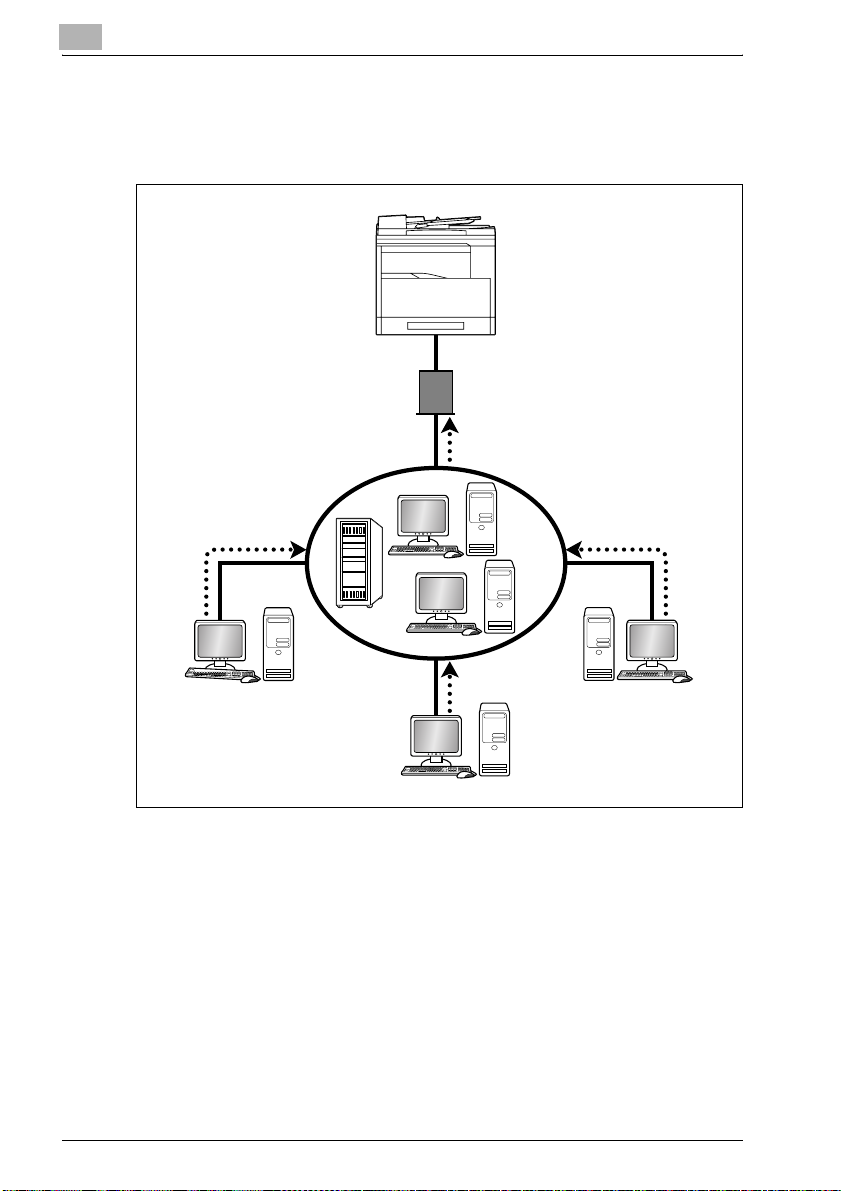
LPR printing / PORT9100 printing
Compatible operating systems: Windows 2000/Windows XP/
Windows Server 2003/Windows Vista
3
Network interface
card NC-503
TCP/IP (LPR/RAW)
protocol
Computer
LPR printing
- Using the LPR (line printer remote) print service, the computer and this
machine are connected over a network.
- The LPR print service is supported by the operating system as the
standard.
- Use a TCP/IP port, and use LPR as the print protocol.
PORT9100 printing
- Using the PORT9100 print service, the computer and this machine can
be connected over a network.
- The PORT9100 print service is supported by the operating system as the
standard.
- Use a TCP/IP port, and use RAW as the print protocol.
NC-503 3-5
Page 48
3
Network printing
IPP printing
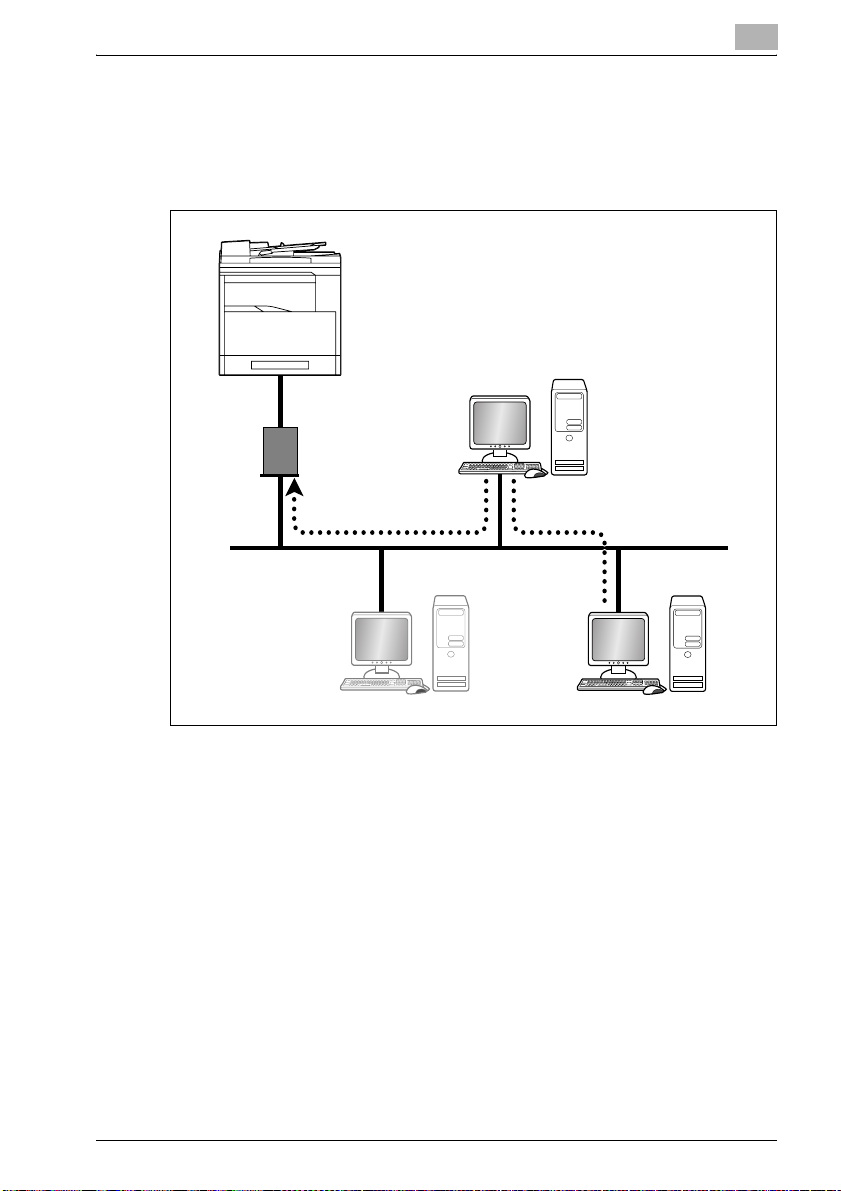
Compatible operating systems: Windows 2000/Windows XP/
Windows Server 2003/Windows Vista
Network interface
card NC-503
Access Access
IPP printing
- Using the IPP (Internet printing protocol) print service, the computer and
this machine are connected over a network.
- The IPP print service is supported by the operating system as the
standard.
- Communications are established with HTTP (Hyper Text Transfer
Protocol), one of the TCP/IP protocols. In order to prevent unauthorized
access in companies and organizations, a firewall must be installed.
However, HTTP is generally configured to allow access through the
firewall. Therefore, with an IPP connection where communications are
established using HTTP, printing from a computer is possible with a
printer outside of the firewall.
TCP/IP (HTTP) protocol
Internet
Access
Computer
3-6 NC-503
Page 49
Network printing
When using a NetWare environment (NetWare server and Windows client)
In a NetWare environment, the Windows computer is used as a NetWare
client, and printing with this machine is possible through the NetWare server.
3
NetWare server
Network interface
card NC-503
TCP/IP protocol or
IPX/SPX protocol
NetWare
client PC
(Windows
computer)
NC-503 3-7
Page 50

3
Network printing
Connecting the NetWare server and this machine
When connecting the NetWare server and this machine over a network, the
following methods are supported.
NetWare version Protocol Emulation Service mode
NetWare 4.x IPX NDS / Bindery Pserver / Nprinter
NetWare 5.x / 6 IPX NDS / Bindery Pserver / Nprinter
TCP/IP NDPS (lpr)
2
Note
If the GDI printer driver is to be used in a NetWare environment, run the
repair program provided for the operating system by Microsoft. Access
the following URL, and then run the repair program.
http://support.microsoft.com/kb/884897
3-8 NC-503
Page 51

Network printing
3.2 Checking the setup
This section provides an overview of the setup procedure that is required for
each network printing method.
Peer-to-peer printing
1 Connect the network cable. (Refer to "Connecting to a local area
network (LAN)" on page 2-16.)
2 From the machine’s control panel, specify the IP address, subnet mask
and default gateway. (Refer to "Specifying an IP address" on
page 3-13.)
3 Print the settings information, and then check the settings. (Refer to
"Printing the settings information" on page 3-18.)
– If optional fax kit FK-506 and image controller IC-206 are not
installed, the settings information cannot be printed from the
machine’s control panel.
4 Install the printer driver. The Peer-to-Peer Utility is installed when the
printer driver is installed.
– If the GDI driver is to be installed, refer to the user manual for the
GDI printer controller, included with this machine.
– If the PCL driver (optional) is to be installed, refer to the user manual
for the image controller IC-206, included with the IC-206 option.
3
5 Add the network port to the computer. (Refer to "Connecting the
computer and this machine over a network" on page 3-19.)
2
Reminder
When installing the printer driver on an operating system other than
Windows 98 SE or Windows Me, the Peer-to-Peer Utility is not installed.
NC-503 3-9
Page 52

3
Network printing
LPR/PORT9100 printing
1 Connect the network cable. (Refer to "Connecting to a local area
network (LAN)" on page 2-16.)
2 From the machine’s control panel, specify the IP address, subnet mask
and default gateway. (Refer to "Specifying an IP address" on
page 3-13.)
3 Print the settings information, and then check the settings. (Refer to
"Printing the settings information" on page 3-18.)
– If optional fax kit FK-506 and image controller IC-206 are not
installed, the settings information cannot be printed from the
machine’s control panel.
4 Install the printer driver.
– If the GDI driver is to be installed, refer to the user manual for the
GDI printer controller, included with this machine.
– If the PCL driver (optional) is to be installed, refer to the user manual
for the image controller IC-206, included with the IC-206 option.
5 Add the network port to the computer. (Refer to "Connecting the
computer and this machine over a network" on page 3-19.)
3-10 NC-503
Page 53

Network printing
IPP printing
1 Connect the network cable. (Refer to "Connecting to a local area
2 From the machine’s control panel, specify the IP address, subnet mask
3 Print the settings information, and then check the settings. (Refer to
4 Install the printer driver. Specify the network port when the driver is
3
network (LAN)" on page 2-16.)
and default gateway. (Refer to "Specifying an IP address" on
page 3-13.)
"Printing the settings information" on page 3-18.)
– If optional fax kit FK-506 and image controller IC-206 are not
installed, the settings information cannot be printed from the
machine’s control panel.
installed.
– If the GDI driver is to be installed, refer to the user manual for the
GDI printer controller, included with this machine.
– If the PCL driver (optional) is to be installed, refer to the user manual
for the image controller IC-206, included with the IC-206 option. For
details on specifying the network port, refer to "Connecting the
computer and this machine over a network" on page 3-19.
NetWare server/client (except NDPS)
1 Connect the network cable. (Refer to "Connecting to a local area
network (LAN)" on page 2-16.)
2 Specify the necessary settings for connecting this machine to a
NetWare server. (Refer to "Connecting the computer and this machine
over a network" on page 3-19.)
3 Specify the necessary settings for printing through a NetWare server
from a NetWare client. (Refer to "Connecting the computer and this
machine over a network" on page 3-19.)
NC-503 3-11
Page 54

3
Network printing
NetWare server/client (NDPS)
1 Connect the network cable. (Refer to "Connecting to a local area
network (LAN)" on page 2-16.)
2 From the machine’s control panel, specify the IP address, subnet mask
and default gateway. (Refer to "Specifying an IP address" on
page 3-13.)
3 Print the settings information, and then check the settings. (Refer to
"Printing the settings information" on page 3-18.)
– If optional fax kit FK-506 and image controller IC-206 are not
installed, the settings information cannot be printed from the
machine’s control panel.
4 Specify the necessary settings for connecting this machine to a
NetWare server. (Refer to "Connecting the computer and this machine
over a network" on page 3-19.)
5 Specify the necessary settings for printing through a NetWare server
from a NetWare client. (Refer to "Connecting the computer and this
machine over a network" on page 3-19.)
3-12 NC-503
Page 55
Network printing
3.3 Specifying an IP address
The following procedure describes how to assign the IP address to the
machine from the control panel.
2
Note
The IP address setting should be specified according to instructions from
the network administrator.
The IP address setting is specified in Utility mode by the administrator.
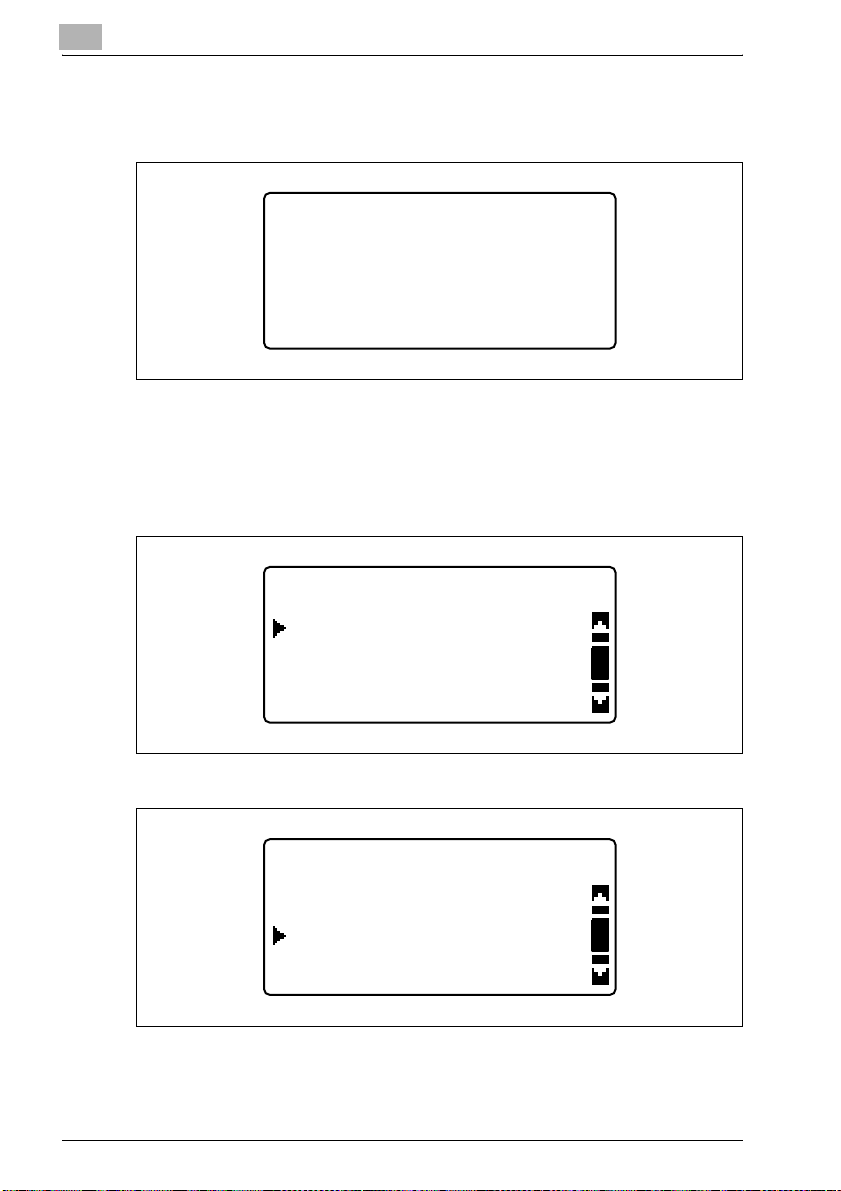
1 Press the [Utility] key in the control panel.
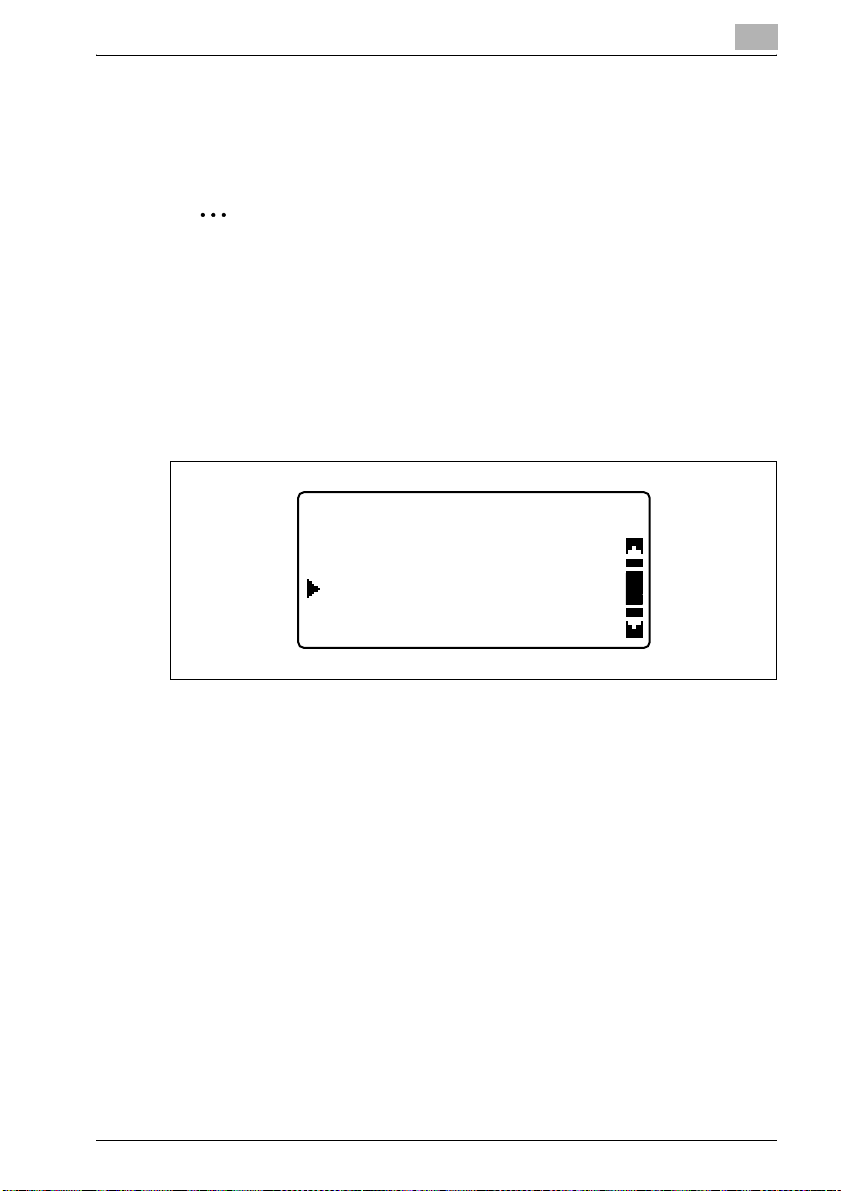
2 Press the [,] or [+] key until "ADMIN. MANAGEMENT" is selected, and
then press the [OK] key.
UTILITY MODE
USER MANAGEMENT
ADMIN. MANAGEMENT
3
COPY SETTING 1
NC-503 3-13
Page 56
3
Network printing
3 Type in the administrator access code, and then press the [OK] key.
– The manufacturer’s default setting is "000000".
ADMIN. MANAGEMENT
ADMIN. NO.:------
– If the code was incorrectly entered, press the [Clear/Stop] key to
erase the number, and then type it in correctly.
4 Press the [,] or [+] key until "NETWORK SETTING" is selected, and
then press the [OK] key.
ADMIN. MANAGEMENT
NETWORK SETTING
E-MAIL SETTING 1
E-MAIL SETTING 2
– If fax kit FK-506 is installed
ADMIN. MANAGEMENT
REMOTE MONITOR
NETWORK SETTING
E-MAIL SETTING 1
3-14 NC-503
Page 57
Network printing
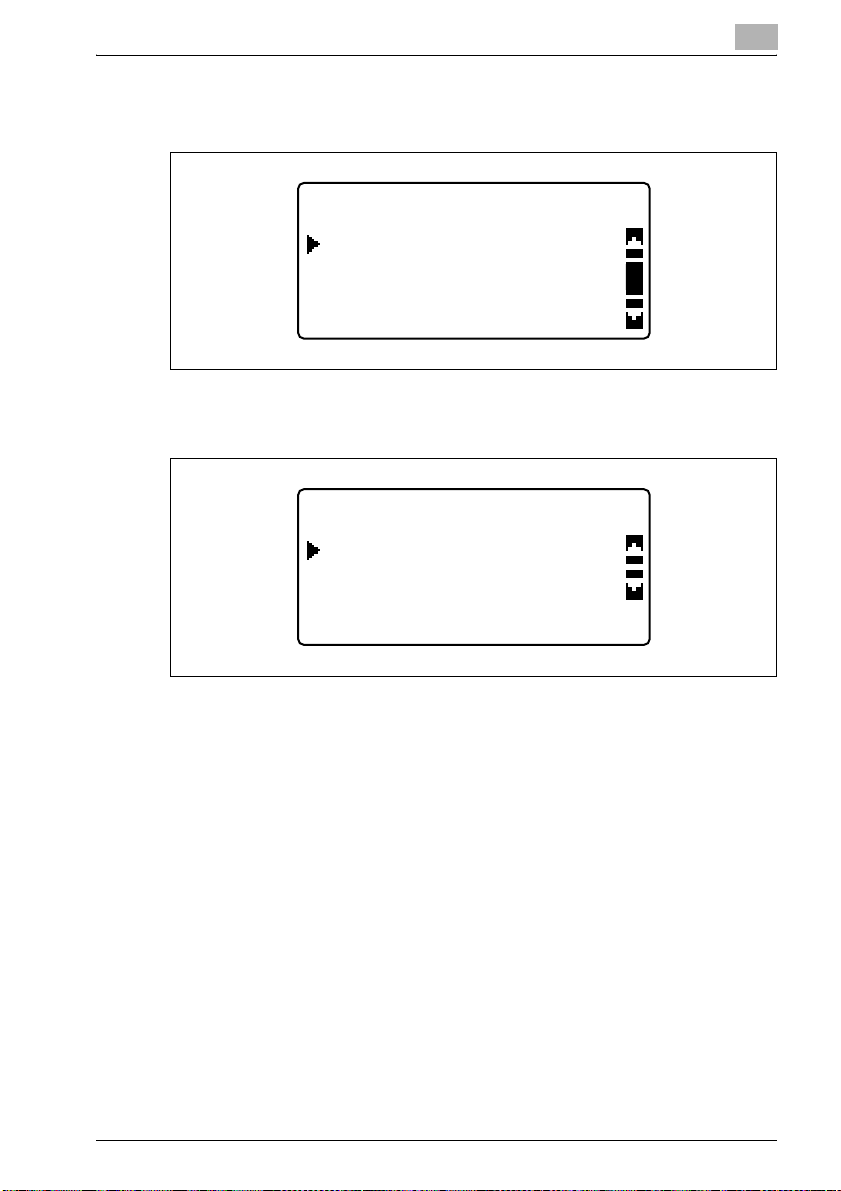
5 In the "NETWORK SETTING" menu, press the [,] or [+] key until "IP
6 Press the [,] or [+] key until "AUTO" or "SPECIFY" is selected, and
3
ADDRESS SETTING" is selected, and then press the [OK] key.
NETWORK SETTING
IP ADDRESS SETTING
DNS CONFIG.
WEB SETTING
then press the [OK] key.
IP ADDRESS SETTING
AUTO
SPECIFY
– If "AUTO" was selected, the IP address will automatically be
obtained from the DHCP server. After the message "ACCEPTED"
appears, the "NETWORK SETTING" menu appears again.
– If "SPECIFY" is selected, a screen appears, allowing you to specify
the IP address. Continue with step 7.
– "AUTO" is available only if a DHCP server is on the network. If
"AUTO" is selected, it will not be necessary to specify the subnet
mask or gateway settings.
NC-503 3-15
Page 58
3
Network printing
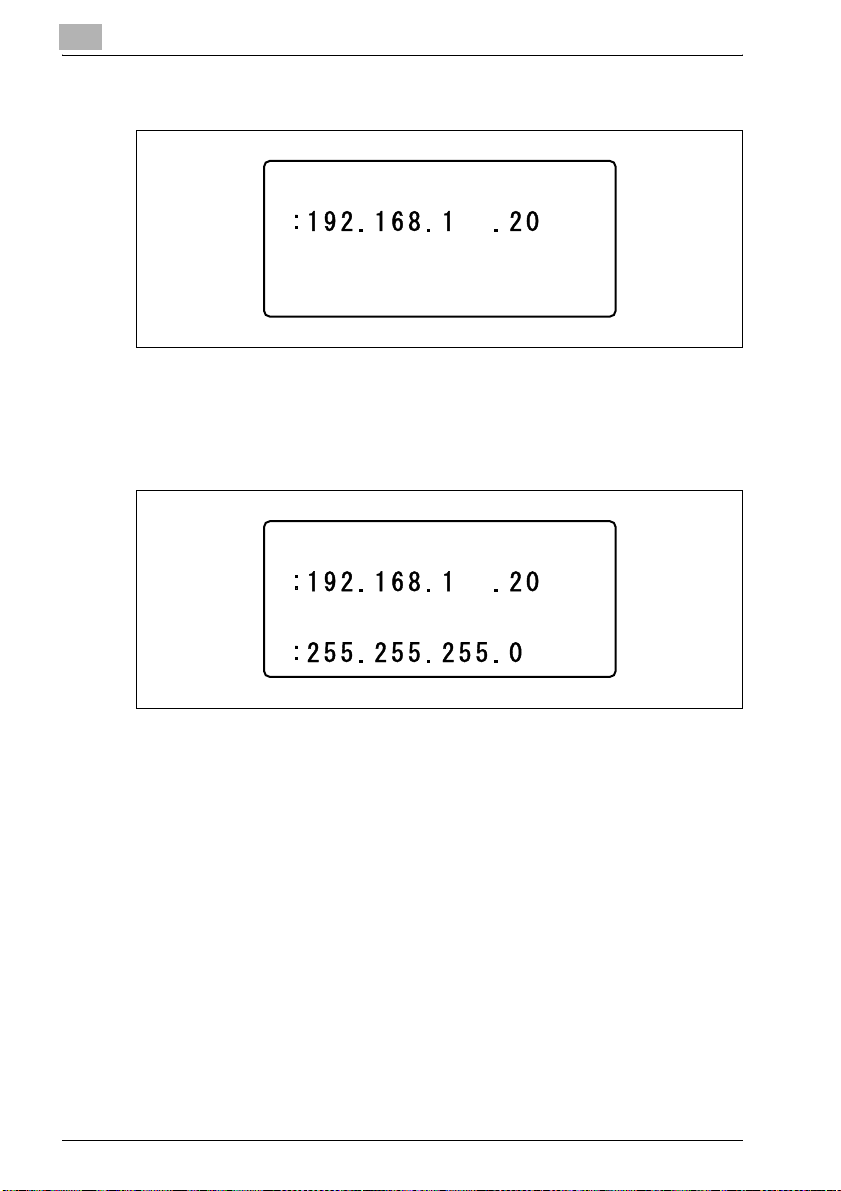
7 Use the keypad to type in the IP address, and then press the [OK] key.
IP ADDRESS
– If the number was incorrectly entered, press the [Clear/Stop] key to
erase it, and then type it in correctly.
8 Use the keypad to type in the subnet mask value, and then press the
[OK] key.
IP ADDRESS
SUBNET MASK
– For the subnet mask, consult with the network administrator.
– If the value was incorrectly entered, press the [Clear/Stop] key to
erase it, and then type it in correctly.
3-16 NC-503
Page 59
Network printing
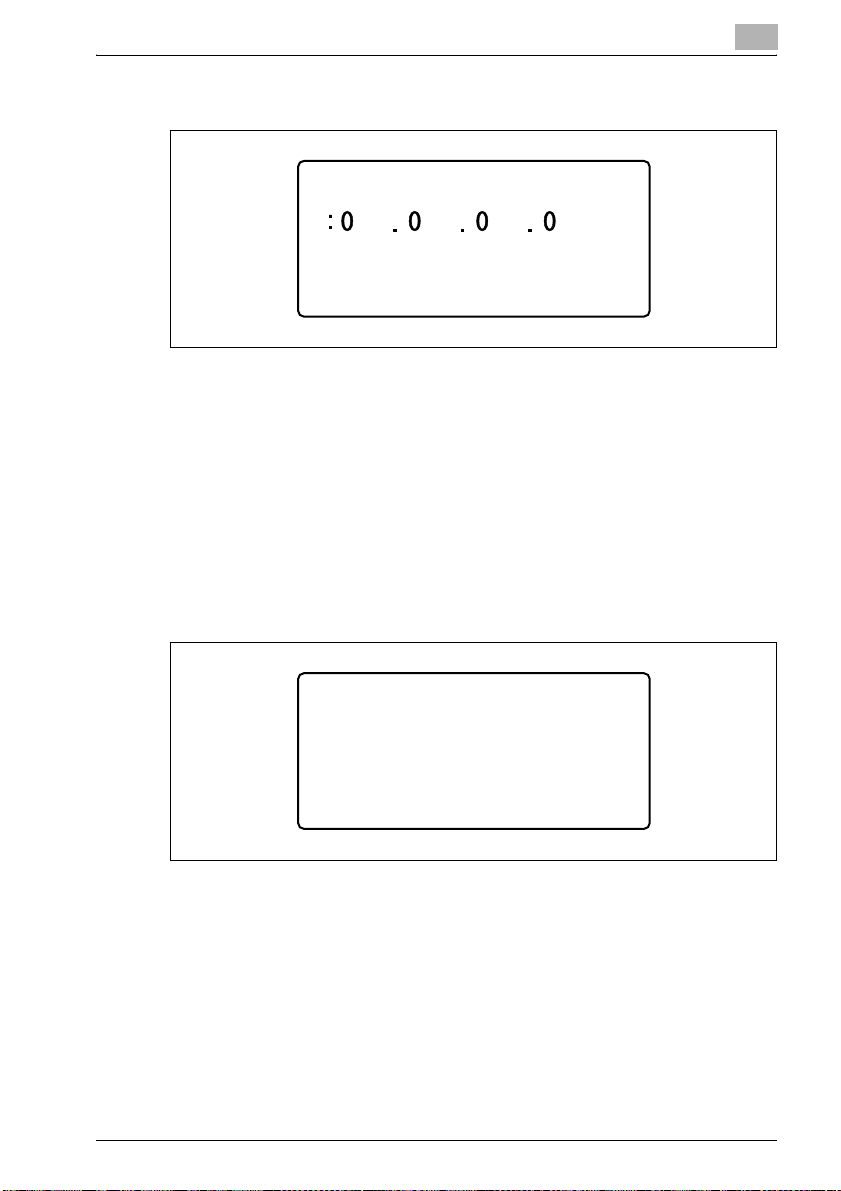
9 Using the keypad, type in the gateway.
10 Press the [OK] key.
11 Press the [Reset] key in the control panel.
3
GATEWAY
– For the gateway, consult with the network administrator.
– If the number was incorrectly entered, press the [Clear/Stop] key to
erase it, and then type it in correctly.
The message "ACCEPTED" appears, and then the "NETWORK
SETTING" menu appears again.
– After the screen shown below appears, turn the machine off, then
on again to restart it.
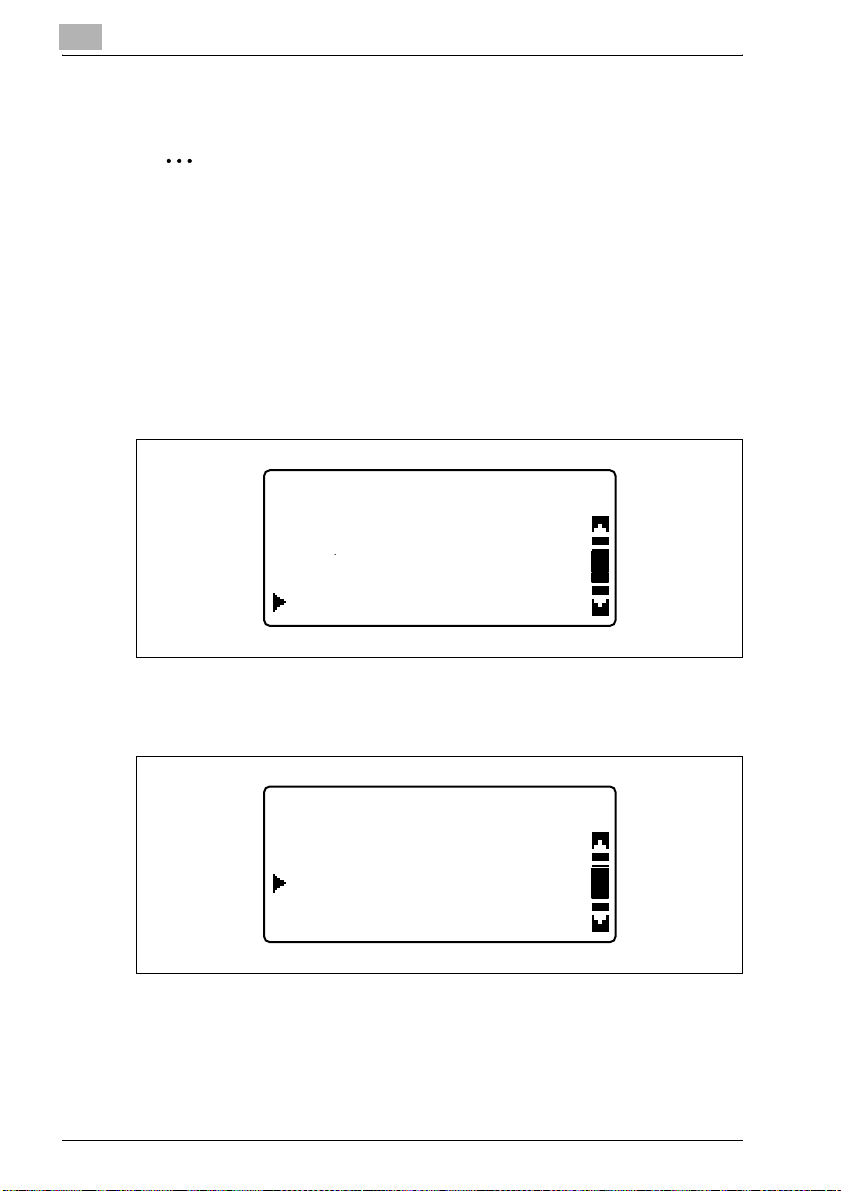
______CAUTION_______
PLEASE RE-START
POWER SUPPLY OFF/ON
– In order to apply the new settings, the machine must be turned off,
then on again to be restarted.
NC-503 3-17
Page 60
3
3.4 Printing the settings information
2
Note
This feature is available only if optional fax kit FK-506 and image
controller IC-206 are installed.
Print the settings information to be able to check the settings.
1 From the control panel, press the [Confirm] key.
The "CONFIRM MODE" menu appears.
2 Press the [,] or [+] key until "PRINT REPORT" is selected, and then
press the [OK] key.
CONFIRM MODE
TOTAL PAGE
TX/RX RESULT
PRINT REPORT
Network printing
The "PRINT REPORT" menu appears.
3 Press the [,] or [+] key until "CONFIGURATION PAGE" is selected.
PRINT REPORT
MACHINE STATUS
CONFIGURATION PAGE
PCL FONT LIST
4 Press the [OK] key.
After the message "PRINTING" appears, the settings information is
printed.
3-18 NC-503
Page 61

Network printing
3.5 Connecting the computer and this machine over a network
Specify the settings necessary for connecting the computer and this
machine over the network and sending a print job through the network from
the computer.
The following connection procedures are described in this section.
- Peer-to-peer printing
– Windows 98 SE/Windows Me
- LPR printing
– Windows 2000
- PORT9100 printing
– Windows 2000/Windows XP/Windows Server 2003/Windows Vista
- IPP printing
– Windows 2000/Windows XP/Windows Server 2003/Windows Vista
- Connecting the NetWare server and this machine
– Specifying the NetWare 4.x/5.x/6 print server mode settings
– Specifying the NetWare 4.x/5.x/6 remote printer mode settings
– Specifying the NetWare 5.x/6 Novell Distributed Print Service (NDPS)
settings
– Specifying print settings for the NetWare client (Windows)
3
NC-503 3-19
Page 62

3
Network printing
Peer-to-peer printing
Compatible operating systems: Windows 98 SE/Windows Me
2
Reminder
Before specifying settings, check that the following preparations have
been completed.
The computer can communicate using the TCP/IP protocol.
This machine can communicate using the TCP/IP protocol.
The printer driver is installed on the computer.
(If the GDI driver is to be installed, refer to the user manual for the GDI
printer controller, included with this machine. If the PCL driver (optional)
is to be installed, refer to the manual for image controller IC-206, included
with the IC-206 option.)
1 On the Start menu, point to "Settings", and then click "Printers" to
open the Printers folder.
2 Right-click the icon for the installed printer.
3 Click "Properties" to open the Properties dialog box.
4 Click the Details tab, and then click the [Add Port] button.
5 Select "Other", and then select "Peer2Peer" from the "list of port
types".
6 Click the [OK] button.
7 Type in the IP address of this machine, and then click the [OK] button.
8 Click the [Apply] or the [OK] button.
3-20 NC-503
Page 63

Network printing
LPR printing
Compatible operating systems: Windows 2000
2
Reminder
Before specifying settings, check that the following preparations have
been completed.
The computer can communicate using the TCP/IP protocol.
This machine can communicate using the TCP/IP protocol.
The printer driver is installed on the computer.
(If the GDI driver is to be installed, refer to the user manual for the GDI
printer controller, included with this machine. If the PCL driver (optional)
is to be installed, refer to the manual for image controller IC-206, included
with the IC-206 option.)
1 On the Start menu, point to "Settings", and then click "Printers" to
2 Right-click the icon for the installed printer.
3 Click "Properties" to open the Properties dialog box.
3
open the Printers folder.
4 Click the Ports tab, and then click the [Add Port] button.
5 In the Printer Ports dialog box, select "Standard TCP/IP Port", and then
click the [New Port] button.
6 After the Add Standard TCP/IP Printer Port Wizard starts up, click the
[Next] button.
7 Type the IP address of this machine into the "Printer Name or IP
Address" box, and then click the [Next] button.
8 Select "Custom", and then click the [Settings] button.
9 Select "LPR" in the protocol group box, type the queue name in the
"Queue Name" box of the "LPR Settings" group box, and then click the
[OK] button.
– Type in a queue name that begins with a letter (for example, "print").
NC-503 3-21
Page 64

3
Network printing
10 Click the [Next] button.
11 Click the [Finish] button.
12 Click the [Close] button.
13 Click the [Close] or [Apply] button.
3-22 NC-503
Page 65

Network printing
PORT9100 printing
Compatible operating systems: Windows 2000/Windows XP/Windows
Server 2003/Windows Vista
2
Reminder
Before specifying settings, check that the following preparations have
been completed.
The computer can communicate using the TCP/IP protocol.
This machine can communicate using the TCP/IP protocol.
The printer driver is installed on the computer.
(If the GDI driver is to be installed, refer to the user manual for the GDI
printer controller, included with this machine. If the PCL driver (optional)
is to be installed, refer to the manual for image controller IC-206, included
with the IC-206 option.)
1 For Windows 2000: On the Start menu, point to "Settings", and then
3
click "Printers" to open the Printers folder.
For Windows XP/Server 2003: On the Start menu, click "Control
Panel", then "Printers and Other Hardware", and then click "View
installed printers or fax printers" to open the Printers and Faxes folder.
For Windows Vista: On the Start menu, click "Control Panel", then
"Hardware and Sound", and then click "Printer" to open the Printers
folder.
2 Right-click the printer icon.
3 Click "Properties" to open the Properties dialog box.
4 Click the Ports tab, and then click the [Add Port] button.
5 In the Printer Ports dialog box, select "Standard TCP/IP Port", and then
click the [New Port] button.
6 After the Add Standard TCP/IP Printer Port Wizard starts up, click the
[Next] button.
7 Type the IP address of this machine into the "Printer Name or IP
Address" box, and then click the [Next] button.
8 Select "Custom", and then click the [Settings] button.
NC-503 3-23
Page 66

3
Network printing
9 Select "RAW".
10 Type "9100" for the port number in the "RAW Settings" group box, and
then click the [OK] button.
11 Click the [Next] button.
12 Click the [Finish] button.
13 Touch [Close].
14 Click the [Close] or [Apply] button.
3-24 NC-503
Page 67

Network printing
IPP printing
Compatible operating systems: Windows 2000/Windows XP/Windows
Server 2003/Windows Vista
2
Note
In order to use IPP, the IPP settings must be enabled from PageScope
Web Connection (PSWC). Refer to "Checking IPP-related settings from
PageScope Web Connection" on page 3-25.
2
Reminder
Before specifying settings, check that the following preparations have
been completed.
The computer can communicate using the TCP/IP protocol.
This machine can communicate using the TCP/IP protocol.
The printer driver is installed on the computer.
(If the GDI driver is to be installed, refer to the user manual for the GDI
printer controller, included with this machine. If the PCL driver (optional)
is to be installed, refer to the manual for image controller IC-206, included
with the IC-206 option.)
3
Checking IPP-related settings from PageScope Web Connection
For details on PageScope Web Connection, refer to "Using PageScope Web
Connection" on page 9-3.
1 Start up PageScope Web Connection.
2 Type in the password to log on to the Administrator mode.
– For the password, consult with the network administrator.
3 Click the Network tab, and then click "IPP Configuration" in the menu.
4 Make sure that the "Enable IPP" check box is selected. If the check box
is not selected, IPP printing cannot be performed.
NC-503 3-25
Page 68

3
Network printing
IPP printing connections
Establish the IPP printing connection. The IPP printing connection must be
set up starting from the installation of the printer driver. (If the GDI driver is to
be installed, refer to the user manual for the GDI printer controller, included
with this machine. If the PCL driver (optional) is to be installed, refer to the
manual for image controller IC-206, included with the IC-206 option.)
1 For Windows 2000: On the Start menu, point to "Settings", and then
click "Printers" to open the Printers folder.
For Windows XP/Server 2003: On the Start menu, click "Control
Panel", then "Printers and Other Hardware", and then click "View
installed printers or fax printers" to open the Printers and Faxes folder.
For Windows Vista: On the Start menu, click "Control Panel", then
"Hardware and Sound", and then click "Printer" to open the Printers
folder.
2 Start up the Add Printer Wizard, and then click the [Next] button.
3 Select "A Network printer or printer attached to another computer",
and then click the [Next] button.
4 Select "Connect to a printer on the Internet or on a home or office
network".
5 Type "http://<this_machine_IP_address>/ipp.cgi" into the URL field.
– (Example) If the IP address for this machine is 192.168.1.20:
http://192.168.1.20/ipp.cgi
6 When the [Next] button is clicked, a confirmation message appears.
7 Click the [OK] button.
8 Follow the instructions that appear in order to finish the installation of
the printer driver.
3-26 NC-503
Page 69
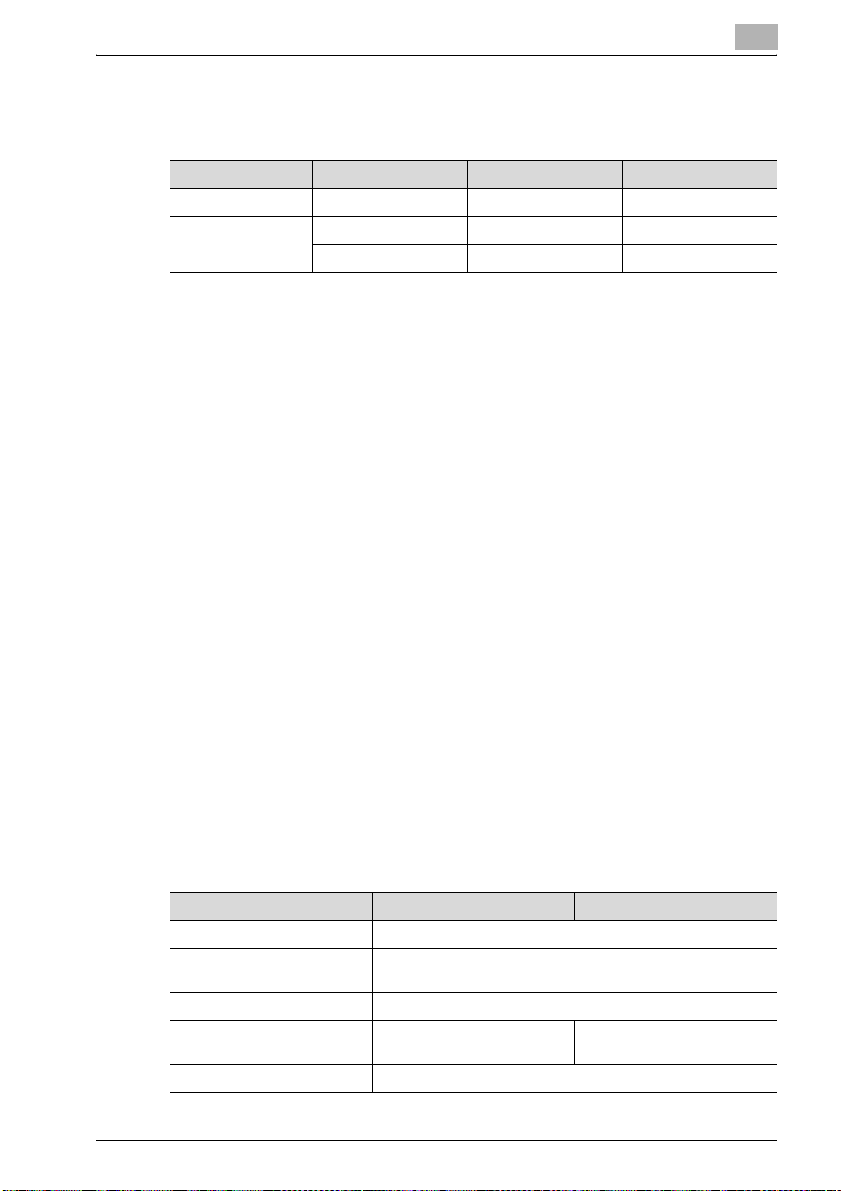
Network printing
Connecting the IPP printing NetWare server and this machine
Connecting the NetWare server and this machine
NetWare version Protocol Emulation Service mode
NetWare 4.x IPX NDS / Bindery Pserver / Nprinter
NetWare 5.x / 6 IPX NDS / Bindery Pserver / Nprinter
Specifying the NetWare 4.x/5.x/6 print server mode settings
1 Log on with Administrator privileges.
2 Start up NWadmin.
3 Select the print server system or category container, and then select
4 Type in the print server name, printer name, print queue name and
3
TCP/IP NDPS(lpr)
"Print service quick setup" from the tool menu.
volume name, select "Other/Unknown" as the printer type, and then
save the specified settings.
– For queue user privileges, the printer notification option,
assignment of multiple queues, and passwords, refer to the
NetWare documentation, and specify settings as necessary.
5 Start up PageScope Web Connection, click the Network tab in
Administrator mode, select "NetWare Configuration", and then specify
the following settings for this machine.
– For details on using PageScope Web Connection, refer to "Using
PageScope Web Connection" on page 9-3.
6 From the NetWare Server console, load MONITOR.NLM.
7 Select the connection settings, and check that the PServer you created
is listed in the active connections section.
Parameter NDS Bindery
NetWare Configuration
Frame Type
Print Server Name Print server name created in step 4
NDS Context Name Name of the context that con-
Print Server Password Specify only when setting from the NetWare Server.
NC-503 3-27
*
*
Enable NetWare (Select the check box to enable it.)
AutoDetect (Select the frame type according to the network environment.)
nects to PServer
Not necessary to specify
Page 70

3
Network printing
Parameter NDS Bindery
Password Retype Specify only when setting from the NetWare Server.
Preferred File Server Not necessary to specify Name of the file server that
Preferred NDS Tree Name of the tree where Pserv-
Print Queue Scan Rate
*
Mode
Printer Number 1 (Change according to the setting.)
Connection Mode Directory Services Bindery
After changing the settings for parameters marked with an asterisk (
the machine off, then on again.
*
er logs on
1 (Change as necessary.)
Pserver
connects to PServer
Not necessary to specify
*
), turn
Specifying the NetWare 4.x/5.x/6 remote printer mode settings
1 Log on with Administrator privileges.
2 Start up NWadmin.
3 Select the organization performing the print service or the category
container, and then select "Print service quick setup" from the "Tools"
menu.
4 Type in the print server name, printer name, print queue name and
volume name, select "Remote parallel, LTP1" as the printer type, and
then save the specified settings.
– For queue user privileges, the printer notification option,
assignment of multiple queues, and passwords, refer to the
NetWare documentation, and specify settings as necessary.
5 Start up PageScope Web Connection, click the Network tab in
Administrator mode, select "NetWare Configuration", and then specify
the following settings for the copier.
– For details on using PageScope Web Connection, refer to "Using
PageScope Web Connection" on page 9-3.
6 From the NetWare Server console, load PSERVER.NLM.
7 From the NetWare Server console, display the printer server screen,
and check that the printer name entered in step4 is displayed for
Printer0 and that it is listed as "waiting for job".
3-28 NC-503
Page 71
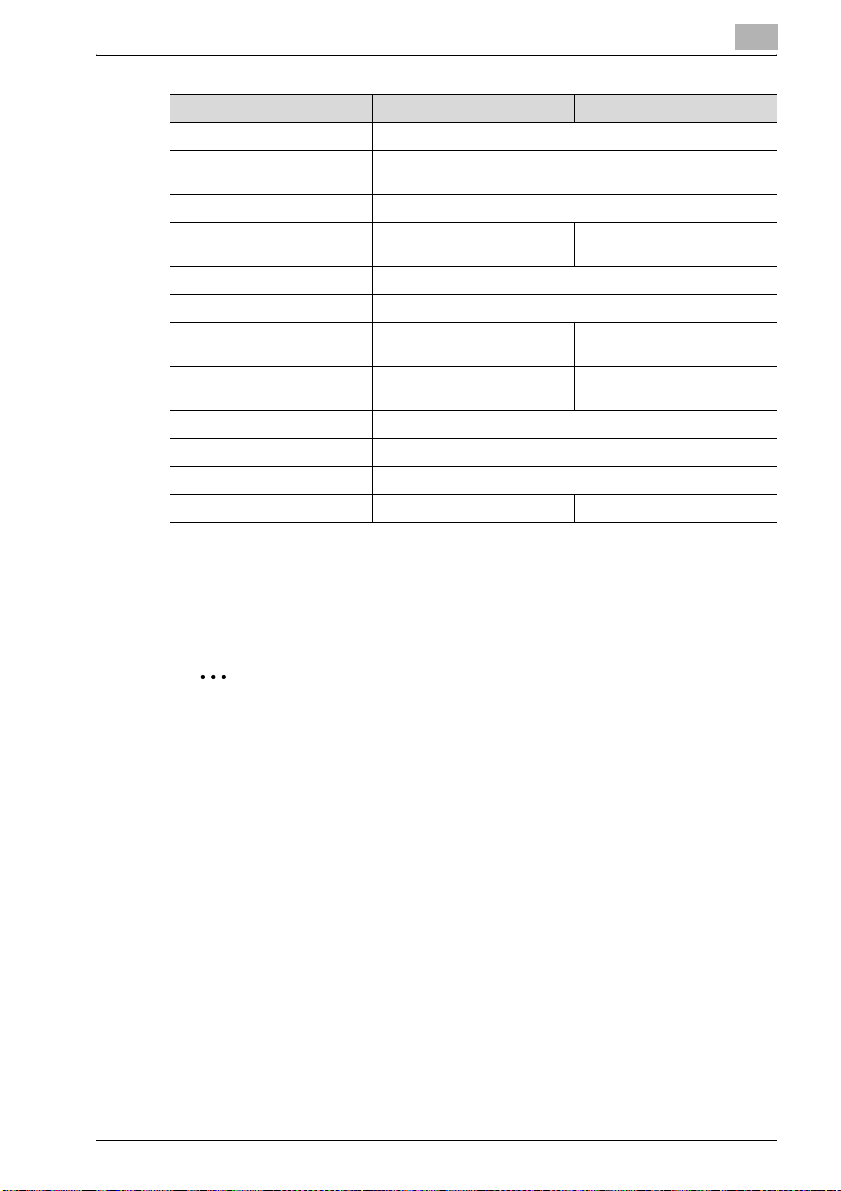
Network printing
Parameter NDS Bindery
NetWare Configuration
Frame Type
Print Server Name Print server name created in step 4
NDS Context Name Name of the context that con-
Print Server Password Specify only when setting from the NetWare Server.
Password Retype Specify only when setting from the NetWare Server.
Preferred File Server Not necessary to specify Name of the file server that
Preferred NDS Tree Name of the tree where Pserv-
Print Queue Scan Rate
Mode
Printer Number 1 (Change according to the setting.)
Connection Mode Directory Services Bindery
After changing the settings for parameters marked with an asterisk (
this machine off, then on again.
Specifying the NetWare 5.x/6 Novell Distributed Print Service (NDPS)
settings
3
*
*
*
*
Enable NetWare (Select the check box to enable it.)
AutoDetect (Select the frame type according to the network environment.)
nects to PServer
er logs on
1 (Change as necessary.)
Nprinter
Not necessary to specify
connects to PServer
Not necessary to specify
*
), turn
2
Reminder
Before specifying NDS settings, make sure that NDPS Broker and NDPS
Manager have been created and loaded.
Check that the NetWare server is set to use the TCP/IP protocol.
Specify the IP address for the controller and check that it has started.
NC-503 3-29
Page 72

3
Network printing
Creating an NDPS printer agent
1 Log on with Administrator privileges.
2 Start up NWadmin.
3 Right-click the name of the organization or department container
where you want to create the printer agent, and then select "NDPS
printer".
4 In the "NDPS Printer Name" box, type the printer name.
5 In the "Printer Agent Source" box, select "Create New Printer Agent",
and then click the [Create] button.
6 Check the printer agent name, and then browse for the NDPS Manager
to specify it in the "NDPS Manager Name" box.
7 Under "Gateway Types", select "Novell Printer Gateway" to register it.
8 In the Novell PDS setting dialog box, select "(No)" for printer and
"Novell Port Handler" for the port handler.
9 In the connection type dialog box, select "Remote Printer LPR/TCPIP".
10 Type in the IP address specified for the controller as the host address
and the queue name as the printer name to complete the registration.
(Sample queue name: print)
11 The printer driver registration dialog box appears, but select "None" for
all operating system to finish the registration.
– For printer user privileges, the printer notification option and
assignment of queues, refer to the NetWare documentation, and
specify settings as necessary.
3-30 NC-503
Page 73

Network printing
Specifying print settings for the NetWare client (Windows)
1 On the Start menu, point to "Settings", click "Printers", and then
2 Browse the network to specify the created queue (or NDPS printer) in
3 Select the printer driver.
4 Follow the Wizard instructions to complete the installation.
3
double-click the Add Printer icon.
the "Printer Port" box.
NC-503 3-31
Page 74

3
Network printing
3-32 NC-503
Page 75

4
Network scanning
Page 76

Page 77

Network scanning
4 Network scanning
Using the network scanning function, scan data can be sent to a recipient’s
computer by e-mail or it can be uploaded to an FTP server.
The scan data can be sent using any of the following methods. Choose the
appropriate method according on the network environment and purpose.
2
Note
To use the scanning functions, a TCP/IP network environment is
required.
4
NC-503 4-3
Page 78
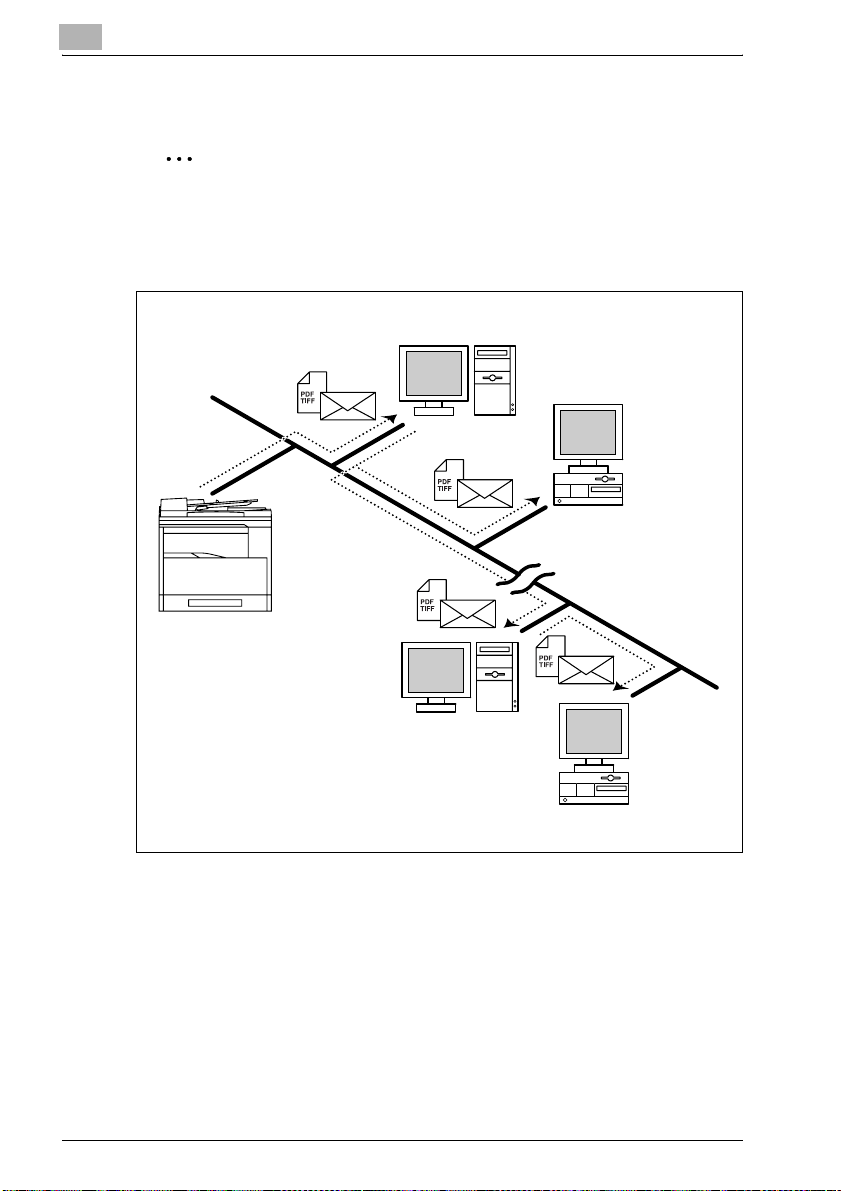
4
Network scanning
Scan to E-mail
2
Note
A network environment that includes a mail server is required.
Scan data is attached to an e-mail message as a TIFF or PDF file, then sent
to a computer on the network or to a computer through the Internet.
Mail server
Client computer
Intranet
Internet
Mail server
Client computer
4-4 NC-503
Page 79
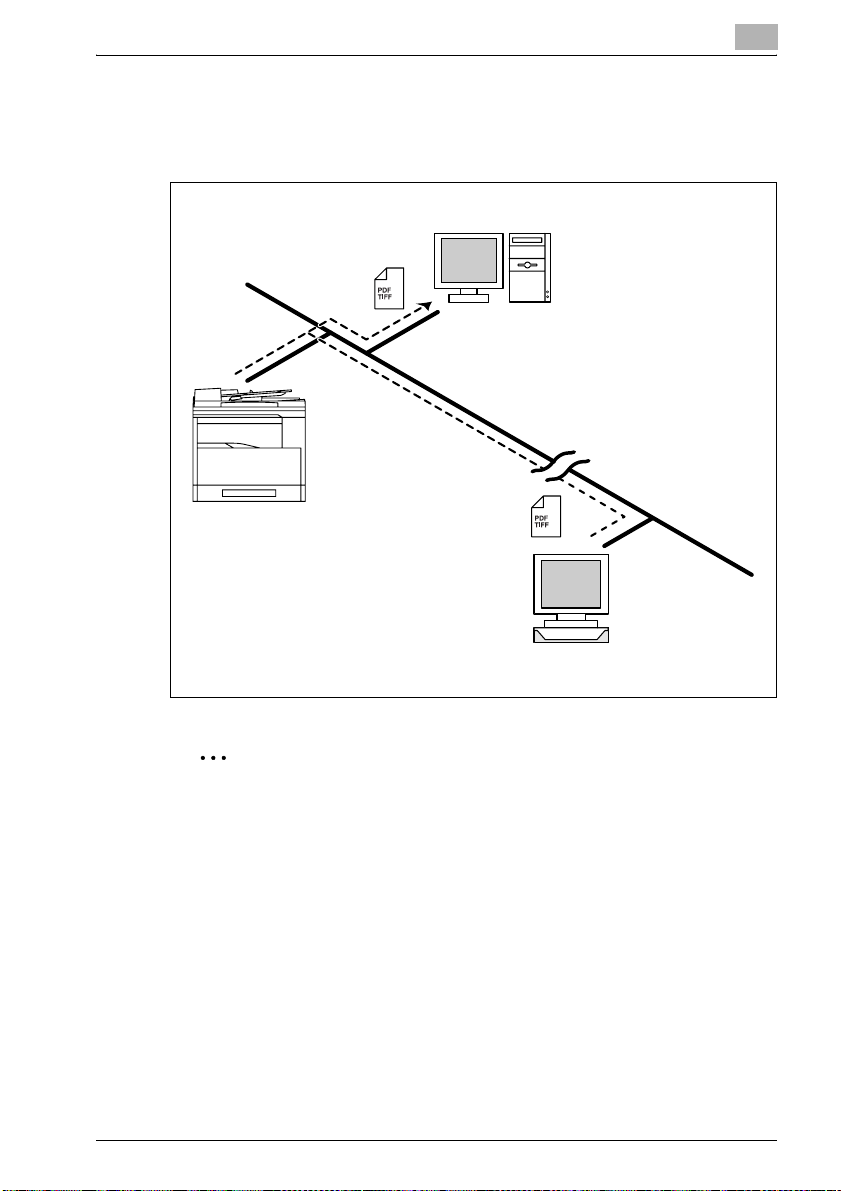
Network scanning
Scan to Server (FTP)
Scan data can be uploaded as TIFF or PDF files to a specified directory on
an FTP server.
4
FTP server
Intranet
Internet
FTP server
2
Note
A network environment that includes an FTP server is required.
An FTP server on the Internet can be accessed through a proxy server.
NC-503 4-5
Page 80
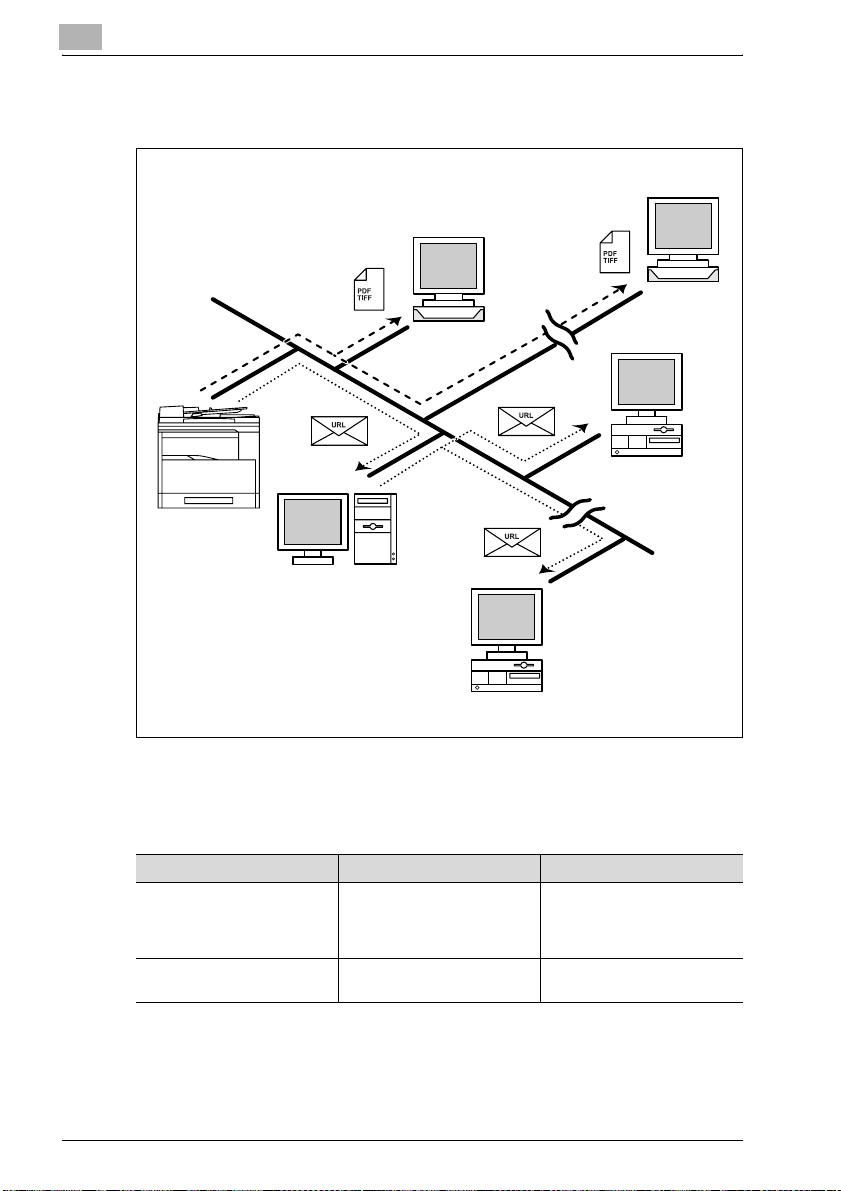
4
Network scanning
The system can be set to send to a specified recipient (up to 10) a notification
of the location on the FTP server where the data was uploaded.
FTP server
FTP server
Internet
Intranet
Mail server
Client computer
Client computer
Internet
Environments for network scan transmissions
The following environment is required in order to use the network scanning
features.
Scan to E-mail Scan to Server (FTP)
Required environment for image data forwarding
Required environment for image data importing
Mail server (SMTP server) • FTP server
• Mail client computer
• Mail server (POP3 server)
• Mail server (SMTP server)
in order to use mail notification
FTP client computer
4-6 NC-503
Page 81

5
Network settings
Page 82

Page 83

Network settings
5 Network settings
This chapter provides descriptions on specifying network settings from the
control panel of the machine.
5.1 Network settings
The available network operations are limited according to the connected
LAN environment. Specify the network settings according to the
environment and functions to be used.
!
Detail
The network settings can be specified from the control panel of the
machine and from PageScope Web Connection. (For details on
PageScope Web Connection, refer to "Using PageScope Web
Connection" on page 9-3.)
List of network settings
5
Parameter Description Scan
o: Necessary; -: Unnecessary; -: As necessary o: Can be specified
NETWORK SETTING
IP ADDRESS SETTING
SUBNET
MASK
GATEWAY Specify the default
Specify the IP address of the machine.
Obtain from the network administrator.
Specify the subnet
mask value for the
network.
Consult with the network administrator.
gateway (IP address
of the router) if a
router is on the network. Consult with
the network administrator.
to
E-mail
o*2 o*2 oo
o*2 o*2 oo
o*2 o*2 oo
Scan
to
Server
(FTP)
Settings
Machine
control
panel
-: Cannot be specified
PageScope
Web Connection
NC-503 5-3
Page 84

5
Network settings
Parameter Description Scan
DNS SETTING
GATEWAY
TX *4
WEB SETTING
LPD SETTING
SLP SETTING
SNMP SETTING
E-MAIL SETTING 1
SENDER
NAME
E-MAIL ADDRESS
SMTP SERVER ADDRESS
Select whether or not
DNS (Domain Name
System) is used. If a
DNS server is on the
network, specify the
IP address of the
DNS server.
If a DNS server is on
the network, select
"ENABLE".
Consult with the network administrator.
To send faxes directly, select "ENABLE".
Specify settings for
accessing PageScope Web Connection.
Specify the protocol
for printing using the
TCP/IP network.
Consult with the network administrator.
Specify the protocol
for searching for
services on the
TCP/IP network and
for automatically
specifying clients.
Consult with the network administrator.
Specify the management protocol for a
network environment
using TCP/IP. Consult with the network
administrator.
Specify the sender’s
name.
Specify the e-mail
address of the sender.
Obtain from the network administrator.
Specify the IP address or host name
for the SMTP server.
Consult with the network administrator.
to
E-mail
--oo
--o-
ooo-
--oo
--oo
--oo
o-*1 oo
o-*1 oo
o-*1*3 oo
Scan
to
Server
(FTP)
Settings
Machine
control
panel
PageScope
Web Connection
5-4 NC-503
Page 85

Network settings
5
Parameter Description Scan
SMTP PORT
NO.
SMTP TIMEOUT
TEXT INSERT
DEFAULT
SUBJECT
POP BEFORE SMTP
E-MAIL
MODE *5
Specify the port
number (between 1
and 65535) of the
SMTP server.
Consult with the network administrator.
Specify the amount
of time (between 30
and 300 seconds)
until the connection
with the SMTP server
times out.
Consult with the network administrator.
Select whether or not
to insert text explaining that image data
has been attached
when scan data is
being sent attached
to an e-mail message.
Specify the default
subject used when
sending scan data
attached to an e-mail
message.
Select whether or not
POP Before SMTP
authentication is
used.
Specify the default
transmission mode
(basic mode or advanced mode) when
sending an Internet
fax (with the destination entered using
the keypad).
to
E-mail
o-*1 oo
o-*1 oo
o-*1 oo
o-*1 oo
-*6 -*7 oo
--oo
Scan
to
Server
(FTP)
Settings
Machine
control
panel
PageScope
Web Connection
NC-503 5-5
Page 86

5
Network settings
Parameter Description Scan
E-MAIL SETTING 2
POP3 SERVER ADDRESS
POP3 PORT
NO.
POP3 TIMEOUT
POP3 ACCOUNT
POP3 PASSWORD
AUTO RECEPTION *5
REPLY ADDRESS *5
HEADER
PRINT *5
Specify the IP address or host name
for the POP3 server.
Consult with the network administrator.
Specify the port
number (between 1
and 65535) of the
POP3 server.
Consult with the network administrator.
Specify the amount
of time (between 30
and 300 seconds)
until the connection
with the POP3 server
times out.
Consult with the network administrator.
Specify the account
name used to log on
to the POP3 server.
Consult with the network administrator.
Specify the password used to log on
to the POP3 server.
Consult with the network administrator.
Specify the time interval ("OFF" or between 1 and 60
minutes) for checking for new e-mail
messages during automatic reception.
Specify the recipient
of error notification
e-mail messages if
an error occurs while
receiving an Internet
fax.
Select whether or not
to print the e-mail
header information
when printing received e-mail messages.
to
E-mail
-*6 -*7 oo
-*6 -*7 oo
-*6 -*7 oo
-*6 -*7 oo
-*6 -*7 oo
--o -
--o -
--o -
Scan
to
Server
(FTP)
Settings
Machine
control
panel
PageScope
Web Connection
5-6 NC-503
Page 87

Network settings
*1
: Necessary if notification of the URL is to be sent by e-mail.
*2
: Can also be obtained automatically from the DHCP server.
*3
: Set the IP address to "0.0.0.0" if there is no usable SMTP server on the
network.
*4
: The setting must be specified in order to use direct faxing. For details on
direct faxing, refer to the user manual for fax kit FK-506.
*5
: The setting must be specified in order to use Internet faxing. For details
on Internet faxing, refer to the user manual for fax kit FK-506.
*6
: Necessary in order to use POP Before SMTP.
*7
: Necessary in order to use POP Before SMTP and if notification of the URL
is to be sent by e-mail.
5
NC-503 5-7
Page 88

5
Network settings
List of LDAP settings
Specify these settings when using an LDAP (Lightweight Directory Access
Protocol) server.
Parameter Description Settings
LDAP SERVER ADDRESS
LDAP PORT NO. Specify the port number (between 1
SSL SETTING Select whether or not SSL is used to
SEARCH BASE Specify where to start the search in the
Attribute for Operation
Panel
Attribute for Web tool Specify the search attributes when us-
SEARCH METHOD Specify the method used to search for
LDAP TIMEOUT Specify the amount of time (between 5
MAX.SEARCH RESULTS
AUTHENTICATION Select the LDAP authentication meth-
LDAP ACCOUNT Specify the account name used to
Specify the IP address or host name
for the LDAP server. Consult with the
network administrator.
and 65535) used for communicating
with the LDAP server. Consult with the
network administrator.
encode the transmission data.
name space of the LDAP server. Consult with the network administrator.
Specify the search attributes when using the control panel to search for destinations on the LDAP server. Consult
with the network administrator.
ing PageScope Web Connection to
search for destinations on the LDAP
server. Consult with the network administrator.
destination names.
and 300 seconds) until a search times
out.
Specify the maximum number of items
(between 5 and 100) that can be received as LDAP search results.
od. Consult with the network administrator.
connect to the LDAP server. Type in an
account name if any setting other than
"ANONYMOUS" was selected as the
authentication method. Consult with
the network administrator.
Machine
control
panel
o: Can be specified
-: Cannot be specified
oo
oo
oo
oo
oo
- o
oo
oo
oo
oo
oo
PageScope Web
Connection
5-8 NC-503
Page 89

Network settings
Parameter Description Settings
LDAP PASSWORD Specify the password used to connect
DOMAIN NAME Specify the necessary domain name
to the LDAP server. Type in a password if any setting other than "ANONYMOUS" was selected as the
authentication method. Consult with
the network administrator.
used to connect to the LDAP server.
Consult with the network administrator.
5
Machine
control
panel
oo
oo
PageScope Web
Connection
NC-503 5-9
Page 90

5
5.2 Specifying settings from the control panel
The network settings can be specified from the control panel of this machine.
To specify the network settings from the control panel of the machine, press
the [Utility] key, and then specify settings for the various menu parameters
available from the "ADMIN. MANAGEMENT" menu in Utility mode.
Settings can be specified for the following network-related parameters in the
"ADMIN. MANAGEMENT" menu.
Menu Submenu Parameter
NETWORK SETTING IP ADDRESS SETTING AUTO / SPECIFY
SUBNET MASK
GATEWAY
DNS CONFIG DISABLE / ENABLE
GATEWAY TX
WEB SETTING DISABLE / ENABLE
LPD SETTING DISABLE / ENABLE
SLP SETTING DISABLE / ENABLE
SNMP SETTING DISABLE / ENABLE
E-MAIL SETTING 1 SENDER NAME -
E-MAIL ADDRESS -
SMTP SERVER ADDRESS -
SMTP PORT NO. 1 to 65535
SMTP TIMEOUT 30 to 300 seconds
TEXT INSERT OFF / ON
DEFAULT SUBJECT -
POP BEFORE SMTP OFF / ON (0 to 60 seconds)
E-MAIL MODE
E-MAIL SETTING 2 POP3 SERVER ADDRESS -
POP3 PORT NO. 1 to 65535
POP3 TIMEOUT 30 to 300 seconds
POP3 ACCOUNT -
POP3 PASSWORD -
*1
*1
*3
*3
-
-
DISABLE / ENABLE
BASIC/ADVANCED
Network settings
5-10 NC-503
Page 91

Network settings
Menu Submenu Parameter
LDAP SETTING LDAP SERVER ADDR. -
USER SETTING NTP SERVER ADDRESS
*1
: These items can be displayed only IP ADDRESS SETTING is set to
“SPECIFY”.
*2
: Can be specified if network interface card NC-503 or image controller
IC-206 is installed on the machine while fax kit FK-506 is not installed.
*3
: Can be specified if the optional fax kit FK-506 is installed.
LDAP PORT NO. 1 to 65535
SSL SETTING DISABLE/ENABLE
SEARCH BASE -
ATTRIBUTE -
SEARCH METHOD -
LDAP TIMEOUT 5 to 300 seconds
MAX.SEARCH RESULTS 5 to 100 items
AUTHENTICATION ANONYMOUS/SIMPLE/ DIGEST-
LDAP ACCOUNT -
LDAP PASSWORD -
DOMAIN NAME -
*2
TIME ZONE
*2
MD5/GSS-SPNEGO
-
-
5
NC-503 5-11
Page 92

5
5.3 NETWORK SETTING
Network settings are specified from the "ADMIN. MANAGEMENT" menu in
Utility mode.
This section provides details on specifying settings for the following
parameters.
- IP ADDRESS SETTING
- SUBNET MASK
- GATEWAY
- DNS CONFIG.
- GATEWAY TX
- WEB SETTING
- LPD SETTING
- SLP SETTING
- SNMP SETTING
2
Reminder
Before specifying network settings, check with the network administrator
for the necessary information.
Network settings
5-12 NC-503
Page 93
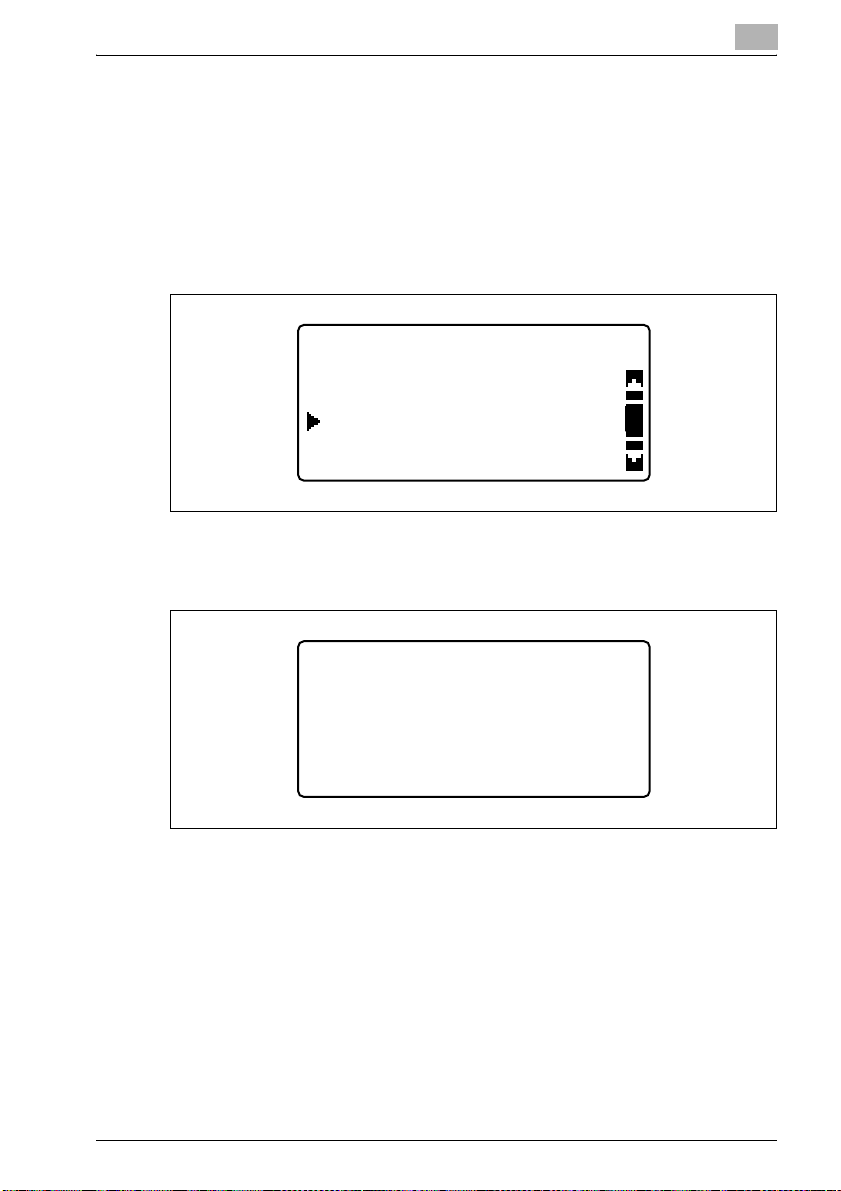
Network settings
Specifying the IP address, subnet mask and default gateway
The settings for the IP address to the gateway are specified in a continuous
operation.
1 Press the [Utility] key in the control panel.
2 Press the [,] or [+] key until "ADMIN. MANAGEMENT" is selected, and
then press the [OK] key.
3 Type in the administrator access code, and then press the [OK] key.
– The manufacturer’s default setting is "000000".
5
UTILITY MODE
USER MANAGEMENT
ADMIN. MANAGEMENT
COPY SETTING 1
ADMIN. MANAGEMENT
ADMIN. NO.:------
– If the number was incorrectly entered, press the [Clear/Stop] key to
erase the number, and then type it in correctly.
NC-503 5-13
Page 94
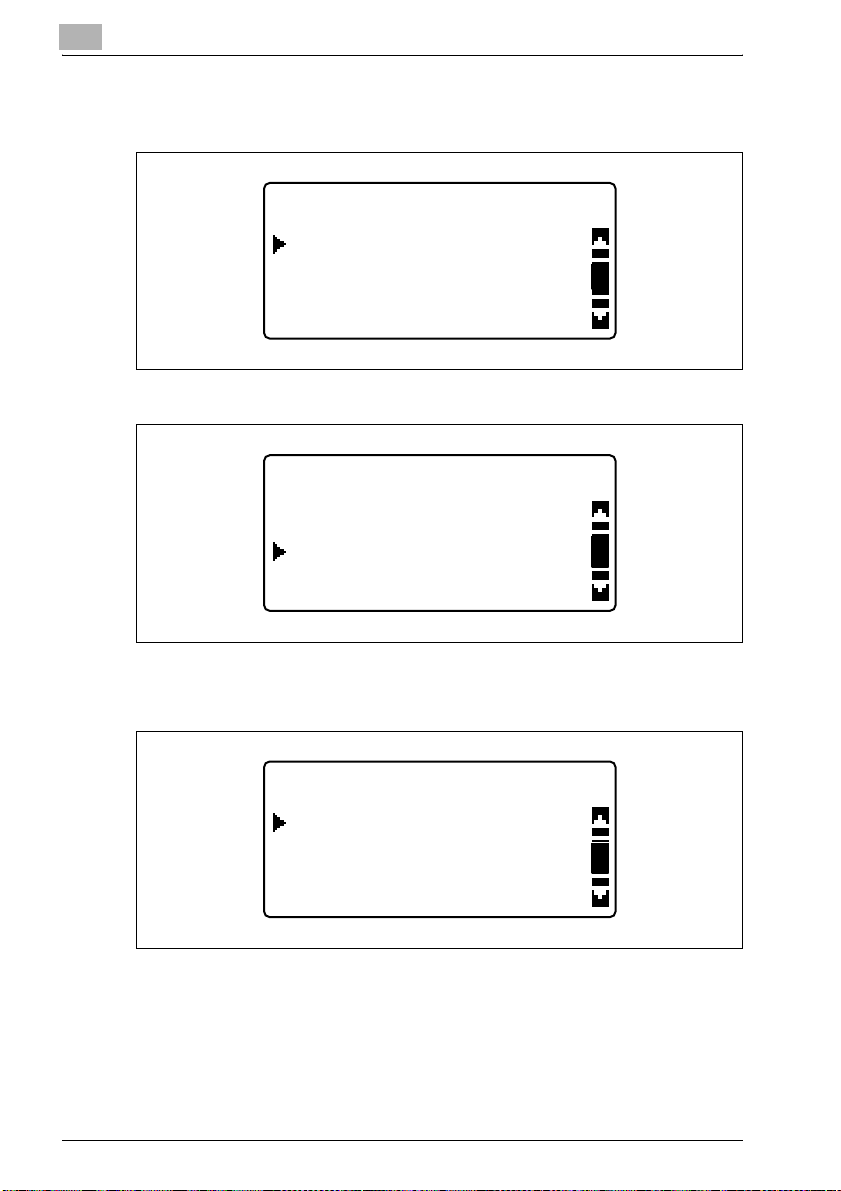
5
Network settings
4 Press the [,] or [+] key until "NETWORK SETTING" is selected, and
then press the [OK] key.
ADMIN. MANAGEMENT
NETWORK SETTING
E-MAIL SETTING 1
E-MAIL SETTING 2
– If fax kit FK-506 is installed
ADMIN. MANAGEMENT
REMOTE MONITOR
NETWORK SETTING
E-MAIL SETTING 1
5 In the "NETWORK SETTING" menu, press the [,] or [+] key until "IP
ADDRESS SETTING" is selected, and then press the [OK] key.
NETWORK SETTING
IP ADDRESS SETTING
DNS CONFIG.
WEB SETTING
5-14 NC-503
Page 95
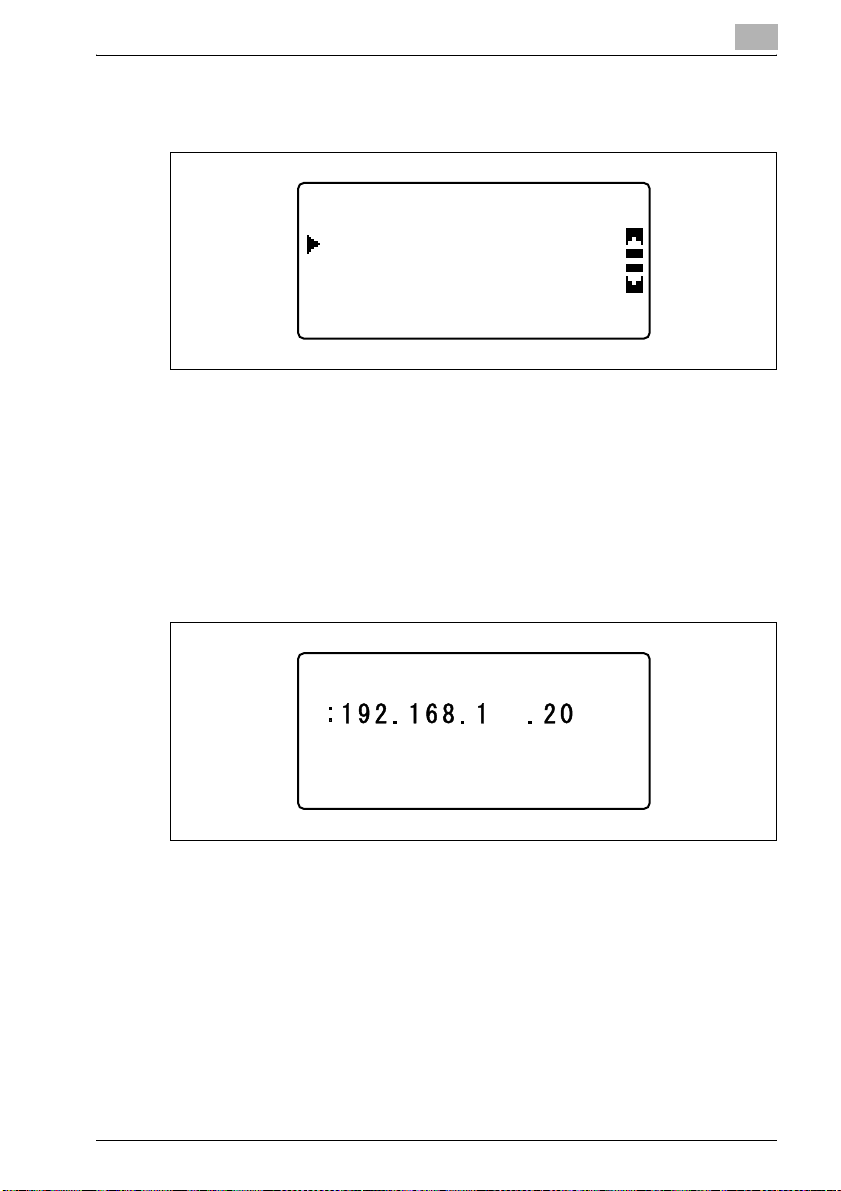
Network settings
6 Press the [,] or [+] key until "AUTO" or "SPECIFY" is selected, and
then press the [OK] key.
– If "AUTO" was selected, the IP address will automatically be
– If "SPECIFY" is selected, a screen appears, allowing you to specify
– "AUTO" is available only if a DHCP server is on the network. If
7 Use the keypad to type in the IP address, and then press the [OK] key.
5
IP ADDRESS SETTING
AUTO
SPECIFY
obtained from the DHCP server. After the message "ACCEPTED"
appears, the "NETWORK SETTING" menu appears again.
the IP address. Continue with step 7.
"AUTO" is selected, it will not be necessary to specify the subnet
mask or gateway settings.
IP ADDRESS
NC-503 5-15
Page 96
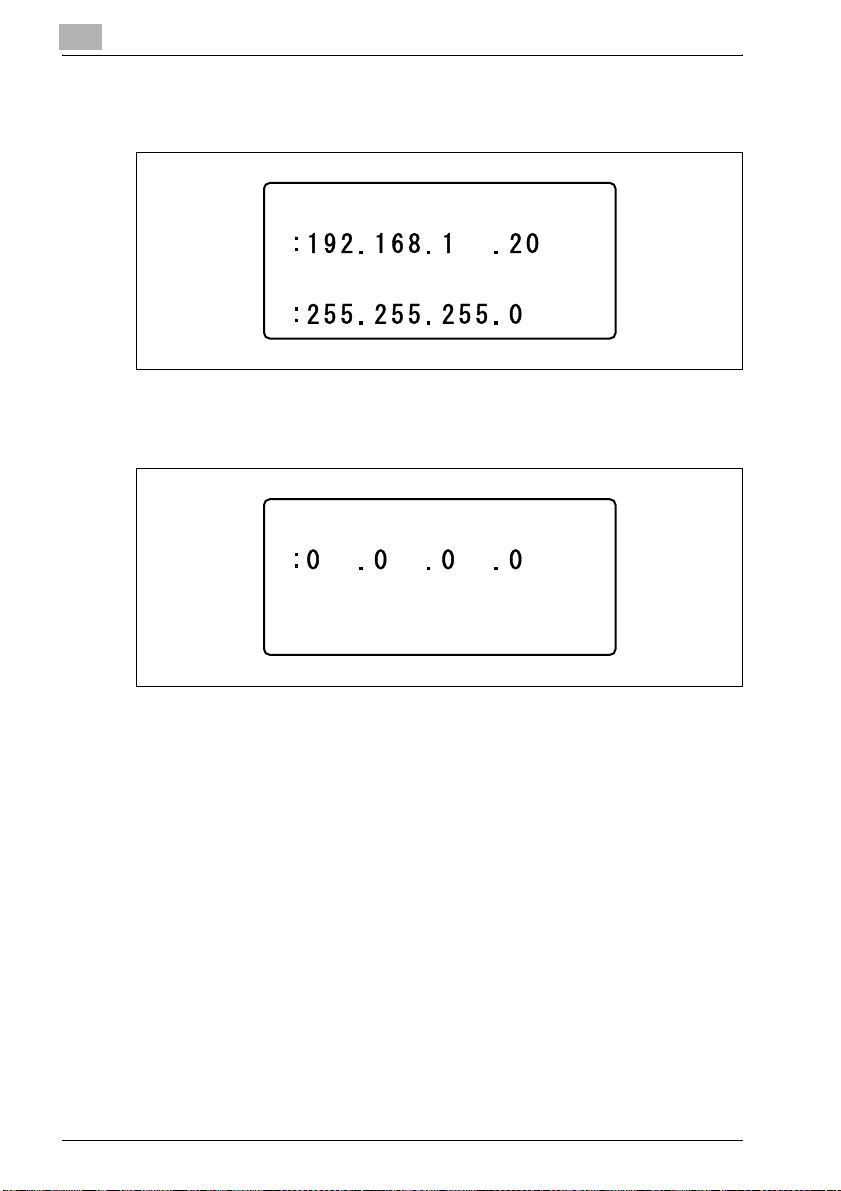
5
Network settings
8 Use the keypad to type in the subnet mask, and then press the [OK]
key.
IP ADDRESS
SUBNET MASK
– For the subnet mask, consult with the network administrator.
9 Use the keypad to type in the gateway.
GATEWAY
10 Press the [OK] key.
After the message "ACCEPTED" appears, the "NETWORK SETTING"
menu appears again.
5-16 NC-503
Page 97

Network settings
11 Press the [Reset] key in the control panel.
– After the screen shown above appears, turn the machine off, then
2
Note
If a number was incorrectly entered, press the [Clear/Stop] key to erase
the number, and then type it in correctly.
2
Reminder
In order to apply the new settings, the machine must be turned off, then
on again to be restarted.
5
______CAUTION_______
PLEASE RE-START
POWER SUPPLY OFF/ON
on again to restart it.
NC-503 5-17
Page 98
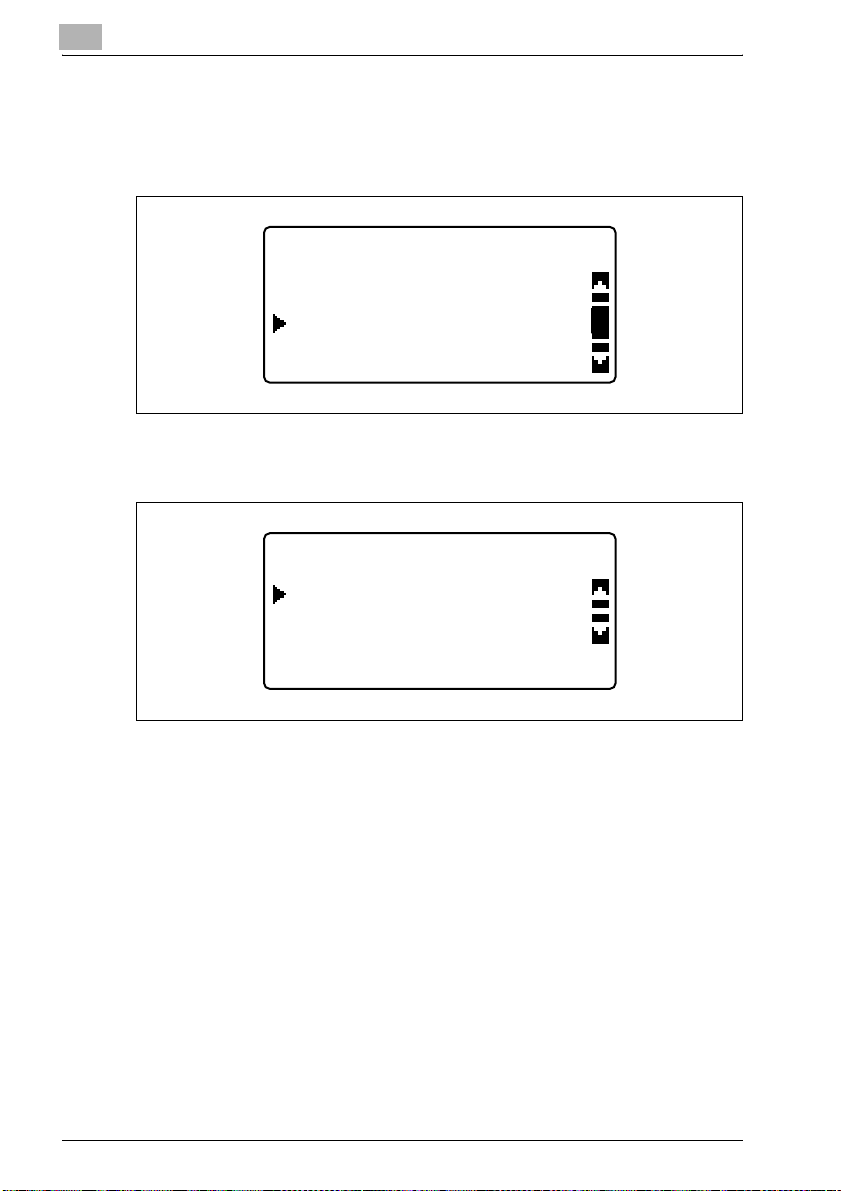
5
Network settings
Specifying the DNS settings
1 In the "NETWORK SETTING" menu, press the [,] or [+] key until "DNS
CONFIG." is selected, and then press the [OK] key.
NETWORK SETTING
IP ADDRESS SETTING
DNS CONFIG.
WEB SETTING
2 Press the [,] or [+] key until "DISABLE" or "ENABLE" is selected, and
then press the [OK] key.
DNS CONFIG.
DISABLE
ENABLE
– If "DISABLE" is selected, the message "ACCEPTED" appears, and
then the "NETWORK SETTING" menu appears again.
– If "ENABLE" was selected, a screen appears, allowing you to
specify the IP address of the DNS server. Continue with step 3.
5-18 NC-503
Page 99

Network settings
3 Use the keypad to type in the IP address of the DNS server.
– For the IP address of the DNS server, consult with the network
4 Press the [OK] key.
After the message "ACCEPTED" appears, the "NETWORK SETTING"
menu appears again.
5 Press the [Reset] key in the control panel.
5
DNS CONFIG.
administrator.
______CAUTION_______
PLEASE RE-START
POWER SUPPLY OFF/ON
– After the screen shown below appears, turn the machine off, then
on again to restart it.
2
Reminder
In order to apply the new settings, the machine must be turned off, then
on again to be restarted.
NC-503 5-19
Page 100
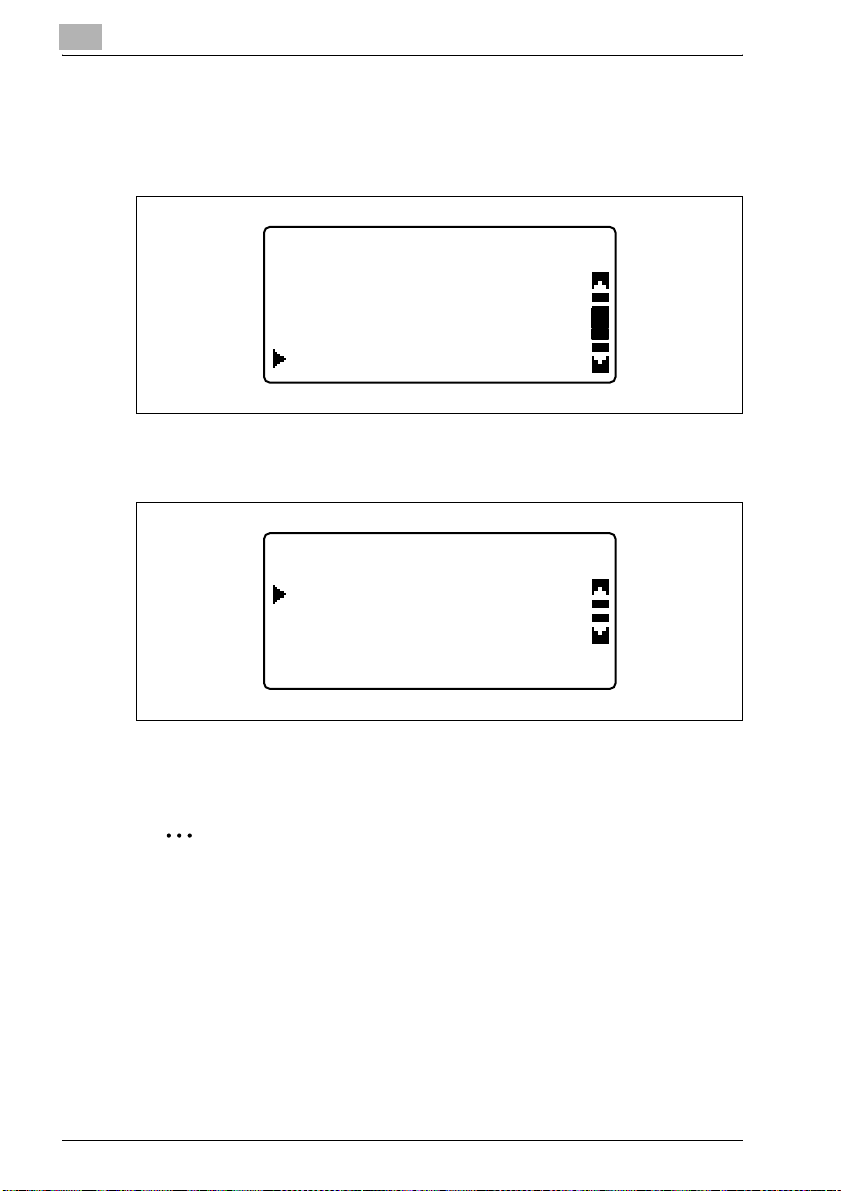
5
Network settings
Specifying the gateway transmission setting
1 In the "NETWORK SETTING" menu, press the [,] or [+] key until
"GATEWAY TX" is selected, and then press the [OK] key.
NETWORK SETTING
IP ADDRESS SETTING
DNS CONFIG.
GATEWAY TXGATEWAY TX
2 Press the [,] or [+] key until "DISABLE" or "ENABLE" is selected, and
then press the [OK] key.
GATEWAY TX
DISABLE
ENABLE
– Whether "DISABLE" or "ENABLE" is selected, the message
"ACCEPTED" appears, and then the "NETWORK SETTING" menu
appears again.
2
Note
The setting for gateway transmissions appears when optional fax kit
FK-506 is installed.
5-20 NC-503
 Loading...