


 Loading...
Recycled paper is used for the inside pages of this book.
Konica Fax 9825
User’s Manual
© 1998 by Konica Business Technologies, Inc.
MAINTENANCE AGREEMENT
The KONICA Fax 9825 will give you many years of trouble-free service. To ensure high quality copying performance and to prevent premature wear and failure of precision parts. and components, periodic cleaning and routine adjustments should be scheduled.
We recommend that you contact your service center to discuss the benefits and advantages of Konica’s Customer Service Maintenance Agreement and to be shown how a maintenance plan can be tailored to your individual copying needs.
NOTICE:
Konica Business Technologies, Inc. has made every effort to ensure that the information in this manual is complete and accurate. However, constant efforts are also being made to improve and update the product. Therefore, Konica Business Technologies shall not be liable for errors in this manual or for any consequential damages resulting from the use of this manual. The information contained herein is subject to changes without notice.
WEB SITE:
www.konicabt.com
FEDERAL OR STATE STATUTES MAY PROHIBIT THE COPYING OF CERTAIN DOCUMENTS OR INFORMATION, RESULTING IN FINES OR IMPRISONMENT FOR VIOLATORS.
MANUAL PART NUMBER:
OP-01-FAX9825
CORRESPONDENCE:
Correspondence regarding this manual may be mailed to the address shown below.
KONICA BUSINESS TECHNOLOGIES, INC.
DIGITAL SYSTEMS SOLUTIONS GROUP & NEW PRODUCT DEVELOPMENT
500 DAY HILL ROAD
WINDSOR, CT 06095

Quick Table of Contents
ntents Co
Part 1: Getting Started |
1 |
|
|
Operating Notices |
1 |
|
How to Use the Manual |
9 |
Chapter 1 |
Installing and Setting up the Machine |
11 |
Chapter 2 |
Getting to Know the Machine |
29 |
Chapter 3 |
Job Status and Memory |
41 |
Part 2: Copying |
47 |
|
Chapter 4 |
Copying a Document |
47 |
Part 3: Faxing |
|
53 |
Chapter 5 |
Dialing Methods |
53 |
Chapter 6 |
Sending a Fax |
61 |
Chapter 7 |
Receiving a Fax |
77 |
Chapter 8 |
Programming the Fax Phonebook |
89 |
Chapter 9 |
Polling - Retrieving Remote Documents 101 |
|
Chapter 10 |
Mailbox |
109 |
Chapter 11 |
Printing Reports |
115 |
Part 4: PC Connectivity |
129 |
|
Chapter 12 |
PC Connectivity Software |
129 |
Chapter 13 |
Printing from the PC |
137 |
Chapter 14 |
Using the Machine on a Network |
141 |
Part 5: Supervisor Functions |
143 |
|
Chapter 15 |
Accessing the Supervisor Menu |
143 |
Part 6: Technical Information |
159 |
|
Chapter 16 |
Troubleshooting and Maintenance |
159 |
Chapter 17 |
Specifications |
183 |
|
Index |
193 |
iii

|
|
|
|
|
|
|
|
|
|
iv |
Konica Fax 9825 User’s Manual |

Detailed Contents
Contents
ntents Co
Operating Notices |
1 |
Safety . . . . . . . . . . . . . . . . . . . . . . . . . . . . . . . . . . . . . . . . . . . |
. 6 |
How to Use the Manual |
9 |
Chapter 1: Installing and Setting up the Machine |
11 |
Where to Install. . . . . . . . . . . . . . . . . . . . . . . . . . . . . . . . . . . . 11 Unpacking. . . . . . . . . . . . . . . . . . . . . . . . . . . . . . . . . . . . . . . . 12 What You May Need To Install. . . . . . . . . . . . . . . . . . . . . . . . 13 Konica Fax 9825 Backup Batteries . . . . . . . . . . . . . . . . . . . . 13 Setting up the Konica Fax 9825 . . . . . . . . . . . . . . . . . . . . . . . 13 Loading Paper . . . . . . . . . . . . . . . . . . . . . . . . . . . . . . . . . . . . 17 Telephone Line Connections . . . . . . . . . . . . . . . . . . . . . . . . . 21 Installing the Second Paper Cassette . . . . . . . . . . . . . . . . . . 23
Chapter 2: Getting to Know the Machine |
29 |
Machine Overview . . . . . . . . . . . . . . . . . . . . . . . . . . . . . . . . . 29
Hardware Features. . . . . . . . . . . . . . . . . . . . . . . . . . . . . . . . . 30
Control Panel . . . . . . . . . . . . . . . . . . . . . . . . . . . . . . . . . . . . . 33
Konica Fax 9825 Control Panel Keys. . . . . . . . . . . . . . . . . . . 34
Using the Machine Menu . . . . . . . . . . . . . . . . . . . . . . . . . . . . 36
Help Using the Menus . . . . . . . . . . . . . . . . . . . . . . . . . . . . . . 37
Konica Fax 9825 Menus. . . . . . . . . . . . . . . . . . . . . . . . . . . . . 38
Multi-Access . . . . . . . . . . . . . . . . . . . . . . . . . . . . . . . . . . . . . . 40
Chapter 3: Job Status and Memory |
41 |
Document Memory . . . . . . . . . . . . . . . . . . . . . . . . . . . . . . . . . 41 Idle Status. . . . . . . . . . . . . . . . . . . . . . . . . . . . . . . . . . . . . . . . 41 Job Status. . . . . . . . . . . . . . . . . . . . . . . . . . . . . . . . . . . . . . . . 42 Printing the First Page of a Pending Job . . . . . . . . . . . . . . . . 43 Canceling a Pending Job . . . . . . . . . . . . . . . . . . . . . . . . . . . . 43 Clearing the Memory . . . . . . . . . . . . . . . . . . . . . . . . . . . . . . . 44 If Memory is Full . . . . . . . . . . . . . . . . . . . . . . . . . . . . . . . . . . . 44
Chapter 4: Copying a Document |
47 |
Load a Document . . . . . . . . . . . . . . . . . . . . . . . . . . . . . . . . . . 47
Copying Documents . . . . . . . . . . . . . . . . . . . . . . . . . . . . . . . . 47
Copy Features . . . . . . . . . . . . . . . . . . . . . . . . . . . . . . . . . . . . 48
v

|
s |
Co |
ntent |
|
Detailed Contents
Chapter 5: Dialing Methods |
53 |
Keypad Dialing (Control Panel) . . . . . . . . . . . . . . . . . . . . . . . 53 One-Touch Dialing . . . . . . . . . . . . . . . . . . . . . . . . . . . . . . . . . 53 Speed Dialing . . . . . . . . . . . . . . . . . . . . . . . . . . . . . . . . . . . . . 53 Manual Dialing . . . . . . . . . . . . . . . . . . . . . . . . . . . . . . . . . . . . 54 Redialing. . . . . . . . . . . . . . . . . . . . . . . . . . . . . . . . . . . . . . . . . 55 Last Number Redialing . . . . . . . . . . . . . . . . . . . . . . . . . . . . . . 55 Group Dial . . . . . . . . . . . . . . . . . . . . . . . . . . . . . . . . . . . . . . . 56 Linked Dialing . . . . . . . . . . . . . . . . . . . . . . . . . . . . . . . . . . . . . 57 Pauses and other Dial Options. . . . . . . . . . . . . . . . . . . . . . . . 57
Chapter 6: Sending a Fax |
61 |
Loading a Document . . . . . . . . . . . . . . . . . . . . . . . . . . . . . . . 61
Automatic Send . . . . . . . . . . . . . . . . . . . . . . . . . . . . . . . . . . . 62
Broadcast Send . . . . . . . . . . . . . . . . . . . . . . . . . . . . . . . . . . . 63
Scheduling Faxes for a Delayed Start . . . . . . . . . . . . . . . . . . 65
Sending Attachments . . . . . . . . . . . . . . . . . . . . . . . . . . . . . . . 66
Manual Send with Voice Contact . . . . . . . . . . . . . . . . . . . . . . 66
Canceling a Transmission . . . . . . . . . . . . . . . . . . . . . . . . . . . 67
Communication Features . . . . . . . . . . . . . . . . . . . . . . . . . . . . 68
Outgoing Faxes Menu . . . . . . . . . . . . . . . . . . . . . . . . . . . . . . 71
Chapter 7: Receiving a Fax |
77 |
Answering Fax Calls. . . . . . . . . . . . . . . . . . . . . . . . . . . . . . . . 77
Receive To Memory . . . . . . . . . . . . . . . . . . . . . . . . . . . . . . . . 82
Confidential Receive. . . . . . . . . . . . . . . . . . . . . . . . . . . . . . . . 82
Reducing Faxes to Fit. . . . . . . . . . . . . . . . . . . . . . . . . . . . . . . 83
Fax Copies, Collation, and Paper Trays. . . . . . . . . . . . . . . . . 84
Pager Notification . . . . . . . . . . . . . . . . . . . . . . . . . . . . . . . . . . 86
Chapter 8: Programming the Fax Phonebook |
89 |
What is the Phonebook? . . . . . . . . . . . . . . . . . . . . . . . . . . . . 89
Creating Individual Cell Entries . . . . . . . . . . . . . . . . . . . . . . . 90
Groups . . . . . . . . . . . . . . . . . . . . . . . . . . . . . . . . . . . . . . . . . . 95
Programmable One-Touch Keys . . . . . . . . . . . . . . . . . . . . . . 97
Chapter 9: Polling - Retrieving Remote Documents 101
Preparing a Document to be Polled (Poll-Out) . . . . . . . . . . . 101
Retrieving Remote Documents (Poll-In) . . . . . . . . . . . . . . . . 103
Delayed Polling (Poll-In) . . . . . . . . . . . . . . . . . . . . . . . . . . . . 104
Continuous Polling (Poll-In) . . . . . . . . . . . . . . . . . . . . . . . . . 105
Cancel a Polling Job. . . . . . . . . . . . . . . . . . . . . . . . . . . . . . . 106
vi |
Konica Fax 9825 User’s Manual |

Detailed Contents
ntents Co
Retrieving Confidential Documents with DTMF . . . . . . . . . . 106
Chapter 10: Mailbox |
109 |
Mailbox Setup. . . . . . . . . . . . . . . . . . . . . . . . . . . . . . . . . . . . 109
Store Document in Local Mailbox. . . . . . . . . . . . . . . . . . . . . 110
Print Mailbox Content . . . . . . . . . . . . . . . . . . . . . . . . . . . . . . 111
Erase Mailbox Content . . . . . . . . . . . . . . . . . . . . . . . . . . . . . 111
Mailboxes and DTMF . . . . . . . . . . . . . . . . . . . . . . . . . . . . . . 111
Chapter 11: Printing Reports |
115 |
Report Overview. . . . . . . . . . . . . . . . . . . . . . . . . . . . . . . . . . 115
Report Header . . . . . . . . . . . . . . . . . . . . . . . . . . . . . . . . . . . 116
Fax Reports . . . . . . . . . . . . . . . . . . . . . . . . . . . . . . . . . . . . . 117
Usage Reports . . . . . . . . . . . . . . . . . . . . . . . . . . . . . . . . . . . 125
Machine Status Reports . . . . . . . . . . . . . . . . . . . . . . . . . . . . 127
Chapter 12: PC Connectivity Software |
129 |
Hardware Requirements & Installation . . . . . . . . . . . . . . . . . 129 Software Requirements & Installation . . . . . . . . . . . . . . . . . 129 Konica Fax 9825 Configuration Program . . . . . . . . . . . . . . . 131 Scanning Documents Using Twain. . . . . . . . . . . . . . . . . . . . 134 Sending Faxes Via Class 1 or 2 Software . . . . . . . . . . . . . . 135
Chapter 13: Printing from the PC |
137 |
Parallel Cable . . . . . . . . . . . . . . . . . . . . . . . . . . . . . . . . . . . . 137 Installing the Konica Fax 9825 Print Driver . . . . . . . . . . . . . 137 Printing with the Konica Fax 9825 . . . . . . . . . . . . . . . . . . . . 137 Printer Menu . . . . . . . . . . . . . . . . . . . . . . . . . . . . . . . . . . . . . 137 Using the Manual Feeder . . . . . . . . . . . . . . . . . . . . . . . . . . . 140
Chapter 14: Using the Machine on a Network |
141 |
Network Faxing. . . . . . . . . . . . . . . . . . . . . . . . . . . . . . . . . . |
. 141 |
Network Scanning . . . . . . . . . . . . . . . . . . . . . . . . . . . . . . . . |
142 |
Chapter 15: Accessing the Supervisor Menu |
143 |
Time and Date . . . . . . . . . . . . . . . . . . . . . . . . . . . . . . . . . . . 143 Setting the Machine ID . . . . . . . . . . . . . . . . . . . . . . . . . . . . . 144 Speed Dial Key. . . . . . . . . . . . . . . . . . . . . . . . . . . . . . . . . . . 145 Pause Key . . . . . . . . . . . . . . . . . . . . . . . . . . . . . . . . . . . . . . 146 LCD Contrast . . . . . . . . . . . . . . . . . . . . . . . . . . . . . . . . . . . . 147 Listen to Dial. . . . . . . . . . . . . . . . . . . . . . . . . . . . . . . . . . . . . 147 Button Sound . . . . . . . . . . . . . . . . . . . . . . . . . . . . . . . . . . . . 148 Alarm Sound. . . . . . . . . . . . . . . . . . . . . . . . . . . . . . . . . . . . . 149
vii

|
s |
Co |
ntent |
|
Detailed Contents
Ring Sound. . . . . . . . . . . . . . . . . . . . . . . . . . . . . . . . . . . . . . 149
Mail/Poll/Relay Menu . . . . . . . . . . . . . . . . . . . . . . . . . . . . . . 150
Timestamp . . . . . . . . . . . . . . . . . . . . . . . . . . . . . . . . . . . . . . 150
Language . . . . . . . . . . . . . . . . . . . . . . . . . . . . . . . . . . . . . . . 151
Access Menu . . . . . . . . . . . . . . . . . . . . . . . . . . . . . . . . . . . . 151
Remote Test . . . . . . . . . . . . . . . . . . . . . . . . . . . . . . . . . . . . . 156
Chapter 16: Troubleshooting and Maintenance |
159 |
Self Test . . . . . . . . . . . . . . . . . . . . . . . . . . . . . . . . . . . . . . . . 159 Solving Problems with Your Machine . . . . . . . . . . . . . . . . . . 160 Problem Checklist. . . . . . . . . . . . . . . . . . . . . . . . . . . . . . . . . 171 Messages . . . . . . . . . . . . . . . . . . . . . . . . . . . . . . . . . . . . . . . 176 Error Codes . . . . . . . . . . . . . . . . . . . . . . . . . . . . . . . . . . . . . 177 Maintaining Your Konica Fax 9825. . . . . . . . . . . . . . . . . . . . 178 Service Information. . . . . . . . . . . . . . . . . . . . . . . . . . . . . . . . 180 Shipping Your Konica Fax 9825 . . . . . . . . . . . . . . . . . . . . . . 180 Consumables and Replacement Parts . . . . . . . . . . . . . . . . . 181
Chapter 17: Specifications |
183 |
Index |
193 |
viii |
Konica Fax 9825 User’s Manual |

Operating Notices
Your machine and supplies have been designed and tested to meet strict safety requirements. These include safety agency examination and approval, and compliance to established environmental standards. Please read the following instructions and refer to them as needed to ensure the continued safe operation of your machine.
Follow all warnings and instructions marked on, or supplied with, the product.
Unplug this machine from the wall outlet before cleaning. Always use materials specifically designated for this machine. Use of other materials may result in poor performance and could create a hazardous situation.
Do not use this machine near water, wet locations, or outdoors.
Do not place this machine on an unstable cart, stand, or table. The machine may fall, causing personal injury or serious damage to the machine.
This machine is equipped with a 3-wire, grounding type plug (that is, a plug having a third grounding pin). This plug will only fit into a grounding type power outlet. This is a safety feature. To avoid the risk of electric shock, contact your electrician to replace the receptacle if you are unable to insert the plug into the outlet. Never use a ground adapter plug to connect the machine to a power source receptacle that lacks a ground connection terminal.
This machine should be operated from the type of power source indicated on the marking label. If you are not sure of the type of power available, consult your local power company.
Do not allow anything to rest on the power cord. Do not locate the machine where persons will step on the cord.
Use of an extension cord with this machine is not recommend or authorized. Users should check building codes and insurance requirements if an extension cord is to be used. Ensure that the total of the ampere ratings does not exceed the extension cord ampere rating. Make sure that the total of all products plugged into the wall outlet does not exceed the outlet rating.
Slots and openings in the cabinet and in the back and bottom of the machine are provided for ventilation. To ensure reliable operation of the machine and to protect it from overheating, these openings must not be blocked or covered. The machine should never be placed near or over a radiator or heat register. This machine should not be placed in a built-in installation unless proper ventilation is provided.
Never spill liquid of any kind on the machine.
Never remove any covers or guards that require a tool for removal. There are no operator serviceable areas within these covers.
1

Never defeat interlock switches. Machines are designed to not allow operator access to unsafe areas. Covers, guards, and interlock switches are provide to ensure that the machine will not operate with covers opened.
WARNING: During normal operation, this machine will produce ozone gas. The amount of ozone produced does not present a hazard to the operator. However, it is advisable that the machine be operated in a well-ventilated area.
Data Coupler Information
The Konica Fax 9825 machine contains an internal data coupler. Its use is restricted by the FCC (Federal Communication Commission). To comply with the FCC rules, you must carefully read and follow the instructions listed below.
This equipment complies with Part 68 of the FCC rules. On the rear of this equipment is a label that contains, among other information, the FCC registration number and the Ringer Equivalence Number (REN). If requested, provide this information to your telephone company.
The REN is useful to determine the quantity of devices you may connect to your telephone line and still have all of those devices ring when your number is called. In most, but not all areas, the sum of the RENs of all devices should not exceed five (5). To be certain of the number of devices you may connect to your line, as determined by the REN, you should call your local telephone company to determine the maximum REN for your calling area.
WARNING: Ask your local telephone company for the modular jack type installed on your line. Connecting this machine to an unauthorized jack can severely damage telephone company equipment. You, not Konica, assume all responsibility and/or liability for any damage caused by the connection of this machine to an unauthorized jack.
You may safely connect the machine to the following standard modular jack: USOC RJ11C. Use the standard line cord (with modular plugs) provided with the installation kit to connect it.
Do not connect this machine to a party or coin operated phone line.
Repairs to the machine should only be made by Konica or an authorized Konica service agency or dealer. This applies at any time during or after the service warranty period. If unauthorized repair is performed, the remainder of the warranty period is null and void.
If you find the telephone line is damaged or the telephone company notifies you that your machine is causing damage, disconnect the machine from the telephone line and call for service. Do not reconnect the machine until necessary repairs are made.
2 |
Konica Fax 9825 User’s Manual |
The telephone company, where practical, will notify you when they need to temporally disconnect service. However, if action is reasonable and necessary, but prior notice is not practical, they may still temporarily disconnect your service. In such cases they must:
♦Immediately notify you of their temporary action.
♦Reconnect service when the source of damage is removed.
♦Inform you of your rights to bring a complaint to the FCC under FCC rules.
The telephone company may make changes to its communications facilities, equipment, operations, or procedures. Such action must be reasonable, required in the operation of their business, and consistent with FCC rules. They must give your prior written notification if the changes can:
♦Make your machine incompatible with their equipment,
♦Require modification or alteration of the machine,
♦Otherwise physically affect performance of the machine.
Radio Frequency Interference Statement
This equipment has been tested and found to comply with the limits for a Class A digital device, pursuant to Part 15, Subpart B of the FCC Rules. These limits are designed to provide reasonable protection against harmful interference when the equipment is operated in a residential environment. This equipment generates, uses, and can radiate radio frequency energy. If not installed and used in accordance with the instruction manual, it may cause harmful interference to radio communications. However, there is no guarantee that interference will not occur in a particular installation. If this equipment does cause harmful interference to radio or television reception, which can be determined by turning the equipment off and on, the user is encouraged to try to correct the interference by one or more of the following measures:
♦Reorient or relocate receiving antenna.
♦Increase the separation between the equipment and receiver.
♦Connect the equipment into an outlet on a circuit different from that to which the receiver is connected.
♦Consult the dealer or an experienced radio/TV technician for help.
Modifications
Changes or modifications not expressly approved by Konica Incorporated could void the user’s authority to operate the equipment.
Notices Operating
3

Telephone Consumer Protection Act of 1991
The Telephone Consumer Protection Act of 1991 makes it unlawful for any person to use a computer or other electronic device to send any message via a telephone fax machine unless such message clearly contains, in a margin at the top or the bottom of each transmitted page or on the first page of the transmission, the date and time it is sent and an identification of the business or other entity, or other individual sending the message, and the telephone number of the sending machine or such business, other entity, or individual.
To comply with this law, you must enter the following information in your fax unit:
♦Date and time
♦Name and telephone number which identify the source of your fax transmission.
Canadian Certification
The Canadian Department of Communications Label on the machine identifies certified equipment. This certification means the equipment meets certain telecommunications networks protective, operational and safety requirements. The Department does not guarantee the equipment will operate to the user’s satisfaction.
Before installing this equipment, users should ensure that it is permissible to be connected to the facilities of the local telecommunications company. The equipment must also be installed using an acceptable method of connection. In some cases, the company’s inside wiring associated with a single line individual service may be extended by means of a certified connector assembly (telephone extension cord).
The customer should be aware that compliance with the above conditions may not prevent degradation of service in some situations.
Repairs to certified equipment should be made by an authorized Canadian maintenance facility designated by the supplier. Any repairs or alterations made by the user to this equipment, or equipment malfunctions, may give the telecommunications company cause to request the user to disconnect the equipment.
Users should ensure for their own protection that the electrical ground connections of the power utility, telephone lines and internal metallic water pipe system, if present, are connected together. This precaution may be particularly important in rural areas.
WARNING: Users should not attempt to make such connections themselves, but should contact the appropriate electric inspection authority or electrician, as appropriate.
The load number (LN) assigned to each machine device denotes the percentage of the total load to be connected to a telephone loop which is used by the device, to prevent over loading. The load number is 5. The termination on a loop may consist of any combination of devices subject only to the requirement that the total of the load numbers of all the devices does not exceed 100.
4 |
Konica Fax 9825 User’s Manual |

This digital apparatus does not exceed the Class A limits for radio noise emissions from digital apparatus set out in the Radio Interference Regulations of the Canadian Department of Communications.
Cet appareil numérique est conforme aux limites d’émission de bruits radioélectriques pour les appareils de classe A stipulées dans le Règlement sur le brouillage radioélectrique du ministère des Communications du Canada.
Australian Certification
♦The CE will not cause harm or damage to a PTN if any of the following events occurs, or a consequential event occurs:
(a)failure or partial failure of any mechanical or electrical component in the CE; or
(b)failure or partial failure of any power supplies to the CE (including both an AC mains supply and a local battery supply); or
(c)incorrect manual operation of the CE; or
(d)operation of the CE outside the operating range of voltage and environmental conditions specified by the manufacturer.
♦The line cord and plug meet the requirements of TS008 [5].
♦This device may be subject to ringing or bell tinkle when calls are made from another device on the same line.
New Zealand Certification
Pursuant to PTC 200 clause 2.2, this equipment has been tested and found to comply with PTC 101 Parts A & B. Software revision level 1.30, residing in U12, was used during the testing and evaluation of the equipment.
Pursuant to PTC 200 clause 8.1.7, this equipment shall not be set up to make automatic calls to the telecom “111” Emergency Service. Neither should this equipment, under any circumstances, be used in any way that may constitute a nuisance to other Telecom customers. Pursuant to clause 7.5.2(4), this device may be subject to ringing or bell tinkle when calls are made from another device on the same line. If this occurs, the problem SHOULD NOT be referred to the Telecom Faults Service. This equipment does not perform LD dialling as Telecom now “strongly discourages decadic signalling” (c5.4.1(1)).
Pursuant to PTC 200, clause 5.6.5(3), access to the PSTN from a Centrex extension usually involves the use of a prefix digit ‘1’ in exactly the same way as that commonly used on PABX extensions. Regarding Non-code Access, users should be aware that the number displayed on the ‘header’ of the fax transmission may not be identical to that of the originator due to the ‘non-code access’ facility provided by some carriers (see also clause 5.6.3).
Notices Operating
5

Safety
Safety
Installation Hints
♦Install your Konica Fax 9825 in a dust-free location away from direct sunlight.
♦Do not plug your Konica Fax 9825 into a power source shared by noise-producing equipment (i.e., air conditioners, etc.).
♦Leave electronic adjustments to authorized service personnel.
Toner Cartridge and Image Drum Unit Handling
♦Leave unused toner cartridges and image drum units in their packages until needed. When replacing a cartridge or unit, re-use the packaging to dispose of the old cartridge or unit.
♦Do not expose these components to light for long periods of time. Never expose the green drum (inside the electrophotographic image drum unit) to direct sunlight.
♦Always hold the image drum unit by the ends - never by the middle. Never touch the green drum inside the unit.
♦Use care when removing the toner cartridge. Do not let it touch your clothing or porous materials. The toner powder can cause permanent stains.
♦Small amounts of toner can be readily removed with soap and cold water. Using heated water will make removing the toner much more difficult.
Toner First Aid Measures
EYE: Flush eyes with plenty of water. If symtoms occur, get medical attention.
SKIN: Wash with water and mild soap.
INGESTION: Wash out mouth with water. Drink one or two glasses of water. If symptoms occur, get medical attention.
INHALATION: Remove victim to fresh air. If symptoms occur, get medical attention.
Operation and Maintenance
♦Use a dry cloth to clean the control panel and the main body of the unit.
♦Do not lubricate moving parts yourself.
♦Pull out the AC plug before trying to remove any objects that may have fallen into the machine.
♦Immediately disconnect the Konica Fax 9825 if it becomes physically damaged and arrange for its repair or disposal.
6 |
Konica Fax 9825 User’s Manual |

Safety
♦When relocating your Konica Fax 9825, always disconnect the telephone line before disconnecting the power cord; then reconnect the power cord.
♦This machine is not intended to be used in parallel with any other telephone devices.
European Safety Instructions
1 |
Carefully read all of these instructions. |
|
|
2 |
Save instructions for later reference. |
|
|
3 |
Follow all warnings and instructions which are marked on the product. |
|
|
4 |
Unplug this product from the main power and telephone line socket before |
|
|
|
cleaning. Use only a damp cloth for cleaning, no solvents or aerosols. |
|
|
5 |
Do not use this product near water, wet locations or outdoors. |
|
|
6 |
Do not place this product on an unsuitable stand or table. The product could fall |
|
|
|
causing personal injury or serious damage to the machine. |
|
|
7 |
Do not cover any slots or openings used for ventilation. Do not place the product |
|
|
|
near a heater. |
Operating |
|
8 |
This product should be operated from the type of power source indicated on the |
||
|
|||
|
marking label. If you are not sure of the type of power available, consult your dealer |
|
|
|
or local electricity board or power company. |
|
|
9 |
This product is equipped with a 3-wire grounding plug (i.e. a plug having a third |
|
|
|
grounding pin). This plug will only fit into a grounding (earth) type power outlet. This |
Notices |
|
|
is a safety feature. If you are unable to insert the plug into the outlet, contact your |
||
|
|
||
|
electrician in order to replace your obsolete socket. You risk electric shock if you |
|
|
|
attempt to defeat the purpose of an earthed plug. |
|
|
10 |
Do not allow anything to rest on the power cord. Do not locate this product where |
|
|
|
persons will walk on the cord. |
|
|
11 |
If an extension cord is used with this product, make sure that the total ampere |
|
|
|
ratings on the products plugged into the extension cord does not exceed the exten- |
|
|
|
sion cord ampere rating. Also, make sure that the total current of all products |
|
|
|
plugged into the wall or floor socket does not exceed the socket rating. |
|
|
12 |
Never push objects of any kind into the product through cabinet slots as they may |
|
|
|
touch dangerous voltage points or short out parts that could result in risk of fire or |
|
|
|
electric shock. Never spill liquid of any kind on the product. |
|
|
13 |
Do not attempt to service this product yourself, as opening or removing covers may |
|
|
|
expose you to dangerous voltage points or other risks. Refer all machine mainte- |
|
|
|
nance to authorized service personnel. |
|
|
14 |
Use of an extension cord with this machine is not recommended or authorized. |
|
|
|
Users should check building codes and insurance requirements if an extension |
|
|
|
cord is to be used. |
|
|
15 |
Never remove any covers of guards that require a tool for removal. There are no |
|
|
|
operator serviceable areas within these covers. |
|
7

Safety
16Unplug this product from the main power and telephone line sockets, and refer servicing to qualified service personnel under the following conditions:
♦When the main power cord is frayed or the plug is damaged.
♦If liquid has been spilled into the product.
♦If the product has been exposed to rain or water.
♦If the product does not operate normally when the operating instructions are followed. Adjust only those controls that are covered by the operating instructions since improper adjustments of those controls may result in damage and will often require extensive work by a qualified technician to restore the product to normal operation.
♦If the product has been dropped or the cabinet has been damaged.
♦If the product exhibits a distinct change in performance, indicating a need for service.
WARNING: During normal operation, this machine will produce ozone gas. The amount of ozone does not present a hazard to the operator. However, it is advisable that the machine be operated in a well ventilated area.
CAUTION: Replace batteries only with the same or equivalent type recommended by the manufacturer. Dispose of used batteries according to the manufacturer’s instructions.
CE Mark
The Konica Fax 9825 complies with the EU recommendations covering the CE mark. More specifically it complied with the following standards:
EN55022 |
EN50082-1 |
EN60950 |
EN41003 |
following the provisions of Low Voltage Directive 73/23/EEC and EMC 91/263/EEC
8 |
Konica Fax 9825 User’s Manual |

How to Use the Manual
This manual describes how to set up, operate and maintain the Konica Fax 9825. To ensure proper operation, be sure to become familiar with the contents of this manual before using the machine.
Information about the different functions of the Konica Fax 9825 are grouped together in this manual. Some functions are covered by a single chapter, others by a number of chapters.
Part 1: Getting Started covers installation and setup and provides an overview of the Konica Fax 9825.
Part 2: Copying explains how to copy documents using the Konica Fax 9825.
Part 3: Faxing explains how to send and receive faxes. In addition, it explains how to use the phonebook, polling, mailboxes, and reports about faxing and machine status.
Part 4: PC Connectivity explains how to use the Konica Fax 9825 with a PC as a printer, scanner, and PC fax machine.
Part 5: Supervisor Functions covers functions that can be made accessible only to a supervisor.
Part 6: Technical Information provides troubleshooting techniques and technical information about the machine.
When procedures in this manual instruct you to enter data, press the keys on the control panel keypad to enter the characters. When a procedure instructs you to press a specific key, that key is called out in bold letters. For example, a procedure step may instruct you to “Press Menu”.
Italic text denotes references to sections of the manual.
All Special Information Notes will be in italics and will appear with the checkmark symbol.
9

The LCD panel displays information for the user. This manual presents displayed information as a sample of what you may experience.
Here is an example of an LCD display:
_______Time________
Time display: ¾12 Hour
Press Æ, then ENTER
When entering data into the LCD window you may be instructed to use the Å or Æ keys which are located directly beneath the LCD window. You will use these keys to toggle certain menu selections.
FastAccess
When a particular menu feature or option is described throughout the manual it will be accompanied by a FastAccess code. This code simply represents the sequential key actions needed to access that particular menu.
For example, the FastAccess code to access the Fax Phonebook menu to add an Individual phone number is M231. The M stands for the Menu key. To use this code you would press the Menu key then enter the number sequence 231 on the numeric keypad.
10 |
Konica Fax 9825 User’s Manual |

Chapter 1
Installing and Setting up
the Machine
This chapter includes the basic procedures for setting up the machine.
Where to Install
Factors to consider when selecting the area in which you wish to set up the Konica Fax 9825 are shown below:
♦Install your machine in a dust-free location away from direct sunlight.
♦Be sure to allow several inches on each side of the fax machine to ensure adequate ventilation.
♦Make sure that both power and telephone outlets are available nearby.
♦Make sure that the PC which will be connected is nearby.
♦Choose an area where the humidity is between 20% and 80%, and where the temperature is between 10C/50F and 32C/90F.
11
Installing and Setting up the Machine
Unpacking
Unpacking
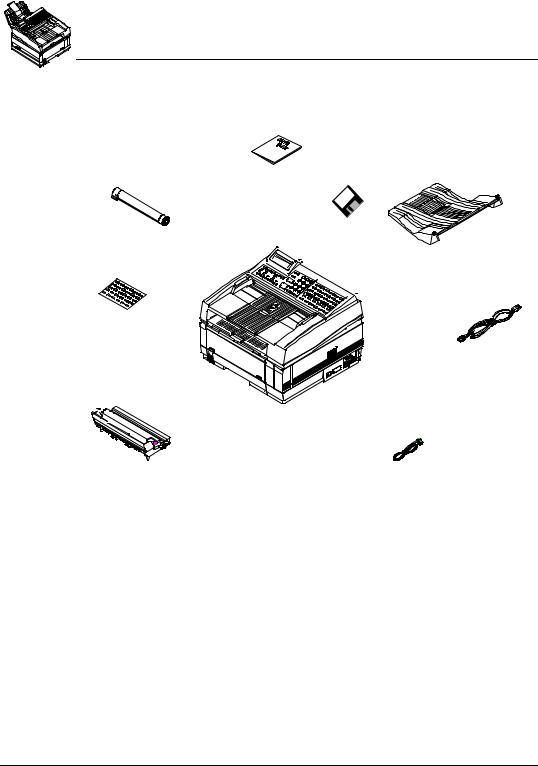
When unpacking the equipment, you should find the following items:
Konica Fax 9825 User Manual (this manual)
Konica Fax Toner
Cartridge
2 Disks for PC
Connectivity Document
Stacker
Power Cord
One-Touch
Labels (2)
Konica Fax 9825
Multifunction Machine
Image Drum Unit
(installed in machine)
Telephone Cord
♦Konica Fax 9825 Multifunction Machine
♦Konica Fax 9825 User Manual (this manual)
♦Image Drum Unit (installed in machine)
♦Konica Fax Toner Cartridge
♦Document Stacker
♦Power Cord
♦Telephone Cord
♦2 Disks for PC Connectivity
♦One-Touch Labels (2)
12 |
Konica Fax 9825 User’s Manual |
Installing and Setting up the Machine
What You May Need To Install
What You May Need To Install
If you wish to use the Konica Fax 9825 for PC printing, PC faxing, or scanning to the PC, you will need to provide a parallel cable. This cable should be less than 10 feet in length with a Centronics connector at one end (the Konica Fax 9825 end) and normally a 25-pin male connector at the other end (PC end).
Konica Fax 9825 Backup Batteries
One coin-cell battery (3 volts) backs up the user definable settings and is known as the SRAM battery. This battery should last for the life of the machine.
The Konica Fax 9825 protects the document memory for up to one hour during a power outage or if you need to turn off the machine for any reason. There is an optional battery that protects the document memory for 72 hours. Contact a service technician for assistance if you want the optional battery installed.
Setting up the Konica Fax 9825
Here is a checklist when setting up the Konica Fax 9825 for the first time.
Toner Cartridge Handling
Be careful when handling the toner cartridge. Toner is the black powder which acts as ink for the Konica Fax 9825. Do not let toner spill onto your clothing or other porous materials. If you do spill toner, small amounts can be removed from skin or clothing with soap and cold water. Never try to remove toner with hot water, as this may cause the toner to bond to clothing or skin. .
1Ensure that the power switch is set to the OFF position (the 0 should be pressed down.
2Plug the power cord into the power outlet on the back of the unit. Then plug the unattached end of the power cord into a grounded AC power outlet.
3To install the fax phone line, insert one end of the telephone cord into the LINE terminal located on the back of the unit. Then insert the unattached end of the telephone cord into your wall telephone jack.
If you want to connect a telephone answering machine on the same line, see the "Telephone Line Connections" section on page 21.
1
13
Installing and Setting up the Machine
Setting up the Konica Fax 9825
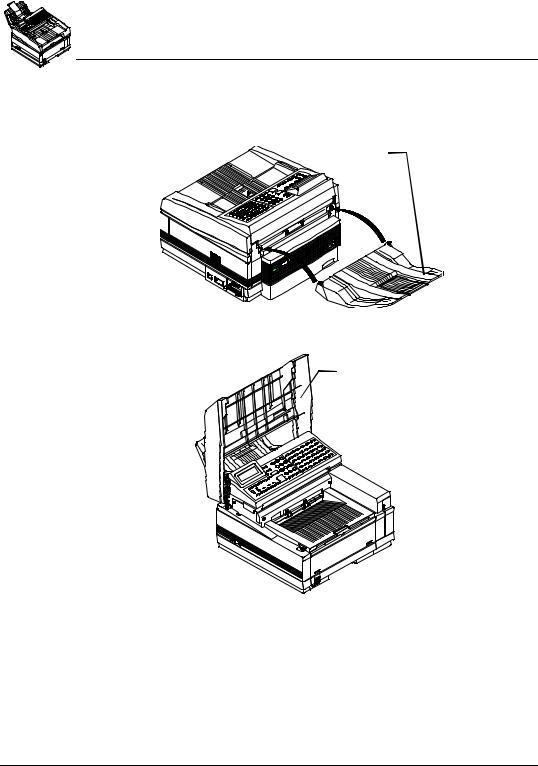
4Attach the document stacker to the rear of the unit, above the LINE and TEL jacks. Slip the document stacker indents over tabs on the unit. You should feel the document stacker lock into place.
Document |
Stacker |
5 Lift the document table until it snaps into an upright position.
Document table
14 |
Konica Fax 9825 User’s Manual |

Installing and Setting up the Machine
Setting up the Konica Fax 9825
6Using your index fingers, push in the cover release buttons on the side of the copy stacker until you hear a click. Then lift the copy stacker.
Document
Table
Copy Stacker
Release
Buttons
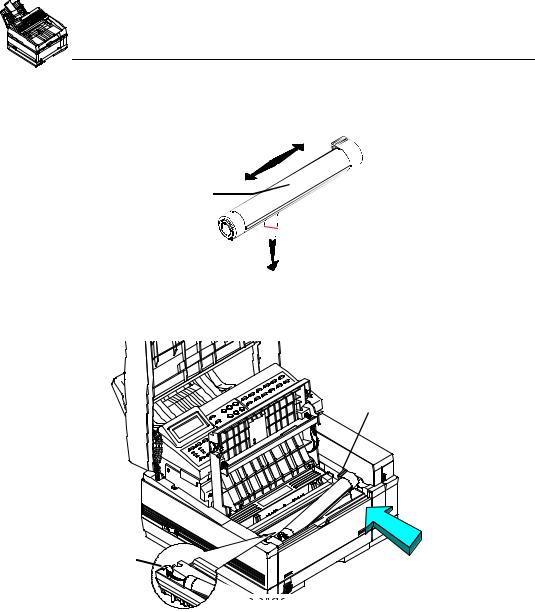
7 Remove the protective foam cylinder from the toner well in the image drum |
1 |
|
unit. |
||
|
15
Installing and Setting up the Machine
Setting up the Konica Fax 9825
8Remove the toner cartridge from its sealed pack and gently shake it from side to side to ensure even distribution of the toner. Then carefully peel the white plastic tape from the bottom of the toner cartridge.
Shake the toner cartridge
from side to side


 Remove the tape
9With the ridged side facing up and the blue lever on your right, insert the toner cartridge into the image drum unit. Slide the left end of the cartridge in first, then lower the right end into place.
 Push Blue Lock Lever in direction of arrow
to lock in place
Tab
|
10 |
|
|
|
|
|
|
|
|
|
|
|
|
|
|
|
|
|
|
|
|
|
|
|
|
|
|
|
|
|
|
|
|
|
|
|
|
|
|
|
Once the toner cartridge is in place, push the blue lever all the way forward |
||||||||
|
|
(towards the control panel) until it stops to secure it and release the toner. |
|||||||
|
11 |
Close the copy stacker and push down until you hear the copy stacker click |
|||||||
|
|
into place. Be sure that the cover latches on both sides. |
|||||||
|
|
If the copy stacker does not close completely, check to make sure that the |
|||||||
|
|
blue lock lever is rotated all the way to the back so that the key on the |
|||||||
|
|
bottom of the copy stacker fits squarely in the notch of the blue lever. |
|||||||
|
|
|
|
|
|
|
|
|
|
16 |
Konica Fax 9825 User’s Manual |
||||||||

Installing and Setting up the Machine
Loading Paper
12Close the document table.
13If you have the optional second paper cassette, see the "Installing the Second Paper Cassette" section on page 23.
14If you want to use the Konica Fax 9825 with a PC for printing, faxing, or scanning, using a parallel cable, connect an available parallel (LPT) port on the PC to the parallel connector on the right side of the Konica Fax 9825. See the "Installing the software applications" section on page 130 for more information.
15Turn the power switch ON (the 1 should be pressed down). Your Konica Fax 9825 will turn on and begin warming up.
After cycling through the startup routines the menu will display the standby mode screen. If you encounter any error messages during the startup routine, see the "Messages" section on page 176.
Loading Paper
Most types of paper will work well in your machine, although some variables in paper composition may affect print quality. Most high-grade photocopying papers produce good results. The majority of cotton bond papers also yield excellent results. Test paper you plan to use in the Konica Fax 9825 before purchasing it in large quantities.
Many papers have a correct side for printing. For the best print quality, check the label on the end of the ream before removing the paper from the ream. The correct side may be indicated by an arrow, symbol or wording. Insert the number of sheets you wish to use with the correct side of the paper facing the rear of the machine.
To load paper in the paper tray:
1Pull the paper cassette completely out of the Konica Fax 9825.
2If needed, lift the top paper adjuster, while sliding it up or down, to adjust the paper length. The paper should not have room to slide back and forth.
3If necessary, move the side adjusters back and forth to adjust the paper width. The paper should not have room to slide from side to side.
4Place the paper in the cassette. Do not fill past the spring clip on the front end of the cassette. Push the paper under the plastic tabs on the paper width adjusters.
5Slide the paper cassette all the way back into your Konica Fax 9825.
6The red indicator on your paper cassette indicates how much paper you have remaining.
17
1

Installing and Setting up the Machine
Loading Paper
Programming the Machine ID
FastAccess: M52
The machine identification is printed at the top of each transmitted page and identifies your machine to the remote fax machine.
The machine identification must be entered prior to transmitting a document. The machine number must identify the telephone number of your machine or company. The machine name must identify the person or company sending the document. The ID number and name can contain up to 20 characters each.
To program the machine ID:
1Press Menu.
2Press 5 to select the Supervisor menu.
3Press 2 to select the Fax ID number menu option. You will first see the following display:
___Fax_ID_number___
Enter phone number:
¾ __________________
Include area code
4Use the numeric keypad to enter the machine telephone number. Include your local area code as part of the number. You may enter up to 20 characters.
5Press Enter when you have finished typing the number.
___Fax_ID_number__ Enter company name: >_ _ _ _ _ _ _ _ _ _ _
Letters on ONE TOUCH
6Use the One-Touch Alphanumeric keypad to enter your company name (or the machine name if your company has multiple fax machines). You may enter up to 32 characters. You can use the Shift key to type lowercase letters.
7When all the characters have been selected for the name, press Enter.
8You can select another option or press Stop to go to standby.
18 |
Konica Fax 9825 User’s Manual |

Installing and Setting up the Machine
Loading Paper
Setting the Date and Time
FastAccess: M51
The time can be displayed using a 12-hour or a 24-hour format. The date format for North America is MM-DD-YY HH:MM; the format for Europe and South America is DD-MM-YY HH:MM. Use the following procedure to set the date and time:
1Press Menu.
2Press 5 to select the Supervisor menu.
3Press 1 to select Time menu option.
_______Time_______
Time display ¾ 12 Hour
Press Æ, then ENTER
4Press Æ until the desired time format displays: 12 Hour or 24 Hour.
5Press Enter.
_______Time_______
Date/time:
¾ 00-00-00 00:00PM Enter date and time
6Use the numeric keypad to enter the date and time. Press Æ until AM or PM is selected.
7Press Enter.
8You can select another option or press Stop to go to standby.
19
1

Installing and Setting up the Machine
Loading Paper
Setting the Receive Timestamp
FastAccess: M55
Default = ON
The local header is printed at the top of received faxes if the header option is on. This header prints above the remote machine header. The local header includes the date, time and page count of the received fax, plus the local and remote machine identification. Use this procedure to set the receive header:
1Press Menu.
2Press 5 to select the Supervisor menu.
3Press 5 to select the Timestamp menu option.
____Timestamp_____
Timestamp ¾Yes
Press Æ, then ENTER
4Press Æ until the desired setting displays: Yes or No.
5Press Enter.
6You can select another option or press Stop to go to standby.
Selecting the Language
FastAccess: M56
This feature allows you to change the language for the display messages and reports. Use the following procedure to select the desired language:
1Press Menu.
2Press 5 to select the Supervisor menu.
3Press 6 to select the Language menu option. If your machine supports more than one language then the following window will display. If your machine supports only one language then pressing 6 will have no effect.
_____Language_____
Language ¾English
Press Æ, then ENTER
4Press Æ repeatedly to select an alternate language.
5When the desired language displays, press Enter.
6You can select another option or press Stop to go to standby.
20 |
Konica Fax 9825 User’s Manual |
Installing and Setting up the Machine
Telephone Line Connections
Telephone Line Connections
The Konica Fax 9825 is intended to be used either as a stand-alone fax and convenience copier, or with a personal computer running the Windows operating system.
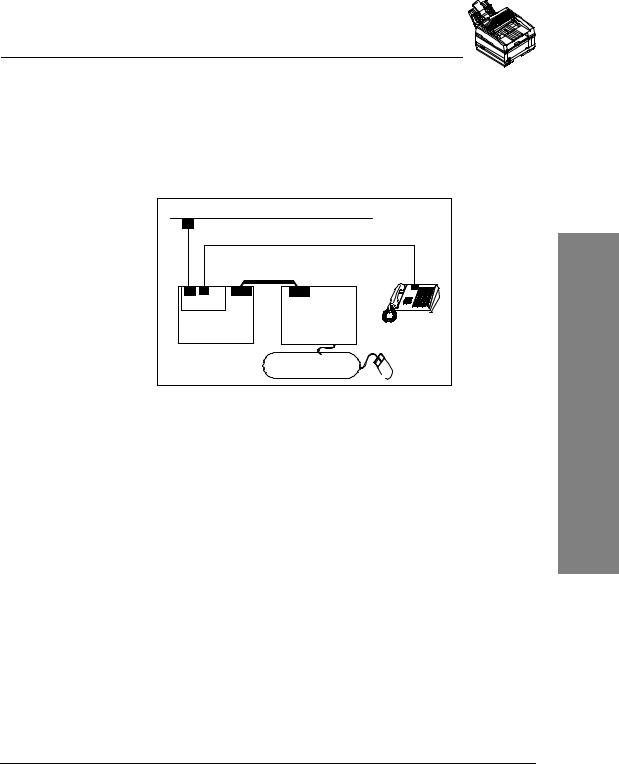
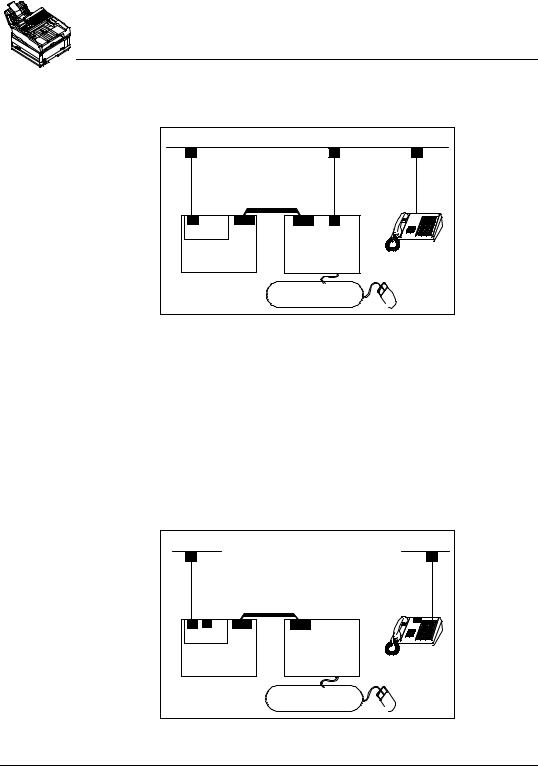
If you want to use the Konica Fax 9825 with a computer and an answering machine, you should connect the devices as shown here (in the USA).
S h ared L in e
P arallel C able
L in e |
Te l |
Konica Fax 9825 |
P C |
Telephone/ |
|
|
|
|
|
A nsw ering |
|
|
M ach ine |
In this configuration, set the telephone answering machine to answer on the lowest number of rings. Set the Konica Fax 9825 to answer on the next highest number of rings. For example, if your answering machine answers on 4 rings, set the Konica Fax 9825 to answer on 5 rings. (See the "Receiving Faxes Automatically" section on page 77.)
The Konica Fax 9825 will monitor all calls answered on the line. If it detects a fax tone, the Konica Fax 9825 disconnects the answering machine and sends the appropriate tones to receive the fax.
1
21
Installing and Setting up the Machine
Telephone Line Connections
For regulatory reasons in some countries outside the US, the Konica Fax 9825 does not have a TEL connector. In these countries, connect the devices as shown here: (You can also connect the devices this way in the US.)
S h ared L in e
Parallel C ab le
L in e |
Konica Fax 9825 |
P C |
Telephone/
A nsw ering
M ach ine
With this setup, the Konica Fax 9825 monitors incoming calls. If it detects a fax tone, it will try to receive the fax. However, if the answering device has already answered the call, the Konica Fax 9825 cannot disconnect the answering machine.
You can avoid this problem by using the distinctive ring capability and setting the Konica Fax 9825 to answer on a lower number of rings than other devices. The Konica Fax 9825 will answer only calls with the ring pattern for a fax and answer those calls before other devices. Distinctive Ring Service is supported in the United States only.
If you do not want to connect your answering machine to the Konica Fax 9825 and you do not have distinctive ring capability, you may connect separate voice and data lines as shown here.
S ep arate L in es |
|
|
Parallel Cable |
|
|
L in e Te l |
|
|
Konica Fax 9825 |
P C |
Telephone/ |
|
|
|
|
|
A nsw ering |
|
|
M ach ine |
22 |
Konica Fax 9825 User’s Manual |
Loading...