

Kia Optima 2006 Owner's Manual

GAS STATION INFORMATION
Gasoline
UNLEADED gasoline
Pump octane number of 87 or higher
Fuel Tank Capacity
17.2 gal. (65 liters)
Recommended Engine Oil
API service SJ, SL or above,
ILSAC GF-3 or above
Engine Oil Capacity with Filter
4-cyl.2400cc:4.5 qts. (4.3 liters)
V-6 2700cc:5.1 qts. (4.8 liters)
Engine Coolant
4-cyl.2400cc:A/T-6.9 qts. (6.5 liters)
M/T-6.7 qts. (6.3 liters)
V-6 2700cc:A/T-7.5 qts. (7.1 liters)
M/T-7.3 qts. (6.9 liters)
Tire Pressure (measured cold)
P205/60R15 : 30 psi
Compact SpareTire Pressure
60 psi
Manual Transaxle Oil
API GL-4, SAE 75W/85
Capacity : 2.2 qts. (2.1 liters)
Automatic Transaxle Fluid
Diamond ATF SP-III, SK ATF SP-III or
other brands meeting the SP-III specification approved by Kia Motors Corp.
Capacity : 8.2 qts. (7.8 liters)
Brake Fluid
FMVSS116 DOT-3 or DOT-4
Power Steering Fluid
PSF-IV

Kia,The Company
Congratulations! Your selection of a Kia was a wise investment. It will give you years of
driving pleasure. Now that you are the owner of a Kia vehicle, you’ll probably be asked a lot
of questions about your vehicle and the company like “What is a Kia?”, “Who is Kia?”, “What
does ‘Kia’ mean?”.
Here are some answers. First, Kia is the oldest car company in Korea. It is a company that has
thousands of employees focused on building high-quality vehicles at affordable prices.
The first syllable, Ki, in the word “Kia” means “to arise from to the world” or “to come up
out of to the world.” The second syllable, a, means “Asia.” So, the word Kia, means “to arise
from” or “to come up out of Asia to the world.”
Drive safely and enjoy your Kia!

Foreword
Thank you for choosing a Kia vehicle.
When you require service, remember that your
dealer knows your vehicle best. Your dealer has
factory-trained technicians, recommended special
tools, genuine Kia replacement parts and is
dedicated to your complete satisfaction.
Because subsequent owners require this important
information as well, this publication should
remain with the vehicle if it is sold.
This manual will familiarize you with operational,
maintenance and safety information about your
new vehicle. It is supplemented by a Warranty &
Consumer Information manual that provides
important information on all warranties regarding
your vehicle. If your vehicle is equipped with an
audio system, you will also receive a Kia
Integrated Audio System Manual. We urge you to
read these manuals carefully.
Kia offers a great variety of options, components
and features for its various models.
Therefore, the equipment described in this
manual, along with the various illustrations, may
not all be applicable to your particular vehicle.
The information and specifications provided in
this manual were accurate at the time of printing.
Kia reserves the right to discontinue or change
specifications or design at any time without notice
and without incurring any obligation. If you have
questions, always check with your Kia Dealer.
We assure you of our continuing interest in your
motoring pleasure and satisfaction in your Kia
vehicle.
© 2005 Kia Motors America, Inc.
All rights reserved. May not be reproduced or
translated in whole or in part without the written
consent of Kia Motors America, Inc.
Printed in Korea
TABLE OF CONTENTS
INTRODUCTION
YOUR VEHICLE AT A GLANCE
KNOWING Y OUR VEHICLE
DRIVING Y OUR VEHICLE
DRIVING TIPS
IN CASE OF AN EMERGENCY
MAINTENANCE
SPECIFICATIONS
CONSUMER ASSISTANCE
INDEX
1
2
3
4
5
6
7
8
9
10

INTRODUCTION
How To Use This Manual . . . . . . . . . . . . . . . . . . . . . . . .1-2
Vehicle Break-In Process . . . . . . . . . . . . . . . . . . . . . . .1-3
1
1-1
Introduction
HOW TO USE THIS MANUAL
We want to help you get the greatest possible driving
pleasure from your vehicle. Your Owner’s Manual can
assist you in many ways. For your safety and the
safety of your passengers, we strongly urge that
you read the entire manual. In order to avoid
death or injury, please review the W ARNING and
CAUTION sections contained throughout the
manual. The WARNING and CAUTION sections
are easily recognized by their special markings
listed on this page.
Illustrations complement the words in this manual to
best explain how to enjoy your vehicle. By reading
your manual, you will learn about features, important
safety information, and driving under various road
conditions.
The general layout of the manual is provided in the
Table of Contents. In addition, an alphabetical index
located at the back of the manual has been provided
for you reference.
Sections: This manual has nine sections plus an
index. Each section begins with a brief list of contents
to provide you with an overview of what
in that section.
is contained
You will find various WARNING’s, CAUTION’s,
and NOTICE’s in this manual. These
WARNING’s, CAUTION’s and NOTICE’s are
provided to enhance your safety and continued
satisfaction with your Kia vehicle. You should
carefully read and follow ALL procedures and
recommendations provided in these WARNING’s,
CAUTION’s and NOTICE’s.
WARNING
A WARNING indicates a situation in which
severe bodily injury or death is likely if
the warning is ignored.
CAUTION
A CAUTION indicates a situation in which
injury, could result if the caution is ignored.
✽✽
NOTICE
A NOTICE indicates a situation in which
damage to your vehicle could result if the
notice is ignored.
1-2

VEHICLE BREAK-IN PROCESS
No special break-in period is needed. By following
a few simple precautions for the first 600 miles (1
000 km) you may add to the performance,
economy and life of your vehicle.
• Do not race the engine.
• Do not maintain a single speed for long periods
of time, either fast or slow. Varying engine
speed is needed to properly break in the
engine.
• Avoid hard stops, except in emergencies, to
allow the brakes to seat properly.
• Avoid full-throttle starts.
1-3

YOUR VEHICLE AT A GLANCE
Interior and Exterior Overview . . . . . . . . . . . . . . . . . . .2-2
Instrument Panel Overview . . . . . . . . . . . . . . . . . . . . .2-3
2
2-1
Your Vehicle At A Glance
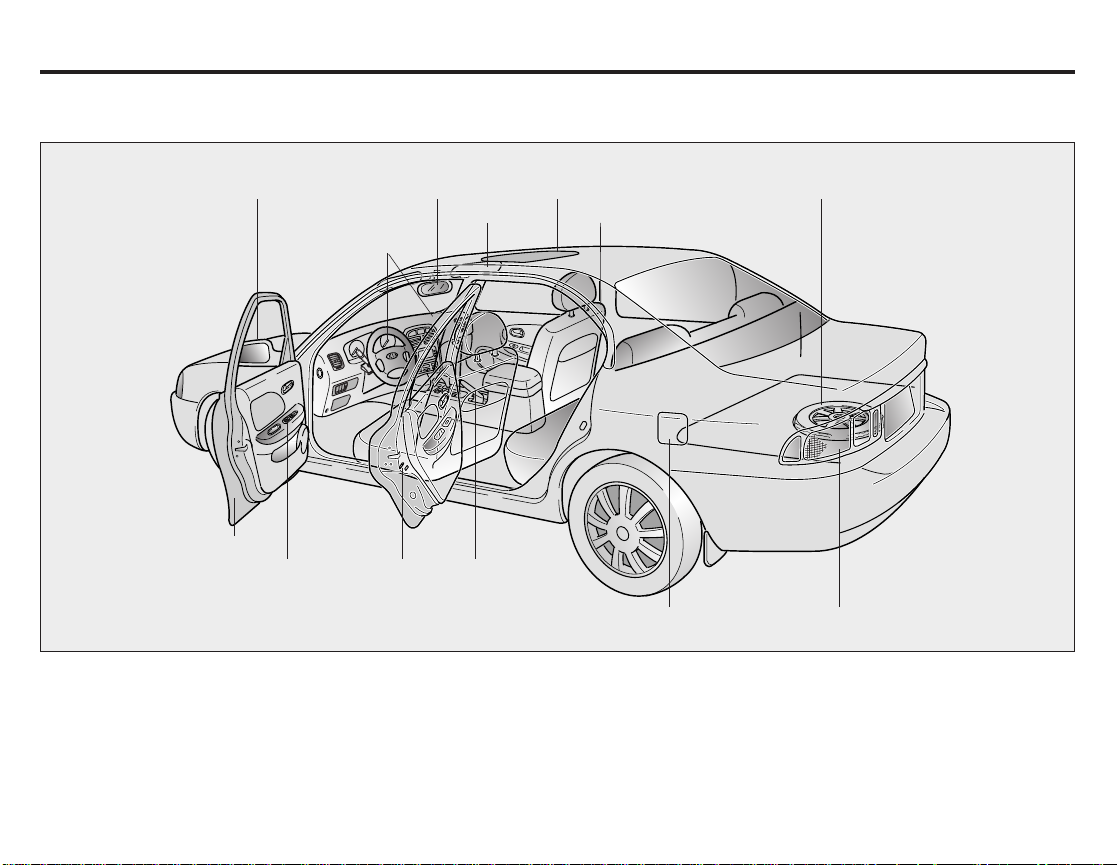
INTERIOR AND EXTERIOR OVERVIEW
Outside rearview mirror
Door
Power window switches
(If Equipped)
Rearview mirror
Air bags
Rear door child
safety lock
Sunroof (If Equipped)
Sunvisor
Parking brake
Seat
Fuel filler lid
Spare tire
Taillamp
MMSA2001
2-2
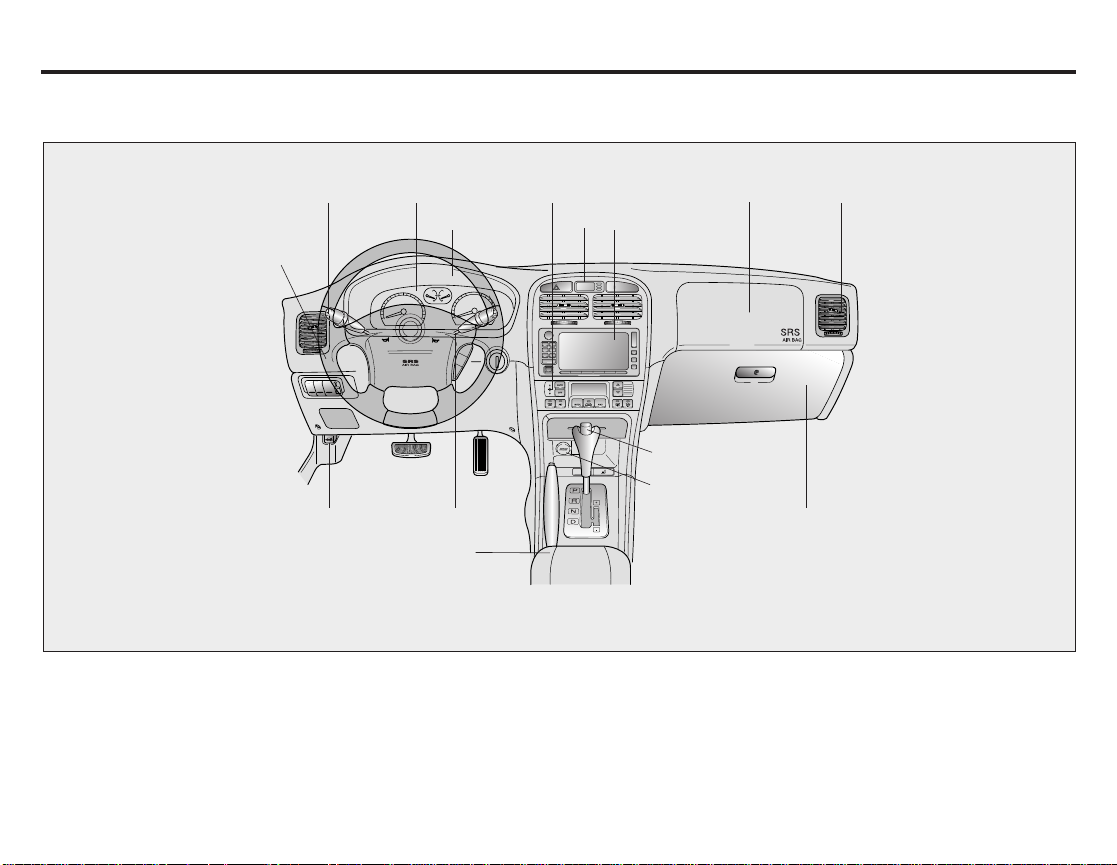
INSTRUMENT PANEL OVERVIEW
RES
ACCEL
CANCEL
COAST
SET
Steering wheel
Hood release
Instrument clusterLight control/Turn signals
Wiper/Washer
Parking brake
Air bag
Climate control
Clock
Radio
Shift lever (Automatic)
Power outlet
Air bag
Vent
Glove box
MMSA2002
2-3

KNOWING Y OUR VEHICLE
Keys . . . . . . . . . . . . . . . . . . . . . . . . . . . . . . . . . . . . . . . 3-2
Keyless Entry System . . . . . . . . . . . . . . . . . . . . . . . . . 3-3
Door Locks . . . . . . . . . . . . . . . . . . . . . . . . . . . . . . . . . . 3-5
Windows . . . . . . . . . . . . . . . . . . . . . . . . . . . . . . . . . . . . 3-9
Front Seat . . . . . . . . . . . . . . . . . . . . . . . . . . . . . . . . . . 3-12
Rear Seat. . . . . . . . . . . . . . . . . . . . . . . . . . . . . . . . . . . 3-22
Safety Belts. . . . . . . . . . . . . . . . . . . . . . . . . . . . . . . . . 3-25
Air Bag - Supplemental Restraint System . . . . . . . . . 3-56
Trunk Lid. . . . . . . . . . . . . . . . . . . . . . . . . . . . . . . . . . . 3-68
Hood . . . . . . . . . . . . . . . . . . . . . . . . . . . . . . . . . . . . . . 3-71
Fuel Filler Lid . . . . . . . . . . . . . . . . . . . . . . . . . . . . . . . 3-73
Steering Wheel . . . . . . . . . . . . . . . . . . . . . . . . . . . . . . 3-76
Mirrors. . . . . . . . . . . . . . . . . . . . . . . . . . . . . . . . . . . . . 3-78
Interior Lights . . . . . . . . . . . . . . . . . . . . . . . . . . . . . . . 3-82
Cup Holder . . . . . . . . . . . . . . . . . . . . . . . . . . . . . . . . . 3-84
Sunglass Holder . . . . . . . . . . . . . . . . . . . . . . . . . . . . . 3-85
Console Storage Compartment . . . . . . . . . . . . . . . . . 3-85
Sunroof . . . . . . . . . . . . . . . . . . . . . . . . . . . . . . . . . . . . 3-87
Antenna . . . . . . . . . . . . . . . . . . . . . . . . . . . . . . . . . . . . 3-90
Luggage Net . . . . . . . . . . . . . . . . . . . . . . . . . . . . . . . . 3-93
3
3-1

Knowing Y our Vehicle
50063
KEYS
Key Code
MMSA3070
The key code number is stamped on the plate
attached to your key set. Should you lose your
keys, this number will enable an authorized Kia
dealer to duplicate your keys easily. Remove this
plate from the key ring and store it in a safe
place. Also, record the code number and keep it
in a safe and handy place, but not in the vehicle.
WARNING - Ignition Key
Leaving children unattended in a vehicle
with the ignition key is dangerous even if
the key is not in the ignition. Children
could place the key in the ignition and
operate the power windows or other
controls, leading to a serious accident.
Never leave a child alone in the vehicle,
with or without keys.
Leaving your sub key with a parking attendant will
ensure that your vehicle’s trunk, trunk lid release,
glove box compartment and rear trunk access
may not be unlocked in your absence.
CAUTION
Use only Kia original parts for the ignition key
in your vehicle. If an aftermarket key is
used, the ignition switch may not return to
ON after START. If this happens, the starter
will continue to operate causing damage to
the starter motor and possible fire due to
excessive current in the wiring.
3-2
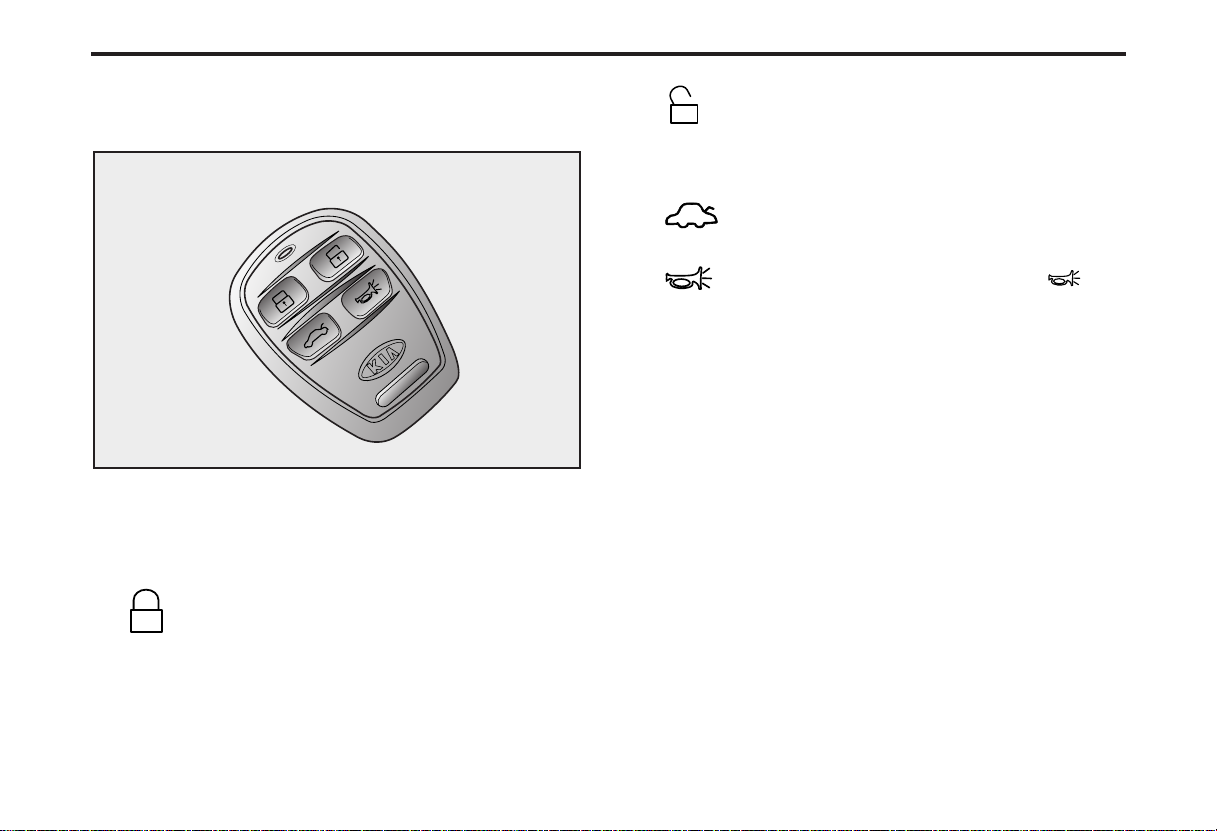
KEYLESS ENTRY SYSTEM
(IF EQUIPPED)
MMSA3067
You can also lock or unlock the door and open
the trunk from outside with the keyless
transmitter.
• To lock the door, press this button once.
(Hazard flasher lights are turned on
once for about one second.)
• To unlock the driver ’s door, press this
button once. (Hazard flasher lights flash
twice.) To unlock the other doors, press
this button twice within three seconds.
• To open the trunk, press this button.
• If you depress the panic button ( ) on
the transmitter, the horn will sounds and
hazard lamp will flash.
The transmitter will not work if any of the following
occur:
• Ignition key is in the ignition switch.
• The transmitter battery is discharged.
• The operational distance 15 feet (5 meters) is
exceeded.
• The weather is very cold or when there are
other vehicles or objects around the vehicle.
When the transmitter does not work correctly, open
and close the door with the ignition key. If you have
a problem with the transmitter, contact an Authorized
Kia Dealer.
3-3
Knowing Y our Vehicle
This device complies with Part 15 of the FCC
rules. Operation is subject to the following two
conditions:
1. This device may not cause harmful interference,
and
2. This device must accept any interference
received, including interference that may cause
undesired operation.
WARNING
Changes or modifications not expressly
approved by the party responsible for
compliance could void the user's
authority to operate the equipment.
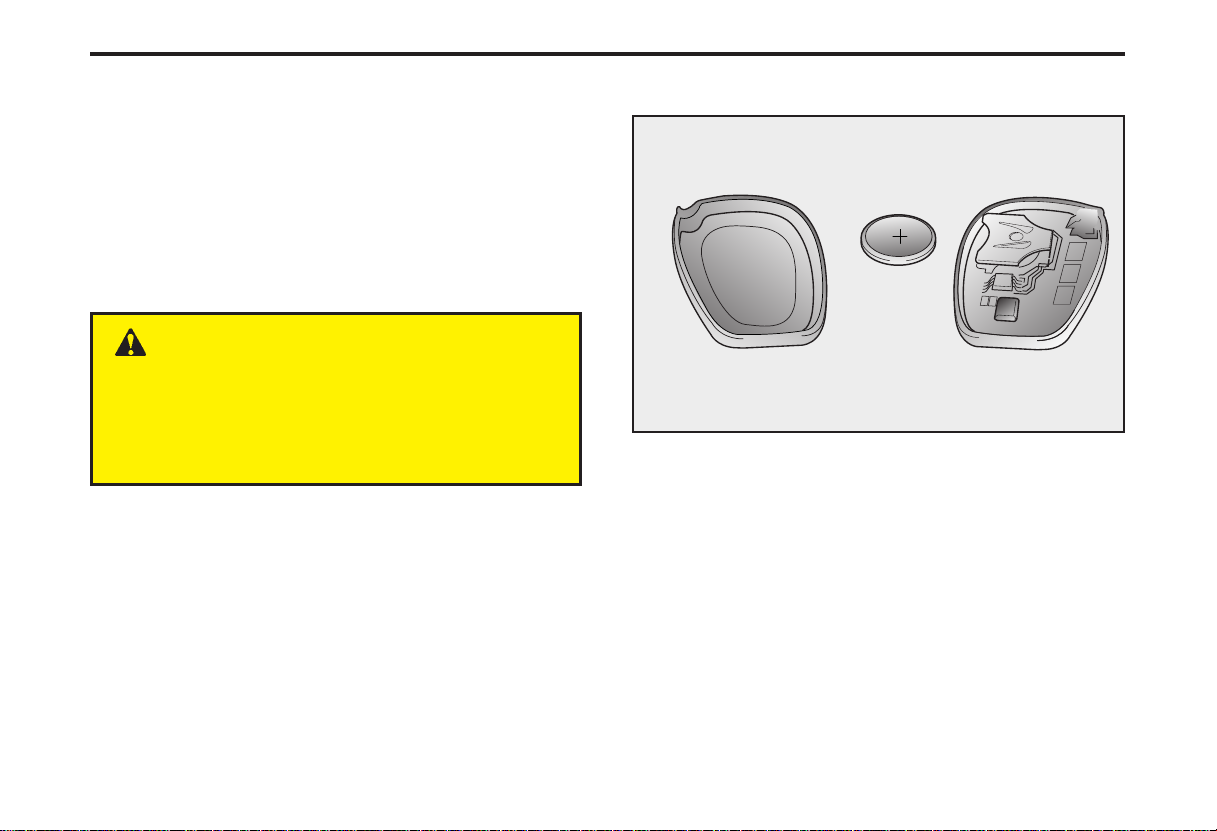
Battery replacement
MMSA3068
Transmitter uses a 3 volt lithium battery which will
normally last for several years.
3-4
When replacement is necessary, use the following
procedure.
1.Using a screwdriver, loosen the screw on the
backside of the transmitter then use a thin tool
to pry open the transmitter.
2.Disassemble the transmitter and remove the
battery.
3.Make sure the battery positive “(+)” symbol
faces up as indicated in the illustration.
CAUTION
Using the wrong battery can cause the
transmitter to malfunction. Be sure to use the
correct battery.
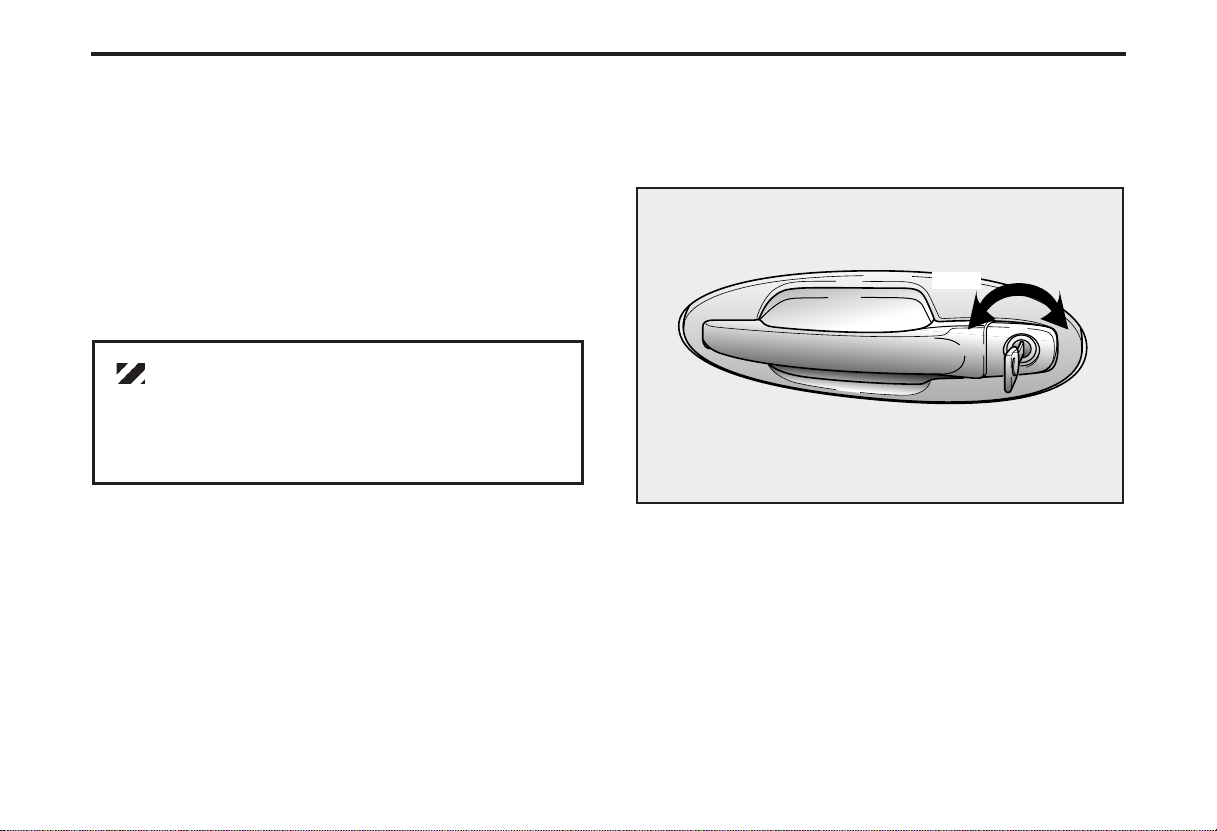
DOOR LOCKS
Automatic Door Locks
Operating Door Locks - With the Key
LOCK
• Both front doors can be locked and unlocked
with the key.
• Turn the key to the left to lock and to the right
to unlock the door.
• Once a door is unlocked, it may be opened by
pulling the door handle.
UNLOCK
MMSA3001
3-5
Knowing Y our Vehicle
Operating Door Locks - Without the Key
MMSA3002
To lock a door without the key, push the inside door
lock button to the “LOCK” position and close the door.
✽✽
NOTICE
Always remove the ignition key, engage the
parking brake, close all windows and lock all
doors when leaving your vehicle unattended.
Two Turn Unlock System
At the driver’s door, if you would unlock the other
doors, you must turn the key to the right twice within
3 seconds, but all for doors can be locked by turn the
key once.
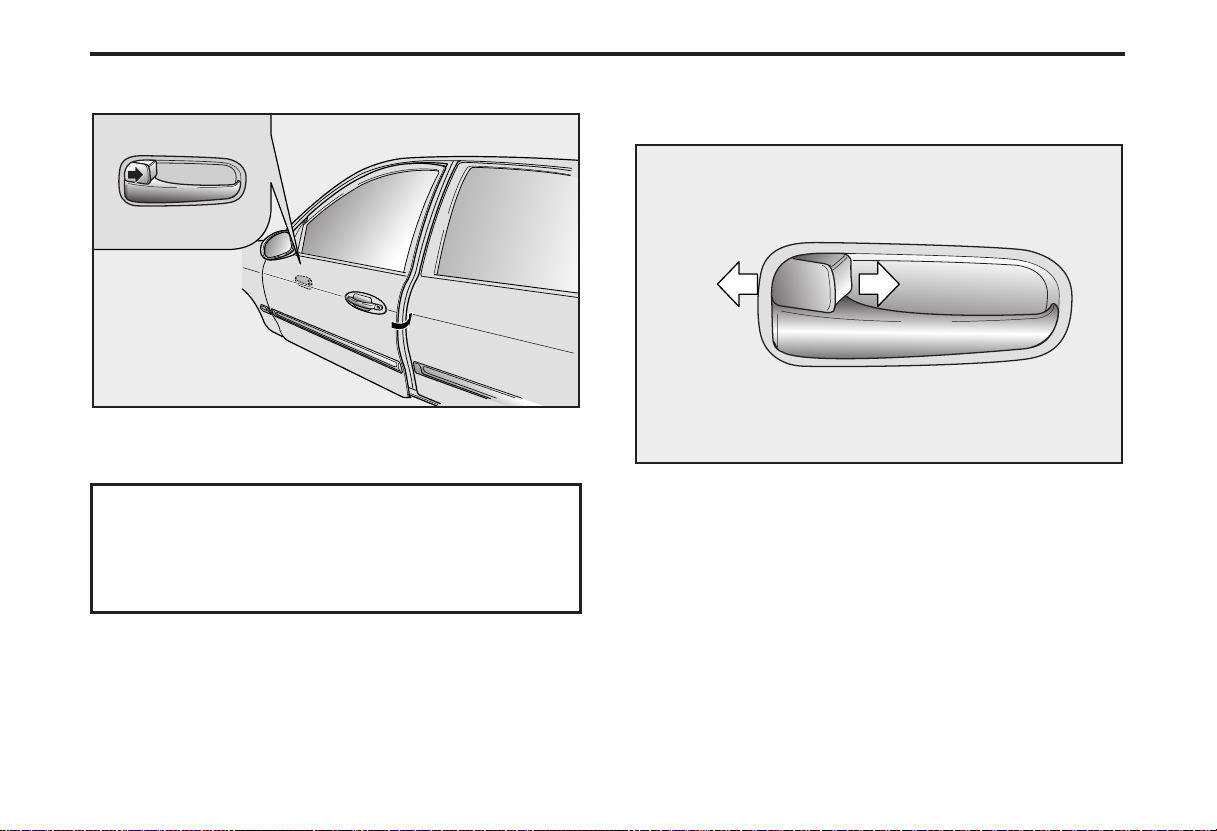
Operating Door Locks From
Inside the Vehicle
UNLOCK
• To lock a door, push the door lock button to the
“LOCK” position.
• To unlock a door, push the door lock button to
the “UNLOCK” position.
• To open a door, pull the door handle outward.
LOCK
MMSA3003
3-6
Central door locks (if equipped)
UNLOCK
The central door locking switch is located on the
driver’s arm rest. It is operated by depressing the
door lock switch. If any door is open when the
switch is depressed, the door will remain locked
when closed.
LOCK
MMSA3004
✽✽
NOTICE
• When pushing the front portion of the driver’s
door lock switch, all vehicle doors will lock.
• When pushing the rear portion of the switch,
all vehicle doors will unlock.
W ARNING
Leaving your vehicle unlocked can invite
theft or possible harm to you or others
from someone hiding in your vehicle
while you are gone. Always remove the
ignition key, engage the parking brake,
close all windows and lock all doors when
leaving your vehicle unattended.
3-7
Knowing Y our Vehicle
The door ajar warning light will illuminate when a
door is not fully closed. Close the door completely
and the light will go out.
WARNING - Unattended
Children
An enclosed vehicle can become extremely
hot, causing death or severe injury to
unattended children or animals who cannot
escape the vehicle. Furthermore, children
might operate features of the vehicle that
could injure them, or they could encounter
other harm, possibly from someone gaining
entry to the vehicle. Never leave children or
animals unattended in your vehicle.
CAUTION
The doors should always be fully closed and
locked while the vehicle is in motion to
prevent accidental opening of the door.
Locked doors will also discourage potential
intruders when the vehicle stops or slows.
Rear Door Child Safety Lock
FREE
LOCK
MMSA3005
The child safety lock is provided to help prevent
children from accidentally opening the rear doors
from inside the vehicle.
3-8
• To lock a rear door so that it cannot be opened
from the inside, push the child safety lock
located on the rear edge of the door to the
“LOCK” position (toward rear of vehicle) before
closing the door.
• To open a rear door while the child safety lock
is engaged, push the door lock knob to the
“UNLOCK” position (red mark is visible) then
pull the outside door handle.
WARNING - Rear Door Locks
If children accidentally open the rear
doors while the vehicle is in motion, the
child could fall out and be seriously
injured. To prevent a child from opening
the rear doors from the inside, the rear
door safety locks should be used
whenever children are in the vehicle.
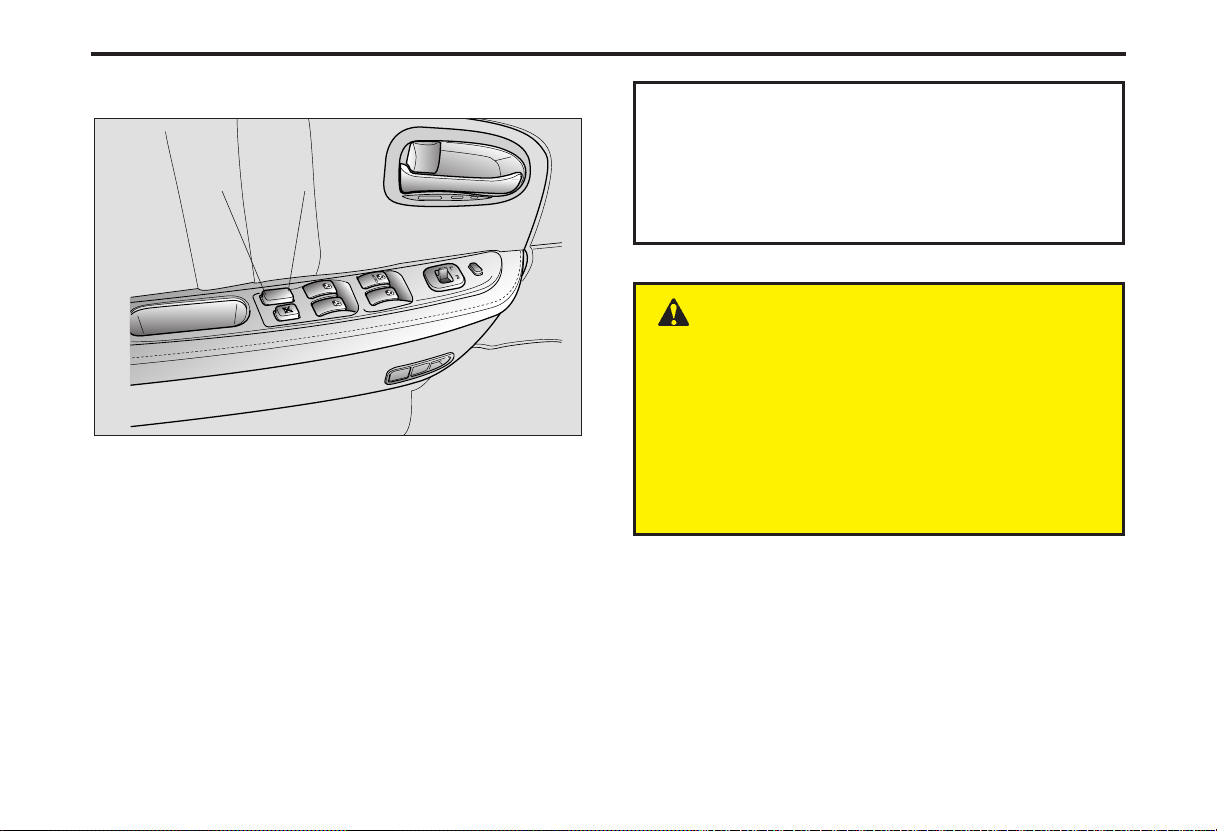
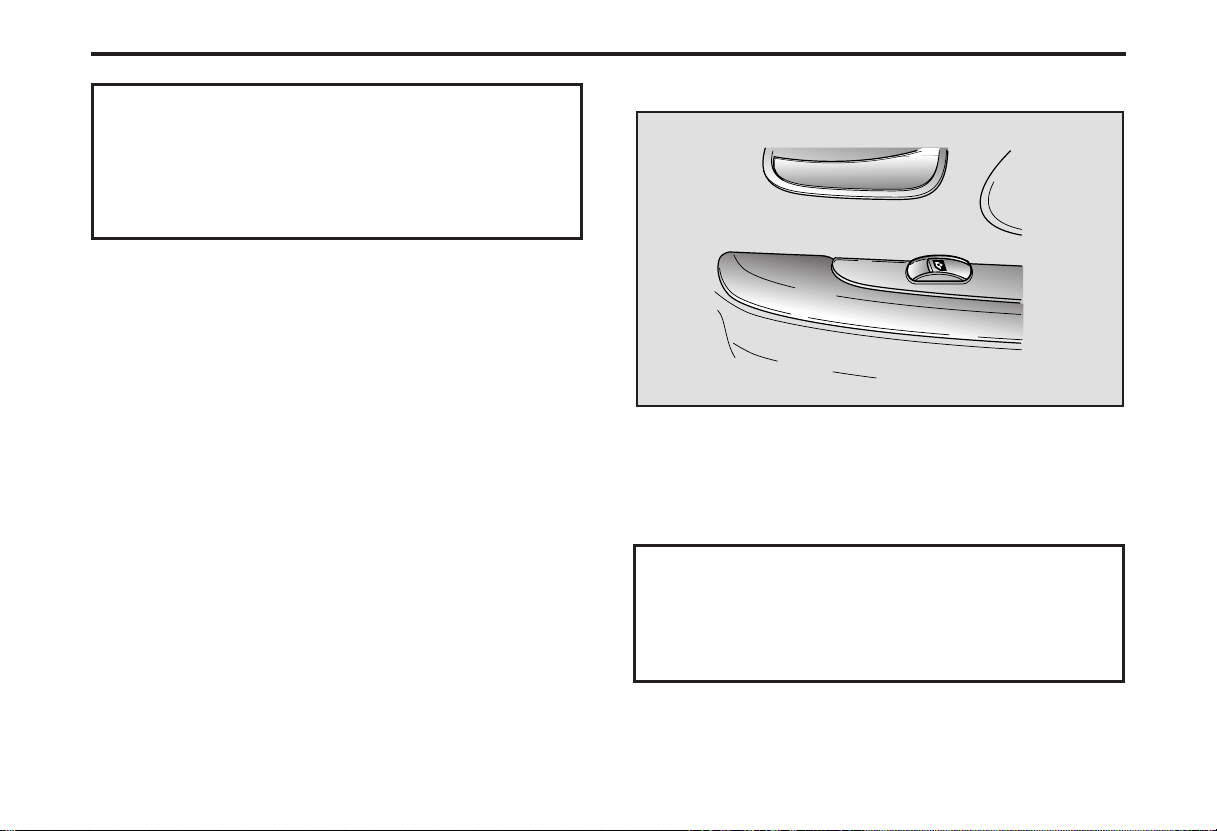
WINDOWS
Power Windows (if equipped)
The ignition switch must be in the ON position for
power windows to operate. Each door has a
power window switch that controls that door’s
window. However, the driver has a power window
switch which can block the operation of the
passenger windows.
✽✽
NOTICE
To prevent the possibility of damage to the
power window system, do not open or close
more than two windows at the same time. This
will also ensure the longevity of the fuse.
WARNING - Windows
• Do not allow children to play with the
power windows. They may seriously
injure themselves or others.
Always double check to make sure all arms,
•
hands, and other obstructions are safely
out of the way before closing a window.
3-9
Knowing Y our Vehicle
Driver’s Door Power Window Controls
Window lock switch
MMSA3004
The driver’s door has a master power window
switch that controls all the windows in the vehicle.
the ignition switch must be in the ON position for
power windows to operate. To open a window,
press down on the front portion of the
corresponding switch. To close a window, pull up
on the front portion of the corresponding power
window switch.
3-10
Power window timer (if equipped)
The power windows can be operated for
approximately 30 seconds after the ignition key is
removed or turn to the ACC or LOCK position.
However, if the front doors are opened, the power
windows cannot be operated even within the 30
seconds after the ignition key removal.
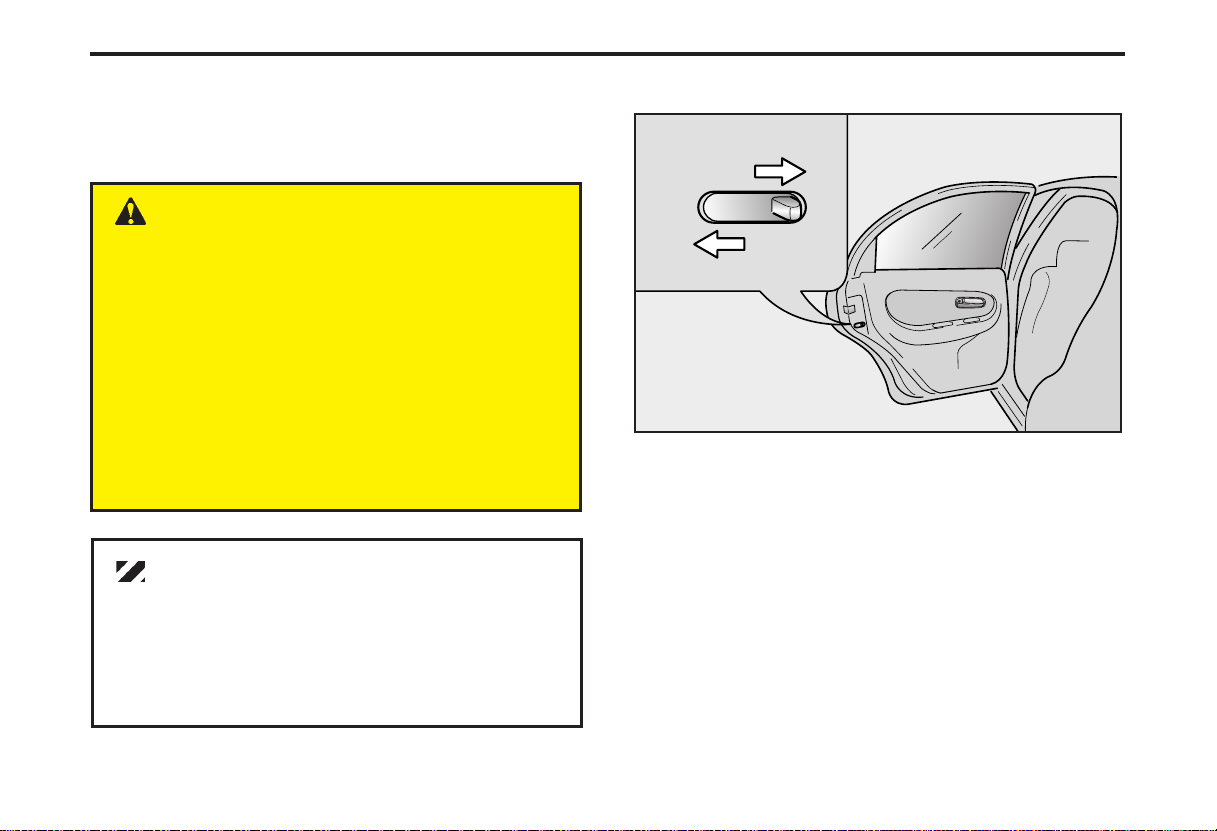
Power Window Lock Switch Feature
The driver can lock the power window switches
on all passenger doors by depressing the left side
(flat portion) of the “WINDOW LOCK” switch
located on the driver’s door to ON (flat side
down). When the power window lock switch is
ON, the driver’s master control can not operate
the passenger door power windows either.
WARNING - Power Windows
Keep the power window lock switch in the
driver’s door in the ON/“LOCK” (left
side/flat portion of switch down) position,
except when someone is operating a
passenger door window. Serious injury
can result (especially to children) from
unintentional window operation.
✽✽
NOTICE
If you notice buffeting and pulsation (wind
shock) with either side window open, you
should open the opposite window slightly to
reduce the condition.
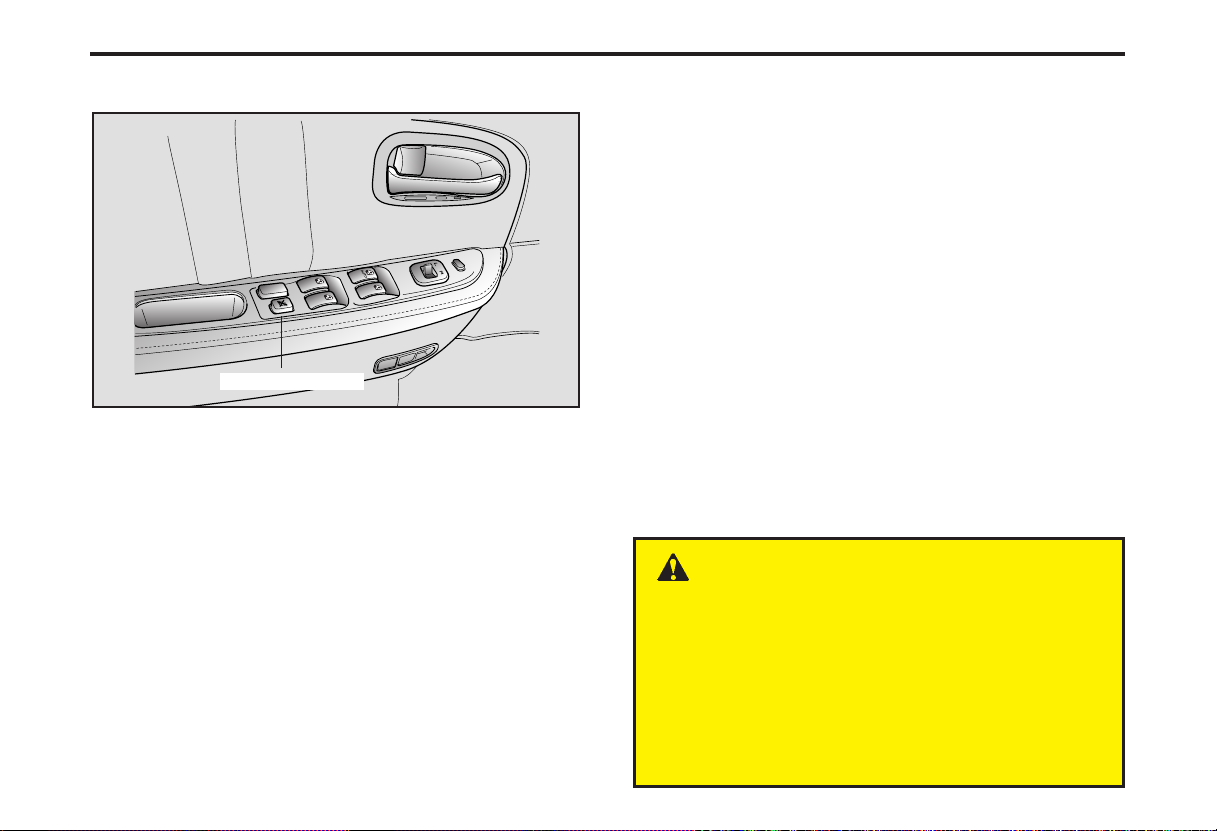
Passenger Doors Power Window Controls
MMSA3006
To open a window, press down on the front
portion of the power window switch. To close a
window, pull up on the front portion of the power
window switch.
✽✽
NOTICE
The driver’s door window “LOCK” switch
must be in the OFF position (not depressed)
to operate the passenger door windows.
3-11
Knowing Y our Vehicle
FRONT SEAT
WARNING - Driver’s Seat
• Adjusting the driver’s seat with the
vehicle in motion could cause loss of
control and a serious accident.
• Do not allow anything to interfere with the
normal position of the seatback. Storing
items against a seatback or in any other
way interfering with proper locking of a
seatback could result in serious or fatal
injury in a sudden stop or collision.
• Always drive and ride with your seatback
upright and the lap portion of the safety
belt, or lap belt, snug and low across the
hips. This position puts your safety
belts in the best position to protect you
in case of an accident.
(Continued)
(Continued)
• The National Highway Traffic Safety
Administration (NHTSA) recommends
that the driver sit at least 10 inches (250
mm) away from the steering wheel to
avoid the risk of serious injury or death
due to the deployment of the driver’s
airbag.
3-12
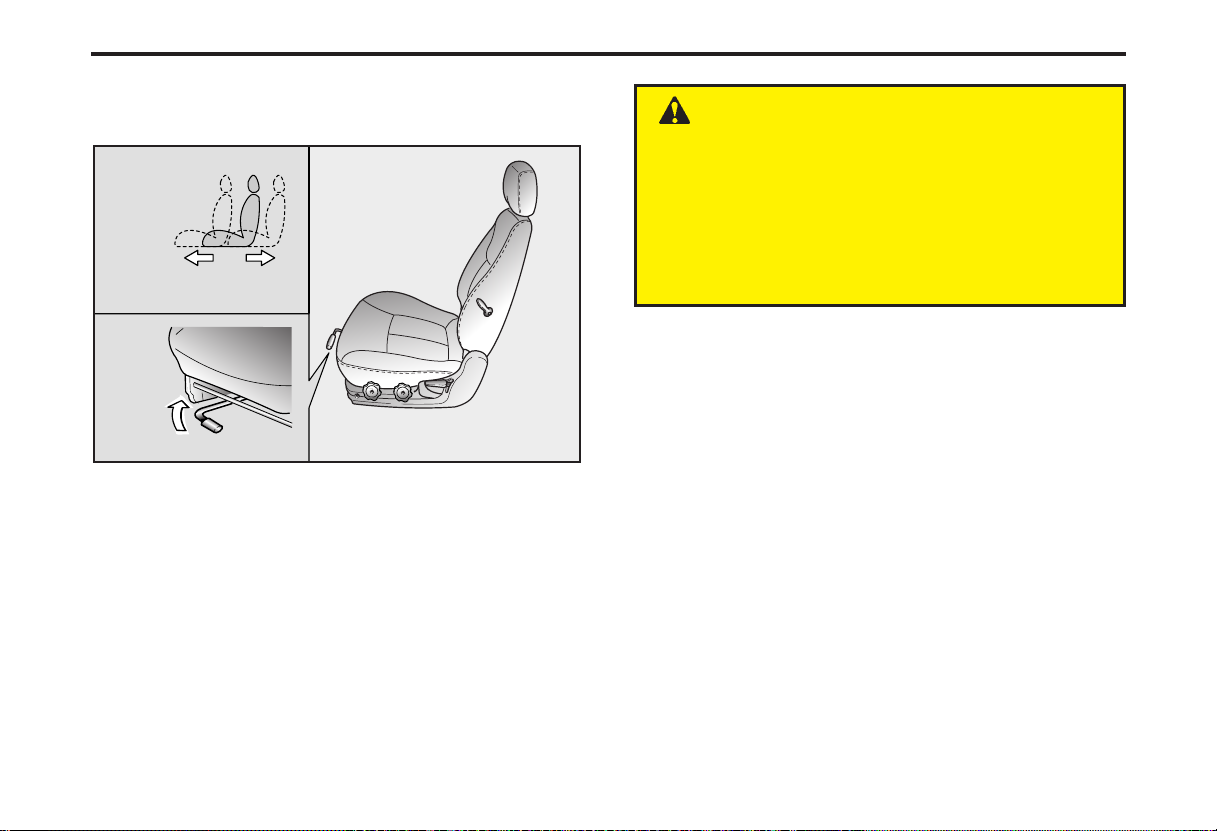
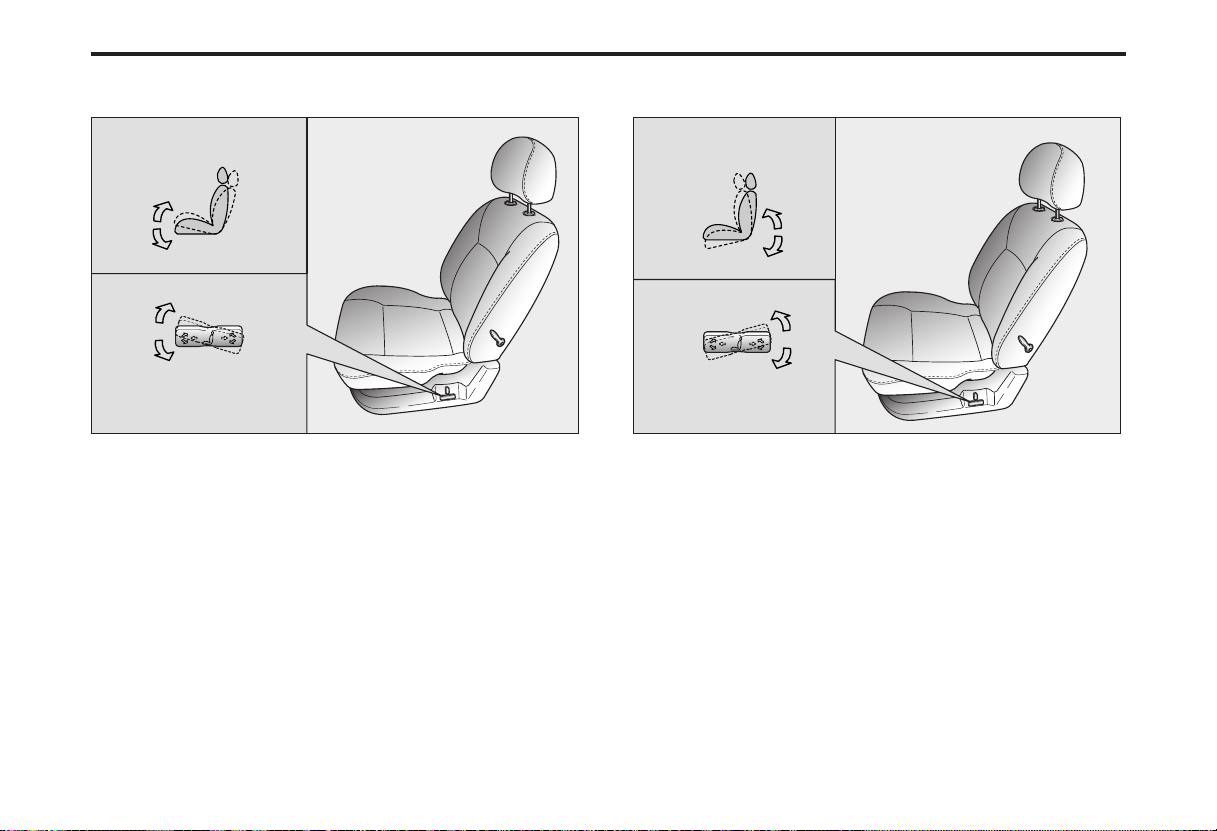
Front Seat Adjustment - Manual
Moving the Front Seat Forward and Backward
WARNING
Loose objects in the driver’s foot area
could interfere with the operation of the
foot pedals, possibly causing an accident.
Loose objects might interfere with the
seat slide mechanism. Do not place
anything under the front seats.
To move the seat forward or backward, pull up on
the lever under the front edge of the seat cushion,
slide the seat to the desired position, and release
the lever. To ensure the seat is locked in position,
check for any seat movement.
MMSA3007
3-13
Knowing Y our Vehicle
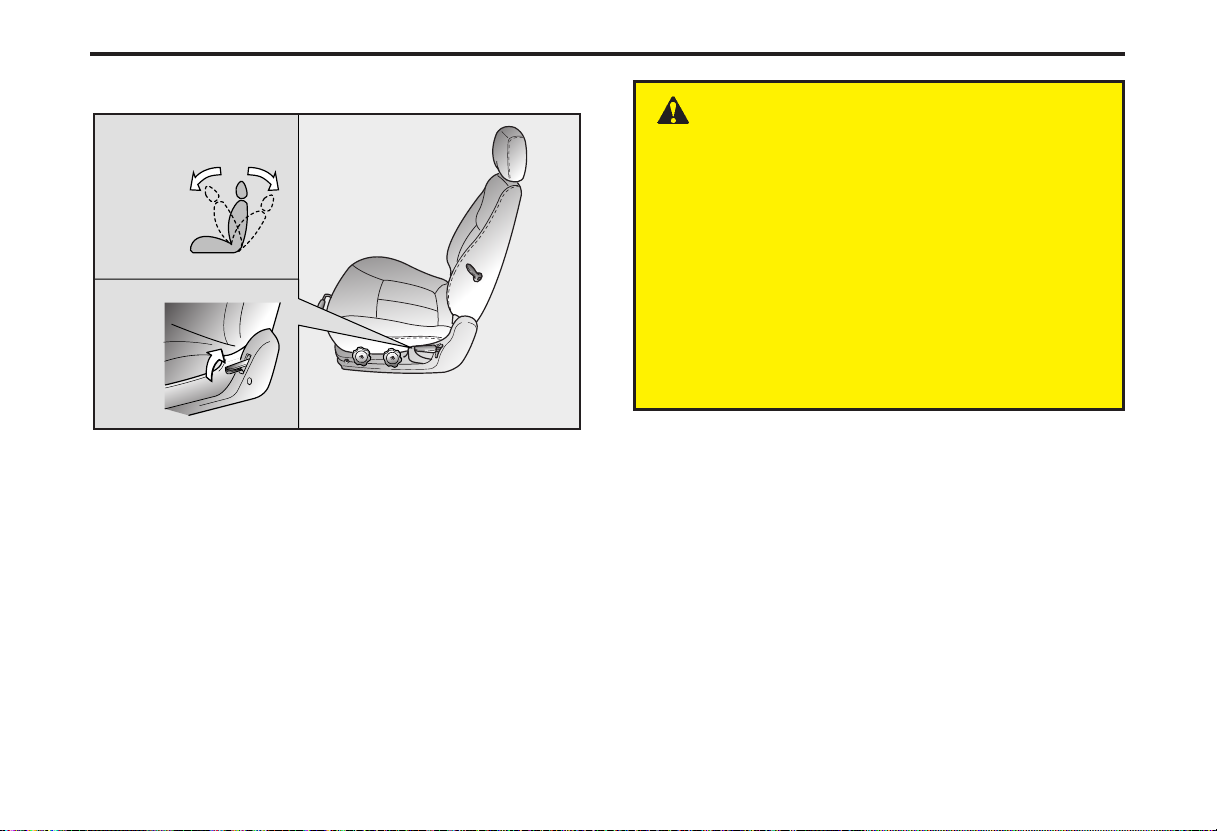
Adjusting the Front Seatback Recliner
WARNING - Front Seat
Riding in a vehicle with a front seatback
reclined could lead to serious or fatal
injury in an accident. If a front seat is
reclined, the occupant’s hips may slide
under the lap portion of the safety belt
applying great force to the unprotected
abdomen. Internal injuries could result.
Keep the seatbacks in a comfortably
upright position whenever the vehicle is
in motion.
To change the seatback angle, lean forward
slightly and raise the lever located on the outer
portion of the seat. Slowly and carefully lean back
to the desired angle and release the lever. After
adjustment, make sure that the lever has returned
to its original locked position.
MMSA3008
3-14
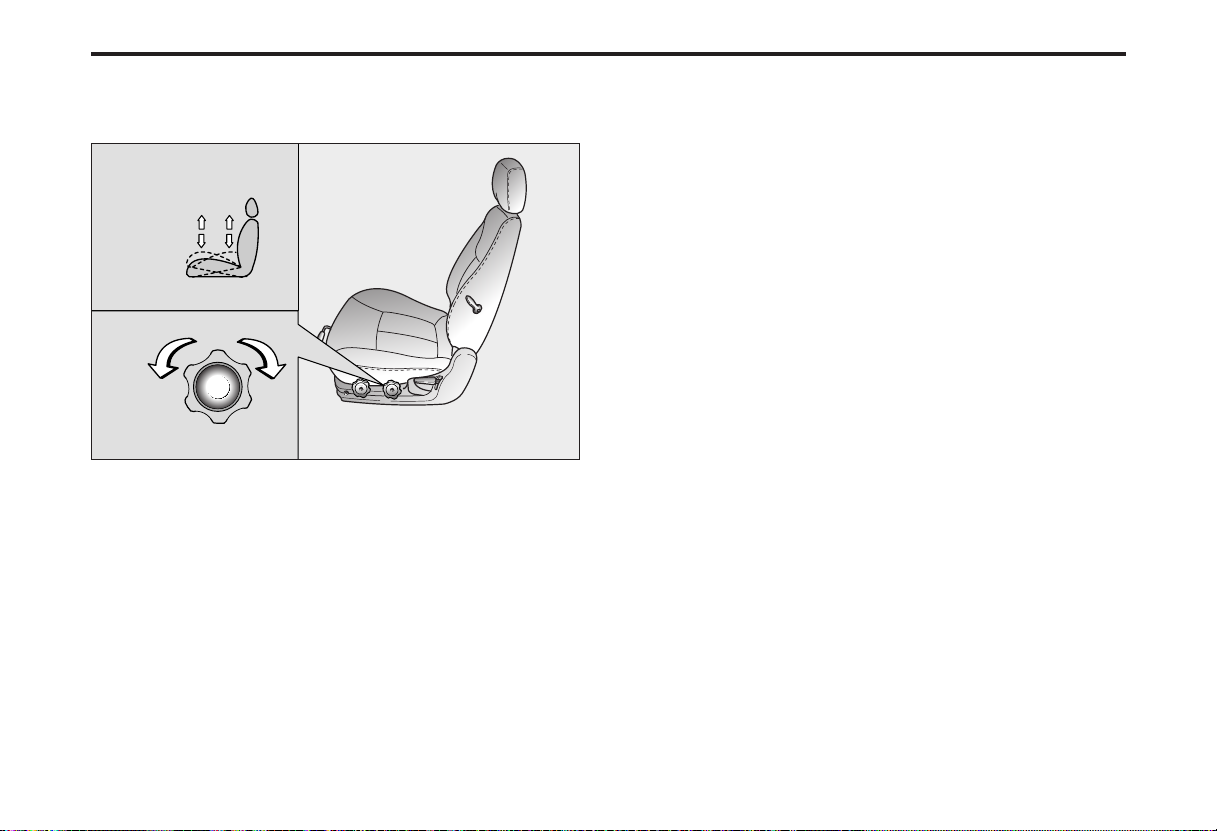
Adjusting the height of front seat cushion
(if equipped)
MMSA3009
To change the height (front portion) of the seat
cushion, rotate the knob located on the outside of
the seat cushion.
• To lower the seat cushion, rotate the knob
toward the front of the vehicle.
• To raise the seat cushion, rotate the knob
toward the rear of the vehicle.
To change the height (rear portion) of the seat
cushion, rotate the knob located on the outside of
the seat cushion.
• To lower the seat cushion, rotate the knob
toward the front of the vehicle.
• To raise the seat cushion, rotate the knob
toward the rear of the vehicle.
3-15
Knowing Y our Vehicle
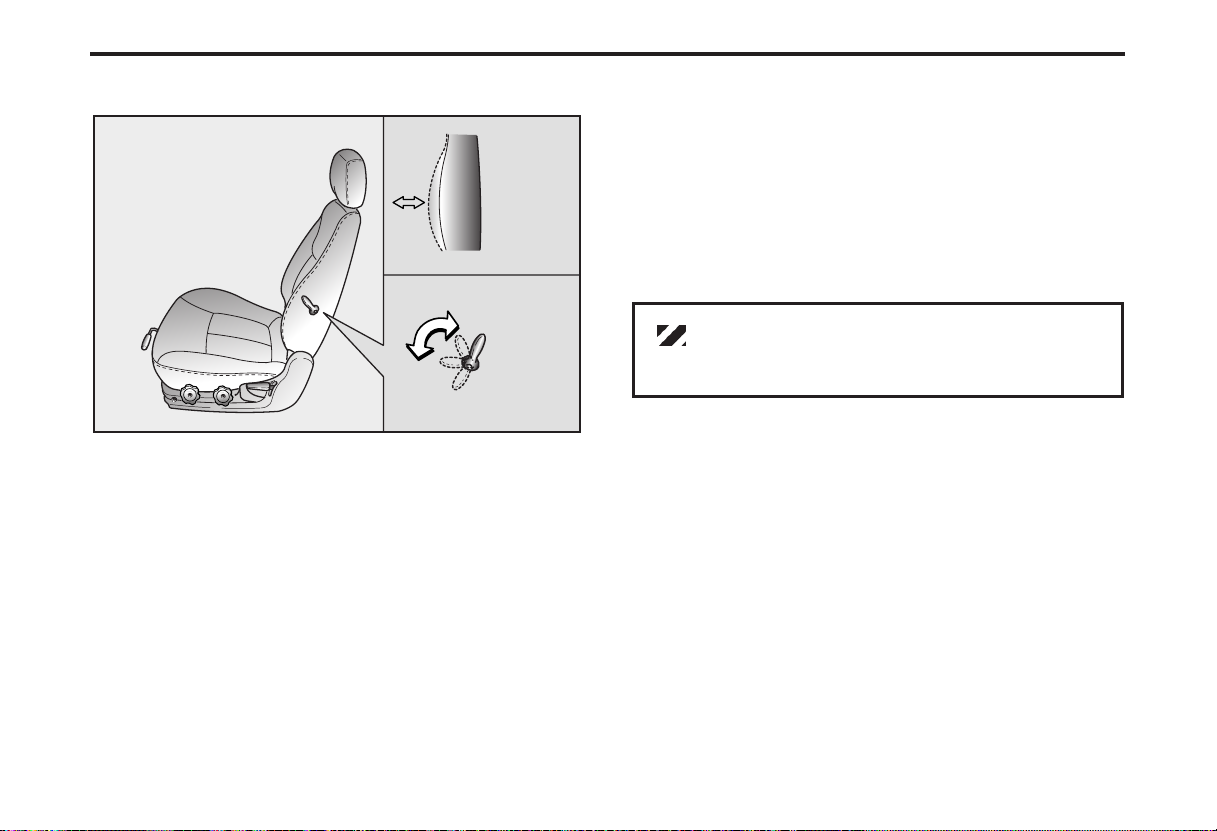
Lumbar Support (Driver’s Seat Only)
You can adjust the lumbar support by moving the
lever on the right side of the driver’s seatback.
Pivoting the lever toward the front of the vehicle
increases the lumbar support. Pivoting the lever
toward the rear of the vehicle decreases the
lumbar support.
MMSA3010
Front Seat Adjustment - Power
(if equipped)
The driver's seat can be adjusted by using the
control knob on the left side of the seat. Before
driving, adjust the seat to the proper position so
as to easily control the steering wheel, pedals and
switches on the instrument panel.
CAUTION
Do not operate two knobs at the same time.
3-16
WARNING - Driver’s Seat
• Never attempt to adjust seat while the
vehicle is moving. This could result in
loss of control, and an accident
causing death, serious injury, or
property damage.
• In order to avoid unnecessary airbag
injuries including the possibility of
severe injury or death, always sit as far
back as possible from the steering
wheel while still being able to maintain
comfortable control of your vehicle.
• The National Highway Traffic Safety
Administration (NHTSA) recommends
that the driver sit at least 10 inches (250
mm) away from the steering wheel to
avoid the risk of serious injury or death
due to the deployment of the driver’s
airbag.
• The power seats are operable with the
ignition OFF. Therefore, children should
never be left unattended in the car.
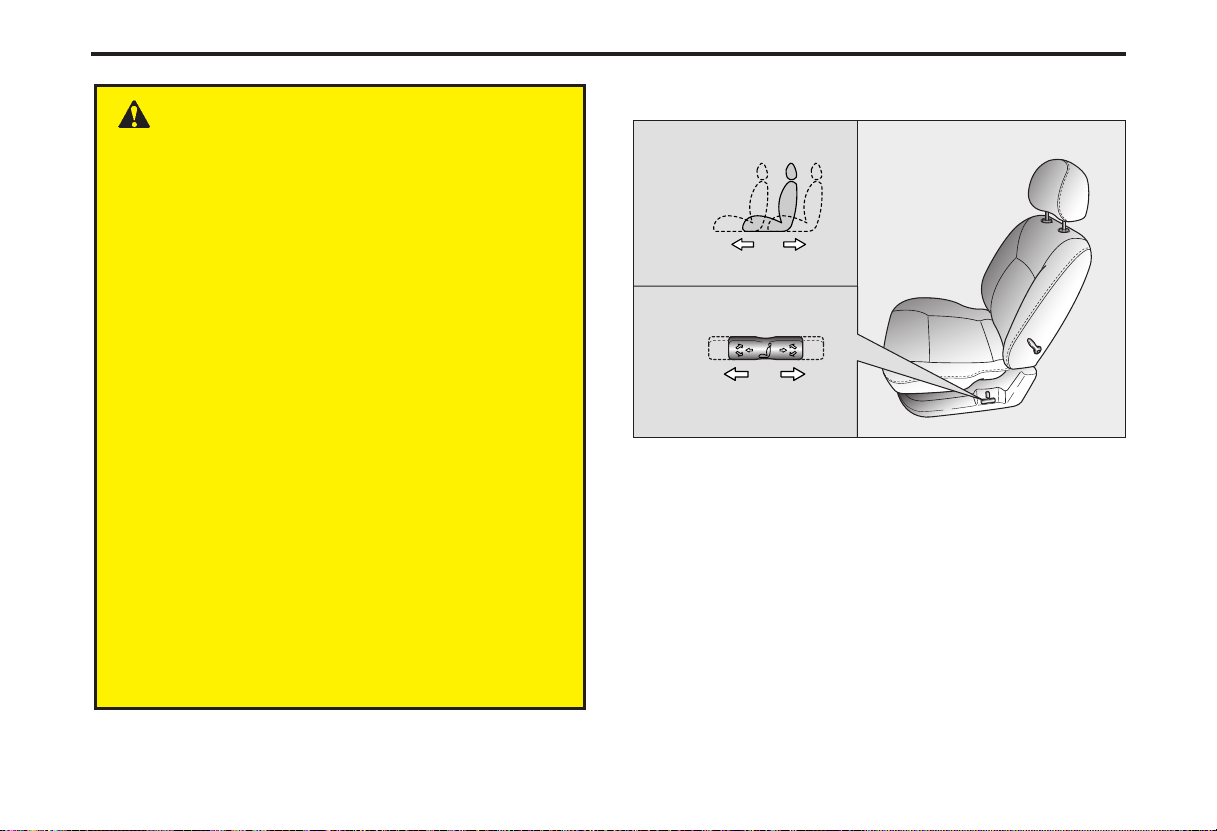
Moving the front seat forward and backward
MMSA3011
Push the control knob forward or backward to
move the seat to the desired position. Release
the knob and the seat will lock in that position.
1.Reclining Control Knob
2.Sliding and Height Adjusting Control Knob
3-17
Knowing Y our Vehicle
✽✽
NOTICE
Prior to operating the vehicle, ensure the seat
is locked securely by trying to move the seat
forward or backward without using the
control knob. If the seat moves, it is not
locked properly.
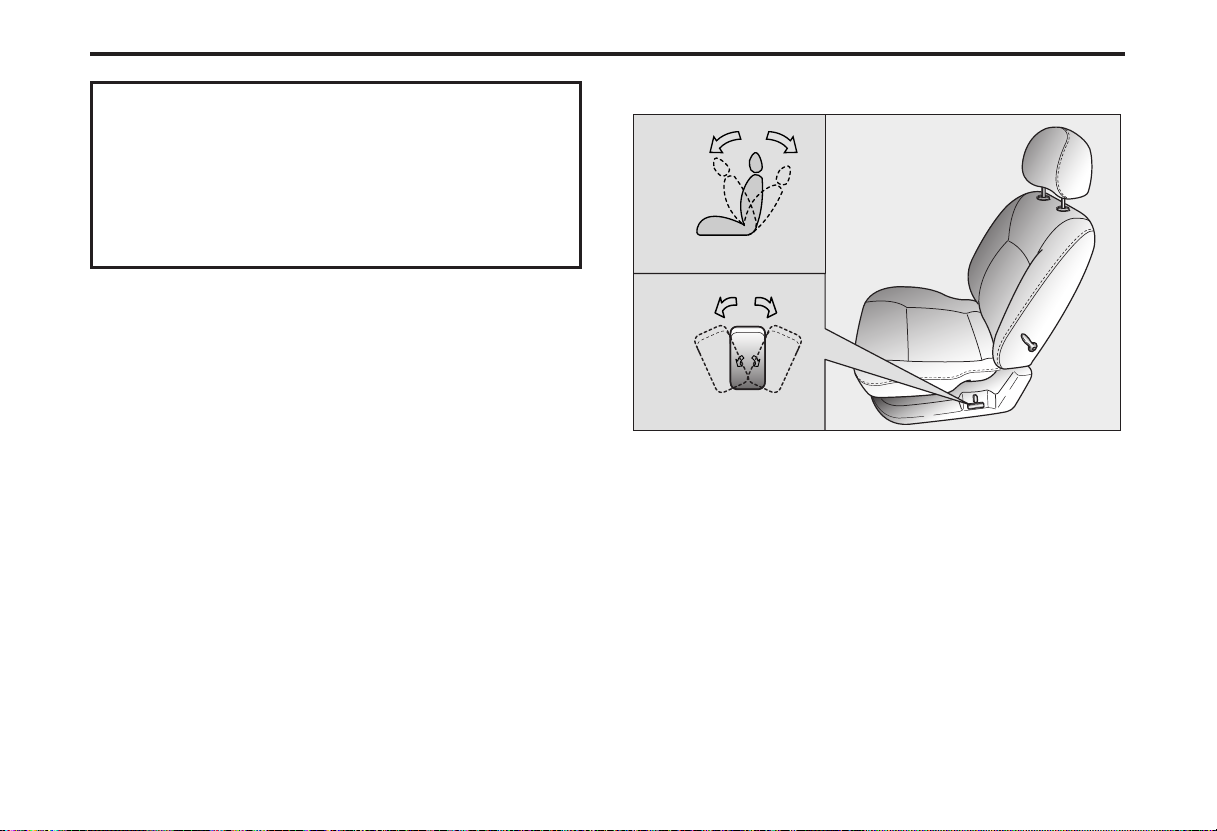
Adjusting the front seatback recliner
MMSA3012
Rotate the upper portion of the control knob
forward or backward to recline the seatback to the
desired position. Release the control knob and
the seatback will lock in position.
3-18
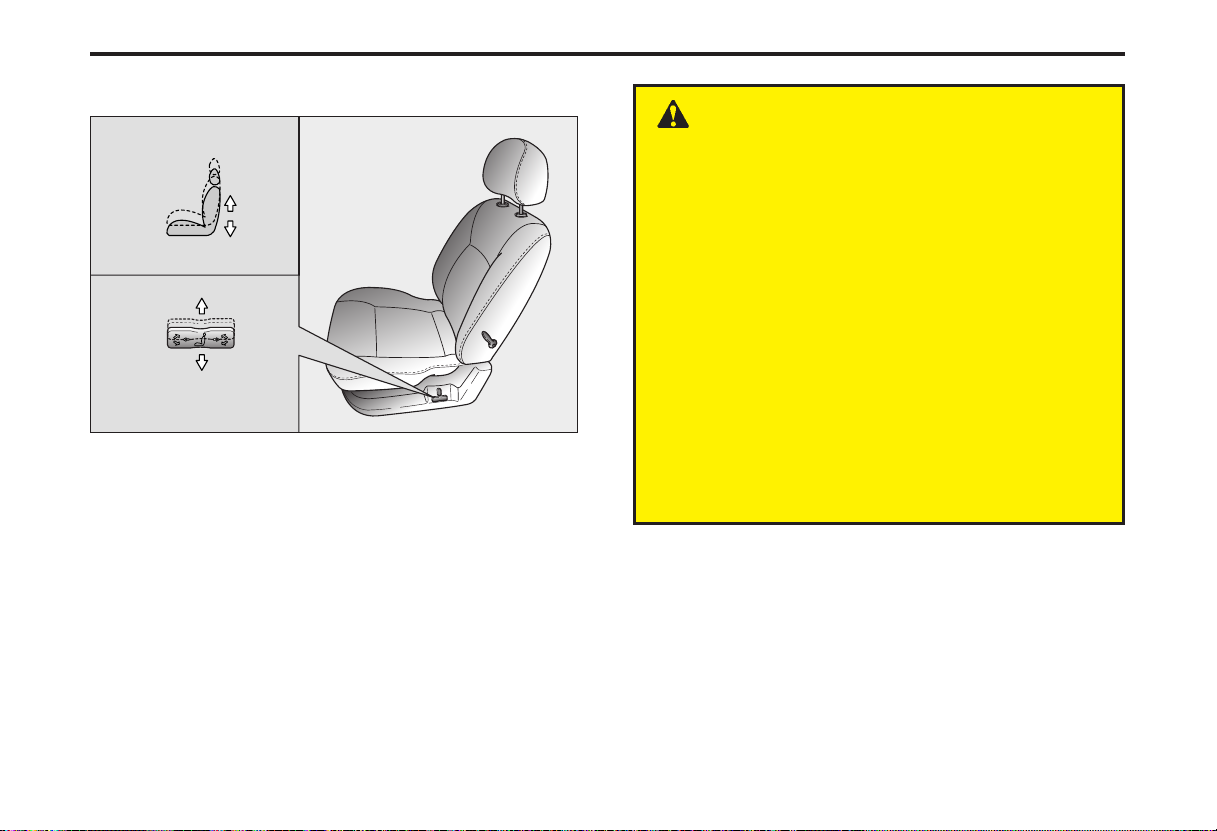
Adjusting the height of front seat cushion
Rear height of front seat cushion
Front height of front seat cushion
MMSA3013 MMSA3014
Move the front portion of the control knob up to
raise or down to lower the front part of the seat
cushion.
Move the rear portion of the control knob up to
raise or down to lower the rear part of the seat
cushion.
3-19
Knowing Y our Vehicle
Height of front seat cushion
MMSA3015
To raise or lower the seat cushion totally, pull up
and push down on the center of the
corresponding switch.
WARNING
To minimize the risk of possible severe
personal injury in the event of a collision,
both the driver's and passenger's
seatbacks should be in a normal seating
position while the car is in motion. The
protection provided by the vehicle’s
restraint system may be reduced
significantly when the seatbacks are
reclined. All parts of the restraint system
are designed to absorb energy in an
accident and this can best be
accomplished if the seatback is in a
normal seating position and the seatbelt
is in close proximity to the occupant.
3-20
 Loading...