

Page 1

KD-X561DBT
KD-X560BT
DIGITAL MEDIA RECEIVER
Quick Start Guide
RÉCEPTEUR MÉDIA NUMÉRIQUE
Guide de démarrage rapide
DIGITAL-MEDIA-RECEIVER
Quick-Start-Anleitung
DIGITALE MEDIA-ONTVANGER
Beknopte handleiding
RICEVITORE DIGITALE MULTIMEDIALE
Guida rapida
RECEPTOR DE MEDIOS DIGITALES
Guía de inicio rápido
RECEPTOR DE MÍDIA DIGITAL
Guia de iniciação rápida
ЦИФРОВОЙ МЕДИА-ПРИЕМНИК
Краткое руководство по началу работы
• For detailed operations and information, refer to the INSTRUCTION MANUAL on the following website:
• Pour plus d’ informations e t de détails sur les op érations, repor tez-vous au MODE D’E MPLOI sur le site Intern et suivant :
• Detaillierte Informationen zu den Funktionen finden Sie in der BEDIENUNGSANLEITUNG auf der folgenden Webseite:
• Raadpleeg voor meer informatie de INSTRUCTIEHANDLEIDING op de volgende website:
• Per le operazioni e le informazioni dettagliate, fare riferimento al MANUALE DI ISTRUZIONI disponibile nel seguente sito web:
• Para obtener información y detalles sobre las operaciones, consulte el MANUAL DE INSTRUCCIONES en el siguiente sitio web:
• Para obter o perações e infor mações detalhad as, consulte o MANUAL DE INST RUÇÕES no seguinte we bsite:
• Для пол учения подробн ой информации о раб оте обратитесь к Р УКОВОДСТВУ ПО ЭКСПЛУАТАЦИИ на след ующем
веб-сайте:
<http://www.jvc.net/cs/car/>
B5K-0634-21 (E)© 2019 JVC KENWOOD Corporation
Page 2
Contents
Before use ................................................................................ 2
How to read this manual ..................................................................................2
Precautions ............................................................................................................... 2
Getting Started ...................................................................... 3
Initial settings ..........................................................................................................3
Clock settings .......................................................................................................... 3
Basics ......................................................................................... 4
Common operations ..........................................................................................4
How to attach/detach the faceplate ........................................................4
Select a source ........................................................................................................4
USB/iPod................................................................................... 5
Preparation ................................................................................................................ 5
Playback operations ............................................................................................5
Tuner/DA B ................................................................................ 6
Tuner basic operations ......................................................................................6
DAB basic operation ...........................................................................................6
Tuner function settings ....................................................................................6
DAB function settings ........................................................................................7
External Components ......................................................... 7
Rear view camera ..................................................................................................7
Bluetooth® smartphone ..................................................... 8
Register your smartphone to the unit .................................................... 8
Receive a call ............................................................................................................ 8
Make a phone call .................................................................................................8
Playing Bluetooth Audio Device ................................................................. 8
Setup .......................................................................................... 9
Settings ........................................................................................................................ 9
Sound settings ........................................................................................................ 9
Installation ............................................................................. 10
Before installation ...............................................................................................10
Installing the unit ................................................................................................11
About this Unit ..................................................................... 14
Maintenance ..........................................................................................................14
Note for specifications .....................................................................................14
Copyrights ...............................................................................................................14
Before use
Precautions
#WARNING
Ñ To prevent injury or fire, take the
following precautions:
• To prevent a short circuit, never put or leave any
metallic objects (such as coins or metal tools)
inside the unit.
• Do not watch or fix your eyes on the unit’s display
when you are driving for any extended period.
• If you experience problems during installation,
consult your JVC dealer.
Ñ Precautions on using this unit
• When you purchase optional accessories, check
with your JVC dealer to make sure that they work
with your model and in your area.
• The Radio Data System or Radio Broadcast Data
System feature won’t work where the service is
not supported by any broadcasting station.
Ñ Protecting the monitor
• To protect the monitor from damage, do not
operate the monitor using a ballpoint pen or
similar tool with the sharp tip.
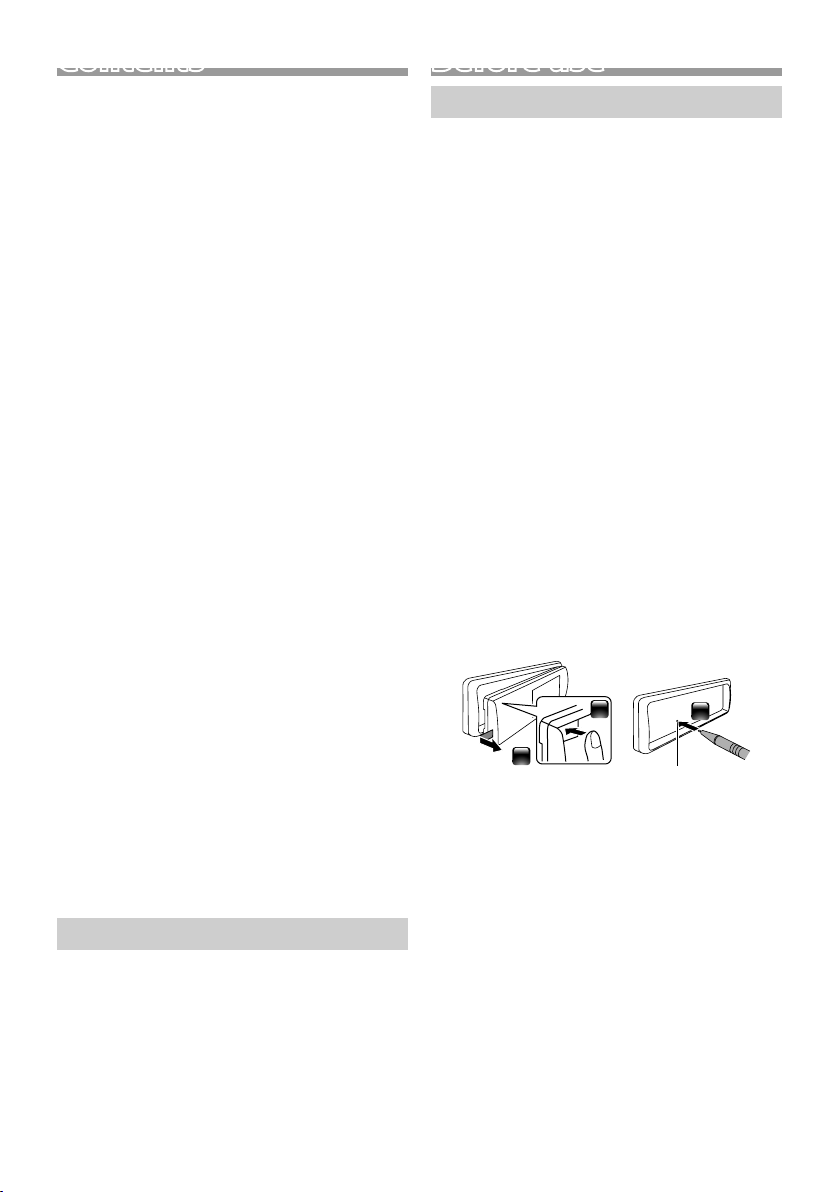
Ñ How to reset your unit
If the unit or the connected unit fails to operate
properly, reset the unit.
1
3
How to read this manual
• The panels shown in this guide are examples used to
provide clear explanations of the operations. For this
reason, they may be different from the actual panels.
• In operation procedures, bracket shape indicates the
item you should control.
[ ]: indicates the selected items or menu.
< >: indicates the name of panel buttons.
• Display language: English is used for the purpose of
explanation. You can select a display language from
the [Language] menu. See Language (P.9).
2
2
Reset button
Page 3
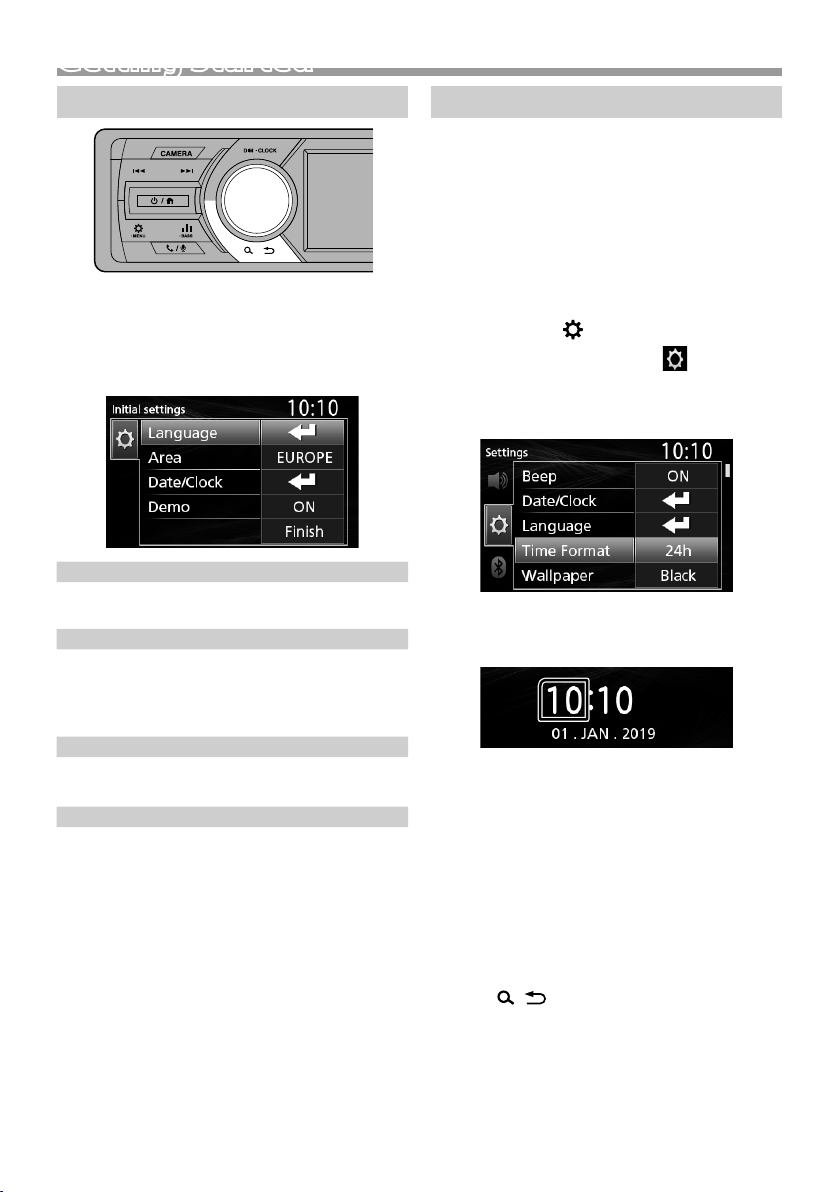
Getting Started
Initial settings
1 Turn the ignition key of your car to ACC.
The unit is turned on.
2 Turn the volume knob to select the item to set
(see the table below), then press the knob to
make a selection.
Language
Select the language used for the control screen and
setting items. Default is “English”.
Area
EUROPE (Default): For Europe, AM/FM intervals: 9
kHz/50 kHz.
M. EAST: For Middle East, AM/FM intervals: 9 kHz/50
kHz.
Date/Clock
Adjust the date, then adjust the time.
Hour / Minute / Month / Day / Year
Demo
Set the demonstration mode. Default is “ON”.
3 Turn the volume knob to select [Finish], then
press the knob.
Clock settings
Ñ Synchronizing the clock time with FM
RDS
Activate [RDS Clock Sync]. See “Tuner function
settings” (P. 6).
Ñ Adjusting the clock manually
✎ NOTE
• Deactivate [RDS Clock Sync] before adjusting the
clock. See “Tuner function settings” (P.6).
1 Press and hold < > to display the settings.
2 Press <E >/<F> to select [ ].
3 Turn the volume knob to select [Time Format],
then press the knob to select the time format
([12h] or [24h]).
4 Turn the volume knob to select [Date/Clock],
then press the knob.
Clock screen appears.
5 Turn the volume knob to adjust the hour, then
press the knob.
6 Turn the volume knob to adjust the minute,
then press the knob.
7 Turn the volume knob to adjust the day, then
press the knob.
8 Turn the volume knob to adjust the month,
then press the knob.
9 Turn the volume knob to adjust the year, then
press the knob.
10
Press < >.
English |
3
Page 4
BasicsBasics
25364
7
1
Volume knob (turn/press)
Common operations
Ñ Turning on the power
1 Press < >.
Ñ Turning off the power
1 Press and hold < >.
Ñ Adjusting the volume
1 Turn the volume knob.
Ñ Mutes the sound
1 Press and hold the volume knob.
appears when the mute function is active.
To restore the sound, press and hold again, or
adjust the volume.
Ñ Display the clock
1 Press and hold the <DIM> button.
Ñ Select dimmer mode
1 Press the <DIM> button.
Dimmer 1, Dimmer 2, Dimmer 3
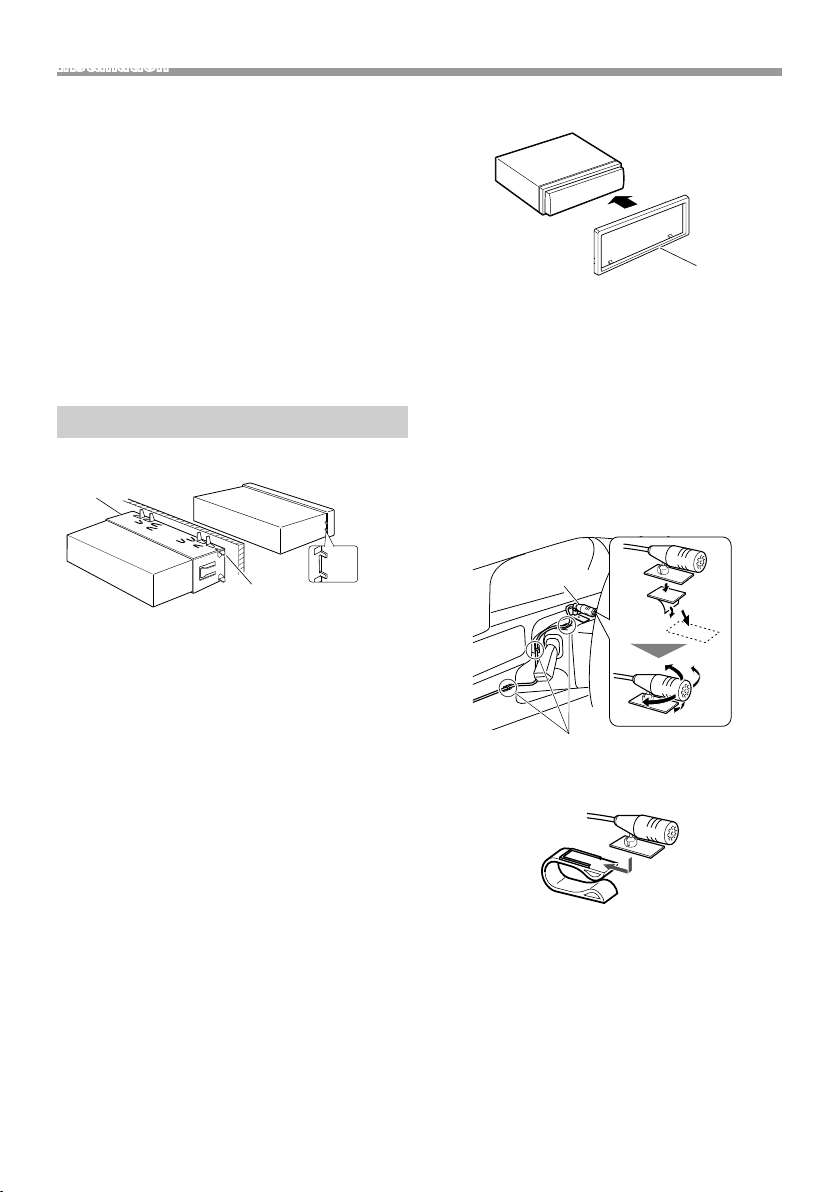
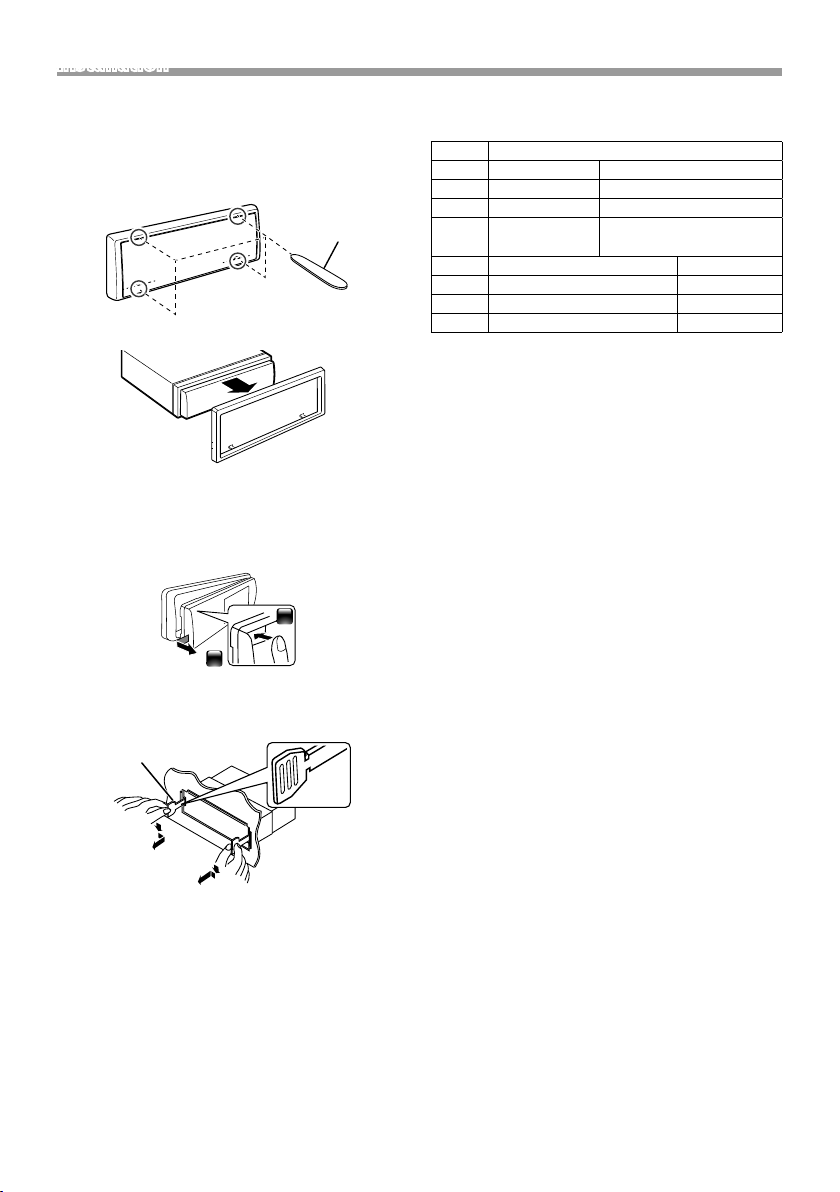
How to attach/detach the faceplate
AttachDetach
1
2
1
2
Remote sensor
MonitorDetach button
Select a source
1 Press < > to display the HOME screen.
HOME screen appears.
2 Turn the volume knob to select the source, then
press the knob.
Clock display
1
Switches to the FM tuner broadcast. (P.6)
2
Switches to the AM tuner broadcast. (P.6)
3
Switches to the DAB broadcast. ( P.6)
4
(K D-X 561D BT o nly)
Plays a Bluetooth audio player. (P. 8)
5
6
[USB]
Plays files on a USB device. (P. 5)
[iPod]
Plays an iPod/iPhone. (P.5)
• When iPod/iPhone is connected.
Switches to an external component connected to
7
the AUX input terminal.
4
Page 5
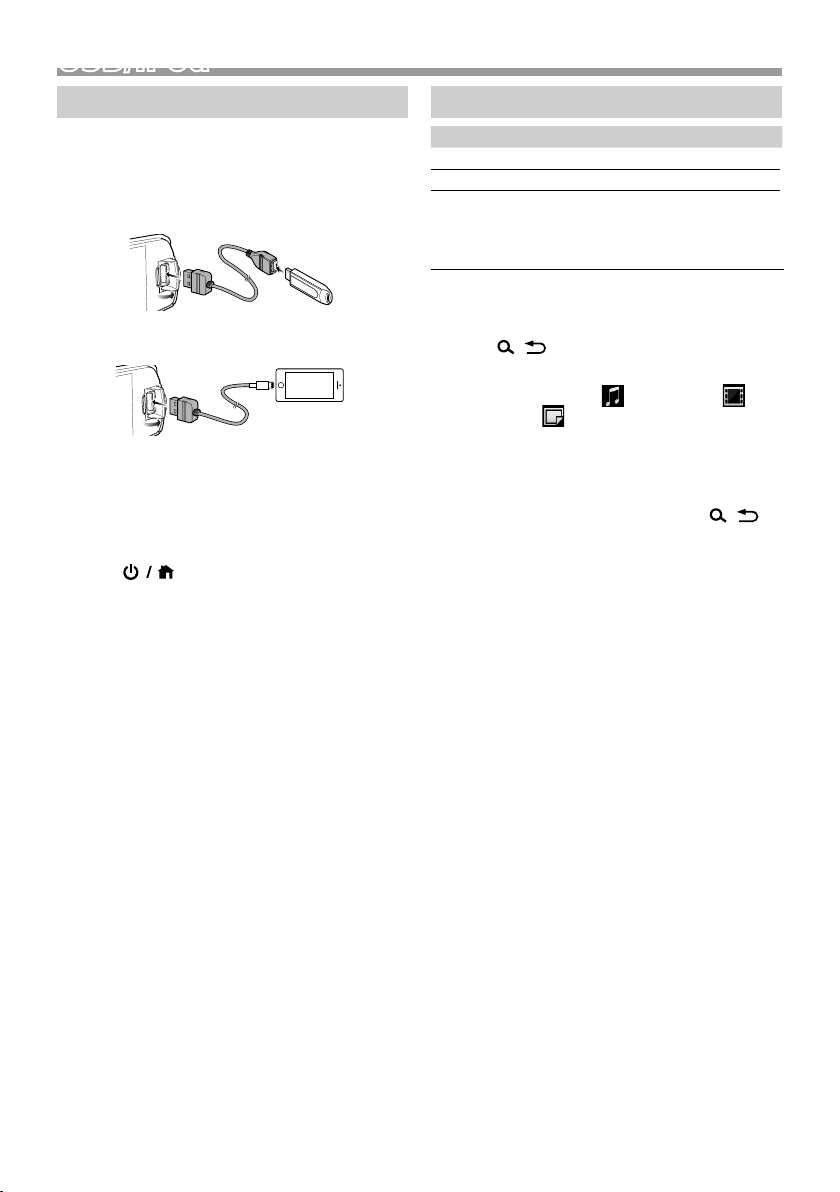
USB/iPod
USB/iPod
Preparation
Ñ Connecting a USB device/iPod/iPhone
1 Open the front port cover.
2 Connect the USB device with the USB cable
(sold separately).
Connect the iPod/iPhone using the KS-U62
(optional accessory).
The unit reads the device and playback starts.
• USB maximum power supply current :
DC 5 V = 1 A
Ñ To disconnect the USB device/iPod/
iPhone
1 Press < > to display the HOME screen.
2 Turn the volume knob to select other than
[USB] and [iPod], then press the knob.
3 Detach the USB device/iPod/iPhone.
Ñ Usable USB device
This unit can play MP3/ WMA/ AAC/ WAV/ FLAC/
OGG/ MPEG1/ MPEG2/ MPEG4/ H.264/ MKV/ JPEG/
BMP/ PNG files stored in a USB mass storage class
device.
Ñ Connectable iPod/iPhone
The following models can be connected to this unit.
Made for
• iPhone X
• iPhone 8 Plus
• iPhone 8
• iPhone 7 Plus
• iPhone 7
• iPhone SE
• iPhone 6s Plus
• iPhone 6s
• iPhone 6 Plus
• iPhone 6
• iPhone 5s
• iPod touch (6th
generation)
Playback operations
To Do this
Play/pause Press the volume knob.
Select a file Press <E>/<F> repeatedly.
Fast-backward/
Fast-forward
Press and hold <E>/<F>.
• Video files: Each time you press
the button, the search speed
changes.
Ñ Selecting a track/content in a list
(Searches file)
1 Press < > to display the LIST screen.
2 Press <E >/<F> to select whether you
search by audio files [ ], video files [ ] or
picture files [ ]. (USB only)
3 Turn the volume knob to select the desired
folder/category, then press the knob.
• When you select a folder its contents are
displayed.
• To return to the previous layer, press <
4 Turn the volume knob to select the desired
item, then press the knob.
Playback starts.
>.
English |
5
Page 6
Tuner/DAB
Tuner/DAB
Tuner basic operations
1 Press < > to display the HOME screen.
2 Turn the volume knob to select [FM] or [AM],
then press the knob.
3 Press <E >/<F> to search for a station
automatically.
“Auto Seek” appears.
(or)
Press and hold <E>/<F> repeatedly to
search for a station manually.
“Manual Seek” appears.
✎ NOTE
• To store stations, perform [Manual Store] or [Auto
Store].
Ñ Select a stored station
You can preset 15 stations for FM and 15 stations
for AM.
1 Press < > to display the LIST screen.
2 Turn the volume knob to select a preset
number, then press the knob.
✎ NOTE
• To exit, press <
>.
DAB basic operation (KD-X561DBT)
1 Press < > to display the HOME screen.
2 Turn the volume knob to select [DAB], then
press the knob.
3 Press <E >/<F> to search for an ensemble
automatically.
“Auto Seek” appears.
(or)
Press and hold <E>/<F> repeatedly to
search for an ensemble manually.
“Manual Seek” appears.
4 Press and hold <E>/<F> select a service
(either primary or secondary) to listen to.
✎ NOTE
• To store service, perform [Favorite].
Ñ Select a service
1 Press < > to display the LIST screen.
2 Turn the volume knob to select a service, then
press the knob.
Ñ Select a stored service
You can store up to 15 services
1 Press < > to display the LIST screen.
6
2 Press <E >/<F> to select [ ].
3 Turn the volume knob to select a service, then
press the knob.
✎ NOTE
• To exit, press <
>.
Tuner function settings
1 Press < > to display the function menu.
2 Turn the volume knob to select the item to set
(see the table below), then press the knob to
make a selection.
3 Press < >.
Manual
Store
Auto
Store
Local
Seek
Area EUROPE (Default): For Europe, AM/FM
Mono *
RDS *
PTY *
AF *
TA *
RDS
Clock
Sync *
*1 FM only
*2 Available when [RDS] is set to [ON].
Stores a station manually.
While listening to a station you want to
store, turn the volume knob to select a
preset number, then press the knob.
Automatically searches and stores the 15
stations with the strongest signals for the
selected band.
• “Auto Store” appears.
Tunes in only to the stations with sufficient
signal strength.
“ON”, “OFF” (Default)
intervals: 9 kHz/50 kHz.
M. EAST: For Middle East, AM/FM intervals:
9 kHz/50 kHz.
1
Determines whether to receive stereo
broadcasts in the stereo mode or
monaural mode.
“ON”, “OFF” (Default)
1
FM Radio Data System features
“ON” (Default), “OFF”
1*2
Searches for a program by program type.
1*2
When station reception is poor,
automatically switches to the station that
is broadcasting the same program over
the same Radio Data System network.
“ON” (Default), “OFF”
1*2
Switches to the traffic information
automatically when the traffic bulletin
starts. (TI indicator lights up.)
“ON”, “OFF” (Default)
Synchronizing the Radio Data System
station time data and this unit’s clock.
1*2
“ON” (Default), “OFF”
Page 7
Tuner/DAB
External Components
DAB function settings (KD-X561DBT)
1 Press < > to display the function menu.
2 Turn the volume knob to select the item to set
(see the table below), then press the knob to
make a selection.
3 Press < > to exit.
Scan Station Updates the DAB Service List.
Favorite Stores a service.
Reset Select [Reset] and then select [Ye s]
TI Switches to the traffic information
Setup
Priority If the same service is provided by
Related
Service
Antenna
Power
PTY Search Searches for a program by program
Zoom DLS Display the Dynamic Label Segment
SERVICE Displays the Service List screen.
While listening to a service you want
to store, turn the volume knob to
select a preset number, then press
the knob.
to set the DAB settings to the initial
default settings.
automatically when the traffic bulletin
starts.
“ON”, “OFF” (Default)
Radio Data System when reception of
the service being provided by Digital
Radio becomes poor, automatically
switches to Radio Data System.
“ON”, “OFF” (Default)
When you select ON, the unit switches
to a related service (if exists) when a
DAB service network is not available.
“ON”, “OFF” (Default)
Sets power supply to the Digital Radio
antenna. Set to “ON” when the Digital
Radio antenna in use is equipped with
a booster.
Default is “ON”.
type.
screen.
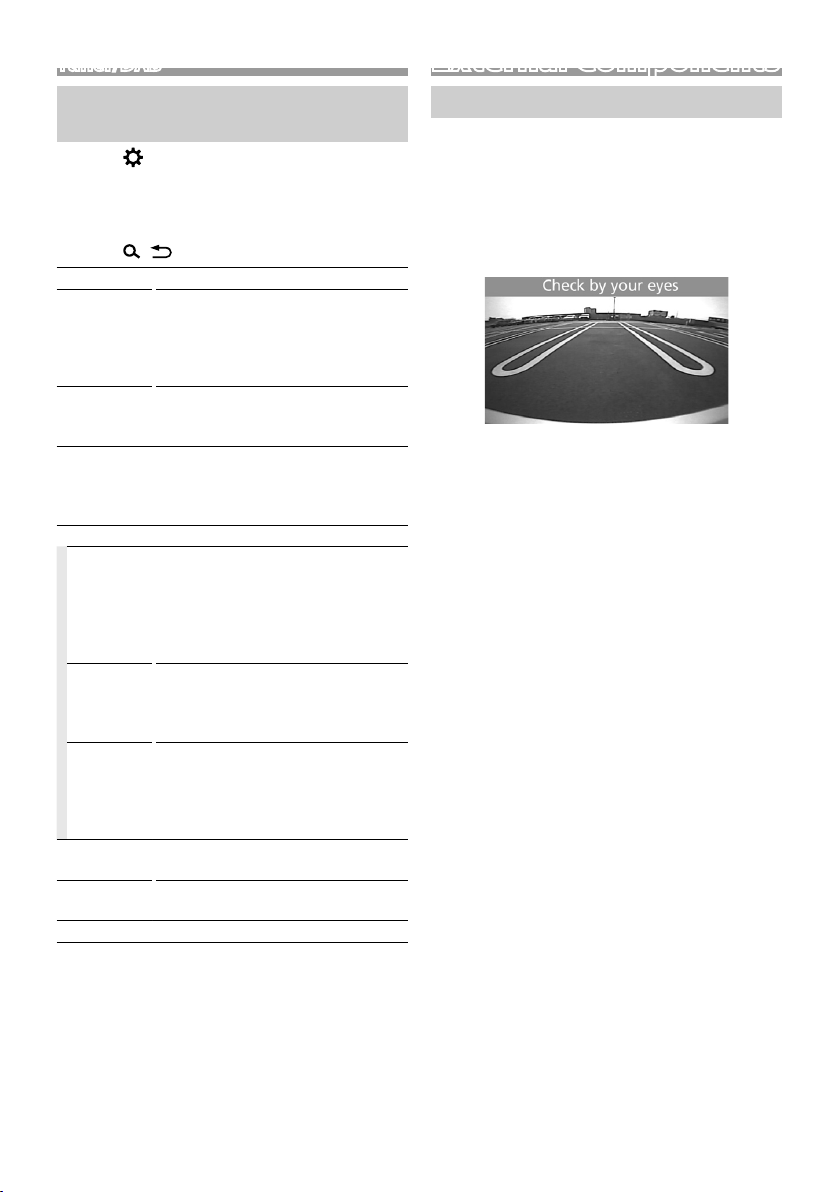
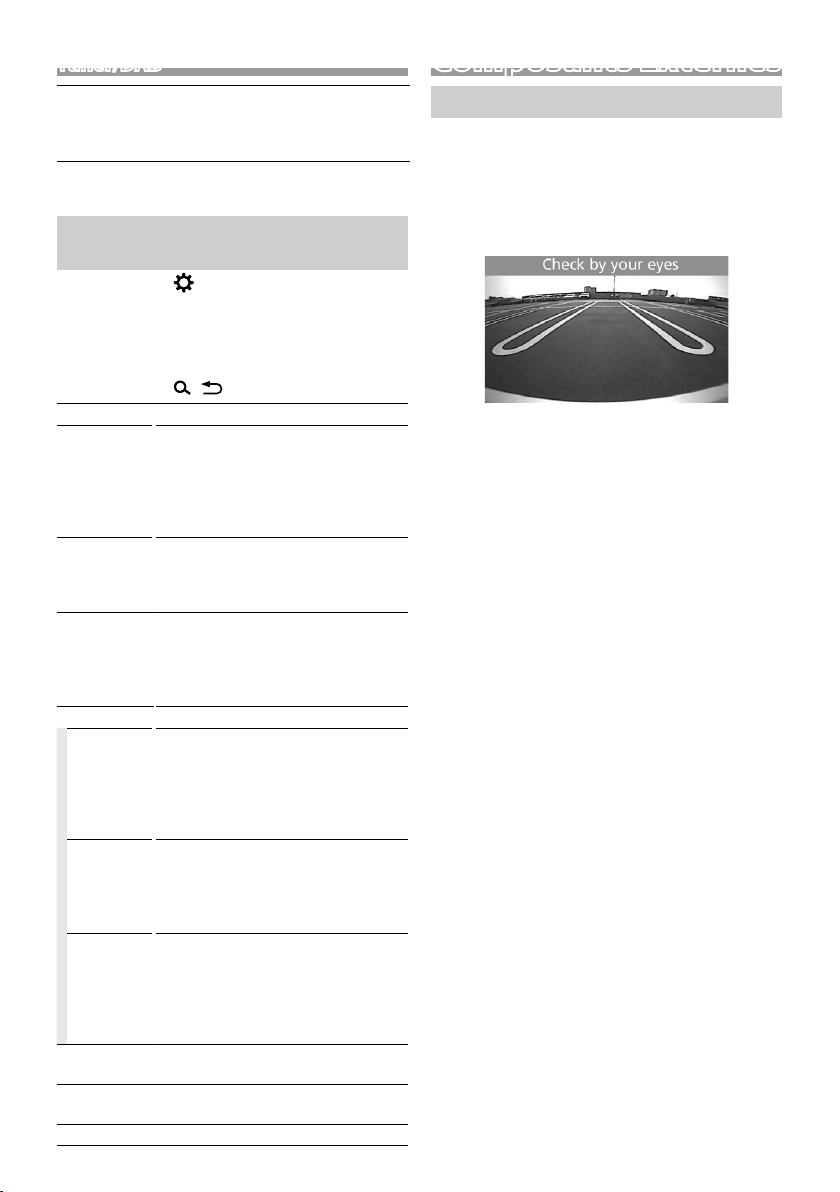
Rear view camera
To use a rear view camera, the REVERSE lead
connection is required. For connecting a rear view
camera. (P.13)
Ñ Displaying the picture from the rear
view camera
The rear view screen is displayed when you shift the
gear to the reverse (R) position.
Ñ To display the picture from the rear view
camera manually
1 Press <CAMERA>.
English |
7
Page 8
Bluetooth® smartphoneBluetooth® smartphone
Register your smartphone to the unit
You can use your Bluetooth smartphone when
paired to this unit.
• You can pair the device and the unit using SSP
(Secure Simple Pairing) which only requires
confirmation.
• One device can be connected at a time.
• When you register a new Bluetooth device,
disconnect the Bluetooth device currently
connected and then register the new device.
1 Turn on the Bluetooth function on your
smartphone/cell-phone.
2 Search the unit (“KD-X56*”) from your
smartphone/cell-phone.
If a PIN code is required, enter the PIN code
(“0000”).
Ñ Disconnecting the device
• Turn off the Bluetooth function from your
smartphone/cell-phone.
• Turn off the ignition switch.
Ñ About smartphone compatible with
Phone book Access Profile (PBAP)
If your smartphone supports PBAP, you can display
the following items when the smartphone is
connected.
• Phone book
• Dialed calls, received calls, and missed calls
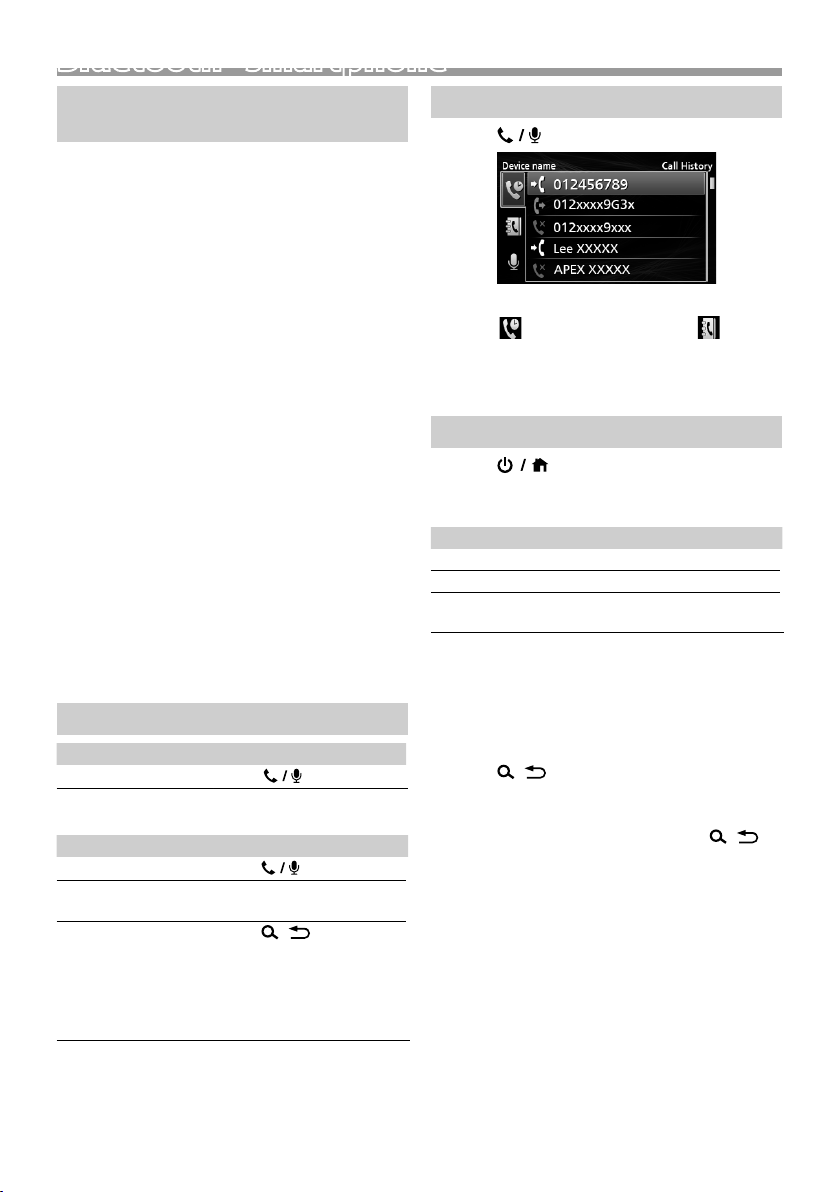
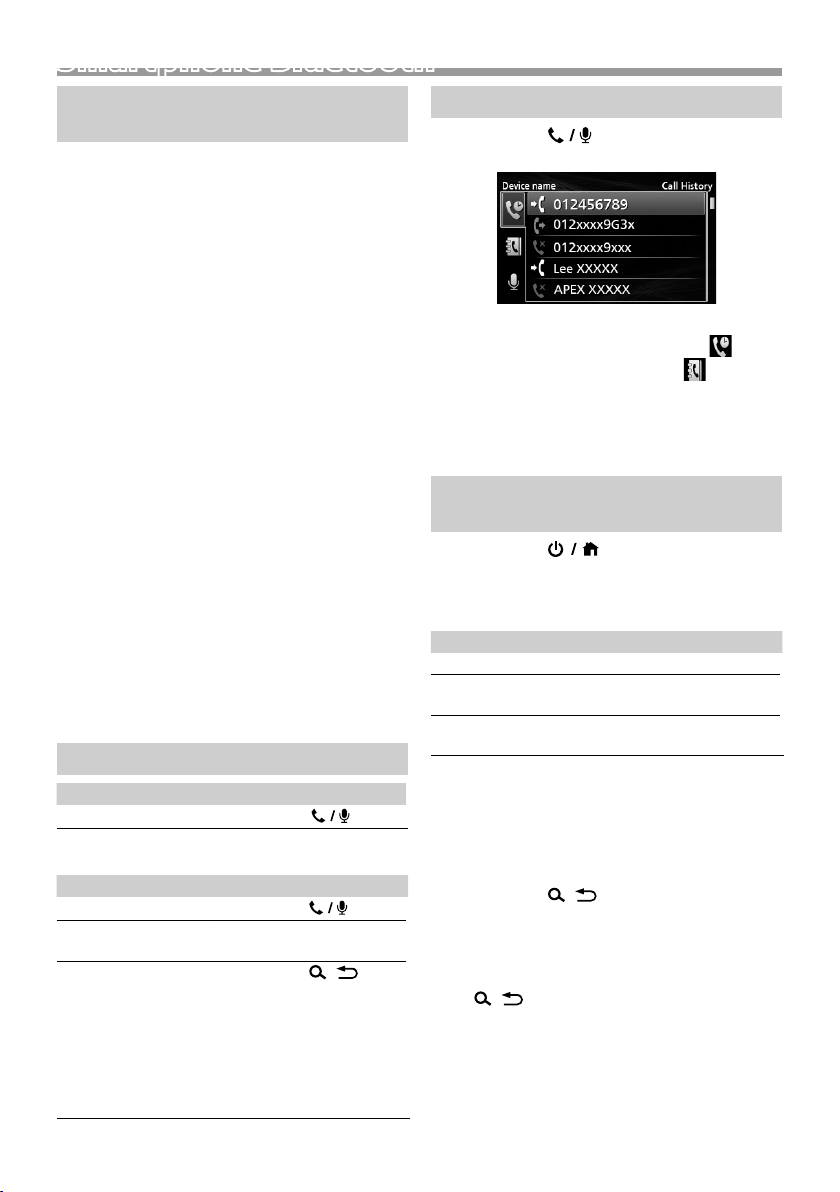
Receive a call
To Do this
Answer a call
Ñ Operations during a call
To Do this
End a call
Adjust the phone
volume
Switching between
hands-free mode and
phone mode
Press <
Press <
Turn the volume knob.
Press <
Each time you press the
button, “Transfer!” appears
and talking method is
switched between handsfree mode and phone mode.
>.
>.
>.
Make a phone call
1 Press < > to enter Bluetooth mode.
2 Press <E >/<F> to select a method to make
a call ([ ]: from the calls history/[ ]: from
the phone book).
3 Turn the volume knob to select the target, then
press the knob to make a call.
Playing Bluetooth Audio Device
1 Press < > to display the HOME screen.
2 Turn the volume knob to select [BT Audio], then
press the knob.
To Do this
Play/pause Press the volume knob.
Select a file Press <E>/<F> repeatedly.
Fast-backward/
Fast-forward
Press and hold <E>/<F>.
✎ NOTE
• Operations and display indications may differ
according to their availability on the connected
device.
Ñ Selecting a content in a list
1 Press < > to display the LIST screen.
2 Turn the volume knob to select an item, then
press the knob.
• To return to the previous layer, press <
>.
8
Page 9

Setup
Setup
Settings
1 Press and hold < > to display the settings.
2 Press <E >/<F> to select the category.
3 Turn the volume knob to select an item (see the
following table), then press the knob.
4 Repeat step 3 until the desired item is selected/
activated or follow the instructions stated on
the selected item.
5 Press < >.
Audio Settings
Fader R12 — F12 (00): Adjusts the front and
Balance L12 — R12 (00): Adjusts the left and
General Settings
Beep ON/OFF: Activates or deactivates the
Date/Clock Adjusts the date and clock. (P. 3)
Language Selects the text language used for on-
Time
Format
Wallpaper Black/Blue: Selects the wallpaper
Demo Set the demonstration mode. Default
Initialize Select [Initialize] and then select [ Yes]
Bluetooth Settings
Sync
Phonebook
BT
Information
rear speaker output balance.
right speaker output balance.
keypress tone. Default is “ON”.
screen information.
12h/24h: Selects time format. Default
is “24h”.
image.
is “ON”.
to set all the settings to the initial
default settings.
ON/OFF: Activates or deactivates the
synchronization of the phonebook
in the connected smartphone with
the unit.
Displays the information about the
connected Bluetooth device (device
name, phone name, and mac address).
Sound settings
1 Press < > to display the sound setting.
2 Turn the volume knob to select an item (see the
following table), then press the knob.
3 Repeat step 2 until the desired item is selected/
activated or follow the instructions stated on
the selected item.
4 Press < >.
Graphic
Equalizer
Loudness Sets the amounts of boost of low and
X’over You can set the crossover frequency of
Delay Adjust the sound delay time so that the
Selects a preset equalizer suitable to the
music genre.
Flat / DRVN / Hard Rock / Hip Hop / Jazz
/ Pop/ R & B / User / Classical
Select [User] to use the settings made
1) Press the volume knob to select the
frequency.
2) Turn the volume knob to adjust the
level.
3) Press <
high tones.
“ON”, “OFF” (Default)
speakers.
1) Press <E>/<F> to select the
speaker.
2) Press the volume knob to select the
item.
3) Turn the volume knob to adjust the
value.
4) Press <
sounds from different speakers arrive at
the listener sitting on the selected seat
at the same time.
1) Press <E>/<F> to select the
speaker.
2) Turn the volume knob to adjust the
value.
3) Press <
>.
>.
>.
English |
9
Page 10
InstallationInstallation
Before installation
Before installation of this unit, please note the
following precautions.
#WARNINGS
• If you connect the ignition wire (red) and the battery
wire (yellow) to the car chassis (ground), you may
cause a short circuit, that in turn may start a fire.
Always connect those wires to the power source
running through the fuse box.
• Do not cut out the fuse from the ignition wire (red)
and the battery wire (yellow). The power supply
must be connected to the wires via the fuse.
#CAUTION
• Install this unit in the console of your vehicle.
Do not touch the metal part of this unit during and
shortly after the use of the unit. Metal part such as
the heat sink and enclosure become hot.
✎ NOTE
• Mounting and wiring this product requires skills and
experience. For best safety, leave the mounting and
wiring work to professionals.
• Make sure to ground the unit to a negative 12V DC
power supply.
• Do not install the unit in a spot exposed to direct
sunlight or excessive heat or humidity. Also avoid
places with too much dust or the possibility of water
splashing.
• Do not use your own screws. Use only the screws
provided. If you use the wrong screws, you could
damage the unit.
• If your car’s ignition does not have an ACC position,
connect the ignition wires to a power source that
can be turned on and off with the ignition key. If you
connect the ignition wire to a power source with a
constant voltage supply, such as with battery wires,
the battery may be drained.
• If the console has a lid, make sure to install the unit
so that the front panel will not hit the lid when
closing and opening.
• If the fuse blows, first make sure the wires aren’t
touching to cause a short circuit, then replace the
old fuse with one with the same rating.
• Insulate unconnected wires with vinyl tape or other
similar material. To prevent a short circuit, do not
remove the caps on the ends of the unconnected
wires or the terminals.
• Secure the wires with cable clamps and wrap vinyl
tape around the wires that comes into contact with
metal parts to protect the wires and to prevent short
circuit.
• Connect the speaker wires correctly to the terminals
to which they correspond. The unit may be
damaged or fail to work if you share the ¤ wires or
ground them to any metal part in the car.
• When only two speakers are being connected to
the system, connect the connectors either to both
the front output terminals or to both the rear output
terminals (do not mix front and rear). For example,
if you connect the ¢ connector of the left speaker
to a front output terminal, do not connect the ¤
connector to a rear output terminal.
• After the unit is installed, check whether the brake
lamps, blinkers, wipers, etc. on the car are working
properly.
• Mount the unit so that the mounting angle is 30°
or less.
• Do not press hard on the panel surface when installing
the unit to the vehicle. Otherwise scars, damage, or
failure may result.
• Reception may drop if there are metal objects near
the Bluetooth antenna.
Bluetooth antenna unit
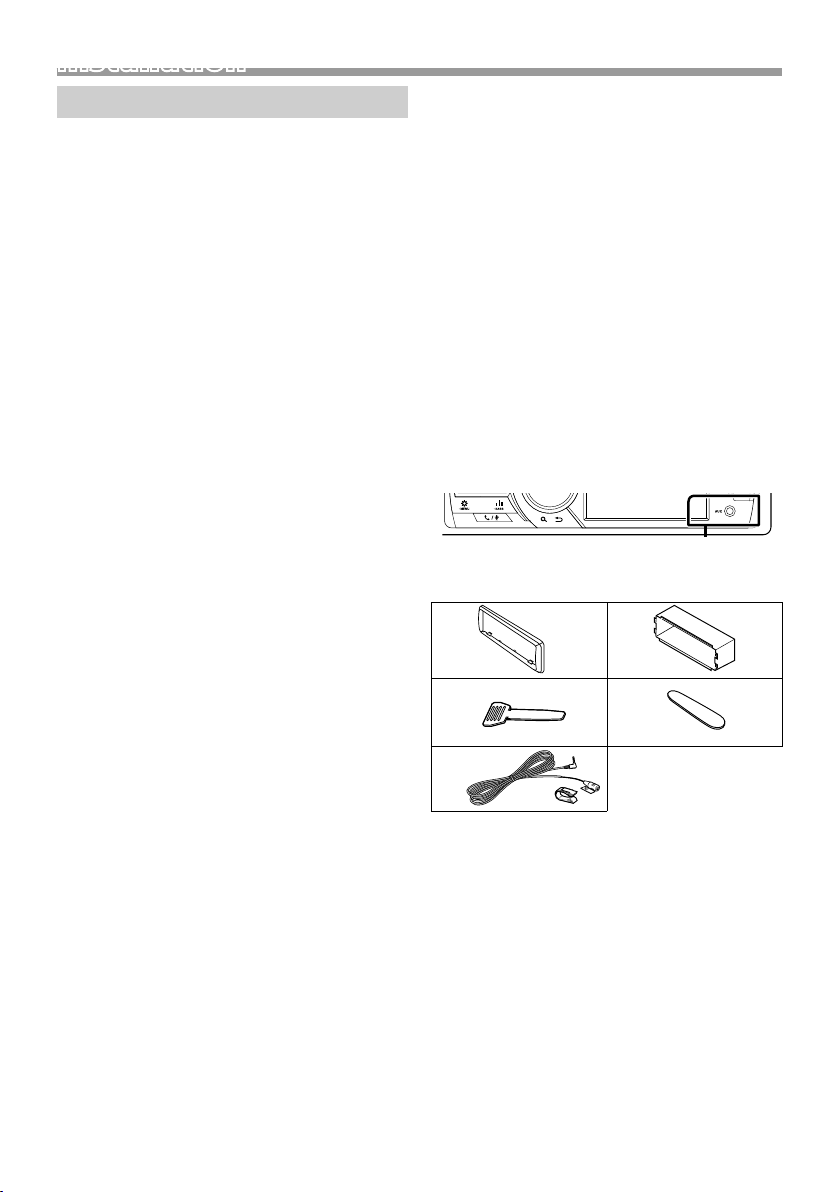
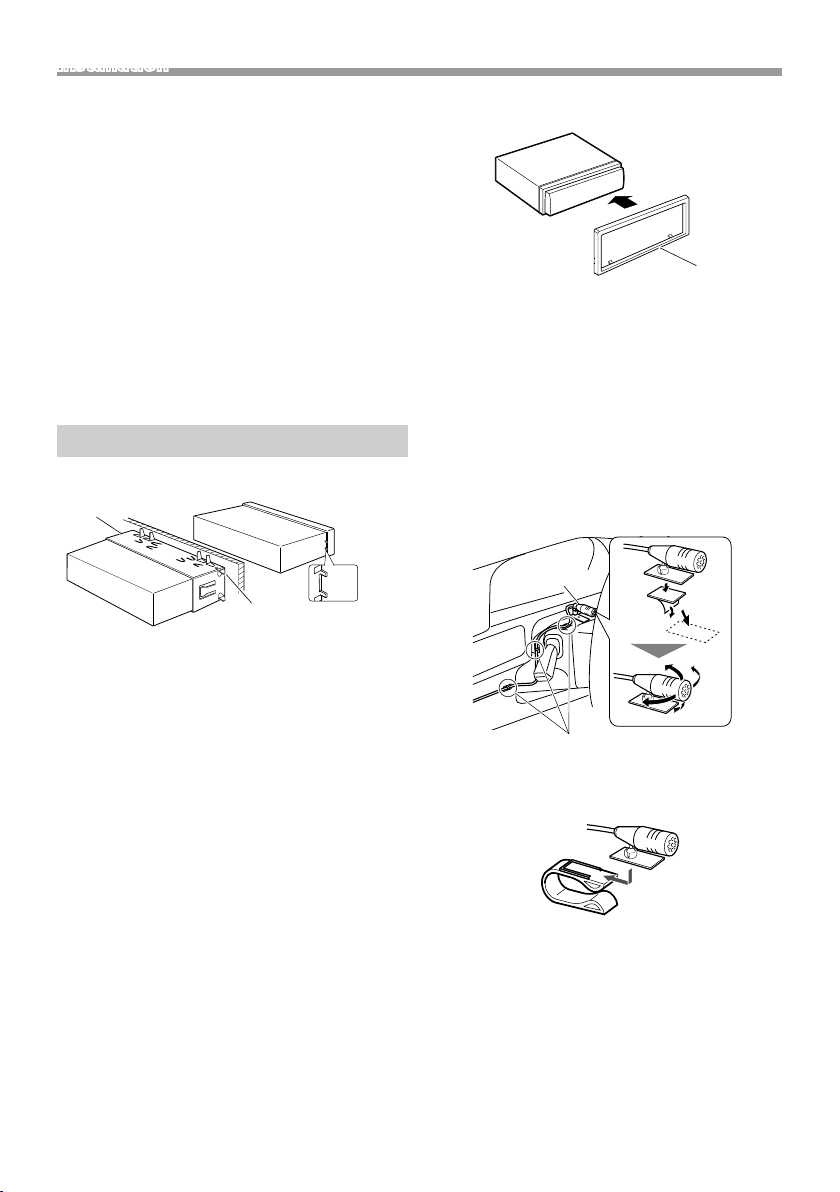
Ñ Supplied accessories for installation
1
3
5
(3 m)
x1
x2
2
x1
4
x1
x1
10
Page 11
Installation
Ñ Installation procedure
1) To prevent a short circuit, remove the key from
the ignition and disconnect the ¤ terminal of the
battery.
2) Make the proper input and output wire
connections for each unit.
3) Connect the wire on the wiring harness.
4) Take Connector B on the wiring harness and
connect it to the speaker connector in your vehicle.
5) Take Connector A on the wiring harness and
connect it to the external power connector on your
vehicle.
6) Connect the wiring harness connector to the unit.
7) Install the unit in your car.
8) Reconnect the ¤ terminal of the battery.
9) Press the reset button.
Installing the unit
Ñ Non-Japanese cars
2
Ñ Trim plate
1) Attach accessory 1 to the unit.
1
Ñ Microphone unit
1) Check the installation position of the microphone
(accessory 5).
2) Clean the installation surface.
3) Remove the separator of the microphone
(accessory 5), and stick the microphone to the
place shown below.
4) Wire the microphone cable up to the unit with it
secured at several positions using tape or other
desired method.
5) Adjust the direction of the microphone (accessory
5) to the driver.
A
Bend the tabs of the
mounting sleeve with a
screwdriver or similar utensil
and attach it in place.
✎ NOTE
• Make sure that the unit is installed securely in place.
If the unit is unstable, it may malfunction (eg, the
sound may skip).
• If the panel opening of your vehicle is too small to
fit the unit (A), trim (the upper and lower sides and
right and left sides of ) panel opening.
5
Fix a cable with a commercial item of tape.
✎ NOTE
• Use the clips if necessary.
English |
11
Page 12
Installation
2
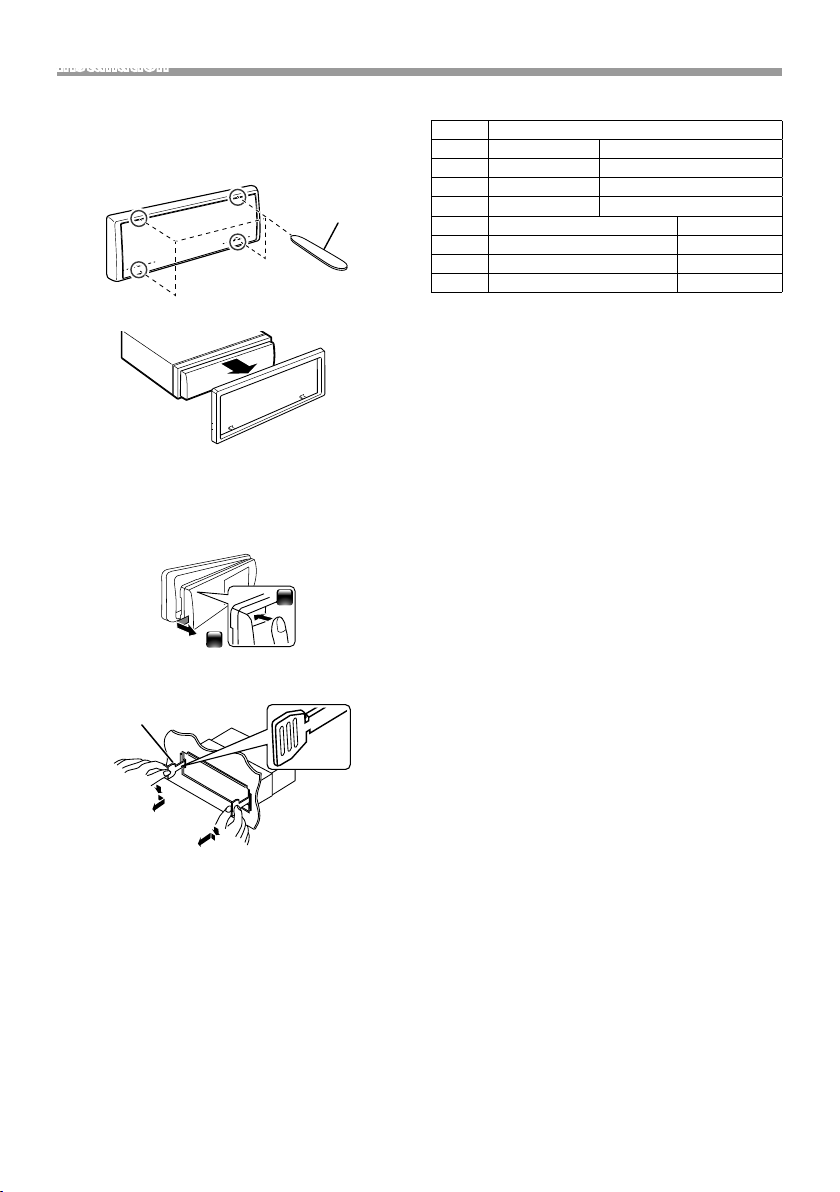
Ñ Removing the trim plate
1) Use the extraction key (accessory 4) to lever out
the four tabs (two on the top part, two on the
bottom part).
4
2) Pull the trim plate forward.
Ñ Removing the unit
1) Remove the trim plate by referring to step 1 in
“Removing the trim plate”.
2) Detach the faceplate.
1
3) Insert the two extraction key (accessory 3) deeply
into the slots on each side, as shown.
3
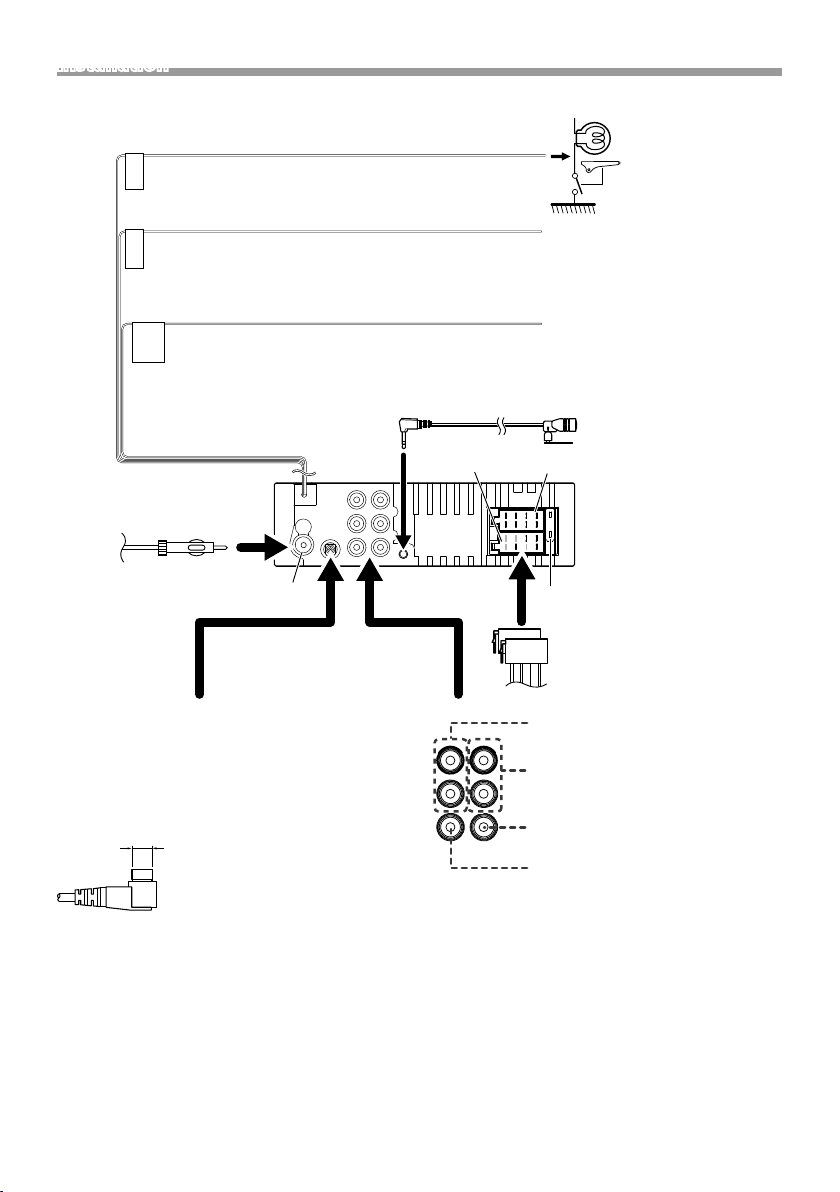
Ñ Wiring harness connector function guide
Pin Color and function
A-4 Yellow Batter y
A-5 Blue/White
[1]
Power Control
A-7 Red Ignition (ACC)
A-8 Black Earth (Ground) Connection
B-1/ B-2 Purple (+) / Purple/Black (–) Rear Right
B-3/ B-4 Gray (+) / Gray/Black (–) Front Right
B-5/ B-6 White (+) / White/Black (–) Front Lef t
B-7/ B-8 Green (+) /
• Speaker Impedance: 4-8 Ω
[1]
Max. 150mA, 12V
Green/Black (–) Rear Left
! CAUTION
Before you connect the commercially available
ISO connectors to the unit, check the following
condition:
• Make sure that the pin assignment of the connector
matches with the JVC unit.
• Take extra notice of the power wire.
• In case battery wire and ignition wire are not
corresponding then change them accordingly.
• In case the car does not have an ignition wire, use a
commercially available interface.
4) Lower the removal tool toward the bottom, and
pull out the unit halfway while pressing towards
the inside.
✎ NOTE
• Be careful to avoid injury from the catch pins on
the extraction key.
5) Pull the unit all the way out with your hands, being
careful not to drop it.
12
Page 13

Installation
Ñ Connecting wires to terminals
Light Green (Parking sensor wire)
For best safety, be sure to connect the parking
PRK SW
sensor.
Purple/White (Reverse sensor wire)
Connect to vehicle’s reverse lamp harness when using the
REVERSE
optional rear view camera.
Light Blue/Yellow (Steering remote control wire)
To steering remote
To use the steering wheel remote control feature, you need an exclusive
STEERING
WHEEL
REMOTE
INPUT
remote adapter (not supplied) matched to your car.
Connect to the
vehicle’s parking brake
detection switch
harness.
Accessory 5:
Bluetooth Microphone
FM/AM antenna
FM/AM antenna input
DAB antenna jack (SMB connector)
KD -X561DBT only
!
When using a commercially available
DAB antenna, the diameter of the SMB
connector must be Φ6.5 mm or less.
Φ 6.5 mm (maximum)
Connector A
Connector B
1 3 5 7
15A
2 4 6 8
1 3 5 7
2 4 6 8
Fuse (15A)
ISO Connector
Rear Audio Preout
(Left; White, Right; Red)
Front Audio Preout
(Left; White, Right; Red)
Subwoofer Preout (Blue)
Rear view camera input (Yellow)
English |
13
Page 14
About this Unit
About this Unit
Maintenance
Ñ Cleaning the Unit
If the front panel of this unit is stained, wipe it with
a dry soft cloth such as a silicon cloth. If the front
panel is stained badly, wipe the stain off with a
cloth moistened with neutral cleaner, then wipe it
again with a clean soft dry cloth.
! CAUTION
• Applaying spray cleaner directly to the unit may
affect its mechanical parts. Wiping the front panel
with a hard cloth or using a volatile liquid such as
thinner or alcohol may scratch the surface or erase
screened print.
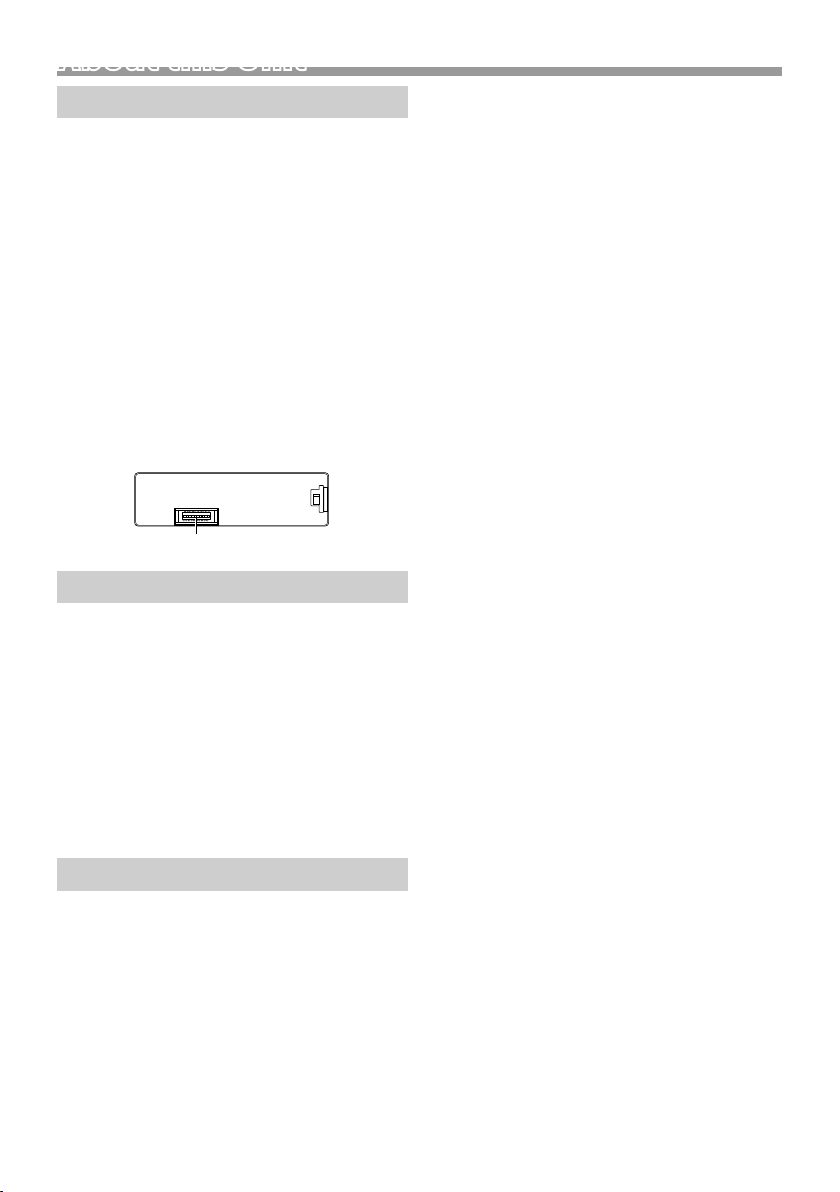
Ñ Cleaning the connector
Detach the faceplate and clean the connector
gently with a cotton swab. Be careful not to
damage the connector.
Connector (on the reverse side of the faceplate)
Note for specifications
Ñ Bluetooth section
Frequency
: 2.402 – 2.480 GHz
Output Power
: +8 dBm (AVE), Power Class1
Ñ General
Speaker Impedance
: 4 – 8 Ω
Operating Voltage
: 12 V DC car battery
Copyrights
• The Bluetooth word mark and logos are registered
trademarks owned by the Bluetooth SIG, Inc.
and any use of such marks by JVC KENWOOD
Corporation is under license. Other trademarks and
trade names are those of their respective owners.
• Use of the Made for Apple badge means that an
accessory has been designed to connect specifically
to the Apple product(s) identified in the badge, and
has been certified by the developer to meet Apple
performance standards. Apple is not responsible for
the operation of this device or its compliance with
safety and regulatory standards. Please note that
the use of this accessory with an Apple product may
14
affect wireless performance.
• Apple, iPhone, iPod, iPod touch, and Lightning are
trademarks of Apple Inc., registered in the U.S. and
other countries.
• Microsoft and Windows Media are either registered
trademarks or trademarks of Microsoft Corporation
in the United States and/or other countries.
• THIS PRODUCT IS LICENSED UNDER THE MPEG4 VISUAL PATENT PORTFOLIO LICENSE FOR
THE PERSONAL AND NON-COMMERCIAL USE
OF A CONSUMER FOR (¡) ENCODING VIDEO IN
COMPLIANCE WITH THE MPEG-4 VISUAL STANDARD
(“MPEG-4 VIDEO”) AND/OR (¡¡) DECODING MPEG4 VIDEO THAT WAS ENCODED BY A CONSUMER
ENGAGED IN A PERSONAL AND NON-COMMERCIAL
ACTIVIT Y AND/OR WAS OBTAINED FROM A VIDEO
PROVIDER LICENSED BY MPEG LA TO PROVIDE
MPEG-4 VIDEO. NO LICENSE IS GRANTED OR SHALL
BE IMPLIED FOR ANY OTHER USE. ADDITIONAL
INFORMATION INCLUDING THAT RELATING TO
PROMOTIONAL, INTERNAL AND COMMERCIAL USES
AND LICENSING MAY BE OBTAINED FROM MPEG LA,
LLC. SEE HTTP://WWW.MPEGLA.COM.
• THIS PRODUCT IS LICENSED UNDER THE AVC
PATENT PORTFOLIO LICENSE FOR THE PERSONAL
USE OF A CONSUMER OR OTHER USES IN WHICH IT
DOES NOT RECEIVE REMUNERATION TO (¡)ENCODE
VIDEO IN COMPLIANCE WITH THE AVC STANDARD
(“AVC VIDEO”) AND/OR (¡¡)DECODE AVC VIDEO
THAT WAS ENCODED BY A CONSUMER ENGAGED
IN A PERSONAL ACTIVITY AND/OR WAS OBTAINED
FROM A VIDEO PROVIDER LICENSED TO PROVIDE
AVC VIDEO. NO LICENSE IS GRANTED OR SHALL
BE IMPLIED FOR ANY OTHER USE. ADDITIONAL
INFORMATION MAY BE OBTAINED FROM MPEG LA,
L.L.C. SEE HTTP://WWW.MPEGLA.COM
• libFLAC
Copyright (C) 2000-2009 Josh Coalson
Copyright (C) 2011-2013 Xiph.Org Foundation
– Redistribution and use in source and binary forms,
with or without modification, are permitted
provided that the following conditions are met:
– Redistributions of source code must retain the
above copyright notice, this list of conditions and
the following disclaimer.
– Redistributions in binary form must reproduce the
above copyright notice, this list of conditions and
the following disclaimer in the documentation
and/or other materials provided with the
distribution.
Neither the name of the Xiph.org Foundation
nor the names of its contributors may be used to
endorse or promote products derived from this
software without specific prior written permission.
THIS SOFTWARE IS PROVIDED BY THE COPYRIGHT
Page 15
About this Unit
HOLDERS AND CONTRIBUTORS ``AS IS’’ AND ANY
EXPRESS OR IMPLIED WARRANTIES, INCLUDING,
BUT NOT LIMITED TO, THE IMPLIED WARRANTIES OF
MERCHANTABILITY AND FITNESS FOR A PARTICULAR
PURPOSE ARE DISCLAIMED. IN NO EVENT SHALL
THE FOUNDATION OR CONTRIBUTORS BE LIABLE
FOR ANY DIRECT, INDIRECT, INCIDENTAL, SPECIAL,
EXEMPLARY, OR CONSEQUENTIAL DAMAGES
(INCLUDING, BUT NOT LIMITED TO, PROCUREMENT
OF SUBSTITUTE GOODS OR SERVICES; LOSS OF USE,
DATA, OR PROFITS; OR BUSINESS INTERRUPTION)
HOWEVER CAUSED AND ON ANY THEORY OF
LIABILITY, WHETHER IN CONTRACT, STRICT LIABILITY,
OR TORT (INCLUDING NEGLIGENCE OR OTHERWISE)
ARISING IN ANY WAY OUT OF THE USE OF THIS
SOFTWARE, EVEN IF ADVISED OF THE POSSIBILITY OF
SUCH DAMAGE.
• libogg
Copyright (c) 2002, Xiph.org Foundation
Redistribution and use in source and binary forms,
with or without modification, are permitted
provided that the following conditions are met:
– Redistributions of source code must retain the
above copyright notice, this list of conditions and
the following disclaimer.
– Redistributions in binary form must reproduce the
above copyright notice, this list of conditions and
the following disclaimer in the documentation
and/or other materials provided with the
distribution.
– Neither the name of the Xiph.org Foundation
nor the names of its contributors may be used to
endorse or promote products derived from this
software without specific prior written permission.
THIS SOFTWARE IS PROVIDED BY THE COPYRIGHT
HOLDERS AND CONTRIBUTORS ``AS IS’’ AND ANY
EXPRESS OR IMPLIED WARRANTIES, INCLUDING,
BUT NOT LIMITED TO, THE IMPLIED WARRANTIES OF
MERCHANTABILITY AND FITNESS FOR A PARTICULAR
PURPOSE ARE DISCLAIMED. IN NO EVENT SHALL
THE FOUNDATION OR CONTRIBUTORS BE LIABLE
FOR ANY DIRECT, INDIRECT, INCIDENTAL, SPECIAL,
EXEMPLARY, OR CONSEQUENTIAL DAMAGES
(INCLUDING, BUT NOT LIMITED TO, PROCUREMENT
OF SUBSTITUTE GOODS OR SERVICES; LOSS OF USE,
DATA, OR PROFITS; OR BUSINESS INTERRUPTION)
HOWEVER CAUSED AND ON ANY THEORY OF
LIABILITY, WHETHER IN CONTRACT, STRICT LIABILITY,
OR TORT (INCLUDING NEGLIGENCE OR OTHERWISE)
ARISING IN ANY WAY OUT OF THE USE OF THIS
SOFTWARE, EVEN IF ADVISED OF THE POSSIBILITY OF
SUCH DAMAGE.
Ñ Information on Disposal of Old Electrical
and Electronic Equipment and Batteries
(applicable for EU countries that have
adopted separate waste collection
systems)
Products and batteries with the symbol (crossed-out
wheeled bin) cannot be disposed as household waste.
Old electrical and electronic equipment and batteries
should be recycled at a facility capable of handling
these items and their waste byproducts.
Contact your local authority for details in locating a
recycle facility nearest to you.
Proper recycling and waste disposal will help conserve
resources whilst preventing detrimental effects on our
health and the environment.
Notice: The sign “Pb” below the symbol for batteries
indicates that this battery contains lead.
For Israel
Ñ ילמשח דויצ לש הפשאל הכלשה רבדב עדימ
תונידמל יטנוולר( תוללוס ןכו ןשי ינורטקלאו
.)תדרפומ הפשא ףוסיא תכרעמב תושמתשמש
םע הפשא חפ( ןומיסה םע תוללוסו םירצומ ךילשהל ןתינ אל
.הליגר תיתיב הפשאכ )וילע X
ןקתמב תוללוס ןכו ןשי ינורטקלאו ילמשח דויצ רזחמל שי
.םהלש יאוולה ירצותבו הלאכ םיטירפב לפטל לגוסמה
ןקתמ תודוא םיטרפ תלבקל תימוקמה תושרה םע רשק ורצ
םיתואנ הפשאל הכלשהו רוזחימ .םכילא בורקה רוזחימה
ונתואירב לע תוילילש תועפשה עונמלו םיבאשמ רמשל ורזעי
.הביבסה לעו
ןייצמ תוללוס רובע ןומיסל תחתמש Pb ןומיסה :בל ומיש
.תרפוע הליכמ הללוסהש
English |
15
Page 16
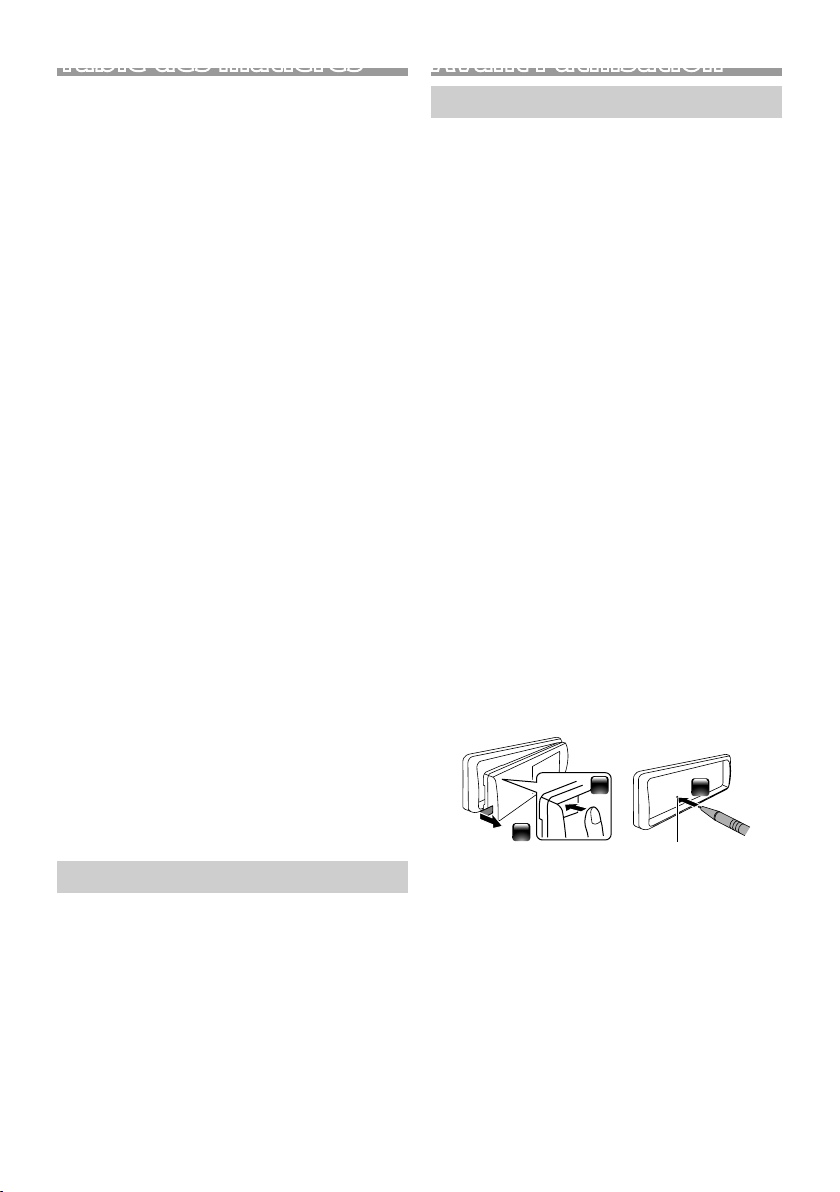
Table des matières
Avant l'utilisation ................................................................ 16
Comment lire ce manuel ...............................................................................16
Précautions .............................................................................................................16
Mise en route ........................................................................ 17
Paramètres initiaux ............................................................................................17
Paramètres de l'horloge .................................................................................17
Les bases ................................................................................ 18
Opérations courantes ......................................................................................18
Comment fixer/détacher la façade .........................................................18
Sélectionner une source ................................................................................18
USB/iPod.................................................................................19
Préparation ..............................................................................................................19
Options de lecture .............................................................................................19
Tuner/DA B ..............................................................................20
Opérations de base du tuner ..................................................................... 20
Utilisation de base de DAB .......................................................................... 20
Paramètres de la fonction tuner .............................................................. 20
Paramètres de la fonction DAB ..................................................................21
Composants Externes ....................................................... 21
Caméra de recul ...................................................................................................21
Smartphone Bluetooth® ...................................................22
Enregistrer votre smartphone dans l'appareil ................................22
Réception d'un appel ...................................................................................... 22
Passer un appel ...................................................................................................22
Utilisation d'un appareil audio Bluetooth en lecture ................. 22
Conguration .......................................................................23
Paramètres..............................................................................................................23
Paramètres du son ............................................................................................ 23
Installation ............................................................................. 24
Avant l'installation ..............................................................................................24
Installation de l'appareil .................................................................................25
À propos de cet appareil ..................................................28
Entretien................................................................................................................... 28
Remarque pour les spécifications........................................................... 28
Copyrights .............................................................................................................. 28
Avant l'utilisation
Précautions
#AVERTISSEMENT
Ñ Pour éviter toute blessure ou incendie,
prenez les précautions suivantes:
• Pour éviter un court-circuit, ne mettez ni ne
laissez jamais d'objets métalliques (comme des
pièces de monnaie ou des outils en métal) à
l'intérieur de l'appareil.
• Ne regardez pas ni ne fixez votre regard sur
l'affichage de l'appareil trop longtemps pendant
la conduite.
• Si vous rencontrez des problèmes pendant
l'installation, consultez votre revendeur JVC.
Ñ Précautions d'utilisation de l'appareil
• Lorsque vous achetez des accessoires en option,
vérifiez auprès de votre revendeur JVC qu'ils
fonctionneront avec votre modèle et dans votre
région.
• Les fonctions Radio Data System ou Radio
Broadcast Data System sont inopérantes dans
les zones où le service n'est pris en charge par
aucune station de radiodiffusion.
Ñ Protection du moniteur
• Ne touchez pas le moniteur avec un stylo à
bille ou tout autre outil pointu. Cela pourrait
l'endommager.
Ñ Comment réinitialiser votre appareil
Si l'appareil ou l'équipement qui lui est branché ne
fonctionne pas normalement, réinitialisez-le.
Comment lire ce manuel
• Les écrans illustrés dans le présent guide sont des
exemples destinés à fournir des explications plus
claires des opérations. Pour cette raison, il peut
arriver qu'ils soient différents de ceux rencontrés
dans la réalité.
• Dans les procédures opérationnelles, la forme du
crochet indique l'élément que vous devez vérifier.
[ ] : indique les éléments ou le menu sélectionnés.
< >: indique le nom des boutons de la façade.
• Langue d'affichage : L'anglais est utilisé dans un but
explicatif. Vous pouvez choisir la langue d'affichage
à partir du menu [Language]. Voir Language
(p.23).
16
1
2
Bouton de réinitialisation
3
Page 17
Mise en route
Paramètres initiaux
1 Tournez la clé de contact de votre véhicule sur
la position ACC.
L'appareil se met en marche.
2 Tournez le bouton du volume pour sélectionner
l'élément à régler (voir le tableau ci-dessous),
puis appuyez sur le bouton pour effectuer une
sélection.
Language
Sélectionne la langue utilisée sur l'écran de
commande et sur les éléments de configuration.
La langue sélectionnée par défaut est « English »
(anglais).
Area
EUROPE (par défaut) : Pour l'Europe, intervalles AM/
FM : 9 kHz/50 kHz.
M.EAST : Pour le Moyen-Orient, intervalles AM/FM :
9 kHz/50 kHz.
Date/Clock
Réglez la date puis l'heure.
Heure/minute/mois/jour/année
Demo
Permet de paramétrer le mode de démonstration.
Le choix par défaut est “ON”.
3 Tournez le bouton du volume pour sélectionner
[Finish], puis appuyez sur le bouton.
Paramètres de l'horloge
Ñ Synchronisation de l'heure avec FM RDS
Activer [RDS Clock Sync] (Synchronisation de
l'heure RDS). Voir «Paramètres de la fonction
tuner» (p.20).
Ñ Ajuster l'horloge manuellement
✎ REMARQUE
• Désactivez [RDS Clock Sync] avant de régler
l'horloge. Voir «Paramètres de la fonction tuner»
(p.20).
1 Appuyez et maintenez enfoncée la touche
< > pour afficher les paramètres.
2 Appuyez sur <E>/< F> pour sélectionner
[ ].
3 Tournez le bouton du volume pour sélectionner
[Time Format], puis appuyez sur le bouton
pour sélectionner le format de l'heure ([12h] ou
[24h]).
4 Tournez le bouton du volume pour sélectionner
[Date/Clock], puis appuyez sur le bouton.
L'écran de l'heure s'affiche.
5 Tournez le bouton du volume pour régler
l'heure, puis appuyez sur le bouton.
6 Tournez le bouton du volume pour régler les
minutes, puis appuyez sur le bouton.
7 Tournez le bouton du volume pour régler le
jour, puis appuyez sur le bouton.
8 Tournez le bouton du volume pour régler le
mois, puis appuyez sur le bouton.
9 Tournez le bouton du volume pour régler
l'année, puis appuyez sur le bouton.
10
Appuyez sur < >.
Français |
17
Page 18
Les basesLes bases
25364
7
1
Bouton du volume (tournez/appuyez)
Opérations courantes
Ñ Allumer le courant
1 Appuyez sur < >.
Ñ Éteindre le courant
1 Appuyez et maintenez enfoncé < >.
Ñ Réglage du volume
1 Tournez le bouton du volume.
Ñ Coupe le son.
1 Appuyez et maintenez enfoncé le bouton du
volume.
apparaît lorsque la fonction sourdine est active.
Pour rétablir le son, appuyez et maintenez
enfoncé à nouveau ou réglez le volume.
Ñ Afficher l'horloge
1 Appuyez et maintenez enfoncé le bouton
<DIM>.
Ñ Sélectionner le mode gradateur
1 Appuyez sur le bouton <DIM>.
Gradateur 1, gradateur 2, gradateur 3
Comment fixer/détacher la façade
AttacherDétacher
1
1
Capteur à distance
MoniteurBouton de séparation
Sélectionner une source
1 Appuyez sur < > pour afficher l'écran
d'ACCUEIL.
L'écran d'ACCUEIL apparaît.
2 Tournez le bouton du volume pour sélectionner
la source, puis appuyez sur le bouton.
Affichage de l'horloge
1
Bascule vers la diffusion du tuner FM. (p.20)
2
Bascule vers la diffusion du tuner AM. (p.20)
3
Commute sur la réception DAB. (p.20)
4
(KD-X561DBT uniquement)
Lit depuis un lecteur audio Bluetooth. (p.22)
5
6
[USB]
Lit les fichiers d'un périphérique USB. (p.19)
[iPod]
Lit depuis un iPod/iPhone. (p.19)
• Lorsqu'un iPod/iPhone est connecté.
Bascule vers un élément externe connecté à la
7
borne d'entrée AUX.
2
18
2
Page 19

USB/iPod
USB/iPod
Préparation
Ñ Connexion d'un périphérique USB/iPod/
iPhone
1 Ouvrez le cache du port sur la face avant.
2 Branchez le périphérique USB avec le câble USB
(vendu séparément).
Connectez l'iPod/iPhone à l'aide du KS-U62
(accessoire en option).
L'appareil lit le périphérique et la lecture
commence.
• Tension d'alimentation maximum pour USB :
CC 5 V = 1 A
Ñ Pour débrancher le périphérique USB/
iPod/iPhone
1 Appuyez sur < > pour afficher l'écran
d'ACCUEIL.
2 Tournez le bouton du volume pour sélectionner
un autre élément que [USB] et [iPod], puis
appuyez sur le bouton.
3 Détachez un périphérique USB/iPod/iPhone.
Ñ Périphérique USB utilisable
Cet appareil peut lire les fichiers MP3/WMA/AAC/
WAV/FLAC/OGG/MPEG1/MPEG2/MPEG4/H.264/
MKV/JPEG/BMP/PNG stockés dans un périphérique
de stockage de masse USB.
Ñ iPod/iPhone connectables
Les modèles suivants peuvent être reliés à cet
appareil.
Convient pour
• iPhone X
• iPhone 8 Plus
• iPhone 8
• iPhone 7 Plus
• iPhone 7
• iPhone SE
• iPhone 6s Plus
• iPhone 6s
• iPhone 6 Plus
• iPhone 6
• iPhone 5s
• iPod touch (6e
génération)
Options de lecture
Pour Faire ceci
Lecture/pause Appuyez sur le bouton du volume.
Sélectionner un
fichier
Retour rapide/
Avance rapide
Appuyez sur <E>/<F> à
plusieurs reprises.
Appuyez et maintenez enfoncée la
touche <E>/<F>.
• Fichiers vidéo : Chaque fois que
vous appuyez sur le bouton, la
vitesse de recherche change.
Ñ Sélection d'une piste/d'un contenu dans
une liste (recherche le fichier)
1 Appuyez sur < > pour afficher l'écran de
la LISTE.
2 Appuyez sur <E>/< F> pour sélectionner
si vous désirez rechercher par fichiers audio
[ ], fichiers vidéo [ ] ou fichiers image
[ ]. (USB seulement)
3 Tournez le bouton du volume pour sélectionner
la catégorie/le dossier de votre choix, puis
appuyez sur le bouton.
• Le contenu d'un dossier est affiché lorsque vous
le sélectionnez.
• Pour revenir au niveau précédent, appuyez sur
<
>.
4 Tournez le bouton du volume pour sélectionner
l'élément de votre choix, puis appuyez sur le
bouton.
La lecture commence.
Français |
19
Page 20
Tuner/DAB
Tuner/DAB
Opérations de base du tuner
1 Appuyez sur < > pour afficher l'écran
d'ACCUEIL.
2 Tournez le bouton du volume pour sélectionner
[FM] ou [AM], puis appuyez sur le bouton.
3 Appuyez sur <E>/< F> pour rechercher
automatiquement une station.
« Auto Seek » (Recherche automatique) apparaît.
(ou)
Appuyez et maintenez enfoncée la touche
<E>/<F> à plusieurs reprises pour
rechercher une station manuellement.
« Manual Seek » (Recherche Manuelle) apparaît.
✎ REMARQUE
• Pour enregistrer les stations, utilisez [Manual Store]
ou [Auto Store].
Ñ Sélectionner une station mémorisée
Vous pouvez présélectionner 15 stations FM et 15
stations AM.
1 Appuyez sur < > pour afficher l'écran de
la LISTE.
2 Tournez le bouton du volume pour sélectionner un
numéro de préréglage, puis appuyez sur le bouton.
✎ REMARQUE
• Pour quitter, appuyez sur < >.
Utilisation de base de DAB (KD-X561DBT)
1 Appuyez sur < > pour afficher l’écran
d’ACCUEIL.
2 Tournez le bouton du volume pour sélectionner
[DAB], puis appuyez sur le bouton.
3 Appuyez sur <E>/< F> pour rechercher
automatiquement un ensemble.
« Auto Seek » (Recherche automatique) apparaît.
(ou)
Appuyez et maintenez enfoncée la touche
<E>/<F> à plusieurs reprises pour
rechercher un ensemble manuellement.
« Manual Seek » (Recherche Manuelle) apparaît.
4 Appuyez et maintenez enfoncée la touche
<E>/<F> sélectionnez un service
(primaire ou secondaire) pour écouter.
✎ REMARQUE
• Pour mémoriser le service, exécutez [Favorite].
Ñ Sélectionner un service
1 Appuyez sur < > pour afficher l’écran de
la LISTE.
2 Tournez le bouton du volume pour sélectionner
un service, puis appuyez sur le bouton.
20
Ñ Sélectionner un service mémorisé
Vous pouvez mémoriser jusqu’à 15 services
1 Appuyez sur < > pour afficher l’écran de
la LISTE.
2 Appuyez sur <E>/< F> pour sélectionner
[
].
3 Tournez le bouton du volume pour sélectionner
un service, puis appuyez sur le bouton.
✎ REMARQUE
• Pour quitter, appuyez sur < >.
Paramètres de la fonction tuner
1 Appuyez sur < > pour afficher le menu des
fonctions.
2 Tournez le bouton du volume pour sélectionner
l'élément à régler (voir le tableau ci-dessous),
puis appuyez sur le bouton pour effectuer une
sélection.
3 Appuyez sur < >.
Manual
Store
Auto
Store
Local
Seek
Area EUROPE (par défaut) : Pour l'Europe,
Mono *
RDS *
PTY *
AF *
TA *
Enregistre une station manuellement.
Pendant l'écoute d'une station que vous
souhaitez enregistrer, tournez le bouton
du volume pour sélectionner un numéro
de préréglage, puis appuyez sur le bouton.
Recherche et enregistre automatiquement
les 15 stations avec les signaux les plus
puissants pour la bande sélectionnée.
• « Auto Store » apparaît.
Recherche uniquement les stations ayant
une intensité suffisante de signal.
« ON », « OFF » (par défaut)
intervalles AM/FM : 9 kHz/50 kHz.
M.EAST : Pour le Moyen-Orient, intervalles
AM/FM : 9 kHz/50 kHz.
1
Détermine s'il faut recevoir les émissions
stéréo en mode stéréo ou en mode
monaural.
« ON », « OFF » (par défaut)
1
Fonctions de FM Radio Data System
« ON » (par défaut), « OFF »
1*2
Recherche un programme par type de
programme.
1*2
Lorsque la réception de la station est
médiocre, sélectionne automatiquement
une station diffusant le même programme
sur le même réseau Radio Data System.
« ON » (par défaut), « OFF »
1*2
Passe automatiquement aux informations
de circulation routière à l'instant ou un
bulletin d'infos-trafic débute. (L'indicateur
TI s'allume.)
« ON », « OFF » (par défaut)
Page 21
Tuner/DAB
RDS
Clock
Sync *1*
*1 FM uniquement
*2 Disponible lorsque [RDS] est réglé sur [ON].
Synchroniser les données de temps de la
station Radio Data System et l'horloge de
2
cet appareil.
« ON » (par défaut), « OFF »
Paramètres de la fonction DAB (KD-X561DBT)
1 Appuyez sur < > pour afficher le menu des
fonctions.
2 Tournez le bouton du volume pour sélectionner
l’élément à régler (voir le tableau ci-dessous), puis
appuyez sur le bouton pour effectuer une sélection.
3 Appuyez sur < > pour quitter.
Scan Station Met à jour la liste des services DAB.
Favorite Permet de mémoriser un service.
Reset Sélectionnez [Reset] puis sélectionnez
TI Passe automatiquement aux
Setup
Priority Si le même service est fourni par Radio
Related
Service
Antenna
Power
PTY Search Recherche un programme par type de
Zoom DLS Afficher l'écran de segment
SERVICE Affiche l'écran de liste des services.
Pendant l'écoute d'un service que
vous souhaitez mémoriser, tournez le
bouton du volume pour sélectionner
un numéro de préréglage, puis
appuyez sur le bouton.
[Ye s] pour configurer tous les
paramètres DAB sur les paramètres
initiaux par défaut.
informations de circulation routière à
l'instant ou un bulletin d'infos-trafic
débute.
« ON », « OFF » (par défaut)
Data System alors que la réception
du service Digital Radio s'affaiblit, la
sélection se fait automatiquement sur
Radio Data System.
« ON », « OFF » (par défaut)
Lorsque vous sélectionnez MARCHE,
l'appareil commute sur un service
semblable (s'il existe) lorsqu'un réseau
service DAB n'est pas disponible.
« ON », « OFF » (par défaut)
Règle l'alimentation sur l'antenne
de la Radio Numérique. Règle sur
«ON» lorsque l'antenne de la Radio
Numérique en cours d'utilisation est
équipée d'un amplificateur.
Le choix par défaut est “ON”.
programme.
d'Étiquette Dynamique.
Composants Externes
Caméra de recul
Pour utiliser la caméra de recul, le câble de
connexion INVERSE est requis. Pour connecter une
caméra de recul. (p.27)
Ñ Affiche l'image de la caméra de recul
L'écran de vue arrière est affiché lorsque vous changez
de vitesse pour la position de marche arrière (R).
Ñ Pour afficher l'image manuellement de
la caméra de recul
1 Appuyez sur <CAMERA>.
Français |
21
Page 22
Smartphone Bluetooth®Smartphone Bluetooth®
Enregistrer votre smartphone dans l'appareil
Vous pouvez utiliser votre smartphone Bluetooth lié
à cet appareil.
• Vous pouvez coupler le périphérique et l'appareil
utilisant SSP (Secure Simple Pairing) qui nécessitent
seulement une confirmation.
• Un seul périphérique peut être connecté à la fois.
• Lorsque vous enregistrez un nouveau périphérique
Bluetooth, veillez à déconnecter d'abord le
périphérique Bluetooth actuellement connecté, puis
enregistrez le nouveau.
1 Activer la fonction Bluetooth sur votre
smartphone/téléphone portable.
2 Recherchez l'appareil («KD-X56*») à partir de
votre smartphone/téléphone portable.
Si un code PIN est requis, entrez le code PIN
(« 0000 »).
Ñ Déconnecter le périphérique
• Désactiver la fonction Bluetooth sur votre
smartphone/téléphone portable.
• Mettre sur arrêt l'interrupteur d'allumage.
Ñ À propos des smartphones compatibles
avec le Profil d'accès au Répertoire
téléphonique (PBAP)
Si votre smartphone prend en charge le service
PBAP, vous pouvez afficher les éléments suivants
lorsque le smartphone est connecté.
• Répertoire téléphonique
• Appels composés, appels reçus et appels en absence
Réception d'un appel
Pour Faire ceci
Répondre à un appel
Ñ Actions possibles pendant un appel
Pour Faire ceci
Finir un appel
Régler le volume du
téléphone
Commutation entre
le mode mains libres
et le mode téléphone
Appuyez sur <
Appuyez sur <
Tournez le bouton du
volume.
Appuyez sur <
Chaque fois que vous
appuyez sur le bouton,
«Transfert !» s'affiche et la
méthode de communication
commute entre le mode
mains libres et le mode
téléphone.
>.
>.
>.
Passer un appel
1 Appuyez sur < > pour passer en mode
Bluetooth.
2 Appuyez sur <E>/< F> pour sélectionner
une méthode pour passer un appel ([ ] : à
partir de l'historique des appels/[ ] : à partir
du répertoire téléphonique).
3 Tournez le bouton du volume pour sélectionner
la cible, puis appuyez sur le bouton pour passer
un appel.
Utilisation d'un appareil audio Bluetooth en lecture
1 Appuyez sur < > pour afficher l'écran
d'ACCUEIL.
2 Tournez le bouton du volume pour sélectionner
[BT Audio], puis appuyez sur le bouton.
Pour Faire ceci
Lecture/pause Appuyez sur le bouton du volume.
Sélectionner un
fichier
Retour rapide/
Avance rapide
Appuyez sur <E>/<F> à
plusieurs reprises.
Appuyez et maintenez enfoncée la
touche <E>/<F>.
✎ REMARQUE
• Certains indicateurs de fonctionnement et
d'affichage peuvent différer en fonction de leur
disponibilité sur l'appareil connecté.
Ñ Sélectionner un contenu dans la liste
1 Appuyez sur < > pour afficher l'écran de
la LISTE.
2 Tournez le bouton du volume pour sélectionner
un élément, puis appuyez sur le bouton.
• Pour revenir au niveau précédent, appuyez sur
<
>.
22
Page 23
Configuration
Configuration
Paramètres
1 Appuyez et maintenez enfoncée la touche
< > pour afficher les paramètres.
2 Appuyez sur <E>/< F> pour sélectionner
la catégorie.
3 Tournez le bouton du volume pour sélectionner
un élément (voir le tableau suivant), puis
appuyez sur le bouton.
4 Répétez l'étape 3 jusqu'à ce que l'élément
souhaité soit sélectionné/activé ou suivez
les instructions indiquées sur l'élément
sélectionné.
5 Appuyez sur < >.
Paramètres audio
Fader R12 — F12 (00) : Règle la balance de
Balance L12 — R12 (00) : Règle la balance de
Paramètres généraux
Beep ON/OFF : Active ou désactive la tonalité
Date/Clock Règle l'heure et la date. (p.17)
Language Sélectionne la langue du texte utilisé
Time
Format
Wallpaper Black/Blue : Sélectionne l'image du
Demo Permet de paramétrer le mode de
Initialize Sélectionnez [Initialize] puis
Paramètres Bluetooth
Sync
Phonebook
BT
Information
sortie des enceintes avant et arrière.
sortie des enceintes gauche et droite.
des touches. Le choix par défaut est
“ON”.
pour les informations sur l'écran.
12h/24h : Sélectionne le format du
temps. La valeur par défaut est «24h».
fond d'écran.
démonstration. Le choix par défaut est
“ON”.
sélectionnez [ Yes] pour définir tous les
paramètres aux réglages initiaux par
défaut.
ON/OFF : Active ou désactive la
synchronisation du répertoire du
smartphone connecté avec l'appareil.
Affiche les informations sur le
périphérique Bluetooth connecté
(le nom du périphérique, le nom du
téléphone et l'adresse MAC).
Paramètres du son
1 Appuyez sur < > pour afficher l'écran de
paramétrage du son.
2 Tournez le bouton du volume pour sélectionner
un élément (voir le tableau suivant), puis
appuyez sur le bouton.
3 Répétez l'étape 2 jusqu'à ce que l'élément
souhaité soit sélectionné/activé ou suivez
les instructions indiquées sur l'élément
sélectionné.
4 Appuyez sur < >.
Graphic
Equalizer
Loudness Définit les niveaux d'amplification des
X’over Vous pouvez définir la fréquence de
Delay Réglez le délai de temporisation du
Sélectionne un égaliseur préréglé
adapté au genre de musique.
Flat / DRVN / Hard Rock / Hip Hop / Jazz
/ Pop/ R & B / User / Classical
Sélectionnez [User] pour utiliser les
paramètres effectués
1) Appuyez sur le bouton du volume
pour sélectionner la fréquence.
2) Tournez le bouton du volume pour
régler le niveau.
3) Appuyez sur <
graves et des aigus.
« ON », « OFF » (par défaut)
croisement des enceintes.
1) Appuyez sur <E>/<F> pour
sélectionner l'enceinte.
2) Appuyez sur le bouton du volume
pour sélectionner l'élément.
3) Tournez le bouton du volume pour
régler la valeur.
4) Appuyez sur <
son de sorte que les sons émis par
les différentes enceintes arrivent à
l'auditeur assis sur le siège sélectionné
en même temps.
1) Appuyez sur <E>/<F> pour
sélectionner l'enceinte.
2) Tournez le bouton du volume pour
régler la valeur.
3) Appuyez sur <
>.
>.
>.
Français |
23
Page 24

InstallationInstallation
Avant l'installation
Avant d'installer cet appareil, veuillez prendre les
mesures de précaution suivantes.
#AVERTISSEMENTS
• Si vous branchez le câble d'allumage (rouge) et le
câble de la batterie (jaune) au châssis de la voiture
(masse), il peut y avoir un court-circuit entraînant, à
son tour, un incendie. Il faut toujours brancher ces
câbles à la source d'alimentation fonctionnant via le
boîtier de fusibles.
• Ne débranchez pas le fusible du câble d'allumage
(rouge) ni du câble de la batterie (jaune).
L'alimentation électrique doit être connectée aux
câbles via le fusible.
#ATTENTION
• Installez cet appareil dans la console du véhicule.
Ne touchez pas les éléments métalliques de cet
appareil pendant et juste après l'utilisation de
l'appareil. Les éléments métalliques tels que le
dissipateur thermique et le coffret sont très chauds.
✎ REMARQUE
• Le montage et le câblage de ce produit requièrent
expérience et savoir-faire. Pour des questions de
sécurité, les travaux de montage et de câblage
doivent être effectués par des professionnels.
• Veillez à brancher l'appareil à une alimentation
électrique négative de 12 Vcc avec mise à la terre.
• N'installez pas l'appareil dans un endroit directement
exposé aux rayons du soleil, à une chaleur excessive
ou à l'humidité. Évitez également les endroits trop
poussiéreux ou susceptibles d'être éclaboussés par
de l'eau.
• N'utilisez pas vos propres vis. N'utilisez que les vis
fournies. L'utilisation de vis non appropriées risque
d'endommager l'appareil.
• Si l'allumage de votre véhicule ne possède pas
de position ACC, branchez les câbles d'allumage
à une source d'alimentation que la clé de contact
peut allumer ou éteindre. Si vous branchez le câble
d'allumage à une source d'alimentation à tension
constante comme les câbles de la batterie, il se peut
que la batterie se décharge.
• Si la console est dotée d'un couvercle, veillez à
installer l'appareil de sorte que la façade ne heurte
pas le couvercle quand elle s'ouvre ou se ferme.
• Si le fusible saute, vérifiez d'abord que les câbles ne
se touchent pas afin d'éviter tout court-circuit, puis
remplacez l'ancien fusible par un nouveau fusible de
même puissance.
• Isolez les câbles non connectés avec un ruban vinyl,
ou tout autre matériau similaire. Pour éviter tout
court-circuit, ne retirez pas les capuchons placés aux
extrémités des câbles non connectés ou des bornes.
24
• Fixez les fils à l'aide de colliers et enroulez le ruban
de vinyle autour des fils qui entre en contact avec les
parties métalliques afin de protéger les fils et éviter
tout court-circuit.
• Branchez correctement les câbles de l'enceinte aux
bornes correspondantes. L'appareil peut subir des
dommages ou ne plus fonctionner si vous partagez
les fils ¤ ou les mettez à la masse avec une partie
métallique du véhicule.
• Si seulement deux enceintes sont branchées au
système, branchez les connecteurs soit aux bornes
de sortie avant soit aux bornes de sortie arrière (ne
pas mélanger les bornes de sortie avant et arrière).
Par exemple, si vous connectez le connecteur ¢
de l'enceinte gauche à une borne de sortie avant,
ne connectez pas le connecteur ¤ à une borne de
sortie arrière.
• Une fois l'appareil installé, vérifiez que les feux de
freinage, les clignotants et les essuie-glace, etc. du
véhicule fonctionnent correctement.
• L'angle de montage de l'appareil doit être inférieur
ou égal à 30°.
• N'exercez pas de pression excessive sur la surface
du panneau lors de l'installation de l'appareil dans
le véhicule. Cela risque de rayer la sur face, de
l'endommager ou d'entraîner une défaillance.
• Il se peut que la réception soit mauvaise si des objets
métalliques se trouvent à proximité de l'antenne
Bluetooth.
Antenne Bluetooth
Ñ Accessoires fournis pour l'installation
1
3
5
(3 m)
x1
x2
x1
2
x1
4
x1
Page 25
Installation
Ñ Procédure d'installation
1) Pour éviter les courts-circuits, retirez la clé de
contact, puis débranchez la borne ¤ de la batterie.
2) Veillez à effectuer correctement les connexions des
câbles d'entrée et de sortie pour chaque appareil.
3) Branchez le câble sur le faisceau de fils.
4) Prenez le connecteur B sur le faisceau de fils, puis
branchez-le au connecteur de l'enceinte dans votre
véhicule.
5) Prenez le connecteur A sur le faisceau de fils, puis
branchez-le à la prise d'alimentation externe de
votre véhicule.
6) Branchez le connecteur du faisceau de fils sur
l'appareil.
7) Installez l'appareil dans votre véhicule.
8) Reconnectez la borne ¤ de la batterie.
9) Appuyez sur le bouton réinitialiser.
Installation de l'appareil
Ñ Voitures non-japonaises
2
Ñ Plaque de garniture
1) Fixez l'accessoire 1 sur l'appareil.
1
Ñ Microphone
1) Vérifiez la position d'installation du microphone
(accessoire 5).
2) Nettoyez la surface d'installation.
3) Retirez le séparateur du microphone (accessoire 5)
et collez le microphone à l'emplacement indiqué
ci-dessous.
4) Branchez le câble du microphone sur l'appareil en
le fixant à divers endroits à l'aide de ruban adhésif
ou de toute autre méthode appropriée.
5) Réglez l'orientation du microphone (accessoire 5)
en direction du conducteur.
A
Courbez les languettes de
la douille de montage à
l'aide d'un tournevis ou d'un
outil similaire, puis fixez-la
en place.
✎ REMARQUE
• Vérifiez que l'appareil est correctement en place.
Si l'appareil n'est pas stable, cela peut occasionner
un dysfonctionnement (le son peut par exemple
sauter).
• Si l'ouverture du tableau de votre véhicule est
trop petit pour placer l'appareil (A), découpez
l'ouverture du tableau (les côtés supérieur et
inférieur et les côtés droit et gauche).
5
Fixez un câble avec du ruban spécialement
prévu à cet effet.
✎ REMARQUE
• Utilisez les attaches si nécessaire.
Français |
25
Page 26
Installation
Ñ Retrait de la plaque de garniture
1) Utilisez la clé d'extraction (accessoire 4) pour sortir
les quatre languettes (deux sur la partie supérieure,
deux sur la partie inférieure) en effectuant un
mouvement de levier.
4
2) Tirer la plaque de garniture vers l'avant.
Ñ Retrait de l'appareil
1) Retirez la plaque de garniture en vous référant à l'
étape 1 dans “Retrait de la plaque de garniture”.
2) Détachez la façade.
1
2
3) Insérez les deux clés d'extraction (accessoire3)
profondément dans les logements de chaque côté,
comme illustré.
3
Ñ Guide de fonctionnement des
connecteurs du faisceau de câbles
Broche Couleur et fonction
A-4 Jaune Batterie
A-5 Bleu/Blanc
A-7 Rouge Allumage (ACC)
A-8 Noir Branchement à la terre
B-1/B-2 Violet (+)/Violet/Noir (–) Arrière droit
B-3/B-4 Gris (+)/Gris/Noir (–) Avant droit
B-5/B-6 Blanc (+)/Blanc/Noir (–) Avant gauche
B-7/B-8 Vert (+) /
• Impédance d'enceinte : 4-8 Ω
[1]
Max. 150 mA, 12 V
[1]
Réglage de puissance
(masse)
Vert /Noir (–) Arrière gauche
! ATTENTION
Avant de connecter les connecteurs ISO
(disponibles dans le commerce) à l'unité, vérifier les
conditions suivantes :
• Veillez à ce que l'affectation des broches du
connecteur corresponde à l'appareil JVC.
• Prendre un avis supplémentaire pour le câble
d'alimentation.
• Si les câbles d'alimentation et de contact ne
correspondent pas, les changer en conséquence.
• Si le véhicule ne dispose pas d'un câble de
démarrage, utiliser une interface disponible dans le
commerce.
4) Abaissez l'outil d'extraction vers le bas et tirez
l'appareil à mi-chemin tout en appuyant vers
l'intérieur.
✎ REMARQUE
• Veillez à ne pas vous blesser avec les broches
d'arrêt sur la clé d'extraction.
5) Tenez l'appareil des deux mains et faites-le sortir
complètement en veillant à ne pas le laisser tomber.
26
Page 27
Installation
Ñ Connexion des câbles sur les contacts électriques
Vert clair (Câble du détecteur de stationnement)
Par mesure de sécurité, connectez le détecteur de
PRK SW
stationnement.
Violet/Blanc (Câble du détecteur de marche arrière)
Connexion au faisceau du feu de marche arrière du
REVERSE
véhicule lors de l'utilisation de la vue arrière de la caméra.
Bleu ciel/Jaune (Câble de la télécommande au volant)
Vers la télécommande au volant
Pour utiliser la fonction de télécommande au volant, vous avez besoin d'un
STEERING
WHEEL
REMOTE
INPUT
adaptateur de télécommande spécial (non fourni) qui correspond à votre
véhicule.
Connexion au
commutateur de
détection du frein à
main.
Accessoire 5:
microphone Bluetooth
Antenne FM/AM
Prise d'antenne DAB (connecteur SMB)
KD-X561DBT uniquement
!
Lors de l’utilisation d’une antenne de
radiodiffusion numérique disponible
dans le commerce, le diamètre du
connecteur SMB doit être de 6,5 mm
maximum.
Φ 6,5 mm (maximum)
Connecteur A
Connecteur B
1 3 5 7
15A
2 4 6 8
1 3 5 7
2 4 6 8
Fusible (15 A)Entrée de l'antenne FM/AM
Connecteur ISO
Préamplification audio arrière
(Gauche : blanc, Droite : rouge)
Préamplification audio avant
(Gauche : blanc, Droite : rouge)
Préamplification du caisson de basses
(bleu)
Entrée de la caméra vue arrière
(jaune)
Français |
27
Page 28
À propos de cet appareil
À propos de cet appareil
Entretien
Ñ Nettoyage de l'appareil
Si la façade de l'appareil est tachée, essuyez-la avec
un chiffon doux et sec, tel qu'un chiffon siliconé.
Si la façade est très sale, essuyez-la avec un chiffon
imbibé d'un produit de nettoyage neutre, puis
essuyez-la à nouveau avec un chiffon doux et sec
propre.
! ATTENTION
• La pulvérisation directe de produit de nettoyage
sur l'appareil risque d'endommager les pièces
mécaniques. Si vous nettoyez la façade avec un
chiffon trop rugueux ou un liquide volatil, comme
un solvant ou de l'alcool, vous risquez d'en rayer la
surface ou d'effacer les caractères sérigraphiés.
• Apple, iPhone, iPod, iPod touch, and Lightning are
• Microsoft and Windows Media are either registered
• THIS PRODUCT IS LICENSED UNDER THE MPEG-
Ñ Nettoyage du connecteur
Retirez la façade et nettoyez le connecteur
délicatement avec un coton-tige. Faites attention à
ne pas endommager le connecteur.
Connecteur (sur le verso de la façade)
• THIS PRODUCT IS LICENSED UNDER THE AVC
Remarque pour les spécifications
Ñ Section Bluetooth
Fréquence
: 2,402 – 2,480 GHz
Puissance de sortie
: + 8 dBm (AVE), classe de puissance 1
Ñ Général
Impédance d'enceinte
: 4 – 8 Ω
Tension de fonctionnement
: batterie de voiture 12 V CC
• libFLAC
Copyrights
• La marque et les logos Bluetooth sont des marques
déposées appartenant à Bluetooth SIG, Inc. et
toute utilisation de ces marques par JVC KENWOOD
Corporation est sous licence. Les autres marques
déposées et appellations commerciales
appartiennent à leurs propriétaires respectifs.
• Use of the Made for Apple badge means that an
accessory has been designed to connect specifically
to the Apple product(s) identified in the badge, and
has been certified by the developer to meet Apple
performance standards. Apple is not responsible for
28
the operation of this device or its compliance with
safety and regulatory standards. Please note that
the use of this accessory with an Apple product may
affect wireless performance.
trademarks of Apple Inc., registered in the U.S. and
other countries.
trademarks or trademarks of Microsoft Corporation
in the United States and/or other countries.
4 VISUAL PATENT PORTFOLIO LICENSE FOR
THE PERSONAL AND NON-COMMERCIAL USE
OF A CONSUMER FOR (¡) ENCODING VIDEO IN
COMPLIANCE WITH THE MPEG-4 VISUAL STANDARD
(“MPEG-4 VIDEO”) AND/OR (¡¡) DECODING MPEG4 VIDEO THAT WAS ENCODED BY A CONSUMER
ENGAGED IN A PERSONAL AND NON-COMMERCIAL
ACTIVIT Y AND/OR WAS OBTAINED FROM A VIDEO
PROVIDER LICENSED BY MPEG LA TO PROVIDE
MPEG-4 VIDEO. NO LICENSE IS GRANTED OR SHALL
BE IMPLIED FOR ANY OTHER USE. ADDITIONAL
INFORMATION INCLUDING THAT RELATING TO
PROMOTIONAL, INTERNAL AND COMMERCIAL USES
AND LICENSING MAY BE OBTAINED FROM MPEG LA,
LLC. SEE HTTP://WWW.MPEGLA.COM.
PATENT PORTFOLIO LICENSE FOR THE PERSONAL
USE OF A CONSUMER OR OTHER USES IN WHICH IT
DOES NOT RECEIVE REMUNERATION TO (¡)ENCODE
VIDEO IN COMPLIANCE WITH THE AVC STANDARD
(“AVC VIDEO”) AND/OR (¡¡)DECODE AVC VIDEO
THAT WAS ENCODED BY A CONSUMER ENGAGED
IN A PERSONAL ACTIVITY AND/OR WAS OBTAINED
FROM A VIDEO PROVIDER LICENSED TO PROVIDE
AVC VIDEO. NO LICENSE IS GRANTED OR SHALL
BE IMPLIED FOR ANY OTHER USE. ADDITIONAL
INFORMATION MAY BE OBTAINED FROM MPEG LA,
L.L.C. SEE HTTP://WWW.MPEGLA.COM
Copyright (C) 2000-2009 Josh Coalson
Copyright (C) 2011-2013 Xiph.Org Foundation
– Redistribution and use in source and binary forms,
with or without modification, are permitted
provided that the following conditions are met:
– Redistributions of source code must retain the
above copyright notice, this list of conditions and
the following disclaimer.
– Redistributions in binary form must reproduce the
above copyright notice, this list of conditions and
the following disclaimer in the documentation
and/or other materials provided with the
distribution.
Neither the name of the Xiph.org Foundation
nor the names of its contributors may be used to
Page 29
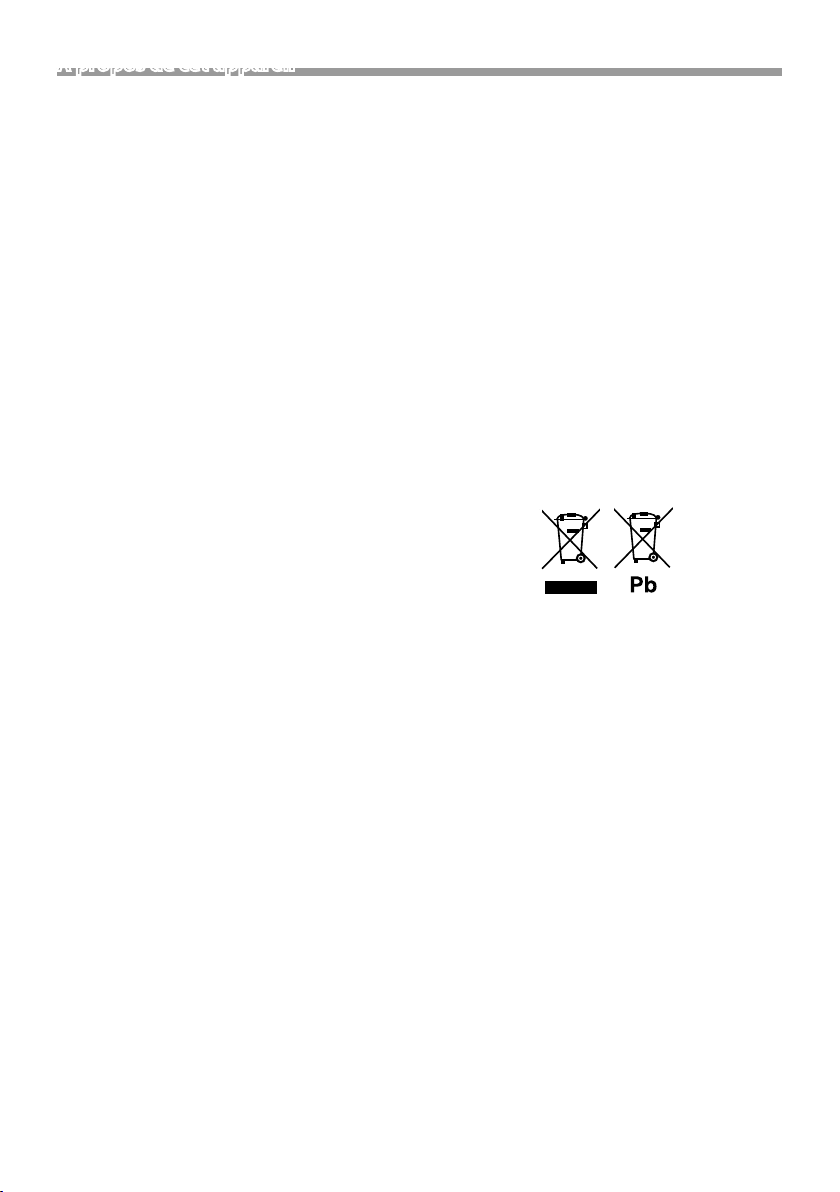
À propos de cet appareil
endorse or promote products derived from this
software without specific prior written permission.
THIS SOFTWARE IS PROVIDED BY THE COPYRIGHT
HOLDERS AND CONTRIBUTORS ``AS IS’’ AND ANY
EXPRESS OR IMPLIED WARRANTIES, INCLUDING,
BUT NOT LIMITED TO, THE IMPLIED WARRANTIES OF
MERCHANTABILITY AND FITNESS FOR A PARTICULAR
PURPOSE ARE DISCLAIMED. IN NO EVENT SHALL
THE FOUNDATION OR CONTRIBUTORS BE LIABLE
FOR ANY DIRECT, INDIRECT, INCIDENTAL, SPECIAL,
EXEMPLARY, OR CONSEQUENTIAL DAMAGES
(INCLUDING, BUT NOT LIMITED TO, PROCUREMENT
OF SUBSTITUTE GOODS OR SERVICES; LOSS OF USE,
DATA, OR PROFITS; OR BUSINESS INTERRUPTION)
HOWEVER CAUSED AND ON ANY THEORY OF
LIABILITY, WHETHER IN CONTRACT, STRICT LIABILITY,
OR TORT (INCLUDING NEGLIGENCE OR OTHERWISE)
ARISING IN ANY WAY OUT OF THE USE OF THIS
SOFTWARE, EVEN IF ADVISED OF THE POSSIBILITY OF
SUCH DAMAGE.
• libogg
Copyright (c) 2002, Xiph.org Foundation
Redistribution and use in source and binary forms,
with or without modification, are permitted
provided that the following conditions are met:
– Redistributions of source code must retain the
above copyright notice, this list of conditions and
the following disclaimer.
– Redistributions in binary form must reproduce the
above copyright notice, this list of conditions and
the following disclaimer in the documentation
and/or other materials provided with the
distribution.
– Neither the name of the Xiph.org Foundation
nor the names of its contributors may be used to
endorse or promote products derived from this
software without specific prior written permission.
THIS SOFTWARE IS PROVIDED BY THE COPYRIGHT
HOLDERS AND CONTRIBUTORS ``AS IS’’ AND ANY
EXPRESS OR IMPLIED WARRANTIES, INCLUDING,
BUT NOT LIMITED TO, THE IMPLIED WARRANTIES OF
MERCHANTABILITY AND FITNESS FOR A PARTICULAR
PURPOSE ARE DISCLAIMED. IN NO EVENT SHALL
THE FOUNDATION OR CONTRIBUTORS BE LIABLE
FOR ANY DIRECT, INDIRECT, INCIDENTAL, SPECIAL,
EXEMPLARY, OR CONSEQUENTIAL DAMAGES
(INCLUDING, BUT NOT LIMITED TO, PROCUREMENT
OF SUBSTITUTE GOODS OR SERVICES; LOSS OF USE,
DATA, OR PROFITS; OR BUSINESS INTERRUPTION)
HOWEVER CAUSED AND ON ANY THEORY OF
LIABILITY, WHETHER IN CONTRACT, STRICT LIABILITY,
OR TORT (INCLUDING NEGLIGENCE OR OTHERWISE)
ARISING IN ANY WAY OUT OF THE USE OF THIS
SOFTWARE, EVEN IF ADVISED OF THE POSSIBILITY OF
SUCH DAMAGE.
Ñ Informations sur l'élimination des
anciens équipements électriques et
électroniques et piles électriques
(applicables dans les pays européens
qui ont adopté des systèmes de collecte
sélective)
Les produits et les batteries comprenant le symbole
(poubelle barrée) ne peuvent pas être jetés parmi les
déchets ménagers.
Les vieux appareils électriques et électroniques,
ainsi que les batteries doivent être recyclés dans un
complexe adapté au traitement de ces déchets et de
leurs sous-produits.
Contactez vos autorités locales pour connaître le site
de recyclage le plus proche.
Recycler de manière adaptée et jeter ses déchets
au bon endroit aide à préserver les ressources tout
en évitant les effets néfastes sur notre santé et
l'environnement.
Avis : La marque “Pb” en dessous du symbole des piles
indique que cette pile contient du plomb.
Français |
29
Page 30
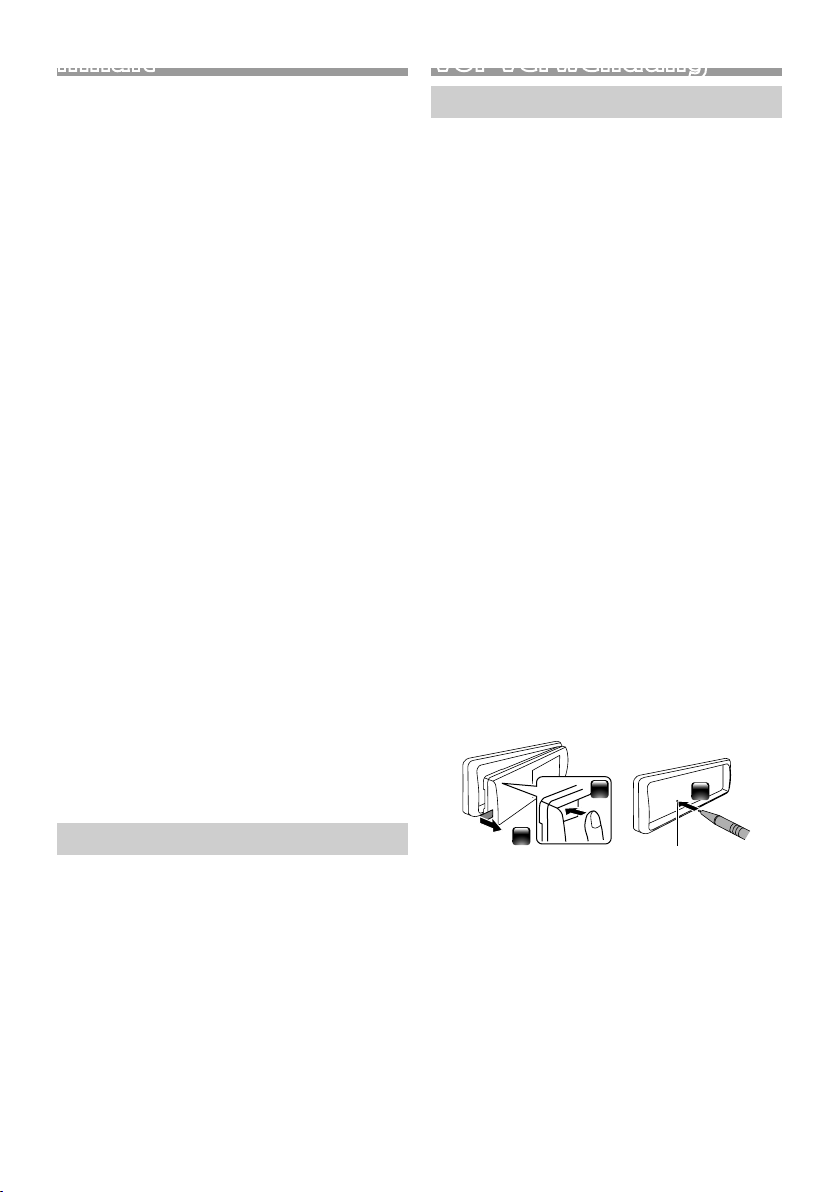
Inhalt
Vor Verwendung .................................................................30
Hinweise zu diesem Handbuch ............................................................... 30
Vorsichtsmaßnahmen ..................................................................................... 30
Erste Schritte ......................................................................... 31
Grundeinstellungen ..........................................................................................31
Uhreinstellungen ................................................................................................31
Grundlagen ...........................................................................32
Allgemeine Funktionen ................................................................................. 32
Anbringen/Abnehmen der Frontblende ........................................... 32
Auswahl einer Quelle ...................................................................................... 32
USB/iPod.................................................................................33
Vorbereitung .........................................................................................................33
Wiedergabefunktionen ................................................................................. 33
Tuner/DA B ..............................................................................34
Tuner-Grundfunktionen ................................................................................ 34
DAB-Grundfunktionen ...................................................................................34
Tunerfunktionseinstellungen .................................................................... 34
DAB-Funktionseinstellungen ..................................................................... 35
Externe Komponenten ..................................................... 35
Rückfahrkamera .................................................................................................. 35
Bluetooth®-Smartphone ..................................................36
Smartphone am Gerät anmelden ........................................................... 36
Einen Anruf empfangen ................................................................................ 36
Telefonanrufe tätigen......................................................................................36
Wiedergabe mit einem Bluetooth-Audiogerät ............................. 36
Einrichtung ............................................................................37
Einstellungen ........................................................................................................ 37
Soundeinstellungen ........................................................................................37
Installation ............................................................................. 38
Vor der Installation ............................................................................................38
Installation des Geräts .................................................................................... 39
Wissenswertes über dieses Gerät .................................42
Wartung ................................................................................................................... 42
Hinweis zu den Spezifikationen ............................................................... 42
Urheberrechte...................................................................................................... 42
Vor Verwendung
Vorsichtsmaßnahmen
# WARNUNG
Ñ Folgende Vorsichtsmaßnahmen
beachten, um Brand oder Verletzungen
zu vermeiden:
• Kurzschlüsse verhindern. Niemals
Metallgegenstände (z. B. Münzen oder Werkzeug)
ins Gerät stecken oder darin belassen.
• Verfolgen Sie die Anzeige des Geräts während der
Fahrt nicht für längere Zeit.
• Falls bei der Installation Probleme auftreten,
nehmen Sie Kontakt mit Ihrem JVC-Händler auf.
Ñ Vorsichtsmaßnahmen bei der
Verwendung dieses Gerätes
• Falls Sie optionale Zusatzgeräte kaufen, wenden
Sie sich an Ihren JVC-Händler, um sicherzustellen,
dass sie mit Ihrem Modell kompatibel sind und in
Ihrer Region verwendet werden können.
• Das Radio Data System bzw. Radio Broadcast Data
System funktioniert nur in Regionen mit Sendern,
die diese Dienste unterstützen.
Ñ Schutz des Monitors
• Um den Monitor vor Beschädigungen zu
schützen, sollten Sie Ihn nicht mit einem
Kugelschreiber oder einem ähnlichen spitzen
Gegenstand bedienen.
Ñ Gerät zurücksetzen
Falls das Gerät bzw. das angeschlossene Gerät nicht
richtig funktioniert, Gerät zurücksetzen.
Hinweise zu diesem Handbuch
• Die in dieser Anleitung gezeigten Bedienelemente
sind Beispiele, die zur Verdeutlichung der
Funktionen dienen sollen. Aus diesem Grund kann
es zu Abweichungen vom vorliegenden Panel
kommen.
• Bei der Beschreibung von Bedienvorgängen
verweisen eckige Klammern auf das Element, das Sie
bedienen sollen.
[ ]: Anzeige des ausgewählten Elementes oder
Menüs.
< >: Bezeichnung der Tasten auf dem Panel.
• Anzeigesprache: Englisch wird zur Erklärung
verwendet. Sie können die Anzeigesprache im
[Language]-Menü wählen. Siehe Language
(S.37).
30
1
2
3
Re set-Tas te
Page 31

Erste Schritte
Grundeinstellungen
1 Stellen Sie den Zündschlüssel Ihres Autos auf
"ACC".
Das Gerät ist eingeschaltet.
2 Drehen Sie den Lautstärkeregler, um das
einzustellende Element auszuwählen (siehe
nachstehende Tabelle), und drücken Sie dann
den Knopf, um eine Auswahl zu treffen.
Language
Wählen Sie die für den Steuerungsbildschirm und
die Einstellungselemente zu verwendende Sprache.
Die Werkseinstellung ist „English“ (Englisch).
Area
EUROPE (Werkseinstellung): Für Europa, MW/UKW-
Intervalle: 9 kHz/50 kHz.
M. EAST: Für den Nahen Osten, MW/UKW-Intervalle:
9 kHz/50 kHz.
Date/Clock
Stellen Sie das Datum ein und dann die Uhrzeit.
Stunde/Minute/Monat/Tag/Jahr
Demo
Zum Einstellen des Demonstrationsmodus.
Werkseinstellung ist „ON“.
3 Drehen Sie den Lautstärkeregler, um [Finish]
auszuwählen, und drücken Sie dann den Knopf.
Uhreinstellungen
Ñ Synchronisiert die Uhrzeit mit FM RDS
Aktiviert [RDS Clock Sync] (RDS-Uhr synch.).
Siehe „Tunerfunktionseinstellungen“ (S.34).
Ñ Die Uhr manuell einstellen
✎ HINWEIS
• Deaktivieren Sie [RDS Clock Sync],
bevor Sie die Uhrzeit einstellen. Siehe
„Tunerfunktionseinstellungen“ (S.34).
1 Halten Sie < > gedrückt, um die
Einstellungen anzuzeigen.
2 Drücken Sie <E>/< F>, um [ ]
auszuwählen.
3 Drehen Sie den Lautstärkeregler, um [Time
Format] auszuwählen, und drücken Sie dann
den Knopf, um das Uhrzeitformat ([12h] oder
[24h]) auszuwählen.
4 Drehen Sie den Lautstärkeregler, um [Date/
Clock] auszuwählen, und drücken Sie dann den
Knopf.
Der Uhrbildschirm erscheint.
5 Drehen Sie den Lautstärkeregler, um die
Stunde einzustellen, und drücken Sie dann den
Knopf.
6 Drehen Sie den Lautstärkeregler, um die
Minute einzustellen, und drücken Sie dann den
Knopf.
7 Drehen Sie den Lautstärkeregler, um den Tag
auszuwählen, und drücken Sie dann den Knopf.
8 Drehen Sie den Lautstärkeregler, um den
Monat einzustellen, und drücken Sie dann den
Knopf.
9 Drehen Sie den Lautstärkeregler, um das Jahr
auszuwählen, und drücken Sie dann den Knopf.
10
Drücken Sie < >.
Deutsch |
31
Page 32

GrundlagenGrundlagen
25364
7
1
Lautstärkeregler (drehen/drücken)
Allgemeine Funktionen
Ñ Das Gerät einschalten
1 Drücken Sie < >.
Ñ Das Gerät ausschalten
1 Halten Sie < > gedrückt.
Ñ Die Lautstärke einstellen
1 Drehen Sie den Lautstärkeregler.
Ñ Schaltet den Ton stumm
1 Halten Sie den Lautstärkeregler gedrückt.
wird angezeigt, wenn die
Stummschaltungsfunktion aktiv ist.
Halten Sie die Taste erneut gedrückt oder
stellen Sie die Lautstärke ein, um den Ton
wiederherzustellen.
Ñ Die Uhr anzeigen
1 Halten Sie die <DIM>-Taste gedrückt.
Ñ Den Dimmer-Modus auswählen
1 Drücken Sie die <DIM>-Taste.
Dimmer 1, Dimmer 2, Dimmer 3
Anbringen/Abnehmen der Frontblende
AnbringenAbnehmen
1
Fernbedienungssensor
MonitorTaste zum Abnehmen
Auswahl einer Quelle
1 Drücken Sie < >, um den HOME-
Bildschirm anzuzeigen.
Der HOME-Bildschirm erscheint.
2 Drehen Sie den Lautstärkeregler, um die Quelle
auszuwählen, und drücken Sie dann den Knopf.
Uhranzeige
1
Schaltet auf den UKW-Empfang. (S. 34)
2
Schaltet auf den MW-Empfang. (S.34)
3
Schaltet auf DAB um. (S.34)
4
(nur KD -X5 61DBT )
Spielt den Bluetooth-Audioplayer ab. (S.36)
5
6
[USB]
Spielt Dateien auf einem USB-Gerät ab. (S.33)
[iPod]
Spielt von einem iPod/iPhone ab. (S.33)
• Wenn ein iPod/iPhone angeschlossen ist.
Wechselt zu einer externen Komponente, die an
7
den AUX-Eingangsanschluss angeschlossen ist.
1
2
32
2
Page 33

USB/iPod
USB/iPod
Vorbereitung
Ñ Anschluss eines USB-Geräts/iPods/
iPhones
1 Öffnen Sie die Abdeckung des vorderen
Anschlusses.
2 Schließen Sie das USB-Gerät mit dem USB-
Kabel (separat erhältlich) an.
Schließen Sie den iPod/das iPhone mit dem KSU62 (optionales Zubehör) an.
Das Gerät liest das Gerät und die Wiedergabe wird
gestartet.
• Maximale USB-Stromversorgung: DC 5 V = 1 A
Ñ Abtrennen des USB-Geräts/iPods/
iPhones
1 Drücken Sie < >, um den HOME-
Bildschirm anzuzeigen.
2 Drehen Sie den Lautstärkeregler, um eine
andere Einstellung als [USB] und [iPod]
auszuwählen, und drücken Sie dann den Knopf.
3 Trennen Sie das USB-Gerät/iPod/iPhone ab.
Ñ Verwendbare USB-Geräte
Dieses Gerät kann MP3/WMA/AAC/WAV/FLAC/
OGG/MPEG1/MPEG2/MPEG4/H.264/MKV/JPEG/BMP/
PNG-Dateien wiedergeben, die auf einem USBMassenspeichergerät gespeichert sind.
Ñ Anschließbare iPods/iPhones
Die nachfolgend aufgeführten Modelle können an
dieses Gerät angeschlossen werden.
Konzipiert für
• iPhone X
• iPhone 8 Plus
• iPhone 8
• iPhone 7 Plus
• iPhone 7
• iPhone SE
• iPhone 6s Plus
• iPhone 6s
• iPhone 6 Plus
• iPhone 6
• iPhone 5s
• iPod touch (6.
Generation)
Wiedergabefunktionen
Zweck Vorgang
Wiedergabe/
Pause
Eine Datei
auswählen
Schnellrücklauf/
Schnellvorlauf
Drücken Sie den Lautstärkeregler.
Drücken Sie <E>/<F>
mehrmals.
Halten Sie <E>/< F>
gedrückt.
• Videodateien: Jedes Mal, wenn
Sie die Taste drücken, ändert sich
die Suchgeschwindigkeit.
Ñ Auswahl eines Titels/Inhalts in einer
Liste (durchsucht die Datei)
1 Drücken Sie < >, um den LISTEN-
Bildschirm anzuzeigen.
2 Drücken Sie <E>/< F>, um auszuwählen,
ob Sie nach Audiodateien [ ], Videodateien
[ ] oder Bilddateien [ ] suchen möchten.
(Nur USB)
3 Drehen Sie den Lautstärkeregler, um den
gewünschten Ordner/die gewünschte
Kategorie auszuwählen, und drücken Sie dann
den Knopf.
• Wählen Sie einen Ordner aus, um den
Ordnerinhalt anzuzeigen.
• Um zur vorherigen Ebene zurückzukehren,
drücken Sie <
>.
4 Drehen Sie den Lautstärkeregler, um das
gewünschte Element auszuwählen, und
drücken Sie dann den Knopf.
Startet Wiedergabe.
Deutsch |
33
Page 34

Tuner/DAB
Tuner/DAB
Tuner-Grundfunktionen
1 Drücken Sie < >, um den HOME-
Bildschirm anzuzeigen.
2 Drehen Sie den Lautstärkeregler, um [FM] oder [AM]
auszuwählen, und drücken Sie dann den Knopf.
3 Drücken Sie <E>/< F>, um automatisch
nach einem Sender zu suchen.
„Auto Seek“ (Automatische Suche) erscheint.
(oder)
Halten Sie <E>/< F> wiederholt gedrückt,
um manuell nach einem Sender zu suchen.
„Manual Seek“ (Manuelle Suche) erscheint.
✎ HINWEIS
• Um Sender zu speichern, führen Sie [Manual Store]
oder [Auto Store] aus.
Ñ Auswahl eines gespeicherten Senders
Sie können 15 UKW-Sender und 15 MW-Sender
speichern.
1 Drücken Sie < >, um den LISTEN-
Bildschirm anzuzeigen.
2 Drehen Sie den Lautstärkeregler, um eine
Voreinstellungsnummer auszuwählen, und
drücken Sie dann den Knopf.
✎ HINWEIS
• Drücken Sie zum Beenden < >.
DAB-Grundfunktionen (KD-X561DBT)
1 Drücken Sie < >, um den HOME-
Bildschirm anzuzeigen.
2 Drehen Sie den Lautstärkeregler, um [DAB]
auszuwählen, und drücken Sie dann den Knopf.
3 Drücken Sie <E>/< F>, um automatisch
nach einem Ensemble zu suchen.
„Auto Seek“ (Automatische Suche) erscheint.
(oder)
Halten Sie <E>/< F> wiederholt gedrückt,
um manuell nach einem Ensemble zu suchen.
„Manual Seek“ (Manuelle Suche) erscheint.
4 Halten Sie <E>/< F> gedrückt, um einen
Service (primär oder sekundär) auszuwählen,
den Sie hören möchten.
✎ HINWEIS
• Um einen Service zu speichern, nutzen Sie [Favorite].
Ñ Auswahl eines Service
1 Drücken Sie < >, um den LISTEN-
Bildschirm anzuzeigen.
2 Drehen Sie den Lautstärkeregler, um einen Service
auszuwählen, und drücken Sie dann den Knopf.
34
Ñ Auswahl eines gespeicherten Service
Sie können bis zu 15 Services speichern
1 Drücken Sie < >, um den LISTEN-
Bildschirm anzuzeigen.
2 Drücken Sie <E>/<F>, um [ ] auszuwählen.
3 Drehen Sie den Lautstärkeregler, um einen Service
auszuwählen, und drücken Sie dann den Knopf.
✎ HINWEIS
• Drücken Sie zum Beenden < >.
Tunerfunktionseinstellungen
1 Drücken Sie < >, um das Funktionsmenü
anzuzeigen.
2 Drehen Sie den Lautstärkeregler, um das
einzustellende Element auszuwählen (siehe
nachstehende Tabelle), und drücken Sie dann
den Knopf, um eine Auswahl zu treffen.
3 Drücken Sie < >.
Manual
Store
Auto
Store
Local
Seek
Area EUROPE (Werkseinstellung): Für Europa,
Mono *
RDS *
PTY *
AF *1*2Bei schlechtem Empfang eines bestimmten
TA *
Speichert einen Sender manuell.
Drehen Sie während der Wiedergabe
eines Senders, den Sie speichern
möchten, den Lautstärkeregler, um eine
Voreinstellungsnummer auszuwählen, und
drücken Sie dann den Knopf.
Durchsucht das ausgewählte Band und
speichert die 15 Sender mit den stärksten
Signalen automatisch.
• „Auto Store“ erscheint.
Stellt nur Sender mit ausreichender
Signalstärke ein.
„ON“, „OFF“ (Werkseinstellung)
MW/UKW-Intervalle: 9 kHz/50 kHz.
M. EAST: Für den Nahen Osten, MW/UKW-
Intervalle: 9 kHz/50 kHz.
1
Legt fest, ob Stereo-Sendungen im Stereooder Mono-Modus empfangen werden.
„ON“, „OFF“ (Werkseinstellung)
1
UKW-Radio Data System-Merkmale
„ON“ (Werkseinstellung), „OFF“
1*2
Sucht einen Sender nach der Programmsparte.
Radiosenders wird automatisch zu einem
Sender umgeschaltet, der dasselbe
Programm über dasselbe Radio-DataSystem-Netzwerk sendet.
„ON“ (Werkseinstellung), „OFF“
1*2
Wechselt automatisch zu den
Verkehrsnachrichten, sobald die
Verkehrsmeldung startet. (Die TI-Anzeige
leuchtet auf.)
„ON“, „OFF“ (Werkseinstellung)
Page 35

Tuner/DAB
RDS
Clock
Sync *1*
*1 nur UKW
*2
Synchronisiert die RadiodatensystemSender-Zeitdaten und diese Geräteuhr.
2
„ON“ (Werkseinstellung), „OFF“
Ist verfügbar, wenn [RDS] auf [ON] eingestellt ist.
DAB-Funktionseinstellungen (KD-X561DBT)
1 Drücken Sie < >, um das Funktionsmenü
anzuzeigen.
2 Drehen Sie den Lautstärkeregler, um das
einzustellende Element auszuwählen (siehe
nachstehende Tabelle), und drücken Sie dann
den Knopf, um eine Auswahl zu treffen.
3 Drücken Sie < > zum Verlassen.
Scan Station Aktualisiert die DAB-Serviceliste.
Favorite
Reset Wählen Sie [Reset] und dann [Yes]
TI Wechselt automatisch zu den
Setup
Priority Falls der gleiche Dienst auch über das
Related
Service
Antenna
Power
PTY Search Sucht nach einem Programm nach
Zoom DLS
SERVICE Zeigt den Servicelisten-Bildschirm an.
Speichert einen Service.
Drehen Sie während der Wiedergabe
eines Service, den Sie speichern
möchten, den Lautstärkeregler, um eine
Voreinstellungsnummer auszuwählen,
und drücken Sie dann den Knopf.
aus, um die DAB-Einstellungen auf die
anfänglichen Standardeinstellungen
zu setzen.
Verkehrsnachrichten, sobald die
Verkehrsmeldung startet.
„ON“, „OFF“ (Werkseinstellung)
Radiodatensystem angeboten wird,
wenn der Empfang eines über DigitalRadio angebotenen Dienstes schlecht
geworden ist, wird automatisch auf
das Radiodatensystem umgeschaltet.
„ON“, „OFF“ (Werkseinstellung)
Wenn Sie „ON“ auswählen, schaltet
das Gerät zu einem verwandten
Service (wenn vorhanden), wenn kein
DAB-Servicenetzwerk vorhanden ist.
„ON“, „OFF“ (Werkseinstellung)
Schaltet die Stromversorgung für die
Digital-Radio-Antenne ein. Auf „ON“
einstellen, wenn die verwendete
Digital-Radio-Antenne mit einem
Antennenverstärker ausgestattet ist.
Werkseinstellung ist „ON“.
der Programmsparte.
Zeigt den Bildschirm Textinformationen an.
Externe Komponenten
Rückfahrkamera
Um eine Rückfahrkamera nutzen zu können, ist die
RÜCKWÄRTS-Kabelverbindung erforderlich. Zum
Anschluss einer Rückfahrkamera. (S.41)
Ñ Anzeige des Bildes von der
Rückfahrkamera
Der Rückansichtsbildschirm wird angezeigt, wenn Sie
in den Rückwärtsgang (R) schalten.
Ñ Manuelle Anzeige des Bildes von der
Rückfahrkamera
1 Drücken Sie <KAMERA>.
Deutsch |
35
Page 36

Bluetooth®-SmartphoneBluetooth®-Smartphone
Smartphone am Gerät anmelden
Sie können Ihr Bluetooth-Smartphone verwenden,
wenn es mit diesem Gerät verbunden ist.
• Sie können das Gerät und die Einheit, die SSP
(Secure Simple Pairing) nutzt, koppeln, was nur eine
Bestätigung voraussetzt.
• Es kann jeweils nur ein Gerät angeschlossen werden.
• Wenn Sie ein neues Bluetooth-Gerät registrieren,
trennen Sie das aktuell verbundene Bluetooth-Gerät
ab und registrieren Sie dann das neue Gerät.
1 Schalten Sie die Bluetooth-Funktion an Ihrem
Smartphone/Mobiltelefon ein.
2 Suchen Sie das Gerät („KD-X56*“) von Ihrem
Smartphone/Mobiltelefon aus.
Wenn die Eingabe eines PIN-Codes erforderlich ist,
geben Sie den PIN-Code („0000“) ein.
Ñ Trennen des Geräts
• Schalten Sie die Bluetooth-Funktion auf Ihrem
Smartphone/Mobiltelefon aus.
• Schalten Sie das Zündschloss aus.
Ñ Über mit Phonebook Access Profile
(PBAP) kompatible Smartphones
Wenn Ihr Smartphone PBAP unterstützt, können
Sie die folgenden Elemente anzeigen, wenn das
Smartphone angeschlossen ist.
• Telefonbuch
• Getätigte Anrufe, empfangene Anrufe und verpasste
Anrufe
Einen Anruf empfangen
Zweck Vorgang
Einen Anruf
annehmen
Ñ Bedienvorgänge während eines Anrufs
Zweck Vorgang
Einen Anruf beenden
Die Telefonlautstärke
einstellen
Zwischen dem
Freisprechmodus
und Telefonmodus
umschalten
Drücken Sie <
Drücken Sie <
Drehen Sie den
Lautstärkeregler.
Drücken Sie <
Jedes Mal, wenn Sie
die Taste drücken, wird
„Transfer!“ angezeigt und der
Sprechmodus wird zwischen
dem Freisprechmodus und
Telefonmodus umgeschaltet.
>.
>.
>.
Telefonanrufe tätigen
1 Drücken Sie < >, um zum Bluetooth-
Modus zu gelangen.
2 Drücken Sie <E>/< F>, um eine
Anrufmethode auszuwählen ([ ]: aus dem
Anrufverlauf/[ ]: aus dem Telefonbuch).
3 Drehen Sie den Lautstärkeregler, um das Ziel
auszuwählen, drücken Sie dann den Knopf, um
einen Anruf zu tätigen.
Wiedergabe mit einem BluetoothAudiogerät
1 Drücken Sie < >, um den HOME-
Bildschirm anzuzeigen.
2 Drehen Sie den Lautstärkeregler, um [BT Audio]
auszuwählen, und drücken Sie dann den Knopf.
Zweck Vorgang
Wiedergabe/
Pause
Eine Datei
auswählen
Schnellrücklauf/
Schnellvorlauf
Drücken Sie den Lautstärkeregler.
Drücken Sie <E>/<F>
mehrmals.
Halten Sie <E>/< F>
gedrückt.
✎ HINWEIS
• Die Funktionen und Anzeigen können je nach ihrer
Verfügbarkeit auf dem angeschlossenen Gerät
abweichen.
Ñ Einen Inhalt in einer Liste auswählen
1 Drücken Sie < >, um den LISTEN-
Bildschirm anzuzeigen.
2 Drehen Sie den Lautstärkeregler, um ein
Element auszuwählen, und drücken Sie dann
den Knopf.
• Um zur vorherigen Ebene zurückzukehren,
drücken Sie <
>.
36
Page 37

Einrichtung
Einrichtung
Einstellungen
1 Halten Sie < > gedrückt, um die
Einstellungen anzuzeigen.
2 Drücken Sie <E>/< F>, um eine Kategorie
auszuwählen.
3 Drehen Sie den Lautstärkeregler, um ein
Element auszuwählen (siehe die folgende
Tabelle), und drücken Sie dann den Knopf.
4 Wiederholen Sie den Schritt 3, bis das
gewünschte Element ausgewählt/aktiviert
ist oder befolgen Sie die Anweisungen des
ausgewählten Elementes.
5 Drücken Sie < >.
Audioeinstellungen
Fader R12 — F12 (00): Stellt die Lautstärke-
Balance L12 — R12 (00): Stellt die Lautstärke-
Allgemeine Einstellungen
Beep ON/OFF: Aktiviert oder deaktiviert den
Date/Clock Stellt das Datum und die Uhrzeit ein.
Language Wählt die für die
Time
Format
Wallpaper Black/Blue: Wählt das Hintergrundbild
Demo Zum Einstellen des
Initialize Wählen Sie [Initialize] und dann [Yes]
Bluetooth-Einstellungen
Sync
Phonebook
BT
Information
Balance der vorderen und hinteren
Lautsprecher ein.
Balance der linken und rechten
Lautsprecher ein.
Tastendruckton. Werkseinstellung ist
„ON“.
(S.31)
Bildschirminformationen verwendete
Sprache aus.
12h/24h: Wählt das Zeitformat aus. Die
Werkseinstellung ist „24h“.
aus.
Demonstrationsmodus.
Werkseinstellung ist „ON“.
aus, um alle Einstellungen auf die
anfänglichen Standardeinstellungen zu
setzen.
ON/OFF: Aktiviert oder deaktiviert die
Synchronisierung des Telefonbuchs
im mit dem Gerät verbundenen
Smartphone.
Zeigt die Informationen über das
angeschlossene Bluetooth-Gerät an
(Gerätename, Name des Smartphones
und Mac-Adresse).
Soundeinstellungen
1 Drücken Sie < >, um die Soundeinstellung
anzuzeigen.
2 Drehen Sie den Lautstärkeregler, um ein
Element auszuwählen (siehe die folgende
Tabelle), und drücken Sie dann den Knopf.
3 Wiederholen Sie den Schritt 2, bis das
gewünschte Element ausgewählt/aktiviert
ist oder befolgen Sie die Anweisungen des
ausgewählten Elementes.
4 Drücken Sie < >.
Graphic
Equalizer
Loudness Legt die Verstärkung der Tief- und
X’over Sie können die Übergangsfrequenz für
Delay Stellen Sie die Verzögerungszeit für
Wählt einen voreingestellten Equalizer
aus, der für das Musikgenre geeignet ist.
Flat / DRVN / Hard Rock / Hip Hop / Jazz
/ Pop/ R & B / User / Classical
Wählen Sie [User] aus, um die
gemachten Einstellungen
anzuwenden
1) Drücken Sie den Lautstärkeregler, um
die Frequenz auszuwählen.
2) Drehen Sie den Lautstärkeregler, um
den Pegel einzustellen.
3) Drücken Sie <
Hochtöne fest.
„ON“, „OFF“ (Werkseinstellung)
die Lautsprecher einstellen.
1) Drücken Sie <E>/<F>, um den
Lautsprecher auszuwählen.
2) Drücken Sie den Lautstärkeregler, um
das Element auszuwählen.
3) Drehen Sie den Lautstärkeregler, um
den Wert einzustellen.
4) Drücken Sie <
den Ton so ein, dass die Sounds der
verschiedenen Lautsprecher den Hörer,
der auf dem ausgewählten Sitz sitzt,
gleichzeitig erreichen.
1) Drücken Sie <E>/<F>, um den
Lautsprecher auszuwählen.
2) Drehen Sie den Lautstärkeregler, um
den Wert einzustellen.
3) Drücken Sie <
>.
>.
>.
Deutsch |
37
Page 38

InstallationInstallation
Vor der Installation
Vor der Installation dieses Geräts beachten Sie bitte
die folgenden Vorsichtsmaßnahmen.
#WARNHINWEISE
• Verbinden Sie Zünddraht (rot) und Batteriekabel
(gelb) mit dem Fahrzeugchassis (Erde), so könnte
dies zu einem Kurzschluss führen, der ein Feuer
entzündet. Schließen Sie diese Drähte nur an eine
Stromquelle an, die durch den Sicherungskasten
geführt wird.
• Zündkabel (rot) und Batteriekabel (gelb) dürfen nie
ohne Einbindung einer Sicherung installiert werden.
Zwischen Stromversorgung und Kabel muss immer
eine Sicherung installiert sein.
#ACHTUNG
• Montieren Sie dieses Gerät in der Konsole Ihres
Fahrzeugs.
Berühren Sie die Metallteile des Geräts während
oder kurz nach der Benutzung nicht. Metallteile wie
der Kühlkörper und das Gehäuse werden heiß.
✎ HINWEIS
• Die Montage sowie die Verkabelung dieses Gerätes
macht besondere Fähigkeiten und Erfahrung
erforderlich. Überlassen Sie die Montage- und
Verkabelungsarbeiten aus Sicherheitsgründen
ausgewiesenem Fachpersonal.
• Betreiben Sie das Gerät ausschließlich mit 12-VoltGleichstrom und negativer Masseverbindung.
• Setzen Sie weder die Frontblende noch deren
Etui direktem Sonnenlicht, extremer Wärme oder
Luftfeuchtigkeit aus. Schützen Sie diese Teile
außerdem vor Staub und Spritzwasser.
• Verwenden Sie für den Einbau ausschließlich
die mitgelieferten Schrauben. Verwenden Sie
ausschließlich die mitgelieferten Schrauben. Falsche
Schrauben können das Gerät beschädigen.
• Wenn die Zündung Ihres Fahrzeuges keine ACCStellung hat, dann schließen Sie die Zündkabel an
eine Stromquelle an, die mit dem Zündschlüssel
ein- und ausgeschaltet werden kann. Wenn
Sie das Zündkabel an eine Stromquelle mit
konstanten Stromversorgung anschließen, wie z. B.
Batteriekabel, kann dies die Batterie entleeren.
• Hat die Konsole eine Klappe, dann stellen Sie bei der
Installation des Gerätes sicher, dass das Frontpanel
beim Öffnen und Schließen nicht gegen die Klappe
stößt.
• Wenn die Sicherung durchbrennt, überprüfen Sie
zuerst, dass die Drähte sich nicht berühren und
einen Kurzschluss verursachen. Ersetzen Sie dann
die durchgebrannte Sicherung durch eine neue
Sicherung mit den gleichen Nenngrößen.
• Isolieren Sie nicht angeschlossene Kabel mit
Vinylband oder ähnlichem Material. Entfernen
Sie nicht die Kappen von den Enden nicht
angeschlossener Kabel und Anschlüsse, damit keine
Kurzschlüsse entstehen.
• Sichern Sie die Leitungen mit Kabelklemmen und
umwickeln Sie die Drähte mit Vinylband, die in
Kontakt mit Metallteilen kommen, um die Kabel zu
schützen und Kurzschlüsse zu verhindern.
• Schließen Sie beide Pole der Lautsprecher an den
Lautsprecherausgängen am Gerät an. Das Gerät
kann beschädigt werden oder den Dienst versagen,
wenn Sie die ¤-Leiter zusammenführen oder über
Metallteile des Fahrzeugs erden.
• Sind nur zwei Lautsprecher an das System
angeschlossen, nutzen Sie die Anschlüsse entweder
an den beiden vorderen oder an den beiden
hinteren Ausgangsklemmen (nicht 1x vorne und
1x hinten anschließen). Wenn Sie zum Beispiel
den ¢-Stecker des linken Lautsprechers an eine
Ausgangsbuchse für vorne anschließen, darf der
¤-Stecker nicht an eine Ausgangsbuchse für hinten
angeschlossen werden.
• Überprüfen Sie nach der Montage des Geräts, ob
die Bremslichter, Blinker, Scheibenwischer usw.
ordnungsgemäß funktionieren.
• Das Gerät so anbringen, dass der Montagewinkel 30
° oder weniger beträgt.
• Bei der Installation des Gerätes im Fahrzeug dürfen
Sie nicht zu sehr auf die Paneloberfläche drücken.
Ansonsten könnte es zu Kratzern, Beschädigungen
oder Fehlfunktionen kommen.
• Die Empfangsqualität wird u. U. durch metallische
Gegenstände in der Nähe der Bluetooth-Antenne
beeinträchtigt.
Bluetooth-Antenne
Ñ Für die Installation mitgeliefertes
Zubehör
1
3
5
(3 m)
x1
x2
2
x1
4
x1
x1
38
Page 39

Installation
Ñ Installationsvorgang
1) Um einem Kurzschluss vorzubeugen, ziehen Sie
bitte den Schlüssel aus dem Zündschloss und
trennen Sie die ¤ -Klemme der Batterie ab.
2) Schließen Sie die Eingangs- und Ausgangskabel
jedes Gerätes richtig an.
3) Schließen Sie alle Kabel am Kabelbaum an.
4) Schließen Sie den Steckverbinder B des
Kabelbaums am Lautsprecheranschluss Ihres
Fahrzeugs an.
5) Schließen Sie den Steckverbinder A des
Kabelbaums am externen Stromanschluss Ihres
Fahrzeugs an.
6) Schließen Sie den Kabelbaumanschluss am Gerät
an.
7) Bauen Sie das Autoradio in Ihrem Fahrzeug ein.
8) Schließen Sie die ¤ -Klemme der Batterie wieder
an.
9) Drücken Sie die Reset-Taste.
Installation des Geräts
Ñ Nichtjapanische Autos
2
A
Sichern Sie das Gerät, indem
Sie die Metalllaschen mit
einem Schraubendreher o.
Ä. umbiegen.
✎ HINWEIS
• Stellen Sie sicher, dass das Gerät fest sitzt. Falls
das Gerät nicht fest sitzt, können Fehlfunktionen
(beispielsweise Sprünge bei der Wiedergabe)
auftreten.
• Wenn die Panelöffnung Ihres Fahrzeugs zu klein ist,
dass das Gerät (A) hineinpasst, beschneiden Sie die
Panelöffnung (deren obere und untere und rechte
und linke Seiten).
Ñ Ziertafel
1) Bringen Sie das Zubehör 1 am Gerät an.
1
Ñ Mikrofoneinheit
1) Überprüfen Sie die Einbauposition des Mikrofons
(Zubehör 5).
2) Säubern Sie die Installationsfläche.
3) Entfernen Sie die Schutzfolie vom Mikrofon
(Zubehör 5) und kleben Sie das Mikrofon an die
unten gezeigte Stelle.
4) Verlegen Sie das Mikrofonkabel bis zum Gerät
und befestigen Sie es an mehreren Punkten mit
Klebeband oder Ähnlichem.
5) Richten Sie die Richtung des Mikrofons (Zubehör
5) auf den Fahrer aus.
5
Befestigen Sie das Kabel mit
handelsüblichem Klebeband.
✎ HINWEIS
• Verwenden Sie bei Bedarf die Clips.
Deutsch |
39
Page 40

Installation
2
Ñ Entfernen der Ziertafel
1) Verwenden Sie den Entnahmeschlüssel (Zubehör
4), um die vier Laschen auszuhebeln (zwei am
oberen Teil, zwei am unteren Teil).
4
2) Ziehen Sie die Zierplatte nach vorn.
Ñ Ausbau des Geräts
1) Entfernen Sie wie unter Schritt 1 von “Entfernen der
Ziertafel” beschrieben die Ziertafel.
2) Nehmen Sie die Frontblende ab.
1
3) Schieben Sie die beiden Entnahmewerkzeuge
(Zubehör3) wie gezeigt tief in die Schlitze zu
beiden Seiten.
3
Ñ Funktionsanleitung für den
Kabelbaumanschluss
Stift Farbe und Funktion
A-4 Gelb Batterie
A-5 Blau/Weiß
A-7 Rot Zündung (ACC)
A-8 Black Erdungsanschluss (Masse)
B-1/B-2 Lila (+)/Lila/Schwarz (–) Hinten rechts
B-3/B-4 Grau (+)/Grau/Schwarz (–) Vorne rechts
B-5/B-6 Weiß (+)/Weiß/Schwarz (–) Vorne links
B-7/B-8 G rün (+)/
• Lautsprecherimpedanz: 4-8 Ω
[1]
Max. 150 mA, 12 V
[1]
Stromsteuerung
Grün/Schwarz (–) Hinten links
! ACHTUNG
Überprüfen Sie die folgende Bedingung, bevor
Sie die handelsüblichen ISO-Stecker an das Gerät
anschließen:
• Überprüfen Sie, ob die Stiftbelegung des Steckers
mit dem JVC-Gerät übereinstimmt.
• Achten Sie besonders auf das Stromkabel.
• Wenn das Batteriekabel und das Zündkabel nicht
übereinstimmen, tauschen Sie sie entsprechend aus.
• Verwenden Sie eine handelsübliche Schnittstelle,
wenn Ihr Auto über kein Zündkabel verfügt.
4) Schieben Sie das Entnahmewerkzeug nach unten
und ziehen Sie das Gerät zur Hälfte heraus, während
es nach innen gedrückt wird.
✎ HINWEIS
• Gehen Sie vorsichtig vor, um sich nicht an
den Vorsprüngen des Entnahmwerkzeugs zu
verletzen.
5) Umfassen Sie das Gerät mit beiden Händen und
ziehen Sie es vorsichtig heraus, damit es nicht
herunterfällt.
40
Page 41

Installation
Ñ Anschließen der Kabel an die Anschlüsse
Hellgrün (Parksensorkabel)
Aus Sicherheitsgründen muss der Feststellbremsen-
PRK SW
Sensor unbedingt angeschlossen werden.
Lila/Weiß (Rückwärtsgangsensorkabel)
An den Rückfahrlicht-Kabelbaum des Fahrzeugs
REVERSE
anschließen bei Verwendung der optionalen
Rückspiegelkamera.
Hellblau/Gelb (Lenkrad-Fernbedienungskabel)
Zur Lenkrad-Fernbedienung
Für die Verwendung der Lenkrad-Fernbedienungsfunktion benötigen
STEERING
WHEEL
REMOTE
INPUT
Sie einen speziellen Fernbedienungsadapter (nicht im Lieferumfang
enthalten), der auf Ihr Fahrzeug abgestimmt ist.
UKW/MW-Antenne
DAB-Antennenbuchse (SMB-Anschluss)
Nur KD-X561DBT
!
Bei Verwendung einer handelsüblichen
DAB-Antenne darf der Durchmesser
des SMB-Steckers höchstens Φ6,5 mm
betragen.
Φ 6,5 mm (maximal)
Anschluss A
Am FeststellbremsenErkennungsschalterkabelbaum
des Fahrzeugs anschließen.
Zubehör 5:
Bluetooth-Mikrofon
Anschluss B
1 3 5 7
15A
2 4 6 8
1 3 5 7
2 4 6 8
Sicherung (15 A)UKW/MW-Antenneneingang
ISO-Steckverbinder
Hinterer Audiovorverstärker
(Links; Weiß, Rechts; Rot)
Vorderer Audiovorverstärker
(Links; Weiß, Rechts; Rot)
Subwoofer-Preout (blau)
Rückfahrkameraeingang (Gelb)
Deutsch |
41
Page 42

Wissenswertes über dieses Gerät
Wissenswertes über dieses Gerät
Wartung
Ñ Gerät reinigen
Ist das Frontpanel des Geräts verschmutzt, reinigen
Sie es mit einem weichen, trockenen Tuch, z. B.
mit einem Silikontuch. Ist das Frontpanel stark
verschmutzt, entfernen Sie den Schmutz mit
einem angefeuchteten Tuch (mit neutralem
Reinigungsmittel) und wischen Sie es anschließend
wieder mit einem weichen trockenen Tuch ab.
! ACHTUNG
• Kein Reinigungsmittel direkt auf das Gerät
sprühen. Dies könnte die mechanischen Bauteile
beschädigen. Das Frontpanel nicht mit einem harten
Tuch oder Lösungsmitteln wie z. B. Verdünner
oder Alkohol reinigen. Dies könnte die Oberfläche
zerkratzen oder Aufdrucke ablösen.
Ñ Den Anschluss reinigen
Nehmen Sie die Frontblende ab und reinigen Sie
den Anschluss vorsichtig mit einem Wattestäbchen.
Achten Sie darauf, den Anschluss nicht zu
beschädigen.
Anschluss (an der Rückseite der Frontblende)
Hinweis zu den Spezifikationen
Ñ Bluetoothbereich
Frequenz
: 2,402 – 2,480 GHz
Ausgangsleistung
: +8 dBm (DURCHSCHN.), Leistungsklasse 1
Ñ Allgem.
Lautsprecherimpedanz
: 4 – 8 Ω
Betriebsspannung
: 12-V-Gleichstrom-Autobatterie
Urheberrechte
• Die Wortmarke Bluetooth und die Logos sind
registrierte Warenzeichen im Eigentum der
Bluetooth SIG, Inc. und jede Verwendung dieser
Marken durch die JVC KENWOOD Corporation
erfolgt unter Lizenz. Andere Warenzeichen und
Handelsmarken sind Eigentum der jeweiligen
Inhaber.
• Use of the Made for Apple badge means that an
accessory has been designed to connect specifically
42
to the Apple product(s) identified in the badge, and
has been certified by the developer to meet Apple
performance standards. Apple is not responsible for
the operation of this device or its compliance with
safety and regulatory standards. Please note that
the use of this accessory with an Apple product may
affect wireless performance.
• Apple, iPhone, iPod, iPod touch, and Lightning are
trademarks of Apple Inc., registered in the U.S. and
other countries.
• Microsoft and Windows Media are either registered
trademarks or trademarks of Microsoft Corporation
in the United States and/or other countries.
• THIS PRODUCT IS LICENSED UNDER THE MPEG4 VISUAL PATENT PORTFOLIO LICENSE FOR
THE PERSONAL AND NON-COMMERCIAL USE
OF A CONSUMER FOR (¡) ENCODING VIDEO IN
COMPLIANCE WITH THE MPEG-4 VISUAL STANDARD
(“MPEG-4 VIDEO”) AND/OR (¡¡) DECODING MPEG4 VIDEO THAT WAS ENCODED BY A CONSUMER
ENGAGED IN A PERSONAL AND NON-COMMERCIAL
ACTIVIT Y AND/OR WAS OBTAINED FROM A VIDEO
PROVIDER LICENSED BY MPEG LA TO PROVIDE
MPEG-4 VIDEO. NO LICENSE IS GRANTED OR SHALL
BE IMPLIED FOR ANY OTHER USE. ADDITIONAL
INFORMATION INCLUDING THAT RELATING TO
PROMOTIONAL, INTERNAL AND COMMERCIAL USES
AND LICENSING MAY BE OBTAINED FROM MPEG LA,
LLC. SEE HTTP://WWW.MPEGLA.COM.
• THIS PRODUCT IS LICENSED UNDER THE AVC
PATENT PORTFOLIO LICENSE FOR THE PERSONAL
USE OF A CONSUMER OR OTHER USES IN WHICH IT
DOES NOT RECEIVE REMUNERATION TO (¡)ENCODE
VIDEO IN COMPLIANCE WITH THE AVC STANDARD
(“AVC VIDEO”) AND/OR (¡¡)DECODE AVC VIDEO
THAT WAS ENCODED BY A CONSUMER ENGAGED
IN A PERSONAL ACTIVITY AND/OR WAS OBTAINED
FROM A VIDEO PROVIDER LICENSED TO PROVIDE
AVC VIDEO. NO LICENSE IS GRANTED OR SHALL
BE IMPLIED FOR ANY OTHER USE. ADDITIONAL
INFORMATION MAY BE OBTAINED FROM MPEG LA,
L.L.C. SEE HTTP://WWW.MPEGLA.COM
• libFLAC
Copyright (C) 2000-2009 Josh Coalson
Copyright (C) 2011-2013 Xiph.Org Foundation
– Redistribution and use in source and binary forms,
with or without modification, are permitted
provided that the following conditions are met:
– Redistributions of source code must retain the
above copyright notice, this list of conditions and
the following disclaimer.
– Redistributions in binary form must reproduce the
above copyright notice, this list of conditions and
the following disclaimer in the documentation
and/or other materials provided with the
distribution.
Page 43

Wissenswertes über dieses Gerät
Neither the name of the Xiph.org Foundation
nor the names of its contributors may be used to
endorse or promote products derived from this
software without specific prior written permission.
THIS SOFTWARE IS PROVIDED BY THE COPYRIGHT
HOLDERS AND CONTRIBUTORS ``AS IS’’ AND ANY
EXPRESS OR IMPLIED WARRANTIES, INCLUDING,
BUT NOT LIMITED TO, THE IMPLIED WARRANTIES OF
MERCHANTABILITY AND FITNESS FOR A PARTICULAR
PURPOSE ARE DISCLAIMED. IN NO EVENT SHALL
THE FOUNDATION OR CONTRIBUTORS BE LIABLE
FOR ANY DIRECT, INDIRECT, INCIDENTAL, SPECIAL,
EXEMPLARY, OR CONSEQUENTIAL DAMAGES
(INCLUDING, BUT NOT LIMITED TO, PROCUREMENT
OF SUBSTITUTE GOODS OR SERVICES; LOSS OF USE,
DATA, OR PROFITS; OR BUSINESS INTERRUPTION)
HOWEVER CAUSED AND ON ANY THEORY OF
LIABILITY, WHETHER IN CONTRACT, STRICT LIABILITY,
OR TORT (INCLUDING NEGLIGENCE OR OTHERWISE)
ARISING IN ANY WAY OUT OF THE USE OF THIS
SOFTWARE, EVEN IF ADVISED OF THE POSSIBILITY OF
SUCH DAMAGE.
• libogg
Copyright (c) 2002, Xiph.org Foundation
Redistribution and use in source and binary forms,
with or without modification, are permitted
provided that the following conditions are met:
– Redistributions of source code must retain the
above copyright notice, this list of conditions and
the following disclaimer.
– Redistributions in binary form must reproduce the
above copyright notice, this list of conditions and
the following disclaimer in the documentation
and/or other materials provided with the
distribution.
– Neither the name of the Xiph.org Foundation
nor the names of its contributors may be used to
endorse or promote products derived from this
software without specific prior written permission.
THIS SOFTWARE IS PROVIDED BY THE COPYRIGHT
HOLDERS AND CONTRIBUTORS ``AS IS’’ AND ANY
EXPRESS OR IMPLIED WARRANTIES, INCLUDING,
BUT NOT LIMITED TO, THE IMPLIED WARRANTIES OF
MERCHANTABILITY AND FITNESS FOR A PARTICULAR
PURPOSE ARE DISCLAIMED. IN NO EVENT SHALL
THE FOUNDATION OR CONTRIBUTORS BE LIABLE
FOR ANY DIRECT, INDIRECT, INCIDENTAL, SPECIAL,
EXEMPLARY, OR CONSEQUENTIAL DAMAGES
(INCLUDING, BUT NOT LIMITED TO, PROCUREMENT
OF SUBSTITUTE GOODS OR SERVICES; LOSS OF USE,
DATA, OR PROFITS; OR BUSINESS INTERRUPTION)
HOWEVER CAUSED AND ON ANY THEORY OF
LIABILITY, WHETHER IN CONTRACT, STRICT LIABILITY,
OR TORT (INCLUDING NEGLIGENCE OR OTHERWISE)
ARISING IN ANY WAY OUT OF THE USE OF THIS
SOFTWARE, EVEN IF ADVISED OF THE POSSIBILITY OF
SUCH DAMAGE.
Ñ Entsorgung von gebrauchten
elektrischen und elektronischen
Geräten und Batterien (anzuwenden
in EU-Ländern mit einem separaten
Sammelsystem für solche Geräte)
Das Symbol (durchgestrichene Mülltonne) auf dem
Produkt oder seiner Verpackung weist darauf hin,
dass dieses Produkt nicht als normaler Haushaltsabfall
behandelt werden darf.
Alte elektrische und elektronische Geräte müssen in
einer Anlage recycelt werden, die für den Umgang mit
diesen Artikeln und dem Begleitabfall geeignet sind.
Unsachgemäße oder falsche Entsorgung gefährden
Umwelt und Gesundheit.
Weitere Informationen über das Recycling dieses
Produktes erhalten Sie von Ihrer Gemeinde oder den
kommunalen Entsorgungsbetrieben.
Hinweis: Das Zeichen „Pb“ unter dem Symbol für
Batterien zeigt an, dass diese Batterie Blei enthält.
Deutsch |
43
Page 44

Inhoud
Voor ingebruikname ..........................................................44
De handleiding gebruiken...........................................................................44
Voorzorgsmaatregelen .................................................................................. 44
Aan de Slag ............................................................................45
Initiële instellingen............................................................................................ 45
Klokinstellingen .................................................................................................. 45
Basisinstellingen .................................................................46
Basisbediening .................................................................................................... 46
Het bevestigen/losmaken van het voorpaneel.............................46
Selecteer een bron ...........................................................................................46
USB/iPod.................................................................................47
Voorbereiding ...................................................................................................... 47
Weergaveopties .................................................................................................. 47
Tuner/DA B ..............................................................................48
Basisbediening van de tuner......................................................................48
DAB Basisbediening ......................................................................................... 48
Functie-instellingen van de tuner .......................................................... 48
DAB functie-instellingen ...............................................................................49
Externe Componenten ..................................................... 49
Achteruitzichtcamera .....................................................................................49
Bluetooth®-smartphone ...................................................50
Registreer uw mobiele telefoon bij het toestel ............................. 50
Een telefoongesprek ontvangen ............................................................ 50
Voer een telefoongesprek uit .................................................................... 50
Bluetooth-audioapparaat afspelen........................................................ 50
Setup ........................................................................................51
Instellingen..............................................................................................................51
Geluidsinstellingen ............................................................................................51
Installatie ................................................................................ 52
Vóór de installatie .............................................................................................. 52
De unit installeren ............................................................................................. 53
Informatie over dit toestel ............................................... 56
Onderhoud ............................................................................................................ 56
Opmerking voor specificaties ................................................................... 56
Auteursrechten ....................................................................................................56
Voor ingebruikname
Voorzorgsmaatregelen
#WAARSCHUWING
Ñ Neem de volgende
voorzorgsmaatregelen om persoonlijk
letsel of brand te voorkomen:
• Om kortsluiting te voorkomen plaats u nooit
metalen voorwerpen (zoals munten of metalen
gereedschappen) in het toestel of laat u deze in
het toestel achter.
• Kijk niet naar het scherm of richt uw ogen niet op
het scherm als u langere tijd aan het rijden bent.
• Raadpleeg uw JVC-dealer als u tijdens de
installatie problemen ondervindt.
Ñ Voorzorgsmaatregelen voor het gebruik
van het toestel
• Neem wanneer u optionele toebehoren
aanschaft contact op met uw JVC-dealer om te
controleren of deze optionele toebehoren met
uw model en in uw regio functioneren.
• De functie Radio Data System of Radio Broadcast
Data System werkt niet als deze functie niet wordt
ondersteund door een te ontvangen radiostation.
Ñ De monitor beschermen
• Om te voorkomen dat de monitor beschadigd
raakt, mag u de monitor niet bedienen met
een balpen of een soortgelijk hulpmiddel met
scherpe punt.
Ñ Uw toestel resetten
Als het toestel of het aangesloten toestel niet naar
behoren werkt, moet het toestel worden gereset.
De handleiding gebruiken
• De panelen die in deze handleiding worden
weergegeven, zijn voorbeelden om een duidelijke
uitleg van de werking te kunnen geven. Om die
reden kunnen de panelen afwijken van de werkelijke
panelen.
• Tijdens bedieningsprocedures geeft de vorm van de
haken aan welke toets of knop u moet bedienen.
[ ]: geeft de geselecteerde items of het menu aan.
< >: geeft de naam van de paneelknoppen aan.
• Displaytaal: Voor de uitleg wordt Engels gebruikt.
U kunt een displaytaal kiezen uit het [Language]menu. Zie Language (P.51).
44
1
2
3
Resetknop
Page 45

Aan de Slag
Initiële instellingen
1 Draai de contactsleutel van uw auto in de stand
ACC.
Het toestel wordt ingeschakeld.
2 Draai aan de volumeknop om het in te stellen
item te selecteren (zie onderstaande tabel) en
druk de knop vervolgens in om een selectie te
maken.
Language
Selecteer de taal die wordt gebruikt voor het
regelscherm en de in te stellen opties. De
standaardinstelling is „English” (Engels).
Area
EUROPE (Standaard): Voor Europa, AM/FM-
intervallen: 9 kHz/50 kHz.
M. EAST: Voor het Midden-Oosten, AM/FM-
intervallen: 9 kHz/50 kHz.
Date/Clock
Pas de datum aan en pas vervolgens de tijd aan.
Uren/minuten/maand/dag/jaar
Demo
Stel de demonstratiemodus in. De
standaardinstelling is „ON”.
3 Draai aan de volumeknop om [Finish] te
selecteren en druk de knop vervolgens in.
Klokinstellingen
Ñ Synchroniseren van de kloktijd met FM
RDS
Activeer [RDS Clock Sync] (RDS
Kloksynchronisatie). Zie “Functie-instellingen van
de tuner” (P. 48).
Ñ De klok handmatig aanpassen
✎ OPMERKING
• Deactiveer [RDS Clock Sync] voordat u de klok
aanpast. Zie “Functie-instellingen van de tuner”
(P.48).
1 Houd < > om de instellingen weer te geven.
2 Druk op <E>/< F> om [ ] te selecteren.
3 Draai de volumeknop om [Time Format] te
selecteren en druk vervolgens op de knop om
de tijdweergave ([12h] of [24h]) te selecteren.
4 Draai aan de volumeknop om [Date/Clock] te
selecteren en druk vervolgens op de knop.
Klokscherm verschijnt.
5 Draai aan de volumeknop om het uur in te
stellen en druk vervolgens op de knop.
6 Draai de volumeknop om de minuten in te
stellen en druk vervolgens op de knop.
7 Draai aan de volumeknop om de dag in te
stellen en druk vervolgens op de knop.
8 Draai aan de volumeknop om de maand in te
stellen en druk vervolgens op de knop.
9 Draai aan de volumeknop om het jaar in te
stellen en druk vervolgens op de knop.
10
Druk op < >.
Nederlands |
45
Page 46

BasisinstellingenBasisinstellingen
25364
7
1
Volumeknop (draaien/indrukken)
Basisbediening
Ñ Het inschakelen van de stroom
1 Druk op < >.
Ñ Uitschakelen van de stroom
1 Houd < > ingedrukt.
Ñ Instellen van het volume
1 Draai aan de volumeknop.
Ñ Dempt het geluid
1 Houd de volumeknop ingedrukt.
verschijnt wanneer de dempingsfunctie actief
is.
Om het geluid te herstellen, houdt u de knop
nogmaals ingedrukt of stelt u het volume in.
Ñ De klok weergeven
1 Houd de <DIM>-knop ingedrukt.
Ñ Selecteer de dimmerstand
1 Druk op de <DIM>-knop.
Dimmer 1, Dimmer 2, Dimmer 3
Het bevestigen/losmaken van het voorpaneel
BevestigenLosmaken
1
2
1
2
Afstandsbedieningsensor
DisplayVerwijderknop
Selecteer een bron
1 Druk op < > om het HOME-scherm weer
te geven.
START-scherm verschijnt.
2 Draai aan de volumeknop om de bron te
selecteren en druk vervolgens op de knop.
Klokweergave
1
Schakelt naar de uitzending van de FM-tuner.
2
(P.48)
Schakelt naar de uitzending van de AM-tuner.
3
(P.48)
Schakelt over naar de DAB-uitzending. (P. 48)
4
(alleen KD-X561DBT)
Afspelen van een Bluetooth audiospeler. (P. 50)
5
6
[USB]
Speelt bestanden op een USB-apparaat af.
(P.47)
[iPod]
Speelt een iPod/iPhone af. (P.47)
• Wanneer de iPod/iPhone is verbonden.
Schakelt naar een extern component dat is
7
aangesloten op de AUX-ingangsaansluiting.
46
Page 47

USB/iPod
USB/iPod
Voorbereiding
Ñ Een USB-apparaat/iPod/iPhone
aansluiten
1 Open het klepje.
2 Sluit het USB-apparaat via de USB-kabel aan
(afzonderlijk verkocht).
Sluit de iPod/iPhone aan met gebruik van de
KS-U62 (optionele accessoire).
Het toestel leest de disk en het afspelen begint.
• Maximale voedingsstroom USB: DC 5 V = 1 A
Ñ Het loskoppelen van het USB-apparaat/
iPod/iPhone
1 Druk op < > om het HOME-scherm weer
te geven.
2 Draai aan de volumeknop om iets ander
dan [USB] en [iPod] te selecteren en druk
vervolgens op de knop.
3 Koppel het USB-apparaat/iPod/iPhone los.
Ñ Bruikbaar USB-apparaat
Dit apparaat kan MP3/WMA/AAC/WAV/FLAC/OGG/
MPEG1/MPEG2/MPEG4/H.264/MKV/JPEG/BMP/PNGbestanden afspelen die zijn opgeslagen op een
USB-apparaat voor massaopslag.
Ñ Aansluitbare iPod/iPhone
De volgende modellen kunnen op dit toestel
worden aangesloten.
Gemaakt voor
• iPhone X
• iPhone 8 Plus
• iPhone 8
• iPhone 7 Plus
• iPhone 7
• iPhone SE
• iPhone 6s Plus
• iPhone 6s
• iPhone 6 Plus
• iPhone 6
• iPhone 5s
• iPod touch (6e
generatie)
Weergaveopties
Naar Doe dit
Afspelen/
pauzeren
Selecteer een
bestand
Snel achteruit/
Snel vooruit
Druk op de volumeknop.
Druk herhaaldelijk op
<E>/< F>.
Houd <E>/<F> ingedrukt.
• Videobestanden: Elke keer
dat u op de knop drukt, zal de
zoeksnelheid veranderen.
Ñ Een nummer/inhoud uit een lijst
selecteren (zoekt bestand)
1 Druk op < > om het LIJST-scherm weer
te geven.
2 Druk op <E>/< F> om te selecteren
of u wilt zoeken op audiobestanden [ ],
videobestanden [ ] of fotobestanden [ ].
(Alleen USB)
3 Draai de volumeknop om de gewenste map/
categorie te selecteren en druk vervolgens op
de knop.
• Wanneer u een map selecteert, wordt de inhoud
ervan weergegeven.
• Om naar de vorige laag terug te keren, drukt u
op <
>.
4 Draai aan de volumeknop om het gewenste
item te selecteren en druk vervolgens op de
knop.
Het afspelen begint.
Nederlands |
47
Page 48

Tuner/DAB
Tuner/DAB
Basisbediening van de tuner
1 Druk op < > om het HOME-scherm weer
te geven.
2 Draai aan de volumeknop om [FM] of [AM] te
selecteren en druk vervolgens op de knop.
3 Druk op <E>/< F> om automatisch naar
een zender te zoeken.
„Auto Seek” (Automatisch Zoeken) verschijnt.
(of)
Houd <E>/< F> herhaaldelijk ingedrukt
om handmatig naar een zender te zoeken.
„Manual Seek” (Handmatig Zoeken) verschijnt.
✎ OPMERKING
• Om zenders op te slaan, voert u [Manual Store] of
[Auto Store] uit.
Ñ Selecteer een opgeslagen zender
U kunt 15 zenders voor FM en 15 zenders voor AM
instellen.
1 Druk op < > om het LIJST-scherm weer
te geven.
2 Draai aan de volumeknop om een
voorkeuzenummer te selecteren en druk
vervolgens op de knop.
✎ OPMERKING
• Om af te sluiten, drukt u op < >.
DAB Basisbediening (KD-X561DBT)
1 Druk op < > om het HOME-scherm weer
te geven.
2 Draai aan de volumeknop om [DAB] te
selecteren en druk de knop vervolgens in.
3 Druk op <E>/< F> om automatisch naar
een ensemble te zoeken.
„Auto Seek” (Automatisch Zoeken) verschijnt.
(of)
Houd <E>/< F> herhaaldelijk ingedrukt
om handmatig naar een ensemble te zoeken.
„Manual Seek” (Handmatig Zoeken) verschijnt.
4 Houd <E>/< F> ingedrukt en selecteer
een service (primaire of secundaire) om naar te
luisteren.
✎ OPMERKING
• Om een service op te slaan, voer [Favorite] uit.
Ñ Selecteer een service
1 Druk op < > om het LIJST-scherm weer
te geven.
2 Draai aan de volumeknop om een service te
selecteren en druk vervolgens op de knop.
Ñ Selecteer een opgeslagen service
U kunt maximaal 15 services opslaan
1 Druk op < > om het LIJST-scherm weer
te geven.
2 Druk op <E>/< F> om [ ] te selecteren.
3 Draai aan de volumeknop om een service te
selecteren en druk vervolgens op de knop.
✎ OPMERKING
• Om af te sluiten, drukt u op < >.
Functie-instellingen van de tuner
1 Druk op < > om het functiemenu weer te geven.
2 Draai aan de volumeknop om het in te stellen item
te selecteren (zie onderstaande tabel) en druk de
knop vervolgens in om een selectie te maken.
3 Druk op < >.
Manual
Store
Auto
Store
Local
Seek
Area EUROPE (Standaard): Voor Europa, AM/
Mono *
RDS *
PTY *
AF *
TA *
Slaat een zender handmatig op.
Druk tijdens het beluisteren van een zender
die u wilt opslaan aan de volumeknop om
een voorkeuzenummer te selectere en druk
vervolgens op de knop.
Zoekt automatisch naar de 15 zenders met
het sterkste signaal voor de geselecteerde
bandbreedte, en slaat deze op.
• „Auto Store” verschijnt.
Stemt alleen af op de zenders met
voldoende signaalsterkte.
„ON”, „OFF” (Standaard)
FM-intervallen: 9 kHz/50 kHz.
M. EAST: Voor het Midden-Oosten, AM/FM-
intervallen: 9 kHz/50 kHz.
1
Bepaalt of stereo-uitzendingen in mono of
stereo worden ontvangen.
„ON”, „OFF” (Standaard)
1
Kenmerken van FM Radio Data System
„ON” (Standaard), „OFF”
1*2
Zoekt een programma op programmatype.
1*2
Wanneer de ontvangstkwaliteit slecht is,
wordt automatisch overgeschakeld op de
zender die hetzelfde programma uitzendt
in hetzelfde Radio Data System-netwerk.
„ON” (Standaard), „OFF”
1*2
Schakelt automatisch naar de
verkeersinformatie wanneer er een
verkeersbericht wordt uitgezonden. (TI
indicator gaat branden.)
„ON”, „OFF” (Standaard)
48
Page 49

Tuner/DAB
RDS
Clock
Sync *1*
*1 Alleen FM
*2 Beschikbaar wanneer [RDS] is ingesteld op [ON].
Het synchroniseren van de tijdgegevens
van de zender van het Radio-datasysteem
2
en de klok van deze eenheid.
„ON” (Standaard), „OFF”
DAB functie-instellingen (KD-X561DBT)
1 Druk op < > om het functiemenu weer te geven.
2 Draai aan de volumeknop om het in te stellen
item te selecteren (zie onderstaande tabel) en
druk de knop vervolgens in om een selectie te
maken.
3 Druk op < > om af te sluiten.
Scan Station Werkt de DAB-servicelijst bij.
Favorite Slaat een service op.
Reset Raak [Reset] aan en raak vervolgens
TI Schakelt automatisch naar de
Setup
Priority Als de ontvangst van een door
Related
Service
Antenna
Power
PTY Search Zoekt een programma op
Zoom DLS Het scherm Dynamische Label
SERVICE Geeft het Servicelijst-scherm weer.
Draai tijdens het beluisteren van
een service die u wilt opslaan
aan de volumeknop om een
voorkeuzenummer te selecteren en
druk vervolgens op de knop.
[Ye s] aan om alle instellingen terug
te zetten naar de oorspronkelijke
standaardinstellingen.
verkeersinformatie wanneer er een
verkeersbericht wordt uitgezonden.
„ON”, „OFF” (Standaard)
digitale radio geleverde dienst slecht
wordt en dezelfde dienst door een
Radio Data System wordt geleverd,
wordt er automatisch geschakeld naar
Radio Data System.
„ON”, „OFF” (Standaard)
Wanneer u AAN selecteert, schakelt de
unit over naar een gerelateerde service
(indien deze bestaat) wanneer een
DAB-servicenetwerk niet beschikbaar is.
„ON”, „OFF” (Standaard)
Stelt de voeding in op de antenne
voor digitale radio. Stel deze optie in
op „ON” als de antenne voor digitale
radio is uitgerust met een versterker.
De standaardinstelling is „ON”.
programmatype.
Segment weergeven.
Externe Componenten
Achteruitzichtcamera
Om een achteruitkijkcamera te gebruiken, is de
OMGEKEERD geleide koppeling nodig. Om een
achteruitkijkcamera aan te sluiten. (P. 55)
Ñ Het beeld van de achteruitkijkcamera
weergeven
Het achteruitkijk-scherm wordt weergegeven
wanneer u de versnelling schakelt naar de achteruitpositie (R).
Ñ Om het beeld van de
achteruitzichtcamera handmatig weer
te geven
1 Druk op <CAMERA>.
Nederlands |
49
Page 50

Bluetooth®-smartphoneBluetooth®-smartphone
Registreer uw mobiele telefoon bij het toestel
U kunt uw Bluetooth-smartphone gebruiken als
deze aan dit toestel is gekoppeld.
• U kunt het apparaat en de eenheid koppelen met
behulp van SSP (Secure Simple Pairing) wat alleen
een bevestiging vereist.
• Er kan slechts één apparaat tegelijkertijd verbonden
zijn.
• Wanneer u een nieuw Bluetooth-apparaat
registreert, ontkoppelt u het Bluetooth-apparaat
dat op dat moment is aangesloten en registreert u
daarna het nieuwe apparaat.
1 Zet de Bluetooth-functie op uw smartphone/
mobiele telefoon aan.
2 Zoek het apparaat („KD-X56*”) vanaf uw
smartphone/mobiele telefoon.
Als er een PIN-code is vereist, voert u de pincode
(„0000”) in.
Ñ Het apparaat ontkoppelen
• Zet de Bluetooth-functie op uw smartphone/
mobiele telefoon uit.
• Zet het contactslot uit.
Ñ Over mobiele telefoons die compatibel
zijn met Phone book Access Profile (PBAP)
Als uw telefoon PBAP ondersteunt, kunt u
de volgende items weergeven wanneer de
smartphone is aangesloten.
• Telefoonboek
• Uitgaande oproepen, ontvangen oproepen en
gemiste oproepen
Een telefoongesprek ontvangen
Naar Doe dit
Een oproep
beantwoorden
Ñ Bediening tijdens een telefoongesprek
Naar Doe dit
Een oproep
beëindigen
Het volume
van de telefoon
aanpassen
Schakelen tussen
de standen
handsfree en
telefoon
50
Druk op <
Druk op <
Draai aan de volumeknop.
Druk op <
Bij elke druk op de toets,
verschijnt „Transfer!” en wordt
de spraakmethode geschakeld
tussen de standen handsfree en
telefoon.
>.
>.
>.
Voer een telefoongesprek uit
1 Druk op < > om Bluetooth in te schakelen.
2 Druk op <E>/< F> om een methode
te selecteren om te bellen ([ ]: uit
de oproepgeschiedenis/[ ]: uit het
telefoonboek).
3 Draai aan de volumeknop om het doel te
selecteren en druk vervolgens op de knop om
te bellen.
Bluetooth-audioapparaat afspelen
1 Druk op < > om het HOME-scherm weer
te geven.
2 Draai aan de volumeknop om [BT Audio] te
selecteren en druk vervolgens op de knop.
Naar Doe dit
Afspelen/
pauzeren
Selecteer een
bestand
Snel achteruit/
Snel vooruit
Druk op de volumeknop.
Druk herhaaldelijk op
<E>/< F>.
Houd <E>/<F> ingedrukt.
✎ OPMERKING
• Aanduidingen in het display en hun beschikbaarheid
kan verschillen afhankelijk van het aangesloten
toestel.
Ñ Selecteren van inhoud in een lijst
1 Druk op < > om het LIJST-scherm weer
te geven.
2 Draai aan de volumeknop om een item te
selecteren en druk vervolgens op de knop.
• Om naar de vorige laag terug te keren, drukt u
op <
>.
Page 51

Setup
Setup
Instellingen
1 Houd < > om de instellingen weer te geven.
2 Druk op <E>/< F> om de categorie te
selecteren.
3 Draai aan de volumeknop om een item te
selecteren (zie de volgende tabel) en druk
vervolgens op de knop.
4 Herhaal stap 3 tot het gewenste item is
geselecteerd/ingeschakeld of volg de
instructies die op het geselecteerde item staan
vermeld.
5 Druk op < >.
Audio-instellingen
Fader R12 — F12 (00): Hiermee stelt u de
Balance L12 — R12 (00): Hiermee stelt u de
Algemene instellingen
Beep ON/OFF: Schakelt het toetsgeluid in of
Date/Clock Stelt de datum en klok in. ( P.45)
Language Selecteert de taal van de tekst die wordt
Time
Format
Wallpaper Black/Blue: Selecteert de
Demo Stel de demonstratiemodus in. De
Initialize Selecteer [Initialize] en selecteer
Bluetooth-instellingen
Sync
Phonebook
BT
Information
balans van de luidsprekers voor en
achter in.
balans van de luidsprekers links en
rechts in.
uit. De standaardinstelling is „ON”.
gebruik voor de informatie op het
beeldscherm.
12h/24h: Selecteert tijdsformat.
Standaard is „24h”.
achtergrondafbeelding.
standaardinstelling is „ON”.
vervolgens [Yes] om alle instellingen
terug te zetten naar de oorspronkelijke
standaardinstellingen.
ON/OFF: Activeert of deactiveert de
synchronisatie van het telefoonboek
in de verbonden telefoon met het
apparaat.
Geeft de gegevens weer van het
verbonden Bluetooth-apparaat
(apparaatnaam, telefoonnaam en
mac-adres).
Geluidsinstellingen
1 Druk op < > om de geluidsinstelling weer te
geven.
2 Draai aan de volumeknop om een item te
selecteren (zie de volgende tabel) en druk
vervolgens op de knop.
3 Herhaal stap 2 tot het gewenste item is
geselecteerd/ingeschakeld of volg de
instructies die op het geselecteerde item staan
vermeld.
4 Druk op < >.
Graphic
Equalizer
Loudness Stelt de hoeveelheid versterking in voor
X’over U kunt de crossoverfrequentie van de
Delay Pas de vertragingstijd van het
Selecteert een vooraf ingestelde
equalizer die geschikt is voor het
muziekgenre.
Flat / DRVN / Hard Rock / Hip Hop / Jazz
/ Pop/ R & B / User / Classical
Selecteer [User] om de gemaakte
instellingen te gebruiken
1) Druk op de volumeknop om de
frequentie te selecteren.
2) Draai aan de volumeknop om het
niveau aan te passen.
3) Druk op <
de lage en de hoge tonen.
„ON”, „OFF” (Standaard)
luidsprekers instellen.
1) Druk op om <E>/<F> om de
luidspreker te selecteren.
2) Druk op de volumeknop om het item
te selecteren.
3) Draai aan de volumeknop om de
waarde aan te passen.
4) Druk op <
geluid aan zodat de geluiden van de
verschillende luidsprekers gelijktijdig bij
de gebruiker die op de geselecteerde
stoel zit aankomen.
1) Druk op om <E>/<F> om de
luidspreker te selecteren.
2) Draai aan de volumeknop om de
waarde aan te passen.
3) Druk op <
>.
>.
>.
Nederlands |
51
Page 52

InstallatieInstallatie
Vóór de installatie
Neem vóór de installatie van dit toestel de volgende
voorzorgsmaatregelen in acht.
#WAARSCHUWINGEN
• Als u de ontstekingskabel (rood) en de accukabel
(geel) op het chassis van de auto (massa) aansluit,
kunt u kortsluiting veroorzaken waardoor brand
kan ontstaan. Sluit deze kabels altijd aan op de
voedingsbron die door de zekeringkast loopt.
• Verwijder niet de zekering van de ontstekingskabel
(rood) en de accukabel (geel). De voeding moet zijn
aangesloten op de kabels via de zekering.
#LET OP
• Installeer dit toestel in de console van uw auto.
Raak het metalen deel van dit toestel tijdens of
na het gebruik niet aan. Metalen delen zoals de
behuizing worden heet.
✎ OPMERKING
• De montage en aansluiting van dit product vereist
kennis en ervaring. Voor uw eigen veiligheid dient
u de montage en aansluiting over te laten aan
deskundigen.
• Zorg dat het toestel op een negatieve 12 Volt
gelijkstroomvoeding is geaard.
• Installeer het toestel niet op plaatsen die aan direct
zonlicht, overmatige hitte of vochtigheid blootstaan.
Vermijd tevens zeer stoffige plaatsen of plaatsen
waar het toestel nat zou kunnen worden.
• Gebruik geen eigen schroeven. Gebruik uitsluitend
de bij het toestel geleverde schroeven. Het
gebruik van verkeerde schroeven kan het toestel
beschadigen.
• Als het contact van uw auto geen ACC-stand heeft,
moet u de ontstekingskabel met een spanningsbron
verbinden die gelijk met het contact van de auto
wordt in- of uitgeschakeld. Als u de ontstekingskabel
verbindt met een spanningsbron waar constant
spanning op staat, zoals een accukabel, kan de accu
leeglopen.
• Als de console een deksel heeft, moet u er bij
de installatie van het toestel op letten dat het
voorpaneel het deksel bij het openen en sluiten niet
raakt.
• Als de zekering is doorgebrand, controleert u eerst
of de kabels elkaar niet raken en zo een kortsluiting
veroorzaken en vervangt u de zekering door een
nieuwe met dezelfde stroomsterkte.
• Isoleer niet-aangesloten kabels met isolatieband of
ander geschikt materiaal. Voorkom kortsluiting door
de kapjes op het uiteinde van de niet-aangesloten
kabels of aansluitingen niet te verwijderen.
• Zet de bedrading met behulp van de kabelklemmen
en wikkel de vinyltape rond de draden die in contact
komt met de metalen delen en om te voorkomen
dat de draden om kortsluiting te voorkomen.
• Sluit de luidsprekerkabels correct aan op de
corresponderende aansluitingen. Het toestel kan
beschadigd raken of niet langer werken als u de
¤-draden deelt of deze aardt met een metalen
onderdeel van het voertuig.
• Indien er maar twee luidsprekers op het systeem
worden aangesloten, moeten de connectors óf
op de beide voorste uitgangen óf op de beide
achterste uitgangen worden aangesloten (verwissel
voor en achter niet). Indien u bijvoorbeeld de ¢
connector van de linker luidspreker op een voorste
uitgang aansluit, mag u de ¤ connector niet op een
achterste uitgang aansluiten.
• Controleer na het installeren van het toestel of de
remlichten, richtingaanwijzers, ruitenwissers etc. van
de auto correct functioneren.
• Installeer het toestel zodanig dat een maximale hoek
van 30° wordt bereikt.
• Duw niet te hard op het paneelopper vlak tijdens de
installatie van het toestel in het voertuig. Dit kan leiden
tot krassen, schade of het niet meer goed functioneren.
• De ontvangst wordt mogelijk slechter wanneer zich
metalen voorwerpen in de buurt van de Bluetoothantenne bevinden.
Bluetooth-antenne
Ñ Meegeleverde accessoires voor
installatie
1
3
5
(3 m)
x1
x2
2
x1
4
x1
x1
52
Page 53

Installatie
Ñ Installatieprocedure
1) Voorkom kortsluiting door de sleutel uit het
contactslot te verwijderen en de ¤ aansluiting van
de accu los te koppelen.
2) Verbind de juiste in- en uitgangskabels van elk
toestel.
3) Sluit de kabel op de bedradingsbundel aan.
4) Neem connector B op de bedradingsbundel en
sluit deze aan op de luidsprekerconnector van uw
auto.
5) Neem connector A op de bedradingsbundel en
sluit deze aan op de externe spanningsconnector
op uw auto.
6) Sluit de connector van de bedradingsbundel op
het toestel aan.
7) Installeer het toestel in uw auto.
8) Sluit de ¤-pool van de batterij weer aan.
9) Druk op de resetknop.
De unit installeren
Ñ Niet-Japanse auto’s
2
A
Buig de lipjes van de
bevestigingshuls met een
schroevendraaier of iets
dergelijks en bevestig deze
op zijn plaats.
✎ OPMERKING
• Zorg ervoor dat het toestel stevig op zijn plaats
zit. Als het toestel instabiel is, kan het slecht
functioneren (het geluid kan bijvoorbeeld
overslaan).
• Als de paneelopening van uw voertuig te klein
is voor het apparaat (A), verklein dan de (onderen bovenzijde en rechter- en linkerzijde) de
paneelopening.
Ñ Sierplaat
1) Bevestig de accessoire 1 aan het toestel.
1
Ñ De microfoon
1) Controleer de installatiepositie van de microfoon
(accessoire 5).
2) Reinig het installatieoppervlak.
3) Verwijder de beschermstrook van de microfoon
(accessoire 5) en plak de microfoon op de plek die
hieronder wordt getoond.
4) Leid de microfoonkabel tot aan de handsfreekit
en zet de kabel op verschillende plaatsen vast met
tape of vergelijkbaar materiaal.
5) Verstel de microfoon (accessoire 5) in de richting
van de bestuurder.
5
Bevestig de kabel met in de handel
verkrijgbare tape.
✎ OPMERKING
• Gebruik indien nodig de klemmen.
Nederlands |
53
Page 54

Installatie
2
Ñ Verwijderen van de afwerkingsplaat
1) Gebruik de extractiesleutel (accessoire 4) om de
vier lipjes los te wippen (twee aan de bovenzijde,
twee aan de onderzijde).
4
2) Trek de afwerkingsplaat naar voren.
Ñ Verwijderen van het apparaat
1) Zie stap 1 in “Het inbouwframe verwijderen” voor
het verwijderen van het inbouwframe.
2) Het voorpaneel verwijderd.
1
3) Steek de twee uitbouwsleutels (accessoire3) diep
in de openingen aan beide kanten, zoals wordt
getoond.
3
Ñ Kabelboomstekker functiegids
Pen Kleur en functie
A-4 Geel Accu
A-5 Blauw/wit
[1]
Spanningsregeling
A-7 Rood Ontsteking (ACC)
A-8 Zwart Aardaansluiting (massa)
B-1/ B-2 Paars (+) / Paars/Zwart (–) Rechts achter
B-3/ B-4 Grijs (+) / Grijs/Zwart (–) Rechts voor
B-5/ B-6 Wit (+) / Wit/Zwart (–) Links voor
B-7/ B-8 Groen (+) /
• Luidsprekerimpedantie: 4-8 Ω
[1]
Max. 150 mA, 12 V
Groen/Zwart (–) Links achter
! VOORZICHTIG
Controleer de volgende toestand, voordat u de
vrij verkrijgbare ISO-aansluitingen aansluit aan het
apparaat:
• Wees ervan verzekerd dat de pinbezetting van de
aansluiting past op het JVC-apparaat.
• Let extra op de stroomkabel.
• In het geval dat de batterijkabel en de
ontstekingskabel niet overeenkomen, wissel ze dan.
• In het geval dat de auto geen ontstekingskabel
heeft, gebruik dan een vrij verkrijgbare interface.
4) Beweeg het gereedschap naar beneden richting de
onderzijde en trek het apparaat halverwege naar
buiten terwijl u tegen de binnenkant duwt.
✎ OPMERKING
• Wees voorzichtig om verwonding door de
klempennen op de uitbouwsleutel te vermijden.
5) Trek het toestel met uw handen geheel naar voren
en let op dat u het toestel niet laat vallen.
54
Page 55

Installatie
Ñ Verbinden van kabels met aansluitingen
Lichtgroen (Kabel van parkeersensor)
Uit het oogpunt van veiligheid is het beslist noodzakelijk
PRK SW
om de kabel van de parkeersensor aan te sluiten.
Paars/Wit (Kabel van achteruitrij-sensor)
Verbinden met de bedradingsbundel van de
REVERSE
achteruitrijlamp van de auto wanneer de optionele
achteruitzichtcamera wordt gebruikt.
Lichtblauw/geel (stuurafstandsbedieningsingang)
Naar stuurafstandsbediening
Om de stuurafstandsbediening te gebruiken, hebt u een adapter nodig
STEERING
WHEEL
REMOTE
INPUT
(niet meegeleverd) die bij uw auto past.
Verbinden met de
bedradingsbundel van de
parkeerremdetectieschakelaar.
Accessoire 5:
Bluetooth-microfoon
FM/AM antenn e
DAB-antenneaansluiting (SMB-connector)
alleen KD-X561DBT
!
Wanneer een in de handel verkrijgbare
DAB-antenne wordt gebruikt, moet de
diameter van de SMB-connector Φ6,5 mm
of minder zijn.
Φ 6,5 mm (maximaal)
Stekker A
Stekker B
1 3 5 7
15A
2 4 6 8
1 3 5 7
2 4 6 8
Zekering (15 A)FM/AM antenne-ingang
ISO-aansluiting
Audio-preout achter
(Links; wit, rechts; rood)
Audio-preout voor
(Links; wit, rechts; rood)
Subwoofer preout (blauw)
Ingang achteruitzichtcamera (geel)
Nederlands |
55
Page 56

Informatie over dit toestel
Informatie over dit toestel
Onderhoud
Ñ Het toestel reinigen
Als er vlekken op het voorpaneel van dit toestel
zitten, veeg deze er dan met een droge, zachte
doek, zoals een siliconendoekje, van af. Als er
hardnekkige vlekken op het voorpaneel zitten,
veeg deze er dan eerst met een met neutraal
reinigingsmiddel bevochtigde doek en vervolgens
met een schone, zachte, droge doek van af.
! VOORZICHTIG
• Als u reinigingsspray rechtstreeks op het toestel
spuit, kunnen de mechanische onderdelen ervan
beschadigd raken. Als u het voorpaneel met een
harde doek of met een vluchtige vloeistof zoals
thinner of alcohol afveegt, kunnen er krassen
ontstaan of wordt opgedrukte tekst gewist.
Ñ De stekker reinigen
Verwijder het voorpaneel en reinig de stekker
voorzichtig met een wattenstaafje. Zorg ervoor dat
u de stekker niet beschadigt.
Stekker (aan de achterkant van het voorpaneel)
Opmerking voor specificaties
Ñ Bluetooth-gedeelte
Frequentie
: 2,402 – 2,480 GHz
Uitgangsvermogen
: +8 dBm (AVE), Power Class1
Ñ Algemeen
Luidsprekerimpedantie
: 4 – 8 Ω
Bedrijfsspanning
: 12 V DC autoaccu
Auteursrechten
• Het Bluetooth-woordmerk en de Bluetooth-logo’s
zijn het eigendom van Bluetooth SIG, Inc. en elk
gebruik van dergelijke merken door JVC KENWOOD
Corporation vindt plaats onder licentie. Andere
handelsmerken en handelsnamen zijn het eigendom
van hun respectievelijke houders.
• Use of the Made for Apple badge means that an
accessory has been designed to connect specifically
to the Apple product(s) identified in the badge, and
has been certified by the developer to meet Apple
56
performance standards. Apple is not responsible for
the operation of this device or its compliance with
safety and regulatory standards. Please note that
the use of this accessory with an Apple product may
affect wireless performance.
• Apple, iPhone, iPod, iPod touch, and Lightning are
trademarks of Apple Inc., registered in the U.S. and
other countries.
• Microsoft and Windows Media are either registered
trademarks or trademarks of Microsoft Corporation
in the United States and/or other countries.
• THIS PRODUCT IS LICENSED UNDER THE MPEG4 VISUAL PATENT PORTFOLIO LICENSE FOR
THE PERSONAL AND NON-COMMERCIAL USE
OF A CONSUMER FOR (¡) ENCODING VIDEO IN
COMPLIANCE WITH THE MPEG-4 VISUAL STANDARD
(“MPEG-4 VIDEO”) AND/OR (¡¡) DECODING MPEG4 VIDEO THAT WAS ENCODED BY A CONSUMER
ENGAGED IN A PERSONAL AND NON-COMMERCIAL
ACTIVIT Y AND/OR WAS OBTAINED FROM A VIDEO
PROVIDER LICENSED BY MPEG LA TO PROVIDE
MPEG-4 VIDEO. NO LICENSE IS GRANTED OR SHALL
BE IMPLIED FOR ANY OTHER USE. ADDITIONAL
INFORMATION INCLUDING THAT RELATING TO
PROMOTIONAL, INTERNAL AND COMMERCIAL USES
AND LICENSING MAY BE OBTAINED FROM MPEG LA,
LLC. SEE HTTP://WWW.MPEGLA.COM.
• THIS PRODUCT IS LICENSED UNDER THE AVC
PATENT PORTFOLIO LICENSE FOR THE PERSONAL
USE OF A CONSUMER OR OTHER USES IN WHICH IT
DOES NOT RECEIVE REMUNERATION TO (¡)ENCODE
VIDEO IN COMPLIANCE WITH THE AVC STANDARD
(“AVC VIDEO”) AND/OR (¡¡)DECODE AVC VIDEO
THAT WAS ENCODED BY A CONSUMER ENGAGED
IN A PERSONAL ACTIVITY AND/OR WAS OBTAINED
FROM A VIDEO PROVIDER LICENSED TO PROVIDE
AVC VIDEO. NO LICENSE IS GRANTED OR SHALL
BE IMPLIED FOR ANY OTHER USE. ADDITIONAL
INFORMATION MAY BE OBTAINED FROM MPEG LA,
L.L.C. SEE HTTP://WWW.MPEGLA.COM
• libFLAC
Copyright (C) 2000-2009 Josh Coalson
Copyright (C) 2011-2013 Xiph.Org Foundation
– Redistribution and use in source and binary forms,
with or without modification, are permitted
provided that the following conditions are met:
– Redistributions of source code must retain the
above copyright notice, this list of conditions and
the following disclaimer.
– Redistributions in binary form must reproduce the
above copyright notice, this list of conditions and
the following disclaimer in the documentation
and/or other materials provided with the
distribution.
Neither the name of the Xiph.org Foundation
Page 57

Informatie over dit toestel
nor the names of its contributors may be used to
endorse or promote products derived from this
software without specific prior written permission.
THIS SOFTWARE IS PROVIDED BY THE COPYRIGHT
HOLDERS AND CONTRIBUTORS ``AS IS’’ AND ANY
EXPRESS OR IMPLIED WARRANTIES, INCLUDING,
BUT NOT LIMITED TO, THE IMPLIED WARRANTIES OF
MERCHANTABILITY AND FITNESS FOR A PARTICULAR
PURPOSE ARE DISCLAIMED. IN NO EVENT SHALL
THE FOUNDATION OR CONTRIBUTORS BE LIABLE
FOR ANY DIRECT, INDIRECT, INCIDENTAL, SPECIAL,
EXEMPLARY, OR CONSEQUENTIAL DAMAGES
(INCLUDING, BUT NOT LIMITED TO, PROCUREMENT
OF SUBSTITUTE GOODS OR SERVICES; LOSS OF USE,
DATA, OR PROFITS; OR BUSINESS INTERRUPTION)
HOWEVER CAUSED AND ON ANY THEORY OF
LIABILITY, WHETHER IN CONTRACT, STRICT LIABILITY,
OR TORT (INCLUDING NEGLIGENCE OR OTHERWISE)
ARISING IN ANY WAY OUT OF THE USE OF THIS
SOFTWARE, EVEN IF ADVISED OF THE POSSIBILITY OF
SUCH DAMAGE.
• libogg
Copyright (c) 2002, Xiph.org Foundation
Redistribution and use in source and binary forms,
with or without modification, are permitted
provided that the following conditions are met:
– Redistributions of source code must retain the
above copyright notice, this list of conditions and
the following disclaimer.
– Redistributions in binary form must reproduce the
above copyright notice, this list of conditions and
the following disclaimer in the documentation
and/or other materials provided with the
distribution.
– Neither the name of the Xiph.org Foundation
nor the names of its contributors may be used to
endorse or promote products derived from this
software without specific prior written permission.
THIS SOFTWARE IS PROVIDED BY THE COPYRIGHT
HOLDERS AND CONTRIBUTORS ``AS IS’’ AND ANY
EXPRESS OR IMPLIED WARRANTIES, INCLUDING,
BUT NOT LIMITED TO, THE IMPLIED WARRANTIES OF
MERCHANTABILITY AND FITNESS FOR A PARTICULAR
PURPOSE ARE DISCLAIMED. IN NO EVENT SHALL
THE FOUNDATION OR CONTRIBUTORS BE LIABLE
FOR ANY DIRECT, INDIRECT, INCIDENTAL, SPECIAL,
EXEMPLARY, OR CONSEQUENTIAL DAMAGES
(INCLUDING, BUT NOT LIMITED TO, PROCUREMENT
OF SUBSTITUTE GOODS OR SERVICES; LOSS OF USE,
DATA, OR PROFITS; OR BUSINESS INTERRUPTION)
HOWEVER CAUSED AND ON ANY THEORY OF
LIABILITY, WHETHER IN CONTRACT, STRICT LIABILITY,
OR TORT (INCLUDING NEGLIGENCE OR OTHERWISE)
ARISING IN ANY WAY OUT OF THE USE OF THIS
SOFTWARE, EVEN IF ADVISED OF THE POSSIBILITY OF
SUCH DAMAGE.
Ñ Informatie over het weggooien
van gebruikte elektrische en
elektronische apparatuur en batterijen
(voor EU-landen die gescheiden
vuilverwerkingssystemen gebruiken)
Producten en batterijen met dit symbool (doorkruiste
vuilnisbak) kunnen niet als gewoon huisvuil worden
weggegooid.
Oude elektrische en elektronische apparaten en
batterijen moeten worden gerecycled door een
hiervoor geschikte faciliteit.
Raadpleeg de lokale betreffende instantie voor details
aangaande een geschikte recycle-faciliteit in uw
buurt.
Het juist recyclen en weggooien van vuil helpt
bronnen te besparen en vermindert een schadelijke
invloed op uw gezondheid en het milieu.
Opmerking: De "Pb"-markering onder het symbool
voor batterijen geeft aan dat de batterij lood bevat.
Nederlands |
57
Page 58

Indice
Prima dell'uso .......................................................................58
Come utilizzare questo manuale ............................................................ 58
Precauzioni ............................................................................................................. 58
Per iniziare .............................................................................59
Impostazioni iniziali .......................................................................................... 59
Impostazioni orologio .................................................................................... 59
Di base .....................................................................................60
Operazioni comuni ........................................................................................... 60
Come montare/staccare il frontalino....................................................60
Selezionare una sorgente ............................................................................. 60
USB/iPod.................................................................................61
Preparazione ..........................................................................................................61
Operazioni di riproduzione ..........................................................................61
Sintonizzatore/DAB............................................................62
Operazioni di base del sintonizzatore.................................................. 62
Funzionamento di base DAB ......................................................................62
Impostazioni della funzione sintonizzatore ..................................... 62
Impostazioni della funzione DAB ............................................................ 63
Componenti esterni ...........................................................63
Telecamera a retrovisione ............................................................................ 63
Smartphone Bluetooth® ...................................................64
Registrare il proprio smartphone sull’unità. .....................................64
Ricevere una chiamata ...................................................................................64
Effettuare una telefonata ..............................................................................64
Riproduzione del dispositivo audio Bluetooth ..............................64
Congurazione ....................................................................65
Impostazioni ......................................................................................................... 65
Impostazioni audio ........................................................................................... 65
Installazione ..........................................................................66
Prima dell’installazione ..................................................................................66
Installazione dell’unità .................................................................................... 67
Informazioni su questa unità ......................................... 70
Manutenzione ...................................................................................................... 70
Nota per le specifiche ..................................................................................... 70
Copyright ................................................................................................................ 70
Prima dell'uso
Precauzioni
#AVVERTENZA
Ñ Per prevenire lesioni o incendi, adottare
le seguenti precauzioni:
• Per prevenire cortocircuiti, non mettere né lasciare
mai oggetti metallici (quali monete o attrezzi di
metallo) all'interno dell'unità.
• Non fissare a lungo il display dell'unità durante la
guida.
• Se si verificano problemi durante l’installazione,
consultare il rivenditore JVC.
Ñ Precauzioni per l'uso di questa unità
• Quando si acquistano accessori opzionali,
verificare con il rivenditore JVC che siano
compatibili con il proprio modello e che siano
utilizzabili nel proprio Paese.
• Le funzioni Radio Data System o Radio Broadcast
Data System non funzionano se tale servizio non
è fornito dalle emittenti.
Ñ Protezione del monitor
• Per evitare che il monitor si danneggi, non
toccarlo con una penna a sfera o oggetti simili
appuntiti.
Ñ Reset dell'unità
Se l'unità o l'unità collegata non funziona
correttamente, eseguirne il ripristino.
Come utilizzare questo manuale
• Le immagini dei pannelli riportate in questa guida
sono esempi utilizzati per spiegare in modo chiaro il
funzionamento. Per questo motivo, possono differire
dagli effettivi pannelli.
• Nelle procedure operative, il tipo di parentesi indica
la voce che si deve controllare.
[ ]: indica le voci o il menu selezionati.
< >: indica il nome dei pulsanti del pannello.
• Lingua del display: a scopo illustrativo si fa uso
della lingua inglese. È possibile selezionare la lingua
di visualizzazione dal menu [Language]. Vedere
Language (P.65).
58
1
2
Pulsante di ripristino
3
Page 59

Per iniziare
Impostazioni iniziali
1 Ruotare la chiave di accensione dell'automobile
in posizione ACC.
L'unità si accende.
2 Ruotare la manopola del volume per
selezionare la voce da impostare (vedere la
tabella sotto), quindi premere la manopola per
effettuare una selezione.
Language
Seleziona la lingua utilizzata per la schermata
di controllo e le voci di impostazione. La lingua
predefinita è “English” (Inglese).
Area
EUROPE (predefinito): per l’Europa, intervalli AM/
FM: 9 kHz/50 kHz.
M. EAST: per il Medio Oriente, intervalli AM/FM:
9 kHz/50 kHz.
Date/Clock
Regolare la data, quindi regolare l’ora.
Ore/Minuti/Mese/Giorno/Anno
Demo
Impostare il modo dimostrativo. L'impostazione
predefinita è “ON”.
3 Ruotare la manopola del volume per
selezionare [Finish], quindi premere la
manopola.
Impostazioni orologio
Ñ Sincronizzazione dell’orologio con FM
RDS
Attivare [RDS Clock Sync] (Sinc. orologio
RDS). Vedere “Impostazioni della funzione
sintonizzatore” (P. 62).
Ñ Regolazione manuale dell’orologio
✎ N OTA
• Disattivare [RDS Clock Sync] prima di regolare
l’orologio. Vedere “Impostazioni della funzione
sintonizzatore” (P.62).
1 Premere e tenere premuto < > per
visualizzare le impostazioni.
2 Premere <E>/<F > per selezionare [ ].
3 Ruotare la manopola del volume per
selezionare [Time Format], quindi premere la
manopola per selezionare il formato dell’ora
([12h] o [24h]).
4 Ruotare la manopola del volume per
selezionare [Date/Clock], quindi premere la
manopola.
Compare la schermata Orologio.
5 Ruotare la manopola del volume per regolare
l’ora, quindi premere la manopola.
6 Ruotare la manopola del volume per regolare i
minuti, quindi premere la manopola.
7 Ruotare la manopola del volume per regolare il
giorno, quindi premere la manopola.
8 Ruotare la manopola del volume per regolare il
mese, quindi premere la manopola.
9 Ruotare la manopola del volume per regolare
l’anno, quindi premere la manopola.
10
Premere < >.
Italiano |
59
Page 60

Di baseDi base
25364
7
1
Manopola del volume (ruotare/premere)
Operazioni comuni
Ñ Accensione
1 Premere < >.
Ñ Spegnimento
1 Premere e tenere premuto < >.
Ñ Regolazione del volume
1 Ruotare la manopola del volume.
Ñ Silenzia il suono
1 Premere e tenere premuta la manopola del
volume.
compare quando la funzione muto è attiva.
Per ripristinare l’audio, premere e tenere
premuto nuovamente o regolare il volume.
Ñ Visualizzare l’orologio
1 Premere e tenere premuto il pulsante <DIM>.
Ñ Selezionare la modalità di attenuazione
della luminosità
1 Premere il pulsante <DIM>.
Dimmer 1, Dimmer 2, Dimmer 3
Come montare/staccare il frontalino
MontareStaccare
1
2
1
2
Sensore remoto
MonitorPulsante di distacco
Selezionare una sorgente
1 Premere < > per visualizzare la
schermata HOME.
Compare la schermata HOME.
2 Ruotare la manopola del volume per
selezionare la sorgente, quindi premere la
manopola.
Display orologio
1
Passa alla trasmissione sintonizzatore FM.
2
(P.62)
Passa alla trasmissione sintonizzatore AM.
3
(P.62)
Passa alla trasmissione DAB. (P.62)
4
(Solo KD-X561DBT)
Riproduce un lettore audio Bluetooth. (P. 64)
5
6
[USB]
Riproduce i file contenuti in un dispositivo USB.
(P.61)
[iPod]
Riproduce un iPod/iPhone. (P.61)
• Quando un iPod/iPhone è connesso.
Passa a un componente esterno connesso al
7
terminale di ingresso AUX.
60
Page 61

USB/iPod
USB/iPod
Preparazione
Ñ Collegamento di un dispositivo USB/
iPod/iPhone
1 Aprire il coperchio della porta anteriore.
2 Collegare il dispositivo USB con l’apposito cavo
(venduto separatamente).
Connettere l’iPod/iPhone usando il KS-U62
(accessorio opzionale).
L'Unità legge il dispositivo e inizia la riproduzione.
• Corrente di alimentazione massima USB:
CC 5 V = 1 A
Ñ Per scollegare il dispositivo USB/iPod/
iPhone
1 Premere < > per visualizzare la
schermata HOME.
2 Ruotare la manopola del volume per
selezionare una voce diversa da [USB] e [iPod],
quindi premere la manopola.
3 Scollegare il dispositivo USB/iPod/iPhone.
Ñ Dispositivi USB utilizzabili
Questa unità può riprodurre file MP3/WMA/AAC/
WAV/FLAC/OGG/MPEG1/MPEG2/MPEG4/H.264/
MKV/JPEG/BMP/PNG memorizzati in un dispositivo
di archiviazione di massa USB.
Ñ iPod/iPhone collegabili
A quest'unità è possibile collegare i seguenti
modelli.
Per
• iPhone X
• iPhone 8 Plus
• iPhone 8
• iPhone 7 Plus
• iPhone 7
• iPhone SE
• iPhone 6s Plus
• iPhone 6s
• iPhone 6 Plus
• iPhone 6
• iPhone 5s
• iPod touch (6ª
generazione)
Operazioni di riproduzione
Per Fare questo
Riprodurre/
mettere in
pausa
Selezionare un
file
Ritorno rapido/
Avanzamento
rapido
Premere la manopola del volume.
Premere <E>/<F>
ripetutamente.
Premere e tenere premuto
<E>/< F>.
• File video: ogni volta che si
preme il pulsante, la velocità
della ricerca cambia.
Ñ Selezione di un brano/contenuto da un
elenco (ricerca i file)
1 Premere < > per visualizzare la
schermata ELENCO.
2 Premere <E>/<F > per selezionare se
cercare in base ai file audio [ ], ai file video
[ ] o ai file di immagine [ ]. (solo USB)
3 Ruotare la manopola del volume per
selezionare la cartella/categoria desiderata,
quindi premere la manopola.
• Quando si seleziona una cartella, viene
visualizzato il relativo contenuto.
• Per tornare al livello precedente, premere
<
>.
4 Ruotare la manopola del volume per
selezionare la voce desiderata, quindi premere
la manopola.
Inizia la riproduzione.
Italiano |
61
Page 62

Sintonizzatore/DAB
Sintonizzatore/DAB
Operazioni di base del sintonizzatore
1 Premere < > per visualizzare la
schermata HOME.
2 Ruotare la manopola del volume per
selezionare [FM] o [AM], quindi premere la
manopola.
3 Premere <E>/<F > per cercare
automaticamente una stazione.
Appare “Auto Seek” (ricerca automatica).
(o)
Premere e tenere premuto <E>/<F>
ripetutamente per cercare manualmente una
stazione.
Appare “Manual Seek” (ricerca manuale).
✎ N OTA
• Per memorizzare le stazioni, eseguire [Manual
Store] o [Auto Store].
Ñ Selezionare una stazione memorizzata
È possibile preselezionare 15 stazioni FM e 15 stazioni AM.
1 Premere < > per visualizzare la
schermata ELENCO.
2 Ruotare la manopola del volume per
selezionare un numero preimpostato, quindi
premere la manopola.
✎ N OTA
• Per uscire, premere < >.
Funzionamento di base DAB (KD-X561DBT)
1 Premere < > per visualizzare la
schermata HOME.
2 Ruotare la manopola del volume per
selezionare [DAB], quindi premere la manopola.
3 Premere <E>/<F > per cercare
automaticamente un gruppo.
Appare “Auto Seek” (ricerca automatica).
(o)
Premere e tenere premuto <E>/<F>
ripetutamente per cercare manualmente un
gruppo.
Appare “Manual Seek” (ricerca manuale).
4 Premere e tenere premuto <E>/<F>,
selezionare un servizio (primario o secondario)
da ascoltare.
✎ N OTA
• Per memorizzare il servizio, eseguire [Favorite].
Ñ Selezionare un servizio
1 Premere < > per visualizzare la
schermata ELENCO.
2 Ruotare la manopola del volume per selezionare
un servizio, quindi premere la manopola.
62
Ñ Selezionare un servizio memorizzato
È possibile memorizzare fino a 15 servizi
1 Premere < > per visualizzare la
schermata ELENCO.
2 Premere <E>/<F > per selezionare [ ].
3 Ruotare la manopola del volume per
selezionare un servizio, quindi premere la
manopola.
✎ N OTA
• Per uscire, premere < >.
Impostazioni della funzione sintonizzatore
1 Premere < > per visualizzare il menu delle
funzioni.
2 Ruotare la manopola del volume per
selezionare la voce da impostare (vedere la
tabella sotto), quindi premere la manopola per
effettuare una selezione.
3 Premere < >.
Manual
Store
Auto
Store
Local
Seek
Area EUROPE (predefinito): per l’Europa,
Mono *
RDS *
PTY *
AF *
TA *1*2Passa automaticamente alle informazioni
Memorizza una stazione manualmente.
Durante l’ascolto di una stazione che si
desidera memorizzare, ruotare la manopola
del volume per selezionare un numero
preimpostato, quindi premere la manopola.
Cerca automaticamente e memorizza le 15
stazioni con i segnali più forti per la banda
selezionata.
• Appare “Auto Store”.
Si sintonizza solo sulle stazioni con segnale
sufficientemente forte.
“ON”, “OFF” (predefinito)
intervalli AM/FM: 9 kHz/50 kHz.
M. EAST: per il Medio Oriente, intervalli AM/
FM: 9 kHz/50 kHz.
1
Determina se ricevere trasmissioni stereo
nella modalità stereo o in quella mono.
“ON”, “OFF” (predefinito)
1
Funzioni del Radio Data System FM
“ON”, “OFF” (predefinito)
1*2
Ricerca un programma in base al tipo di
programma.
1*2
Quando il segnale trasmesso dalla stazione è
debole, passa automaticamente alla stazione
che trasmette lo stesso programma sulla
stessa rete Radio Data System.
“ON” (Predefinito), “OFF”
sul traffico quando inizia la trasmissione di
un bollettino sul traffico. (L’indicatore TI si
accende.)
“ON”, “OFF” (predefinito)
Page 63

Sintonizzatore/DAB
RDS
Clock
Sync
*1*
*1 Solo FM
*2 Disponibile quando [RDS] è impostato su [ON].
Sincronizzazione dei dati orario stazione
Sistema dati radio e dell’orologio di questa
unità.
2
“ON” (Predefinito), “OFF”
Impostazioni della funzione DAB (KD-X561DBT)
1 Premere < > per visualizzare il menu delle
funzioni.
2 Ruotare la manopola del volume per
selezionare la voce da impostare (vedere la
tabella sotto), quindi premere la manopola per
effettuare una selezione.
3 Premere < > per uscire.
Scan Station
Favorite Memorizza un servizio.
Reset Selezionare [Reset], quindi selezionare
TI Passa automaticamente alle
Setup
Priority
Related
Service
Antenna
Power
PTY Search Ricerca un programma in base al tipo di
Zoom DLS Visualizzare la schermata segmento
SERVICE
Aggiornare l’elenco dei servizi DAB.
Durante l’ascolto di un servizio che
si desidera memorizzare, ruotare la
manopola del volume per selezionare
un numero preimpostato, quindi
premere la manopola.
[Ye s] per impostare le impostazioni
DAB alle impostazioni iniziali
predefinite.
informazioni sul traffico quando inizia la
trasmissione di un bollettino sul traffico.
“ON”, “OFF” (predefinito)
Se lo stesso servizio viene fornito anche
dalla rete Radio Data System, qualora
la ricezione della radio digitale dovesse
affievolirsi, questo automaticamente
commuta alla funzione Radio Data System.
“ON”, “OFF” (predefinito)
Quando si seleziona ON, l’unità passa
a un’etichetta servizio correlata (se
presente) quando una rete etichetta
servizio DAB non è disponibile.
“ON”, “OFF” (predefinito)
Imposta l'alimentazione di corrente
all'antenna della radio digitale.
Impostare su “ON” quando l'antenna
della radio digitale in uso è dotata di un
amplificatore.
L'impostazione predefinita è “ON”.
programma.
Dynamic Label (Etichetta dinamica).
Visualizza la schermata dell’elenco servizi.
Componenti esterni
Telecamera a retrovisione
Per utilizzare una telecamera a retrovisione, è
necessaria una connessione del cavo REVERSE. Per
collegare una telecamera a retrovisione. (P. 69)
Ñ Visualizzazione dell’immagine dalla
telecamera a retrovisione
La schermata a retrovisione viene visualizzata quando
si innesta la retromarcia (R).
Ñ Per visualizzare l’immagine dalla
telecamera a retrovisione manualmente
1 Premere <TELECAMERA>.
Italiano |
63
Page 64

Smartphone Bluetooth®Smartphone Bluetooth®
Registrare il proprio smartphone sull’unità.
È possibile utilizzare il proprio smartphone
Bluetooth se è abbinato a quest’unità.
• È possibile accoppiare il dispositivo e l’unità
utilizzando SSP (Secure Simple Pairing) che necessita
solo di conferma.
• È possibile registrare un dispositivo per volta.
• Quando si registra un nuovo dispositivo Bluetooth,
disconnettere il dispositivo Bluetooth attualmente
connesso e registrare il dispositivo nuovo.
1 Attivare la funzione Bluetooth sul proprio
smartphone/telefono cellulare.
2 Ricercare l’unità (“KD-X56*”) dal proprio
smartphone/telefono cellulare.
Se viene richiesto un codice PIN, immettere il
codice PIN (“0000”).
Ñ Disconnessione del dispositivo
• Disattivare la funzione Bluetooth sul proprio
smartphone/telefono cellulare.
• Spegnere l’interruttore di accensione.
Ñ Informazioni sugli smartphone
compatibili con il profilo di accesso alla
rubrica (PBAP)
Se lo smartphone supporta PBAP, è possibile
visualizzare le seguenti voci quando lo smartphone
è collegato.
• Rubrica telefonica
• Chiamate effettuate, chiamate ricevute e chiamate
perse
Ricevere una chiamata
Per Fare questo
Rispondere a una
chiamata
Ñ Operazioni durante una chiamata
Per Fare questo
Terminare una
chiamata
Regolare il volume
del telefono
Commutare tra
modalità vivavoce e
modalità telefono
64
Premere <
Premere <
Ruotare la manopola del
volume.
Premere <
Ogni volta che si preme il
pulsante, viene visualizzato
“Transfer!” e il metodo
di comunicazione viene
commutato tra modalità
vivavoce e modalità telefono.
>.
>.
>.
Effettuare una telefonata
1 Premere < > per entrare in modalità
Bluetooth.
2 Premere <E>/<F > per selezionare un
metodo per effettuare una chiamata ([ ]:
dalla cronologia delle chiamate/[ ]: dalla
rubrica telefonica).
3 Ruotare la manopola del volume per
selezionare la destinazione, quindi premere la
manopola per effettuare una chiamata.
Riproduzione del dispositivo audio Bluetooth
1 Premere < > per visualizzare la
schermata HOME.
2 Ruotare la manopola del volume per
selezionare [BT Audio], quindi premere la
manopola.
Per Fare questo
Riprodurre/
mettere in
pausa
Selezionare un
file
Ritorno rapido/
Avanzamento
rapido
Premere la manopola del volume.
Premere <E>/<F>
ripetutamente.
Premere e tenere premuto
<E>/< F>.
✎ N OTA
• Le operazioni e le indicazioni del display possono
variare in base alla disponibilità sul dispositivo
collegato.
Ñ Selezione di un contenuto in un elenco
1 Premere < > per visualizzare la
schermata ELENCO.
2 Ruotare la manopola del volume per
selezionare una voce, quindi premere la
manopola.
• Per tornare al livello precedente, premere
<
>.
Page 65

Configurazione
Configurazione
Impostazioni
1 Premere e tenere premuto < > per
visualizzare le impostazioni.
2 Premere <E>/<F > per selezionare la
categoria.
3 Ruotare la manopola del volume per
selezionare una voce (vedere la tabella
seguente), quindi premere la manopola.
4 Ripetere il passaggio 3 fino a quando la voce
desiderata non è stata selezionata/attivata
o seguire le istruzioni indicate sulla voce
selezionata.
5 Premere < >.
Impostazioni audio
Fader R12 — F12 (00): regola il bilanciamento
Balance L12 — R12 (00): regola il bilanciamento
Impostazioni generali
Beep ON/OFF: attiva o disattiva il tono di
Date/Clock Regola la data e l’orologio. (P. 59)
Language Seleziona la lingua del testo utilizzato
Time
Format
Wallpaper Black/Blue: seleziona l’immagine di
Demo Impostare il modo dimostrativo.
Initialize Selezionare [Initialize] e quindi
Impostazioni Bluetooth
Sync
Phonebook
BT
Information
di uscita dell’altoparlante anteriore e di
quello posteriore.
di uscita dell’altoparlante sinistro e di
quello destro.
pressione dei tasti. L'impostazione
predefinita è “ON”.
per le informazioni sullo schermo.
12h/24h: Seleziona il formato orario.
L’impostazione predefinita è “24h”.
sfondo.
L'impostazione predefinita è “ON”.
selezionare [Yes] per impostare tutte le
impostazioni alle impostazioni iniziali
predefinite.
ON/OFF: attiva o disattiva la
sincronizzazione della rubrica
telefonica nello smartphone connesso
con l’unità.
Visualizza le informazioni relative al
dispositivo Bluetooth collegato (nome
dispositivo, nome telefono e indirizzo
mac).
Impostazioni audio
1 Premere < > per visualizzare l’impostazione
audio.
2 Ruotare la manopola del volume per
selezionare una voce (vedere la tabella
seguente), quindi premere la manopola.
3 Ripetere il passaggio 2 fino a quando la voce
desiderata non è stata selezionata/attivata
o seguire le istruzioni indicate sulla voce
selezionata.
4 Premere < >.
Graphic
Equalizer
Loudness Imposta la quantità di amplificazione
X’over È possibile impostare la frequenza
Delay Regolare il tempo di ritardo dell’audio in
Seleziona un equalizzatore
preimpostato adatto al genere musicale.
Flat / DRVN / Hard Rock / Hip Hop / Jazz
/ Pop/ R & B / User / Classical
Selezionare [User] per usare le
impostazioni effettuate
1) Premere la manopola del volume per
selezionare la frequenza.
2) Ruotare la manopola del volume per
regolare il livello.
3) Premere <
dei toni bassi e alti.
“ON”, “OFF” (predefinito)
crossover degli altoparlanti.
1) Premere <E>/<F> per
selezionare l’altoparlante.
2) Premere la manopola del volume per
selezionare la voce.
3) Ruotare la manopola del volume per
regolare il valore.
4) Premere <
modo che i suoni da altoparlanti diversi
arrivino all’ascoltatore seduto sul sedile
selezionato allo stesso tempo.
1) Premere <E>/<F> per
selezionare l’altoparlante.
2) Ruotare la manopola del volume per
regolare il valore.
3) Premere <
>.
>.
>.
Italiano |
65
Page 66

InstallazioneInstallazione
Prima dell’installazione
Prima dell'installazione di quest'unità, osservare le
seguenti precauzioni.
#AVVERTENZE
• Se si collega il cavo di accensione (rosso) e il cavo
della batteria (giallo) al telaio della vettura (massa),
si potrebbe provocare un cortocircuito, dal quale
potrebbe scaturire un incendio. Collegare sempre
questi cavi all'alimentazione passante per la scatola
fusibili.
• Non escludere il fusibile dal cavo di accensione
(rosso) e dal cavo della batteria (giallo).
L'alimentazione deve essere collegata ai cavi tramite
il fusibile.
#ATTENZIONE
• Installare quest'unità nella console del veicolo.
Durante e immediatamente dopo l'uso dell'unità
non toccare la parte metallica dell'unità stessa,
poiché la temperatura delle parti metalliche, come
ad esempio il termodispersore e il contenitore, può
diventare molto alta.
✎ N OTA
• Il montaggio e i collegamenti elettrici di questo
prodotto richiedono competenza ed esperienza. Per
garantire la massima sicurezza, affidare il montaggio
e i collegamenti elettrici a tecnici qualificati.
• Collegare l'unità a massa ad un'alimentazione
negativa a 12 V c.c.
• Non installare l'unità in un punto esposto alla luce
solare diretta o a calore o umidità eccessivi. Evitare
anche luoghi troppo polverosi o esposti a possibili
spruzzi d'acqua.
• Non usare viti di tipo diverso; utilizzare soltanto
quelle fornite in dotazione. L'uso di viti non idonee,
potrebbe danneggiare l'unità.
• Se l'accensione della vettura non prevede la
posizione ACC, collegare i cavi dell'accensione ad
un alimentazione commutabile mediante la chiave
di accensione. Se si collega il cavo di accensione ad
un'alimentazione a tensione costante, come i cavi
della batteria, la batteria potrebbe scaricarsi.
• Se la console ha un coperchio, installare l'unità in
modo che il frontalino non urti contro il coperchio
durante l'apertura e la chiusura.
• In caso di intervento del fusibile, verificare prima
se l'eventuale contatto dei cavi ha provocato un
cortocircuito e quindi sostituire il fusibile con uno di
capacità identica.
• Isolare i cavi scollegati con nastro vinilico o un
materiale simile. Per evitare cortocircuiti, non
rimuovere i cappucci alle estremità dei cavi
scollegati o dei terminali.
• Assicurare i cavi con dei morsetti e avvolgere del
nastro vinilico attorno ai cavi che entrano in contatto
con le parti in metallo per proteggerli e per evitare
un corto circuito.
• Collegare correttamente i cavi degli altoparlanti
ai corrispondenti terminali. L'unità potrebbe
danneggiarsi o smettere di funzionare se si
condividono i cavi ¤ o se li si collega a qualsiasi
parte metallica nel veicolo.
• Se al sistema sono collegati soltanto due altoparlanti,
collegare i connettori ad entrambi i terminali di
uscita anteriori o ad entrambi i terminali di uscita
posteriori (non collegare contemporaneamente ai
terminali anteriori e posteriori). Per esempio, se si
collega il connettore ¢ dell'altoparlante sinistro
a un terminale di uscita frontale, non collegare il
connettore ¤ a un terminale di uscita posteriore.
• Dopo l'installazione dell'unità, controllare il corretto
funzionamento di luci di arresto, lampeggiatori,
tergicristalli, ecc.
• Montare l'unità con un'angolazione non superiore
a 30°.
• Non premere con decisione sulla superficie del
pannello durante l'installazione dell'unità sul veicolo,
onde evitare possibili deformazioni, danni o anomalie.
• La presenza di oggetti metallici in prossimità
dell'antenna Bluetooth può compromettere
l'efficacia della ricezione.
Unità antenna Bluetooth
Ñ Accessori in dotazione per l’installazione
1
3
5
(3 m)
x1
x2
2
x1
4
x1
x1
66
Page 67

Installazione
Ñ Procedura di installazione
1) Per evitare cortocircuiti, estrarre la chiave
dall'accensione e scollegare il ¤ morsetto della
batteria.
2) Effettuare le corrette connessioni dei cavi in
ingresso e in uscita da ciascuna unità.
3) Collegare il cavo al cablaggio.
4) Prendere il connettore B dal cablaggio e collegarlo
al connettore dell'altoparlante sul veicolo.
5) Prendere il connettore A dal cablaggio e collegarlo
al connettore dell'alimentazione esterna sul veicolo.
6) Collegare il connettore del cablaggio all'unità.
7) Installare l'unità sul veicolo.
8) Ricollegare il terminale ¤ della batteria.
9) Premere il pulsante di ripristino.
Installazione dell’unità
Ñ Autovetture non giapponesi
2
A
Piegare le alette del
contenitore di montaggio
con un cacciavite o attrezzo
simile e fissarlo in posizione.
✎ N OTA
• Verificare che l'unità sia saldamente installata in
posizione. Se l'unità è instabile potrebbe non
funzionare correttamente (ad esempio potrebbero
verificarsi "salti" in fase di riproduzione).
• Se l’apertura del pannello del veicolo è troppo
piccola per montare l’unità (A), ritagliare l’apertura
del pannello (i lati superiore e inferiore e i lati destro
e sinistro dell’apertura).
Ñ Piastra di taglio
1) Fissare l'accessorio 1 all'unità.
1
Ñ Microfono
1) Controllare la posizione di installazione del
microfono (accessorio 5).
2) Pulire la superficie di installazione.
3) Rimuovere il separatore del microfono (accessorio
5) e attaccare il microfono nel punto mostrato di
seguito.
4) Collegare il cavo del microfono fino all'unità,
fissandolo in vari punti con nastro adesivo o altri
metodi di fissaggio.
5) Regolare la direzione del microfono (accessorio 5)
rispetto al guidatore.
5
Fissare un cavo con un nastro normalmente
reperibile in commercio.
✎ N OTA
• Utilizzare i clip se necessario.
Italiano |
67
Page 68

Installazione
2
Ñ Rimozione della piastra di taglio
1) Utilizzare la chiave di estrazione (accessorio 4)
per estrarre le quattro linguette (due sulla parte
superiore, due su quella inferiore).
4
2) Tirare la piastra da taglio in avanti.
Ñ Rimozione dell’unità
1) Rimuovere la piastra di taglio facendo riferimento
alpassaggio 1 in “Rimuovere la piastra di taglio”.
2) Rimuovere il frontalino.
1
3) Inserire le due chiavi di estrazione (accessorio3) in
profondità nelle fessure su ognuno dei lati, come
mostrato in figura.
3
Ñ Guida alle funzioni dei connettori di
cablaggio
Contatto Colori e funzioni
A-4 Giallo Batteria
A-5 Blu/Bianco
A-7 Rosso Accensione (ACC)
A-8 Nero Collegamento a terra
B-1/B-2 Viola (+)/Viola/Nero (–) Posteriore
B-3/B-4 Grigio (+)/Grigio/Nero (–) Anteriore
B-5/B-6 Bianco (+)/Bianco/Nero (–) Anteriore
B-7/B-8 Verde (+) /
• Impedenza altoparlante: 4-8 Ω
[1]
Max. 150 mA, 12 V
[1]
Comando alimentazione
(massa)
destro
destro
verde/nero (–) Posteriore
sinistro
sinistro
! ATTENZIONE
Prima di collegare i connettori ISO disponibili in
commercio all’unità, controllare quanto segue:
• Assicurarsi che l’assegnazione del pin del connettore
corrisponda all’unità JVC.
• Prestare molta attenzione al cavo di alimentazione.
• Nel caso in cui il cavo della batteria e il cavo di
accensione non corrispondano, cambiarli.
• Nel caso in cui la macchina non disponga di un cavo
di accensione, utilizzare un’interfaccia disponibile in
commercio.
4) Abbassare l’attrezzo di rimozione verso il fondo e
tirare parzialmente all’esterno l’unità premendo
verso l’interno.
✎ N OTA
• Fare attenzione a non ferirsi con i dadi di blocco
sulla chiave di estrazione.
5) Estrarre completamente l'unità senza farla cadere.
68
Page 69

Installazione
Ñ Collegare i fili ai terminali
Verde chiaro (cavo sensore di parcheggio)
Per la massima sicurezza, collegare il sensore di
PRK SW
parcheggio.
Viola/bianco (cavo sensore retromarcia)
Collegare il cablaggio della luce di retromarcia del veicolo
REVERSE
quando si utilizza la telecamera opzionale di retrovisione.
Celeste/giallo (cavo di comando remoto del volante)
Al controllo remoto dello sterzo
Per utilizzare la funzione di comando remoto del volante, occorre uno
STEERING
WHEEL
REMOTE
INPUT
speciale adattatore remoto (non in dotazione) adatto alla vettura.
Collegare il cablaggio
dell'interruttore
di rilevamento
posizione del freno
di stazionamento del
veicolo.
Accessorio 5:
Microfono Bluetooth
Antenna FM/AM
Jack per antenna DAB (connettore SMB)
Solo KD-X561DBT
!
Se si desidera utilizzare antenne DAB
commerciali, il diametro del connettore
SMB deve essere pari o inferiore a Φ 6,5
mm.
Φ 6,5 mm (massimo)
Connettore A
Connettore B
1 3 5 7
15A
2 4 6 8
1 3 5 7
2 4 6 8
Fusibile (15 A)Ingresso antenna FM/AM
Connettore ISO
Preuscita audio posteriore
(sinistra: bianco, destra: rosso)
Preuscita audio anteriore
(sinistra: bianco, destra: rosso)
Preuscita subwoofer (blu)
Ingresso telecamera di retrovisione
(Giallo)
Italiano |
69
Page 70

Informazioni su questa unità
Informazioni su questa unità
Manutenzione
Ñ Pulizia dell'unità
Se il frontalino di questa unità è macchiato, pulirlo
con un panno morbido asciutto come ad esempio
un panno al silicone. Se il frontalino è molto
macchiato, rimuovere la macchia con un panno
imbevuto di un detergente neutro, quindi ripulirlo
con un panno morbido pulito e asciutto.
! ATTENZIONE
• Applicare detergenti spray direttamente sull’unità
può danneggiare i componenti meccanici. Pulendo
il frontalino con un panno non morbido o usando
un liquido volatile come diluente o alcol si rischia di
graffiare la superficie o di cancellare le serigrafie.
Ñ Pulizia del connettore
Rimuovere il frontalino e pulire delicatamente
il connettore con un bastoncino cotonato. Fare
attenzione a non danneggiare il connettore.
Connettore (sul lato posteriore del frontalino)
Nota per le specifiche
Ñ Sezione Bluetooth
Frequenza
: 2,402 – 2,480 GHz
Potenza di uscita
: +8 dBm (AVE), Classe di potenza 1
Ñ Gen.
Impedenza altoparlante
: 4 – 8 Ω
Tensione di esercizio
: batteria auto da 12 V CC
Copyright
• Il marchio e i loghi Bluetooth sono marchi di
fabbrica registrati di proprietà di Bluetooth SIG,
Inc. L’uso di tali marchi da parte di JVC KENWOOD
Corporation è soggetto a licenza. Gli altri marchi e
nomi commerciali sono di proprietà dei rispettivi
proprietari.
• Use of the Made for Apple badge means that an
accessory has been designed to connect specifically
to the Apple product(s) identified in the badge, and
has been certified by the developer to meet Apple
performance standards. Apple is not responsible for
the operation of this device or its compliance with
70
safety and regulatory standards. Please note that
the use of this accessory with an Apple product may
affect wireless performance.
• Apple, iPhone, iPod, iPod touch, and Lightning are
trademarks of Apple Inc., registered in the U.S. and
other countries.
• Microsoft and Windows Media are either registered
trademarks or trademarks of Microsoft Corporation
in the United States and/or other countries.
• THIS PRODUCT IS LICENSED UNDER THE MPEG4 VISUAL PATENT PORTFOLIO LICENSE FOR
THE PERSONAL AND NON-COMMERCIAL USE
OF A CONSUMER FOR (¡) ENCODING VIDEO IN
COMPLIANCE WITH THE MPEG-4 VISUAL STANDARD
(“MPEG-4 VIDEO”) AND/OR (¡¡) DECODING MPEG4 VIDEO THAT WAS ENCODED BY A CONSUMER
ENGAGED IN A PERSONAL AND NON-COMMERCIAL
ACTIVIT Y AND/OR WAS OBTAINED FROM A VIDEO
PROVIDER LICENSED BY MPEG LA TO PROVIDE
MPEG-4 VIDEO. NO LICENSE IS GRANTED OR SHALL
BE IMPLIED FOR ANY OTHER USE. ADDITIONAL
INFORMATION INCLUDING THAT RELATING TO
PROMOTIONAL, INTERNAL AND COMMERCIAL USES
AND LICENSING MAY BE OBTAINED FROM MPEG LA,
LLC. SEE HTTP://WWW.MPEGLA.COM.
• THIS PRODUCT IS LICENSED UNDER THE AVC
PATENT PORTFOLIO LICENSE FOR THE PERSONAL
USE OF A CONSUMER OR OTHER USES IN WHICH IT
DOES NOT RECEIVE REMUNERATION TO (¡)ENCODE
VIDEO IN COMPLIANCE WITH THE AVC STANDARD
(“AVC VIDEO”) AND/OR (¡¡)DECODE AVC VIDEO
THAT WAS ENCODED BY A CONSUMER ENGAGED
IN A PERSONAL ACTIVITY AND/OR WAS OBTAINED
FROM A VIDEO PROVIDER LICENSED TO PROVIDE
AVC VIDEO. NO LICENSE IS GRANTED OR SHALL
BE IMPLIED FOR ANY OTHER USE. ADDITIONAL
INFORMATION MAY BE OBTAINED FROM MPEG LA,
L.L.C. SEE HTTP://WWW.MPEGLA.COM
• libFLAC
Copyright (C) 2000-2009 Josh Coalson
Copyright (C) 2011-2013 Xiph.Org Foundation
– Redistribution and use in source and binary forms,
with or without modification, are permitted
provided that the following conditions are met:
– Redistributions of source code must retain the
above copyright notice, this list of conditions and
the following disclaimer.
– Redistributions in binary form must reproduce the
above copyright notice, this list of conditions and
the following disclaimer in the documentation
and/or other materials provided with the
distribution.
Neither the name of the Xiph.org Foundation
nor the names of its contributors may be used to
endorse or promote products derived from this
Page 71

Informazioni su questa unità
software without specific prior written permission.
THIS SOFTWARE IS PROVIDED BY THE COPYRIGHT
HOLDERS AND CONTRIBUTORS ``AS IS’’ AND ANY
EXPRESS OR IMPLIED WARRANTIES, INCLUDING,
BUT NOT LIMITED TO, THE IMPLIED WARRANTIES OF
MERCHANTABILITY AND FITNESS FOR A PARTICULAR
PURPOSE ARE DISCLAIMED. IN NO EVENT SHALL
THE FOUNDATION OR CONTRIBUTORS BE LIABLE
FOR ANY DIRECT, INDIRECT, INCIDENTAL, SPECIAL,
EXEMPLARY, OR CONSEQUENTIAL DAMAGES
(INCLUDING, BUT NOT LIMITED TO, PROCUREMENT
OF SUBSTITUTE GOODS OR SERVICES; LOSS OF USE,
DATA, OR PROFITS; OR BUSINESS INTERRUPTION)
HOWEVER CAUSED AND ON ANY THEORY OF
LIABILITY, WHETHER IN CONTRACT, STRICT LIABILITY,
OR TORT (INCLUDING NEGLIGENCE OR OTHERWISE)
ARISING IN ANY WAY OUT OF THE USE OF THIS
SOFTWARE, EVEN IF ADVISED OF THE POSSIBILITY OF
SUCH DAMAGE.
• libogg
Copyright (c) 2002, Xiph.org Foundation
Redistribution and use in source and binary forms,
with or without modification, are permitted
provided that the following conditions are met:
– Redistributions of source code must retain the
above copyright notice, this list of conditions and
the following disclaimer.
– Redistributions in binary form must reproduce the
above copyright notice, this list of conditions and
the following disclaimer in the documentation
and/or other materials provided with the
distribution.
– Neither the name of the Xiph.org Foundation
nor the names of its contributors may be used to
endorse or promote products derived from this
software without specific prior written permission.
THIS SOFTWARE IS PROVIDED BY THE COPYRIGHT
HOLDERS AND CONTRIBUTORS ``AS IS’’ AND ANY
EXPRESS OR IMPLIED WARRANTIES, INCLUDING,
BUT NOT LIMITED TO, THE IMPLIED WARRANTIES OF
MERCHANTABILITY AND FITNESS FOR A PARTICULAR
PURPOSE ARE DISCLAIMED. IN NO EVENT SHALL
THE FOUNDATION OR CONTRIBUTORS BE LIABLE
FOR ANY DIRECT, INDIRECT, INCIDENTAL, SPECIAL,
EXEMPLARY, OR CONSEQUENTIAL DAMAGES
(INCLUDING, BUT NOT LIMITED TO, PROCUREMENT
OF SUBSTITUTE GOODS OR SERVICES; LOSS OF USE,
DATA, OR PROFITS; OR BUSINESS INTERRUPTION)
HOWEVER CAUSED AND ON ANY THEORY OF
LIABILITY, WHETHER IN CONTRACT, STRICT LIABILITY,
OR TORT (INCLUDING NEGLIGENCE OR OTHERWISE)
ARISING IN ANY WAY OUT OF THE USE OF THIS
SOFTWARE, EVEN IF ADVISED OF THE POSSIBILITY OF
SUCH DAMAGE.
Ñ Informazioni sullo smaltimento delle
vecchie apparecchiature elettriche ed
elettroniche e delle batterie (valide
per i Paesi europei che hanno adottato
sistemi di raccolta differenziata)
I prodotti e le batterie recanti il simbolo di un
cassonetto della spazzatura su ruote barrato non
possono essere smaltiti insieme ai normali rifiuti di
casa.
I vecchi prodotti elettrici ed elettronici e le batterie
devono essere riciclati presso una apposita struttura
in grado di trattare questi prodotti e di smaltirne i
componenti.
Per i dettagli sulla posizione della struttura di
riciclaggio più vicina, contattare l’autorità locale.
Se eseguiti correttamente, l’eliminazione e il
riciclaggio di questi prodotti aiutano a conservare
le risorse e a prevenire gli effetti nocivi sulla salute e
sull’ambiente.
Attenzione: La sigla “Pb” che appare sotto il simbolo
delle batterie indica che contengono piombo.
Italiano |
71
Page 72

Contenido
Antes de la utilización .......................................................72
Cómo leer este manual .................................................................................. 72
Precauciones ......................................................................................................... 72
Inicio ........................................................................................73
Ajustes iniciales ................................................................................................... 73
Ajustes del reloj ...................................................................................................73
Conceptos básicos .............................................................. 74
Funciones habituales .......................................................................................74
Cómo acoplar/desacoplar el panel frontal ........................................74
Seleccionar una fuente ...................................................................................74
USB/iPod.................................................................................75
Preparativos ........................................................................................................... 75
Operaciones de reproducción .................................................................. 75
Sintonizador/DAB ...............................................................76
Funcionamiento básico del sintonizador ...........................................76
Funcionamiento básico de DAB ................................................................76
Ajustes de la función del sintonizador..................................................76
Ajustes de la función DAB ............................................................................ 77
Componentes externos .................................................... 77
Cámara de visión trasera ............................................................................... 77
Teléfono inteligente con Bluetooth® ...........................78
Registre su teléfono inteligente en la unidad ................................. 78
Reciba una llamada .......................................................................................... 78
Realice una llamada telefónica ................................................................. 78
Reproducir dispositivos de audio Bluetooth ................................... 78
Conguración .......................................................................79
Ajustes ....................................................................................................................... 79
Ajustes de sonido .............................................................................................. 79
Instalación .............................................................................80
Antes de la instalación .................................................................................... 80
Instalación de la unidad .................................................................................81
Acerca de esta unidad .......................................................84
Mantenimiento ....................................................................................................84
Nota para especificaciones .........................................................................84
Derechos de autor.............................................................................................84
Antes de la utilización
Precauciones
#ADVERTENCIA
Ñ Para evitar lesiones o incendios, tome
las precauciones siguientes:
• Para evitar un cortocircuito, nunca coloque ni deje
objetos metálicos (como monedas o herramientas
metálicas) dentro de la unidad.
• No mire fijamente la pantalla de la unidad
mientras está conduciendo durante un periodo
prolongado de tiempo.
• Si tiene problemas durante la instalación, consulte
con su distribuidor JVC.
Ñ Precauciones para el uso de esta unidad
• Cuando compre accesorios opcionales, pregunte
a su distribuidor JVC si dichos accesorios son
compatibles con su modelo y en su región.
• La función Radio Data System o Radio Broadcast
Data System no funcionará en lugares donde no
existan emisoras compatibles con este servicio.
Ñ Cómo proteger el monitor
• Para proteger el monitor de posibles daños, no lo
utilice con un bolígrafo con punta de bola o una
herramienta similar con una punta afilada.
Ñ Cómo reiniciar la unidad
Si la unidad o la unidad conectada no funcionan
correctamente, reiníciela.
Cómo leer este manual
• Los paneles que se incluyen en este manual son
ejemplos utilizados para ofrecer explicaciones de las
distintas operaciones. Por esta razón, pueden diferir
de los paneles que se visualizan en realidad.
• En los procedimientos operativos, las llaves indican
el elemento que debe emplear.
[ ]: Indica el menú o los elementos seleccionados.
< >: Indica el nombre de los botones del panel.
• Idioma de visualización: En este manual, se utiliza
el inglés para las explicaciones. Puede seleccionar el
idioma de visualización desde el menú [Language].
Consulte Language (P.79).
72
1
2
Botón Restablecer
3
Page 73

Inicio
Ajustes iniciales
1 Coloque la llave de encendido del coche en la
posición ACC.
La unidad se pone en marcha.
2 Gire el mando del volumen para seleccionar
el elemento que se va a ajustar (véase la tabla
siguiente) y, a continuación, pulse el mando
para realizar una selección.
Language
Seleccione el idioma utilizado para la pantalla de
control y los elementos de configuración. El idioma
predeterminado es “English” (inglés).
Area
EUROPE (predeterminada): Intervalos AM/FM para
Europa: 9 kHz/50 kHz.
M. EAST: Intervalos AM/FM para Oriente Medio:
9 kHz/50 kHz.
Date/Clock
Ajuste la fecha y, a continuación, ajuste la hora.
Hora/minuto/mes/día/año
Demo
Configure el modo de demostración. La opción
predeterminada es "ON".
3 Gire el mando del volumen para seleccionar
[Finish] y, a continuación, pulse el mando.
Ajustes del reloj
Ñ Sincronización de la hora del reloj con
FM RDS
Activa [RDS Clock Sync] (Sinc. del reloj RDS].
Consulte “Ajustes de la función del sintonizador”
(P. 76).
Ñ Ajuste del reloj manualmente
✎ N OTA
• Desactive [RDS Clock Sync] antes de ajustar el reloj.
Consulte “Ajustes de la función del sintonizador”
(P.76).
1 Mantenga < > pulsado para visualizar los
ajustes.
2 Pulse <E >/<F> para seleccionar [ ].
3 Gire el mando del volumen para seleccionar
[Time Format] y, a continuación, pulse el mando
para seleccionar el formato de la hora ([12h] o
[24h]).
4 Gire el mando del volumen para seleccionar
[Date/Clock] y, a continuación, pulse el mando.
Aparece la pantalla del reloj.
5 Gire el mando del volumen para ajustar la hora
y, a continuación, pulse el mando.
6 Gire el mando del volumen para ajustar los
minutos y, a continuación, pulse el mando.
7 Gire el mando del volumen para ajustar el día y,
a continuación, pulse el mando.
8 Gire el mando del volumen para ajustar el mes
y, a continuación, pulse el mando.
9 Gire el mando del volumen para ajustar el año
y, a continuación, pulse el mando.
10
Pulse < >.
Español |
73
Page 74

Conceptos básicosConceptos básicos
25364
7
1
Mando del volumen (girar/pulsar)
Funciones habituales
Ñ Encendido
1 Pulse < >.
Ñ Apagado
1 Mantener < > pulsado.
Ñ Ajuste del volumen
1 Gire el mando del volumen.
Ñ Silencia el sonido
1 Mantenga pulsado el mando del volumen.
aparece cuando la función de silenciamiento
está activa.
Para restaurar el sonido, mantenga pulsado de
nuevo o ajuste el volumen.
Ñ Mostrar el reloj
1 Mantenga el botón <DIM> pulsado.
Ñ Seleccionar el modo de atenuación
1 Pulse el botón <DIM>.
Atenuación 1, Atenuación 2, Atenuación 3
Cómo acoplar/desacoplar el panel frontal
AcoplarDesacoplar
1
2
1
2
Sensor remoto
MonitorBotón de desacople
Seleccionar una fuente
1 Pulse < > para visualizar la pantalla
HOME (inicio).
Aparece la pantalla HOME (inicio).
2 Gire el mando del volumen para seleccionar la
fuente y, a continuación, pulse el mando.
Pantalla del reloj
1
Cambia a la emisión del sintonizador de FM.
2
(P.76)
Cambia a la emisión del sintonizador de AM.
3
(P.76)
Cambia a la emisión DAB. (P. 76)
4
(KD-X561DBT solo)
Reproduce un reproductor de audio Bluetooth.
5
(P.78)
6
[USB]
Reproduce archivos en un dispositivo USB.
(P.75)
[iPod]
Reproduce un iPod/iPhone. (P.75)
• Cuando está conectado un iPod/iPhone.
Cambia a un componente externo conectado al
7
terminal de entrada AUX.
74
Page 75

USB/iPod
USB/iPod
Preparativos
Ñ Conexión de un dispositivo USB/iPod/
iPhone
1 Abra la cubierta del puerto de la parte frontal.
2 Conecte el dispositivo USB con el cable USB
(vendido por separado).
Conecte el iPod/iPhone mediante el KS-U62
(accesorio opcional).
La unidad lee el dispositivo y se inicia la
reproducción.
• Corriente de alimentación máxima del USB:
CC 5 V = 1 A
Ñ Para desconectar el dispositivo USB/
iPod/iPhone
1 Pulse < > para visualizar la pantalla
HOME (inicio).
2 Gire el mando del volumen para seleccionar
una fuente diferente a [USB] y [iPod] y, a
continuación, pulse el mando.
3 Desconecte el dispositivo USB/iPod/iPhone.
Ñ Dispositivos USB que pueden utilizarse
Esta unidad puede reproducir archivos MP3/
WMA/AAC/WAV/FLAC/OGG/MPEG1/MPEG2/
MPEG4/H.264/MKV/JPEG/BMP/PNG guardados en
un dispositivo de clase de almacenamiento masivo
USB.
Ñ iPod/iPhone que pueden conectarse
Los siguientes modelos pueden conectarse a esta
unidad.
Fabricados para
• iPhone X
• iPhone 8 Plus
• iPhone 8
• iPhone 7 Plus
• iPhone 7
• iPhone SE
• iPhone 6s Plus
• iPhone 6s
• iPhone 6 Plus
• iPhone 6
• iPhone 5s
• iPod touch (6.ª
generación)
Operaciones de reproducción
Para Hacer esto
Reproducir/
pausar
Seleccionar un
archivo
Retroceso
rápido/avance
rápido
Pulse el mando del volumen.
Pulse <E>/<F> varias veces.
Mantenga <E>/< F>
pulsado.
• Archivos de vídeo: Cada vez
que pulse el botón, cambia la
velocidad de búsqueda.
Ñ Selección de una pista/contenido en una
lista (búsqueda de archivo)
1 Pulse < > para visualizar la pantalla
LISTA .
2 Pulse <E >/<F> para seleccionar si buscará
por archivos de audio [ ], archivos de vídeo
[ ] o archivos de imagen [ ]. (solo USB)
3 Gire el mando del volumen para seleccionar la
carpeta/categoría deseada y, a continuación,
pulse el mando.
• Cuando selecciona una carpeta, se muestran sus
contenidos.
• Para regresar al nivel anterior, pulse <
>.
4 Gire el mando del volumen para seleccionar el
elemento deseado y, a continuación, pulse el
mando.
La reproducción se inicia.
Español |
75
Page 76

Sintonizador/DAB
Sintonizador/DAB
Funcionamiento básico del sintonizador
1 Pulse < > para visualizar la pantalla
HOME (inicio).
2 Gire el mando del volumen para seleccionar
[FM] o [AM] y, a continuación, pulse el mando.
3 Pulse <E >/<F> para buscar una emisora
automáticamente.
Aparece “Auto Seek” (buscar automáticamente).
(o)
Mantenga pulsado el botón <E>/< F>
varias veces para buscar manualmente una
emisora.
Aparece “Manual Seek” (buscar manualmente).
✎ N OTA
• Para memorizar emisoras, ejecute [Manual Store] o
[Auto Store].
Ñ Seleccionar una estación memorizada
Puede programar 15 emisoras para FM y 15
emisoras para AM.
1 Pulse < > para visualizar la pantalla
LISTA .
2 Gire el mando del volumen para seleccionar un
número programado y, a continuación, pulse
el mando.
✎ N OTA
• Para salir, pulse < >.
Funcionamiento básico de DAB (KD-X561DBT)
1 Pulse < > para visualizar la pantalla
HOME (inicio).
2 Gire el mando del volumen para seleccionar
[DAB] y, a continuación, pulse el mando.
3 Pulse <E >/<F> para buscar un conjunto
automáticamente.
Aparece “Auto Seek” (buscar automáticamente).
(o)
Mantenga pulsado el botón <E>/< F>
varias veces para buscar manualmente un
conjunto.
Aparece “Manual Seek” (buscar manualmente).
4 Mantenga pulsado el botón <E>/< F>
seleccione un servicio (bien principal o
secundario) a escuchar.
✎ N OTA
• Para almacenar un servicio, realice [Favorite].
Ñ Seleccione un servicio
1 Pulse < > para visualizar la pantalla LISTA.
2 Gire el mando del volumen para seleccionar un
servicio y, a continuación, pulse el mando.
Ñ Seleccione un servicio almacenado
Puede almacenar hasta 15 servicios
1 Pulse < > para visualizar la pantalla LISTA.
2 Pulse <E >/<F> para seleccionar [ ].
3 Gire el mando del volumen para seleccionar un
servicio y, a continuación, pulse el mando.
✎ N OTA
• Para salir, pulse < >.
Ajustes de la función del sintonizador
1 Pulse < > para visualizar el menú de funciones.
2 Gire el mando del volumen para seleccionar
el elemento que se va a ajustar (véase la tabla
siguiente) y, a continuación, pulse el mando
para realizar una selección.
3 Pulse < >.
Manual
Store
Auto
Store
Local
Seek
Area EUROPE (predeterminada): Intervalos AM/
Mono *
RDS *
PTY *
AF *
Guarda una emisora manualmente.
Mientras escucha una emisora que desea
almacenar, gire el mando del volumen para
seleccionar un número programado y, a
continuación, pulse el mando.
Busca y guarda automáticamente las 15
emisoras con las señales más fuertes de la
banda seleccionada.
• Aparece “Auto Store”.
Sintoniza solo las emisoras con una fuerza
de señal suficiente.
“ON”, “OFF” (predeterminado)
FM para Europa: 9 kHz/50 kHz.
M. EAST: Intervalos AM/FM para Oriente
Medio: 9 kHz/50 kHz.
1
Determina si se van a recibir emisoras estéreo
en el modo estéreo o en el monoaural.
“ON”, “OFF” (predeterminado)
1
Características del sistema de radiodifusión
de datos FM
“ON” (Predeterminado), “OFF”
1*2
Busca un programa por tipo de programa.
1*2
Si la recepción de una emisora es deficiente,
se cambia automáticamente a la emisora que
esté emitiendo el mismo programa a través
de la misma red de Radio Data System.
“ON” (Predeterminado), “OFF”
76
Page 77

Sintonizador/DAB
TA *1*2Cambia a la información de tráfico
RDS
Clock
Sync
*
*1 Solo FM
*2 Disponible cuando [RDS] está ajustado en [ON].
automáticamente cuando empieza el boletín
de tráfico. (Se ilumina el indicador TI).
“ON”, “OFF” (predeterminado)
Sincronización mediante el Sistema de
datos de radio de los datos horarios de la
emisora y el reloj de esta unidad.
1*2
“ON” (Predeterminado), “OFF”
Ajustes de la función DAB (KD-X561DBT)
1 Pulse < > para visualizar el menú de funciones.
2 Gire el mando del volumen para seleccionar
el elemento que se va a ajustar (véase la tabla
siguiente) y, a continuación, pulse el mando
para realizar una selección.
3 Pulse < > para salir.
Scan Station
Favorite
Reset Seleccione [Reset] y después seleccione
TI Cambia a la información de tráfico
Setup
Priority Si se ofrece el mismo servicio por
Related
Service
Antenna
Power
PTY Search
Zoom DLS
SERVICE Muestra la pantalla Lista de servicios.
Actualiza la lista de servicio DAB.
Almacena un servicio.
Mientras escucha un servicio que desea
almacenar, gire el mando del volumen
para seleccionar un número programado
y, a continuación, pulse el mando.
[Ye s] para establecer los ajustes DAB en
los ajustes iniciales predeterminados.
automáticamente cuando empieza el
boletín de tráfico.
“ON”, “OFF” (predeterminado)
sistema de datos de radio cuando la
recepción por radio digital empeora, se
cambia automáticamente a sistema de
datos de radio.
“ON”, “OFF” (predeterminado)
Al seleccionar ON (encendido),
la unidad cambia a un servicio
relacionado (si existe) cuando una red
de servicio DAB no esté disponible.
“ON”, “OFF” (predeterminado)
Ajusta la alimentación de la antena
de radio digital. Seleccione “ON” si la
antena de radio digital que utiliza está
equipada con amplificador.
La opción predeterminada es "ON".
Busca un programa por tipo de programa.
Visualizar la pantalla Dynamic Label
Segment (segmento de etiqueta dinámica).
Componentes externos
Cámara de visión trasera
Para usar una cámara de visión trasera, se requiere
la conexión del cable de MARCHA ATRÁS. Para
conectar una cámara de visión trasera. (P. 83)
Ñ Visualización de la imagen desde la
cámara de visión trasera
Se muestra la pantalla de visión trasera cuando
cambia la palanca de cambios a la posición de marcha
atrás (R).
Ñ Para visualizar manualmente la imagen
desde la cámara de visión trasera
1 Pulse <CAMERA>.
Español |
77
Page 78

Teléfono inteligente con Bluetooth®Teléfono inteligente con Bluetooth®
Registre su teléfono inteligente en la unidad
Puede utilizar su teléfono inteligente Bluetooth
cuando esté emparejado con esta unidad.
• Puede emparejar el dispositivo y la unidad usando
SSP (Emparejamiento simple seguro) el cual solo
requiere de confirmación.
• Solo puede conectarse un dispositivo a la vez.
• Cuando registre un nuevo dispositivo Bluetooth,
desconecte el dispositivo Bluetooth conectado
actualmente y, a continuación, registre el nuevo
dispositivo.
1 Active la función Bluetooth en su teléfono
inteligente/teléfono móvil.
2 Busque la unidad (“KD-X56*”) en su teléfono
inteligente/móvil.
Si se requiere un código PIN, introduzca el código
PIN (“0000”).
Ñ Desconexión del dispositivo
• Desactive la función Bluetooth en su teléfono
inteligente/teléfono móvil.
• Apague el interruptor de encendido.
Ñ Acerca de teléfonos inteligentes
compatibles con el Perfil de acceso a la
agenda telefónica (PBAP)
Si su teléfono inteligente es compatible con PBAP,
podrá visualizar los siguientes elementos cuando el
teléfono inteligente esté conectado.
• Agenda del teléfono
• Llamadas realizadas, llamadas recibidas y llamadas
perdidas
Reciba una llamada
Para Hacer esto
Responder una
llamada
Ñ Operaciones durante una llamada
Para Hacer esto
Finalizar una llamada
Ajustar el volumen
del teléfono
Cambio entre el
modo manos libres y
el modo teléfono
Pulse <
Pulse <
Gire el mando del volumen.
Pulse <
Cada vez que pulse el botón,
“Transfer!” aparece y el
método de habla cambia
entre el modo manos libres y
el modo teléfono.
>.
>.
>.
Realice una llamada telefónica
1 Pulse < > para entrar en el modo
Bluetooth.
2 Pulse <E >/<F> para seleccionar un
método con el que realizar una llamada ([ ]:
desde el historial de llamadas/[ ]: desde la
lista de direcciones).
3 Gire el mando del volumen para seleccionar un
destino y, a continuación, pulse el mando para
realizar una llamada.
Reproducir dispositivos de audio Bluetooth
1 Pulse < > para visualizar la pantalla
HOME (inicio).
2 Gire el mando del volumen para seleccionar [BT
Audio] y, a continuación, pulse el mando.
Para Hacer esto
Reproducir/
pausar
Seleccionar un
archivo
Retroceso
rápido/avance
rápido
Pulse el mando del volumen.
Pulse <E>/<F> varias veces.
Mantenga <E>/< F>
pulsado.
✎ N OTA
• Las operaciones y las indicaciones en pantalla
pueden variar en función de su disponibilidad en el
dispositivo conectado.
Ñ Seleccione un contenido en una lista
1 Pulse < > para visualizar la pantalla
LISTA .
2 Gire el mando del volumen para seleccionar un
elemento y, a continuación, pulse el mando.
• Para regresar al nivel anterior, pulse <
>.
78
Page 79

Configuración
Configuración
Ajustes
1 Mantenga < > pulsado para visualizar los
ajustes.
2 Pulse <E >/<F> para seleccionar la
categoría.
3 Gire el mando del volumen para seleccionar
un elemento (véase la tabla siguiente) y, a
continuación, pulse el mando.
4 Repita el paso 3 hasta que el elemento deseado
se seleccione/active o siga las instrucciones
indicadas en el elemento seleccionado.
5 Pulse < >.
Ajustes de audio
Fader R12 — F12 (00): Ajusta el balance de
Balance L12 — R12 (00): Ajusta el balance de
Ajustes generales
Beep ON/OFF: Activa o desactiva el tono
Date/Clock Ajusta la fecha y la hora. (P.73)
Language Selecciona el idioma del texto utilizado
Time
Format
Wallpaper Black/Blue: Selecciona una imagen de
Demo Configure el modo de demostración. La
Initialize Seleccione [Initialize] y después
Ajustes de Bluetooth
Sync
Phonebook
BT
Information
salida de los altavoces delanteros y
traseros.
salida de los altavoces de la izquierda y
la derecha.
de pulsación de las teclas. La opción
predeterminada es "ON".
para la información en pantalla.
12h/24h: Selecciona el formato de la
hora. La opción predeterminada es
“24h”.
fondo de pantalla.
opción predeterminada es "ON".
seleccione [Yes] para establecer todos
los ajustes en los ajustes iniciales
predeterminados.
ON/OFF: Activa o desactiva la
sincronización de la agenda en el
teléfono inteligente conectado con la
unidad.
Muestra la información sobre el
dispositivo Bluetooth conectado
(nombre del dispositivo, nombre del
teléfono y dirección mac).
Ajustes de sonido
1 Pulse < > para visualizar los ajustes de
sonido.
2 Gire el mando del volumen para seleccionar
un elemento (véase la tabla siguiente) y, a
continuación, pulse el mando.
3 Repita el paso 2 hasta que el elemento deseado
se seleccione/active o siga las instrucciones
indicadas en el elemento seleccionado.
4 Pulse < >.
Graphic
Equalizer
Loudness Fija las cantidades de refuerzo de los
X’over Es posible ajustar la frecuencia de cruce
Delay Ajuste el tiempo de retardo del
Selecciona un ecualizador predefinido
adecuado al género musical.
Flat / DRVN / Hard Rock / Hip Hop / Jazz
/ Pop/ R & B / User / Classical
Seleccione [User] para utilizar la
configuración que se ha realizado
1) Pulse el mando del volumen para
seleccionar la frecuencia.
2) Gire el mando del volumen para
ajustar el nivel.
3) Pulse <
tonos altos y bajos.
“ON”, “OFF” (predeterminado)
de altavoces.
1) Pulse <E>/<F> para
seleccionar el altavoz.
2) Pulse el mando del volumen para
seleccionar el elemento.
3) Gire el mando del volumen para
ajustar el valor.
4) Pulse <
sonido de modo que el sonido de los
diferentes altavoces llegue al mismo
tiempo al oyente sentado en el asiento
seleccionado.
1) Pulse <E>/<F> para
seleccionar el altavoz.
2) Gire el mando del volumen para
ajustar el valor.
3) Pulse <
>.
>.
>.
Español |
79
Page 80

InstalaciónInstalación
Antes de la instalación
Antes de la instalación de esta unidad, tenga en
cuenta las precauciones siguientes.
#ADVERTENCIAS
• Si conecta el cable de encendido (rojo) y el cable de
la batería (amarillo) al chasis del automóvil (tierra),
podría producir un cortocircuito y esto, a su vez, un
incendio. Conecte siempre esos cables a la fuente de
alimentación que pasa por la caja de fusibles.
• No corte el fusible del cable de ignición (rojo) y el
cable de la batería (amarillo). El suministro de energía
debe conectarse a los cables por medio del fusible.
#PRECAUCIÓN
• Instale esta unidad en la consola de su vehículo.
No toque la parte metálica de esta unidad durante e
inmediatamente después del uso de la unidad. Las
partes metálicas, tales como el disipador de calor o
la carcasa, pueden estar muy calientes.
✎ N OTA
• La instalación y el cableado de este producto
requieren habilidad y experiencia. Para mayor
seguridad, deje el trabajo de montaje y cableado en
manos de profesionales.
• Asegúrese de utilizar para la unidad una fuente
de alimentación de 12 V CC con conexión a tierra
negativa.
• No instale la unidad en un sitio expuesto a la luz
directa del sol, o excesivamente húmedo o caluroso.
Además deberá evitar sitios con mucho polvo o con
posibilidad de salpicaduras de agua.
• No utilice sus propios tornillos. Utilice solo los
tornillos suministrados. El uso de tornillos diferentes
podría causar daños en la unidad.
• Si el encendido de su automóvil no está provisto de
la posición ACC, conecte los cables de encendido a
una fuente de alimentación que pueda conectarse y
desconectarse con la llave de encendido. Si conecta
el cable de encendido a una fuente de alimentación
con un suministro de voltaje constante, como con
los cables de la batería, la batería puede agotarse.
• Si la consola tiene una tapa, asegúrese de instalar la
unidad de forma que el panel frontal no golpee la
tapa al abrirse o cerrarse.
• Si se funden los fusibles, asegúrese primero de
que los cables no están en contacto pues pueden
ocasionar un cortocircuito, luego reemplace el
fusible dañado por uno nuevo que tenga la misma
potencia de servicio.
• Aísle los cables no conectados con una cinta
de vinilo u otro material similar. Para evitar
cortocircuitos, no retire las tapas de los extremos de
los cables o terminales no conectados.
• Asegure los cables con las abrazaderas de cable y
envuelva cinta de vinilo alrededor de los cables que
entren en contacto con los elementos metálicos
para proteger los cables y para evitar cortocircuitos.
• Conecte los cables de los altavoces a cada uno de
los terminales correspondientes. La unidad se puede
dañar o no funcionar si comparte los cables ¤ o
los conecta a tierra a cualquier parte metálica del
vehículo.
• Si se han conectado solamente dos altavoces al
sistema, enchufe los conectores a ambos terminales
de salida delanteros o a ambos terminales de salida
traseros (es decir, no mezcle terminales delanteros y
traseros). Por ejemplo, si conecta el conector ¢ del
altavoz izquierdo a un terminal de salida delantero,
no conecte el conector ¤ a un terminal de salida
posterior.
• Después de instalar la unidad, compruebe que
las luces de freno, las luces intermitentes, el
limpiaparabrisas, etc. funcionan satisfactoriamente.
• Instale la unidad en un ángulo de 30˚ o menos.
• No presione con fuerza la super ficie del panel al instalar
la unidad en el vehículo. De lo contrario, pueden
producirse marcas, daños o fallos.
• La recepción podría ser baja si existen objetos
metálicos cerca de la antena Bluetooth.
Unidad de antena Bluetooth
Ñ Accesorios suministrados para la
instalación
1
3
5
(3 m)
x1
x2
2
x1
4
x1
x1
80
Page 81

Instalación
Ñ Procedimiento de instalación
1) Para evitar cortocircuitos, retire la llave del
encendido y desconecte el terminal ¤ de la
batería.
2) Realice de forma adecuada las conexiones de
cables de entrada y salida para cada unidad.
3) Conecte el cable al mazo de conductores.
4) Tome el conector B en el mazo de cables y
conéctelo al conector de altavoz de su vehículo.
5) Tome el conector A en el mazo de cables y
conéctelo al conector de alimentación externa de
su vehículo.
6) Conecte el mazo de cables a la unidad.
7) Instale la unidad en el automóvil.
8) Conecte nuevamente el terminal ¤ de la batería.
9) Pulse el botón Restablecer.
Instalación de la unidad
Ñ Coches no japoneses
2
Ñ Placa
1) Conecte el accesorio 1 a la unidad.
1
Ñ Unidad de micrófono
1) Compruebe la posición de instalación del
micrófono (accesorio 5).
2) Limpie la superficie de instalación.
3) Extraiga el separador del micrófono (accesorio 5) y
fije el micrófono en la posición indicada más abajo.
4) Conecte el cable del micrófono a la unidad de
forma segura en varias posiciones mediante cinta u
otro método.
5) Ajuste la dirección del micrófono (accesorio 5)
hacia el conductor.
A
Doble las lengüetas del
manguito de montaje con
un destornillador o similar
y fíjelo.
✎ N OTA
• Asegúrese de que la unidad esté firmemente
instalada en su lugar. Si la unidad está en una
posición inestable, es posible que no funcione
correctamente (por ejemplo, el sonido puede
interrumpirse).
• Si el panel de apertura de su vehículo es demasiado
pequeño para que se ajuste a la unidad (A), recorte
(las partes superior e inferior y los lados derecho e
izquierdo) la abertura del panel.
5
Fije un cable con una cinta adhesiva de uso
comercial.
✎ N OTA
• Use los clips si es necesario.
Español |
81
Page 82

Instalación
2
Ñ Retirada del marco
1) Use la tecla de extracción (accesorio 4) para
extraer las cuatro pestañas (dos en la parte superior,
dos en la parte inferior).
4
2) Tire de la placa hacia adelante.
Ñ Desmontaje de la unidad
1) Retire el marco según las indicaciones del paso 1 de
“Retirar el marco”.
2) Retire el panel frontal.
1
3) Introduzca las dos llaves de extracción (accesorio3)
profundamente en las ranuras de cada lado, tal y
como se muestra.
3
Ñ Guía de funciones de los conectores del
mazo de cables
Patilla Color y función
A-4 Amarillo Batería
A-5 Azul/Blanco
A-7 Rojo Encendido (ACC)
A-8 Negro Conexión a tierra (masa)
B-1/ B-2 Púrpura (+) / Púrpura/Negro (–) Trase ro
B-3/ B-4 Gris (+) / Gris/Negro (–) Delantero
B-5/ B-6 Blanco (+) / Blanco/Negro (–) Delantero
B-7/ B-8 Verde (+) /
• Impedancia del altavoz: 4-8 Ω
[1]
Máx. 150 mA, 12 V
[1]
Control de alimentación
derecho
derecho
Verde/Negro (–) Trasero
izquierdo
izquierdo
! PRECAUCIÓN
Antes conectar los conectores ISO disponibles
comercialmente a la unidad, compruebe la
siguiente condición:
• Asegúrese de que la asignación de clavijas del
conector coincide con la unidad JVC.
• Tome precauciones extra con el cable de
alimentación.
• In caso de que el cable de la batería y el cable de
encendido no correspondan, entonces cámbielos
según corresponda.
• En caso de que el coche no tenga un cable
de encendido, use una interfaz disponible
comercialmente.
4) Baje la herramienta de extracción hacia abajo y
extraiga la unidad hasta la mitad mientras presiona
hacia dentro.
✎ N OTA
• Tenga cuidado de no hacerse daño con los
pasadores de bloqueo de la llave de extracción.
5) Termine de sacar la unidad con las manos,
prestando atención para no dejarla caer.
82
Page 83

Instalación
Ñ Conectar los cables a los terminales
Luz verde (Cable del sensor de aparcamiento)
Para mayor seguridad, asegúrese de conectar el
PRK SW
sensor de estacionamiento.
Morado/blanco (Cable del sensor de marcha atrás)
Conecte el mazo de la luz de marcha atrás del vehículo
REVERSE
cuando utilice una cámara de visión trasera opcional.
Azul claro/Amarillo
(cable del mando a distancia de la dirección)
Al mando a distancia de la dirección
Para utilizar la función de mando a distancia en el volante es necesario un
STEERING
WHEEL
REMOTE
INPUT
adaptador remoto exclusivo (no suministrado) apropiado para su vehículo.
Realice la conexión en
el arnés del interruptor
de detección del freno
de aparcamiento del
vehículo.
Accesorio 5:
Micrófono Bluetooth
Antena FM/AM
Conector de la antena DAB (conector SMB)
KD-X561DBT solo
!
Si se utiliza una antena DAB disponible en
el mercado, el diámetro del conector SMB
debe ser como máximo de Φ 6,5 mm.
Φ 6,5 mm (máximo)
Conector A
Conector B
1 3 5 7
15A
2 4 6 8
1 3 5 7
2 4 6 8
Fusible (15A)Entrada de antena FM/AM
Conector ISO
Salida previa de audio trasera
(izquierda: blanca, derecha: roja)
Salida previa de audio delantera
(izquierda: blanca, derecha: roja)
Salida previa de subwoofer (azul)
Entrada de la cámara de visión trasera
(Amarillo)
Español |
83
Page 84

Acerca de esta unidad
Acerca de esta unidad
Mantenimiento
Ñ Limpieza de la unidad
Si el panel frontal de esta unidad está manchado,
límpielo con un paño suave y seco, como por
ejemplo, un paño de silicona. Si el panel frontal está
muy manchado, limpie la mancha con un paño
humedecido con un producto de limpieza neutro
y, a continuación, vuelva a limpiarlo con un paño
suave, limpio y seco.
! PRECAUCIÓN
• Aplicar un limpiador en espray directamente sobre la
unidad, puede dañar sus componentes mecánicos.
Limpiar el panel frontal con un paño áspero o con
un líquido volátil, como un disolvente o alcohol,
podría rayar la superficie o borrar las impresiones de
la pantalla.
Ñ Limpieza del conector
Desacople el panel frontal y limpie con suavidad
el conector con un bastoncillo de algodón. Tenga
cuidado de no dañar el conector.
Conector (en el lado interior del panel frontal)
Nota para especificaciones
Ñ Sección de Bluetooth
Frecuencia
: 2,402 – 2,480 GHz
Potencia de salida
: +8 dBm (AVE), clase de potencia 1
Ñ General
Impedancia del altavoz
: 4 – 8 Ω
Voltaje de funcionamiento
: Batería de coche de 12 V CC
Derechos de autor
• La marca denominativa y los logos de Bluetooth son
marcas registradas propiedad de Bluetooth SIG, Inc.
y cualquier uso de dichas marcas por JVC KENWOOD
Corporation está sujeto a los términos de licencia. El
resto de marcas comerciales y nombres comerciales
corresponden a sus respectivos propietarios.
• Use of the Made for Apple badge means that an
accessory has been designed to connect specifically
to the Apple product(s) identified in the badge, and
has been certified by the developer to meet Apple
84
performance standards. Apple is not responsible for
the operation of this device or its compliance with
safety and regulatory standards. Please note that
the use of this accessory with an Apple product may
affect wireless performance.
• Apple, iPhone, iPod, iPod touch, and Lightning are
trademarks of Apple Inc., registered in the U.S. and
other countries.
• Microsoft and Windows Media are either registered
trademarks or trademarks of Microsoft Corporation
in the United States and/or other countries.
• THIS PRODUCT IS LICENSED UNDER THE MPEG4 VISUAL PATENT PORTFOLIO LICENSE FOR
THE PERSONAL AND NON-COMMERCIAL USE
OF A CONSUMER FOR (¡) ENCODING VIDEO IN
COMPLIANCE WITH THE MPEG-4 VISUAL STANDARD
(“MPEG-4 VIDEO”) AND/OR (¡¡) DECODING MPEG4 VIDEO THAT WAS ENCODED BY A CONSUMER
ENGAGED IN A PERSONAL AND NON-COMMERCIAL
ACTIVIT Y AND/OR WAS OBTAINED FROM A VIDEO
PROVIDER LICENSED BY MPEG LA TO PROVIDE
MPEG-4 VIDEO. NO LICENSE IS GRANTED OR SHALL
BE IMPLIED FOR ANY OTHER USE. ADDITIONAL
INFORMATION INCLUDING THAT RELATING TO
PROMOTIONAL, INTERNAL AND COMMERCIAL USES
AND LICENSING MAY BE OBTAINED FROM MPEG LA,
LLC. SEE HTTP://WWW.MPEGLA.COM.
• THIS PRODUCT IS LICENSED UNDER THE AVC
PATENT PORTFOLIO LICENSE FOR THE PERSONAL
USE OF A CONSUMER OR OTHER USES IN WHICH IT
DOES NOT RECEIVE REMUNERATION TO (¡)ENCODE
VIDEO IN COMPLIANCE WITH THE AVC STANDARD
(“AVC VIDEO”) AND/OR (¡¡)DECODE AVC VIDEO
THAT WAS ENCODED BY A CONSUMER ENGAGED
IN A PERSONAL ACTIVITY AND/OR WAS OBTAINED
FROM A VIDEO PROVIDER LICENSED TO PROVIDE
AVC VIDEO. NO LICENSE IS GRANTED OR SHALL
BE IMPLIED FOR ANY OTHER USE. ADDITIONAL
INFORMATION MAY BE OBTAINED FROM MPEG LA,
L.L.C. SEE HTTP://WWW.MPEGLA.COM
• libFLAC
Copyright (C) 2000-2009 Josh Coalson
Copyright (C) 2011-2013 Xiph.Org Foundation
– Redistribution and use in source and binary forms,
with or without modification, are permitted
provided that the following conditions are met:
– Redistributions of source code must retain the
above copyright notice, this list of conditions and
the following disclaimer.
– Redistributions in binary form must reproduce the
above copyright notice, this list of conditions and
the following disclaimer in the documentation
and/or other materials provided with the
distribution.
Neither the name of the Xiph.org Foundation
Page 85

Acerca de esta unidad
nor the names of its contributors may be used to
endorse or promote products derived from this
software without specific prior written permission.
THIS SOFTWARE IS PROVIDED BY THE COPYRIGHT
HOLDERS AND CONTRIBUTORS ``AS IS’’ AND ANY
EXPRESS OR IMPLIED WARRANTIES, INCLUDING,
BUT NOT LIMITED TO, THE IMPLIED WARRANTIES OF
MERCHANTABILITY AND FITNESS FOR A PARTICULAR
PURPOSE ARE DISCLAIMED. IN NO EVENT SHALL
THE FOUNDATION OR CONTRIBUTORS BE LIABLE
FOR ANY DIRECT, INDIRECT, INCIDENTAL, SPECIAL,
EXEMPLARY, OR CONSEQUENTIAL DAMAGES
(INCLUDING, BUT NOT LIMITED TO, PROCUREMENT
OF SUBSTITUTE GOODS OR SERVICES; LOSS OF USE,
DATA, OR PROFITS; OR BUSINESS INTERRUPTION)
HOWEVER CAUSED AND ON ANY THEORY OF
LIABILITY, WHETHER IN CONTRACT, STRICT LIABILITY,
OR TORT (INCLUDING NEGLIGENCE OR OTHERWISE)
ARISING IN ANY WAY OUT OF THE USE OF THIS
SOFTWARE, EVEN IF ADVISED OF THE POSSIBILITY OF
SUCH DAMAGE.
• libogg
Copyright (c) 2002, Xiph.org Foundation
Redistribution and use in source and binary forms,
with or without modification, are permitted
provided that the following conditions are met:
– Redistributions of source code must retain the
above copyright notice, this list of conditions and
the following disclaimer.
– Redistributions in binary form must reproduce the
above copyright notice, this list of conditions and
the following disclaimer in the documentation
and/or other materials provided with the
distribution.
– Neither the name of the Xiph.org Foundation
nor the names of its contributors may be used to
endorse or promote products derived from this
software without specific prior written permission.
THIS SOFTWARE IS PROVIDED BY THE COPYRIGHT
HOLDERS AND CONTRIBUTORS ``AS IS’’ AND ANY
EXPRESS OR IMPLIED WARRANTIES, INCLUDING,
BUT NOT LIMITED TO, THE IMPLIED WARRANTIES OF
MERCHANTABILITY AND FITNESS FOR A PARTICULAR
PURPOSE ARE DISCLAIMED. IN NO EVENT SHALL
THE FOUNDATION OR CONTRIBUTORS BE LIABLE
FOR ANY DIRECT, INDIRECT, INCIDENTAL, SPECIAL,
EXEMPLARY, OR CONSEQUENTIAL DAMAGES
(INCLUDING, BUT NOT LIMITED TO, PROCUREMENT
OF SUBSTITUTE GOODS OR SERVICES; LOSS OF USE,
DATA, OR PROFITS; OR BUSINESS INTERRUPTION)
HOWEVER CAUSED AND ON ANY THEORY OF
LIABILITY, WHETHER IN CONTRACT, STRICT LIABILITY,
OR TORT (INCLUDING NEGLIGENCE OR OTHERWISE)
ARISING IN ANY WAY OUT OF THE USE OF THIS
SOFTWARE, EVEN IF ADVISED OF THE POSSIBILITY OF
SUCH DAMAGE.
Ñ Información acerca de la eliminación
de equipos eléctricos, electrónicos y
baterías al final de su vida útil (aplicable
a los países de la UE que hayan adoptado
sistemas independientes de recogida de
residuos)
Los productos y las pilas con el símbolo (cubo de
basura tachado) no podrán ser desechados como
residuos domésticos.
Las pilas y los equipos eléctricos y electrónicos usados
se deben reciclar en instalaciones que gestionen tales
elementos y residuos.
Póngase en contacto con la autoridad local para
obtener detalles acerca de una planta de reciclaje
cercana.
Un reciclaje y tratamiento de residuos correcto
ayudará a conservar los recursos a la vez que evitará
efectos perjudiciales para nuestra salud y el medio
ambiente.
Nota: El símbolo “Pb”, debajo del símbolo de las pilas,
indica que esta pila contiene plomo.
Español |
85
Page 86

Índice
Antes de utilizar ...................................................................86
Como ler este manual ..................................................................................... 86
Precauções ............................................................................................................. 86
Primeiros Passos ..................................................................87
Definições iniciais .............................................................................................. 87
Definições do Relógio..................................................................................... 87
Básicos .....................................................................................88
Operações comuns .......................................................................................... 88
Como instalar/desinstalar o painel frontal ........................................88
Selecionar uma fonte ...................................................................................... 88
USB/iPod.................................................................................89
Preparativos ........................................................................................................... 89
Operações de reprodução...........................................................................89
Sintonizador/DAB ...............................................................90
Operações básicas do sintonizador....................................................... 90
Operação básica do DAB .............................................................................. 90
Configurações da função do sintonizador .......................................90
Configurações da função do DAB........................................................... 91
Componentes Externos ....................................................91
Câmara de vista traseira ................................................................................ 91
Smartphone com Bluetooth® .........................................92
Registe o seu smartphone na unidade ............................................... 92
Receber uma chamada .................................................................................. 92
Fazer uma chamada .........................................................................................92
Reproduzir um dispositivo de áudio Bluetooth ............................ 92
Conguração ........................................................................93
Definições ............................................................................................................... 93
Definições de som............................................................................................. 93
Instalação ...............................................................................94
Antes da instalação ........................................................................................... 94
Instalar a unidade...............................................................................................95
Sobre esta unidade ............................................................98
Manutenção ..........................................................................................................98
Nota para as especificações .......................................................................98
Direitos de autor .................................................................................................98
Antes de utilizar
Precauções
# ADVERTÊNCIA
Ñ Para evitar lesões ou um incêndio, tome
as seguintes precauções:
• Para evitar um curto-circuito, nunca coloque
ou deixe objetos metálicos (como moedas ou
ferramentas) dentro da unidade.
• Não veja nem fixe os olhos no visor da unidade
quando está a conduzir por longos períodos.
• Se aparecerem problemas durante a instalação,
consulte o seu revendedor JVC.
Ñ Precauções de utilização desta unidade
• Quando comprar acessórios opcionais, confirme
junto do representante JVC que eles funcionam
com o seu modelo e na sua zona.
• A função Radio Data System (Sistema dados
rádio) ou Radio Broadcast não funciona onde o
serviço não é suportado por nenhuma estação
de difusão.
Ñ Proteger o monitor
• Para proteger o monitor de danos, não opere
o monitor utilizando uma esferográfica ou um
objeto semelhante com ponta afiada.
Ñ Como reiniciar a unidade
Se a unidade ou a unidade ligada não funcionar
corretamente, reinicialize-a.
Como ler este manual
• Os painéis mostrados neste manual são exemplos
utilizados para dar explicações claras sobre as
operações. Por esta razão, poderão ser diferentes
dos painéis reais.
• Nos procedimentos de operação, os parênteses
indicam o item que deve controlar.
[ ]: indica os itens ou menu selecionados.
< >: indica o nome de botões de painel.
• Idioma de exibição: O inglês é utilizado para o
propósito de explicação. Pode selecionar um idioma
de exibição a partir do menu [Language]. Veja
Language (P.93).
86
1
2
Botão de reposição
3
Page 87

Primeiros Passos
Definições iniciais
1 Rode a chave de ignição do seu carro para ACC.
A unidade está ligada.
2 Rode o botão do volume para escolher o item
a ser definido (consulte a tabela abaixo) e, em
seguida, prima o botão para fazer uma seleção.
Language
Selecione o idioma utilizado para o ecrã de controlo
e os itens de definição. A predefinição é “English”
(Inglês).
Area
EUROPE (Predefinição): Para a Europa, intervalos
AM/FM: 9 kHz/50 kHz.
M. EAST: Para o Médio Oriente, intervalos AM/FM:
9 kHz/50 kHz.
Date/Clock
Acerte a data e depois a hora.
Hora/Minuto/Mês/Dia/Ano
Demo
Defina o modo de demonstração. A predefinição é
“ON”.
3 Rode o botão do volume para selecionar
[Finish] e, em seguida, prima o botão.
Definições do Relógio
Ñ Sincronização da hora do relógio com o
FM RDS
Ative [RDS Clock Sync] (Sincronização do
Relógio RDS). Veja “Configurações da função do
sintonizador” (P.90).
Ñ Ajustar o relógio manualmente
✎ N OTA
• Desative [RDS Clock Sync] antes de acertar
o relógio. Veja “Configurações da função do
sintonizador” (P.90).
1 Prima e mantenha premido < > para exibir as
definições.
2 Prima <E>/<F > para selecionar [ ].
3 Rode o botão do volume para selecionar [Time
Format] e, em seguida, prima o botão para
selecionar o formato da hora ([12h] ou [24h]).
4 Rode o botão do volume para selecionar [Date/
Clock] e, em seguida, prima o botão.
É apresentado o ecrã Relógio.
5 Rode o botão do volume para ajustar a hora e,
em seguida, prima o botão.
6 Rode o botão do volume para ajustar os
minutos e, em seguida, prima o botão.
7 Rode o botão do volume para ajustar o dia e,
em seguida, prima o botão.
8 Rode o botão do volume para ajustar o mês e,
em seguida, prima o botão.
9 Rode o botão do volume para acertar o ano e,
em seguida, prima o botão.
10
Prima < >.
Português |
87
Page 88

BásicosBásicos
25364
7
1
Botão de volume (rodar/premir)
Operações comuns
Ñ Ligar a alimentação
1 Prima < >.
Ñ Desligar a alimentação
1 Prima e mantenha premido < >.
Ñ Ajuste do volume
1 Rode o botão do volume.
Ñ Silencia o som
1 Prima e mantenha premido o botão do
volume.
aparece quando a função sem som está ativa.
Para restaurar o som, prima e mantenha
premido novamente, ou ajuste o volume.
Ñ Exibir o relógio
1 Prima e mantenha premido o botão <DIM>.
Ñ Selecione o modo de atenuação da luz
1 Prima o botão <DIM>.
Atenuador 1, Atenuador 2, Atenuador 3
Como instalar/desinstalar o painel frontal
LigarDesligar
1
2
1
2
Sensor remoto
MonitorDesmontar o botão
Selecionar uma fonte
1 Prima < > para exibir o ecrã INICIAL.
Aparece o ecrã HOME (inicial).
2 Rode o botão do volume para selecionar a
fonte e, em seguida, prima o botão.
Mostrador de Relógio
1
Muda para a emissão FM do sintonizador.
2
(P.90)
Muda para a emissão AM do sintonizador.
3
(P.90)
Muda para a Transmissão DAB. (P.90)
4
(Apenas KD-X561DBT )
Efetua a reprodução de um leitor de áudio
5
Bluetooth. (P. 92)
6
[USB]
Efetua a reprodução de ficheiros num dispositivo
USB. (P. 89)
[iPod]
Efetua a reprodução de um iPod/iPhone. (P. 89)
• Quando está conectado um iPod/iPhone.
Muda para um componente externo conectado
7
ao terminal de entrada AUX.
88
Page 89

USB/iPod
USB/iPod
Preparativos
Ñ Ligar um dispositivo USB/iPod/iPhone
1 Abra a tampa da porta frontal.
2 Ligue o dispositivo USB com o cabo USB
(vendido separadamente).
Ligue o iPod/iPhone usando o KS-U62
(acessório opcional).
A unidade lê o dispositivo e inicia a reprodução.
• Corrente de fornecimento de energia máxima de
USB: CC 5 V = 1 A
Ñ Para desligar o dispositivo USB/iPod/
iPhone
1 Prima < > para exibir o ecrã INICIAL.
2 Rode o botão do volume para selecionar algo
diferente de [USB] e [iPod] e, em seguida, prima
o botão.
3 Desligue o dispositivo USB/iPod/iPhone.
Ñ Compatibilidade com dispositivos USB
Esta unidade pode reproduzir ficheiros MP3/
WMA/AAC/WAV/FLAC/OGG/MPEG1/MPEG2/
MPEG4/H.264/MKV/JPEG/BMP/PNG armazenados
num dispositivo USB de armazenamento em massa.
Ñ Compatibilidade iPod/iPhone
Os seguintes modelos podem ser ligados a esta
unidade.
Feito para
• iPhone X
• iPhone 8 Plus
• iPhone 8
• iPhone 7 Plus
• iPhone 7
• iPhone SE
• iPhone 6s Plus
• iPhone 6s
• iPhone 6 Plus
• iPhone 6
• iPhone 5s
• iPod touch (6.ª
geração)
Operações de reprodução
Para Faça isto
Reproduzir/
pausar
Selecione um
ficheiro
Recuo rápido/
Avanço rápido
Prima o botão do volume.
Prima <E>/<F>
repetidamente.
Prima e mantenha premido
<E>/< F>.
• Ficheiros de vídeo: Cada vez que
premir o botão, a velocidade de
procura muda.
Ñ Selecionar uma faixa/conteúdo numa
lista (Procurar o ficheiro)
1 Prima o botão < > para ver o ecrã LISTA.
2 Prima <E>/<F > para selecionar se
pretende procurar ficheiros de áudio [ ],
ficheiros de vídeo [ ] ou ficheiros de imagem
[ ]. (apenas USB)
3 Rode o botão do volume para selecionar a
pasta/categoria pretendida e, em seguida,
prima o botão.
• Quando seleciona uma pasta, os seus conteúdos
são apresentados.
• Para regressar à camada anterior, prima
<
>.
4 Rode o botão do volume para selecionar o item
desejado e, em seguida, prima o botão.
Inicia-se a reprodução.
Português |
89
Page 90

Sintonizador/DAB
Sintonizador/DAB
Operações básicas do sintonizador
1 Prima < > para exibir o ecrã INICIAL.
2 Rode o botão do volume para selecionar [FM]
ou [AM] e, em seguida, prima o botão.
3 Prima <E>/<F > para procurar
automaticamente uma estação.
É apresentado “Auto Seek” (Procura Automática).
(ou)
Prima e mantenha premido <E>/< F>
repetidamente para procurar manualmente
uma estação.
É apresentado “Manual Seek” (Procura Manual).
✎ N OTA
• Para armazenar estações, execute [Manual Store]
ou [Auto Store].
Ñ Selecione uma estação armazenada
É possível predefinir 15 estações para FM e 15
estações para AM.
1 Prima o botão < > para ver o ecrã LISTA.
2 Rode o botão do volume para selecionar um
número predefinido e, em seguida, prima o
botão.
✎ N OTA
• Para sair, prima <
>.
Operação básica do DAB (KD-X561DBT)
1 Prima < > para exibir o ecrã INICIAL.
2 Rode o botão do volume para selecionar [DAB]
e, em seguida, prima o botão.
3 Prima <E>/<F > para procurar
automaticamente um conjunto.
É apresentado “Auto Seek” (Procura Automática).
(ou)
Prima e mantenha premido <E>/< F>
repetidamente para procurar manualmente um
conjunto.
É apresentado “Manual Seek” (Procura Manual).
4 Prima e mantenha premido <E>/< F>
selecione um serviço (primário ou secundário)
para ouvir.
✎ N OTA
• Para memorizar um serviço, execute [Favorite].
Ñ Selecione um serviço
1 Prima o botão < > para ver o ecrã LISTA.
2 Rode o botão do volume para selecionar um
serviço e, em seguida, prima o botão.
90
Ñ Selecione um serviço memorizado
É possível memorizar até 15 serviços
1 Prima o botão < > para ver o ecrã LISTA.
2 Prima <E>/<F > para selecionar [ ].
3 Rode o botão do volume para selecionar um
serviço e, em seguida, prima o botão.
✎ N OTA
• Para sair, prima <
>.
Configurações da função do sintonizador
1 Prima o botão < > para exibir o menu de
funções.
2 Rode o botão do volume para escolher o item
a ser definido (consulte a tabela abaixo) e, em
seguida, prima o botão para fazer uma seleção.
3 Prima < >.
Manual
Store
Auto
Store
Local
Seek
Area EUROPE (Predefinição): Para a Europa,
Mono *
RDS *
PTY *
AF *
TA *
Armazena manualmente uma estação.
Ao ouvir uma estação que queira
memorizar, rode o botão do volume para
selecionar um número predefinido e, em
seguida, prima o botão.
Automaticamente procura e armazena as
15 estações com os sinais mais fortes para a
banda selecionada.
• É apresentado “Auto Store”
(Armazenamento Automático).
Sintoniza apenas nas estações com força de
sinal suficiente.
“ON”, “OFF” (Padrão)
intervalos AM/FM: 9 kHz/50 kHz.
M. EAST: Para o Médio Oriente, intervalos
AM/FM: 9 kHz/50 kHz.
1
Determina se receber emissões estéreo no
modo estéreo ou no modo monaural.
“ON”, “OFF” (Padrão)
1
Recursos de FM Radio Data System
“ON” (Padrão), “OFF”
1*2
Procura um programa por tipo.
1*2
Quando a receção de uma estação é
deficiente, muda automaticamente para
a estação que está a transmitir o mesmo
programa, na mesma rede Radio Data
System (RDS).
“ON” (Padrão), “OFF”
1*2
Muda automaticamente para a informação
de trânsito quando começa o boletim de
trânsito. (O indicador TI acende-se.)
“ON”, “OFF” (Padrão)
Page 91

Sintonizador/DAB
RDS
Clock
Sync
*
*1 Apenas FM
*2 Disponível quando [RDS] é definido como [ON].
Sincronizar a hora da estação do Sistema de
Dados de Rádio e o relógio desta unidade.
“ON” (Padrão), “OFF”
1*2
Configurações da função do DAB (KD-X561DBT)
1 Prima o botão < > para exibir o menu de
funções.
2 Rode o botão do volume para escolher o item
a ser definido (consulte a tabela abaixo) e, em
seguida, prima o botão para fazer uma seleção.
3 Prima < > para sair.
Scan Station Atualiza a lista de serviços DAB.
Favorite
Reset Selecione [Reset] e, em seguida,
TI Muda automaticamente para a
Setup
Priority Se o mesmo serviço for fornecido pelo
Related
Service
Antenna
Power
PTY Search Procura um programa por tipo.
Zoom DLS Exibe o ecrã de segmento de Etiqueta
SERVICE Apresenta o ecrã de Lista de Serviço.
Memoriza um serviço.
Ao ouvir um serviço que queira
memorizar, rode o botão do volume
para selecionar um número predefinido
e, em seguida, prima o botão.
selecione [Yes] para definir todas as
definições DAB nas predefinições
iniciais.
informação de trânsito quando
começa o boletim de trânsito.
“ON”, “OFF” (Padrão)
sistema de dados de rádio quando
a receção do serviço fornecida pelo
rádio digital se tornar deficiente, muda
automaticamente para o sistema de
dados de rádio.
“ON”, “OFF” (Padrão)
Quando seleciona ON (Ligar), a
unidade comuta para um serviço
relacionado (se existir) quando a rede
do serviço DAB não está disponível.
“ON”, “OFF” (Padrão)
Define a alimentação da antena do
rádio digital. Definido em “ON” quando
a antena do rádio digital em utilização
está equipada com um amplificador.
A predefinição é “ON”.
Dinâmica.
Componentes Externos
Câmara de vista traseira
Para usar uma câmara de vista traseira, é necessária
a conexão de guia REVERSE. Para conectar uma
câmara de vista traseira. (P.97)
Ñ Apresentar a imagem a partir da câmara
de vista traseira
O ecrã de vista traseira é exibido quando for engatada
a marcha-atrás (R).
Ñ Para visualizar manualmente a imagem
da câmara de visão traseira
1 Prima <CAMERA>.
Português |
91
Page 92

Smartphone com Bluetooth®Smartphone com Bluetooth®
Registe o seu smartphone na unidade
Pode utilizar o seu smartphone com Bluetooth
quando estiver emparelhado com esta unidade.
• Pode emparelhar o dispositivo e a unidade usando
SSP (Secure Simple Pairing, Emparelhamento
Simples Seguro), que apenas requer confirmação.
• Pode ser conectado um dispositivo de cada vez.
• Quando registar um novo dispositivo Bluetooth,
desconecte o atual dispositivo Bluetooth e, depois,
registe o novo.
1 Ligue a função Bluetooth no seu smartphone/
telemóvel.
2 Procure a unidade (“KD-X56*”) a partir do seu
smartphone/telemóvel.
Se for necessário um código PIN, introduza o
código PIN (“0000”).
Ñ Desligar o dispositivo
• Desligue a função Bluetooth no seu smartphone/
telemóvel.
• Desligue a ignição.
Ñ Acerca de smartphones compatíveis com
Phone book Access Profile (PBAP)
Se o smartphone suportar PBAP, pode exibir os
seguintes itens quando o smartphone estiver
ligado.
• Lista telefónica
• Chamadas feitas, chamadas recebidas e chamadas
perdidas
Receber uma chamada
Para Faça isto
Atender uma
chamada
Ñ Operações durante uma chamada
Para Faça isto
Terminar uma
chamada
Ajustar o volume do
telefone
Alternar entre o
modo de mãos livres
e o modo de telefone
Prima <
Prima <
Rode o botão do volume.
Prima <
Sempre que prime o botão,
“Transfer!” aparece e o
método de falar é alternado
entre o modo mãos-livres e o
modo telefone.
>.
>.
>.
Fazer uma chamada
1 Prima < > para entrar em modo
Bluetooth.
2 Prima <E>/<F > para selecionar um
método para fazer uma chamada ([ ]:
do histórico de chamadas/[ ]: da lista
telefónica).
3 Rode o botão do volume para selecionar o
destino e, em seguida, prima o botão para fazer
uma chamada.
Reproduzir um dispositivo de áudio Bluetooth
1 Prima < > para exibir o ecrã INICIAL.
2 Rode o botão do volume para selecionar [BT
Audio] e, em seguida, prima o botão.
Para Faça isto
Reproduzir/
pausar
Selecione um
ficheiro
Recuo rápido/
Avanço rápido
Prima o botão do volume.
Prima <E>/<F>
repetidamente.
Prima e mantenha premido
<E>/< F>.
✎ N OTA
• As indicações de operação e exibição podem diferir
de acordo com sua disponibilidade no dispositivo
conectado.
Ñ Selecionar conteúdos numa lista
1 Prima o botão < > para ver o ecrã LISTA.
2 Rode o botão do volume para selecionar um
item e, em seguida, prima o botão.
• Para regressar à camada anterior, prima
<
>.
92
Page 93

Configuração
Configuração
Definições
1 Prima e mantenha premido < > para exibir as
definições.
2 Prima <E>/<F > para selecionar a
categoria.
3 Rode o botão do volume para selecionar um
item (consulte a tabela abaixo) e, em seguida,
prima o botão.
4 Repita o passo 3 até que o item desejado seja
selecionado/ativado ou siga as instruções
indicadas no item selecionado.
5 Prima < >.
Definições de áudio
Fader R12 — F12 (00): Ajusta o balanço de
Balance L12 — R12 (00): Ajusta o balanço de
Definições gerais
Beep ON/OFF: Ativa ou desativa o tom de
Date/Clock Ajusta a data e o relógio. (P.87)
Language Seleciona o idioma de texto utilizado
Time
Format
Wallpaper Black/Blue: Seleciona a imagem do
Demo Defina o modo de demonstração. A
Initialize Selecione [Initialize] e, em seguida,
Definições Bluetooth
Sync
Phonebook
BT
Information
saída das colunas frontal e traseira.
saída das colunas esquerda e direita.
pressão das teclas. A predefinição é
“ON”.
para as informações no ecrã.
12h/24h: Seleciona o formato da hora. A
predefinição é “24h”.
papel de parede.
predefinição é “ON”.
selecione [Yes] para definir todas as
definições para as predefinições iniciais.
ON/OFF: Ativa ou desativa a
sincronização da lista telefónica
no smartphone conectado com a
unidade.
Exibe as informações sobre o
dispositivo Bluetooth conectado
(nome do dispositivo, nome do
telefone e endereço mac).
Definições de som
1 Prima < > para exibir a definição de som.
2 Rode o botão do volume para selecionar um
item (consulte a tabela abaixo) e, em seguida,
prima o botão.
3 Repita o passo 2 até que o item desejado seja
selecionado/ativado ou siga as instruções
indicadas no item selecionado.
4 Prima < >.
Graphic
Equalizer
Loudness Define as quantidades de reforço dos
X’over Pode definir a frequência de crossover
Delay Ajuste o tempo de atraso do som para
Seleciona um equalizador predefinido
adequado ao género musical.
Flat / DRVN / Hard Rock / Hip Hop / Jazz
/ Pop/ R & B / User / Classical
Selecione [User] para usar as
configurações feitas
1) Prima o botão de volume para
selecionar a frequência.
2) Rode o botão de volume para ajustar
o nível.
3) Prima <
sons altos e baixos.
“ON”, “OFF” (Padrão)
para as colunas.
1) Prima <E>/<F> para selecionar
a coluna.
2) Prima o botão de volume para
selecionar o item.
3) Rode o botão de volume para ajustar
o valor.
4) Prima <
que os sons das diferentes colunas
cheguem ao ouvinte sentado no
assento selecionado ao mesmo tempo.
1) Prima <E>/<F> para selecionar
a coluna.
2) Rode o botão de volume para ajustar
o valor.
3) Prima <
>.
>.
>.
Português |
93
Page 94

InstalaçãoInstalação
Antes da instalação
Antes da instalação desta unidade, tenha em
consideração as seguintes precauções.
#AVISOS
• Se ligar o fio de ignição (vermelho e o fio da bateria
(amarelo) ao chassis do automóvel (terra), pode
causar um curto-circuito, que por sua vez pode
causar um incêndio. Ligue esses fios sempre à fonte
de energia que passa através da caixa de fusíveis.
• Não elimine o fusível do cabo de ignição (vermelho)
e do cabo da bateria (amarelo). A fonte de
alimentação deve ser ligada aos cabos passando
pelo fusível.
#ATENÇÃO
• Instale este aparelho na consola do seu automóvel.
Não toque nas peças de metal deste aparelho
durante ou pouco depois da utilização do aparelho.
As peças de metal, como por exemplo a armação,
aquecem.
✎ N OTA
• A instalação e ligação deste aparelho requerem
conhecimentos e experiência. Para maior segurança,
deixe as operações de montagem e ligação a cargo
de profissionais.
• Assegure-se de que liga a unidade a uma fonte de
alimentação de 12 V CC com massa negativa.
• Não instalar o aparelho num local exposto à luz solar
direta ou calor e humidade excessivos. Evite também
locais com demasiada poeira ou a possibilidade de
salpicos de água.
• Não utilize os seus próprios parafusos. Utilize apenas
os parafusos fornecidos. O uso de parafusos não
apropriados pode resultar em danos ao aparelho
principal.
• Se a ignição do automóvel não tiver uma posição
ACC, conecte os fios da ignição a uma fonte de
energia que possa ser ativada e desativada pela
chave de ignição. Se ligar o fio de ignição a uma
fonte de alimentação com um débito de tensão
permanente, como os cabos da bateria, a bateria
poderá ficar descarregada.
• Se a consola tiver tampa, certifique-se que instala o
aparelho de forma a que o painel frontal não bata na
tampa ao abrir e ao fechar.
• Se o fusível fundir, certifique-se primeiro de que os
fios não tocam uns nos outros para não causar um
curto-circuito, e substitua o fusível antigo por outro
com a mesma potência.
• Isole os cabos não ligados com fita isolante ou
outro material similar. Para evitar curtos-circuitos,
não remova as capas dos finais dos cabos não
conectados ou dos terminais.
• Fixe os fios com grampos de cabos e envolva
uma fita de vinil em torno dos fios que entrem em
contacto com peças metálicas para proteger os fios
e evitar curto-circuito.
• Ligue os cabos individuais do altifalante aos
terminais correspondentes. A unidade poderá ficar
danificada ou deixar de funcionar se partilhar os fios
¤ ou os ligar à massa a qualquer peça metálica do
carro.
• Quando houver somente dois altifalantes
conectados ao sistema, ligue os conectores a
ambos os terminais de saída frontais ou a ambos os
terminais de saída traseiros (não misture terminais
frontais com traseiros). Por exemplo, se ligar o
conector ¢ do altifalante esquerdo a um terminal
de saída dianteiro, não ligue o conector ¤ a um
terminal de saída traseiro.
• Depois que a unidade tiver sido instalada, verifique
se as lâmpadas de stop, os pisca-piscas, os limpa
pára-brisa, etc. do automóvel estão funcionando
corretamente.
• Monte o aparelho de forma a que o ângulo de
montagem seja de 30˚ ou menos.
• Não faça muita pressão sobre a superfície do painel
quando instalar a unidade no automóvel. Caso
contrário poderão resultar marcas, danos ou avarias.
• A receção poderá ser reduzida se existirem objetos
metálicos próximos da antena Bluetooth.
Unidade da antena Bluetooth
Ñ Acessórios fornecidos para instalação
1
3
5
(3 m)
x1
x2
x1
2
x1
4
x1
94
Page 95

Instalação
Ñ Método de instalação
1) Para prevenir um curto-circuito, remova a chave da
ignição e desligue o terminal ¤ da bateria.
2) Faça as ligações apropriadas dos cabos de entrada
e saída de cada unidade.
3) Ligue o fio à cablagem.
4) Ligue o conector B da cablagem ao conector do
altifalante do seu veículo.
5) Ligue o conector A da cablagem ao conector de
energia externa do seu veículo.
6) Ligue o conector da cablagem à unidade.
7) Instale o aparelho no seu carro.
8) Volte a ligar o terminal ¤ da bateria.
9) Pressione o botão de reposição.
Instalar a unidade
Ñ Carros não-japoneses
2
A
Dobre as patilhas da manga
de montagem com uma
chave de parafusos ou um
utensílio semelhante e fixe-a
no respetivo lugar.
✎ N OTA
• Certifique-se de que a unidade está firmemente
instalada na posição adequada. Se a unidade estiver
instável, poderá funcionar incorretamente (por
exemplo, com falhas no som).
• Se a abertura do painel do seu veículo for muito
pequena para caber na unidade (A), apare (os lados
superior e inferior e os lados direito e esquerdo da)
abertura do painel.
Ñ Moldura
1) Anexar acessório 1 à unidade.
1
Ñ Unidade do microfone
1) Verifique a posição de instalação do microfone
(acessório 5).
2) Limpe a superfície de instalação.
3) Retire o separador do microfone (acessório 5) e
coloque o microfone na placa apresentada abaixo.
4) Ligue o cabo do microfone na unidade,
prendendo-o em várias posições com fita adesiva
ou outro método.
5) Ajuste a direção do microfone (acessório 5) ao
condutor.
5
Fixe um cabo com fita adesiva.
✎ N OTA
• Se necessário, use os clipes.
Português |
95
Page 96

Instalação
2
Ñ Retirar a moldura
1) Use a chave de extração (acessório 4) para levantar
as quatro abas (duas na parte superior e duas na
parte inferior).
4
2) Puxe a moldura para a frente.
Ñ Retirar a unidade
1) Retire a moldura seguindo o passo 1 em “Retirar a
moldur a”.
2) Retire o painel frontal.
1
3) Insira as duas chaves de remoção (acessório3)
profundamente nas ranhuras de cada lado,
conforme indicado.
3
Ñ Guia de funcionamento do conector da
cablagem elétrica
Pino Cor e função
A-4 Amarelo Bateria
A-5 Azul/Branco
A-7 Vermelho Ignição (ACC)
A-8 Preto Ligação terra (massa)
B-1/ B-2 Roxo (+) / Roxo/Preto (–) Traseiro direito
B-3/ B-4 Cinzento (+) /
Cinzento/Preto (–)
B-5/ B-6 Branco (+) /
Branco/Preto (–)
B-7/ B-8 Verde (+) /
• Impedância de Altifalante: 4-8 Ω
[1]
Máx. 150 mA, 12 V
[1]
Controlo de energia
Dianteiro direito
Dianteiro esquerdo
Verde/Preto (–) Traseiro esquerdo
! AT ENÇÃO
Antes de conectar os ISO comercialmente
disponibilizados à unidade, verifique a seguinte
condição:
• Certifique-se de que a atribuição de pino do
conector corresponde à unidade JVC.
• Tenha precaução redobrada com o cabo de
alimentação.
• Caso o cabo da pilha e o cabo de ignição não
correspondam, altere-os adequadamente.
• Caso o carro não tenha um cabo de ignição, use
uma interface disponível comercialmente.
4) Baixe a ferramenta de remoção na direção do
fundo e, em seguida, puxe a unidade até à metade
enquanto prime para o interior.
✎ N OTA
• Tenha cuidado para não se ferir com os pinos de
retenção da chave de remoção.
5) Puxe a unidade totalmente para fora, com as mãos,
tendo cuidado para não a deixar cair.
96
Page 97

Instalação
Ñ Ligar os cabos aos terminais
Verde-claro (Fio do sensor de estacionamento)
Para maior segurança, assegure-se de que liga o
PRK SW
sensor de estacionamento.
Roxo/Branco (Fio do sensor de marcha-atrás)
Ligue à cablagem de luz de marcha-atrás quando utilizar a
REVERSE
câmara de visão traseira opcional.
Azul-claro/amarelo (fio do controlo remoto do volante)
Para controlo remoto do volante
Para utilizar a função de controlo remoto do volante, é necessário um
STEERING
WHEEL
REMOTE
INPUT
adaptador remoto exclusivo (não fornecido) que corresponda ao seu
automóvel.
Ligue à cablagem do
interruptor de deteção
do travão de mão do
veículo.
Acessório 5:
Microfone Bluetooth
Antena FM/AM
Tomada de antena DAB (conector SMB)
Ap enas K D-X 561DB T
!
Quando utilizar uma antena DAB
disponível no mercado, o diâmetro do
conector SMB deve ser igual ou inferior
a Φ 6,5 mm.
Φ 6,5 mm (máximo)
Conector A
Conector B
1 3 5 7
15A
2 4 6 8
1 3 5 7
2 4 6 8
Fusível (15 A)Entrada da antena FM/AM
Conector ISO
Pré-saída de Áudio Traseira
(Esquerda; Branco, Direita; Vermelho)
Pré-Saída Áudio Frontal
(Esquerda; Branco, Direito; Vermelho)
Pré-saída do subwoofer (azul)
Entrada da câmara de visão traseira
(Amarelo)
Português |
97
Page 98

Sobre esta unidade
Sobre esta unidade
Manutenção
Ñ Limpar a unidade
Se o painel frontal da unidade estiver manchado,
limpe-o com um pano macio e seco como um
pano de silicone. Se a painel frontal estiver muito
manchado, limpe a mancha com um pano
humedecido com detergente neutro e, de seguida,
limpe-o com um pano seco.
! AT ENÇÃO
• A aplicação direta de spray de limpeza na unidade
poderá afetar as respetivas peças mecânicas. Limpar
o painel frontal com um pano que não seja macio ou
usando um líquido volátil, como diluente ou álcool,
pode riscar a superfície ou apagar caracteres.
Ñ Limpar o conector
Retire o painel frontal e limpe suavemente o
conector com um cotonete. Tenha cuidado para
não danificar o conector.
Conector (no verso do painel frontal)
Nota para as especificações
Ñ Secção Bluetooth
Frequência
: 2,402 – 2,480 GHz
Alimentação de saída
: +8 dBm (AVE), Classe de potência 1
Ñ Geral
Impedância de altifalante
: 4 – 8 Ω
Tensão de operação
: bateria de carro de 12 V CC
Direitos de autor
• A marca da palavra e os logótipos Bluetooth são
marcas comerciais registadas propriedade da
Bluetooth SIG, Inc. e qualquer utilização de tais
marcas pela JVC KENWOOD Corporation está
licenciada. Outras marcas registadas e nomes de
marcas são dos respetivos proprietários.
• Use of the Made for Apple badge means that an
accessory has been designed to connect specifically
to the Apple product(s) identified in the badge, and
has been certified by the developer to meet Apple
performance standards. Apple is not responsible for
the operation of this device or its compliance with
98
safety and regulatory standards. Please note that
the use of this accessory with an Apple product may
affect wireless performance.
• Apple, iPhone, iPod, iPod touch, and Lightning are
trademarks of Apple Inc., registered in the U.S. and
other countries.
• Microsoft and Windows Media are either registered
trademarks or trademarks of Microsoft Corporation
in the United States and/or other countries.
• THIS PRODUCT IS LICENSED UNDER THE MPEG4 VISUAL PATENT PORTFOLIO LICENSE FOR
THE PERSONAL AND NON-COMMERCIAL USE
OF A CONSUMER FOR (¡) ENCODING VIDEO IN
COMPLIANCE WITH THE MPEG-4 VISUAL STANDARD
(“MPEG-4 VIDEO”) AND/OR (¡¡) DECODING MPEG4 VIDEO THAT WAS ENCODED BY A CONSUMER
ENGAGED IN A PERSONAL AND NON-COMMERCIAL
ACTIVIT Y AND/OR WAS OBTAINED FROM A VIDEO
PROVIDER LICENSED BY MPEG LA TO PROVIDE
MPEG-4 VIDEO. NO LICENSE IS GRANTED OR SHALL
BE IMPLIED FOR ANY OTHER USE. ADDITIONAL
INFORMATION INCLUDING THAT RELATING TO
PROMOTIONAL, INTERNAL AND COMMERCIAL USES
AND LICENSING MAY BE OBTAINED FROM MPEG LA,
LLC. SEE HTTP://WWW.MPEGLA.COM.
• THIS PRODUCT IS LICENSED UNDER THE AVC
PATENT PORTFOLIO LICENSE FOR THE PERSONAL
USE OF A CONSUMER OR OTHER USES IN WHICH IT
DOES NOT RECEIVE REMUNERATION TO (¡)ENCODE
VIDEO IN COMPLIANCE WITH THE AVC STANDARD
(“AVC VIDEO”) AND/OR (¡¡)DECODE AVC VIDEO
THAT WAS ENCODED BY A CONSUMER ENGAGED
IN A PERSONAL ACTIVITY AND/OR WAS OBTAINED
FROM A VIDEO PROVIDER LICENSED TO PROVIDE
AVC VIDEO. NO LICENSE IS GRANTED OR SHALL
BE IMPLIED FOR ANY OTHER USE. ADDITIONAL
INFORMATION MAY BE OBTAINED FROM MPEG LA,
L.L.C. SEE HTTP://WWW.MPEGLA.COM
• libFLAC
Copyright (C) 2000-2009 Josh Coalson
Copyright (C) 2011-2013 Xiph.Org Foundation
– Redistribution and use in source and binary forms,
with or without modification, are permitted
provided that the following conditions are met:
– Redistributions of source code must retain the
above copyright notice, this list of conditions and
the following disclaimer.
– Redistributions in binary form must reproduce the
above copyright notice, this list of conditions and
the following disclaimer in the documentation
and/or other materials provided with the
distribution.
Neither the name of the Xiph.org Foundation
nor the names of its contributors may be used to
endorse or promote products derived from this
Page 99

Sobre esta unidade
software without specific prior written permission.
THIS SOFTWARE IS PROVIDED BY THE COPYRIGHT
HOLDERS AND CONTRIBUTORS ``AS IS’’ AND ANY
EXPRESS OR IMPLIED WARRANTIES, INCLUDING,
BUT NOT LIMITED TO, THE IMPLIED WARRANTIES OF
MERCHANTABILITY AND FITNESS FOR A PARTICULAR
PURPOSE ARE DISCLAIMED. IN NO EVENT SHALL
THE FOUNDATION OR CONTRIBUTORS BE LIABLE
FOR ANY DIRECT, INDIRECT, INCIDENTAL, SPECIAL,
EXEMPLARY, OR CONSEQUENTIAL DAMAGES
(INCLUDING, BUT NOT LIMITED TO, PROCUREMENT
OF SUBSTITUTE GOODS OR SERVICES; LOSS OF USE,
DATA, OR PROFITS; OR BUSINESS INTERRUPTION)
HOWEVER CAUSED AND ON ANY THEORY OF
LIABILITY, WHETHER IN CONTRACT, STRICT LIABILITY,
OR TORT (INCLUDING NEGLIGENCE OR OTHERWISE)
ARISING IN ANY WAY OUT OF THE USE OF THIS
SOFTWARE, EVEN IF ADVISED OF THE POSSIBILITY OF
SUCH DAMAGE.
• libogg
Copyright (c) 2002, Xiph.org Foundation
Redistribution and use in source and binary forms,
with or without modification, are permitted
provided that the following conditions are met:
– Redistributions of source code must retain the
above copyright notice, this list of conditions and
the following disclaimer.
– Redistributions in binary form must reproduce the
above copyright notice, this list of conditions and
the following disclaimer in the documentation
and/or other materials provided with the
distribution.
– Neither the name of the Xiph.org Foundation
nor the names of its contributors may be used to
endorse or promote products derived from this
software without specific prior written permission.
THIS SOFTWARE IS PROVIDED BY THE COPYRIGHT
HOLDERS AND CONTRIBUTORS ``AS IS’’ AND ANY
EXPRESS OR IMPLIED WARRANTIES, INCLUDING,
BUT NOT LIMITED TO, THE IMPLIED WARRANTIES OF
MERCHANTABILITY AND FITNESS FOR A PARTICULAR
PURPOSE ARE DISCLAIMED. IN NO EVENT SHALL
THE FOUNDATION OR CONTRIBUTORS BE LIABLE
FOR ANY DIRECT, INDIRECT, INCIDENTAL, SPECIAL,
EXEMPLARY, OR CONSEQUENTIAL DAMAGES
(INCLUDING, BUT NOT LIMITED TO, PROCUREMENT
OF SUBSTITUTE GOODS OR SERVICES; LOSS OF USE,
DATA, OR PROFITS; OR BUSINESS INTERRUPTION)
HOWEVER CAUSED AND ON ANY THEORY OF
LIABILITY, WHETHER IN CONTRACT, STRICT LIABILITY,
OR TORT (INCLUDING NEGLIGENCE OR OTHERWISE)
ARISING IN ANY WAY OUT OF THE USE OF THIS
SOFTWARE, EVEN IF ADVISED OF THE POSSIBILITY OF
SUCH DAMAGE.
Ñ Informações sobre a Eliminação de
Baterias e de Equipamentos Elétricos e
Eletrónicos Usados (aplicável nos países
da UE que adotaram sistemas de recolha
separada de resíduos)
Produtos e baterias com o símbolo (contentor de lixo
com rodas barrado com uma cruz) não podem ser
eliminados como lixo doméstico.
As baterias e os equipamentos elétricos e eletrónicos
usados devem ser reciclados em uma instalação capaz
de manusear esses itens e seus subprodutos residuais.
Contacte a autoridade local para os detalhes sobre a
localização da instalação de reciclagem mais próxima.
A reciclagem e eliminação de lixo adequada ajudará a
preservar os recursos naturais, ao mesmo tempo que
prevenirá efeitos prejudiciais à nossa saúde e meio
ambiente.
Aviso: O sinal “Pb” abaixo do símbolo para baterias
indica que a bateria contém chumbo.
Português |
99
Page 100

Содержание
Перед эксплуатацией................................................... 100
Как читать эту инструкцию: ....................................................................10 0
Меры предосторожности .......................................................................100
Приступая к работе ....................................................... 101
Первоначальные настройки ................................................................. 101
Настройки часов ............................................................................................101
Основы .................................................................................102
Общие операции ............................................................................................102
Как прикрепить/отсоединить лицевую панель ......................102
Выберите источник ......................................................................................102
USB/iPod...............................................................................103
Подготовка .......................................................................................................... 103
Операции воспроизведения ................................................................ 103
Тюн ер/DAB .........................................................................104
Основные операции тюнера ................................................................104
Основные операции DAB ........................................................................104
Настройки функций тюнера ..................................................................104
Настройки функций DAB ..........................................................................105
Внешние устройства .....................................................105
Камера заднего вида ...................................................................................105
Смартфон с Bluetooth® ................................................ 106
Зарегистрируйте Ваш мобильный телефон
в устройстве
Прием вызова ...................................................................................................106
Сделать звонок ................................................................................................106
Воспроизведение с аудио устройства Bluetooth ..................106
Настройка ........................................................................... 107
Настройки ...........................................................................................................107
Настройки звука .............................................................................................107
Установка ............................................................................108
Перед установкой .........................................................................................108
Установка устройства .................................................................................109
Информация об устройстве ...................................... 112
Техническое обслуживание ..................................................................112
Примечание к спецификации .............................................................. 112
Авторские права ............................................................................................ 112
......................................................................................................106
Перед эксплуатацией
Меры предосторожности
#ПРЕДУПРЕЖДЕНИЕ
Ñ Для предотвращения травм или
возникновения пожара соблюдайте
следующие меры предосторожности:
• Во избежание короткого замыкания никогда
не вставляйте и не оставляйте какие-либо
металлические предметы (такие как монеты
или металлические инструменты) внутри
устройства.
• Не смотрите и не удерживайте взгляд на
дисплее устройства во время управления
автомобилем продолжительное время.
• Если Вы столкнулись с проблемами во время
установки, свяжитесь со своим дилером JVC.
Ñ Меры предосторожности при
использовании данного устройства
• В случае покупки дополнительных аксессуаров
проконсультируйтесь с Вашим дилером JVC и
убедитесь, что они работают с Вашей моделью
и в Вашем регионе.
• Функция Radio Data System или Radio Broadcast
Data System не будет работать там, где она не
поддерживается какой-либо радиостанцией.
Ñ Защита монитора
• Чтобы защитить монитор от повреждений, не
управляйте монитором с помощью шариковой
ручки или другого подобного инструмента с
острым концом.
Ñ Сброс параметров устройства
Если устройство или подключенное устройство
работает некорректно, сбросьте настройки
устройства.
Как читать эту инструкцию:
• Панели в этой инструкции приведены в
качестве примеров, позволяющих наиболее
наглядно объяснять действия. Поэтому они
могут отличаться от панелей, имеющихся в
действительности.
• В порядке действий форма скобок указывает
позицию, которую необходимо нажать.
[ ]: указывает выбранные позиции или меню.
< >: обозначает название кнопок панели.
• Язык отображения: Индикация на английском
языке используется в качестве примера с
целью объяснения. Вы можете выбрать язык
отображения в меню [Language]. См. Language
(с.107).
100
1
2
3
Кнопка сброса
 Loading...